

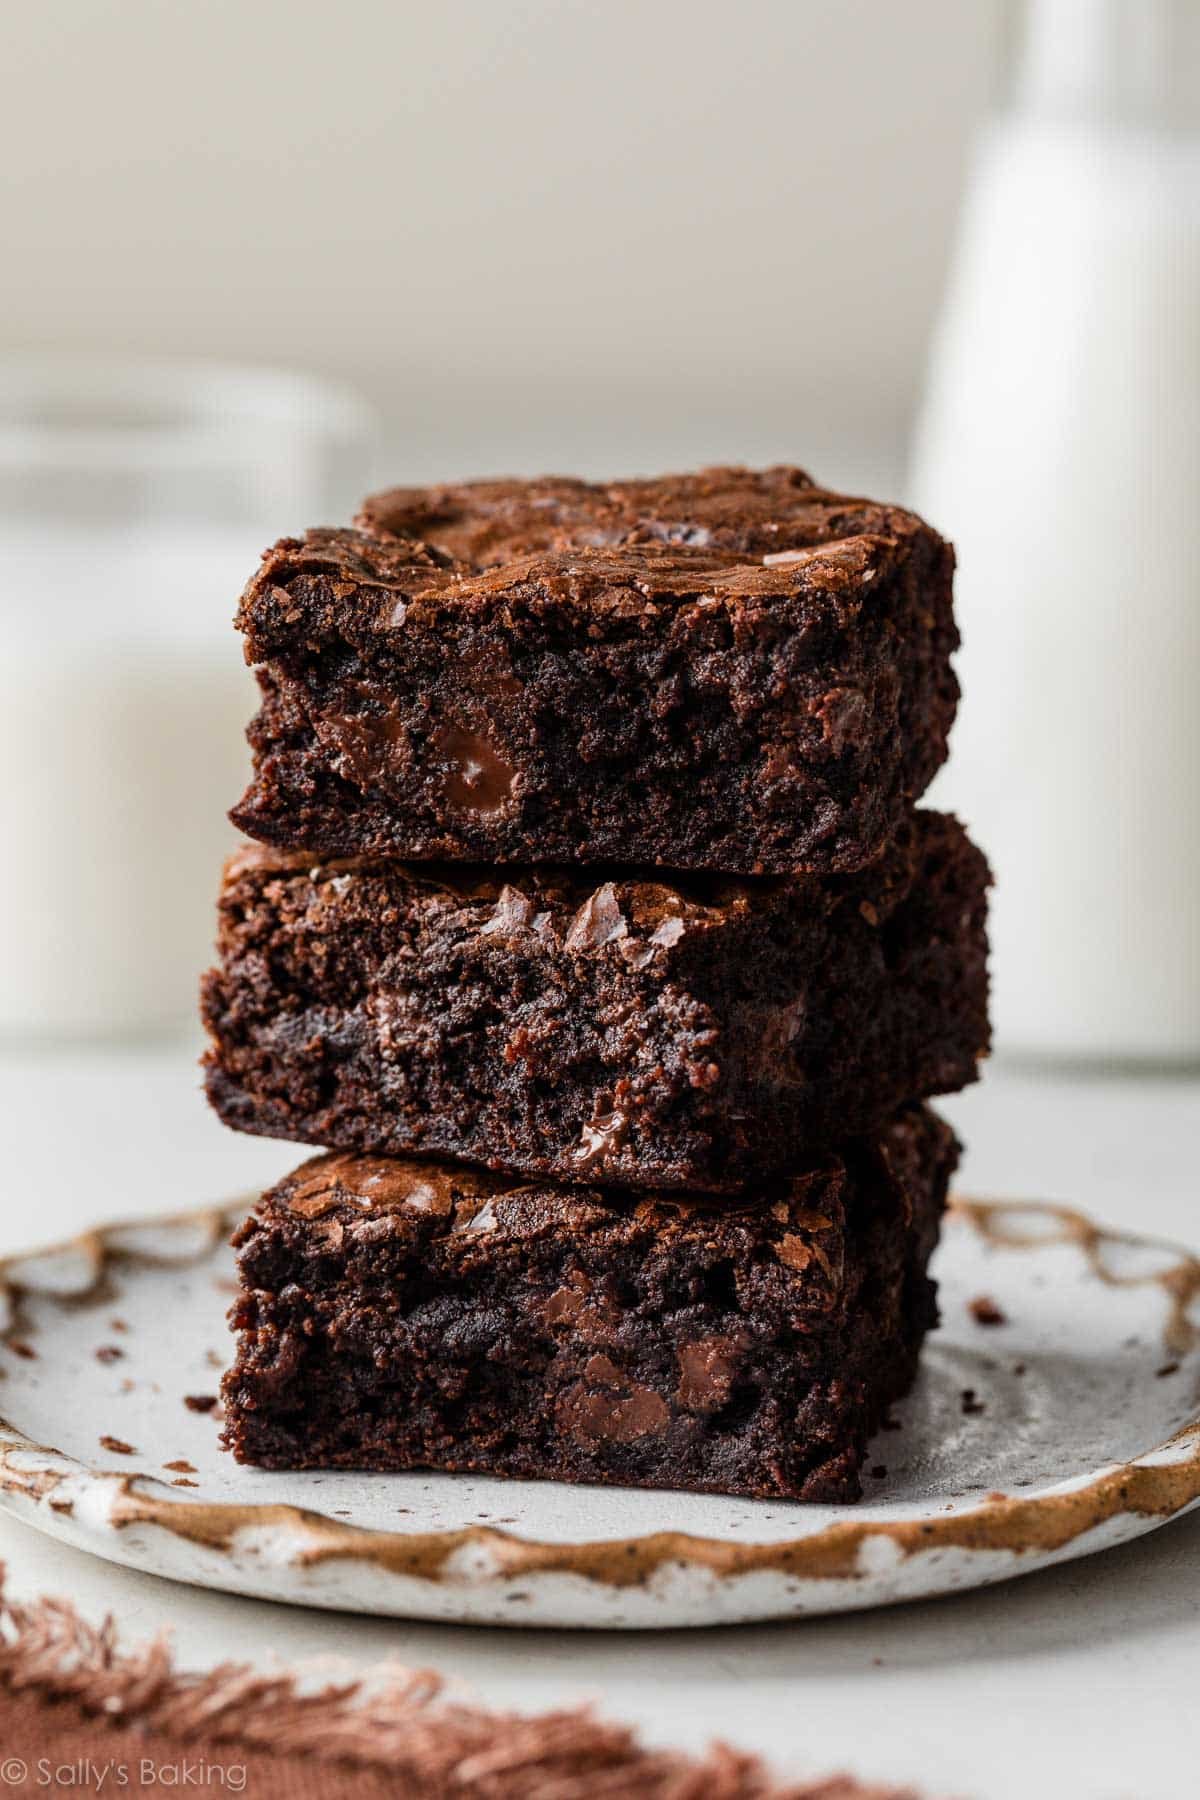
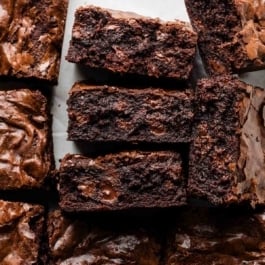
These seriously fudgy homemade brownies are quite possibly the richest, most decadent brownies you’ll ever try. They’re thick, dense, and supremely chocolatey, thanks to a triple dose of chocolate: cocoa powder, melted chocolate, and chocolate chips. They’re basically one step away from pure fudge!

I originally published this recipe in 2016 and have since made a few important changes based on reader feedback. We reduced the sugar to make them less sweet, and now bake them in a 9-inch square pan instead of a 9×13, which yields thicker, richer brownies.
If you Google “homemade brownies,” prepare to receive thousands of search results. (I don’t recommend doing this while hungry.) I threw my homemade frosted brownies recipe into the ring back in 2014—and I still love that one. Those brownies are chewy, dense, easy, and topped with chocolate frosting to boot.
But maybe today you’re not in the mood for chewy brownies or sweet buttercream. Maybe what you want is something even richer. Deep, pure chocolate flavor that melts in your mouth… almost like eating fudge, but with a little more texture.
That’s where today’s brownie recipe comes in.
Because that’s the best part about baking: you can continually experiment like a mad, butter-loving scientist. And if you think about it, we can never have too many recipes that combine butter, sugar, and chocolate. I even have a different recipe for thick & fudgy brownies in my New York Times–best-selling cookbook, Sally’s Baking 101.
Ingredients You Need
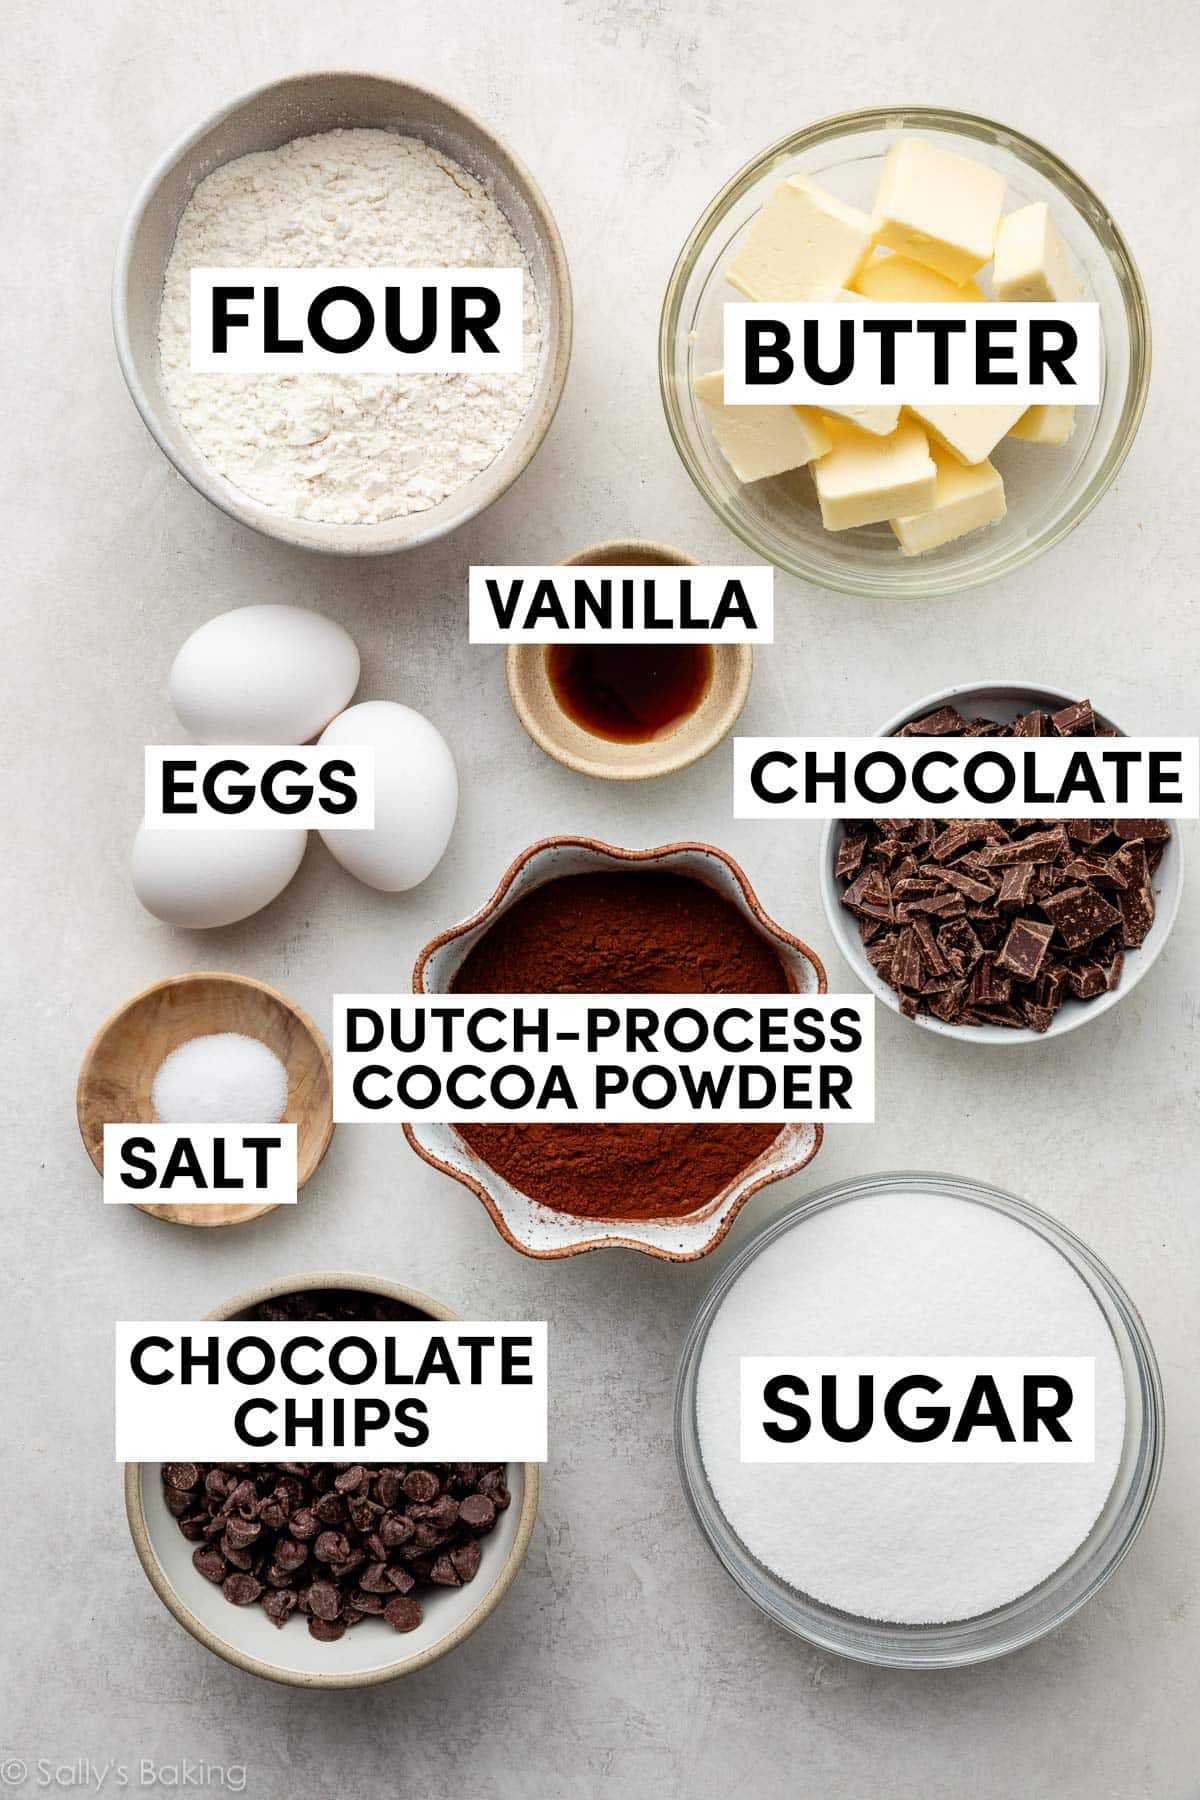
- Butter: You can make brownies with butter, oil, or a combination of both, but in testing, we liked these brownies best with all butter. Unparalleled for flavor!
- Baking Chocolate: You need 4 ounces (1 standard bar) of either semi-sweet or bittersweet chocolate. Chop it up, and divide it in half. You’ll melt half with the butter, and then fold in the rest of the chopped chocolate along with the chocolate chips.
- Sugar: Sugar does much more than sweeten brownies. It liquifies as they bake, creating a softer center, and migrates to the top, creating that shiny, crackly surface characteristic of a good brownie.
- Eggs: Eggs are one of the main ingredients in brownies. Just as they do in flourless chocolate cake, eggs bind, add richness, and provide structure.
- Vanilla: Even the most chocolatey desserts benefit from pure vanilla!
- Cocoa Powder: Though natural cocoa powder can be used, I suggest a Dutch-process cocoa powder (I really like this brand) for a richer, smoother chocolate flavor. This brownie recipe does not rely on chemical leaveners; if a recipe does, that’s when it’s important to remember the difference between Dutch-process vs. natural cocoa powder.
- Flour: The cocoa powder takes the place of some flour, so you’ll only need 1 cup in these homemade brownies. The more flour in brownie batter, the cakier the brownies will taste. We want a dense and fudgy batch today, so use as little flour as possible.
- Salt: To balance all the flavors.
- Chocolate Chips: You may think these brownies have enough chocolate already that you could leave out the chocolate chips, but see below for why they’re key to brownie success!
Why is there no baking powder or baking soda in these brownies? Adding baking powder or baking soda lifts brownies up and creates a cakier result. But today, we all want a brownie so dense and fudgy that it’s basically 1 step up from eating pure chocolate.
You’ll get a taste of how dense these brownies are when you’re whisking the batter. It’s so thick and so fudgy.
Seriously fudgy.
How to Make the Fudgiest Brownies: Key Steps
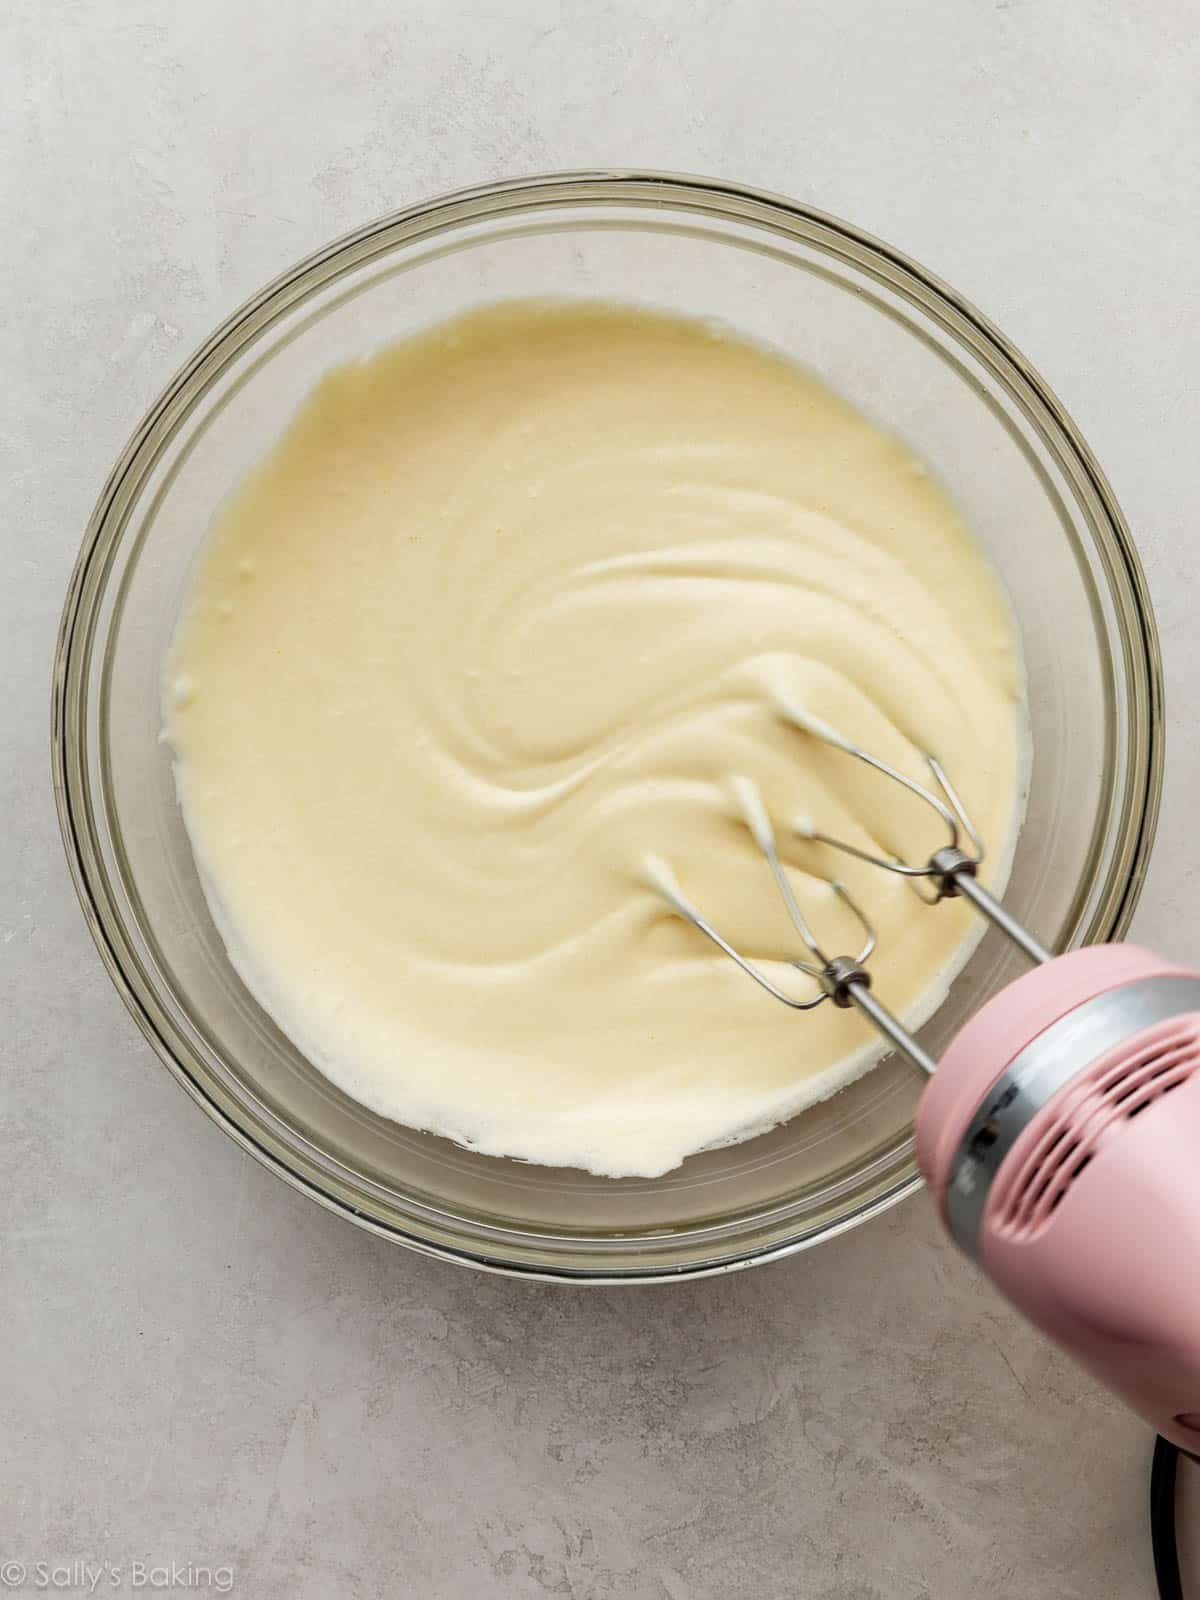
Start by melting together the butter and half of the chopped chocolate, stirring until smooth. Next, beat together the sugar and eggs. This is a new step in this recipe, and it’s key to developing that shiny, crackly, tissue-thin surface on the brownies.
Whip until your sugar and egg mixture reaches what’s known as the “ribbon stage”—the color will lighten to a very pale yellow, and the consistency will thicken and increase in volume. (This takes around 3 minutes.) It should look like a creamy, slightly foamy custard. That foam is going to provide necessary structure for the brownies:
Why Is It Called the Ribbon Stage?
If you stop whipping and lift the beaters or whisk attachment up out of the bowl, the mixture should fall in a continuous stream that creates a trail of folded ribbon lines on the surface that remain visible for 10–30 seconds before they disappear back into the mixture. King Arthur Baking has a helpful article about this, if you’d like some more information and visuals.
Now combine your two mixtures, and then add in the remaining ingredients.

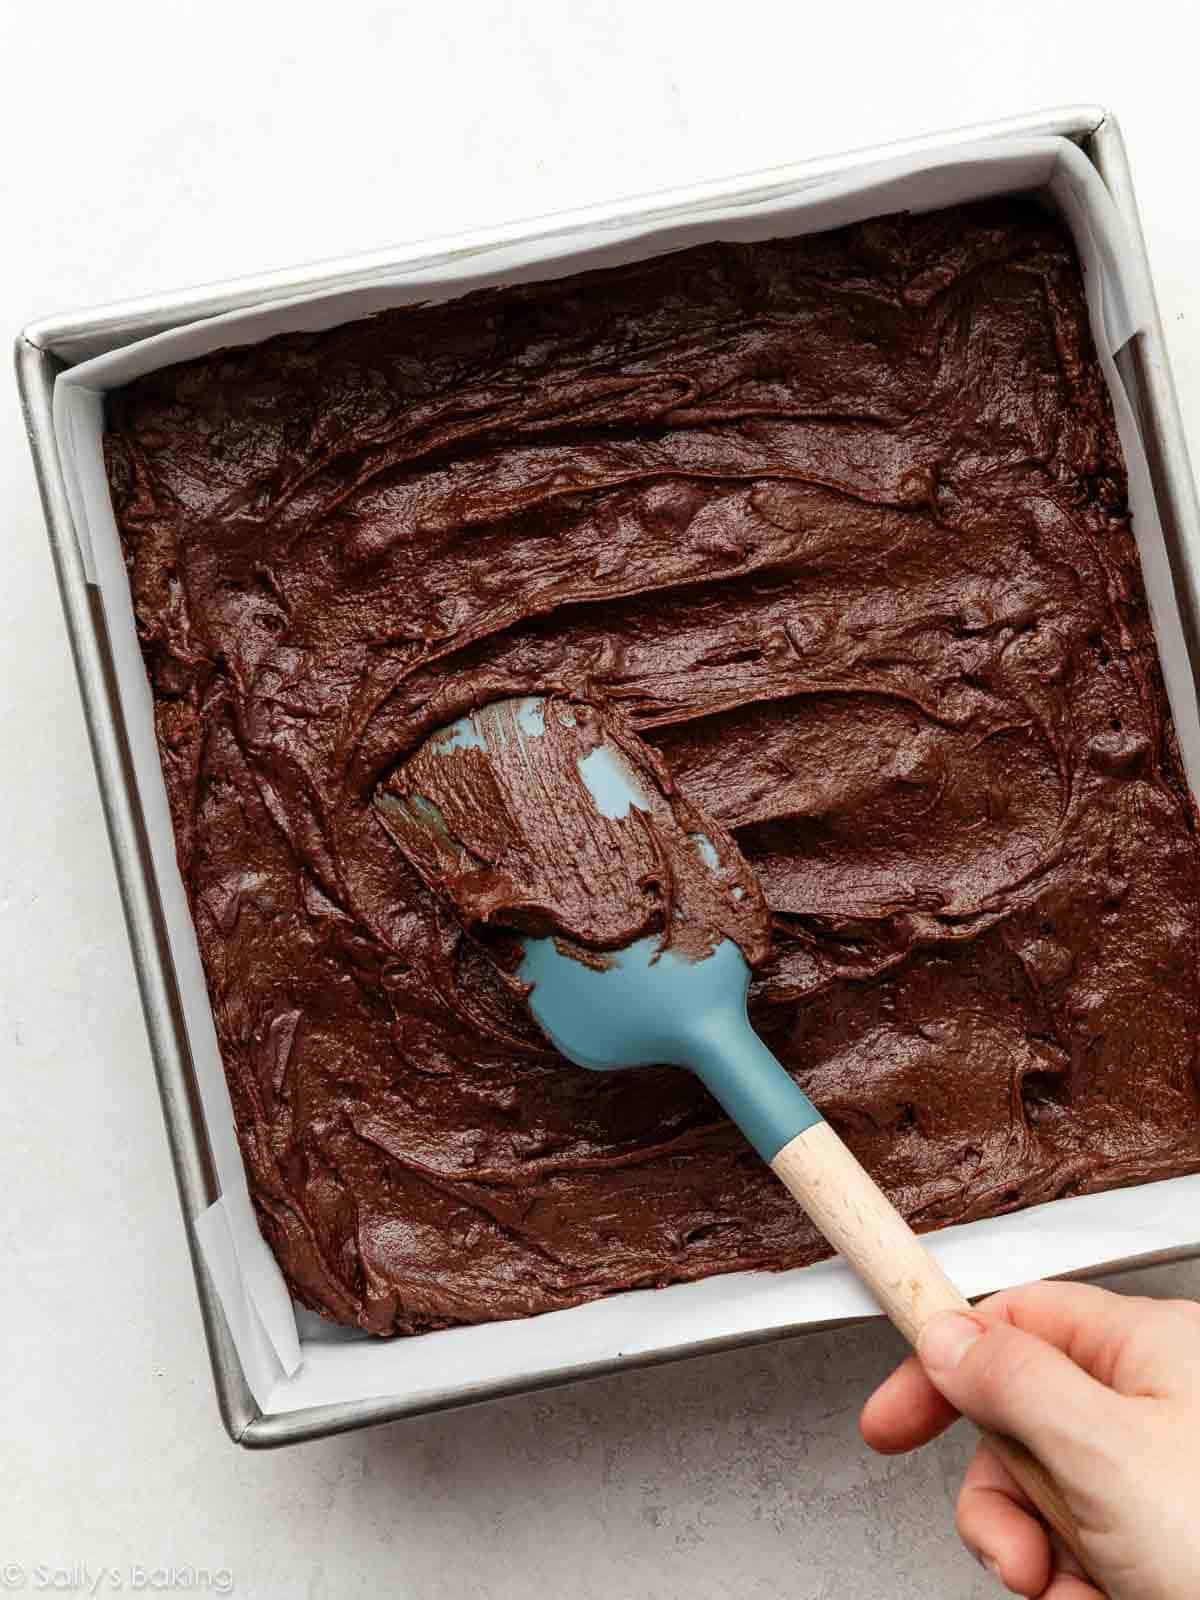
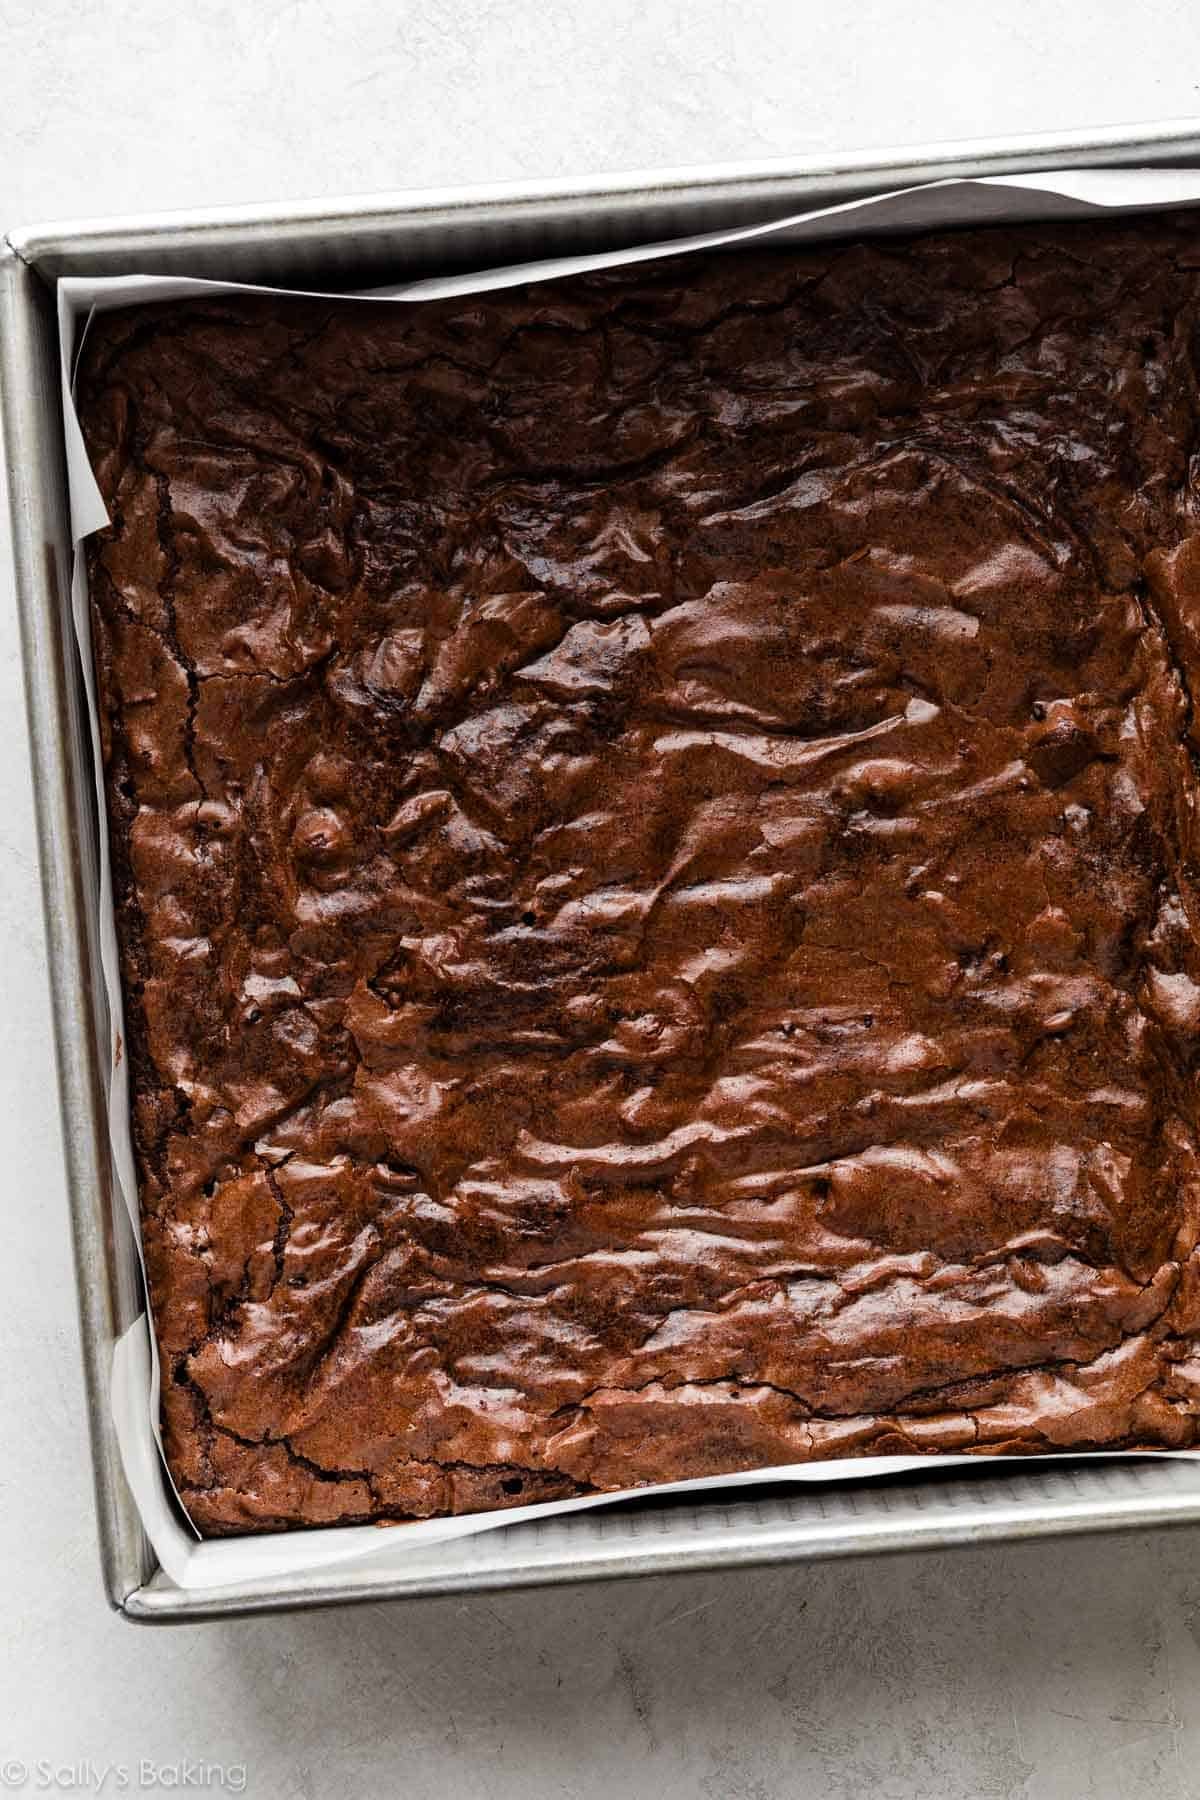
Spread the batter in a lined 9-inch square baking pan. Use a metal baking pan, not glass or ceramic, to ensure the brownies bake evenly.
For a larger batch, see this 9×13-inch pan of homemade brownies. The recipe is carefully scaled up from today’s version. It’s not simply doubled; the ingredient ratios, baking time, and method were carefully adjusted to maintain the same rich, chewy, fudgy texture in a larger pan. If you’re baking for a crowd, that’s the recipe to use!
How to Get Shiny Crackly Tops in Brownies
The secret is in the sugar! If properly dissolved, the sugar will migrate to the top as the brownie batter bakes, creating that signature shiny and crackly surface we all know and love.
Whipping the sugar with the eggs gives it a head start on dissolving, thanks to the water content in the egg whites. Combining that with warm melted butter and chocolate will help to dissolve it even further. If your sugar isn’t properly dissolved, your brownies will look—and taste—grainy. Very unappetizing!
The other trick is to always include chocolate chips. I learned this years ago from the smart folks at King Arthur Baking, and Tessa at Handle the Heat also has a great article explaining the keys to brownie crust success.
How to Tell When Brownies Are Done Baking
This can be tricky, so here’s how to determine when these brownies are done:
- Set the timer to 28 minutes as soon as the brownies go into the oven. Once you begin to smell that captivating scent of chocolate permeate through the kitchen, check the brownies. Even if this is at the 25-minute mark.
- Stick a toothpick in the center and pull it out. If the toothpick comes out coated in wet batter, the brownies need more time.
- Continue to check the brownies with a new toothpick every 2 minutes. If there are a few moist crumbs on the toothpick, the brownies are done. You don’t want a totally clean toothpick—that could mean your brownies are overbaked and might be dry. 32 minutes is the most these brownies have ever taken in my oven (if using a 9-inch metal baking pan).
Now comes the hardest part: waiting for the brownies to cool completely before cutting them. I wish I had a tip for you here on how to speed up this torturous process, but I do not. BEST OF LUCK.
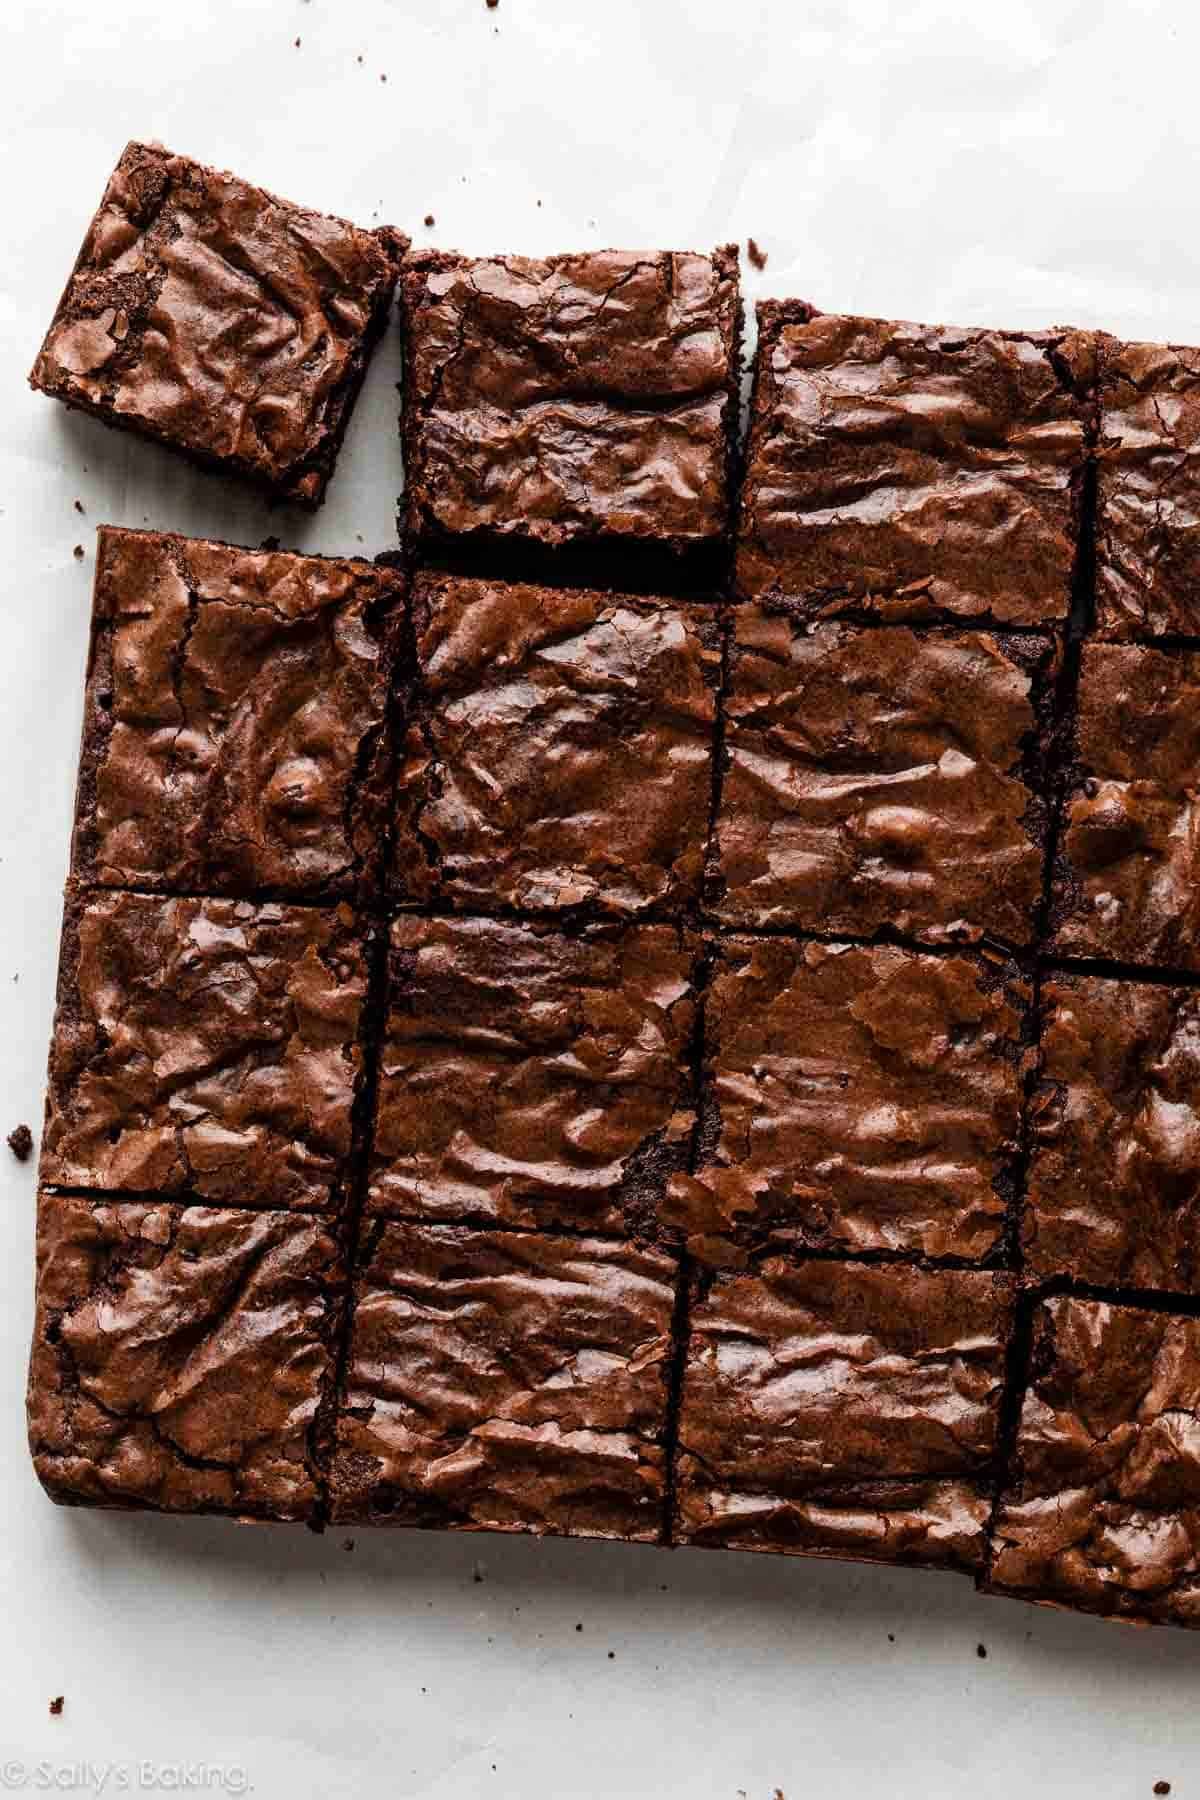
Here’s the real question: are you a center person or an edge person? Save me the corners please.


Seriously Fudgy Homemade Brownies
- Prep Time: 10 minutes
- Cook Time: 30 minutes
- Total Time: 3 hours
- Yield: 16 brownies
- Category: Baking, Bars, Brownies, Dessert
- Method: Baking
- Cuisine: American
Description
This recipe has been *slightly updated* since my team and I originally published it in 2016. These seriously fudgy homemade brownies are thick, dense, and intensely chocolatey thanks to cocoa powder, melted baking chocolate, and chocolate chips. With shiny crackly tops and melt-in-your-mouth centers, this is our go-to brownie recipe.
Ingredients
- 3/4 cup (12 Tbsp; 170g) unsalted butter, sliced into 12 Tbsp-size pieces
- 4 ounces (113g) semi-sweet chocolate, coarsely chopped and divided*
- 1 and 2/3 cups (333g) granulated sugar
- 3 large eggs, at room temperature
- 2 teaspoons pure vanilla extract
- 1 cup (84g) unsweetened natural or Dutch-process cocoa powder*
- 1 cup (125g) all-purpose flour (spooned & leveled)
- 3/4 teaspoon salt
- 1 cup (180g) semi-sweet chocolate chips
Instructions
- Preheat the oven to 350°F (177°C) and line a 9-inch square metal baking pan with parchment paper, leaving an overhang on two opposite sides to lift out the finished brownies (makes cutting easier!). Set aside.
- In a small microwave-safe bowl or liquid measuring cup, combine the butter and half (2oz/56g) of the chopped chocolate. Melt in 30-second increments, stirring after each, until completely melted and smooth. Set aside to slightly cool while you continue.
- In a large bowl with a handheld or stand mixer fitted with a whisk attachment, combine the sugar and eggs. Beat on medium-high speed until the sugar is dissolved and the mixture is pale and ribbon-y, about 3 minutes.
- Pour the warm melted butter/chocolate into the bowl with the sugar/eggs, add the vanilla, and beat or whisk to combine.
- With a fine mesh sieve, sift the cocoa powder and flour into the batter, add the salt, then whisk or beat on low speed to incorporate. Fold in the remaining 2 ounces/57g chopped chocolate and the chocolate chips. The batter will be very thick. Spread it evenly into the prepared pan. (A small offset spatula can help here.)
- Bake for 28–30 minutes, then test the brownies with a toothpick. Insert the toothpick into the center of the pan. If it comes out coated with wet batter, the brownies are not done. If there are only a few moist crumbs, the brownies are done. Keep checking every 2 minutes until you have moist crumbs. Brownies typically take 30–32 minutes in my oven. Err on the side of under-baking, as the brownies will continue to set as they cool.
- Remove from the oven and place on a cooling rack to cool completely in the pan. When cool, lift the brownies out by gripping the parchment overhangs and transfer to a cutting board. Use a sharp knife to cut into squares.
- Cover and store leftover brownies at room temperature for up to 1 week.
Notes
- Make-Ahead & Freezing Instructions: Brownies freeze well for up to 3 months. Thaw overnight in the refrigerator, then bring to room temperature before serving.
- Special Tools (affiliate links): 9-inch Square Baking Pan | Parchment Paper | Glass Mixing Bowls | Electric Mixer (Handheld or Stand) | Fine Mesh Sieve | Whisk | Silicone Spatula | Small Offset Spatula | Cooling Rack
- Chocolate: Baking chocolate is typically sold in 4-ounce (113g) bars. Half will be melted with the butter, and half will be chopped up and folded into the batter with the chocolate chips. I suggest Ghirardelli, Baker’s, or Lindt brands; in either semi-sweet (56% cacao) or bittersweet (60% cacao).
- Cocoa Powder: You can use either natural or Dutch-process cocoa powder in this recipe. I prefer Dutch-process (such as this brand) for a smoother chocolate flavor.
- Recipe Update in 2026: My team and I made a couple slight updates to this recipe based on reader feedback. To make it the way it was originally written, increase the sugar to 2 cups (400g) and increase the chocolate chips to 1.5 cups (270g). Proceed with steps 1 and 2 in the recipe above. Skip step 3. Then, whisk the 2 cups (400g) sugar into the melted butter and chocolate mixture. Whisk in the eggs and vanilla, followed by the remaining ingredients. Proceed with baking the brownies.
- 9×13-Inch Pan Version: For a larger batch, see this 9×13-inch pan of homemade brownies. The recipe is carefully scaled up from today’s version. It’s not simply doubled; the ingredient ratios, baking time, and method were carefully adjusted to maintain the same rich, chewy, fudgy texture in a larger pan. If you’re baking for a crowd, that’s the recipe to use!


Reader Comments and Reviews
Hi, This recipe looks amazing but I am a vegetarian, can you please suggest an alternative for eggs?
Hi Vishakha! We haven’t tested any egg substitutions, and the eggs play a key role in the structure and texture so we’re unsure what might work best. Let us know if you do any experimenting!
Hi Sally!
Love these brownies so much! You mentioned in your “ Why this recipe works” video that this recipe has no leveling agents and if you added them, it would be a more cakey brownie. If I wanted a more cakey brownie , would I add baking soda or baking powder and how much would you recommend? I love all of your recipes and keep coming back to your website. Thanks so much, Taylor
Hi Taylor! While adding a leavening agent would make the brownies a little cakier, I don’t recommend simply adding baking powder or baking soda to this recipe. The amount of eggs, butter, chocolate, sugar, and flour all work together to create that dense, fudgy texture, so adding leavening alone won’t produce the *best* cakey brownie. I don’t currently have a recipe for a truly cakey brownie, but it’s definitely on my list of recipes to work on in the future!
Has anyone tried to make these gluten free? What kind of gf flour did you use? Thank you
Hi Susan, we haven’t tested it, but let us know if you do!
Sally – these look great!
I’m looking a cakey recipe and can’t find it anywhere.
Do you have one or is there something I can do here to give me that result?
Hi Princess, Our brownie recipes are definitely more fudgy than cakey. If you are looking for more of a cakey texture, you’ll want to look for a different recipe that uses more flour and/or less fat to create that texture.
Do you buy your parchment cut or do you cut it your self?
Hi Todd, We just cut it to the size of the pan we are using.
No need to choose between corners or center pieces if you use a 3-channel brownie pan. Then every piece is an edge piece. I’ve been making these brownies for years and am always asked to bring them to parties. They’re fantastic!
hello! i was wondering if there’s a way i could use hersheys milk chocolate for this recipe without making it horribly sweet, maybe reduce the sugar and up the cocoa?
Hi Angel, Milk chocolate works great in these brownies- they’ll be a little sweeter than if you had used semisweet chocolate, but still very delicious. You can try reducing the sugar just a bit but keep in mind that the sugar is also responsible for the texture so changing the amount will yield different results.
Do the chocolate chips truly need to be added? I’m hoping for a smooth brownie and the chips I feel would negate that … thanks!
Your recipes are always amazing!
Hi Bd! You can leave out the chocolate chips if you prefer, knowing the taste and texture will change without them. See the post above for details on why the chips are for more than just flavor.
I am reading conflicting comments if the brownies can be baked in an 8×8 tin. Please can you let me know if it’s possible. Thank you!
Hi Jamie, you need a 9-inch square pan for these brownies. I’m trying to find where we mentioned an 8-inch pan in the Notes and comments. If possible, can you let me know where you saw that so I can correct it? Thank you very much and sorry for any confusion.
I don’t have a chocolate bar, can I substitute with just more cocoa powder?
Hi Tilley! This recipe really needs the baking chocolate.
These are ABSOLUTELY the BEST brownies! As always, I swear by Sally’s recipes. They are fudgy and cakey! I added some chopped 70% cocoa Lindt chocolate balls to add some rich texture! Thank you
Amazing brownies!!
Will add to my collection.
I’ve always had great success with “blooming” cocoa powder with coffee. Is there any scope to add that step into the recipe? Where could it be added? I just wonder how that would impact the overall chocolate flavour.
Hi Priya, the cocoa powder does get added to a fairly warm liquid mixture, which helps to bloom the cocoa. If you’d like, you could try sifting and whisking the cocoa into the melted butter/chocolate mixture while it’s hot. We haven’t tried it, so are unsure of the result, but if you decide to try it, let us know how it goes!
I was looking for a new brownie recipe as my go-to recipe can be a bit dense on the second day. I don’t typically weigh my ingredients, but I did with this recipe and it turned out perfectly! My husband loved them as well. Perfect brownie to eat in a brownie sundae! These are soooo richly chocolate, (a plus in my book), that a little vanilla ice cream is a perfect combination. We ate them warm from the pan! DELISH! I set my timer for 28 minutes and checked every two minutes as instructed and ended up taking them out at 32 minutes.
very dry even when baked for 26 minutes instead of 28-30
Hi Olivia, how did you measure your flour? Be sure to spoon and level (or use a kitchen scale) to ensure the flour isn’t over measured, which can dry out baked goods. Did you bake the brownies in a glass pan by chance? That can also cause the brownies to dry out. We hope this helps for next time!
A dear friend asked if I would bake 2 batches of these brownies for his club get-together so he could “share” with the other members. Found out later that he loved them so much, he only “shared” half a pan and kept the rest for himself! High praise,
indeed, Sally, so thanks!
Only brownies I’ve found that are a great, gooey brownie texture and don’t taste like oil. Definitely one of my family’s favorite confections.
What happens if i used unsweetened chocolate instead of the semi sweet chocolate for the chopped part of this recipe?
Hi Carin, the brownies will taste more dark/bitter.
I’ve been trying to learn how to bake and brownies have been hard for me. They’ve always been too cakey and I could never form a nice crust. I tried this recipe today and I am really happy. My first actual good brownie that I have made. So delicious thank you
I’ve made these brownies four times! We just love them! They freeze beautifully, no loss of flavor or texture, even after 2 months. My husband loves them out of the freezer, slightly thawed, but still cold. It was hard to do, but I sent some to friends and they love them too!
Quick easy recipe with great results!
Super fudgy and decadent brownies!
Hi, just want to ask how long can I put this in the fridge?
Hi AJ, you can put the baked and cooled brownies in the refrigerator for up to 1 week. We do not recommend refrigerating the batter.
These are delicious! One of the best brownies I’ve had. I had slight trouble with the ribbon stage when mixing the sugar and eggs. I mixed them for almost 10 minutes because the ribbon-ing seemed to disappear so quick. But, still a pretty easy and delicious recipe!
I made this today and it was an instant hit at my home! Thank you very much for this easy and smashing recipe
I am never disappointed with any of your recipes and this one is the best yet! Easy to follow instructions and baking time was 32 minutes to the most amazing brownies ever!
We’re thrilled to read this! Thanks for giving these brownies a try, Pam.
I want to try your recipe so I see different sources recommended adding espresso powder I want to be sure what you think?
Hi Saba, yes, you can absolutely add some espresso powder to these brownies. We’d say 1-2 teaspoons, depending on your preference. Enjoy!
Hi Naf, The full written recipe does reflect the changes and is the updated recipe. If you want to make the original recipe before any changes were made, you can follow the instructions in the recipe notes. You can use an aluminum foil pan with no changes.
Would this recipe work with a swirl of peanut butter incorporated just before baking?
Hi Christina, you can definitely try that!
Sally,
These are a favorite in my home. IMO, the best version had a ratio of brown sugar and white sugar in the recipe but I see that’s been changed. Did I imagine that? Is there a way to get a copy of that one again? I had it but I must’ve lost the back page after I printed it years ago.
hi Rei, yes! The ratios we had in the notes were 1 and 1/2 cups (300g) granulated sugar and 1/2 cup (100g) packed brown sugar.
Yes! I agree with Rei, that was the best recipe version.. can you add a second recipe for this version?
These are perfect and very indulgent
I have made these 3 times now and each time they come out perfect.
I use a 8 x 8 square tin and they take 45 mins ( in my gas oven )at the same temp as the recipe states.
Lovely thick brownies for all of my family to share, I urge anyone who loves brownies to give this a try
This was what I was looking for. I realized I don’t have a 9 inch pan so I needed an adjustment for an 8 inch.
I have baked these brownies 3 times now and they are absolutely gorgeous!! Really so fudgy and rich in chocolate flavour, they taste amazing.
I was wondering, would these be suitable to be frozen once cooked (and cooled), in order to save them for a later date? I’d love to know if they are and if you have any specific tips for freezing/defrosting them!
Hi Kassidy, yes, absolutely! These freeze well – see Notes after the recipe for instructions.
Hi Sally. Zainab here. I steamed baked my brownies and they actually worked! They were so fudged. It was heaven