

These soft pretzel bites are exactly like regular homemade soft pretzels, but shaped into smaller pieces. The dough requires just 6 ingredients and there’s hardly any rise time, so this is a wonderful recipe for yeast beginners. Have fun shaping the bites (they don’t need to be perfect!) and enjoy warm flavorful homemade pretzels within an hour. Serve plain, cinnamon sugar style, or with your favorite dip such as spicy cheese sauce or stone ground mustard.

I originally published this recipe in 2015 and have since added new photos, a video tutorial, and more success tips. This recipe previously called for an egg wash before topping with salt, but that step is now optional as the pretzels can be salted while they are still wet from the boiling step. The written recipe below reflects that small change.
I’m writing this over 7 years after this recipe was first published and say with 100% honesty that kids and adults alike FLOCK to these pretzel bites. They’re always a massive hit, a favorite party snack, and the fact that they’re surprisingly easy is music to the ears!
One reader, Ali, commented: “Made these for the Super Bowl. I was nervous because I have very little experience with yeast and my last attempt at a yeast recipe turned out terribly. Much to my relief, these were so easy and turned out DELICIOUS! I will absolutely be making them again. I especially loved how short the rise time was… no need to start the process the night before or even hours before. Thank you! ★★★★★”
Another reader, Connie, commented: “So easy and delicious! I put off making these because I thought they would be more involved, but they were so simple! I made half with salt and half with cinnamon sugar, and these will be on all my party menus! ★★★★★”
Tell Me About These Soft Pretzel Bites
- Flavor: If you enjoy soft pretzels, you’ll love these smaller bites. They’re completely homemade, so unlike store-bought frozen soft pretzels, each has that soft, warm, and fresh-from-the-oven taste and texture. You can keep the pretzels traditional with a sprinkling of coarse salt or try the cinnamon sugar version detailed in the recipe notes.
- Texture: The difference between bread and soft pretzels/soft pretzel bites is an alkaline bath. Do you know what that is? I promise it’s a very easy step. This is when shaped soft pretzel dough takes a dip in boiling water and baking soda, a quick step that provides the iconic chewy pretzel texture and adds a deeper, richer color to the baked pretzels. The boiling water also locks in the shape so the pretzels don’t over-puff in the oven. (Without the baking soda bath, you lose texture, that deep brown color, and flavor. So, basically, you will have bite-size bread instead of pretzels.) We do this key step when making regular soft pretzels, soft pretzel rolls, jalapeño cheddar soft pretzels and soft pretzel knots, too.
- Ease: Have you ever made my recipe for regular homemade soft pretzels? It was one of the first recipes I ever published, only to be republished with step-by-step photos a few years later. It’s become a “famous” & popular recipe on this website because the pretzels are relatively quick, extremely easy, and deliver great taste. Same story with these pretzel bites! Though the recipe requires yeast, I always say that this pretzel dough is a terrific starting point for yeast beginners because there’s very little rise time. And shaping the dough into bite-size pieces is easier than shaping into pretzels. Lots of perks about today’s recipe!

Dough for Soft Pretzel Bites
I never stray from my original soft pretzel dough, so that’s what you’ll use for these pretzel bites. You need just 6 basic ingredients to get started including warm water, yeast, a little sugar to feed the yeast, melted butter, salt, and all-purpose flour. (If you have it, the same amount of bread flour works too!). You can use either instant (quick rise) or active dry yeast in this dough. I usually use Platinum Yeast from Red Star, which is an instant yeast.
The dough doesn’t require extended rise time and the baking soda bath is pretty quick, so besides the baking step, the longest stretch of time this recipe requires is shaping.
Baking with Yeast Guide
Reference this Baking with Yeast Guide whenever you work with baker’s yeast. I include practical answers to all of your common yeast questions.
Step-By-Step Pictures
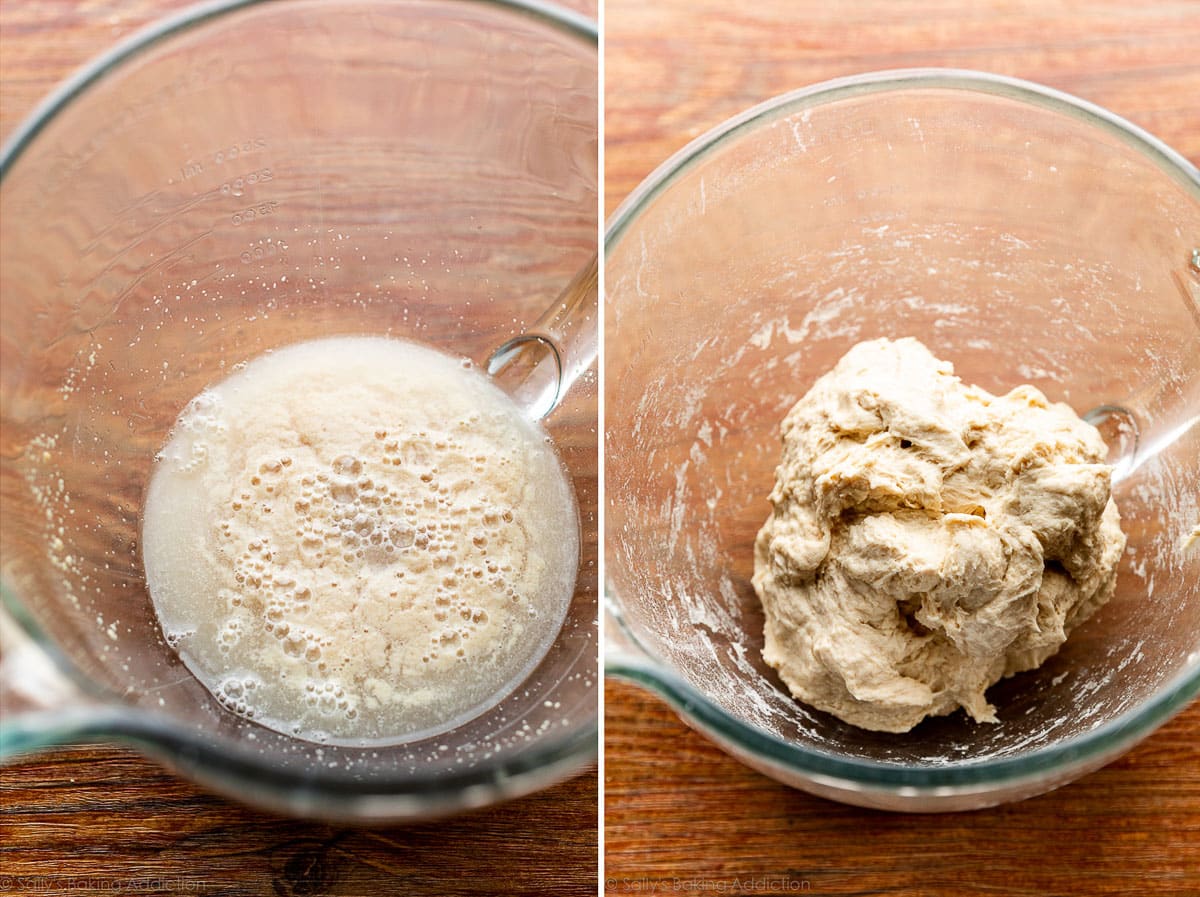
Whisk the warm water, yeast, and sugar together. Cover and let the mixture sit for a few minutes until foamy on top. Waiting for it to foam isn’t totally necessary, but it helps us see that the yeast is ready and active. The right photo below shows the dough before kneading. Review my How to Knead Dough video tutorial if needed before starting the next step.
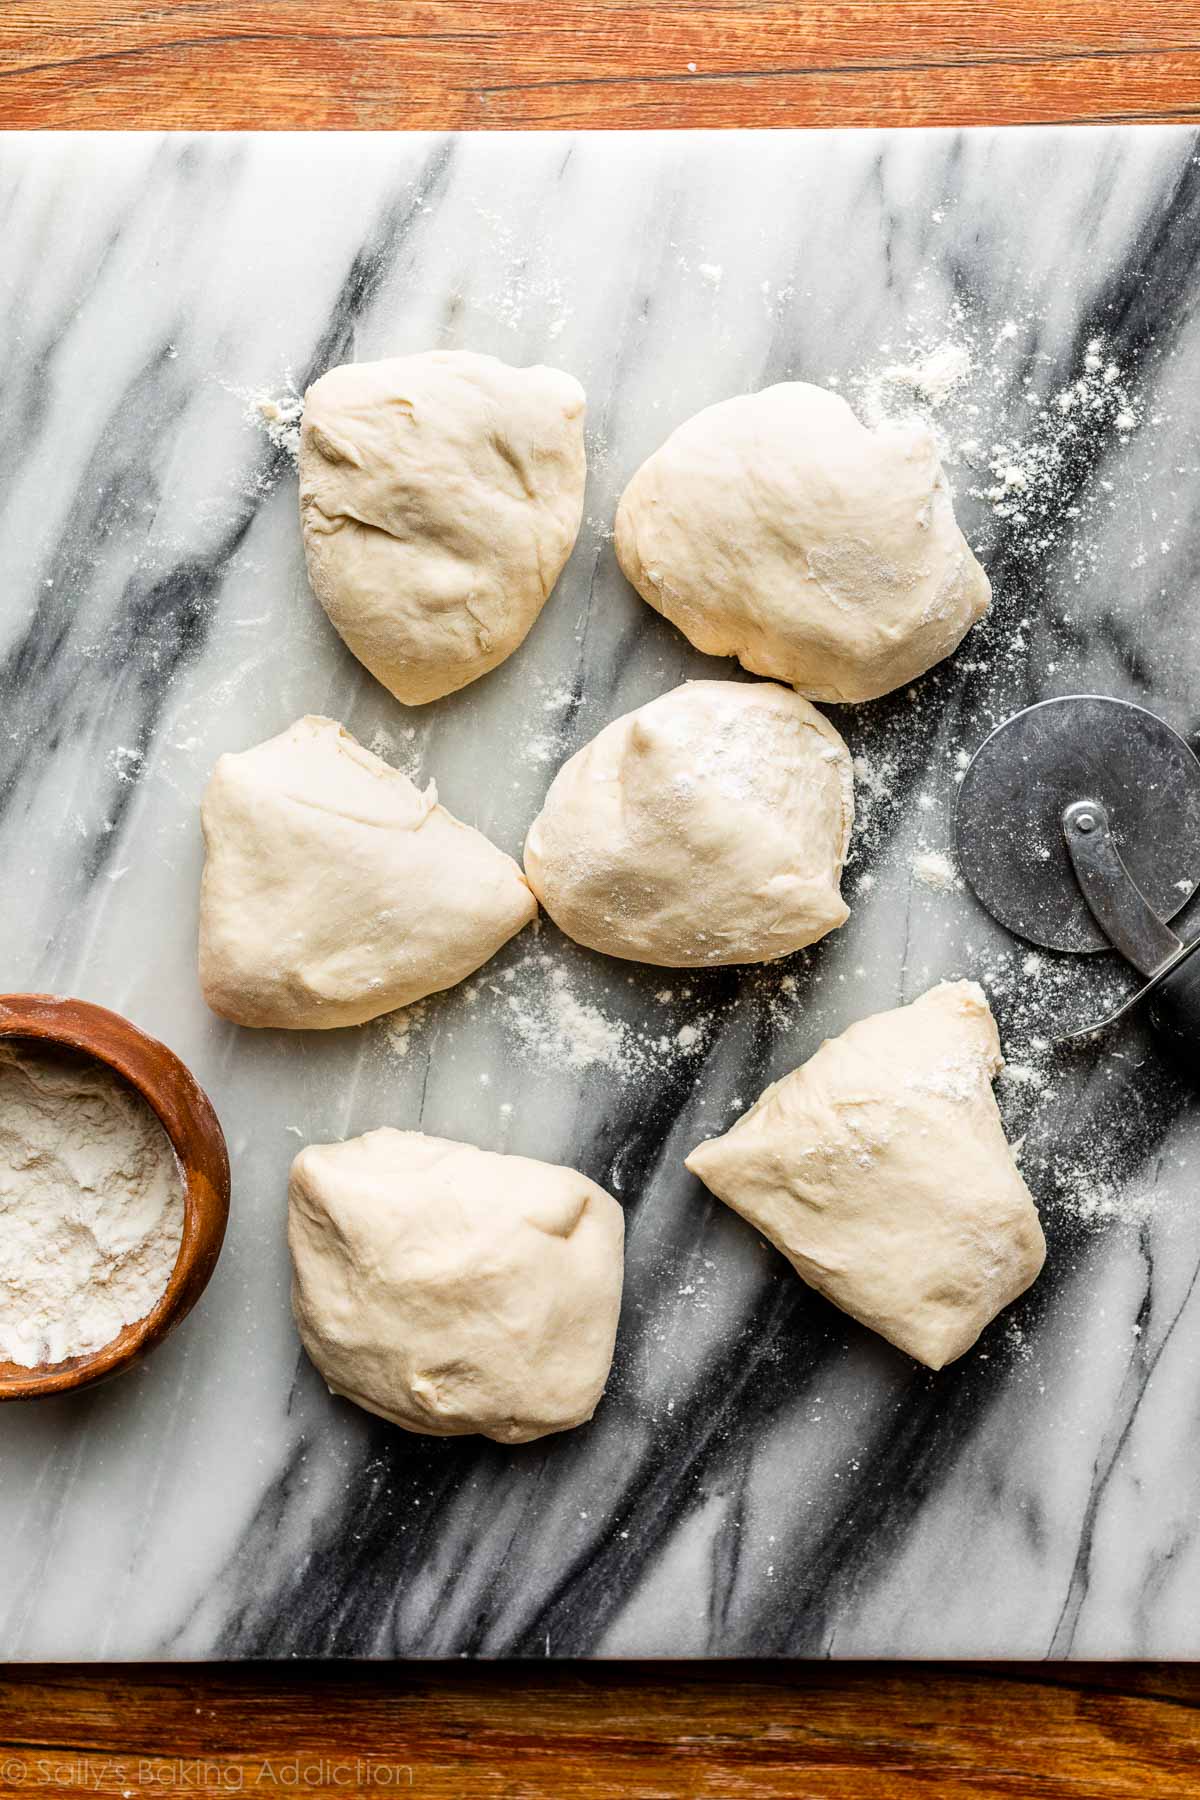
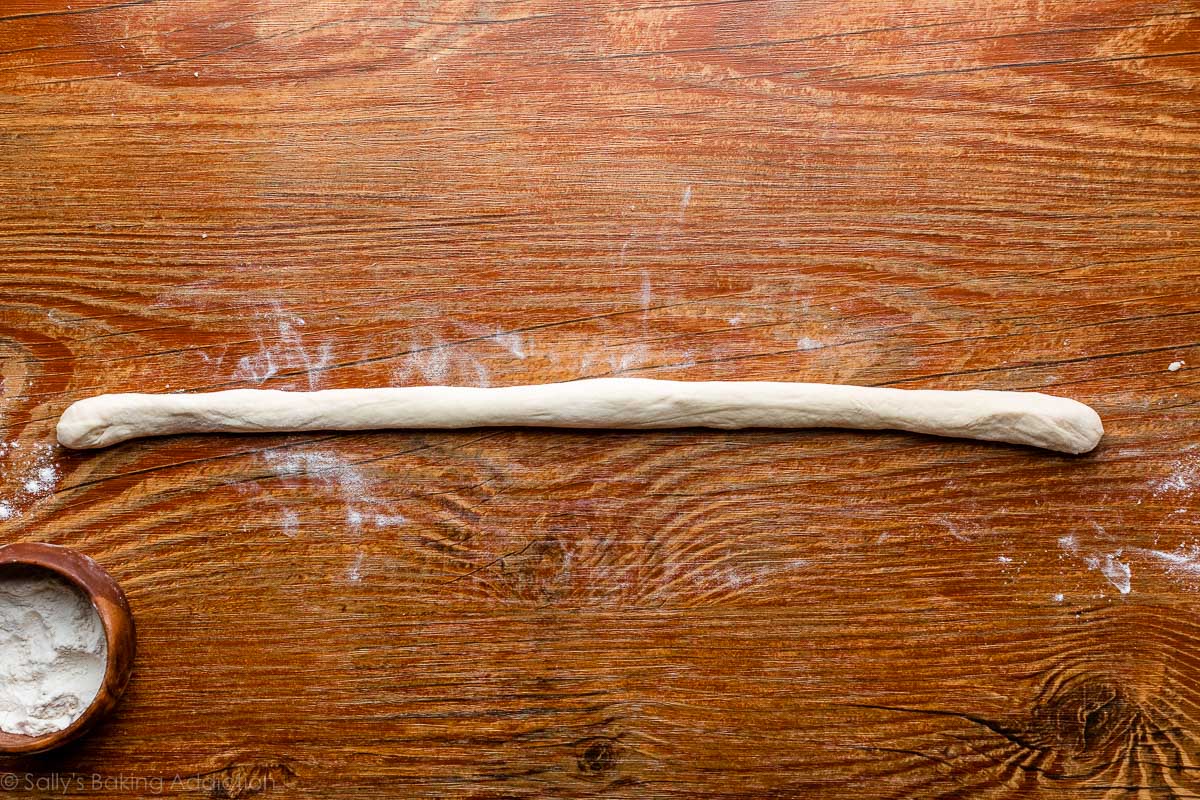
Knead the dough, divide into 6 sections, and then roll into six 20-inch ropes. The video tutorial located in the recipe shows these steps as well. Cut each rope into 1.5 – 2 inch pieces to make bites. I like to use a (affiliate links) pizza cutter or bench scraper for cutting this dough, but a sharp knife works perfectly fine too. Use what you have.
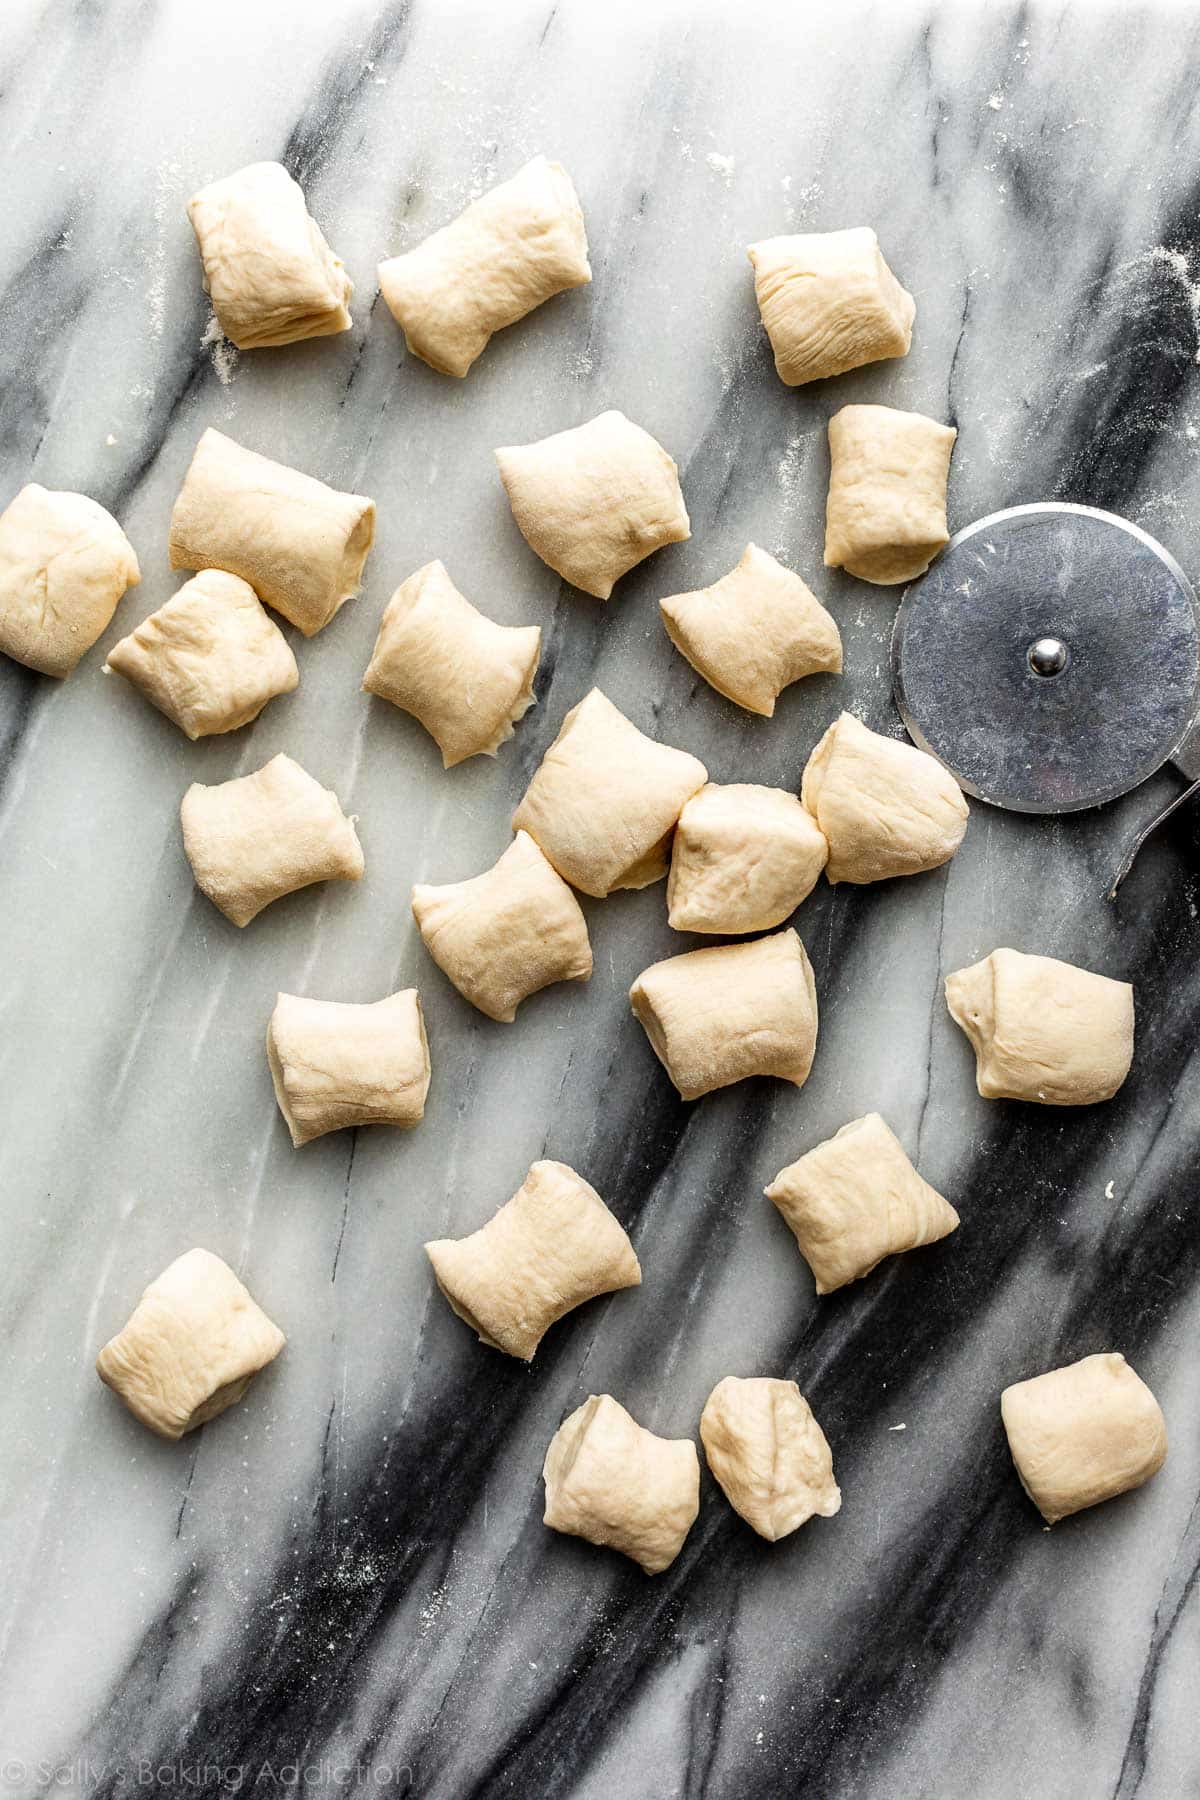
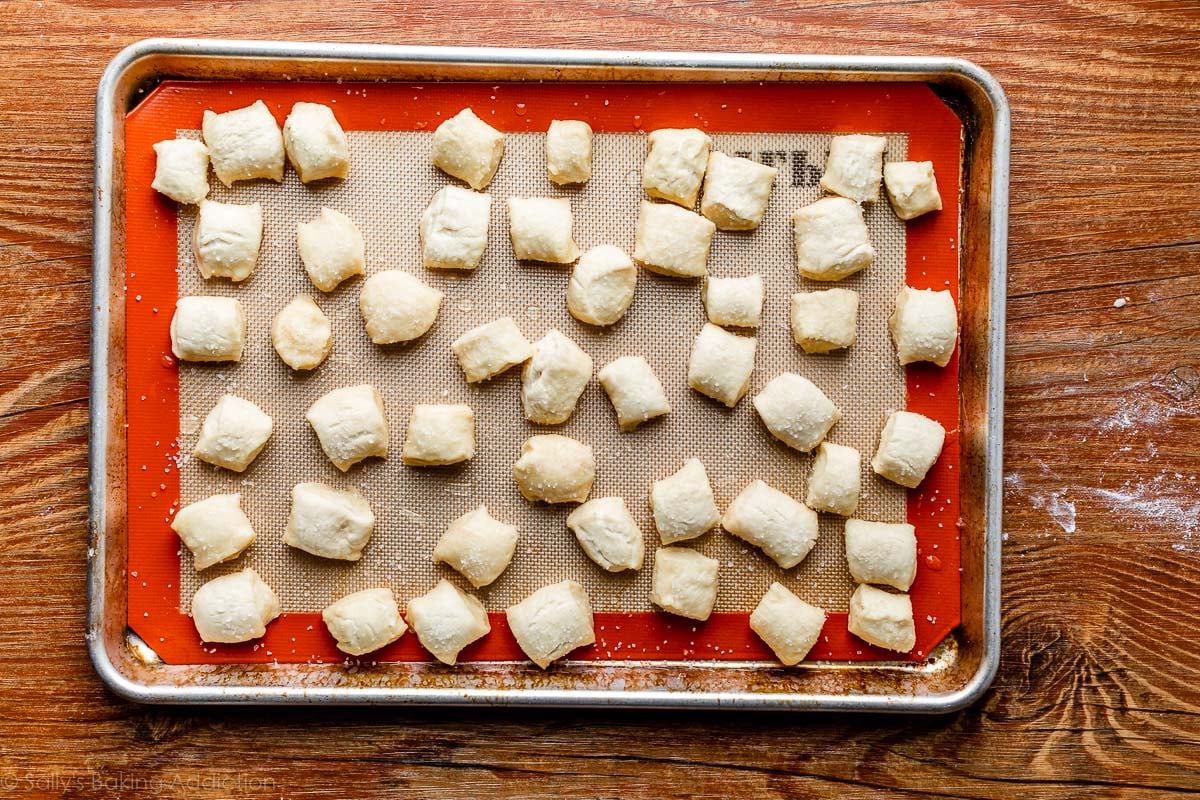
The photo above shows the pretzel bites after the baking soda bath. At this point, they are ready to bake.
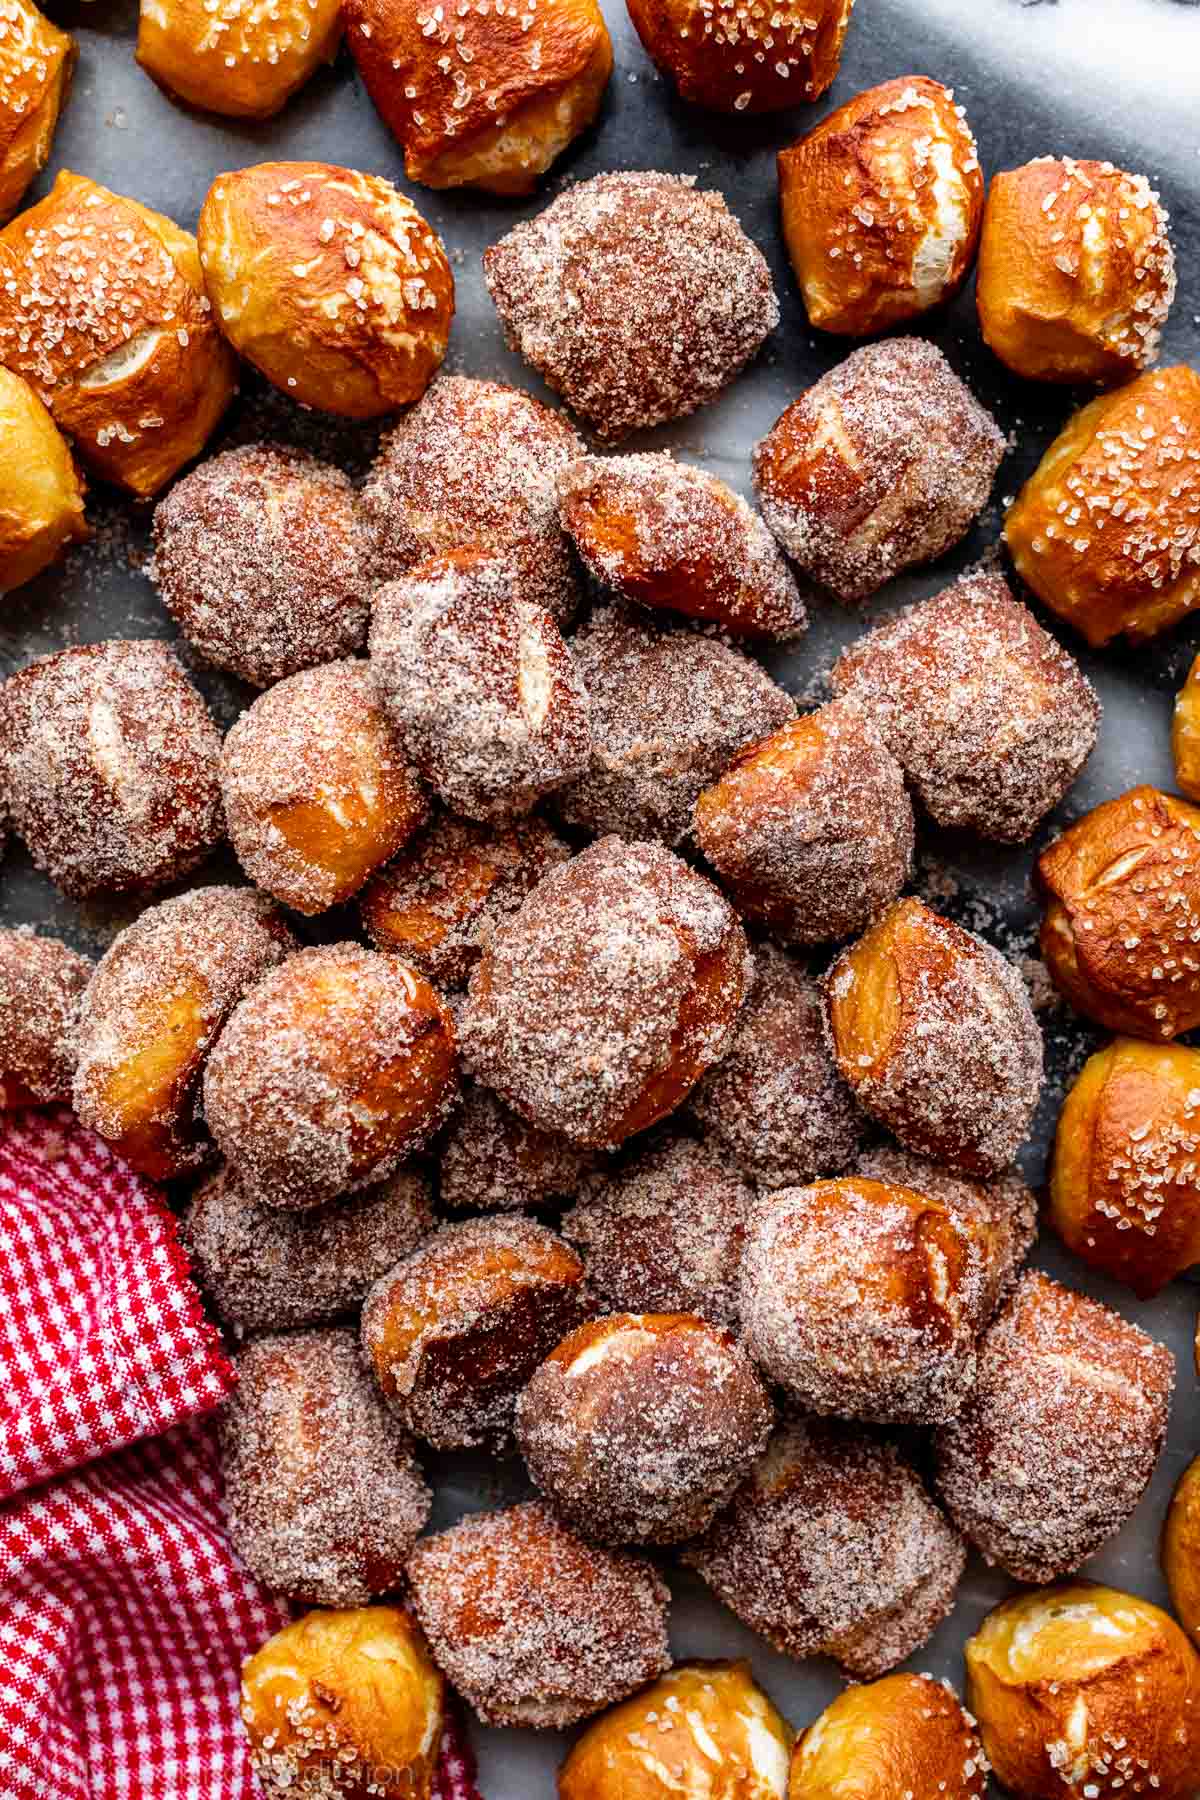
Try Cinnamon Sugar Pretzel Bites
Immediately after the baking soda bath while the soft pretzel bites are still wet, sprinkle with coarse salt. Or if you’d like a different topping, skip the coarse salt and try the cinnamon sugar version. Bake the pretzels completely plain without salt. Once done and still warm out of the oven, brush with melted butter then dip into a mix of cinnamon and granulated sugar. See specific instructions in the Notes below.
By the way, you can have fun with even more toppings such as everything bagels seasoning instead of coarse salt. Heavily sprinkle on the pretzels while they’re still wet from the baking soda bath before baking.
For a larger version, try these soft pretzel rolls. Great for sandwiches!
Make-Ahead Tip
If you are making pretzel bites in advance, do not top them with coarse salt before baking. The salt draws the moisture out of the pretzels, and once you’ve placed the baked and cooled pretzel bites in an airtight container or bag, it doesn’t take long before you’ll notice water droplets forming inside and the pretzel bites become soggy and wrinkled. Yuck!
If you won’t be serving the pretzel bites the same day you bake them, omit the salt-topping step. Bake as directed, then allow to cool completely before placing them in an airtight container, and store at room temperature. When you are ready to serve them, place the pretzel bites on a baking sheet and brush them lightly with water, then sprinkle with coarse salt. Bake them in a 350°F (177°C) oven for 5 minutes, or until warmed through.
Same goes for freezing homemade soft pretzel bites: wait to top with salt until you’re ready to serve them. Cool the unsalted baked pretzel bites completely, then freeze in an airtight freezer-safe container or zip-top bag for up to 3 months. To reheat, brush frozen pretzel bites (no need to thaw) with water and sprinkle with coarse salt, then bake at 350°F (177°C) for 10 minutes or until warmed through.
More Appetizers & Snacks
- Pepperoni Pizza Dip
- Garlic & Bacon Spinach Dip
- Sweet Potato Skins
- Honey Mustard Pretzel Pieces
- Crab Dip
- Homemade Artisan Crackers
- Bacon Wrapped Cheesy Stuffed Jalapeños
- Honey BBQ Popcorn Chicken
- Cranberry Pecan Cheese Ball

Soft Pretzel Bites
- Prep Time: 40 minutes
- Cook Time: 15 minutes
- Total Time: 1 hour
- Yield: 5 dozen
- Category: Appetizer
- Method: Baking
- Cuisine: American
Description
These soft pretzel bites are always a crowd favorite! The easy dough requires just 6 ingredients and there’s hardly any rise time, so this is a wonderful recipe for yeast beginners. Have fun shaping the bites (they don’t need to be perfect!) and enjoy warm flavorful homemade pretzels within an hour. Review recipe notes and watch the video tutorial before starting.
Ingredients
- 1 and 1/2 cups (360g/ml) warm water (lukewarm; around 100°F (38°C) is great)
- 2 and 1/4 teaspoons (7g) instant or active dry yeast (1 standard packet)
- 1 Tablespoon brown sugar or granulated sugar
- 1 teaspoon salt
- 1 Tablespoon (14g) unsalted butter, melted and slightly cooled
- 3 and 3/4–4 cups (469–500g) all-purpose flour (spooned & leveled), plus more for hands and work surface
- topping: coarse salt/coarse sea salt
Baking Soda Bath
- 1/2 cup (120g) baking soda
- 9 cups (2.1L) water
Optional for Serving
- spicy cheese sauce or your favorite mustard
Instructions
- Make the dough: Whisk warm water, yeast, and sugar together in the bowl of your stand mixer fitted with a paddle or dough hook attachment. (If you do not have a stand mixer, just use a regular large mixing bowl and a wooden spoon or silicone spatula.) Cover yeast mixture and allow to sit for 5 minutes or until foamy on top. Add salt, melted butter, and 3 cups (375g) of flour. Beat on low speed for 1 minute, scrape down the sides of the bowl with a rubber spatula if needed, then add 3/4 cup (95g) of flour. Beat on low speed until the dough comes together and pulls away from the sides of the bowl, about 2 minutes. If dough is extremely sticky after 1 minute of mixing, add remaining 1/4 cup (30g) of flour and continue to beat for 1 more minute. (You can see in the video that I add the remaining flour.)
- Knead the dough: Keep the dough in the mixer (and switch to the dough hook if using the paddle) and beat for an additional 5 full minutes, or knead by hand on a lightly floured surface for 5 full minutes. (If you’re new to bread-baking, my How to Knead Dough video tutorial can help here.) If the dough becomes too sticky during the kneading process, sprinkle 1 teaspoon of flour at a time on the dough or on the work surface/in the bowl to make a soft, slightly tacky dough. Do not add more flour than you need because you do not want a dry dough. After kneading, the dough should still feel a little soft. Poke it with your finger—if it slowly bounces back, your dough is ready to rise. You can also do a “windowpane test” to see if your dough has been kneaded long enough: tear off a small (roughly golfball-size) piece of dough and gently stretch it out until it’s thin enough for light to pass through it. Hold it up to a window or light. Does light pass through the stretched dough without the dough tearing first? If so, your dough has been kneaded long enough and is ready to rise. If not, keep kneading until it passes the windowpane test.
- Cover lightly with a towel and allow to rest for 10-30 minutes. (Meanwhile, I like to get the water + baking soda boiling as instructed in step 5.)
- Preheat oven to 400°F (204°C). Line 2 baking sheets with parchment paper or silicone baking mats. Silicone baking mats are highly recommended over parchment paper. If using parchment paper, lightly spray with nonstick spray or grease with butter. Set aside.
- Shape: With a sharp knife, pizza cutter, or bench scraper, cut dough into 6 equal pieces (just eyeball it, doesn’t have to be perfect). Sprinkle work surface very lightly with flour. (Tip: The heavier you flour the work surface, the harder it is to roll the dough. A little stickiness actually helps. You only need *a very light* dusting of flour.) Roll each piece of dough into a 20-inch rope. If the ropes keep shrinking and stretching the dough becomes difficult, stop what you’re doing, lightly cover all of the dough, and let it rest for 10 minutes so the gluten can relax. Then, return to rolling it into ropes. Cut each rope into 1.5–2-inch pieces to make bites.
- Baking Soda Bath: Mix water and baking soda together in a large pot. Bring to a boil. Place 8–10 pretzel bites into the boiling water for a quick 10–15 seconds. (Any longer and your pretzels could take on a metallic taste.) Using a slotted spatula or spoon, lift the pretzel bites out of the water and allow excess water to drip off. Place bites onto prepared baking sheets. Sprinkle each with coarse sea salt while they are still wet, or leave plain if using cinnamon sugar topping listed in the notes. Repeat baking soda bath with remaining pretzel bites. If needed, you can cover and refrigerate the boiled/unbaked bites for up to 24 hours before baking.
- Bake for 15 minutes or until golden brown. Remove from the oven and serve warm.
- Cover and store leftover pretzel bites at room temperature for up to 3 days. They lose a little softness over time. To reheat, microwave for a few seconds or bake in a 350°F (177°C) for 5 minutes.
Notes
- Make Ahead & Freezing Instructions: If planning to freeze baked pretzel bites, do not top them with coarse salt before baking. Cool completely, then freeze in an airtight freezer-safe container or zip-top bag for up to 3 months. To reheat, brush frozen pretzel bites (no need to thaw) with water and sprinkle with coarse salt, then bake at 350°F (177°C) for 10 minutes or until warmed through, or microwave frozen pretzel bites until warm. The prepared pretzel dough can be covered and refrigerated for up to one day or frozen in an airtight container for 2–3 months. Thaw frozen dough in the refrigerator overnight. Refrigerated dough can be shaped into pretzel bites while still cold, but allow some extra time, about 1 hour, for the pretzel bites to puff up before continuing with the baking soda bath and baking.
- Special Tools (affiliate links): Electric Stand Mixer | Baking Sheets | Silicone Baking Mats or Parchment Paper | Pizza Cutter or Bench Scraper | Large Pot | Coarse Salt
- Flour: If you have it, the same amount of bread flour works instead of all-purpose flour. Do not use whole wheat flour.
- Cinnamon Sugar: Bake the pretzel bites completely plain without salt in step 7. As the pretzel bites bake, melt 4 Tablespoons (60g) unsalted butter. Set aside. Combine 3/4 cup (150g) granulated sugar and 1 and 1/2 teaspoons ground cinnamon. Set aside. Once the pretzels are done and still warm out of the oven, brush each with melted butter then generously dip into cinnamon sugar. Cinnamon sugar pretzels are best served that day because the melted butter topping causes them to become soggy after a few hours.
- Reference my Baking with Yeast Guide for answers to common yeast FAQs.
- Egg? This recipe used to call for brushing the boiled pretzel bites with a beaten egg before sprinkling with coarse salt. Now you can skip the egg and sprinkle the salt on the pretzels while they are still wet from the boiling step. If you prefer them the old way, feel free to continue brushing with the beaten egg before salting and baking.


Reader Comments and Reviews
Best pretzel bites recipe by far that ive ever made these taste just like the mall if not better.. I say better I made them twice second time I forgot sugar so those wonderin if you can make it sugar free you can, I can’t taste a difference other than its not as sweet.
Made these for my husband who usually gets a sonic pretzel everyday and he absolutely loved them! He asked if I could make it with pepperoni inside and cheese sprinkled on top. Any recommendations for how that could work? Could I wrap the dough around pepperoni after the baking soda/water bath? I saw you have a pepperoni bite recipe, but he wants it with the pretzel taste/style in tact.
Hi! I am planning to bake these for a Father’s Day party that my family is hosting since it is also my dad’s birthday and he really wants pretzel bites. Would I be able to make the dough today, refrigerate, and then do the baking soda bath and then the cooking time? Thanks!
Hi Jenna, yes! See the make ahead section in the recipe notes.
I made half a batch of these earlier today, and they disappeared within thirty minutes. I’m currently making a second full batch because they were so good that we need more!
Well this was a revelation! These little pretzel bites are the bomb. I was nervous but shouldn’t have been. They’re perfect. Thank you so much for the recipe. Will make again for sure.
I made half of them in the oven and the other half in the air fryer! I find them better cooked in the air fryer than in the oven; they taste more pretzel-y, if you get what I’m saying. I set the air fryer at 400 for 5-7 minutes, and they came out absolutely amazing!!
This recipe is great. Easy to follow and my pretzel bites came out so good. They were golden brown as in the picture. I sprinkled some of them with kosher salt, cinnamon and keep some plain. They were tasty! A little crispy on the outside and chewy inside. I didn’t even need dipping. I did half of recipe because I don’t want to keep leftover and would love to bake them fresh.
My kid was begging to go to the mall and get those super expensive pretzel bites the other day so I decided to try to find an easy recipe. I found this one and it was a hit. My kid said they’re way better than the ones at the mall – the best he’s ever had even – and has asked me to make them every day since.
The bites are beautifully soft and bake well- unfortunately there is not much for flavor or taste. Mostly just a strong yeast taste comes through.
how should i package these for a marketplace?
I’m going to bag them or maybe even cups like aunties Anne’s!
Hi Sally, planning to try these, my 14 year old is obsessed with hard pretzels, (like the cracker kind) do you think he will enjoy these?
Hi Chloe, if he’s a fan of traditional soft pretzels, too, he should enjoy these! They’re a soft, more bread-like pretzel, like a traditional soft pretzel. If you’re looking for hard pretzel recipes, you might want to try these seasoned pretzels or honey mustard pretzels. Let us know if you give anything a try!
I live in Reno – at about 5,800 ft altitude. Do you have advice for altitude adjustments?
Hi Deborah, I wish we could help, but have no experience baking at high altitude. Some readers have found this chart helpful: https://www.kingarthurflour.com/learn/high-altitude-baking.html
I have made this recipe dozens of times (I use it in my middle school foods classes) and they never come out as golden brown as yours. In fact, they stay pretty white. How do you get such a dark golden brown?
Hi Emily, The quick baking soda boil gives the pretzels their traditional flavor and lovely browned color—was the bath time shortened at all? Otherwise they may just need a few additional minutes in the oven. Thank you for giving these a try!
These were SO good! I also took 1/3 of the dough and made 4 large soft pretzels to go with the bites. They turned out perfect too! Thank you for making these accessible for others!
Hi another question (decided to make the bites for a party). If I prep all the way through the baking soda bath, but want to cover and refrigerate and bake the next day to finish them fresh – should I sprinkle with coarse salt after the bath, or should I re-wet them the next day and sprinkle the salt right before I bake them? Thanks!
Hi Becca, my apologies! Yes, you can cover and refrigerate them after boiling. Sprinkle with salt after the bath.
These were delicious I am old and still can’t prepare a good cheese sauce from scratch to save my life. Next time I will make one out of velveeta and spices. These pretzels are so good. Thank you for the recipe.
So I have been making these A LOT this week. DELICIOUS. Out of this world. So savory. BUT, instead of baking, I pop them into my deep fryer. I know. Not the healthiest idea but I tried both versions, and I prefer the deep fryer. They seem to puff up more, are softer yet crispier somehow. And instead of brushing them, I take my big punch bow sized mixing bowl, pour melted butter into it, close the lid or a plate over top then shake. Then I sprinkle with McCormick cinnamon and sugar shaker. So addictive. Either way, awesome recipe!
Have been looking to fry them! At what step, do you fry them?
I made this recipe for a Super Bowl party. They were a hit!! I doubled the recipe and they were GONE IN MINUTES!!
Absolutely soft and chewy and delicious!
Has anyone tried stuffing them with cream cheese or a filling?
Hi Christy, we haven’t tested it, but we’re sure you could! Let us know what you try.
I put jalapenos with pepperoni and cheese, cut the dough rope sections into 8 instead of 10. Most melted out but were very good.
These are delicious however the dough at 4 cups was extremely sticky and unworkable
It required nearly 5 cups of flour to be workable- so if you are trying this recipe highly recommend 4 cups and adding as you go!
I was going to make pretzels for a game day snack until my husband asked for pretzel bites. I knew you had a great recipe as I have made the pretzels before. I did not realize you had a specific “pretzel bite” recipe so I just used the regular pretzel recipe. I rolled them out as the recipe says and then cut them into bite size pieces. I followed the rest of the prepping and baking instructions and they turned out GREAT! They were a crowd favorite.
What a great recipe!! Made these today as a Super Bowl snack. Your recipe directions are spot on! Made half a batch with salt and the other half with cinnamon and sugar. Delicious!
I made these very quickly and WOW are they good. I used a garlic parsley mixed with a seasalt which made them tasty. I mixed every thing in a bread machine on dough setting. Had to add a touch of flour to make a little less sticky dough. Thank you for an easy easy pretzel bite recipe.
Going to be a Superbowl snack hit.
Hello Sally, I just tried this recipe and the little pretzel bites are very tasty. Thank you. I also have a question about types of flour. I am living in Romania and if I remember correctly with the type of flour used here, recipes can require extra amounts of flour. The common type of flour is a 000. I had to add extra flour to this recipe and I am just wondering with all your baking experience/knowledge if you have any helps. Thank you again. I really appreciate your site—find your recipes and information helpful.
Can I make the dough prior then bake the next day? If so, what would be the modifications?
Hi Hannah, You can refrigerate the prepared dough for up to a day – so after kneading in step 2 – see the Make Ahead instructions in the recipe notes for more details!
This is dangerously good and very easy. So fun for date night!