

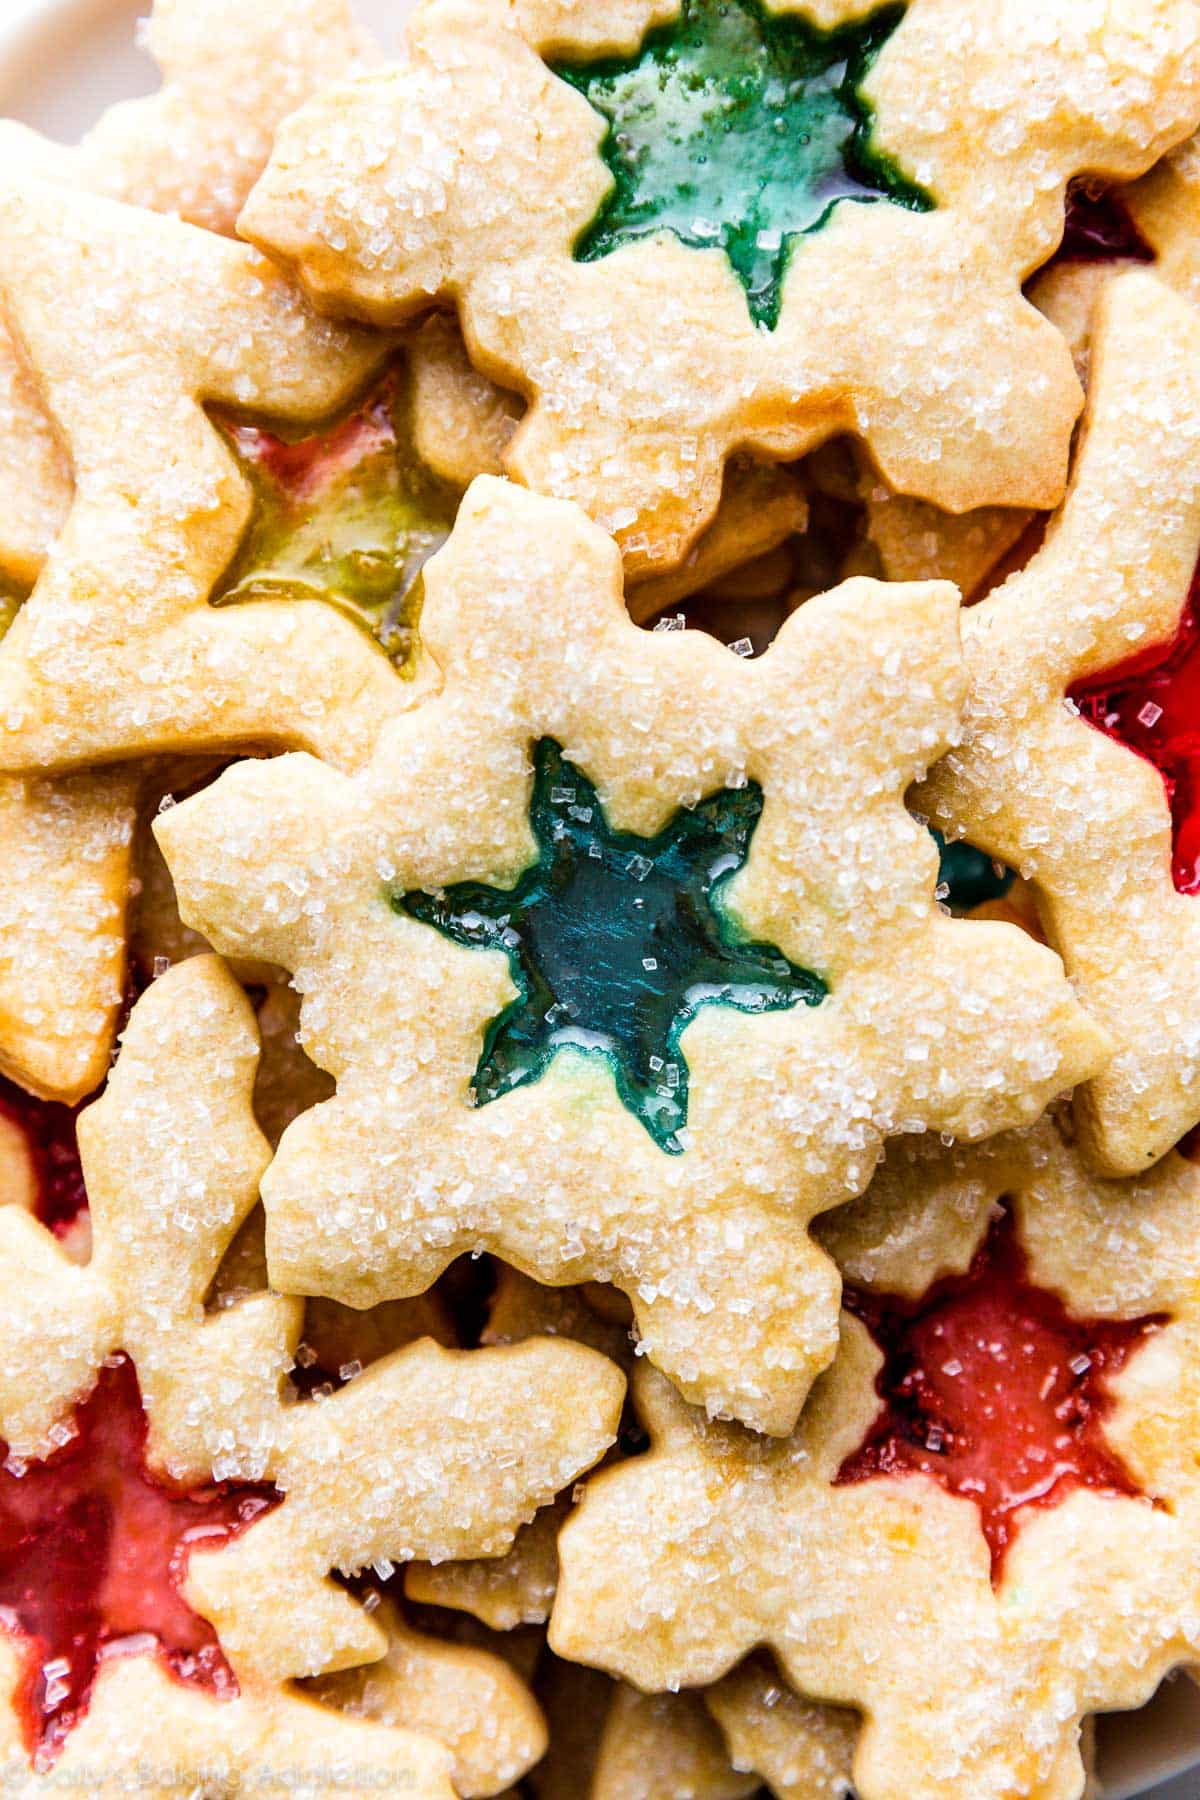
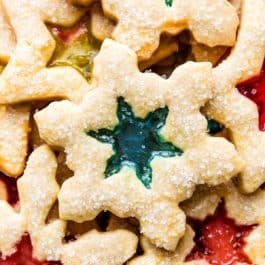
These stained glass window cookies are made with my favorite sugar cookies. Cut out the center of each and fill with crushed hard candies before baking. The candy melts as the cookies bake, creating a gorgeous windowpane effect. There’s no extra decorating or icing required! This is a fun and wildly impressive cookie you can add to your holiday baking.
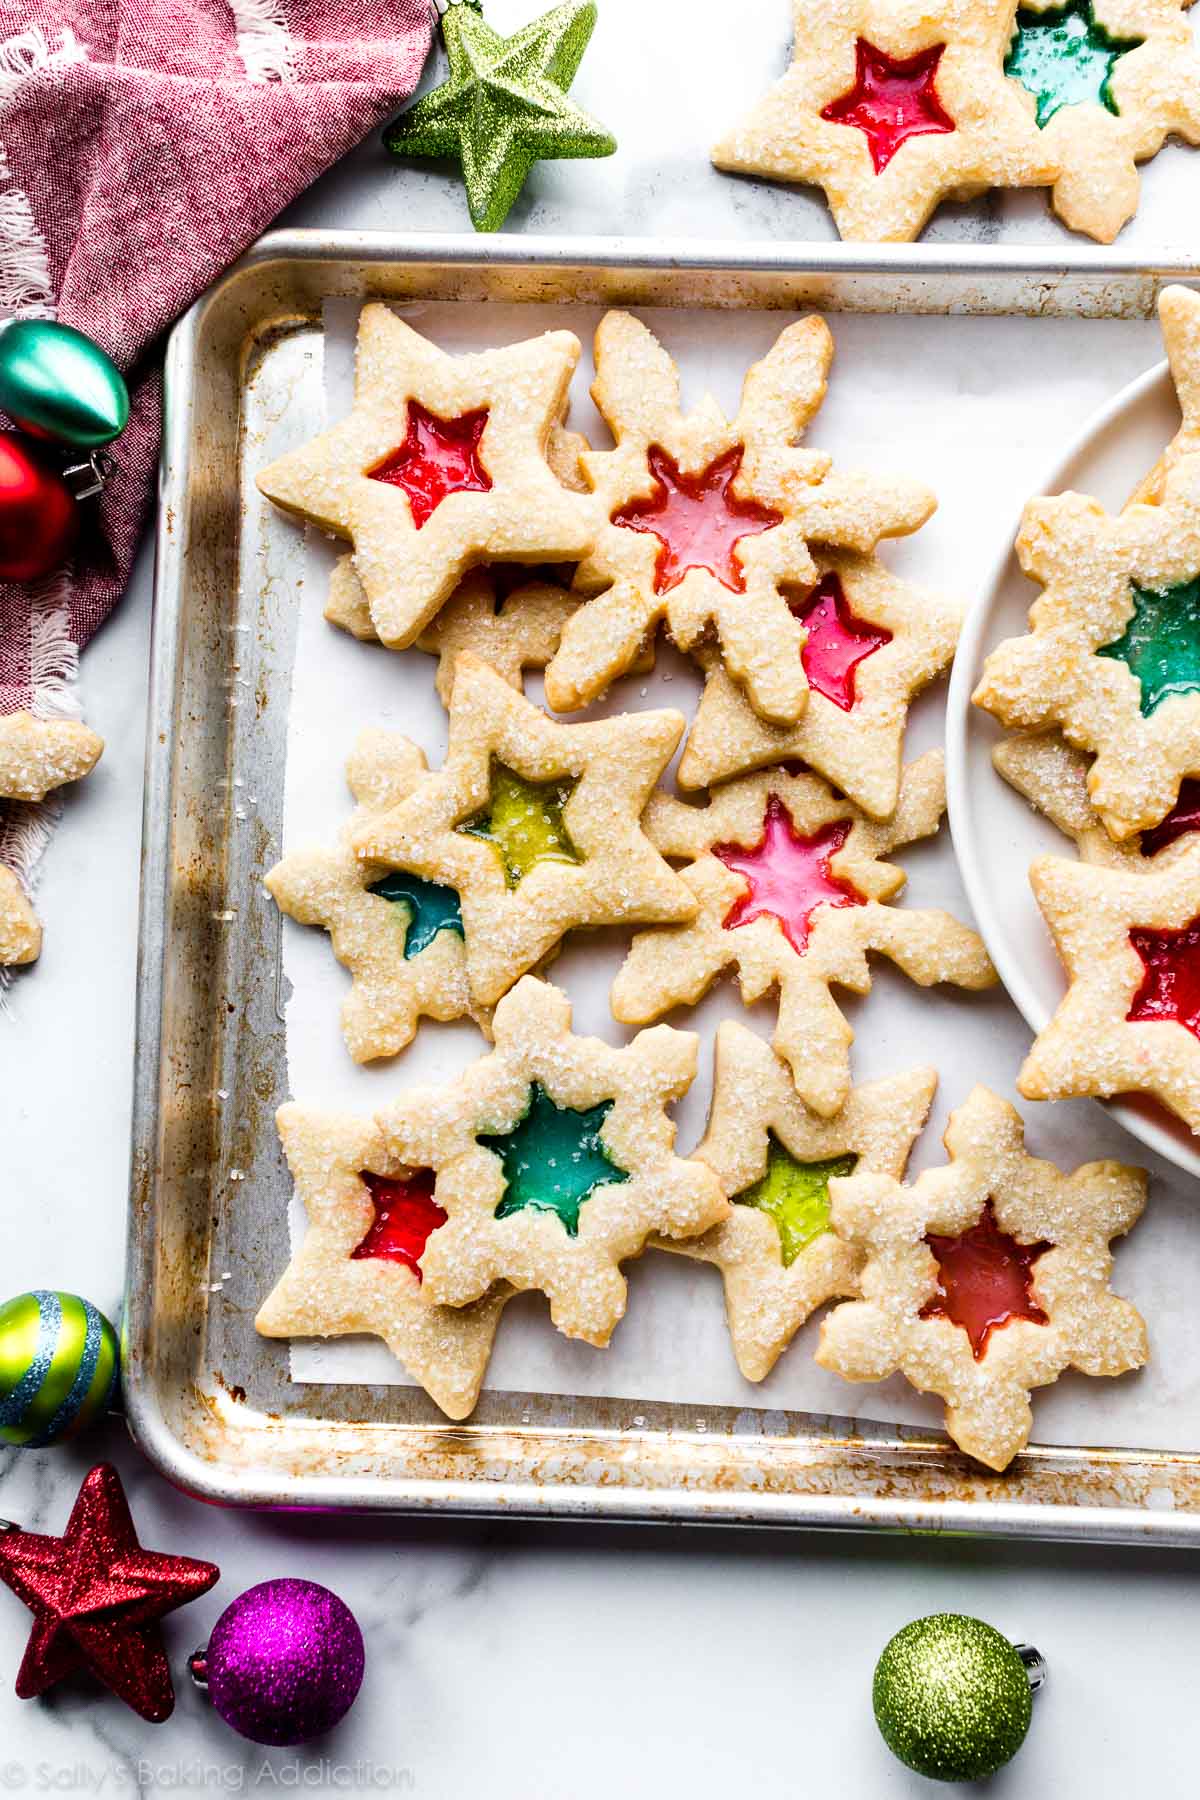
I’ve always wanted to make this style of cookie. I saw stained glass window cookies, also known as windowpane cookies, featured on the cover of Food Network’s holiday magazine and decided it was fate. I used my own sugar cookie recipe, topped them with crisp sparkling sugar, and was delighted with how beautiful they turned out. My daughter was in awe!
Today I’m showing you exactly how I did it plus some success tips that I found helpful.
Tell Me About These Stained Glass Window Cookies
- Texture: Underneath all this glitz and glamour, we have a classic buttery sugar cookie, one of the most loved recipes on my site, in fact. It’s a foundation recipe that I’ve used time and time again to create new recipes, just l’ve done with chocolate chip cookies, peanut butter cookies, and even these vanilla cupcakes. If you avoid over-baking, they’re relatively soft with slightly crisp edges. The sparkling sugar on top adds a pleasant crunch. After the melted candy center cools, it becomes hard candy again. I found it easiest to eat the sugar cookie edges and save the hard candy center for last. The candy center is a thin layer, so it’s much easier to bite into/suck on than a full-size Jolly Rancher or other candy.
- Flavor: The sugar cookies have a sweet vanilla flavor. I was going to prepare them with vanilla sugar, but felt the fragrant vanilla bean would get lost under the fruity candy.
- Ease: Not too tricky! If you’re comfortable making cut-out sugar cookies, you’ll do just fine with these. I appreciate that there’s no finicky icing or decorating required—the cookies are decorated right out of the oven.
- Time: The cookie dough comes together in minutes. Roll it out, then chill it in the refrigerator for at least 1-2 hours. Without chilling, the cookies will completely lose their shape. (It’s a crucial step.) After that, cut the dough into shapes, re-roll the scraps, then fill with crushed candies and bake. Set aside a few hours to complete this recipe.
One reader, Trisha, commented: “These cookies were beautiful and tasted delicious! The candy center adds such a nice fruit flavor surprise! These were a beautiful addition to my Christmas cookie box this year. Thanks for another great recipe, Sally! ★★★★★”
Overview: How to Make Stained Glass Window Cookies
The full printable recipe is below.
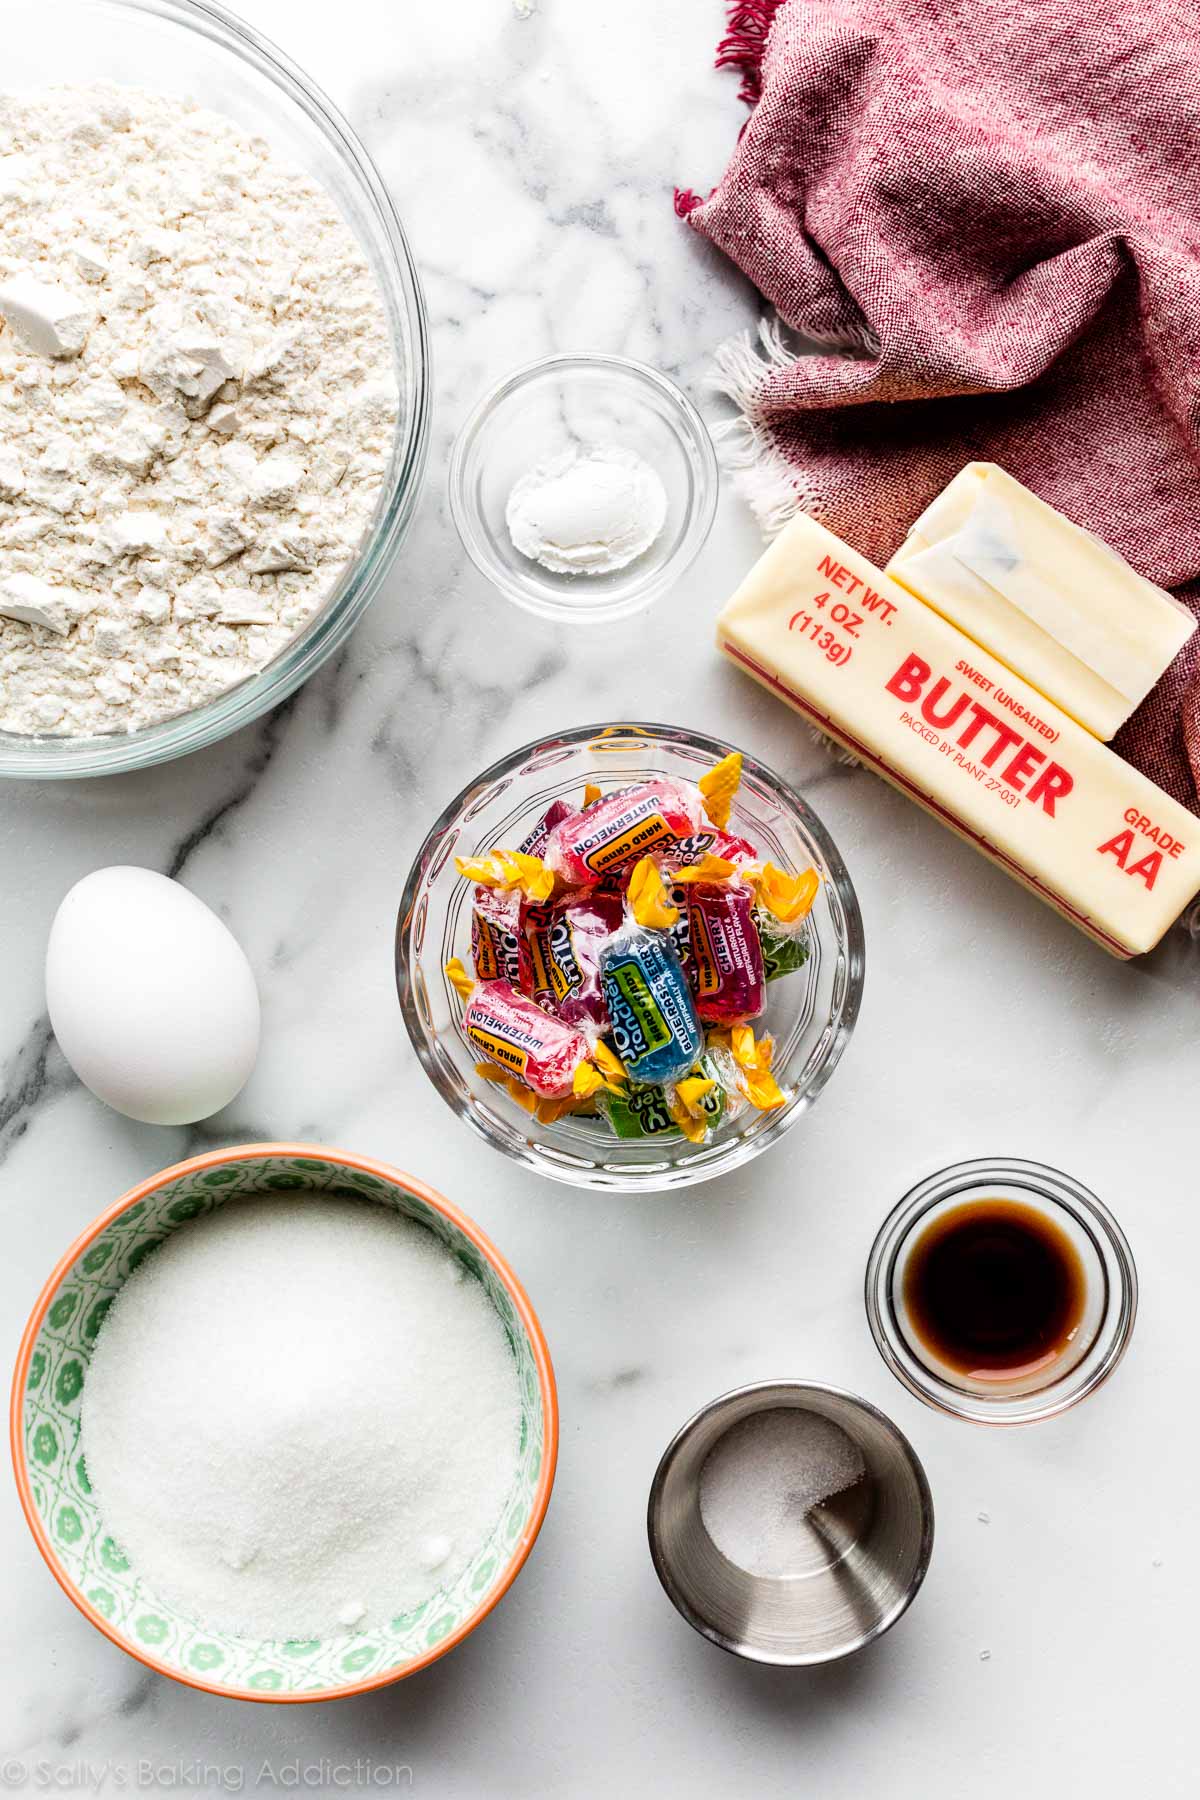
- Make sugar cookie dough. You only need 7 basic ingredients for this cookie dough.
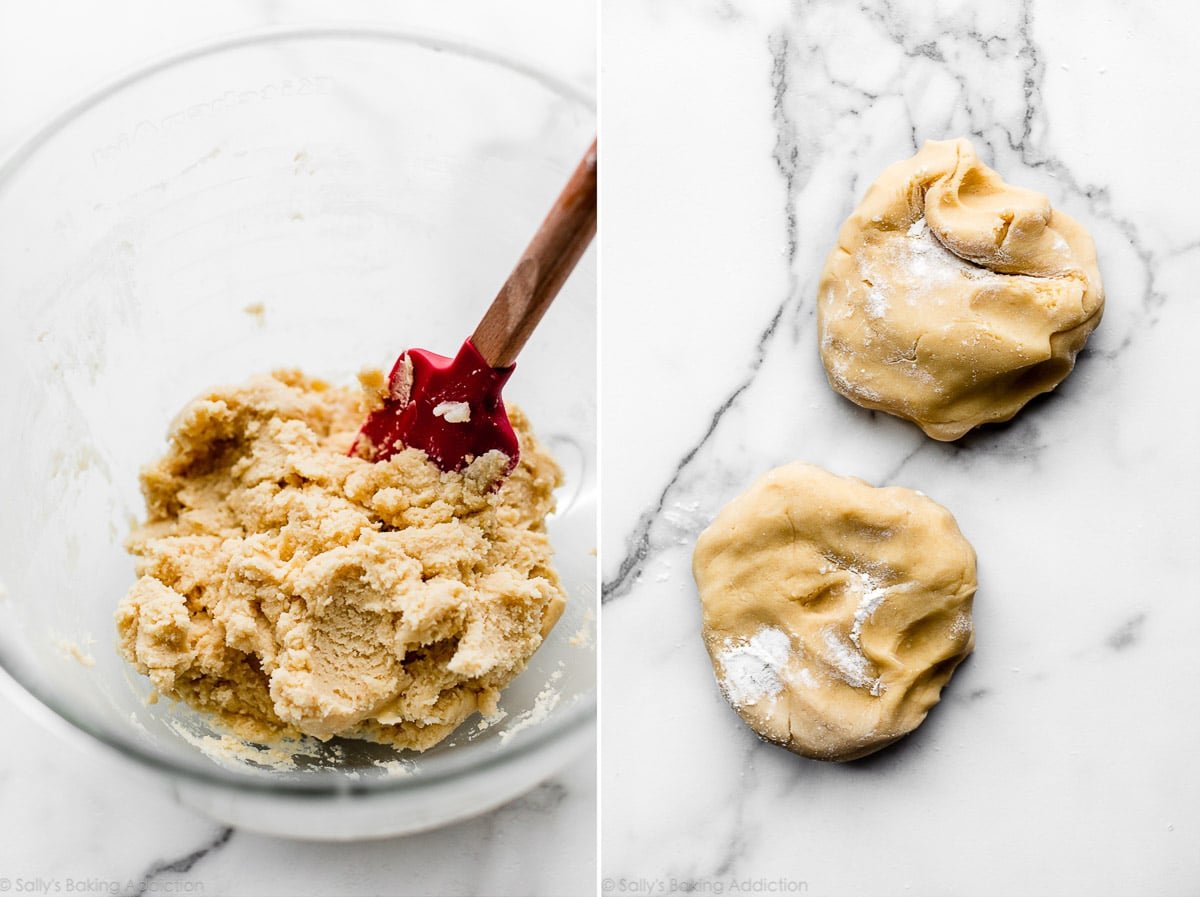
- Divide in two pieces. Smaller sections of dough are easier to roll out.
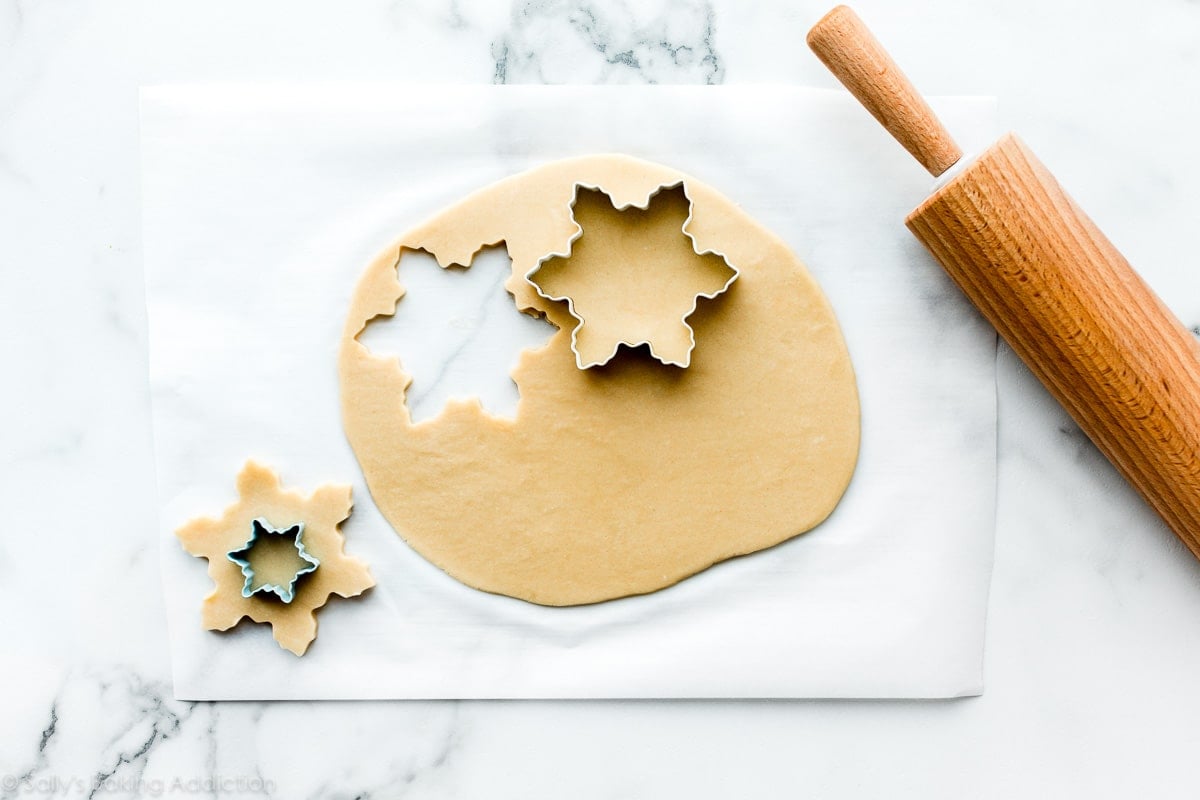
- Roll out cookie dough. Roll it out to 1/4 inch thick or just under 1/4 inch thick.
- Chill rolled out dough. Without chilling, the cookies won’t hold their shape. Chill the rolled out dough in the refrigerator for at least 1-2 hours and up to 2 days.
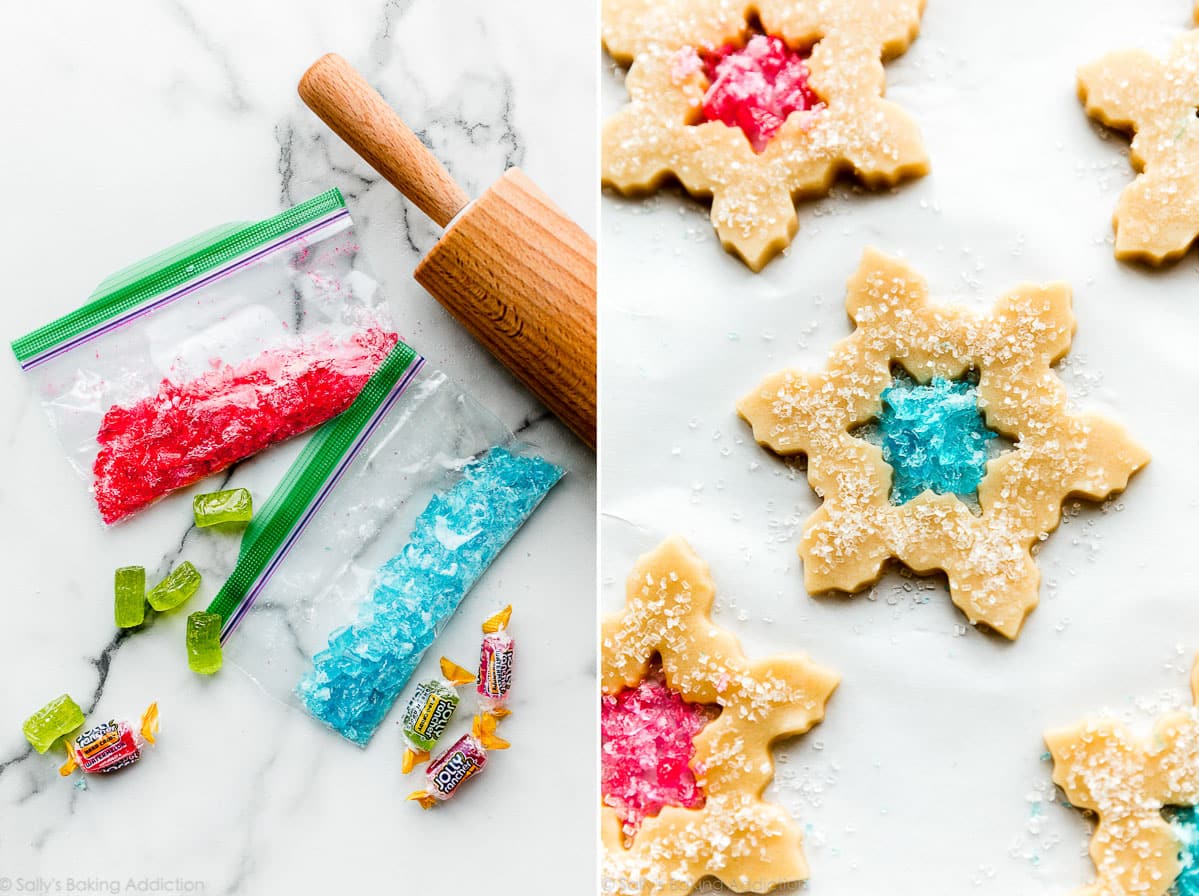
- Crush your candies. Unwrap the hard candies, separate the colors, then crush them into smaller pieces. More on this step below. Warning: it gets messy!
- Cut into shapes. You need 2 cookie cutter sizes for this recipe—1 large and 1 small. If you don’t have a small cookie cutter, use a knife to cut out a circle, diamond, or other easy shape. Have a little flour nearby when you’re rolling out the cookie dough. Keep your work surface, hands, and rolling pin lightly floured. Re-roll all your scraps—you’ll be surprised how many cookies you get from this amount of dough. Work quickly during this step because you don’t want the dough to become too soft.
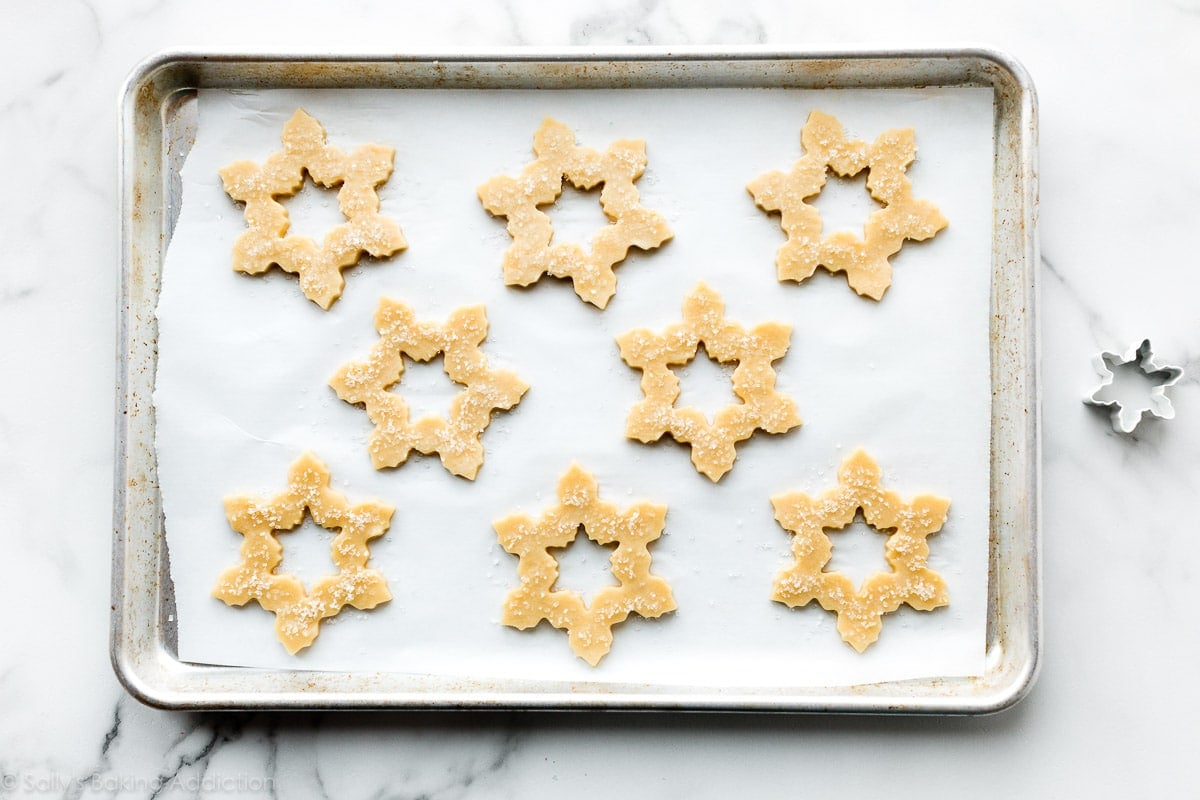
- Top with coarse sugar or sprinkles. The topping is optional, but adds a beautiful sparkle. Brush the cookies with a beaten egg white or water to help the coarse sugar stick.
- Fill the centers with crushed candies.
- Bake & cool. Depending on their exact size, the cookies take about 12-13 minutes. Cool the cookies on the baking sheets until the melted candy center solidifies. Cooling usually takes about 15 minutes.
The Trick is the Order of Steps
Notice how I roll out the dough BEFORE chilling it in the refrigerator? If you’re curious, let me explain why I do this. To prevent the cookies from over-spreading, the cookie dough must chill in the refrigerator. Roll out the dough right after you prepare it, then chill the rolled-out dough. (At this point the dough is too soft to cut into shapes.) Don’t chill the cookie dough and then try to roll it out because it will be too cold and difficult to work with. I divide the dough in half before rolling it out and highly recommend you do the same. Smaller sections of dough are simply more manageable.
Best Candies to Use
Any semi-translucent hard candy works. Some examples include Jolly Ranchers, Life Savers, or clear-ish lollipops. (For lack of better words!) Candy canes work too—you just won’t have the same stained glass window look. If you don’t have candy like this where you live, you can make hard candy from scratch. Here’s a homemade hard candy recipe I’ve used and loved.
Tools You Need
- Rolling Pin: This is my favorite rolling pin. If you have difficulty evenly rolling out dough, try this adjustable rolling pin. It’s really helpful!
- Cookie Cutters: As I mention above, you need 2 cookie cutter sizes—1 large for the cookie’s shape and 1 for the center cut-out. I recommend a 3.5 or 4 inch cookie cutter for the cookie, then a 1.5 inch cookie cutter for the center. If you don’t have a tiny cookie cutter for the center, don’t worry about it. You can cut out a circle or any other shape using a sharp knife. If you want to purchase a large and mini cookie cutter set, though, I recommend this snowflake cookie cutter set (used in the photos and video) and this star set (used in the photos, great for kids). Or use a 3.5-4 inch circle cookie cutter and any shape mini cookie cutter. Here is a mini Christmas cookie cutter set. Or how fun would these be with hearts for Valentine’s Day cookies?!
- Plastic/Paper Bags: The best way to crush the hard candies is to place them in a plastic bag and crush them with a rolling pin, which is a convenient tool because you need one for the dough. A meat mallet works too! Don’t crush the candies into a fine powder—we don’t want it to caramelize and burn. Instead, crush them into fine pebble-sized bits. The crushed candies will pierce the bag no matter how careful you are. Some candy dust will escape, so just know that this step is messy. If you don’t want to use plastic, use a paper bag or paper plate.
- Cookie/Baking Sheets: If you need a brand recommendation, I use and love USA Pan and Nordic Ware 12×17-inch half sheet pans.
- Parchment Paper or Silicone Baking Mats: I recommend baking the stained glass window cookies on lined baking sheets because the melted candy center will harden and stick to a bare pan. Using parchment paper or silicone mats is crucial if you want to remove the cookies in 1 piece. I actually use parchment paper and/or silicone baking mats for rolling out the cookie dough too. This is my little trick because you can easily transfer the rolled out dough to the refrigerator this way. Lift the paper/mat with the rolled out dough on top, put it on a baking sheet, and place it in the refrigerator. If you don’t have enough room for 2 baking sheets in your refrigerator, stack the rolled out dough on top of each other. (You can watch me do all this in the video tutorial above.)
- Pastry Brush: If you decide to top the cookies with coarse sugar or sprinkles before baking, you need to brush the surface of the cookie with a beaten egg white or a little water. This helps the coarse sugar/sprinkles stick. A pastry brush is handy.
Any of these baking tools would be great to add to your holiday wish list. And while you’re at it, be sure to check out my complete guide of Holiday Gifts for Bakers. Lots of fun ideas in there, either for yourself or other baker friends!

FAQ: Can I Do This With Other Cookie Dough?
Absolutely! Instead of sugar cookie dough, try this process with chocolate sugar cookies, cream cheese cut-out cookies with Nutella glaze, or gingerbread cookies. Or you could even cut windows in gingerbread house dough to make actual stained glass windows. I need to try that next.


Stained Glass Window Sugar Cookies
- Prep Time: 2 hours, 30 minutes (includes chilling)
- Cook Time: 13 minutes
- Total Time: 3 hours (includes cooling)
- Yield: 24
- Category: Dessert
- Method: Baking
- Cuisine: American
Description
Sugar cookies turn into colorful windows when you fill their centers with crushed hard candies. Before starting, review the helpful video tutorial below and the success tips above.
Ingredients
- 2 and 1/4 cups (281g) all-purpose flour (spooned & leveled), plus more as needed for rolling and work surface
- 1/2 teaspoon baking powder
- 1/4 teaspoon salt
- 3/4 cup (12 Tbsp; 170g) unsalted butter, softened to room temperature
- 3/4 cup (150g) granulated sugar
- 1 large egg, at room temperature
- 2 teaspoons pure vanilla extract
- 15–20 unwrapped hard candies, such as Jolly Ranchers or Life Savers
Optional Topping Before Baking
- 1 large egg white OR 2 Tablespoons (30ml) water
- 1/3 cup (65g) coarse sugar or sprinkles
Instructions
- Whisk the flour, baking powder, and salt together in a medium bowl. Set aside.
- In a large bowl using a handheld or a stand mixer fitted with a paddle attachment, beat the butter and sugar together on high speed until completely smooth and creamy, about 3 minutes. (Here’s a helpful tutorial if you need guidance on how to cream butter and sugar.) Add the egg and vanilla and beat on high speed until combined, about 1 minute. Scrape down the sides and up the bottom of the bowl and beat again as needed to combine.
- Add the dry ingredients to the wet ingredients and mix on low until combined. Dough will be a bit soft. If the dough seems too soft and sticky for rolling, add 1 more Tablespoon of flour.
- Divide the dough into 2 equal parts. Place each portion onto a piece of lightly floured parchment paper or a lightly floured silicone baking mat. With a lightly floured rolling pin, roll the dough out to about 1/4-inch thickness or slightly thinner (anywhere between 1/8 – 1/4 inch is fine). Use more flour if the dough seems too sticky. The rolled-out dough can be any shape, as long as it is evenly thick.
- Lightly dust one of the rolled-out doughs with flour. Place a piece of parchment on top. (This prevents sticking.) Place the 2nd rolled-out dough on top. Cover with plastic wrap or aluminum foil, then refrigerate for at least 1-2 hours and up to 2 days.
- As the cookie dough chills, begin crushing the candies. The best way to crush the hard candies is to separate them by color, place each color in plastic bags, and crush them with a rolling pin or meat mallet. Don’t crush the candies into a fine powder—crush them into fine pebble-sized bits. The crushed candies will pierce the bag no matter how careful you are. Some candy dust will escape, so just know that this step is messy. If you don’t want to use plastic, use a paper bag or paper plate. (A bag is preferred so candy doesn’t go flying everywhere.) Set crushed candy aside.
- Once cookie dough has chilled, preheat oven to 350°F (177°C). Line 2-3 large baking sheets with parchment paper or silicone baking mats. Carefully remove the top dough piece from the refrigerator. If it’s sticking to the bottom, run your hand under it to help remove it—see me do this in the video above. Using your large cookie cutter, cut the dough into shapes. Using your small cookie cutter, cut out the center shape. (You don’t need the center piece—re-roll it!) Re-roll all the remaining dough and continue cutting until all is used. Repeat with 2nd piece of dough. Note: It doesn’t seem like a lot of dough, but you get a lot of cookies from the dough scraps you re-roll.
- Carefully arrange cookies on baking sheets 3 inches apart. If your cookies are intricately shaped, use two hands to transfer them to the lined baking sheet.
- Optional Topping: If using an egg white, beat it lightly with a fork or small whisk for 10 seconds. It’s easier to brush onto tops of cookies if it’s beaten first. Brush tops of shaped cookies with egg white or water. Sprinkle coarse sugar/sprinkles on top.
- Fill Cookie Centers: Fill the cut-out centers about 3/4 full with crushed candies. The candy pieces melt and expand, so you don’t need to over-fill. I use and recommend 1 color per cookie, but feel free to mix for a spotty multicolor look. The candies are sticky, so wipe off your fingers as needed.
- Bake for 12-13 minutes or until candies have melted and the cookies are lightly browned around the edges. If your oven has hot spots, rotate the baking sheet halfway through bake time. Allow cookies to cool on the baking sheet until the melted candy center sets, about 15 minutes. Once melted candy center has set, transfer to a wire rack to cool completely.
- Cover and store cookies at room temperature for up to 1 week. For longer storage, cover and refrigerate for up to 10 days.
Notes
- Freezing Instructions: Sugar cookies freeze well up to 3 months. After candy center cools and sets, layer the cookies between sheets of parchment paper in a freezer-friendly container. To thaw, thaw in the refrigerator or at room temperature. You can also freeze the cookie dough for up to 3 months before rolling it out. Prepare the dough through step 3, divide in half, flatten both halves into a disk as we do with pie crust, wrap each in plastic wrap, then freeze. To thaw, thaw the disks in the refrigerator, then bring to room temperature for about 1 hour. Roll out the dough as directed in step 4, then chill rolled out dough in the refrigerator for 45 minutes – 1 hour before cutting into shapes and baking.
- Optional Topping: In the pictured cookies, I used an egg white and white sparkling sugar sprinkles, something you can usually find in the baking aisle at the grocery store. (I like Wilton brand.) The egg white created a lovely golden sheen. If you use water, the cookies may look a little pale in comparison.
- Special Tools (affiliate links): Electric Mixer (Handheld or Stand Mixer) | Baking Sheets | Silicone Baking Mat or Parchment Paper | Rolling Pin or Adjustable Rolling Pin | Snowflake Cookie Cutters, Star Cookie Cutters and Mini Christmas Cookie Cutters | Pastry Brush | Cooling Rack
- Room Temperature: Room temperature butter is essential. If the dough is too sticky, your butter may have been too soft. Room temperature butter is actually cool to the touch. Room temperature egg is preferred so it’s quickly and evenly mixed into the cookie dough.
- Be sure to check out my top 5 cookie baking tips AND these are my 10 must-have cookie baking tools.
Adapted from Food Network


Reader Comments and Reviews
This recipe was so easy and so sweet for Christmas time. They turned out beautifully even though I’ve never done candy windows before. I made the recipe vegan friendly by subbing a flax egg and vegan margarine and they were great!
Happy to hear those substitutions worked for you — thank you for sharing!
I made these cookies and they were great the first day, after that the centers of the cookies melted!!! No more stained glass,, and yes I kept them in the fridge so I don’t know why they melted!
The cookies are delicious! The dough was a little challenging to work with (I more of a drop-bake cookie baker), but once we rolled out the cookies thicker it was easier to cut out. Would make again, but might invest in better cookie cutters and do the egg wash instead of water + sugar. Thanks for sharing this recipe!
The kids loved helping make these cookies, especially when it came to crushing candy. They were amazed at the magic of crushed candy turning to stained glass.
Plus the cookie itself tastes delicious.
These were such a huge hit with the kids! Thank you for the tip about rolling out the dough BEFORE chilling it. Thanks to that the cookies turned out much better shape-wise then previous years Christmas cut-outs. I will be trying more of your recipes!
Such a fun project! My only regret is using such tiny cookie cutters — it was SO tedious. The red and green candy centers turned out lovely.
It was fun to bake with my daughter, she really liked the colorful glass in center of the snowflake. Cookies turned out amazing. Liked by my family. Happy holidays. Thanks
Our family used this technique for both sugar cookies and gingerbread houses! It added such a beautiful look to my cookies boxes! Such a mood lifter. Thank you!
These were fun to make. Who would’ve known you can make stain glass windows in cookies with Jolly Rancher candies? So fun and really good. The center is a great surprise in taste, it’s easy to chew. It’s not thick The heat melts the candy’s down and they thin out. You’ve got to make these cookies!
I love the idea of these, but think I prefer just plain old sugar cookies best! They do look pretty though!
These were so fun to make! Thank you for a year full of great challenges!
Thank you for all your participation, Kristin. I hope you are proud of all your 2020 bakes!
Hello Sally,
I can definitely say that I started baking after trying your chocolate chip cookies for the very first time. Ever since, I have tried quite a few of your recipes and every single one of them
comes out successfully! I feel so happy every time to see the perfect end result. This stained glass cookie was no exception! Not a fan of hard candy but was quite intrigued to bake it . The kids were just super impressed! Thank you for your detailed
recipes, the read ahead instructions and the videos!! Have made so many batches of cookies to pass on to friends this season. Would have never done it if not for your recipes. Thank you so much and have a wonderful holiday season!!
Sumathy
I love baking these! I didn’t have much success with the green candies but the red and blue were beautiful. One tip would be to make sure all the same size cookies are on one tray. I had some smaller cut outs burn. I tested on cookie first to get the can’t proportions right. My kids are impressed!
My girls and I had so fun making these cookies. The cookies scream Christmas and it’s just right amount of sweets even having the candies in middle. Next time, we bake these stunning cookies, we need to sprinkle sugars on the side of the cookies to make them even more festive. Love how it kept its shape. I love your recipes and it has given me such an encouragement to bake more and more. I will be emailing our stain glass cookies picture.
Loved making these for the holiday season. Your sugar cookies are my favorite and this took them to the next level. I gifted one star to each of my daughters teachers and therapists especially since they have been stars in 2020 helping us as much as they can! Looking forward to the next challenge. Wishing everyone a wonderful 2021!!!
Very pretty looking cookies and much easier to make those colorful stained glass windows than I’ve imagined. I had fun baking them with my 4-year old!
Such a cool recipe! Loved baking this challenge!
Super easy to make, delicious, and impressive looking. This will be a new go-to to gift at Christmas. Frosting is fun for the kids, but these pack a wow factor (that my frosting skills cannot). Definitely give it a try!
It was fun making these cookies. I used Nerds, some Jolly Ranchers, and lollipops for making these cookies. I loved the stained glass look when they were done. Thanks, Sally for sharing it with us. Happy Holidays!
Simple, delicious, and beautiful… what more could you ask for? Like another commenter I left the little cutouts as mini cookies that I snacked on while waiting for the other batches to bake.
These were a fun cookie to make. Making sure to pull them out at the right time is key. My first batch i accidentally cooked a little to long. The second batch came out perfect. They were very colorful. Tasted very good too.
This recipe was so fun! I used cinnamon candies in a gingerbread cookies and Jolly Ranchers in the sugar cookie. I did mix some of the colors and it blended prettily if I sectioned them off. Fun challenge, thanks!
These cookies are so fun to make and look absolutely beautiful! They are easy to make and so rewarding when you see the end result.
Festive and Fun! My husband, a carpenter, loved smashing the jolly ranchers for me the cookies rolled out great and were a hit with my friends!
These came out beautifully and the sugar cookie base is fantastic. I didn’t find these to be too time consuming, or maybe I just had a lot of fun making them and didn’t notice! I thought the Jolly Ranchers were pretty difficult to smash and actually dented my rolling pin doing the smashing, so be careful which surface you choose to smash them on!
Definitely one of the coolest cookies I have ever made. They’re beautiful and taste great!
Great recipe. Kids really enjoyed these.
These were really good! The dough was a little bit wet and a little hard to roll out, but I live in a humid place. These were fun to make too. I used lifesavers and they worked well. Thanks!
Crisp, delicious cookies. I used cinnamon candy instead of fruity, and they were YUM!
These are gorgeous! My son, age 12, loves to bake and made these to add to our cookie trays. They made a beautiful addition. They appeared much more complicated to make than they actually were. These will be a new tradition. Thanks!