

Here is my tested recipe and video tutorial teaching you how to make star bread. This beautiful holiday brunch recipe is surprisingly easy and impresses everyone!
One of the best parts of my summer was visiting Kansas with several other baking bloggers. It was the best experience! We toured wheat farms with Kansas Wheat and baked with Red Star Yeast, one of my beloved partners. There I learned how to make star bread from master bread baker Zoe Bakes; it is one of the most stunning bread creations. Truly a piece of art. Carb art.
Star Bread Video Tutorial
I’ve always admired this beautiful bread, but was intimidated to try it. It’s so intricate and looks impossible, right? Had I never watched the process, I would’ve NEVER known how EASY it is!! And today I’m showing you how to recreate this masterpiece in a few simple steps. Full video tutorial is below in the recipe card.
It’s much easier than you may think, just like my cinnamon roll wreath. Basically… if you know how to use a knife or pizza cutter, you know how to make star bread.
How to Make Star Bread in 4 Steps
- Make a simple 7 ingredient dough and let it rise for 90 minutes. We’re using the same dough from Everything Bagel Pull Apart Bread, but adding a little more sugar and butter since this is meant to be sweet. It’s a small-batch dough recipe, perfect for our star bread. After the dough rises for 90 minutes, punch it down to release the air bubbles. (Watch me do this in the video above.)
- Roll out the star bread. Divide the dough into 4 equal pieces. Roll each out into a rough 10-inch circle. Stack them on top of each other with your filling between each. There will be 4 layers of dough and 3 layers of filling.
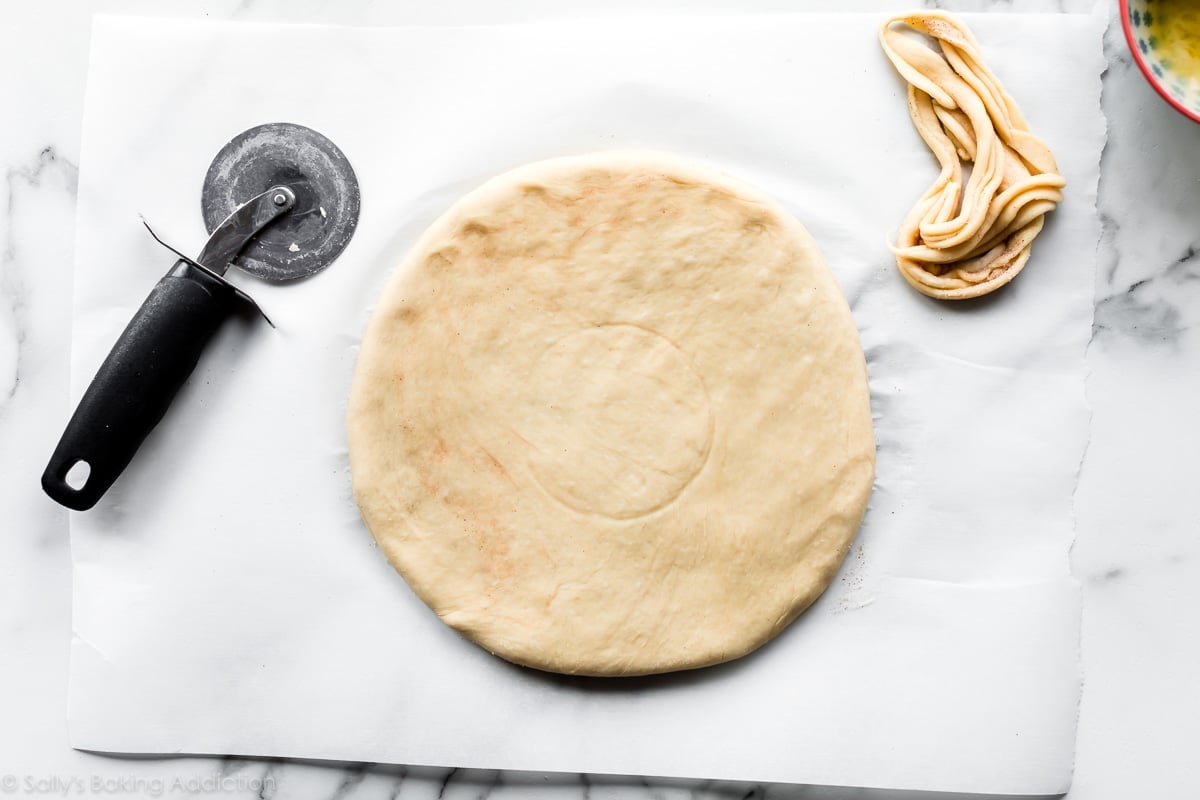
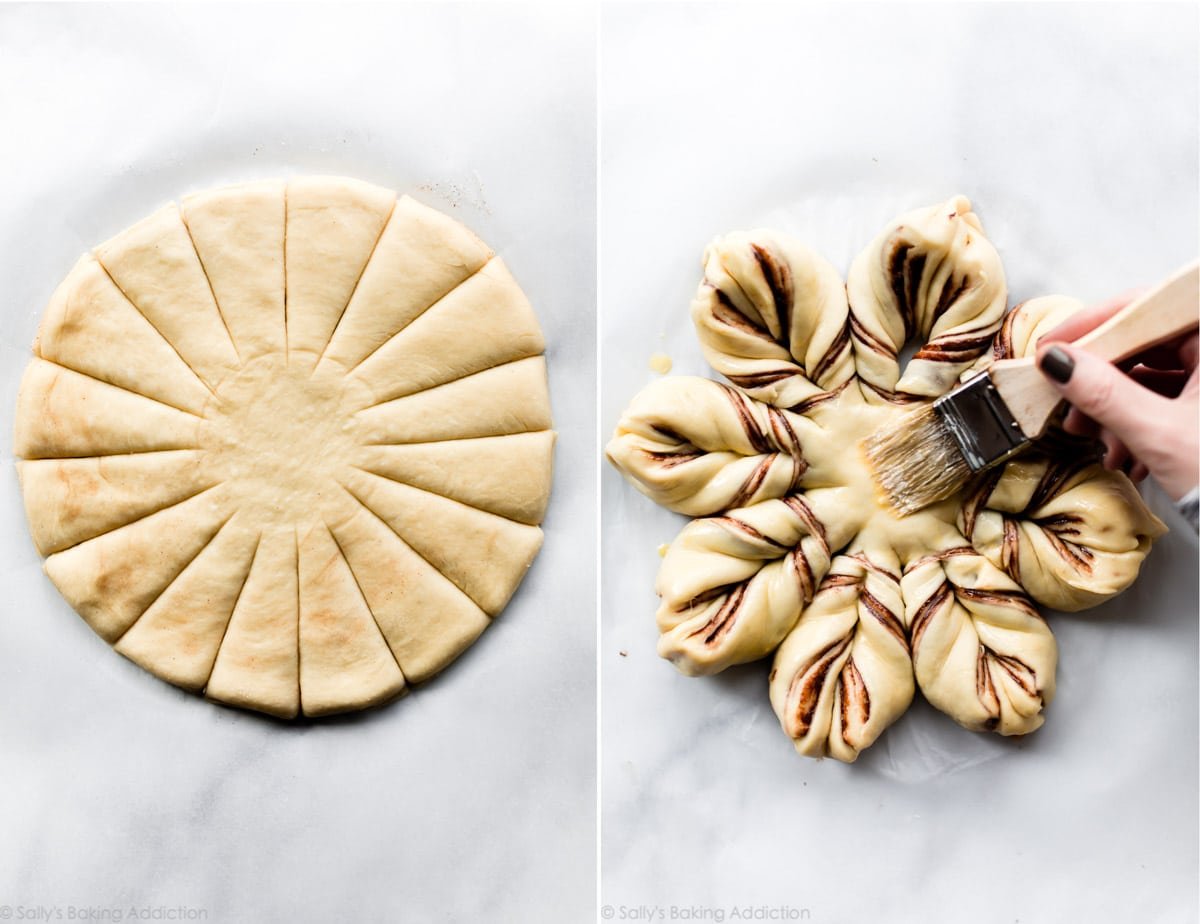
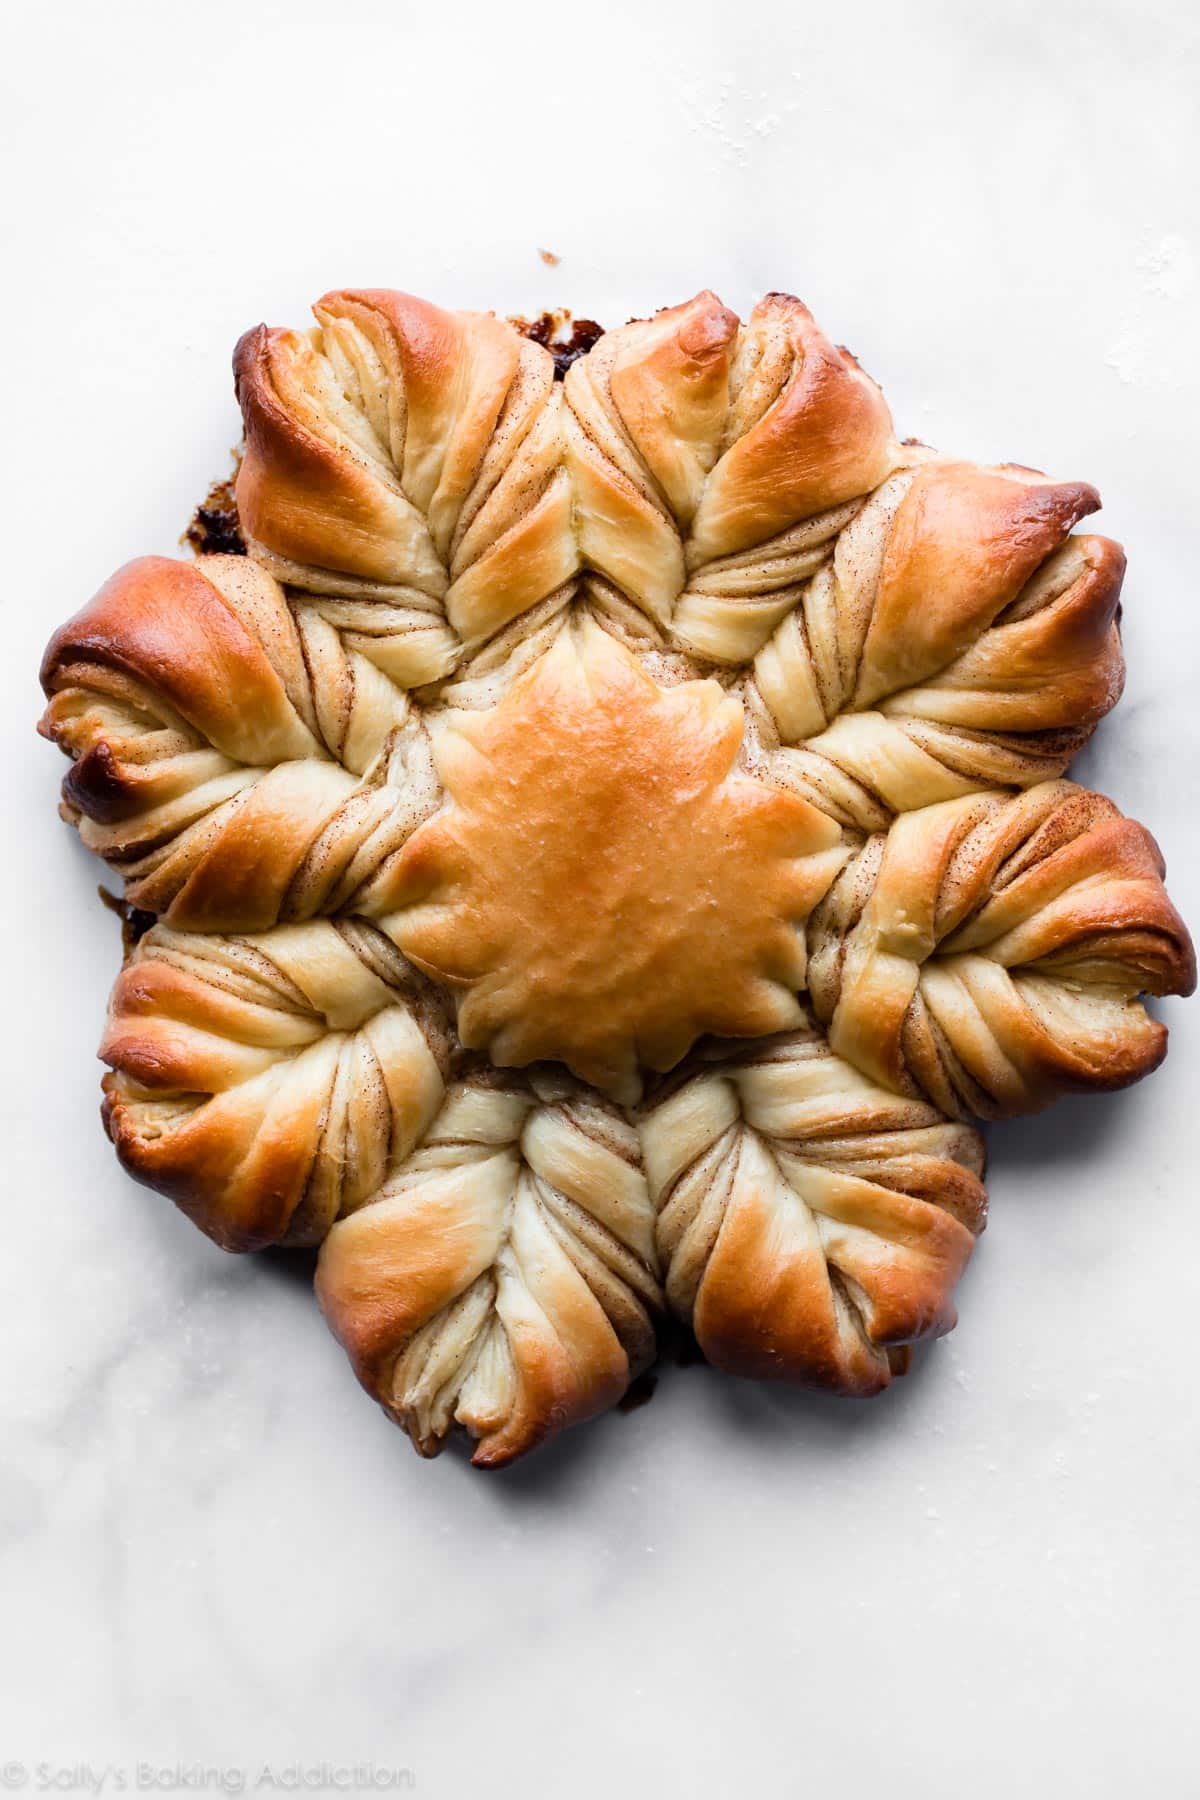
- Shape the star bread. As you saw in the video, this isn’t tricky! Cut any scraps around the edges so you have an even circle. Place a 3 inch round object or bowl in the center to make an indent. This is the center of the star. Using a pizza cutter, cut 16 even strips. Grab two strips and twist them away from each other, then press the two ends together. Your star bread will have 8 points.
- Let it rest for 20 minutes, then bake. Cover the shaped bread and let it rest for 20 minutes before brushing with egg wash and baking. Egg wash promises a beautifully shiny and golden star bread!
This is a SHORTCUT Bread Recipe
We’re cutting down the rise time, which makes this star bread process even quicker. Shaped breads like pull apart bread or cinnamon rolls, typically require 2 rises. A 1st rise for the dough, then a 2nd rise after the dough is shaped. I found this to be problematic with star bread. The 2nd rise gave the dough too much time to puff up, causing the bread to lose its lovely shape when baked.
Instead, just cover the shaped star bread and let it rest for about 20 minutes before baking. That’s it! Just 20 minutes, the perfect amount of time to clean up and preheat the oven.
- This significantly cuts down on our prep time. Yay!
- Promises the bread holds its shape!
Star Bread Fillings!
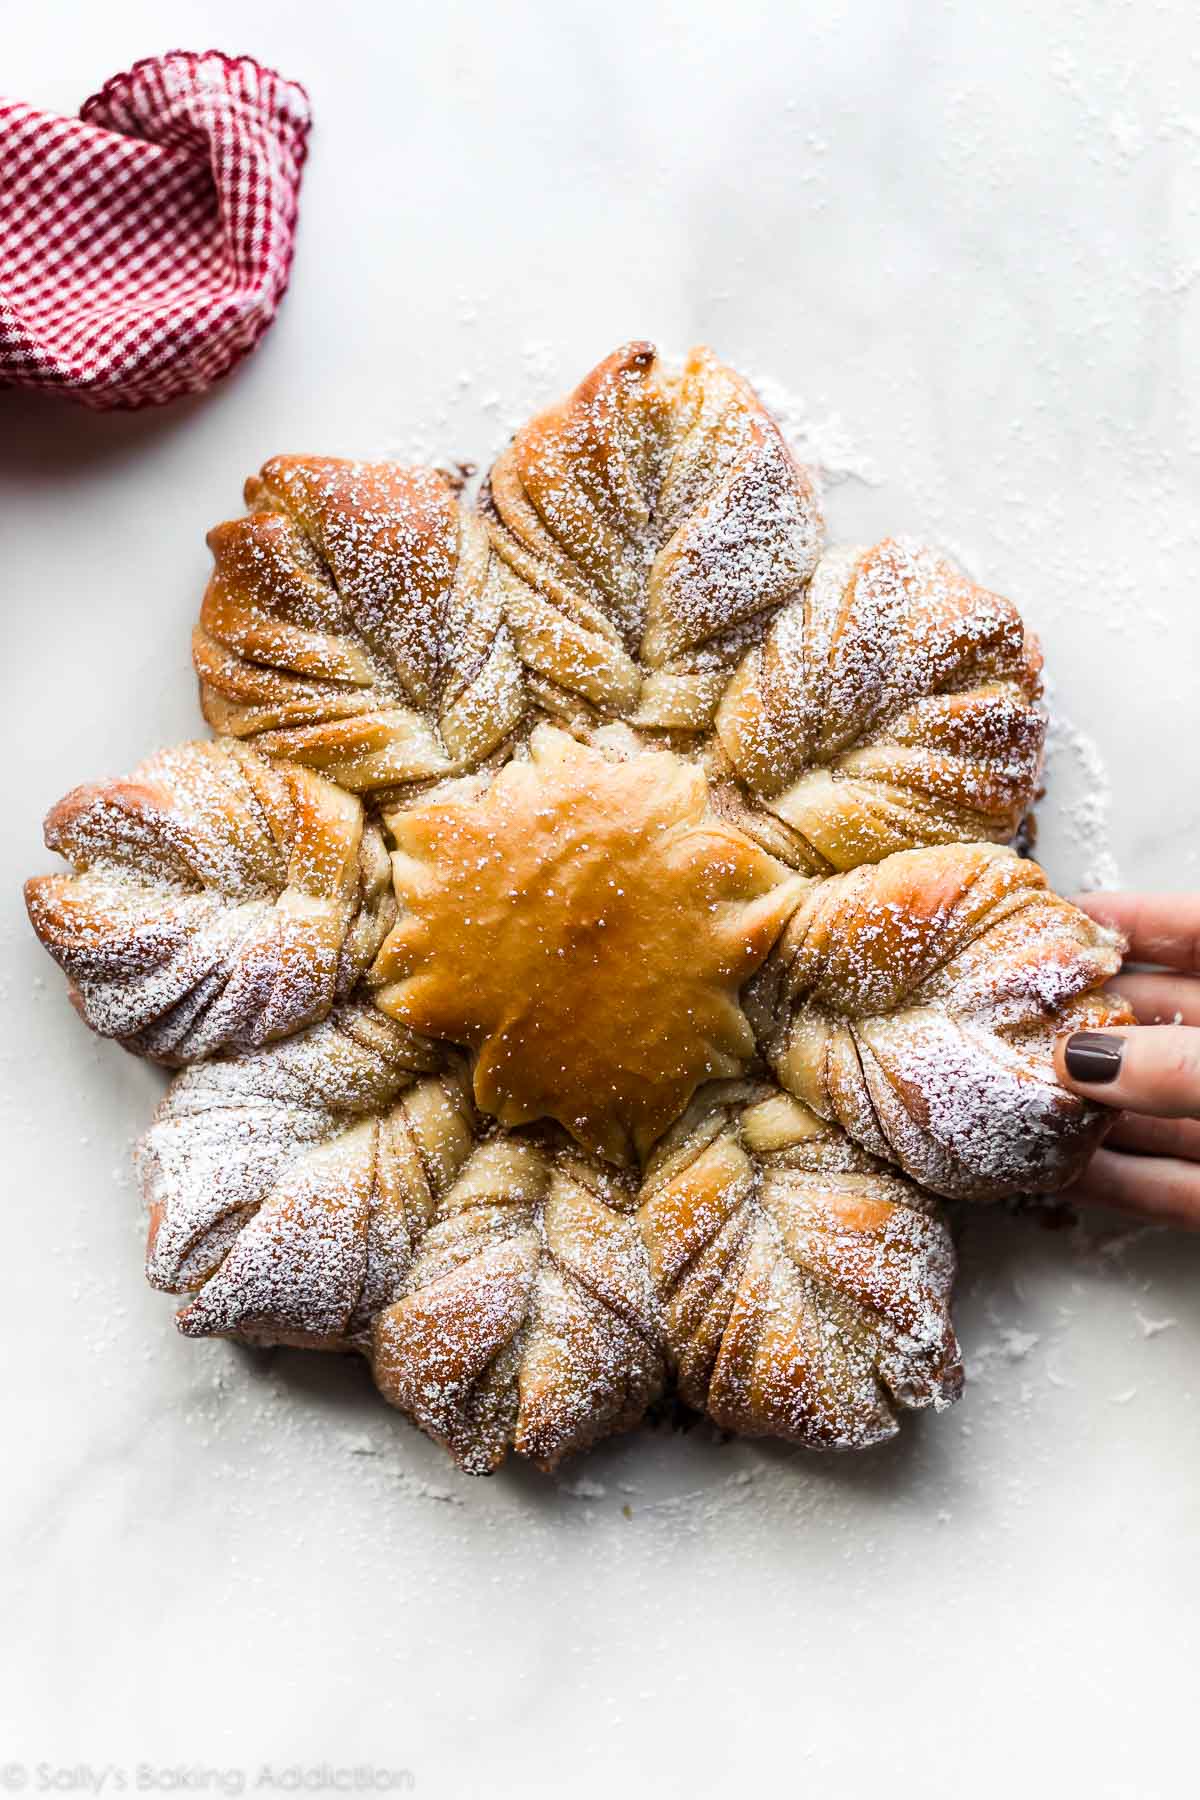
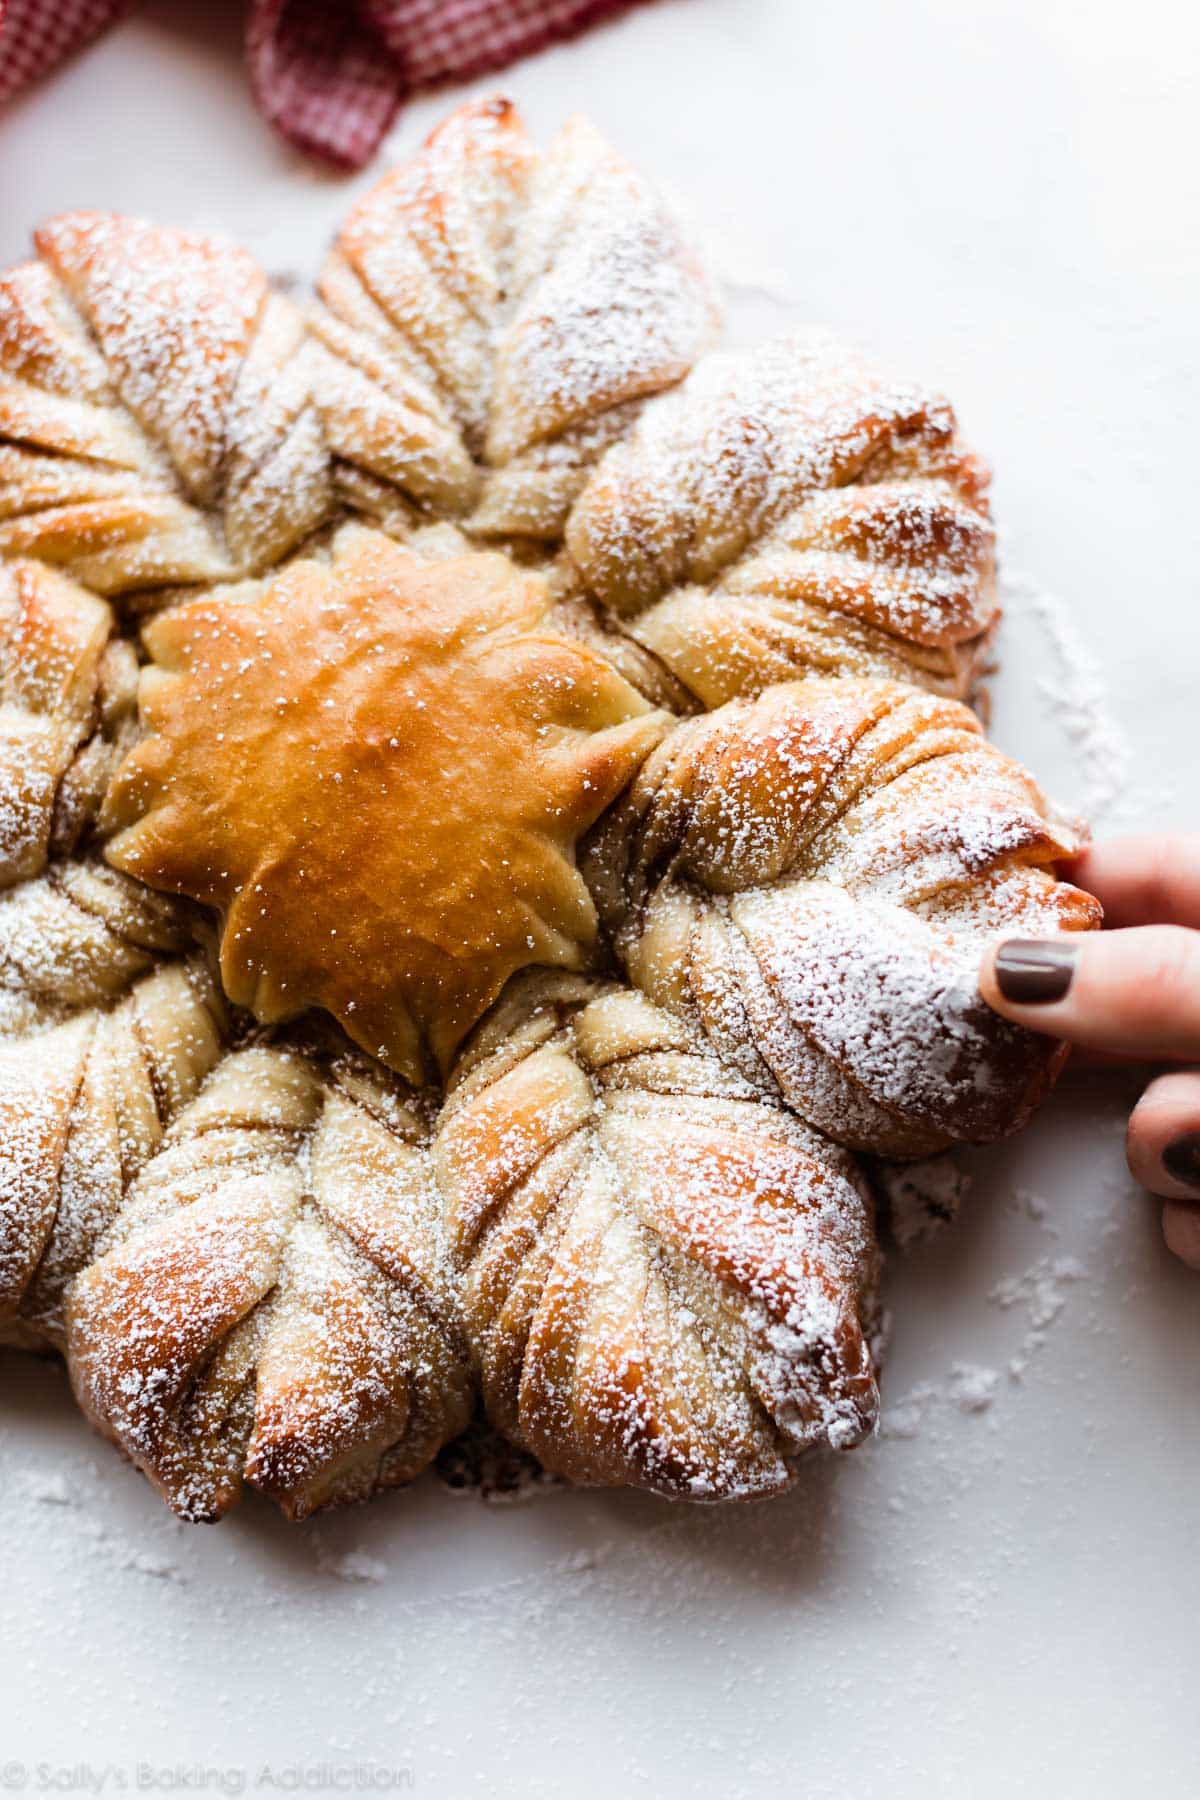
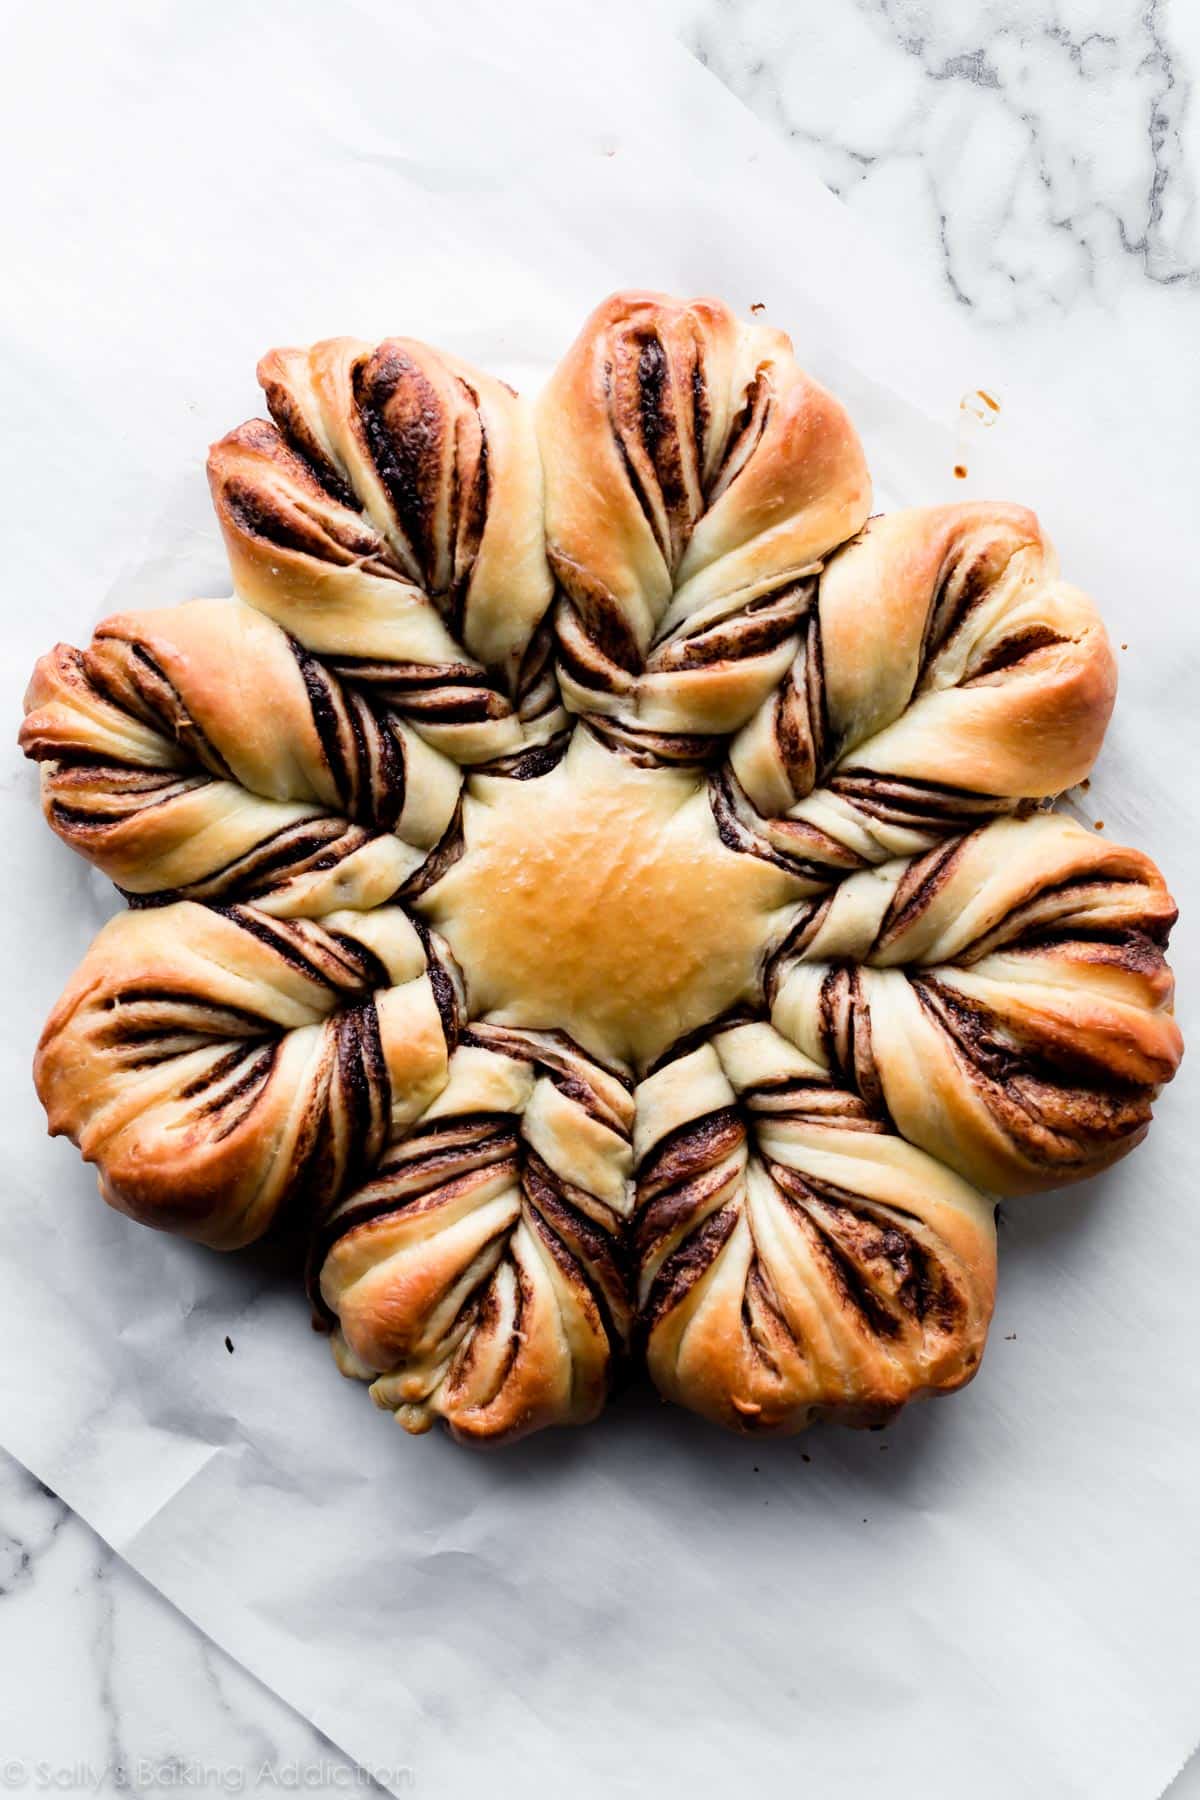
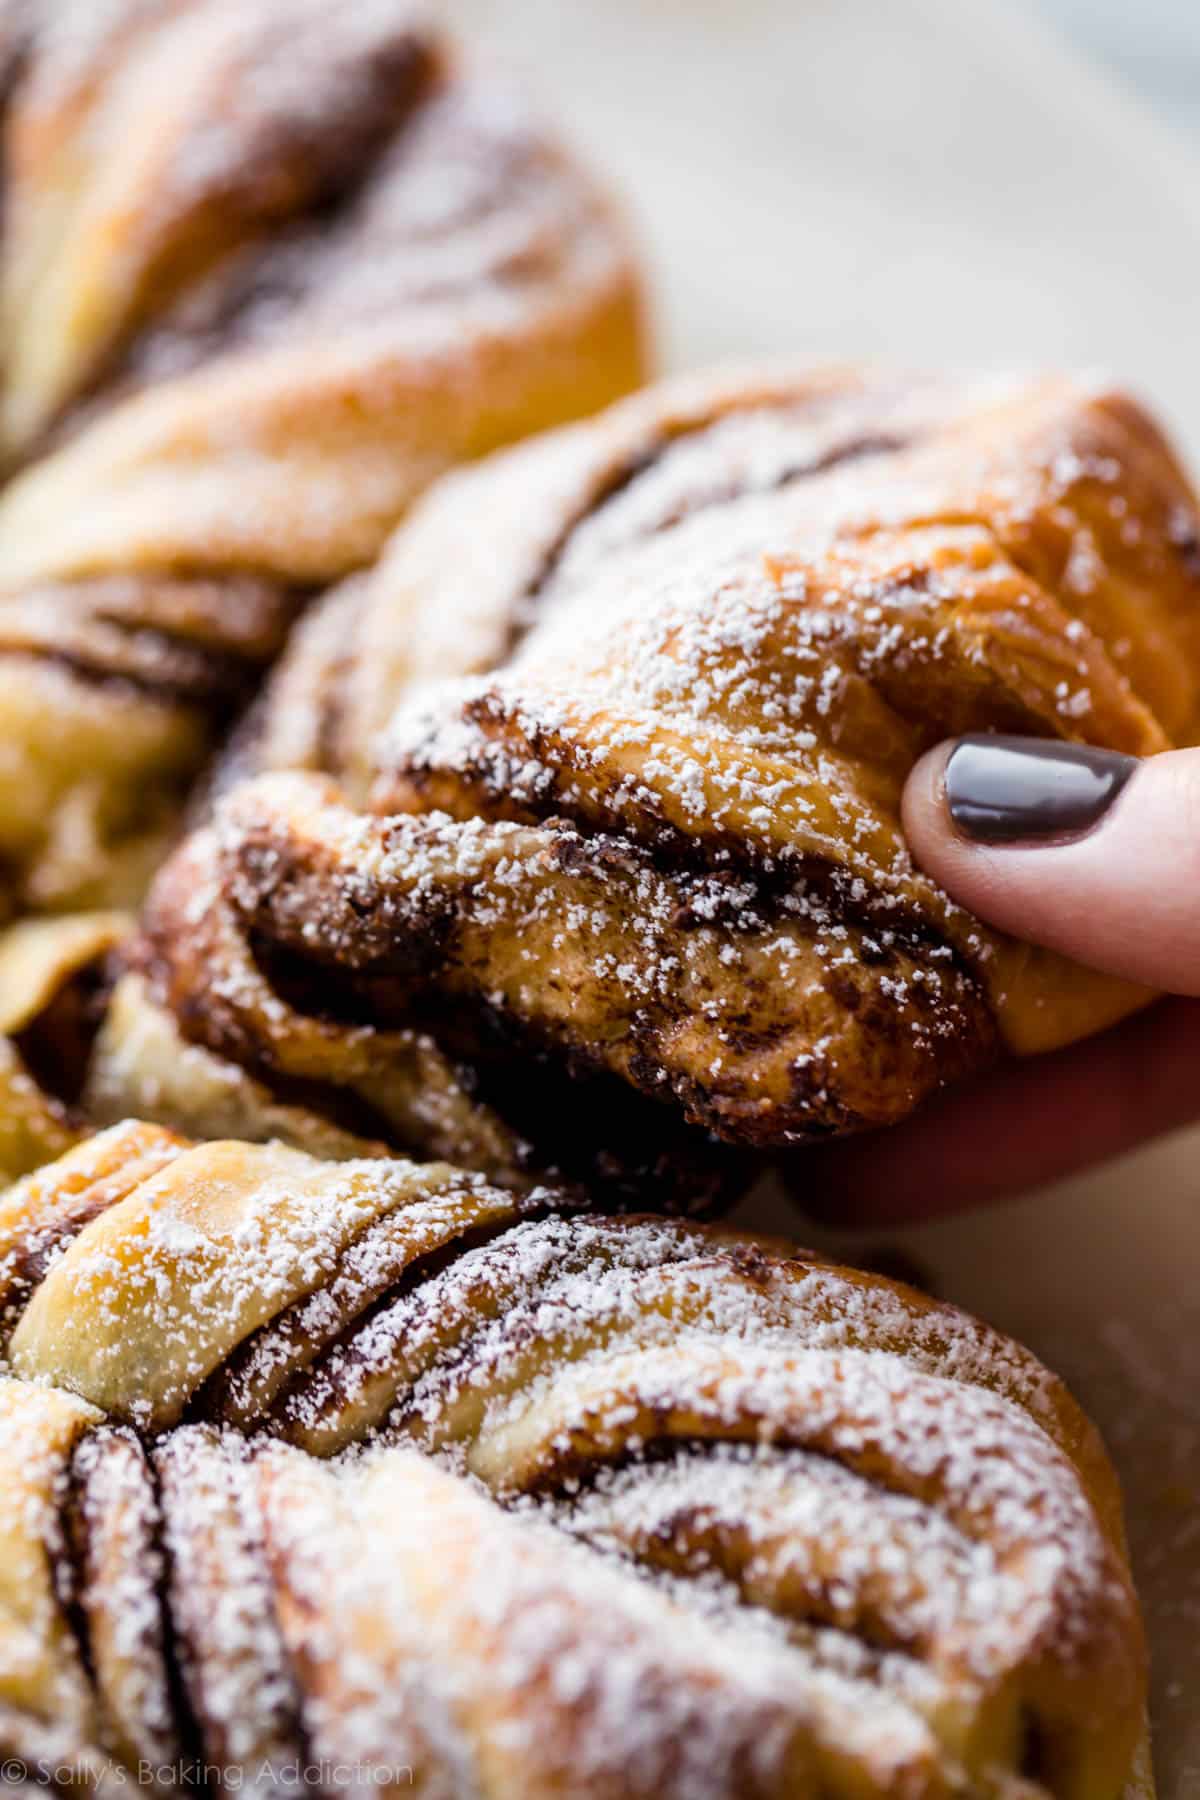
Pictured today is a Nutella star bread and cinnamon sugar star bread. There’s many options when it comes to fillings, but the most important thing to remember is to top each layer lightly. If you go too heavy on the filling, it will spill out everywhere.
- cinnamon sugar
- nutella
- your favorite jam
- butter + brown sugar + crystallized ginger (this is how we made it in Kansas!)
- apple butter or pumpkin butter
- chai spice
- butter + cinnamon sugar + walnuts + dates
- cinnamon sugar + orange zest + fresh or dried cranberries
- savory such as pesto, tomato sauce, cheese, herbs, etc
*Make sure any chunks are very finely chopped.
Isn’t the Nutella star bread pretty? Reminds me of Nutella babka, but easier to shape. Obviously the Nutella variation was very good, but the cinnamon sugar star bread was pure comfort food. Paired with a buttery soft dough, you can’t go wrong with any filling.
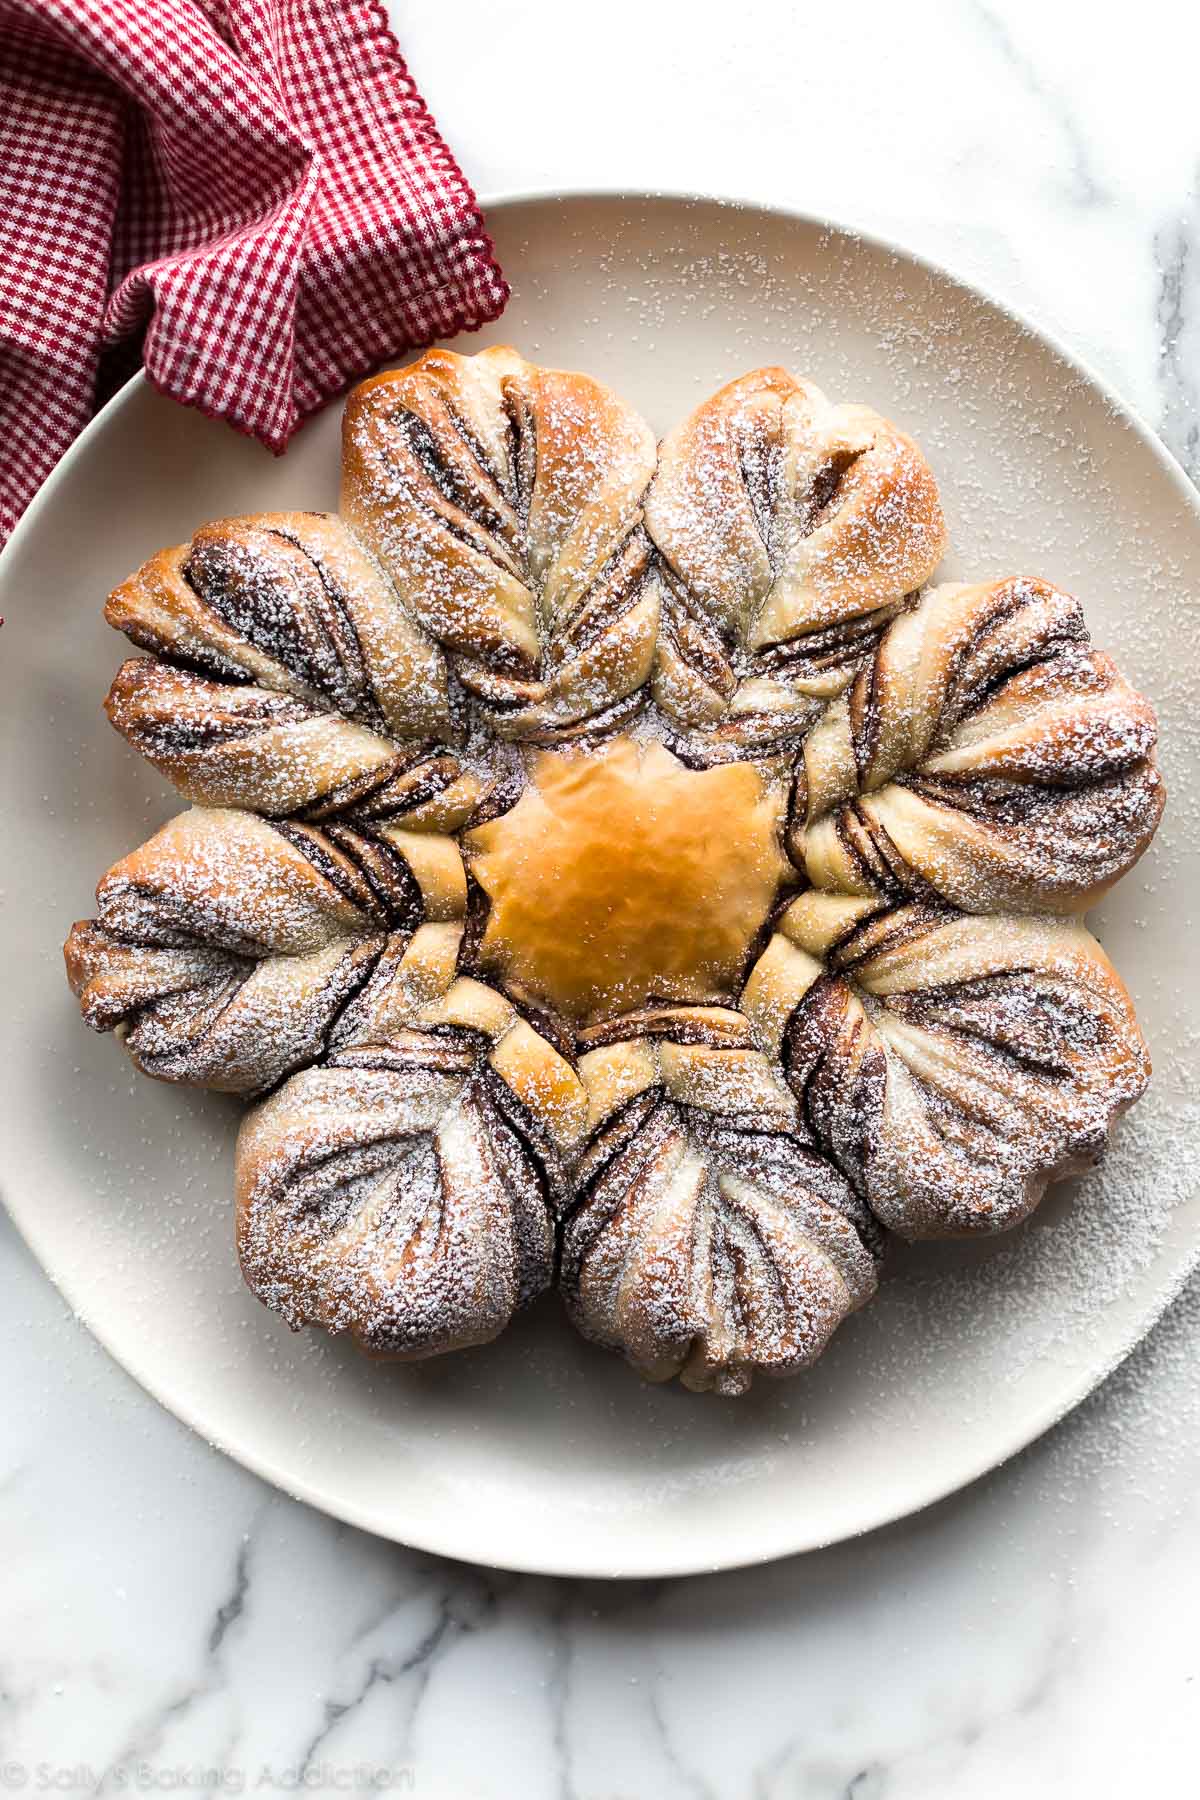
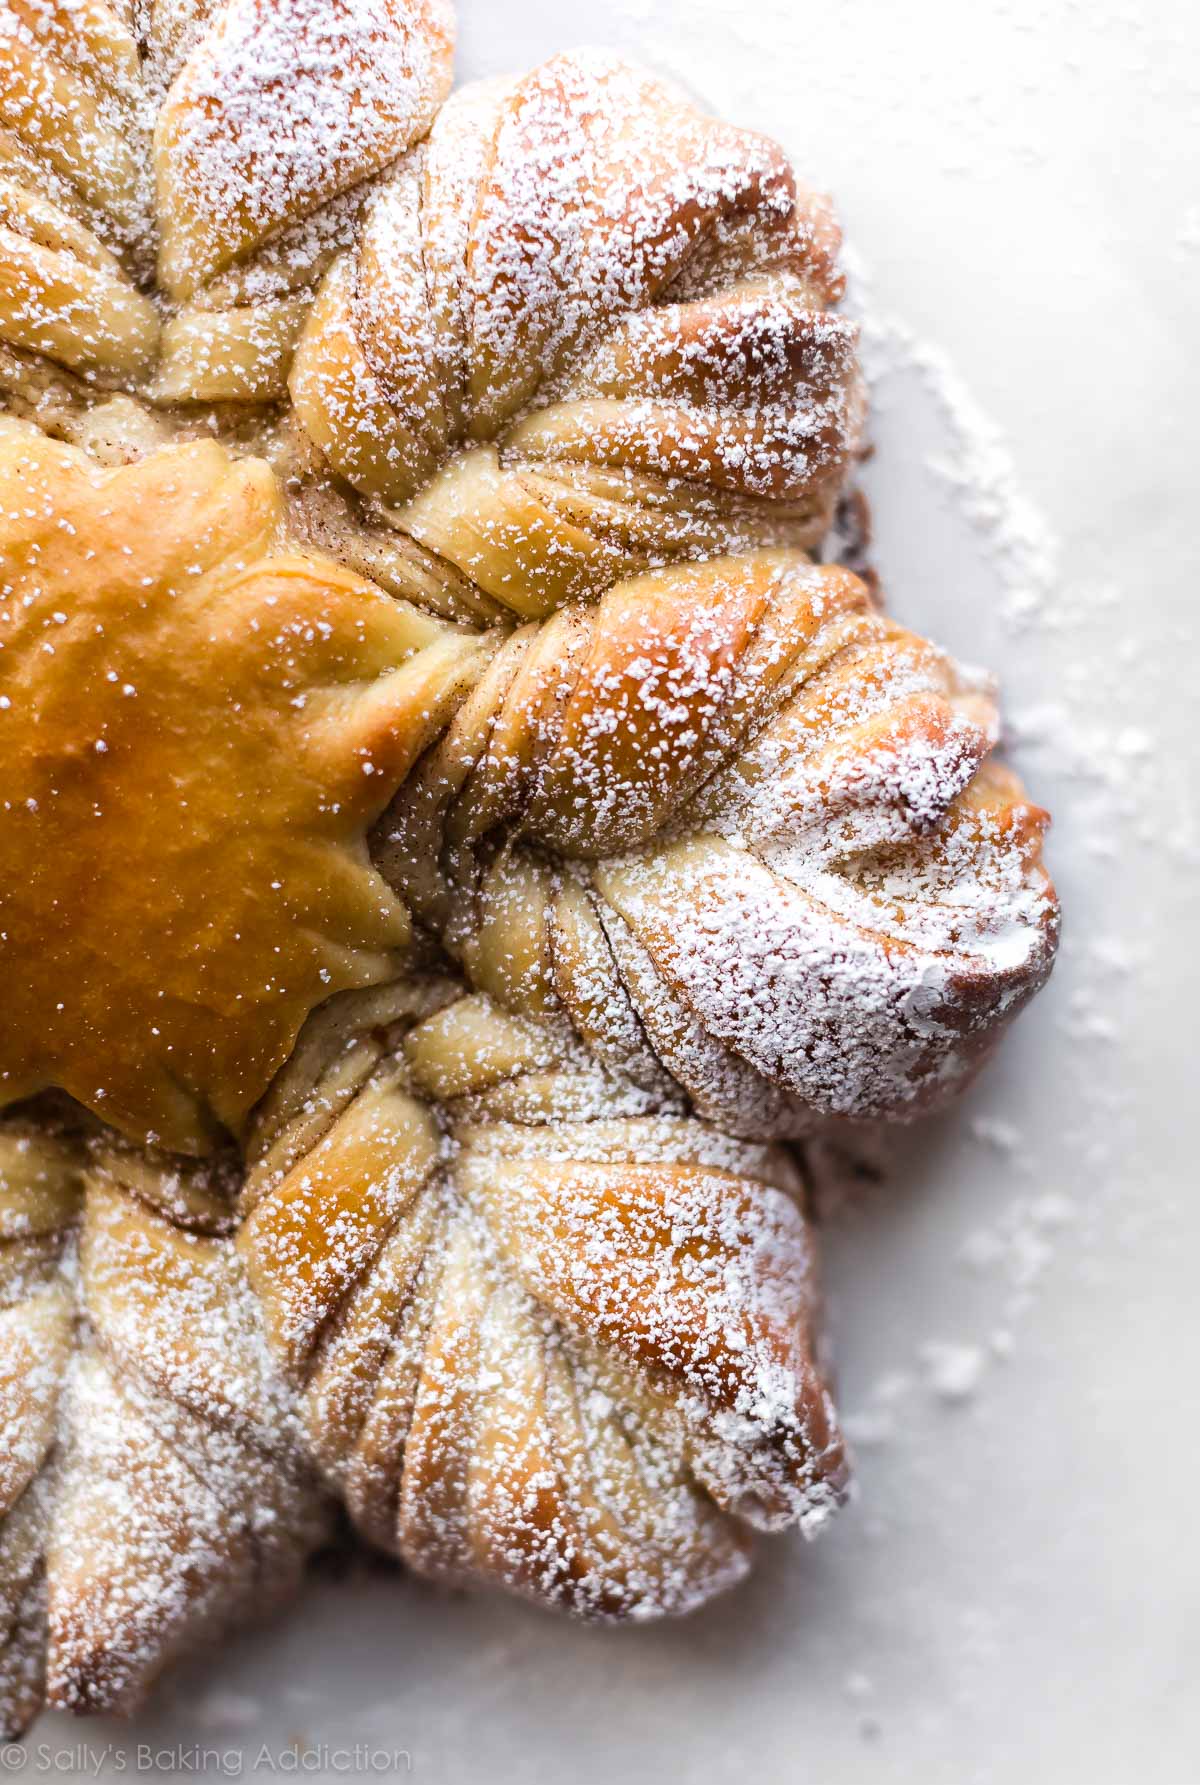
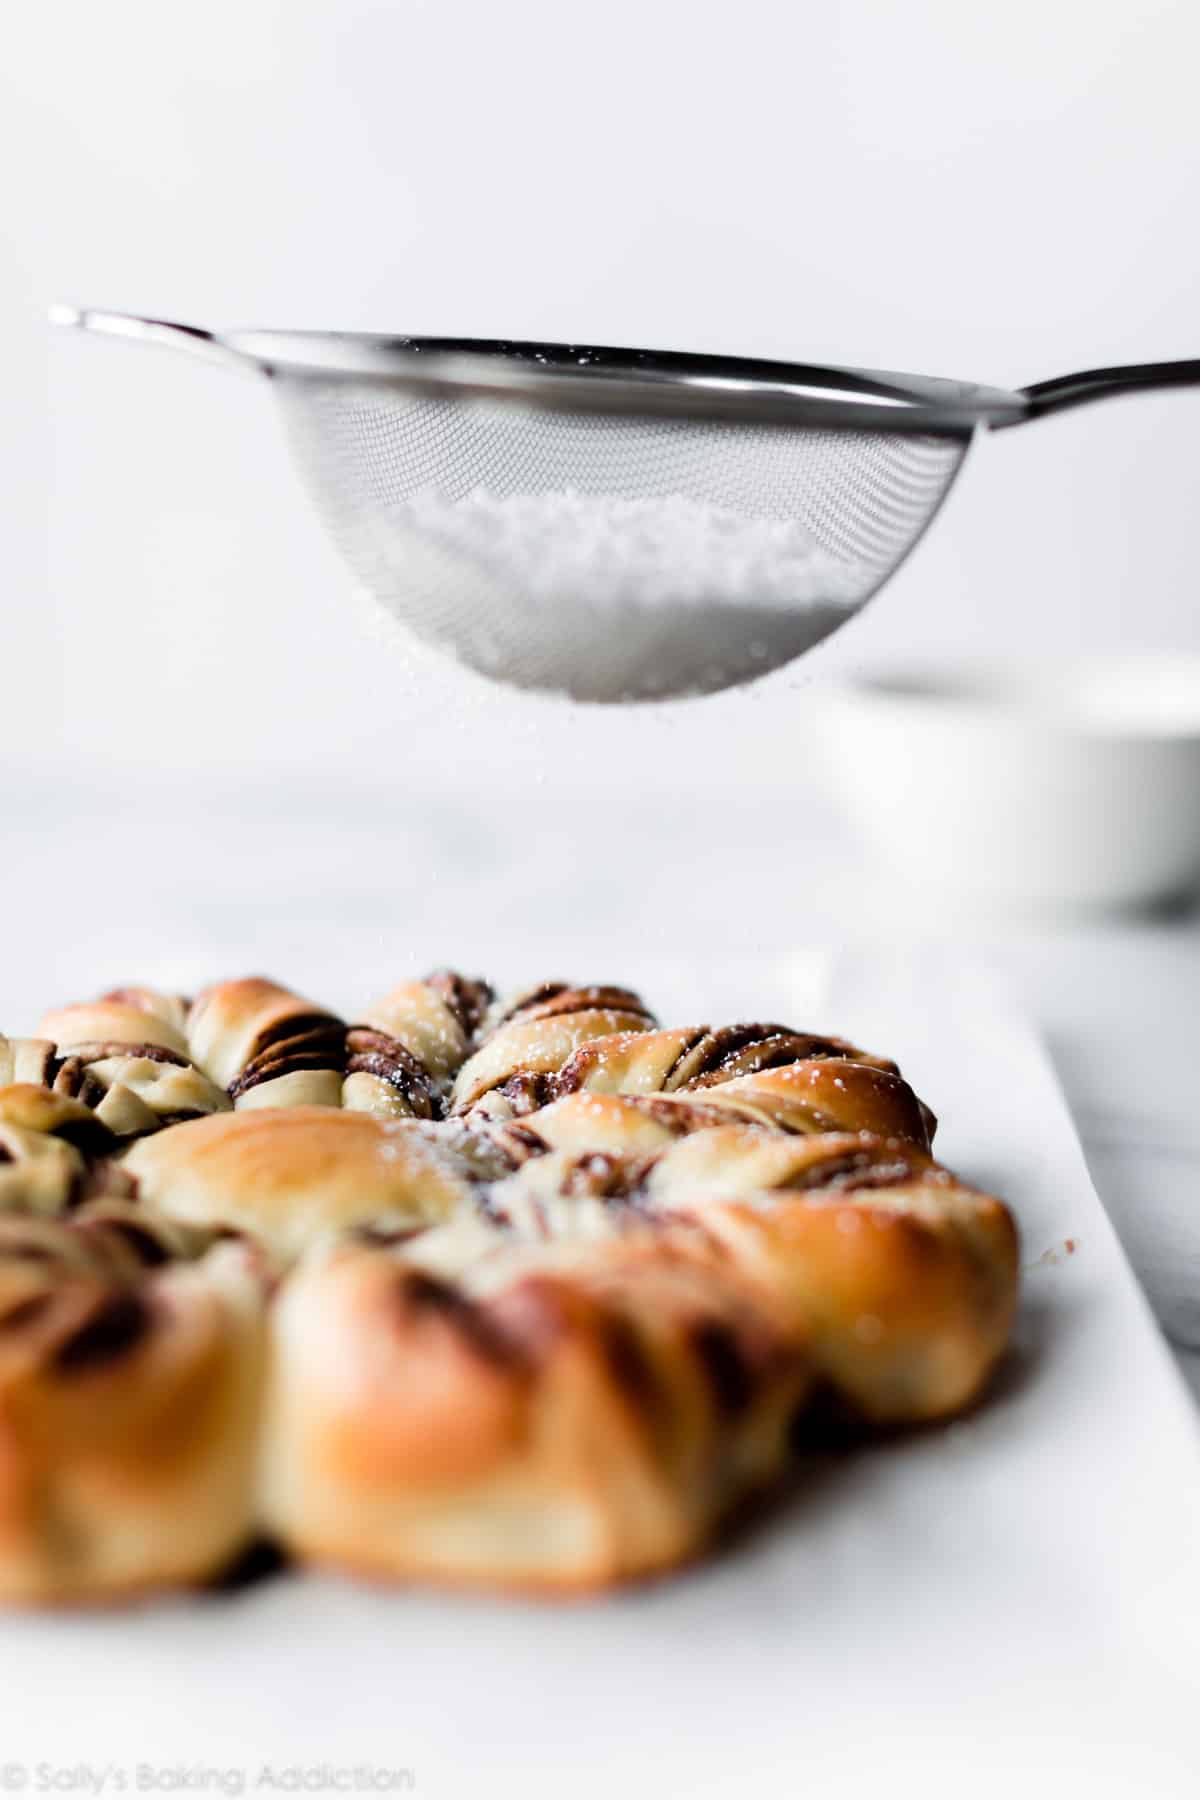
A dusting of confectioners’ sugar completes the star. Looks like a snowflake, doesn’t it? You could also drizzle some vanilla icing on top, raspberry twist bread style.
Be the *star* of your holiday get togethers with this easy star bread recipe!
(So corny, I couldn’t help myself.)
Make Ahead Options
- Refrigerate dough for up to 1-2 days. Prepare bread dough through step 3 below. After it has risen, punch the dough down to release the air bubbles. Cover the dough tightly, then place it in the refrigerator for up to 2 days. When ready, remove the dough from the refrigerator and let it sit on the counter, uncovered, for 20 minutes. Punch the dough down again to release any air bubbles. Then, continue with step 5 below.
- Freeze dough for up to 3 months. Prepare bread dough through step 3 below. After it has risen, punch the dough down to release the air bubbles. Cover the dough tightly, then place it in the freezer for up to 3 months. When ready, thaw the bread overnight in the refrigerator. Remove the dough from the refrigerator and let it sit on the counter, uncovered, for 20 minutes. Punch the dough down again to release any air bubbles. Then, continue with step 5 below.

Star Bread
- Prep Time: 2 hours, 30 minutes
- Cook Time: 30 minutes
- Total Time: 3 hours
- Yield: serves 8
- Category: Bread
- Method: Baking
- Cuisine: American
Description
Watch the video tutorial (below) before beginning so you can easily shape this star bread masterpiece. What I love most about this homemade bread recipe, besides its ability to impress EVERYONE, is that the rise times have been reduced. If the bread rises for too long, it could lose its shape. I love a shortcut recipe!
Ingredients
- 2 teaspoons instant or active dry yeast*
- 3 Tablespoons granulated sugar
- 3/4 cup (180ml) whole milk
- 1/4 cup (4 Tbsp; 56g) unsalted butter, softened to room temperature
- 1 large egg
- 2 and 1/3 cups (291g) all-purpose flour (spooned & leveled), plus more as needed
- 1 teaspoon salt
- filling (see recipe note)
- egg wash: 1 large egg beaten with 1 Tablespoon (15ml) milk
- 2 Tablespoons confectioners’ sugar
Instructions
- Make the dough: Place the yeast and sugar in the bowl of a stand mixer fitted with a dough hook or paddle attachment. Or, if you do not own a stand mixer, a regular large mixing bowl. Heat the milk on the stove or in the microwave until warm to touch, about 110°F (43°C). Pour warm milk on top of yeast/sugar. Whisk gently to combine, then loosely cover with a clean kitchen towel and allow to sit for 5-10 minutes. The mixture will be frothy after 5-10 minutes.
- If you do not have a mixer, you can mix by hand in this step. Add the butter, egg, flour, and salt. Beat on low speed for 3 minutes. Dough will be soft. Using lightly floured hands, form it into a ball. If the dough is too sticky to handle, add 1-3 more Tablespoons of flour, but you want a very soft dough.
- Place the dough in a greased bowl (nonstick spray is fine) and cover with plastic wrap or aluminum foil. Place in a slightly warm environment to rise until doubled in size, around 60-90 minutes. For this warm spot, I suggest using the oven. Preheat to 150°F, then turn the oven off after preheating. Place the covered bowl inside and shut the oven door. This is your warm environment.
- Prepare filling: Line a large baking sheet with parchment paper or a silicone baking mat and prepare your star bread filling. See all my options in the recipe notes below.
- Assemble the bread: Watch the video above to guide you through this step. Punch down the dough to release the air. Place dough on a lightly floured work surface. Divide into 4 equal pieces and, with a floured rolling pin, roll each out into a thin 10-inch circle. Place the bottom circle on prepared baking sheet. If it lost its circle shape, use your hands to form the edges back into a round shape. Top with filling, then layer the remaining circles and filling on top. The top layer does not have filling on it, so only 3 of the 4 circles will be topped with filling. Using a sharp knife or pizza cutter, cut any scraps around the edges so you have an even circle. Place a 3 inch round object or bowl in the center and make an indent. This is the center of the star. Now it’s time to cut strips from the edge to the center 3-inch circle. Using a pizza cutter, cut 16 even strips. Using both hands, grab two strips and twist them away from each other twice, then press the two ends together to make a point. Your star bread will have 8 points.
- Cover the shaped bread with plastic wrap or aluminum foil and let it rest for 20 minutes.
- Preheat oven to 350°F (177°C).
- Bake the bread: Using a pastry brush, lightly brush the star bread with egg wash. This ensures a beautifully shiny golden brown bread. Bake for about 25- 30 minutes or until golden brown on top. If you notice the top or points browning too quickly, loosely tent the star bread with aluminum foil. Remove from the oven and cool for 5 minutes.
- Dust confectioners’ sugar on top and enjoy warm. Cover and store leftover star bread at room temperature for 1-2 days or in the refrigerator for 4-5 days.
Notes
- Make Ahead Instructions: Refrigerate dough for up to 1-2 days or freeze up to 3 months. Prepare bread dough through step 3 below. After it has risen, punch the dough down to release the air bubbles. Cover the dough tightly, then place it in the refrigerator for up to 2 days or in the freezer for up to 3 months. When ready, thaw the bread overnight in the refrigerator. (If frozen.) Remove the dough from the refrigerator and let it sit on the counter, uncovered, for 20 minutes. Punch the dough down again to release any air bubbles. Then, continue with step 5. I do not recommend shaping the star bread and refrigerating overnight. Letting the shaped bread sit in the refrigerator overnight risks over-rising and losing its shape.
- Special Tools (affiliate links): Stand Mixer or Large Mixing Bowl and Wooden Spoon/Silicone Spatula | Whisk | Baking Sheet | Silicone Baking Mat or Parchment Paper | Rolling Pin | Pizza Cutter | Pastry Brush
- Yeast: I always use Red Star Platinum yeast, an instant yeast. If using active dry yeast, the rise times could be slightly longer. Reference this Baking with Yeast Guide whenever you work with baker’s yeast. I include practical answers to all of your common yeast questions.
- Layers: The top layer does not have filling on it, so only top 3 of the 4 shaped circles.
- FILLINGS:
Cinnamon Sugar: Spread 1 Tablespoon of very soft unsalted butter onto each of the 3 circles. (3 Tbsp total.) Mix 1/4 cup (50g) granulated sugar with 1/2 teaspoon ground cinnamon. This is the total amount and you will divide it between each circle. Sprinkle evenly over butter on each circle.
Nutella: Spread 1 heaping Tablespoon of Nutella onto each of the 3 circles. Nutella is difficult to spread onto soft dough, so warm it up in the microwave for a few seconds until it’s a spreadable consistency.
Your favorite jam: Spread 1 Tablespoon of jam onto each of the 3 circles.
Butter, Brown Sugar, + Ginger: Spread 1 Tablespoon of very soft unsalted butter onto each of the 3 circles. Mix 3 Tablespoons packed light or dark brown sugar with 1/2 teaspoon ground cinnamon and 1 Tablespoon finely chopped crystallized ginger. Sprinkle evenly over butter on each circle.
Apple Butter or Pumpkin Butter: Spread 1 heaping Tablespoon onto each of the 3 circles.
Chai Spice: Spread 1 Tablespoon of very soft unsalted butter onto each of the 3 circles. Mix 3 Tablespoons granulated sugar with 1/4 teaspoon each ground cinnamon, ground ginger, ground cardamom, and ground allspice. Sprinkle evenly over butter on each circle.
Butter + Cinnamon Sugar + Walnuts + Dates: Spread 1 Tablespoon of very soft unsalted butter onto each of the 3 circles. Mix 3 Tablespoons packed brown or granulated sugar with 1/4 teaspoon ground cinnamon, and 2 Tablespoons each finely chopped walnuts and pitted dates. Sprinkle evenly over butter on each circle.
Cinnamon sugar + Orange Zest + Fresh or Dried Cranberries: Spread 1 Tablespoon of very soft unsalted butter onto each of the 3 circles. Mix 3 Tablespoons packed brown or granulated sugar with 1/4 teaspoon ground cinnamon, 2 teaspoons orange zest, and 3 Tablespoons finely chopped fresh or dried cranberries. Sprinkle evenly over butter on each circle.
Savory: Reduce sugar in the dough to 1 Tablespoon. Spread 1 heaping Tablespoon of tomato sauce or homemade pesto onto each of the 3 circles. Top each with a light layer of shredded cheese, herbs, and/or chopped pepperoni.
Method taught by master baker Zoe Bakes!


Reader Comments and Reviews
Sally~ you forgot the best filling! I used almond paste crumbled very finely over each layer. SO delicious. Thanks for the recipe. I’ve used many of your recipes over the past few years.
This turned out beautifully! It was so fun to make and it’s even better to eat. I made a cranberry orange jam for the filling. I put way more jam than you’re probably supposed to, but I want jam in every bite! Highly recommend this recipe to impress guests or try something new. Do allot a few hours to make, assemble, and bake though! Can’t wait to make another.
Great tutorial and fairly easy for such impressive results. i weigh all my ingredients and did have to add about 1 tablespoon more flour to the dough. I will make again and again!!
tried this for a family party and it was great! i was wondering if anyone knew how many calories were in each serving?
Made this recipe for the first time today. So good yet simple ! I am going to make it again this week !
I made this bread twice so far – once on my own and the other time with my daughter (little helper). I was so intimidated making this bread at first. Does take a little bit of skill but definitely doable! Best eaten the same day as it was made. Highly recommend!
This bread is absolutely GORGEOUS!!! It is SUPER simple and easy t make. Thanks Sally for yet another great recipe!
This was my first attempt at bread & I was doubtful I would succeed. But with the easy to follow & detailed guide + video, it turned out perfect!! My family absolutely loved it! You got me hooked on bread making now. Hoping to try your cheese bread recipe soon!
hi lovely sally,i was wondering if i can eliminate sugar and spread Mince Meat between layers??you think this work???
Sally! I did it! I cannot thank you enough for making me feel so accomplished while trying to get through this difficult time. Your star bread has been on my list and I made it and it looks amazing! I did have a bit of a difficult time shaping the first 2 layers (it was really elastic and kept snapping back) and had to add probably more flour than I should have. By the 3rd layer, the dough was a bit more compliant. I only had 1% milk but I did have milk powder which I mixed with water for the yeast. I wonder if that had anything to do with it? No matter…I look so fancy!! Tagged you on instagram…hope you see it!
This looks amazing. I am going to give it a try, but I was wondering how to go about maybe using ham and cheese?
It should work if you chop up the ham. See my recipe notes for a savory version.
Hi! I’ve made this a few times with your suggested fillings with good results. I’d really like to make a spring version with a lemon blueberry filling, and have a lemon blueberry curd recipe I’ve made before and loved, but I’m worried it would be too wet as a filling… Do you think it’d be workable in something like this if I did a thin layer, or am I better off with a lemon blueberry jam?
That sounds delicious! Curd can be pretty thick so it’s difficult to say without knowing what recipe you are using. In my Lemon Curd recipe I give a tip in the notes section at the end on how to make it thicker – perhaps you can use that same trick with your recipe.
This is our first recipe from your blog we made today, I had my partner helping me make this desert to show him how easy it is to follow your blog. We had fun making this dish, we ended up making it with brown sugar & apple pie spice with chopped pecans. We reduced salt to 1/4 tsp to have my mom have it with strict sodium diet. This desert is very great wow factor, nice and light desert.
I have been getting my partner to learn how to cook and bake. In September my partner had taken a 12 week basic cooking course to learn basics in kitchen. I sent the instructor a picture of our desert. she said “You two are amazing! Bread looks fabulous”. she enjoys seeing pictures of product he has made.
I was telling my mom about your blog, I said that this is going to be my favourite blog to make new recipes. Next Bread will make is Monkey Bread & Cheese Bread
Your new friends from Canada!
Sally, this recipe is a wonder. I made it today and it’s so good I actually laughed after my first bite. Absolutely delicious! And surprisingly easy!
If using my KitchenAid mixer, how long do I knead the dough & on what speed? Just a little new to this. Thanks!
Hi Paige! Beat on low speed for 3 minutes.
Made this for a Christmas party and it turned out just amazing! The star bread looks so pretty that you can almost pass off for an experienced bread baker, all thanks to Sally’s easy instructions! I doubled the recipe and made 2 star breads, one with cinnamon sugar and the other with pesto and cheese. Both tasted just great! Thank you Sally!
This was BEAUTIFUL! Sally has taught me all I know about baking difficult things and I love her for it! I can’t believe how wonderful this recipe is! I made my dough the night before, put it in the fridge and then let it rest uncovered for 20 minutes (per Sally’s instructions) and it turned out LOVELY!
2 revisions that I might note:
1. When assembling the bread, place the bottom circle on parchment paper, so it is easy to transfer to the baking sheet (the recipe doesn’t say this but got the tip from Sally’s video:)
2. In the, “How to Make Star Bread in 4 Easy Steps” it says: “There will be 4 layers of dough and 4 layers of filling.” This is incorrect. In the recipe, it says that there will be 4 layers of dough and 3 layers of filling. Just in case anyone gets confused:)
Thanks for making this Christmas so special Sally!
I have made this probably 4 or 5 times, once as a savory version. Today, was a total, success! I used 3 tbls less milk, which I had already taken out, before I started and only needed 1 tbls extra flour. The dough was never this easy to work with. I don’t have a lot of counter space, so it’s hard to roll out the discs. Today, for more room, “sanitized” my dining room table and ended up with plenty of room to roll, into the thin layers, for the first time. The filling is butter, cinnamon/sugar and some homemade strawberry/peach/mango jam I made a few months ago.
Again Sally, thanks for a great recipe. Merry Christmas to you and your family.
Thanks for an excellent recipe. I used the “make ahead” version with cinnamon filling and it was great. I have made the King Arthur version of this recipe and your dough is both easier and tastier. I’ll be using this recipe from now on.
Sally do you put 1/4 C. of sugar and cinnamon on each layer or is that divided between the layers?
Hi Ann! That’s divided between each layer.
Hi Sally! I just made this for the first time (trial run for Christmas Day) and it’s amazing! My husband teenage boys devoured it in less than 10 minutes and only left me a little piece but it was delicious. I can’t believe how easy it actually was, thanks to your video. I can’t wait to try a savory version next time!
Hi Sally!
I love this recipe and have made it multiple times!
I would like to make it again for a holiday party this weekend and was wondering what you might recommend regarding baking it ahead of time. I will be driving for 1.5 hours with it and was wondering whether I should let it rest in the car before baking and bake it there or bake it before leaving and quickly heat it up again when I get there?
Thank you!
After your dough is shaped, it only needs to rest for 20 minutes. I recommend baking it before you leave and if you wish to serve it warm you can certainly warm it back up when you arrive.
Looks so soft and fluffy! This would be perfect to take to an office holiday potluck. A few questions: 1) Would this be all right to bake the night before and then bring the next day to serve at room temperature? 2) What’s the best way of storing this bread since it’s sort of an unwieldy shape – saran wrap? Foil? 3) I adore both Nutella and cinnamon sugar – would it be feasible to alternate the fillings between the 3 layers (i.e. 1 layer butter/cinnamon sugar, 1 layer Nutella, 1 layer butter/cinnamon sugar), or would that make the appearance look wonky?
This would be a total hit at your office potluck! To answer your questions- 1) serving at room temperature is perfectly ok! 2) tightly wrap with plastic wrap (I usually put it on a serving plate and wrap that all really tightly together) and 3) love that idea!
Hello!
What filling would go best with a caramel drizzle on top for this sweet bread?
I recommend the Nutella, chai spice, pumpkin butter, apple butter, or cinnamon sugar.
100%. Thank you Sally!
Fabulous recipe – tasted amazing and looks stunning!
I have one question though – after mixing the dough you say in the video “using lightly floured hands form the dough into a ball”. For me the dough at this stage is so sticky there is no shaping happening! Do you mean we need to work the dough (in the bowl) very gently until it becomes less sticky and will form a ball?
Thanks so much, absolutely love your recipes.. I’ve tried several and they never fail!!
Hi Vivian, I’m so glad you enjoyed this recipe! If the dough is too sticky to handle at that stage you can add 1-3 more Tablespoons of flour, but you do want a very soft dough!
My mouth is getting watery.
This is going to taste delicious.
I’m so going to make this.
Is going to be the most hardest thing I’ve ever made but… I can do it.
Thank you Sally
I want to try this recipe but I’m not sure if I understand correctly, when you say ‘1 Tablespoon of very soft unsalted butter onto each of the 3 circles.’, is it 1 tbsp of butter total, or for each circle?
1 Tablespoon on 3 dough circles, so 3 Tablespoons total.
I made this vegan this and it was amazing! My son has a dairy and egg allergy, so I used an egg replacer, Earth Balance “butter,” and plain unsweetened almond milk. Honestly, I didn’t have high hopes with all the changes, but it was heavenly! Tasted just as good as the non-vegan version, made it with apple butter and some cinnamon sugar. So so good, Sally, like always!
This was fantastic, clear instructions and people were amazed that I could make something so beautiful!
I made some minor mods for a person with anaphylactic allegories to milk and eggs, and it’s a delicious vegan treat!
Thank you so much!
Ooh, how did you modify it? My son has an egg and dairy allergy, so I would love to hear what worked for you.
I use Becel Vegan margarine to replace the butter, and for the egg I use this:
1 teaspoon baking powder
1.5 tablespoons water
1.5 tablespoons canola oil
That should replace one egg.
Some cooks have said to mix them separately from the main recipe, but I’m lazy and dump it in.
Good luck!
I made this today with the help of my 4-year-old granddaughter. We used Nutella as the filling. The dough comes together quickly and is so easy to work with. I’ll definitely be making this again with lots of different fillings!!