

A summery twist on cinnamon rolls, these glazed strawberry rolls can be made ahead to save time in the morning.

Make-ahead strawberry rolls are on the menu this week and there’s no breakfast more tempting. The rolls are soft and fluffy with a homemade strawberry filling, topped off with a sweet and tangy lemon glaze that seeps into every crevice.
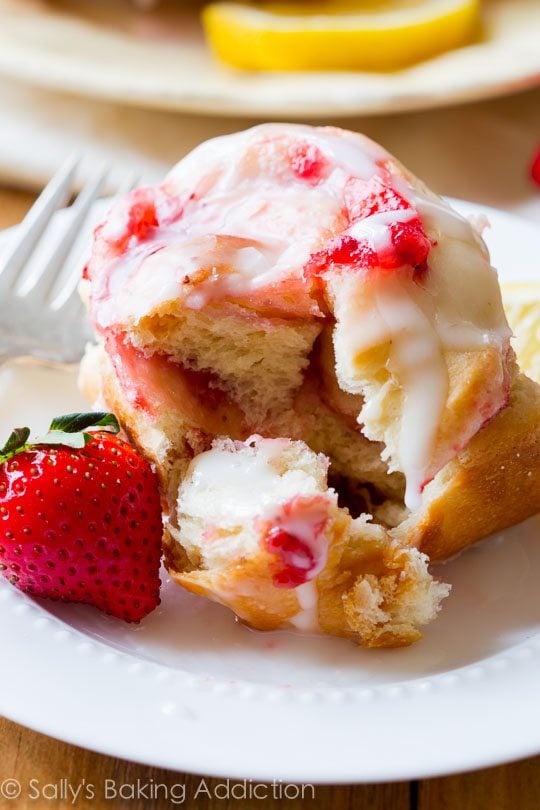
Everyone’s had cinnamon rolls before but how many of you can say you’ve had strawberry lemon rolls?! Consider these summer’s version of a cinnamon roll!
You may have already spotted this recipe on People a couple months ago. I first made them when the weather began warming up and have made them almost a half dozen times since. (We do not take weekend breakfast lightly in this house. Go BIG or go back to bed.) Oh, the best part! You can easily freeze the rolls and wake up to warm, gooey, soft, and sweet strawberry rolls in the morning. For freezing directions, see the recipe below.
A Few Quick Tips
I want everyone to make these rolls successfully because no one should be denied their sweeeeeet strawberry satisfaction! This recipe starts off as a regular yeasted roll. The importance of some dough ingredients:
Use whole milk for the best taste. Whole milk, with its creamy and thick texture, will produce the softest, fluffiest dough. Shocking, I know. 2% works, yes, but whole milk is best! I don’t recommend anything else.
Butter = flavor. You simply cannot create a buttery, tender dough like this without butter! Make sure it is softened. Not melted or cold. Softened to room temperature.
Eggs are everything in dough. Bread dough that is rich with eggs will rise very high because eggs aid in leavening. Not only this, the fat in the yolks help tenderize and lighten up the dough.


The strawberry filling is homemade. It’s the same filling I use for my strawberry shortcake cupcakes, only slightly scaled down. Nothing artificial or fake, just pure strawberry goodness. Shortcut tip: you can use your favorite strawberry jam or preserves if that’s more convenient. And if you’re short on time, try this filling with my no yeast cinnamon rolls dough.
The glaze is all lemon, baby! These rolls are kind of like a big ol’ glass of strawberry lemonade. Only 1,000x better because it’s a doughy sweet roll. If lemon isn’t your fave, try the cream cheese icing from these overnight cinnamon rolls instead. If lemon IS your favorite, you must try my lemon sweet rolls—double the lemon flavor with lemon in the filling AND frosting. And don’t sleep on blueberry sweet rolls either! (–> Different dough recipe. Today’s dough, with two rises, is a little more tender!)

If you’re new to yeasted doughs, my Baking with Yeast Guide and How to Knead Dough tutorial may be helpful to review before beginning.
Print
Strawberry Rolls with Sweet Lemon Glaze
- Prep Time: 1 hour
- Cook Time: 25 minutes
- Total Time: 5 hours, 40 minutes
- Yield: 12 rolls
- Category: Breakfast
- Method: Baking
- Cuisine: American
Description
A summery twist on cinnamon rolls, these glazed strawberry rolls can be made ahead to save time in the morning.
Ingredients
Dough
- 1 cup (240ml) whole milk*
- 2/3 cup (135g) granulated sugar
- 1 and ½ Tablespoons (14g) active dry yeast (2 standard size packets)
- 1/2 cup (8 Tbsp; 113g) unsalted butter, softened to room temperature and cut into 4 pieces
- 2 large eggs, at room temperature
- 1/2 teaspoon salt
- 4 and 1/2 cups (563g) all-purpose flour (spooned & leveled), plus more for dusting/rolling
Filling
- 1 and 3/4 cups (222g) finely chopped strawberries*
- 1/3 cup (68g) granulated sugar
- 1 and 1/2 Tablespoons cornstarch
Lemon Glaze
- 1 cup (120g) confectioners’ sugar, sifted
- 2–3 Tablespoons (30-45ml) fresh lemon juice
Instructions
- Make the dough: In a small saucepan, warm the milk over low heat until lukewarm—about 95°F (35°C). Pour the warm milk into the bowl of a stand mixer fitted with the dough hook attachment (OR you can use a handheld mixer). With a spoon, manually stir in the sugar and yeast. Cover the bowl with a towel and let sit until the yeast is foamy, about 5-10 minutes. If the yeast does not dissolve and foam, start over with fresh yeast. On low speed, beat in the softened butter until it is slightly broken up. Add the eggs, one at a time, and then the salt. The butter won’t really be mixing into the mixture, so don’t be alarmed if it stays in pieces. On low speed, gradually add the flour. Once it is all added, beat on medium speed until a soft dough forms—about 4 minutes.
- Increase speed to medium-high and beat until the dough is soft and supple, about 6 minutes longer. If you do not have a stand-mixer with a hook attachment, knead the dough by hand in this step.
- Knead the dough: Keep the dough in the mixer and beat for an additional 5 full minutes, or knead by hand on a lightly floured surface for 5 full minutes. (If you’re new to bread-baking, my How to Knead Dough video tutorial can help here.) If the dough becomes too sticky during the kneading process, sprinkle 1 teaspoon of flour at a time on the dough or on the work surface/in the bowl to make a soft, slightly tacky dough. Do not add more flour than you need because you do not want a dry dough. After kneading, the dough should still feel a little soft. Poke it with your finger—if it slowly bounces back, your dough is ready to rise. You can also do a “windowpane test” to see if your dough has been kneaded long enough: tear off a small (roughly golfball-size) piece of dough and gently stretch it out until it’s thin enough for light to pass through it. Hold it up to a window or light. Does light pass through the stretched dough without the dough tearing first? If so, your dough has been kneaded long enough and is ready to rise. If not, keep kneading until it passes the windowpane test.
- Form the dough into a ball and transfer it to a lightly greased bowl. Cover the dough loosely with plastic wrap, a paper towel, or aluminum foil and let sit in a warm place until doubled in size, about 2 hours. Here’s what I do: turn the oven on to 200°F (93°C). Turn the oven off. Stick the covered dough inside the oven and allow it to rise in this warm environment.
- As the dough rises, make the filling: Warm the strawberries in a small saucepan over medium heat. Stir constantly for 4 minutes until the strawberries begin to release juices. Add the granulated sugar and cornstarch and continue to stir for another 2 minutes. The mixture will thicken. Remove from the heat, spoon into a heatproof bowl or container, and chill until ready to use. You do not want a warm filling as you spread it onto the dough.
- Grease the bottom of a 9×13-inch baking dish, then line with parchment paper. Turn the dough out onto a lightly floured work surface and, using a rolling pin, roll into a 12×18 inch rectangle. Make sure the dough is smooth and evenly thick, even at the corners.
- Spread the strawberry filling all over the dough. Tightly roll up the dough to form an 18-inch-long log. Cut into 12 even rolls (about 1.5 inches in width each). Arrange them in the prepared baking pan.
- Cover the rolls and allow to rise in a warm environment once again until the are puffy—about 1 – 2 hours (or overnight, see Overnight instructions.)
- After the rolls have risen, preheat the oven to 375°F (190°C). Bake for about 25 minutes, until they are golden brown. About halfway through the bake time, I like to cover the rolls loosely with aluminum foil so the tops don’t brown too much. Remove pan from the oven and allow to cool on a wire rack for about 10 minutes as you make the glaze.
- Make the glaze: Whisk the lemon juice and confectioners’ sugar together until smooth. Pour over warm rolls and serve.
- Cover leftovers tightly and keep in the refrigerator for up to 1 week.
Notes
- Make Ahead—Overnight Instructions: For the second rise in step 7, cover the sliced rolls very tightly and let sit overnight in the refrigerator. In the morning, remove from the refrigerator, keep covered, and allow to rise in a warm environment for 1 hour then continue with step 8.
- Make Ahead—Freezing Instructions: You can freeze cinnamon rolls for up to 3 months, and I recommend a few different methods for freezing cinnamon rolls. The first method is to freeze them after shaping, before they’ve had their 2nd rise (step 7). Thaw in the refrigerator overnight, then let rise for 1.5–2 hours at room temperature before baking. The second method is to par-bake the risen rolls for 10 minutes, let cool completely, then cover and freeze. Thaw in the refrigerator overnight, then let sit at room temperature for 30 minutes before baking. Finish baking for 15–20 minutes. You can also freeze fully baked cinnamon rolls. See How to Freeze Cinnamon Rolls for more details about all of these methods.
- Special Tools (affiliate links): Electric Mixer (Handheld or Stand) | Small Saucepan | 9×13-inch Baking Dish | Rolling Pin | Cooling Rack | Whisk
- Milk: Whole milk encouraged. 2% is fine, but whole milk is best with its higher fat content. For best taste and texture, I don’t recommend any other milk or milk substitutes.
- Strawberries: Fresh or frozen chopped strawberries work. Do not thaw first if using frozen.
- Reference my Baking with Yeast Guide for answers to common yeast FAQs.


Reader Comments and Reviews
I used my own cinnamon roll recipe but followed sallys strawberry filling recipe. I also spread cream cheese on the dough then the strawberries.
It was very messy, hard to keep the roll tight, aside from that theyre delicious.
The lemon glaze adds such a refreshing taste as well.
I love Sallys baking recipes, she’s the only one that I follow and I sell a ton of baked goods. Thanks Sally
i used the overnight method and my rolls appear to have risen in the fridge. should i still let them sit in a warm environment for an hour?
Hi Rachel, did they double in size or just get a little puffy? If they’re just a bit puffy, we’d still let them sit at room temperature for an hour.
Could I use part or all bread flour for a sturdier roll? I have a bunch of bread flour to use!
Hi Abigail, yes, you can. Using bread flour will yield a slightly chewier roll.
Not at all what I expected. First Sally’s Baking recipe used and doubt I’ll try another. Rolls had no flavor (needs more salt and more sugar), the filling was a stressful liquid nightmare, and baking time was inaccurate for me.
Thank you so much for the feedback, Betty. This is a recipe we are hoping to revisit this year. I appreciate you letting us know the particulars of how it turned out (and didn’t turn out!) for you.
This was the worst Sally’s recipe I’ve ever tried. 100% agree with the most recent comment. Followed the recipe to a T, and they were dry, tough and tasted more like a coffee cake. Super disappointed .
Hi Heidi, I really appreciate this feedback and it’s time I revisit this recipe to see how I can update and improve it. Your feedback is valuable, and I’m so sorry the recipe gave you so much trouble.
prob one of the only recipes on this site that I’ve ran into that is just terrible. The instructions were lackluster and there isn’t a video to clarify specific instructions. Maybe more experienced bakers can figure it out but I’ve made almost everything on this site with no issue, usually there are videos that help and a lot of recipes have much better pictures of the process. The pictures on this recipe just look AI with no instructions on the process.
Following the directions exactly gave me 7 extremely messy rolls that don’t hold together at all. Everything else I make following directions on this site turn out great, it’s just this recipe. I think maybe a video or pictures of the actual process would help.
Hi Isabella, thank you so much for the feedback. This recipe is quite old and you’re right, as time has gone by, there have been better photos, more step-by-step photos and directions, as well as videos. This one is on my list to update. (These pictures aren’t AI… just very very old!) Again, thank you for the feedback and sorry you had trouble.