

Homemade soft pretzel rolls come together quickly with a few basic kitchen ingredients. For the best results, follow my step photos and detailed instructions. You’ll love this dinner roll version of soft pretzels!
Meet soft pretzel rolls, the mealtime-appropriate version of soft pretzels. Instead of shaping the dough into traditional pretzels, we simply craft the dough into balls. Like soft pretzel bites, but bigger! I know we all like the sounds of that. There’s a lot to cover today so let’s dive right in.
These Soft Pretzel Rolls Are:
- Made with 7 basic ingredients
- Extra chewy
- Soft and fluffy in the centers
- Easier than you think
- Loaded with real pretzel flavor
- Topped with crunchy coarse salt
- Baked to golden brown perfection
Behind the Recipe
Are you familiar with my soft pretzels recipe? It’s a completely un-intimidating approach to making pretzels from scratch. If you have zero skill in the kitchen, you can make homemade soft pretzels. I even turned this recipe into soft pretzel knots and jalapeño cheddar soft pretzels, too. But for soft pretzel rolls, we skip the twisting/shaping and form the dough into balls. Much easier.
To make soft pretzel rolls, we use the exact same dough that we use to make soft pretzels. This simple dough comes together with incredibly basic ingredients like water, yeast, butter, brown sugar, salt, and flour. Separate, they’re awesome. Together? Soft pretzels!
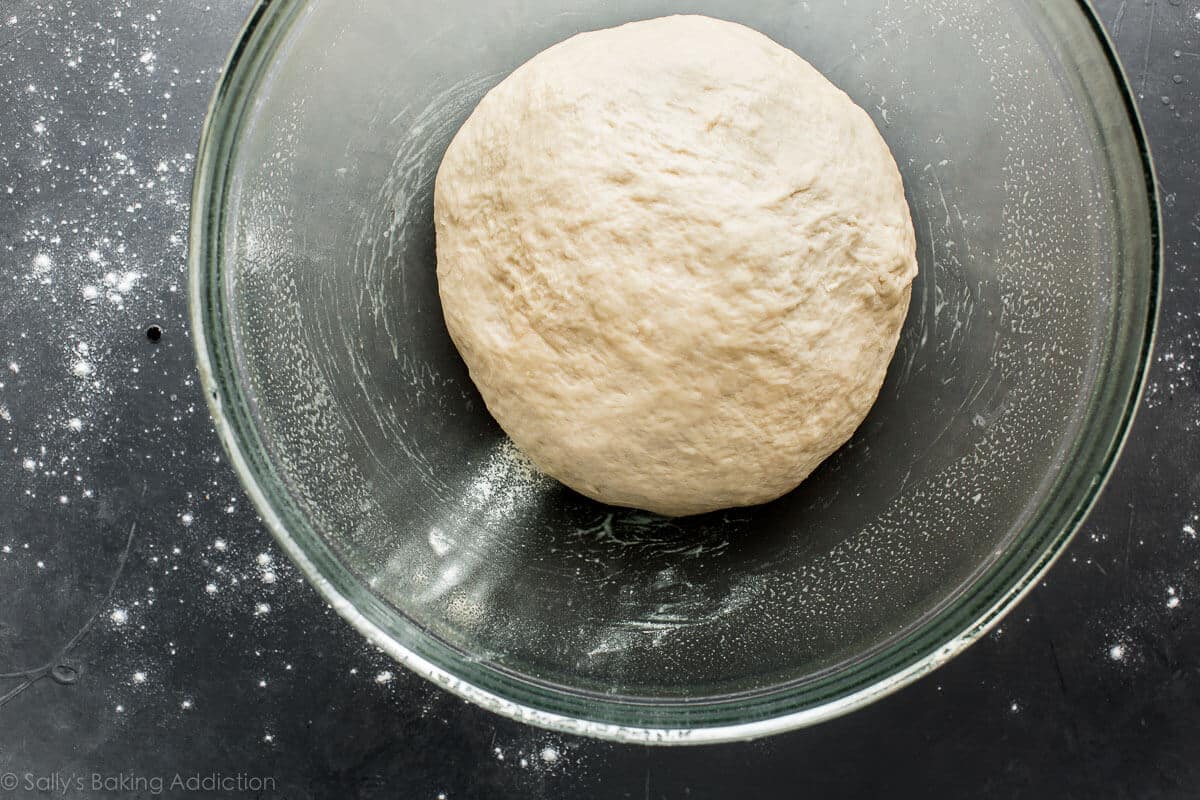
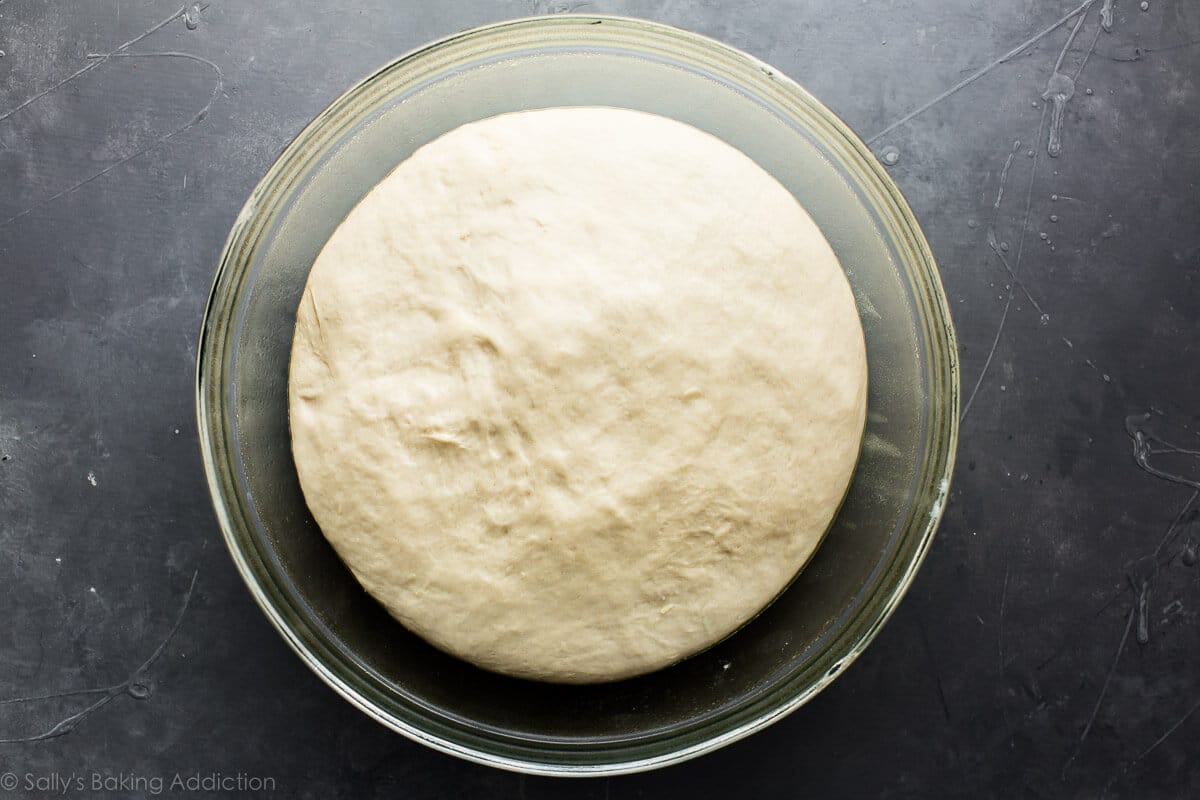
The primary difference between the two is that today’s rolls require a little extra rise time. We want the rolls to be fluffier than regular soft pretzels, so we give the dough a few extra minutes to rest—it’ll nearly double in size. See the photo of dough above and the one right below? There’s about 1 hour between the two photos—some great rise there.
Overview: How to Make Soft Pretzel Rolls
- Make the dough. See my How to Knead Dough video tutorial if you need extra help with that step.
- Let the dough rise for an hour. Or until doubled in size, as pictured above.
- Punch down the dough. This helps get rid of any air bubbles.
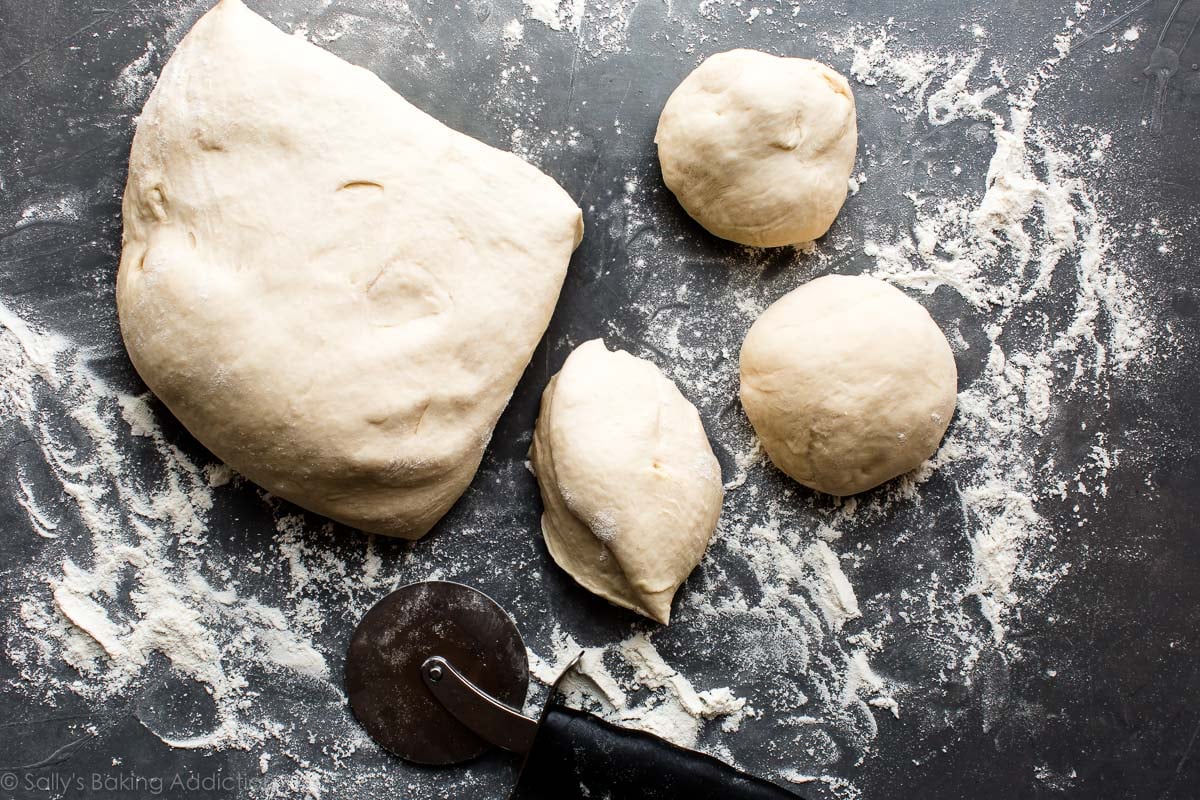
- Divide the dough to form the rolls. Aim for roughly 1/3 cup of dough each, which will yield about 12 rolls. Shape into balls.
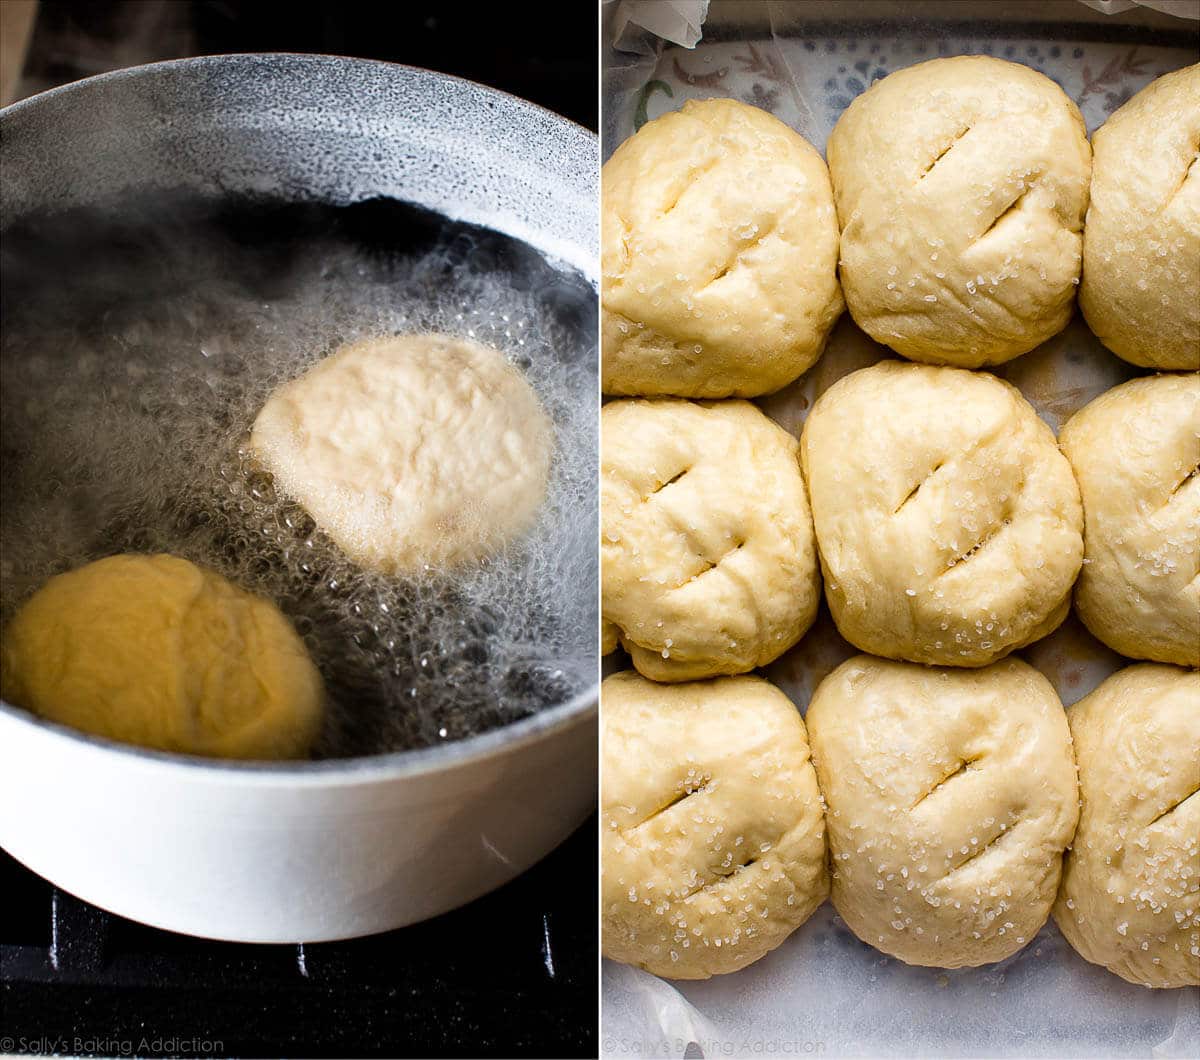
- Give the rolls a baking soda bath. See below for more details.
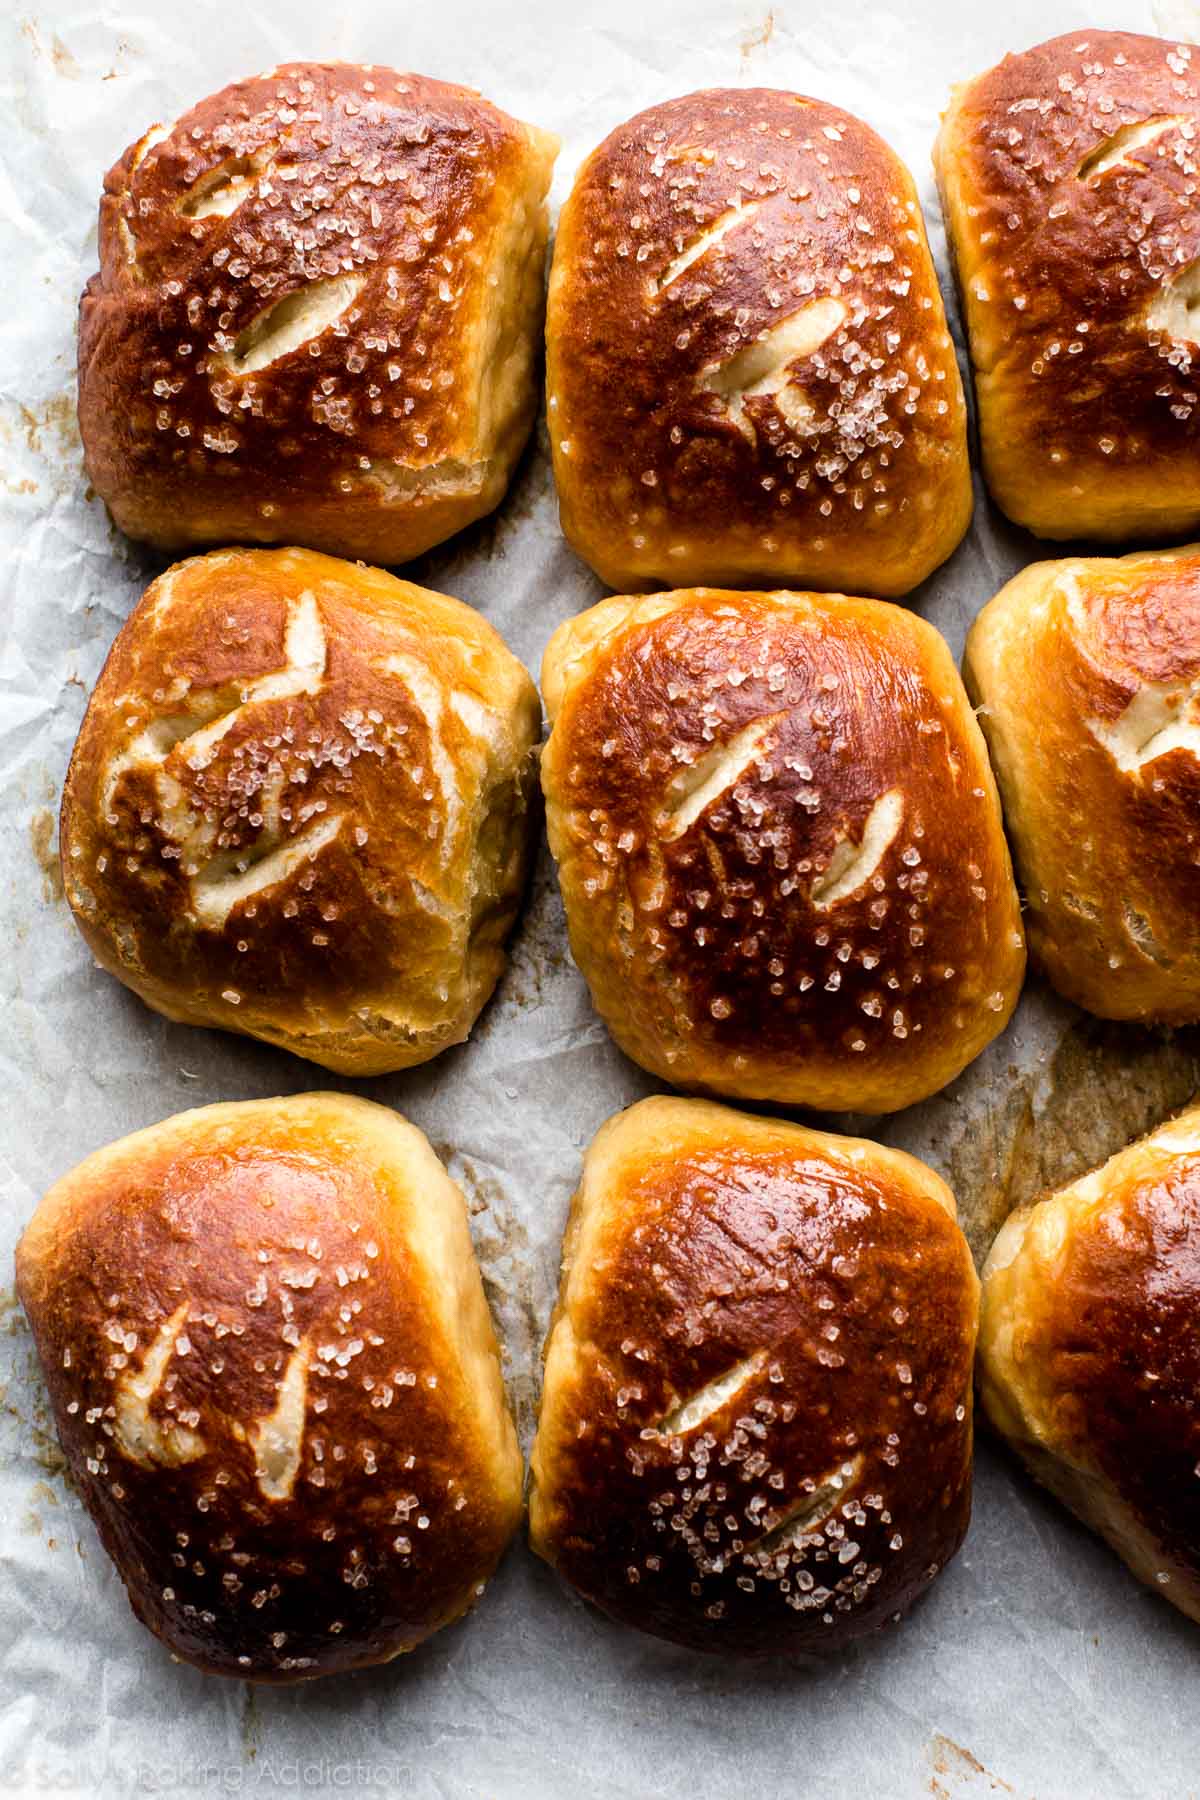
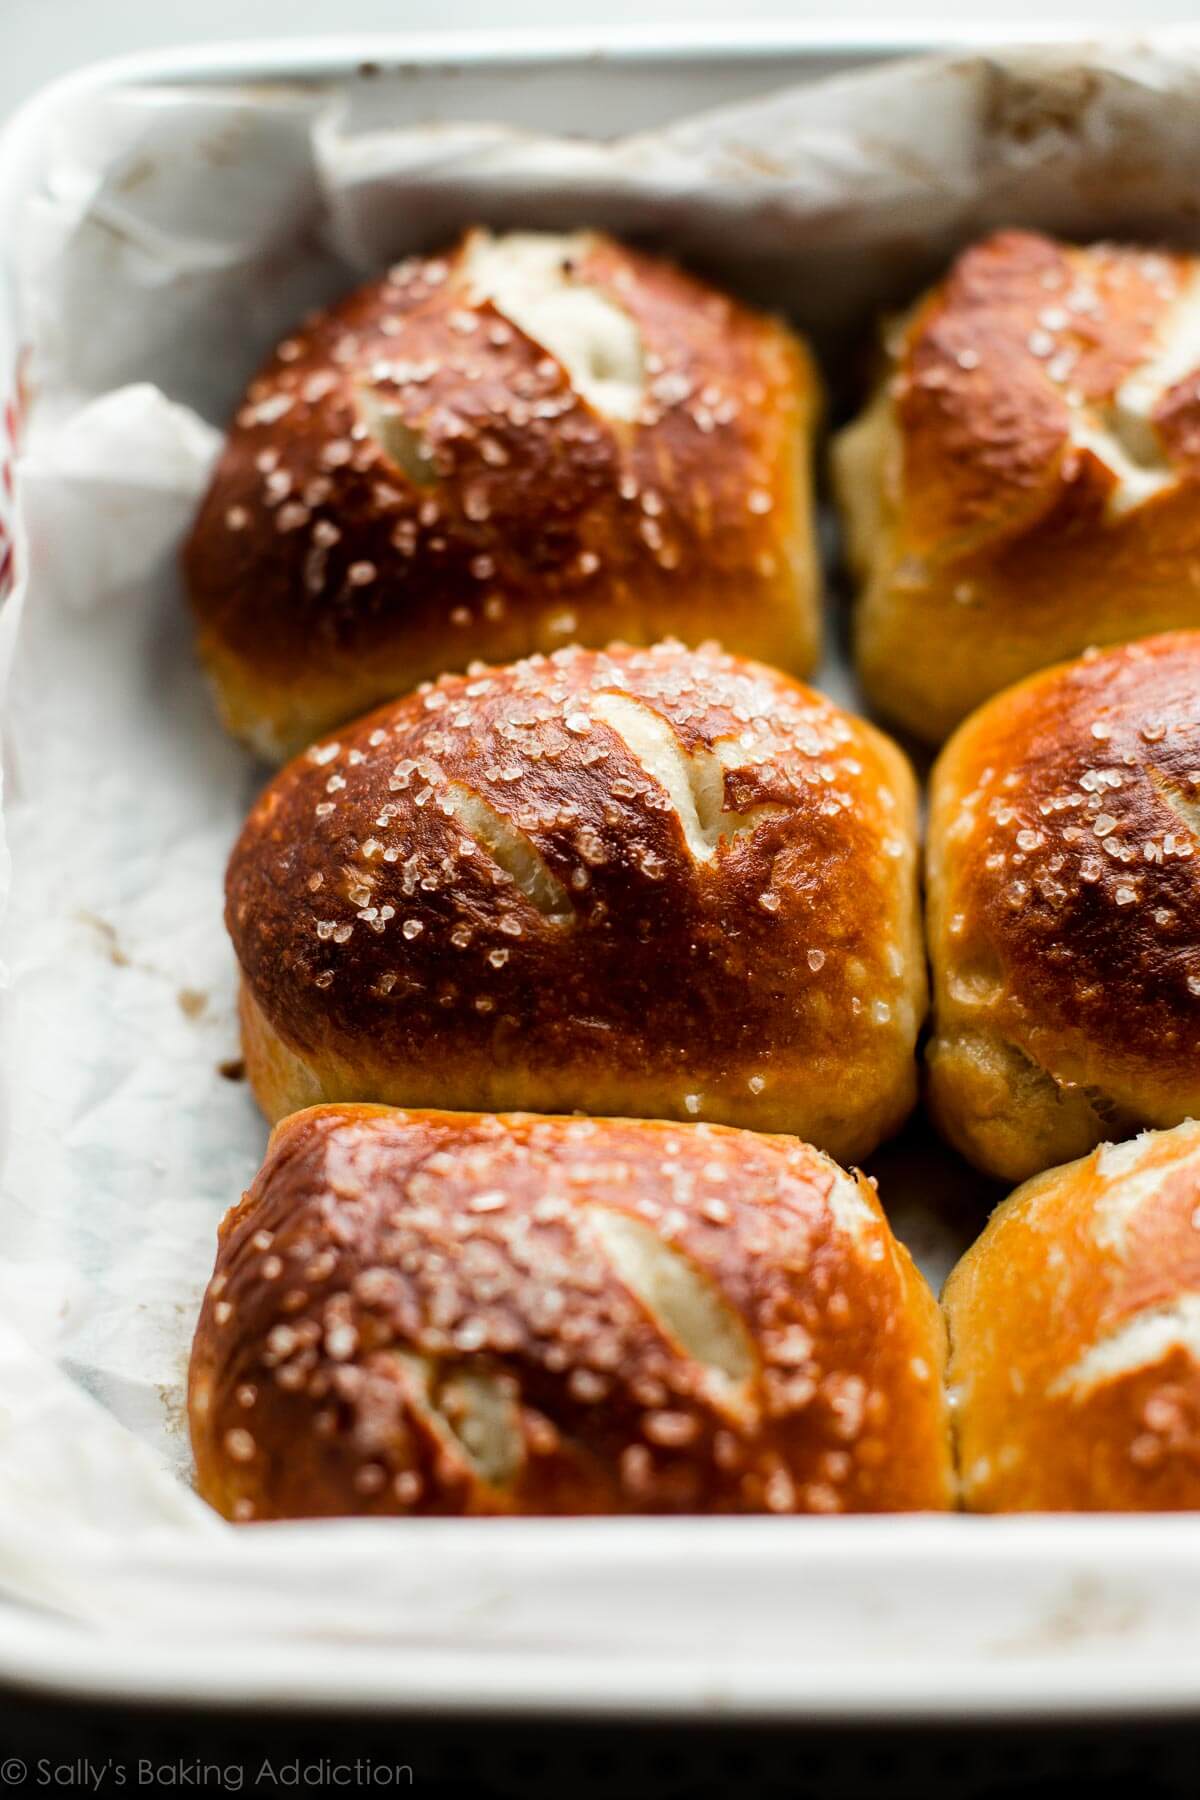
- Place rolls into prepared baking pan. I like to bake the rolls squished together in a baking pan because they hold their shape much better. You can, however, separate them on a large baking sheet.
- Score the tops of each roll & top with butter and coarse sea salt.
- Bake until golden brown.

Baking Soda Bath
Each step is important but the baking soda bath is imperative. Why? It’s what gives pretzels that iconic flavor and chewy exterior, plus it locks in the super soft center and helps deepen the golden brown color on the exterior. Save time and get the water boiling as you’re shaping the dough into balls. Then drop each dough ball into the boiling water + baking soda for a quick soak. Worth it!
The rolls look wrinkly after boiling but if foods like sloppy joes + baked beans + messy casseroles teach us anything about life, it’s this: appearances can be pretty deceiving. Soon enough, those pale wrinkly buns will transform into buttery + salty + golden brown delights.
3 Success Tips for Homemade Pretzel Rolls
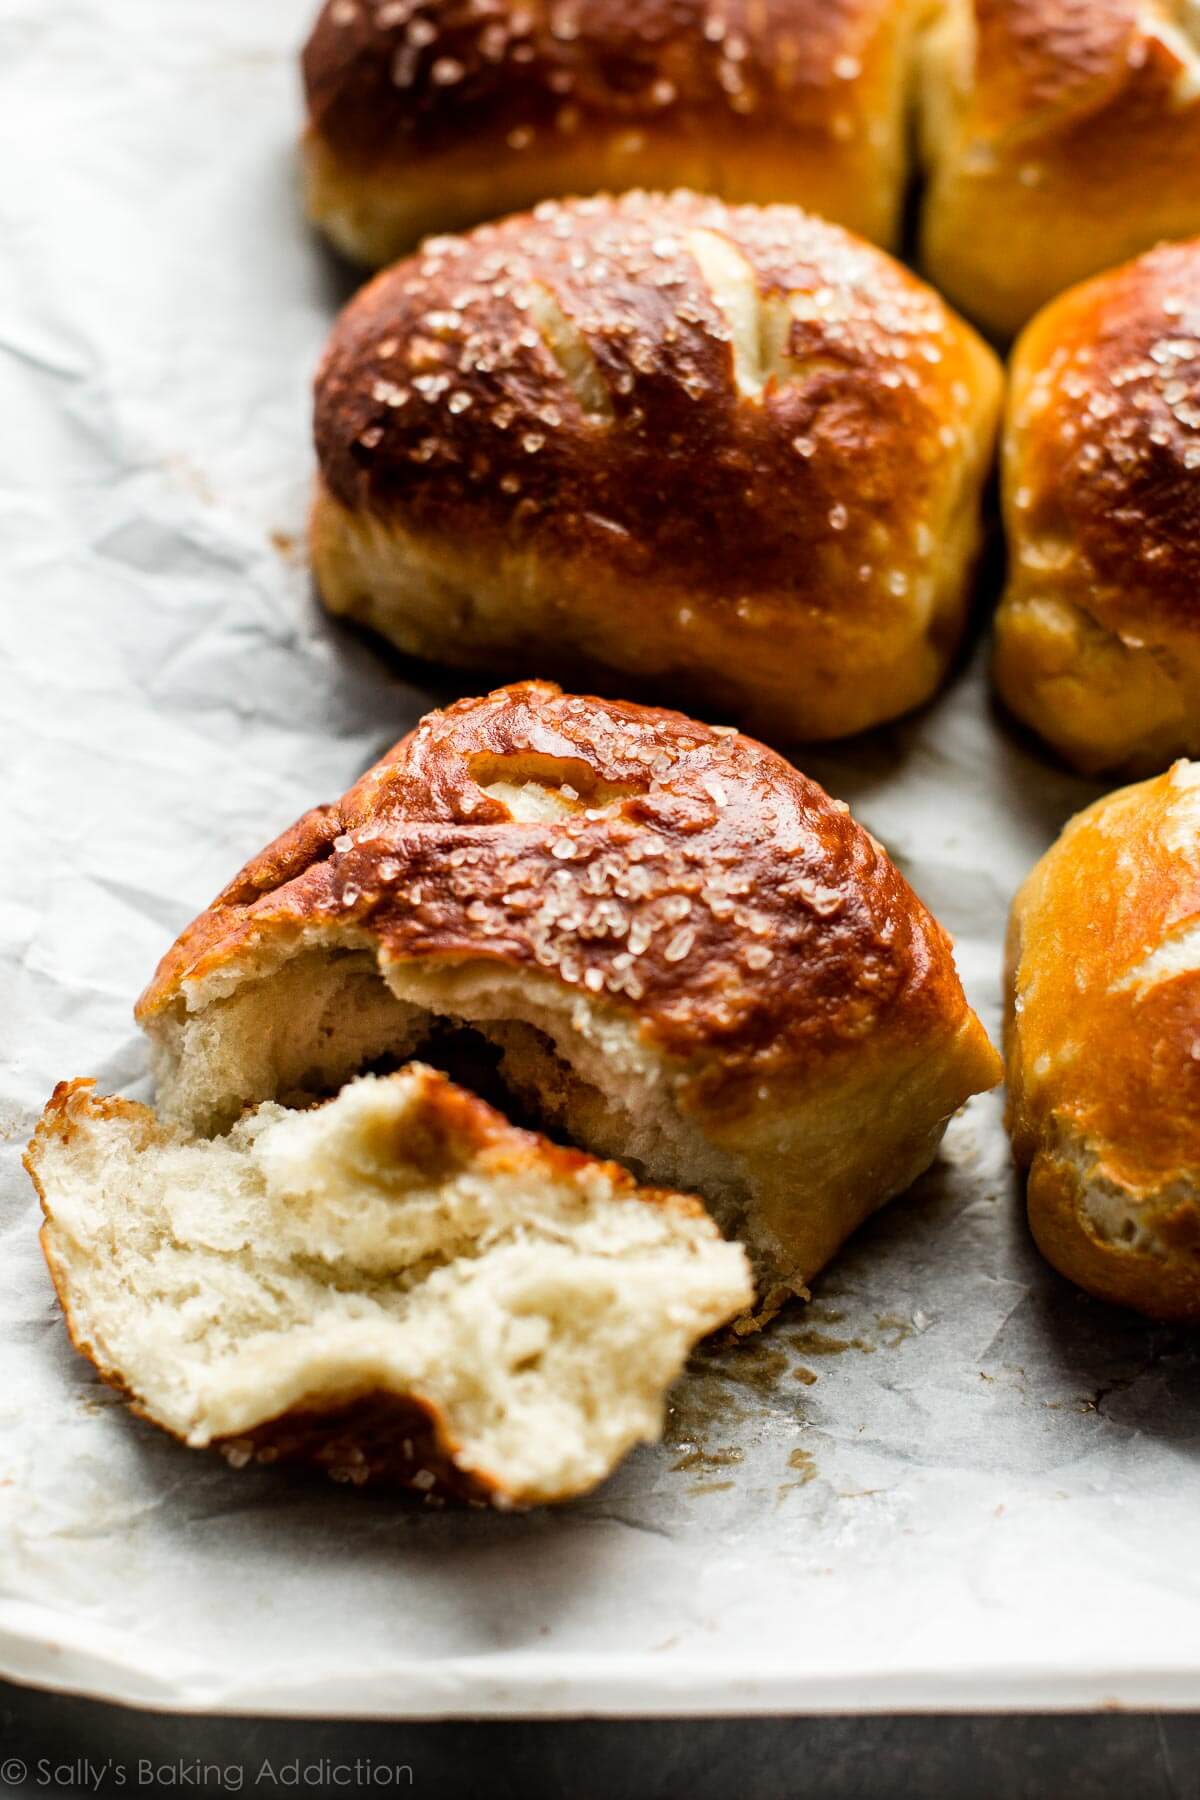
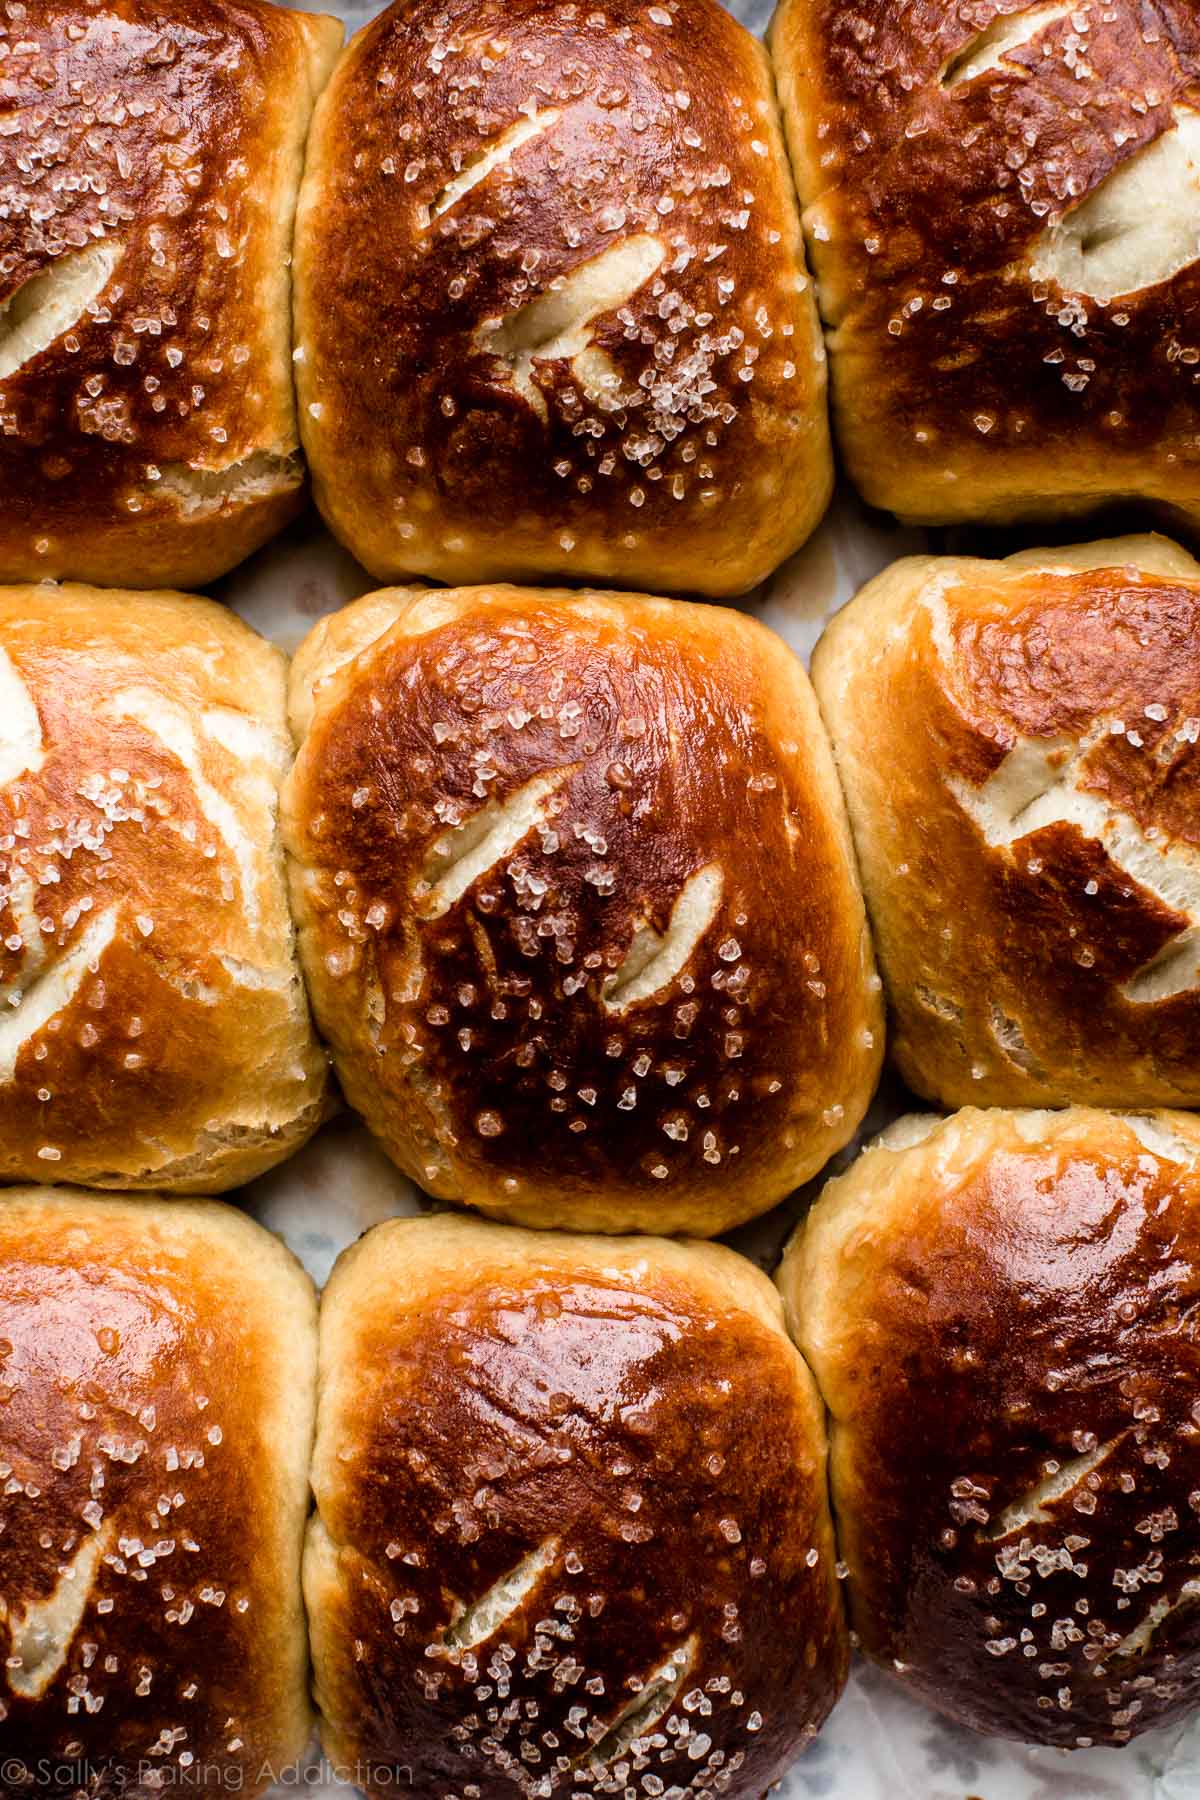
- Score the tops of the rolls. Use a sharp knife to do this once the rolls come out of the baking soda bath. Scoring the tops allows the rolls to expand and the centers to cook all the way through since they’re thicker rolls.
- Brush with melted butter and sprinkle with coarse salt. This gives the rolls that delicious bakery-style flavor.
- Bake until golden brown. The deeper the color, the better the flavor.
Make-Ahead Tip
If you are making pretzel rolls in advance, do not top them with coarse salt before baking. The salt draws the moisture out of the pretzel rolls, and once you’ve placed the baked and cooled pretzel rolls in an airtight container or bag, it doesn’t take long before you’ll notice water droplets forming inside and the pretzel rolls become soggy and wrinkled. Yuck!
If you won’t be serving the pretzel rolls the same day you bake them, omit the salt-topping step. Bake as directed, then allow to cool completely before placing them in an airtight container, and store at room temperature. When you are ready to serve them, place the pretzel rolls on a baking sheet and brush them lightly with melted butter, then sprinkle with coarse salt. Bake them in a 350°F (177°C) oven for 5–10 minutes, or until warmed.
Same goes for freezing homemade soft pretzel rolls: wait to top with salt until you’re ready to serve them. Cool the unsalted baked pretzel rolls completely, then freeze in an airtight freezer-safe container or zip-top bag for up to 3 months. To reheat, brush frozen pretzels (no need to thaw) with melted butter and sprinkle with coarse salt, then bake at 350°F (177°C) for 20 minutes or until warmed through.
What to Serve With Pretzel Rolls
The most delicious ways to eat these pretzel rolls? Enjoy them with beer cheese dip or garlic and bacon spinach dip, as buns for ham & swiss sandwiches, with soup (like minestrone soup or creamy chicken noodle soup), as a side with walnut crusted chicken, with a swipe of homemade honey butter, or straight from the pan. They’re big, soft, fluffy, and pretzel-y!
Print
Easy Pretzel Rolls
- Prep Time: 1 hour, 30 minutes
- Cook Time: 25 minutes
- Total Time: 2 hours
- Yield: 12 rolls
- Category: Bread
- Method: Baking
- Cuisine: American
Description
Making easy pretzel rolls from scratch is simpler than you think. Follow this easy and approachable way to make them at home!
Ingredients
- 1 and 1/2 cups (360ml) warm water (lukewarm—no need to take temperature but around 100°F (38°C) is great)
- 2 and 1/4 teaspoons (7g) instant or active dry yeast (1 standard packet)
- 1/4 cup (4 Tablespoons; 56g) unsalted butter, divided
- 1 teaspoon salt
- 1 Tablespoon brown sugar
- 3 and 3/4–4 cups (469–500g) all-purpose flour (spooned & leveled), plus more for work surface
- coarse sea salt for sprinkling
Baking Soda Bath
- 1/2 cup (120g) baking soda
- 9 cups (2,160ml) water
Instructions
- Whisk yeast and warm water together. Allow to sit for 1 minute. Meanwhile, melt 1 Tablespoon of butter (reserve the rest for step 7). Whisk in salt, brown sugar, and melted butter. Slowly add 3 cups of flour, 1 cup at a time. Mix with a wooden spoon or dough hook attached to a stand mixer until dough is thick. Add 3/4 cup more flour until the dough is no longer sticky. If it is still sticky, add 1/4–1/2 cup more, as needed. Poke the dough with your finger—if it bounces back, it is ready to knead.
- Knead the dough: Keep the dough in the mixer and beat for an additional 5 full minutes, or knead by hand on a lightly floured surface for 5 full minutes. (If you’re new to bread-baking, my How to Knead Dough video tutorial can help here.) If the dough becomes too sticky during the kneading process, sprinkle 1 teaspoon of flour at a time on the dough or on the work surface/in the bowl to make a soft, slightly tacky dough. Do not add more flour than you need because you do not want a dry dough. After kneading, the dough should still feel a little soft. Poke it with your finger—if it slowly bounces back, your dough is ready to rise. You can also do a “windowpane test” to see if your dough has been kneaded long enough: tear off a small (roughly golfball-size) piece of dough and gently stretch it out until it’s thin enough for light to pass through it. Hold it up to a window or light. Does light pass through the stretched dough without the dough tearing first? If so, your dough has been kneaded long enough and is ready to rise. If not, keep kneading until it passes the windowpane test.
- Rise: Place in a large greased bowl, cover tightly with plastic wrap, and allow to rise in a warm environment for 1 hour or until nearly doubled in size. (Tip: I preheat my oven to 200°F (93°C), turn it off, place the dough inside and shut the oven. This is the warm environment.)
- Once risen, punch down dough to release any air bubbles. Turn out onto a lightly floured surface and, with a sharp knife or pizza cutter, cut dough into 1/3-cup (about 75g) sections. You should have about 12 pieces. Shape into balls.
- Preheat oven to 400°F (204°C). Line a baking sheet with parchment paper or silicone baking mat OR line a 9×13 baking pan with parchment paper (I use a baking pan). Set aside.
- Bring baking soda and 9 cups of water to a boil in a large pot. Drop 1–2 pretzel rolls into the boiling water for 20–30 seconds. Any longer than that and your pretzels will have a metallic taste. Using a slotted spatula, lift the pretzel roll out of the water and allow excess water to drip off. Place pretzel rolls onto prepared baking sheet or close together in the baking pan. Using a sharp knife, score a couple slits into the top of each.
- Melt the remaining butter. Lightly brush each roll with melted butter and sprinkle with coarse sea salt.
- Bake for 22–26 minutes or until deep golden brown on all sides.
- Remove from the oven and serve warm. Pretzel rolls may be stored in an airtight container or zip-top bag for up to 3 days (they lose a little softness over time).
Notes
- Make Ahead Instructions: If planning to freeze baked pretzel rolls, do not top them with coarse salt before baking. Cool completely, then freeze in an airtight freezer-safe container or zip-top bag for up to 3 months. To reheat, brush frozen pretzel rolls (no need to thaw) with melted butter and sprinkle with coarse salt, then bake at 350°F (177°C) for 20 minutes or until warmed through, or microwave until warm. The prepared pretzel dough can be covered and refrigerated for up to one day or frozen in an airtight container for 2–3 months. Thaw frozen dough in the refrigerator overnight. Bring to room temperature, then continue with step 3.
- Special Tools (affiliate links): Stand Mixer or Glass Mixing Bowl and Wooden Spoon | Baking Sheets | Silicone Baking Mats or Parchment Paper | Large Pot | Slotted Spatula | Pastry Brush | Coarse Sea Salt
- Reference my Baking with Yeast Guide for answers to common yeast FAQs.


Reader Comments and Reviews
Hi Sally!
I love to enjoy pretzel bread with honey mustard, so can I brush this with honey butter that has a bit of mustard before baking? And can I bake this in a glass pan and will there be changes in baking temp. and time? Thanks a lot and I enjoy watching your website and videos from across the globe 🙂
Hi Eunice, we can’t see why not! You can bake them in a glass pan. Bake time may be slightly longer.
Oh my goodness!!! These are delicious. Easy to follow recipe. Thank you! Thank you! Thank you!