

Follow this simple recipe and video tutorial for the best all butter pie crust. It will make you a pie expert immediately! Complete with all my tips and troubleshooting, this pie crust recipe is buttery, flaky, and tender with the most incredible flavor.
At the request of many, today I’m sharing my go-to all-butter pie crust recipe. It competes with my butter and shortening pie crust for the #1 spot in my pie-loving heart. (Scroll to the recipe notes for my pie crust comparison!) This recipe is such a fan favorite, that it deserved a spot in print! You’ll also find this recipe in my cookbook, Sally’s Baking 101. In the book it’s called Double Pie Crust (and it’s on page 136).
I’ve made thousands of pies in my day and consider myself a pie expert. A pi-expert, if you will. I’ve made all the pie crust mistakes so I can coach you through the process and supply you with all the knowledge and confidence to tackle pie crust once and for all.
You’ll be a pi-expert with this recipe and tutorial on your side!
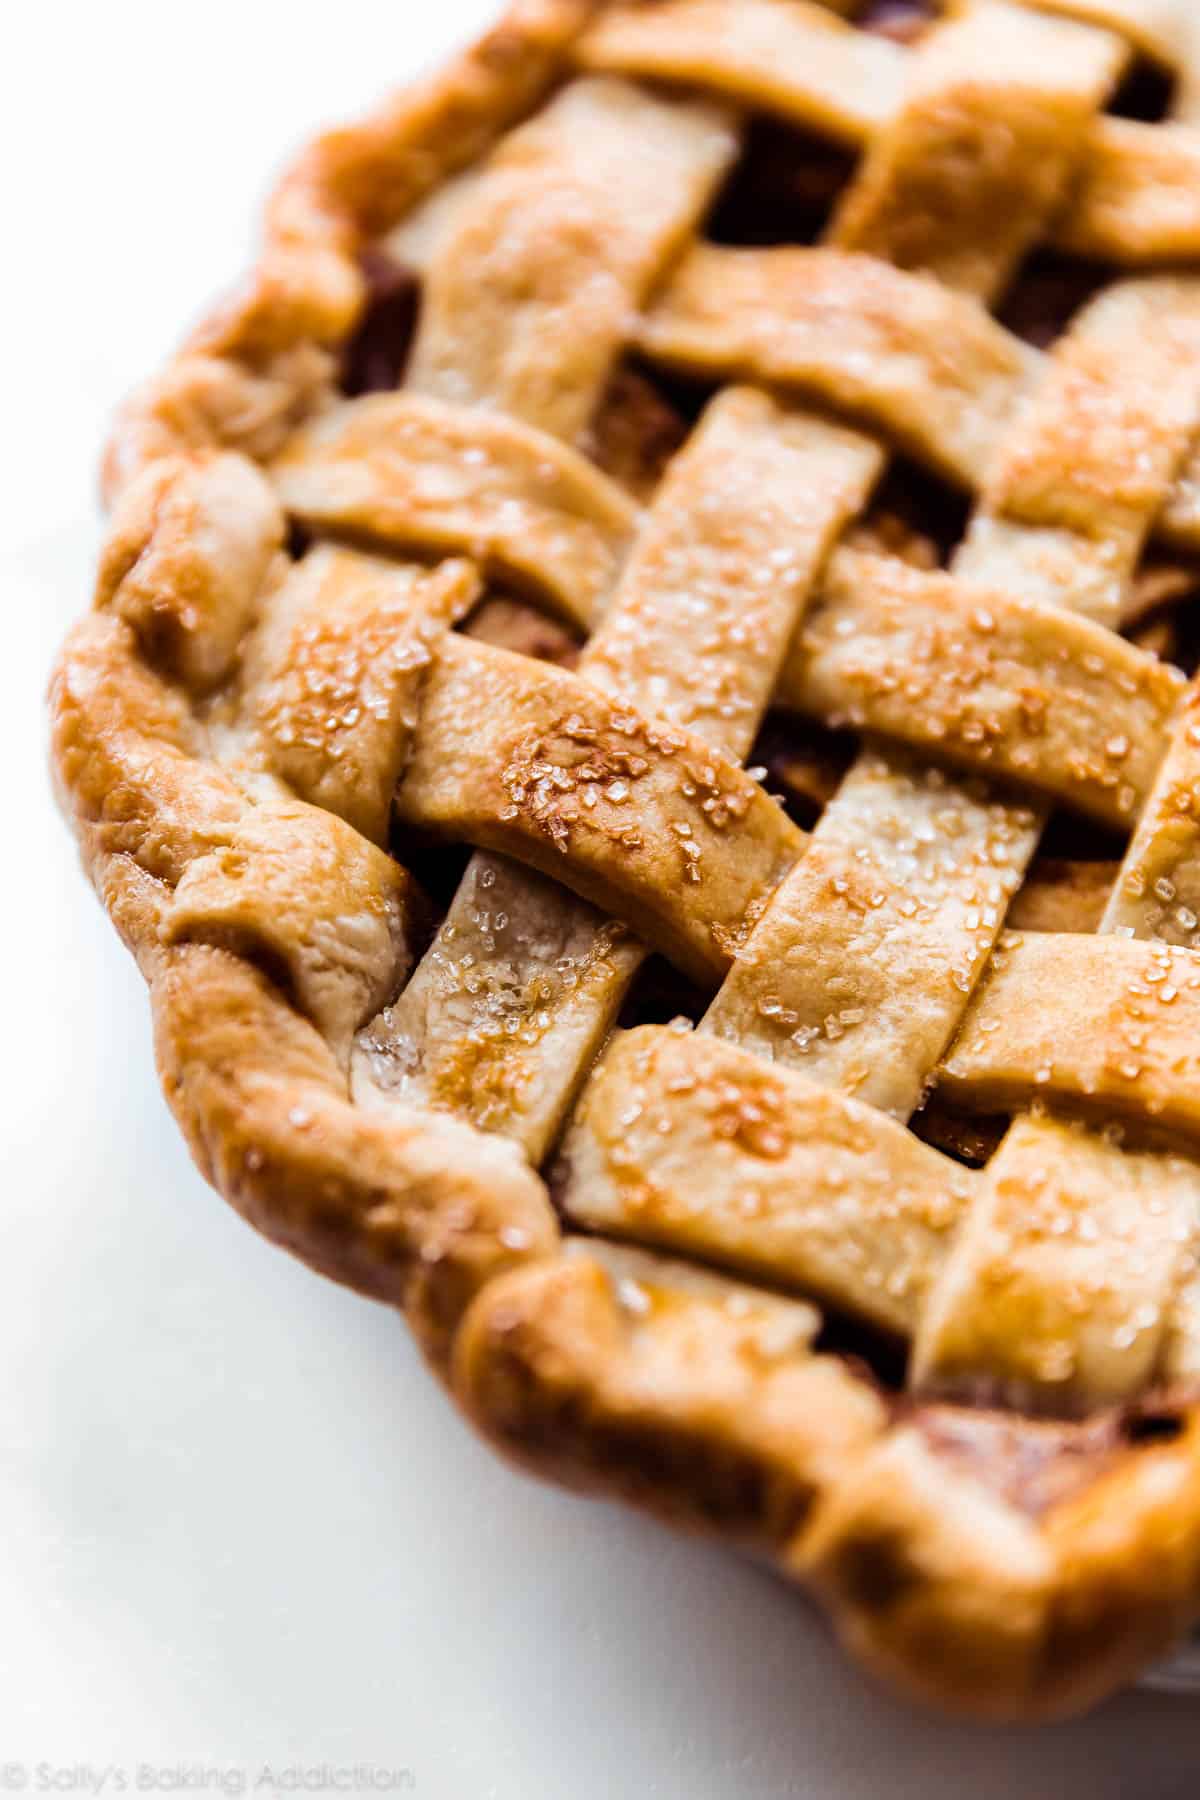
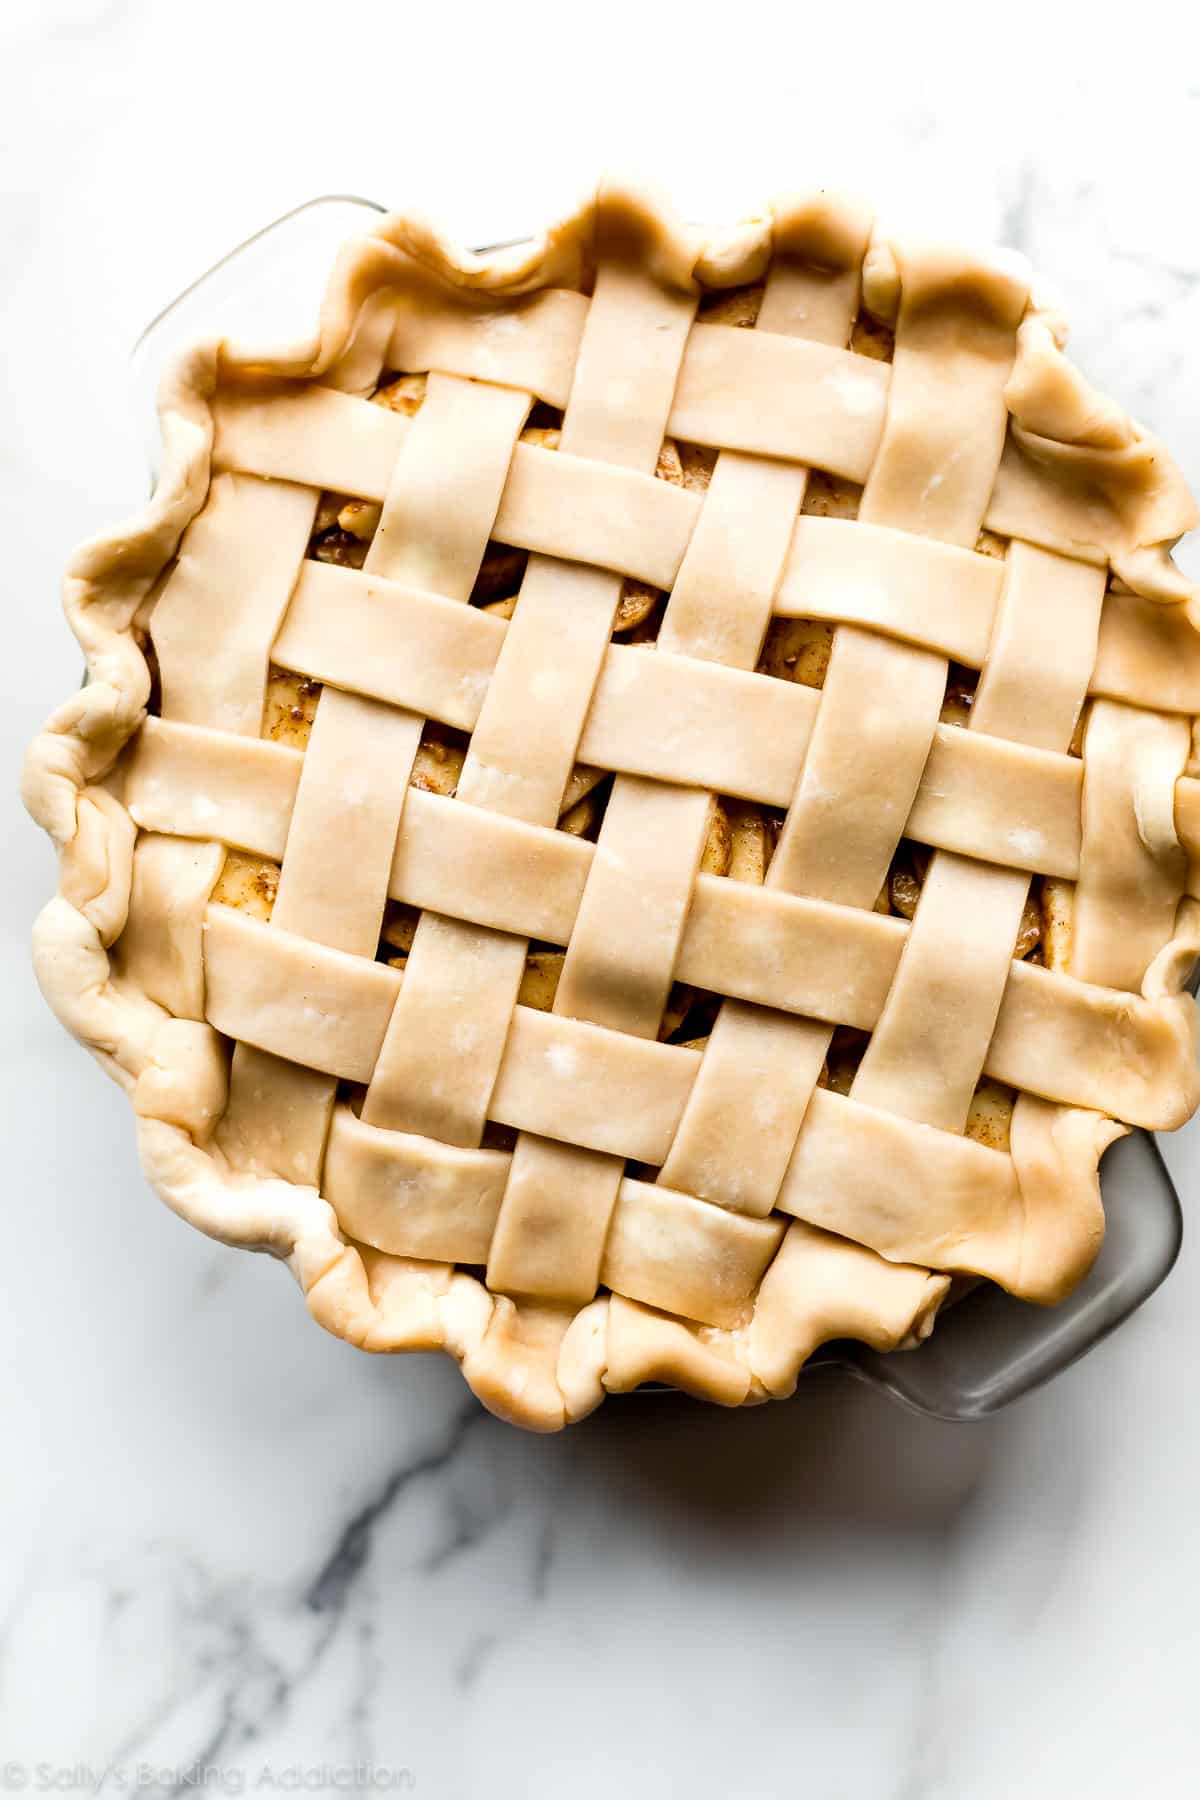
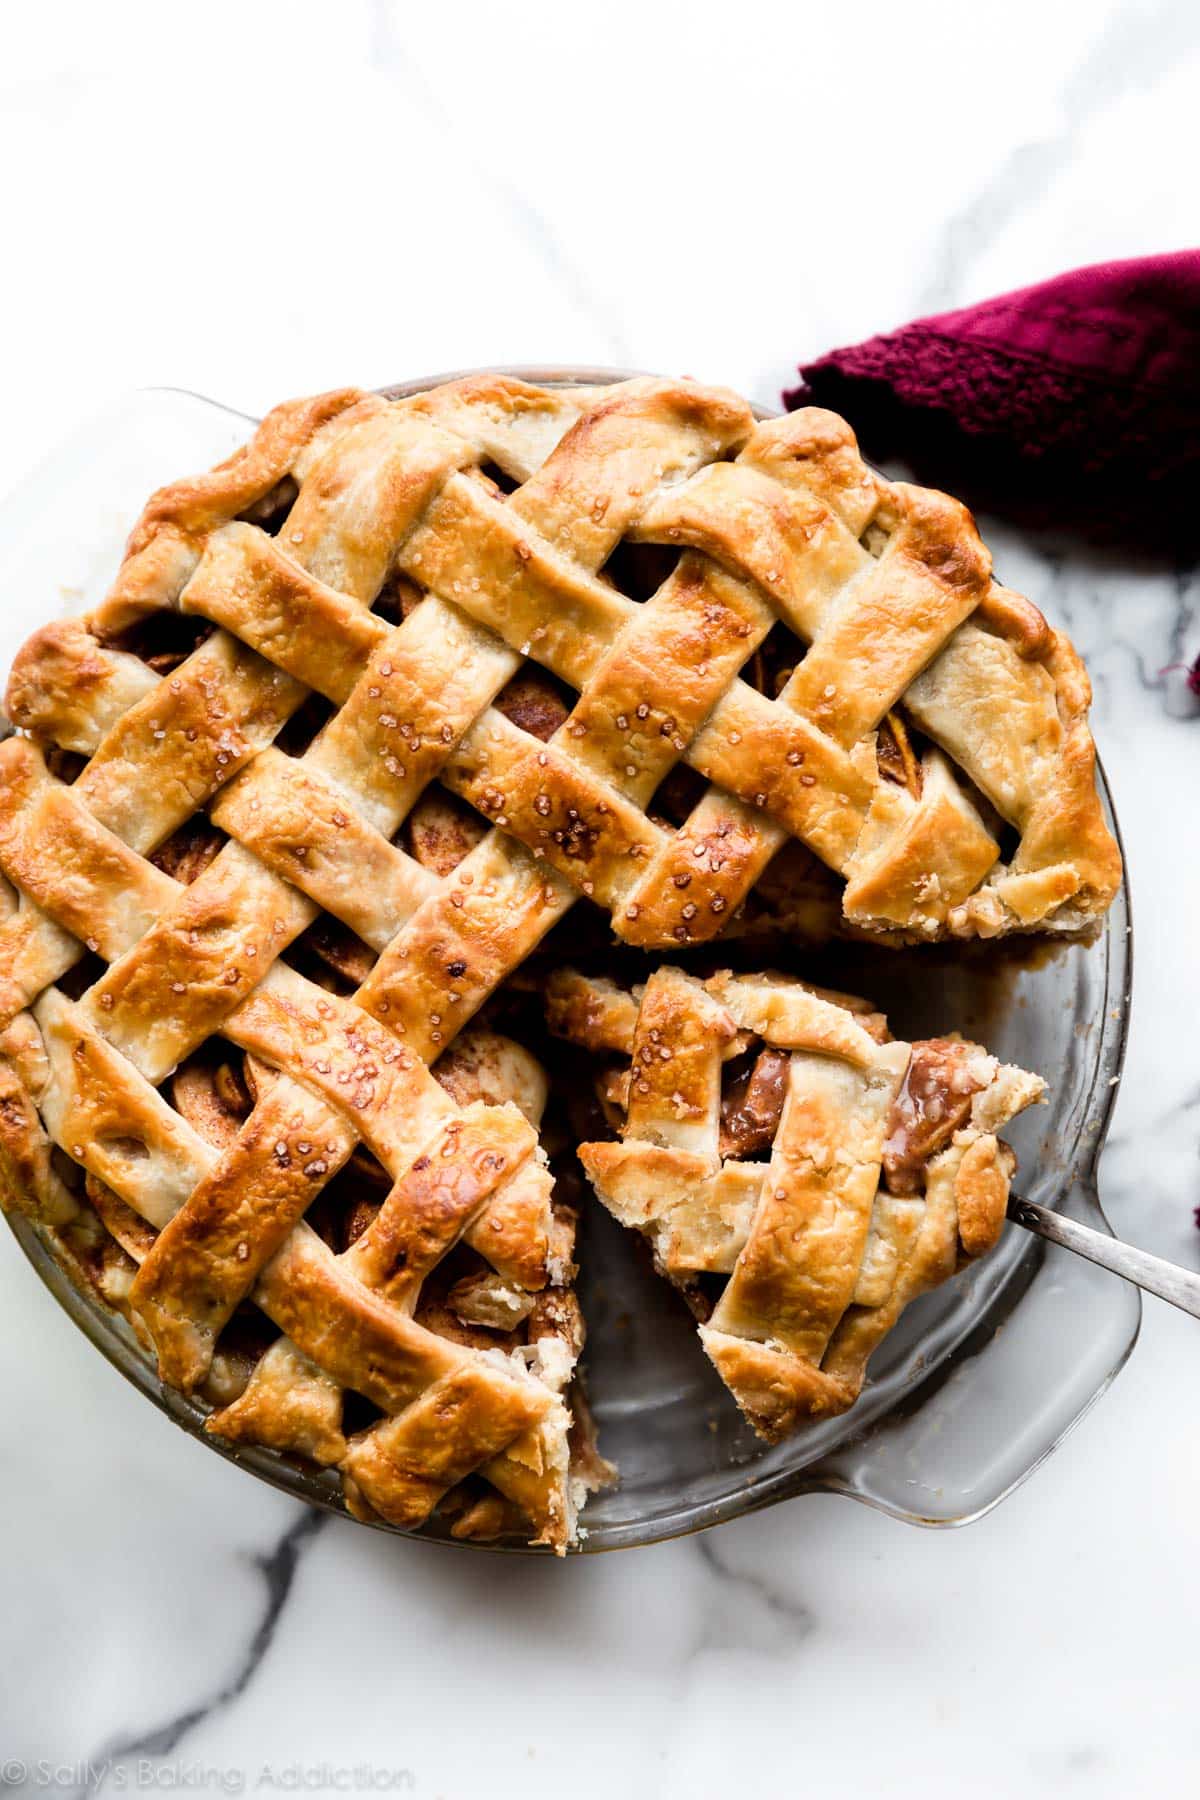
Watch my video tutorial for butter pie crust with lattice topping. This is my homemade apple pie with chai spices, a favorite every Fall season.
Start with a dependable pie crust recipe and you’re set for success. Soon everyone will be asking YOU for all your pie crust secrets.
Only 5 Ingredients in Butter Pie Crust
This pie crust is made with 5 ingredients. Each ingredient has a very specific job. And with so few ingredients, it’s important to use the best quality.
- Flour – The structure of pie crust.
- Salt – Flavor flavor flavor. Use table salt instead of coarse salt. Smaller salt crystals dissolve and disperse more evenly throughout the dough.
- Granulated Sugar – Pie crust should not be sweet, but adding a little sugar to butter pie crust improves its flavor and enhances browning. The sugar crystals also help break down the hard pieces of butter.
- Cold unsalted butter – Supplies the pie crust’s unbeatable flavor and flaky texture. Use unsalted butter. The amount of salt in different brands’ salted butter varies, so for better control over the flavor, it’s best to begin with unsalted and add your salt.
- Ice water – The final ingredient, about 1/2 cup of ice cold water holds all the ingredients together. Use just enough so the dough holds its shape when rolling out. Many pie crust recipes don’t call for enough ice water, giving you a dry pie dough that cracks when you roll it out. When in doubt, add a little more water. You’re better off with more water (wet pie dough) than not enough water (dry, cracking pie dough) because you can always work more flour into the dough, but you can’t really add water to the pie dough when you’re trying to roll it out.
I use this crust in my apple cheddar pie—there I add some sharp cheddar cheese. It’s also the starting point for chocolate pie crust that we use for chocolate pop tarts!
Basic Pie Crust Steps
- Mix dry ingredients together.
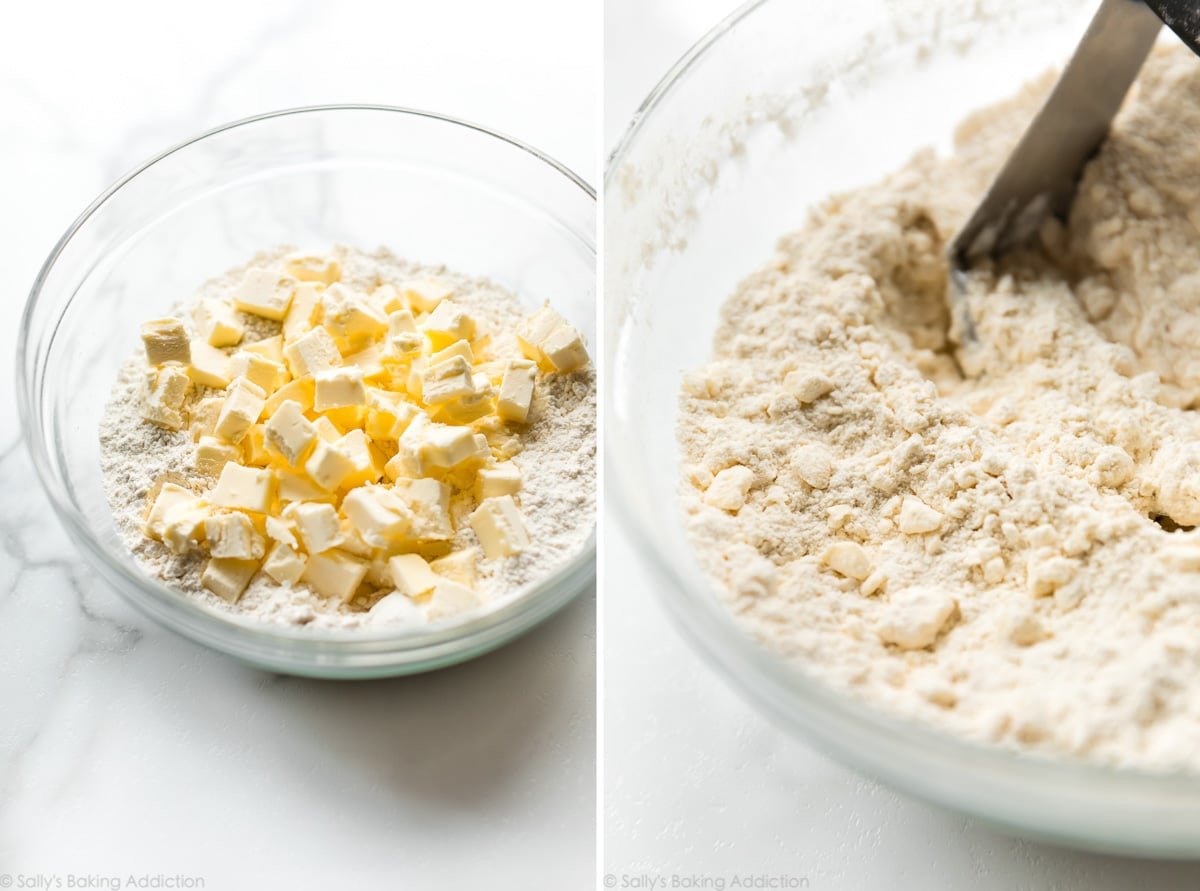
- Cut in the butter with a pastry cutter or food processor.
- Add ice water a little bit at a time until the dough begins to come together. It will feel thick and moist, not overly wet. You’ll use around 1/2 cup (120ml).
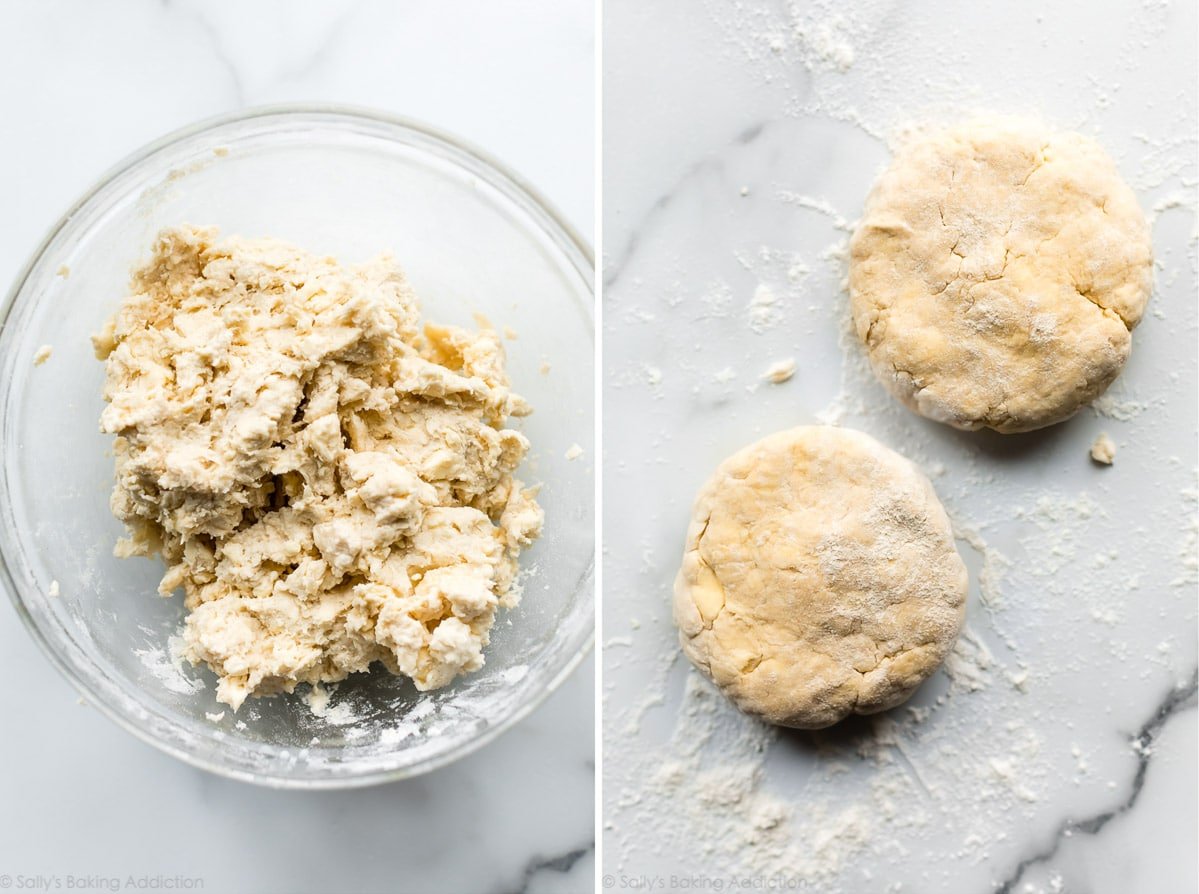
- Mold pie dough into a ball.
- Cut in half. This recipe yields two 9-inch pie crusts.
- Flatten into discs. Wrap in plastic wrap.
- Chill for 2 hours before using.
These steps are shown in the video tutorial above and described in the recipe below.
Why the Emphasis on Cold?
Keeping your pie dough as cold as possible prevents the fat from melting too soon. Too soon = before the pie crust enters the oven.
- What happens when the pie dough is warm? The butter in the pie crust will melt before baking, which means you lose all the flakiness and structure. Warm pie dough melts into a pool of grease. You’ll have a hard, crunchy, and greasy crust instead of a beautifully tender flaky crust.
- What happens when the pie dough is cold? The butter in the pie crust will melt inside the oven. Butter has a high volume of water content and this water converts to steam as the pie dough bakes. The steam separates the crust into multiple flaky layers, making this the most delicious pie crust ever.
The colder the dough, the flakier the pie crust.
How to Keep Pie Dough Cold:
- Use ice cold water. Fill a glass with 1 cup of water, add ice. You only need 1/2 cup of water in this butter pie crust recipe, but have a little extra just in case.
- Use cold butter. I keep some of my butter in the freezer and transfer it to the refrigerator a couple hours before beginning the crust. The butter is part frozen and very cold.
- Chill the pie dough for at least 2 hours before rolling out. This step is non-negotiable; it’s the most crucial in the entire pie crust recipe.
- For extra insurance, chill your flour and your mixing bowl in the refrigerator or freezer. Sounds a little silly, but trust me… it really helps!
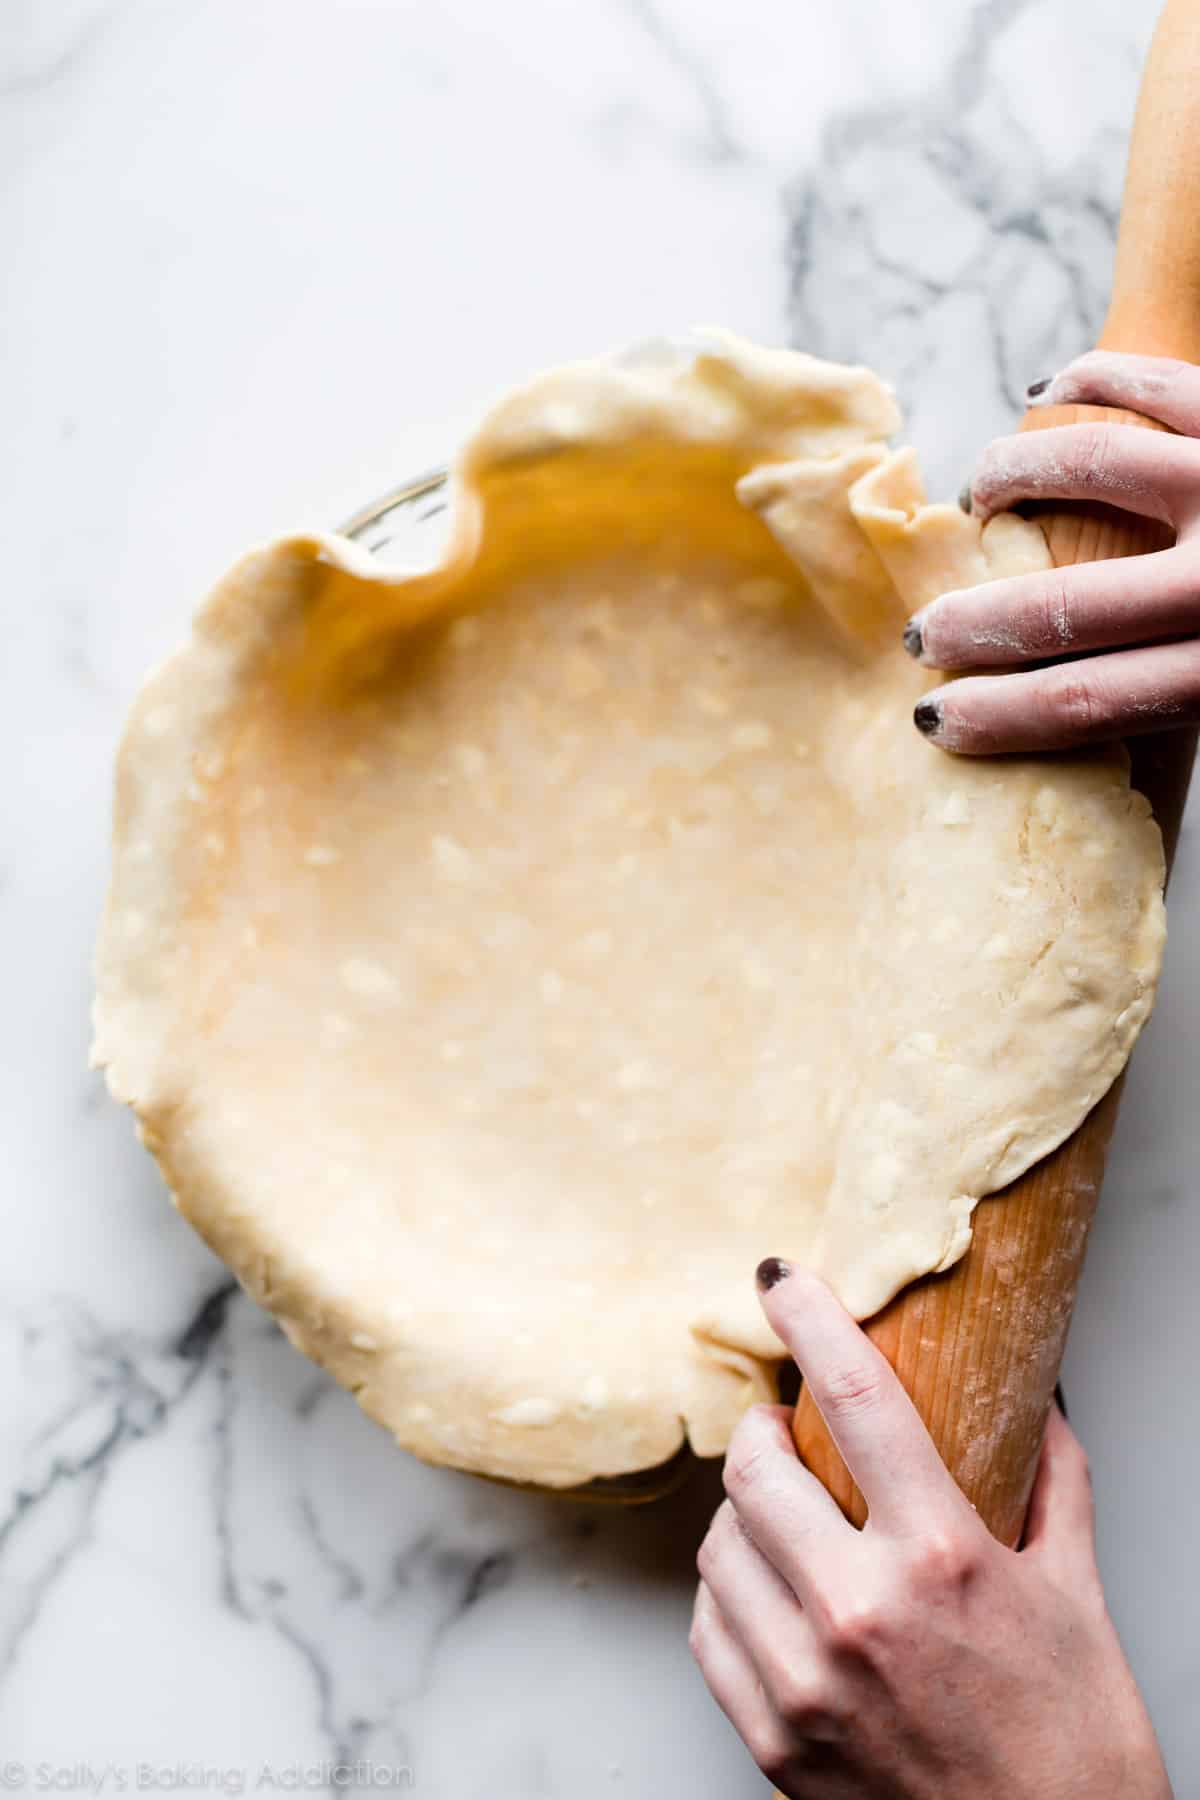
How to Roll Out Pie Dough
After the dough has chilled, it’s time to roll it out. Keep a small bowl of flour nearby to keep your work surface, rolling pin, and hands lightly floured. This prevents the pie dough from sticking. When rolling pie dough out, always start from the center and work your way out in all directions, turning the dough as you go. If the pie dough feels too warm or the butter is melting, stop. Lift it up, place on a baking sheet, and chill in the refrigerator for at least 10 minutes before continuing.
Butter Pie Crust Tips
- I’m going to repeat myself here. Keep all pie crust ingredients cold. On a hot day, you can chill the measured out flour in the refrigerator or freezer before starting. When taking the pie crust out of the refrigerator to roll out and fill, make sure your pie filling is ready to go. If not, keep the pie crust in the refrigerator until it is.
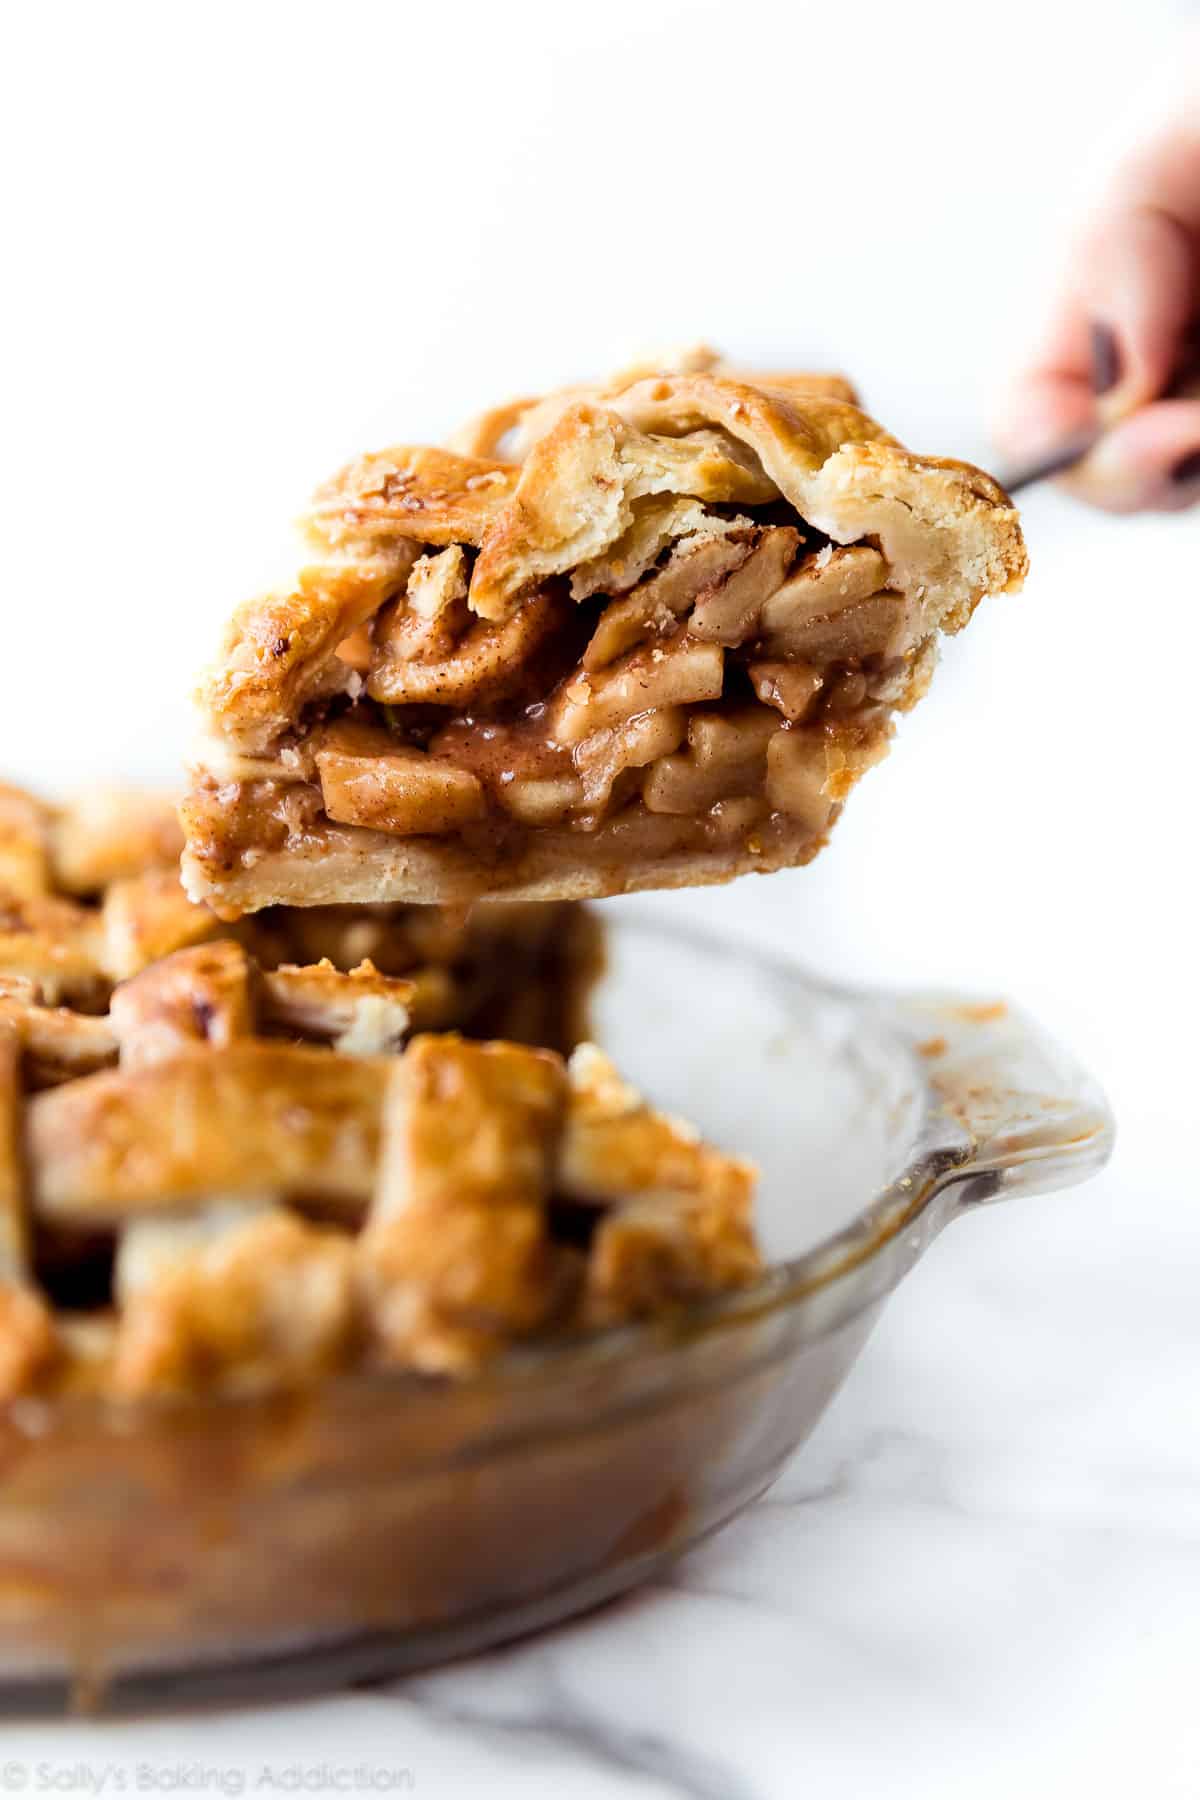
- Glass pie dishes are best. Why? As opposed to ceramic or metal pie dishes, glass pie dishes conduct heat evenly, which allows the bottom of the crust to bake thoroughly. Also, you can see when the sides and bottom of the crust have browned.
- If your pie recipe requires pre-baking (blind bake pie crust)—let’s say you’re making a pie with an especially wet filling—use pie weights or dried beans. Without pie weights, the pie dough will puff up, then shrink. Whichever you choose, be sure to line the crust with parchment or aluminum foil, then fill the empty pie crust with the weights. See my post and video tutorial for how to blind bake pie crust.
- Always use a pie crust shield. A shield keeps the crust edge covered, which protects it from browning too quickly or worse, burning. Use an adjustable silicone pie crust shield that you can fit to the size of your delicate pie crust. Metal can break the crust. Alternatively, you can cover the pie with a piece of aluminum foil. Cut a large circle in the center of the square so the center of the pie is exposed.
- Learn how to braid pie crust with my how to braid pie crust video tutorial.
- Learn how to lattice pie crust, too.
- Last but not least, learn how to crimp and flute pie crust. Those pretty decorative pie crust edges add function and flair!
Pie Crust Troubleshooting
- Prevent a crumbly pie dough that rips and tears when you roll it out. Make sure you use enough ice water when preparing your pie dough. Too little water creates an unworkable dough.
- Prevent a tough pie crust. Tough crusts are the result of not enough fat in the crust, as well as overworking the dough. Use the all butter pie crust recipe or my shortening and butter pie crust recipe to ensure a flaky, tender pie crust. Additionally, don’t work the dough too much.
- Prevent a burnt crust with a pie shield. See above.
Recommended Pie Crust Tools
(All my recommend products are affiliate links. I trust these tried-and-true tools!)
- Pastry cutter – Though you can use a food processor to make this butter pie crust, I strongly recommend a pastry cutter to avoid over-mixing. Food processors are quick to over-work pie dough.
- Pastry mat – I prefer rolling pie dough out on a lightly floured counter because countertops are usually colder, but you can use a lightly floured pastry mat instead.
- Rolling pin – An obvious must with pie dough! I also love this marble rolling pin. Marble rolling pins are usually cooler to touch and we all know that pie dough loves the cold.
- Glass pie dish – My mother-in-law bought me this Pyrex pie dish 5 years ago and it’s been my go-to ever since. I have 4 of them now! Like I mention in my pie crust tips above, glass pie dishes conduct heat evenly, which allows the bottom of the crust to bake thoroughly. This is important. There’s no comparison, Pyrex is the best.
- Pizza cutter or pastry wheel – To cut your pie dough into strips for lattice decoration or any decoration. Have you seen my pie crust designs post?
- Pastry brush – An egg wash is simply an egg mixed with milk or water (usually milk). Lightly brush the pie dough with an egg wash using a pastry brush. The egg wash creates a golden, shiny, crisp crust. Without it, pie crust is dull and lacking color.
- Pie weights – These are crucial when you blind bake pie crust for no-bake or custard pies. Note: 2 packs of these pie weights is definitely needed!
- Pie crust shield – Pie crust edges are usually higher up than the center of the pie, leaving them exposed to the most heat. They brown quicker than the center of the pie, so it’s important to protect it with a shield. I usually place a pie crust shield on the pie about halfway through bake time. I recommend an adjustable silicone pie crust shield that you can adjust. Or you can cover the pie with a piece of aluminum foil: cut a circle in the center so the center of the pie is exposed.
Pie Recipes
Now that you’re fully prepared and equipped, here are several pie recipes to use your all butter pie crust. Pictured is my chai spice apple pie and I topped it with salted caramel in the video.
- Traditional Apple Pie & Salted Caramel Apple Pie
- Lemon Meringue Pie (a blind bake pie crust recipe)
- Caramel Pear Pie
- Pumpkin Pie
- Pecan Pie
- Banana Cream Pie (a blind bake pie crust recipe)
- Cherry Pie
- Peach Pie
- Blueberry Pie
- Blueberry Peach Pie
- Sweet Potato Pie
- Butterscotch Pie (a blind bake pie crust recipe)
- Fun recipes: Apple Hand Pies, Brown Sugar Cinnamon Pop Tarts, Pecan Pie Tarts
- Or any of my favorite Thanksgiving pie recipes!

All Butter Pie Crust
- Prep Time: 20 minutes
- Cook Time: 0 minutes
- Total Time: 2 hours, 20 minutes
- Yield: 2 pie crusts
- Category: Pie
- Method: Baking
- Cuisine: American
Description
Follow this simple recipe and video tutorial for the best all butter pie crust. It will make you a pie expert immediately! Complete with all my tips and troubleshooting, this pie crust recipe is buttery, flaky, and tender with the most incredible flavor. This recipe is also in my cookbook, Sally’s Baking 101.
Ingredients
- 2 and 1/2 cups (313g) all-purpose flour, plus more as needed (spooned & leveled)
- 2 teaspoons granulated sugar
- 1 teaspoon salt
- 1 cup (16 Tbsp; 226g) unsalted butter, chilled and cubed
- 1/2 cup (120ml) ice water, plus more as needed
Instructions
- In a large bowl, whisk together the flour, sugar, and salt together. Add the cold cubed butter on top. Using a pastry cutter, food processor, or two forks (pastry cutter is ideal, see post above), cut or pulse the butter into the dry ingredients until it resembles coarse meal. You’re looking for pea-sized bits of flour-coated butter. A few larger bits of butter is OK.
- Drizzle the cold water over the surface of the flour mixture, 1 Tablespoon at a time, and stir after each addition. Stop adding water when the dough comes together easily and begins to form large clumps. The dough will feel moist and a little sticky, but not feel overly wet. Do not add any more water than you need to. I always use about 1/2 cup (120ml) of ice water.
- Transfer the dough to a lightly floured work surface. Using floured hands, gently bring the dough mixture together into a ball. Avoid overworking the dough. If it feels too dry or is too crumbly to form a ball, dip your fingers in cold water and then continue bringing the dough together. If it feels too sticky, sprinkle on a little more flour and continue bringing it together. Using a sharp knife or bench scraper, divide the dough in half. Using your hands, gently flatten each half into a 1-inch-thick disc.
- Wrap each disc tightly in plastic wrap and refrigerate for at least 2 hours and up to 5 days before using in a pie recipe.
- After refrigerating, the dough is ready to roll out and use in a pie recipe. Proceed with the pie per your recipe’s instructions. TIP: When rolling out the chilled pie dough discs, use gentle force with your rolling pin. Start from the center of the disc and work your way out in all directions, turning the dough with your hands between rolls. Smooth out the edges if you notice cracks. (See video.) Keeping your work surface, rolling pin, and hands lightly floured makes rolling out easier.
Notes
- Make Ahead Instructions: Prepare the pie dough through step 4 and freeze the discs for up to 3 months. Thaw overnight in the refrigerator before using in your pie recipe.
- Special Tools (affiliate links): Glass Mixing Bowl | Pastry Cutter | Silicone Spatula | Rolling Pin | 9-inch Glass Pie Dish | Pizza Cutter or Pastry Wheel | Pastry Brush | Pie Weights | Pie Crust Shield
- Pie Crust Comparison: Let’s see how this all butter pie crust recipe compares to my favorite buttery flaky pie crust, which uses a mix of shortening and butter. Due to butter’s high water content, this all butter pie crust is lighter textured with more defined flakes. As the crust bakes, the butter’s water converts to steam, creating thousands of deliciously light flakes. It’s also so buttery! However, because of all this butter, I find that the shortening and butter pie crust is a little easier to work with. Shortening has a higher melting point than butter, so the crust holds its shape wonderfully. Both crusts are fantastic, but if you are looking to make intricate pie crust designs I highly recommend my buttery flaky pie crust.
- Try This: Replacing 1 Tablespoon of ice water with cold apple cider vinegar creates an even flakier, more tender pie dough. It’s so tasty. Try it!


Reader Comments and Reviews
This is the best all butter pie crust! I have used it a lot, and it never fails. It’s flaky and the perfect texture. Absolutely the best!! 6 stars ⭐️⭐️⭐️⭐️⭐️⭐️
Hi! Is it possible to fully make the pie ahead of time – freeze then bake it? I didn’t know how this would affect the cook time. Thanks!
Hi Haleigh! What pie recipe are you referring to? We usually don’t recommend fully assembling fruit pies ahead of time because you risk the crust becoming soggy.
Hi, I’ve made this crust before to make apple pie and last time it came out very hard. I had to use a cake pan because I do not own a pie pan. How much of the dough would you recommend or ratio? Would you recommend for me to do to not make it like that again and make it flaky and soft
Hi Michaela, an 8 or 9 inch round cake pan would work best if you don’t have a pie pan. Use the recipe and instructions, trimming excess dough if needed. Tough dough is often caused by over-working the dough, so be very careful not to mix or handle it more than needed. Also be careful not to add too much flour to the dough – make sure to spoon and level when measuring, or use a kitchen scale. Sally has a great video on how to make pie crust in our other, very similar pie crust recipe, if you would like to watch that for a visual! Hope these tips help for next time.
Hello, is it possible to chill the dough in freezer instead of fridge? In which case how much time should I chill instead of the 2 hours?
Hi Mark, we don’t recommend it. It always chills unevenly and rolling out (and shrinking while baking!) is always an issue.
Hello Sally! Could you clarify a bit what is meant with ” fold the dough into itself until all flour is merged with the fat”? This text appears in the Instructions section 4. How long should I keep folding the dough? This procedure is also not shown in the video
Hi Marianna! Fold together until all the flour is moistened.
Such a great pie crust. Lovely and flakey. Turned out so well when I used it for mini quiches. Looking forward to making a pie with it. Also really easy to make and handle.
I see the measurement for the dish used was 9″, I am making a 10″ quiche, would half the recipe be sufficient?
TIA,
Adrienne
Hi Adrienne! This recipe yields 2 pie crusts for 9 inch pies. (1/2 of the recipe for 1 pie.) You can use 3/4 of this dough to ensure you have enough for your 10 inch pie.
But how long do I bake?! I’m using a cooking filling.
Hi Abbie, here’s everything you need to know about how to blind bake pie crust.
Can I use oil instead of butter???
Hi Nancy, butter is crucial here—we don’t recommend any substitutes.
Hi! I made the Sugar Cinnamon Pop tarts. I followed your recipe and found it to be time consuming. The turned out wonderfully tasty! A friend said the crust was very flaky and the best she’s ever eaten. I was thinking about cutting out the steps of putting the cutout bottoms in the fridge. Having ahead of time, tops and bottoms prepared so it wouldn’t take that much time. They came from the oven so lightly browned.
I also made the All butter pie crust!! Also going to follow your pie apple pie filling. Thank you so very much for sharing your recipes!! A+✓
!!
Hi Sally and Friends,
What flour do you recommend using for gluten-sensitive folks? My husband is gluten sensitive, so whenever I bake I substitute with a “one to one” gluten free baking flour, usually King Arthur’s or Bob’s Red Mill. I made the pie crust for the first time today, but found that the dough was extra crumbly (even after getting it to a soft enough and moist enough with the ice cold water). I’m wondering, is it possible that the gluten-free aspect could contribute to this? I am amazed that I was able to roll it out and get it into the pie pan (glass)! It definitely does not look very pretty lol, and thought I would try some decorative designs (there was no way that was going to keep, haha). I’m curious what your take is and what you would suggest doing for our fellow gluten-free friends. Thank you, Sally!
Hi Emily! We wish we could help, but admittedly, our team does not have much experience baking with gluten-free flour. Although some readers report using an all-purpose 1:1 gluten-free flour in many of our recipes with success, you should expect slightly different results anytime you substitute ingredients. For best results, you may have more success with a pie crust recipe that was specifically developed to use gluten free flour. If you do decide to do more experimenting with this recipe, please let us know how it goes!
I made this pie crust for a pi day pie for my son’s elementary school yesterday and it was a huge hit, thank you! One question that I’ve never found answered is how long do you let the pie dough disk rest after taking it out of the fridge before rolling? I always start too soon when it’s too cold and it cracks around the edges. Thanks!
Hi Amy, it really depends on the temperature of your kitchen and how cold the dough is. Usually just a few minutes is all, since you still want to work with a cold dough. So glad it was a hit!
Love your website – my go-to site for baking recipes and instruction! Thanks for another great recipe
I started hate.making pie crust and I used this receipt with salt butter no salted added and it smells amazing I hope this taste as good as it looks
Keep going back to this recipe. Makes a beautiful flaky, tasty crust.
I have made this recipe 4 or 5 times. For context, I have experience in the kitchen. A half cup of ice water is never enough when I make this recipe. I have gotten a tough crust from this recipe because I have overworked the dough trying to get the water amount correct. I would say I add 3 full tablespoons more ice water. Just my experience. I keep coming back because all of the other recipes of Sally’s are spot on!
I want to experiment with mini pie crusts and wanted to use this recipe! How would temp and/or baking time change if the dish is 3-4 inches? Would it change at all from a standard bake?
Hi Kate, are you talking about par-baking or blind baking the crust, or baking it with a filling? The total amount of bake time really depends on your pie recipe, and how long the filling needs to bake; but in terms of blind baking the crusts, the bake time may be a little shorter depending on the size. When we make mini pumpkin pies, for example, in a mini muffin tin, we don’t par-bake the crusts at all, because the time it takes to bake the filling is enough to also bake the mini-size crusts.
Another comment about this pie dough.
I had extra when I made mini pecan pies right before Christmas. I wrapped it in plastic wrap, put it in the refrigerator, and forgot about it. A couple days ago I took all of the leftover dough out, intending to bake it but I did not remember what was in all of the dough balls. I tolled the dough out, cut it with a three inch cookie cutter, baked it at 350 until it looked done, and pulled it out if the oven. After the rounds cooled, I toasted and buttered them. Excellent snack.
I made this crust yesterday and halved the recipe as I was going to make a raisin cream pie. It was the worst pie crust I have ever made. It was so tough I had to use a paring knife to cut the pieces. I am hoping that setting overnight the cream filling will soften the crust so it is eatable. What did I do wrong? I followed the recipe as I stated only halvng it. I have used many of your recipes before and have loved them all.
Hi Judy, a tough pie crust is most often caused by over-working the dough. Make sure to handle it as little as possible when bringing it together. You can watch Sally’s video on our similar pie crust recipe (using shortening and butter) for more tips and tricks.
I prefer all butter pie crusts(can’t beat the flavor) and this recipe is great. Like some of the other commenters, I was having trouble with my par baking pie crusts melting into a pile of mush. I was advised oven temperature might not be accurate and sure enough after kicking up the oven temperature to 425 degrees…no more mush. Once the piecrust is par baked I add the filling and reduce oven temperature to 350 degrees and if necessary put foil around crust edges so they don’t burn.
The result was an absolutely lovely apple pie ! Sally your recipes are so clear and meticulously displayed, I can’t thank you enough. As a Londoner living in India I miss nothing more than baked items. It isn’t easy to source all of the ingredients, and the thoroughness of your recipe guarantees that even if I tweak it a little it still comes out fantastic! Thank you from an avid foodie and pastry lover ✨
This crust was so buttery and flaky! Best recipe I’ve used and your tips worked out great.
Wow 10/10! I have always struggled with pastry but after reading this post I felt confident I would succeed and I did. My mulberry pies, big and individual, looked and tasted perfect. They did not crack or crumble. What a fantastic recipe.
I’ve been making pies since I was 12yrs 73 now, I’m know as the pie lady. I have always used crisco, I found this recipe omg wonderful also using.a food processor! Since I’ve gotten arthritis
this recipe was awesome, my pie turned out so well! i subbed 1/4 cup water for honey whiskey and loved the result (no idea if that actually helped but still haha). the all-butter recipe was much easier for me to work with than the shortening/butter one, so i’ll definitely be using this from now on!
1/4 honey whiskey for half the water* sorry haha
Why did it bake hard as a rock?? I know I’ve used this recipe before with great results, but this was the first time I par baked it. I swear I followed your directions exactly and did not over knead it. I chilled it for two days in the fridge and then transferred it to the freezer for a day and then let it defrost in the fridge for one day. I put the dough into the pie pan and let it chill in there for two hours in the freezer. I lined with parchment reinforced with foil and weights and baked at 425° for 15 minutes. I let it cool completely before adding the pumpkin pie filling, and as I have never had a pumpkin pie without a raw bottom, I baked it on the bottom rack of my oven, which was on a pizza stone. I set the pie pan, which was metal directly on the pizza Stone. the pie turned out beautifully, but the crust was almost impossible to cut with a knife! Pretty embarrassing, but still delicious. It was fine to pick up with your hand and eat it that way. Nobody broke a tooth! but what did I do wrong? That’s what baffles me because I know that I have made an apple pie with this crust before, and it turned out perfectly. Any suggestions would be helpful. I swear I did not over mix it. That’s the only thing I can think of my butter pieces were a little bit on the two big side if that matters. But they always are. I’m always afraid of over mixing the butter into the flour. The pie was a lively golden brown and the filling did not crack, it was not over baked. Thank you!
Hi Susan, I’m sorry to hear this! If I had to guess, I’d say it was probably caused by baking it in a metal pan directly on a pizza stone instead of on an oven rack that allows air to circulate underneath the bottom of the pie dish. We would also recommend using a glass pie dish, which conducts heat more evenly, retains heat longer, and allows you to see whether your pie crust looks baked through from underneath. It also could be that you par-baked the crust at a higher temperature, and from frozen. In our how to par-bake pie crust post and our pumpkin pie recipe, we recommend par-baking at 375 for 10-15 minutes with weights, then removing the weights and baking another 7-8 minutes. I hope these tips help for next time!
I’ve used this recipe probably four times at this point, and my family and I have really enjoyed it! However, I did par bake it for a pumpkin pie and fully blind bake it for a French silk pie, the crust came out extremely tough and hard, and I’m not sure why. My oven was clear and I followed the instructions to a T. I made sure I didn’t over kneed it and let it sit and chill in my fridge. Are there any recommendations or something I should try for the future the next time I use this recipe?
Hi Lauren, Pastry like this pie crust can turn tough if it is overworked. Once you add the water, try to work the dough as little as possible to bring it together. If the dough is too dry, you can add a little more water as needed. Thank you for giving this a try!
I love this recipe. If I have to make a cold pie, what would baking instructions for this pie crust be on its own?
Hi Philip, you can follow the instructions for fully blind baking a pie crust here.
I made your apple Carmel pie which was delicious but struggled with the buttery pie crust. When I read you used King Arthurs Flour I went to that site and discovered your weight for 2 1/2 cups of flour and theirs differs. Being a novice baker I am confused that the weights would be different. I weight my ingredients when given the amounts. Please reply
Hi Mary Ann, We consistently measure 1 cup of spooned and leveled all-purpose flour as 125g, and 2 and 1/2 is about 313g. The recipe has been tested with these gram measurements.
I love this site and this recipe. It’s my go-to recipe for pie crust. It’s so easy to make and always turns out right. I will be trying your flakey crust soon as well! Love your recipes
I love this site and this recipe. It’s my go-to recipe for pie crust. It’s so easy to make and always turns out right. I will be trying your flakey crust soon as well! Love your recipes
Unfortunately I am going to have to go back to my old standard pie crust recipe. Although this is delicious, the crust melts and collapses. I put a beautifully crimped pie crusts in the oven only to have mushy crust as soon as I put in in the oven to par bake it. So disappointed to present this for Thanksgiving.
I’ve made this recipe before for pumpkin pies and pot pies, but when I went to make it today for our Thanksgiving pumpkin pie (which I love!) it did just as the previous commenter said and the sides collapsed into a mushy mess when I pre-baked it! After I had fluted it and it looked so beautiful too. I’m so disappointed! Sally could you give any insight into why that happened?? I followed the recipe almost exactly, and it was kept cold all throughout. Never had that happen before!
Hi Megan, you mention that you followed the recipe almost exactly–what changes did you make? If you take a look at our post on how to par-bake pie crust, you may see some tips there that could help… freezing the shaped pie crust before baking is an option you could try for next time. Hope this experience doesn’t discourage you from trying again!