

If you’ve been reading my blog for a few years, you may be familiar with my annual July 4th tradition. 🙂 Every year on or around July 4th, I share a new apple pie recipe. This year marks year 6! Apple pie, an American classic, is my all-time favorite dessert. I shared my first recipe back in 2013 and every year since then:
- 2013: Salted Caramel Apple Pie
- 2014: Apple Pie Bars (with Salted Caramel on top)
- 2015: Apple Crumble Pie
- 2016: Apple Slab Pie with Maple Icing
- 2017: Traditional Apple Pie
- 2018: Apple Hand Pies
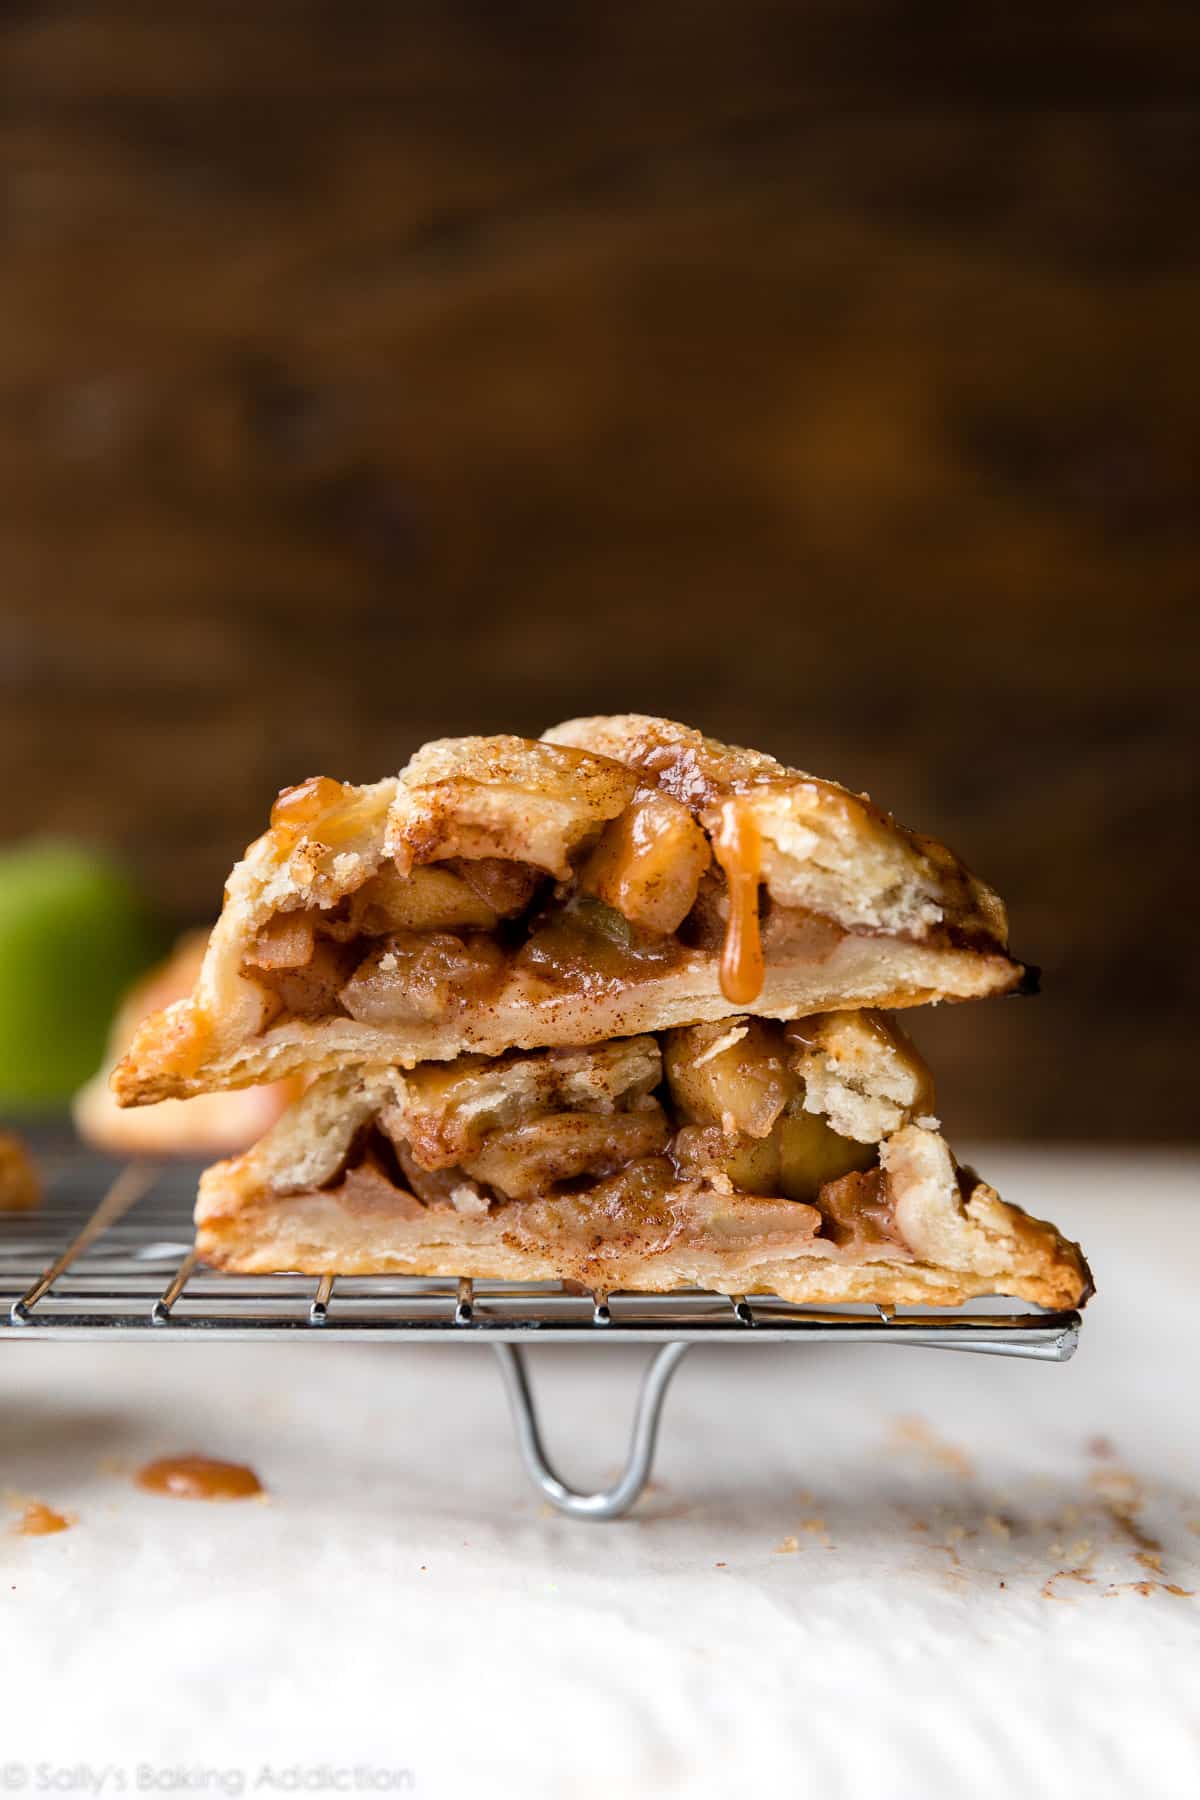
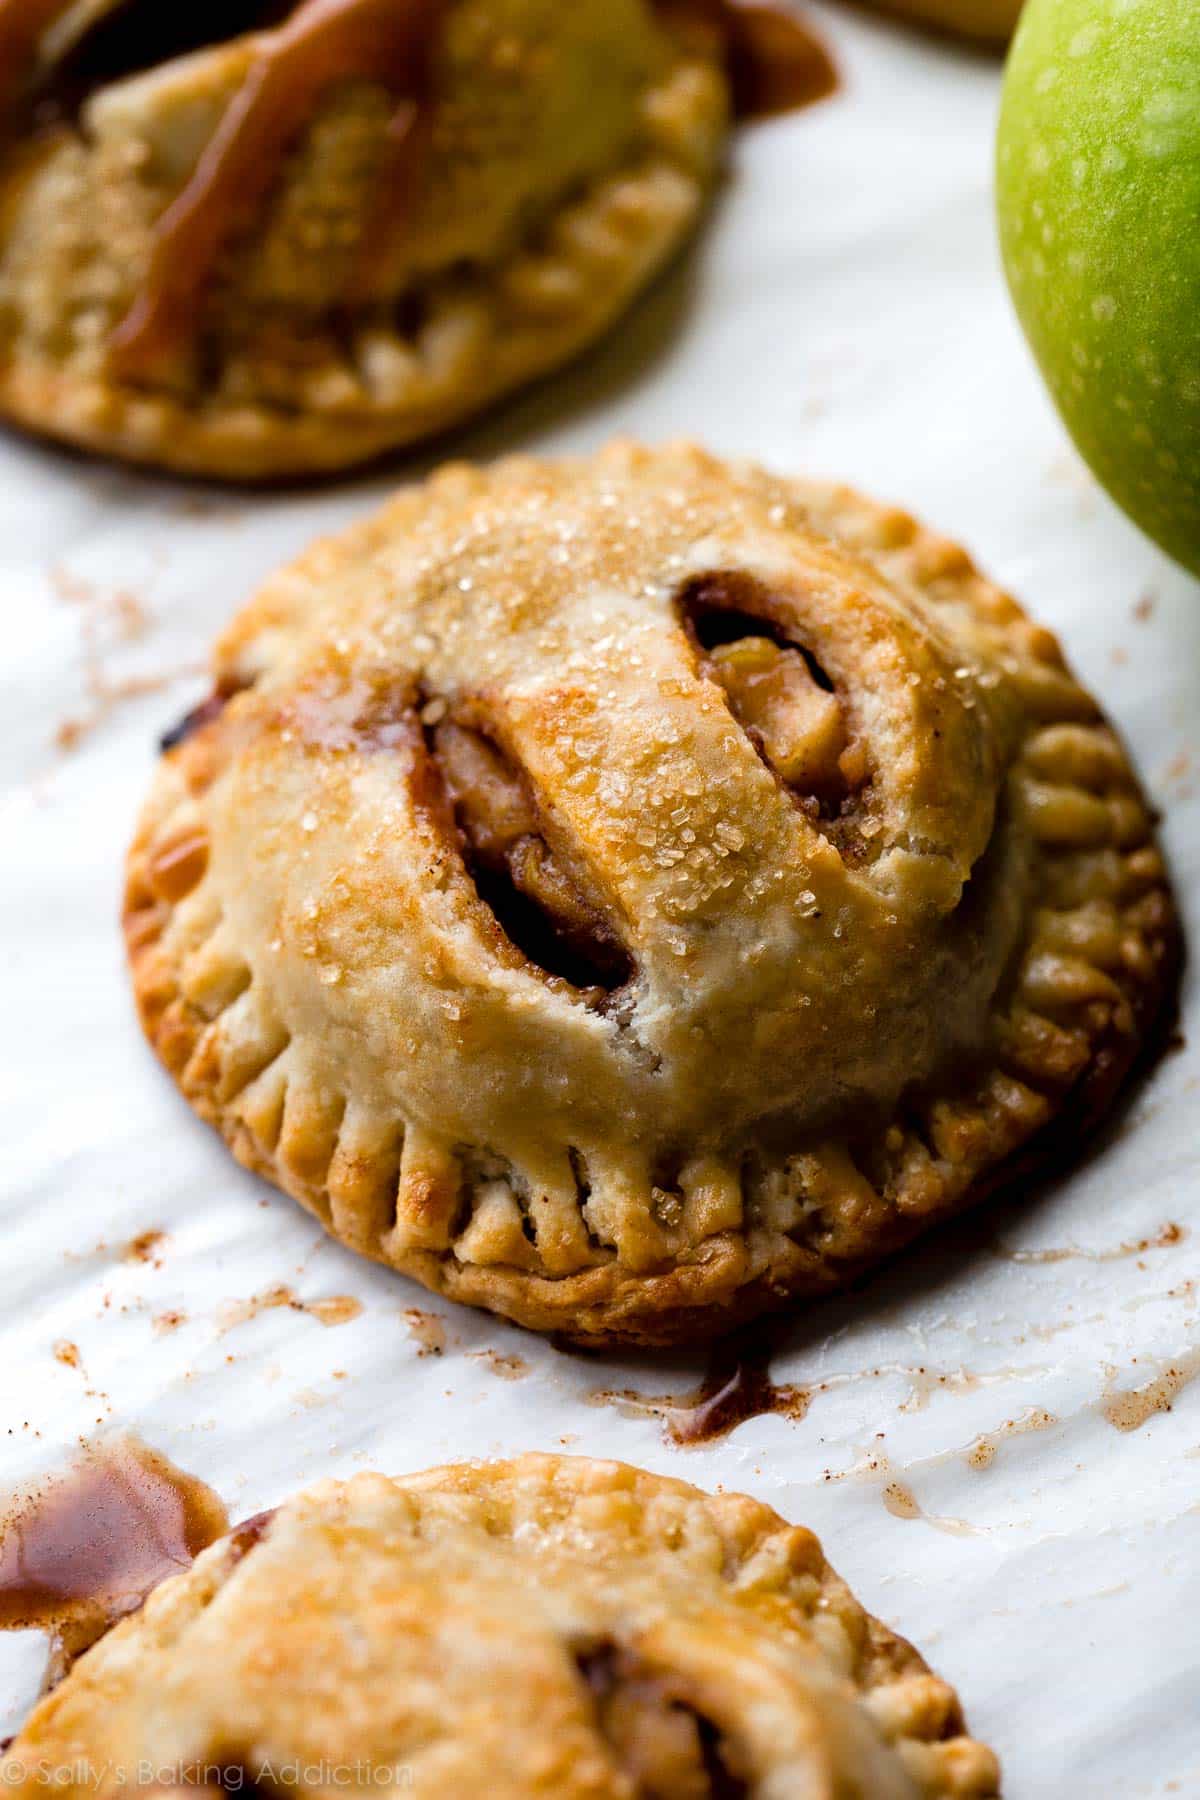
My recipe for homemade individual apple hand pies is really fun for summertime; hand pies are an easy grab and go dessert, so they’re great for summer picnics. Awesome portion control. No serving utensils or plates required. Can be served warm, room temperature, or cold and honestly taste great each way. Kids can help shape them and hand pies can be prepared days ahead or frozen.
And, best part of all, you literally have an apple pie just for yourself.
Today I’m sharing my apple hand pie recipe, step-by-step photos, and a video tutorial. I also include alternate filling suggestions just in case apple isn’t your thing. Lots to go over so let’s get started!
Homemade Pie Dough
First step is to make your pie dough. There’s a higher crust-to-filling ratio in hand pies, so we want a crust that tastes GOOD. I recommend using my homemade pie crust. This crust, prepared with a mix of butter and shortening, is sturdy enough to bake in different shapes and designs. Pie crust may intimidate you, so let’s go over my pie crust tips and tricks:
- Why a mix of butter and shortening? Not all fats are created equal. With its high melting point, shortening helps pie crust hold its shape and since it melts slowly, creates flaky layers and a tender texture. Butter imparts unparalleled, impeccable flavor. So I use both fats to create a strong, flaky, and buttery crust.
- Use cold fats and ice cold water. Keeping the pie dough as cold as possible is imperative, especially in the summertime. If room temperature or warm, the fats will melt as you mix and roll out the pie dough, rendering it impossible to work with. The baked crust will be tough and dense. In the summer months, I even suggest beginning with cold flour. Stick the bowl of flour + salt in the freezer for 30 minutes before adding the fats. This acts as extra insurance to help guarantee your pie dough will be (1) easy to work with and (2) taste good!
- Handle the dough with care. When rolling out pie dough, go slow. Always start from the center and work your way out in all directions, turning the dough with your hands as you go. If the edges are cracking, smooth them out with your fingers and hands. (You can see me do this in the video below.)
- Marbles and specks of butter in the pie dough are a good thing. All the more buttery pockets and flakes in the baked pie dough!
- All is not lost. If you notice the dough is cracking or too dry, dip your fingers in cold water and smooth out any cracks. If it’s cracking, it needs some moisture. If the dough seems really flimsy and sticky, lightly flour it. If it’s sticky, it’s too wet.
Here’s the full recipe for pie crust. More tips and troubleshooting assistance over that way. The recipe yields 2 crusts, and you’ll use both in this recipe to produce 10 hand pies.
Apple Pie Filling
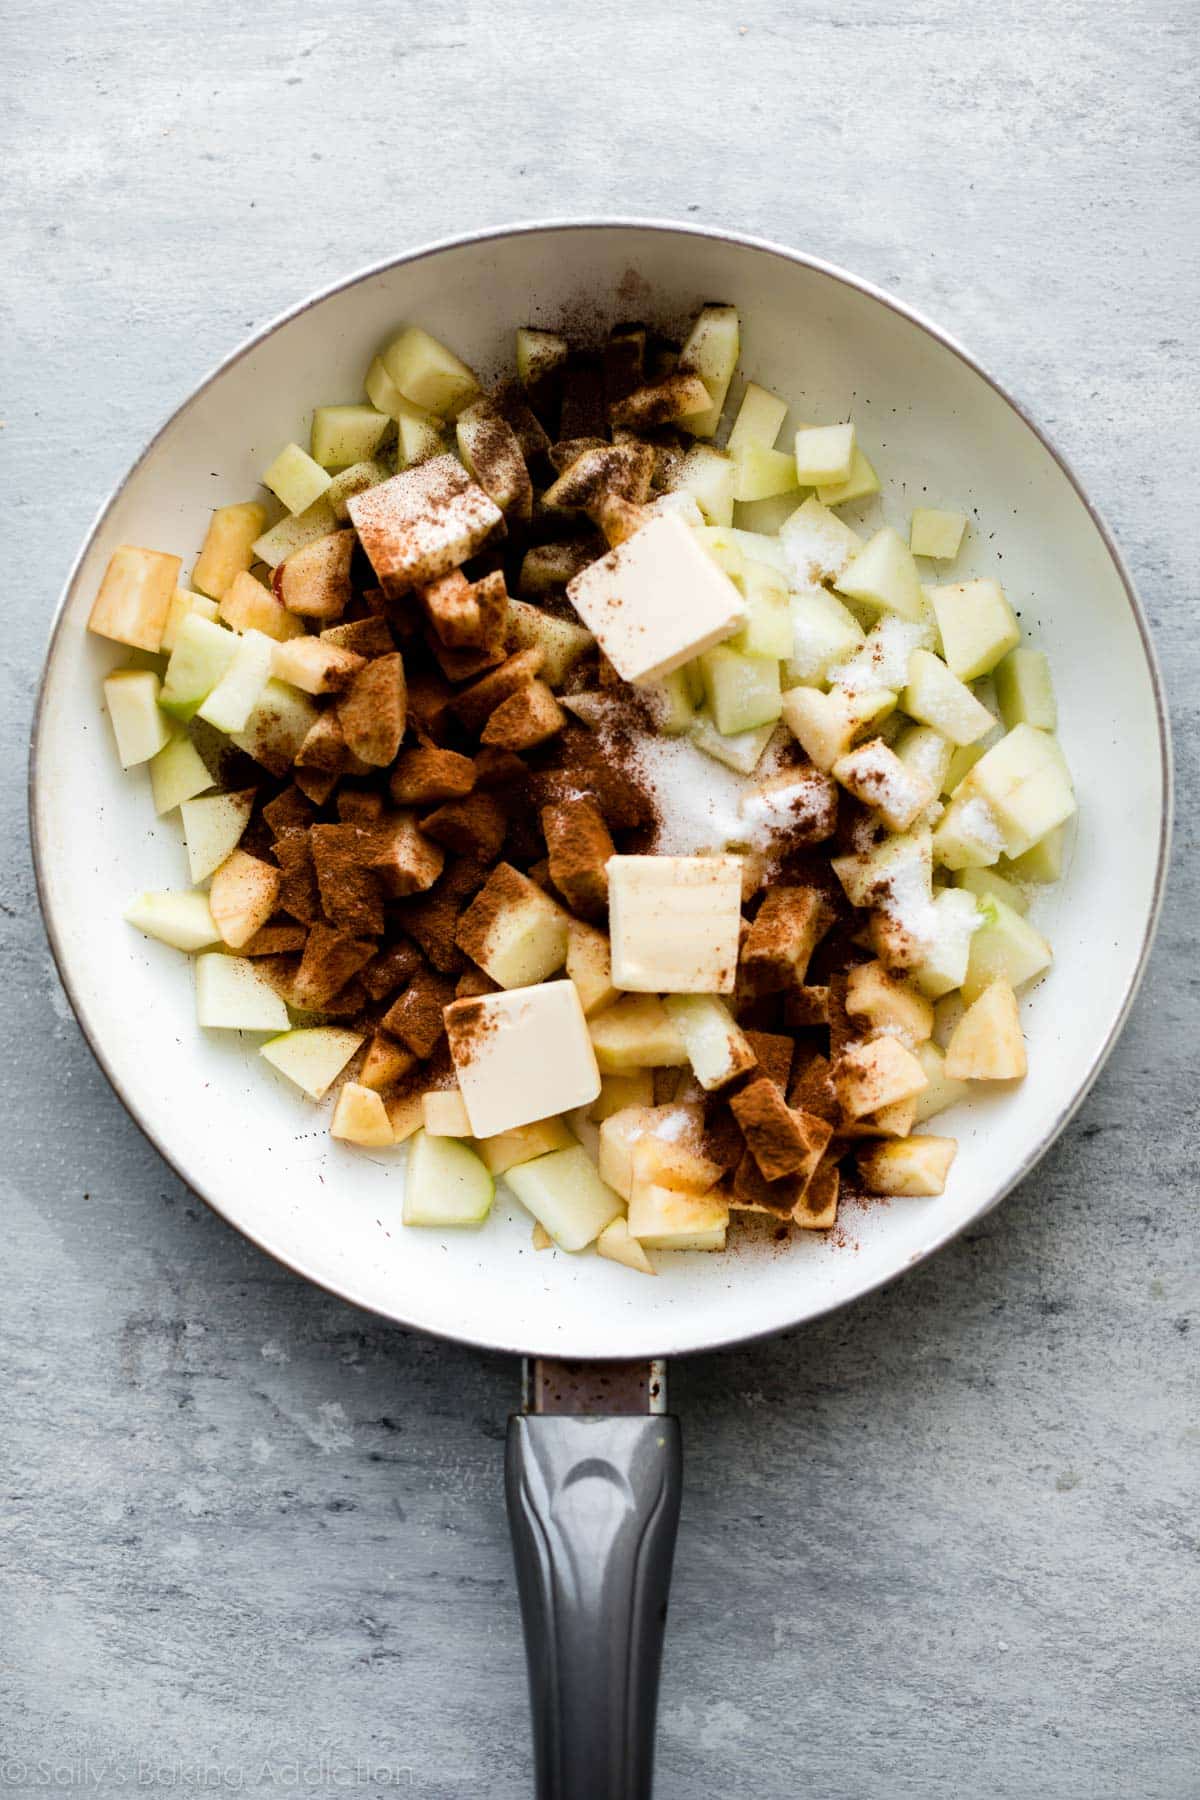
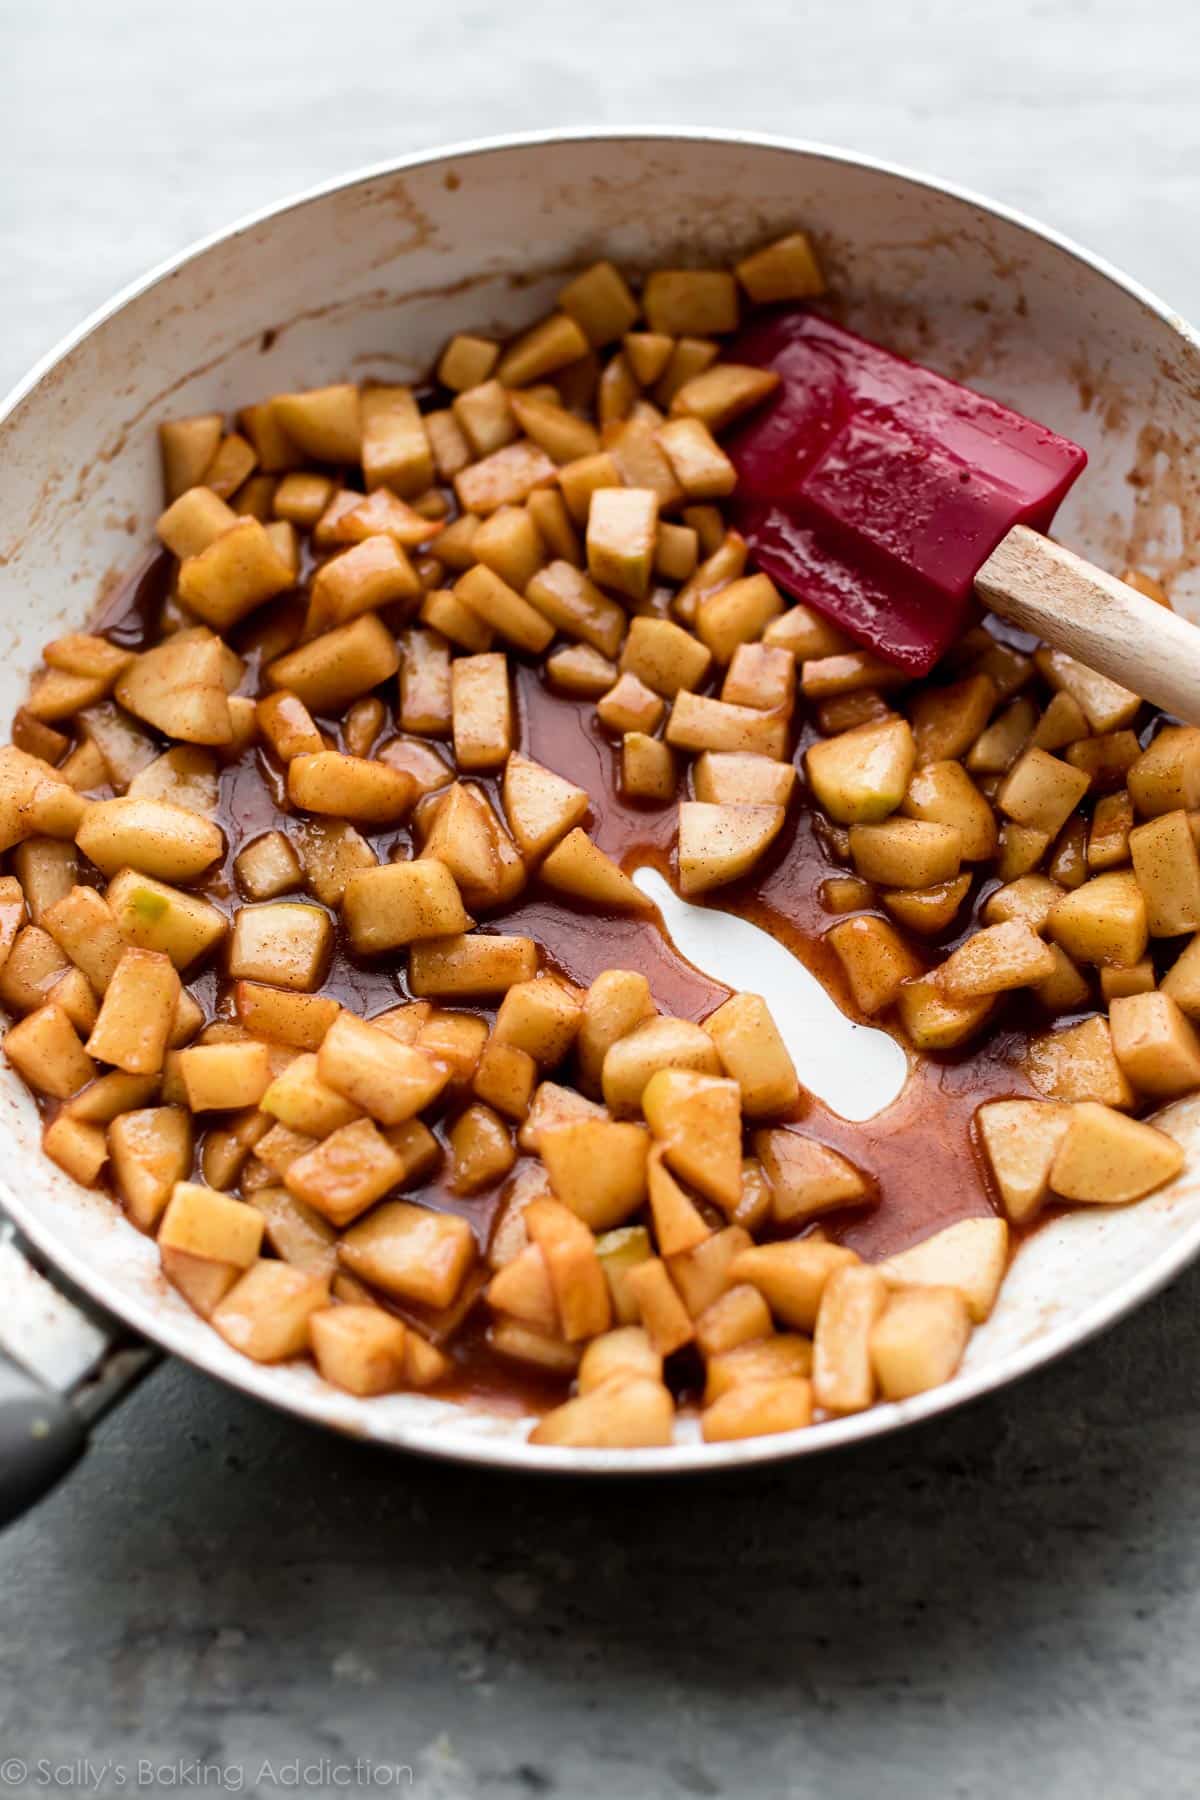
Just apples, sugar, spices, and butter. What more could one want?* The hand pie bake time isn’t long enough to really soften the apples, so let’s get them started on the stove. The filling is buttery, pleasantly sweet, and filled with cinnamon spice. You can prepare it a couple days ahead of time (along with the pie dough!) so all you have to do is assemble and bake the hand pies for dessert.
*Salted caramel. One could also want salted caramel. That’s going on top!!
Whenever I make apple pie bars, apple pie, apple cranberry crumble pie, or even apple cake, I always use 2 different kinds of apples for more depth of flavor. (half sweet variety, half tart variety.) For a detailed list of my favorite apple varieties and when to use each, you can visit my post The Best Apples for Baking.
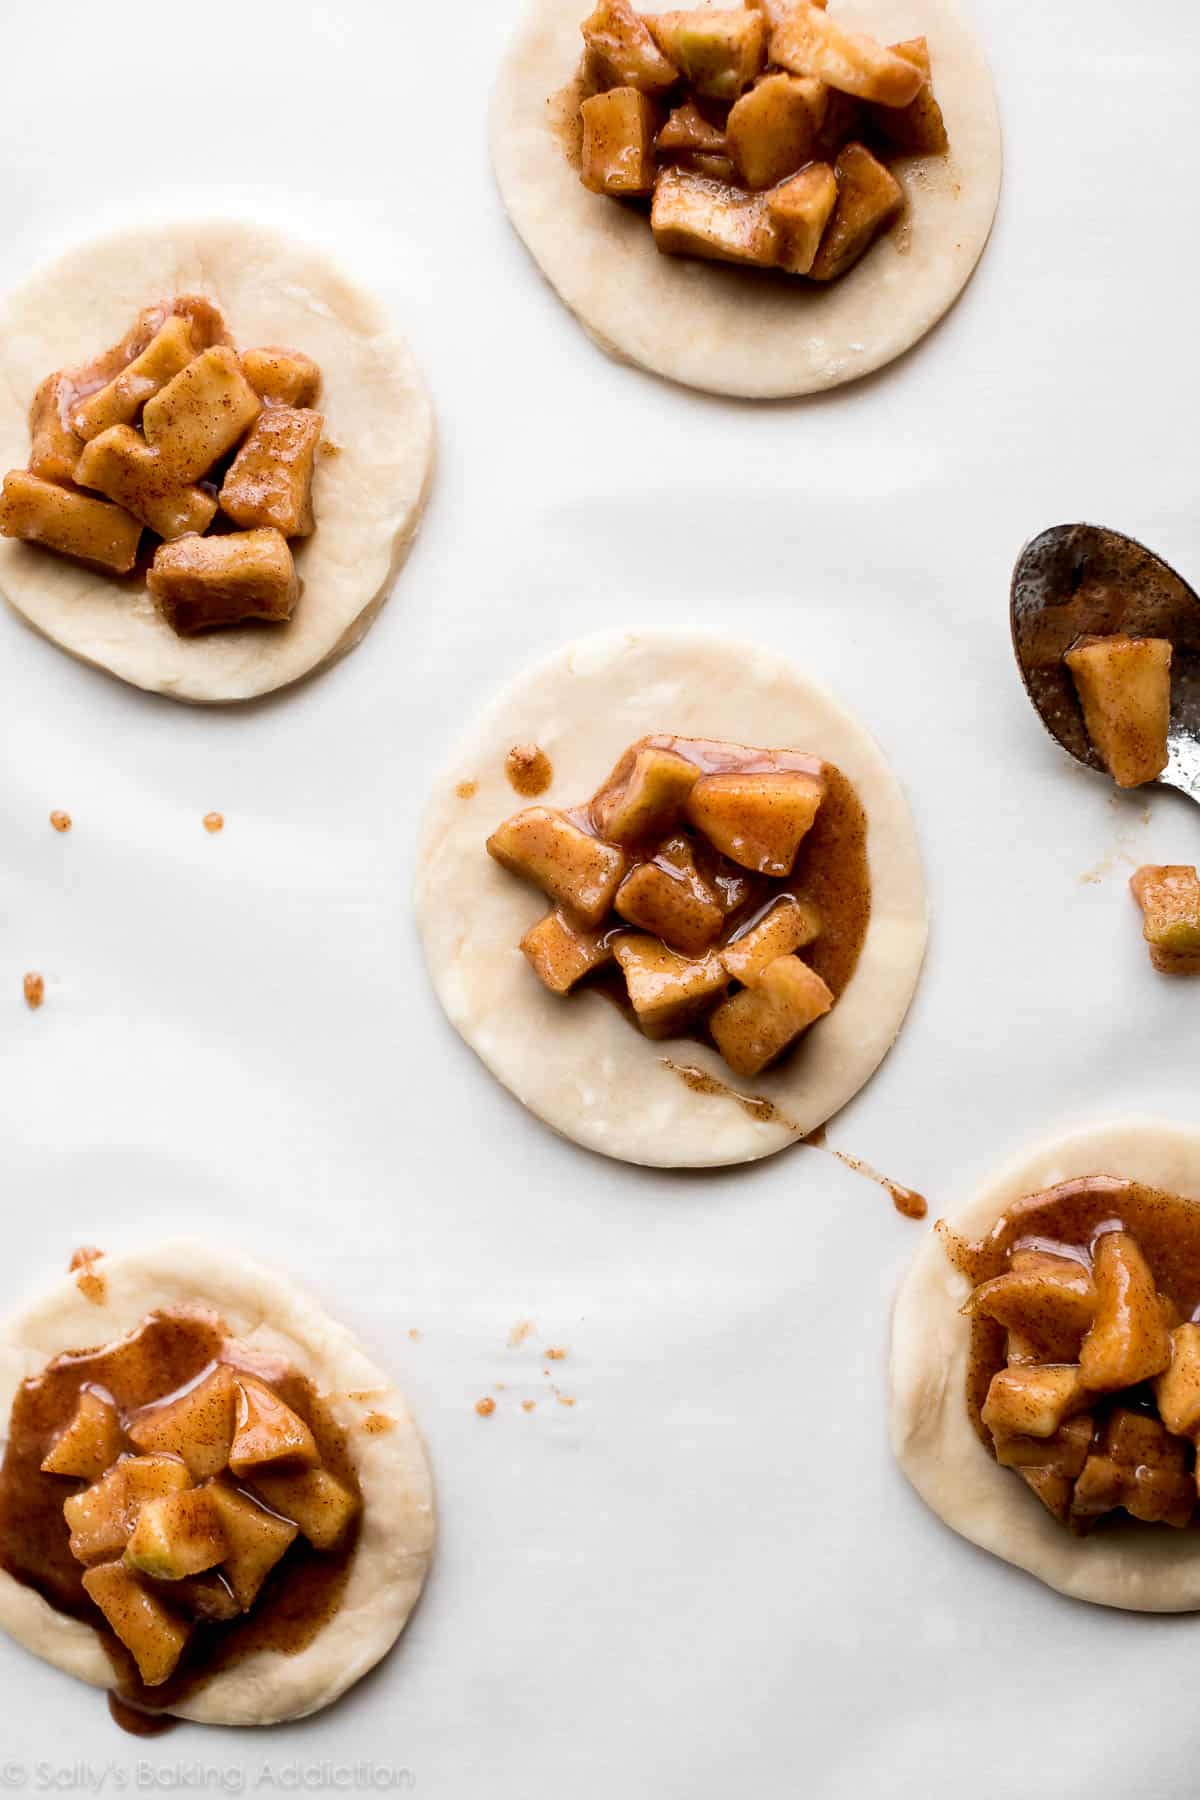
My only tip for the apple pie filling: cut the apples into small bite-size pieces. That way you can fit more into each hand pie.
Alternate Fillings
So many delicious options!
- Blueberry: Combine 2 cups of fresh blueberries (I don’t recommend frozen—too wet), 1.5 Tablespoons cornstarch, 1/3 cup granulated sugar, and a splash of lemon juice together in a saucepan. Cook the filling just like you would with the apple pie filling in the directions below.
- Strawberry: Follow blueberry instructions, but use 2 cups chopped fresh strawberries.
- Cherry: Simply follow the filling recipe + instructions for my cherry pastry pies (step 1 in that recipe).
- Jam: fill with a spoonful or 2 of your favorite jam or preserves.
- Brown sugar cinnamon: Just make my homemade brown sugar cinnamon pop tarts. They’re hand pies. 🙂
Alternate Shapes
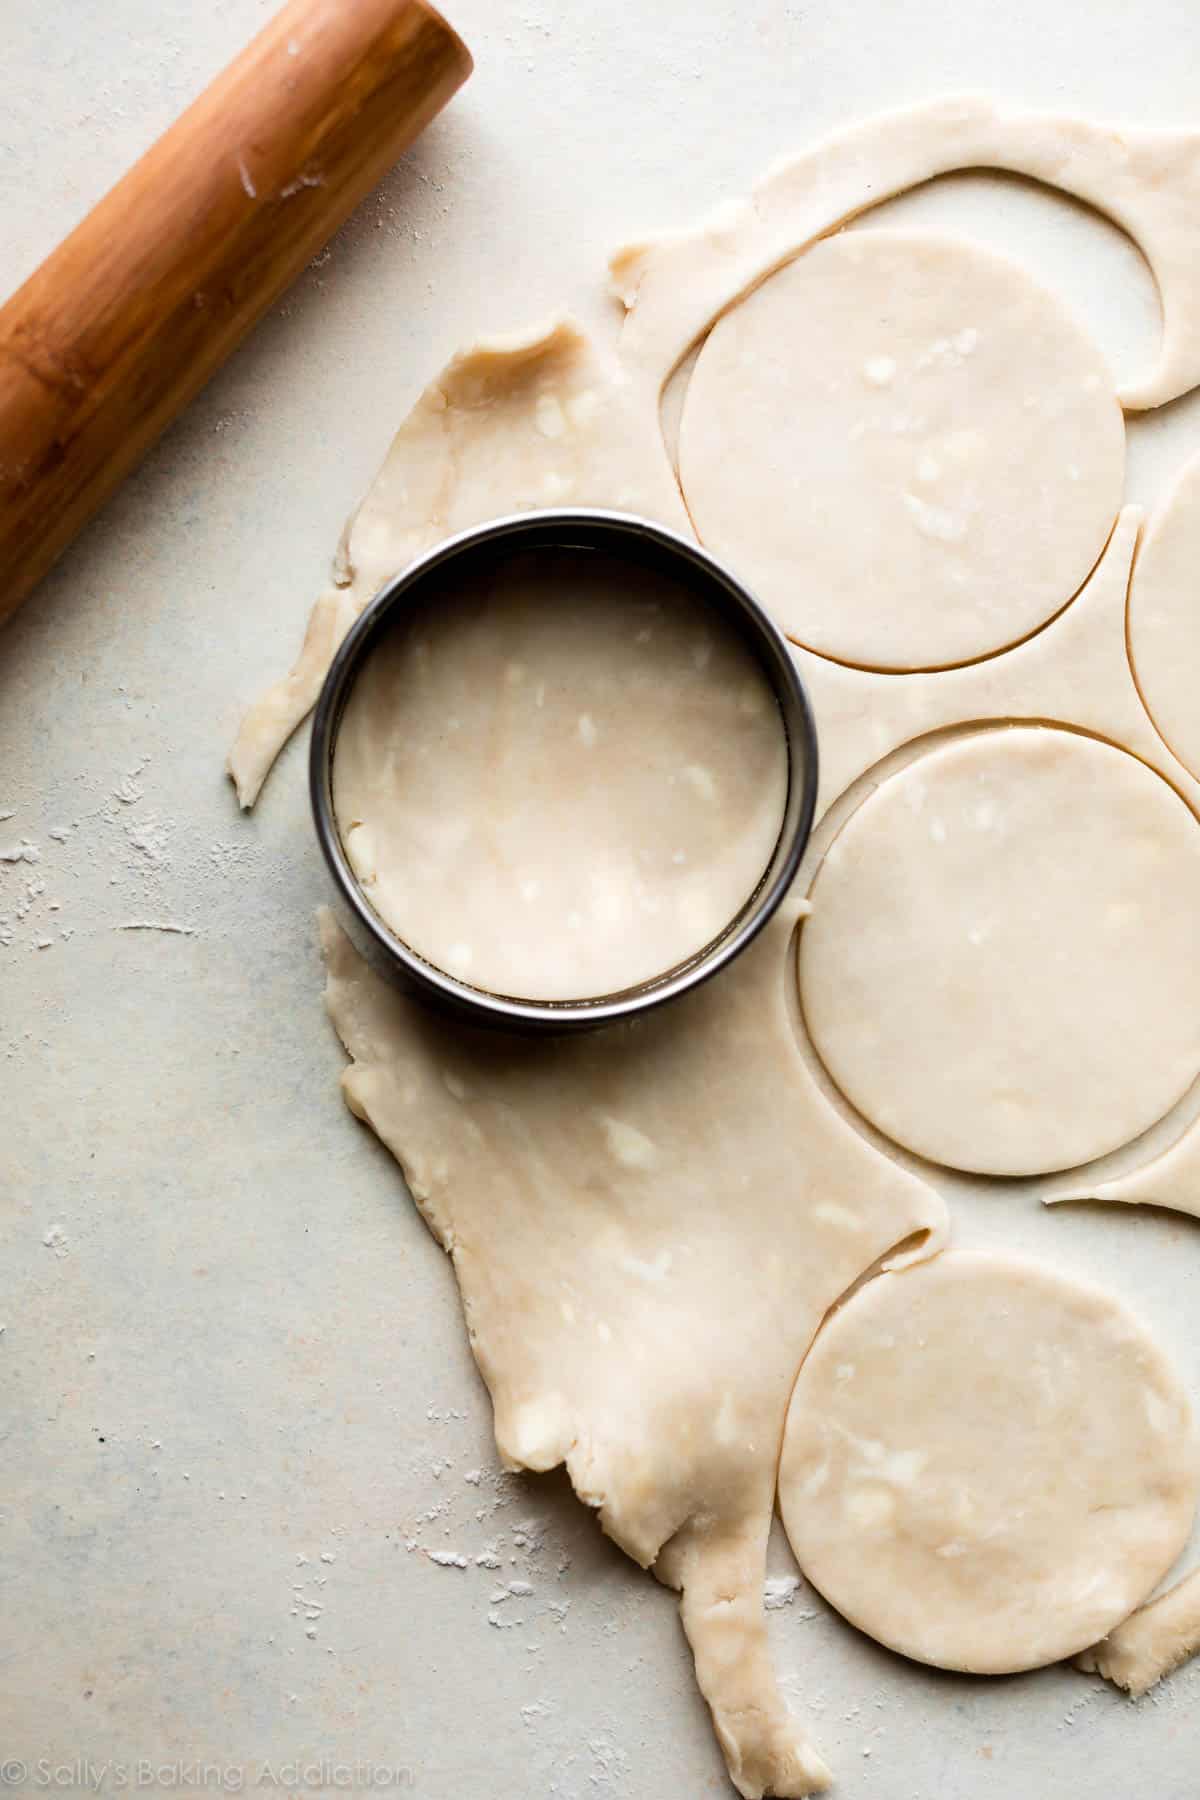
You can shape the hand pies whatever shape you want. I use a 3.5-inch round cookie cutter. I don’t suggest anything smaller than 3 inches in diameter because you can’t fit enough filling in a pie that small. You can also shape into rectangles. See my homemade brown sugar cinnamon pop tarts as an example. I use a ruler and cut into 3×4-inch rectangles. Bake time will be more or less depending on size—just bake until crust is golden brown. Use the same oven temperature.
Watch me assemble the hand pies in this video:
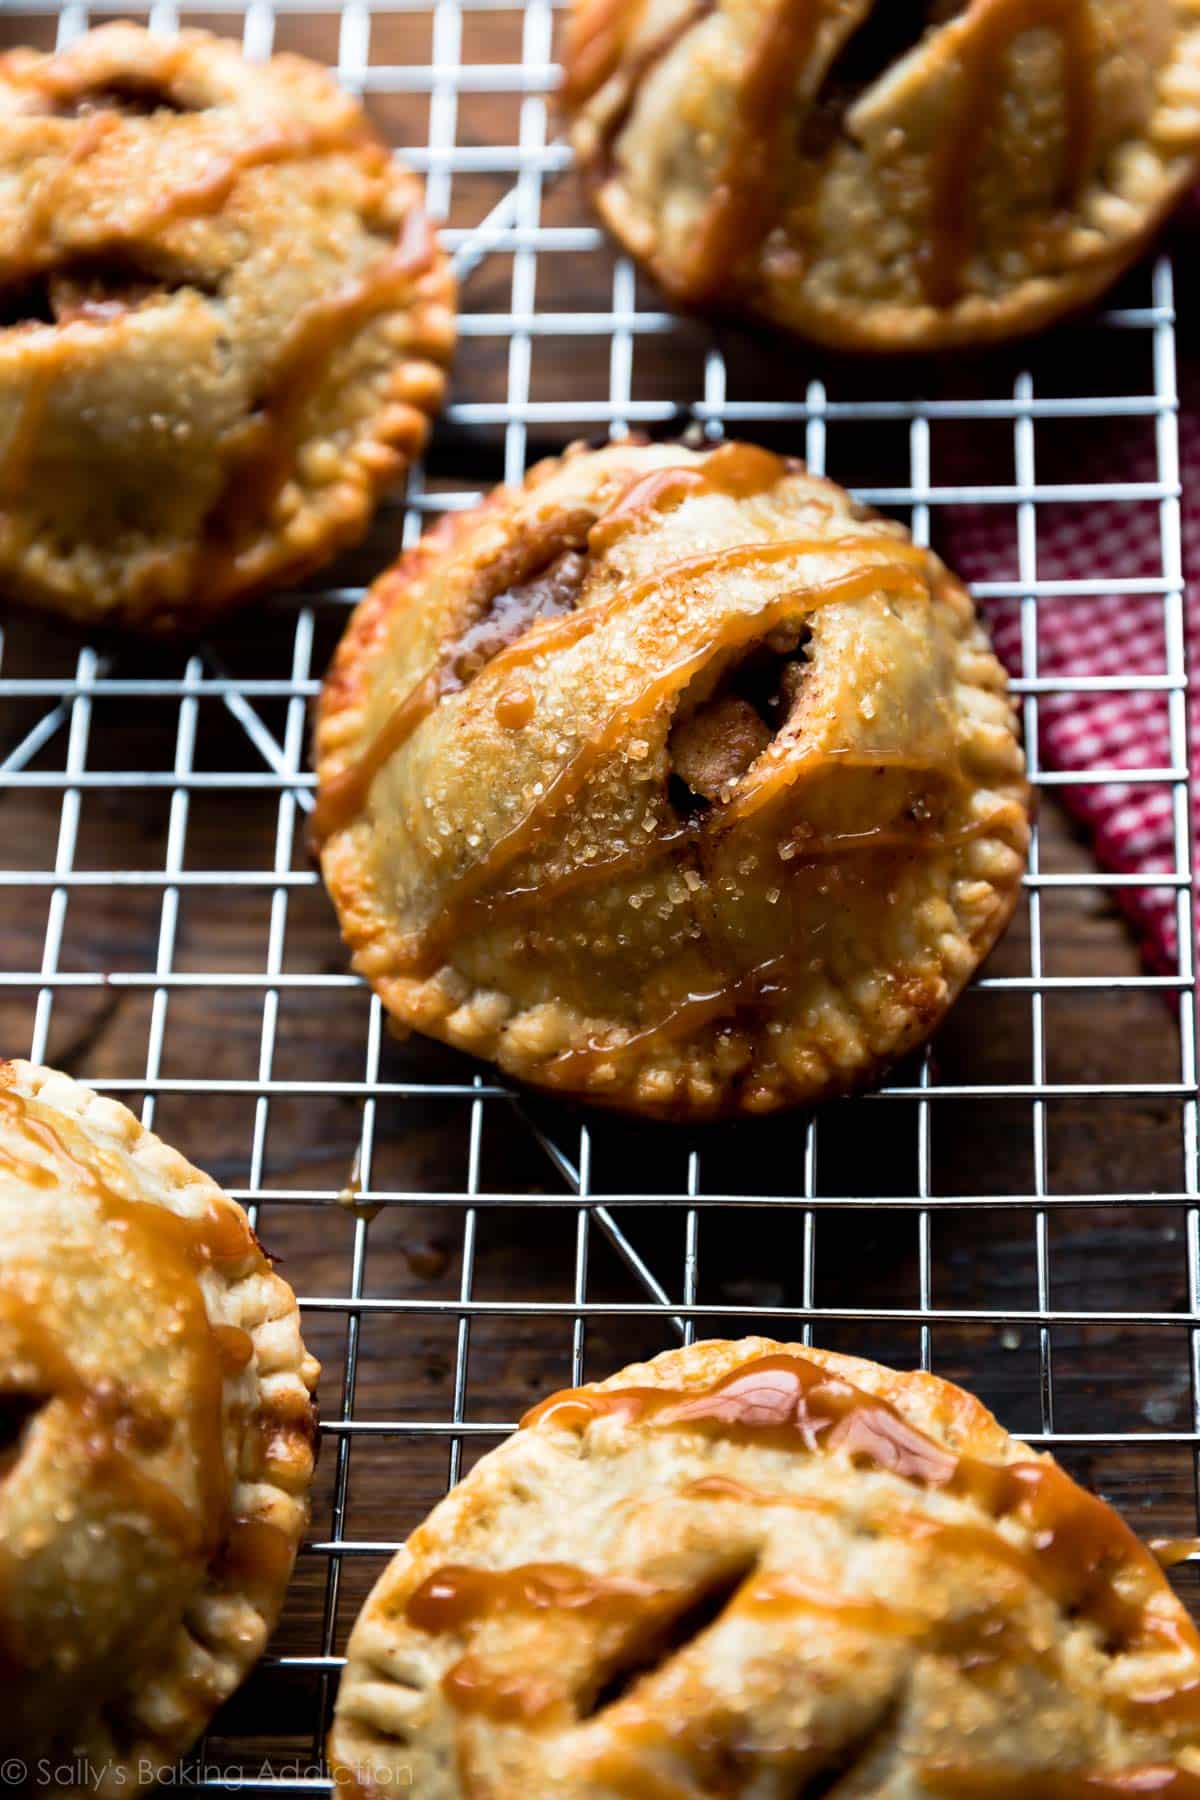
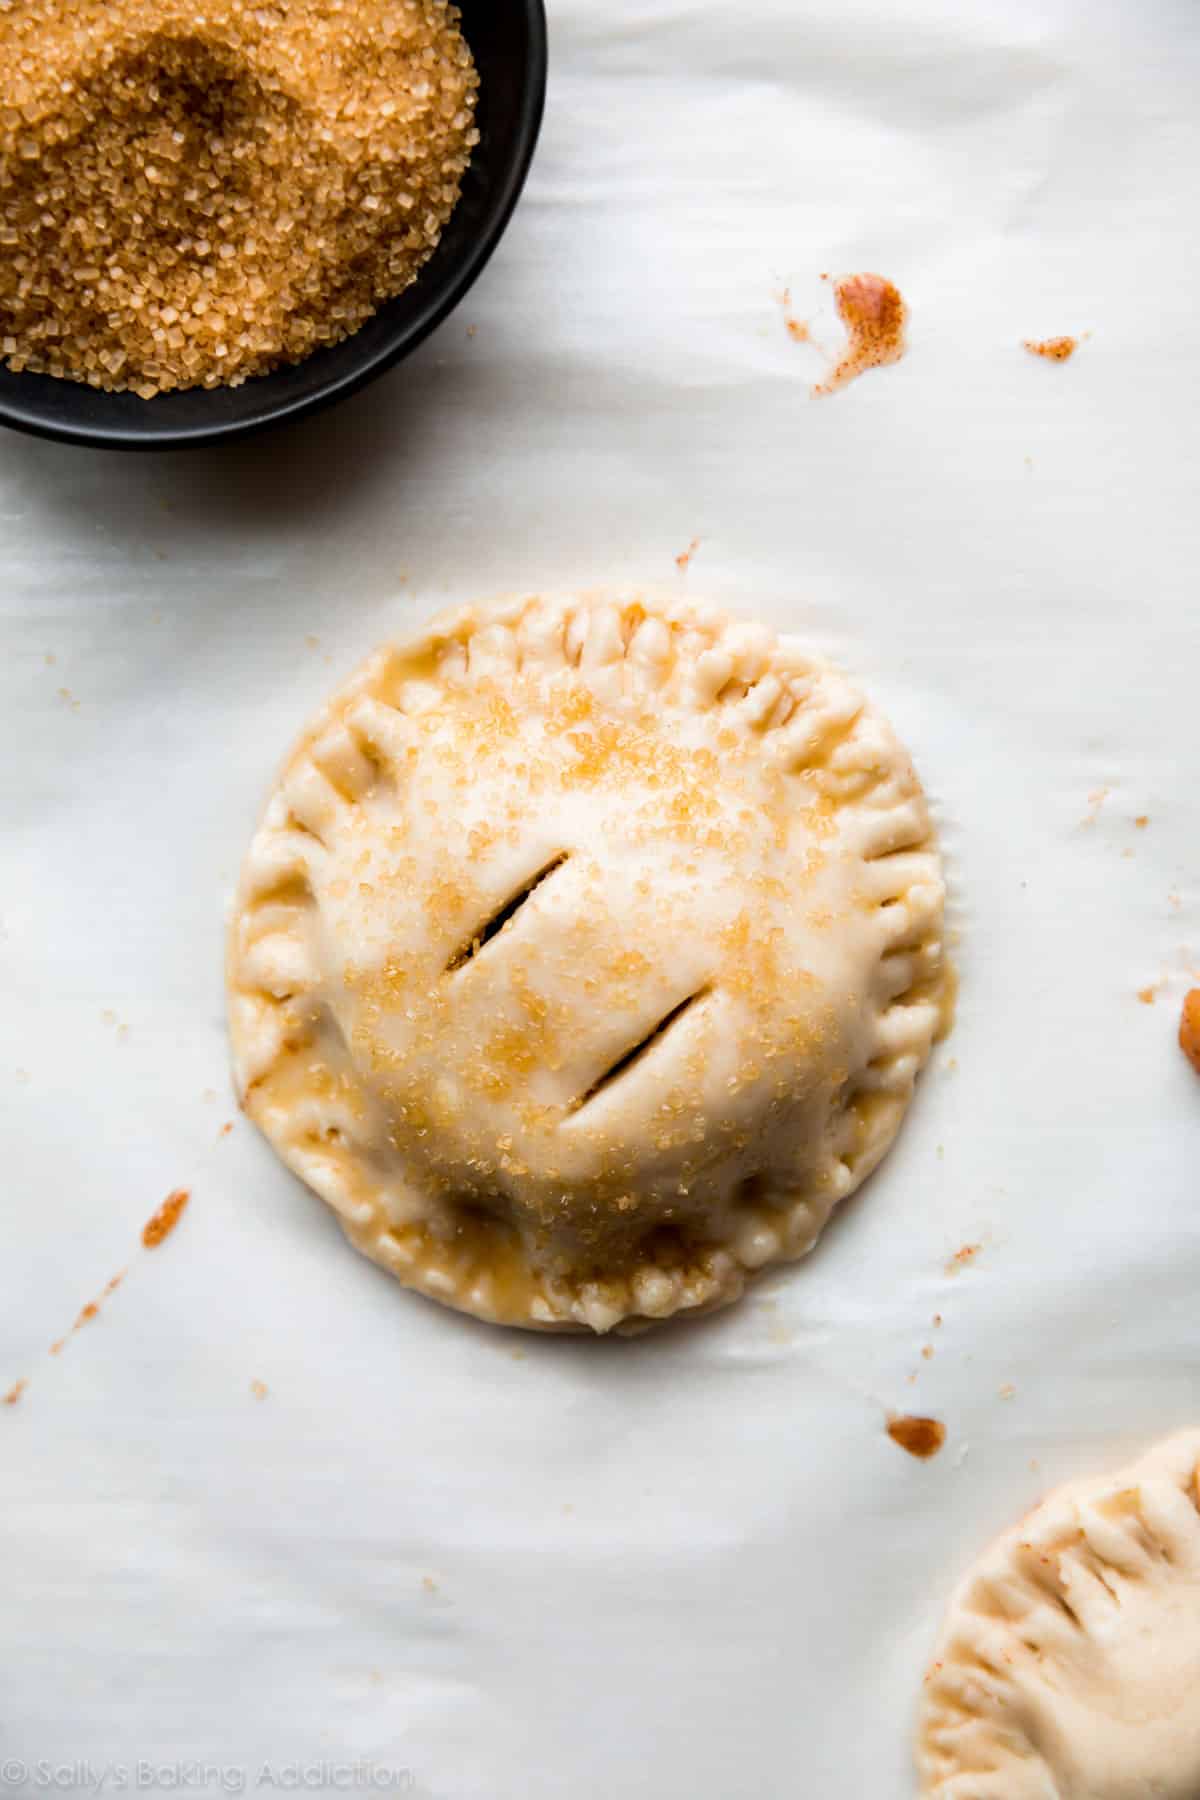
Easy, right? After I cut the dough into circles, I pile it on a plate and refrigerate for about 15 minutes. Remember what I said above? The colder the pie dough is, the easier it is to work with. After the hand pies are assembled, crimp the pie crust edges, brush with a little egg wash to help the crusts brown, sprinkle with coarse sugar for added crunch and sparkle, then bake until golden brown.
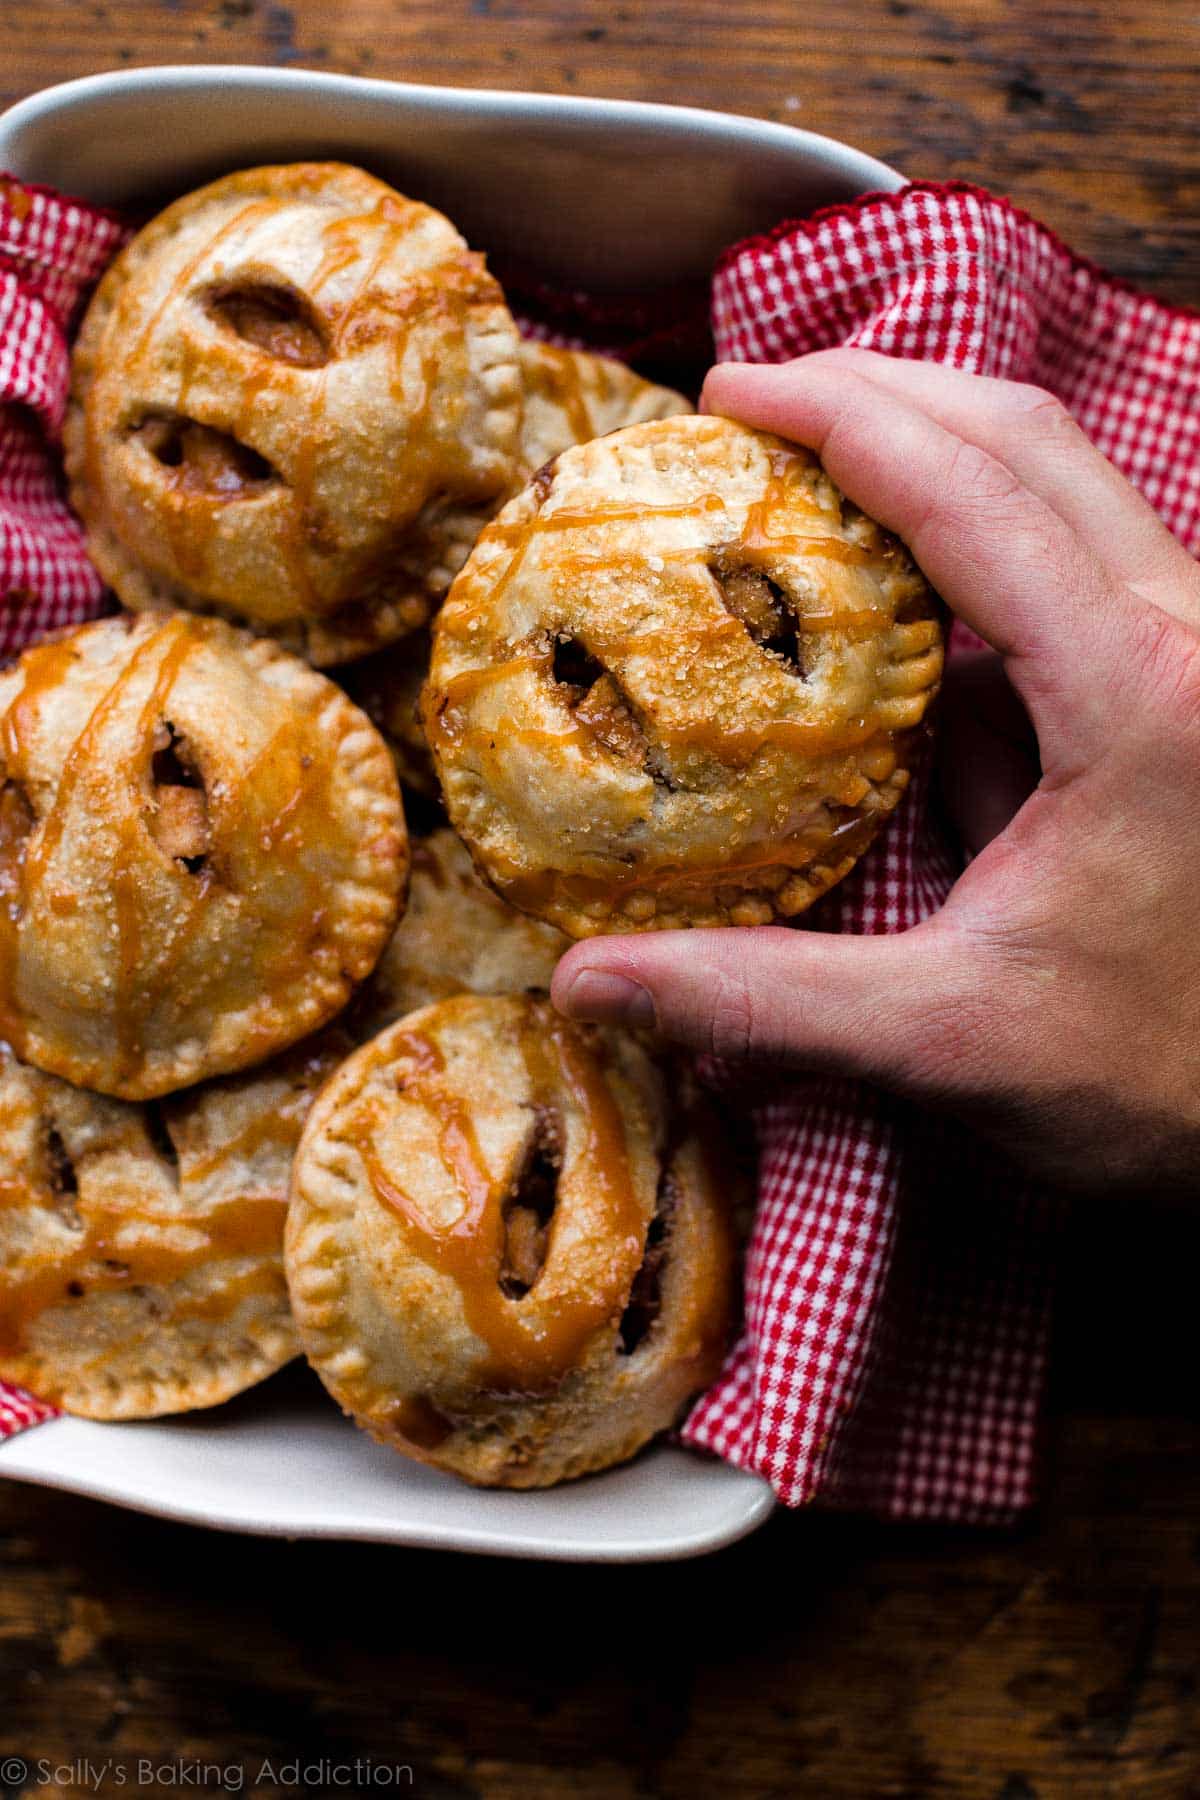
Best served with salted caramel on top. Or try this maple glaze icing from my pumpkin hand pies. Maybe a dollop of whipped cream too? Or just bowl + spoon + vanilla ice cream is perfectly acceptable! Eat your heart out!
See Your Apple Hand Pies!
Many readers tried this recipe as part of a baking challenge! Feel free to email or share your recipe photos with us on social media. 🙂
Print
Apple Hand Pies
- Prep Time: 2 hours, 45 minutes
- Cook Time: 30 minutes
- Total Time: 3 hours, 15 minutes
- Yield: 10-12 3.5-inch hand pies
- Category: Pie
- Method: Baking
- Cuisine: American
Description
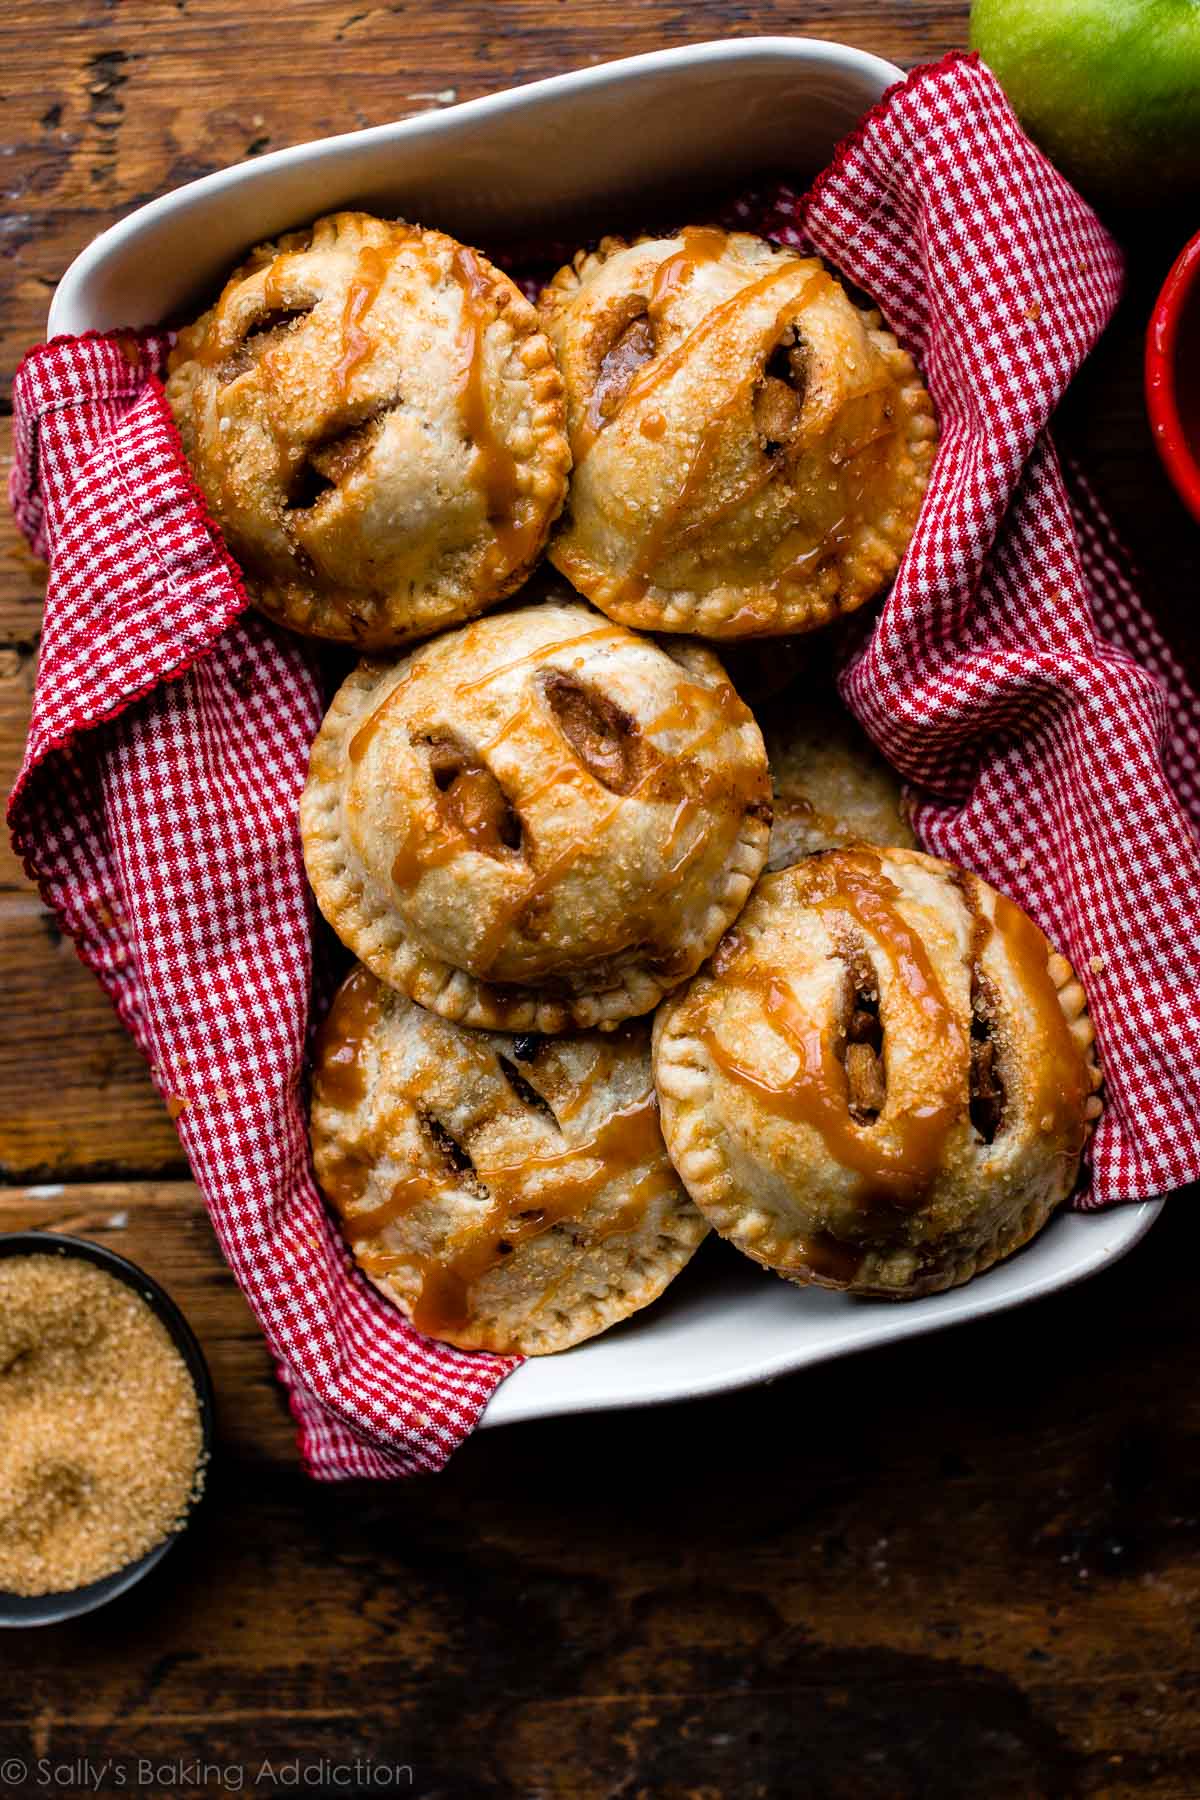
Homemade apple hand pies with buttery flaky pie crust and a juicy cinnamon apple pie filling! Topped with salted caramel, these mini apple pies are both delicious and adorable.
Ingredients
- Homemade Pie Crust (makes 2 crusts, use both)
- 3 medium apples, peeled and diced into small bite-size pieces (about 2 and 1/2 cups, or 300g, diced)
- 1/3 cup (70g) granulated sugar
- 2 Tablespoons (28g) unsalted butter
- 1 teaspoon ground cinnamon
- 1/4 teaspoon ground nutmeg
- 1/4 teaspoon ground allspice
- egg wash: 1 large egg beaten with 1 Tablespoon (15ml) milk
- optional: homemade salted caramel for topping
Instructions
Preliminary note: you can shape the hand pies whatever shape you want. I use a 3.5-inch round cookie cutter. I don’t suggest anything smaller than 3 inches in diameter because you can’t fit much filling in a pie that small. You can also shape into rectangles. See my homemade brown sugar cinnamon pop tarts as an example. For those I use a ruler and cut into 3×4-inch rectangles. Bake time will be more or less depending on hand pie size—just bake until crust is golden brown. Use the same oven temperature.
- The crust: Prepare my pie crust recipe through step 5. The dough must chill for 2 hours in the refrigerator. You can make pie dough ahead, see instructions below.
- The filling: Combine the diced apples, granulated sugar, butter, cinnamon, nutmeg, and allspice together in a medium saucepan or skillet over low-medium heat. While occasionally stirring, bring to a simmer. Allow to simmer for 2 minutes. Remove from heat and allow to cool uncovered at room temperature for 30 minutes. You can make filling ahead, see instructions below.
- Roll out the pie dough: See my video above as a visual guide for the next few steps. On a lightly floured work surface, roll out one of the discs of chilled dough (keep the other one in the refrigerator). Turn the dough about a quarter turn after every few rolls. At any sign of sticking, sprinkle some flour underneath then keep rolling. Roll out until it’s about 12 inches in diameter and about 1/8–1/4-inch thick. Using your cookie cutter, cut into circles. Re-roll any scraps and cut into circles. Place cut circles in the refrigerator to keep cold. The colder the shaped dough, the easier it is to work with. Repeat with 2nd pie dough and refrigerate cut circles for at least 15 minutes before filling the hand pies.
- Meanwhile, preheat oven to 375°F (191°C). Line two large baking sheets with parchment paper or silicone baking mats.
- Fill the hand pies: Arrange half of the circles about 3 inches apart on prepared baking sheets. These are the bottom crusts. Using a sharp knife, cut slits into the remaining circles. These are the top crusts. The slits act as vents so that steam can escape as the hand pies bake. Place about 2 Tablespoons of filling in the center of each bottom crust. (Or however much fits while leaving the edges bare.) Place top crust on top. Press your fingers all around the edges to seal, then crimp the pie crust edges with a fork. If the hand pies lost some shape, use your hands to form a round circle again. It’s OK if some filling juice is leaking out. Lightly brush the top of the pie crust with egg wash mixture. Sprinkle with coarse sugar, if desired.
- At this point the hand pies can be baked, but if they don’t feel cool to touch anymore, freeze for 10 minutes before baking. The colder they are going into the oven, the better they’ll hold their shape.
- Bake for about 28–32 minutes or until they’re golden brown on top and around the edges. Rotate pans halfway through baking. Remove from the oven and allow the hand pies to cool on the baking sheets for 5 minutes, then transfer to a wire rack to cool until ready to handle. You can serve warm or at room temperature. If desired, serve with a drizzle of warm salted caramel.
- Cover leftovers and store in the refrigerator for up to 5 days.
Notes
- Make Ahead / Freezing Instructions: A couple ways to make ahead of time! The pie crust dough can be prepared ahead of time and stored in the refrigerator for up to 5 days or in the freezer for up to 3 months. Thaw in the refrigerator before using. Filling can also be prepared ahead of time. Cover tightly and store in the refrigerator for up to 2 days. Prepared filling can be frozen up to 3 months. Thaw in the refrigerator before using. Assembled and unbaked hand pies can be covered and refrigerated for up to 3 days or frozen for up to 3 months. If frozen, no need to thaw before baking; simply add an extra couple minutes of bake time. Baked hand pies can be frozen for up to 3 months. Thaw in the refrigerator, then bring to room temperature before serving.
- Special Tools (affiliate links): Medium Saucepan or Skillet | Pastry Cutter | Rolling Pin | 3.5-inch Round Cutter | Baking Sheets | Silicone Baking Mats or Parchment Paper | Pastry Brush | Cooling Rack
- Half Recipe: If desired, you can halve the the filling recipe and only use 1 pie crust to yield about 5 hand pies.
- Apples: Use any apples you like best. I always use Granny Smith + a red variety for a tart/sweet combination. I love Pink Lady, Honeycrisp, Jazz, or Fuji.


Reader Comments and Reviews
A challenging recipe! Take two was more successful for me.
I used my own pie crust. For perfect portions I actually weighed the finished pie dough and divided into 30 chunks. Then I rolled out each chunk into a 3.5″ circle. Ended up with a more rustic look, but was an infinitely easier process.
I made these over the last couple of days. All of the tips and videos were appreciated! However, the minute I tried to transfer the hand pies from the baking sheet (I cooled them for 20 minutes) they absolutely disintegrated. The flavor of the crust is crumby/light/gritty, like shortbread.
I had hoped that the crust would be much more robust– something a person could actually hold and eat, like Trader Joe’s handheld rhubard and apple pie. ( Still desperate for a more hearty crust. ) Nonetheless, delicious.
I swapped out the regular sugar with brown sugar. I used my own pie crust recipe.I did not make any other changes. After reading about other people saying there was too much liquid, I cooked the apples on medium high heat to help the water from the apples cook down. A 2 tablespoon measuring cup level is the perfect amount of filling for a 3 1/2 inch circle. We stayed at a hotel for three days while we went to an amusement park… these were wonderful little snacks when the grandkids got hungry between meals. Never met a recipe from this site that I didn’t like. Thank you!
These were soooo good! I made these after feeling confident enough after making the apple pie, peach pie (yum), and my new favorite Strawberry Rhubarb; which I had never tried in all my 60 years because it’s basically red celery. Wow! Sally, you know what you are doing! These handheld pies are labor intensive, but all great things usually do require a bit extra work.
Question: Can I make the handheld pies using the strawberry-rhubarb and the peach filling from the pie recipes?
Yes, absolutely! So glad you enjoyed this recipe.
Do you have any savory filling ideas, so I can make them for lunch!
Hi Shaundra, we don’t have a savory hand pie recipe, just some full-size pot pie recipes like chicken pot pie. You may find some inspiration online by searching savory hand pies, or even Cornish pasty recipes. Hope this helps!
Made this filling and your cherry pastry recipe filling. Using store bought dough and baking off tomorrow for Thanksgiving. The cherry filling tasted good but a little sweet and I even had already cut back on the sugar called for. Also, love your recipes and tips but the videos and ads keep crashing my iPad browser. I have to print (waste) as it even took me 3 tries to be able to post this. I’m sure you make $. Off them but it really is super annoying and sometimes I just search for another site. 🙁
The filling is great.
Now let’s talk about the crust…..I love salt. In fact, I put extra salt on my fries. But, man your crust recipe was way too salty and greasy. And I’m a fat fan. Even adding cinnamon sugar on the crust just didn’t help out the crust. I’ve been baking for more than 50years. The last 3 years I’ve been ill and this year I wanted to refer to a recipe. I regret it.
Sally, I not one for posting but this is the one recipe everyone loves. Last Thanksgiving I made these for my son to take to his partners dinner. I sent about a dozen. Theirs was a small gathering with an Octogenarian in attendance. Apparently, this person almost nothing but that day he ate 10 of the 12. The family was so pleased he enjoyed them no one minded. So thank you for a most excellent recipe that has been well received by many family and extended family members.
Blue Ribbon for New England Baked Fall Treat contest at the Topsfield Fair (Massachusetts) this year. Had used this recipe a couple years ago and got the red ribbon. Thanks, Sally
I’ve made these a few times now and they are always a hit! I’ve frozen them after baking and cooling, and they still taste as delicious as ever after thawing and rewarming. I haven’t tried the salted caramel but a simple powdered sugar glaze was good, too. I love having a bag of them in the freezer for unexpected guests (or when I need to treat myself!). Thank you so much, Sally!
I made little jack o lantern faces in mine! They were a huge hit
Just made these and while I tweaked the filling a little (added some brown sugar and cloves) and made a few mistakes with the crust, they still came out really great. Thanks, Sally. Your recipes always give me really good guidance while I’m learning to make things myself.
What size cutter do you use, Sally?
We use a 3.5-inch round cookie cutter.
These hand pies look so cute! I have a question: Could I use Sally’s All-Butter Pie Crust to make these? I am a big fan of the all-butter pie crust, but I’m not sure if the rolling and cutting out will work well with it.
Yes, absolutely!
Great! Thanks so much! 🙂
This is a question. I have a bunch of peaches that I have turned into a basic peach filling, IE sugar cinnamon etc. does not have any starch added. We have a peach tree that produces way more than we can utilize before they spoil. To use it in these hand pies, how much starch to 1lb of filling should I use? I tend to favor tapioca starch for my pies, do you suggest using something else? Will definitely be trying it with apples as well as blueberries next summer when our blueberries come in again. Thanks
Hi Gary, it’s hard to say without testing it ourselves and it may take a bit of tinkering/experimenting to see what works best. For reference, we use 1/2 cup (63g) all-purpose flour OR 1/4 cup instant tapioca for this peach pie recipe, which uses about 3 pounds of peaches. Let us know if you try anything!
I have the crust & filling prepped, but we didn’t end up making them over the weekend as a group activity. Can I use the crusts and filling to make a full size pie in lieu of hand pies?
Hi Gretchen! Here’s our apple pie recipe. You’ll need to add more apples, sugar, spices, and some flour to your apple mixture. Make sure to drain any extra liquid from your apples that have been sitting.
hi could I dhape these like your pumpkin hand pies? they were so cute! would I half to make the circils bigger due to chunky filling? thanks!
Hi T, you certainly could, but the filling may spill out when folding. If you cut the circles a bit larger, you should be fine! Same baking temperature and the baking time will be pretty similar, too. Hope they’re a hit!
Can these be made using pre-made pie crust, store bought filling, and store bought caramel? It is for a bake sale so it would make it a lot faster and easier to make in a larger quantity. Is this possible?
These were so good last time I made them!
Hi Lena, we’re sure you could.
This was labor-intensive but soooo worth it! I added some ground vanilla and reduced the liquid of the filling some more to coat the apples more thickly.
Luckily I made a double batch because we ate half a tray before they even had a chance to cool down!
Thank you Sally & team for another outstanding recipe!
These were awesome! I made apple ones in the shape of footballs for our home opener party. (The stitches on the football were the vents.)
The best pie crust and filing I have ever tasted
My hat off
I made the blueberry version of these since we had just gone blueberry picking. They were quite a bit of work but absolutely delicious. For the sake of others making these for the first time, I would like to share my experience. I used Sally’s crust recipe that was provided. I only had a 3 1/4 inch round cookie cutter so I used that one. I cut them 1/6” thick. (I used my Joseph Joseph rolling pin for consistency and accuracy). The dough made 15 total hand pies (30 tops and bottoms) which was several more than Sally’s because her cookie cutter was a bit larger than mine. I used 2 T of filling and I ended up running out of it after 9 pies. In hindsight, next time I will double the filling if I use the same 3 1/4” cookie cutter, roll to the same 1/6” thickness, and still use 2T of filling.
Can I use the same recipe but use blueberries in place of the apples? Would baking time etc need to be adjusted? Thanks!!
Hi Tiffany, check out the Alternate Fillings section of the post for blueberry, strawberry, and cherry options!
Sally, these were incredible! From the flaky dough down to the apple pie filling! My boys thought they were the best things to ever come out of our kitchen. Hand held apple pie?? Ummm YES! :))) I’m going to make them again this week with a different filling, Saskatoon Berry Pie. It’s a berry native to the area we live in in Canada. Can’t wait! Thank you again!
Incredible! The berries worked. It isn’t just the recipe though. Your YouTube’s are what helped me to actually make this pie crust. I have never had success until I found your YouTube. Thank you so much! Our family has used your recipes a lot over the years, but I didn’t realize How incredible you are at explaining on video. I have one last question. My husband wants me to make the apple ones. I’m going to make the ahead of time as the reception is not until the end of July. Do you think I could serve these thawed with everything ready even the caramel drizzle or does that have to be done right before? I normally make cookies and I just want to do something different but because I’m preparing all the food for the reception, the dessert really needs to be done way ahead of time thank you for any insights and thanks again for this incredible recipe.
Hi Laura! We would wait to add the drizzle until after the hand pies have been thawed and are almost ready to serve. Thank you so much for making and trusting our recipes, and for your kind note!
These look amazing and I have been looking forever for a berry hand pie recipe for my daughter’s wedding reception. It will be an open house since she is already married. I want to use fresh fruit and make them and then freeze them. Do you have a recipe for that?
Hi Laura, check out the Alternate Fillings section of the post for blueberry, strawberry, and cherry options! You could also use the mixed berry filling from our berry turnover recipe here. We’d love to know what you try!
Perfect from crust to the filling. We are traveling in a RV with a sm convection/MW. We were craving pie so these cute hand held pies were the perfect substitute. Will be freezing most of them-instant dessert after a long day on the road. Thank you much
How hard are these to bake?
Hi Damien! These are an intermediate baking recipe, because you’re making homemade pie dough. If you use a pre-made pie crust, these would be quite simple to make for a beginner!
I bake once a month for an organization that reaches out to abused and exploited women. I always try to do something special that they may not get often. Usually bakers bring cupcakes. Since sweet treats need to be individual (as they have no way to cut cakes or pies), your hand pies recipe is perfect. I sprinkled a little turbinado sugar on top before baking for a bit more crunch. When they cooled, I drizzled a vanilla glaze for added fun and decoration. Everyone loved them. Thank you.