

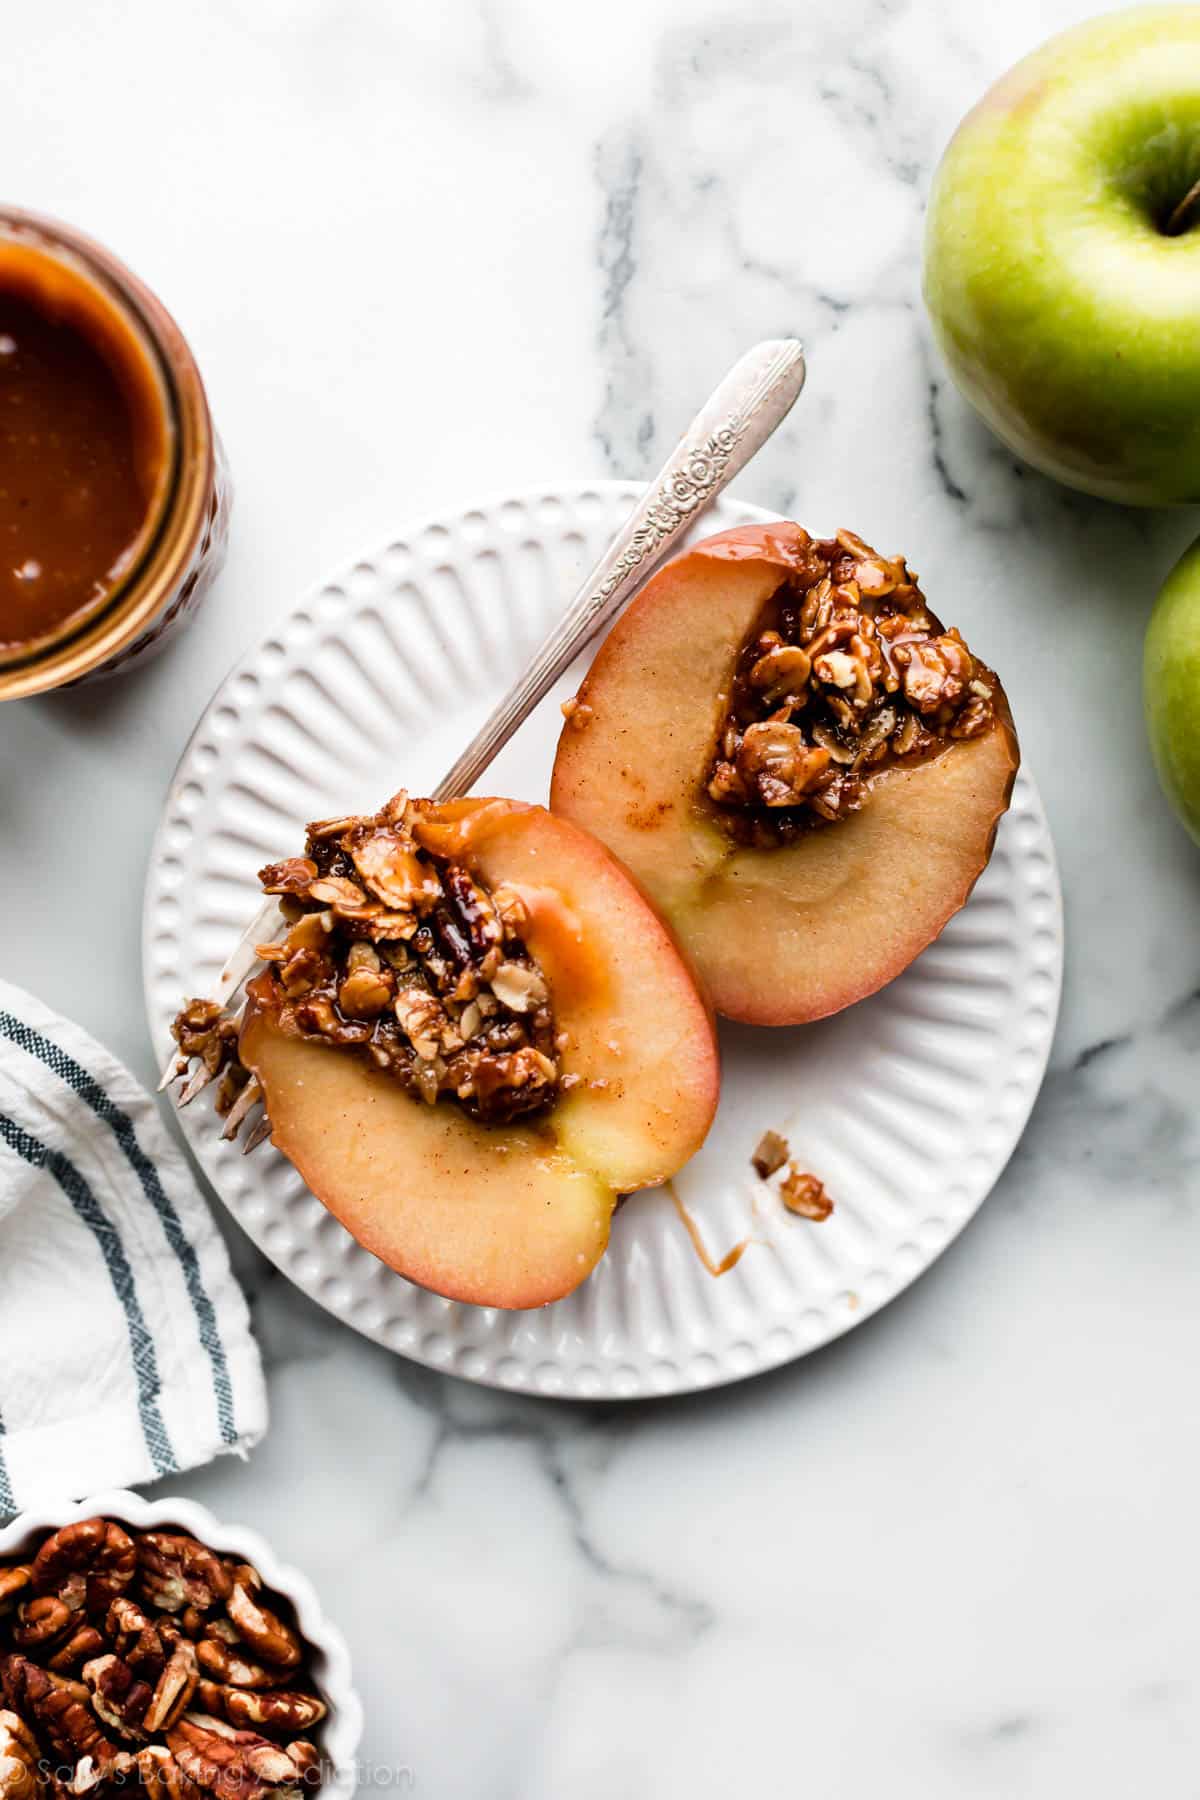
Craving a dessert where fresh apples shine? These juicy baked apples highlight fall’s favorite fruit. Core your apples, fill with a buttery brown sugar cinnamon crumble, then bake until slightly soft. Enjoy warm from the oven and for a little extra pizazz, serve with salted caramel or vanilla ice cream. This is a relatively quick dessert that kids AND adults both love.

Whenever I take my first bite of a freshly baked apple, I always ask myself why I don’t make them more often. It’s a classic and comforting treat that tastes unbelievable right out of the oven, especially on chilly nights. No-fuss and quick, baked apples are the solution when you need a guaranteed delicious dessert without putting in a ton of effort.
Hold onto this recipe. I promise it will come in handy. Especially if you’re on the hunt for healthier dessert recipe ideas or quick dessert recipes!
One reader, Megan, commented: “Delicious and easy to make! Will make again. Great way to enjoy fall flavors without the pie crust! ★★★★★”
One reader, Shannon, commented: “Quick and simple… but looks and tastes fancy!! Went amazing with vanilla ice cream, of course! ★★★★★”
What Are Baked Apples?
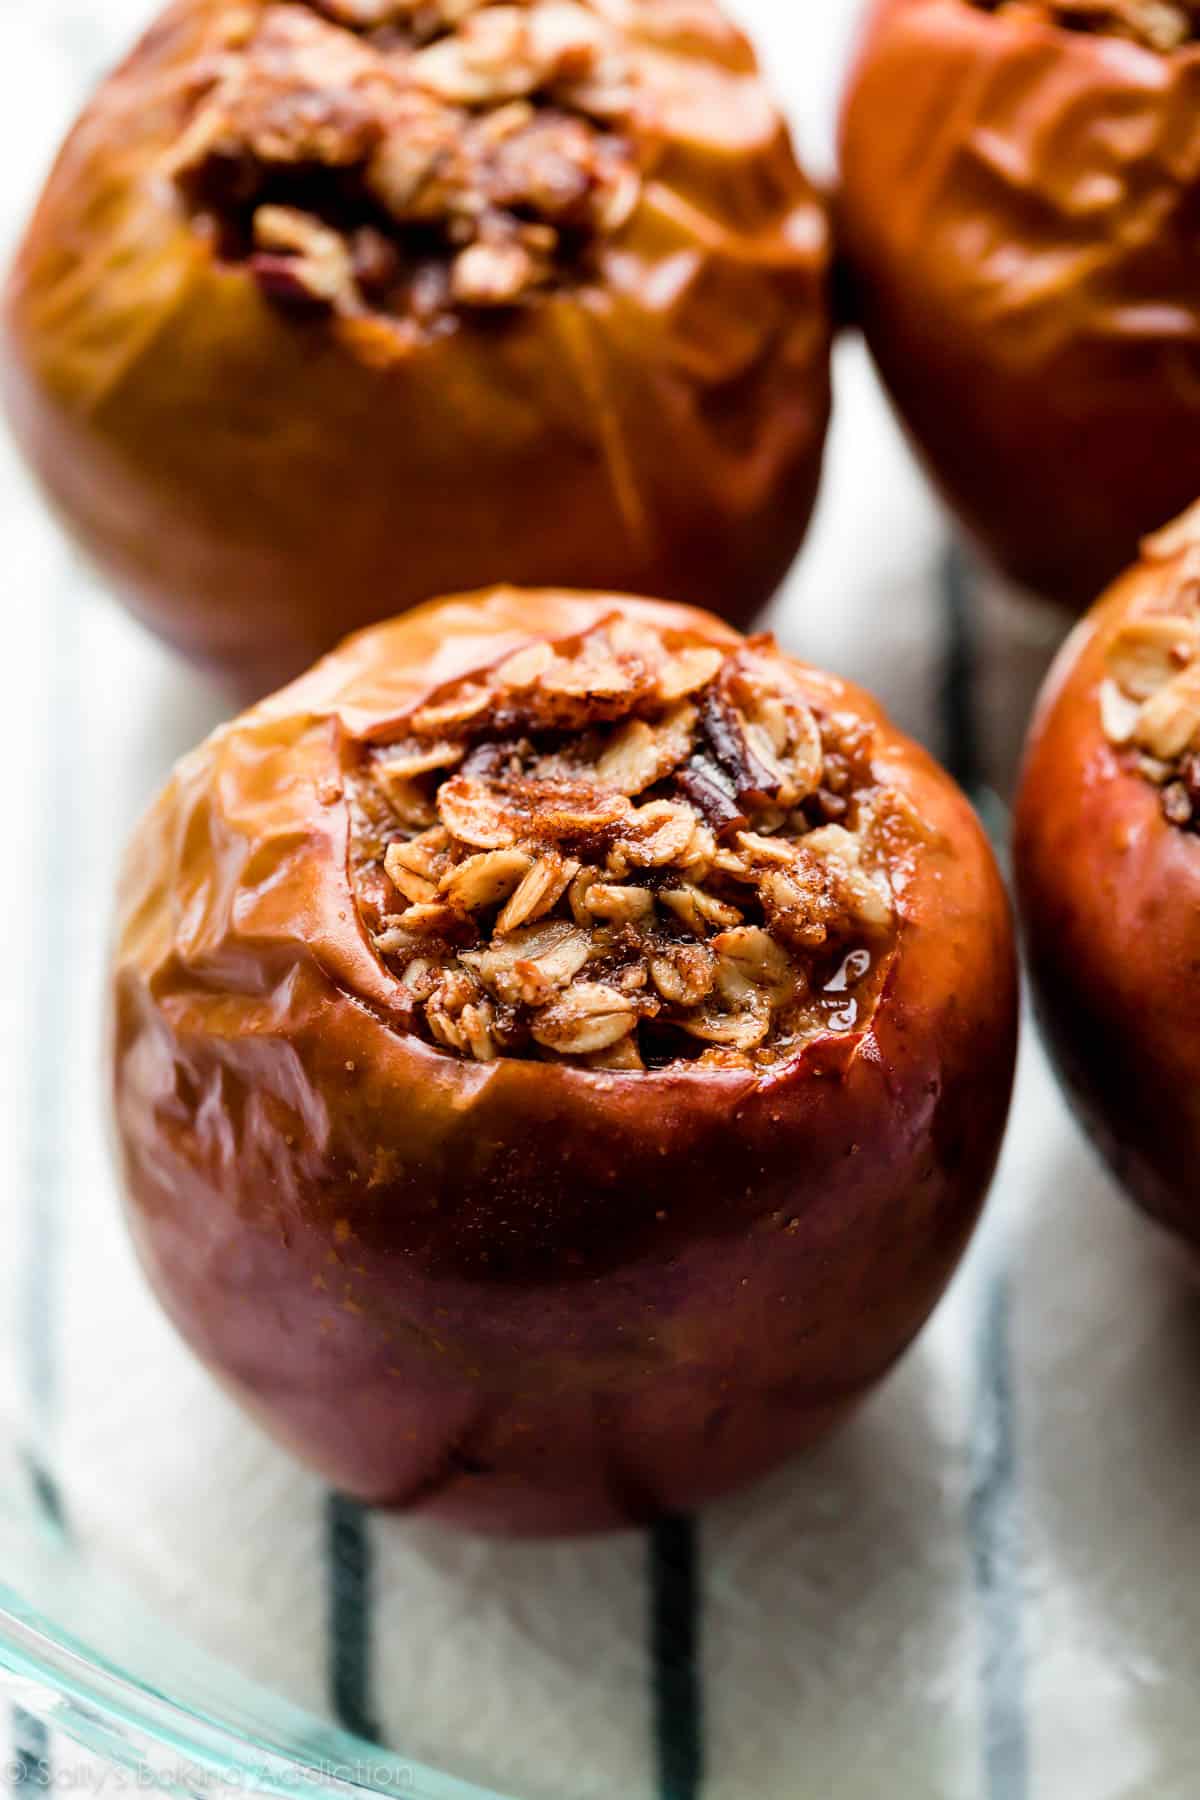
The term baked apples can refer to sliced, chopped, or whole apples that are baked until slightly softened and juicy. Baked apples usually include sugar, butter, and/or cinnamon. This recipe is for whole baked apples, cored and stuffed with buttery brown sugar and cinnamon-spiced oats, and baked until warm and juicy. We’re doing it big today.
You’ll Love These Baked Apples Because They’re:
- Great for a small family and you easily can halve or double the recipe as needed
- Like individually portioned apple crisp
- Made with only 6 simple ingredients
- Free from common allergens—no eggs, no gluten, no nuts (nuts are optional)
- The perfect way to use freshly picked apples
When it comes to gluten free dessert recipes, these are always a top pick in the fall!
Overview: How to Make Baked Apples
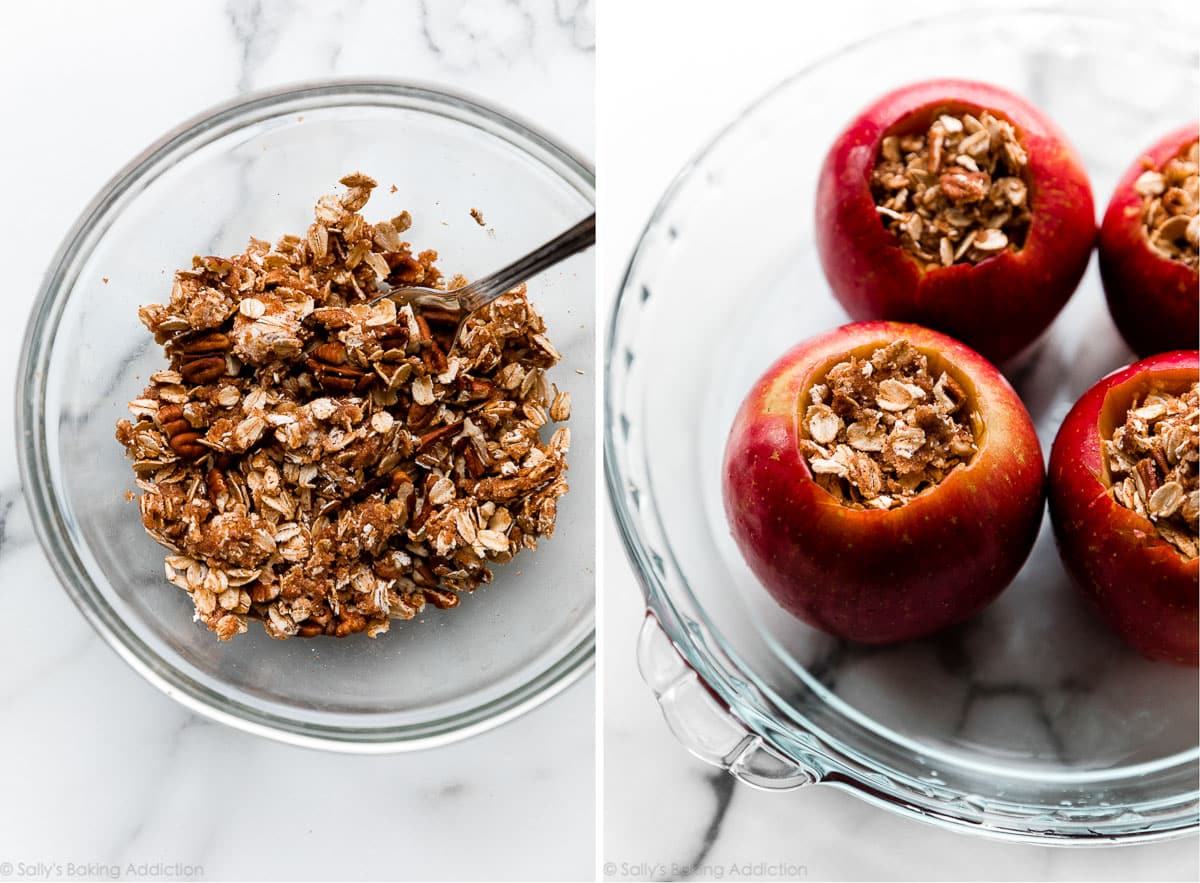
- Mix all of the filling ingredients together. You need soft butter, brown sugar, cinnamon, nutmeg, and oats. Craving a little flavor? Add some raisins, dried cranberries, or chopped pecans. You could also add the zest from 1 orange or a pinch of ground ginger, too.
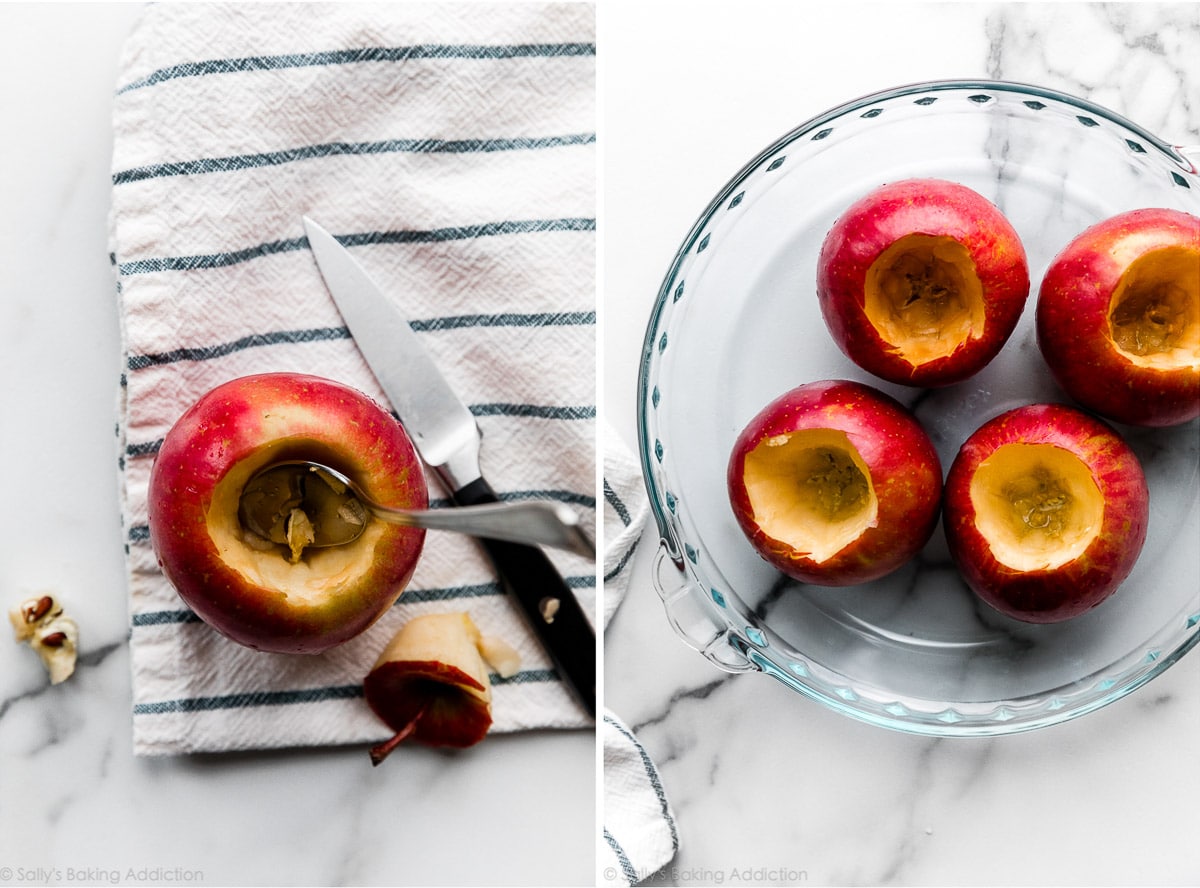
- Core the apples. This step is the trickiest part of the recipe, but if you use a little arm muscle and have patience, you’ll be fine. I recommend using a sharp paring knife and a spoon. (Or an apple corer.) I find cookie scoops can easily break or crack the apples. Once the core is out, use a spoon to dig out any more seeds.
- Place the apples into your baking dish. I recommend an 8-inch or 9-inch round or square pan. Once the apples are in the dish, fill them with the brown sugar oat mixture.
- Add warm liquid. To keep the apples moistened and to prevent them from burning, fill the pan with a little warm water. Like when we bake flourless chocolate cake, we want a steamy and humid oven for baked apples. For something different, use warm apple cider instead! (You can even spike the water or apple cider with a couple Tablespoons of bourbon or whiskey. Cheers.)
- Bake. The baked apples take about 40-45 minutes to become pleasantly soft and tender. Bake longer for softer, mushier baked apples.
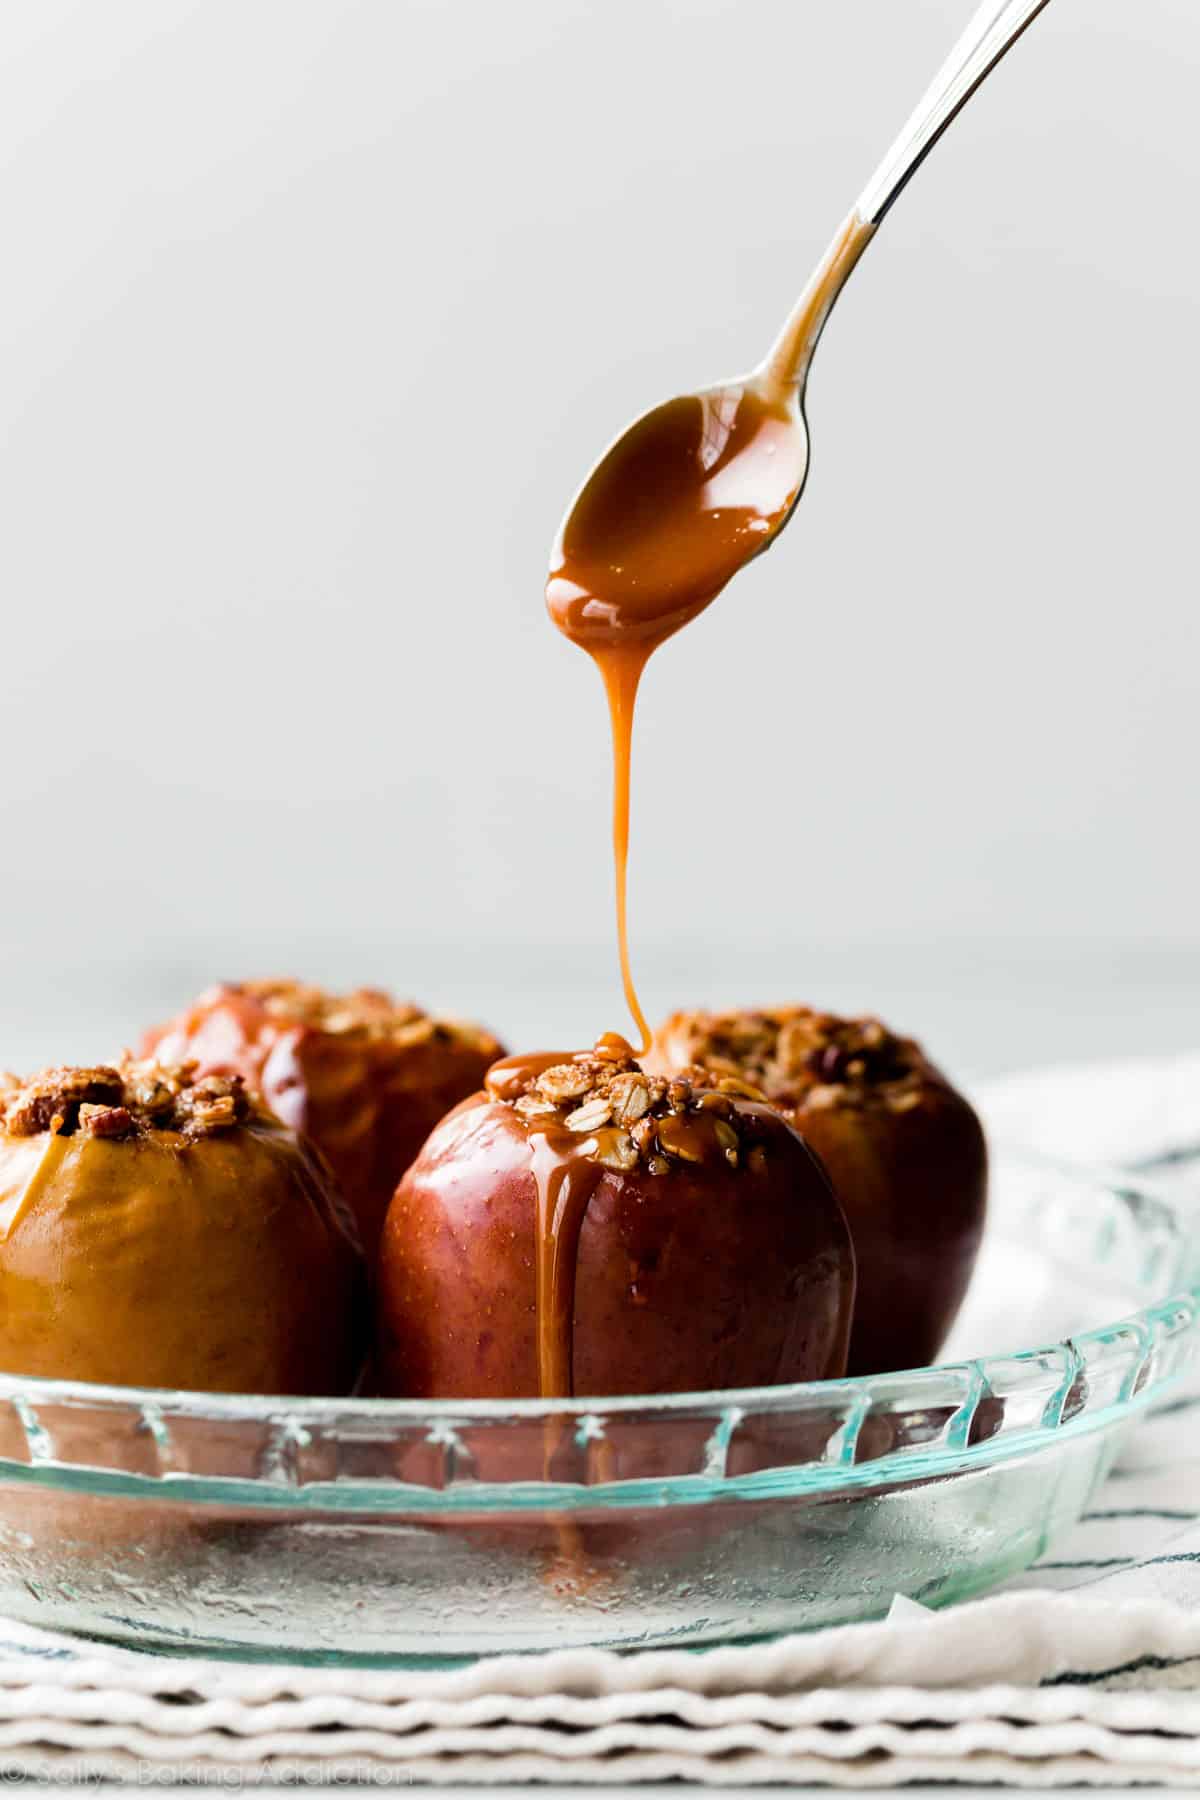
- Serve. Remove the baked apples from the oven and let them sit for about 5 minutes before serving. If you crave a little extra juiciness, spoon some of the hot liquid from the pan onto each. Serve with whipped cream, salted caramel, and/or vanilla ice cream.
What About a Version with Pie Crust?
While these baked apples are like individual apple crisps, my apple pie baked apples are like individual apple pies. (Another fun fall baking project adults & kids will both enjoy!) If you’re more of a pie crust aficionado, try that version instead. Plus, it’s hard to ignore how adorable that little lattice topping is!
Are They Soft & Mushy?
Yes, they’re slightly soft but no, they aren’t mushy. The best part of this recipe, besides all the flavors, is that you have total control over the texture. Bake for only about 40-45 minutes for slightly soft apples that hold their shape but can still be eaten with a spoon. Add a few more minutes if you like them extra soft or mushy.
Best Apples to Use
The best apples to use for whole baked apples are firm and perfectly round. I usually use Granny Smith, Fuji, Pink Lady, or Honeycrisp. Select apples that stand up straight because you don’t want them to topple over in the oven. If you favor pears, you’ll love my maple vanilla baked pears instead.
My advice: The larger the apple, the more brown sugar crumble you can stuff inside!

More Ways to Use Your Apples
- Apple Crumble Pie
- Brown Butter Apple Blondies
- Apple Cinnamon Bread & Fresh Apple Cake
- Healthy Apple Muffins
- Apple Pie Bars (with Salted Caramel!)
- Apple Cinnamon Scones
- Gluten Free Apple Crisp
- Apple Pie
See Your Homemade Baked Apples
Many readers tried this recipe as part of a baking challenge!
Print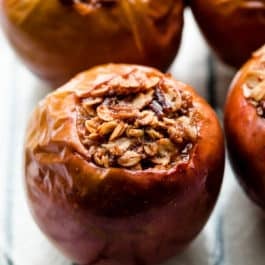
Baked Apples
- Prep Time: 15 minutes
- Cook Time: 45 minutes
- Total Time: 1 hour
- Yield: 4
- Category: Dessert
- Method: Baking
- Cuisine: American
Description
This recipe is for whole baked apples stuffed with buttery brown sugar oat crumble. For extra flavor, feel free to swap the water with warm apple cider.
Ingredients
- 3 Tablespoons (43g) unsalted butter, softened to room temperature (extra soft, so it’s easy to mash)
- 1/4 cup (50g) packed light or dark brown sugar
- 1/2 teaspoon ground cinnamon
- 1/8 teaspoon ground nutmeg
- 1/4 cup (21g) old-fashioned whole rolled oats
- 4 large apples (see note), rinsed and patted dry
- optional: 2 Tablespoons raisins, dried cranberries, or chopped nuts
For Baking
- 3/4 cup (180ml) warm water
Instructions
- Preheat oven to 375°F (191°C).
- Using a handheld or stand mixer with a paddle attachment, or simply using a fork or spoon, beat/mash the butter, sugar, cinnamon, and nutmeg together until combined. Stir in the oats, then the raisins/dried cranberries/nuts, if using. Set aside.
- Core the apples: This can be tricky, but I recommend using a sharp paring knife and a spoon. (Or an apple corer.) I find cookie scoops can easily break or crack the apples. Using a sharp paring knife, cut around the core, about halfway or 3/4 down into the apple. Use a spoon to carefully dig out the core. Takes a bit of patience and arm muscle. Once the core is out, use a spoon to dig out any more seeds.
- Place cored apples in an 8-inch or 9-inch baking pan, cake pan, or pie dish. Spoon filling into each apple, filling all the way to the top. Pour warm water into the pan around the apples. The water helps prevent the apples from drying out and burning.
- Bake for 40-45 minutes or until apples appear slightly soft. Bake longer for softer, mushier baked apples. The time depends on how firm your apples were and how soft you want them to be.
- Remove apples from the oven and, if desired, baste the outside of the apples with juices from the pan. This adds a little moisture to the skin, but it’s completely optional.
- Serve warm with salted caramel, whipped cream, or ice cream. Cover and store leftovers in the refrigerator for up to 2 days.
Notes
- Make Ahead Instructions: I don’t recommend preparing the baked apples ahead of time to serve later. They brown and become mushy, fast. Instead, prepare the filling in advance, cover, and refrigerate for up to 3 days before spooning into the apples and baking. I don’t recommend freezing these baked apples because they’re overly mushy when thawed.
- Special Tools (affiliate links): Electric Mixer (Handheld or Stand) or Glass Mixing Bowl | Apple Corer | 8-inch Square Pan or Round Pan, 9-inch Square Pan or Round Pan, or 9-inch Pie Dish
- Best Apples to Use: Choose perfectly round apples that are on the firmer side. I usually use Granny Smith, Fuji, Pink Lady, or Honeycrisp. Make sure they stand up straight on their bottom, so they don’t tip over in the oven. For more information, here are the best apples to use for baking.
- Sugar: Brown sugar adds moisture, as well as the best flavor. Feel free to use regular granulated sugar or even coconut sugar if needed. I don’t recommend any liquid sweeteners or sugar replacements.
- Oats: Oats add wonderful texture. You can use the same amount of quick oats instead. I don’t recommend leaving out the oats but if you need to, you can try replacing with finely chopped nuts. I don’t recommend replacing with oat flour or any flour.


Reader Comments and Reviews
This was my first time making homemade baked apples! I had so much fun! I followed the recipe but added cloves, cranberries and warm caramel sauce! Plus, while preparing the filling I was excited because other ideas were generating in my mind for the next time!
Super delicious comfort food recipe! I used dried cherries to add a little tartness.
Such an easy and delicious recipe! Doubled the amount and made it for a family gathering- it was a hit! Especially with some homemade brown sugar Carmel drizzled on top.
Super yummy! The perfect recipe to make to use up the leftover apples from apple picking!
I gotta say I wasn’t sure I was gonna like these apples, but they were SO easy to make and SO yummy! I could eat a bowl of just the filling
All the apple pie flavor without the pie! My husband and I loved them, used fresh apples from the orchard this weekend! So delicious!
Also, I used a melon baller to core my apples
These turned out great! Getting the core out was almost like scooping a pumpkin, definitely easier than it sounded!
I am 11 and I really want to be a baker when I grow up and I was looking for something to bake that was easy and delicious and this what perfect! i used the wrong apples but that was totally my fault. I really recommend these!!!
What a surprise! I was skeptical that this recipe would be much fun or exciting to eat, but I needed something for a gluten-free friend. (Be sure and buy gluten-free oats if you need TRUE gluten-free, as many oats oftentimes are processed right alongside grains with gluten.) But they LOVED this recipe. So delicious, perfect for fall, perfect for a gathering (everyone loved cutting them open to see the filling). I served them with whipped cream, and they were surprisingly filling too! Highly recommend.
We loved this recipe! So quick, easy, and super yummy!
I would wholeheartedly suggest adding Sally’s homemade salted caramel on top – it was delicious.
Delicious and super easy to make! I accidentally cored through to the bottom on a couple but it didn’t seem to matter.
I did enjoy making this recipe – only I learned a valuable lesson. Use the apples that are listed!! I used Gala – what I had on hand. They did not cook well. We served it with vanilla ice cream! Yummy!
Such a simple yet delicious recipe. With the cinnamon and nutmeg it tastes like Fall. I topped mine with homemade vanilla custard and chopped toasted pecans.
These baked apples were easy and tasty. I served them with your homemade salted caramel sauce and vanilla ice cream and those were definitely a must! I did crave more of the filling though-it’s just so good. Also the butter leaked and was very liquidy in each of my apples 🙁 Not sure why that happened. I double checked the ratios several times and chilled my filling prior to stuffing and baking.
This is a great and simple recipe! I do feel like it is lacking in flavor though.
These were super simple to put together and was such a nice dessert. We had ours with vanilla ice cream… my husband said the apples tasted like apple pie.
This is a great quick dessert, perfect for the fall.
Thanks Sally!
Loved these so much!! They were super easy to make and made my kitchen smell like fall. Can’t wait to make these over and over again!
Delicious! I can’t believe how easy these are to whip up. They are the perfect fall dessert!
A quick easy fall recipe! Perfect amount of spice and sweetness
I made these with Honeycrisp apples, and they were delicious served with homemade caramel. My parents and husband gobbled them up quickly!
Super simple recipe that’s the perfect start for baking all things apple and fall. I added raisins and used both honeycrisp and fuiji apples. Topped with whipped cream this dessert was a hit! I will definitely make these again.
Delicious and easy to make. Thanks Sally
My family and I absolutely loved this recipe. My husband and kids ate it with ice cream and I had it with some salted caramel. I used honey crisp apples. So easy and so delicious. We will definitely be making this again!
The baked apples were delicious and very easy to make. I used 3 different varieties of apples and baked them 5 minutes longer to have them mushy. This makes a healthier option to apple crisp. I felt it was a lot of apple with just a bit of crumble. Honestly, I prefer a crisp even though this was easy and tasty.
Loved this recipe! It was such a great opportunity to have my 6 year old son make something all on his own (minus coring the apples of course). Easy enough for him to read the recipe and measure and mix everything. He was very excited to do these and they were delicious with some vanilla ice cream and your salted caramel sauce!
This was really good! And it smelled delicious! The smell was perfect for autumn and it was warm and moist. I didn’t add raisins, cranberries, or nuts. But I did make homemade salted caramel sauce to go with it!
A great way to use up some of my apples from picking! Simple and taste great thanks for the recipe!
This was super easy and delicious. I needed to cook my apples longer but this did not stop people from eating them.
Delicious! Made the salted caramel to go with it and I am so happy I did, because it was perfection! I made it with 2 Honey Crisp and 2 Granny Smith and the Honey Crisp was the winner for us. Not only because they help up better, but the flavor of the apple came through more! This will be something we make more because it is so easy!
My son, age 12, was eager to bake these. They were really easy to make, sweet, and delicious. Even my husband who claims, he HATES baked apples, gobbled one up Served with so delicious vanilla ice cream and some caramel sauce! YUMMM! The filling…OM goodness. The skin on my apples were a bit tough…but what a scrumptious treat!