

Learn how to make a Biscoff pie crust with this easy 2-ingredient recipe. As thick and buttery as a graham cracker crust, but with extra flavor from the sweetly spiced Biscoff speculoos cookies. You can use this Biscoff crust recipe for bar desserts, pies, cheesecakes, and more.
If you’re not familiar with Lotus Biscoff cookies (AKA speculoos), they’re a European biscuit (AKA crispy crunchy cookie) with a distinctive caramelized, cinnamon-spiced flavor. Which makes for an absolutely delicious flavor pairing with so many recipes—like pumpkin cheesecake pie, banoffee pie, or pecan pie cheesecake.
The steps to make the Biscoff pie crust are exactly the same as a graham cracker crust, minus the added sugar, and it conveniently uses exactly one standard-size package of Biscoff biscuits/cookies.
Many bakers, myself included, love cookie crumb crusts because they add a nice crunch to pies and bars. They’re also worlds quicker and easier than traditional pastry pie crust!
You Only Need 2 Ingredients
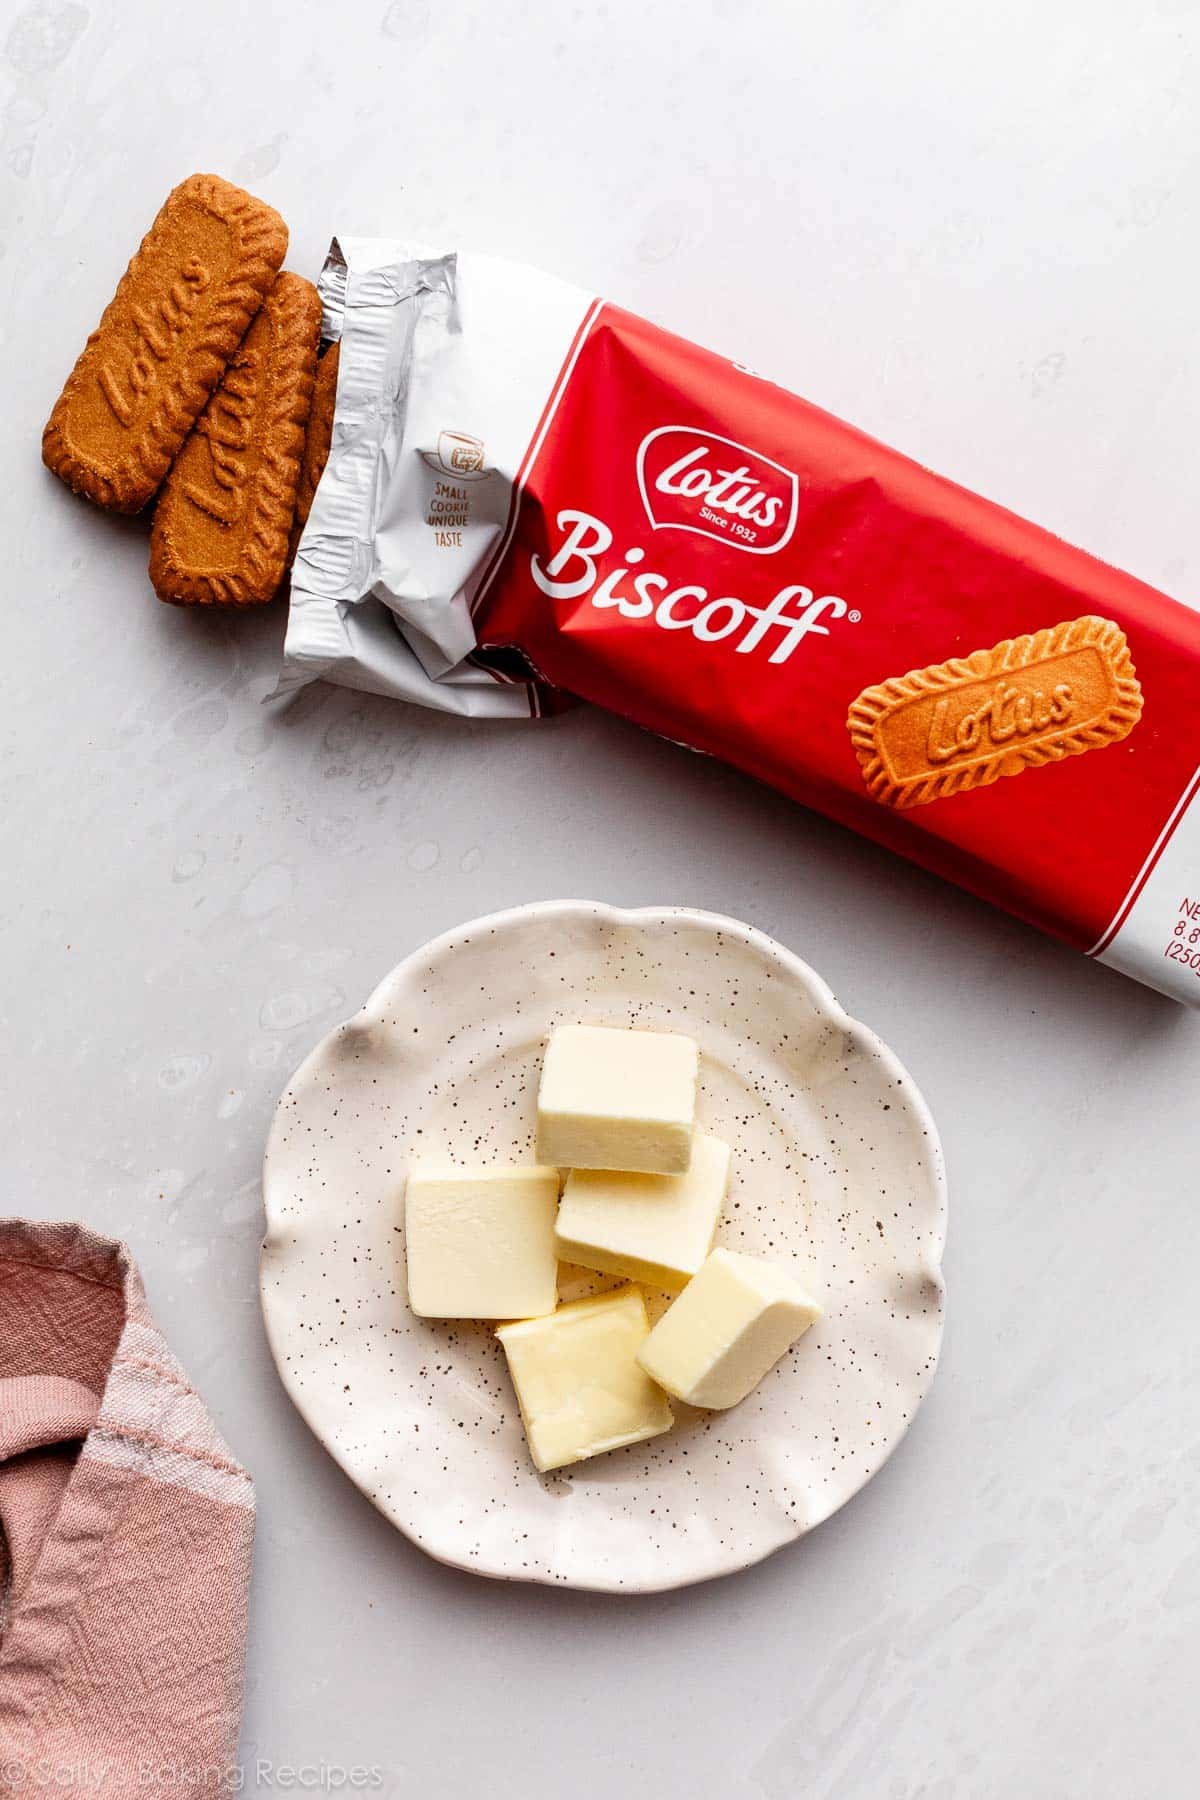
- Biscoff Cookies: (Well, obviously.) This crust is made with 1 standard-size package (8.8 ounces or 250g) of Biscoff biscuits/cookies, which contains 32 cookies.
- Butter: Melted butter binds the tiny crumbs together, and makes this crust taste unbelievably buttery and delicious. You need 5 Tablespoons (71g) of butter.
How to Make a Biscoff Pie Crust
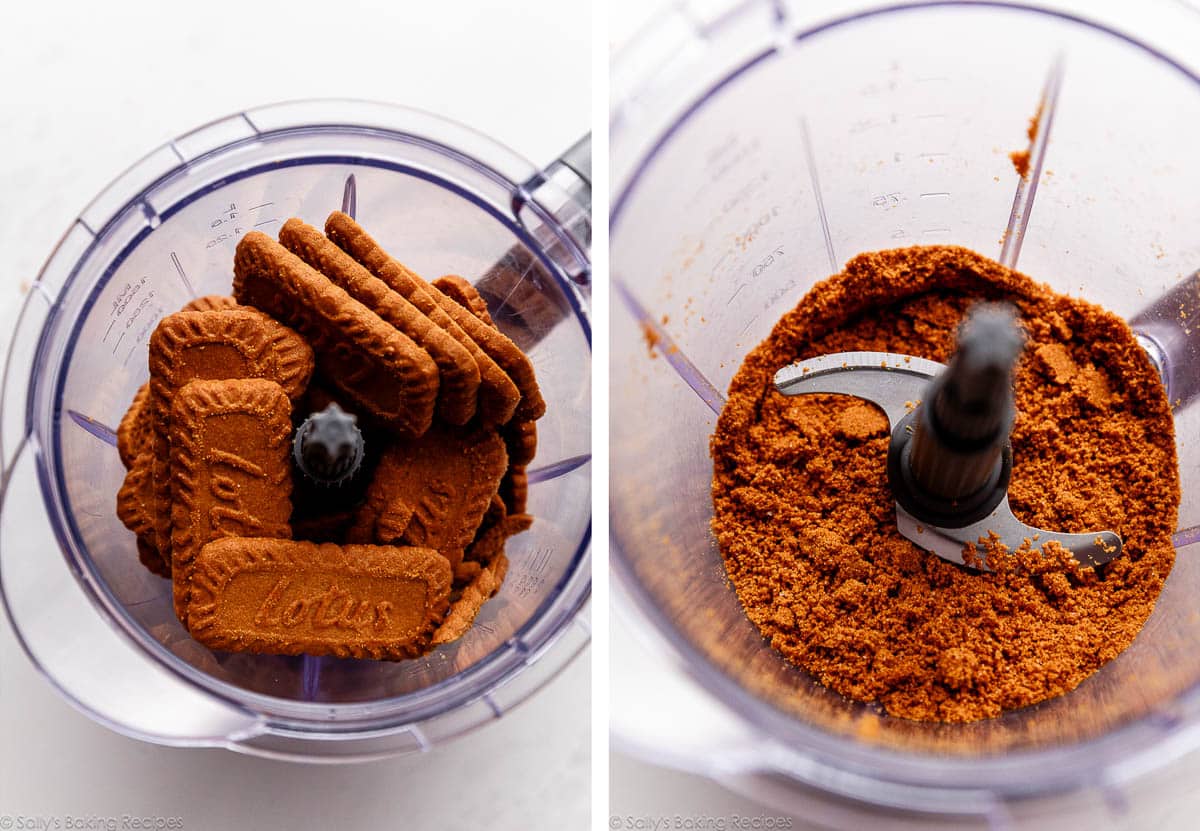
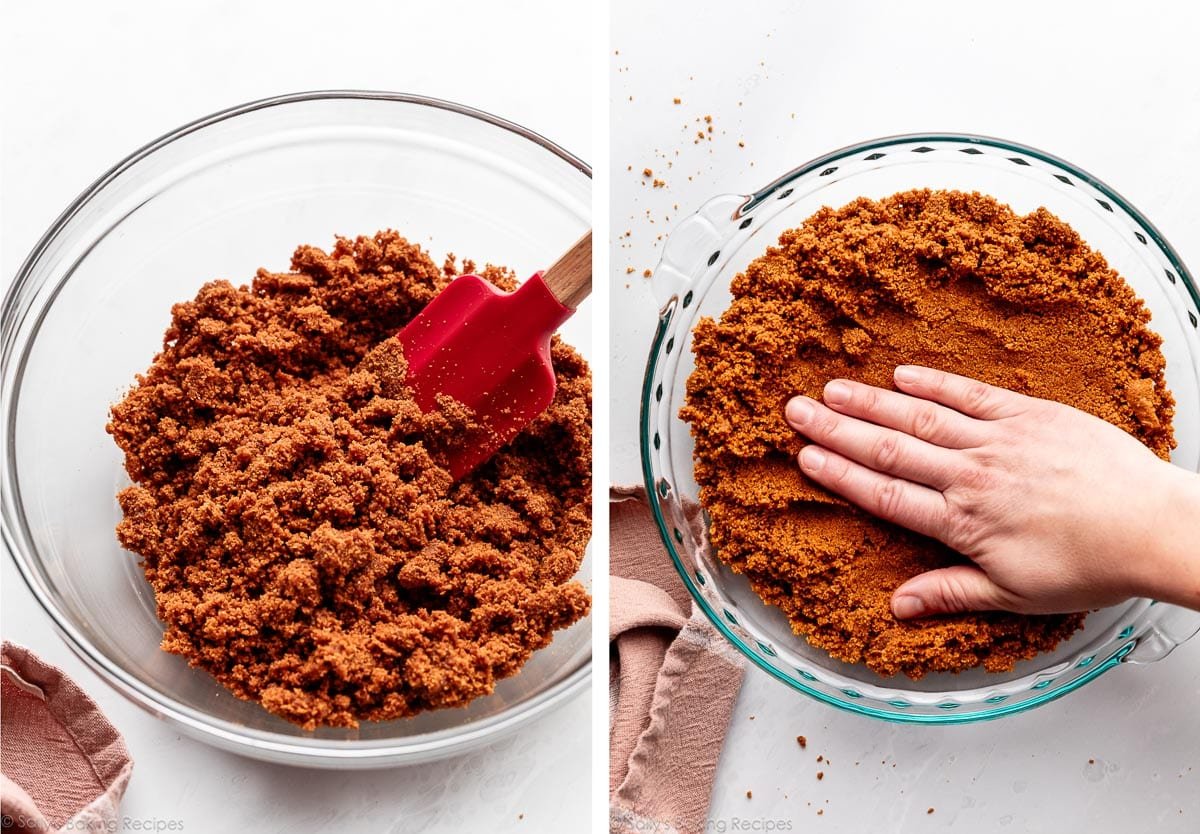
Start by grinding up the cookies. You can use a food processor or blender for this, but if you don’t have one, just put them in a zip-top bag and crush them with a rolling pin. You want really fine crumbs, so pulse or crush until you have sand-like crumbs with no big chunks.
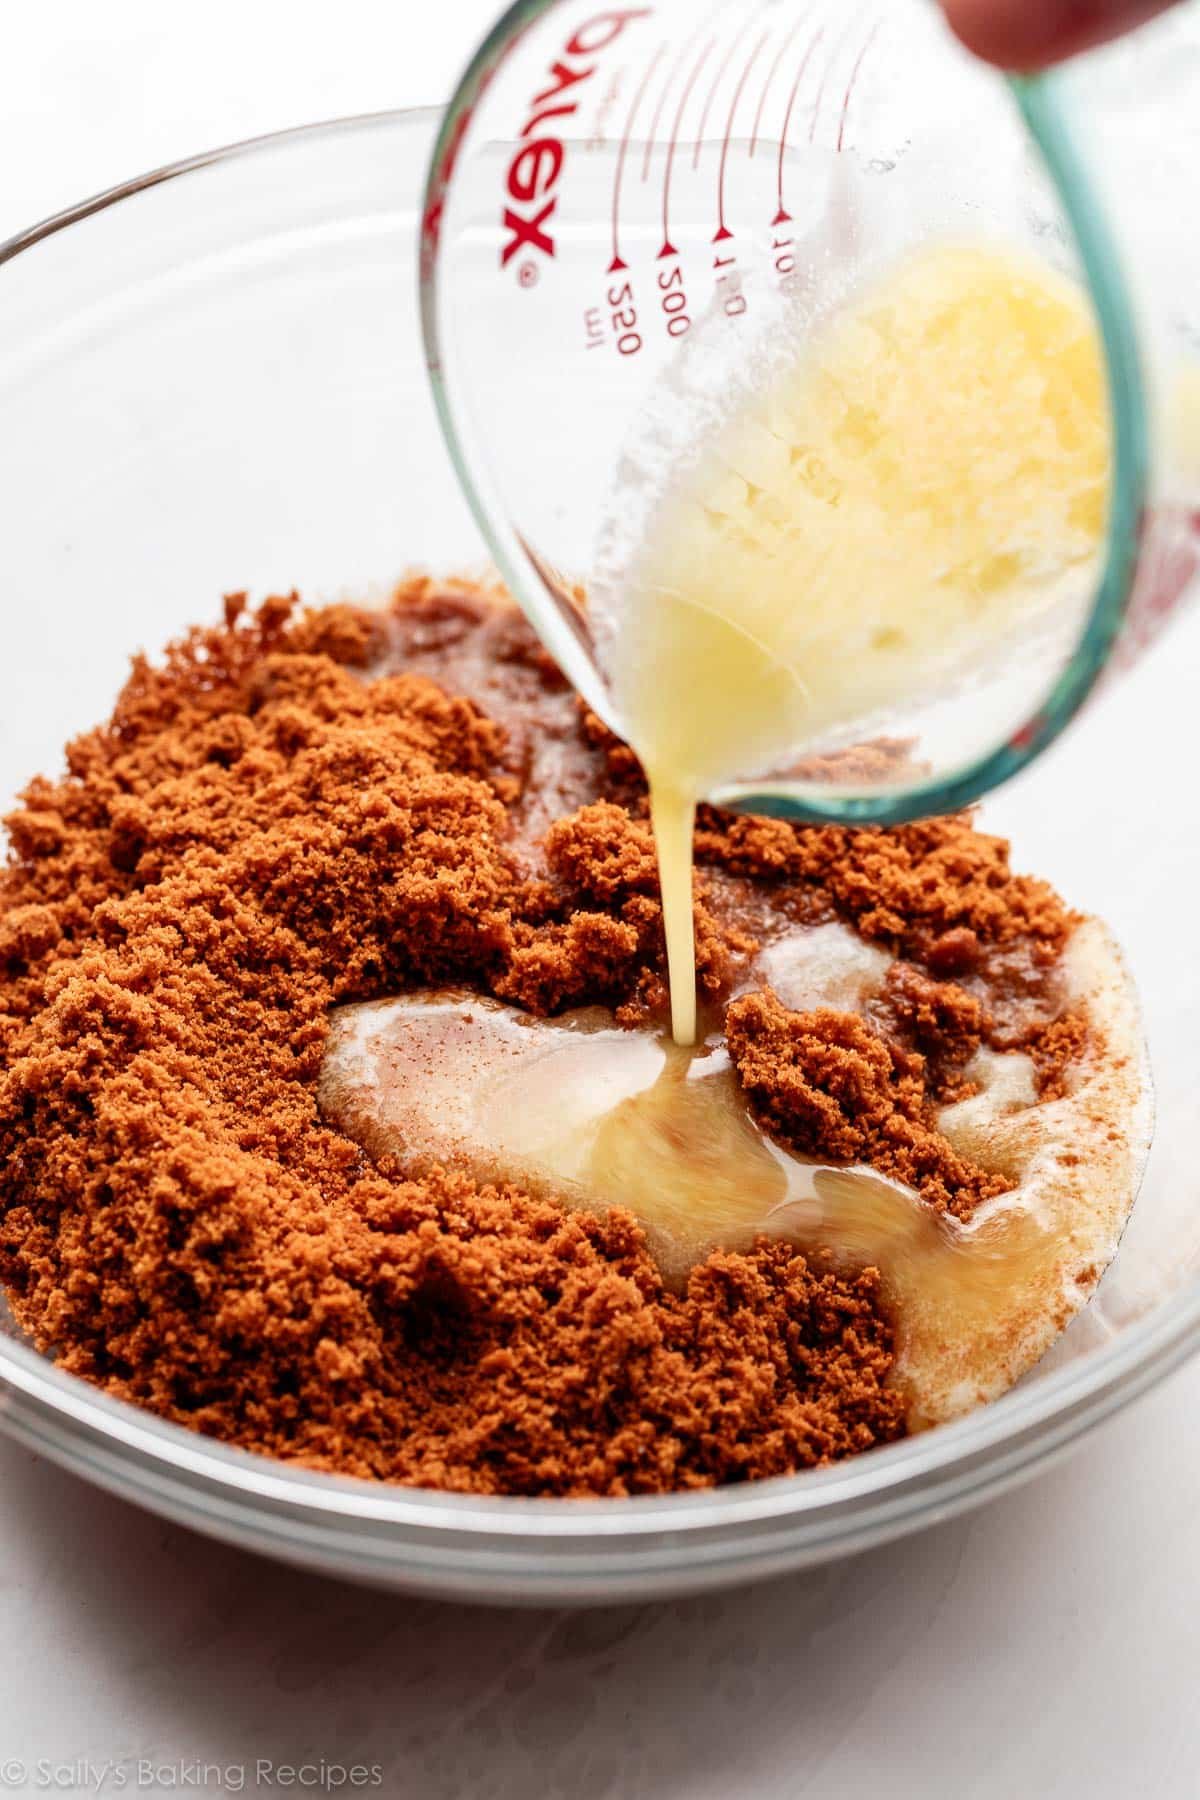
Pour the crumbs into a mixing bowl and stir in the melted butter. The mixture will be thick, sandy, and coarse.
Pressing the Crust (Success Tips So Your Crust Stays Put!)
The ratio of ingredients is important, but what matters most is how you press the mixture into your pan. The technique you use can make or (quite literally) break a great crumb crust:
- Don’t be nervous that it’s crumbly: The mixture inevitably feels too crumbly as you start pressing it into the pan, but when you start applying pressure, it will stick together.
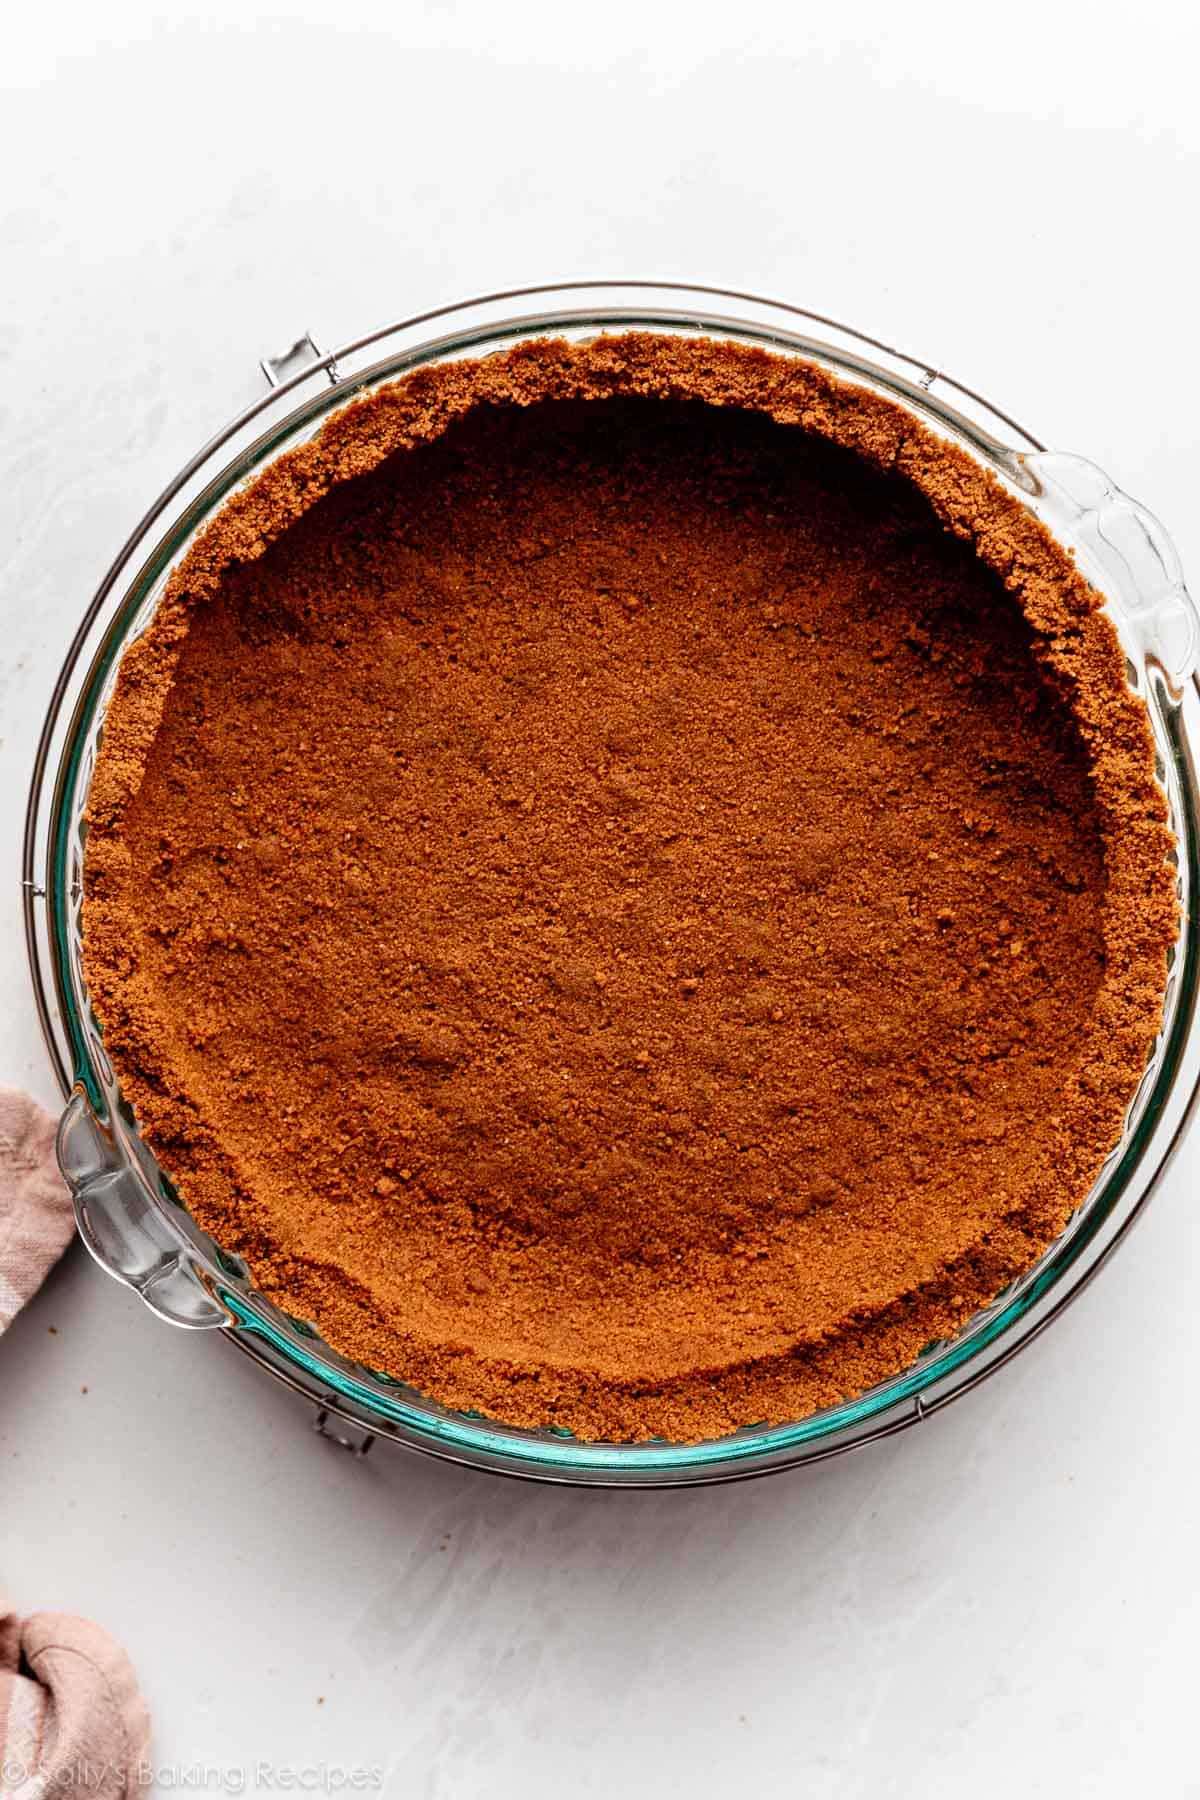
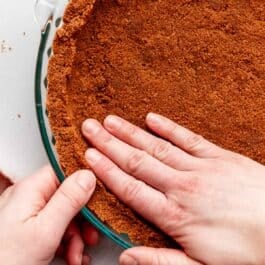
- Use your hands first: Press the bottom and around the sides with medium-firm pressure until the crumbs aren’t moving around anymore—you don’t want any loose crumbs. You can use a small flat-bottomed measuring cup to help smooth out the surface.
- Don’t pack too tightly: The crust needs to be compact, so it doesn’t crumble apart, but not so tight that it bakes into a hard, dense crust. You really just want to pack it until the shape has set and it’s no longer crumbly.
- Keep it rounded if making a pie: This sounds a bit odd, but you don’t want a right angle at the bottom edges where the sides and the bottom meet. Instead, you want it a little bit rounded so it stays connected when you slice into it—so the side crust doesn’t immediately separate from the bottom crust. Slide a spoon around the inside of the crust where the sides and bottom meet, to get that rounded shape. I do this when I make graham cracker crust, too.
I like to use my thumb on one hand and 4 fingers on my other hand to go around the top and sides.

FAQ: What Size Pan Does This Fit?
You can press this Biscoff crumb crust into an ungreased 8-inch, 9-inch, or 10-inch pie dish, cake pan, springform pan, or square pan. It’s not enough for a 9×13-inch pan. If you’re making a 9×13-inch dessert, I recommend you 1.5x the recipe.
FAQ: Do I Have to Bake This Biscoff Cookie Pie Crust?
Typically, yes. After shaping into your pan, this crust should be baked, and the amount of time really depends on the recipe you’re using, and whether it’s a baked or a no-bake filling. Check the pie or cheesecake recipe you’re using for crust baking and cooling instructions.
I usually pre-bake this Biscoff crust for 10 minutes at 350°F (177°C) before adding a filling. If you’re making a no-bake pie/dessert: cool the crust before filling it, unless the no-bake pie recipe you are using instructs otherwise.
You could also make this Biscoff pie crust with the same amounts of gingersnaps or vanilla wafers. For an easy Oreo crust, see my Oreo crust guide. For a classic graham cracker crust, see my post on how to make a perfect graham cracker crust.
Try This Biscoff Crust With:
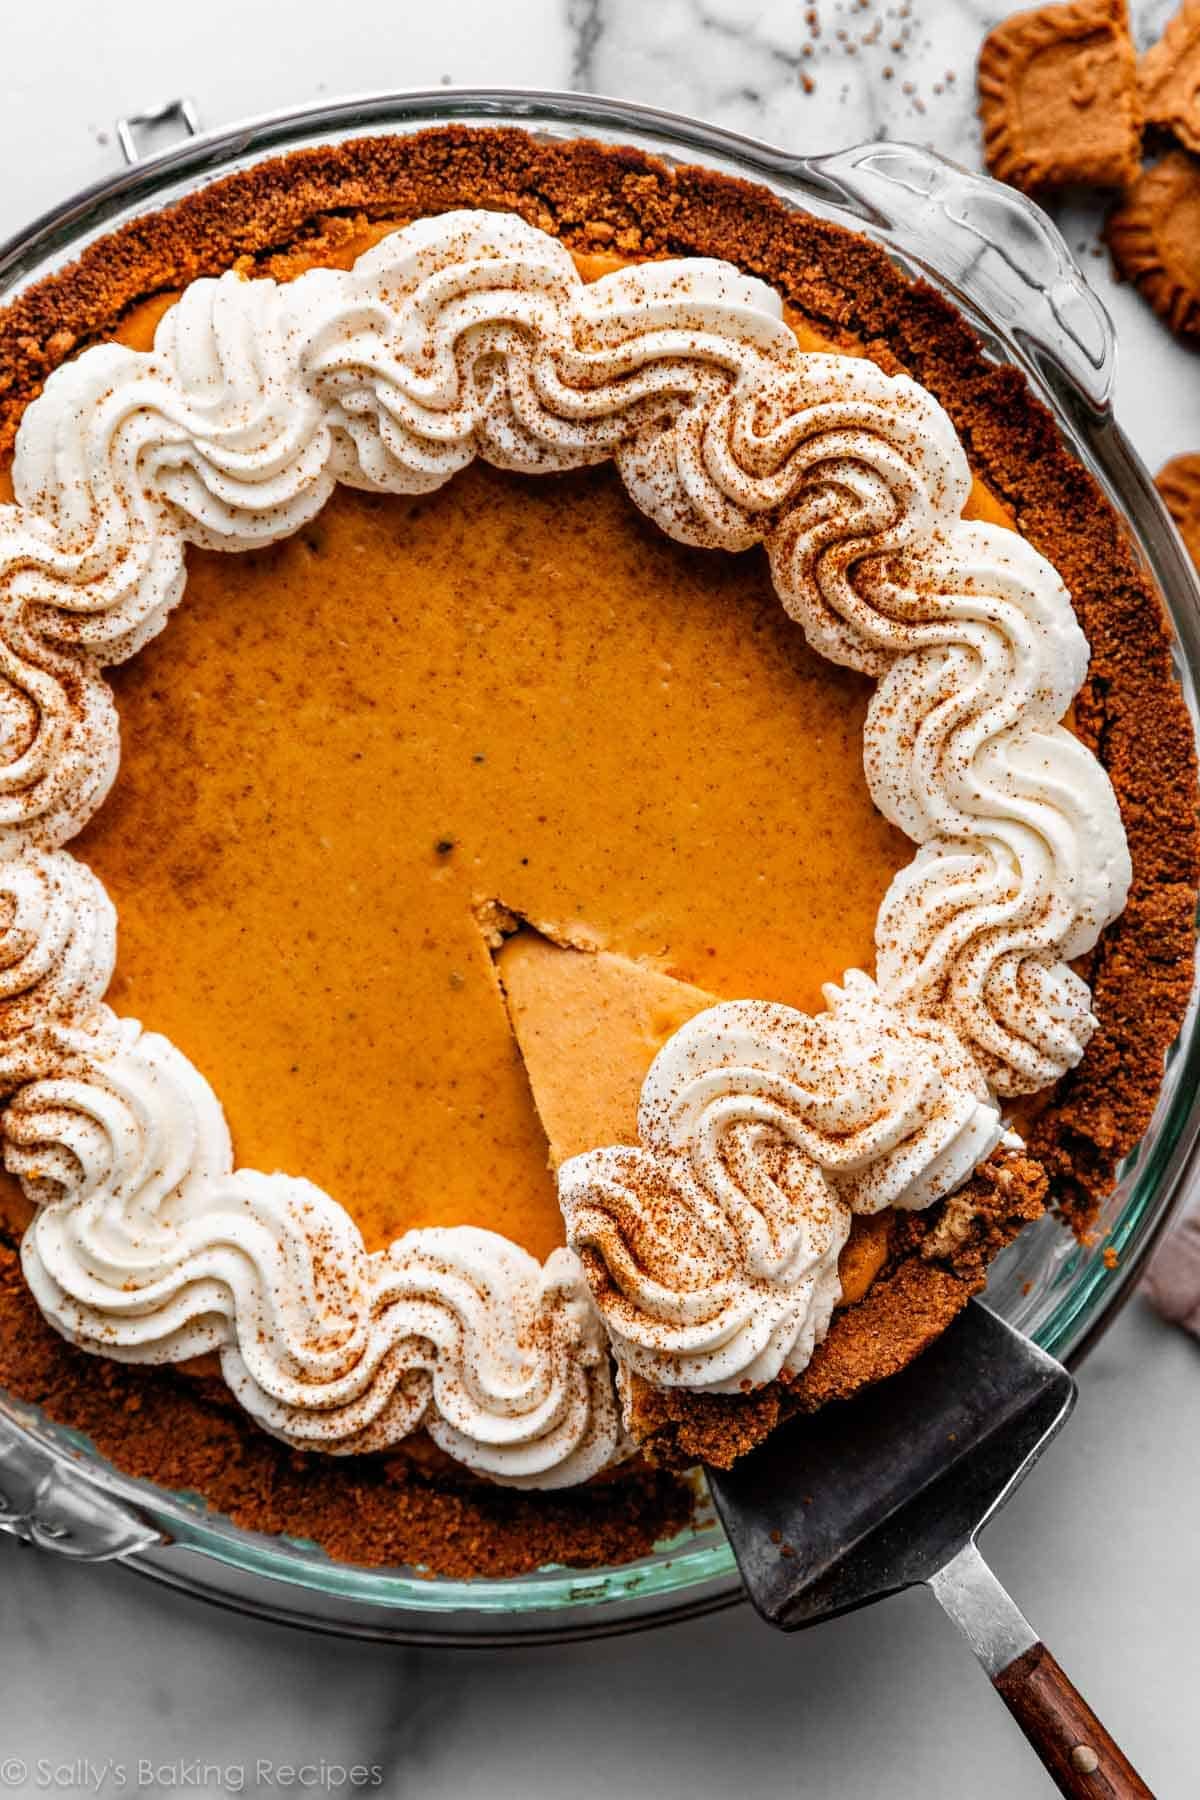
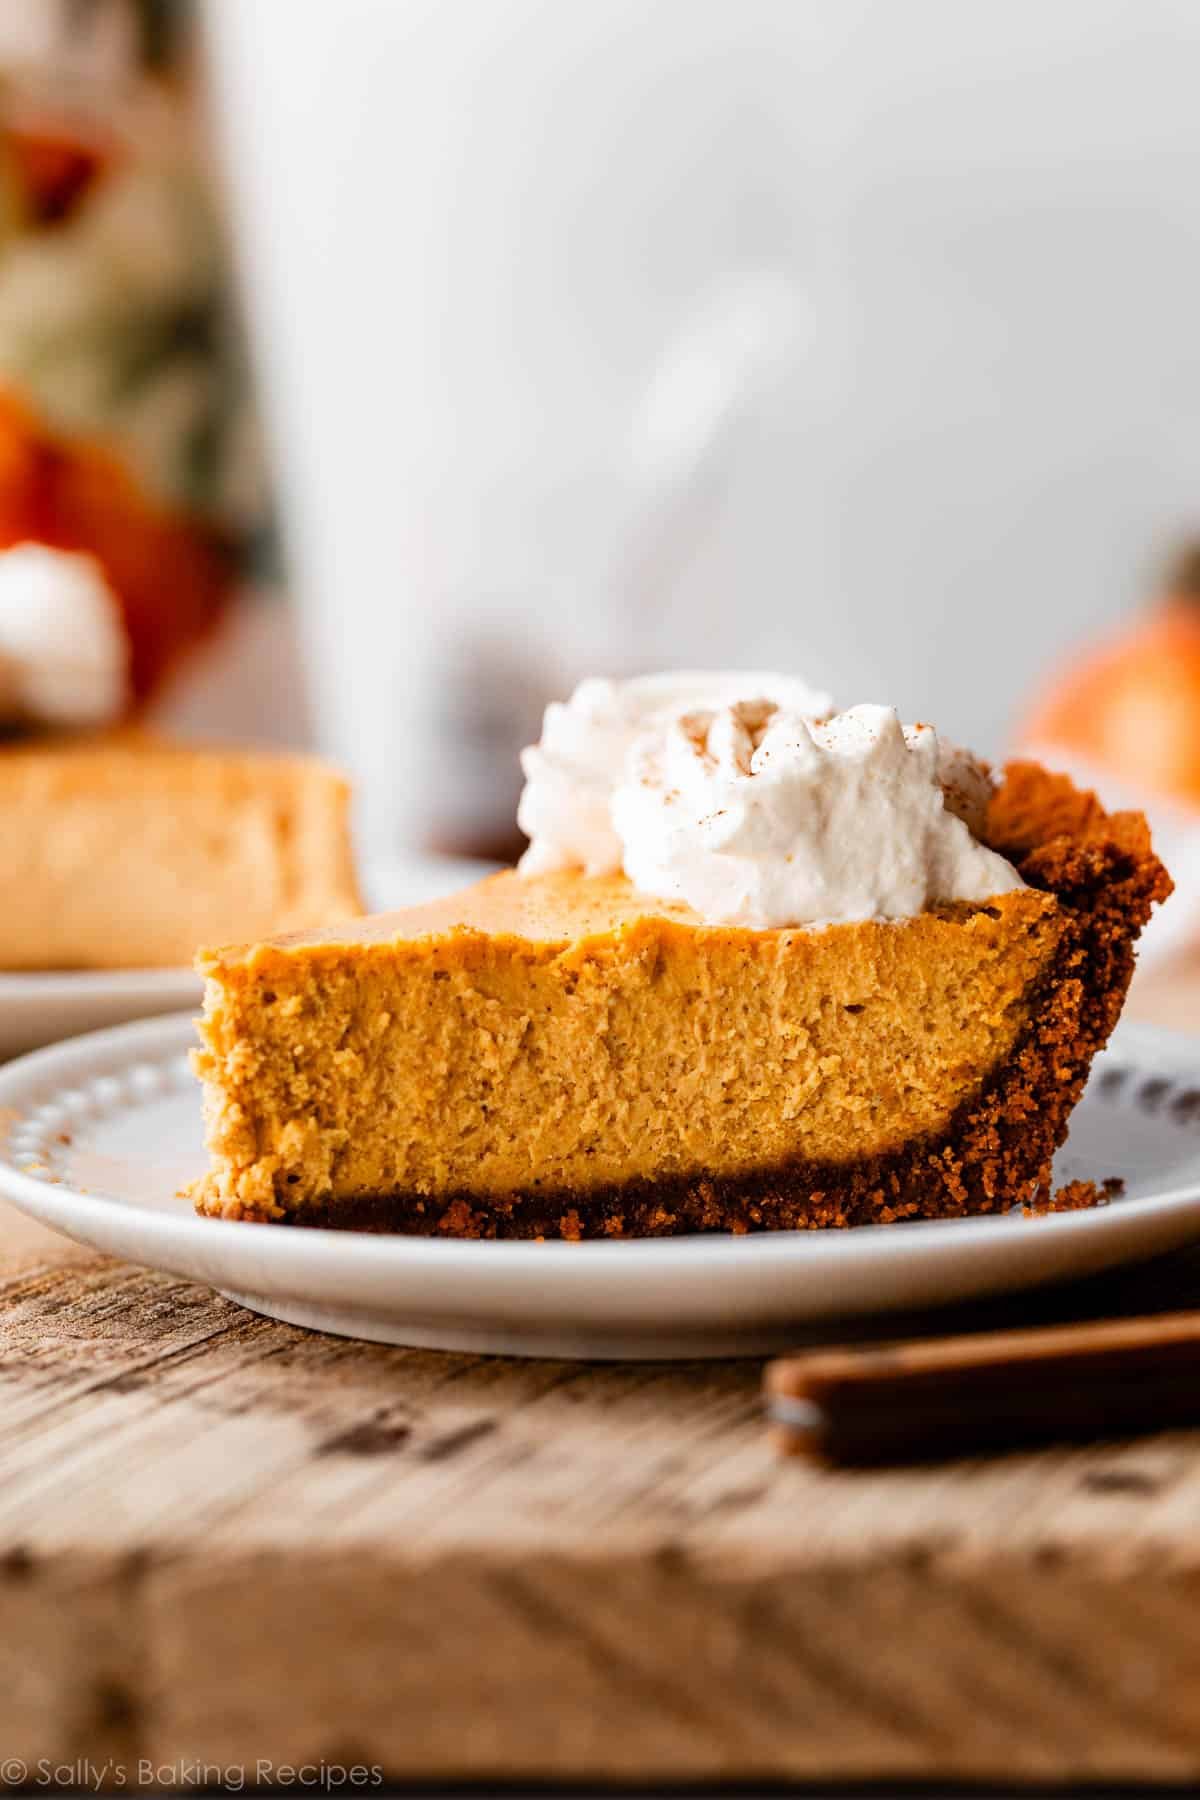
- Pumpkin Cheesecake Pie (pictured)
- Cheesecake Pie
- Banoffee Pie
- Creamy Lemon Pie or Key Lime Pie
- Peanut Butter Pie
- Strawberry Cream Cheese Pie
- Cheesecake or Pecan Pie Cheesecake
- White Chocolate Raspberry Cheesecake Bars
- Pumpkin Pie Bars
Many of the recipes linked above call for a graham cracker or Oreo cookie crust. You would just replace the crust in each recipe with today’s Biscoff crust, and follow the same baking instructions.
Biscoff Pie Crust
- Prep Time: 5 minutes
- Cook Time: 10 minutes
- Total Time: 15 minutes
- Yield: 1 9-inch pie crust
- Category: Pie
- Method: Baking
- Cuisine: American
Description
Use this recipe and my shaping methods detailed in the instructions to make a perfect Biscoff cookie crumb pie crust.
Ingredients
- 32 Biscoff cookies (8.8 oz./250g)
- 5 Tablespoons (71g) unsalted butter, melted
Instructions
- Use a food processor or blender to grind the Biscoff cookies into fine crumbs. You can also place them in a zip-top bag and crush them into fine crumbs with a rolling pin and some arm muscle. You will have about 2 cups crumbs.
- In a medium bowl, stir the Biscoff crumbs and melted butter together until combined. The mixture will be thick, coarse, and sandy. Try to smash/break up any large chunks.
- Pour the mixture into an ungreased 8-inch, 9-inch, or 10-inch pie dish, cake pan, springform pan, or square pan. With medium pressure using your hand, pat the crumbs down into the bottom and up the sides to make a compact crust. Do not pack down with heavy force because that makes the crust too hard. Simply pat down until the mixture is no longer crumby/crumbly. Tip: You can use a small flat-bottomed measuring cup to help press down the bottom crust and smooth out the surface, but do not pack down too hard. If making a pie, run a spoon around the bottom “corner” where the edge and bottom meet to help make a rounded crust—this helps prevent the crust from falling apart when you cut slices.
- For a baked dessert, pre-bake this crust per your filling recipe’s directions. I usually pre-bake for 10 minutes at 350°F (177°C). For a no-bake dessert, cool the crust completely before using, unless your filling’s recipe instructs otherwise.
Notes
- Make-Ahead & Freezing Instructions: It’s freezer friendly! Freeze the prepared crust in your pan for up to 3 months. Thaw before using in your recipe. For shorter storage, keep the prepared crust in the refrigerator for up to 3 days before using in your recipe.
- Special Tools (affiliate links): Food Processor | Glass Mixing Bowl
- What Size Pan Does This Crust Fit? Use an 8-inch, 9-inch, or 10-inch pie dish, cake pan, springform pan, or square pan for this recipe. It’s not enough for a 9×13-inch pan. If you’re making a 9×13-inch dessert, I recommend 1.5x the recipe.


Reader Comments and Reviews
I LOVE this idea of the Biscoff cookie crust. Love these cookies, and I know it will make a fabulous pie crust. Thanks for that tip. That said, I have to say that the picture of the whole pumpkin pie with the one piece being removed is upsetting. I am literally triggered that the piece of pie coming out of the pan is missing its “nose.” I don’t want that piece! LOL!!!
Can you substitute ginger snap cookies for the Biscoff?
Definitely!
Thank you! Same recipe?
Yes, same amounts.
Hi, are you saying to use Biscoff biscuits or Biscoff cookies because there’s definitely a difference. Thank you!
Hi Courteney, this recipe calls for Lotus Biscoff cookies (AKA speculoos), as written in the post. Hope it’s a hit if you give it a try!
I noticed that this recipe uses 250g of cookies crumbs to 5 tablespoons of butter compared to your graham cracker recipe that uses 180 grams of crumbs to 6 tablespoons of butter. Is there a reason why there is less butter and more cookie crumbs used in the biscoff recipe?
Hi Dana, we tested it both ways, and found that this ratio is best for a Biscoff pie crust.
Any tips on using this for mini-pies or tarts? (Specifically, mini pecan pies)
Hi Lauren! Follow the same procedure, just pressing the mixture into the smaller containers. Here’s our mini pecan pies recipe you can reference as well.
When you say to freeze the prepared crust(in the make ahead notes), do you bake it first? I’m using this recipe for mini cheesecakes and want to make & freeze the crust beforehand. I’m unsure if I should do the pre bake then freeze the mini crusts(no filling), completely bake the crusts(as if there was filling in them), or just freeze them in cupcake liners without baking them at all.
Hope this makes sense!
Thanks!
Hi Aimee, I think I would pre-bake the crusts for 10 minutes, let cool completely, and then freeze. But I actually think you could do any of those options and it would be fine for mini cheesecakes in cupcake liners. They’re pretty forgiving!
Will this burn if I use it for a pumpkin pie?
Hi Brooke, see instruction #4 on the recipe card! For a baked dessert, pre-bake this crust per your filling recipe’s directions. I usually pre-bake for 10 minutes at 350°F (177°C). For a no-bake dessert, cool the crust completely before using, unless your filling’s recipe instructs otherwise. Hope it’s a hit!
I’m making a no bake Canoli Cream Pie. Are waffle cones a good substitute ingredient for a no bake crust, using 1 Tablespoon of brown sugar, 7 Tablespoons Unsalted melted butter? (Duplicating the taste of Canoli shells). Will the crust turn out similarly to your no bake crust using graham crackers?
Hi Patty, we haven’t tested it know for sure, but we imagine that should work well. Let us know if you do give it a try.
I am always curious why we are asked to pour the crumbs into a separate bowl and then combine them with the melted butter? It would seem less hassle to just add the melted butter to the food processor. This is what I usually do, but maybe there’s a good reason not to? Thanks!
Hi Monika, we find that method can sometimes overwork the crumbs + butter and turn it into more of a paste, so we prefer to mix the crumbs and butter in gently by hand. But if that method works well for you, certainly feel free to use it!
In the caption of the recipe you wrote 1 9 inch pan. instead my silly mind read 19 inch pan hahaha. it caused for a bit of upscaling. maybe 1x 9 inch pan may be a little more clear? anyway it turned out great anyway, thank you!
I actually prefer crumb crusts except perhaps for fruit pies, because they are crispy and buttery. This Biscoff one was wonderful with my chilled pumpkin mousse pie.
Hi! If I’m planning on making this ahead, should I pre-bake the crust before or after freezing/chilling? Thanks for the recipe!!!
It depends if the recipe you are using needs a warm pre-baked crust. If not, you can pre-bake before or after making it ahead/freezing.
One quick clarification: if I am making a 9×13 I would need to make 1.5 for both the filling and crust? I am looking forward to making this dessert!
Hi Destiny! Making 1.5x this recipe would be enough crust for a 9×13 dessert. The filling would depend on the recipe you’re using.
Looks amazing and the only store bought biscuit I will eat – the beloved Lotus Biscoff! Think this will be amazing with this year’s pumpkin pie or even better, pumpkin cheesecake.
Let me know how it turns out!
What can I substitute for the butter please?
Hi Chris, we haven’t tested it, but you could try using a plant-based butter instead. Let us know if you give it a try.
Thanks for the reply. Does plant based butter taste like butter? I’m trying to get a substitute because I don’t like the taste of butter. If I can’t taste it then I’m ok with it.