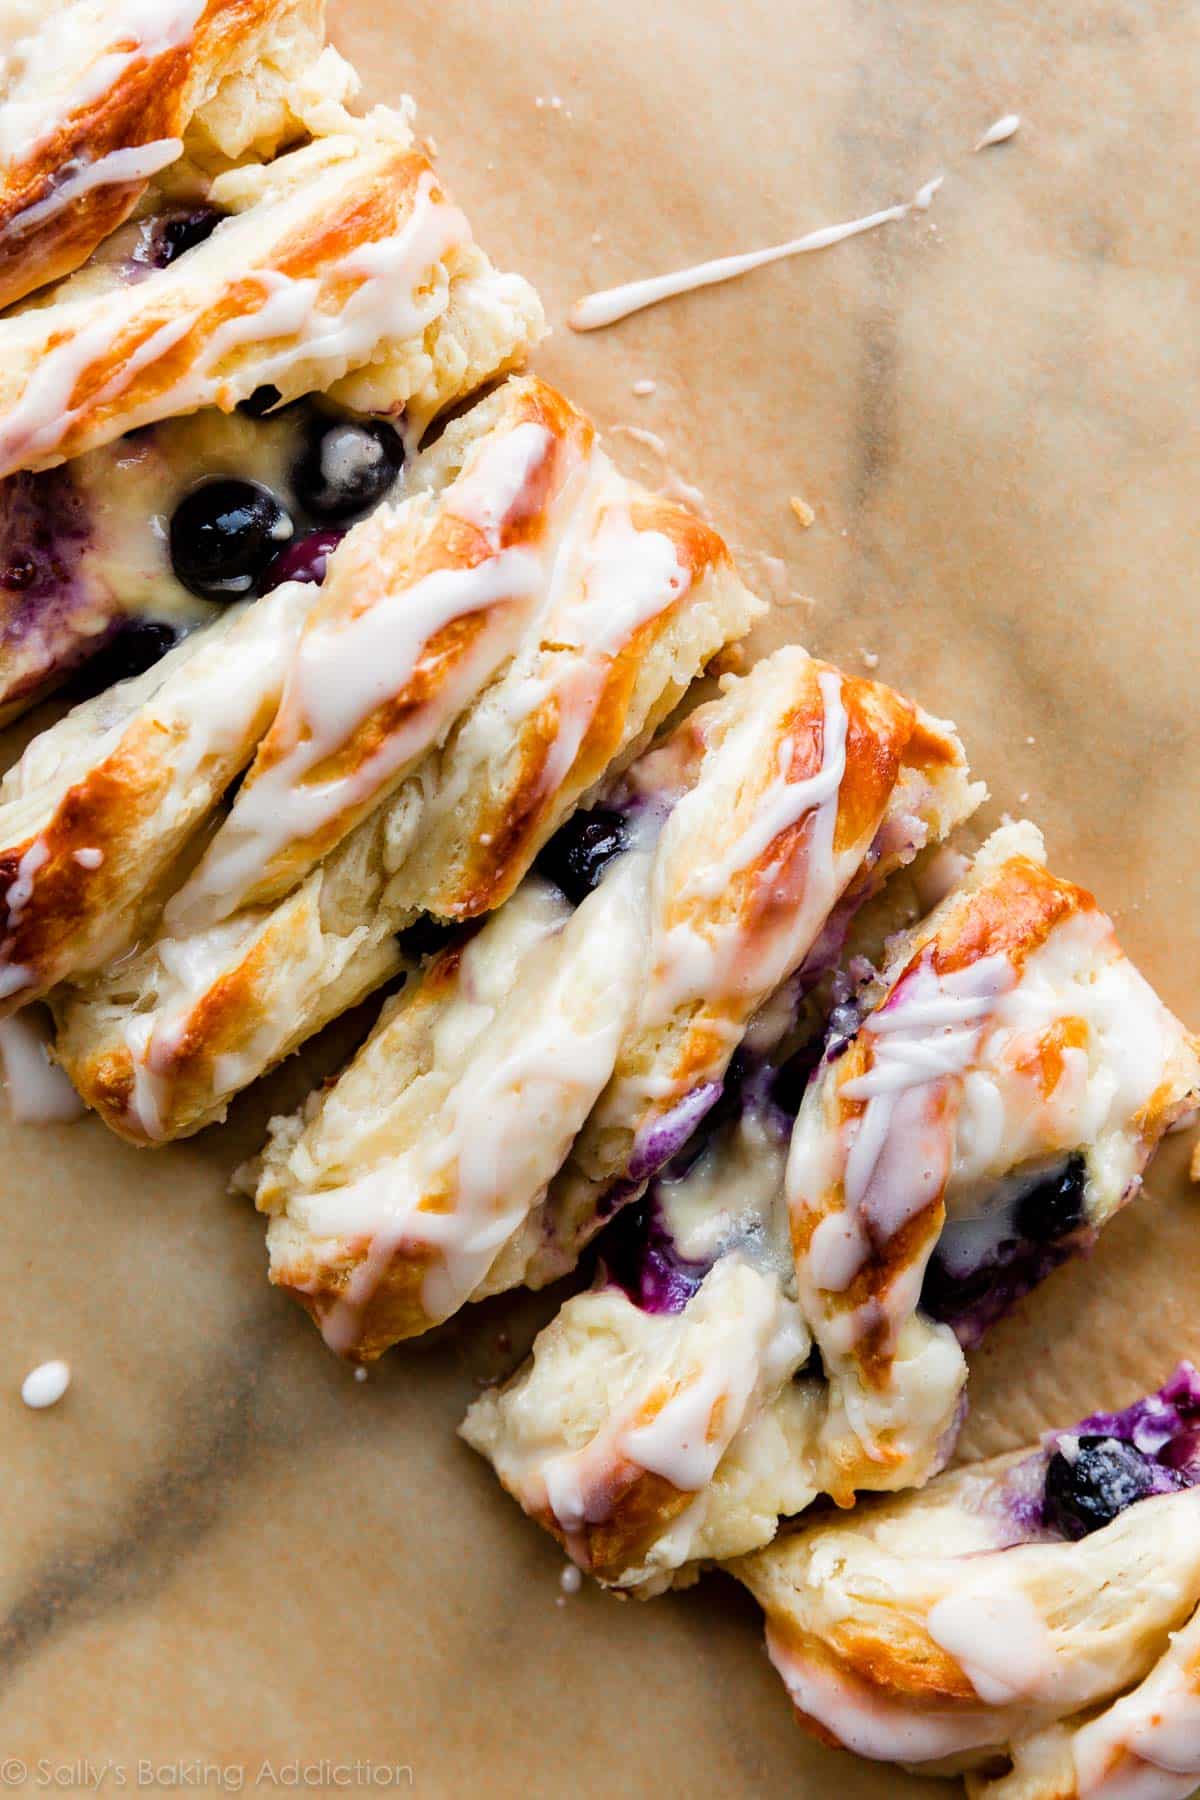
With layers of buttery flaky dough and a sweet cheese filling, this blueberry cream cheese pastry braid is undoubtedly irresistible. Though it seems intimidating, making breakfast pastries from scratch is completely doable for the home baker. Here we’re using a modified variation of classic Danish pastry dough. Follow these detailed instructions for success.
Have you tried this variation of classic Danish pastry dough before? It’s a quicker method to real Danish pastry and an adaption of several trusted sources: Cooking Illustrated, Joy of Cooking, and pastry master Beatrice Ojakangas. I combined all of the recipes I studied to produce a shortcut version of the famously flaky buttery dough.
This is a Shortcut Homemade Pastry Dough
This is not the traditional method of making real danish pastry. This dough is usually laminated several times between layers of butter, similar to how we prepare homemade croissants. Here we are working the butter directly into the dough using a food processor. We’re still rolling out and folding the dough, just as you do when you laminate dough with butter, but we’re not folding it up with a separate layer of butter.
I use the term “shortcut” loosely. This dough still takes at least 5-6 hours total with 2 rounds of refrigeration. Pastries made from this dough are just as buttery, tender, and flaky. I usually make individual breakfast pastries from this dough, but another option is a beautiful pastry braid like this raspberry pastry braid or today’s blueberry cream cheese version.

Follow the Pastry Dough Recipe Carefully
Though I include the information in this post as well, I encourage you to review the pastry dough post. We’re using that exact dough to make our blueberry cream cheese pastry braid. Are you new to working with yeast? Reference this Baking with Yeast Guide where I include practical answers to common yeast questions.
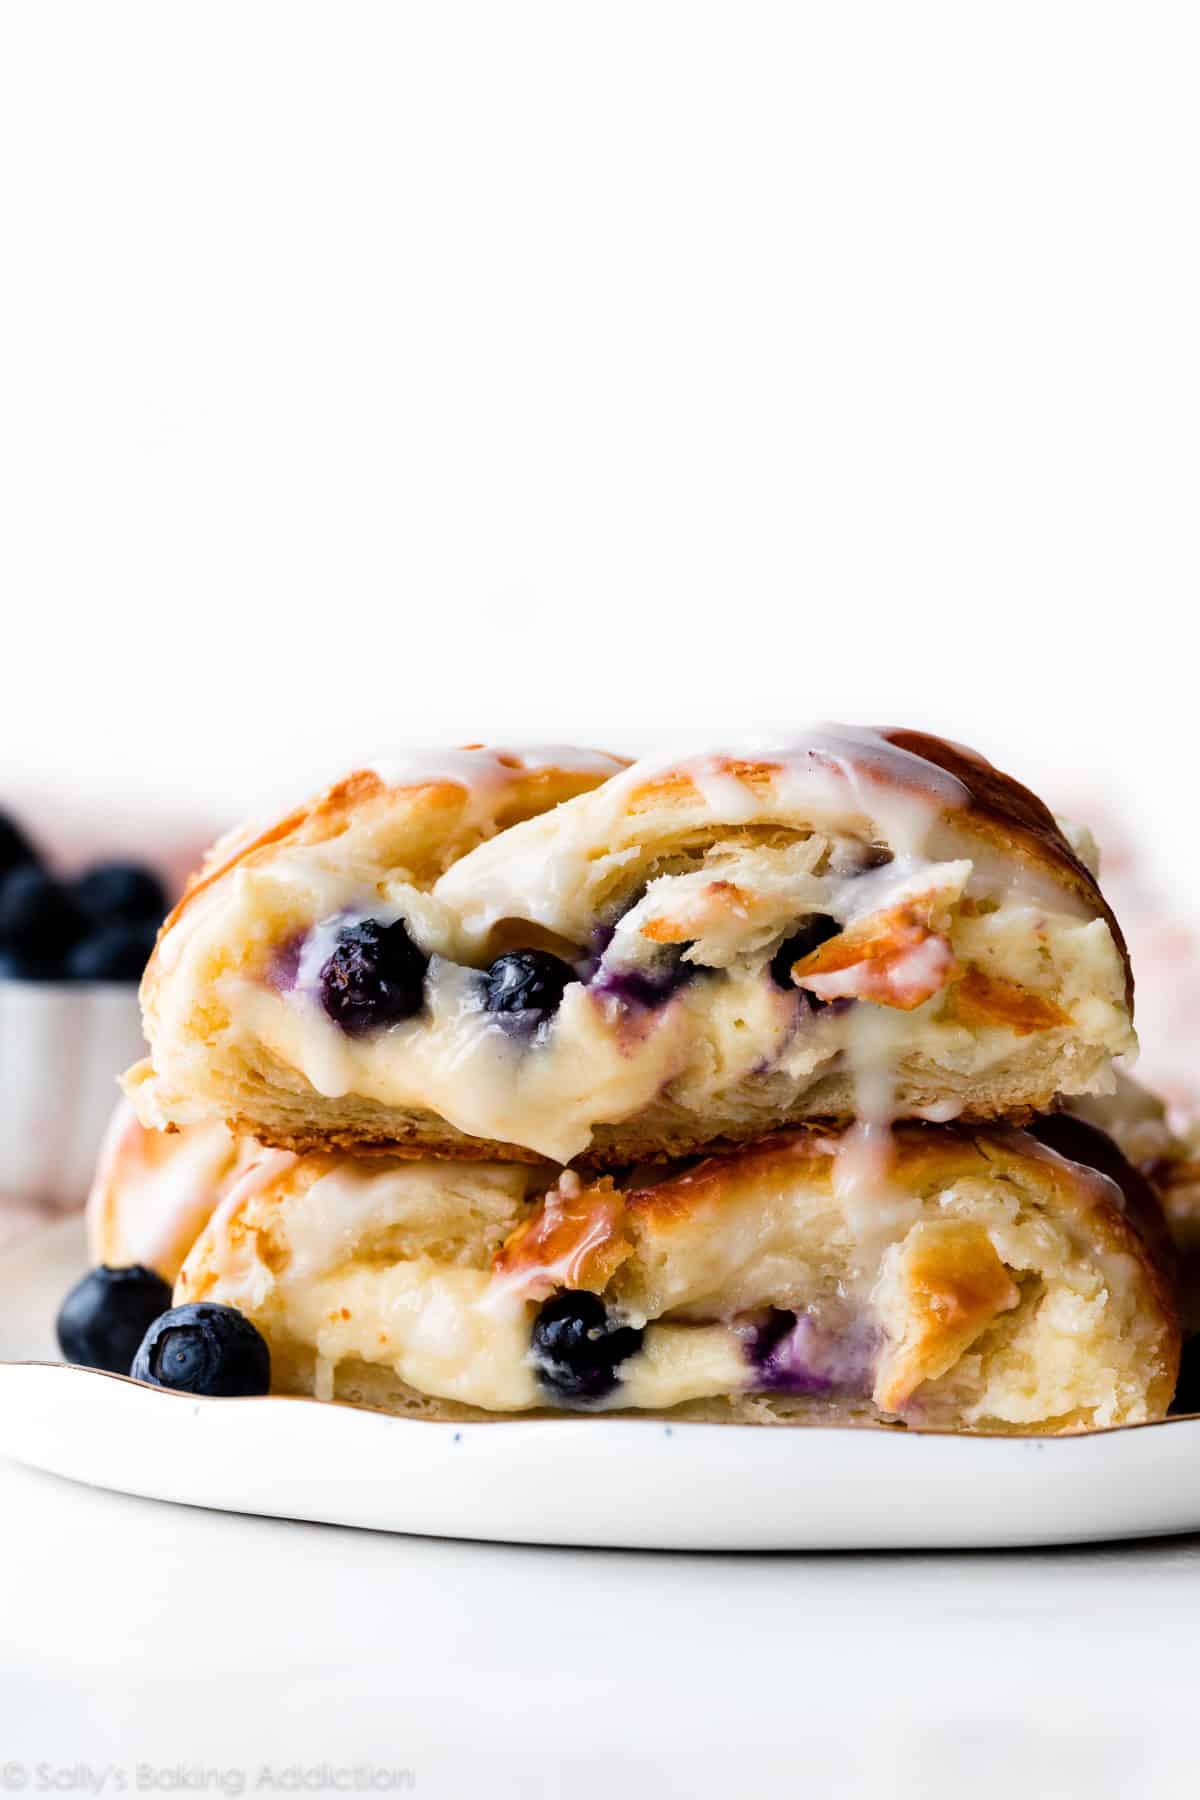
Cream Cheese & Blueberry Filling
Lightly sweetened, this creamy cheese filling is my favorite for pastries. (I use it for my regular breakfast pastries, too.) Tastes like cheesecake! You need brick cream cheese, 1 egg yolk, granulated sugar, a little lemon juice, and vanilla extract. I dotted the cream cheese filling with blueberries for a burst of juiciness. You can skip the berries or replace with raspberries, blackberries, sliced peaches, or chopped apples or strawberries.
How to Make a Blueberry Cream Cheese Pastry Braid
- Make the pastry dough. You can review it in detail in this pastry dough post.
- 1st refrigeration. Wrap the sticky dough up tightly and refrigerate for at least 4 hours and up to 48 hours. This dough is very sticky and should be sufficiently chilled whenever you are working with it.
- Shortcut lamination. Now let’s do a variation of laminating aka rolling and folding dough and butter together. Remember when we made croissants and laminated the dough with a sheet of butter? The butter is IN this homemade pastry dough. So, instead, we’re just rolling and folding the dough itself. Roll it out into a rectangle. Fold it in thirds like a letter, then turn it clockwise. Roll it out into a rectangle again. Repeat the folding. Turn it clockwise again. Repeat rolling and folding 1 more time for a total of 3 times. Have extra flour on hand for this step—I use plenty of it during this whole process!
- 2nd refrigeration. Wrap the laminated dough up tightly and refrigerate for at least 1 hour and up to 24 hours.
- Shape the pastry braid. This recipe yields 2 braids, so cut the dough in half. Refrigerate any dough you aren’t working with. Roll the half of dough into a 12×8 inch rectangle. Using a sharp knife, cut off two corners of the dough (on one 8-inch side) and then two small triangles 3 inches apart from each other on the other end (the other 8-inch side). Spread 1/2 of the cream cheese filling down the center of the strip. Using a sharp knife, pastry wheel, or pizza cutter, cut 10 slanting strips along both sides. Fold strips over dough, alternating each side to resemble a twist or a braid. Fold the bottom end up to seal the filling inside. Repeat with 2nd half of dough and remaining cream cheese filling. Step-by-step photos below.
- Brush with egg wash. This is a combination of egg and milk and guarantees a shiny and crisp golden crust.
- Chill. To help guarantee the braids hold their shape, chill them in the refrigerator as the oven preheats and even up to 1 hour.
- Bake until golden brown.
Because of all the chilling, this pastry is a wonderful recipe to begin the night before and serve the next morning. Or even prep the dough a few days in advance so your work is cut down the day of serving. I include freezing and make-ahead instructions below.
Here are step-by-step photos after the 2nd refrigeration.

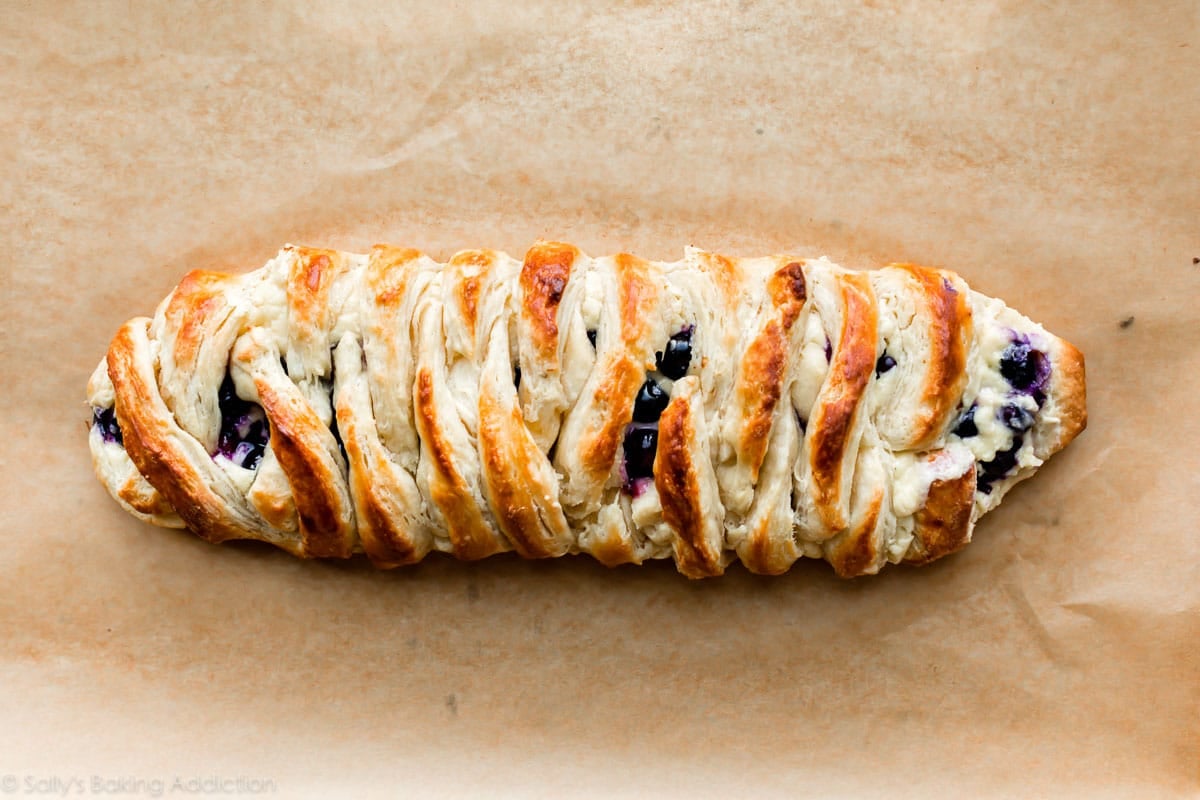
Once the braid is finished, drizzle it with vanilla icing.

This Recipe Yields 2 Braids
This recipe yields 2 lbs of dough, which equals 2 braids. Perfect if you’re looking for Easter brunch recipes to feed a crowd! (The filling and icing are enough for 2 braids, too.) 1 braid serves 5-6 people. If you don’t need that many tempting pastries around, freeze the second half of the dough for a later time. That’s what I usually do!
Take some time to read through the instructions before you begin. That will make the whole pastry-making-process much easier for you. You can do this!
Print
Blueberry Cream Cheese Pastry Braid
- Prep Time: 6 hours (includes chilling)
- Cook Time: 20 minutes
- Total Time: 6 hours, 25 minutes
- Yield: 2 braids, 6 servings each
- Category: Breakfast
- Method: Baking
- Cuisine: Danish
Description
Follow these instructions to create a buttery crisp and flaky pastry braid at home.
Ingredients
Pastry Dough
- 1/4 cup (60ml) warm water (between 100-110°F, 38-43°C)
- 2 and 1/4 teaspoons active dry or instant yeast (1 standard packet)*
- 1/2 cup (120ml) whole milk, at room temperature (between 68–72°F, 20-22°C)
- 1 large egg, at room temperature
- 1/4 cup (50g) granulated sugar
- 1 teaspoon salt
- 14 Tablespoons (196g) unsalted butter, cold
- 2 and 1/2 cups (315g) all-purpose flour (spooned & leveled), plus more for generously flouring hands, surface, and dough
Cream Cheese Filling
- 8 ounces (226g) full-fat brick cream cheese, softened to room temperature
- 1 large egg yolk
- 1/3 cup (67g) granulated sugar
- 1 teaspoon fresh lemon juice
- 1 teaspoon pure vanilla extract
- 2/3 cup (93g) fresh or frozen blueberries (do not thaw)
- optional: 1/3 cup (40g) sliced almonds
Egg Wash
- 1 large egg
- 2 Tablespoons (30ml) whole milk
Vanilla Icing
- 1/2 cup (60g) confectioners’ sugar
- 1 Tablespoon (15ml) heavy cream or milk
- 1/2 teaspoon pure vanilla extract
Instructions
- Preliminary note: To help guarantee success, I recommend reading through the recipe before beginning. I also detail this recipe in the separate pastry dough post. Do not use an electric mixer for this dough. It’s best if the dough is folded together with a wooden spoon or silicone spatula since it is so sticky. There is very minimal mixing required.
- Make the Pastry Dough: Whisk the warm water, yeast, and 1 Tablespoon (6g) of sugar together in a large bowl. Cover and allow to rest until foamy on top, about 5 minutes. If the surface doesn’t have bubbles on top or look foamy after 15 minutes (it should if the yeast isn’t expired), start over with a fresh packet of yeast. Whisk in remaining sugar, the milk, egg, and salt. Once these wet ingredients are mixed together, lightly cover and set the bowl aside as you work on the next step.
- Cut the cold butter into 1/4 inch slices and add to a food processor or blender. Top with 2 and 1/2 cups flour. Pulse the mixture 12-15 times, until butter is crumbled into pea-size bits. See photo below for a visual. Using a food processor or blender is best for this dough. Keeping that in mind, if you don’t have one, you can use a pastry cutter to work in the butter.
- Pour the flour mixture into the wet yeast mixture. Very gently fold everything together using a silicone spatula or wooden spoon. Fold *just until* the dry ingredients are moistened. The butter must remain in pieces and crumbles, which creates a flaky pastry. Turn the sticky dough out onto a large piece of plastic wrap, parchment paper, aluminum foil, or into any container you can tightly cover.
- 1st Refrigeration: Wrap the dough/cover up tightly and refrigerate for at least 4 hours and up to 48 hours.
- Roll & Fold: Take the dough out of the refrigerator to begin the “rolling and folding” process. If the dough sat for more than 4 hours, it may have slightly puffed up and that’s ok. (It will deflate as you shape it, which is also ok.) Very generously flour a work surface. The dough is very sticky, so make sure you have more flour nearby as you roll and fold. Using the palm of your hands, gently flatten the dough into a small square. Using a rolling pin, roll out into a 15×8-inch rectangle. When needed, flour the work surface and dough as you are rolling. Fold the dough into thirds as if it were a business letter. (See photos and video tutorial.) Turn it clockwise and roll it out into a 15 inch long rectangle again. Then, fold into thirds again. Turn it clockwise. You’ll repeat rolling and folding 1 more time for a total of 3 times.
- 2nd Refrigeration: Wrap up/seal tightly and refrigerate for at least 1 hour and up to 24 hours. You can also freeze the dough at this point. See freezing instructions.
- Line two large baking sheets with parchment paper or silicone baking mats. Rimmed baking sheets are best because butter may leak from the dough as it bakes. If you don’t have rimmed baking sheets, when it’s time to preheat the oven, place another baking sheet on the oven rack below to catch any butter that may drip.
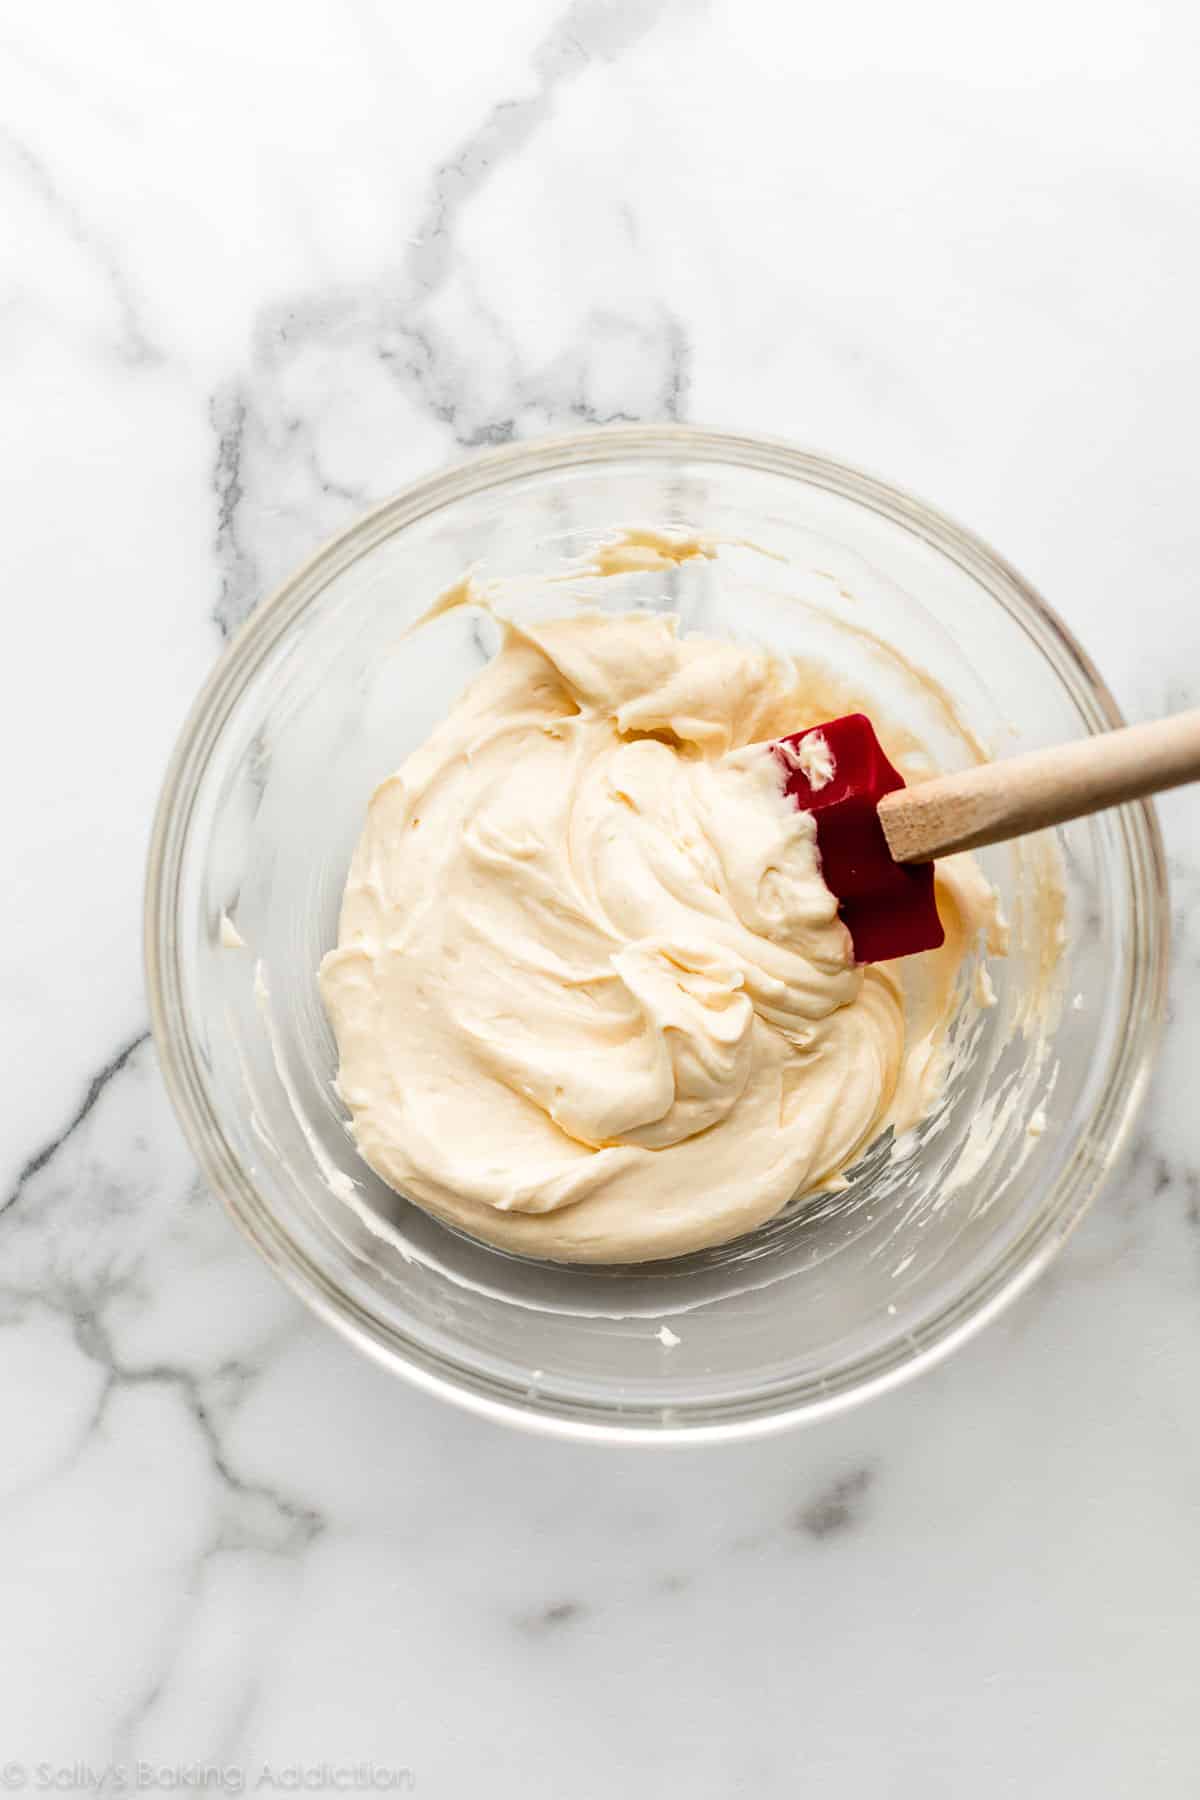
- Make the cheese filling: In a medium bowl using a handheld or stand mixer fitted with a paddle attachment, beat the cream cheese and egg yolk together on medium speed until smooth. Add the sugar, lemon juice, and vanilla, then beat until smooth. Cover and refrigerate until ready to use.
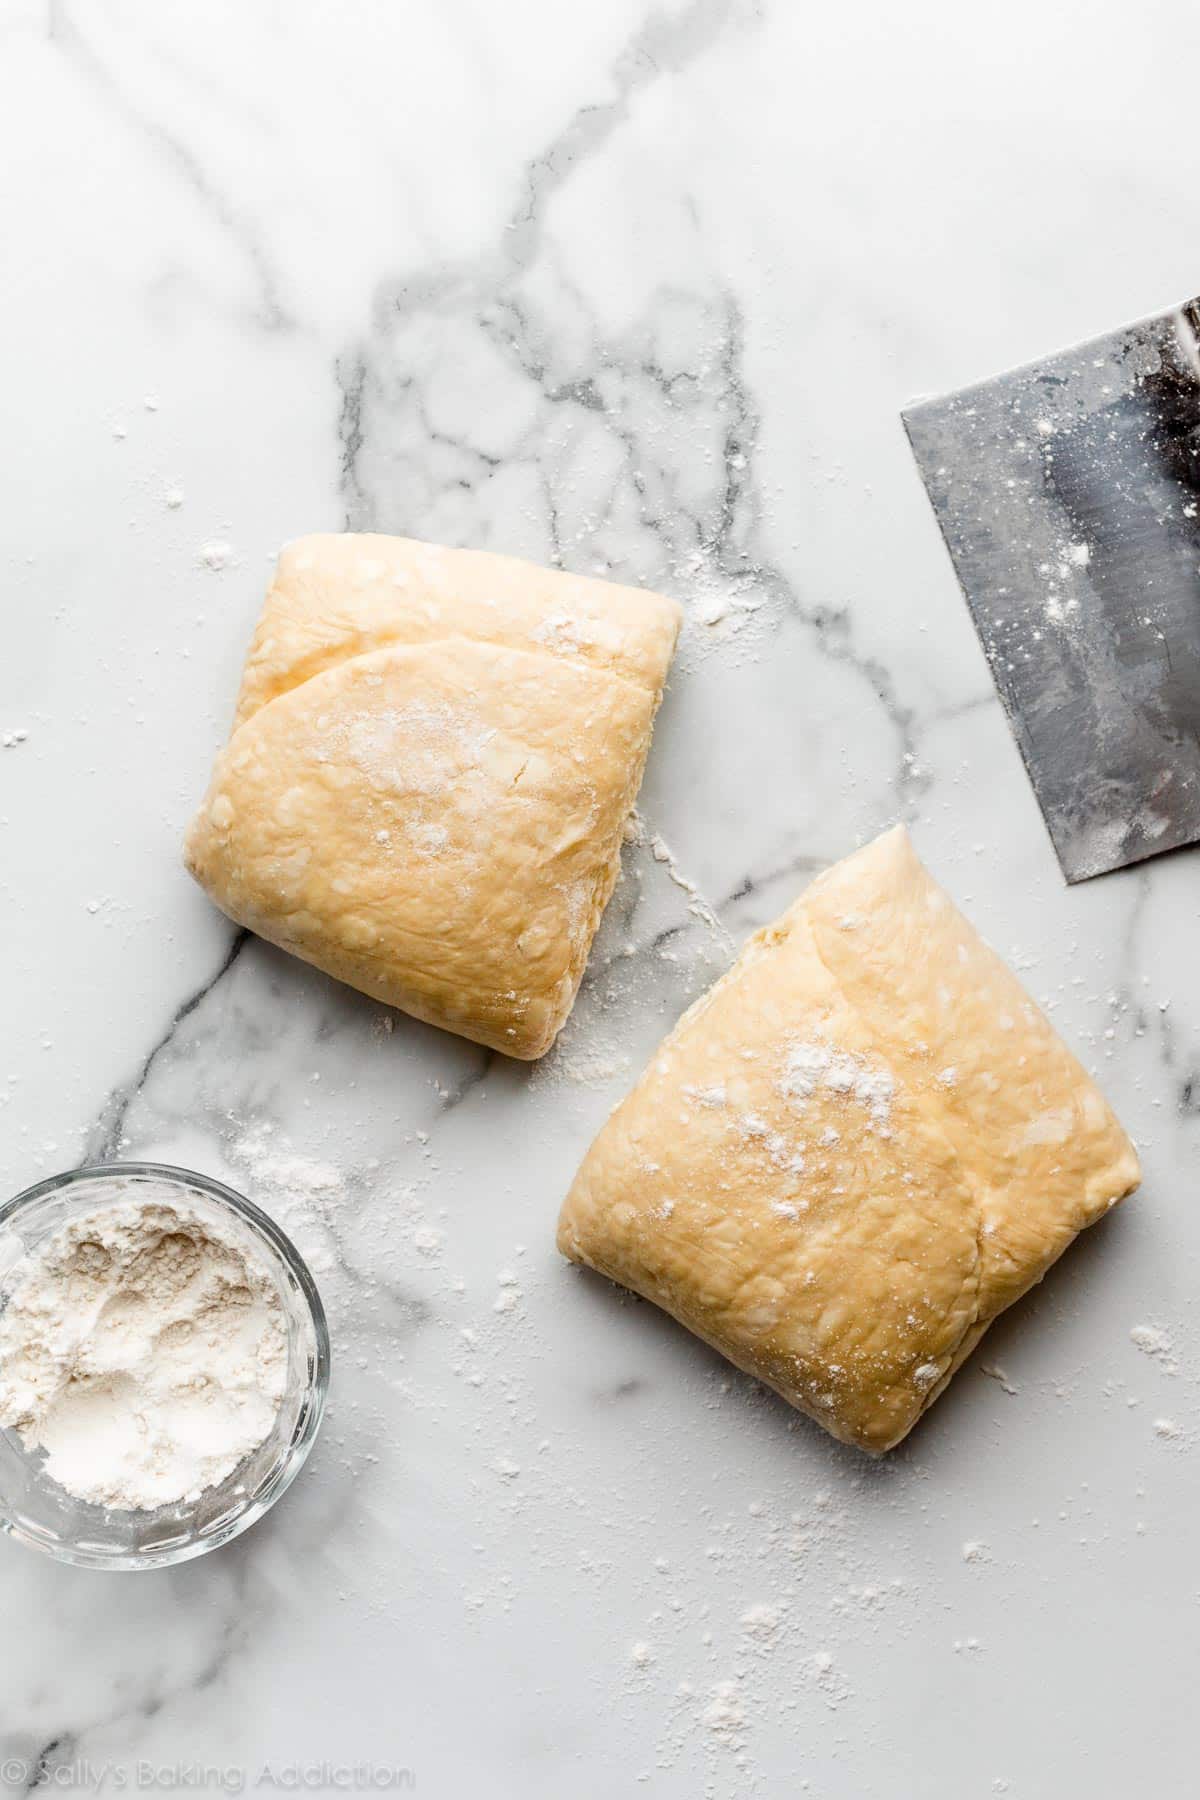
- Take the dough out of the refrigerator and cut it in half. Wrap 1 half up and keep refrigerated as you work with the first half. (You can freeze half of the dough at this point, use the freezing instructions below.)
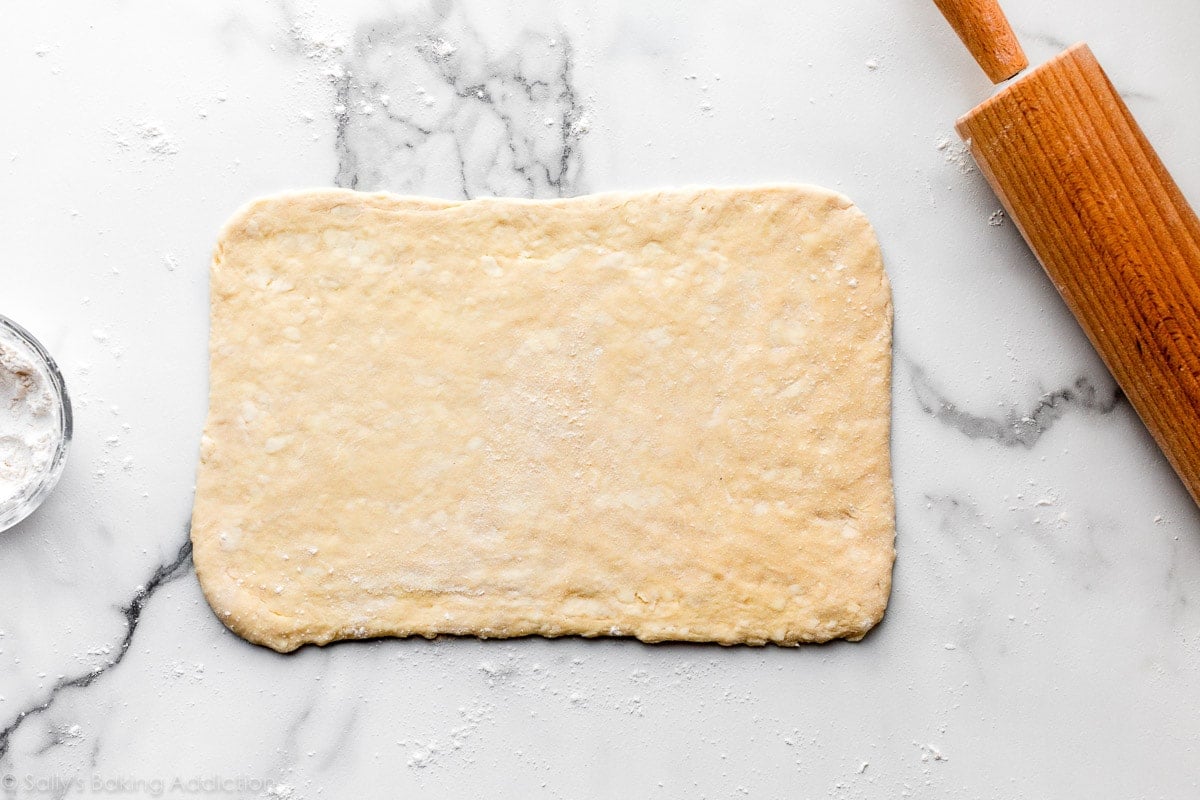
- On a floured work surface, roll dough out into a 12×8-inch rectangle. You can roll out the dough on a lightly floured piece of parchment paper or lightly floured silicone baking mat instead because you will transfer the shaped dough to a lined baking sheet next.
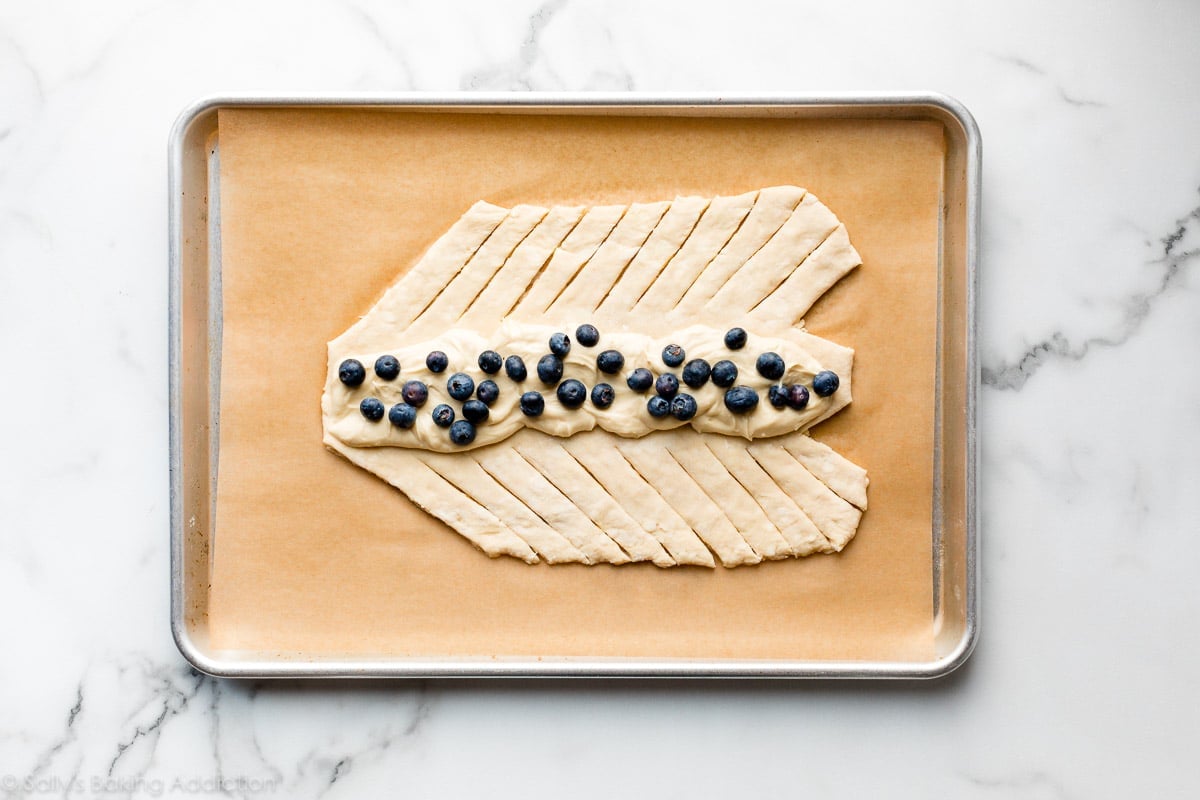
- Using a sharp knife, cut off two corners of the dough (on one 8-inch side) and then two small triangles 3 inches apart from each other on the other end (the other 8-inch side). See visual below.
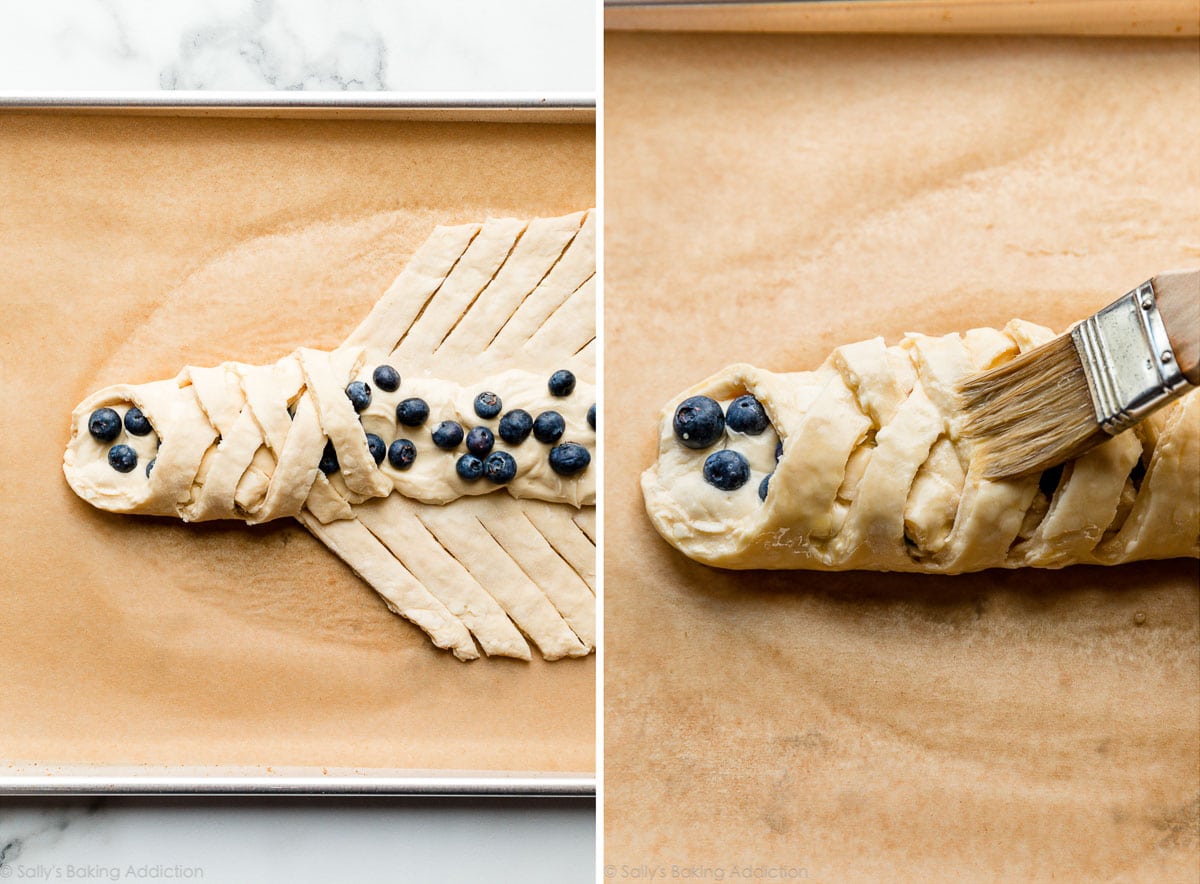
- Spread 1/2 of the cream cheese filling down the length of the center of the strip, which should be about 3 inches wide. Dot with half of the blueberries (1/3 cup). Using a sharp knife, pastry wheel, or pizza cutter, cut 10 slanting strips (3/4 – 1 inch wide each) along both sides. Fold strips over filling, alternating each side to resemble a twist or a braid. Fold the bottom end up to seal the filling inside. Repeat with the second half of the dough and the rest of the filling. The braids may seem very narrow, but they puff up and out as they bake.
- Egg Wash: Whisk the egg wash ingredients together. Brush all over the dough. If you want a little crunch from almonds, sprinkle them evenly on top of the braids after brushing the dough with egg wash.
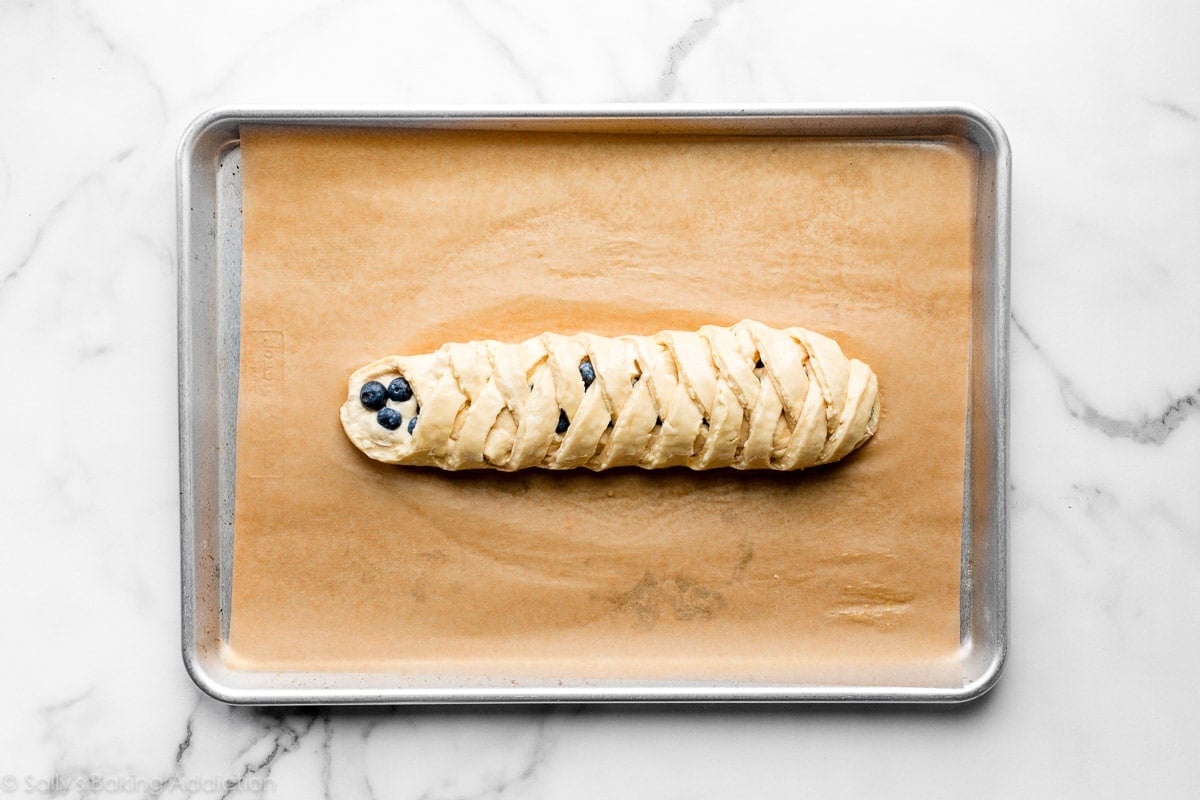
- I strongly recommend refrigerating the shaped braids before baking for at least 15 minutes and up to 1 hour before baking. The braids tend to leak more butter and/or lose more shape if they haven’t chilled.
- Preheat oven to 400°F (204°C).
- Bake each braid for 18-22 minutes or until golden brown. Some butter may leak from the dough, that’s completely normal and expected. Feel free to remove the baking sheets from the oven halfway through baking and brush the dough with any of the leaking butter, then place back in the oven to finish baking. (That’s what I do!)
- Remove baked braids from the oven and cool for at least 5 minutes before icing, cutting, and serving.
- Vanilla Icing: Whisk the icing ingredients together. If you want a thicker icing, whisk in more confectioners’ sugar. If you want a thinner icing, whisk in more milk or cream. Drizzle over warm pastries and serve.
- Cover leftover iced or un-iced pastries and store at room temperature for 1 day or in the refrigerator for up to 5 days. Or you can freeze them for up to 3 months. Thaw before serving. Before enjoying, feel free to reheat leftover iced or un-iced pastries in the microwave for a few seconds until warmed.
Notes
- Make Ahead & Freezing Instructions: Prepare the dough as instructed in steps 2-4. At this point the dough can be refrigerated up to 48 hours. You can also prepare the dough through step 6. At this point the dough can be refrigerated up to 24 hours. During or after this second chilling time, you could also freeze the dough for up to 1 month. (I don’t recommend freezing the dough before the rolling and folding step.) Thaw overnight in the refrigerator, then continue with step 8. You can also freeze the shaped and filled braids after shaping them in step 13. Thaw in the refrigerator, then continue with step 14.
- Special Tools (affiliate links): Glass Mixing Bowls | Whisk | Food Processor or Pastry Cutter | Silicone Spatula or Wooden Spoon | Rolling Pin | Baking Sheets | Silicone Baking Mat or Parchment Paper | Electric Mixer (Handheld or Stand) | Pizza Cutter | Pastry Brush
- Temperature & Substitutions: The temperature of your ingredients is imperative to this pastry’s success. Make sure you take the time to warm the water and bring the milk to room temperature. Keep the butter in the refrigerator until you need it in step 3. I do not recommend any substitutions in this carefully formulated dough, though a lower fat or nondairy milk works in a pinch. For the egg wash, low fat or nondairy milks work, as do heavy cream or half-and-half.
- Yeast: You can use either active dry yeast or instant (quick rise) yeast. The instructions and amount are exactly the same no matter which you use. Reference my Baking with Yeast Guide for answers to common yeast FAQs.
- Halve the Recipe? I don’t recommend halving this dough recipe. Make the dough as written, then freeze half after step 10.
- Dough recipe adapted from Cooking Illustrated, Joy of Cooking, and Beatrice Ojakangas
Keywords: blueberry cream cheese pastry braid, pastries


I made this for the first time for a party and it was fantastic. Everyone thought I bought it at an expensive bakery. The only questions I have, How can I get rid of the very slight yeast taste which I find happens when you use packaged yeast. I did not have any complaints, but I could taste a slight yeast flavor.
Hi AnnieB, I’m so glad to read that you tried and loved this pastry braid recipe. I wonder if the dough rose for too long? You can usually detect a strong yeast taste/flavor if the yeast was “working” for too long before baking. Or, in step 2, make sure that the yeast has dissolved very well in the warm water and the mixture looks pretty foamy on top. That should help too.
Hi. I’m wondering – if I freeze this after step 13, how long do I thaw in refrigerator before baking? Would an overnight thaw in the fridge work and bake in the morning as directed in step 17? Thank you
Hi Rhonda! Thaw in the refrigerator, then continue with step 14.
Yes. I was wondering approx how long? Overnight?
Overnight is perfect!
I did it, I did it!!!! First one hot a little too done on bottom, so I moved to higher rack in oven. Perfect! Question, do I have to precook sluced raw apples or peaches? Thanks so much!
★★★★★
I made this recipe today for my Dad for Father’s Day, followed the recipe to a tee and it turned out wonderfully. My dad “this is the best pastry I’ve had in my life” and they were recently in Europe so if that says anything about this recipe..will make again but will play around with the fillings next time.
★★★★★
I ‘ve made many of your recipes and have to say, this is my favorite along with the coconut pineapple cake. Nothing like a fresh baked pastry. I always make both braids when my family comes over and they are immediately consumed.
Can I replace the butter with coconut oil? Will that affect the dough at all?
Hi Steven, butter is necessary here to create those signature flaky pastry layers. We don’t recommend swapping with anything else.
I’m a slow mover in the kitchen so this recipe took me an especially long time to complete but it is completely worth the time and effort. It didn’t turn quite as flaky as I’d have liked but I already knew as I was making the dough that I’d incorporated the butter too much. Next time will just use a pastry cutter as my blender just wasn’t doing what I needed it to do.
Making the braid is also super fun. Very rewarding project to pull out of the oven and it tastes heavenly.
★★★★★
Deliciosa receta
★★★★★
This was phenomenal! The pastry dough is amazing on its own, but the filling really completes it.
★★★★★
I forgot to put the salt into the dough. Can I incorporate it by sprinkling over the dough before I start folding and rolling it? Or should I just skip it all together?
I would add a little salt– the sprinkling suggestion you made would be best. Just add a pinch all over the dough– no need to add 1 full teaspoon.
I finally made this. The recipe was easy to follow. It came out so beautiful. I can’t wait to eat some while drinking some coffee.
★★★★★
I have made this recipe twice now and I absolutely love it. Everyone is so impressed with the way it looks. The only problem I’ve had is it just seems like it over cooks a bit on the bottom and the top but the inside is sometimes a bit undercooked. This might be something wrong with my own oven or my own method but I’m just curious if anyone else has noticed this happening.
★★★★★
Yes, same for me with the first one.
I turned down the oven to 375 for the 2nd braid as well as tenting but I’m freezing it for later so not sure if it worked. I may have added too many blueberries.
Still delicious!
This is my first time making it.
Oh this is SO good. Worth the time! Followed the recipe exactly and it came out amazing.
★★★★★
Can I refrigerate the finished pastry, filling and everything, overnight and then just pop it in the oven the next morning?
Hi Abbie, sure can!
I have made (and LOVED) this recipe several times. Our favorite combination is the cream cheese filling with cherries on top. One question… do you think this dough would work for morning buns? Do you have a recipe you use for morning buns?
★★★★★
Hi Anne, we’re so glad you’ve been enjoying this recipe! We don’t currently have a recipe for morning buns, but we’d love to know if you find one you love. This dough recipe could be a good place to start, but we’d recommend a quick internet search for a specific morning bun recipe with lots of positive reviews.
Wow first time I made pastry dough. Made these for Father’s Day for my (somewhat critical) chef husband who loves danishes. Needless to say I was a bit worried. He loved them so much! Thank you for a great easy to follow recipe.
★★★★★
I know peaches aren’t nearly as sturdy as blueberries – and they have a lot more moisture. But – do you think fresh peaches would work here? Or even a combination of peaches and blueberries?
Hi Sue, You can skip the berries or replace with raspberries, blackberries, sliced peaches, or chopped apples or strawberries! Enjoy!
Hi,
What a fantastic recipe and instructions! Question- has anyone made this with gluten free flour?
Thanks!
★★★★★
Oh my goodness, this recipe has just become a family favorite. We had a 90th birthday bash for my mother-in-law and I served 2 at a breakfast. My granddaughters kept coming back for 2nd and 3rds. AMAZING! I followed the recipe exactly and so glad I did. With a house full of people I was able to do the stages of assembly days in advance. We will be having this at my Christmas brunch every year. Thank you for the detailed instructions.
We’re so happy to hear this pastry was a hit with your family, Chris!
I used 2% milk (2 2/3 c), 15g more butter than specified, instant yeast, and everything else was pretty much the same. I dont have a food processor or a pastry cutter, so i broke the butter into the flour mannually. The dough was incredibly sticky and I was worried it wouldn’t turn out well (the picture looks a lot drier and firmer than mine). I was out of flour at that point, so I couldn’t adjust the ratio. I rolled it pretty thin and filled the pastries with peach preserves. HOLY GUACAMOLE, soooo good. The pastry was incredibly light and airy, but also with that characteristic flakiness you associate with a great danish. The peach preserves was a bit too sweet for my taste, so i think next time I’ll try a custard or a light sweet cream with vanilla. Thanks for the great recipe!
★★★★★
This recipe is delicious! I was intimidated by the pastry dough & braid but the detailed instructions were very helpful and it turned out delish.
★★★★★
Hi! I made this a couple weeks ago it was amazing!!!! So easy to follow! Thank you. My one question- I would like to make again and was wondering can the cream cheese filing be made the night before?
Hi Elsbeth! You should be able to refrigerate the cream cheese filling overnight without any issues. Let us know how it goes!
Hi, in a pinch, could i use puffed pastry dough, purchased from store? thank you!
Absolutely! Bake time and oven temperature would be the same.
Looks amazing and smells amazing. Just a beginning baker and trying to figure out where I went wrong as the middle dough still seems raw. Not sure if it is or its a product of the cream cheese filling. Is there a way to verify for a beginner baker?
★★★★★
Hi Timothy, It sounds like it was simply underbaked. An easy fix for next time is to tent the top with aluminum foil if the top is browning before the center is full baked.
This turned out well, I added some lemon zest to the cream cheese filling and it was very tasty. I think somewhere along the way I messed up the dough because it was a little more cakey than flaky, not sure what I did wrong. Nonetheless it was very good.
★★★★★
This looks so delicious! I am wondering if I can make bear claws using this pastry recipe? I have a bucket full of huckleberries and am craving huckleberry bear claws. I’m assuming the dough will work but not sure?
Hi Mack! I haven’t tested it, so I can’t be certain. You may have better luck with my homemade doughnuts dough.
Sally, you give the best, detailed instructions. It makes following along so easy
★★★★★
I made this for the first time, for family night yesterday! It was perfectly amazing! One family member requested it for her birthday cake! I love desserts that can be made ahead of time, in stages, over several days. It makes the process so much easier, especially when you’re making a dessert for a family dinner; and for a recipe with a number of steps, spreading it out over several days makes it lot less overwhelming.
★★★★★
I made this recipe today and the braids looked and tasted great. My question is can I use this dough to make croissants or do I need to do the full lamination? I may try putting chocolate in the braid next time.
Thanks for this great recipe.
I enjoyed meeting you and your husband last November at Charleston in Baltimore. You all were so gracious to let me interrupt your dinner.
★★★★★
Hi Linda! It was so lovely to meet you as well. What a delicious spot for dinner, too!
You could use this dough to make croissants, but for best results (taste and texture) I recommend using my real homemade croissants recipe.
Mmmmmm this is sooooo delicious!!!!!!
Thank you for such an awesome recipe!!
I made this twice and each time my dough is still raw on the bottom. I kept it as long as I could in the oven without burning the top. I’ve measured everything so I’m not sure what’s up! Any suggestions?
Thanks again! My husband went gaga over this delicious one!!
★★★★★
Hi Kathleen! So glad you are enjoying this pastry braid recipe. It’s definitely one of my favorites. It sounds like a couple adjustments to the oven could help. Reduce the oven temperature to 375°F (191°C) and bake for a few extra minutes. Tenting the braids with aluminum foil would help cook them a little more evenly as well.