How to Make a Cheesecake Water Bath (Video)

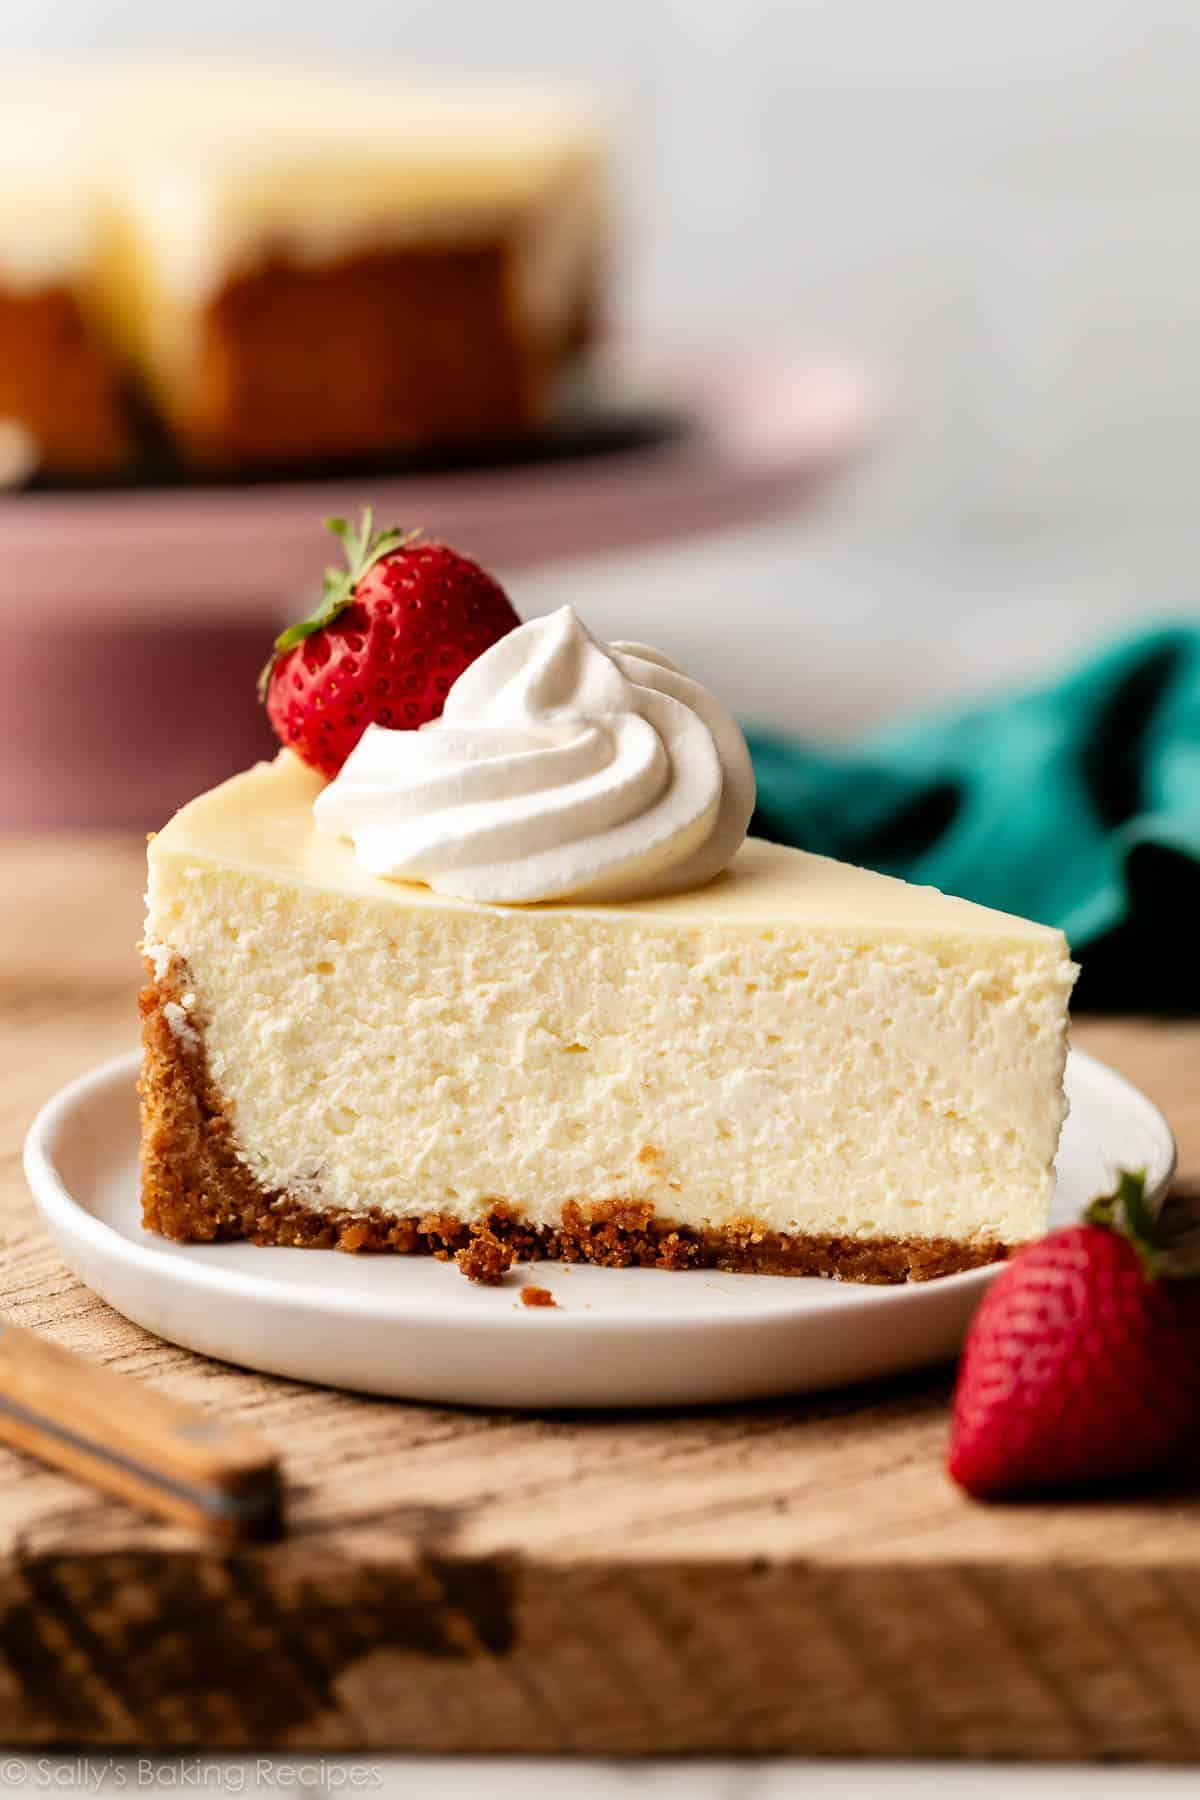
Whether you’re making a classic cheesecake, or a flavorful variation like lemon cheesecake, amaretto cheesecake, cinnamon swirl cheesecake, or pecan pie cheesecake, it’s helpful to know the what, why, and how of baking a cheesecake in a water bath. For picture-perfect, tall, and smooth cheesecake, you don’t want to skip this imperative step. Use my video tutorial as a guide.

slice of cheesecake with whipped cream and strawberry on top on white plate on top of wood board.

What Is a Cheesecake Water Bath?

Baking your cheesecake in a water bath is the best way to ensure cheesecake success. Don’t worryโ€”you don’t have to buy any special equipment or a fancy bathtub-size baking appliance! It simply means placing the springform pan with the unbaked cheesecake in it inside a larger pan with hot water in it.

cheesecake batter in wrapped aluminum foil sitting in water bath in the oven.

Why Should I Bake Cheesecake in a Water Bath?

We’re essentially adding steam to the baking and cooling steps. Why do we do this? Is it because this is a high-maintenance dessert that demands a spa treatment? Well, actually, sort of!

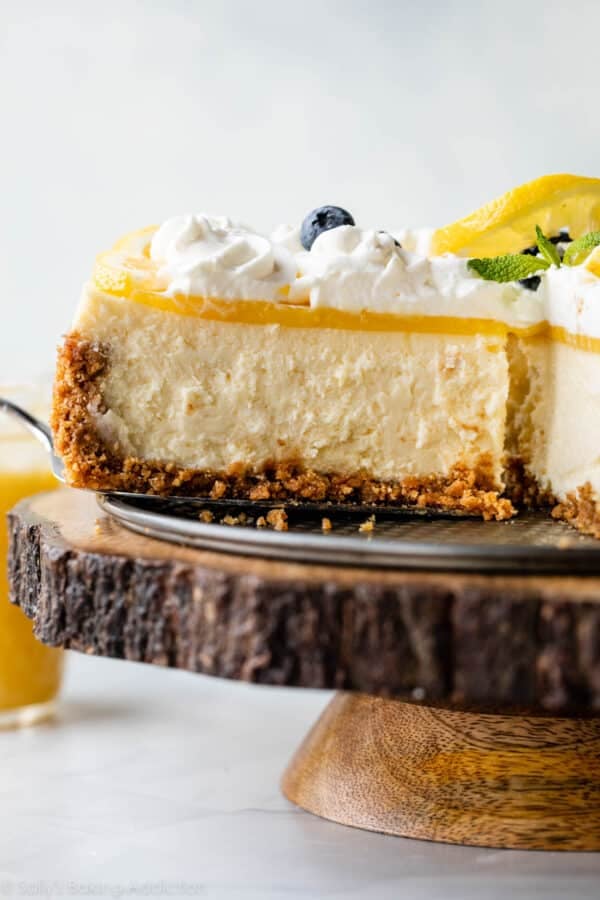
Cheesecake loves a humid environment, and we want to give it the best chance of baking up smooth, creamy, tall, and crack-free. Here’s why:

  • Cheesecakes Are Egg-Heavy: Eggs need a moist and humid environment to properly rise and avoid drying out or burning.
  • Prevent Cracks in the Surface: The steam from the hot water will lift the cheesecake up slowly and evenly, reducing the risk of cracks on the surface. You can read more about this in this post on How to Prevent Cracks in Cheesecake.
  • Prevent Sinking: Starting the cooling process in the oven, still in the water bath, makes for a slow and even cool-down, which helps prevent the cheesecake from sinking back down as it cools. Cheesecakes are not fans of sudden temperature changes. (Chocolate soufflรฉ is… they like to sink!)

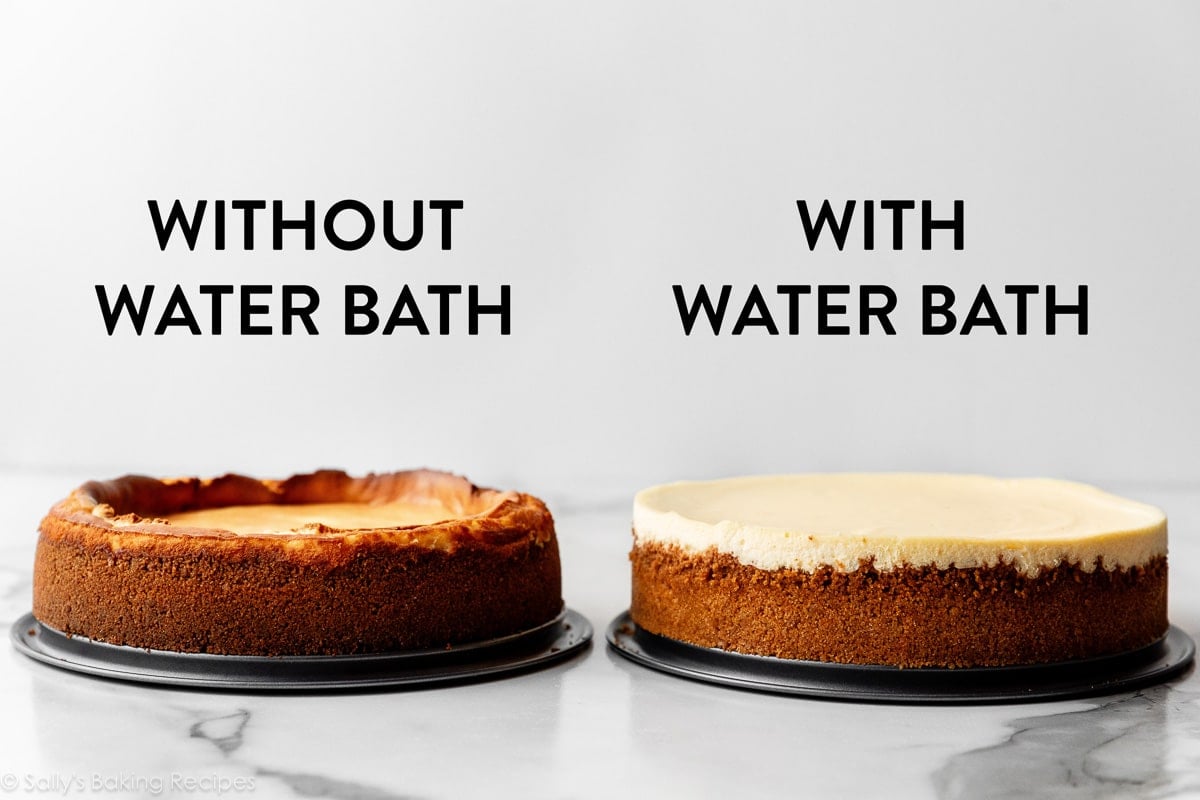
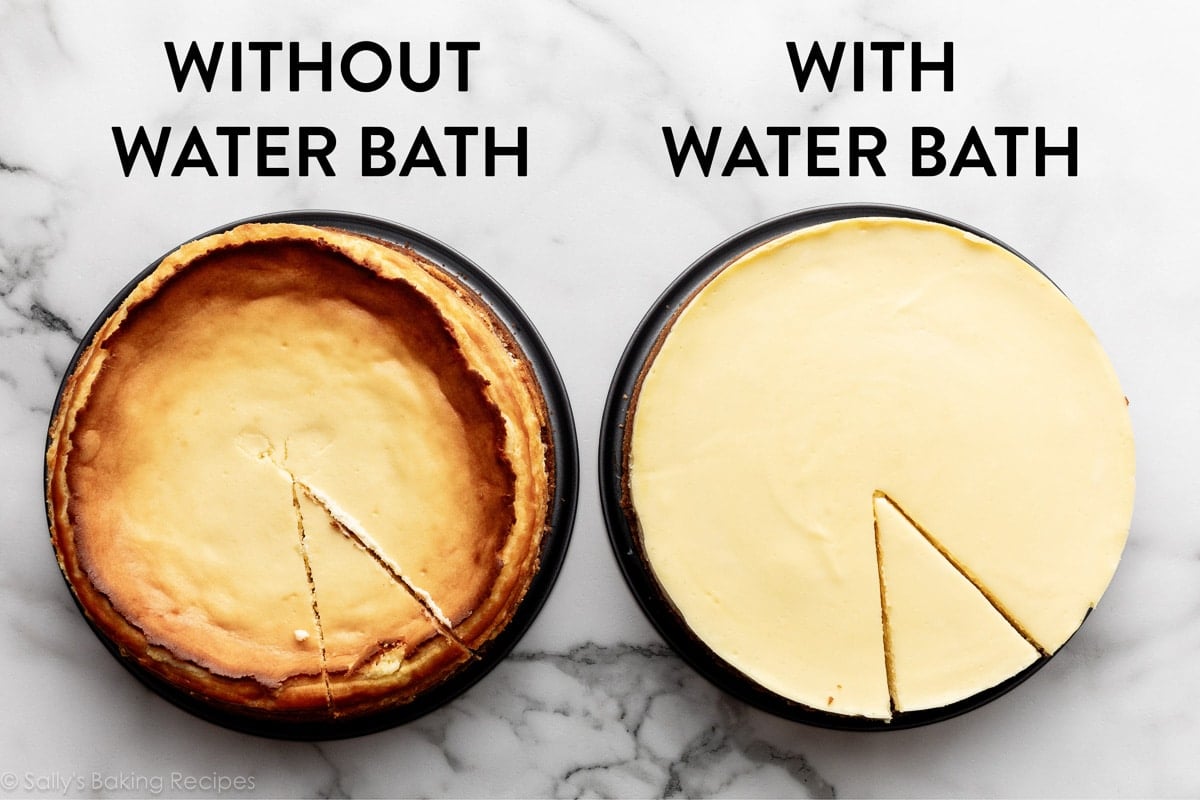
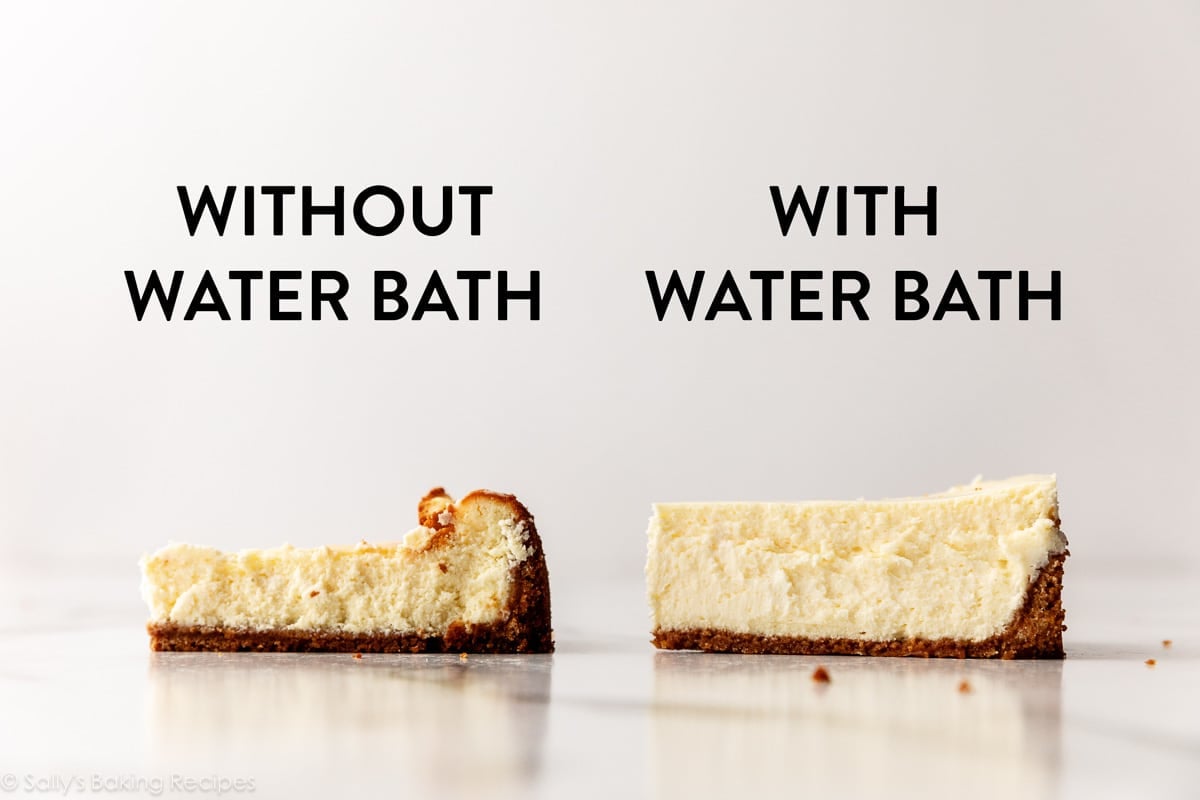
Check out the photos below. As you can see, taking a few extra minutes to prepare a water bath for your cheesecake is well worth it. Look at these differences, using the same exact cheesecake recipe.

two cheesecakes side-by-side and one is deflated and browned with the text without water bath on top and the other is smooth and creamy looking.
image showing two cheesecakes and one is browned and cracked and the other is smooth.
two slices of cheesecakes comparing one baked in a water bath and the other not baked in a water bath.

I’m going to walk you through 2 different methods for baking a cheesecake in a water bath, and both work exceptionally well.

1. How to Make a Traditional Water Bath

Here’s what you need:

And here’s how to do it:

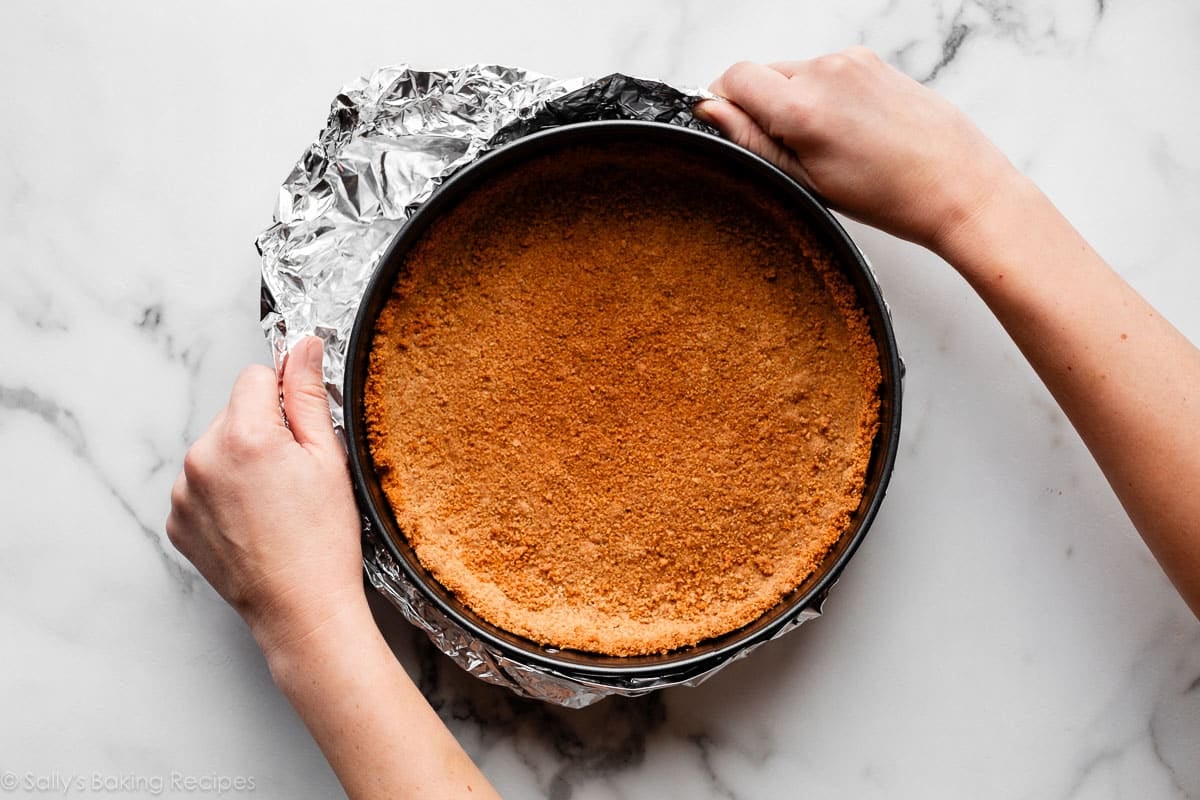
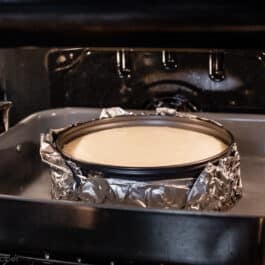
  1. Tear or cut two pieces of foil and lay one on top of the other. After you’ve shaped your crust inside (and pre-baked the crust, if your cheesecake recipe calls for this step), place the springform pan on the double-layer sheet of foil. Fold up the sides of the foil, tightly wrapping the exterior of the cheesecake pan on the bottom and up the sides. If you pre-baked the crust, be extra careful if the pan is still hot! This foil wrap prevents water from seeping in through your springform pan.
  2. Boil water. You need enough to fill your large pan with about an inch of water, so I usually boil a full kettle.
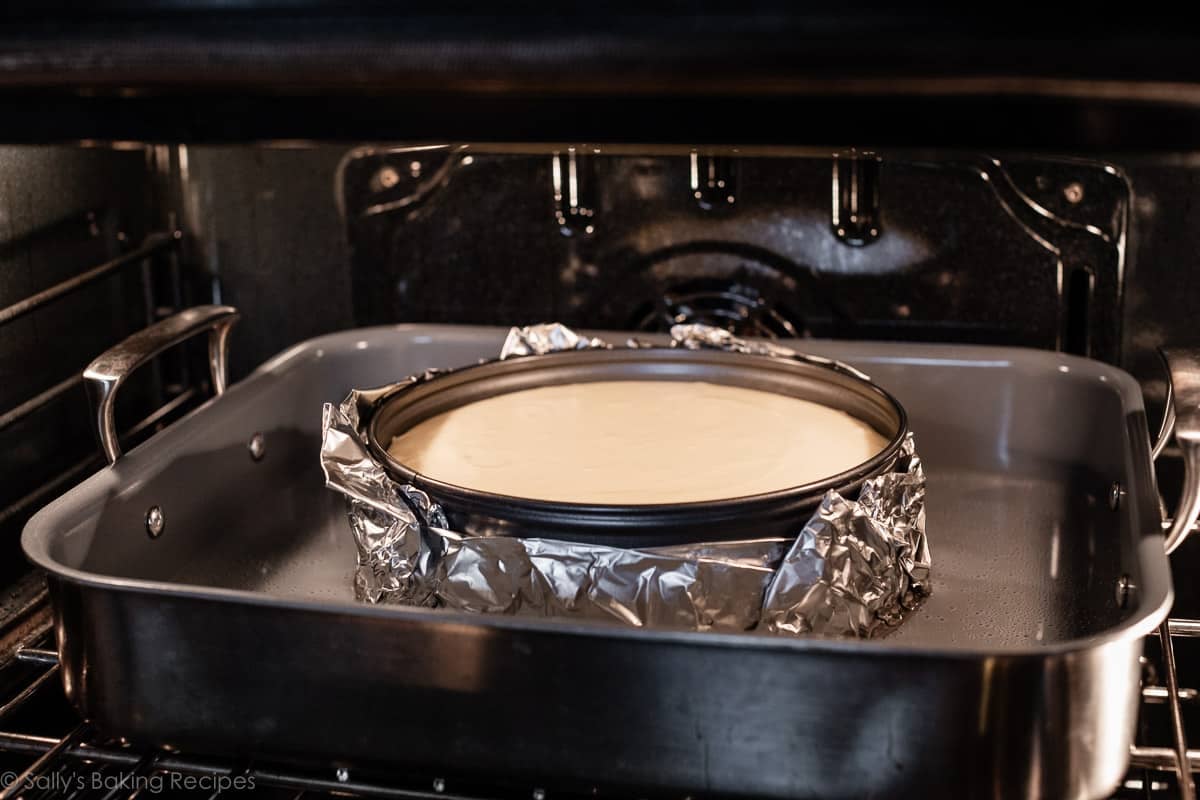
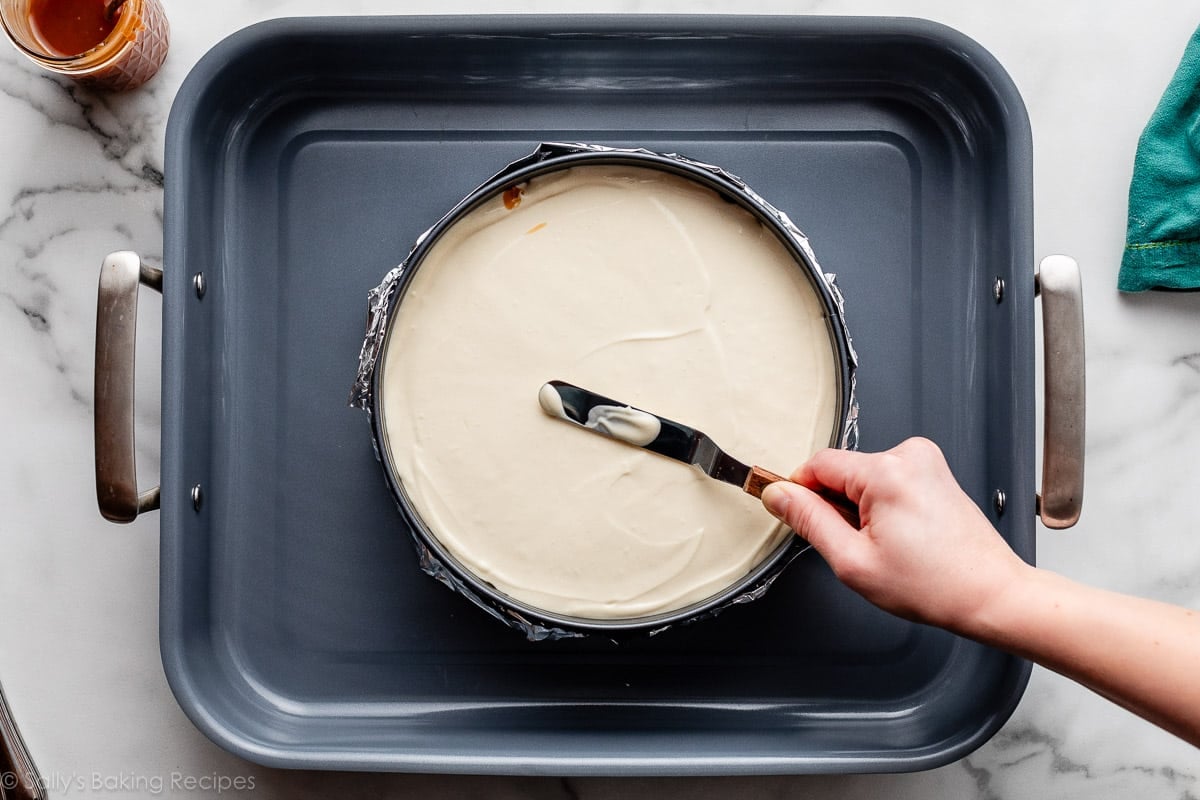
  3. Place the foil-wrapped springform pan inside your large roasting pan. Pour and spread your cheesecake batter into the prepared crust. Place the roasting pan on the middle or lower-middle rack in your preheated oven. (You can also pour the boiling water into the roasting pan outside of the oven, and carefully transfer the pan to the ovenโ€”just be careful not to spill or splash!)
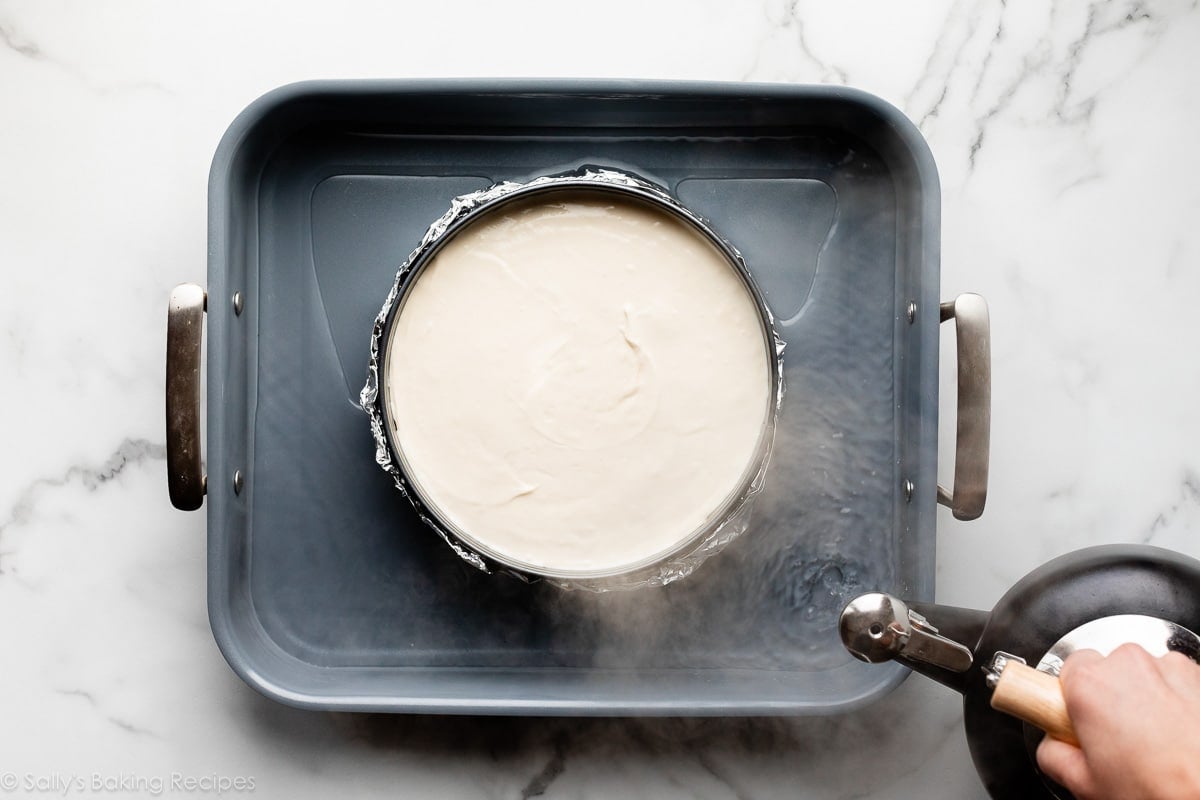
  4. Working quickly but carefully, pour hot water into the roasting pan, so that the wrapped springform pan is surrounded by hot water, about 1 inch deep. I usually fill with water once placed in the oven to bake because it is hard to transfer a water-filled roasting pan with a cheesecake inside of it into the oven. But, again, you can do it either way!
  5. Quickly shut the oven door, and bake the cheesecake.
hands wrapping outside of springform pan with graham cracker crust with aluminum foil.
hand spreading batter with offset spatula in springform pan set in a roasting pan.

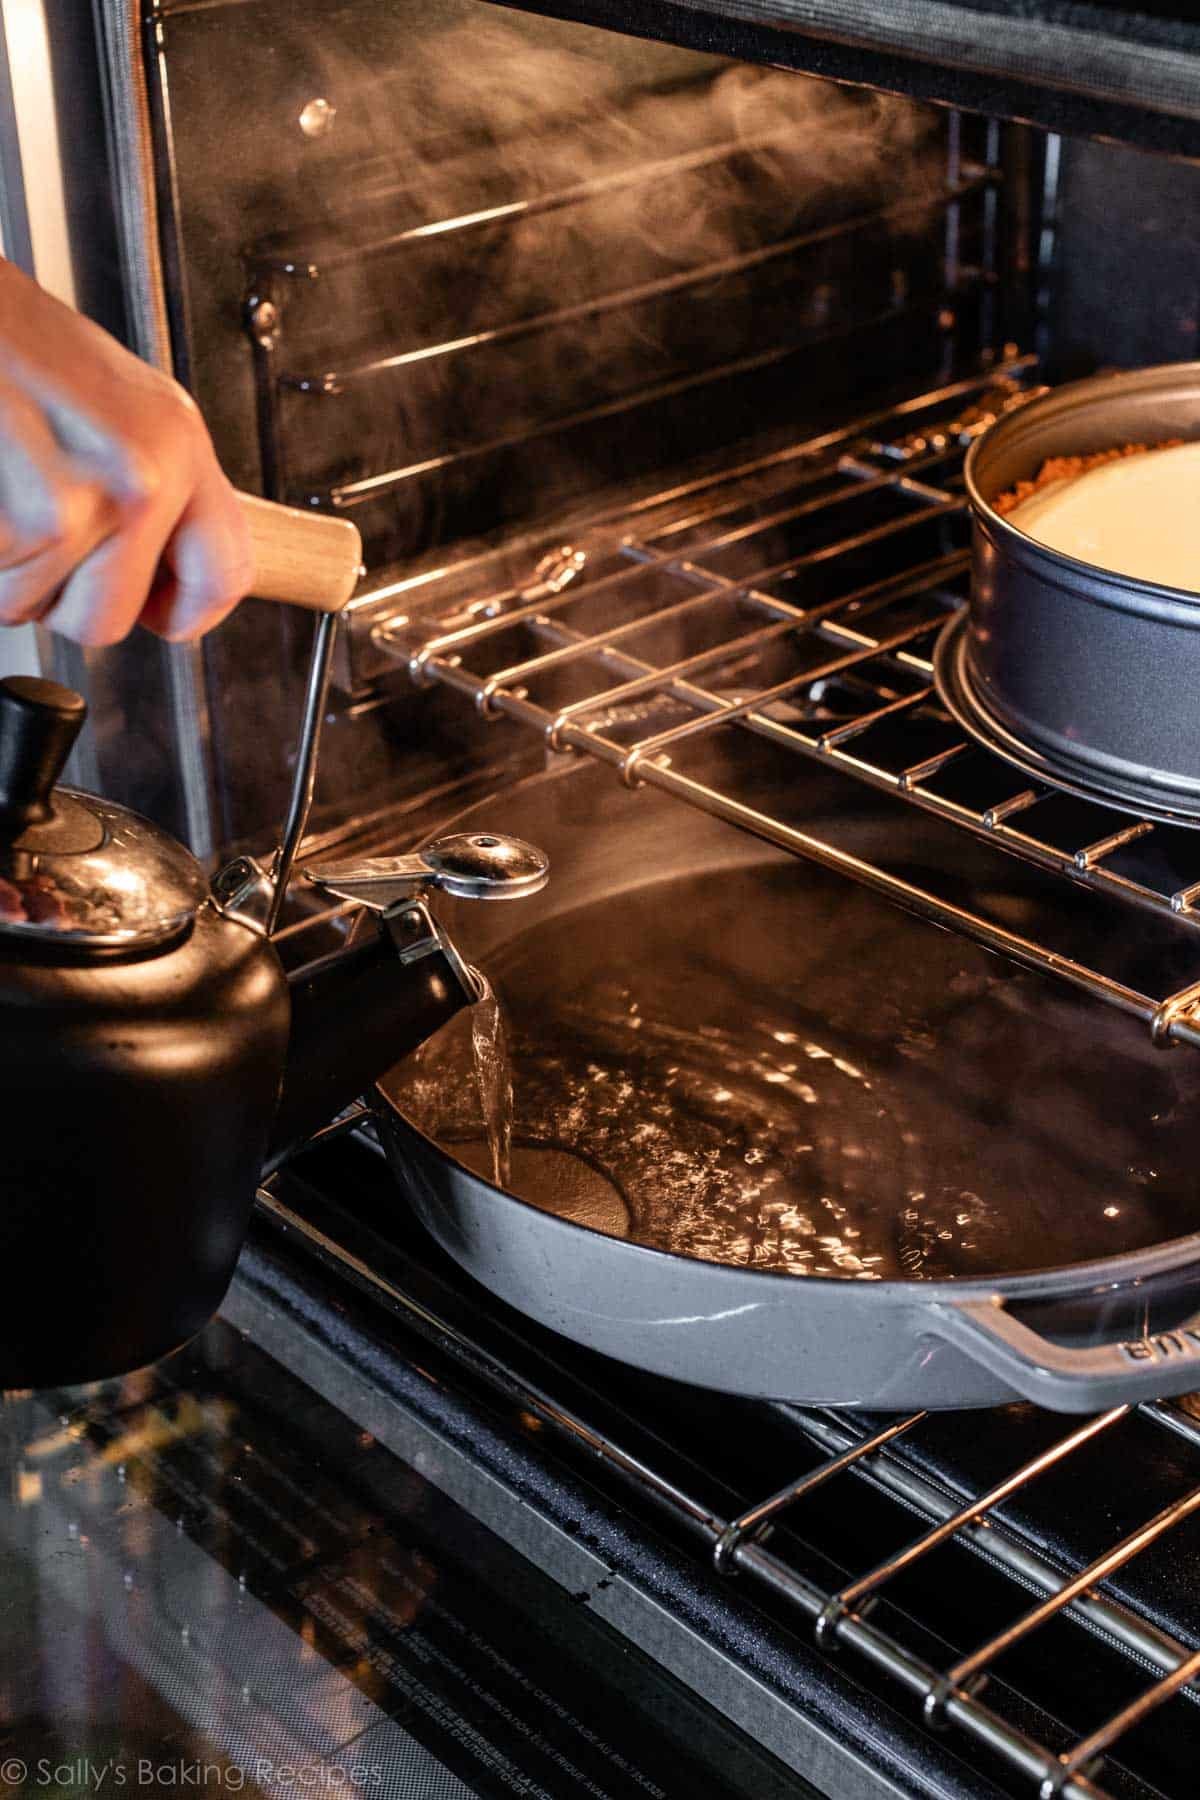
Like I mentioned, you can either place the roasting pan (with the cheesecake in it) in the oven now, and then pour in the boiling water, OR you can pour the boiling water in the roasting pan and transfer it to the oven. I took this following photo outside of the oven just to show you this step. In my video below, I do this while the pan is IN the oven. Again, either way is fine.

pouring boiling water into roasting pan with cheesecake.
cheesecake batter in wrapped aluminum foil sitting in water bath in the oven.

2. Alternate Option

If you don’t want to risk water leaking into your springform pan, I have an alternate water bath method that works wonderfully. You still need a large oven-safe pan, but it will go on a bottom rack of the oven, below the rack the cheesecake is on.

Here’s what you need:

And here’s how to do it:

  1. Boil water. You need enough to fill your large pan with about an inch of water, so I usually boil a full kettle.
  2. Place your cheesecake on the middle oven rack.
  3. Immediately place the large oven-safe pan you’re using on the bottom oven rack.
  4. Pour hot water into the empty pan on the bottom rack, so that it’s about 1 inch deep.
  5. Quickly shut the oven door, and bake the cheesecake.

This unique water bath adds steam to the oven without having the cheesecake sit inside the water itself. This method can also be used to add steam to baking artisan bread, for a crispier crust.

pouring water into round roasting pan in oven.

Cooling the Cheesecake in the Water Bath

When your cheesecake is done baking (the edges are set but the center still jiggles slightly if you tap the pan), don’t take it out of the oven. Turn the oven off and crack open the oven door so that some steam can escape. Let the cheesecake cool down slowly in the oven with the door slightly ajar for at least an hour, with the water bath (either method you used) still in the oven as well, so it remains in that humid environment while it cools gradually.

After about an hour, remove the cheesecake from the oven. Then let it cool completely on a wire rack, before transferring it to the refrigerator to chill, per your recipe instructions.


If your cheesecake is still showing a few cracks, there’s a solution for that! Whipped cream or a sauceโ€”like salted caramel, strawberry sauce, raspberry sauce, or blueberry sauceโ€”can cover up even the craggiest cheesecake surface. Or spread on a layer of chocolate ganache or lemon curd, whatever flavor goes best with your cheesecake.

I cover this pumpkin swirl cheesecake with whipped cream:

pumpkin cheesecake with whipped cream on a wood slice cake stand

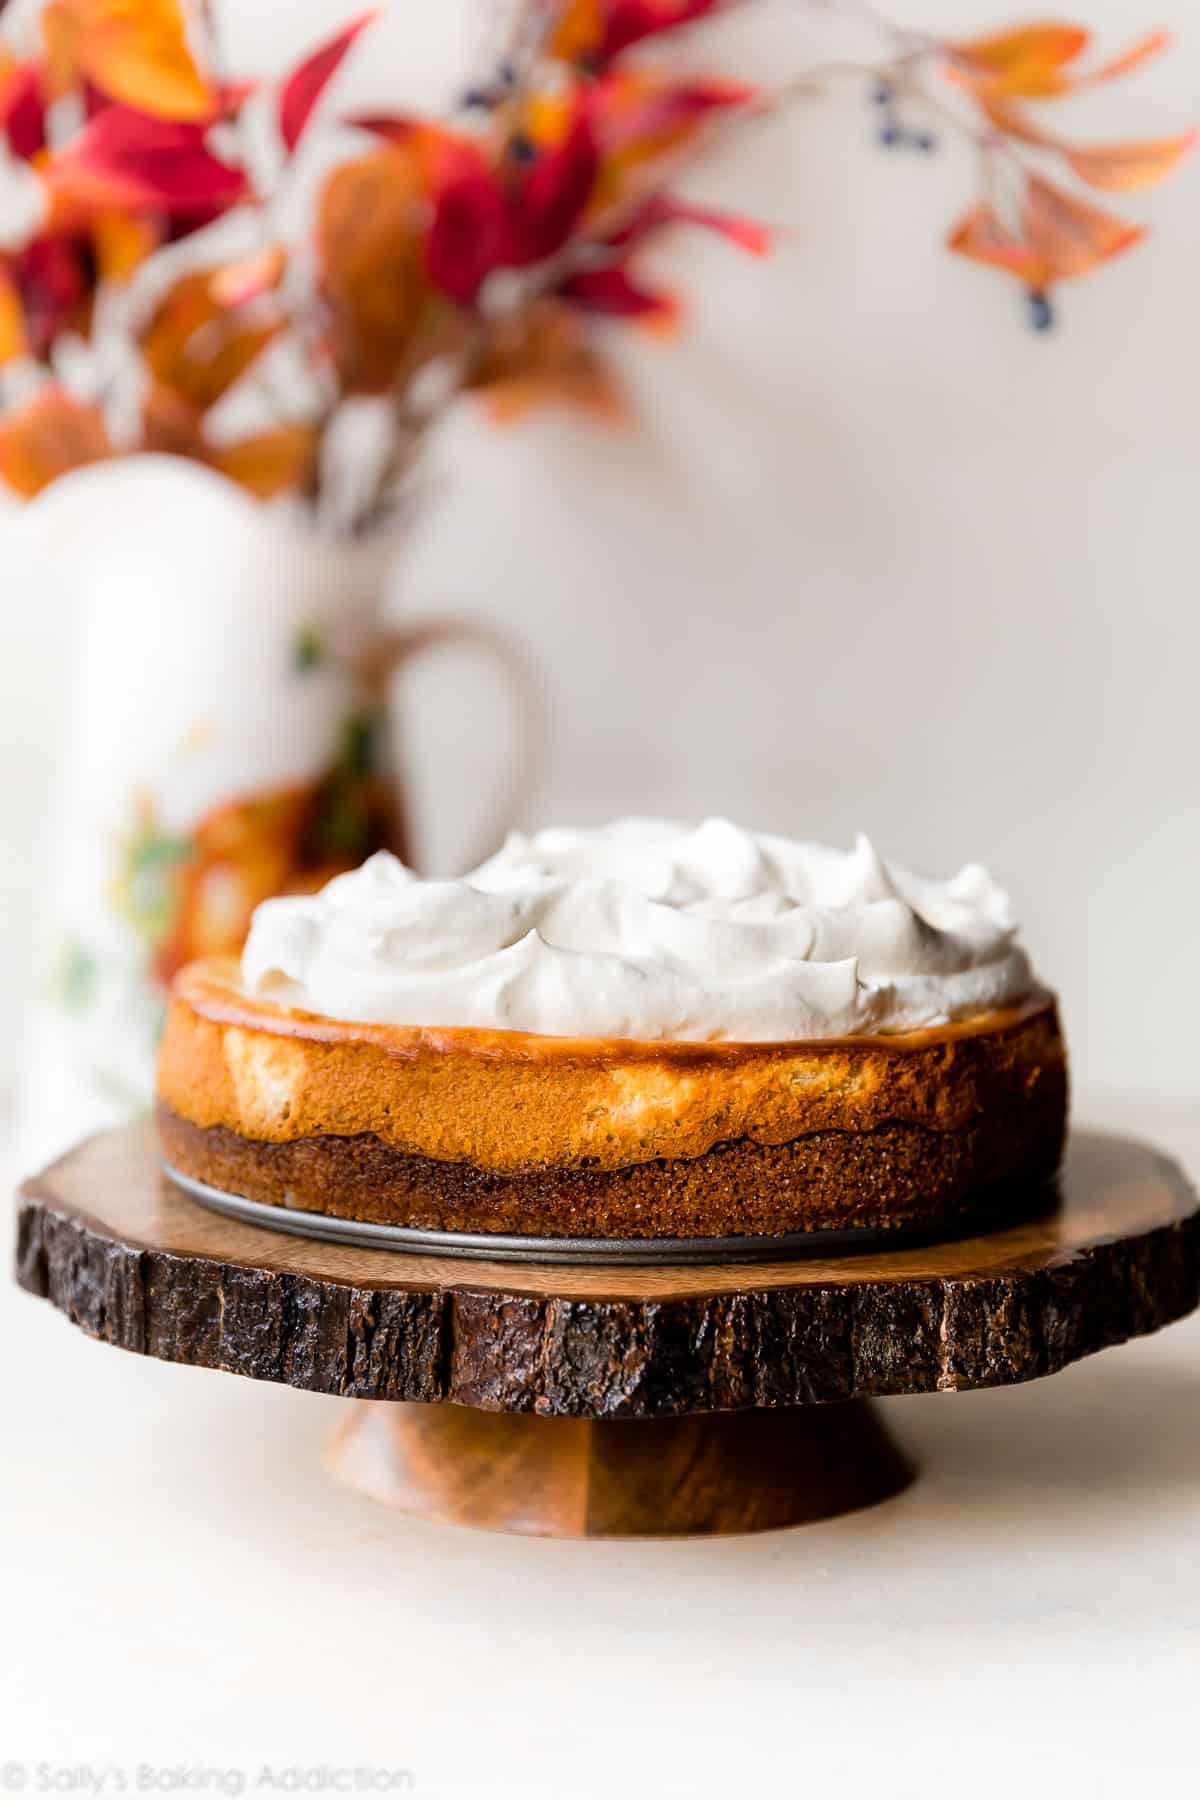
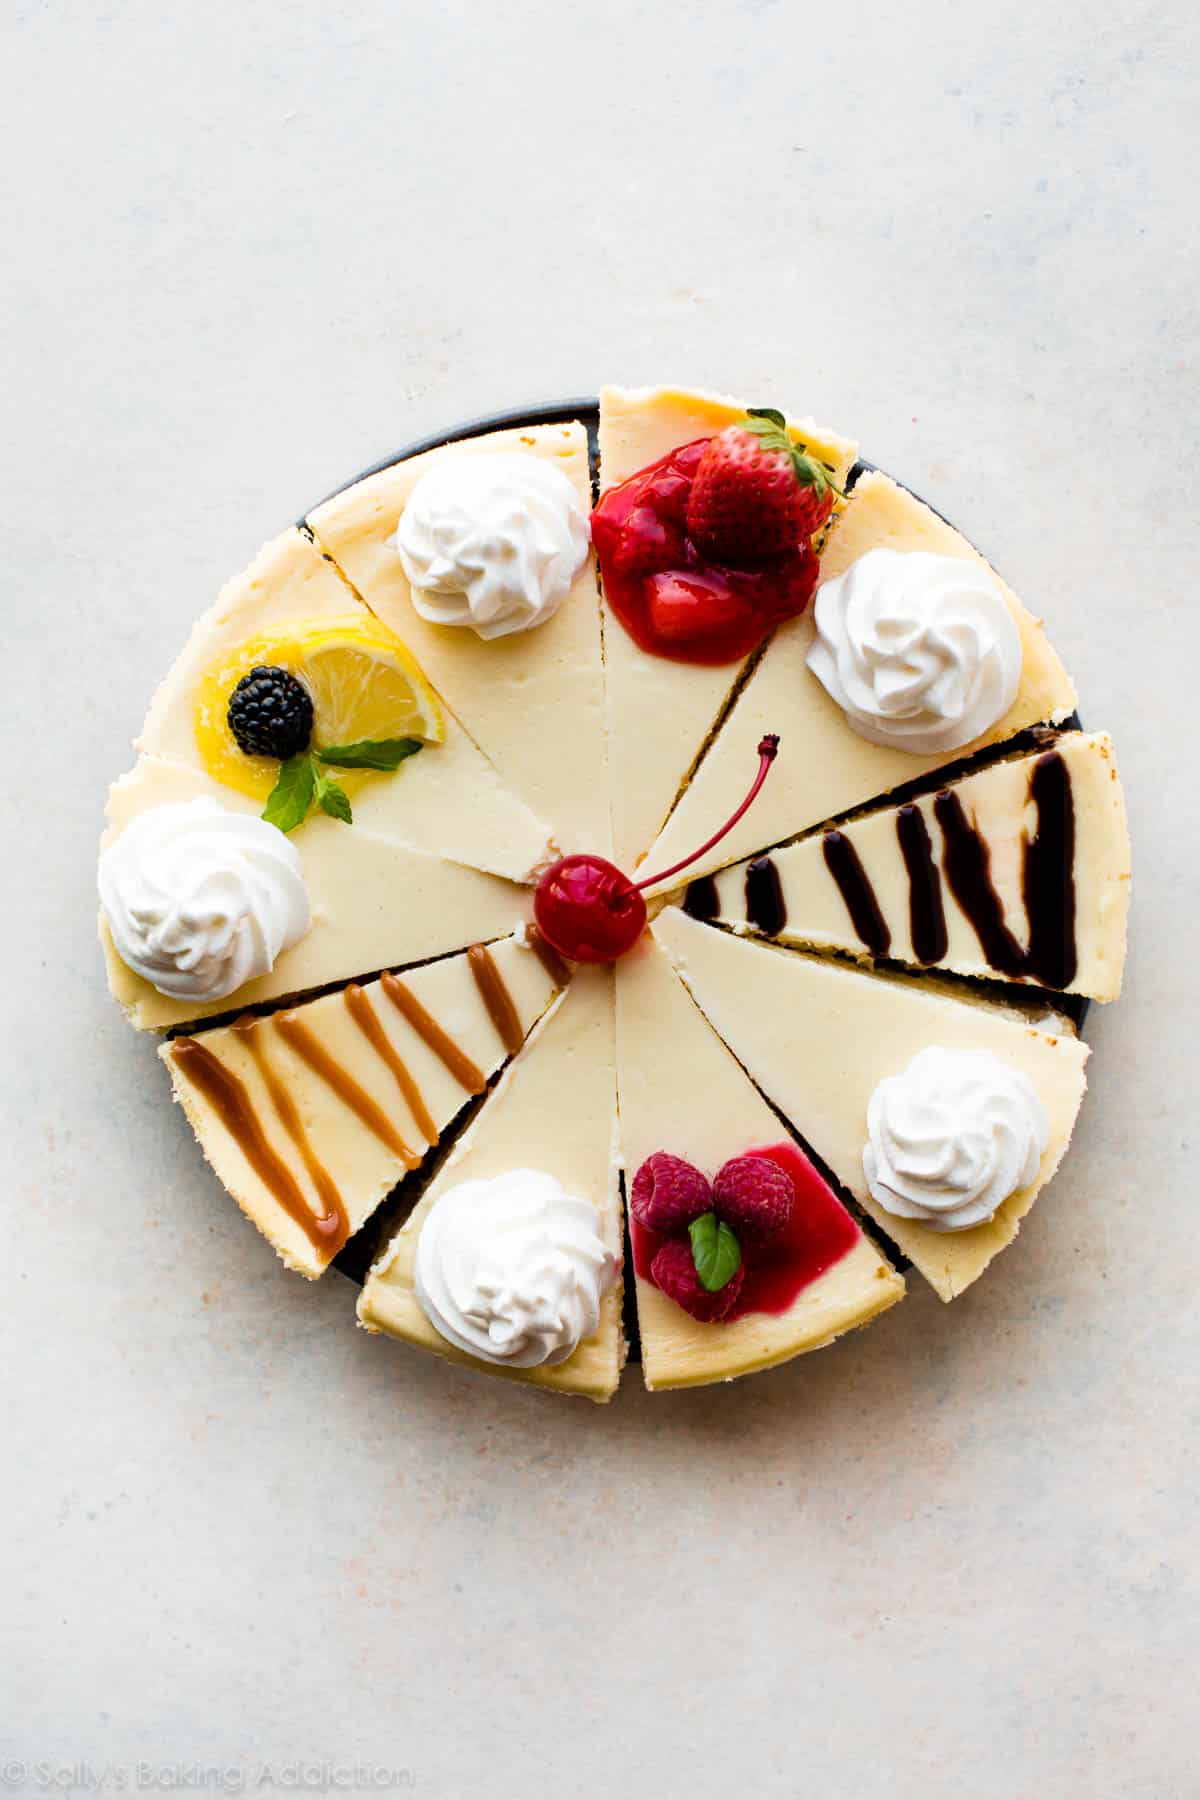
Even if your cheesecake doesn’t crack at all, toppings are always a wonderful finishing touch to your cheesecake masterpiece. So many delightful options!

overhead image of slices of cheesecake with various toppings

And if all this seems a little overwhelming, try a no-bake cheesecake or easy cheesecake pie instead.

Print
clock clock iconcutlery cutlery iconflag flag iconfolder folder iconinstagram instagram iconpinterest pinterest iconfacebook facebook iconprint print iconsquares squares iconheart heart iconheart solid heart solid icon
cheesecake batter in wrapped aluminum foil sitting in water bath in the oven.

How to Make a Cheesecake Water Bath

5 Stars 4 Stars 3 Stars 2 Stars 1 Star 4.6 from 5 reviews
  • Author: Sally
  • Prep Time: 10 minutes
  • Cook Time: 1 hour
  • Total Time: 1 hour, 10 minutes
  • Yield: 1 cheesecake
  • Category: Dessert
  • Method: Baking
  • Cuisine: American
Save Recipe

Description

Baking your cheesecake in a water bath is the best way to ensure cheesecake success. Follow these directions using your own cheesecake recipe. Here is my classic cheesecake, if you’d like to try it.


Ingredients

  • Cheesecake recipe, or any cheesecake that requires baking
  • Springform pan (I usually use this one)
  • Aluminum foil (I recommend heavy duty)
  • Large roasting pan
  • Kettle of water


Instructions

  1. Preheat oven as directed in your cheesecake recipe, and adjust an oven rack to the middle or lower-middle position.
  2. Make the Crust: Make the crust according to your cheesecake recipe instructions and press it into your springform pan. If your recipe calls for pre-baking the crust, bake as directed.
  3. Wrap the Pan: Tear or cut two large pieces of aluminum foil, and lay one on top of the other. Set the springform pan (be careful if it’s hot from the oven!) on top of the foil, and tightly wrap the foil around the outside of the pan. This will prevent any water from leaking into the cheesecake. *You can also wrap the pan before pre-baking the crust, if you’d like.* Place the wrapped springform pan inside your large roasting pan.
  4. Boil Water: Fill a kettle or pot with water and set over high heat to bring the water to a boil. You need 1 inch of hot water in your roasting pan for the water bath, so make sure you boil enough.
  5. Add the Filling: Pour/spread your cheesecake batter into the crust as directed in your recipe.
  6. Place the entire roasting pan with the cheesecake inside it onto the middle or lower-middle oven rack. Carefully pour the boiling-hot water into the roasting pan, so that the water is about 1 inch deep. Close the oven door quickly to trap the steam inside.
  7. Bake the cheesecake as directed in your recipe.
  8. Cool & chill the cheesecake: Turn the oven off and open the oven door slightly. Let the cheesecake sit in the oven with the water bath as it cools down for 1 hour. Remove the cheesecake from the oven and the water bath, and set the springform pan on a wire rack to cool completely. Once cooled to room temperature, refrigerate the cheesecake as directed in your recipe.

Notes

  1. Recommended Tools (affiliate links):ย 9-inch Springform Pan or 10-inch Springform Pan | Heavy Duty Aluminum Foil | Large Roasting Pan | Kettle or Electric Kettle | Cooling Rack
  2. Alternate Water Bath Method: Place the cheesecake (no need to wrap the springform pan in foil) on the center oven rack of the preheated oven. Place a large roasting pan or metal baking pan (do not use glassโ€”I usually use a 9×13-inch baking pan or an extra-large cast iron skillet) on the bottom oven rack. Pour boiling-hot water into the empty pan on the bottom rack, about 1 inch deep. Immediately close oven door to trap the steam inside. This unique water bath adds steam to the oven without having the cheesecake sit inside the water itself.ย 
sally mckenney headshot purple shirt.
About the Author

Sally McKenney

Sally McKenney is a baker, food photographer, and New York Times best-selling author. Her kitchen-tested recipes and step-by-step tutorials have given millions of readers the knowledge and confidence to bake from scratch. Sallyโ€™s work has been featured on TODAY, Good Morning America, Taste of Home, People, and more.

Read More

Leave a Comment

Your email address will not be published. Required fields are marked *

Recipe rating 5 Stars 4 Stars 3 Stars 2 Stars 1 Star

This site uses Akismet to reduce spam. Learn how your comment data is processed.

Reader Comments and Reviews

  1. James T says:
    November 21, 2025

    Any reason why you say no glass? Could I not use my 9×13 pyrex?

    Reply
    1. Trina @ Sally's Baking says:
      November 22, 2025

      Hi James! We just worry about glass shattering with quick temperature changes. It’s rare, but it can happen. Using a metal pan takes that risk away!

      Reply
  2. Shannon says:
    November 15, 2025

    I’m torn! Making the pumpkin cake cheesecake and I don’t know which water bath method to use! I don’t make many cheesecakes, and the comments about water seeping in make me nervous. Do both techniques work equally well, or does the bain-Marie work a bit better?

    Reply
    1. Beth @ Sally's Baking says:
      November 15, 2025

      Hi Shannon, we’ve used both methods with about equal success. If you go with the traditional water bath, make sure you double-wrap the springform pan with heavy-duty foil.

      Reply
  3. Rachel Francis says:
    October 5, 2025

    How do I save the cheesecake if Iโ€™ve taken it out after cooling and itโ€™s swimming in water (leaked in to the spin form pan despite double layer and firm folding around)?

    Reply
  4. Nancy Roche says:
    July 29, 2025

    A friend taught me to use lemon curd as a stabilizer for whipped cream. You spoon in a couple of dollops in when the cream is half set and continue whipping. the cream keeps really well and you have a nice tangy taste. I found a Cross and Blackwell brand that sells both lime and lemon, but lemon is fine instead of lime.

    Reply
  5. Pam says:
    July 23, 2025

    Hi Sally. I love baking and I enjoy everything you do along with the hows and whys.

    I have always used a water bath with my cheesecakes. However, more often than not, the water seeped in. I have a new solution that works every time. I still wrap the pan in foil but then I insert it into a roasting bag. I pull the bag up above the foil and fold it back over the foil. It works great and keeps everything dry.

    Reply
  6. Rudresh Mahanthappa says:
    July 22, 2025

    Hi!
    Do you have an opinion on using a silicone sleeve/protector around the pan instead of foil?

    Thanks!

    Reply
    1. Lexi @ Sally's Baking says:
      July 22, 2025

      Hi Rudresh, we haven’t tried a silicone sleeve with a springform before, so we’re unsure how well they work. Let us know if you do give them a try!

      Reply
  7. Alexandra says:
    June 21, 2025

    This cheesecake is the best I have ever made! Iโ€™m new to the water bath though, I followed instructions to a T right to the aluminum foil being very secure, but water still got into my two NEW springform pans. Iโ€™m so upset. Do you think the graham crust will still be soggy after being in the fridge overnight?
    Do you have any suggestion on how to get the moisture out of the crust? I hope you can help. Thanks for the amazing recipe !

    Reply
    1. Beth @ Sally's Baking says:
      June 22, 2025

      Hi Alexandra, I’m so sorry to hear that! Did you double-wrap the pans with 2 layers of heavy-duty foil? That’s the best way we’ve found to prevent water from getting in. You could also try using the alternate water bath method we describe next time, where the pan is not actually sitting in the water. I hope this helps for next time!

      Reply
  8. Sandy Lax says:
    March 11, 2025

    Water bath is the only way I make cheesecakes. Doing it for years

    Reply
  9. CC says:
    December 31, 2024

    Help! Just pulled my cheesecake out of the oven & got into the foil โ€” is it ruined? I donโ€™t want to take it out of the pan until itโ€™s cooled. The water bath was fabulous when I did it the first time for thanksgiving & I didnโ€™t do anything differently this time. Im so sadโ€ฆand now i need to run out & buy more cream cheese to make another one

    Reply
    1. Trina @ Sally's Baking says:
      December 31, 2024

      Hi CC, the crust may be soggy if water got into the pan.

      Reply
  10. Jessica says:
    December 7, 2024

    Hello! I don’t need the crust as I am layering the cheesecake between 2 layers of cake. If I don’t use the crust, do the baking instructions change? Should I grease the springform pan? Thank you!

    Reply
    1. Trina @ Sally's Baking says:
      December 9, 2024

      Hi Jessica, Weโ€™ve never used our classic cheesecake recipe for a crustless cheesecake but you can certainly try it. Obviously the pre-bake is not necessary. The total cheesecake bake time should be the same though. Keep the cooling and chilling process the same as well.

      Reply
    2. Nancy Roche says:
      July 29, 2025

      Iโ€™m not fond of graham crust so I usually use gingersnaps, though I bought some Biscoff to try. Then I saw lemon snaps so I ground them up and will try those.The problem Iโ€™ve found with gingersnaps is they make the crust kind of hard,but I may be pressing too hard

      Reply
  11. Irene Francis says:
    November 29, 2024

    I love the water bath method! Cheesecake comes out super creamy. What is the best way to remove the cheesecake from the pan? When I use the butter knife, it Does not give it a neat finish. Can you use parchment paper or something else there must be a technique for this. Thank you kindly!

    Reply
    1. Michelle @ Sally's Baking says:
      November 29, 2024

      Hi Irene, You can certainly place a round piece of parchment on the bottom of you pan so that it slides off more easily.

      Reply
  12. Rashidah says:
    November 28, 2024

    Thank you so much for this post!! I was about to put a cheesecake in the oven for our Thanksgiving meal and realized that I didnโ€™t have a large roasting pan like the recipe directions called for. So, following your alternate baking method, I used a bundt pan for the boiling water. Worked perfectly! Donโ€™t think Iโ€™ll bother with the regular water bath method in the future! This was so much easier!

    Reply
  13. Deb says:
    November 4, 2024

    Hi, for either of the methods, do you cover the cheesecake on the top with aluminum foil? I love your cheesecake recipes and typically bake them in the Instant Pot with the top covered. However I have to make this for a bigger party this time and need to bake it in the oven! Thanks!

    Reply
    1. Trina @ Sally's Baking says:
      November 4, 2024

      Hi Deb! No, we don’t usually cover cheesecakes in the oven.

      Reply
  14. E says:
    October 13, 2024

    Hi, if I use the alternate method with the steam pan underneath, how long do I bake it for? Thank you!

    Reply
    1. Sally @ Sally's Baking says:
      October 14, 2024

      Hi E, the bake time remains the same.

      Reply
  15. troy says:
    September 25, 2024

    can i use a pre made aliumiun with pie crust and do a water bath for cheese cake ?

    Reply
    1. Lexi @ Sally's Baking says:
      September 25, 2024

      Hi Troy, yes, you can still do a waterbath but make sure to only use a thin layer of water, or use the alternative method outlined in the post.

      Reply
  16. Robin says:
    August 9, 2024

    The best cheesecake I ever made! I had to make it gluten-free, so I replaced the flour with cornstarch (same measure) and used gluten-free graham crackers. It was perfect! Thank you Sally!

    Reply
  17. Lilly says:
    May 1, 2024

    I was wondering if you could use a lard cast iron pan for the 1st method I donโ€™t have a pan large enough to fit the spring form pan but I do have a large enough cast iron to fin the spring form pan and 1 inch of water. Would a cast iron pan work? Canโ€™t wait to up my cheesecake game! Thank you for the post ๐Ÿ™‚

    Reply
    1. Trina @ Sally's Baking says:
      May 1, 2024

      Hi Lilly, yes that should work fine.

      Reply
  18. Bixx kailey says:
    February 17, 2024

    I use to use your โ€œpan of water below the cheese cake rack however I switched to the โ€œwater bath and like it so much better, I donโ€™t get the fall from the cheese cake as I did the other way. I usually put my cream cheese on the counter the night before to be at room temp.
    In the morning I found that my loving wife had put it back in the fridge. So I put it in a bowl of hot water. When I took it out to use it it was fairly warm and I found the sugar and cream cheese went together much better with less whipping.

    Reply
  19. Ellie says:
    February 2, 2024

    Hi there! Would you recommend using a disposable/aluminum roasting pan for this? Thanks.

    Reply
    1. Trina @ Sally's Baking says:
      February 2, 2024

      Hi Ellie! We don’t simply because it may be difficult to get an aluminum pan full of water out of the oven when you’re done. Those pans are pretty flimsy!

      Reply
  20. Charles says:
    January 27, 2024

    Potentially silly question, but why can you not use a glass baking pan? I’m planning to use the alternate method when I make your confetti cheesecake later this week, and my only 9×13 is a pyrex. I have a cast iron that I think I can make work, but wanted to understand why glass is off-limits. Thank you!

    Reply
    1. Trina @ Sally's Baking says:
      January 27, 2024

      Hi Charles! Pouring boiling water into a glass dish risks the dish shattering.

      Reply
  21. Jaclyn Barnett says:
    January 20, 2024

    Have tried both methods and they work every time. I bought the same springform pan you recommend too.

    Reply
  22. Rudy says:
    December 26, 2023

    Can I bake two cheesecakes at the same time?

    Reply
    1. Lexi @ Sally's Baking says:
      December 27, 2023

      Hi Rudy, it’s doable if you have a water bath pan that will allow the cheesecakes to bake at the same time without the edges of their pans touchingโ€”but, since ovens can often have hot spots, we recommend baking them one at a time for best results.

      Reply
  23. Karla says:
    December 20, 2023

    If you use a cast iron skillet to do the alternate water bath, would it matter if itโ€™s been seasoned with coconut oil?

    Reply
    1. Lexi @ Sally's Baking says:
      December 21, 2023

      Hi Karla, no issue there!

      Reply
  24. Diane M says:
    December 16, 2023

    I always use a water bath when I make a cheesecake, but I do one more thing to assure no water seeps into the cheesecake pan. After wrapping the pan in foil, I take a Reynoldsโ€™s slow cooker liner and roll the top of it down to the height of the pan. I place the foil wrapped pan into the liner and then into the roasting pan, and then add the water. The liner might be somewhat loose around the pan, but I think it still helps keep out the water.

    Reply
    1. Ellie says:
      April 13, 2024

      Diane… I’ve learned to do the same thing after twice getting seepage from just using foil. Works like a charm and can be reused.

      Reply
  25. Justin Walker says:
    November 22, 2023

    The “alternate method” did NOT work for me. Big crack down the middle of my Thanksgiving cheesecake. I think too much steam escapes when you have to check if it is done or tent it with foil. Will just use the traditional method next time.

    Reply
  26. Lacy says:
    November 20, 2023

    Hi! I just baked the pumpkin swirl ginger snap crust cheesecake and it came out tasting delicious. I am proud of myself as I had never made cheesecake before and used your water bath method and it is perfect. My only question is, it leaked a lot of butter/fat from the bottom of it. Is that normal? How can I prevent that from happening? It didnโ€™t change the taste or consistency of the cheesecake. The only possible thing it affected was my crust stuck some to the bottom of the spring pan. Any advise is appreciated! Thank you!

    Reply
    1. Sally @ Sally's Baking says:
      November 26, 2023

      Hi Lacy, I’m so glad to read this guide was helpful for you. For the butter/fat leakage, what could help is adding more gingersnap cookie crumbs which will help absorb more of the butter.

      Reply
  27. Loo Americo says:
    November 13, 2023

    If i use a pre-made graham cracker crust, could I just place it directly in the water without wrapping it in foil?

    Reply
    1. Trina @ Sally's Baking says:
      November 13, 2023

      Hi Loo, we usually find that with a smaller cheesecake pie, no water bath is necessary.

      Reply
  28. Eva says:
    October 30, 2023

    In my experience , when I used regular sized foil, no matter how well I wrapped the foil, and how many layers I used, the water got in. Commercial sized foil, solves that problem because that avoids having any seams. Water, whether in baking or carpentry has an amazing way of going where it wants to go. But yes, absolutely the water bath makes a big difference.

    Reply
    1. Ellie E. says:
      April 13, 2024

      I use a small Reynolds cooking bag on the outside of the aluminum foil. I cut it down and fold it into the foil. Works great and can reuse.

      Reply
  29. Heather says:
    October 21, 2023

    Is one of these methods (cheesecake in the water bath vs. water bath under the cheesecake) the preferred method, or do both ways produce the same results?

    Reply
    1. Sally @ Sally's Baking says:
      October 22, 2023

      Hi Heather, I’ve found little to no difference between the two. Sometimes the cheesecake IN the water bath seems to have a smoother top, but it’s not all the time. Both of these methods help produce cheesecakes that do not crack on top, and remain nice and creamy-dense in the centers.

      Reply
  30. Holly says:
    October 20, 2023

    I put my cheesecake pan in a medium size roasting bag and then the layer of foil. The foil helps keep the side of the bag where it needs to be and between the bag and foil, Iโ€™ve not had a mishap of water getting in.

    Reply