

If you enjoy trying homemade versions of store-bought favorites, you will love these fudge chocolate pastry tarts because they’re just like chocolate pop tarts but with a homemade touch! Like my homemade brown sugar cinnamon pop tarts recipe, this is a fun baking project for a snowy or rainy day or when you’re looking for a special baking recipe to try out.
One reader, Alex, commented: “I loved this recipe!! It really challenged me because I am not an experienced baker by any means, but the pop tarts came out so great!! I loved how flaky the pastry was, and the chocolate was so decadent. I am excited to try and make the brown sugar cinnamon ones as well! ★★★★★“
Pastry tart can refer to a handful of different baked goods like actual tarts made in a full size or mini tart pan, tarts made from puff pastry, or something like hand pies—which is what I consider today’s chocolate dessert recipe. They’re like store-bought pop tarts, but I don’t suggest putting them in the toaster to reheat.
Whatever you call them, they’re perfect for anyone who LOVES chocolate.
These Fudge Chocolate Pastry Tarts Are:
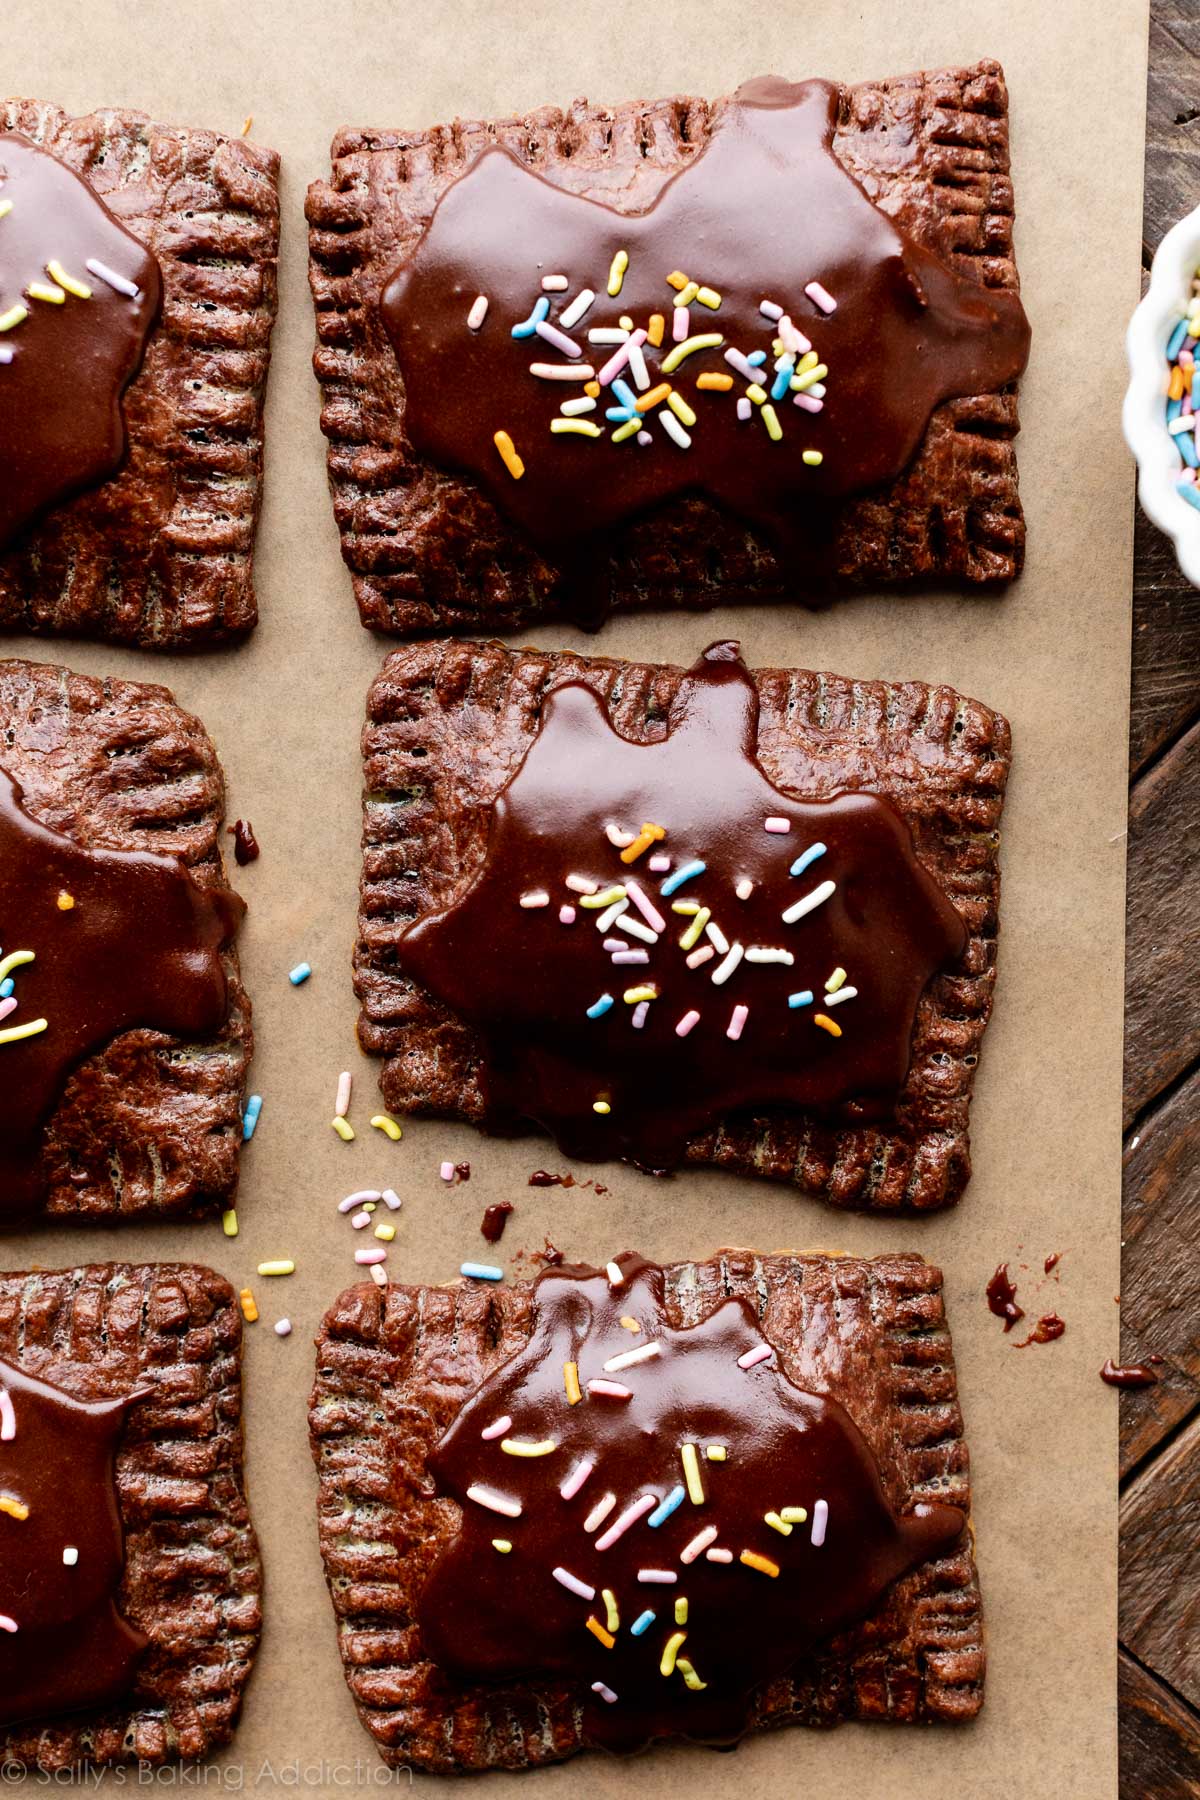
- Draped in chocolatey cocoa icing
- A homemade version of store-bought pop tarts
- Like these chocolate hand pies, but with a slightly different filling & topping
- Best after they have completely cooled
- An intermediate baking recipe and doable for most home bakers
- Definitely a dessert, but feel free to indulge for breakfast!
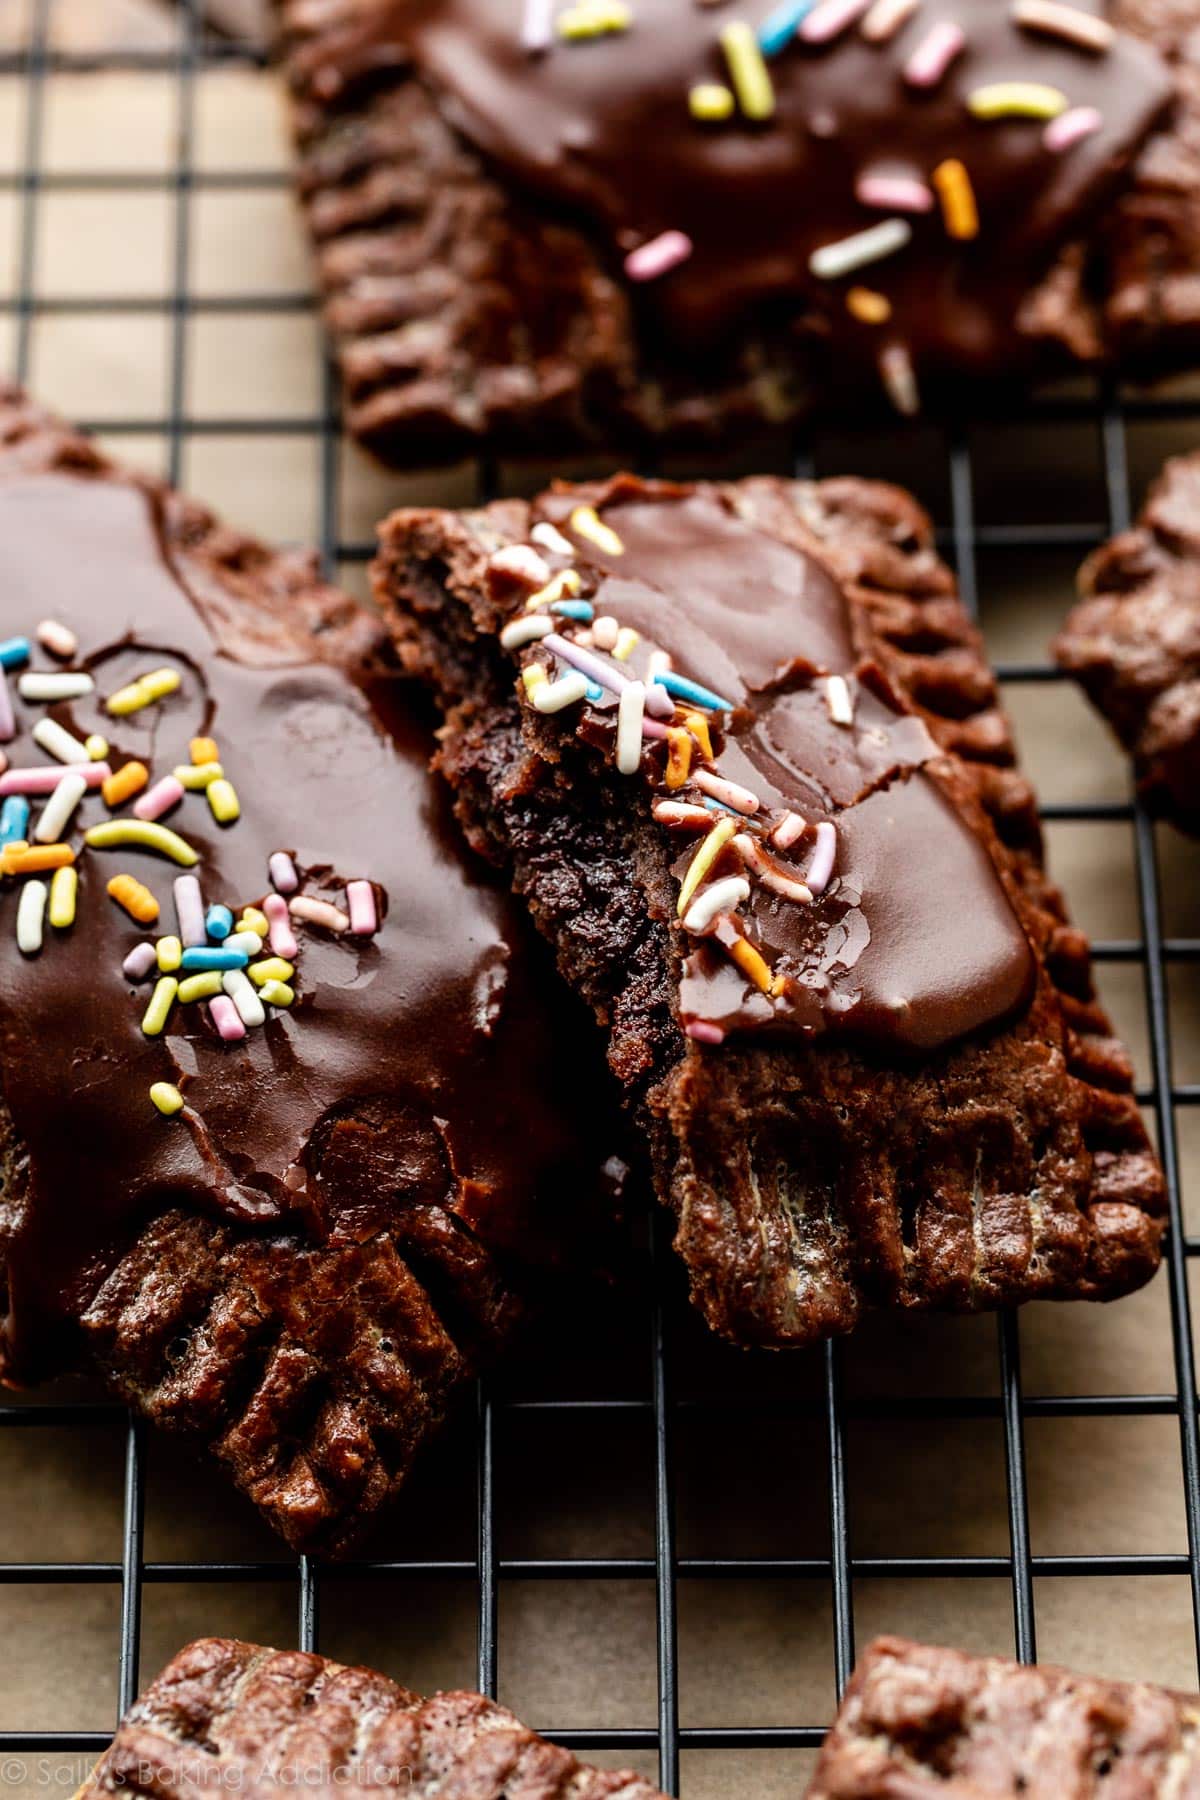
After completely cooling, the crust is deliciously crumbly, the filling has thickened, and the icing has set. If you have the self control, WAIT to eat one!
3 Parts to Homemade Chocolate Pop Tarts
There are 3 components to these homemade chocolate pop tarts and even though the ingredient list below looks long, the ingredients are mostly repeated in each part of the recipe. (For example, you use butter in all 3 components.) Here’s each part of the recipe:
- Chocolate Pastry/Pie Dough
- Fudge Filling (tastes like brownies!)
- Cocoa Icing
You need 11 ingredients total. Let me walk you through the steps so you have a better idea of the process. There is also a video tutorial in the recipe card below.
Chocolate Pie Dough
The envelope sealing in all of the fudge filling is chocolate pie crust and I recommend you make this first because the dough needs to refrigerate for at least 2 hours. This is an all butter chocolate pie dough, so you don’t need shortening which is a fat I like to combine with butter in my favorite pie crust recipe. I do have an all butter pie crust that I love as well and today’s recipe is basically a chocolate version of that. We’ll swap some flour for cocoa powder, reduce the salt, and use milk as the liquid. Since there’s no leavening, you can use either dutch-process or natural cocoa powder. (If you’re ever curious, here is the difference between dutch-process vs. natural cocoa powder.)
- Tools for Pie Dough (affiliate links to products I use and love): A food processor makes the pie dough process easier and if you don’t have one, use a pastry cutter. A blender could work, but be VERY careful not to over-work this dough. You also need a rolling pin, sharp knife or pizza cutter for shaping the dough, and a pastry brush.
- Pie Dough Success Tip: For the most successful chocolate pie dough, make sure your butter and milk are VERY cold otherwise both will incorporate into the dough too quickly and you’ll be left with unworkable dough/paste.
Instead of chocolate dough, feel free to use my favorite regular pie crust or all butter pie crust.
Where Else Can I Use This Chocolate Pie Dough?
The dough recipe yields enough for 2 pie crusts and you can use 1 for any of the following recipes—simply switch out the dough in each recipe for the chocolate version.
- Brownie Pie (blind bake as directed in that recipe)
- French Silk Pie (blind bake as directed)
- Nutella Tart (bake crust as directed in that recipe)
- Snickers Caramel Tart (bake crust as directed)
- Pecan Pie
Pie Dough Step Photos
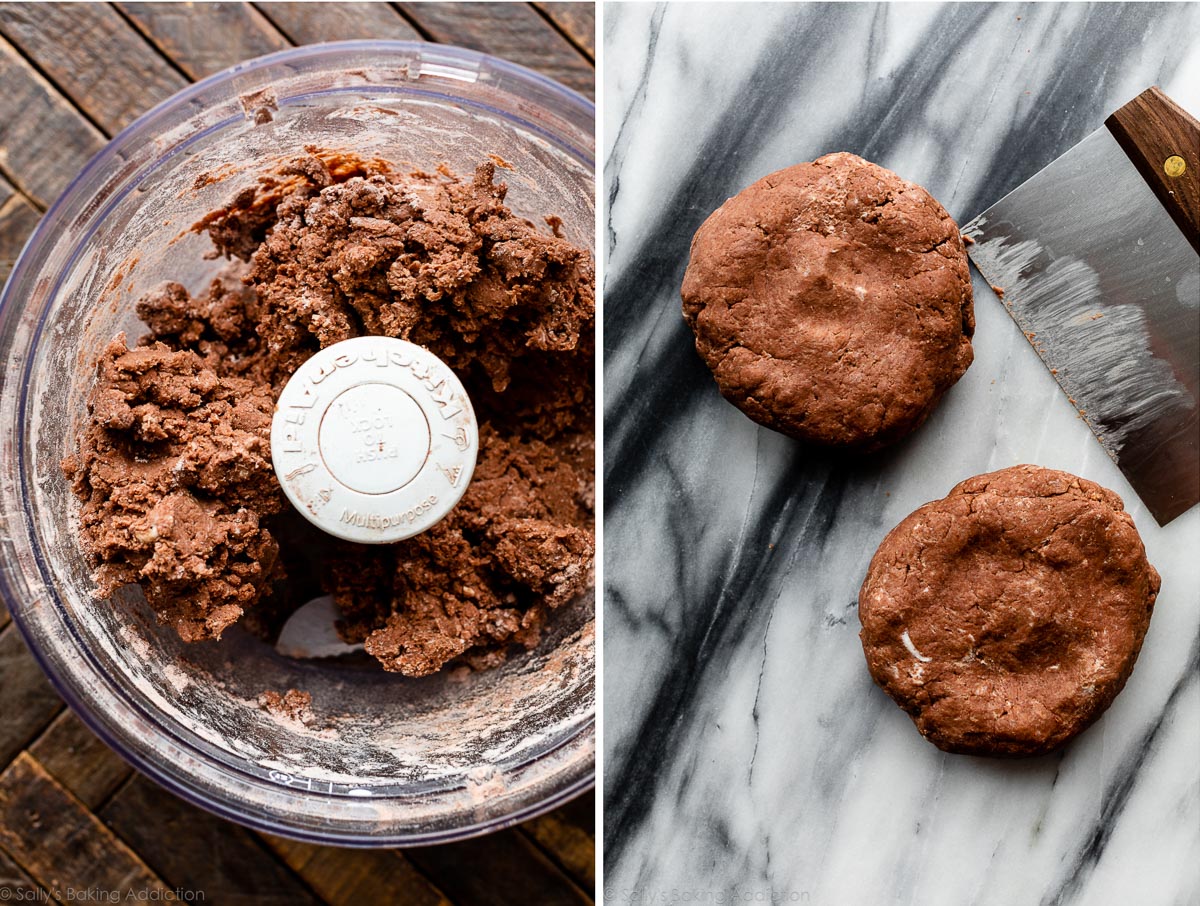
The full detailed recipe is below, but let me walk you through the step photos as they will be helpful especially when it comes to the dough. Using either a food processor or pastry cutter, pulse/cut your cold butter into a mixture of flour, cocoa powder, sugar, and salt. Just like regular pie dough, you want coarse butter crumbles coated with the dry ingredients:
Slowly add the cold milk just until the dough clumps and comes together. Divide dough in half, flatten into discs, and then refrigerate both for at least 2 hours:
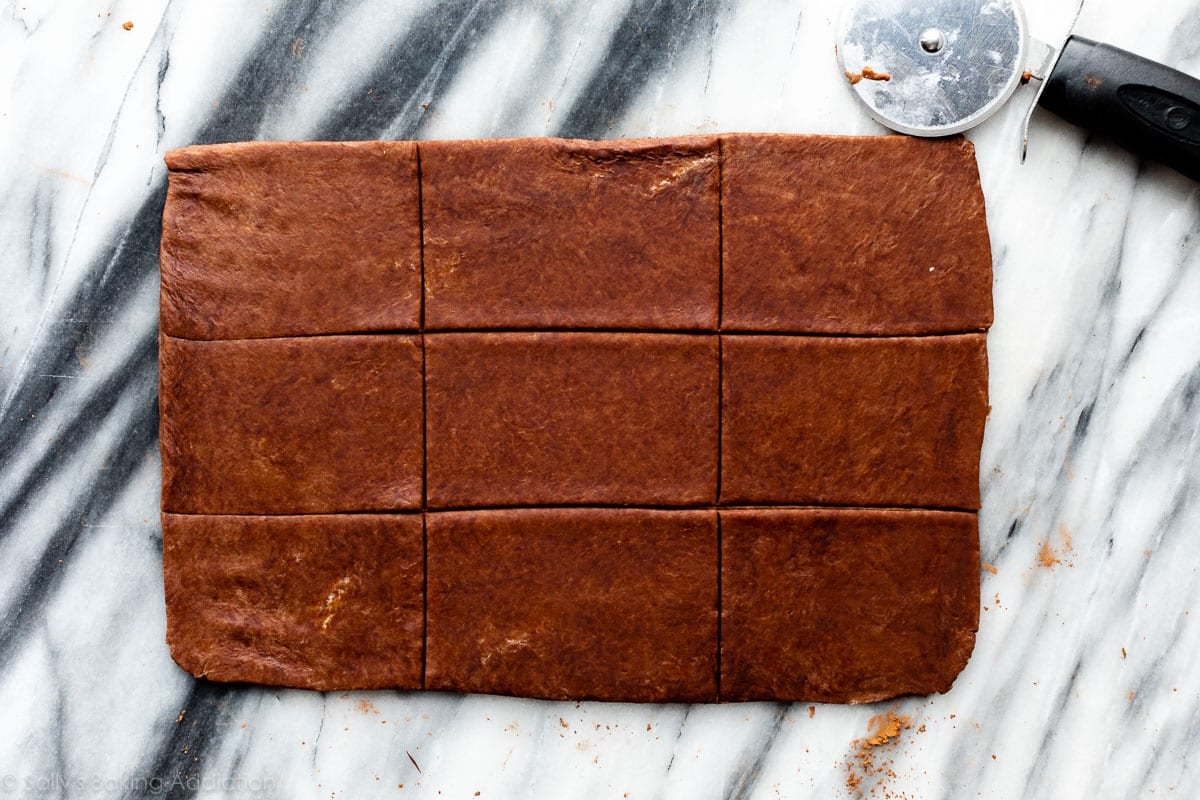
Roll out each chilled disc into a 9×12-inch rectangle and use cocoa powder instead of flour to prevent the dough from sticking. Take your time with this because the dough is quite stiff.

Then cut each rectangle into 9 3×4-inch rectangles. You’ll have 18 rectangles, which makes 9 pop tarts. Here is just 1 so you have an idea what it looks like:
The shaped dough is ready to be filled and assembled. As instructed in the recipe below, have an egg wash handy because that’s the “glue” that adheres the top and bottom doughs together.
Fudge Filling
In my regular chocolate hands pies, we use chocolate ganache as the filling. In today’s recipe, we’re making a fudge filling that when baked and cooled—tastes like homemade brownies. My goal for the filling was to make a thicker, yet less rich chocolate ganache. It worked very well!
- Make the fudge filling immediately after you prepare the pie dough because it needs to cool and thicken before you assemble the pop tarts. You need chocolate, milk, sugar, butter, and vanilla extract. Most of the ingredients come together on the stove.
You end up with about 3/4 cup (180ml) fudge filling so each pop tart gets a heaping Tablespoon. Don’t forget the egg wash border around the bottoms.
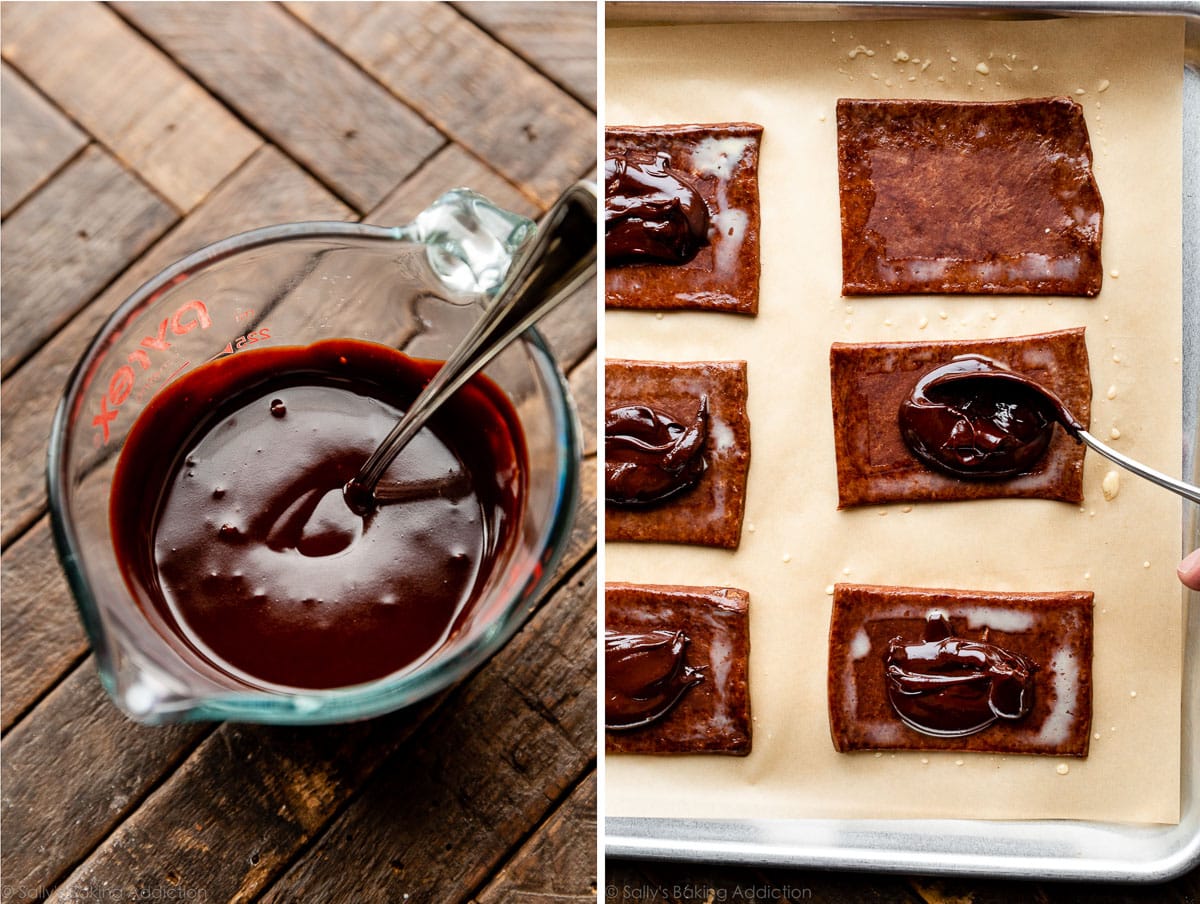
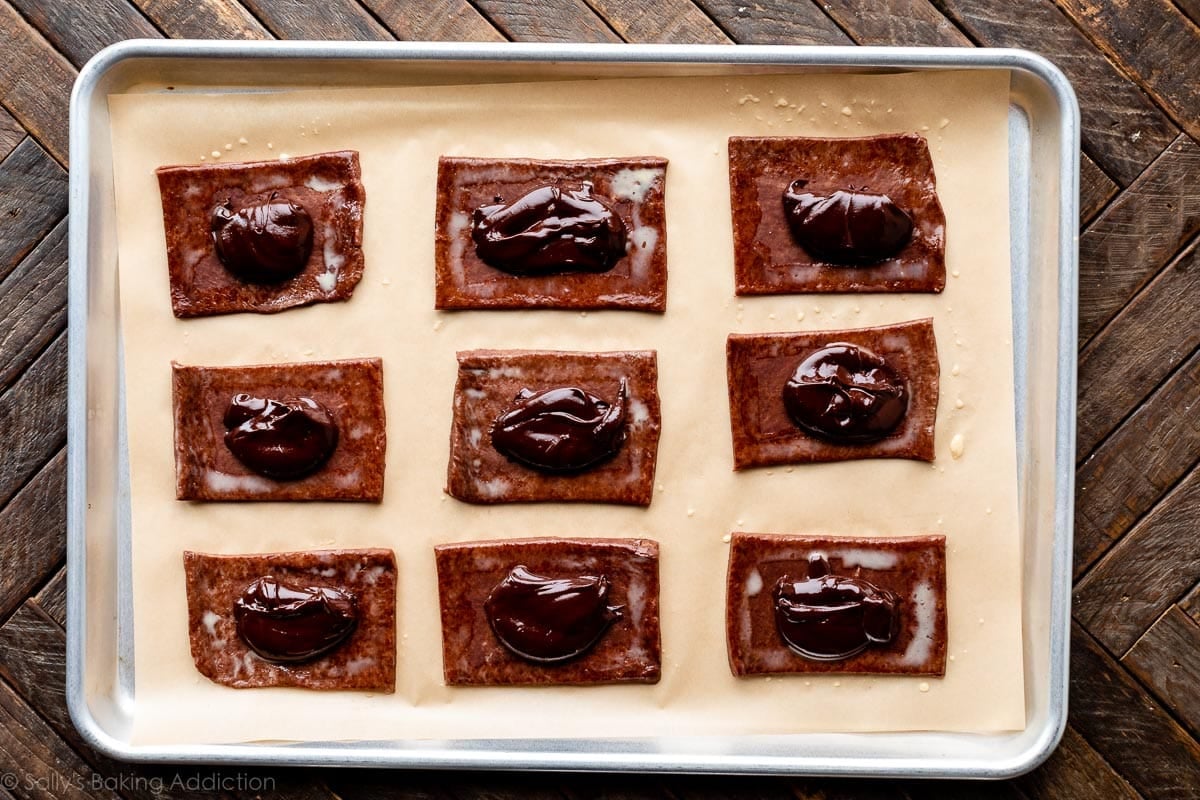
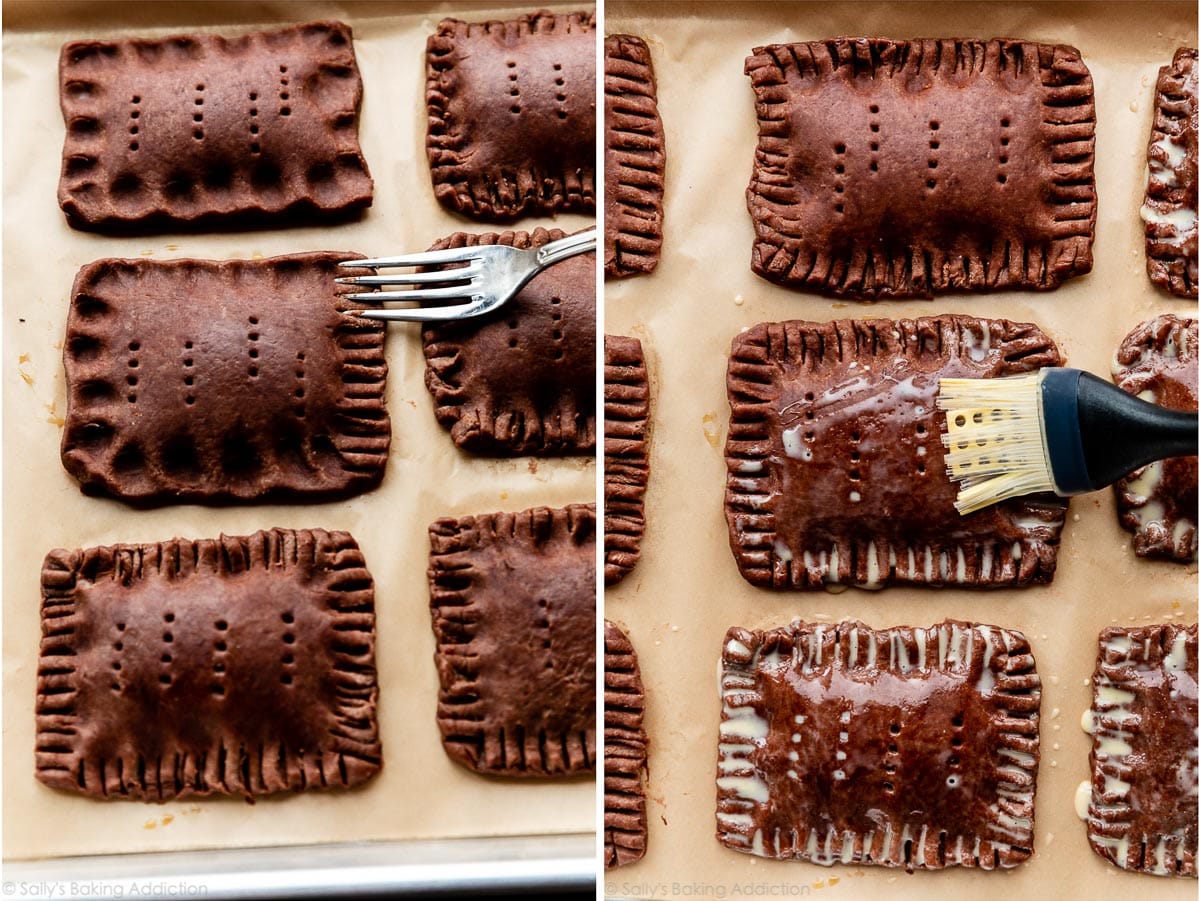
After spooning the fudge filling on the rectangles, lay the other set of pie dough rectangles on top of each and press your finger around the edges to slightly seal. Poke holes in the top pie crust with a fork or toothpick, which allows steam to escape.
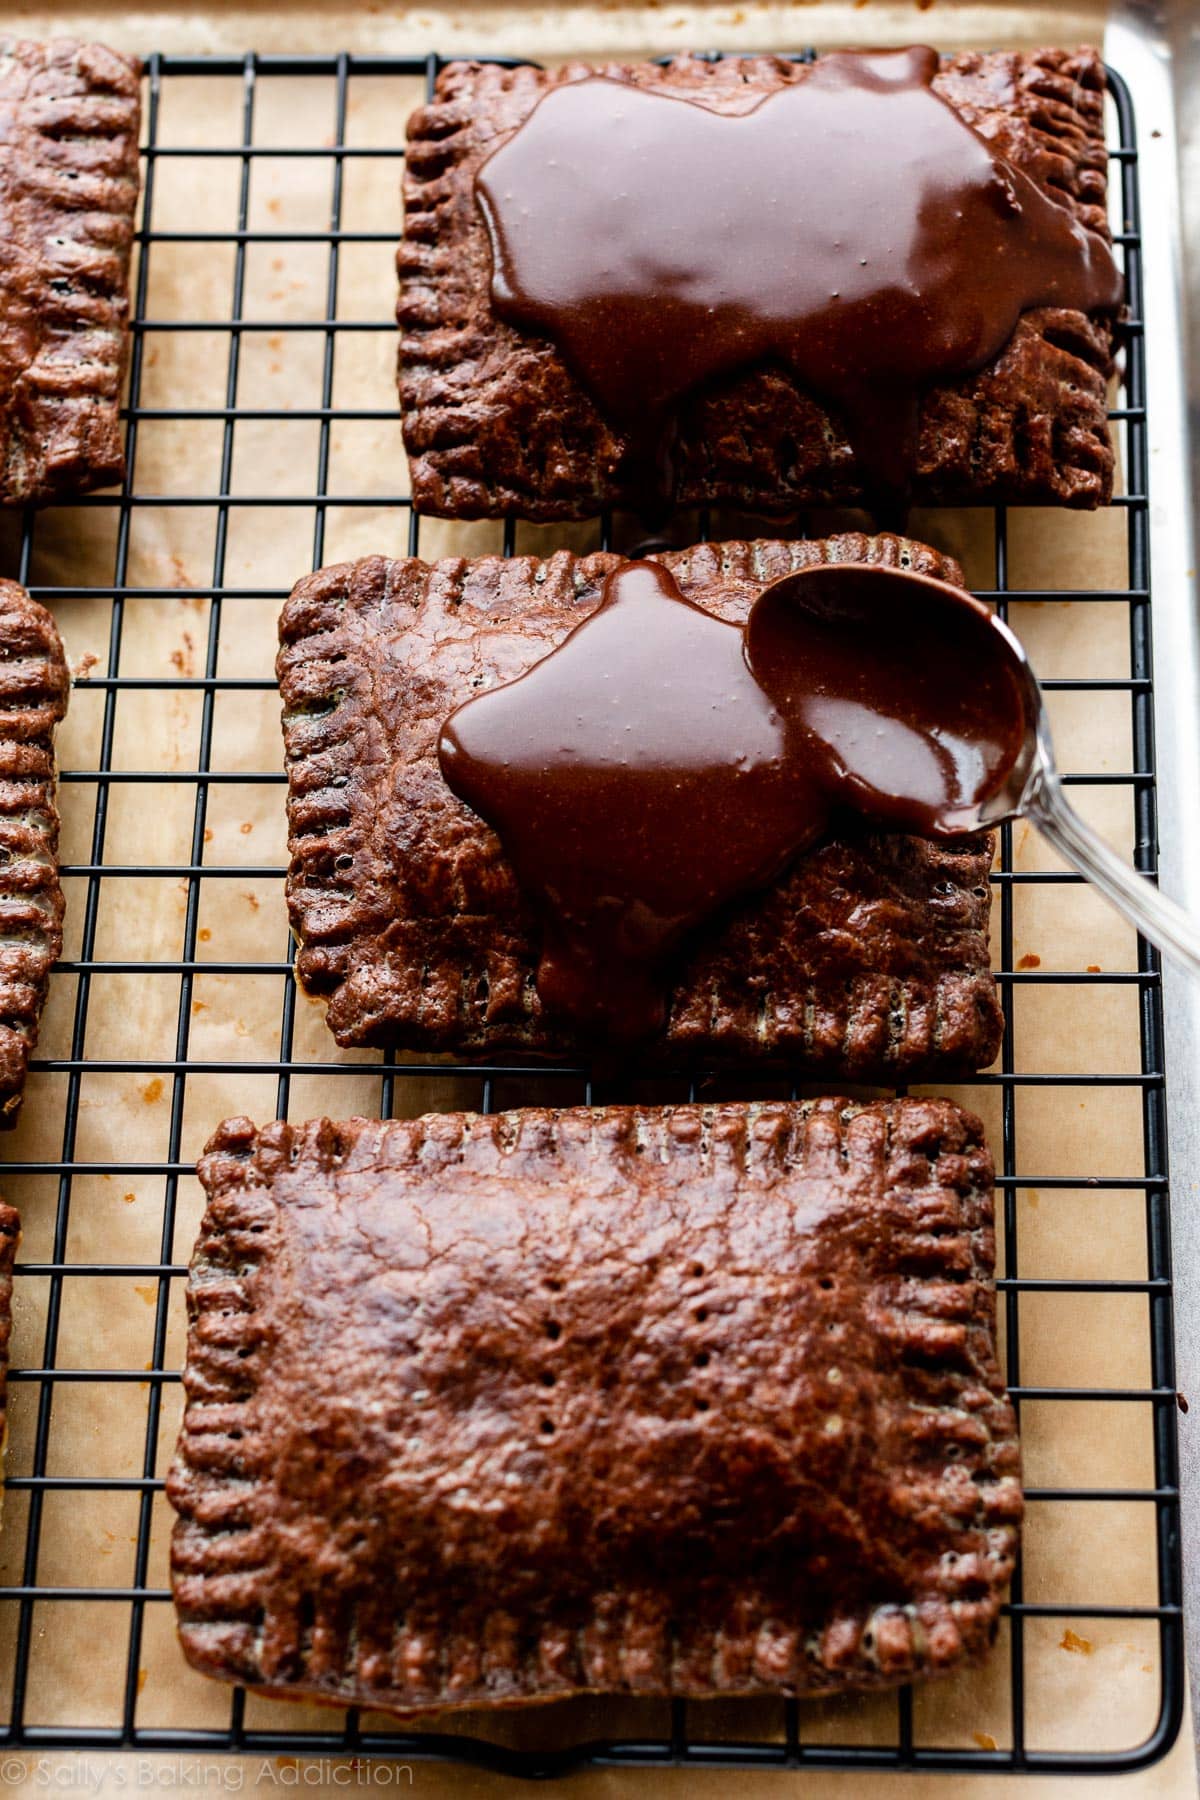
To finish assembling, crimp the edges with a fork (just like when we crimp pie crust) to ensure no filling spills out (if it does, it’s not a big deal). Brush with egg wash which gives the baked tarts their glistening sheen.
As the chocolate pastry pop tarts bake, make the icing. You’re almost done!
Cocoa Icing That Sets
After the chocolate pastry tarts bake and slightly cool, spoon chocolate icing on top. When testing this recipe, I often went back and forth about the icing. Did I want a chocolate version of royal icing or a simple drizzle of melted chocolate? I ultimately decided on a sweet cocoa icing that—thanks to the butter—eventually thickens and sets. You need melted butter, hot water, confectioners’ sugar, cocoa powder, and vanilla extract. You can use milk instead of water, but I find that version doesn’t set as nicely. Feel free to skip the icing if desired.
- This would be a lovely icing to use on chocolate sugar cookies, but I don’t recommend using a piping tip because it’s quite drippy. You could use it for glazed doughnuts, too!
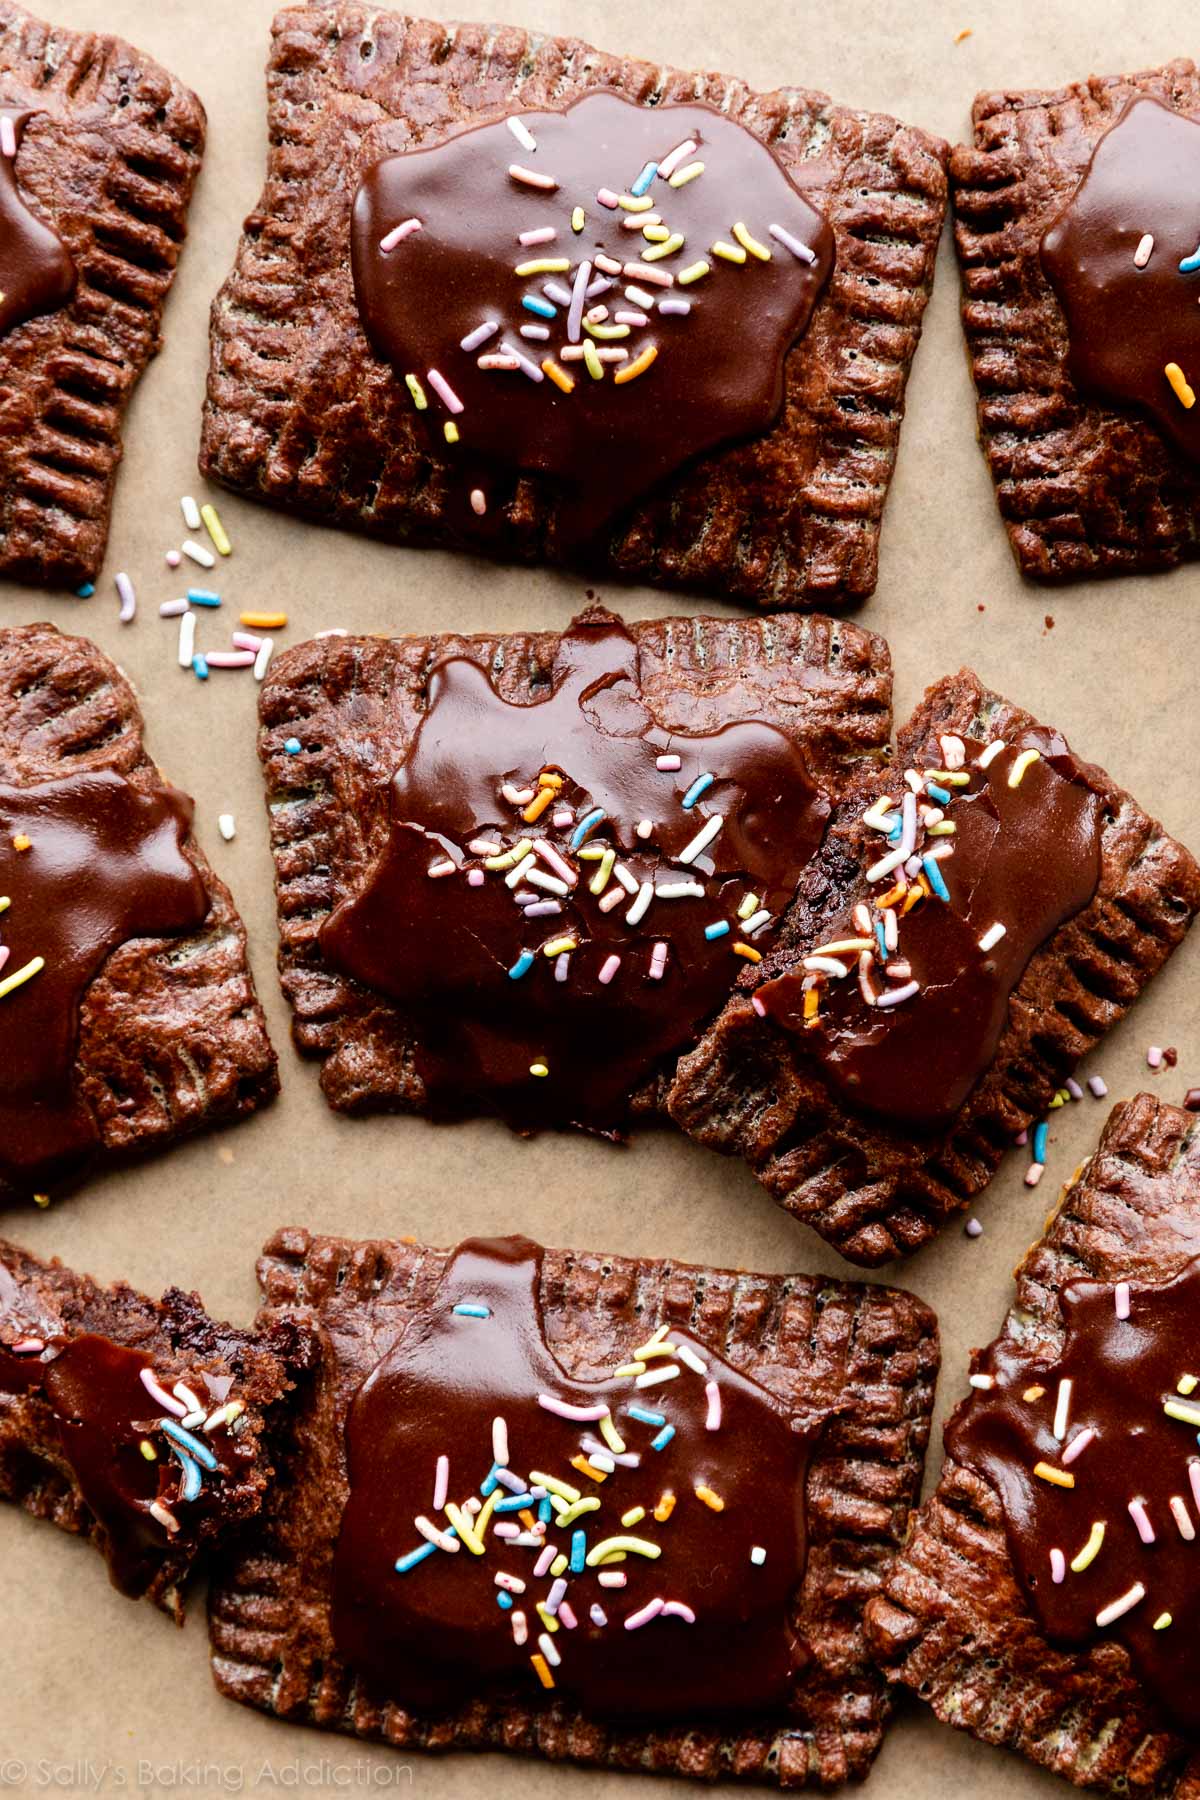
Sprinkles are the finishing touch, but you can skip them if desired. These pastry tarts are a homemade version of a fun childhood favorite and I hope you enjoy the process. (And end result!!!)
For more takes on classic childhood treats, try my rice krispie treats, cream-filled chocolate cupcakes, mini animal cracker cookies, and oatmeal creme pies.
See Your Chocolate Pop Tarts!
Many readers tried this recipe as part of a baking challenge! Feel free to email or share your recipe photos with us on social media. 🙂
Print
Homemade Fudge Chocolate Pop Tarts
- Prep Time: 3 hours, 30 minutes (includes dough chilling)
- Cook Time: 25 minutes
- Total Time: 4 hours, 10 minutes
- Yield: 9 pastry tarts
- Category: Dessert
- Method: Baking
- Cuisine: American
Description
Follow these thorough instructions to make a homemade version of store-bought chocolate pop tarts. These fudge chocolate pastry pies hold shape if they chill before baking (step 6) and taste best if they cool before you dig in!
Ingredients
Dough & Assembly
- 2 and 1/4 cups (281g) all-purpose flour (spooned & leveled)
- 1/4 cup (21g) unsweetened natural or dutch-process cocoa powder, plus more as needed for rolling
- 2 Tablespoons (24g) granulated sugar
- 1/2 teaspoon salt
- 1 cup (16 Tbsp; 226g) unsalted butter, very cold and cubed
- 1/2 cup (120ml) cold whole milk*
- egg wash: 1 egg beaten with 1 Tablespoon (15ml) milk
Fudge Filling
- 4 ounce (113g) semi-sweet chocolate bar, coarsely chopped*
- 1/4 cup (60ml) whole milk*
- 2 Tablespoons (25g) granulated sugar
- 1 Tablespoon (14g) unsalted butter, cold and cubed
- 1 teaspoon pure vanilla extract
Cocoa Icing
- 1 Tablespoon (14g) unsalted butter
- 2 Tablespoons (30ml) water
- 1 cup (120g) confectioners’ sugar
- 2 Tablespoons (10g) unsweetened natural or dutch-process cocoa powder
- 1 teaspoon pure vanilla extract
- optional: sprinkles for garnish
Instructions
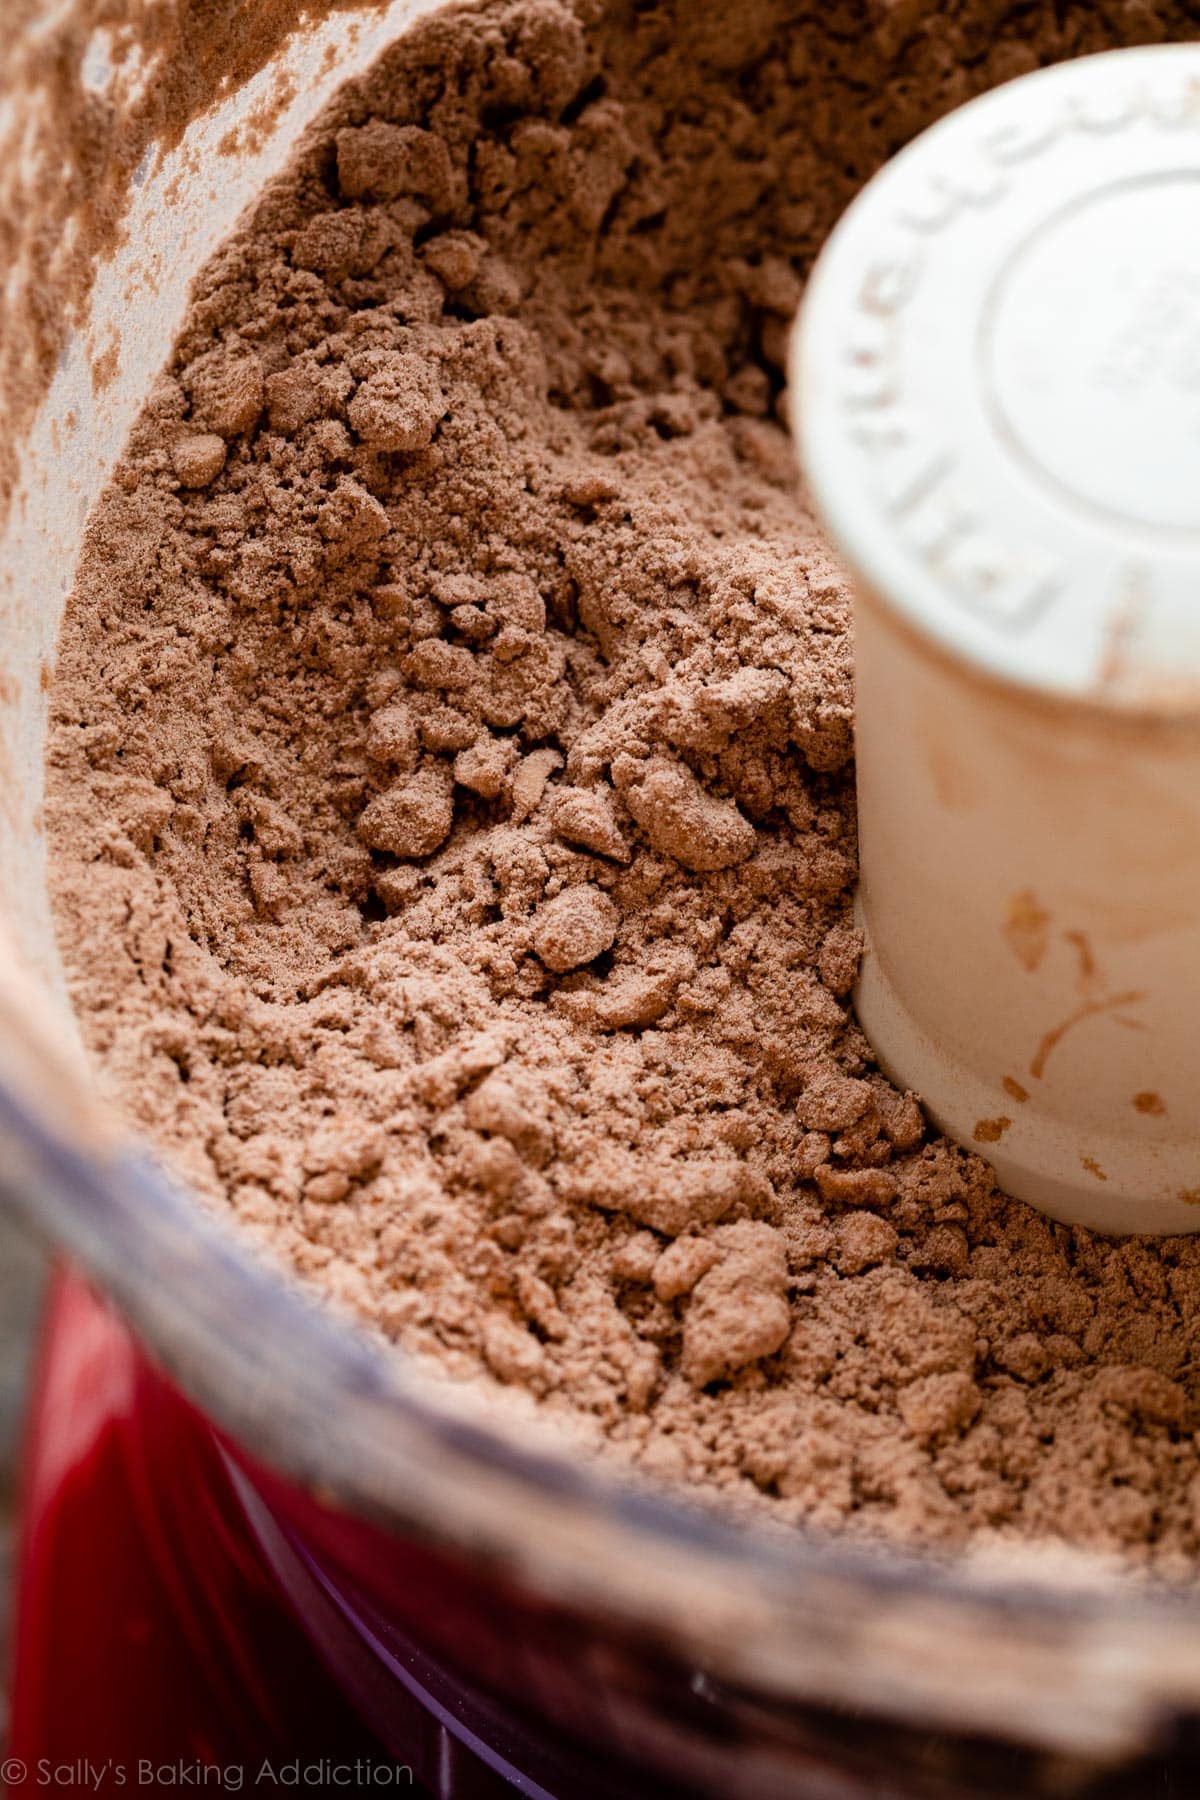
- Make the dough first: Place the flour, cocoa powder, sugar, and salt into a large 8-cup capacity or higher food processor or, if you don’t have a food processor, in a large bowl. Pulse or whisk until combined. Add butter and pulse or use a pastry cutter to manually cut in until coarse pea-sized crumbs form. See photo above for a visual. In 3 additions, pour in the milk and pulse or stir after each addition. After all the milk is added, pulse or stir more until the dough clumps up and comes together. If it’s too dry, add 1 Tablespoon (15ml) of cold milk. Try not to overwork the dough. Pour onto a work surface lightly dusted with cocoa powder or all-purpose flour. Use your hands to form dough into a ball. Divide the dough in half and flatten each into 1-inch thick discs. Wrap each disc tightly in plastic wrap and refrigerate for 2 hours and up to 5 days.
- Make the fudge filling soon after you prepare the dough: The fudge filling needs to cool and thicken, so that is why I recommend making it soon after you put the pastry dough in the refrigerator. Place chocolate, milk, and sugar in a medium saucepan over medium heat. Stir frequently as chocolate melts and mixture combines. Once melted, remove from heat and stir in the butter and vanilla extract. Pour into a heatproof bowl, cover, and set aside at room temperature to cool and thicken. You want the consistency slightly thinner than peanut butter. Note: You can refrigerate the filling to thicken it, but it may become too thick and cold. If it’s too thick, reheat in the microwave for a few seconds.
- Line 1 large baking sheet with parchment paper or a silicone baking mat. Make sure there is enough room in your refrigerator for the baking sheet because the shaped pastry pop tarts must chill for 15 minutes before baking.
- Roll out the chilled pie dough: Remove 1 of the dough discs from the refrigerator and let it sit at room temperature for 10 minutes to slightly warm up because it will be quite solid. (Keep the other in the refrigerator until step 5.) Lightly dust a work surface, rolling pin, and your hands with cocoa powder or all-purpose flour. Using a rolling pin, roll the dough into a 9×12-inch rectangle. Use gentle force with your rolling pin and use your hands to help keep the edges straight. You can watch me roll out the dough in the video below if you need a visual (2:23 mark). Visible specks of butter and fat in the dough are perfectly normal and expected. Trim the edges of the rectangle to straighten if needed. Cut rectangle into 3 equal strips and cut those into thirds for a total of 9 3×4-inch rectangles. Use a ruler to help make this process easier and more accurate. Arrange the dough rectangles 2 inches apart on the prepared baking sheet and chill in the refrigerator as you roll out 2nd half of dough in the next step.
- Roll out the 2nd half of dough and cut into 9 3×4-inch rectangles like you did with the 1st half of dough in step 4.
- Assemble the pastry tarts: Remove 1st set of dough rectangles from the refrigerator. Using a pastry brush, brush edges of each of these 9 rectangles with egg wash. Spoon a heaping Tablespoon of filling into center of each. Lay the other set of pie dough rectangles on top of each and press your finger around the edges to slightly seal. Poke holes in the top pie crust with a fork or toothpick and then crimp with a fork to ensure no filling spills out (if it does, it’s not a big deal). Refrigerate the shaped pastries uncovered for at least 15 minutes and up to 3 hours. This firms up the pastry and helps set its shape. (After chilling, feel free to carefully transfer the pastries to a new lined baking sheet if you don’t want to bake them on the cold baking sheet.)
- Meanwhile, preheat oven to 375°F (191°C). And look ahead to step 9—you can make the icing as the pastries bake in step 8.
- Brush pastry tarts with egg wash and bake for 25-26 minutes or until edges appear set. Remove from the oven and allow pastries to cool for 5 minutes before transferring to a wire rack to cool completely. Pastries taste best after completely cooling—they are very soft and rich when warm.
- Make the icing: In a medium saucepan over low heat or in a medium heatproof bowl using the microwave, warm butter and water together until butter has melted. Whisk mixture with the remaining icing ingredients. Cool icing for 15 minutes before spooning onto pastries. You can add the icing when the pastries are still warm, but again, they taste best after completely cooling. Immediately top with sprinkles, if using. Note: The longer the icing cools, the thicker it gets. If you let it cool too long before spooning on the pastries, the surface will stiffen up—whisking will bring it back together though. You can also reheat on the stove or in the microwave to thin out if needed.
- Cover and store pastries at room temperature for up to 1 day or in the refrigerator for up to 1 week.
Notes
- Make Ahead & Freezing Instructions: You can make the pie dough up to 5 days in advance, see step 1. You can also make the fudge filling up to 1 day in advance. Cover and refrigerate and when ready to use, heat in the microwave for just a few seconds to slightly thin out. You can assemble and refrigerate the pastries for up to 3 hours, see step 6. Baked and cooled pastries (with or without glaze) freeze well for up to 3 months. Thaw and heat in the microwave if desired. Do not heat in a toaster.
- Special Tools (affiliate links): Food Processor (8 cup capacity or higher; in the video I use a super large 14-cup KitchenAid food processor) or Pastry Cutter | Glass Mixing Bowl | Rolling Pin | Sharp Knife or Pizza Cutter | Pastry Brush | Baking Sheet | Silicone Baking Mat or Parchment Paper
- Chocolate: For the best results, use a 4 ounce “baking chocolate” bar found in the baking aisle. I prefer Bakers or Ghirardelli brands. You can use semi-sweet or even milk chocolate. Bittersweet makes a VERY dark and rich filling, so keep that in mind if you use a very dark chocolate. We have not tested it with white chocolate, so we can’t guarantee results. You can also use chocolate chips and 2/3 cup (about 120g) would be the best amount to use.
- Milk: For best taste and texture, whole milk is ideal in the filling and pie crust. You can use lower fat or non dairy milk if needed, but avoid any milk that is fat free.


Reader Comments and Reviews
My 5-year-old and I made this recipe for this month’s baking challenge. It was our first time attempting a recipe like this (I am more of a cake and cookie baker), but I am glad we tried something outside of my comfort zone. The directions were easy to follow and the pastry tarts came out delicious! It was the perfect balance of chocolate and sweetness. Both of my kids raved about them (and they are hard to please.)
These were delicious! The recipe was easy to follow. I like that it can be broken up into multiple work periods. I didn’t have a ton of time on the day I started the dough, but was able to work with it and finish the tarts a day later.
I enjoyed making these for the baking challenge. I was unsure how they would turn out because I’m not experienced with chocolate dough, and they looked a bit wonky during assembly–but the final product was fantastic! I did feel like the first dough disc got warm more quickly than I wanted while I was rolling it out, so I omitted the 10-minute warm-up at room temperature for the second disc, and that worked much better!
I normally get a little nervous working with pie dough. This dough was so easy to work with and they came out great. I will definitely try these again and maybe do different fillings. You can always trust Sally’s recipes!
I made mine into little circles and had some homemade raspberry compote which I added to some of my pastry tarts and chocolate filling in others. My dough got a bit too warm so it wasn’t a 100% success on my side but still fun and delicious. Thank you for your helpful notes!
Sally, you make rolling the dough look too easy in the videos! Lol! I actually did a decent job of getting the right shape this time. Great recipe and so chocolatey.
This was a bit time consuming to make, but definitely worth the effort! Very tasty!
So tasty and the recipe is really easy to follow!
I often struggle with pastry but this one was great— no rips or tears and rolled out pretty easily! And the end result was delicious!
Got no idea what pop tarts taste like because they’re not really available in my country so I was really curious and really excited to try out this recipe for this month’s challenge. Thanks to the precise instructions my only problem was that I went to 5 different stores and none of them had rainbow sprinkles! I know that sprinkles were optional but I thought they would look a bit sad without anything. Thankfully I found caramel candies at home and turned them into chips using a grater. My icing turned out not too sweet so I found that the cocoa and caramel complemented each other really well. I’m the type of person who adores everything chocolatey even when other people think it’s too much chocolate so I loved the end result. The taste and the structure were just right, took some time with all the cooling, taking out, waiting for the icing to set etc but was worth it in the end! Thank you for the recipe!
These were a journey lol. It’s a great way to spend a Saturday afternoon (and evening) though, and feel like I got to try some new things. They smelled exactly like pop tarts when baking. I ate these with a scoop of ice cream and they were good…but I’d rather have a straight up chocolate pie I think. Thanks for the fun challenge though, with no ingredients I didn’t already have!
Had a blast making these tasty treats with my 6 year twin nieces! The steps are easy to follow and produce accurate results when followed. For our hand pies we used 2% milk and the flavor and consistency was on par. Additionally, to ensure our butter was extra cold for the crust, I placed it in the freezer for about 20 minutes. Last, my nieces requested pink and blue icing so I used 130 g of powdered sugar instead of the instructed 120 g and 10 g cocoa powder.
This was my first baking challenge. It was a fun recipe to bake with my 10 year old daughter. I would agree that they taste better once cooled. Ultimately, it was too much chocolate and too many steps to become part of our regular recipes. We recently made the chocolate mouse cake which was SO delicious and worth the effort!
Easy was quite easy to make and absolutely delicious!
The recipe was pretty straightforward and simple despite how long the instructions might appear. The fudge flavor is awesome–could have possibly used a different flavor to complement the chocolate as it is pretty rich. Everyone loved the pie crust shell however!
I almost didn’t make these thinking no one really likes poptarts, am so glad I did. Before I could snap a pic of the 9, my daughter already started eating one! Seriously yummy and almost makes me want to wonder how much flavorful a savory pastry would be. Sally – do you have a savory one? Or maybe you can suggest what I can replace in the dough?
Loved this!! Once again directions are so explicit!! Makes everything easier and ohhhhh so delicious!! Added some raspberry preserves. Yum!!!
I loved this recipe!! It really challenged me, because I’m not an experienced baker by any means, but the pop tarts came out so great!! I loved how flaky the pastry was, and the chocolate was so decadent. I am excited to try and make the brown sugar cinnamon ones as well!!
This was my first time with one of your challenges. It was really fun! I don’t care for sprinkles (gasp!, I know!) so I left them off. One of my favorite combos is chocolate and peanut butter, so I tried to make a peanut butter filing to go with the chocolate ganache. These were amazing! I was afraid they would be too sweet, but because it is a pie dough and not a cookie, the total package was delicious!
The pastry tarts are delicious. I’m a brand-new baker, but the clear directions, photos and videos made this recipe easy to follow.
I enjoyed the challenge. I am not a big fan of pop tarts but thought these were a delicious indulgence. My son-in-law was impressed and my grandkids were excited to taste their Oma’s baking challenge. I don’t know if I would make them again, but I now have the skills to make homemade pop tarts if someone puts in the request. Thanks for the fun!
I made these today, and they turned out very yummy! My husband and 2 year old loved them! Perfect recipe for any chocolate lover. Thank you for a fun challenge!
A tasty and fun challenge! Made as a Valentine’s activity with my daughter 🙂 Cut ours into little hearts and decorated with heart sprinkles. These were a big hit at a Valentine’s Day potluck we attended!
My family really enjoyed these pastry tarts. I was impressed with how flaky they turned out, and *very* happy/surprised that I managed to bake all of mine without having any of the delicious filling ooze out! They do require some preparation and effort, but the end result was very delicious. I would definitely consider making them again as a special treat. Thank you for another fun baking challenge!
I appreciated this challenge. I am not the best at rolling out pie dough so I ended up with two less than the recipe says but it was good practice for me! It was fun to try something I’d never done before and the end result was delicious. Thank you for sharing your talent!
Delicious! My husband said they taste like all of the best parts of a brownie – a gooey middle and crispy outside. This was a fun way to spend a snowy afternoon in Massachusetts.
What fun challenge! I never, in a thousand years, would have imagined I would bake a chocolate pop tart! And alas, here I am! Thanks Sally for pushing me beyond my comfort level in baking.
This recipe appears to be quite overwhelming at first glance, but is very easy to follow. The videos always help!
Enjoy at room temperature. Such a decadent treat!
I made this recipe for the monthly challenge. A very new to me type recipe as I don’t really do any type of pastry dough. The direction we’re great even if the execution was a little rough tasted great and my 3 year old sous chef loved it!
This was a great recipe to keep honing in on those pastry/pie dough type skills. Haven’t made a chocolate one as of yet so thankful to have in my tool box. Dough turned out nice and flakey, chocolate filling was lovely rich flavor and with a glaze that reminded me of a chocolate donut. Thanks Sally! What a combo for a chocolate lover
Pastry dough was great! I opted to not make the fudge filling and raid my pantry for a variety of spreads and jams. Next time I’ll go for the recipe filling because I’m so curious!
These were great! Portion control is a big thing for me but the dough for these actually worked well rolled out a bit thinner and then the proportions worked out perfectly when I cut them a bit smaller and ended up with 18 pastries.
I wasn’t a fan of the pastry dough itself, but I loved the flavor of the chocolate fudge inside.
Honestly a really great recipe! Love having a homemade edition of a childhood favorite! I started the dough the night before and it made the actual process so much easier!