

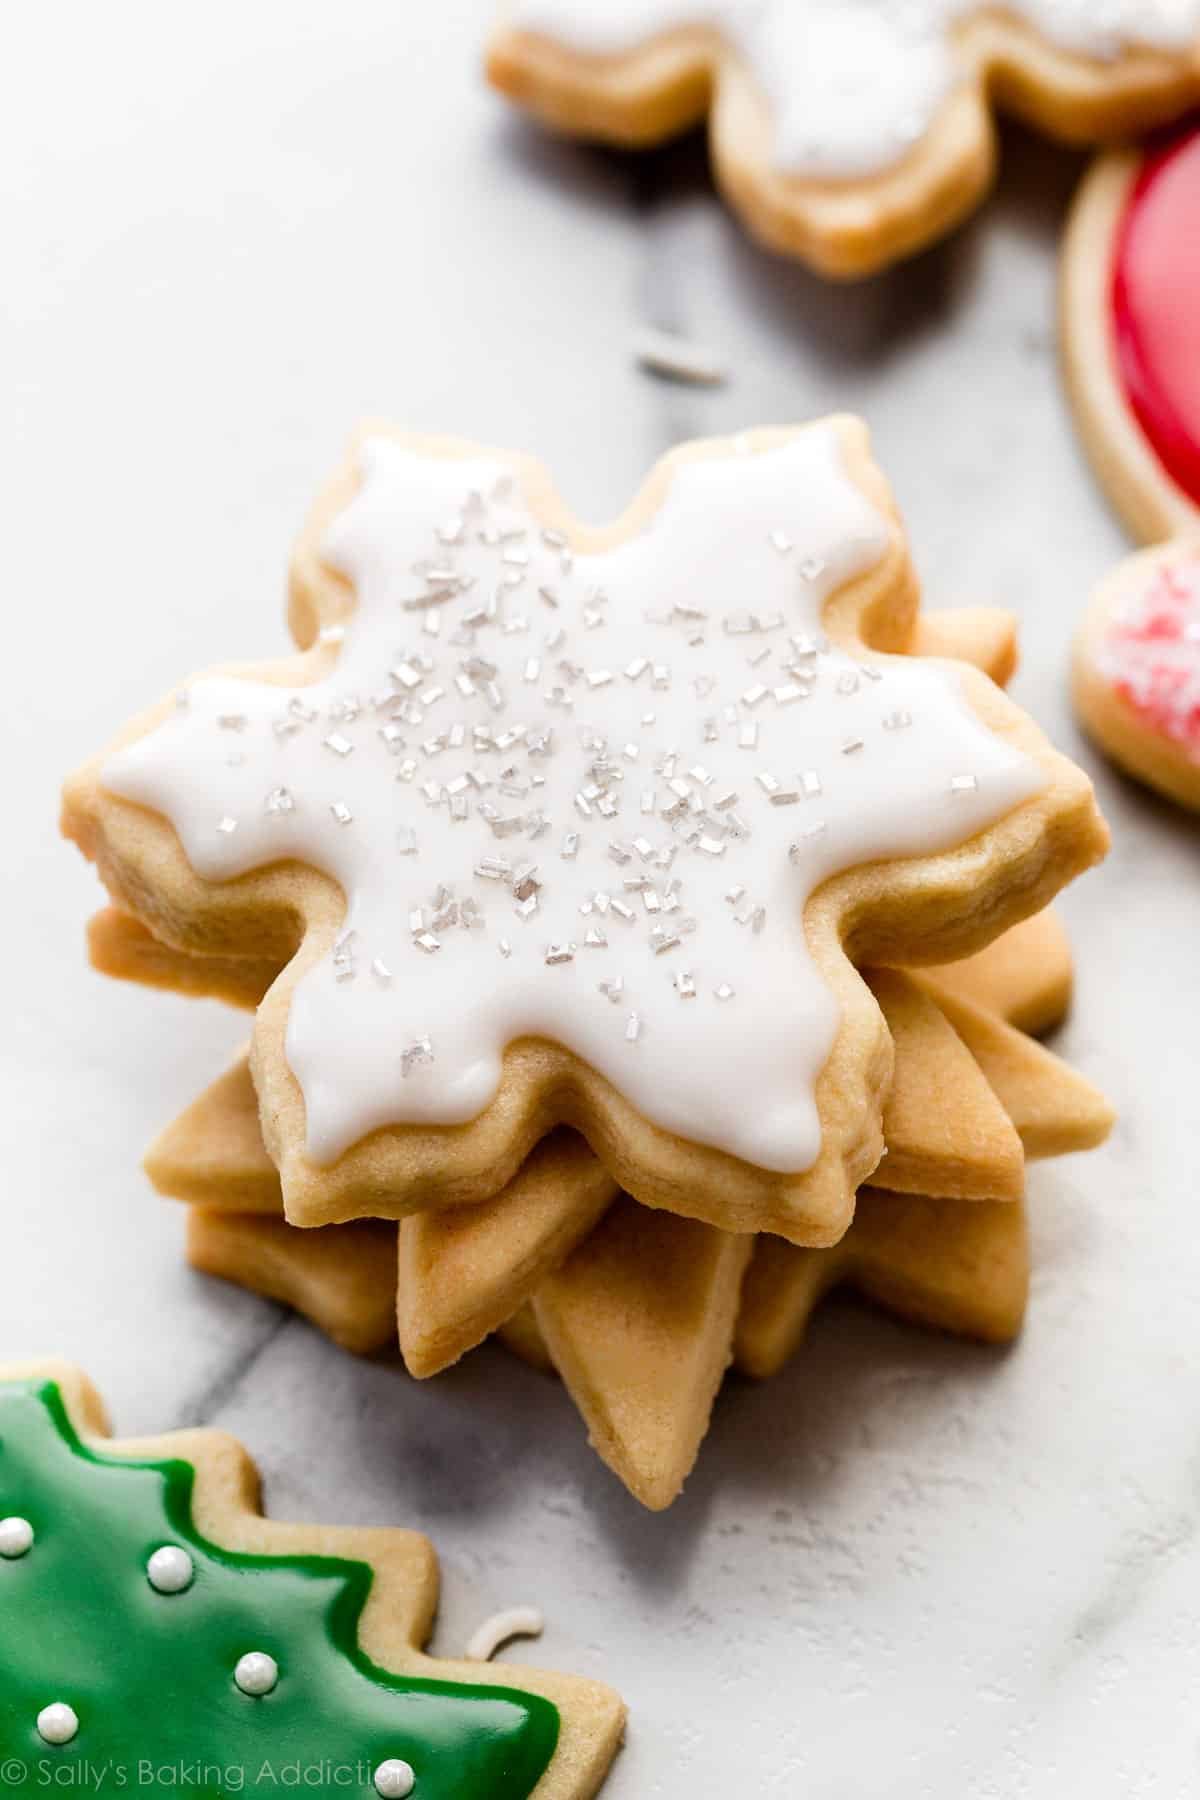
These are fan-favorite cut-out Christmas sugar cookies! My recipe for sugar cookies promises flavorful cookies with soft and thick centers, slightly crisp edges, and flat tops for decorating. The dough comes together with 7–8 simple ingredients, and the cookies hold their cookie cutter shape in the oven. Decorate them with my easy glaze cookie icing, a wonderful alternative to royal icing. Get out your rolling pin and favorite cookie cutters and have fun!

I originally published this recipe in 2014 and have since added new photos, a video tutorial, a few more success tips, and a list of helpful tools.
The holiday season and a batch of decorated Christmas sugar cookies go hand-in-hand. Today’s recipe is a classic staple, and has been a popular favorite since I first published it many years ago. It’s basically my favorite sugar cookie recipe, but all dressed up for the holidays. And I love that you don’t need to mess with royal icing! The cookie icing below is unfussy and low maintenance, which is definitely appreciated if you’re baking a lot of cookies in December. 😉
Here’s Why You’ll Love These Christmas Sugar Cookies
- Soft, thick centers with slightly crisp edges
- Irresistible buttery vanilla flavor
- Made from simple ingredients
- Leave plain or flavor with extras like maple, cinnamon, peppermint, and more
- Hold shape while baking
- Icing is manageable for young bakers and beginners
- Freeze beautifully
- Easy-to-follow recipe used by beginner and expert bakers alike
By the way, if you love sugar cookies, but aren’t up for decorating with icing, you’ll enjoy my stained glass window cookies, Christmas sparkle cookies, pecan sugar cookies, or drop Christmas sugar cookies instead.
How to Make Christmas Sugar Cookies
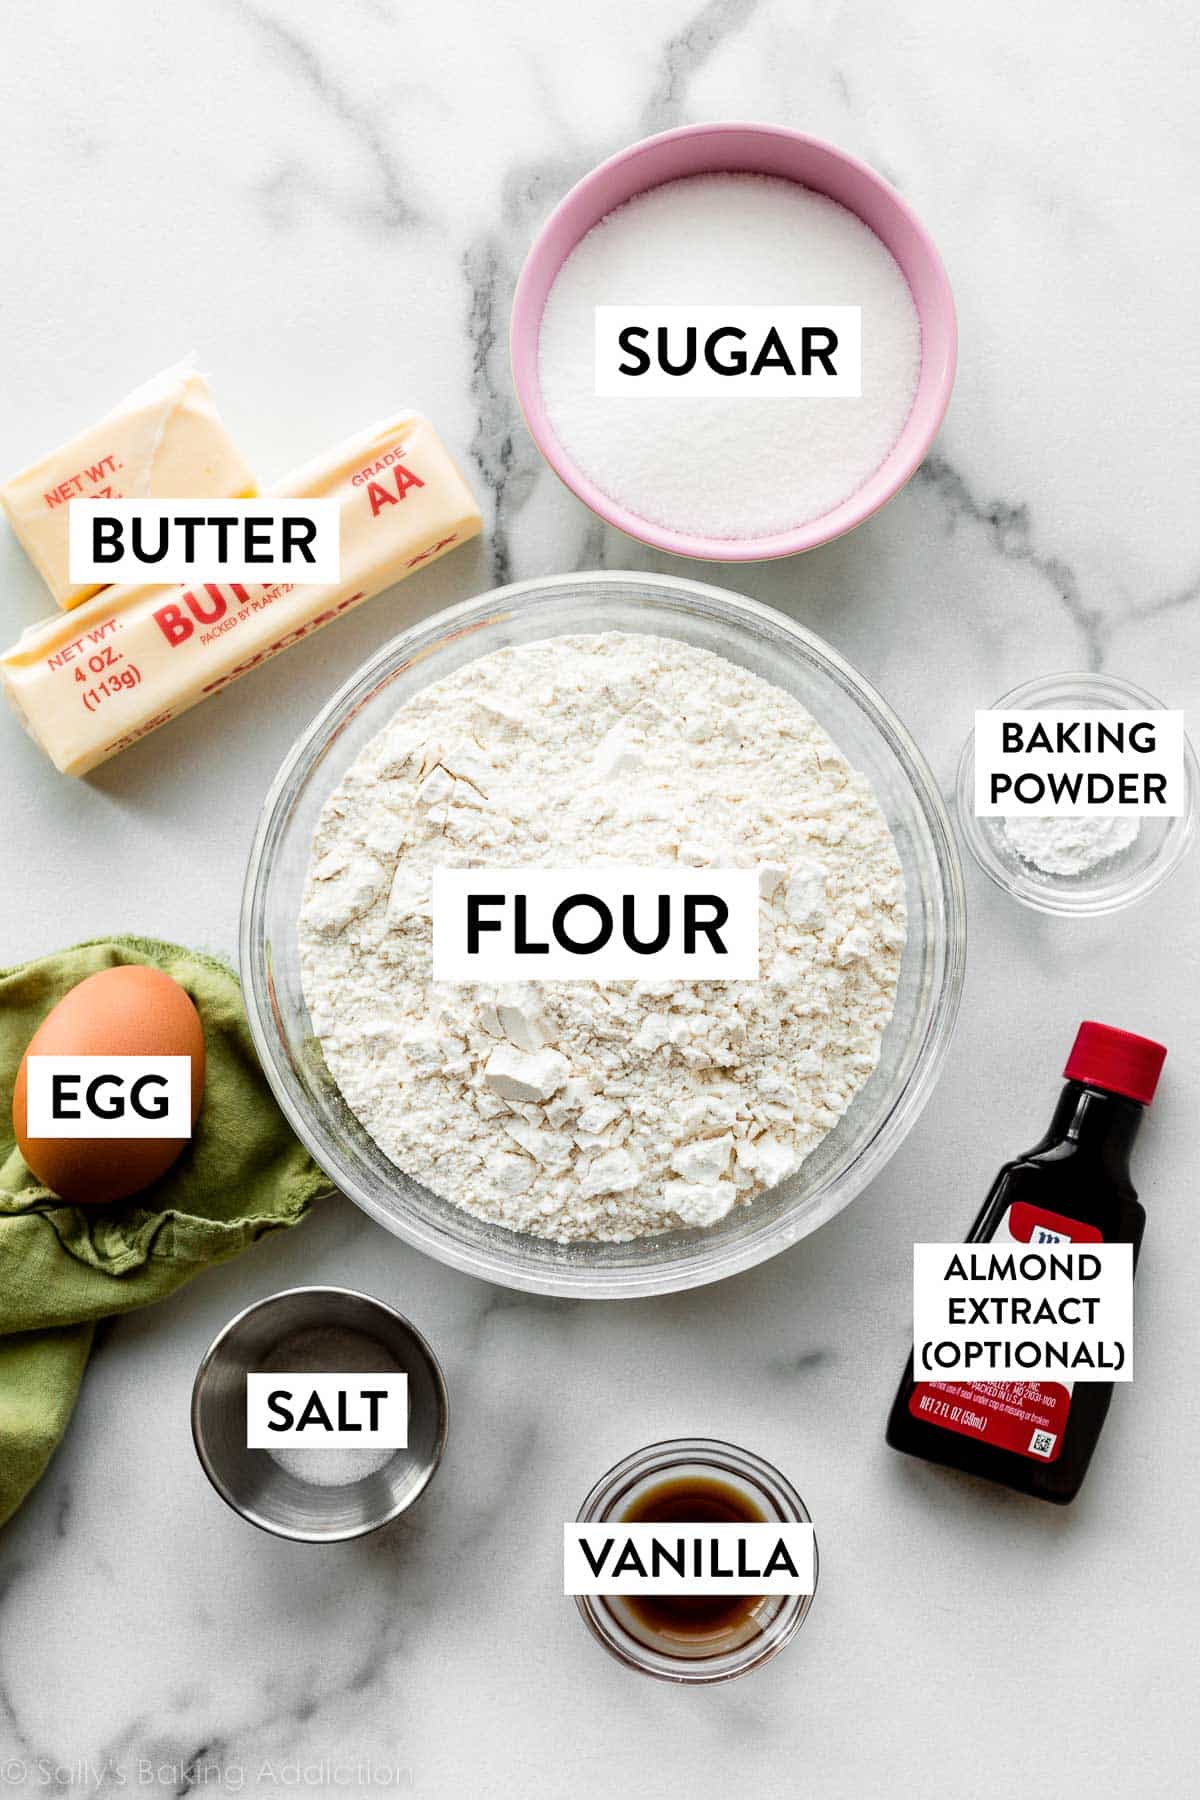
You need 7–8 ingredients for the dough. With so few ingredients, it’s important to follow the recipe closely, because each one has an important job. Creamed butter and sugar form the base of the dough. Egg and flour provide structure, and vanilla adds flavor. I almost always add a touch of almond extract for additional flavor, and highly recommend that you try it too! You could also use peppermint extract or another flavor extract instead. Baking powder adds lift, and salt balances the sweet.
So many little ingredients doing big jobs to create a perfect cookie:
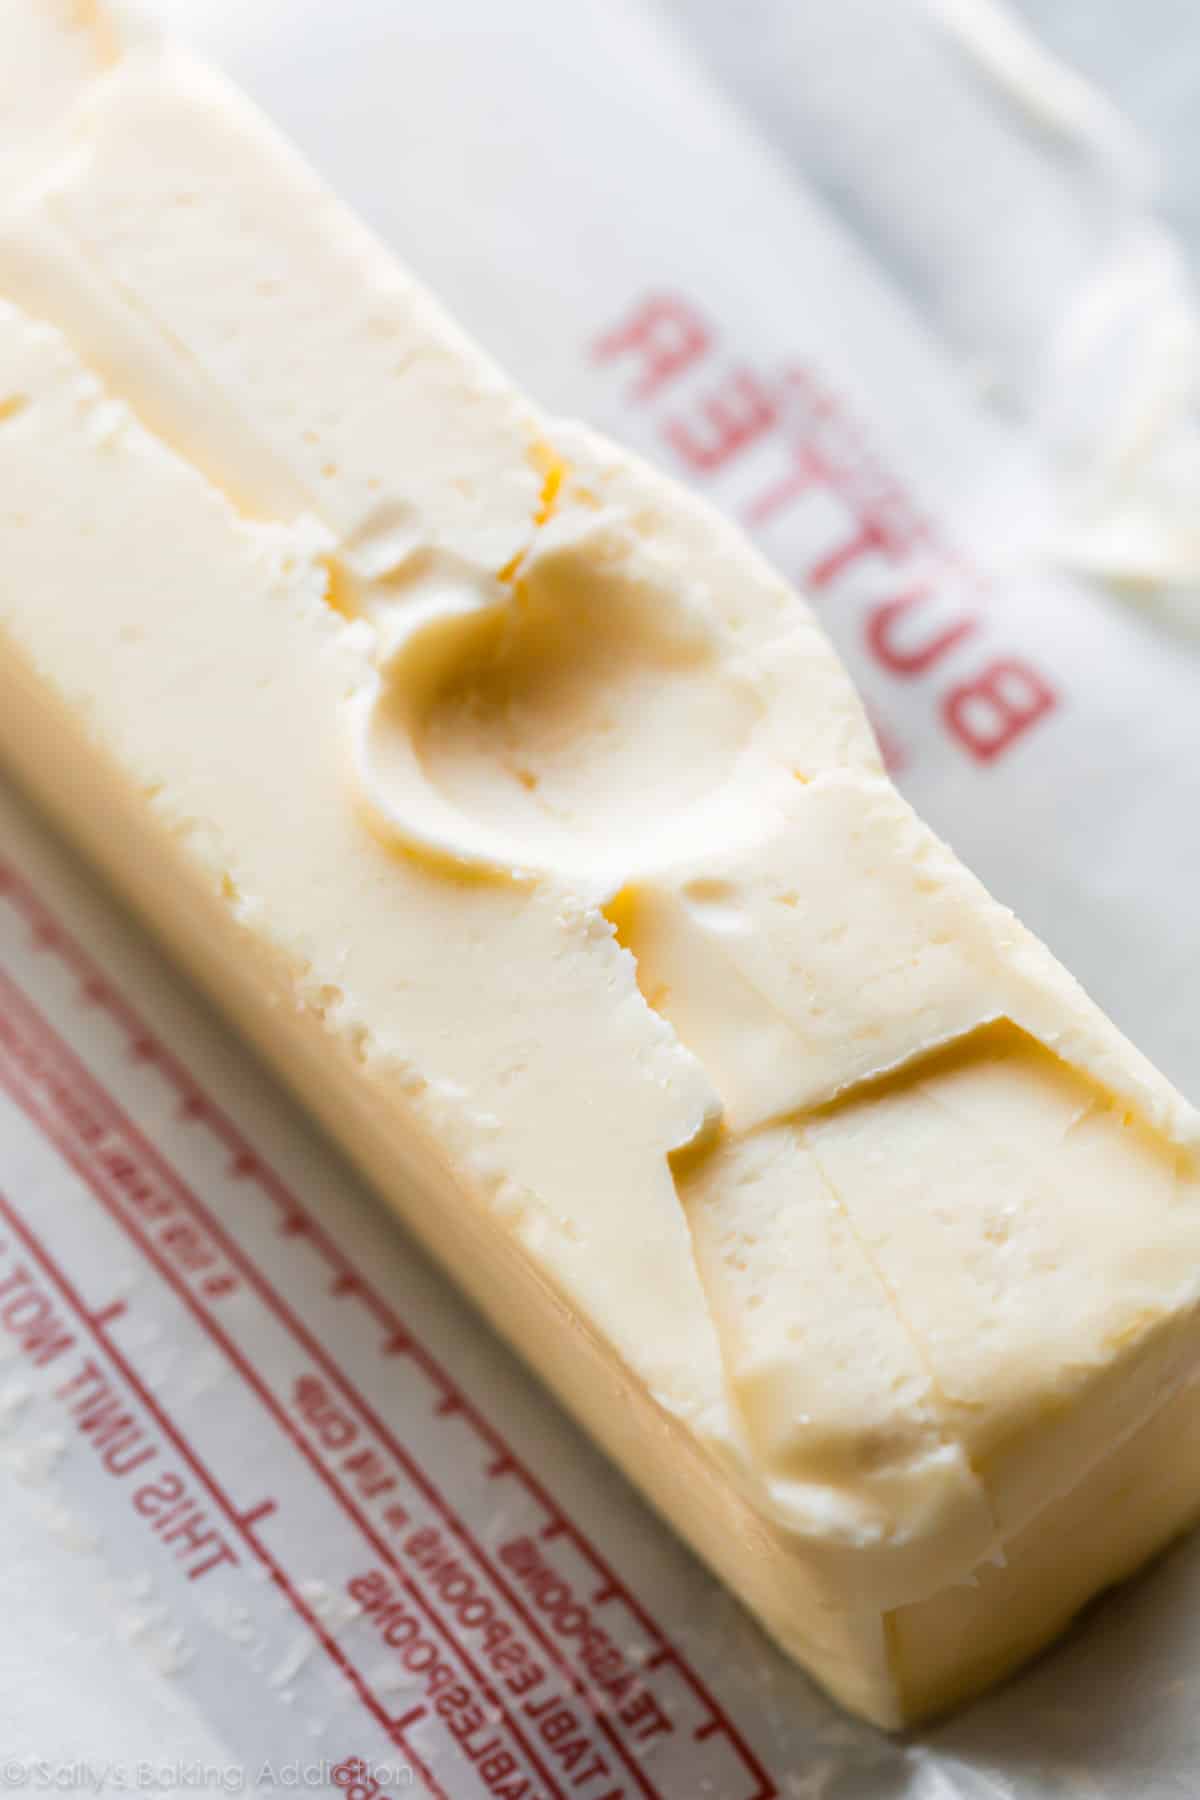
Success Tip: Make sure you start with proper room temperature butter. Room temperature butter is cool to the touch and about 65°F (18°C), which may be cooler than your kitchen. To test the butter to make sure it’s ready to cream, poke it with your finger. Your finger should make an indent without sinking down into the butter. The butter should not be shiny or greasy.
This is a recipe that requires some planning ahead.
After you make the cookie dough, it must chill for 1–2 hours, and up to 2 days. Chilling is a mandatory step. Without chilling, these cookie cutter sugar cookies won’t hold shape. You don’t want your snowman-shaped cookie turning into the Stay-Puft Marshmallow Man (though that could work for Halloween cookies).
Also, the icing recipe below needs at least 24 hours to dry/set (but you can certainly eat them prior to the icing drying!). This is much longer than royal icing, which usually dries in 2 hours. So even though we’re not messing with finicky royal icing, we do have to wait longer to stack/transport the cookies.
After you make the cookie dough, divide it in half:
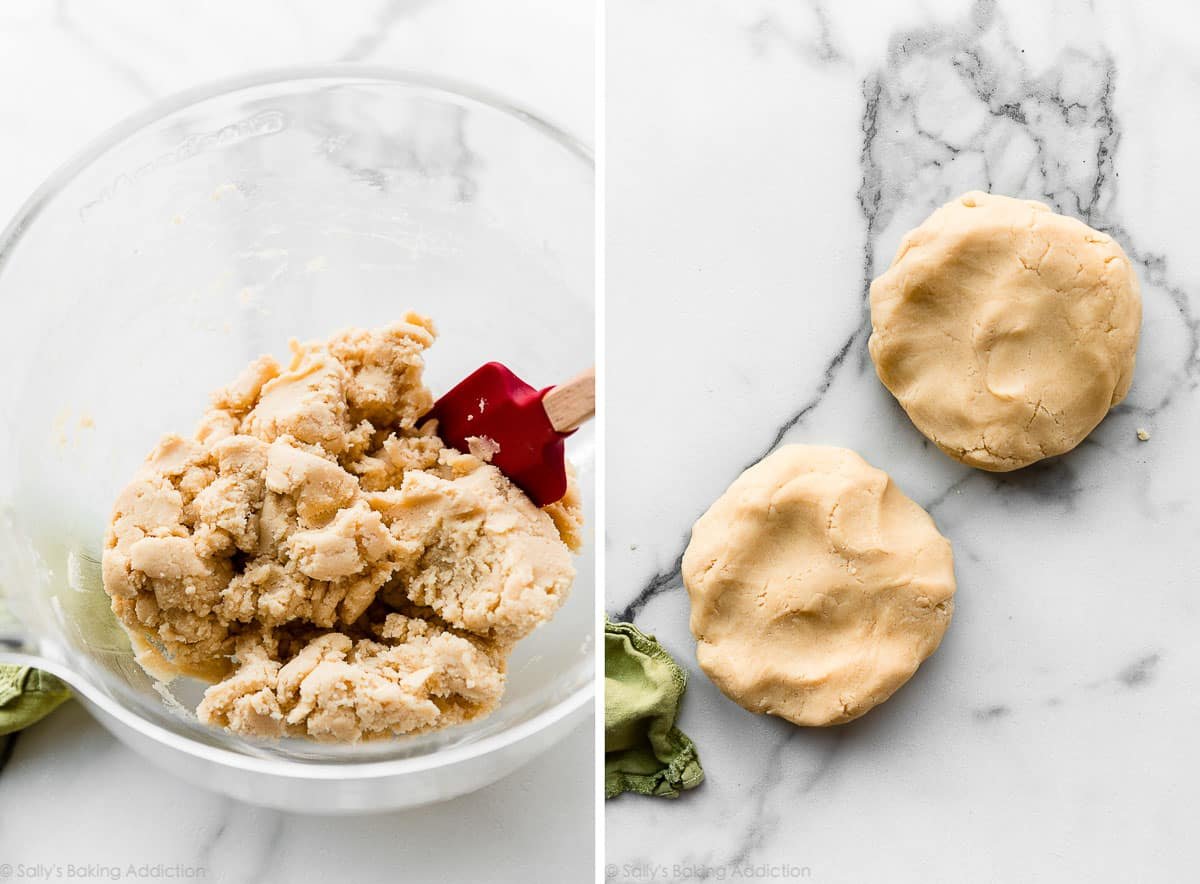
And then roll out each portion of dough before chilling:
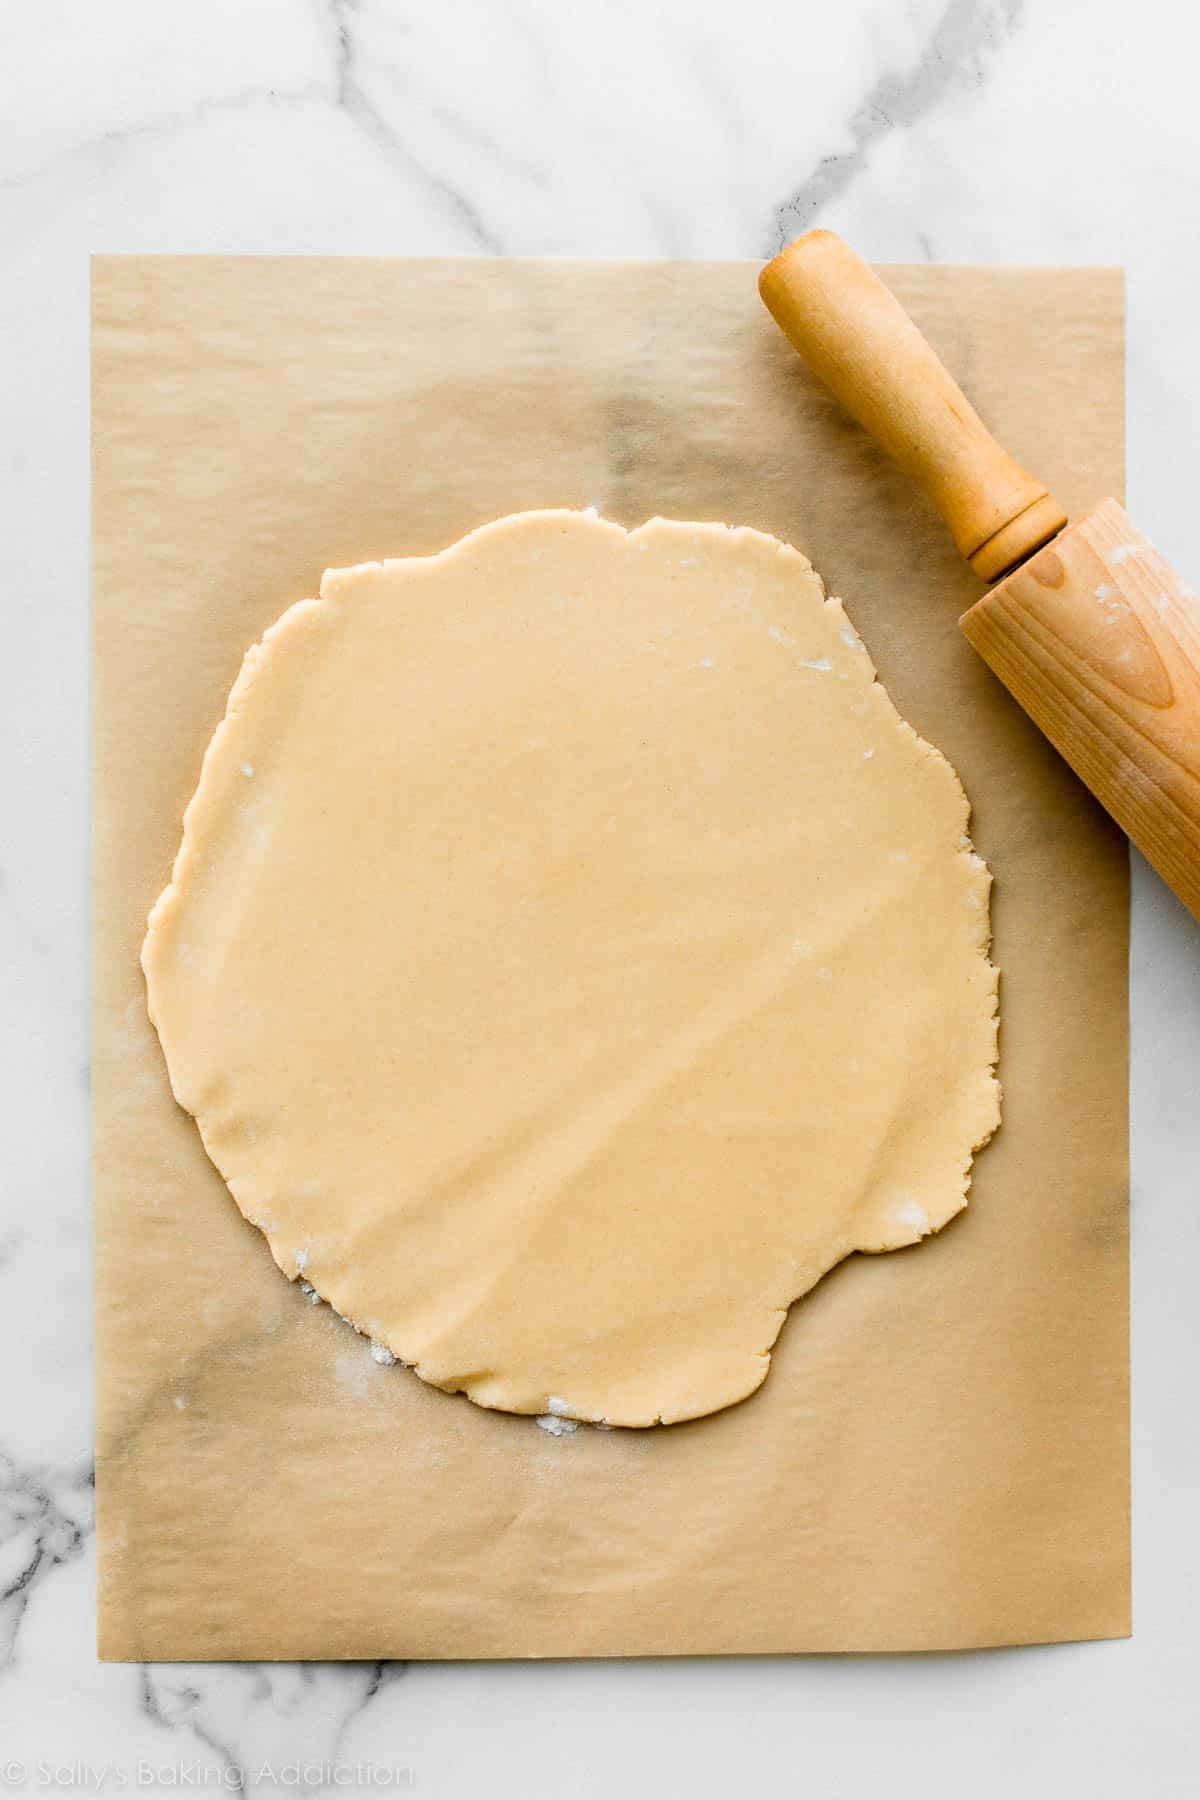
Let’s talk about rolling out this dough, because it’s an unusual order of steps.
3 Tricks to Rolling Out Christmas Cookie Dough
- Trick #1: Pay attention to the order of the steps. Notice how I roll out the dough BEFORE chilling it in the refrigerator? That’s the most important trick! Let me explain why I do this. Just like when you’re making chocolate chip cookies, to prevent the cookies from over-spreading, the dough must chill. If you’ve ever tried rolling out chilled sugar cookie dough, you may remember how difficult it is to roll out cold, stiff dough. So, roll out the dough while it’s still soft (right after mixing it together), and then chill the rolled-out dough.
- Trick #2: Divide the dough in half before rolling it out. Why? Smaller sections of dough are easier to roll out.
- Trick #3: Roll out the cookie dough directly on a silicone baking mat or parchment paper so you can easily transfer it to the refrigerator. Pick the whole thing up, set it on a baking sheet, and place it in the refrigerator. If you don’t have enough room for two baking sheets in your refrigerator, simply stack the pieces of rolled-out dough on top of each other, with parchment paper or silicone baking mat in between. You can see me doing this in the video tutorial below.
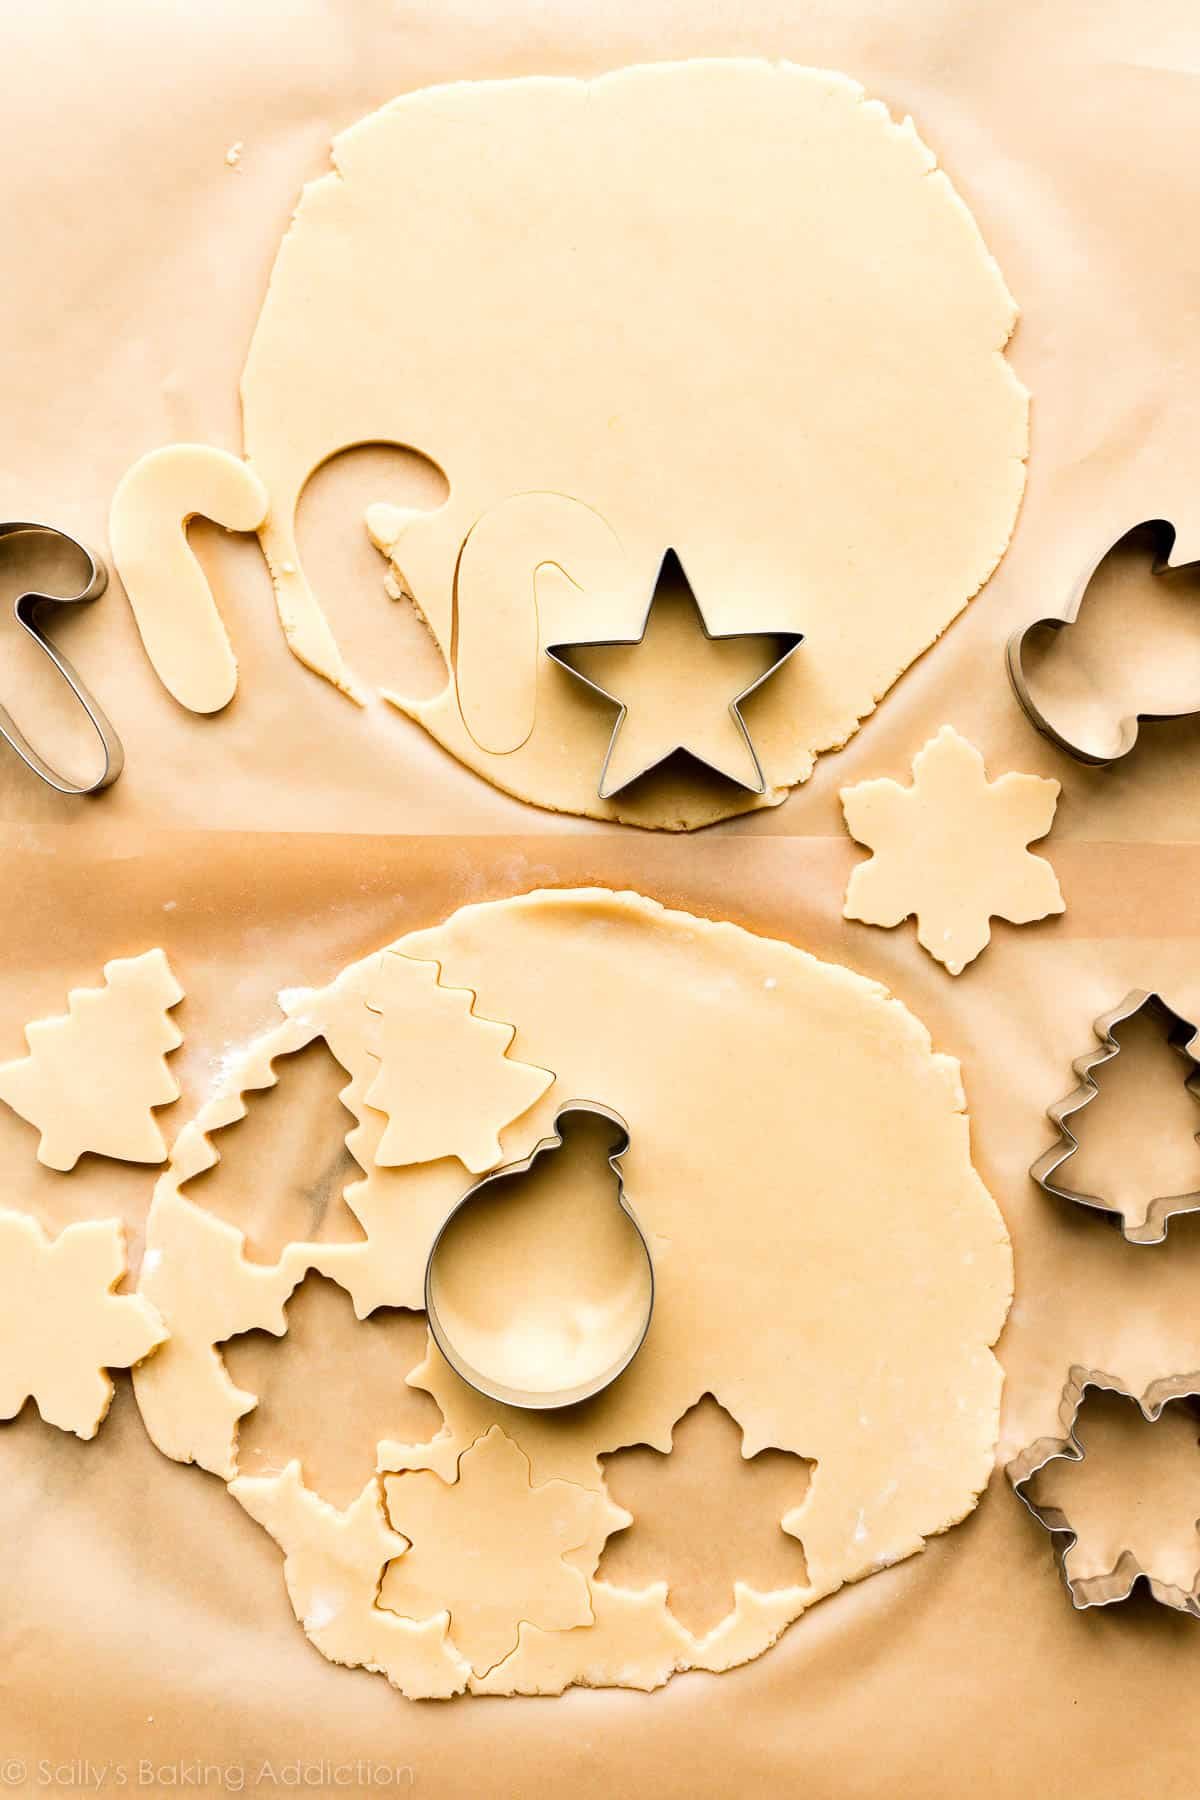
After the rolled-out dough chills for at least 1–2 hours, use cookie cutters to cut out shapes, and re-roll your scraps. Remember, you have two slabs of dough.
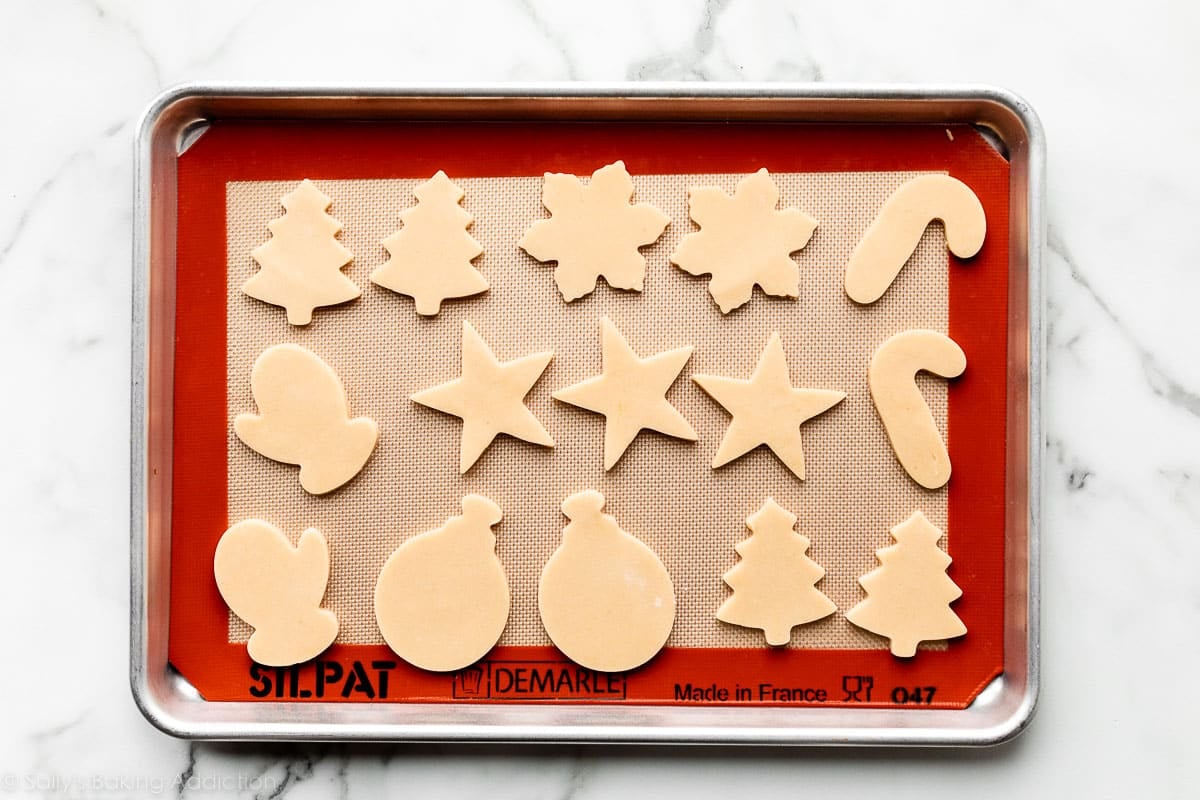
Arrange cookies on a lined baking sheet. I usually get about 2 dozen 3-inch cookies from this recipe. Here’s some of the cookies before baking:
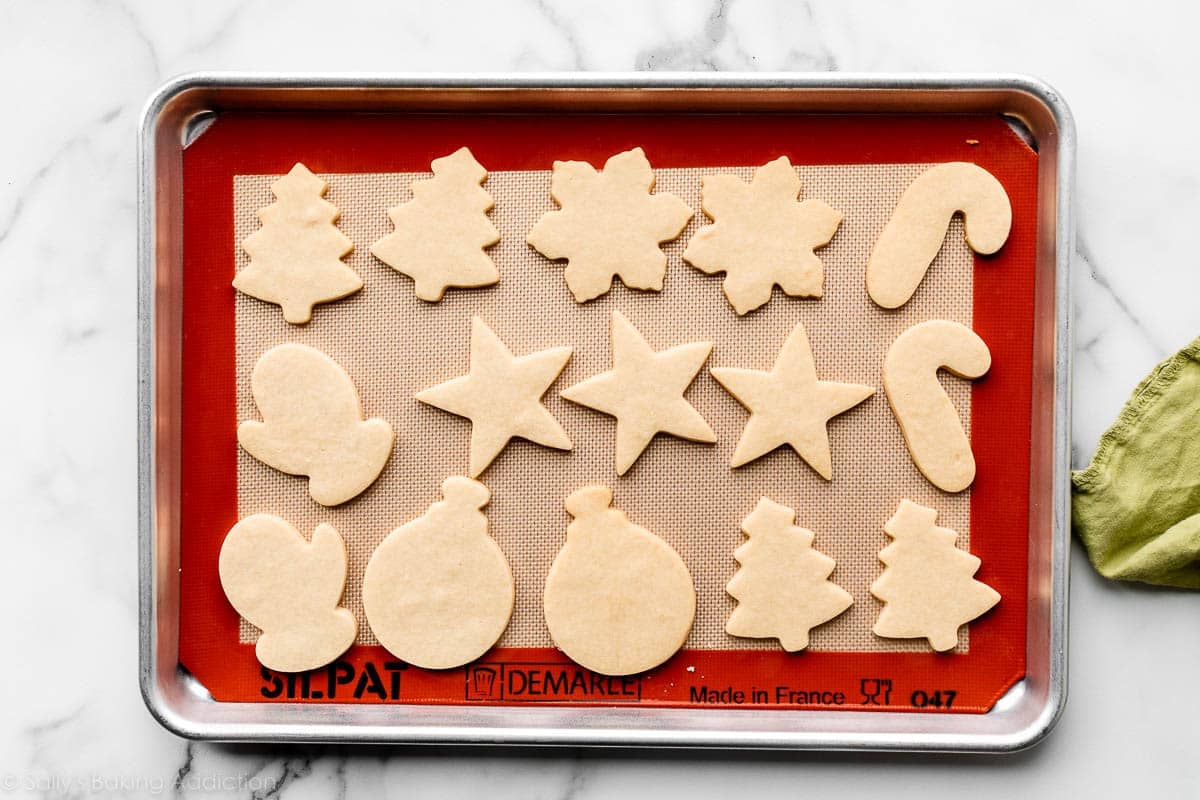
And after baking:
Use My Easy Cookie Icing
My easy cookie icing recipe below is a great alternative to traditional royal icing. It’s like a very thick opaque glaze and comes together quickly with a fork and a mixing bowl. This is one of my favorite ways to decorate sugar cookies because it’s low maintenance, but still delivers pretty (and tasty) results. I have a separate cookie icing page dedicated to it, and it can be used on pretty much any cookie cutter cookies like gingerbread cookies, brown sugar cut-out cookies, chocolate sugar cookies, Valentine’s Day cookies, or Easter cookies.
(I also have a recipe for thick cookie buttercream, if you’d like that option!)
Here’s why you’ll love the cookie glaze icing:
- 5 basic ingredients
- Can tint the icing different colors
- Can use squeeze bottle or piping tips to decorate
- Manageable for everyone
- Doesn’t dry into hard cement texture
- After it dries, you can stack, freeze, and transport cookies
You need confectioners’ sugar, water, vanilla extract (replace with water to keep the icing stark white), a touch of corn syrup, and a little salt. The corn syrup gives the icing sticking power and creates a beautiful sheen when the icing dries. The icing sets after 24 hours, so you can easily stack these Christmas sugar cookies for storage, transport, or even shipping.

Yes, you can create gourmet-looking Christmas cookies like the ones above without royal icing! For more decorating inspiration, see my video tutorial on how to decorate sugar cookies.
Christmas Sugar Cookie Tools
Before I leave you with the recipe, let me suggest some useful sugar cookie tools. These are the exact products I use in my own kitchen:
- Electric Mixer: stand mixer or handheld.
- Baking Sheets: I use and love these baking sheets.
- Parchment or Baking Mats: silicone baking mats or parchment sheets (for rolling out & transferring the rolled-out dough, and for baking the cookies).
- Rolling Pin: This is my favorite rolling pin. If you have difficulty evenly rolling out dough, try this adjustable rolling pin. It’s really helpful!
- Cookie Cutters: If you’d like suggestions for cookie cutters, I love Ann Clark brand. (Not sponsored, just a genuine fan!) The pictured shapes came from this holiday cookie cutter set.
- Food Coloring: Liquid food coloring can alter the consistency of the icing, so I recommend gel food coloring. I like Americolor brand.
- Squeeze Bottle: To make decorating a breeze, use a squeeze bottle. They’re less intimidating than piping tips and very easy to use. If you want to use a piping tip, I love Wilton #4 for decorating sugar cookies. (You’ll also need a disposable or reusable piping bag if using a piping tip.)
These baking tools would be great to add to your holiday wish list. And while you’re at it, be sure to check out my guide of Holiday Gifts for Bakers. Lots of fun ideas in there, either for yourself or other baker friends! You can also review my recommended Best Cookie Baking Tools and Cookie Decorating Supplies for even more suggestions.

Craving More Christmas Cookies?
- Peanut Butter Blossoms (same base dough as these peanut butter cookies!)
- Gingerbread Cookies
- Lace Cookies
- Homemade Gingerbread House
- Spritz Cookies
- Butter Cookies and Chocolate Butter Cookies
- Snowball Cookies
- Pinwheel Cookies
- Hot Cocoa Cookies
This recipe is part of my annual cookie countdown called Sally’s Cookie Palooza. It’s the biggest, most delicious event of the year! Browse dozens of cookie recipes over on the Sally’s Cookie Palooza page.


Christmas Sugar Cookies Recipe with Easy Icing
- Prep Time: 2 hours
- Cook Time: 12 minutes
- Total Time: 2 hours, 10 minutes
- Yield: 24 3-inch cookies and 1.5 cups icing
- Category: Cookies
- Method: Baking
- Cuisine: American
Description
Cut-out Christmas sugar cookies with crisp edges and soft centers. This icing recipe is so simple, making decorating hassle-free!
Ingredients
Cookies
- 2 and 1/4 cups (281g) all-purpose flour (spooned and leveled), plus more as needed for rolling and work surface
- 1/2 teaspoon baking powder
- 1/4 teaspoon salt
- 3/4 cup (12 Tbsp; 170g) unsalted butter, softened to room temperature
- 3/4 cup (150g) granulated sugar
- 1 large egg, at room temperature
- 2 teaspoons pure vanilla extract
- 1/4 or 1/2 teaspoon almond extract (optional, but makes the flavor outstanding)*
Easy Icing
- 3 cups (360g) confectioners’ sugar
- 1/2 teaspoon pure vanilla extract (omit and replace with water for stark white icing)
- 2 teaspoons light corn syrup*
- 4.5–5 Tablespoons (67–75ml) room temperature water
- pinch salt*
- optional: gel food coloring & sprinkles for decorating
Instructions
- Make sure you have allotted enough time (and enough counter space!) to make these cookies. The cookie dough needs to chill, the cookies need to cool completely, and the icing needs 24 hours to completely set. If enjoying right away and hardened icing isn’t a concern, you’ll only need about 3–4 hours to make these.
- Make the cookie dough: Whisk the flour, baking powder, and salt together in a medium bowl. Set aside.
- In a large bowl using a handheld or a stand mixer fitted with a paddle attachment, beat the butter and sugar together on high speed until completely smooth and creamy, about 3 minutes. (Here’s a helpful tutorial if you need guidance on how to cream butter and sugar.) Add the egg, vanilla, and almond extract (if using), and beat on high speed until combined, about 1 minute. Scrape down the sides and up the bottom of the bowl and beat again as needed to combine.
- Add the dry ingredients to the wet ingredients and mix on low until combined. Dough will be a bit soft. If the dough seems too soft and sticky for rolling, add 1 more Tablespoon of flour.
- Divide the dough into 2 equal parts. Place each portion onto a piece of lightly floured parchment paper or a lightly floured silicone baking mat. With a lightly floured rolling pin, roll the dough out to about 1/4-inch thickness. Use more flour if the dough seems too sticky. The rolled-out dough can be any shape, as long as it is evenly 1/4-inch thick.
- Lightly dust one of the rolled-out doughs with flour. Place a piece of parchment on top. (This prevents sticking.) Place the second rolled-out dough on top. Cover with plastic wrap or aluminum foil, then refrigerate for at least 1–2 hours and up to 2 days.
- Once chilled, preheat oven to 350°F (177°C). Line 2–3 large baking sheets with parchment paper or silicone baking mats. Carefully remove the top dough piece from the refrigerator. If it’s sticking to the bottom, run your hand under it to help remove it. Using a cookie cutter, cut the dough into shapes. Re-roll the remaining dough and continue cutting until all is used. Repeat with second piece of dough. (Note: It doesn’t seem like a lot of dough, but you get a lot of cookies from the dough scraps you re-roll.)
- Arrange cookies on baking sheets about 3 inches apart. Bake for 11–12 minutes or until lightly browned around the edges. If your oven has hot spots, rotate the baking sheet halfway through bake time. Allow cookies to cool on the baking sheet for 5 minutes, then transfer to a wire rack to cool completely before decorating. No need to cover the cookies as they cool.
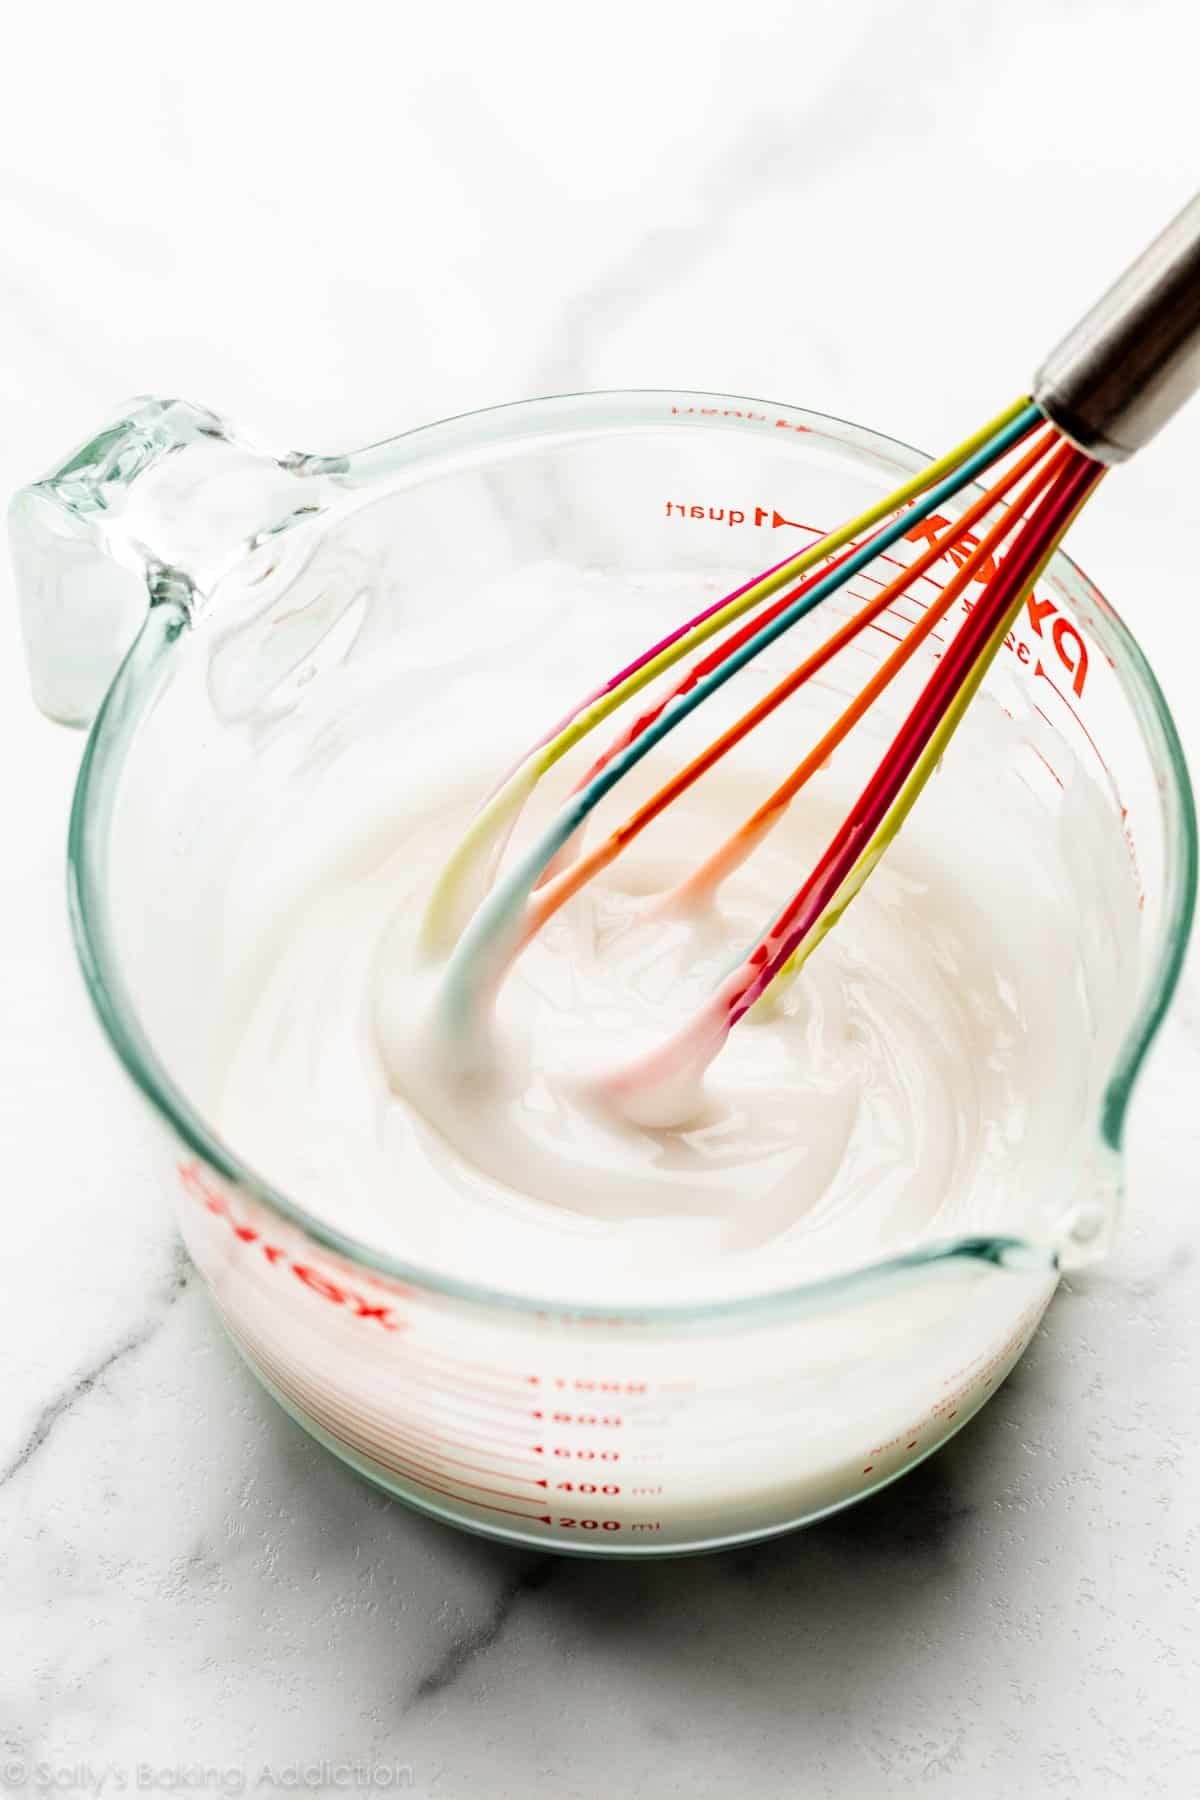
- Make the icing: Using a fork, stir the confectioners’ sugar, vanilla, corn syrup, and 4.5 Tablespoons (67ml) of water, and optional salt together in a medium bowl. It will be very thick and almost impossible to stir. Switch to a whisk and whisk in 1/2 Tablespoon (8ml) more of water. If you lift the whisk and let the icing drizzle back into the bowl, the ribbon of icing will hold shape for a few seconds before melting back into the icing. That is when you know it’s the right consistency and is ready to use. If it’s too thick (sometimes it is), whisk in another 1/2 Tablespoon (8ml) of water or a little more until you reach the proper consistency.
- If you’re tinting the icing another color, stir in the food coloring. You can pour some icing into different bowls if using multiple colors. When tinting icing, use only 1–2 drops at first, stir it in, then add more as needed to reach your desired color. Remember, color darkens as icing dries.
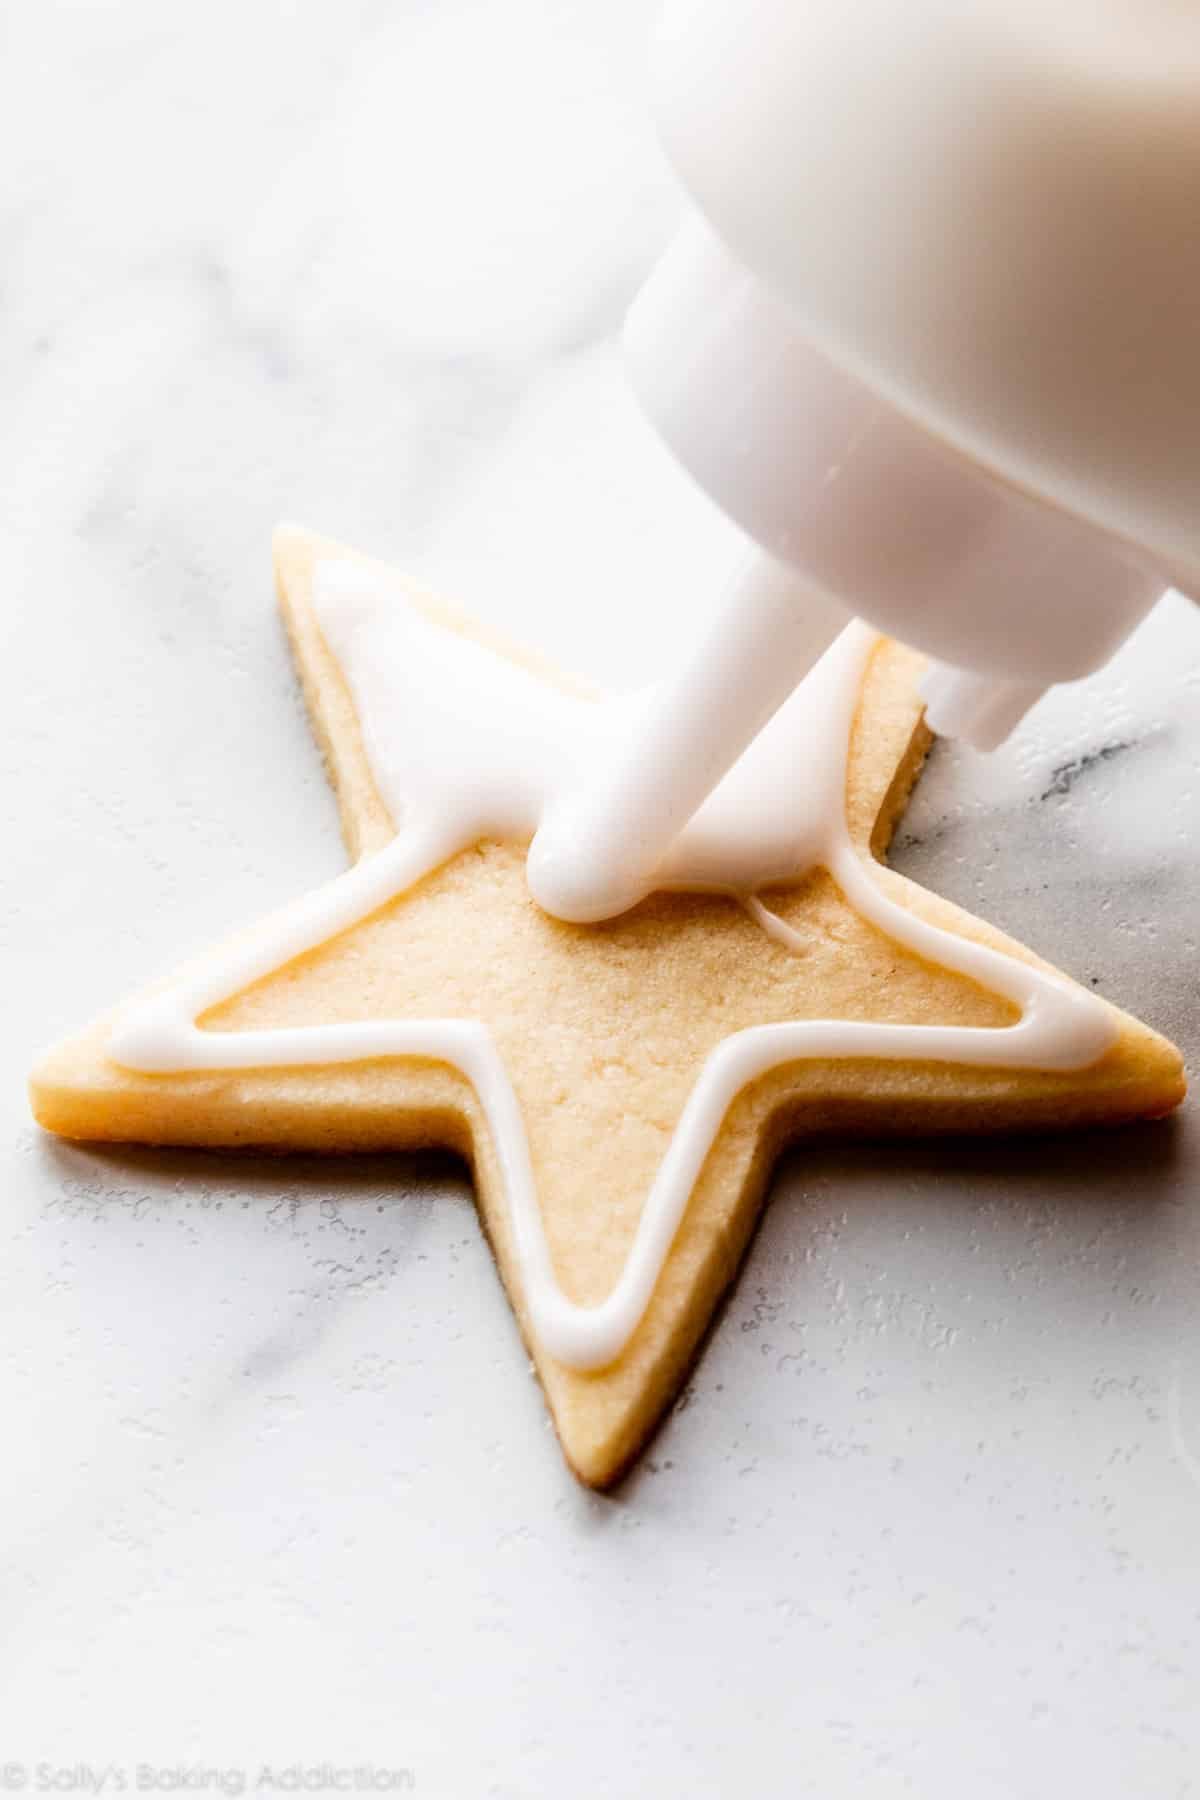
- Decorate the cookies: You can dip the cookies into the icing or use squeeze bottles or piping bags (reusable or disposable) fitted with piping tips (I usually use Wilton Piping Tip #4). Decorate your cookies as desired. If using the squeeze bottles or piping tips, I usually outline cookies with icing first, then fill in the middle. If adding sprinkles on top of the icing, add them right after applying icing on your cookie.
- Let icing dry/set: Feel free to enjoy cookies before icing completely dries. Icing dries in 24 hours. No need to cover the decorated cookies as you wait for the icing to set. If it’s helpful, decorate the cookies directly on a baking sheet so you can place the entire baking sheet in the refrigerator to help slightly speed up the icing setting. Once the icing has dried, these cookies are great for gifting or for sending.
- Cover and store decorated cookies for up to 5 days at room temperature or up to 10 days in the refrigerator.
Notes
- Freezing Instructions: Plain or decorated sugar cookies freeze well up to 3 months. Wait for the icing to set completely before layering between sheets of parchment paper in a freezer-friendly container. To thaw, thaw in the refrigerator or at room temperature. You can also freeze the cookie dough for up to 3 months before rolling it out. Prepare the dough through step 4, divide in half, flatten both halves into a disc as we do with pie crust, wrap each in plastic wrap, then freeze. To thaw, thaw the discs in the refrigerator, then bring to room temperature for about 1 hour. Roll out the dough as directed in step 5, then chill rolled-out dough in the refrigerator for 45 minutes–1 hour before cutting into shapes and baking.
- Make-Ahead Instructions & Storing Icing: If not decorating right away, cover the icing tightly and keep in the refrigerator for up to 2 days. You can store in piping bags (with clips or rubber bands to seal ends), in squeeze bottles, or covered in bowl or container. Bring to room temperature before using. If icing has thickened up, add a few drops of water and mix in to thin out. Depending how you stored the icing (squeeze bottle/piping bag/container or bowl) shake squeeze bottle to mix/massage piping bag to mix/whisk in bowl or container to mix.
- Special Tools (affiliate links): Electric Mixer (Handheld or Stand) | Baking Sheets | Silicone Baking Mats or Parchment Sheets | Rolling Pin or Adjustable Rolling Pin | Holiday Cookie Cutter Set | Cooling Rack | Squeeze Bottle | Piping Bag (Disposable or Reusable) | Americolor Soft Gel Paste Color Kit | Couplers | Wilton Tip #4
- Room Temperature Butter: Room temperature butter is essential. If the dough is too sticky, your butter may have been too soft. Room temperature butter is actually cool to the touch. Room temperature egg is preferred so it’s quickly and evenly mixed into the cookie dough.
- Flavors: I love flavoring this cookie dough with 1/2 teaspoon almond extract as listed in the ingredients above. For lighter flavor, use 1/4 teaspoon. Instead of the almond extract, try using 1 teaspoon of maple extract, coconut extract, lemon extract, or peppermint extract. Or add 1 teaspoon pumpkin pie spice or ground cinnamon. If using lemon extract, you can also add 1 Tablespoon lemon zest.
- Corn Syrup: Corn syrup gives the icing sticking power and creates a beautiful sheen on the dried icing. I don’t recommend skipping it, but you can if absolutely needed.
- Salt: I know salt isn’t a typical ingredient in cookie icing, but it helps offset its sweetness. You need just a small pinch.
- Yield of Icing: This amount of icing is enough for icing 2 dozen cookies. You’ll have plenty if you want to divide it and tint the batch multiple colors, too. Icing can easily be halved by halving all of the ingredients. (Still add a tiny pinch of salt.)
- Be sure to check out my top 5 cookie baking tips AND these are my 10 must-have cookie baking tools.


Reader Comments and Reviews
Any substitute for the almond extract to make this recipe nut-free?
Add a little more vanilla extract in its place.
Hey Sally,
I plan on freezing these (to enjoy with my bridesmaids on my wedding morning!) I see you suggest thawing in th refrigerator. Do you mean the frozen dough or the frozen baked cookies? I normally just let the frozen baked cookies defrost in a plastic baggie on the counter.
Hi Kelly! Both– I always like to thaw in the refrigerator to avoid excess condensation.
Hi Sally
-I’ve made a few of your recipes over the years so when I had to make cut out sugar cookies for my daughter in laws shower I knew exactly what website to go to -yours!
They came out perfect and everyone loved them. thank you !!!
This recipe is wonderful! I am so happy that I found it. I have wanted to bake my own cookies that tasted as good as the ones I buy at local bakery. THANK YOU! These are fun to make and this is a great recipe. The only change we make to it is to TRIPLE the almond…..amazing results. I am sharing this with any who ask. So far, my cookies are a hit. This is a novelty for me since my husband does the majority of the cooking.
Hi Sally, I can’t wait to try these! On icing the entire top of cookie say with a base color, do you use squirt bottle and spread? Thank you
Glenda
I use the squirt bottle to spread it around, yes!
Best cookies ever! Made them for Chanuka with a stained glass dreidel inside. Baked them for my daughter’s class. Voted the tastiest cookies hands down!
I just made these yesterday. I made two batches, and I left out the almond extract because I don’t have any. They turned out so beautifully! I love the icing recipe; it sets perfectly and has a nice glossy sheen to it. Your cookie recipes rock!
Oh my!! These are the BEST cookies! The dough is so easy to put together and to work with. They taste amazing; buttery and not too sweet. They cooked up perfect, just like you said, crispy on the edges with a nice soft middle!! And the icing…oh the icing! It’s the perfect consistency for using a squeeze bottle and yet it sets up firm and glossy so you can stack the cookies or pack and ship them. I’m SOOOO glad I finally found this amazing recipe! Thank you thank you thank you Sally!!
Hello Sally,
I don’t normally comment on the internet and I can’t bake to save my life! This recipe is amazing and the details made me feel like my mom was in the kitchen helping me! (mom passed years ago) My children love the cookies! Thanks for helping me make beautiful and delicious Christmas cookies! I feel like super mom!
Can you refrigerate the dough for days? Or just up to one day only?
I’ve actually refrigerated it for 2 days, but made sure that it was covered with another piece of parchment paper. And the cookies were fine!
I am making these cookies tonight and the dough is currently chilling in my fridge! I am so excited, I have always liked baking but I really never did it until i found your recipe for cake batter chocolate chip. You’re recipes are always easy to follow, very descriptive (which is so helpful) and always turn out soooo good. Thank you!
I made these cookies exactly as you stated and they came out perfect!! I used a squirt bottle as you suggested and the frosting doesn’t look like it was sloppily put on. I’ll be making another batch of these before Christmas. Thanks for the recipe 🙂
Hands down the best sugar cookie recipe I’ve found!! I love them, hubby/kids love them, and everyone else who tries them!! I think people invite me to their Christmas parties just because they know I’m bringing a batch of these bad boys lol!! I love the icing as is but this time I added a hint of lemon extract in the icing and it was really good! Thanks so Much for this recipe! ☺☺
Hi Sally! I love all of your recipes! Have you ever tried writing with this icing? I’d like to make these into place cards for Christmas but not sure the icing will work well for that. Any idea? Thanks!!
It doesn’t write very well if I’m being honest. Best to use a traditional royal icing.
Hi Sally, I wanted to share my experience in making these. I chilled my rolled-out dough overnight in the fridge, just as described in the recipe, and laid a piece of parchment paper on the top piece. When it came time to remove these from the fridge & begin using cookie cutters, the parchment papers were badly stuck to the dough. It wouldn’t have been a problem if the two dough slabs weren’t stacked, as I could have just turned a slab over and peeled off the paper. But this way, the hardened dough prevented me from being able to separate the layers. I ended up needing to tear apart the top layer and re-roll. Not the end of the world but sorta defeated the purpose of chilling. Maybe I needed to leave them sitting out for a little after removing them from the fridge? At any rate, these came out really nicely despite the momentary frustration. I discovered I’d prefer to roll them a bit thicker than I did.
A question: is this the type of recipe where one could add cornstarch for a softer cookie? Or would that change the texture or flavor too much?
Thanks again for a delicious recipe–my first time making scratch sugar cookies.
Hi Trixie! Thanks so much for your feedback. For the cornstarch– this is a precise amount of flour (dry) to butter (wet) BUT 1 teaspoon of cornstarch should be OK if you’re looking for a slightly softer cookie.
Oh my goodness! These look absolutely amazing. There’s this bakery near me that makes amazing sugar cookies….but I bet yours tastes better 🙂 Anyway, I’m allergic to almonds so I was wondering if there’s some substitute to the almond extract or if I could just leave it out altogether?
You can just leave it out or add more vanilla in its place. Enjoy!
I made this recipe a few weeks ago for the first time and they were a hit at a fundraiser/bake sale! The chilling is absolutely necessary and helps the cookies hold their shape so well, and the icing is beautiful. I cannot wait to make them again for Christmas! I’ll definitely double the recipe.
Hey Sally!!!
I was wondering if I could leave out the almond extract because it overpowers the taste sometimes in other cookies I’ve tried, will this happen?
Thank you!!!
It’s not overpowering in these at all! But you can always leave it out if you’d prefer.
Hi Sally! Just wondering if there is a way I could speed up the setting time for the icing? Thanks!
Hi Cara! I find the BEST way to speed up the time is to simply use a royal icing instead. Or you can set the cookies in the refrigerator, which helps speed it up 🙂
Hey Sally! These cookies look very wonderful and I was wondering, if I leave out the icing because my family aren’t huge fans of it, should i add more sugar to the cookie dough?
They’re sweet even without the icing 🙂
Hi, Sally!!
Your step-by-step were so helpful!! Can you tell me, how long does the cookie glaze take to dry?
Glad it helped! Overnight – 24 hours to completely dry.
Hi Sally! I made your sugar cookies and they are wonderful!! I just wanted to ask about icing and storage. If I ice the cookies this evening (Friday) for a party on Sunday. I will let them dry overnight, then what is the best way to store them until Sunday? Should they be stored on tje fridge?
Thank you
Glad you love them, Bonnie! Store at room temperature for a day or so– they’re just fine on the counter for that long.
Your directions were SO helpful — chilling these discs in the exact width for cutting into shapes is absolutely brilliant. Also, your icing recipe is superior — I tried to make yours and another website’s side-by-side and there wasn’t any question! It was especially easy to decorate by filling reusuable squeeze bottles. Thank you for another wonderful cookie recipe! I always look forward to trying your cookie recipes.
Thank you so much for this cookie recipe. I made them a couple days ahead for my sons 1st birthday. I froze them and then decorated them with your icing recipe a day before the party. So simple and everyone loved them. The only problem I had was that there were no leftovers for me. Thanks again and I will be making these cookies for Christmas. I sent you the url image of them. Not sure if you can see them.
Hi Sally,
I wanted to thank you for this wonderful recipe. I made christmas themed sugar cookies in december using this recipe and absolutely LOVED them!! I made some again yesterday but valentines themed this time to send to my brother. I cannot get over how delicious these cookies are!! I follow the recipe to a T & they always come out perfect! And not only do they taste great but they hold their shape SO well….. I’m not a huge almond extract fan but here its just the perfect amount to give them that extra something…. The icing is fantastic as well. It sets up beautifully… I I haven’t colored mine, i just leave it white & use various sprinkles/colored sugars/ etc to decorate. These will be made often in my kitchen!! Thanks again!!
Made this recipe today, and the cookies turned out just fabulous! They were so soft, the perfect thickness and by far the best sugar cookies I’ve made. Thanks for the great recipe Sally 🙂
I used the recipe and it was GREAT. Thanks for all the great tips. My family had a good time decorating cookies.
Great recipe! I was looking for a sugar cookie recipe that was easy to make, roll out and tasted great. This was exactly that! I have pinned this recipe and I’m sure I’ll sure I’ll use it many more times.
I tried this recipe for the first time over the weekend. The cookies came out great! I didn’t have any almond extract, so I substituted amaretto instead.
Sally, I’ve tried several of your recipes and they’ve all been a success! A great big THANK YOU 🙂
I do have some quick questions though on this particular recipe. Here they go-
1. How do you roll out the dough to a 1/4″ thick? I rolled the dough but noticed that the ends were thinner. Any tips?
2. After cutting out the cookies and reworking the dough to recut I noticed the dough began to get soft. Should I re-chill the dough and place my cookies back into the refrigerator?
3. Lastly, do you recommend re-chilling the cookies for a bit right before placing them into the oven to hold a crisp shape?
Thank you in advance!
Hi Phyllis– (1) roll the dough out slowly with a rolling pin. If the edges are a little thinner, that’s fine. Just don’t cut the thin parts into the cookie cutter shapes and use that excess dough (the scraps) to re-roll. (2) yep, chill the dough if you notice it becoming soft. (3) I don’t find it necessary to re-chill the cut out cookie dough shapes before baking unless they have become extremely soft.