

These festive Easter cookies are soft and buttery with hints of vanilla and almond. Pretty in pastel shades, they’re topped with my favorite royal icing and decorated to look like Easter eggs, PEEPS-inspired bunnies with marshmallow tails, and carrots. For simpler designs, like on the bunnies and carrots, you can use my easy glaze cookie icing. Gorgeous on a plate and quick to disappear, these springtime treats are eggs-tra special. See what I did there? 😉
One reader, Casey, commented: “This is the absolute BEST sugar cookie recipe I have ever tried, and I’ve tried plenty! The cookies taste delicious, the dough is easy to work with, and the cookies actually hold their shape when baked. I also used the royal icing recipe to decorate my Easter cookies, and it was easy to pipe. ★★★★★“

For today’s Easter cookies, I use my classic sugar cookies recipe. No surprise there, because it’s one of the most popular recipes on my website! It’s loved by many, and certainly one to keep in your back pocket along with my recipes for chocolate chip cookies and pie crust. If you enjoying using it to make Easter cookies, bring it back out in the summer time for fireworks cookies! Or see my full tutorial for how to decorate sugar cookies for even more inspiration. 🙂
(If you prefer a soft and almost creamier-style sugar cookie, you can take today’s decorating inspiration and use it on my cream cheese cut-out cookies with Nutella glaze.)
So Much to Love About These Easter Cookies
- Texture: If you keep the rolled-out dough thick enough, you’ll be rewarded with extra soft and thick sugar cookie centers. The edges are nice and crisp, and the royal icing on top adds a textural contrast as well.
- Flavor: Sweet, vanilla- and almond-hinted, and irresistibly buttery.
- Ease: The dough is surprisingly easy to put together, but if you want the cookies to look like the photos here, you’ll need a few decorating tools. See the full list of Recommended Tools below.
- Time: I recommend setting aside an afternoon for making and decorating these Easter cookies. It’s typically 4 hours from start to finish, depending on the level of decorating detail you want. There’s plenty of hands-off time if you want to make another one of my spring dessert recipes!

Overview: How to Make Easter Cookies
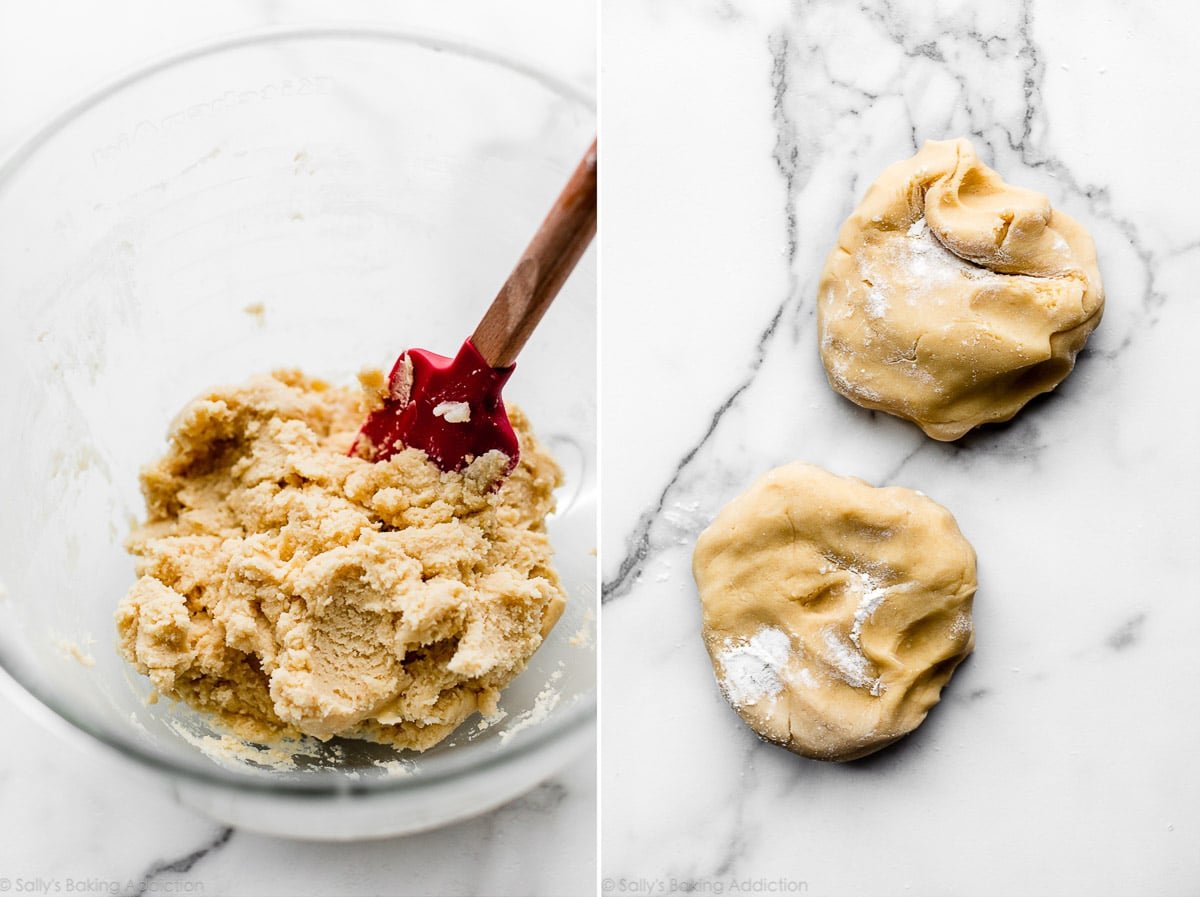
- Make cookie dough. You need 7–8 ingredients for the dough. With so few ingredients, it’s important that you follow the recipe closely. Creamed butter and sugar provide the base of the cookie dough. Egg is the cookie’s structure and vanilla extract adds flavor. I almost always add a touch of almond extract for additional flavor. Flour is an obvious ingredient, baking powder adds a little lift, and salt balances the sweet.
- Divide in 2 pieces. Smaller sections of dough are easier to roll out.
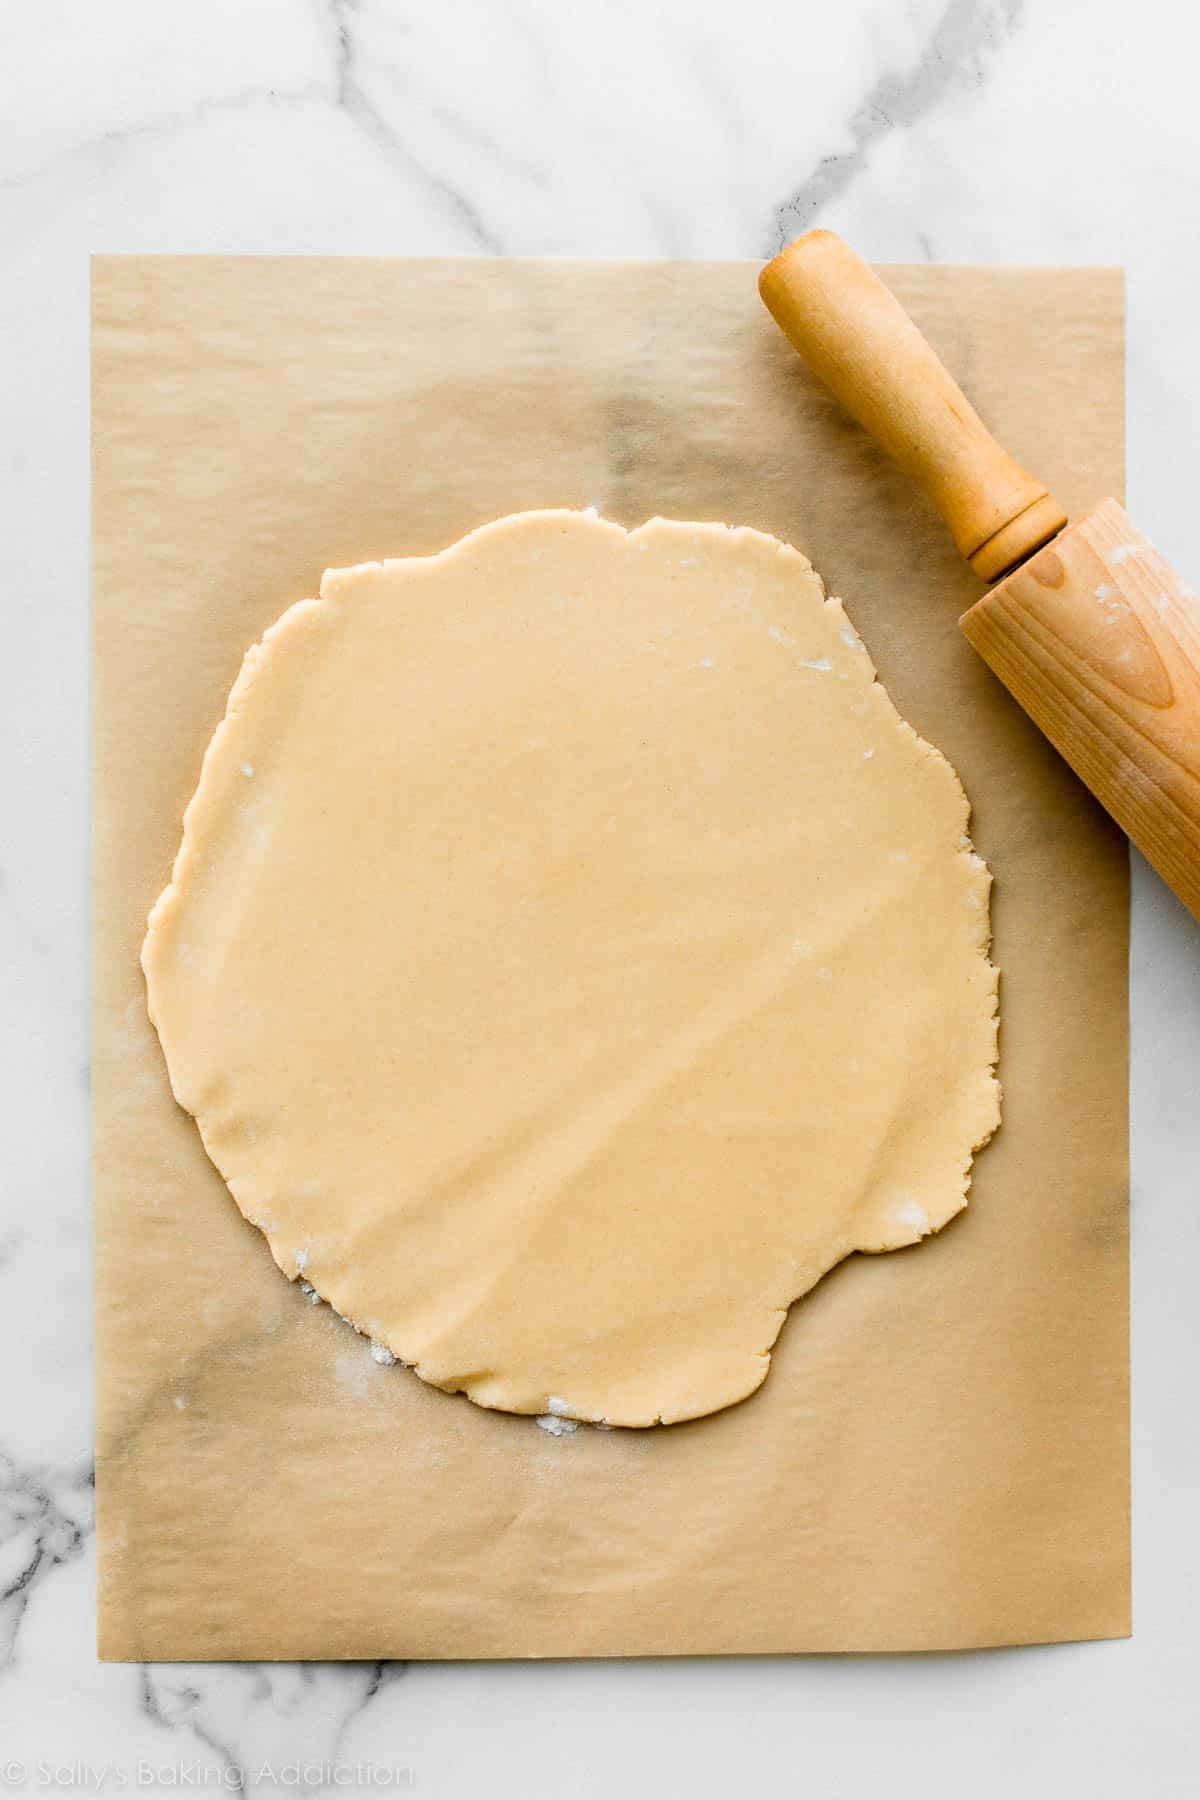
- Roll out cookie dough. Roll it out to 1/4-inch thickness. If you have difficulty evenly rolling out dough, try this adjustable rolling pin. It’s really helpful!
- Chill rolled-out cookie dough. Without chilling, these cookie cutter cookies won’t hold their shape. Chill the rolled-out cookie dough for at least 2 hours and up to 2 days.
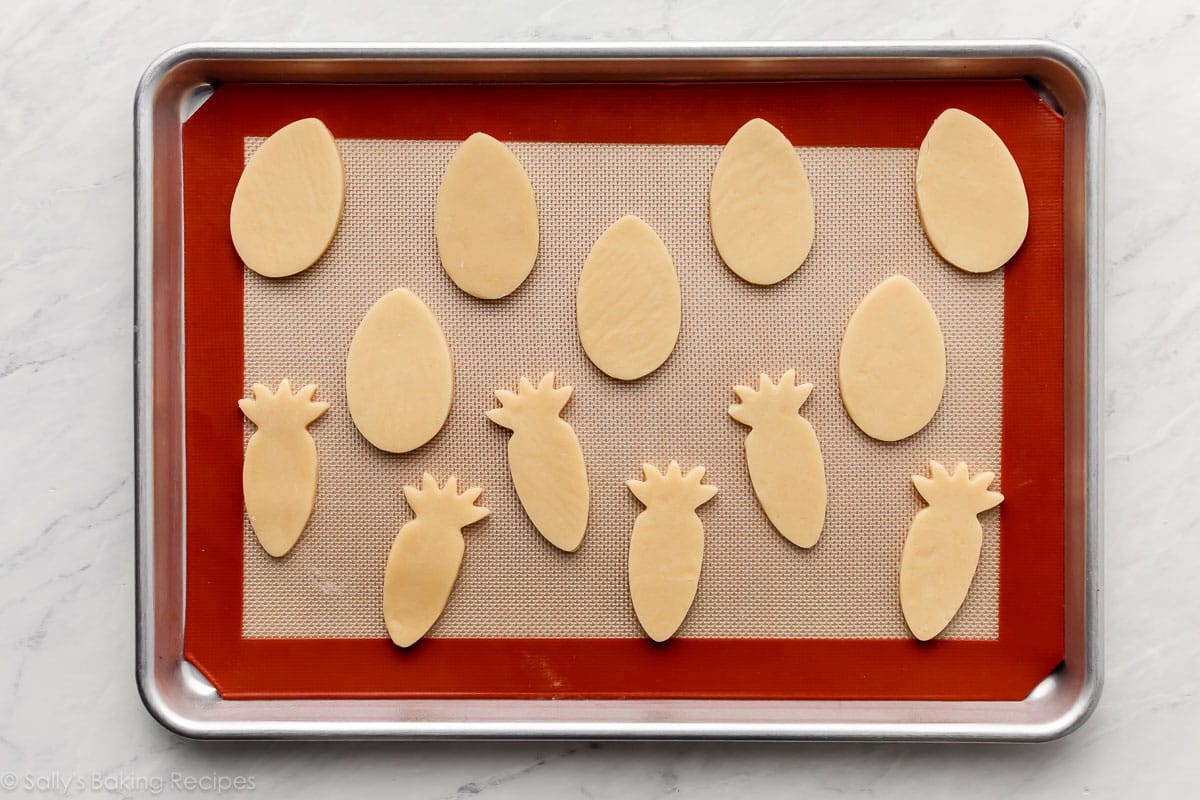
- Cut into shapes. If you need suggestions for cookie cutters, I love Ann Clark brand. (Not sponsored, just a genuine fan!) For the cookies pictured here, I used an egg cookie cutter, bunny cookie cutters, and the carrot from this set. That set includes an egg and a bunny, plus other Easter- and spring-themed shapes.
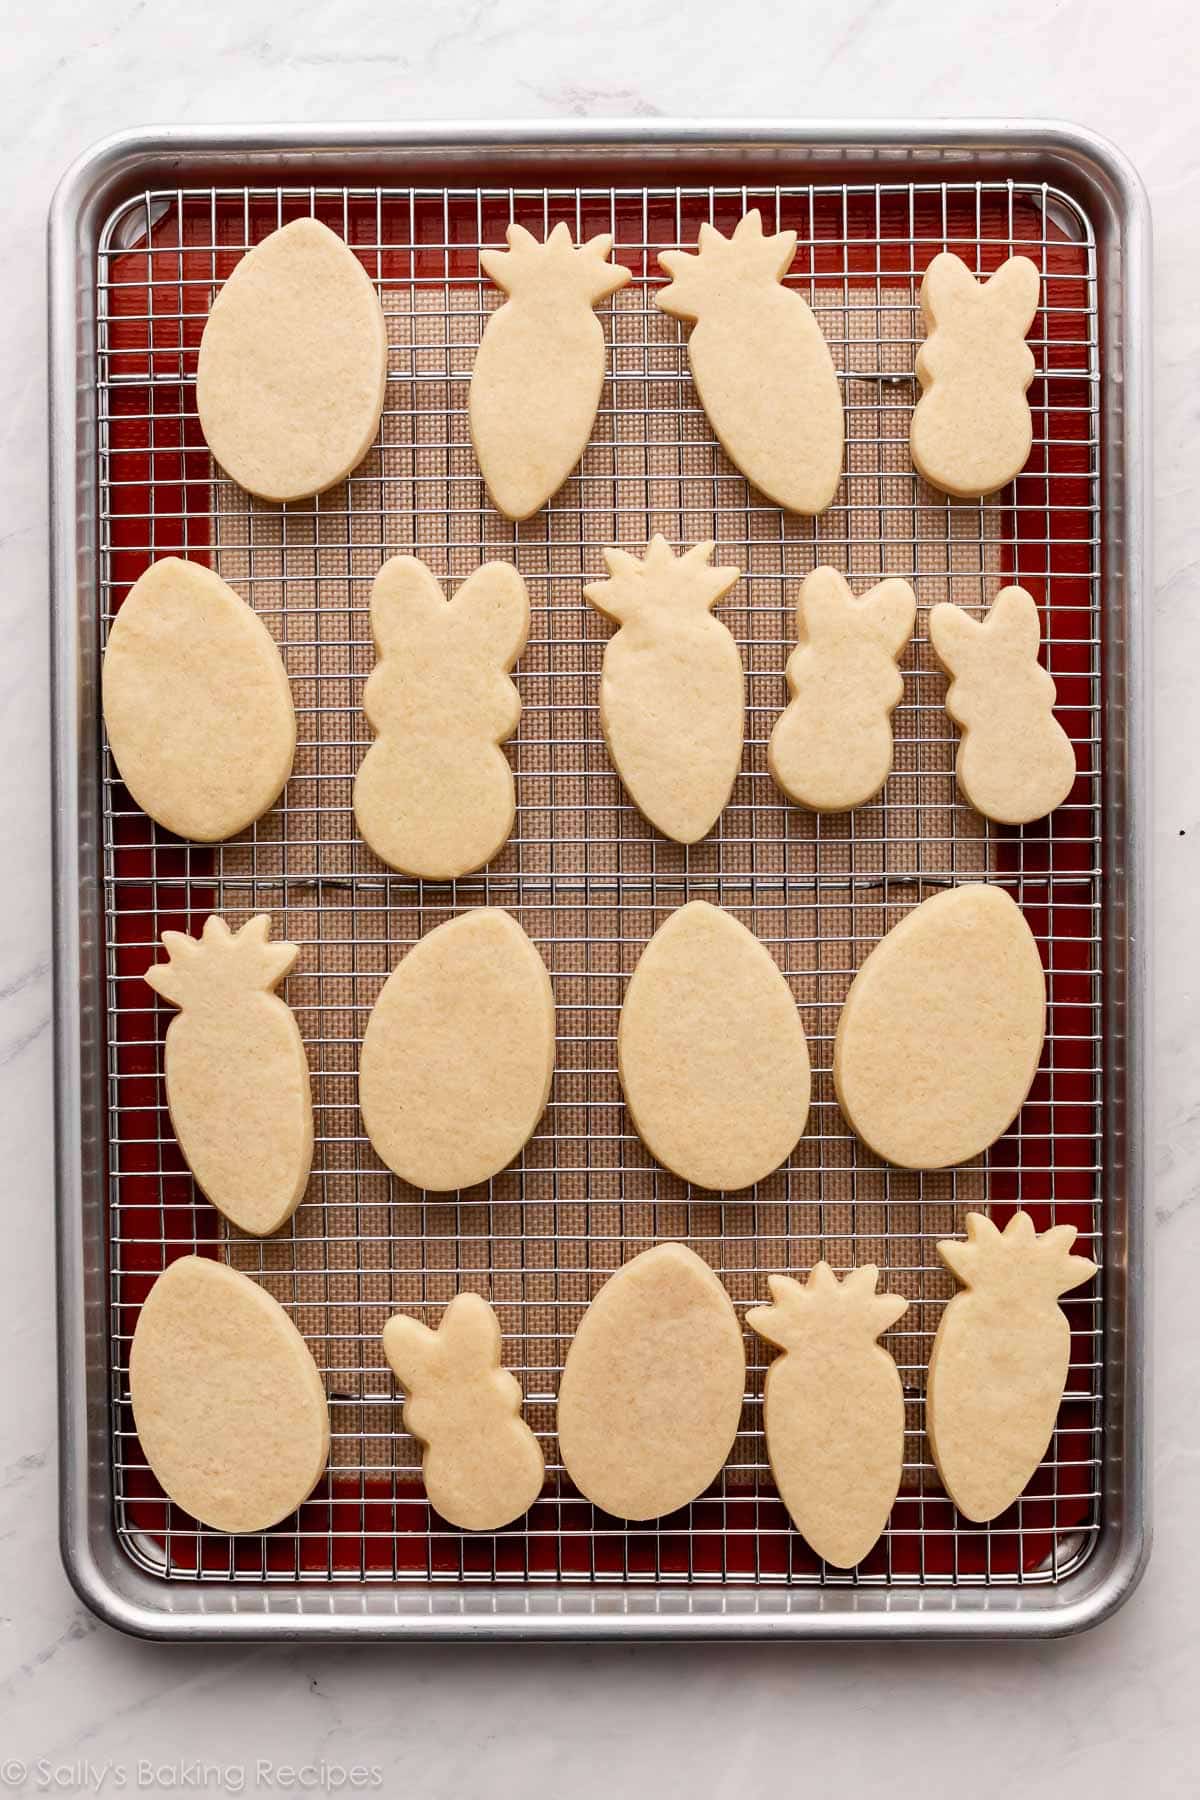
- Bake & cool. Depending on size, the cookies need about 12 minutes in the oven.
- Decorate. More on the icing below.
The Trick Is the Order of Steps
Notice how I roll out the dough BEFORE chilling it in the refrigerator?
Let me explain why I do this. Just like when you’re making, say, double chocolate chip cookies, to prevent them from over-spreading, the cookie dough must chill in the refrigerator. For today’s Easter cookies, roll out the dough right after you make it, then chill the rolled-out dough. (Because at this point the dough is too soft to cut into shapes.) Don’t chill the cookie dough and then try to roll it out because it will be too cold and hard. I divide the dough in half before rolling it out, and highly recommend you do the same. Smaller sections of dough are simply more manageable.
Here’s another trick! Roll out the cookie dough directly on silicone baking mats or parchment paper sheets so you can easily transfer it to the refrigerator. Pick the whole thing up, set it on a baking sheet, and place it in the refrigerator. If you don’t have enough room for 2 baking sheets in your refrigerator, you can stack the pieces of rolled-out dough on top of each other (with parchment or baking mat in between).
The cookies stay soft for days, so if you want to save time, these are an excellent make-ahead Easter dessert option because you won’t lose any deliciousness. Keep them in an airtight container at room temperature until ready to decorate.
Choose Your Icing
I link to 2 icing options in the written recipe below. You can use either icing on today’s Easter cookies, and it just depends on the look you’re going for. (And how much effort you want to put in!)
- Choose royal icing if you want precise decorative detail on your cookies, particularly the Easter egg cookies in these photos. It’s actually my preferred sugar cookie icing because it’s easy to use, dries in a couple of hours, and doesn’t have a texture comparable to hardened cement. It’s actually on the softer side, with a little crisp to it! It calls for meringue powder, which is a specialty ingredient but is more readily available these days. You can find it in some grocery store baking aisles, most craft stores that have a baking section, or you can shop for meringue powder online.
- Choose easy cookie icing if you’re going for a more simple design, such as the pictured bunnies and carrots. You could *probably* use this for the detail on the Easter egg sugar cookies, but the detail won’t be as sharp. I usually go for this icing if I’m decorating with young bakers, or if I don’t feel like using my electric mixer. It has a glaze consistency, and takes longer to dry than the royal icing: about 24 hours.
On today’s pictured cookies, I used royal icing. If you want to skip both the cookie cutters and the icing, try these Jelly Bean sugar cookies instead
Again, use royal icing for clean details on the Easter egg-shaped cookies. Divide the batch of royal icing up into a few bowls, and use gel food coloring to tint the icing different colors. I use Wilton round icing tip #4 for outlining and flooding, then let that layer dry completely. I usually place the decorated cookies on a baking sheet (or I decorate them directly on the baking sheet), make some room in the refrigerator, and stick the pan inside. The icing will set in about 30 minutes.

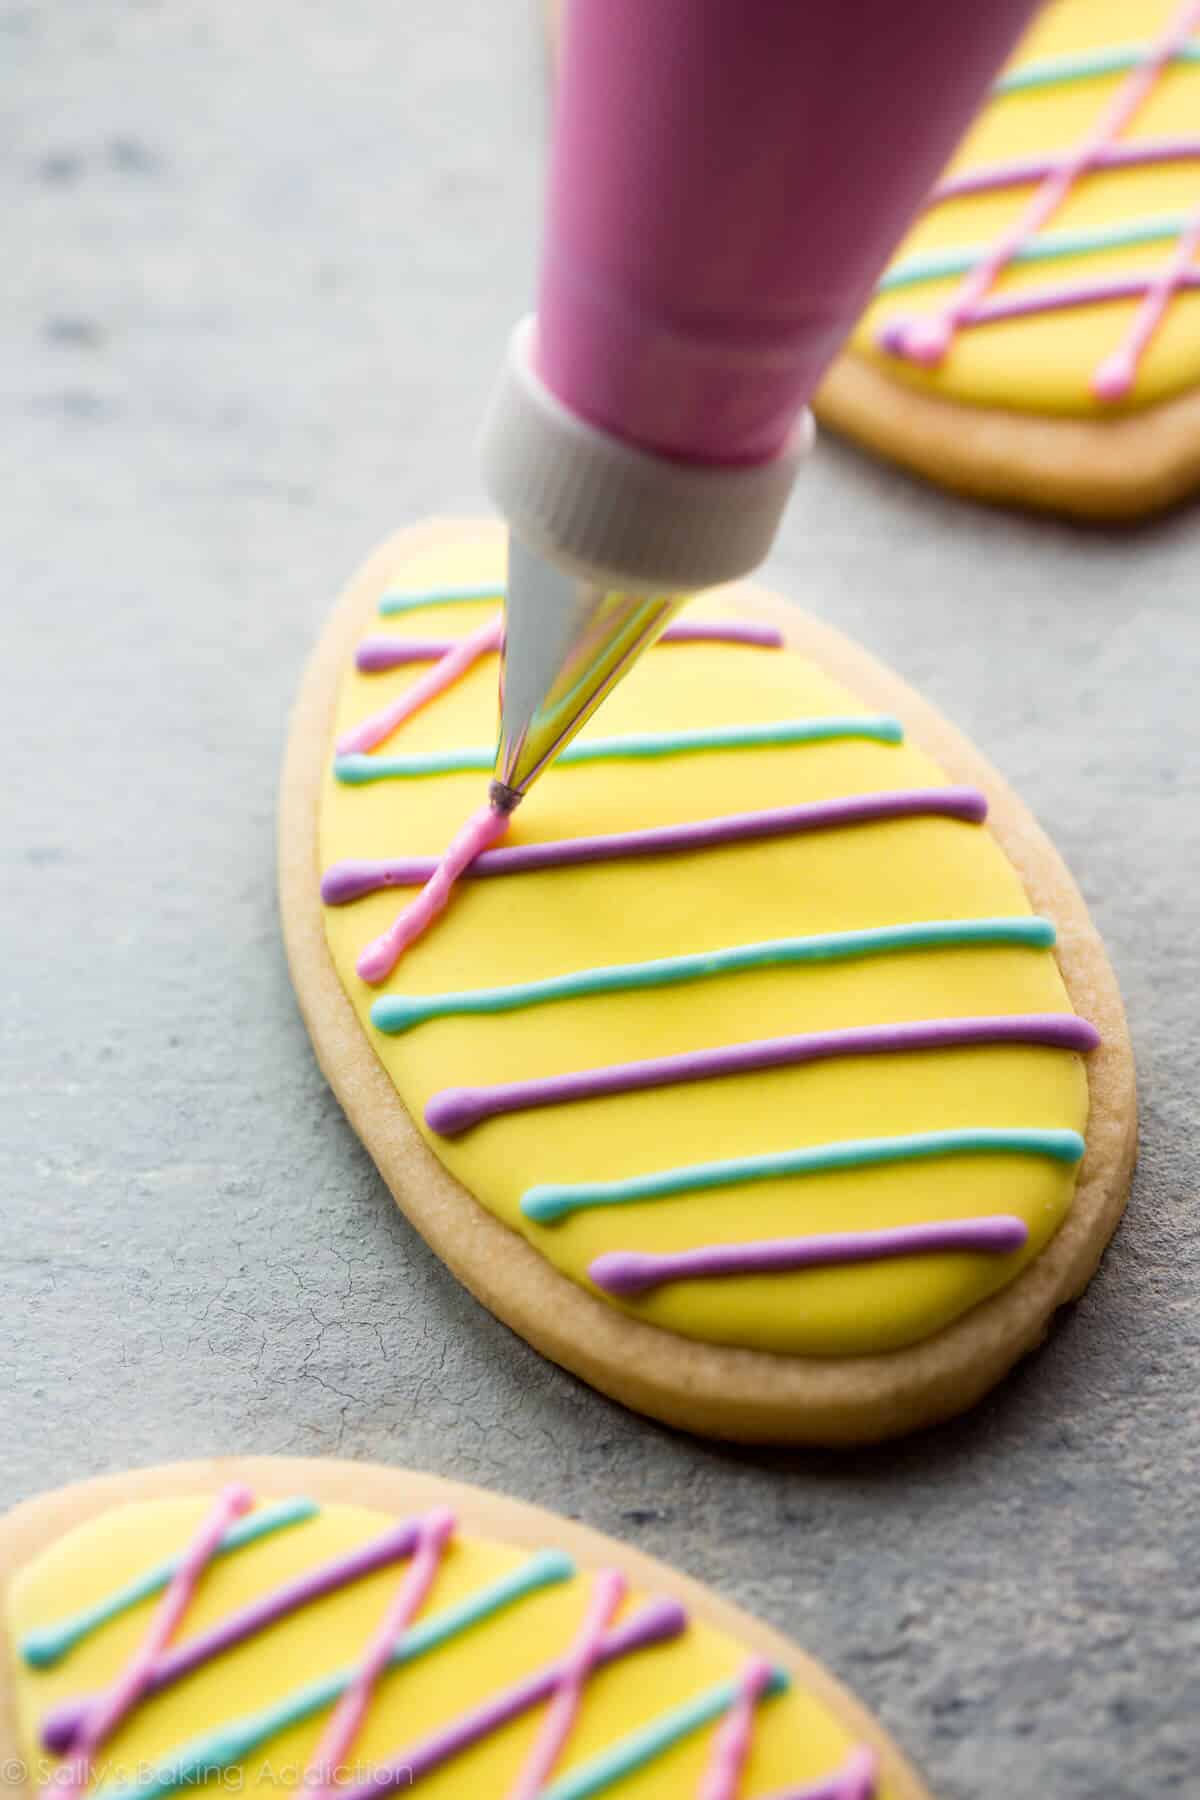
Then I use Wilton icing tip #2 or icing tip #1 for the lines and dots. This is what we use to create the thin lines on fireworks cookies too.
Or use glaze-style cookie icing for a simple decoration. This works on simply decorated cookies such as these Christmas sugar cookies and would work wonderfully on the bunnies and carrots in today’s photos. (You could, of course, use royal icing for the bunnies and carrots instead.)
For the bunnies, I kept the icing white and added sanding sugar sprinkles on top while the icing was wet, then cut a mini marshmallow in half for the tail. For the carrots, I kept the icing white for the stems and added green sanding sugar. Then I tinted some of the icing orange for the carrot itself.

For the bunnies, you could even skip the marshmallow tails and use some melted chocolate or brown icing to add eyes and a nose. So cute!

Stack, wrap, gift, and/or store: Once the icing layers have set, you can stack, wrap, gift, ship, and/or store these Easter cookies for a week. Can you believe that some of the cookies in these pictures are 3 weeks old? I froze them, let them thaw on the counter, and snapped a picture before I set them out for serving. There’s a little bit of a texture difference between frozen and thawed icing and freshly made icing (both icings taste a *bit* harder after freezing), but no one ever seems to mind… or notice.
Recommended Tools for Your Easter Cookies
- Handheld or Stand Mixer
- Rolling Pin or this Adjustable Rolling Pin
- Baking Sheets
- Silicone Baking Mats or Parchment Sheets
- Cookie Cutters: I used an egg cookie cutter, bunny cookie cutters, and the carrot from this set. That set includes an egg and a bunny, plus other Easter- and spring-themed shapes.
- Americolor Soft Gel Paste Color Kit: In my experience, this is the BEST coloring for royal icing and simple glaze cookie icing. The colors are always so rich and vivid. You only need a teeny drip for the pastel colors in today’s cookies. So these colors will last you a very long time! I used the sky blue, lemon yellow, violet, and fuchsia. And I used the orange for the carrots.
- Piping Tips/Squeeze Bottle: If you’re using piping bags and icing tips, I recommend Wilton icing tip #4 for outlining and flooding your cookies. For precise detail, such as the dots and lines on the Easter egg cookies, use icing tip #2 or icing tip #1. If you’re not piping intricate details on your cookies, you can use a squeeze bottle instead of piping bags and icing tips. A bottle is less intimidating than piping tips, and very easy for young bakers to use. I don’t recommend a squeeze bottle if you want sharp icing detail, though.
- Disposable or reusable piping bags: You can use these for either icing, along with your icing tips.
- Coupler(s): If you only have 1 piping tip and want to decorate with multiple colors of icing, keep the tip on the outside of the bag by using a coupler so you can easily transfer the piping tip to other bags of colored icing.
- Sanding Sugar Sprinkles: These are sold in most grocery stores in the baking aisle. You can also order them online. I like Wilton or CK Products brands. I use these on the pictured bunnies and carrot cookies.
For even more recommendations, see this full list of my favorite cookie decorating supplies.


You’ll also enjoy my buttercream egg candies or peanut butter eggs. And hop on over to my Easter recipes section, Easter brunch recipes post, or Easter dessert recipes post if you need more delicious ideas. 🙂
Print
Easter Cookies (Decorated & Festive)
- Prep Time: 2 hours, 30 minutes
- Cook Time: 12 minutes
- Total Time: 4 hours, 45 minutes (includes cooling)
- Yield: 24 3-4 inch cookies
- Category: Cookies
- Method: Baking
- Cuisine: American
Description
These festive Easter cookies are soft and buttery with hints of vanilla and almond. Pretty in pastel shades, they’re topped with my favorite royal icing and decorated like Easter eggs, PEEPS-inspired bunnies with marshmallow tails, and simple carrots. For simpler designs, like on the bunnies and carrots, you can use my easy glaze cookie icing.
Ingredients
- 2 and 1/4 cups (281g) all-purpose flour (spooned & leveled), plus more as needed for rolling and work surface
- 1/2 teaspoon baking powder
- 1/4 teaspoon salt
- 3/4 cup (12 Tbsp; 170g) unsalted butter, softened to room temperature
- 3/4 cup (150g) granulated sugar
- 1 large egg, at room temperature
- 2 teaspoons pure vanilla extract
- 1/2 teaspoon almond extract (optional, but makes the flavor outstanding)*
For Decorating
- royal icing or easy cookie glaze icing (see blog post above to read about each)
- gel food coloring
- sanding sugar sprinkles
- mini marshmallows, halved (for bunny tails)
Instructions
- Whisk the flour, baking powder, and salt together in a medium bowl. Set aside.
- In a large bowl using a handheld or a stand mixer fitted with a paddle attachment, beat the butter and sugar together on high speed until completely smooth and creamy, about 3 minutes. (Here’s a helpful tutorial if you need guidance on how to cream butter and sugar.) Add the egg, vanilla, and almond extract (if using) and beat on high speed until combined, about 1 minute. Scrape down the sides and up the bottom of the bowl and beat again as needed to combine.
- Add the dry ingredients to the wet ingredients and mix on low speed until combined. Dough will be a bit soft. If the dough seems too soft and sticky for rolling, add 1 more Tablespoon of flour.
- Divide the dough into 2 equal parts. Place each portion onto a piece of lightly floured parchment paper or a lightly floured silicone baking mat. With a lightly floured rolling pin, roll the dough out to about 1/4-inch thickness. Use more flour if the dough seems too sticky. The rolled-out dough can be any shape, as long as it is evenly 1/4-inch thick.
- Lightly dust one of the rolled-out dough portions with flour. Place a piece of parchment paper on top. (This prevents sticking.) Place the 2nd rolled-out dough on top. Cover with plastic wrap or aluminum foil, then refrigerate for at least 1–2 hours and up to 2 days.
- Once chilled, preheat oven to 350°F (177°C). Line 2 or 3 large baking sheets with parchment paper or silicone baking mats. Carefully remove the top dough piece from the refrigerator. If it’s sticking to the bottom, run your hand under it to help remove it. Using a cookie cutter, cut the dough into shapes. I used an egg cookie cutter, bunny cookie cutters, and the carrot from this set.
- Re-roll the remaining dough and continue cutting until all is used. Repeat with 2nd piece of dough. (Note: It doesn’t seem like a lot of dough, but you get a lot of cookies from the dough scraps you re-roll.)
- Arrange cookies on baking sheets 3 inches apart. Bake for 11–12 minutes or until lightly browned around the edges. If your oven has hot spots, rotate the baking sheets halfway through bake time. Allow cookies to cool on the baking sheet for 5 minutes, then transfer to a wire rack to cool completely before decorating.
- Decorate: Prepare royal icing or cookie glaze icing. If you’re using royal icing, it’s best to use piping bags and tips. If you’re using the cookie glaze icing, you can use a squeeze bottle or piping bags/tips. Keep in mind that if you want sharp design detail on the Easter eggs, it’s best to use royal icing and piping bags/tips.
- For the carrots and bunnies: Keep most of the icing white for the bunnies and carrot tops, and tint some orange for the carrots. Using icing tip #4 or a squeeze bottle, outline and flood the bunnies and the carrot tops with white icing. Immediately top with sanding sugar sprinkles. And, for the bunnies, add a halved marshmallow “tail” while the icing is still wet. If making the carrot cookies, outline and flood the orange icing after applying the green sprinkles on the carrot tops. Allow icing to set. No need to cover the decorated cookies as you wait for the icing to set. If it’s helpful, decorate the cookies directly on a baking sheet so you can place the entire baking sheet in the refrigerator to help speed up the icing setting. Royal icing sets within about 2 hours, and cookie glaze icing sets in about 24 hours.
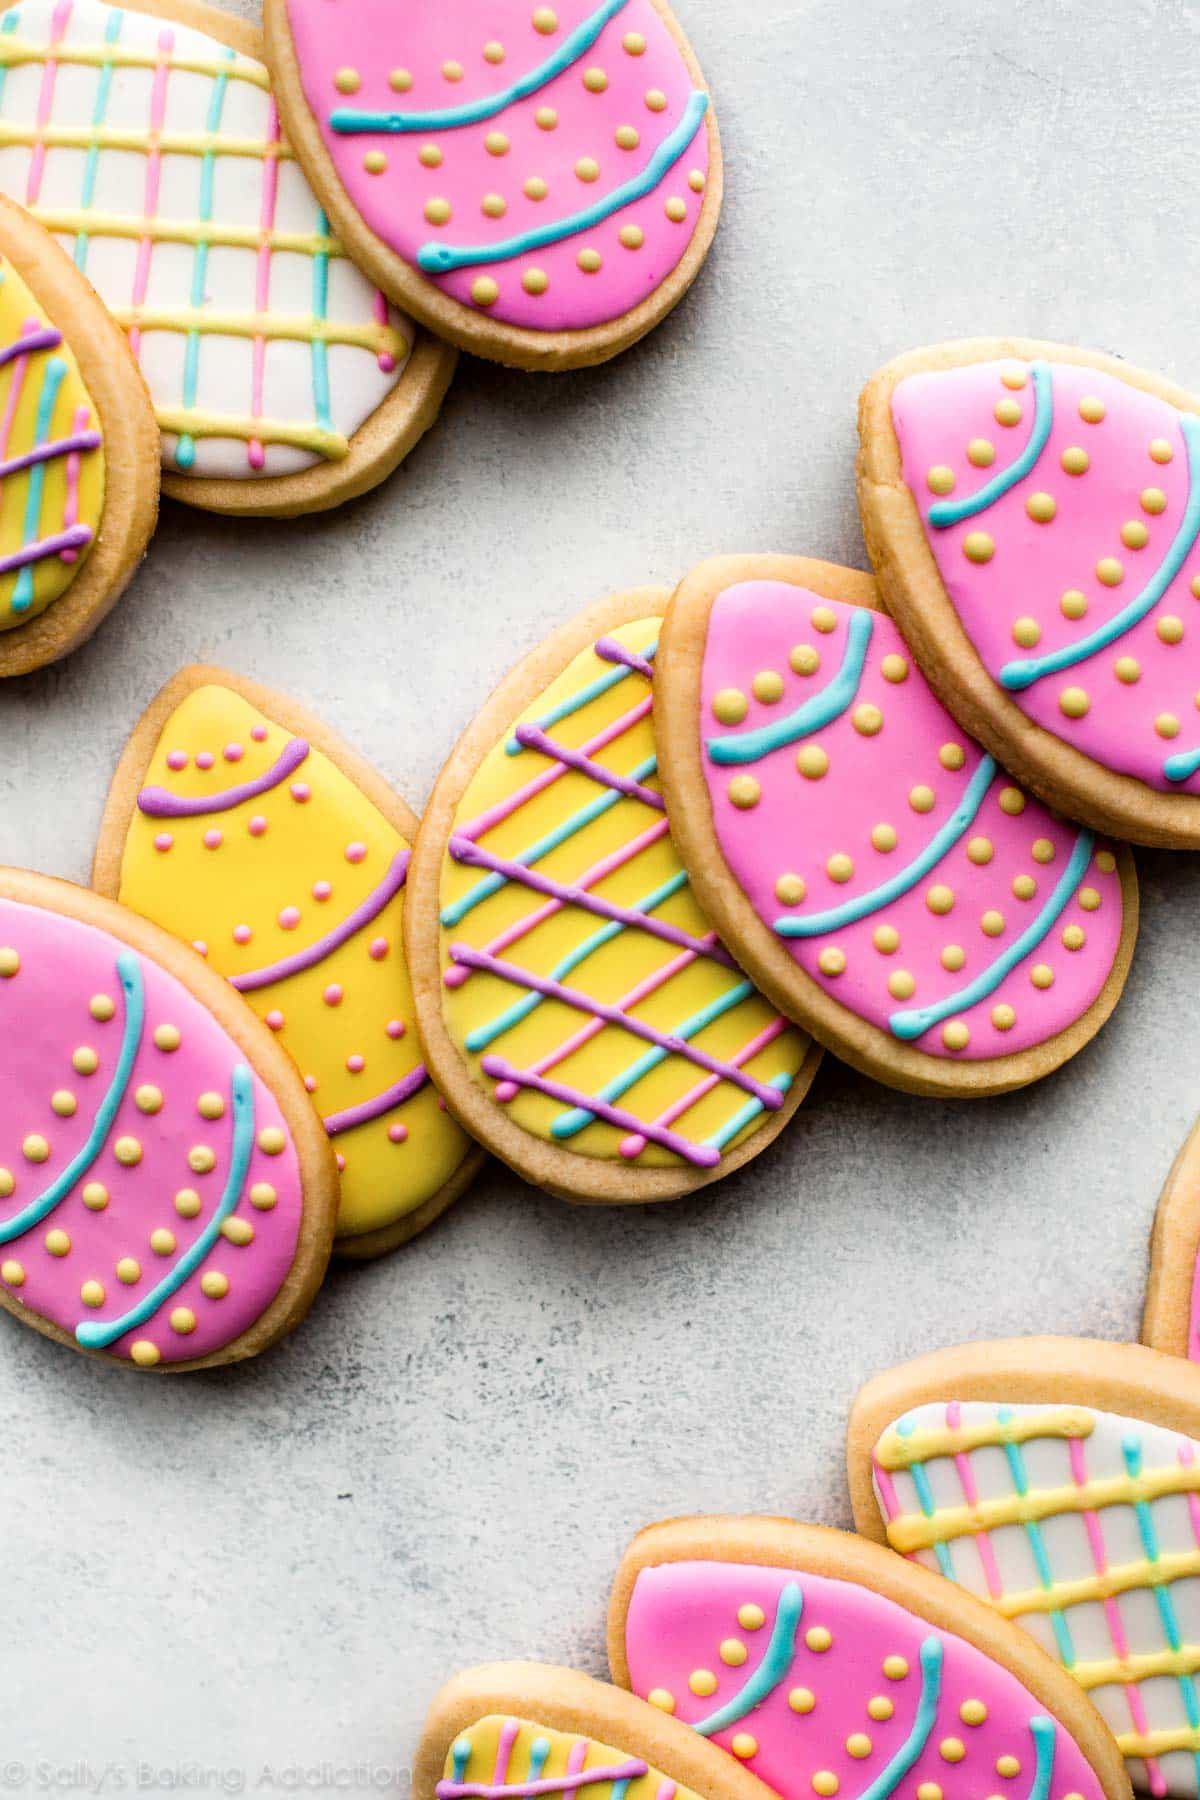
- For the Easter eggs: Divide icing up among a few bowls. I used 4 colors: sky blue, lemon yellow, violet, and fuchsia. I left some icing white. Using icing tip #4, outline and flood with your base color(s). Allow icing to set (I place the cookies in the refrigerator so the icing sets in about 30 minutes). Using piping tip #2 or piping tip #1, add decorative designs in different colors like polka dots, squiggles, plaid, or stripes. Allow icing to set. No need to cover the decorated cookies as you wait for the icing to set. If it’s helpful, decorate the cookies directly on a baking sheet so you can place the entire baking sheet in the refrigerator to help speed up the icing setting. Royal icing sets within about 2 hours.
- Enjoy cookies right away or wait until the icing sets to serve them. Once the icing has set, these cookies are great for gifting or for sending. Plain or decorated cookies stay soft for about 5 days when covered tightly at room temperature. For longer storage, cover and refrigerate for up to 10 days.
Notes
- Freezing Instructions: Plain or decorated sugar cookies freeze well up to 3 months. Wait for the icing to set completely before layering between sheets of parchment paper in a freezer-friendly container. To thaw, thaw in the refrigerator or at room temperature. You can also freeze the cookie dough for up to 3 months before rolling it out. Prepare the dough through step 3, divide in half, flatten both halves into discs as we do with pie crust, wrap each in plastic wrap, then freeze. To thaw, thaw the discs in the refrigerator, then bring to room temperature for about 1 hour. Roll out the dough as directed in step 4, then chill rolled-out dough in the refrigerator for 45 minutes to 1 hour before cutting into shapes and baking.
- Special Tools (affiliate links): Electric Mixer (Handheld or Stand Mixer) | Rolling Pin or Adjustable Rolling Pin | Baking Sheets | Silicone Baking Mats or Parchment Sheets | Cookie Cutters (I used an egg cookie cutter, bunny cookie cutters, and the carrot from this set) | Cooling Rack | Americolor Soft Gel Paste Color Kit | Wilton Icing Tip #4 for outlining and flooding | Wilton Icing Tip #2 or Wilton Icing Tip #1 for Easter egg detail | Squeeze Bottle | Piping Bags (Disposable or Reusable) | Couplers
- Room Temperature: Room-temperature butter is essential. If the dough is too sticky, your butter may have been too soft. Room-temperature butter is actually cool to the touch. Room-temperature egg is preferred so it’s quickly and evenly mixed into the cookie dough.
- Flavors: I love flavoring this cookie dough with 1/2 teaspoon almond extract as listed in the ingredients above. For lighter flavor, use 1/4 teaspoon. Instead of the almond extract, try using 1 teaspoon of maple extract, coconut extract, lemon extract, or peppermint extract. If using lemon extract, you can also add 1 Tablespoon lemon zest.
- Be sure to check out my top 5 cookie baking tips AND these are my 10 must-have cookie baking tools.


Reader Comments and Reviews
I would love to bake these cookies but my daughter has an egg allergy. Can I make this recipe with an egg substitute? Which one works best for this recipe. Thanks!
Hi Elisa, we haven’t tested these cookies with any egg substitutes, so we’re unsure what might work best. Let us know if you try anything!
Could you use this to make in the Peeps cookie pan where the cookies are shaped like Peeps?
We imagine that should work, Patti!
I want to make easter cookies decorations with lots of bunnies and colorful eggs easter Sunday is April 5. I make this recipe on easter Sunday. I’m put the bunnies and eggs in the Easter basket to make it colorful.
I just made this dough to the tee…..why is it so dry??? I thought I had forgotton something. Nope. Can I add milk to make it more pliable?
Hi Kathy! How did you measure the flour? Make sure to spoon and level (instead of scooping) to avoid packing in too much flour into your measuring cups next time – or use a kitchen scale. You can read more about properly measuring baking ingredients in this post. You can try adding a little milk to this batch.
I love your recipes and use them all the time. I was wondering if you have the nutritional information on your recipes. Many of us are are restricted diets yet want to enjoy these delicious treats. It sure would help.
Hi Kathy! We don’t usually include nutrition information as it can vary between different brands of the same ingredients. Plus, many recipes have ingredient substitutions or optional ingredients listed. However, there are many handy online calculators where you can plug in and customize your exact ingredients/brands. Readers have found this one especially helpful: https://www.verywellfit.com/recipe-nutrition-analyzer-4157076
Sugar cookies are amazing, However this is the second time using the royal icing recipe and will never use it again. Followed the icing recipe to a tee, measured everything exactly and it was too thin, so added more sugar and mixed it for at least two more minutes, still too thin-it was running out of the piping tip. Messy and just not worth the time or waste of ingredients. I’m buying pre-made from now on.
Hi Mimi! I’m glad you enjoy the cookies. For the royal icing, if you keep whipping it, it will thicken. So another minute or 2 in the mixer may have helped. Just in case you want to try it again sometime.
This is the absolute BEST sugar cookie recipe I have ever tried, and I’ve tried plenty! The cookies taste delicious, the dough is easy to work with, and the cookies actually hold their shape when baked. I also used the royal icing recipe to decorate my Easter cookies, and it was easy to pipe (I didn’t have piping tools, so I just put the icing in a sandwich bag and cut off the corner).
I love this recipe! The dough is soft and easy to work with, plus the cookies held their shape perfectly when baked. Also, taste is perfect. I love the addition of almond extract.
hello! i made this recipe with gluten-free flour. when i tried to cut the dough into shapes, it stuck to the paper and i couldn’t for the life of me pick it up to move it into the baking tray without the cookie losing its shape. do i need to add more flour, or did the gluten-free flour mess it up?
I’ve used this recipe for years subbing gluten free flour and vegan butter to accommodate allergies and the cookies have turned on very good. I roll the room temperature dough out flat between parchment or waxed paper and then chill it for a couple hours or overnight before cutting into shapes. I also loosen the chilled dough from the paper before cutting into shapes so it doesn’t stick. The gluten/dairy free cookies taste a bit grainier than the regular cookies.
This recipe is fantastic. Coming from someone who has always had trouble with cut out cookies. This recipe is delicious and the dough is so easy to work with.
Hi Sally! Could you do the “easy icing” for the base layer and then royal icing on top for the intricate detail? I don’t love to taste of meringue, so would be interested to try this combination for the more detailed cookies like the Easter eggs.
Hi Alexa, that should work just fine. Just make sure the easy icing is completely dry/set before adding the royal icing. Let us know how it goes!
Can I use butter instead of unsalted butter ??
Hi Janice! unsalted butter is recommended, as salted butter can contain various amount of salt depending on the brand used. If using salted butter, feel free to omit the added salt. (And here is more on the difference between unsalted and salted butter, if you’re interested!)
Hi Sally! Where do you get your colored sugar? I live in Germany and it’s hard to find.
Hi Jessica! These are sold in most grocery stores in the baking aisle. You can also order them online. We link to our favorites in the Recommended Tools section of the post above!
I want to amend my earlier email. After looking at the site again, it would appear that I printed up the recipes prior to the typo being fixed. I made them both ways by the way and were really yummy. The dough was just a bit harder to work with in the dough with extra butter.
THANKS!
Joan
These cookies are AMAZING!
My cookies came out perfectly love your recipe
Hi Sally,
Thank you for sharing your recipe, the children and I had fun making and decorating these Easter cookies. I am glad I found a easy sugar cookie dough that actually turned out well and your royal icing recipe was a success.
Hi Sally, I love this recipe and get so many compliments on my cookies. Thank you. I just used this recipe for Shamrocks yesterday and am ready to get started on my Easter cookies now. I need to make A LOT of cookies. Can I double the recipe or should I make them in two separate batches? Oh, and I used your trick to bring butter to room temperature fast…what a brilliant idea! Thank you!!
Hi Maria! We’re so glad you love these cookies. We recommend making two separate batches instead of doubling for best results. Happy baking!
Hi! Just wondering where I’m going wrong will cut shapes out perfect but then when I re roll and place in fridge and then re cut after first batch has been cooked the shapes don’t hold or stay super high?
Hi Ash, I’m wondering if the re-rolled dough simply isn’t cold enough. Try leaving it in the refrigerator even longer – an easy fix for next time!
These look adorable! I’ve made your sugar cookies a few times and I love them, I was wondering if there is any way of flavour them without using artificial flavourings like almond or vanilla?
Thank you
Hi Evan! You can purchase these extracts as “pure” instead of imitation. I usually use pure. Citrus zest or dried culinary lavender are lovely additions as well.
Do you think it’s ok to add rainbow sprinkles into the mix for a funfetti cookie?
Yes, that should work!
Sally, These cookies look beautiful! I love your cream cheese sugar cookies and cream cheese frosting. Do you think I can use the cream cheese frosting recipe to pipe a similar look on these egg cutout cookies?
Thank you, Joanna! You can certainly use cream cheese frosting but it does very different than royal icing and it doesn’t dry hard. But you can definitely make them super cute using it 🙂