

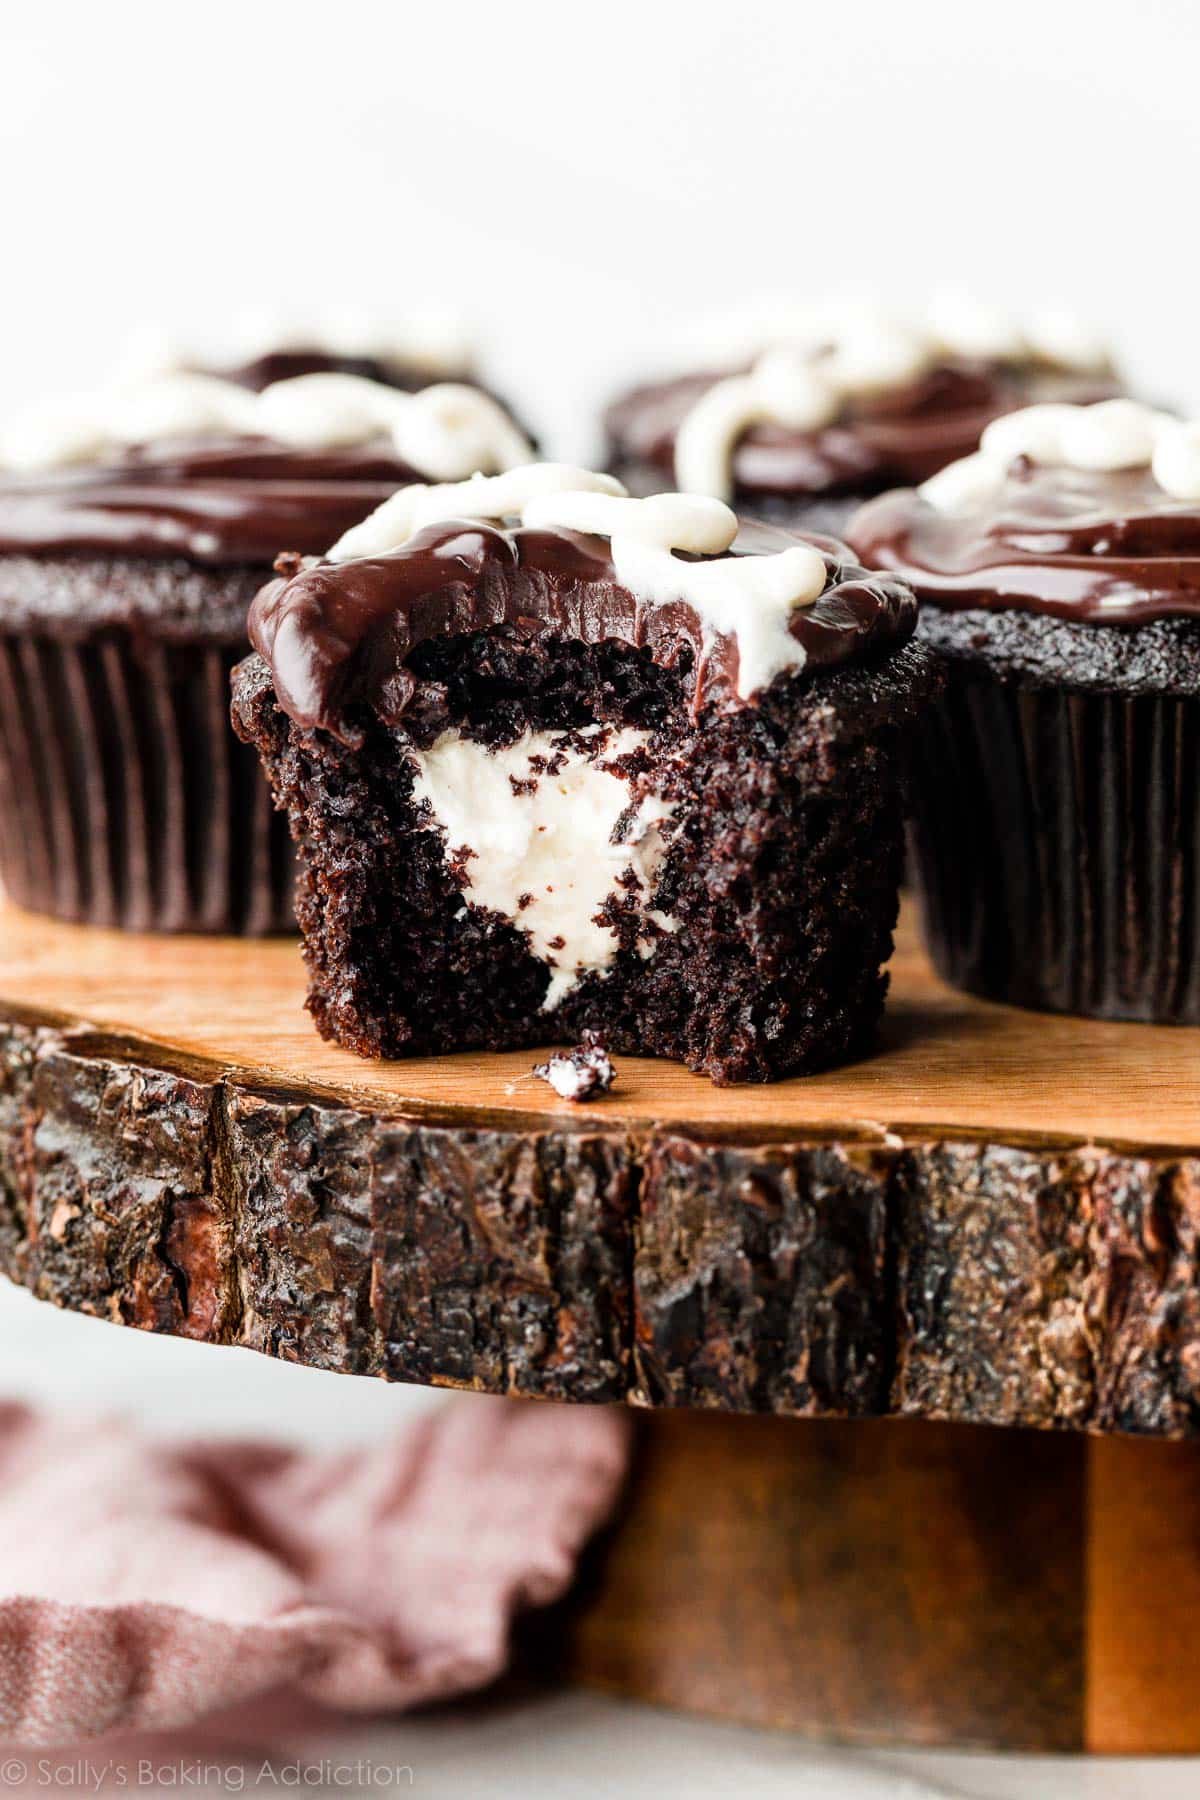
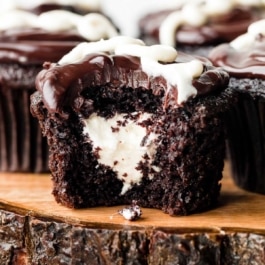
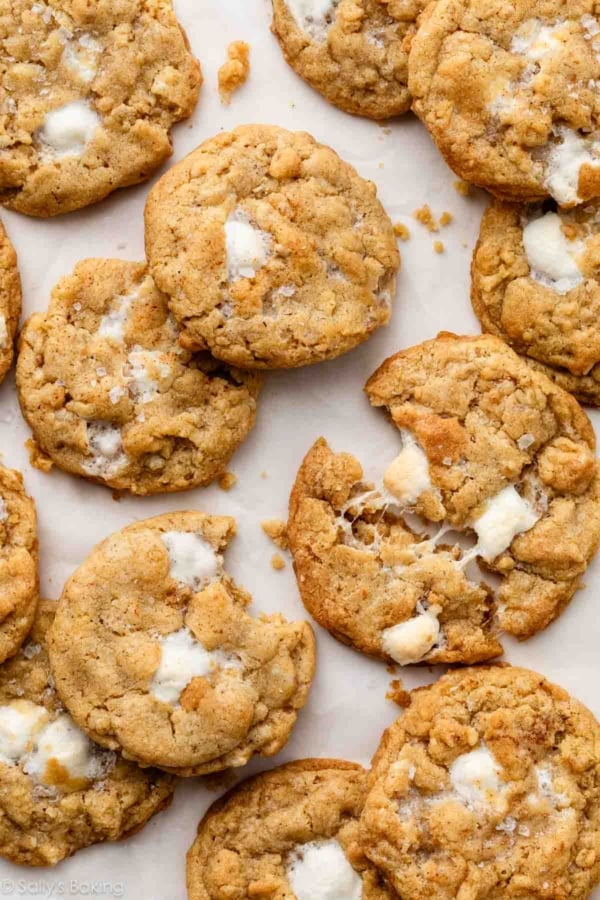
Enjoy a homemade version of the classic packaged treat! These dreamy cream-filled chocolate cupcakes start with a moist and deeply chocolatey cupcake, which is filled with fluffy whipped vanilla buttercream, and topped with a rich 2-ingredient chocolate ganache. Truly one of the best desserts I’ve ever baked and every single taste tester has RAVED about them.
One reader, Ruth, commented: “Wow! These are definitely the best cupcakes I have ever made. My family ate them and agreed. I can’t recommend this recipe enough, and we will definitely be making them again! It was the first time I’ve filled a cupcake, and I was surprised at how easy it really was. It worked, and everyone fell in love with these delicious cupcakes. Thanks again for another incredible recipe! ★★★★★”

I feel like I’ve said this before, but this is truly my new favorite cupcake recipe. Honestly. I close my eyes in delight every time I bite into one. They are that good.
Why You’ll Love These Cream-Filled Chocolate Cupcakes
- The cupcakes are basically this popular chocolate cake, but halved
- Extra soft & moist, not dense or dry at all
- Extreme chocolate flavor; hot liquid “blooms” the cocoa
- Sweet, fluffy vanilla cream in the center
- Chocolate topping is just 2 ingredients and sets into a soft fudge-like texture
- Like the packaged American treat, but fresh & homemade
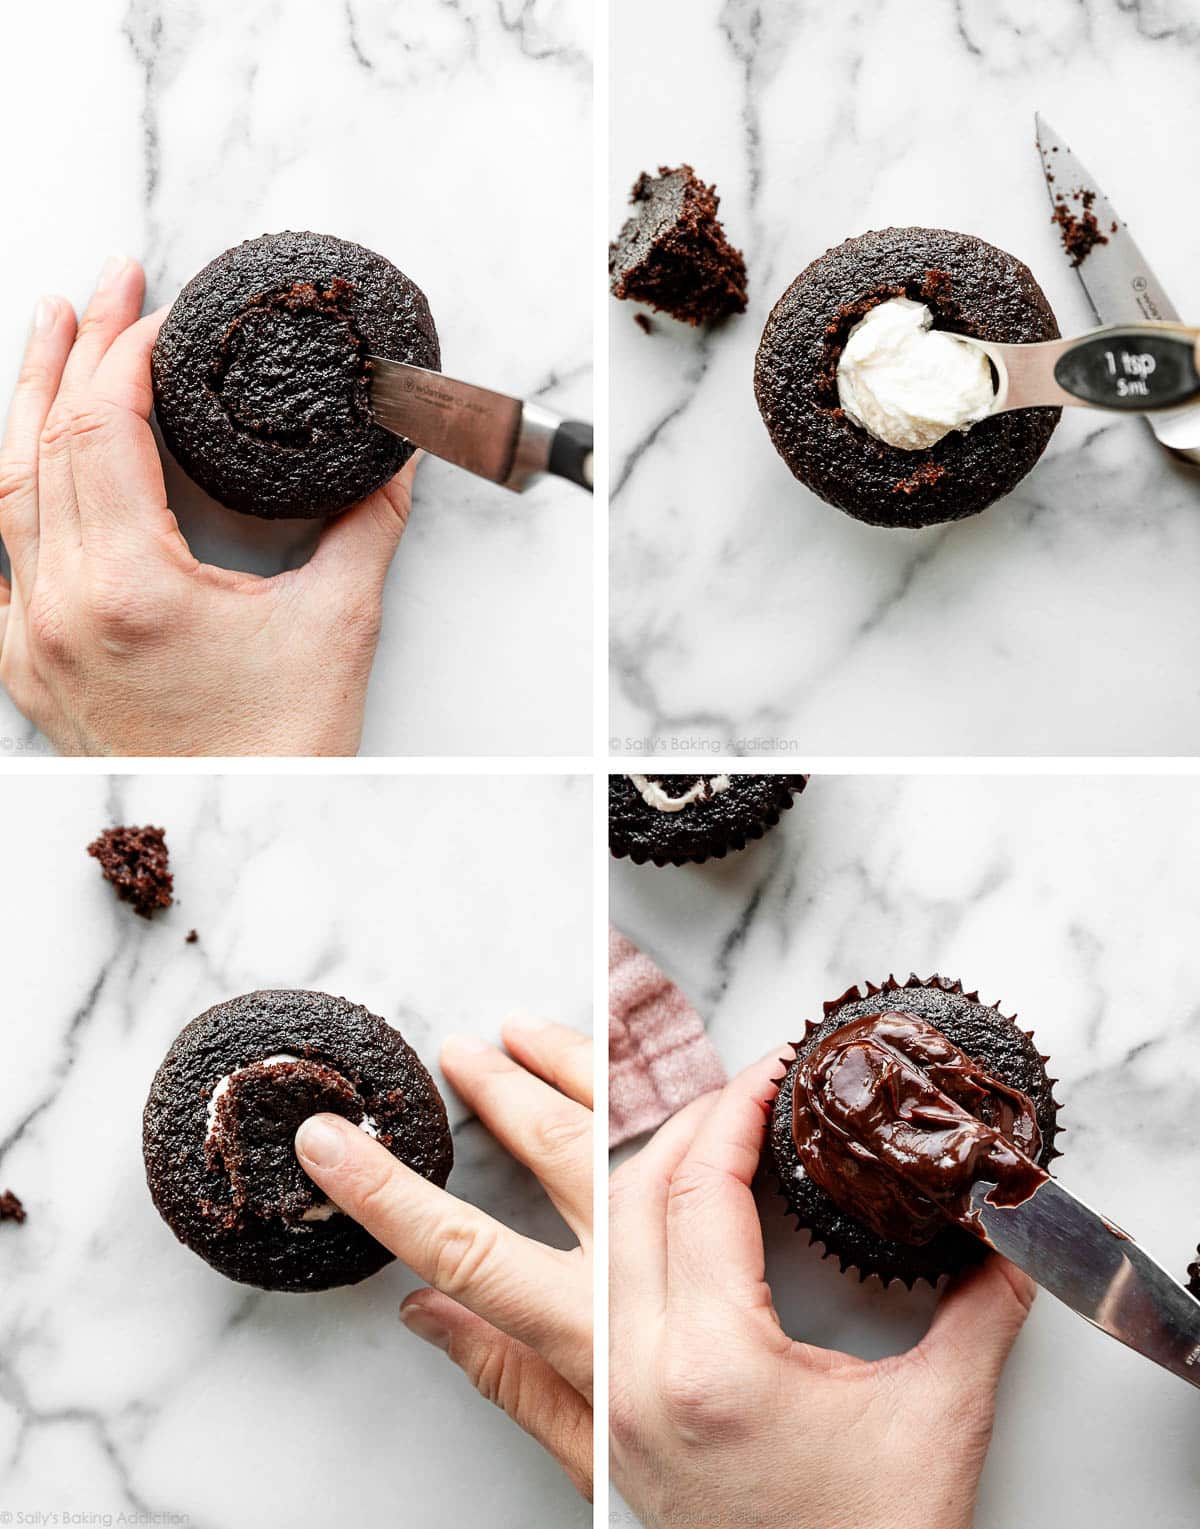
Even for an assembled/decorated cupcake, the process is still pretty straightforward. Make the cupcakes, carve a little hole in the center of the cooled cupcakes, fill with an easy whipped buttercream, and spread ganache on top. Use any extra filling to pipe on a squiggly loopy-loop (technical terms). Let me explain some key ingredients and show you this process in photos.
Make the Chocolate Cupcakes First
I decided to use my very favorite (and reader-loved!) chocolate cake as the base for today’s cupcake recipe. I practically halved all of the ingredients. My regular super moist chocolate cupcakes are great, but they can be quite fragile. I love this newer cupcake recipe below, and even use it for these chocolate covered strawberry cupcakes, chocolate cupcakes with vanilla frosting, and these Easter cupcakes.
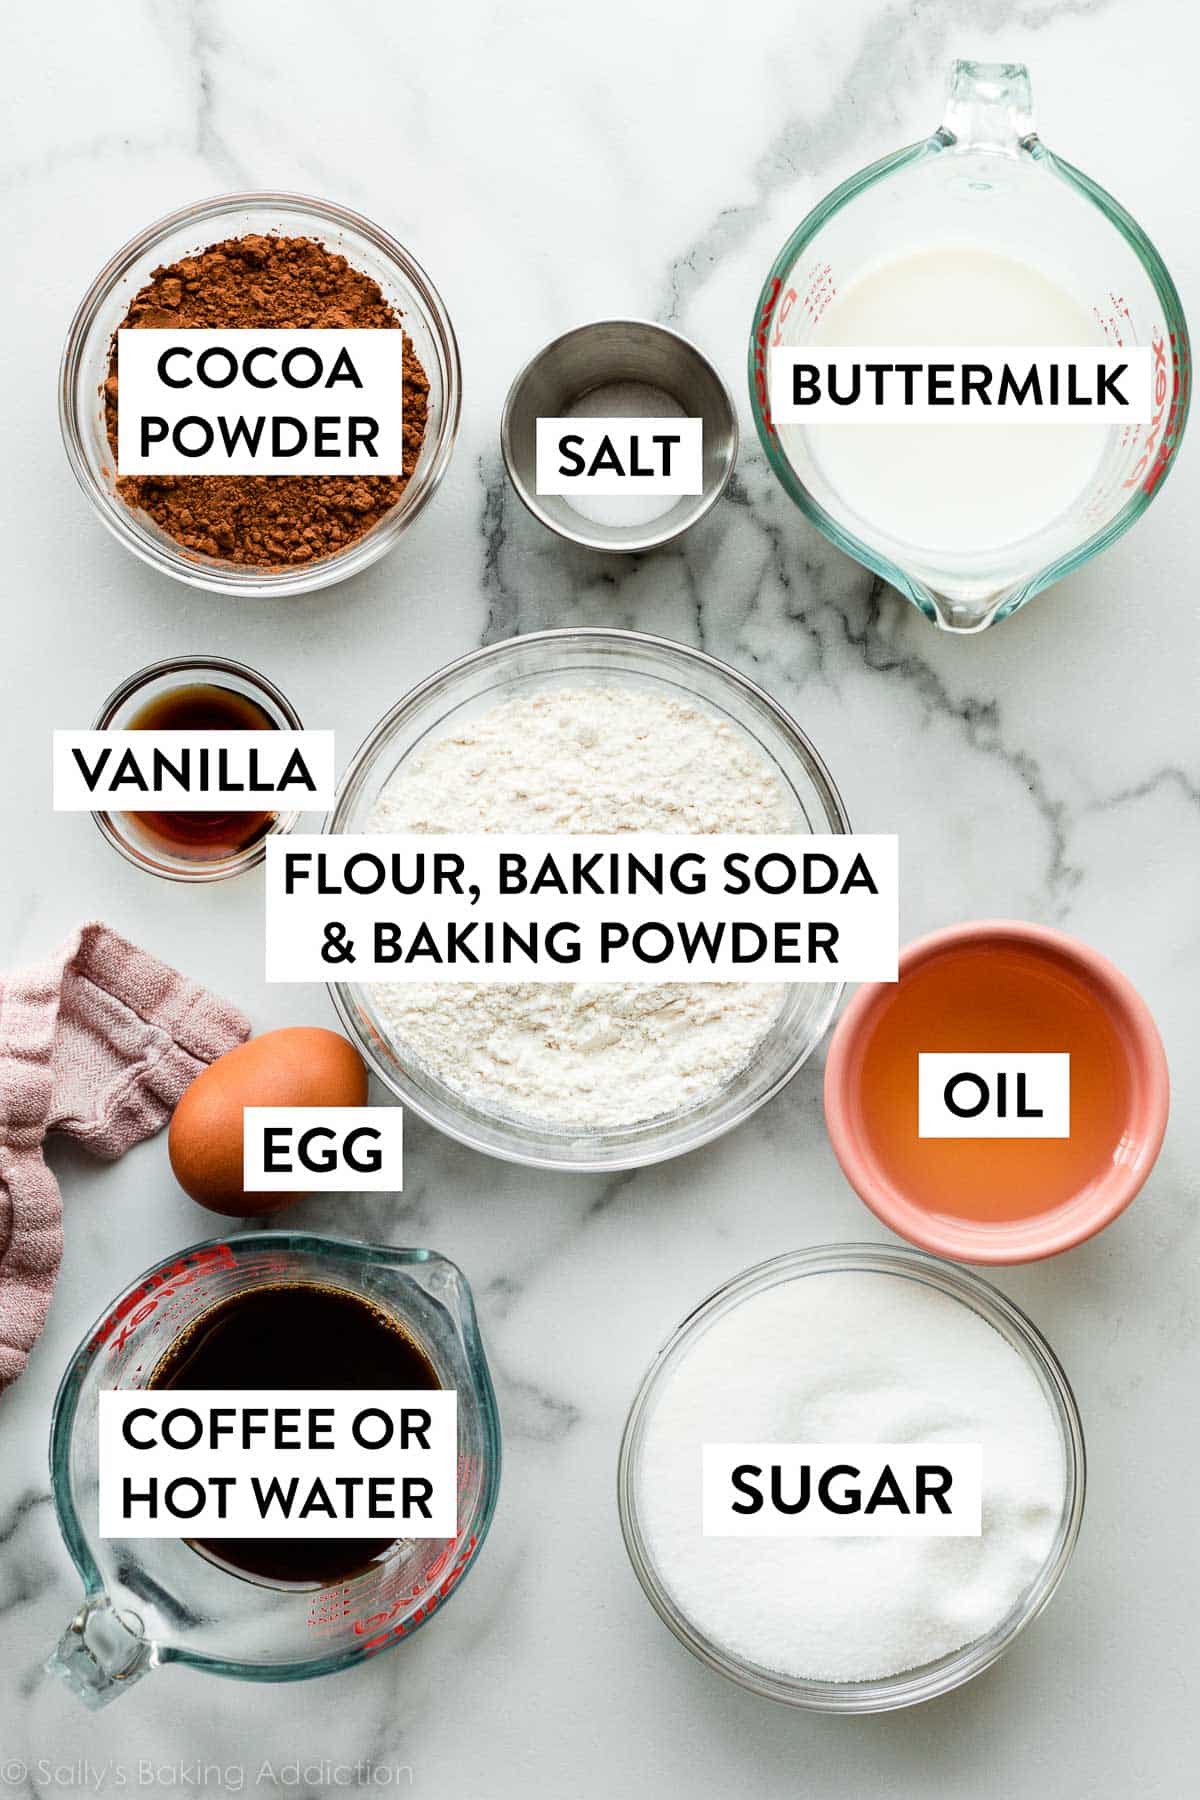
For the BEST texture and flavor, you need these key ingredients:
- Natural Cocoa Powder: Use unsweetened, natural cocoa powder (not Dutch-process). You can read about the difference in this post: Dutch-process vs. Natural Cocoa Powder. I typically use Hershey’s (the regular kind, not the Special Dark) or Ghirardelli brand cocoa powder. (Not affiliated with these brands, just a fan of the products.)
- Oil: Cocoa powder is a very drying ingredient, so you’ll usually find it paired with oil in cake and cupcake recipes. Oil provides moisture and doesn’t weigh down a baked good. Vegetable oil is ideal, but melted coconut oil or even light olive oil may be used instead.
- Buttermilk: The team and I tested these cupcakes with buttermilk and with sour cream. Made with buttermilk, they have the best flavor, but can be a little soft and sticky, so slightly more difficult to cut and fill. Made with sour cream, they have a sturdier crumb, but the chocolate flavor isn’t as strong. We liked the buttermilk cupcakes best, and a quick chill in the refrigerator after they’ve fully cooled helps make the filling/assembly process easier.
- Hot Coffee or Hot Water: Hot liquid enhances the cocoa powder’s flavor. It also encourages it to bloom and dissolve appropriately. I promise these cupcakes don’t taste like coffee at all! If you don’t drink coffee, you can use hot water. For deeper and richer flavor, though, use coffee. You can either brew it in a coffee maker or make instant coffee. Decaf coffee works!
You also need all-purpose flour (cake flour is too light when paired with cocoa powder), baking powder, baking soda, salt, sugar, egg, & vanilla extract.
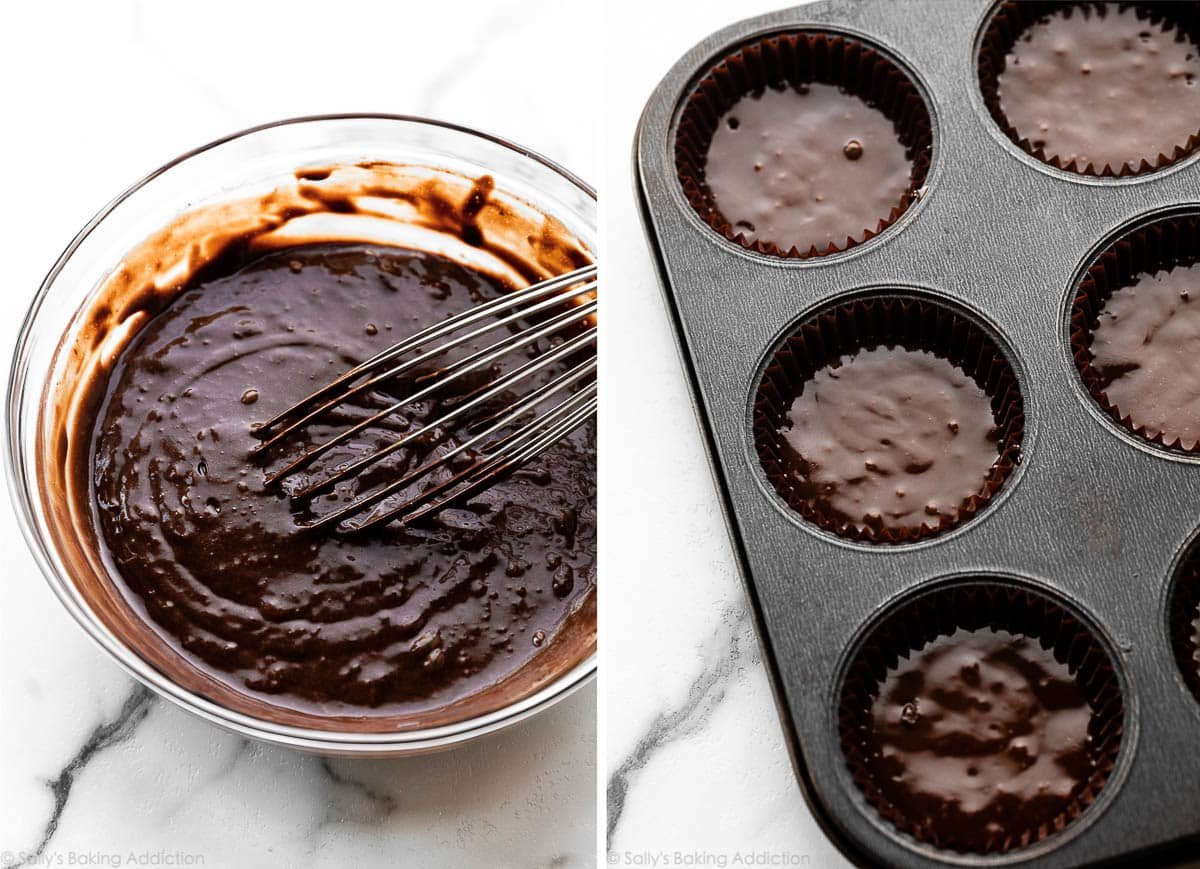
Spoon/pour the thin batter into a 12-count muffin pan lined with cupcake liners—you should have enough batter to make 15 cupcakes, so you will either need 2 muffin pans or you can divide and bake them in 2 batches. Fill the liners about 2/3 full. If you use the batter to make fewer than 15 cupcakes, you are overfilling the lined cups and your cupcakes will spill over the sides.
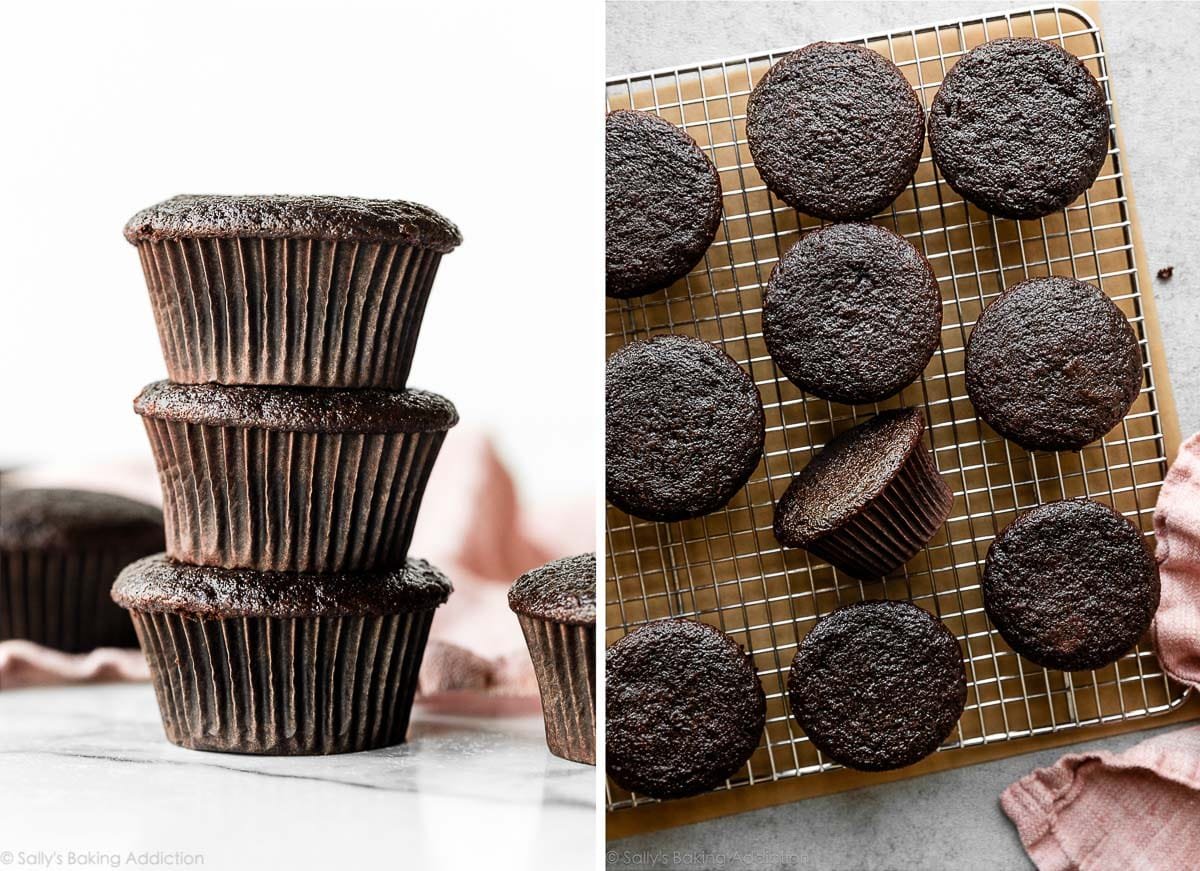
Optional (but recommended) step: When the cupcakes are completely—or nearly completely—cool, place them in the refrigerator for 20–30 minutes to make them a bit easier to carve into and fill.
The cupcakes bake up nice and flat on top:
And now… is there any topping more rich and indulgent-tasting than chocolate ganache?
Make the Chocolate Ganache
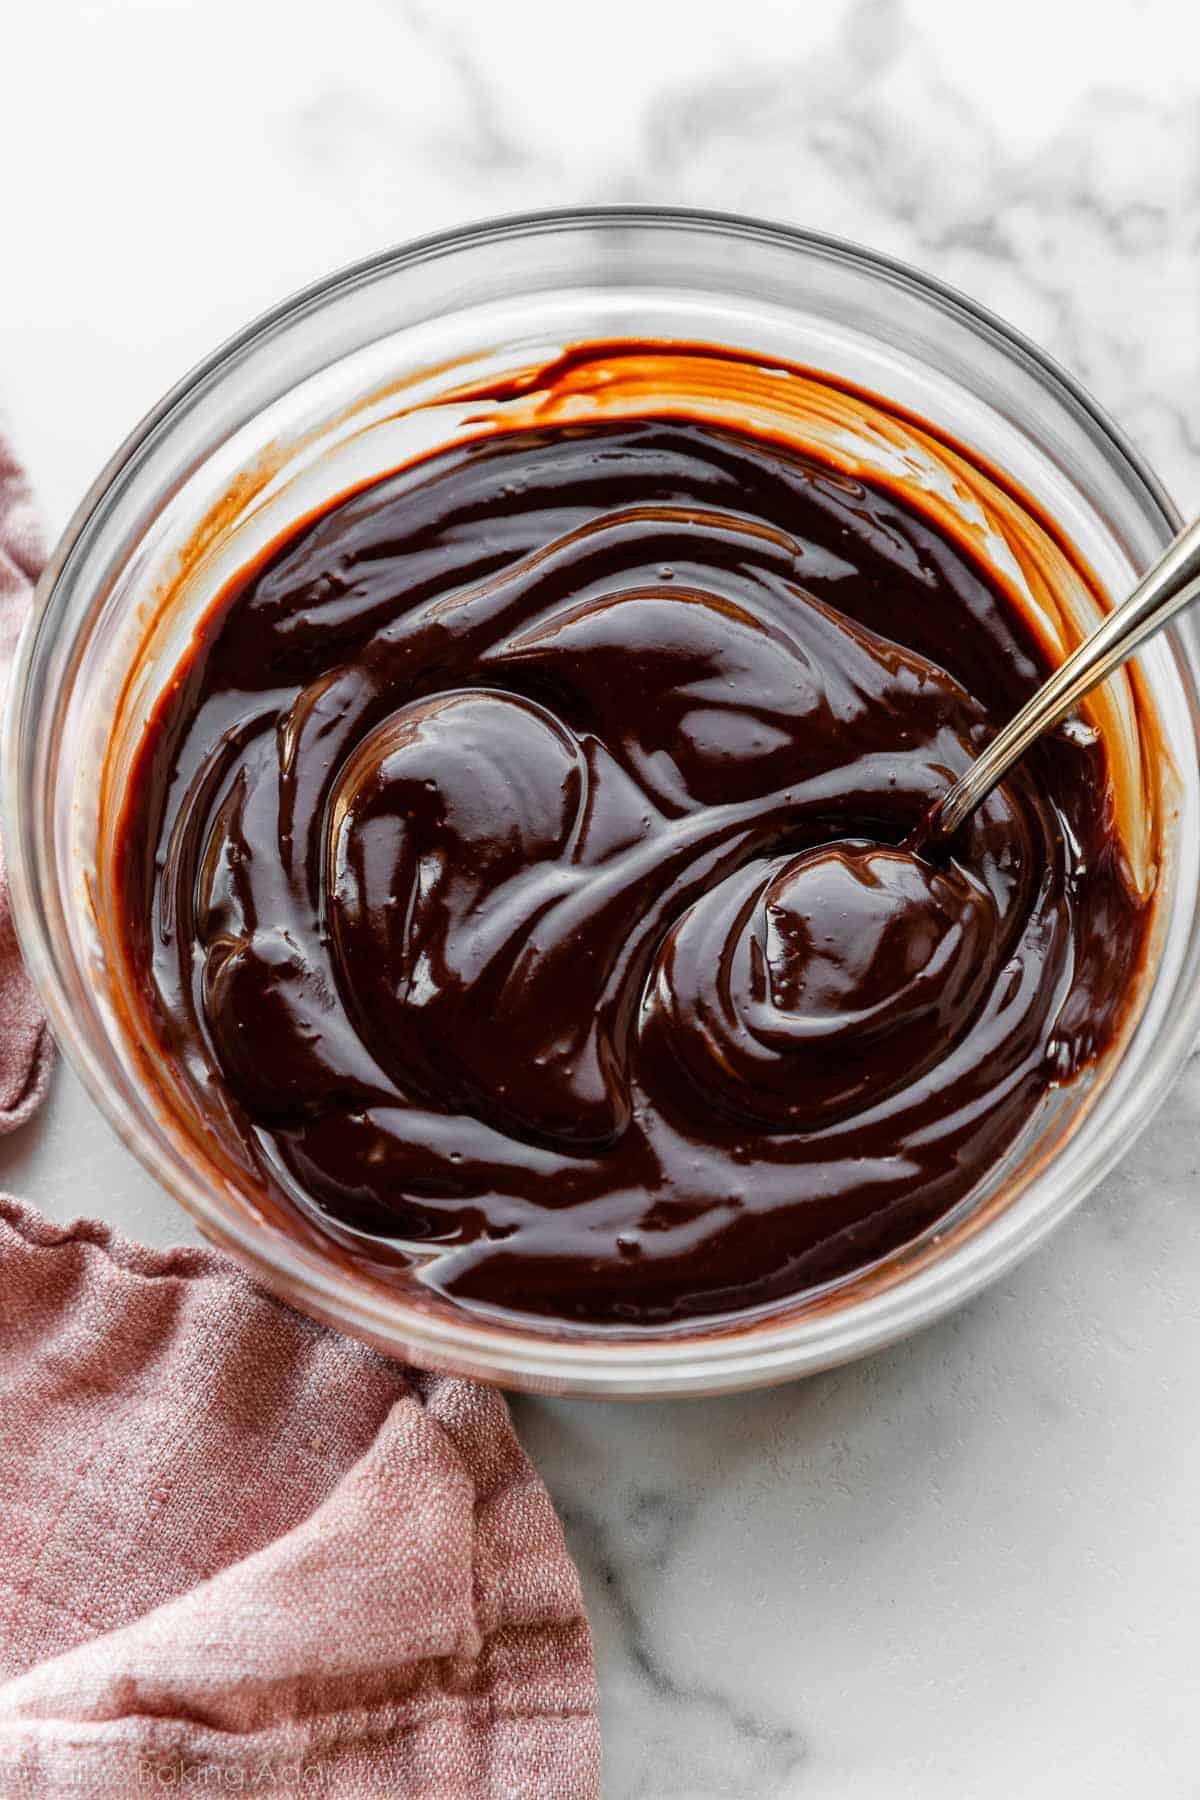
Even though it’s the topping, I recommend making the chocolate ganache before you make the filling and while the cupcakes cool. This is because the ganache also needs to cool and thicken.
You need just 2 ingredients to make chocolate ganache:
- Pure Chocolate: Make sure you use real, quality chocolate. I typically use the 4-ounce baking bars found in the grocery store baking aisle, by Ghirardelli or Baker’s. You can use quality chocolate chips instead, but the ganache won’t be as smooth, as chocolate chips have stabilizers in them. You need 6 ounces, which is 1.5 bars (170g). 8 ounces proved to be too much and 4 ounces wasn’t enough.
- Heavy Cream: This may be called by another name where you are, like heavy whipping cream or double cream. Just make sure it has a minimum of 36% fat content, otherwise it won’t set up as well. Usually you should use 6 ounces of cream per 6 ounces of chocolate, but I recently reduced it down to 2/3 cup (just over 5 ounces), so the ganache is a little thicker.
Heat the cream on the stovetop, pour over finely chopped chocolate in a heatproof bowl, let sit for a few minutes, and then slowly stir until the chocolate has all melted. The ganache will be very thin at first, but since chocolate is solid at room temperature, the ganache will thicken as it cools:
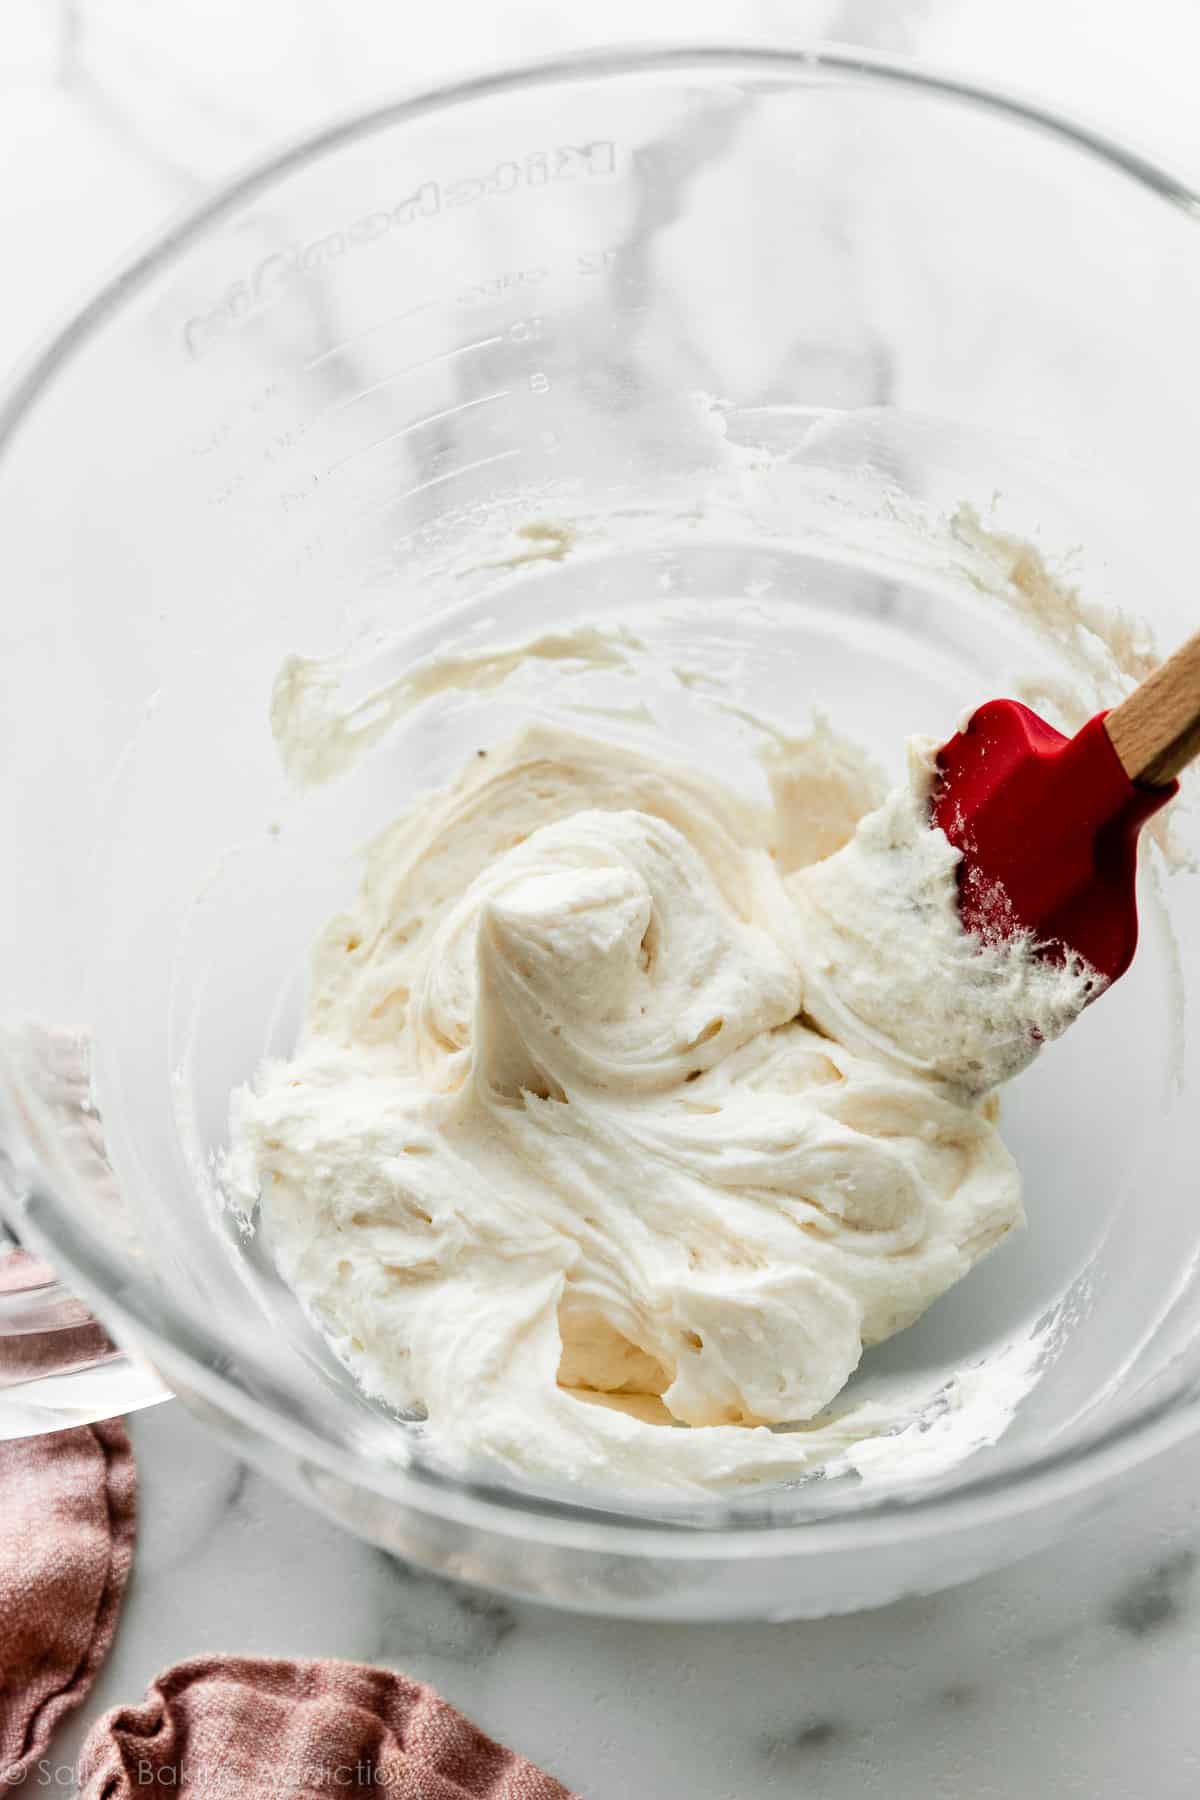
Whipped Vanilla Buttercream
For the cream portion of these cream-filled chocolate cupcakes, use fluffy whipped vanilla buttercream. This is the same whipped buttercream frosting I use for vanilla sheet cake, but with the ingredient ratios adjusted to yield less. You need just enough to fill 15 cupcakes, with a little leftover to pipe the squiggly loops on top. LOL.
You’re basically making a regular vanilla buttercream frosting, but whipping it on high speed for a few minutes to make it extra light, fluffy, and almost marshmallow-tasting. Many homemade Hostess-style cupcake recipes use shortening or store-bought marshmallow creme (fluff) in the filling, but this one uses just 5 simple ingredients: butter, confectioners’ sugar, heavy cream, vanilla, and salt. Feel free to use this marshmallow meringue as the filling instead, if you’d like. Some readers have also filled them with raspberry cake filling or pastry cream—YUM!
Fill & Assemble the Cream-Filled Chocolate Cupcakes
Alright, let’s do this! The process is just like filling my strawberry shortcake cupcakes and lemon raspberry jam cupcakes. With a sharp knife, cut a circle in the cupcake, and remove the center, which will be roughly the shape of a cone. Using a small spoon, fill the middle of the cupcake with as much whipped buttercream as you can. (Usually between 1–2 teaspoons.) Slice/tear off the pointed tip of the cone-shaped piece of cupcake, and gently press the round piece back on top of the filling. If you need any extra help with this step, see my How to Fill Cupcakes tutorial and video.
This can get messy because the cupcakes are oh-so-soft and moist. That’s fine, you’re covering up the mess with ganache.
With a knife or small icing spatula, spread the thickened chocolate ganache on top of the cupcakes.
Let’s see all of that come together:
Optional: Pipe the Squiggly Loopy Loops
For the finishing touch, fit a small round piping tip (I use Wilton #6) to a piping bag and fill with the remaining whipped buttercream. I went for the signature Hostess cupcake look by piping the loopy loops across the top of each cupcake, but feel free to get creative with your design. An initial, a heart, smiley face, birthday age/number, etc. You could even decorate them as Halloween cupcakes. Or skip this decorating step entirely.


How about a cake version? I thought some might ask! See recipe Note below.
And if you love trying this nostalgic treat, be sure to try my chocolate cake roll recipe, too! Or check out these copycat desserts to make at home for more ideas!

Cream-Filled Chocolate Cupcakes
- Prep Time: 40 minutes
- Cook Time: 22 minutes
- Total Time: 3 hours (includes cooling)
- Yield: 15 cupcakes
- Category: Dessert
- Method: Baking
- Cuisine: American
Description
Fill these deeply chocolatey cupcakes with fluffy whipped vanilla buttercream and top with a rich 2-ingredient chocolate ganache. See the step-by-step photos above or use the video tutorial below as your guide.
Ingredients
Chocolate Cupcakes
- 1 cup (125g) all-purpose flour (spooned & leveled)
- 1/2 cup (42g) unsweetened natural cocoa powder
- 1 teaspoon baking soda
- 1/2 teaspoon baking powder
- 1/2 teaspoon salt
- 1/3 cup (80ml) vegetable oil
- 1 cup (200g) granulated sugar
- 1 large egg, at room temperature
- 1 teaspoon pure vanilla extract
- 1/2 cup (120ml) buttermilk*, at room temperature
- 1/2 cup (120ml) hot coffee or hot water
Chocolate Ganache Topping
- 6 ounces (170g) semi-sweet chocolate, finely chopped
- 2/3 cup (160ml or 5.3 ounces) heavy cream
Whipped Vanilla Buttercream Filling
- 1/2 cup (8 Tbsp; 113g) unsalted butter, softened to room temperature
- 2 cups (240g) confectioners’ sugar
- 3 Tablespoons (45ml) heavy cream
- 2 teaspoons pure vanilla extract
- salt, to taste
Instructions
- Make the cupcakes: Preheat the oven to 350°F (177°C). Line a 12-count muffin pan with cupcake liners. This recipe yields about 15 cupcakes, so line a second muffin pan with 3 cupcake liners or bake in batches.
- Whisk the flour, cocoa powder, baking soda, baking powder, and salt together in a large bowl. Set aside. Whisk the oil, sugar, egg, vanilla, and buttermilk together until combined. Pour the wet ingredients into the dry ingredients, add the hot coffee/water, and whisk until the batter is completely combined. Batter is thin.
- Pour/spoon the batter into the liners, filling only 2/3 full to avoid spilling over the sides. You should have enough batter for 15 cupcakes.
- Bake for 20–22 minutes, or until a toothpick inserted in the center comes out clean.
- Allow cupcakes to cool in the pan for 10 minutes, and then transfer to a wire rack to cool completely. Cupcakes must be completely cooled—and even chilled for 20–30 minutes in the refrigerator if they’re particularly sticky on top—before assembling.
- Make the chocolate ganache: Place finely chopped chocolate in a medium heatproof bowl. Heat the cream in a small saucepan over medium heat until it begins to gently simmer. (Do not let it come to a rapid boil—that’s too hot!) Pour over chocolate, then let it sit for 2–3 minutes to gently soften the chocolate. With a metal spoon or small rubber spatula, very slowly stir until chocolate has melted and mixture is smooth. Ganache is thin. The finer you chopped the chocolate, the quicker it will melt with the cream. If it’s not melting, do not microwave it. If needed, see Troubleshooting Chocolate Ganache. Once ganache mixture is smooth, transfer it to the refrigerator and let it chill for at least 30 minutes to thicken before spreading on cooled and filled cupcakes.
- Make the whipped vanilla buttercream filling: With a handheld or stand mixer fitted with a paddle attachment, beat the butter on medium speed until creamy, about 2 minutes. Add confectioners’ sugar, heavy cream, and vanilla extract. Beat on low speed for 30 seconds, then increase to medium-high speed and beat for 3 full minutes. Add up to 1/4 cup (30g) more confectioners’ sugar if frosting is too thin or another 1 Tablespoon (15ml) of cream if frosting is too thick. Add a pinch of salt if frosting is too sweet. (I add a very tiny pinch of salt.) Frosting should be extra fluffy.
- Fill the cupcakes: Using a sharp knife, cut a circle into the center of the cooled cupcakes to create a little pocket about 1 inch deep. The piece you removed will be sort of cone-shaped. Spoon or pipe whipped buttercream inside each carved-out cupcake—use however much frosting will fit. (I use either a teaspoon measuring spoon or Wilton piping tip #12 to fill cupcakes. Usually you can fit between 1–2 teaspoons of frosting in each.) Slice/tear off the pointy end of the “cone” piece of cupcake you removed, and gently press the round piece back on top of the filling. See my How to Fill Cupcakes post if you need extra visuals or help with this step.
- Top with ganache: With a knife or small icing spatula, spread the thickened chocolate ganache on top of each cupcake. Spread on a thick layer, so it sets as a thick fudge-like topping.
- (Optional) Pipe icing swirl/loops on top: Fill a piping bag with the remaining vanilla buttercream. Pipe a looping swirl, or any design you prefer, on top of the ganache-covered cupcake. (No need to chill ganache-topped cupcakes before doing this.) I use Wilton piping tip #6 for piping.
- Serve immediately or store covered at room temperature or in the refrigerator for up to 1 day before serving. Cover and store leftover cupcakes in the refrigerator for up to 3 days. I recommend a cupcake carrier for storing and transporting decorated cupcakes.
Notes
- Make Ahead & Freezing Instructions: Bake the cupcakes 1 day in advance. Keep cupcakes covered tightly at room temperature and fill/frost the day of serving. Whipped buttercream and chocolate ganache can be prepared the day before too. Cover each and refrigerate overnight. The ganache will be nice and thick. If needed to thin out, spoon ganache into heatproof bowl and place over a pot of simmering water. Stir constantly until thinned out. Unfrosted, unfilled cupcakes can be frozen up to 3 months. Thaw overnight in the refrigerator and bring to room temperature before assembling and serving.
- Special Tools (affiliate links): 12-count Muffin Pan | Cupcake Liners | Electric Mixer (Handheld or Stand Mixer) | Small Icing Spatula | Piping Bag (Reusable or Disposable) | Wilton Piping Tip #6 | Wilton Piping Tip #12 | Cupcake Carrier
- Cupcakes Sinking: The cupcakes may look like they’re sinking in the center while they’re baking, but they should pop back up by the time baking is finished. It doesn’t matter all that much if they sink a bit in the center, though, because you’re cutting out the middles and filling them with cream.
- Buttermilk vs. Sour Cream: I tested these cupcakes both ways. Made with buttermilk, they have the best flavor, but can be a little soft and sticky, so slightly more difficult to cut and fill (I recommend a quick chill in the refrigerator before cutting and filling, to make them a bit easier to work with). Made with sour cream, they have a sturdier crumb, but the chocolate flavor isn’t as strong. You can also try using half of each, if you happen to have both!
- Buttermilk: Buttermilk is required for this recipe. You can make your own DIY buttermilk substitute if needed. Add 1 teaspoon of white vinegar or lemon juice to a liquid measuring cup. Then add enough whole milk to the same measuring cup until it reaches 1/2 cup. (In a pinch, lower fat or nondairy milks work for this soured milk, but the cupcakes won’t taste as moist or rich.) Stir it around and let sit for 5 minutes. The homemade “buttermilk” will be somewhat curdled and ready to use in the recipe.
- Hot Coffee or Hot Water: Hot liquid enhances the cocoa powder’s flavor. It also encourages it to bloom and dissolve appropriately. I promise these cupcakes don’t taste like coffee at all! If you don’t drink coffee, you can use hot water. For deeper and richer flavor, though, use coffee (regular or decaf, but make sure it’s black with no sugar or cream). You can either brew it in a coffee maker or make instant coffee.
- Chocolate for Ganache: Real, quality chocolate is ideal for ganache to set properly. I use the 4-ounce baking bars found in the grocery store baking aisle, such as Ghirardelli or Baker’s brands. You’ll need 1.5 of the 4-ounce bars to yield 6 ounces. If you can’t find those, you can use 170g (about 1 cup) of high-quality semi-sweet chocolate chips.
- Can I Make This Into a Cake? Absolutely. Use my chocolate cake recipe for 2 cake layers, spread the whipped buttercream on one cooled cake, top with 2nd cake, and top entire cake with ganache.
- More Success Tips: Be sure to check out my How to Use Piping Tips post for instructions on how to fill a piping bag, and my How to Make Chocolate Ganache post for any ganache questions. And you can also read my 10 Tips for Baking the BEST Cupcakes.


Reader Comments and Reviews
Just made the cupcakes and they smell delicious!! Would it hurt to fully assemble them with the filling and ganache frosting and then refrigerate overnight? Trying to do as much as I can before taking to a party the next day.
Hi LL, yes! Store cupcakes covered at room temperature or in the refrigerator for up to 1 day before serving.
Can I use the same buttercream recipe to frost the cupcakes as well?
You can, but you will want to make more to ensure you have enough to top the cupcakes as well.
How do I store the frosted cupcakes? Do I have to put them in the refrigerator since there is butter in the recipe?
You can store the cupcakes at room temperature for up to 1 day or in the refrigerator for up to 3 days. We like to use a cupcake carrier for storing cupcakes, but you can use another type of food storage container instead.
Thanks again. I’ve been a big fan of your website and recipes for a while now and can’t wait to try to make these cupcakes!
My grandkids loved these! I will be making them again! They are a bit of work, but well worth it!