

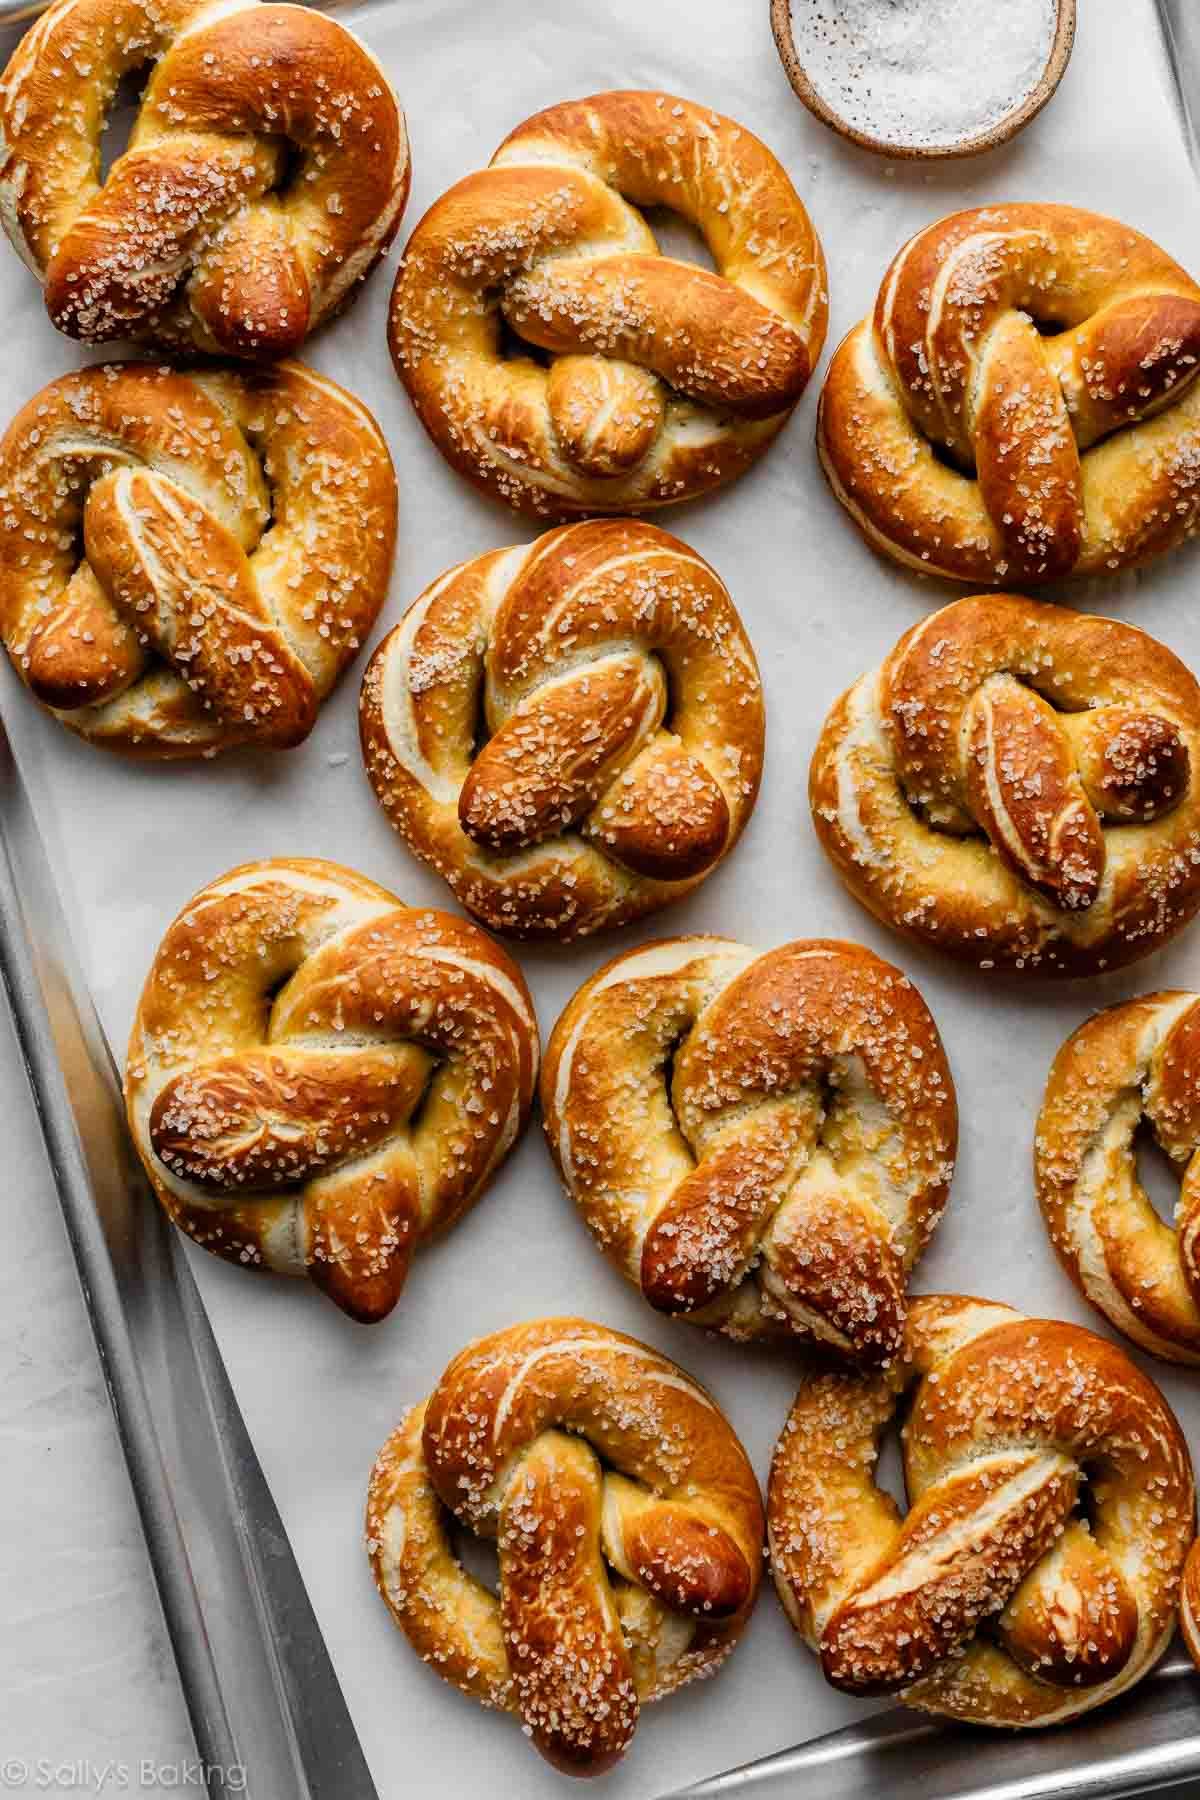
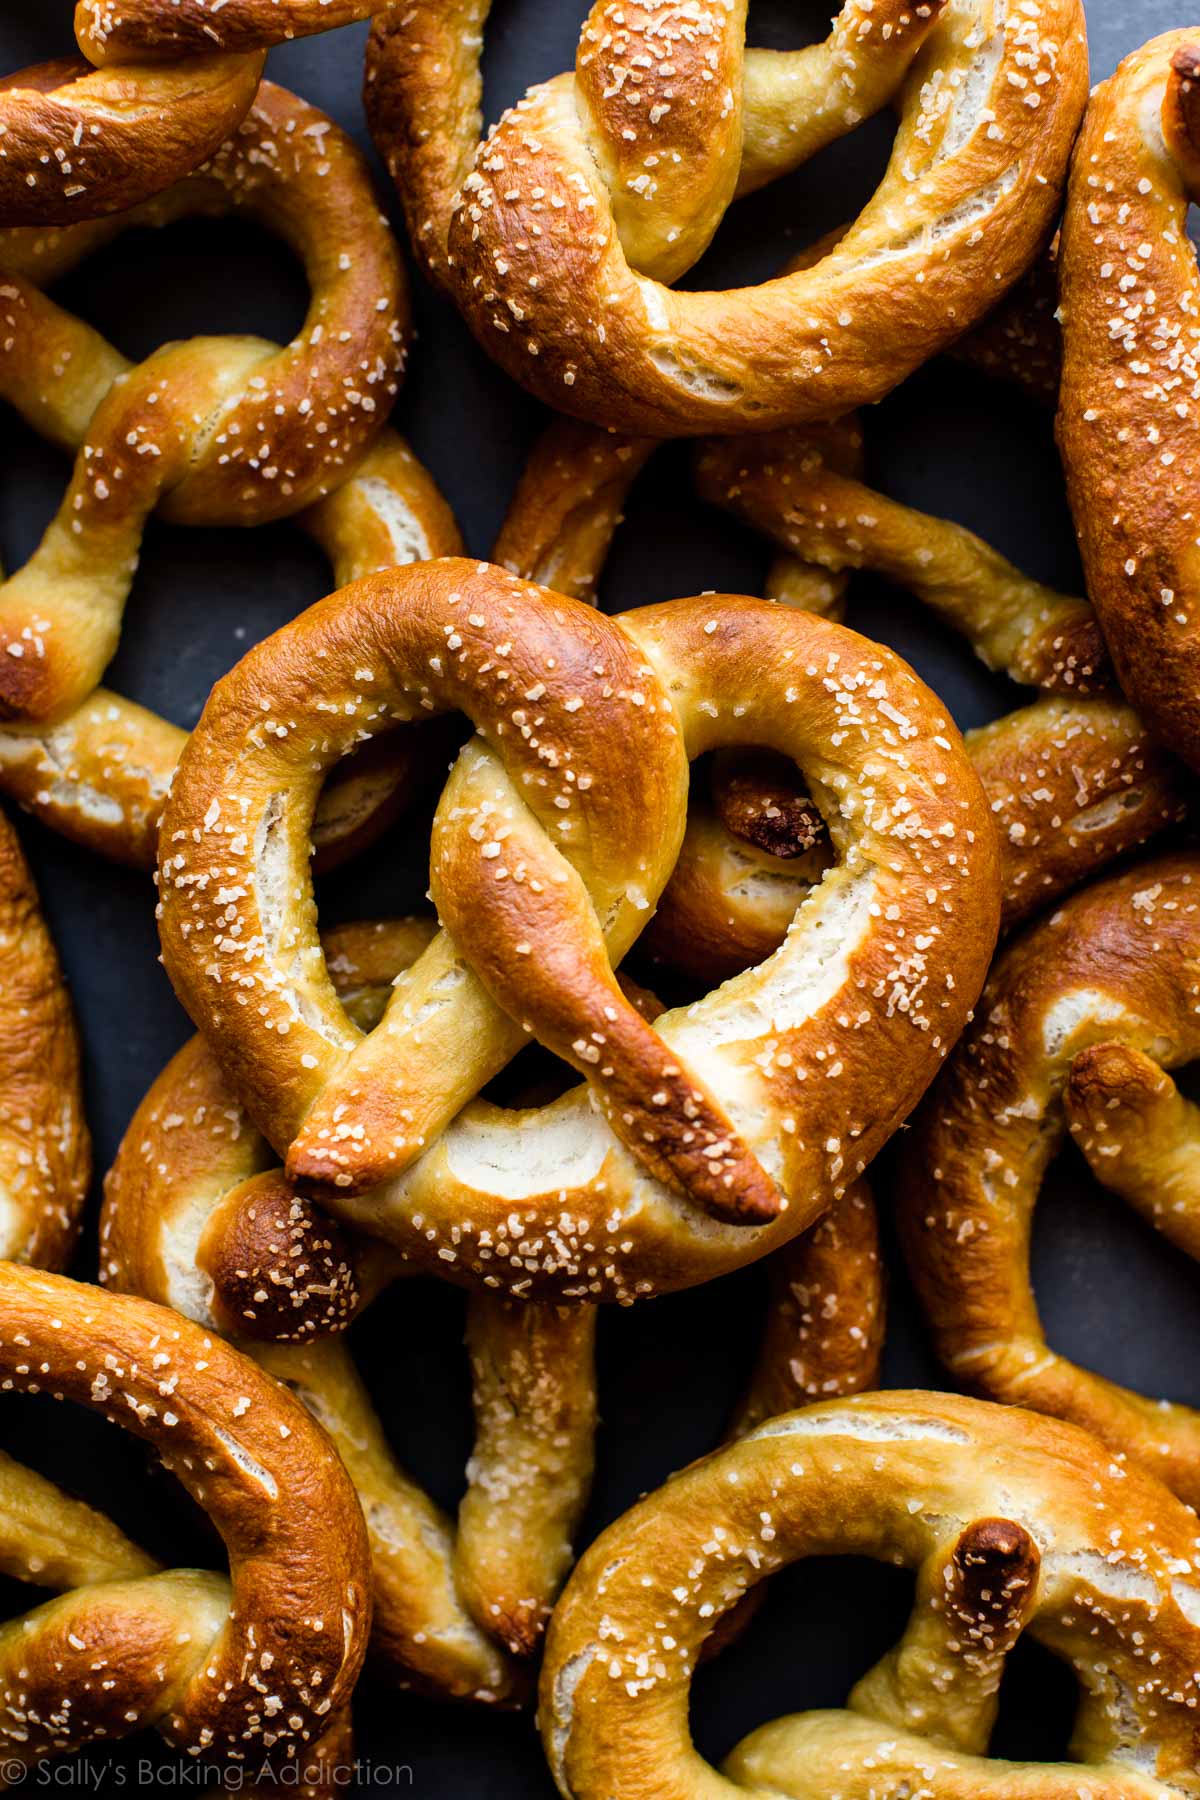
This is one of the easiest ways to prepare homemade soft pretzels and the results are extra delicious. The soft pretzel dough only needs to rest for 10 minutes before shaping. The quick baking soda boil gives the pretzels their traditional flavor. Make sure you watch the video for how to shape pretzels!
Homemade soft pretzels are nothing new around here because this recipe has been a reader favorite for years. This recipe is such a fan favorite, that it deserved a spot in print! You’ll also find this recipe in my cookbook, Sally’s Baking 101 (which has become a New York Times Best Seller!).
The dough requires just 6 ingredients and there’s hardly any rise time, so not only are these easy, they’re pretty quick too. In fact, I remember feeling pleasantly surprised at the ease and speed the first time I made them—it took us only 30 minutes to make 1 batch!
Over the years, I’ve added a smidge of melted butter to the dough for improved flavor. Furthermore, we’ve introduced the baking soda bath. While it sounds strange, this step is what gives pretzels that iconic flavor, chewy texture, helps deepen their golden color in the oven, and locks in the super soft interior. If you get the water boiling ahead of time, it really only adds 5 minutes to the entire process.
We’ve also made them soft pretzel bites, soft pretzel knots (with various toppings), jalapeño cheddar pretzels, and soft pretzel rolls from this simple dough. There’s no wrong way to shape a pretzel, but let’s stick with the classic today. I promise you’ll no longer feel intimidated working with yeast, shaping pretzels, or the baking soda bath.

Even if you have zero skill in the kitchen, you can make these homemade soft pretzels.
Step-by-Step Photos
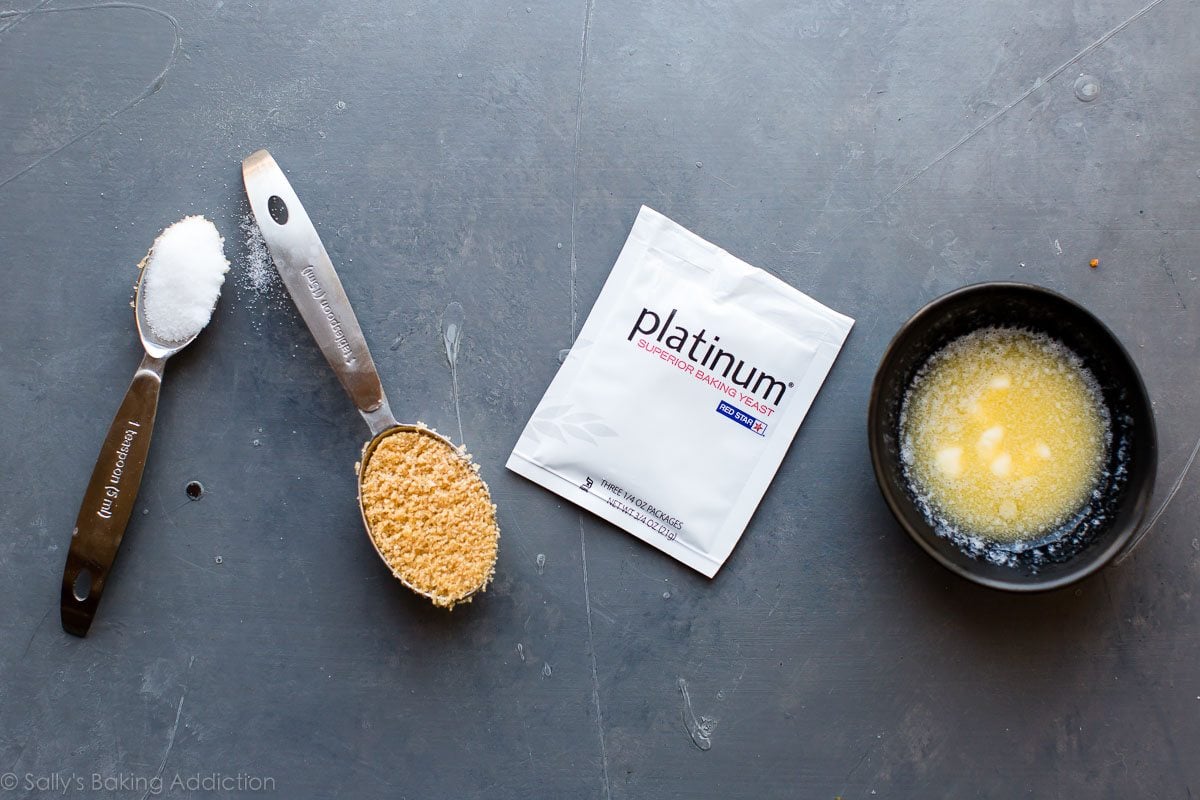
Let’s chat about the dough. You need the simplest, most basic ingredients possible and I bet each one is in your kitchen right now. Warm water, 1 packet of yeast, brown or regular granulated sugar, melted butter, salt, and flour.
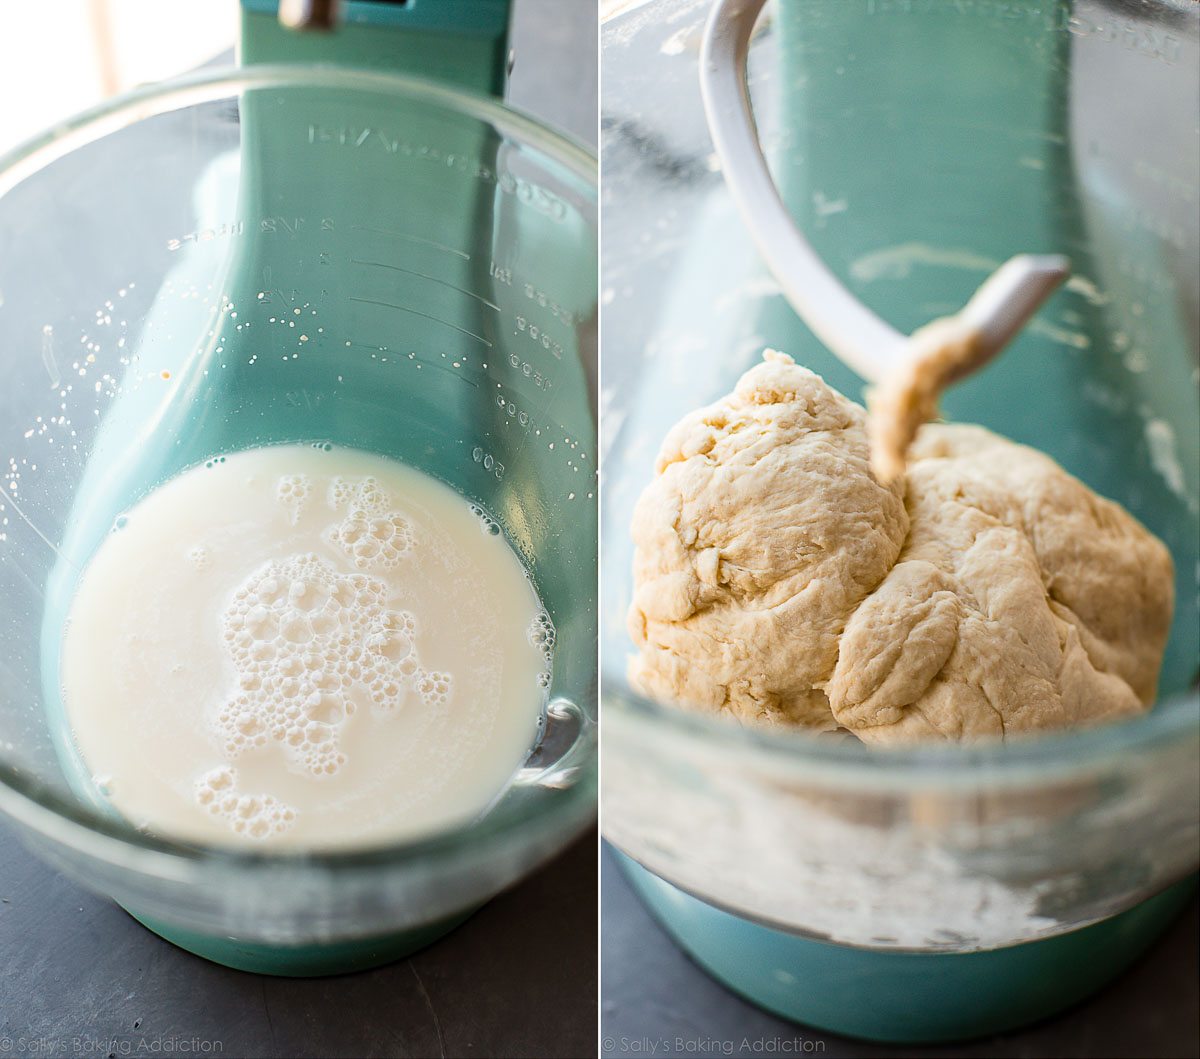
Mix the yeast and sugar in the warm water, let it sit for a minute, then whisk in the butter and salt, then add the flour. You can use a stand mixer fitted with a dough hook attachment a big bowl and wooden spoon. Work with what you have in the kitchen. And if you need extra help with kneading, see my full How to Knead Dough video tutorial.
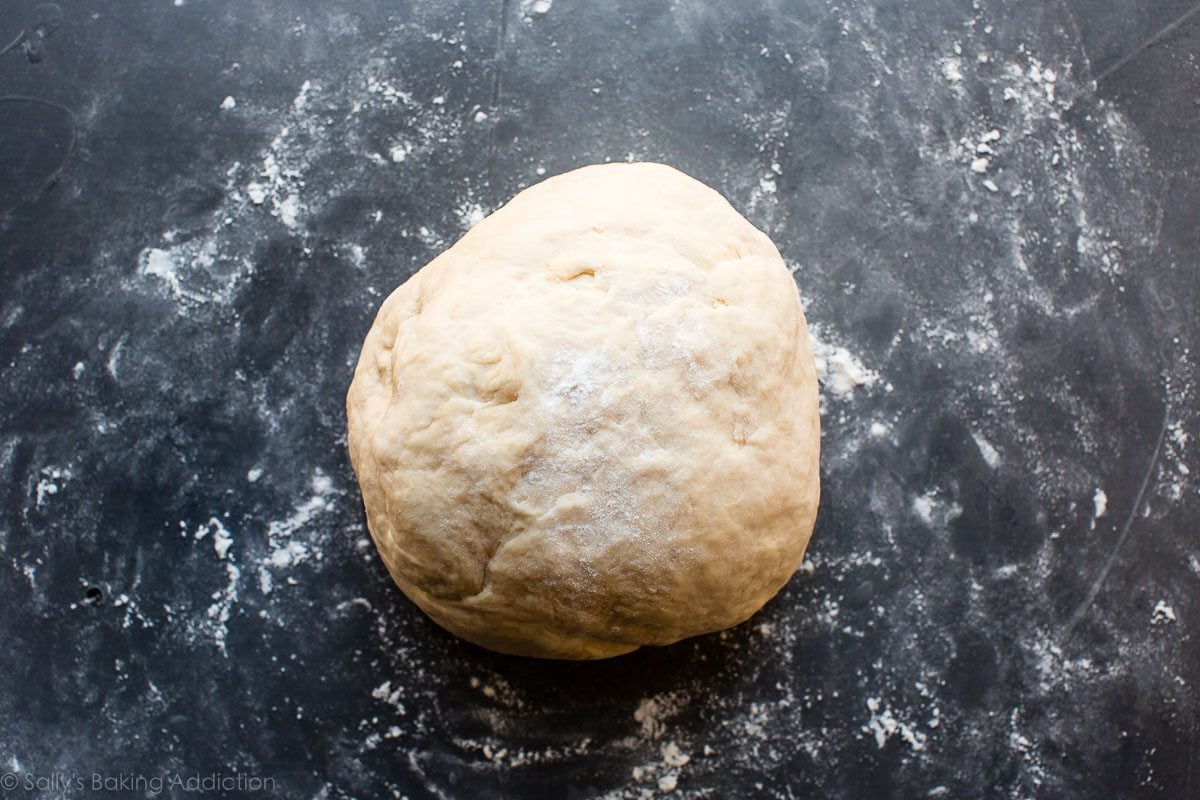
You don’t have to wait to let this dough rise for an extended period of time. Just 10 to 30 minutes does the trick. Don’t have a lot of time on your hands? This recipe is for you. If, however, you want to extend the rise time, you certainly could. Doughs that leave time for bulk fermentation (when the dough rises before shaping), typically have a more enhanced, developed flavor. In fact, some pretzel recipes require an overnight rise in the refrigerator. If you have the time for that, do it! However, I find a brief rise suitable for today’s pretzels, especially if I’m making them with younger bakers.
How to Shape Homemade Soft Pretzels
Now it’s time to shape.
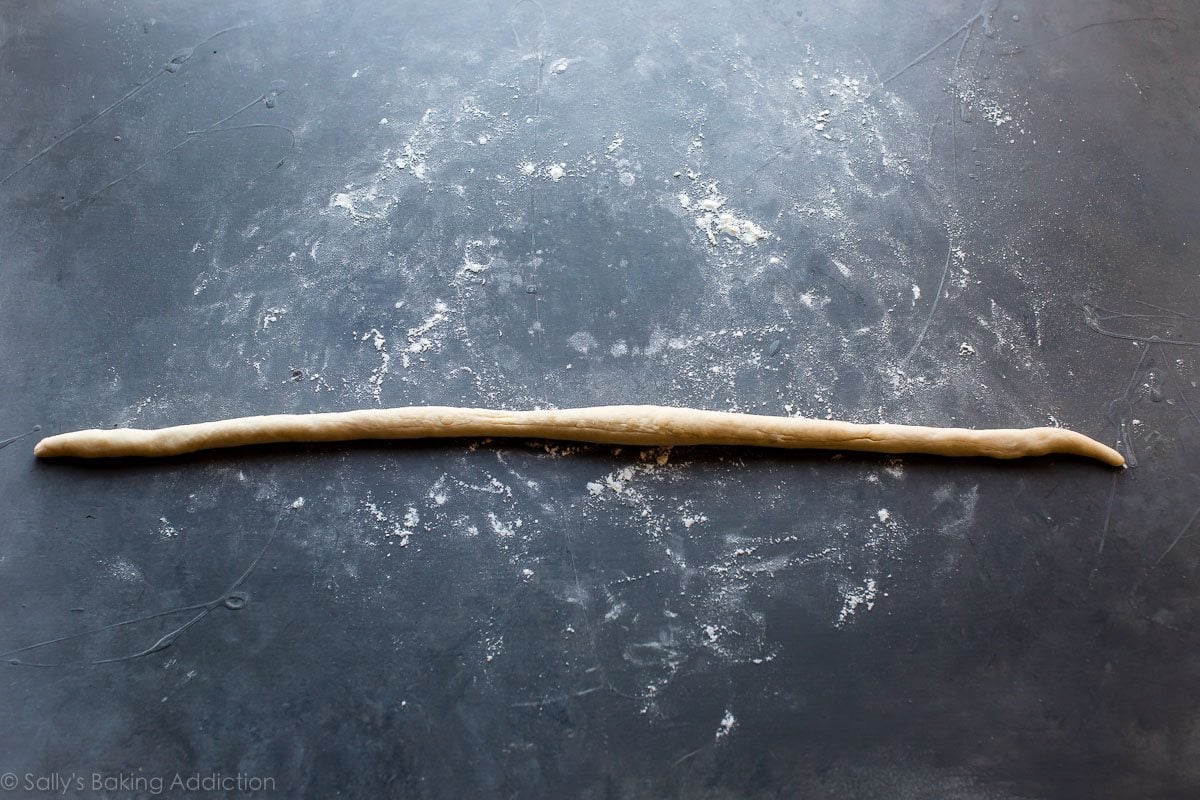

Roll about 1/3 cup (75g) of dough into a long 20- to 22-inch rope.
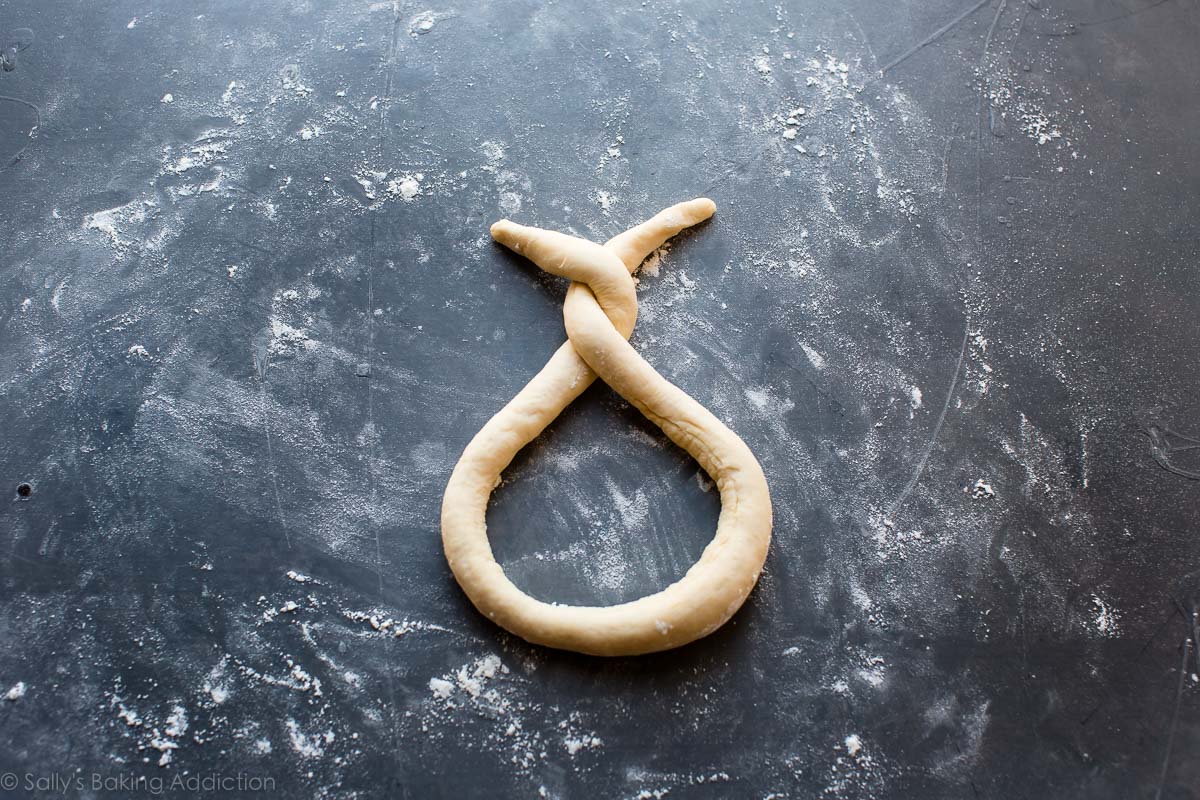
Twist the ends and bring the ends down. That’s a pretzel!
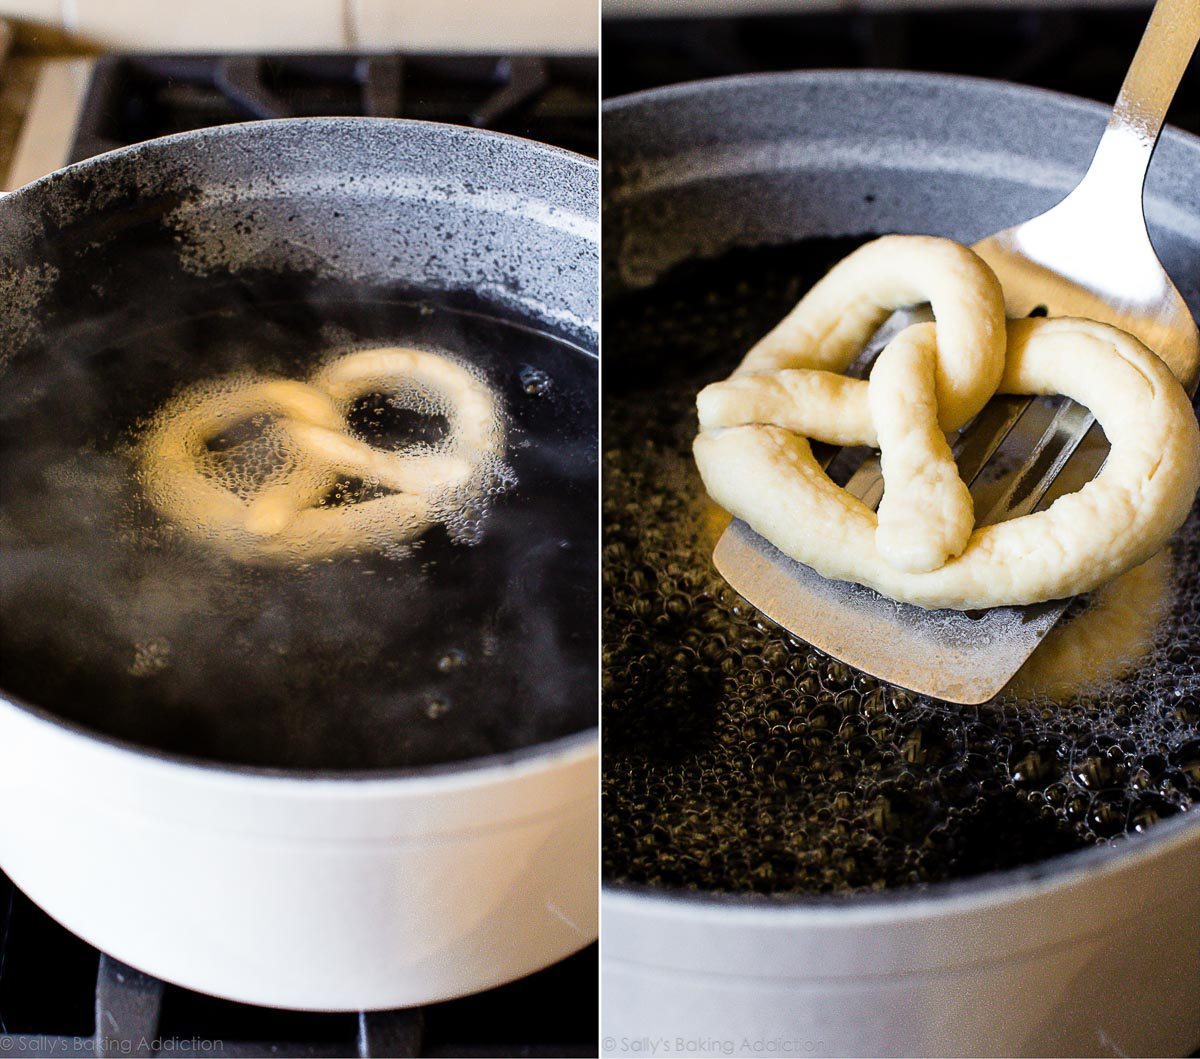
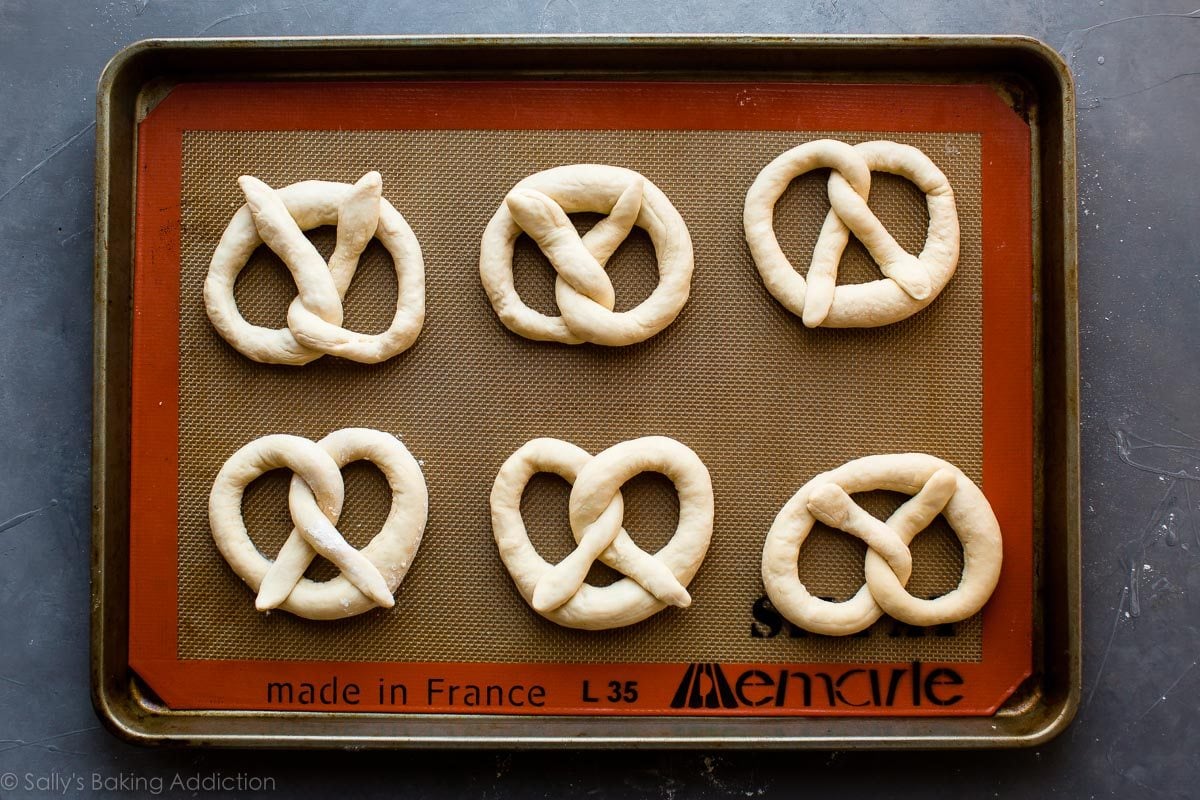
Now drop the pretzels into the boiling water + baking soda. Let them boil for 20–30 seconds each, then place onto a baking sheet. This pretzel dough makes 12 regular-size soft pretzels, so I use 2 baking sheets. 6 on each.
Sprinkle with coarse salt and bake in a hot oven. That’s it, you’re done.

Make-Ahead Tip
If you are making pretzels in advance, do not top them with coarse salt before baking. The salt draws the moisture out of the pretzels, and once you’ve placed the baked and cooled pretzels in an airtight container or bag, it doesn’t take long before you’ll notice water droplets forming inside and the pretzels become soggy and wrinkled. Yuck!
If you won’t be serving the pretzels the same day you bake them, omit the salt-topping step. Bake as directed, then allow to cool completely before placing them in an airtight container, and store at room temperature. When you are ready to serve them, place the pretzels on a baking sheet and brush them lightly with water, then sprinkle with coarse salt. Bake them in a 350°F (177°C) oven for 5–10 minutes, or until warmed through.
Same goes for freezing homemade soft pretzels: wait to top with salt until you’re ready to serve them. Cool the unsalted baked pretzels completely, then freeze in an airtight freezer-safe container or zip-top bag for up to 3 months. To reheat, brush frozen pretzels (no need to thaw) with water and sprinkle with coarse salt, then bake at 350°F (177°C) for 20 minutes or until warmed through.
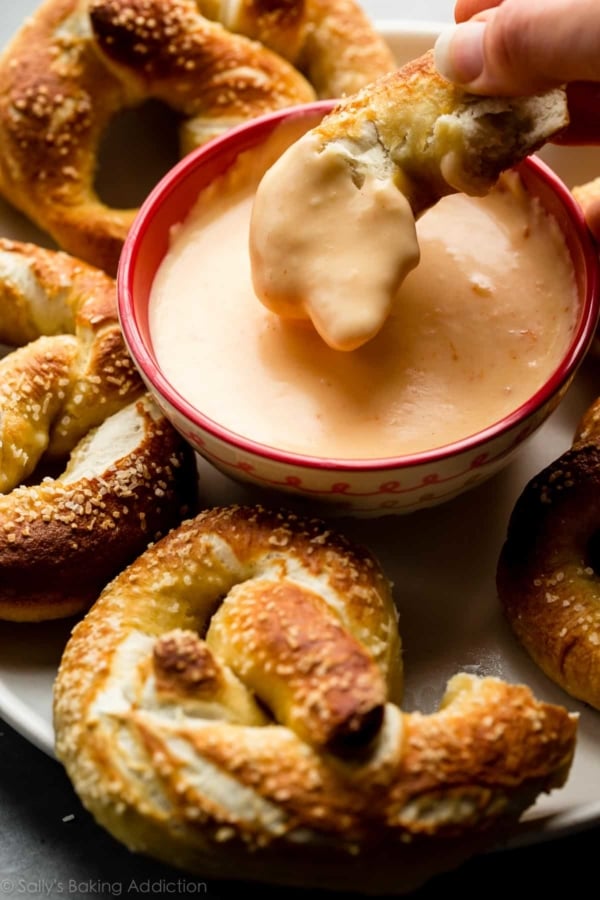

And if you want to kick your soft pretzel status into major high gear, add some spicy nacho cheese sauce.
Print
Easy Homemade Soft Pretzels
- Prep Time: 25 minutes
- Cook Time: 15 minutes
- Total Time: 40 minutes
- Yield: 12 pretzels
- Category: Snacks
- Method: Baking
- Cuisine: American
Description
This is one of the easiest ways to prepare homemade soft pretzels for beginners, and the results are extra delicious! The dough is a family recipe and only needs to rest for 10 to 30 minutes before shaping. The quick baking soda boil gives the pretzels their traditional flavor, and I do not recommend skipping it. This recipe is also in my New York Times best-selling cookbook, Sally’s Baking 101.
Ingredients
- 2 and 1/4 teaspoons (7g) instant or active dry yeast (1 standard packet)
- 1 Tablespoon brown sugar or granulated sugar
- 1 and 1/2 cups (360ml) warm water (around 100°F/38°C)
- 1 Tablespoon (14g) unsalted butter, melted and slightly cooled
- 1 teaspoon salt
- 3 and 3/4–4 cups (469–500g) all-purpose flour (spooned & leveled), plus more as needed
- coarse salt, for topping
Baking Soda Bath (See Recipe Note)
- 1/2 cup (120g) baking soda
- 9 cups (2.13L) water
Instructions
- Whisk the yeast and sugar into warm water. Cover and allow to sit for 1 minute.
- Whisk in the melted butter and salt. Add 3 cups (375g) of flour. Mix with a wooden spoon (or dough hook attachment if using a stand mixer) until combined. Add 3/4 cup (94g) more flour until the dough is slightly tacky and pulls away from the sides of the bowl. If it is still sticky, add up to 1/4 cup more (31g) flour, 1 Tablespoon at a time, as needed. Poke the dough with your finger—if it bounces back, it is ready to knead.
- Knead the dough: Keep the dough in the mixer and beat for an additional 3 to 5 full minutes, or knead by hand on a lightly floured surface for 3 to 5 minutes. (If you’re new to bread-baking, my How to Knead Dough video tutorial can help here.) If the dough becomes too sticky during the kneading process, sprinkle 1 teaspoon of flour at a time on the dough or on the work surface/in the bowl to make a soft, slightly tacky dough. Do not add more flour than you need because you do not want a dry dough. After kneading, the dough should still feel a little soft. Poke it with your finger—if it slowly bounces back, your dough is ready to rise. You can also do a “windowpane test” to see if your dough has been kneaded long enough: tear off a small (roughly golfball-size) piece of dough and gently stretch it out until it’s thin enough for light to pass through it. Hold it up to a window or light. Does light pass through the stretched dough without the dough tearing first? If so, your dough has been kneaded long enough and is ready to rise. If not, keep kneading until it passes the windowpane test.
- Shape the kneaded dough into a ball. Cover lightly with a towel and allow to rest for 10 to 30 minutes. (Meanwhile, I like to get the water + baking soda boiling as instructed in step 8.)
- Preheat oven to 400°F (204°C). Line 2 baking sheets with parchment paper or silicone baking mats. Silicone baking mats are highly recommended over parchment paper. If using parchment paper, lightly spray with nonstick spray or grease with butter. Set aside.
- With a sharp knife or pizza cutter, cut dough into 75g sections, which is about 1/3 cup of dough each.
- Roll the dough into a 20–22-inch rope. Form a circle with the dough by bringing the 2 ends together at the top of the circle. Twist the ends together. Bring the twisted ends back down towards yourself and press them down to form a pretzel shape.
- Bring baking soda and 9 cups of water to a boil in a large pot. Drop 1–2 pretzels into the boiling water for 20–30 seconds. Any longer than that and your pretzels will have a metallic taste. Using a slotted spatula, lift the pretzel out of the water and allow as much of the excess water to drip off. Place pretzel onto prepared baking sheet. Repeat with remaining pretzels. If desired, cover the boiled, unbaked pretzels with lightly oiled plastic wrap and refrigerate for up to 24 hours before baking (step 9).
- Sprinkle the tops of the pretzels with coarse salt. Bake for 12–15 minutes or until dark golden brown.
- Remove from the oven and, if desired, serve warm with spicy nacho cheese sauce.
- Cover and store leftover pretzels at room temperature for up to 3 days. See Make Ahead & Freezing Instructions in recipe Notes below for more storage info. To reheat, microwave for a few seconds, or bake at 350°F (177°C) for 5 minutes.
Notes
- Make Ahead & Freezing Instructions: If planning to freeze fully baked pretzels, do not top them with coarse salt before baking. Cool completely, then freeze in an airtight freezer-safe container or zip-top bag for up to 3 months. To reheat, brush frozen pretzels (no need to thaw) with water and sprinkle with coarse salt, then bake at 350°F (177°C) for 20 minutes or until warmed through, or microwave frozen pretzels until warm. The prepared pretzel dough can be covered and refrigerated for up to one day or frozen in an airtight container for 2–3 months. Thaw frozen dough in the refrigerator overnight. Refrigerated dough can be shaped into pretzels while still cold, but allow some extra time, about 1 hour, for the pretzels to puff up at room temperature before continuing with the baking soda bath and baking. You can also freeze the boiled, unbaked pretzels and here’s how: after boiling the pretzels in step 8, place them on a lightly greased parchment paper- or silicone baking mat-lined baking sheet. Freeze the pretzels for about 1 hour, then transfer them to an airtight freezer-safe container or zip-top bag (squeeze out as much air as possible from the bag before sealing) and freeze for up to 3 months. To bake, brush frozen pretzels (no need to thaw) with water and sprinkle with coarse salt, then bake at 400°F (204°C) for 15–20 minutes or until dark golden brown.
- Special Tools (affiliate links): Electric Stand Mixer or Glass Mixing Bowl | Wooden Spoon | Baking Sheets | Silicone Baking Mats or Parchment Paper | Pizza Cutter | Large Pot (such as a Dutch oven)
- Baking Soda Bath (Step 8): The baking soda bath is strongly recommended because it helps create that chewy texture and distinctive pretzel flavor. If skipping, brush the shaped and unbaked pretzels with a mixture of 1 beaten egg + 1 Tablespoon of dairy or nondairy milk. This is known as an egg wash. Sprinkle the brushed pretzels with salt. The egg wash will help the salt stick. If you don’t have an egg, simply brush with 2 Tablespoons of dairy or nondairy milk.
- Cinnamon Sugar Pretzels: Skip the coarse salt topping (and skip the egg wash, see note above, if you aren’t doing the baking soda bath step). Bake as directed in step 9. Meanwhile, melt 4 Tablespoons (56g) of unsalted or salted butter. Brush the baked and warm pretzels with melted butter, then dip the tops into a mix of cinnamon and sugar. I usually use 3/4 cup (150g) of granulated sugar and 1 and 1/2 teaspoons cinnamon. Cinnamon-sugar pretzels taste best the day they’re made because the melted butter topping causes them to become soggy after a few hours.
- Reference my Baking with Yeast Guide for answers to common yeast FAQs.


Reader Comments and Reviews
tried these with my 10 year old today, had a lot of fun shaping them, and very tasty, Thanks for the recipe!
Absolutely fabulous
Was skeptical on how quickly these could be made, but was blown away with the results.
Will make again and again!
Thank you so very much ❤️
I just made the yummiest pretzels with my daughter thanks to your receipt. The only problem I had was they got stuck to the baking paper and I could taste some baking soda on them. What did I do wrong? Last few minutes of baking I brushed some melted butter and brown sugar on all them them.
Sally, you’re a genius!! You made this recipe so easy to follow and they came out 100% perfectly, first time around. I even halved the recipe, as this was going to be a movie night snack for just my hubby and me. Delicious. So impressed… I have tried lots of internet recipes and many have been quite good, but I’ve never been pleased enough to write a comment. Now I’m going to try more of your recipes. Thank YOU. HappyInEdmonton
Made them with my 3 year old today as she kept trying to eat the play dough ones we made super easy and I make and she loved dipping them in Nutella
Hi Sally! Would it be possible to use vegetable oil in place of the butter? Also, could white sugar be substituted for the brown sugar? Trying to use what I have in my pantry rather then venture out to the supermarket in these crazy times. Thank you for all of your awesome recipes and stay safe 🙂
Either wouldn’t be a problem in a pinch. Enjoy!
Thanks Sally, I made these using everything listed except the butter (used vegetable oil in place of it) and they were fabulous! Can’t wait to make them again (they’re already almost gone)!
These turned out SO good!! We made them with our kids and so that made it take longer, but perfect texture. Also, we used all bread flour and it worked just great!
Excellent! And pretty easy, my kids made them. As good as Aunties Anne’s. We’ll definitely make these again, thank you.
These soft pretzels were absolutely amazing!!
Very easy and fun project for our family. We brushed some with butter and sprinkled with cinnamon sugar after baking. hey are delicious too! Thanks for sharing Sally.
Just baked 2 batches of these – you just single-handedly saved our Opening Day!!!
Hi Sally!
Do we have to let the active dry yeast bloom first?
Most modern active-dry yeasts are already active, so you can definitely skip it.
Hi Sally,
Thank you for this recipe! My girls beg for pretzels at the mall when we go and I don’t often say yes haha. So they will be so excited when I tell them we’re actually making our own!
My question is, for the yeast, is there a “better” one of the two? I have both so I was just curious if the outcome changes at all with the different yeasts.
Thanks again,
Kim
Hi Kim, I almost always use Red Star Platinum which is an instant yeast. However for this recipe since we aren’t letting the dough rise over a long period of time you can use either instant or active.
Hi! In the midst of this , I have a giant bag of whole wheat flour and not a lot of white flour, so I’m trying to use the whole wheat flour first. Would whole wheat flour work for this? Also, I tried your fluffy whole wheat waffle recipe the other day and those were DELICIOUS!
Thank you!
Hi Alix! It would, yes, but the pretzels will taste pretty dense. Here are all my recipes using whole wheat flour if you’re interested!
So good!!!
I just tired making these for the first time today and they turned out wonderful! Once they were done baking I brushed some melted butter on a few of them and then dipped them in cinnamon and sugar– they were excellent too. Auntie Anne’s who?
I absolutely love this recipe! I’ve been making them for almost three years now and make a huge batch every year as an appetizer and serve with my own beer cheese recipe at our yearly crawfish boil. Our friends love them! I have found that I can make the batch and bake the week before and then freeze. I reduce my baking time just a bit and take them out as they begin to brown. This way when I go to reheat them later they don’t get over done. I take my pretzels out of the freezer a few hours before the party, let the defrost and pop in the oven to re-heat and crisp up.
Hi Sally! I finally conquered my fear of baking with yeast and made these pretzel s today with my kiddos. The recipe was easy to follow and the finished product tasted great but…..every single one stuck to the bottom of the parchment paper! I had to cut them free to eat, which resulted in losing half of the golden brown and chewy crust. What did I do wrong???
Hi Rebecca! I’m so glad you tried these soft pretzels. 🙂 For next time– spraying parchment with nonstick spray should work, but I can’t recommend silicone baking mats enough. I use them for everything!
Do you think these would turn out if I only used bread flour or even mostly bread flour? Having a hard time finding regular flour these days!
Definitely!
Hi! I made these with my 9 year old daughter today. They were fun to make and my family absolutely faved about how delicious they were!!! Thank you so much for the great recipe, instructions, and pictures. We will definitely make them again!
I made this before a couple days ago. It’s really easy and I love that I don’t have to wait 2 hrs for it to rest. The 10 min resting time gave me time to grate cheese to add to it. added some cayenne pepper and pizza seasoning. it came out more like buns, than pretzels, but hey, with the additions, it was still good
Hi Sally, I made these a while ago with the cheese sauce and they were delicious the night I baked them, but the next day they were really hard and they tasted different (and not in a good way!). Is there something I might have done wrong, or something I should do differently next time? Thanks!
Hi Savannah, Unfortunately soft pretzels are best enjoyed the same day you make them. I have been able to keep them at room temperature for a few days but they do taste best if you warm them back up either in the oven or the microwave. Freezing them works well also!
Hi! I made these pretzels and they tasted amazing 🙂 I left some of them overnight in an airtight container, however in the morning they’re pretty scary looking. The salt seems to have absorbed any liquid that was in the pretzels and the pretzels looks like they had an allergic reaction! It’s covered in bumps and they’re pretty ripply. Any suggestions?? I want to make a new batch – help!
I’m so glad you enjoyed them, Esther. Unfortunately soft pretzels really are best enjoyed right away. Re-heating the leftovers usually brings them back to life though. Next time try not using salt on the ones you aren’t going to eat and try freezing them instead of storing them at room temperature (see recipe note for freezing instructions).
These were fantastic – light and fluffy, with a nice crust. They taste fantastic dipped in nacho cheese, and I would definitely eat these any time.
I’ll be making them again for sure!
Hi Sally,
I must be your worst student. I had so much trouble rolling the dough on these – it kept springing back on itself or would break. The pretzels ended up so fat that there were no gaps in the middle and they aren’t pretty. The texture and taste is great though! 🙂 Maybe I just need more practice, but do you think I under/over worked the dough in my mixer? Also, I reduced the sugar as I’m not a fan of Aunt Annie’s….
Hi M S! I’m happy to help. If you notice this dough (or any homemade dough for that matter!) springing back and “shrinking” as you work to shape it, let it sit and rest for a few minutes. Cover all of the dough for 10 minutes, then return to it. The gluten needs a chance to settle.
I love this recipe! I’ve made them multiple times now. Do you think I can replace the butter with something to make them vegan? I have a friend I’d love to make them for. Have you tried it?
I made these today – my first attempt at soft pretzels – and, OH MY GOODNESS, they are seriously good! Real deal soft pretzels that I will be making again and again! Who knew it was so simple. Thank you for sharing this recipe.
This recipe is great but I started to realize I made a mistake when I only ended up with 7 pretzels. I made them way too big and they slide off the spatula into the water splashing it on my hand. I got a bit burnt but the pretzels are still yummy. I’m going to try again but make sure I get twelve.
Ouch! I’m glad you enjoyed them anyway, Mae! If you try again watch the above video and right at the 30 second mark you will be able to see how I cut the dough to end up with 12.
If I want to freeze them already shaped, do I do the baking soda bath after shaping before I freeze? Or do I shape, freeze, baking soda bath, bake?
Hi Tiffany! If you want to freeze the shaped, unbaked pretzels, I find it’s best to do the baking soda bath right before baking– even drop them into the bath while frozen. That being said, I have frozen these shaped pretzels AFTER the bath too. It doesn’t make a huge difference either way.
This is my very first time making these and I am so glad they turned out! They were so good and I will be making these again soon! They were so easy!