

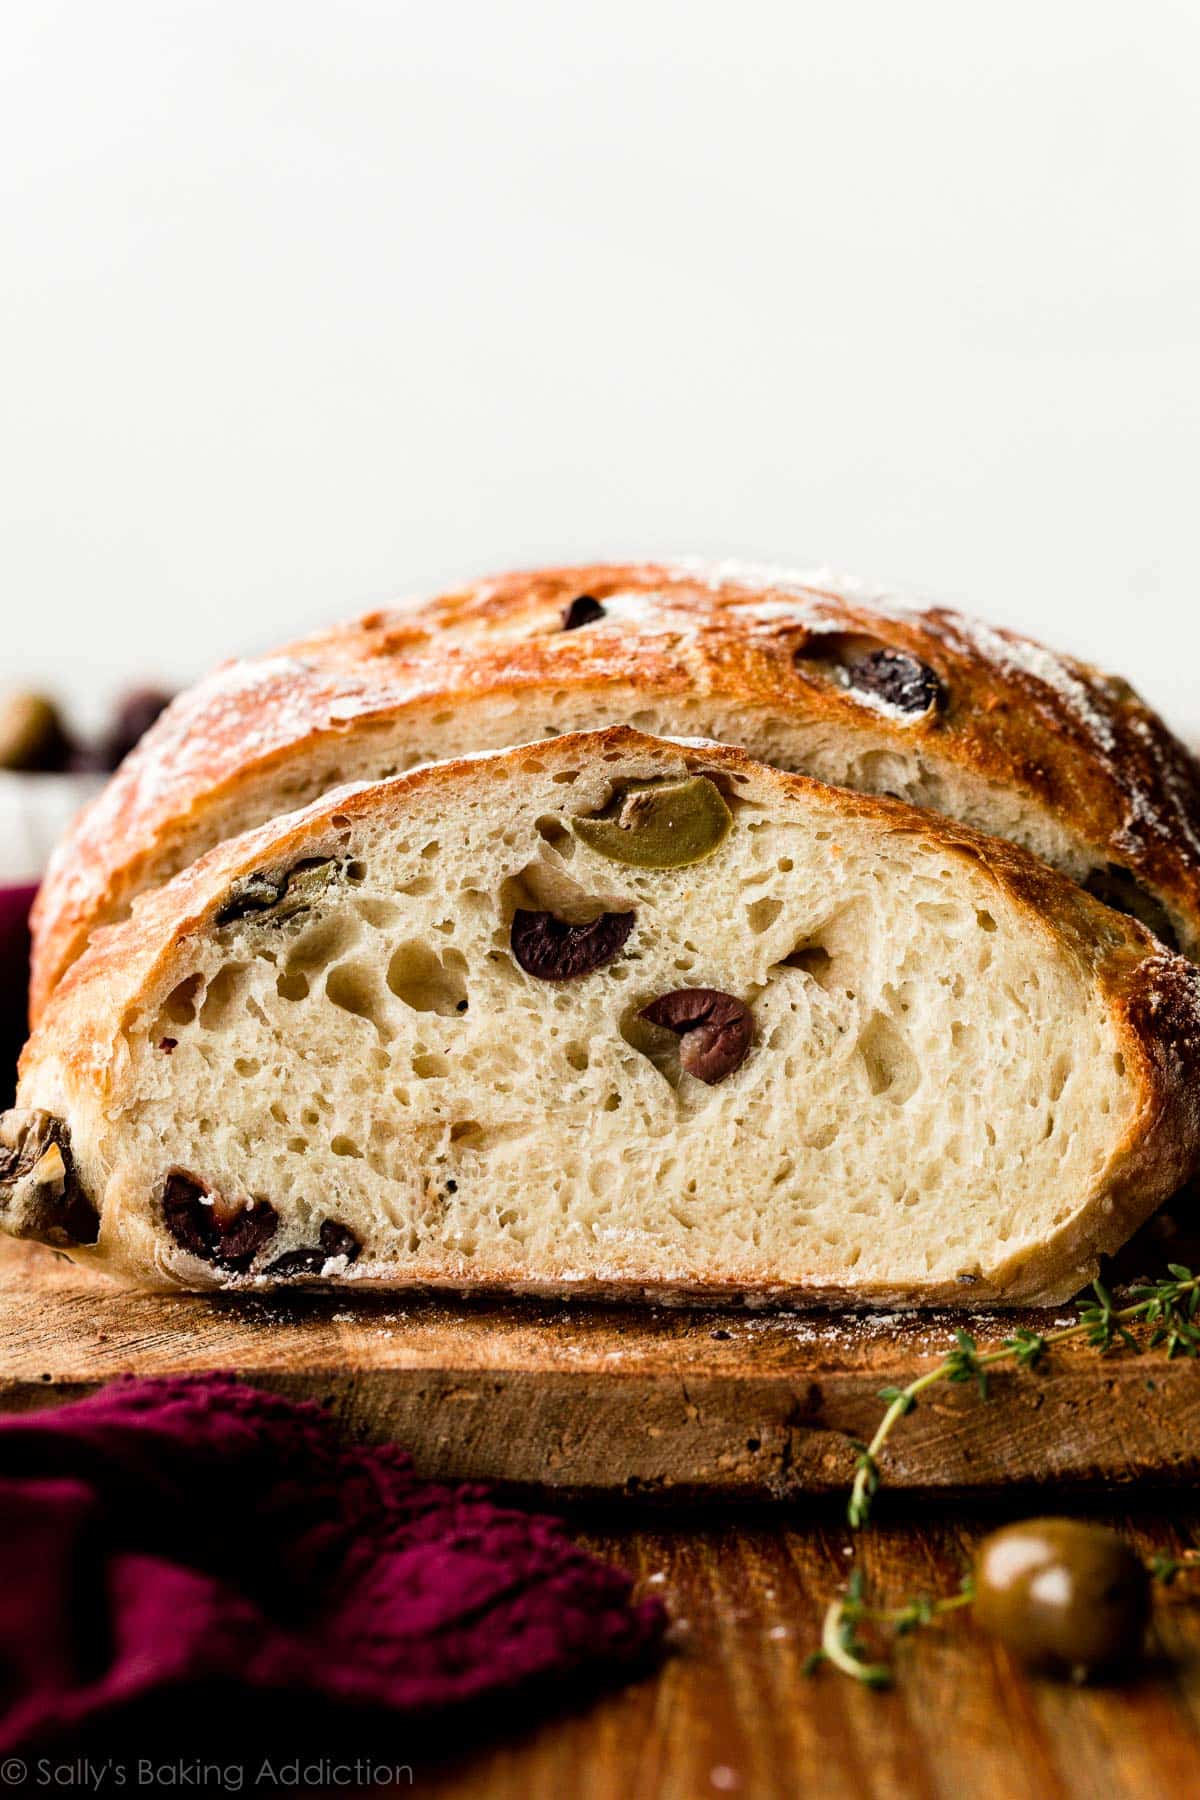
This crusty olive bread is perfect for serving at your next dinner party, or alongside a cheese and charcuterie board. It’s sure to impress your guests, and they won’t have any idea how easy it actually is! There’s no kneading or complicated shaping involved, and the vast majority of time is hands-off. This loaf is soft inside with a crispy chewy crust, and includes garlic, oregano, and plenty of salty olives.
One reader, Shannon, commented: “Another phenomenal recipe. Had this last night with the Baked Chicken Meatballs—was so delicious. So much flavor and with minimal effort, especially for a bread. Did a mix of kalamata and green olives. Wonderful. ★★★★★“
Another homemade yeast bread to love!
Don’t let your eyes fool you… the dark speckles in today’s bread are not chocolate chips and raisins. They’re olives! This recipe is based off of my homemade artisan bread, a wonderfully easy and widely popular no-knead bread that’s fit for both beginners and experts. (Note that I bake this bread at a slightly lower oven temperature because the olives can burn.)
A Flavorful Bread Recipe for Beginners
Today’s olive bread basically makes itself, so if you’re nervous to try homemade bread, this recipe is a great introduction. Even though the recipe is easy, the bread does NOT skimp on flavor. It’s just a simple way of baking homemade bread inspired by the no-knead technique originating from bread expert Jim Lahey. Here’s why it’s so simple:
- Only 7 ingredients
- Absolutely no kneading (just like homemade English muffins!)
- Zero complicated shaping
- No mixer required
- 90% of the time is totally hands off
- Can bake in a dutch oven or on a baking sheet
Plus, you can make it in 4 hours or let the dough rest in the refrigerator for up to 3 days (great make-ahead recipe!). Once you realize how easy it is to prepare salty, herby, garlicky olive bread, you’ll find any excuse to bake it.
Key Ingredients You Need & Why
Today’s Mediterranean-inspired bread is an egg free baking recipe and dairy free recipe. Here are the ingredients you need:

- Bread Flour: While you could use all-purpose flour in this recipe, I strongly recommend using bread flour. Bread flour produces a stronger, chewier bread and that makes a big difference in an artisan-style loaf like this olive bread or this homemade ciabatta bread.
- Instant Yeast: While you can use active dry yeast if that’s all you have, any quick-rise or instant yeast will produce flavorful results in less time. I use more yeast in this recipe compared to my cranberry nut no-knead bread and no-knead jalapeño cheddar bread. Why? Those doughs rest and rise at room temperature. However, for more flavor and just as much rise, I use more yeast and let this dough rest in the refrigerator. (Cool air slows the fermentation process and helps develop better flavor.)
- Salt: Just like with asiago-crusted skillet bread and no-knead pizza bread, I recommend using coarse salt because I find the bread’s flavor lacking with regular table salt.
- Garlic + Herbs: Dried oregano and garlic powder add flavor to the dough. You could also try some chopped fresh herbs or roasted garlic cloves, or simply leave them out. The recipe is pretty adaptable, just like the toppings for focaccia!
- Olives: See below for my recommendations.
- Water: I normally encourage you to use warm liquid with yeast, like we do in no knead seeded oat bread, because warm liquid helps the yeast work faster. However, use cool or room-temperature water here. Not freezing cold, not super warm… just cool to the touch. 70°F (21°C) is great, but the exact temperature doesn’t matter as long as it’s not warm. We use the same cool water method for no-knead honey oat bread.
- Optional Cornmeal: If you’re using a baking sheet, dust the pan with cornmeal for a pop of flavor and a little crunch. This is completely optional. If you have it, use it. If you don’t have it, dust the pan with flour.
Best Olives to Use
Kalamata olives are excellent in this bread, but you can use a medley of olives. I’ve made it both ways. Whatever you use, give the olives a rough chop.
Let Me Show You How to Make This Olive Bread
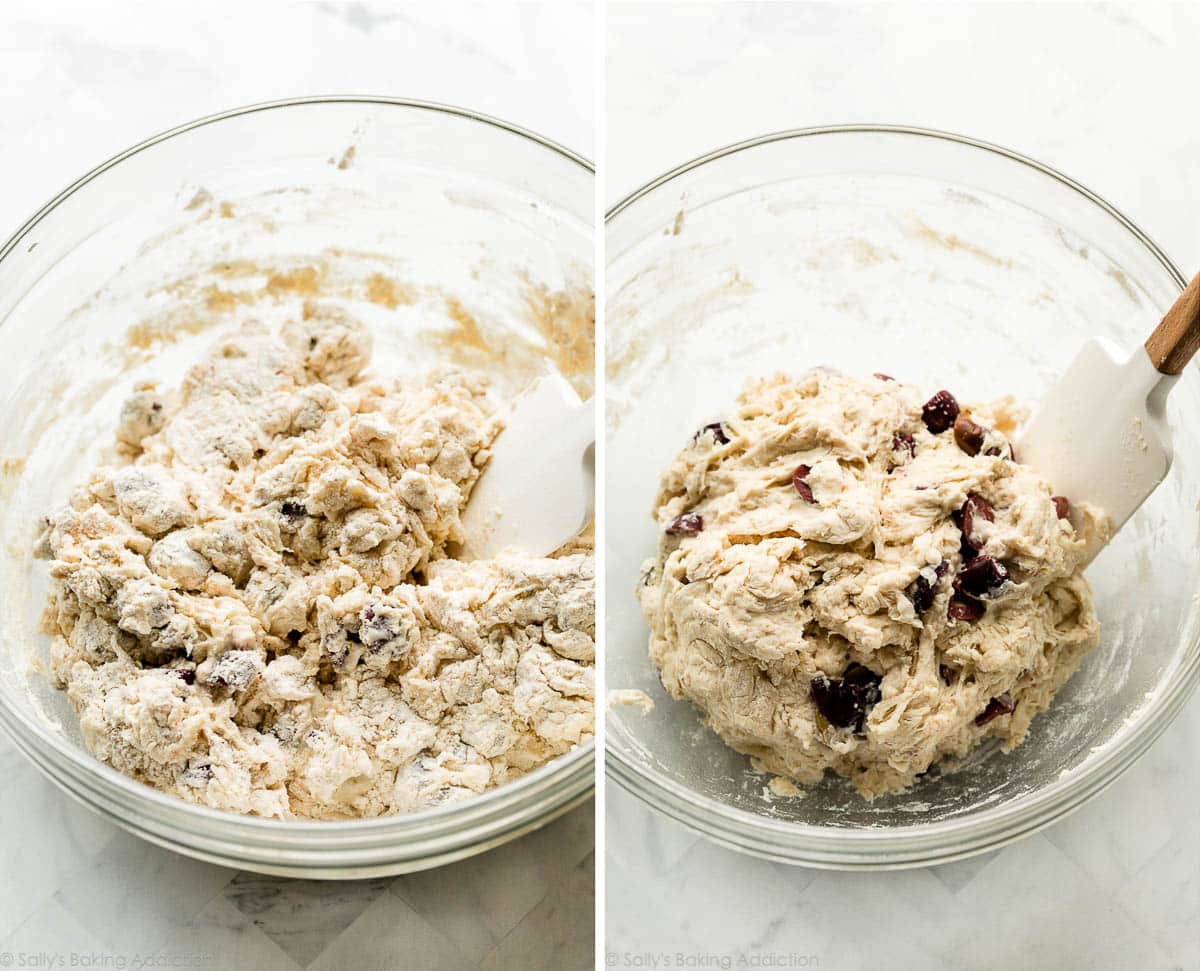
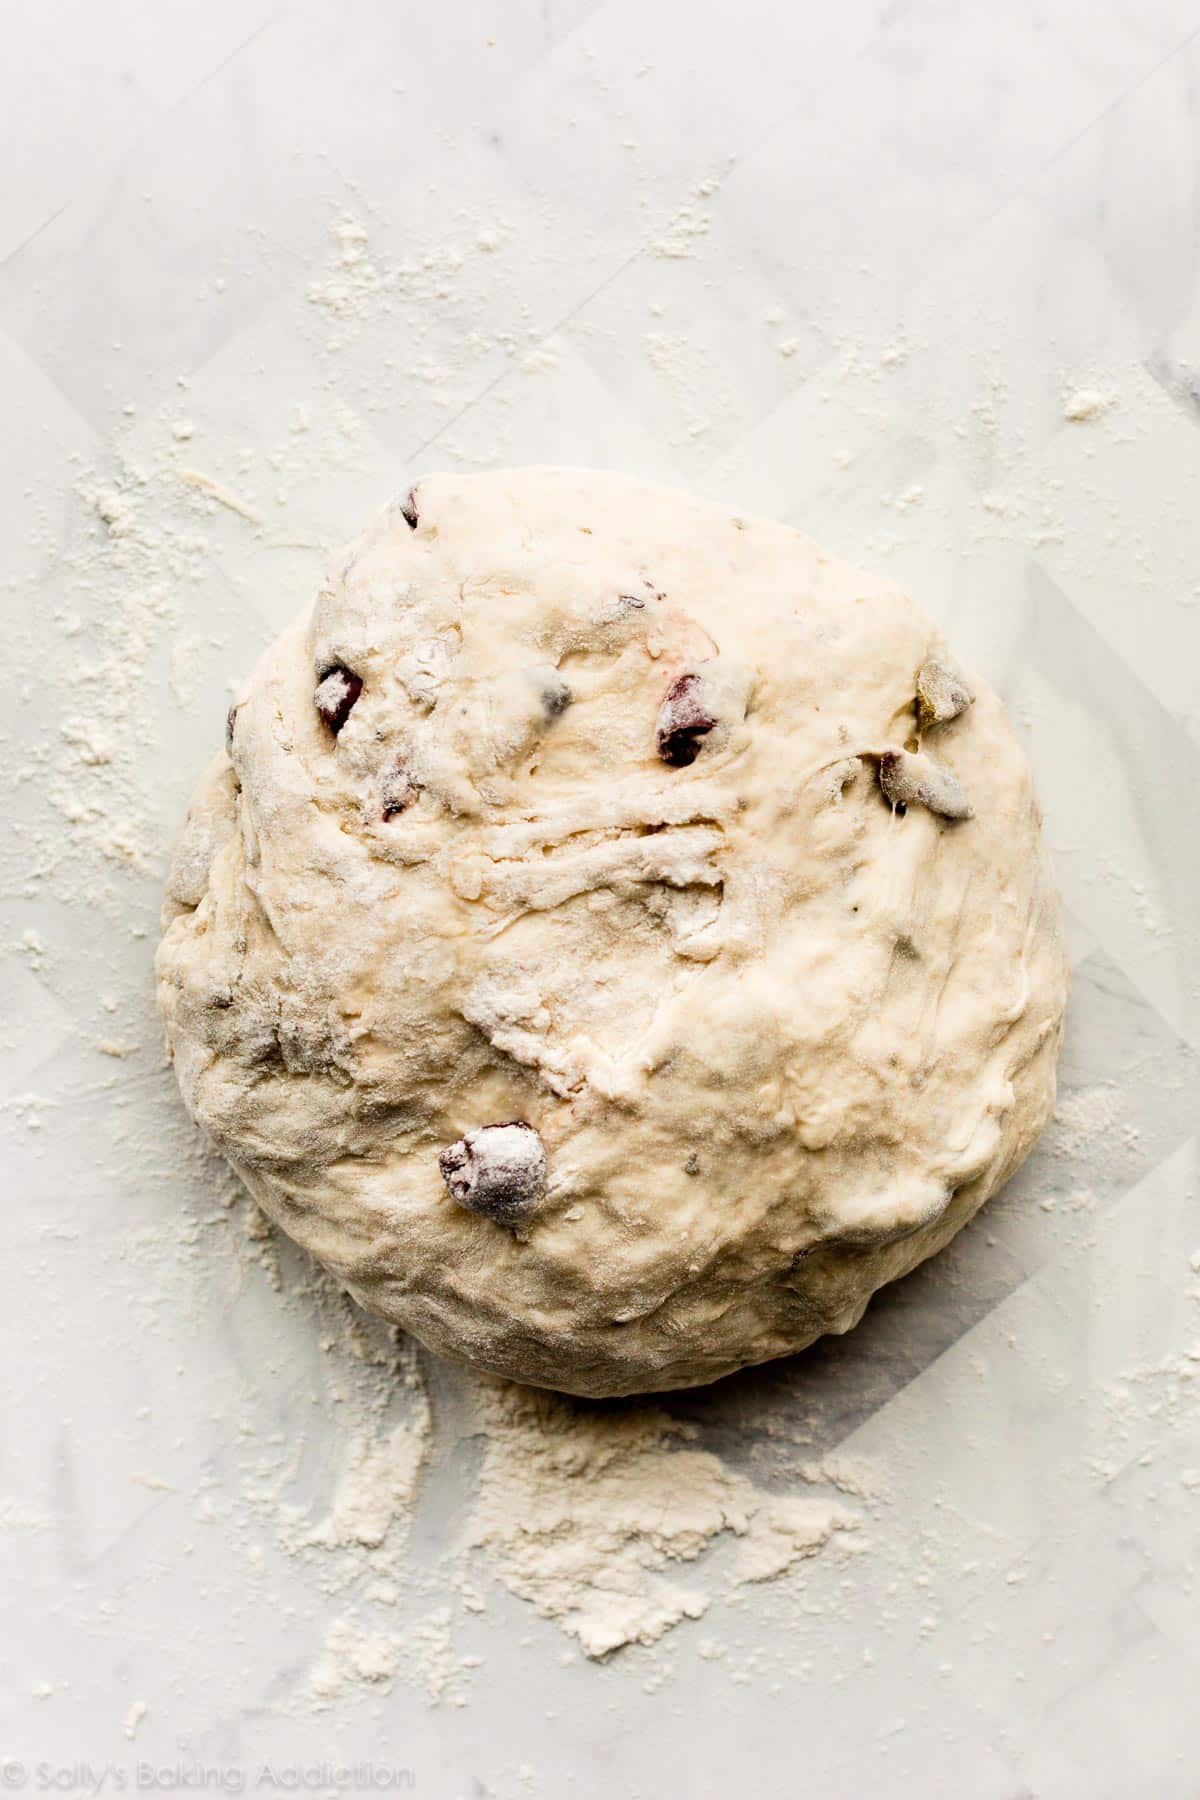
Mix the dry ingredients together and then mix in the chopped olives and water. At first the dough will seem very dry and shaggy and you’ll question if it will even come together. (See above!) Use a spatula at first and then switch to your hands to ensure all of the flour is moistened. The dough is a little sticky after it’s thoroughly mixed.
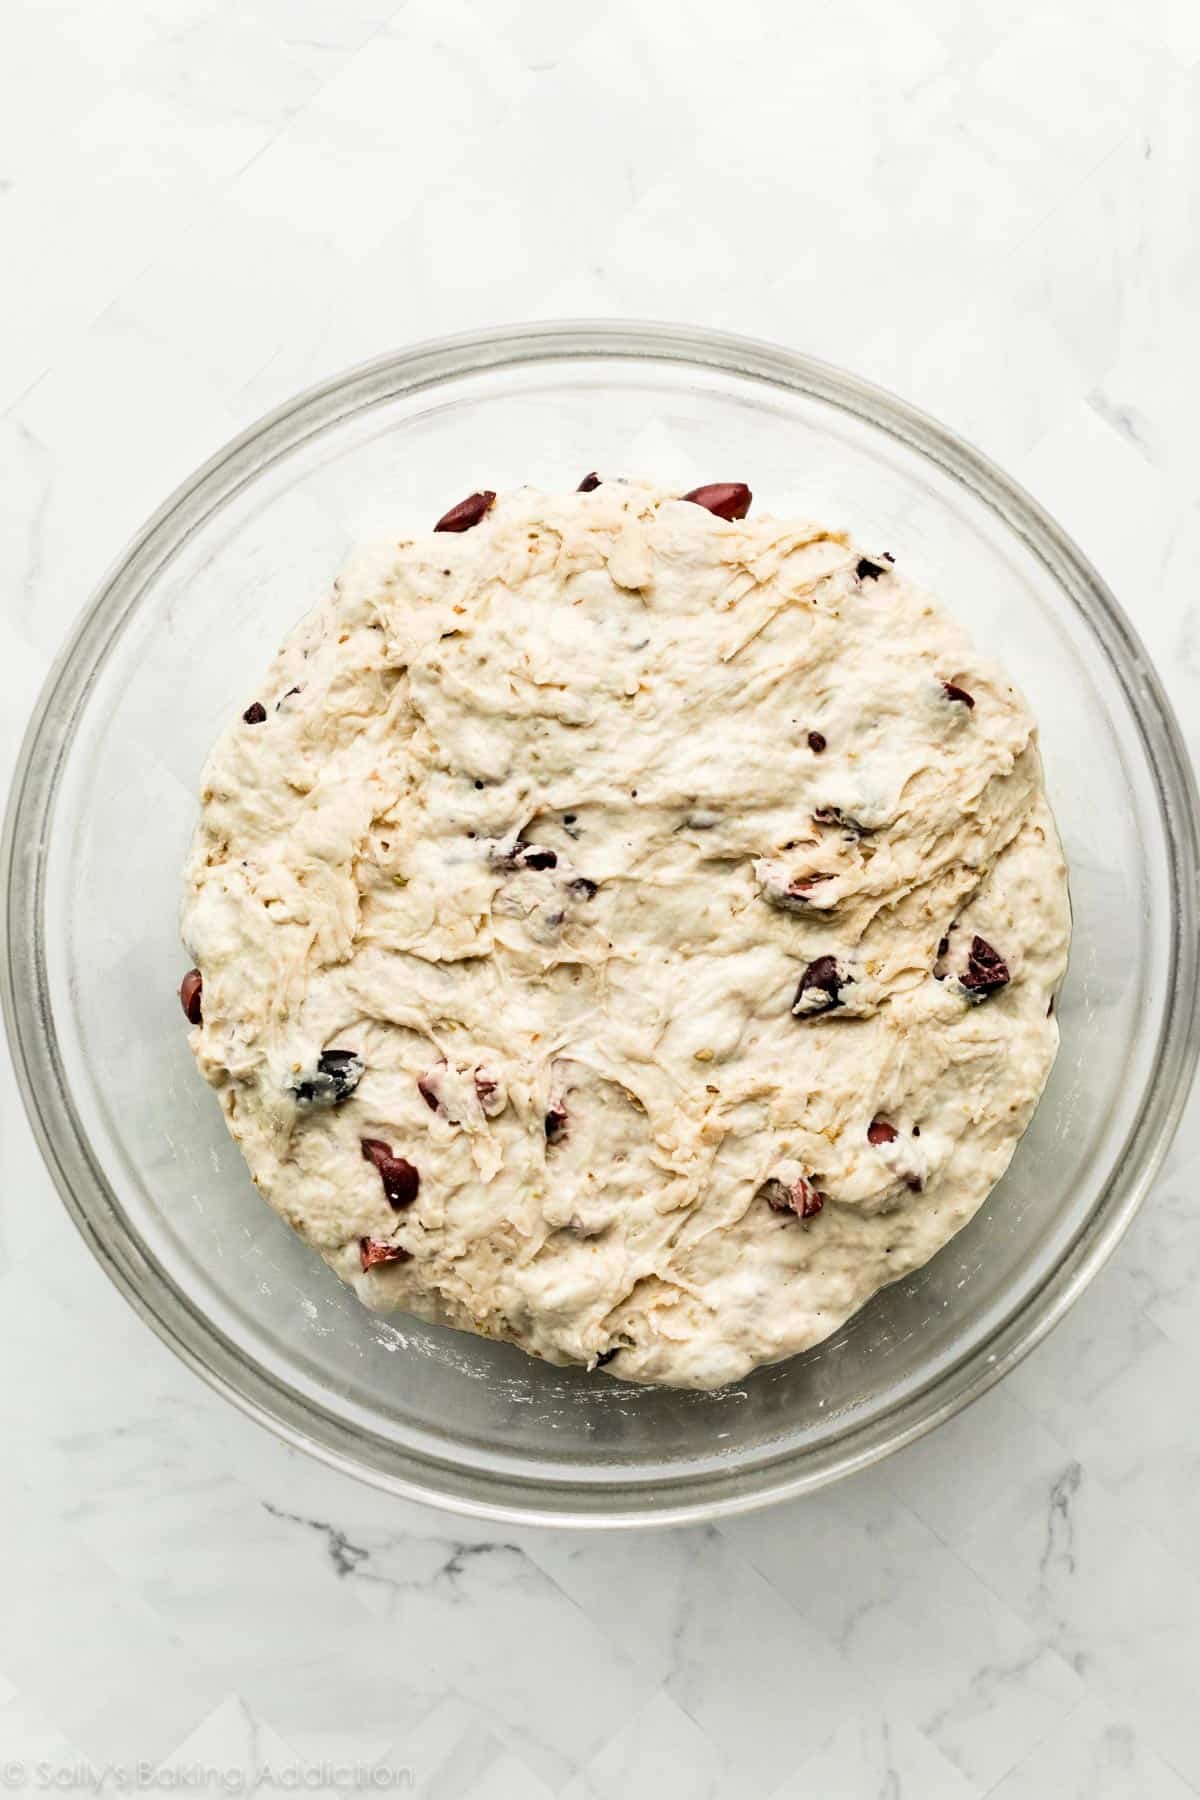
Let it rise. Cover the dough and let it rise at room temperature for about 2–3 hours.
You can immediately continue with step 4 below (gently shaping before baking) or refrigerate the dough for up to 3 days. For best flavor, I strongly recommend refrigerating the risen dough even if it’s just for a couple hours.
After the dough rises and rests in the refrigerator, use generously floured hands to shape the dough into a round boule or ball-like shape:
Now it’s time to choose between a dutch oven or baking sheet. This bread isn’t picky!
Use a Baking Sheet or Dutch Oven
You can use either. Baking the olive bread in a covered dutch oven traps steam inside the pot, creating that perfect crust. If you plan to bake a lot of bread in the future, you won’t regret picking up a dutch oven. If you don’t have a dutch oven, a nonstick large baking sheet is best. Let me explain both ways:
- Baking Sheet: Lightly dust it with flour and/or cornmeal. Place the dough on top, cover it, and let it rest as the oven preheats. You will find these detailed instructions in the recipe below, along with my crispy crust optional trick in step 7!
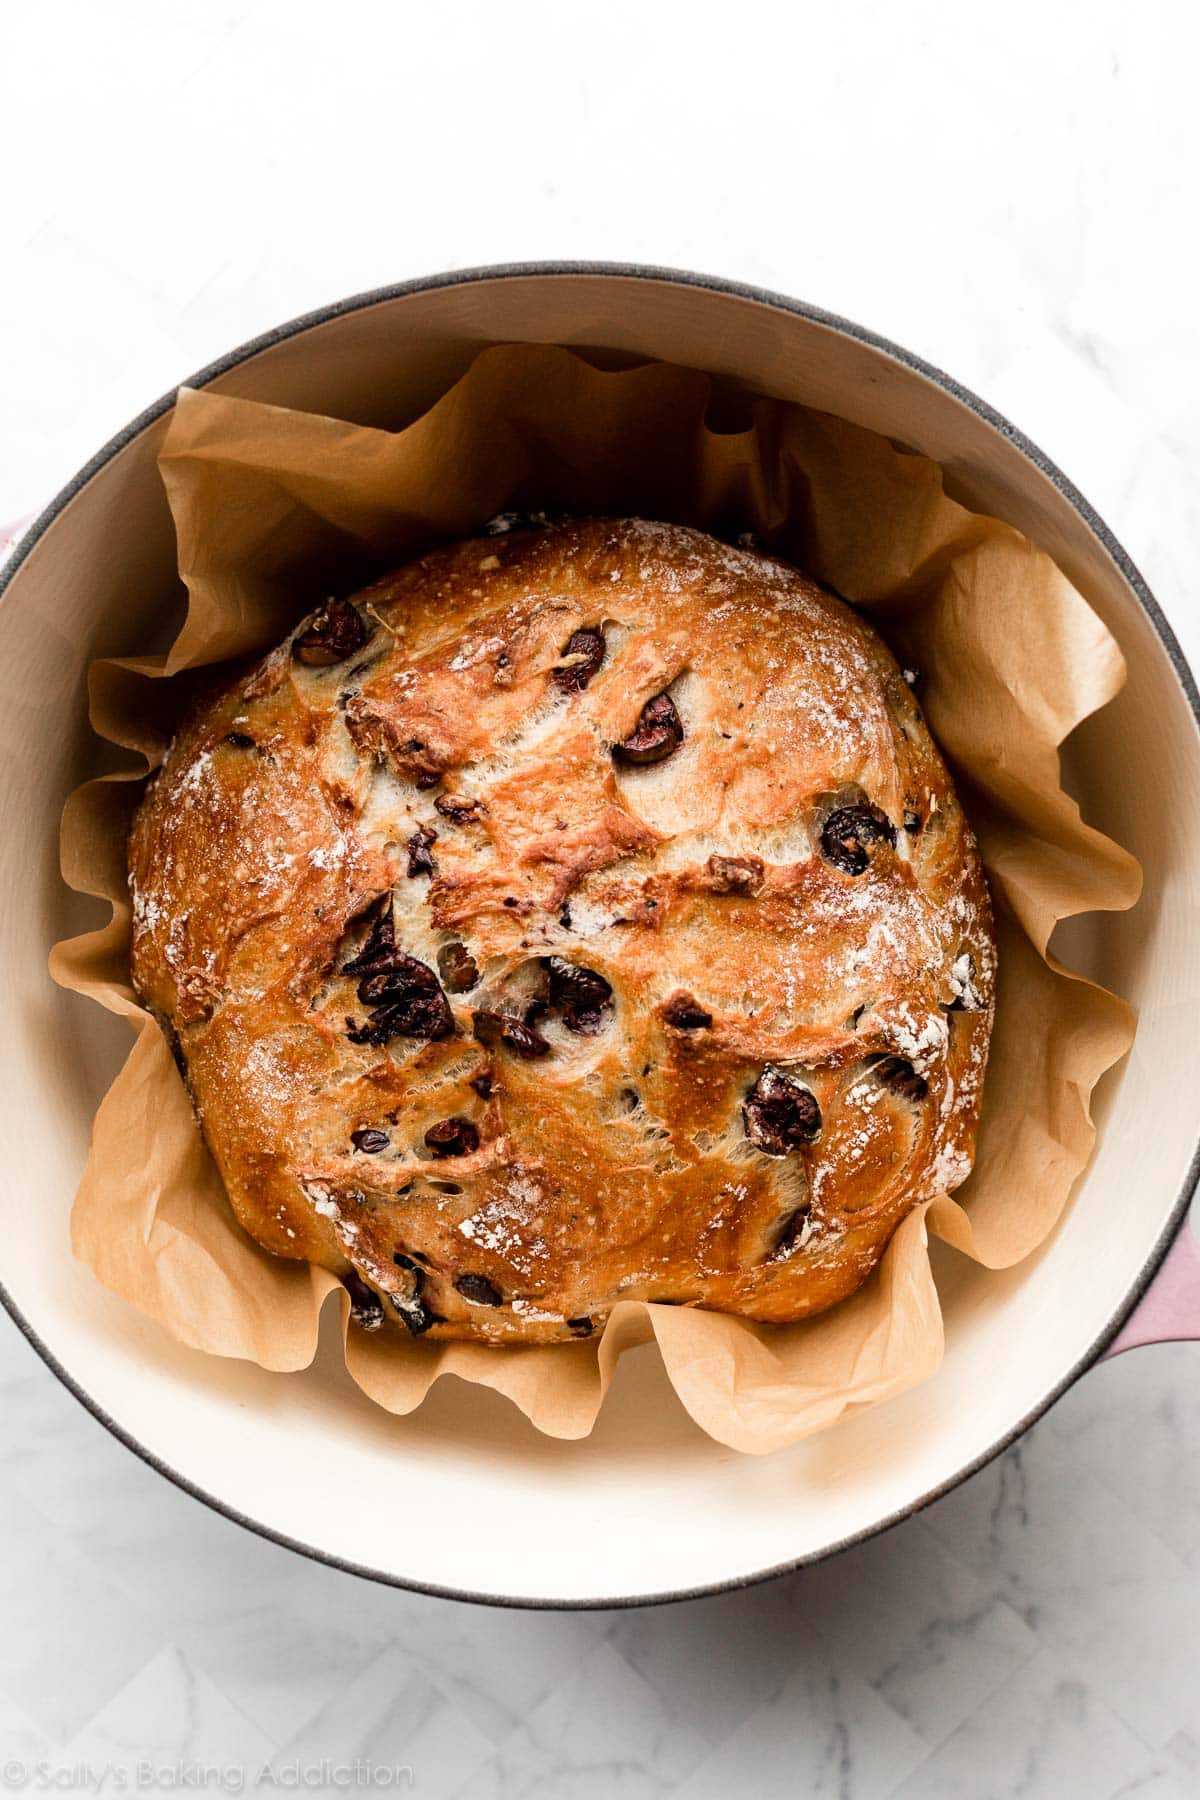
- Dutch Oven: Place the empty dutch oven with lid in the oven as it preheats. Place the dough on high heat resistant parchment paper (I use this parchment paper) and then fit inside a bowl. Cover and let the dough rest as the oven preheats, then place it (with the parchment) in the hot dutch oven before baking. You will find these detailed instructions in the recipe Note below.
Whichever you use, don’t forget to score the dough with a bread lame or sharp knife. Scoring allows the wet, airy dough to “breathe” as it rises and bakes.
Dutch oven method:
Baking sheet method:
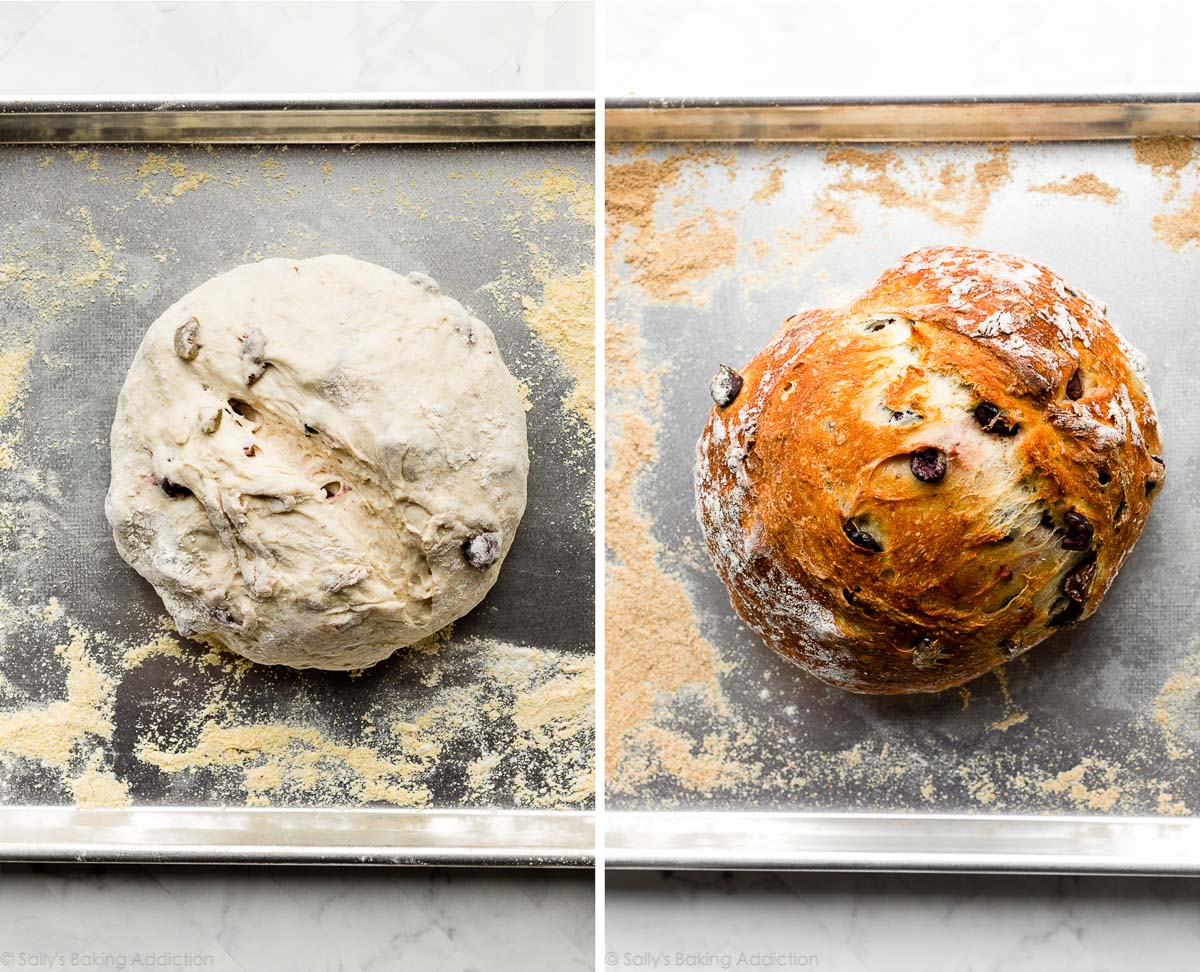
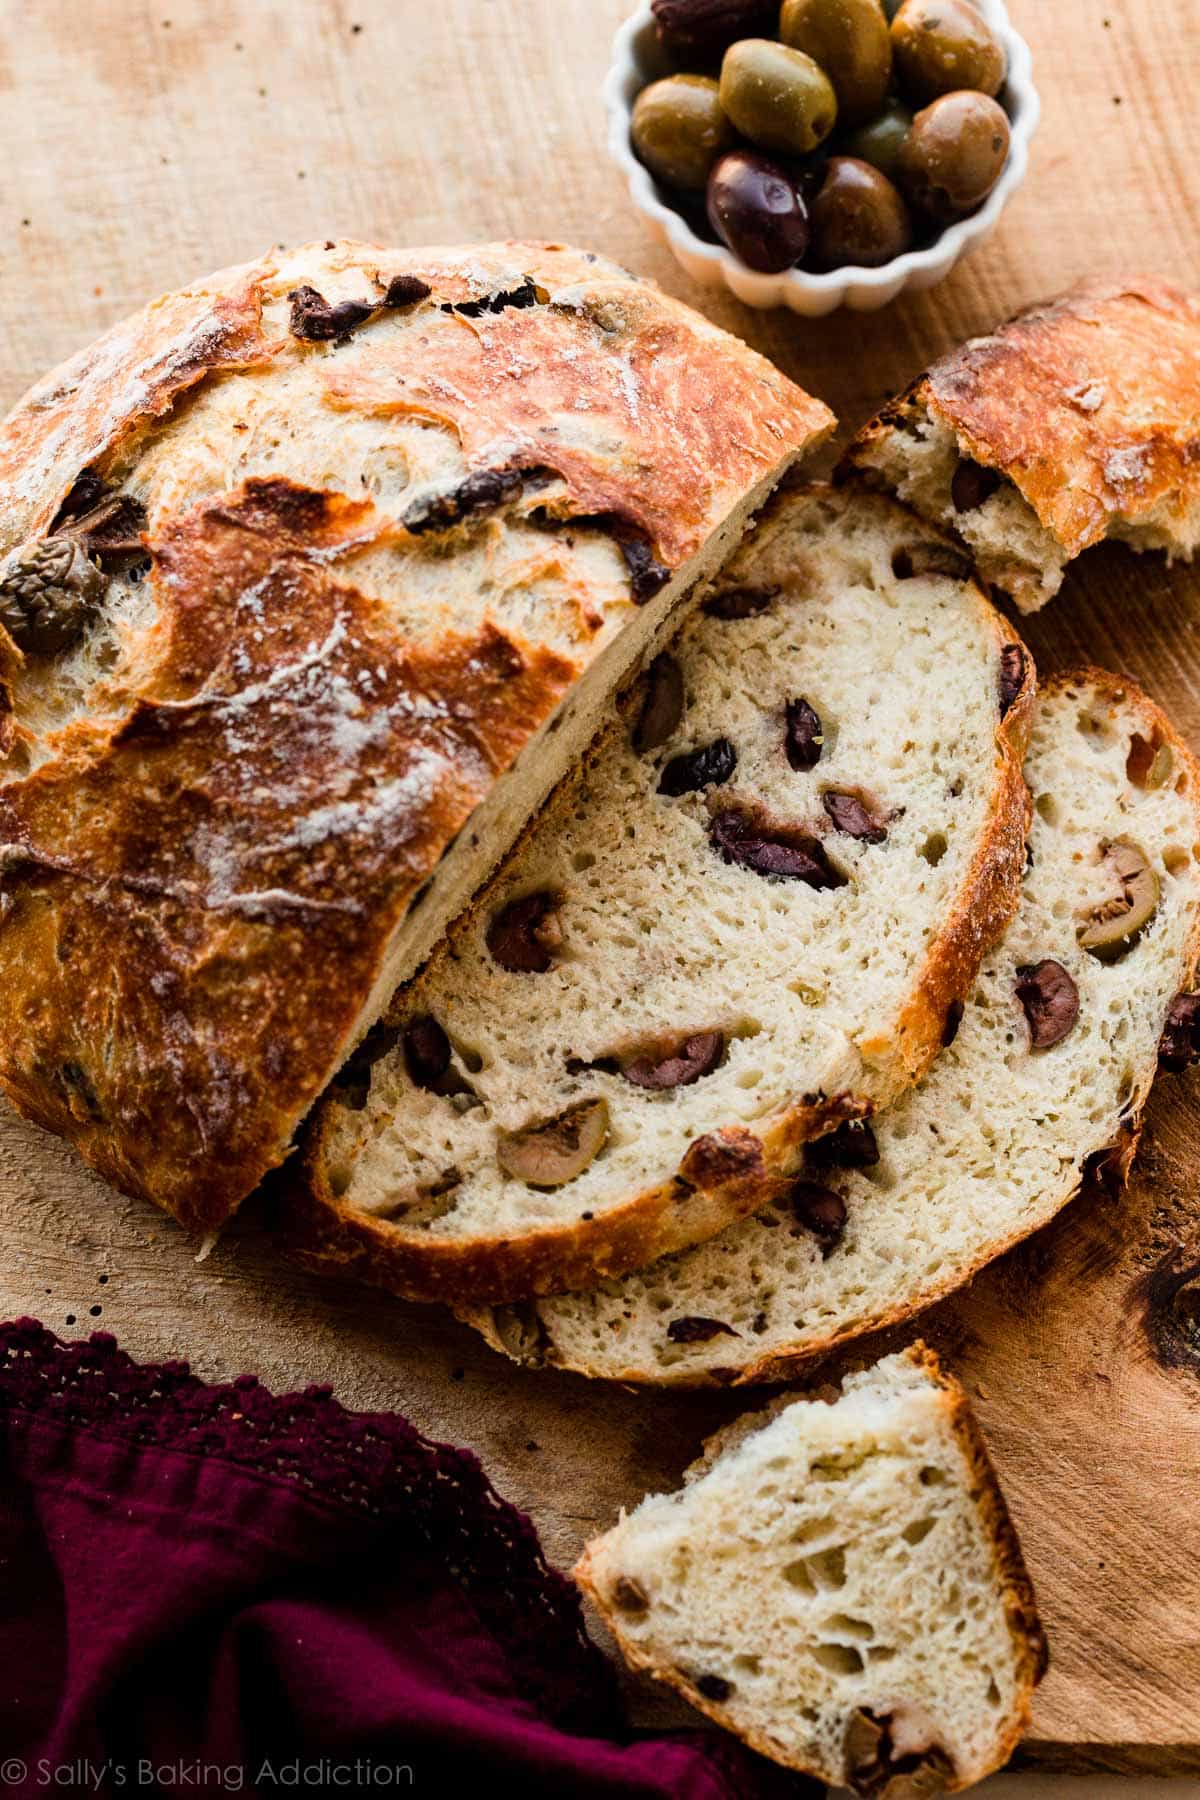
The bread is unbelievable when it’s fresh from the oven—warm, crispy, crusty, and soft inside!
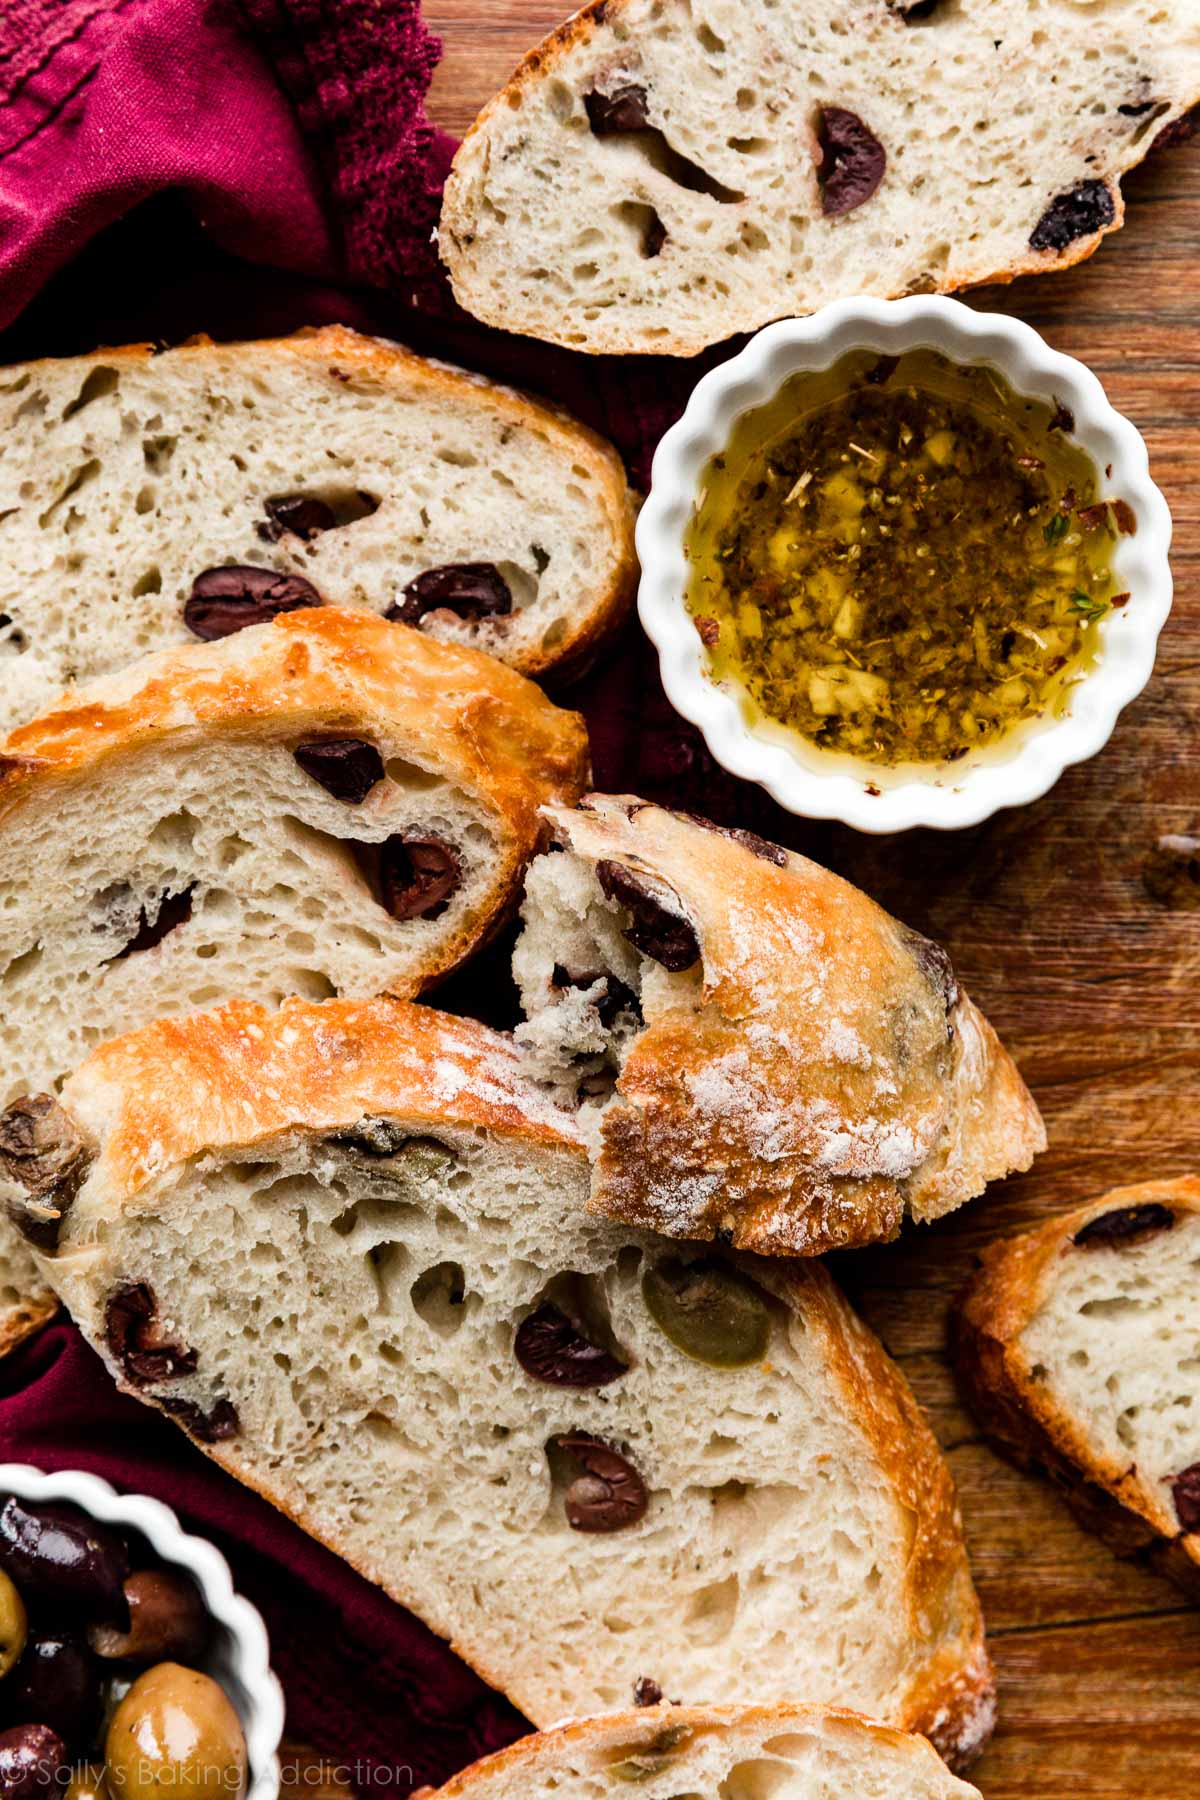
What Can I Serve With This Olive Bread?
Honestly, it’s fantastic plain. But I usually mix together a super easy + flavorful dipping oil: 3 Tablespoons (45ml) extra virgin olive oil and 2 minced cloves of garlic plus a sprinkle each of red pepper flakes, fresh or dried thyme, dried oregano, salt, and pepper. The bread would also be delicious paired with homemade pesto.
Serve your olive bread alongside a charcuterie or cheese platter, or with any Mediterranean-style fare. I love it with a big Greek salad and have even served it with minestrone soup, pesto shrimp, chicken meatballs, and lemon thyme chicken.
Print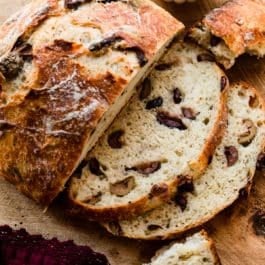
Easy No-Knead Olive Bread
- Prep Time: 4 hours
- Cook Time: 35 minutes
- Total Time: 4 hours, 35 minutes
- Yield: 1 loaf; 10-12 servings
- Category: Bread
- Method: Baking
- Cuisine: American
Description
Follow this recipe and enjoy homemade olive bread that’s altogether crisp, soft, garlicky, herby, and salty. Review Notes before beginning. If you’re new to working with yeast, reference my Baking with Yeast Guide for answers to common yeast FAQs.
Ingredients
- 3 and 1/4 cups (about 430g) bread flour (spooned & leveled), plus more as needed for shaping and pan
- 2 teaspoons instant or active dry yeast
- 2 teaspoons coarse salt (see note)
- 2 teaspoons dried oregano
- 1 and 1/2 teaspoons garlic powder
- 1 heaping cup (about 135g) roughly chopped olives
- 1 and 1/2 cups (360ml) water, close to room temperature at about 70°F (21°C)
- optional: cornmeal for dusting pan
Instructions
- In a large un-greased mixing bowl, whisk the flour, yeast, salt, oregano, and garlic powder together. Using a silicone spatula or wooden spoon, mix in the olives. Pour in the water and gently mix together. The dough will seem dry and shaggy, but keep working it until all the flour is moistened. If needed, use your hands to work the dough ingredients together. The dough will be sticky. Shape into a ball in the bowl as best you can. (Tip: Stir dough by hand. Dough is too sticky for a mixer.)
- Keeping the dough in the bowl, cover the dough tightly with plastic wrap or aluminum foil and set on the counter at room temperature (honestly any normal room temperature is fine). Allow to rise for 2-3 hours. The dough will just about double in size, stick to the sides of the bowl, and have a lot of air bubbles.
- You can continue with step 4 immediately, but for absolute best flavor and texture, I strongly recommend letting this risen dough rest in the refrigerator for at least 12 hours and up to 3 days. (Even just a couple hours is good!) Place covered dough in the refrigerator for up to 3 days. The dough will puff up during this time, but may begin to deflate after 2 days. That’s normal and nothing to worry about.
- Lightly dust a large nonstick baking sheet (with or without rims and make sure it’s nonstick) with flour and/or cornmeal. Turn the dough out onto a floured work surface. Using generously floured hands, shape into a ball as best you can. Dough is very sticky. Transfer to prepared baking sheet. Loosely cover and allow dough to rest for 45 minutes. You will bake the dough on this prepared baking sheet. See recipe note if you want to use a pizza stone or dutch oven.
- During this 45 minutes, preheat the oven to 425°F (218°C).
- When ready to bake, using a very sharp knife or bread lame (some even use kitchen shears), score the dough with a slash or an X, about 1/2 inch deep. (“Score” = shallow cut.) If the shaped loaf flattened out during the 45 minutes, use floured hands to reshape into a ball.
- Optional for a slightly crispier crust: After the oven is preheated and bread is scored, place a shallow metal or cast iron baking pan or skillet (I usually use a metal 9×13-inch baking pan) on the bottom oven rack. Carefully and quickly pour 3-4 cups of boiling water into it. Place the scored dough/baking pan on a higher rack and quickly shut the oven, trapping the steam inside. The steam helps create a crispier crust.
- Place the shaped and scored dough (on the flour/cornmeal dusted pan) in the preheated oven on the center rack. Bake for 35-40 minutes or until the crust is golden brown. How to test for doneness—give the warm loaf a light tap. If it sounds hollow, it’s done. For a more accurate test, the bread is done when an instant-read thermometer reads the center of the loaf as 195°F (90°C).
- Remove the bread from the oven and allow to cool for at least 10-20 minutes before slicing and serving. Store leftovers loosely covered at room temperature for up to 3 days or in the refrigerator for up to 1 week.
Notes
- Make Ahead & Freezing Instructions: The dough can sit in the refrigerator for up to 3 days, so this is a wonderful recipe to begin ahead of time. You can also bake the bread, allow it to cool, and freeze for up to 3 months. Thaw in the refrigerator and allow to come to room temperature before serving. You can also freeze the dough. Complete the recipe through step 3. Wrap in plastic wrap and place in a freezer-friendly container. Freeze up to 3 months. To bake, allow dough to thaw overnight in the refrigerator, or for 2–3 hours at room temperature. Continue with step 4 and the rest of the recipe instructions.
- Special Tools (affiliate links): Glass Mixing Bowls | Wooden Spoon or Silicone Spatula | Baking Sheet or Dutch Oven | 2-Cup Measuring Cup | Bread Lame | Instant-Read Thermometer | Coarse Sea Salt
- Flour: For absolute best flavor and chewy texture, I strongly recommend using bread flour. You can use a 1:1 substitution of all-purpose flour in a pinch with no other changes to the recipe. I recommend avoiding whole wheat flour in this dough, however if necessary, you can replace up to 1 cup (about 130g) of the bread flour with whole wheat flour.
- Yeast: You can use instant or active dry yeast, but I highly recommend an instant (aka “rapid rise” or “quick rise” yeast). The bread will rise faster. 2 teaspoons is a little less than 1 standard packet. If using active dry yeast, there are no changes needed to the recipe. The rise time in step 2 may take longer. Reference my Baking with Yeast Guide for answers to common yeast FAQs.
- Salt: Use a coarse salt, such as coarse sea salt, in this bread. I find the flavor slightly lacking when using regular table fine salt. If you only have fine salt, reduce to 1 and 1/2 teaspoons.
- Dried Oregano & Garlic Powder: Feel free to use 2-3 teaspoons chopped fresh oregano or substitute 2 teaspoons of another dried herb you love. Instead of garlic powder, you can use 2 teaspoons minced fresh garlic or roasted garlic.
- Using a Dutch Oven: The process is similar to Cranberry Nut No-Knead Bread. You need a 6-quart or larger dutch oven or any large oven-safe pot with a lid (lid is crucial—see cranberry nut no-knead bread for more information). Prepare dough recipe above through step 3. Turn the dough out onto a lightly floured work surface and, using lightly floured hands, shape into a ball as best you can. Doesn’t have to be perfect. Transfer dough to a large piece of parchment paper. (Large enough to fit inside your pot and one that is safe under such high heat. I use this parchment and it’s never been an issue.) Lift the parchment paper and dough up and place it all into a large mixing bowl. Using a very sharp knife or bread lame, gently score an X into the top. Cover dough lightly with plastic wrap and leave alone for 30 minutes. During this 30 minutes, preheat the oven to 425°F (218°C). Place your dutch oven (with the lid) inside for 30 minutes so that it’s extremely hot before the dough is placed inside. After 30 minutes, remove the dutch oven from the oven and carefully place the dough inside by lifting it up with the parchment paper and sticking it all—the parchment paper included—inside the pot. Cover with the lid. Bake for 30 minutes with the lid on. Carefully remove the lid and continue baking for 10 more minutes or until the bread is golden brown. You can test for doneness exactly how you would in step 8 above. Remove pot from the oven, carefully remove the bread from the pot, and allow to cool on a wire rack for 10-20 minutes before slicing/serving.
- Using a Pizza Stone: If you want to bake your bread on a pizza stone, place pizza stone in the preheating oven. Remove hot pizza stone, dust with cornmeal or a little flour, and then transfer shaped and scored dough to hot pizza stone and bake as directed.
- No Nonstick Pan?: If you don’t have a nonstick baking sheet, line it with parchment paper instead. Coat with a dusting of flour and/or cornmeal before placing the dough on top. Parchment paper can burn, so it’s best to check the box to see how much heat yours can tolerate. Lower your oven heat if necessary, and bake the bread for longer until it’s golden brown and sounds hollow when tapped.


Reader Comments and Reviews
Can this bread be made in a oven proof Pyrex glass bowl?
Hi Dorinda, we would stick with a baking sheet or Dutch oven for best results.
Is the temperature you suggest for a fan oven? Or do I need to knock off about 20C?
Hi Matthew! We always recommend conventional settings for baking (not convection/fan). The flow of air from convection heat can cause baked goods to rise and bake unevenly and it also pulls moisture out of the oven. If you do use convection/fan settings for baking, lower your temperature by 25 degrees F and keep in mind that things may still take less time to bake.
why can’t this be baked in a bread pan?
Hi Reena, There is a little too much dough for a standard size (9×5 inches) loaf pan, but you could try dividing the dough in half and using 2 loaf pans. The edges should still crisp up and the bake time may vary.
Hello Sally,
Thank you for all the recepie. I never baked bread before and your recepies easy to fallow, the cranberry nut and olive bread me favor it.
will tyr the others too later.
63 year old guy here. Love cooking and trying recipes.
I substituted 1/2 cup of water with olive brine. Two days in fridge. Divided dough to two sticks. Convection baked 25 Mins.
Wow! Will absolutely make this again. Thanks. Mike.
I threw this dough together Saturday morning, let it rest in the fridge overnight and baked Sunday evening. This is divine. I cooked the bread in a cast iron dutch oven and it came out perfect. Will definitely be making this regularly.
How could you adapt the recipe to make mini-loaves?
Hi Darlene, if you divide this dough in half and bake in two smaller loaves, the bake time should be more like 20-25 minutes. Bake until golden brown. Gently tap the loaves-—if they sound hollow, the bread is done. For a more accurate test of doneness, the bread is done when an instant read thermometer inserted in the center reads 195°F (90°C).
Amazing! I made some olive rolls from another website that tasted okay but turned out completely flat. I was disappointed so I wanted to find a recipe for a loaf of olive bread. The reviews don’t lie. This smelled incredible while baking and I hoped it tasted as good as it smelled. It does. I wanna eat the whole loaf. I was also looking for a perfect recipe that I can make during the week when I have to work and this is perfect. I threw the dough together before bed and put it in the refrigerator overnight. As soon as a I woke up I let it sit out for about an hour and then baked it in my Dutch oven while I was getting ready for work. I can’t wait for my husband to try this. It looks a little flat but there are plenty of fluffy air pockets in the inside. This is going to be my new go to recipe.
I am using new instant rise yeasts. After three hours the dough did not rise like my other no knead bread. I spread the dough out and added more yeast and set to rise another two hours. Will that work?
Hi T Mark, is it extra cold in your kitchen today? The dough may just need more time to rise!