


Today we’re conquering our fears and making homemade croissants! If you’re about to run away screaming, I understand. I’m not sugarcoating it: croissants aren’t easy. Croissants require time, patience, and a lot of rolling. However, just because this recipe is advanced doesn’t mean that YOU have to be an advanced baker to try it. You can absolutely handle this quintessential baking bucket list recipe. ♥
Let me hold your hand through the whole process. I’m sharing step-by-step photography, a full video tutorial, plenty of tricks based on what I’ve learned, and the croissant recipe. I started working on croissants earlier this year. I studied a couple recipes, tested them, tweaked what I found necessary, and played with this dough for weeks. The croissants are golden brown, extra flaky, crisp on the outside, soft on the inside, and unbelievable warm from the oven. One bite of this delicate French pastry will immediately transport you to a quaint French bakery. I’m confident in this homemade croissants recipe and I’m confident in YOU baking them.
The good news! You need zero fancy equipment and zero special ingredients. If you’re looking for a weekend project, know how to read directions, and crave a fresh homemade pastry (don’t we all?), then stick around. You’ll be rewarded with the BEST treat ever!!!

Let’s get right into it. Just like making mille-feuille, making croissants is a labor of love. The long recipe directions and all these step-by-step photographs seem intimidating, but let me walk you through the basic process so you aren’t nervous.
The Process
- Make easy dough from butter, flour, sugar, salt, yeast, and milk.
- Roll out dough into a large rectangle.
- Make the butter layer (I have an easy trick for this!!!).
- Enclose the butter layer inside the dough.
- Roll out the dough into another large rectangle, then fold it back together.
- Roll out the dough again, fold it back together again.
- Roll out the dough one more time, fold it back together.
- Shape the croissants.
- Bake!
There’s resting time between most steps, which means most of the time is hands off. To help us develop all the layers, croissant dough needs to rest in the refrigerator often. That’s why I call making croissants a project. Do it over a couple days with long breaks between the steps.

All that rolling out and folding back together? That’s called LAMINATING.
What is Laminated Dough?
Laminating dough is the process of folding butter into dough many times, which creates multiple alternating layers of butter and dough. When the laminated dough bakes, the butter melts and creates steam. This steam lifts the layers apart, leaving us with dozens of flaky airy buttery layers. Same process that makes our Chicago-style deep dish pizza crust so buttery and flaky!
Just like we do when we make a croissant bread loaf or homemade cruffins, we’re going to laminate the dough 3 times, which will create 81 layers in our croissants. Yes, 81! Let me paint that picture for you.
- Start with dough, butter layer, dough = 3 layers
- Roll it out and fold it into thirds = 9 layers
- Roll that out and fold it into thirds = 27 layers
- Roll that out one last time and fold it into thirds = 81 layers
So we’re only laminating the dough 3 times, but that gives us 81 layers. When the croissants are rolled up and shaped, that’s one 81 layer dough rolled up many times. So when you bite into a croissant, you’re literally biting into hundreds of layers.
Isn’t that SO COOL???

Croissants Video Tutorial
Watch me make croissants in this video. I talk you through the whole video too.
Now let’s see everything come together in step-by-step photographs.
DOUGH
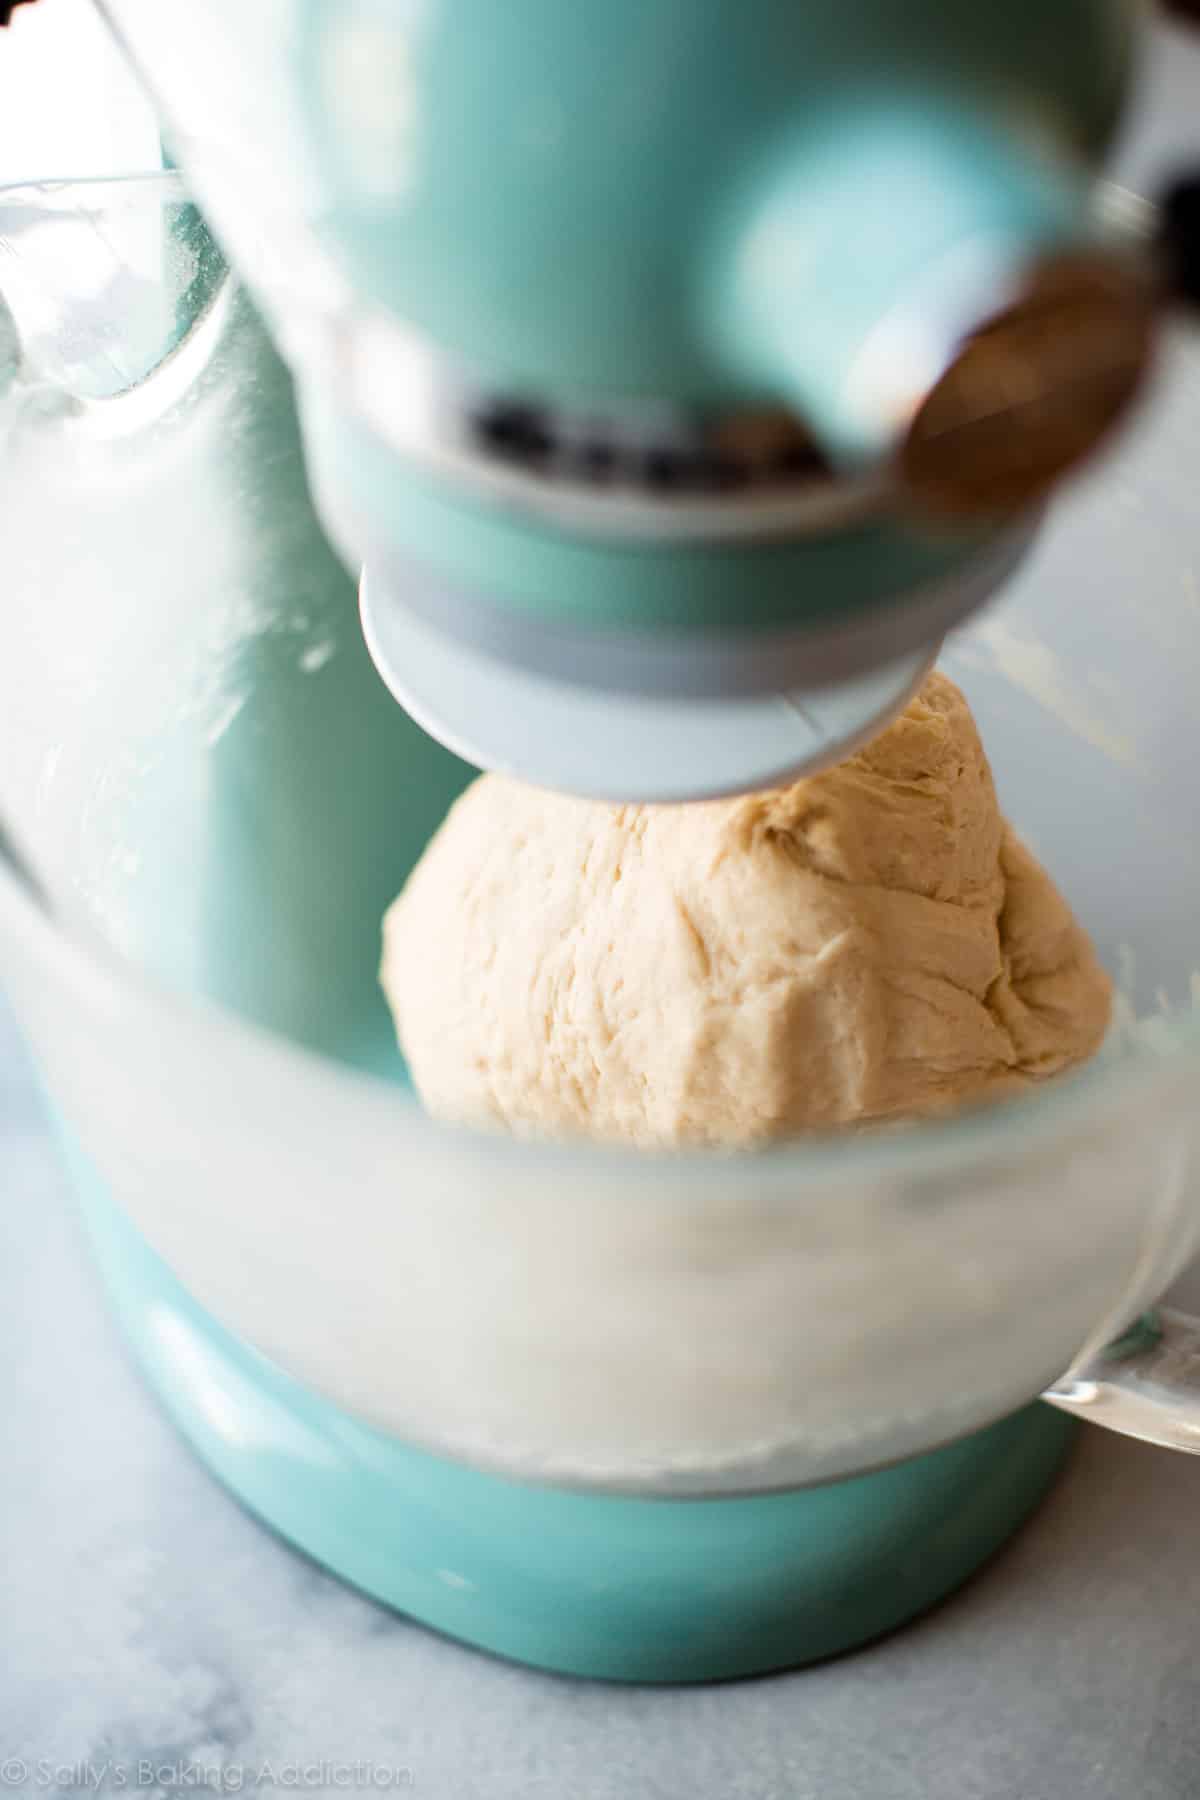
Croissant dough begins with butter, flour, sugar, salt, yeast, and milk. Unlike most yeasted doughs that require warm liquid to activate the yeast, you’re going to use cold milk. The yeast will work its magic later on in the recipe. In the beginning steps of croissants, the dough should always be cold. If, at any point, the dough becomes too warm… stop. Stop what you’re doing and place the dough back in the refrigerator for 20 minutes.
The mixer will beat the dough for about 5 minutes. Stand by your mixer as it works the dough. This dough isn’t particularly heavy, but your mixer will still get a workout. Did you see my Instagram story when my mixer FELL OFF MY COUNTER? I walked away at the wrong time and the whole thing danced off the counter. Unplugged itself and everything. Don’t make my mistake!
See my How to Knead Dough video tutorial if you need any extra help with the kneading step.
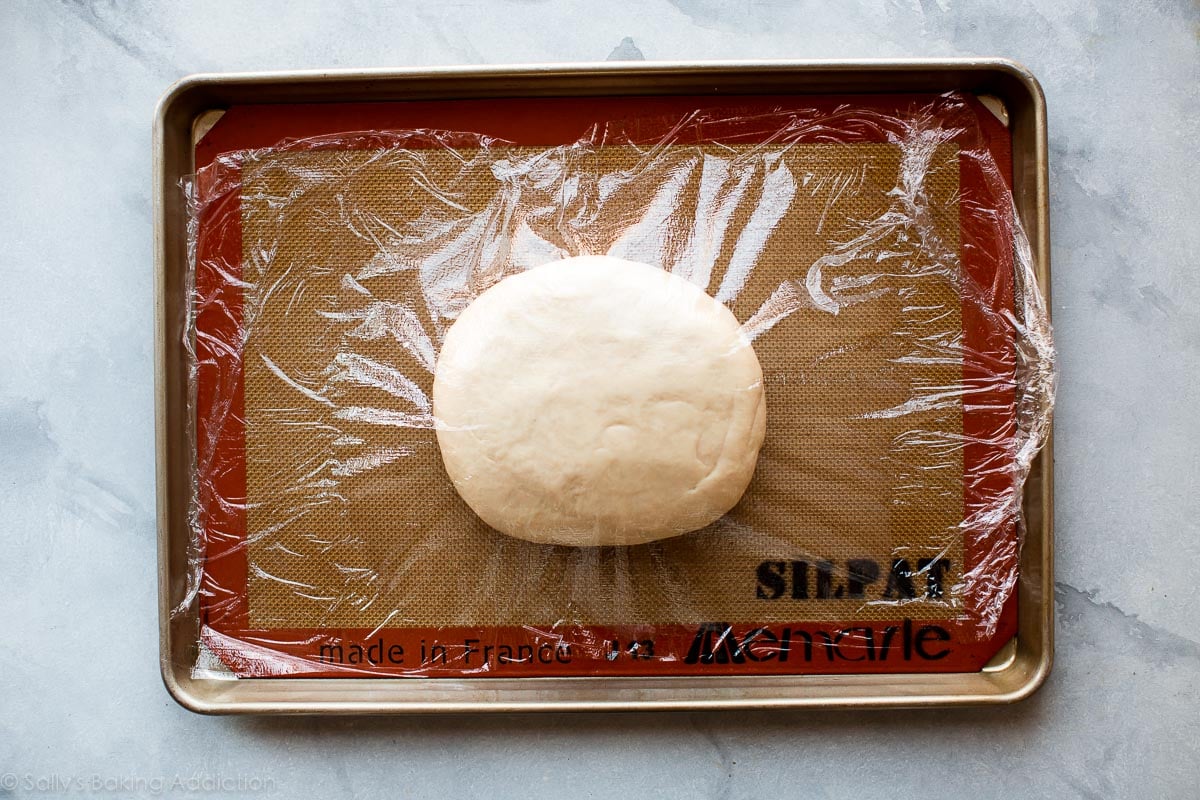
We made the dough, now we’re going to cover it and let it rest in the refrigerator for 30 minutes.
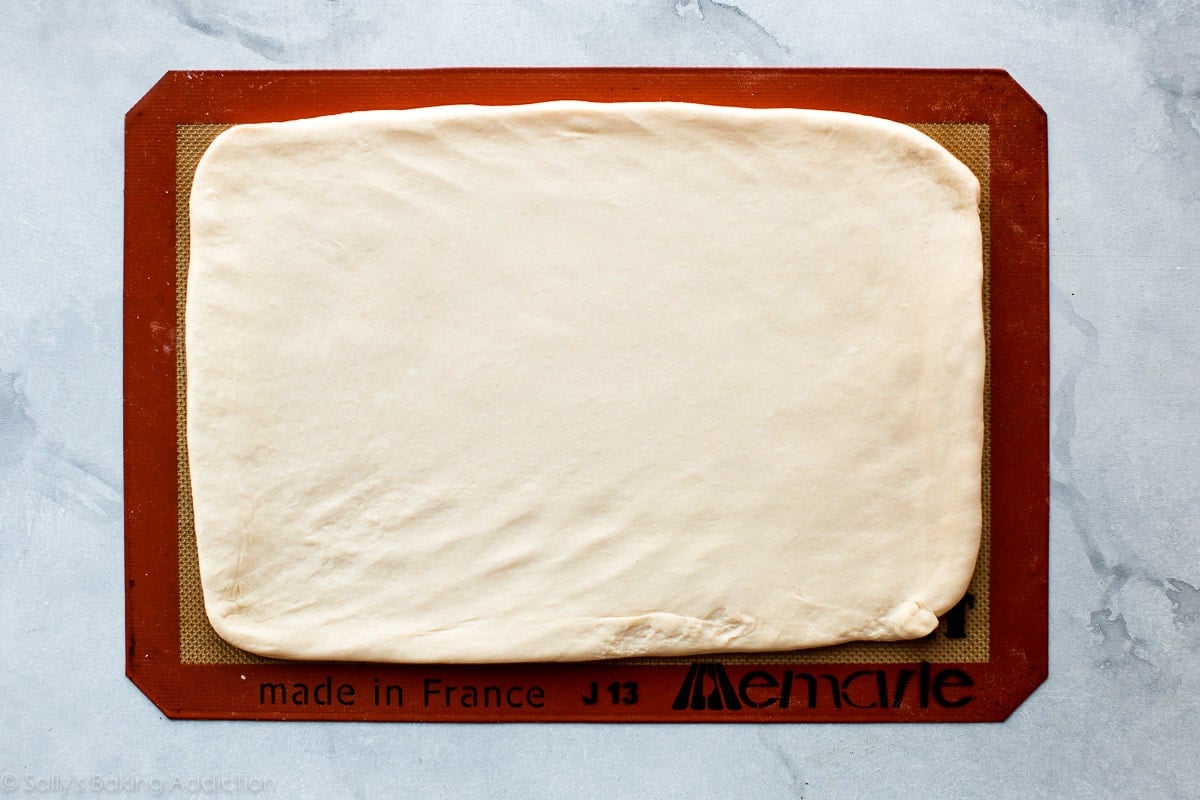
Now let’s roll out the dough into a 14×10-inch rectangle. Use a clean ruler or measuring tape. The ruler or measuring tape, besides your rolling pin, is the most crucial tool when making croissants.
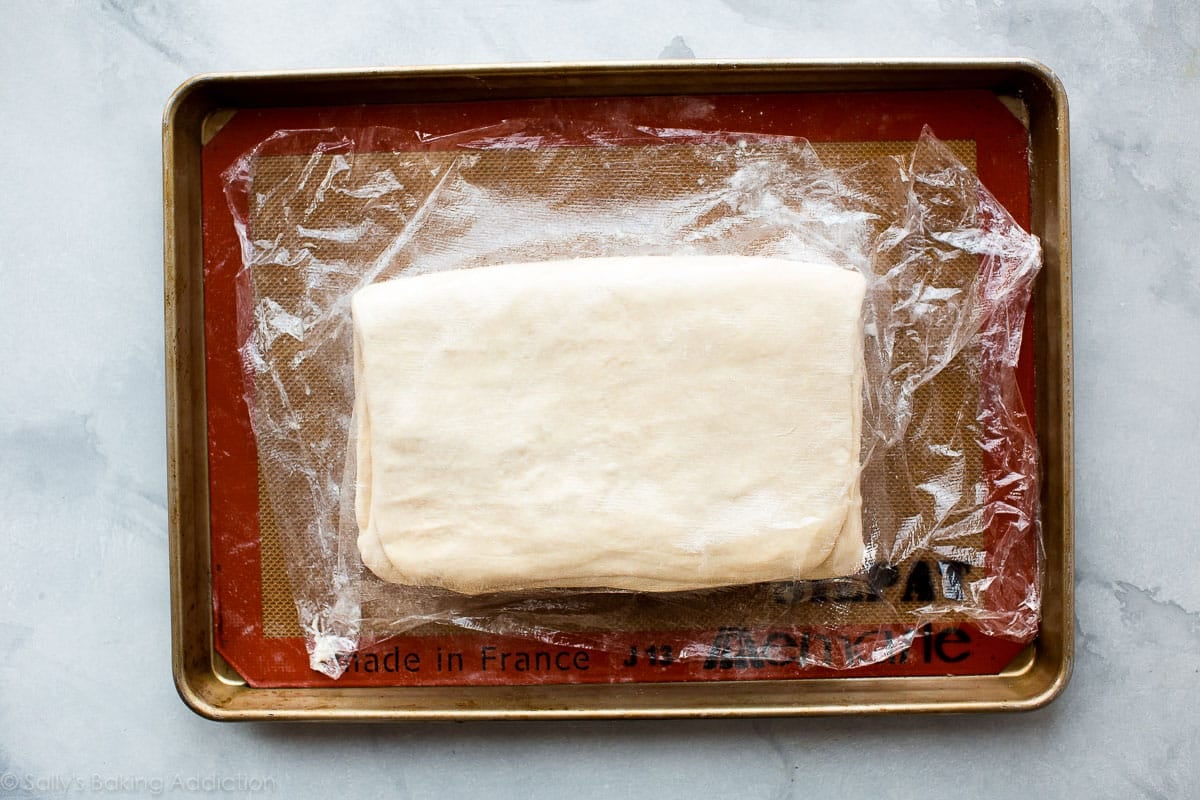
I recommend using a silicone baking mat. While we will still lightly flour it, the mat is nonstick and it’s a handy guide for the exact measurement. You also need to transfer the dough to a baking sheet and the silicone baking mat makes that possible.
The dough isn’t extremely cold after only 30 minutes in the refrigerator, so it will be easy to roll out. Be precise with the 14×10-inch measurement. The dough will want to be oval shaped, but keep working the edges with your hands and rolling pin until you have the correct size rectangle. You can see how I do all this in the video below.
Cover the rolled out dough and chill it for 4 hours or overnight. Literally pick up the silicone baking mat, put it on top of your baking sheet, cover the dough, and chill it. I usually chill it for 4 hours because there is one more 4 hour or overnight chill period coming up. That’s when I typically chill it overnight, making this a 2 day recipe.
BUTTER
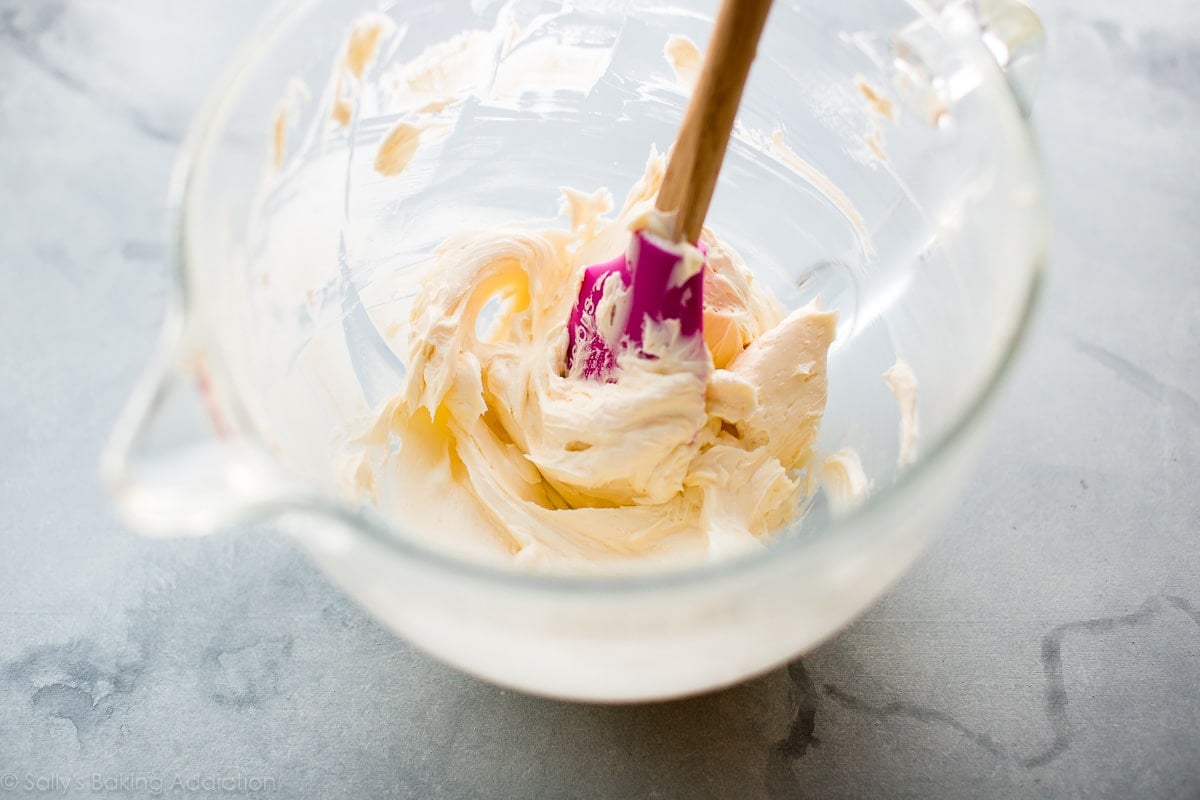
Many croissant recipes instruct you to shape extremely cold butter into a rectangle or square. Have you ever tried to manipulate cold sticks of butter into another shape? It’s really hard. I learned the following trick from Zoe at Zoe Bakes. Please go follow Zoe, she is the absolute best. ♥
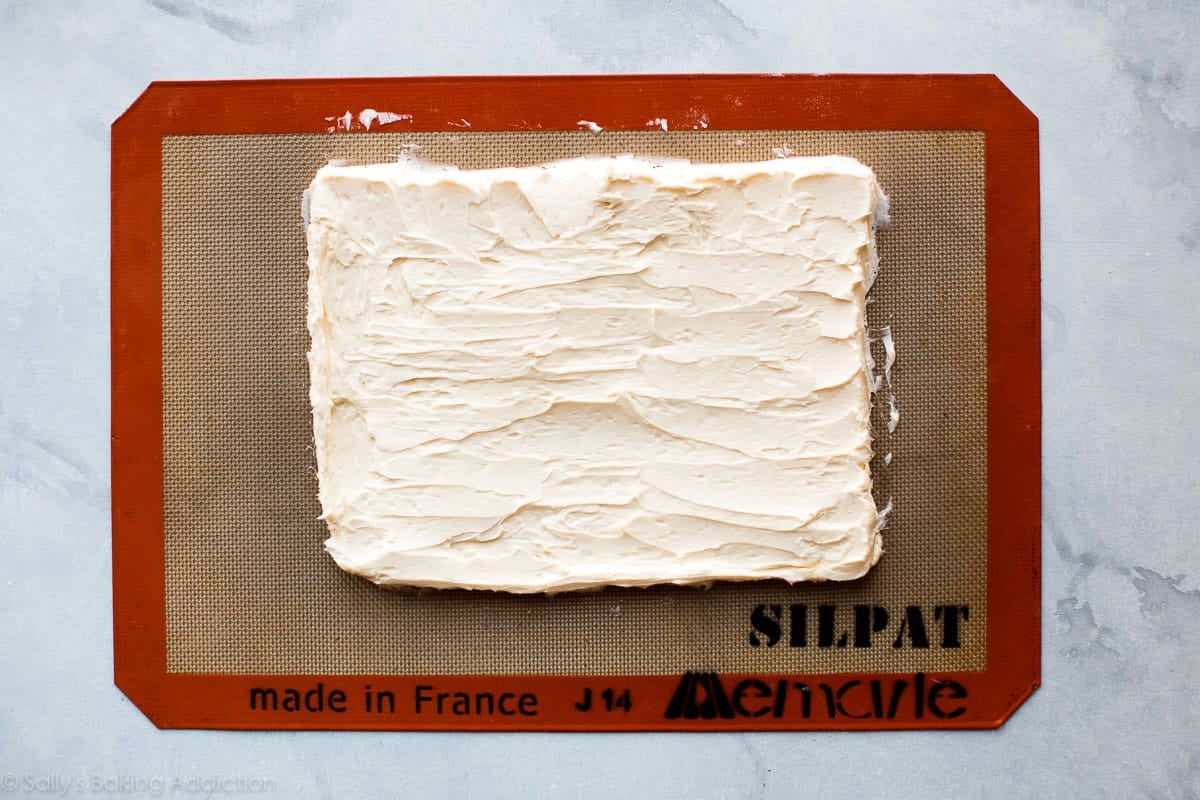
Start with softened butter, beat it with flour so it has some stability, then spread into a rectangle and chill it. It’s 100x easier to shape softened butter than it is to shape cold butter. Thank you, Zoe!
You can use any butter you like best. If you’re going to spend money on European style butter, croissants are when to do it. If I’m being honest, I use store-brand butter and love the croissant’s flavor. It’s butter. It’s going to be good regardless.
The butter rectangle is 7×10 inches, half the length of the dough and the same width, so it fits into the dough. We will chill the butter rectangle right on the silicone baking mat. After it’s chilled, we can peel it right off and place it on the dough to begin lamination.
Make sure you only chill the butter for about 30 minutes. Our goal is to have the croissant dough and butter be the same temperature. It makes lamination possible. Butter solidifies much quicker than a soft dough, so that’s why our dough will chill for 4 hours and our butter will only chill for 30 minutes. Make sense?
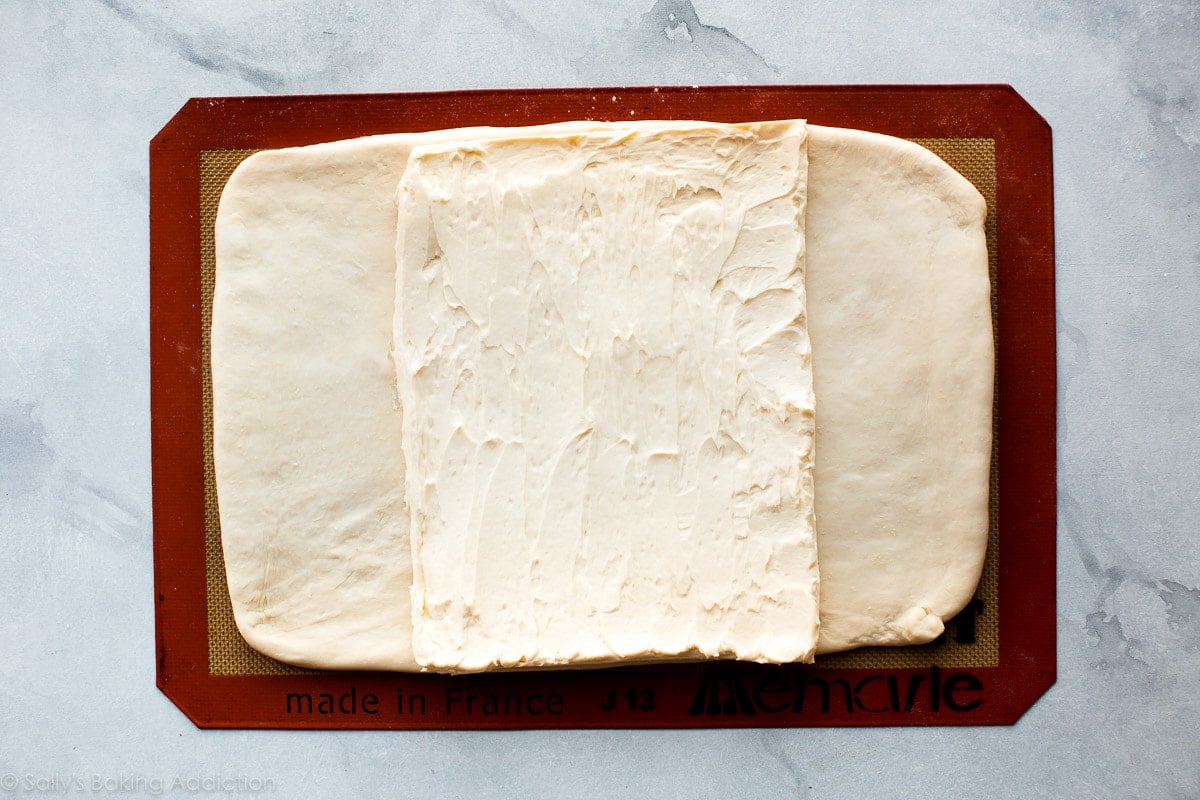
Because you shaped the butter into the precise 7×10-inch size, it fits nicely on the 14×10-inch dough. (After the butter rectangle chills, you can always cut sharp edges with a pizza cutter or knife to make it the appropriate size.)
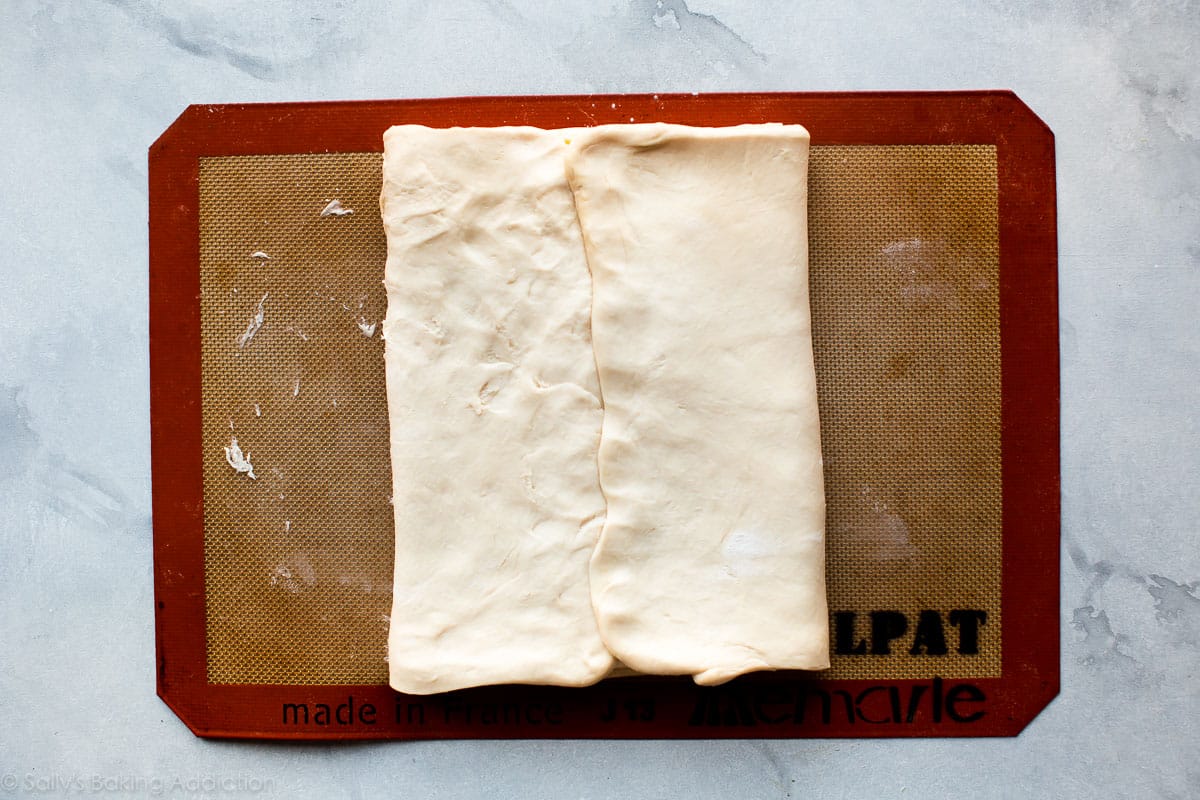
Fold the cold dough over the cold butter. Use your fingers to seal the butter inside.
Now we’re going to laminate the dough 3x with a 30 minute break between the 2nd and 3rd time. Why between the 2nd and 3rd time? Because our dough has been out of the refrigerator for long enough by this point and needs to be chilled again. 30 minutes is plenty.
I do not have step-by-step pictures of the lamination process because it’s time sensitive and the dough just became too warm as I tried to set up the shot. However, you can see me laminate the dough and talk through the process in the video below. (3:20-5:15 minutes) Watching me work through this step is more helpful anyway.
Our dough has been rolled out and folded 3x, now it’s time to rest.
Cover the laminated dough and chill it for 4 hours or overnight. This is when I usually chill it overnight.
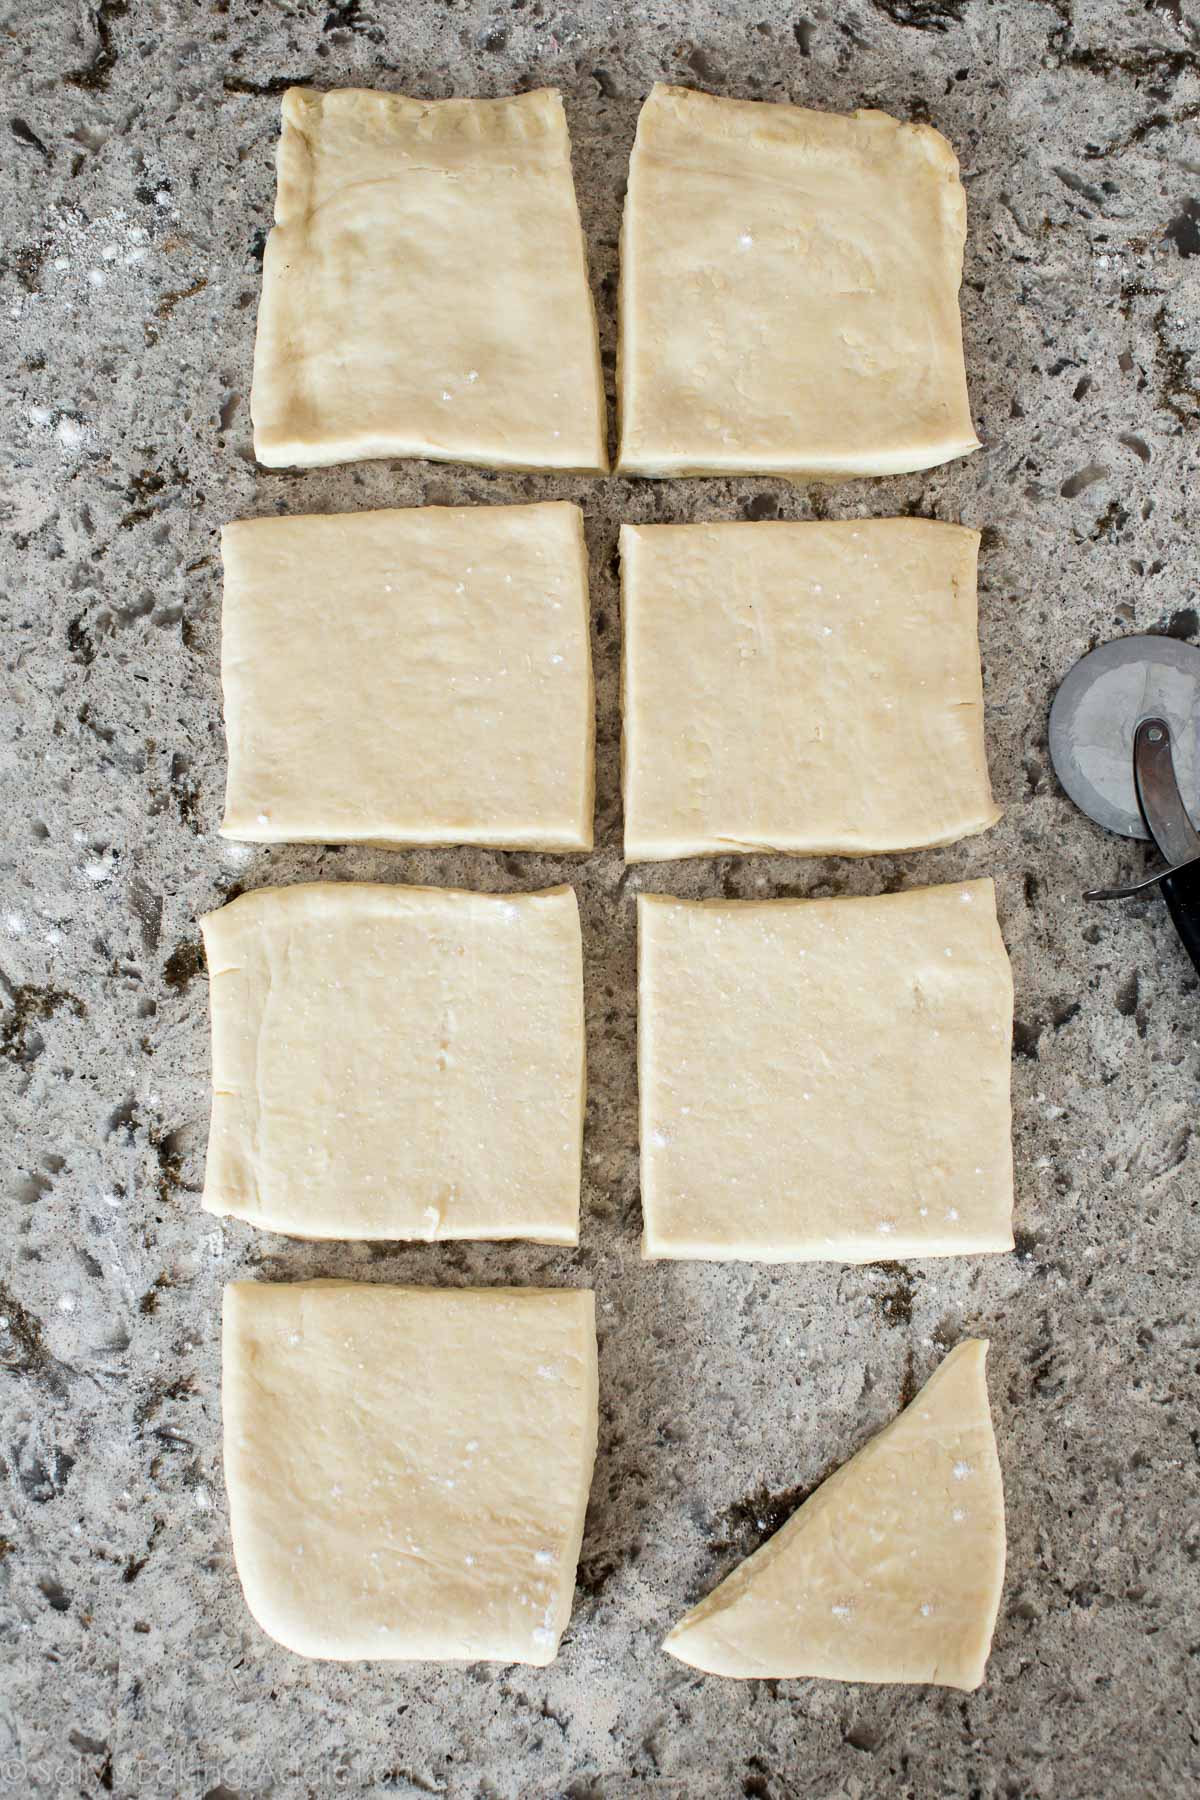
Roll out the dough 1 more time. This time you’ll roll it into an 8×20-inch rectangle.
Use your pizza cutter and slice the rectangle down the center to create two 4×20 rectangles. Then slice across 3x to create eight 4×5-inch rectangles.
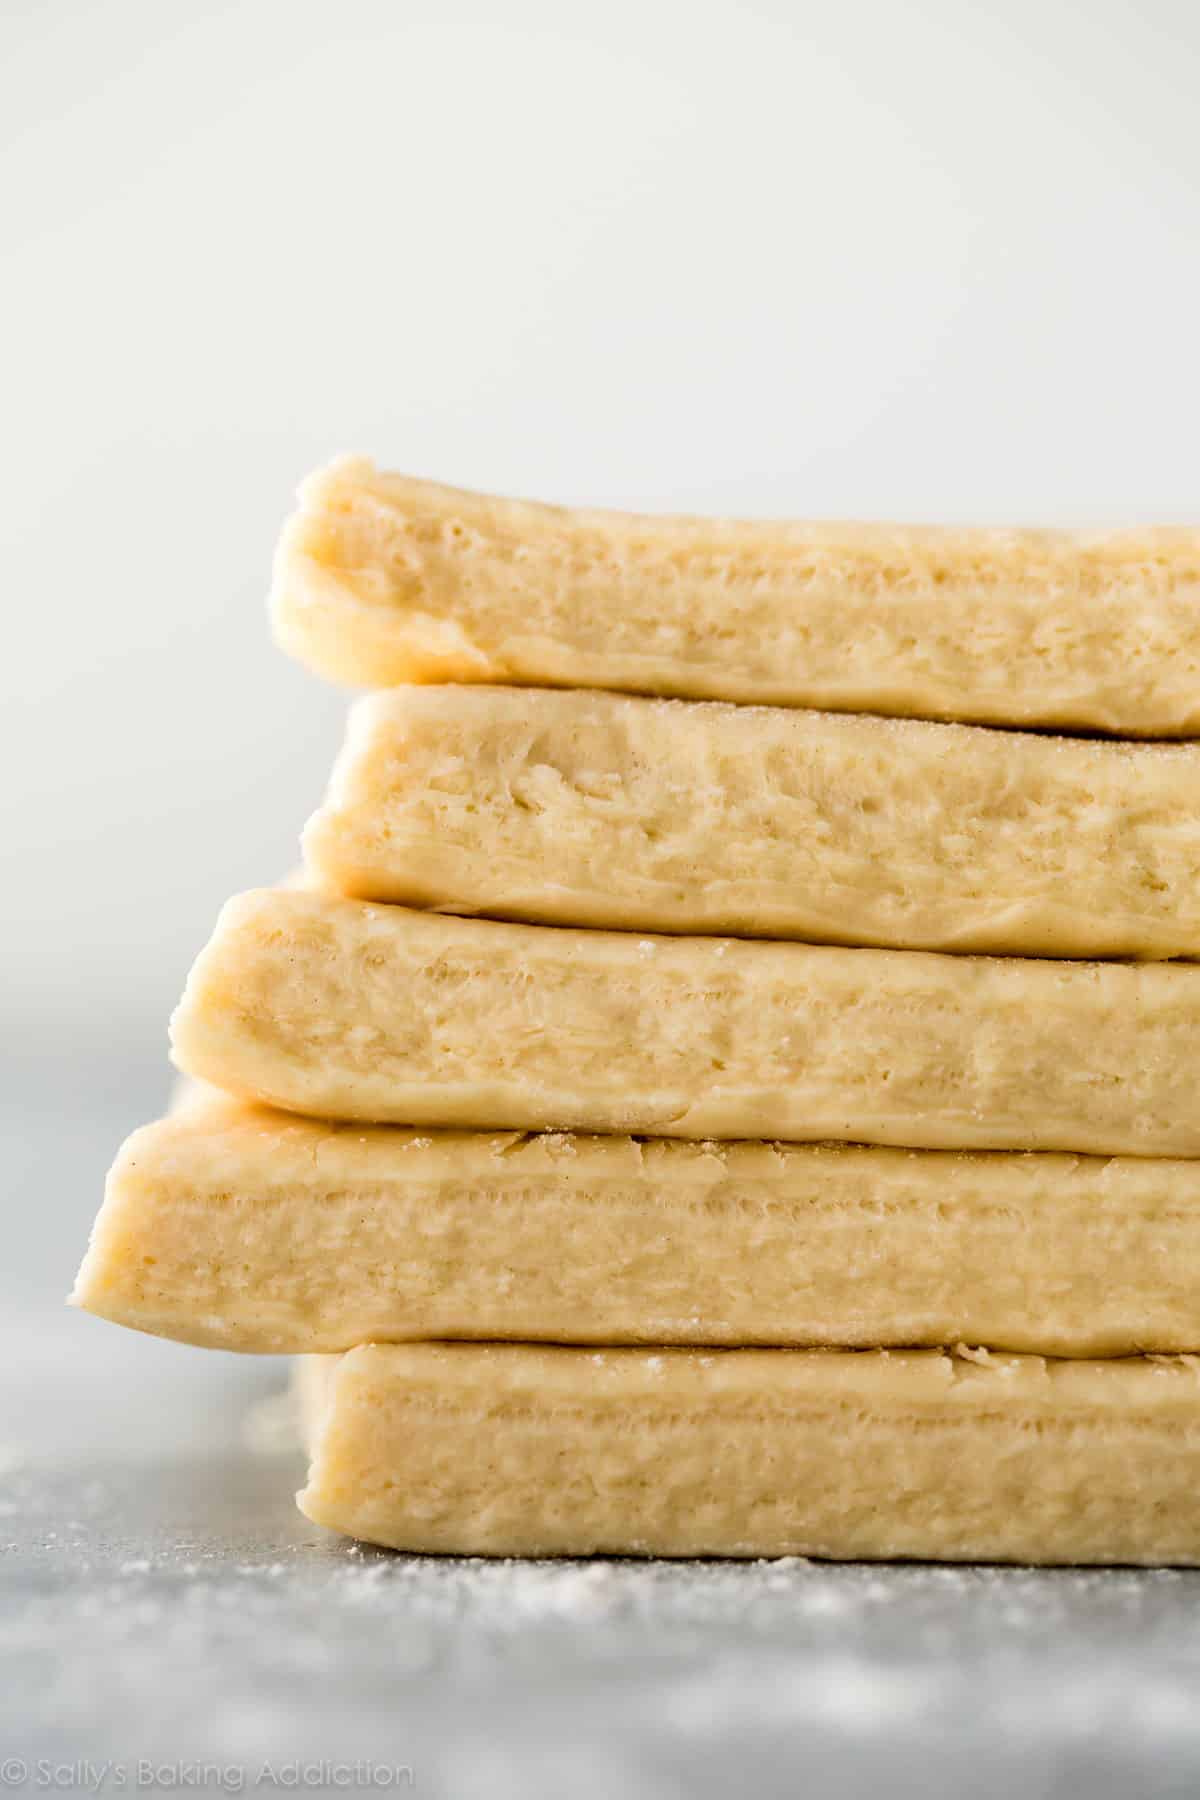
Look at all these layers!!!!
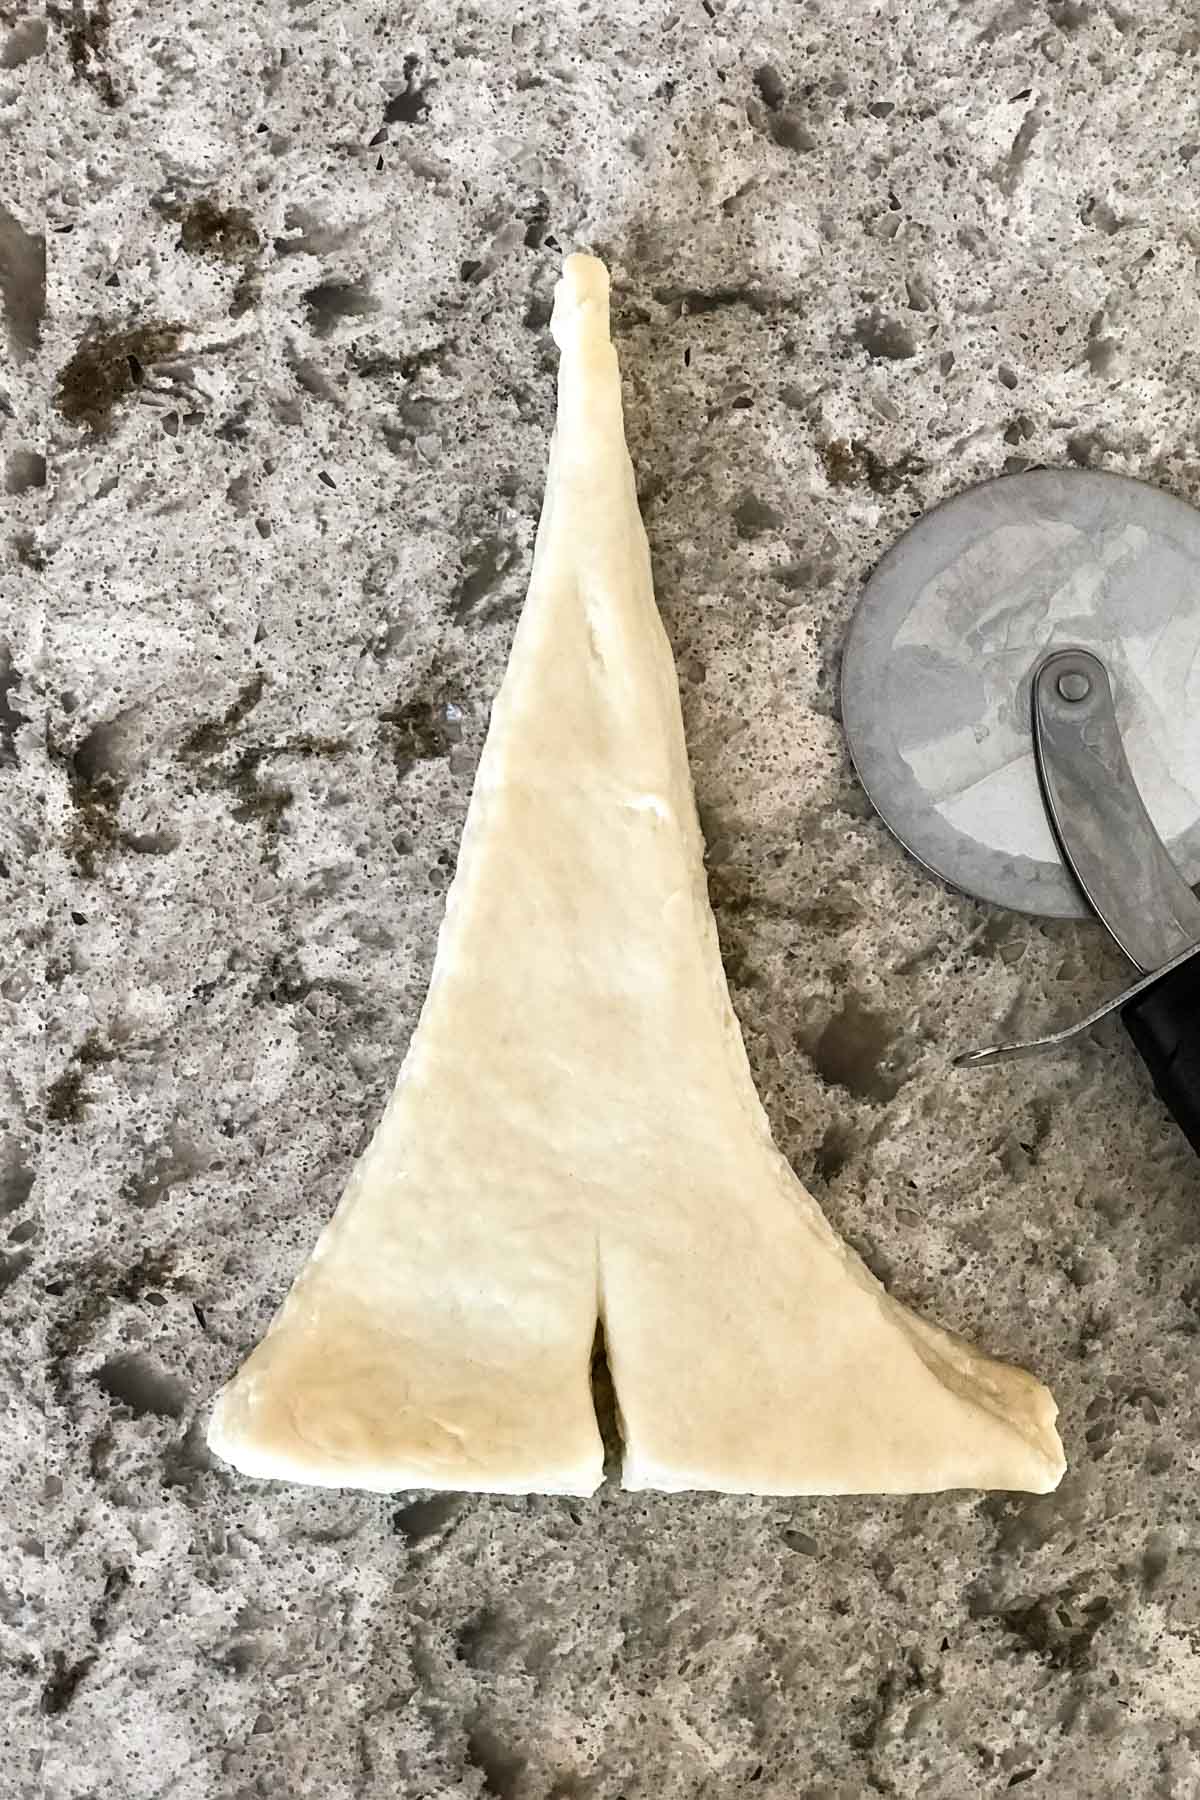
Now slice each of the 8 rectangles into 2 triangles. Using your fingers or a rolling pin, stretch the triangles to be about 8 inches long. Do this gently as you do not want to flatten the layers. Cut a small slit at the wide end of the triangle, then tightly roll up into a crescent shape making sure the tip is underneath.
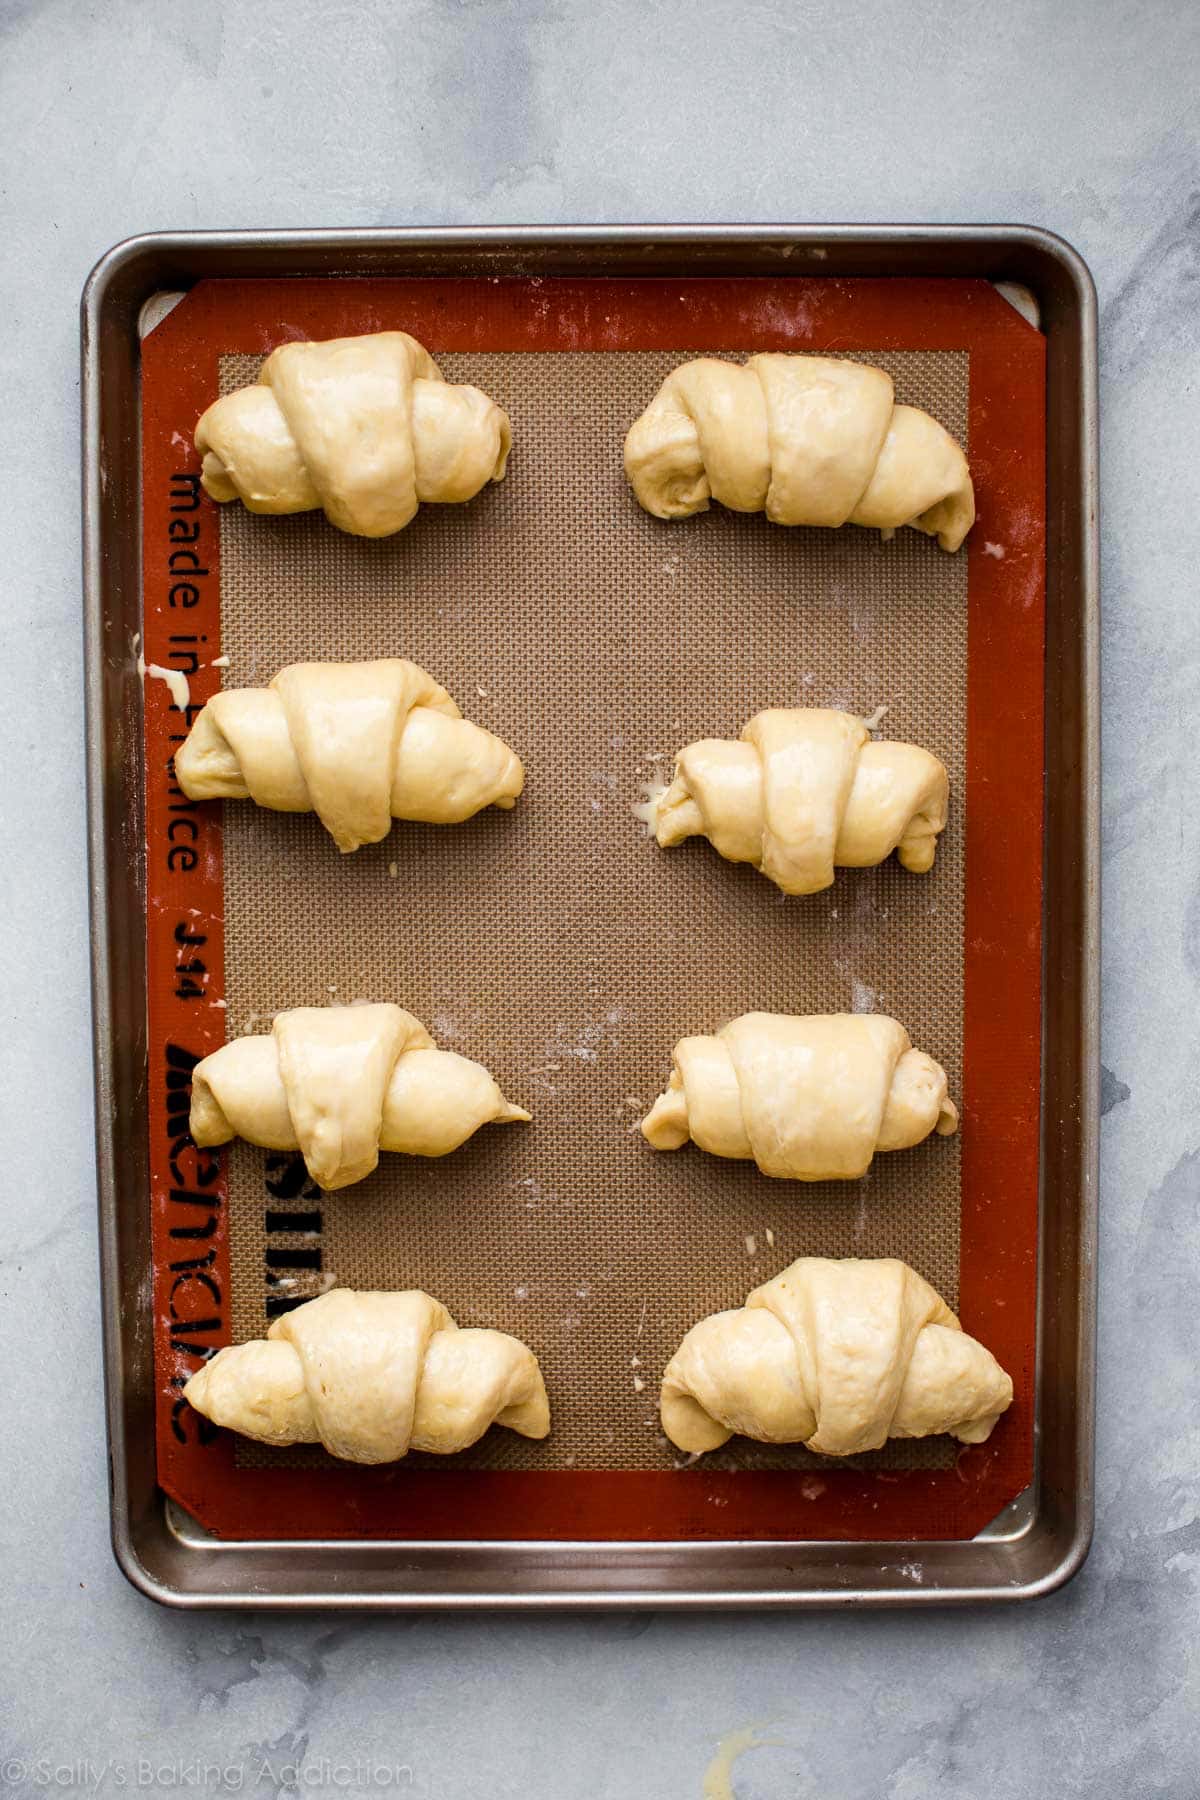
Loosely cover the shaped croissants and allow to rest at room temperature (I suggest just keeping them on the counter) for 1 hour, then place in the refrigerator to rest for 1 hour. Unlike a lot of croissant recipes, I prefer the shaped croissants to be cold going into the oven. They won’t spread as much. They will rise and proof for the 1 hour at room temperature and continue to do so in the refrigerator for another hour.
The croissants are ready to bake after that! FINALLY.
Brush them with egg wash (egg + milk).
Bake.

Indulge. Because after making the dough and rolling it out a million times, you completely deserve to. Enjoy them plain or with jam, honey butter, or homemade raspberry sauce. Interested in chocolate croissants? Of course you are!
If you happen to have any leftovers, day old croissants are perfect so soak up flavors in an easy breakfast casserole.

FAQ: Why Are There Chunks of Butter in My Dough & Why Did Butter Leak Out of the Croissants?
These are 2 common questions and I’m happy to sum it all up for you. Some butter leakage during the baking process is normal and expected; however, if your baking croissants are sitting on pools of butter, your butter layer may have been too cold. It would make sense to give the best temperature for the butter layer, but you’re really looking for texture. You want the dough and sheet of butter to be similar in softness. If the butter layer is too hard, it will crack and split under the dough. Let it sit at room temperature to soften before the laminating process (step 7) OR reduce the chill time in step 6 down from 30 minutes to about 15.
See Your Croissants!
Many readers tried this recipe as part of a baking challenge! Feel free to email or share your recipe photos with us on social media. 🙂
Print
How to Make Croissants
- Prep Time: 12 hours, 45 minutes
- Cook Time: 20 minutes
- Total Time: 13 hours, 10 minutes
- Yield: 16 croissants
- Category: Pastries
- Method: Baking
- Cuisine: French
Description
Buttery, flaky, and perfect homemade croissants!
Ingredients
- 1/4 cup (4 Tbsp; 56g) unsalted butter, softened to room temperature
- 4 cups (500g) all-purpose flour (spooned & leveled), plus more for rolling/shaping
- 1/4 cup (50g) granulated sugar
- 2 teaspoons salt
- 1 Tablespoon active dry or instant yeast
- 1 and 1/2 cups (360ml) cold whole milk
Butter Layer
- 1 and 1/2 cups (340g) unsalted butter, softened to room temperature
- 2 Tablespoons (16g) all-purpose flour
Egg Wash
- 1 large egg
- 2 Tablespoons (30ml) whole milk
Instructions
- Preliminary notes: Watch the video below and use the step-by-step photos before you begin. Read the recipe before beginning. Make room in the refrigerator for a baking sheet. In step 6 and again in step 13, you will need room for 2 baking sheets.
- Make the dough: Cut the butter in four 1-Tablespoon pieces and place in the bowl of an electric stand mixer fitted with the dough hook attachment (or you can use a handheld mixer or no mixer, but a stand mixer is ideal). Add the flour, sugar, salt, and yeast. Turn the mixer on low-medium speed to gently combine the ingredients for 1 minute. With the mixer running, slowly pour in the milk. Once all of the milk is added, turn the mixer up to medium speed and begin to knead the dough.
- Knead the dough: Keep the dough in the mixer and beat for an additional 5 full minutes, or knead by hand on a lightly floured surface for 5 full minutes. (If you’re new to bread-baking, my How to Knead Dough video tutorial can help here.) If the dough becomes too sticky during the kneading process, sprinkle 1 teaspoon of flour at a time on the dough or on the work surface/in the bowl to make a soft, slightly tacky dough. Do not add more flour than you need because you do not want a dry dough. After kneading, the dough should still feel a little soft. Poke it with your finger—if it slowly bounces back, your dough is ready to rest. You can also do a “windowpane test” to see if your dough has been kneaded long enough: tear off a small (roughly golfball-size) piece of dough and gently stretch it out until it’s thin enough for light to pass through it. Hold it up to a window or light. Does light pass through the stretched dough without the dough tearing first? If so, your dough has been kneaded long enough and is ready to rest. If not, keep kneading until it passes the windowpane test.
- Remove dough from the bowl and, with floured hands, work it into a ball. Place the dough on a lightly floured silicone baking mat lined, lightly floured parchment paper lined, or lightly floured baking sheet. (I highly recommend a silicone baking mat because you can roll the dough out in the next step directly on top and it won’t slide all over the counter.) Gently flatten the dough out, as I do in the video below, and cover with plastic wrap or aluminum foil. Place the entire baking sheet in the refrigerator and allow the covered dough to rest in the refrigerator for 30 minutes.
- Shape the dough: Remove the dough from the refrigerator. I like to keep the dough on the silicone baking mat when I’m rolling it in this step because the mat is nonstick and it’s a handy guide for the exact measurement. Begin flattening out the dough with your hands. You’re rolling it out into a rectangle in this step, so shaping it with your hands first helps the stretchy dough. Roll it into a 14×10-inch rectangle. The dough isn’t extremely cold after only 30 minutes in the refrigerator, so it will feel more like soft play-doh. Be precise with the measurement. The dough will want to be oval shaped, but keep working the edges with your hands and rolling pin until you have the correct size rectangle.
- Long rest: Place the rolled out dough back onto the baking sheet (this is why I prefer a silicone baking mat or parchment because you can easily transfer the dough). Cover the rolled out dough with plastic wrap or aluminum foil, place the entire baking sheet in the refrigerator and allow the covered dough to rest in the refrigerator for 4 hours or overnight. (Up to 24 hours is ok.)
- Butter layer (begin this 35 minutes before the next step so the butter can chill for 30 minutes): In a large bowl using a hand-held mixer or stand mixer fitted with a paddle or whisk attachment, beat the butter and flour together until smooth and combined. Transfer the mixture to a silicone baking mat lined or parchment paper lined baking sheet. (Silicone baking mat is preferred because you can easily peel the butter off in the next step.) Using a spoon or small spatula, smooth out into a 7×10-inch rectangle. Be as precise as you can with this measurement. Place the entire baking sheet in the refrigerator and chill the butter layer for 30 minutes. (No need to cover it for only 30 minutes.) You want the butter layer firm, but still pliable. If it gets too firm, let it sit out on the counter for a few minutes to gently soften. The more firm the butter layer is the more difficult it will be to laminate the dough in the next step.
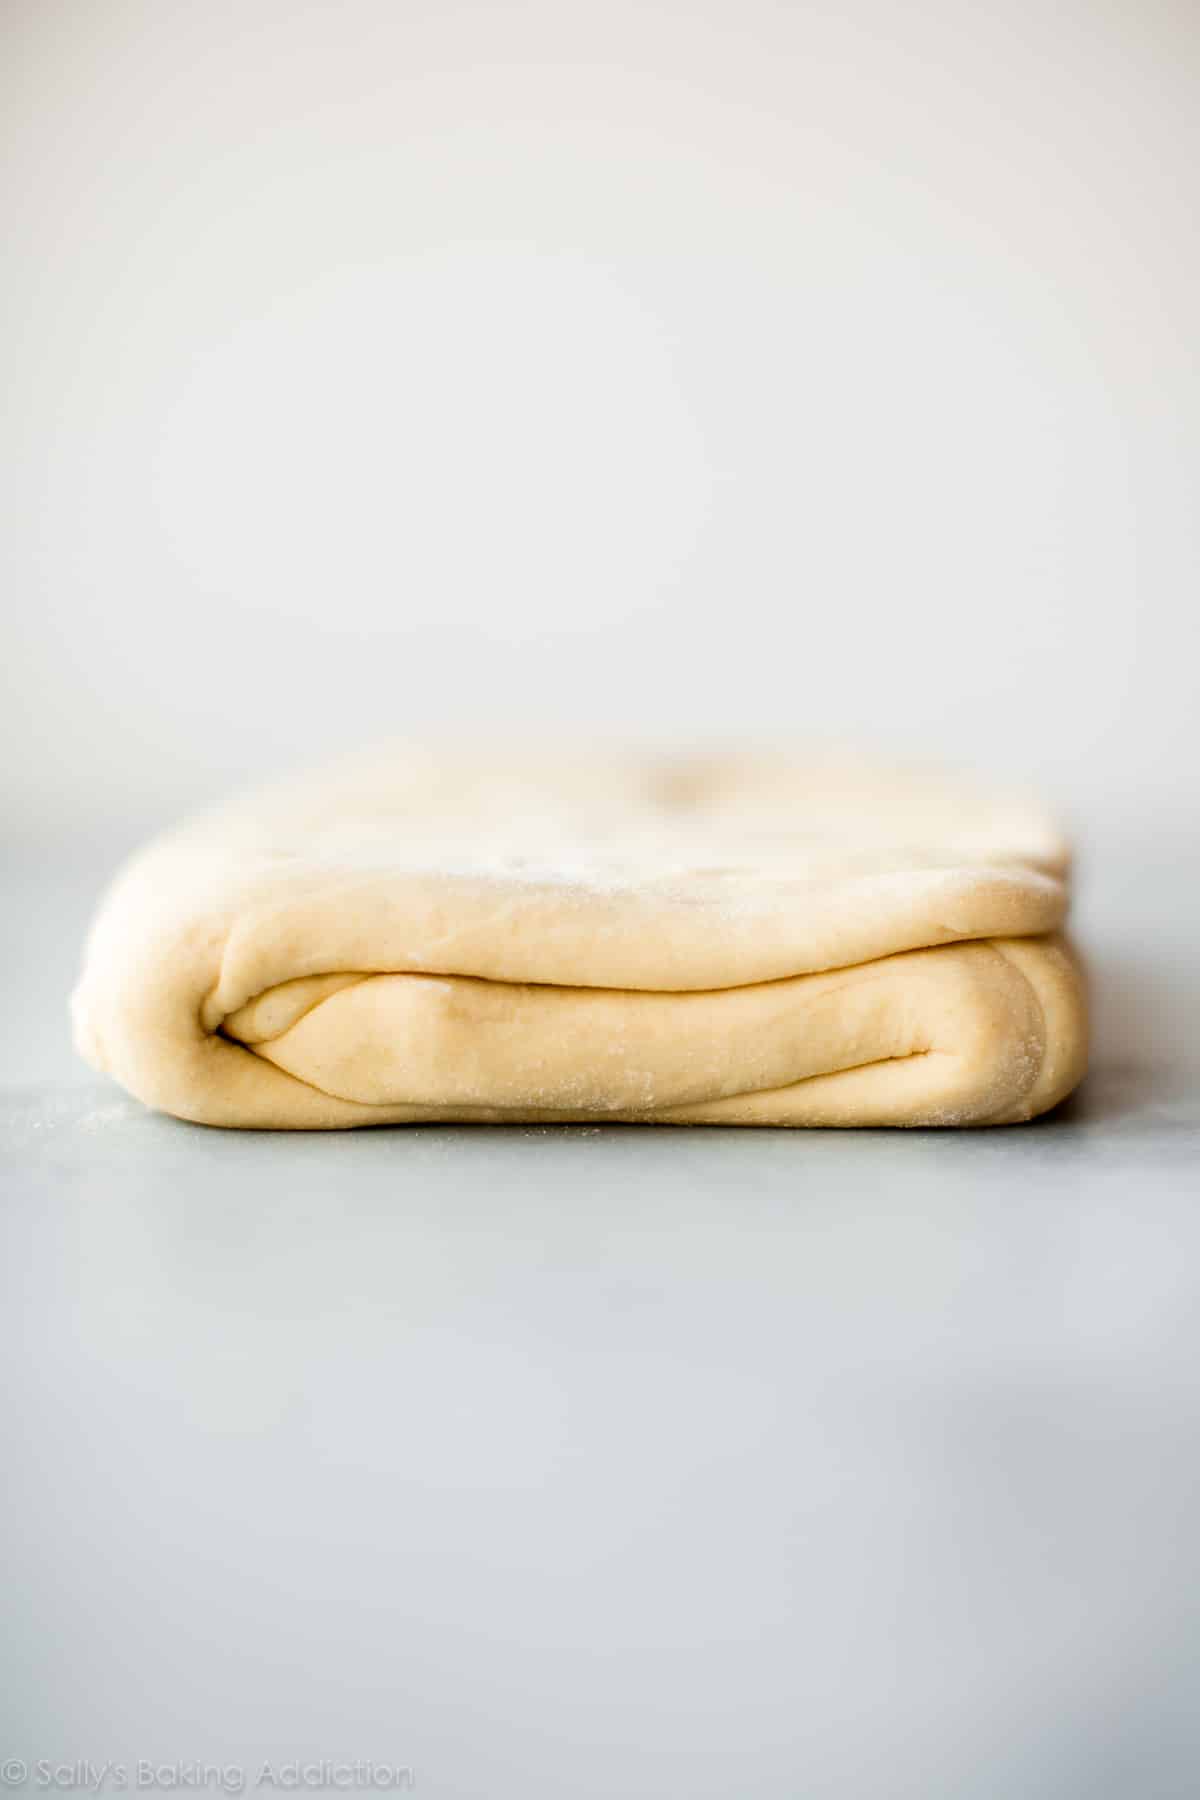
- Laminate the dough: In this next step, you will be rolling out the dough into a large rectangle. Do this on a lightly floured counter instead of rolling out on your silicone baking mat. The counter is typically a little cooler (great for keeping the dough cold) and the silicone baking mat is smaller than the measurement you need. Remove both the dough and butter layers from the refrigerator. Place the butter layer in the center of the dough and fold each end of the dough over it. If the butter wasn’t an exact 7×10-inch rectangle, use a pizza cutter or sharp knife to even out the edges. Seal the dough edges over the butter layer as best you can with your fingers. On a lightly floured counter, roll the dough into a 10×20-inch rectangle. It’s best to roll back and forth with the shorter end of the dough facing you, like I do in the video below. Use your fingers if you need to. The dough is very cold, so it will take a lot of arm muscle to roll. Again, the dough will want to be oval shaped, but keep working it with your hands and rolling pin until you have the correct size rectangle. Fold the dough lengthwise into thirds as if you were folding a letter. This was the 1st turn.
- If the dough is now too warm to work with, place folded dough on the baking sheet, cover with plastic wrap or aluminum foil, and refrigerate for 30 minutes before the 2nd turn. I usually don’t have to.
- 2nd turn: Turn the dough so the short end is facing you. Roll the dough out once again into a 10×20-inch rectangle, then fold the dough lengthwise into thirds as if you were folding a letter. The dough must be refrigerated between the 2nd and 3rd turn because it has been worked with a lot by this point. Place the folded dough on the baking sheet, cover with plastic wrap or aluminum foil, and refrigerate for 30 minutes before the 3rd turn.
- 3rd turn: Roll the dough out once again into a 10×20-inch rectangle. Fold the dough lengthwise into thirds as if you were folding a letter.
- Long rest: Place the folded dough on the lined baking sheet, cover with plastic wrap or aluminum foil, and refrigerate for 4 hours or overnight. (Up to 24 hours is ok.)
- At the end of the next step, you’ll need 2 baking sheets lined with silicone baking mats or parchment paper. The dough is currently on a lined baking sheet in the refrigerator, so you already have 1 prepared!
- Shape the croissants: Remove the dough from the refrigerator. On a lightly floured counter, roll the dough out into an 8×20-inch rectangle. Use your fingers if you need to. Once again, the dough is very cold, so it will take a lot of arm muscle to roll. The dough will want to be oval shaped, but keep working it with your hands and rolling pin until you have the correct size rectangle. Using a pizza cutter or sharp knife, slice the dough in half vertically. Each skinny rectangle will be 4-inches wide. Then cut 3 even slices horizontally, yielding 8 4×5-inch rectangles. See photo above for a visual. Cut each rectangle diagonally to make 2 triangles. You have 16 triangles now. Work with one triangle at a time. Using your fingers or a rolling pin, stretch the triangle to be about 8 inches long. Do this gently as you do not want to flatten the layers. Cut a small slit at the wide end of the triangle, then tightly roll up into a crescent shape making sure the tip is underneath. Slightly bend the ends in towards each other. Repeat with remaining dough, placing the shaped croissants on 2 lined baking sheets, 8 per sheet. Loosely cover with plastic wrap or aluminum foil and allow to rest at room temperature (no warmer—I suggest keeping on the counter) for 1 hour, then place in the refrigerator to rest for 1 hour or up to 12 hours. (Or freeze, see freezing instructions.) I prefer the shaped croissants to be cold going into the oven.
- Preheat oven to 400°F (204°C).
- Egg wash: Whisk the egg wash ingredients together. Remove the croissants from the refrigerator. Brush each lightly with egg wash.
- Bake the croissants: Bake until croissants are golden brown, about 20 minutes. Rotate the pans halfway through baking. If croissants show signs of darkening too quickly, reduce the oven to 375°F (190°C).
- Remove croissants from the oven and place on a wire rack to cool for a few minutes before serving. They will slightly deflate as they cool.
- Croissants taste best the same day they’re baked. Cover any leftover croissants and store at room temperature for a few days or in the refrigerator for up to 1 week. You can also freeze for up to 3 months, then thaw on the counter or overnight in the refrigerator. Warm up to your liking.
Notes
- Make Ahead Instructions: Croissants are perfect for getting started ahead of time. The dough can rest for 4 hours or overnight in step 5 and again in step 11. You can also freeze the dough after the 3rd turn in the lamination process (after step 10). Instead of the 4 hour rest in the refrigerator in step 11, wrap the dough tightly in plastic wrap or aluminum foil, place in a freezer zipped-top bag, and freeze for up to 3 months. Thaw in the refrigerator and continue with step 12. You can also freeze the shaped croissants after they rest for 1 hour at room temperature in step 13. (Before placing in the refrigerator.) Cover them tightly and freeze for up to 1 month. Thaw completely in the refrigerator, then bake as directed.
- Special Tools (affiliate links): Stand Mixer (preferred), Hand Mixer, or Glass Mixing Bowl with Wooden Spoon / Silicone Spatula | Rolling Pin | Pizza Cutter | Pastry Brush | Silicone Baking Mat or Parchment Paper | Baking Sheet | Cooling Rack
- Yeast: I use and recommend Red Star Platinum, an instant yeast. You can use active dry yeast instead if needed. No changes to the recipe or prior proofing required; just mix it in as instructed. (Most modern yeasts are already active!) Reference my Baking with Yeast Guide for answers to common yeast FAQs.
- Keep Dough Cold: Make sure the dough is ALWAYS cold. If it warms up too much, stop what you’re doing and place the dough back in the refrigerator for 20 minutes.
- Floured Surface: Lightly flour the work surface, your hands, the dough, and the rolling pin as you work.
- Air Bubbles: Are there air bubbles in your dough as you roll? That’s ok. Pop them with your fingers or a toothpick, then lightly flour where you popped the air bubble.
- Croissants for Brunch: I recommend starting the recipe the day before in the early afternoon. Complete steps 1-10, then let the laminated dough have a long rest in the refrigerator overnight (step 11). Begin step 13 2-3 hours before brunch.
- Dough adapted from Joy of Baking, Food & Wine, and Epicurious


Reader Comments and Reviews
I didn’t take your advice to read the recipe before starting (I never learn!) so ended up with croissants just before bed but they were so worth it!
The only successful croissant recipe I’ve ever used
So glad, Mary!
Hi! I wanted to try making croissants for the first time and chose this recipe because it was so detailed, and your recipes have always worked so well for me. I have just finished the 3rd lamination turn and it seems to be going well. The only thing is that I could sort of see chunks of butter through the dough when I was rolling it out, even though it was flat and rolling well. Will this cause any problems or can I do anything to fix it at this point?
Thank you so much, I’m excited to see how these turn out!
Hi R, that’s expected–hope they turn out wonderfully!
Hi Sally,
Your written instructions say to leave the shaped croissants at room temperature for one hour, but in the video you say to leave them out for 30 minutes. Which is correct?
Thanks, Steve
This was a great recipe but the part before putting into the oven (proofing) was really delicate. I followed the directions but it wasn’t enough time and they came out too doughy for the first batch. I would totally appreciate understanding under and over proofing and what are the signs. Also, I believe I had used too much flour to make sure it didn’t stick, it would be nice to have some tips here to avoid over – flouring the dough during the turns. I used a commenters suggestion to freeze or refrigerate the rolling pins before turns. That helped with not warming up the dough. The granite counter was also warm to the touch during the summer even with AC going so I think the wooden boos blocks (a couple together) would have been helpful on top of parchment paper? I am not sure. If anyone has suggestions I am open to it. Otherwise the rest of the batch turned out well as I fine tuned the proofing over time
Hey Sally! I have a query, I’ll be using Active dry yeast but I’m not sure about the reactiveness of the yeast as it’s a bit old. Will it be okay if I proof it with warm milk and use the milk-yeast mixture if it’s active? Or is it important for me to use the yeast without proofing it?
Hi Megha! Yes, you can absolutely proof your yeast. We recommend warming 1/4 cup (60ml) of the milk you need for the dough to to about 110°F(43°C). Mix in 1 teaspoon of the sugar needed for the dough as well as the yeast. Cover and let it rest for 5-8 minutes. If the mixture is foamy on top, your yeast is active and ready.
Good croissants. I made them using the delayed method of rising overnight in the refrigerator after forming. I let them stay out before baking, but they needed a lot longer than an hour to puff up to the wobbly state needed before baking. The flavor was great, but there needed to be more rolled layers – not laminated layers, but the layers you get when you roll up the croissants. I was a little surprised by the size of the triangles. They need to be bigger – definitely longer, and that could be accomplished by rolling the dough thinner. I leave it to you to figure out dimensions, but the triangles need to be at least 10 inches long before rolling. Have you ever seen Tartine’s croissant recipe? Take a look. They are sublime. https://www.saveur.com/best-croissants-recipe/
Hi Cathy, you could simply stretch the triangles to be closer to 9 or 10 inches. I have not tried that recipe before, and appreciate the suggestion. Thank you for your feedback!
This recipe was sooo good! I added Nutella in the middle and my entire family devoured it in one day. I would suggest doubling the recipe because everyone eats them so quickly LOL
Made these over last 2days.its the third recipe I’ve tried and I have to say it’s a good and easy recipe.just time consuming but well worth the work.will definitely make again.
Once the croissant are made, can the be frozen and baked later?
Yes – see recipe Notes for details!
I’ve been testing different recipes to see which recipe and method I like the best. So far, your recipe always tastes the best and I really enjoy the process.
I have a question about the first long rest. Why is it necessary to rest the dough that long prior to lamination? What is it achieving? Also, I’ve seen other recipes suggest fermenting the dough at room temperature for an hour and then freezing it before lamination. Is there a benefit to fermenting the dough at room temperature vs chilled in the fridge overnight?
Hi Amanda, this post receives so many comments and yours got lost! Thank you for trying this recipe. During that initial long rest, you’re letting the dough relax after you just rolled it out. The reason it’s so long is to help develop flavor, and to ensure it’s very very cold which makes it easier to work with. I haven’t tried the method of freezing before lamination, so I can’t comment on that.
This recipe was perfect. I have some extra equipment, so I was able to start these at 7 am and have them ready by 3 pm and they were absolutely beautiful on my very first try with a lot of light, flakey layers. I was all set for a two day process when my brother (who had requested them for his birthday) wanted to celebrate a day earlier, so I had no choice but to try. Your explanation about how the butter and dough needed to be similar in temp was the key. I stuck the dough in the freezer for about 20-30 min, then put both in the fridge for the same amount of time. The real trick however is that I have a sheeter. Since both rollers are metal, I took a bag of frozen veggies and got the rollers super cold. By virtue of how these machines work, I was able to QUICKLY do all three laminations prior to the dough growing warm. I then stuck it in the fridge for 30 min, brought it back out to roll out and get my squares, stuck them back in the fridge until I could handle them without being sticky, and then formed the croissants and proofed. They were in the fridge for at least 2 hours before I baked them, and so the end result really was amazing. Thank you for teaching us SO MUCH. You are a go-to for me!
Am very much looking forward to making these, as they seem to be engineered to turn out exceedingly well. One change I would make, though – French butter croissants are straight. If they are curved, the shape indicates that they have been made with margarine or some other fat that isn’t butter. While you might find real crescent-shaped croissants made with all butter, you are only safe if you stick with the straight ones. Plus they are easier to shape! I’ll let you know how I make out!
Is it possible to use this recipe to make croissant rolls/buns?
I’m sure this dough could work for that, but I haven’t specifically tested it. Let me know if you do!
I love using your recipes! They have worked so well for cupcakes, brownies, cakes, mousses, and puddings. This was my first time making croissants and they turned out great! I did struggle with preventing the butter from leaking after the 2nd turn and was scared I would come out with dry croissants, so I stopped after the 2nd fold. Therefore, my croissants needed a little longer, about 10 mins more, to bake. I was surprised to see that very little butter seeping out! I filled half the croissants with chocolate and topped with sesame seeds. They are very flaky and delicious. Thanks, Sally!
Hi! I made the dough and did not proof the yeast as per instructions…but now there are pieces of yeast visible in my dough…is this normal?
Hi Rhonda, Our dough looks like that too– it’s no problem! Continue on with the recipe.
I finally did it! And I’m so glad I did! These croissants are amazing! They’re not perfect by far, but I’m so pleased with them! Thanks for the clear directions and helpful hints!
I don’t have a mixer and it took me a long time to mix the dough and I worried all the way through because it was sticky. I added more flour and then worried because I thought I would spoil it. Then when I did the butter, the butter was too hard and broke up… I was NOT looking forward to the finished product. I cancelled breakfast plans with my parents because I didn’t want to serve them a horrible mess… BUT THEY TURNED OUT BEAUTIFULLY!!!!! Yes, I had a little butter leakage, but for a first time, and for a pastry I was so terrified to make, I am so proud of myself and I thank you SO MUCH for this beautiful recipe and your very clear instructions ❤️ Will I make them again? Yes, but not in a hurry I’m traumatised but with a full belly ❤️
This recipe was fantastic. The video was super helpful. The recipe had the perfect amount of description. My only problem is that im having trouble with not-burning the outside, what i believe is the egg wash thats burning. I tried the recipe’s recommendations without success. I also tried cooking at 375F for the whole 20 min, and it was a bit undercooked. I saw the recommendations below to make an aluminum foil tent, to lower my rack, or to check if my pan is aluminum, which i will try next time. In my opinion, it still turned out fine- besides the outside coating, nothing on the inside was burnt and it was all still fluffy and great. These croissants and this recipe was so good that I now choose sallysbakingaddiction.com for any recipes I want, if its available. Super helpful, great results. I thought this was laid out in an excellent way.
Thank you so much for making and trusting our recipes, Ally!
I’ve tried twice to make the dough but both times it never pulled away from the bowl enough and was very sticky. What am I doing wrong? i used correct measurements and room temp butter like the recipe said
Hi Julia, If the dough is just too wet and sticky, add a little more flour as you work with it. (About 1/4 cup should help.)
My dough didn’t pull away from the mixer either
This recipe turned out amazing! I did two batches, so I could take them to Easter Brunch.
these turned out literally so good it’s like i’m in france DO IT
just a quick question, would my croissants still turn out ok if i can see chunks of butter?
Should still be just fine. They may taste a little greasy, but otherwise delicious.
Hi! I am hoping to make this in my Family and Consumer Science Foods & Nutrition class at the high school I teach at, but we only have 55 minute classes. Is there anyway that the 30 minute rest in step 3 can be left overnight? Would that work? Please let me know if you can. Thank you!
Hi Katherine, unfortunately you don’t want to go past 30 minutes. This is really just a brief rest to relax the gluten in the dough; you don’t want it to rise much at all.
This recipe is really good
Hello! I’ve tried this recipe twice now, and the first time the bottoms burned terribly but the tops were good. I baked them at 400 on the lowest oven rack. I did some more reading and turned down the temp to 375 and put the racks in the middle of the oven for the second try and they were better, but the bottoms still burned a bit and the tops were pale. Both tries the edible parts were delicious! What should I change to fix the baking part? I have no issues making or shaping the dough.
Thank you for this excellent guide!
Hi Cat, So glad you tried these homemade croissants. If you decide to try them again, make a couple adjustments in the oven. First, lower the oven temp by 25F, which you have tried. Lower the oven rack, too. Both will help the croissants bake more evenly. You can also tent them loosely with aluminum foil which will prevent the outsides/bottoms from burning.
I figured out that I was baking these on a dark sheet instead of an aluminum sheet and that made all the difference. i would recommend amending the recipe with suggested bakeware. i’m still so grateful for this guide, as are my friends & coworkers since i foist my experiments onto them
I love this recipe because it makes a very intimidating process feel doable. I’ve made it a few times and the last time I did it I did a fourth laminating turn and they turned out so good! So I recommend that but also making sure not to leave them in the fridge for too long between steps or it could make the yeast activate and make your dough too fluffy to manage. It’s definitely a balance but I loved how many layers there were when I did this! Can’t wait to try it again!
My Croissants were a little dense, but you can see layers and taste buttery. After the 30 min my butter was hard.Should the butter be pliable. Would lower temp and longer coo time make them less dense?
Hi Bruce, yes, the butter should be pliable. (Also, somehow I keep missing questions on this page, so my apologies for the delay.) A shorter time in the refrigerator will help the butter in the dough. The oven bake time/temperature won’t really have anything to do with this. Unless they were burnt. Then you can just reduce the bake time.
Hi! I am making the croissants and I want to know can I bake them in a convection oven and at what temperature and the amount of time
Hi Mk, we usually recommend using conventional settings for baked goods. The flow of air from convection heat can cause baked goods to rise and bake unevenly and it also pulls moisture out of the oven. If you do use convection settings for baking, lower your temperature by 25 degrees F and keep in mind that things may still take less time to bake.
Going to make your Croissant recipe! Can you use Almond milk in place of the whole milk?
Hi Bruce, a lower fat or non-dairy milk is fine in a pinch but the dough will not be as rich.
Thank you! That’s what I figured, the fat in the milk is necessary.