

Learn how to create a stunning lattice pie crust with this helpful information and easy video tutorial. Latticing pie dough is much easier than it looks!

Pies are my favorite dessert. Not only because they taste SO DARN GOOD, but because they’re very satisfying to make. From-scratch pies take careful precision and the end result tastes even sweeter because you know how much love and effort you put into it.
I receive a lot of questions about how to lattice pie crust, so I decided to condense all my tips and information on 1 single page. Hope you feel more *PIE CONFIDENT* after reading and watching!
Designing a pie crust is a form of art. There are so many different pie crust arrangements, but the classic lattice weaving is my favorite. The simple, yet stunning lattice design will never go out of style. Even though it’s a very common way to style pie dough, latticing pie crust seems pretty intimidating. Today I’m sharing a full tutorial with a helpful video so you can be confident with your next piece of pie artwork.
Trust me, it’s easier than it looks!

What is Lattice Pie Crust?
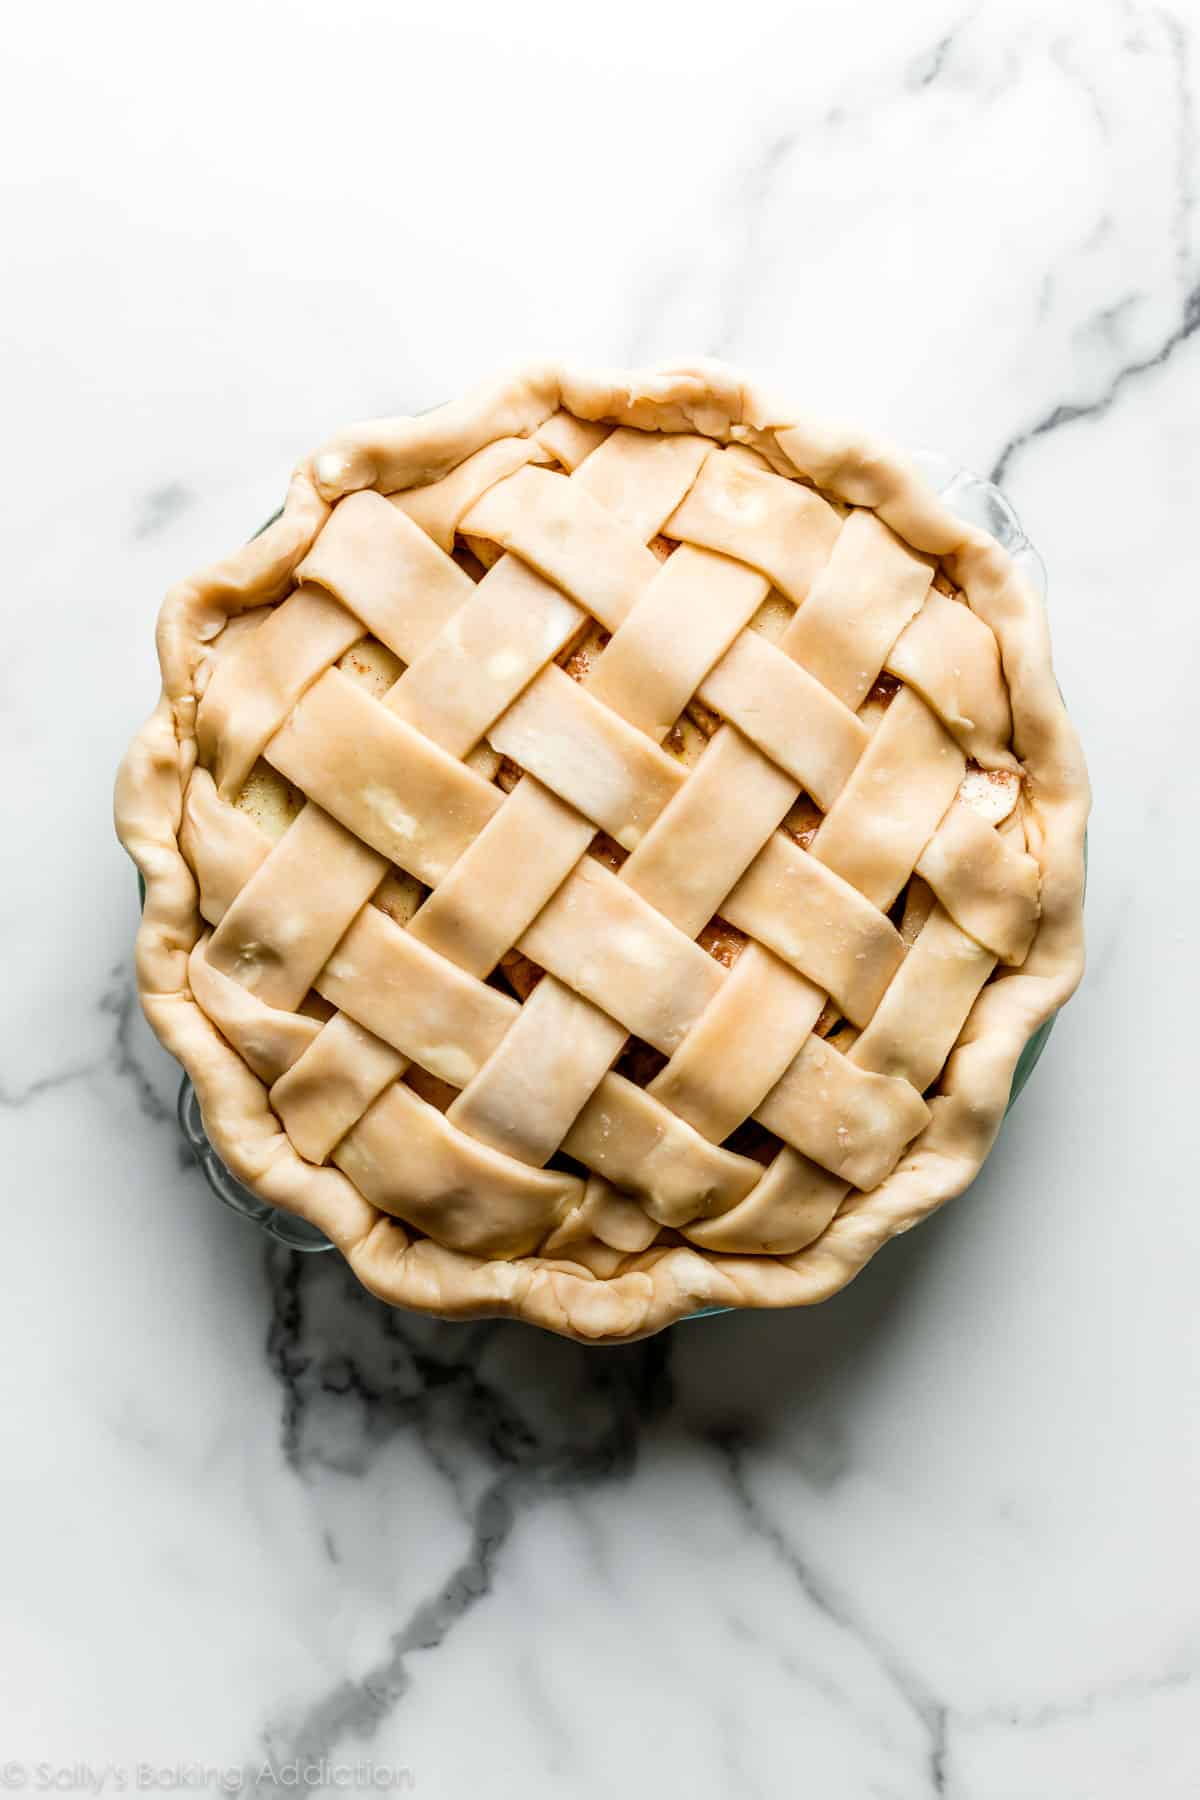
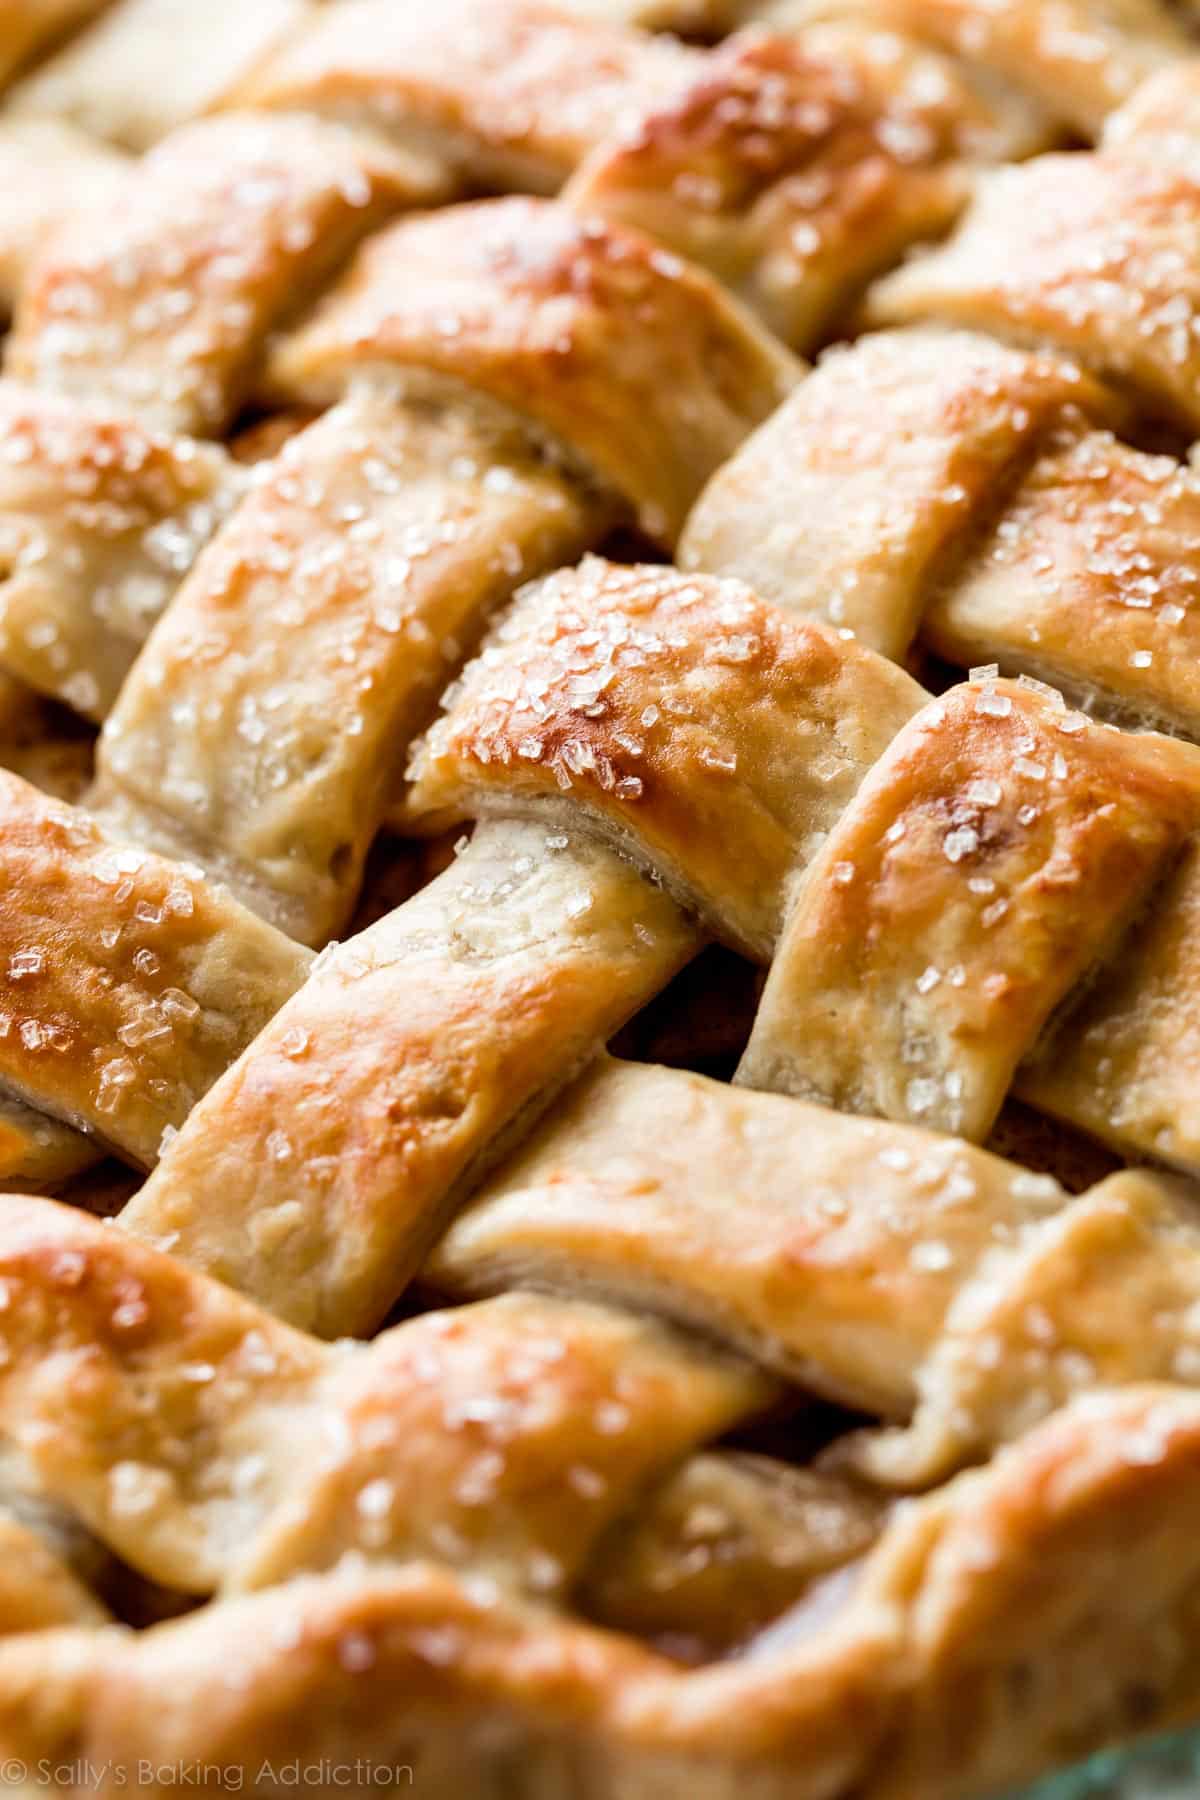
Lattice pie crust is weaved pie dough. Strips of dough lay on top of pie filling, layered over and under one another to create a basket weave appearance. Not only is latticing a beautiful way to decorate a pie, the holes between the strips allow steam to escape. Without these vents, the fruit pie filling could cause a mini explosion in your oven. It’s not pretty!!
Here’s What You Need:
I have a full list of the best pie baking tools, but for this lattice design here’s exactly what you will need:
- Quality pie crust
- Extra flour
- Rolling pin
- Ruler (or just eyeball it!)
- Pizza cutter or sharp knife
- Pastry brush for egg wash
Start with Quality Pie Dough
Lattice will not work unless you begin with quality pie dough. Don’t sabotage your efforts from the start. I recommend my favorite pie crust, which uses both butter and shortening for flavor and stability, or my all butter pie crust. Either are excellent choices for your lattice pie crust because they’re sturdy, yet bake up incredibly light and flaky.
I used my butter and shortening pie crust in these photos.

Troubleshooting Pie Crust
- Pie crust is tough: Tough crusts are the result of not enough fat in the crust, as well as overworking the dough.
- Don’t have enough pie dough: To ensure you have enough pie dough for overhang and a pretty topping, roll your dough out to a 12-inch circle, about 1/8 inch thick.
- Pie dough is dry & cracking around edges when rolling: Use enough ice water when preparing the pie dough. If it’s too late and you notice the edges of your pie crust are cracking as you roll it out, dip your fingers in ice-cold water and meld the edges back together. Wait a minute, and then try rolling out again.
- Pie dough is falling apart & crumbling when rolling: Try adding more water AND more flour. Sprinkle a tiny bit of ice water and flour onto the cracks and crumbled pieces, and gently work it all in with your fingers. Wait a minute, and then try rolling out again.
How to Lattice Pie Crust
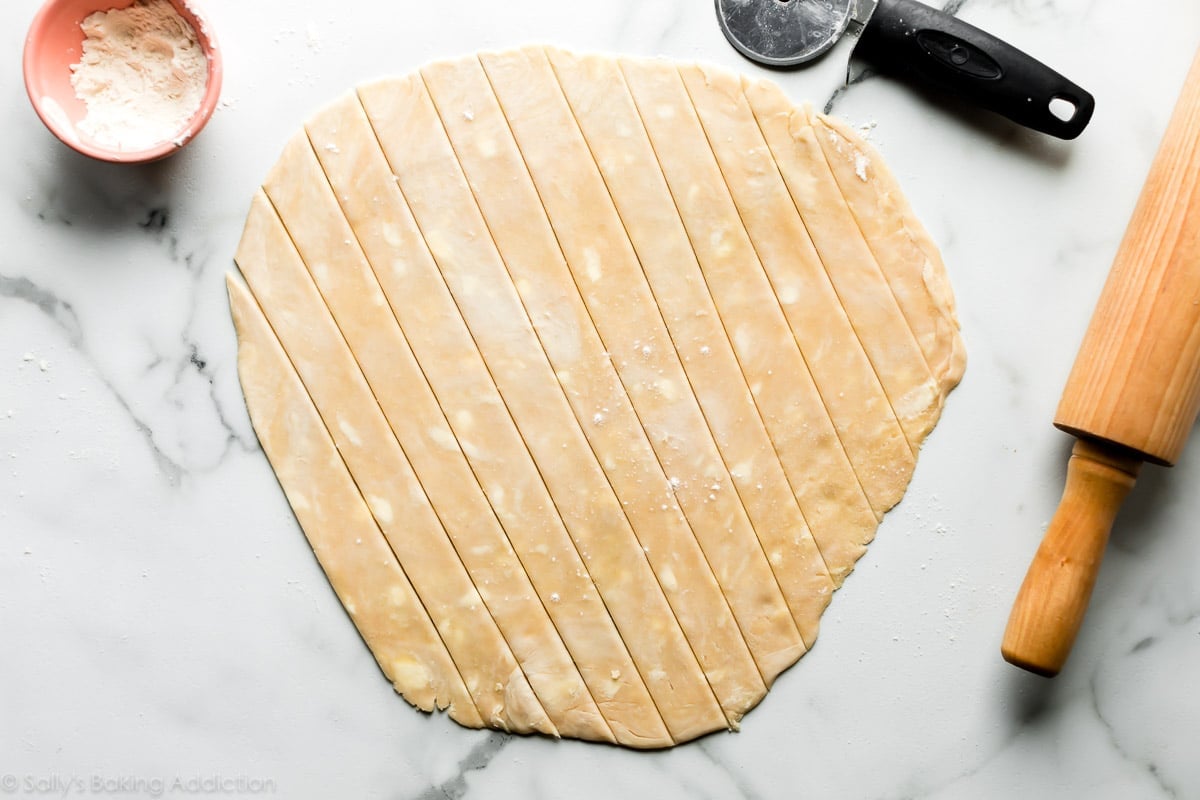
- Roll out pie dough into a 12-inch circle.
- Cut dough into strips. To keep things simple, I recommend 12-1 inch strips.
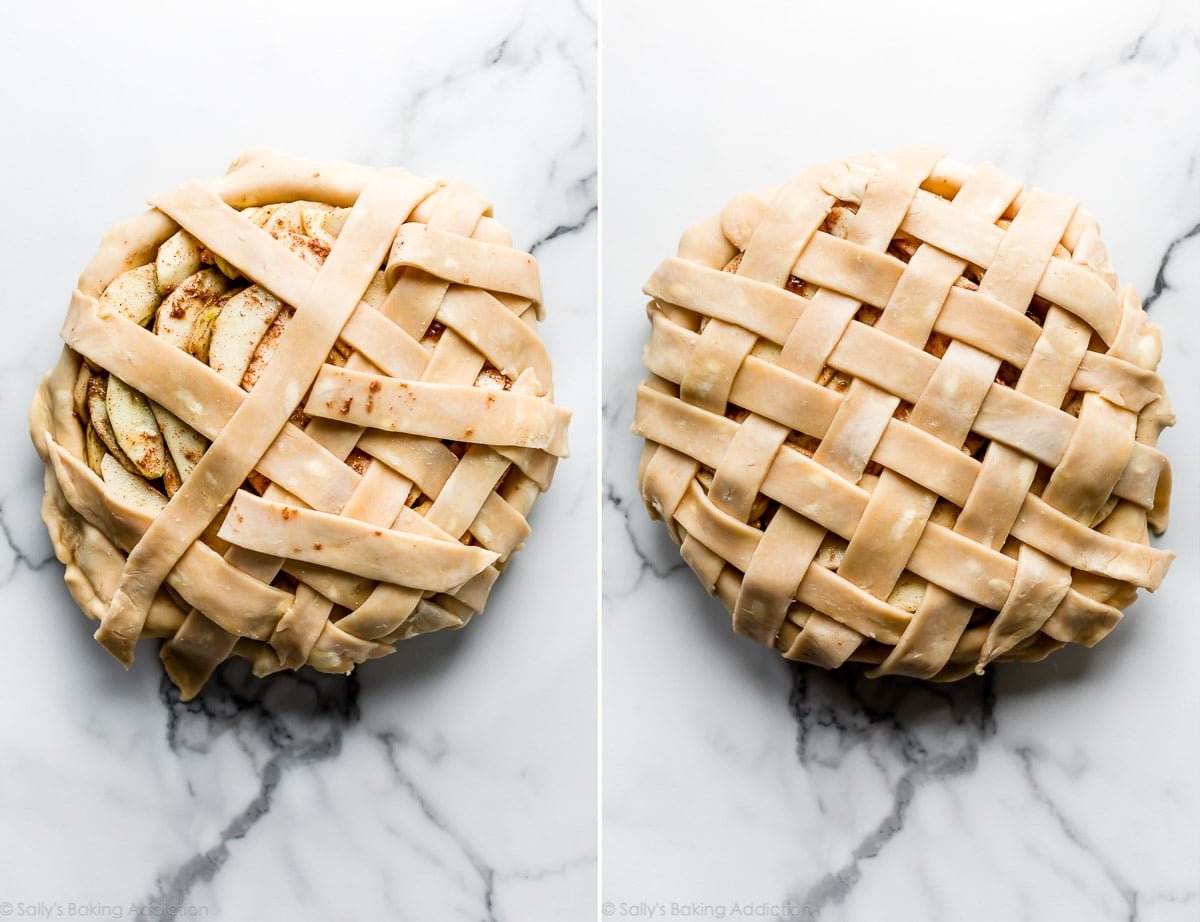
- Lay 6 strips vertically and evenly spaced on top of the filled pie. Use the longer strips in the center of the pie and the shorter strips on the ends.
- Fold every other strip (3 in total) all the way back so they’re almost falling off of the pie. Lay one of the 6 unused strips perpendicular on top. Unfold the 3 vertical strips back so they lay over the perpendicular strip. You have 5 strips left.
- Fold the other 3 vertical strips back. Lay one of the 5 unused strips perpendicular on top. Unfold the 3 vertical strips back so they lay over the perpendicular strip. You’re now beginning to see the beautiful woven pattern!
- Repeat with last 4 strips, weaving the strips over and under one another.
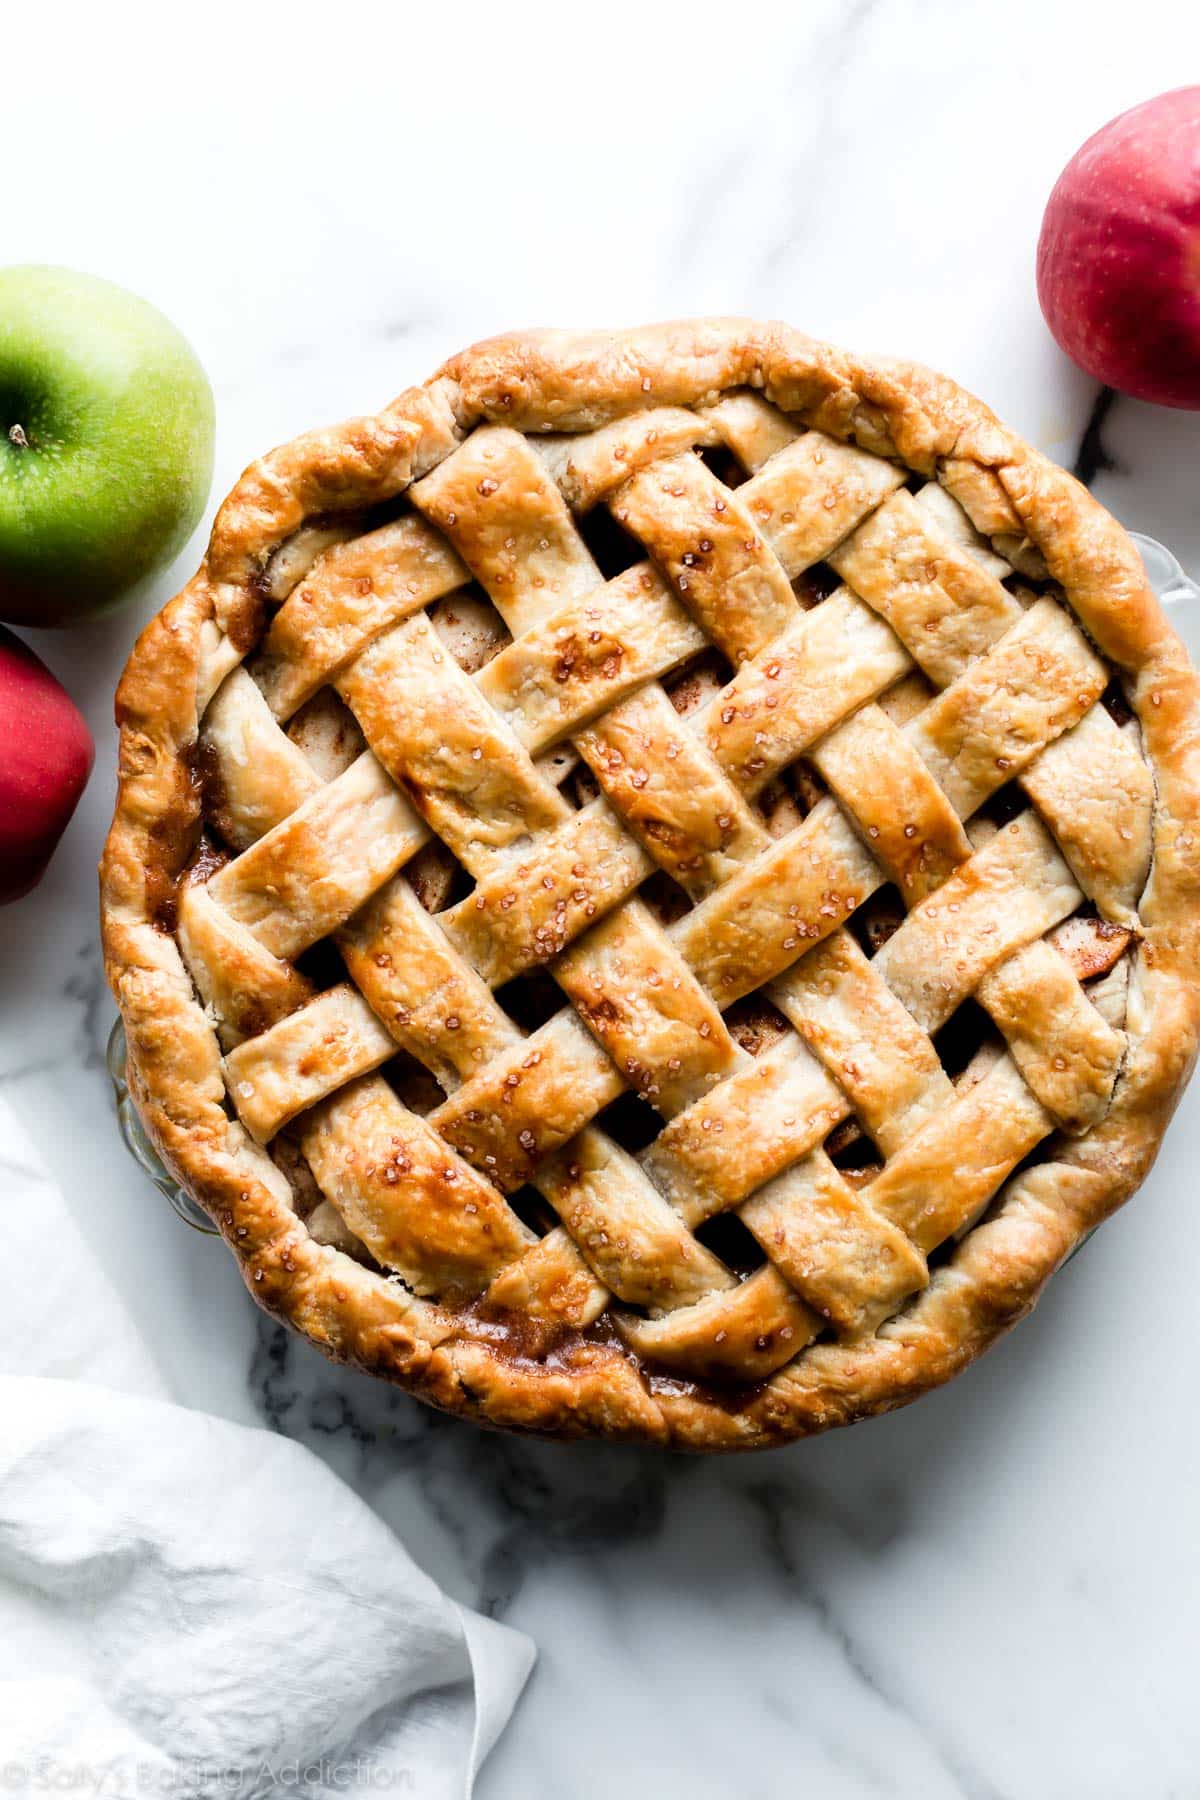
- Fold the excess dough that lays over the edges of the pie back and pinch them with the bottom pie crust. Crimp or flute the pie crust (I fluted the crust in these photos), then brush with egg wash (egg + milk) and sprinkle with a little coarse sugar. This adds a lovely sparkle and crunch!
- Refrigerate unbaked pie for 20 to 30 minutes prior to baking. This is an often overlooked step, but cold dough is guaranteed to hold the lattice shape.
Video Tutorial: Latticing Pie Crust
If you’re a visual learner, use this video tutorial to help understand the process.

My “Thick Edge” Trick
After you create the lattice, you’ll have excess pie dough around the circumference of the pie. Feel free to trim a lot of the excess dough, but if you want enough dough for a pretty edge to flute or crimp, don’t trim it too much or at all. Instead, fold the strips back onto the pie and pinch together with the bottom pie crust. I understand that may not make a ton of sense, but the video tutorial above shows how I do this.
You can also watch how I flute the edges using my thumb and index finger on one hand and my index finger knuckle on the other hand. Fluting pie dough seals the top and bottom crusts together with a lovely scallop design.
For extra details on this step, see my full tutorial on how to crimp and flute pie crust.
2 Final Success Tips
- Keep dough cold when rolling out: Warm pie dough is unworkable. If the dough becomes too warm when you’re rolling it out, stop what you’re doing, pick it up as gently as you can, put it on a plate or small baking sheet, and then over and refrigerate it for 10-20 minutes.
- Don’t Overthink: Your pie will be beautiful and taste amazing even if your lattice is crooked or uneven. Latticing takes practice. The more you do it, the better you become!
Homemade Pie Recipes
Each have a lattice crust on top.
- Classic Apple Pie
- Salted Caramel Apple Pie
- Peach Pie – this one includes braided pie crust using my How to Braid Pie Crust tutorial
- Caramel Pear Pie
- Apple Cheddar Pie
- Cherry Pie
- Blueberry Peach Pie
- Strawberry Rhubarb Pie
- Blueberry Pie
- Apple Cranberry Pie
- Triple Berry Pie

How to Lattice Pie Crust
- Prep Time: 45 minutes
- Cook Time: 0 minutes
- Total Time: 45 minutes
- Yield: 1 pie
- Category: Dessert
- Method: Decorating
- Cuisine: American
Description
Follow this tutorial for a beautiful lattice pie crust topping. Watch the video tutorial and read through all my tips before beginning.
Ingredients
- Homemade Pie Crust (or use my all butter pie crust)
- all-purpose flour for work surface
- egg wash: 1 large egg beaten with 1 Tablespoon (15ml) milk
- coarse sugar for sprinkling on crust
Instructions
- Watch the video tutorial above for a visual of each step. (Latticing is better seen than explained!)
- Make dough in advance: Prepare my pie crust recipe through step 5. Chill in the refrigerator overnight.
- After you roll out the bottom crust and fill your pie, it’s time to lattice. On a lightly floured surface with a floured rolling pin, roll out top pie crust into a 12-inch circle. It’s ok if it’s not a perfect circle, as long as it’s 12 inches in diameter.
- Cut dough into strips. To keep things simple, I recommend 12 1-inch strips.
- Lay 6 strips vertically and evenly spaced on top of the filled pie. Use the longer strips in the center of the pie and the shorter strips on the ends.
- Fold every other strip (3 in total) all the way back so they’re almost falling off of the pie. Lay one of the 6 unused strips perpendicular on top. Unfold the 3 vertical strips back so they lay over the perpendicular strip. You have 5 strips left.
- Fold the other 3 vertical strips back. Lay one of the 5 unused strips perpendicular on top. Unfold the 3 vertical strips back so they lay over the perpendicular strip. You’re now beginning to see the beautiful woven pattern!
- Repeat with last 4 strips, weaving the strips over and under one another.
- Fold the excess dough that lays over the edges of the pie back and pinch them with the bottom pie crust to seal. Crimp or flute the edges of the pie, then brush with egg wash and sprinkle with a little coarse sugar. This adds a lovely sparkle and crunch!
- Refrigerate unbaked pie for 20–30 minutes prior to baking. This is an often overlooked step, but cold dough is guaranteed to hold the lattice shape.
- Bake the pie as directed in your recipe. I recommend my apple pie.
Notes
- Special Tools (affiliate links): Rolling Pin | Ruler (or just eyeball it) | Pizza Cutter or Sharp Knife | Pastry Brush


Reader Comments and Reviews
I have always found that cold dough crumbles and cracks, and warm dough is smooth and easy to work with and doesn’t fall apart. So, I’ve always made mine nice and doughy-smooth by molding it by hand, and letting my hands warm it up, like my home ec teacher taught us, years ago.
Thanks so much for video on making lattice crust. Made one before but had a hard time this way is so much better
Do you brush the top with butter or egg wash
Hi Sandra, We usually brush the crust with egg wash before baking.
Thank you so much for the video and instructions! It went perfectly the first time around and all because of you!
Awful I did everything on point .it was dry couldn’t roll it out . Am waisted alot of butterand time !
Hi W, we’re happy to help troubleshoot. If you are experiencing a dry, crumbly crust, the dough may have been over-worked and/or it was too dry. Don’t be afraid to add more ice water until the dough clumps together and feels a little moist. Keep the fats as cold as possible, use a pastry cutter to cut in the fats by hand, and don’t overwork them. You want little pieces of cold butter throughout. Hope this helps!
What a fabulous tutorial to make a lattice piecrust! Thank you!
Great recipe. Music much too loud and annoying.
Hi Sally! Love your recipes! I always struggle with my pie dough. I’m pretty close to getting the texture just right but I rarely have excess dough around the edges, it’s just barely enough to come to the edge on the top crust and my bottom crust sits perfectly in the dish with no overhang. I measure the circle to exactly 12 inches. Also when I make lattice, your strips look sturdy and thick. I cut mine to an inch but they look thin and soft compared to yours. What am I doing wrong? Thanks <3
Hi Kim! You can roll your pie dough out just a bit thinner to have extra on the edges. Your pie dish may be a smidge bigger and/or deeper. Make sure to keep the dough cold when working with it, when it warms, it becomes softer and more difficult to work with. If you feel it getting warmer, stop working and pop everything in the fridge for 10-15 minutes before continuing. Hope these tips help!
This looks amazing. I am wondering how are you able to keep the bottom pie crust edges soft enough to lift up and press in to the lattice if you had to blind bake the bottom crust? Mine always gets too hard to work with even with a protector on it. Thank you!!
Hi Tara! This can be frustrating for sure. See this helpful tutorial on another site. It’s great! https://food52.com/blog/18422-par-bake-your-double-crust-pies-join-the-anti-soggy-crust-crusade
(The link may not be clickable, so copy/paste the URL into your browser.)
Lattice pie finish has always intrigued me and the only way I could think of doing it ,is the way you do it, however your system of pulling every second strip back neatly to then interweave is where the magic happens. That has stumped me for years to the point where I get confused thinking “But How Would I control All the Strips” and not try because it was too scarey. Thank you so much
I’ve seen a lot of recipes that say to chill the uncooked pie crust in the glass pie pan for 30 minutes before putting it into the over, but if you use a glass pie dish isn’t there a danger of the glass shattering when you put it in a hot oven? I don’t trust going from very cold to hot like that. Am I wrong?
Hi Christine, We’ve never had a problem using our Pyrex glass pie pans, but use your best judgement and do what you feel comfortable with. If you do not wish to use glass you can certainly use a metal pie plate or even a disposable one will go easily from chilled to the oven.
What temperature do I cook at?
Hi Holly, here’s our detailed pie flaky pie crust recipe!
I tried the lattice crust on a cherry pie today. I think it turned out pretty good.
Thanks so much for the simple step by step. Just latticed my first pie and it wasn’t that hard!
YES! We did it! Thanks for the help. And it goes with a Perfect Peach Pie.
I made a beautiful strawberry rhubarb pie today — easy peasy when you follow the directions! I put lattice on the top, sprinkled the top with sugar crystals…..only to find out after baking when it cooled that I actually sprinkled the top with KOSHER SALT! I was able to pick some of it off, but I wonder if I put sugar on the top and then used my kitchen torch to melt the sugar would this work? Or am I stuck with salty pie crust?
Hi Wendy, you can simply try sprinkling the top with sugar — no need to use the torch to melt. Hope that helps to cut the saltiness!
Hi Sally, You recipes are the best. I was wondering if you can substitute coconut oil in the solid form in place of the shortening? So instead of butter and shortening it would be butter and coconut oil.
Hi Ellyn, some readers have substituted solid and cold coconut oil. However, you may enjoy our all butter pie crust instead.
I am a true beginner baker. I have noticed my coconut oil separates out from the dough into solid globs when I cool it. I end up reworking the dough to integrate the coconut oil, which means the dough gets more work than it should. This causes more delays, so I have to refrigerate the dough again. Then the oil separates out and the recycle repeats. I will not try coconut oil again until I cook enough (if ever) to find out how to make it work. Unless you really know how to handle solid globules of coconut fat and how they affect dough integrity, I would say avoid it.
Thank you so much for the video! I’m always nervous to try to work with pie dough; this is my second time making a pie. This is my first time latticing a crust and it went so smoothly!!
When you bake your pies what rack would you place them on middle top or bottom?
Hi Tori, we usually bake our pies in the lower third or the center position.
Question: do you really do 12” in diameter for the bottom crust or is it more like 13-14”? I’m tempted to roll it out wider next time. I do not get nearly as much overhang as you and I use a deep dish 9” Pyrex pan like yourself. I feel like I’ve made this mistake before so I don’t get the nice stacking effect on the rim the way yours ends up because there’s not nearly as much slack on either layer to work with.
Hi Elizabeth, Ours is usually right at 12 inches. But if your pan is just a little bigger you can roll yours our a little bit larger if needed.
Hi! I just tried this method and it looked gorgeous going into the oven, but now that it’s in there the edges of the crust look like they just melted away and fell open I made sure to tuck in the sides like the video. Any tips or thoughts on what I did wrong? Thanks!
Hi Audrey, did you make sure to press the strips and edges of the crust together tightly? If you try it again, make sure the pie dough strips and rim are as seamless as possible.
Hi! I want to try this for the salted caramel apple pie but I have a question: which strips do I use? From the video I saw some shorter strips but do I use those too? If so which strips do I use for which part (vertical or horizontal)? Thanks?
Hi Multavit, The longer strips will be for the center of the cake and the shorter strips can go toward the outside. I hope this helps!
Just one last question, the pie crust recipe makes 2 balls, is the first for the bottom part and the second for the top (the lattice part)? Thanks
Hi Sally,
I am not new to baking and decorating pies, but I have been avoiding lattice for the past 20 years. My question is: To what thickness do you roll your dough out prior to cutting the lattice pieces? Thank you.
Hi Michelle, If you are using our pie crust recipe and roll the dough out to a 12 inch circle, it will be about 1/4 inch thick. Let us know if you try it!
I make 5 inch pies and your lattice top is amazing! My strips are under an inch and never brown although the bottom and sides are great. To fix the raw looking middle strips I tried egg white, egg yolks, and also milk brushed on top including sprinkled sugar. It’s still ugly. Where did I go wrong? I’m seriously considering painting on the browned shade with food coloring.
Hi Monica, You can cover the outside of the crust – if you don’t have the correct size pie shield you can use aluminum foil – and then let the pie bake until the center of the crust is fully baked.
Thank you so much for the video on how to do a lattice crust. It was immensely helpful. I used your crust recipe to make my first pie dough on Thanksgiving and now I’ve graduated to making several pies. Thanks for all the tips. I used to only bake cakes and all your advice was great.
Can’t wait to try some lattice pie making! Can you please advise about what kind of surface is best to use when cutting pie dough with a pizza cutter or dough cutter? I don’t want to damage the blade of my cutter. Isn’t marble too hard to use a blade on?
Hi Andrea, We cut right on our counter but you can certainly roll your dough out and cut in on a silicone baking mat to protect both your marble surface and your pizza cutter.
Whew. Thank you so much, Sally. You stuck by my side with your directions and video and I needed the video a second time when I got tripped up for a second with layering the lattice, but first bit was enough of a reminder.
My first Lattice crust and deep dish apple pie- in the oven!! Learned a couple of things, for sure. One important thing, everyone: make sure that bottom crust hangs over enough- mine didn’t, so after the lattice was done I could only crimp to seal the best I could to avoid leakage while baking-preparing myself for this possibility!! Lol I was worried about making the bottom too thin, now I will probably have a soggy bottom! Lol
The other thing was my lattice strips started to stick and got longer as I pulled them off my rolling surface. Lol. Learning!
So, on my birthday request list: glass deep dish pie dish
Sally, thank you. Your directions were amazing per usual.
Sorry such a long post!!
Sally, is there any way to save a pie crust that is already prepared and chilled but too dry? I used your recipe for butter/shortening crust and misjudged how much water. So when I rolled out the first crust it cracked and needed to be pieced together. Anything I can do to save the second one?
Btw you recipe has me totally inspired. I’m making my first cherry pie and my first homemade crust today!
YES! Dry pie crust can be saved. Moisten your fingertips with cold water and gently work the water into the cracks of the dough as you roll it out. The dough will come together with the water from your fingers. Works every time. That pie dough is just thirsty!
Thank you! The crust and the pie ended up coming out delicious!
Love this post! Very useful. I love doing latticework designs, especially on your apple pie. Your all-butter pie crust is my very favorite recipe to use! 🙂
can you lattice a blind baked crust?
Hi Joyce! A blind baked crust is the bottom pie crust that has been baked without a filling– is that what you are referring to? I wouldn’t lattice a bottom pie crust. Sorry if I’m misunderstanding your question.
I was wondering the same thing. If you par bake the bottom crust, can you still do a lattice top crust? I’m worried about not par baking the bottom crust and it turning out soggy. However, I don’t know how to bring the top and bottom seams together when the bottom crust is par baked, or if the par baked crust will over-bake when you bake the fully assembled pie (given that the lattice crust will be raw and needs to bake longer). I hope that makes sense.
Hi Vanessa, If you wish to use a lattice crust it’s best to not par bake the bottom. If you are using this for a recipe that has a long enough bake time there really shouldn’t be a need to par bake!
I’ve been practicing your apple pie recipe with the lattice too and getting better and better. So today I’m making it for our 4th of July barbecue. Excited to share the apple pie with our neighbors and friends. I love your tutorials, Sally. It fast tracks me from being an amateur first-time baker to a confident one. Thank you!
I LOVE pie and especially love making beautiful designs on top…..if in doubt, good ole lattice always comes through 😉
Thank you for the awesome post Sally!!! Your tips are always so useful! ❤