

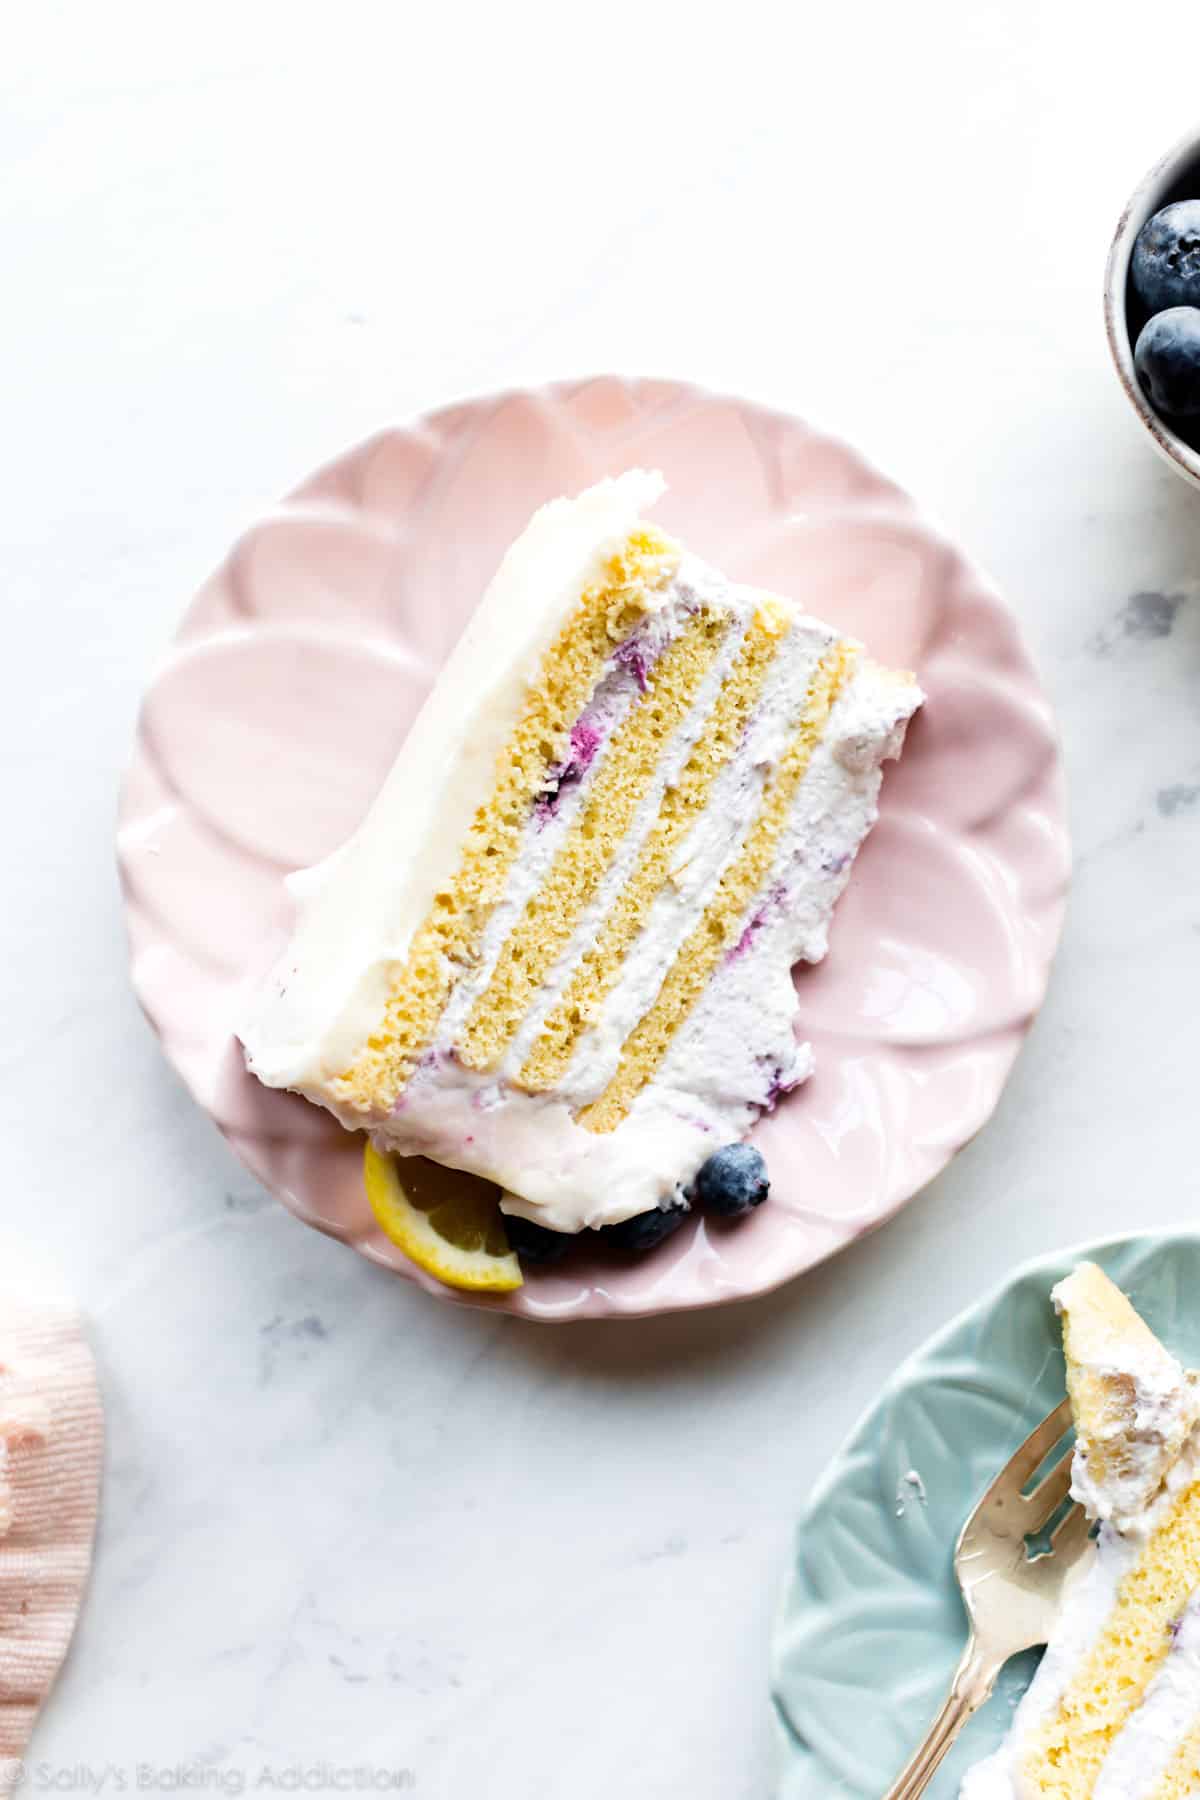
Assembled with vanilla sponge cake, lemon blueberry swirl whipped cream, and lemon cream cheese buttercream, this vertical cake is a beautiful masterpiece. It’s soft and light with bright refreshing flavors and an impressive aesthetic. For recipe success, follow the recipe and video tutorial closely.
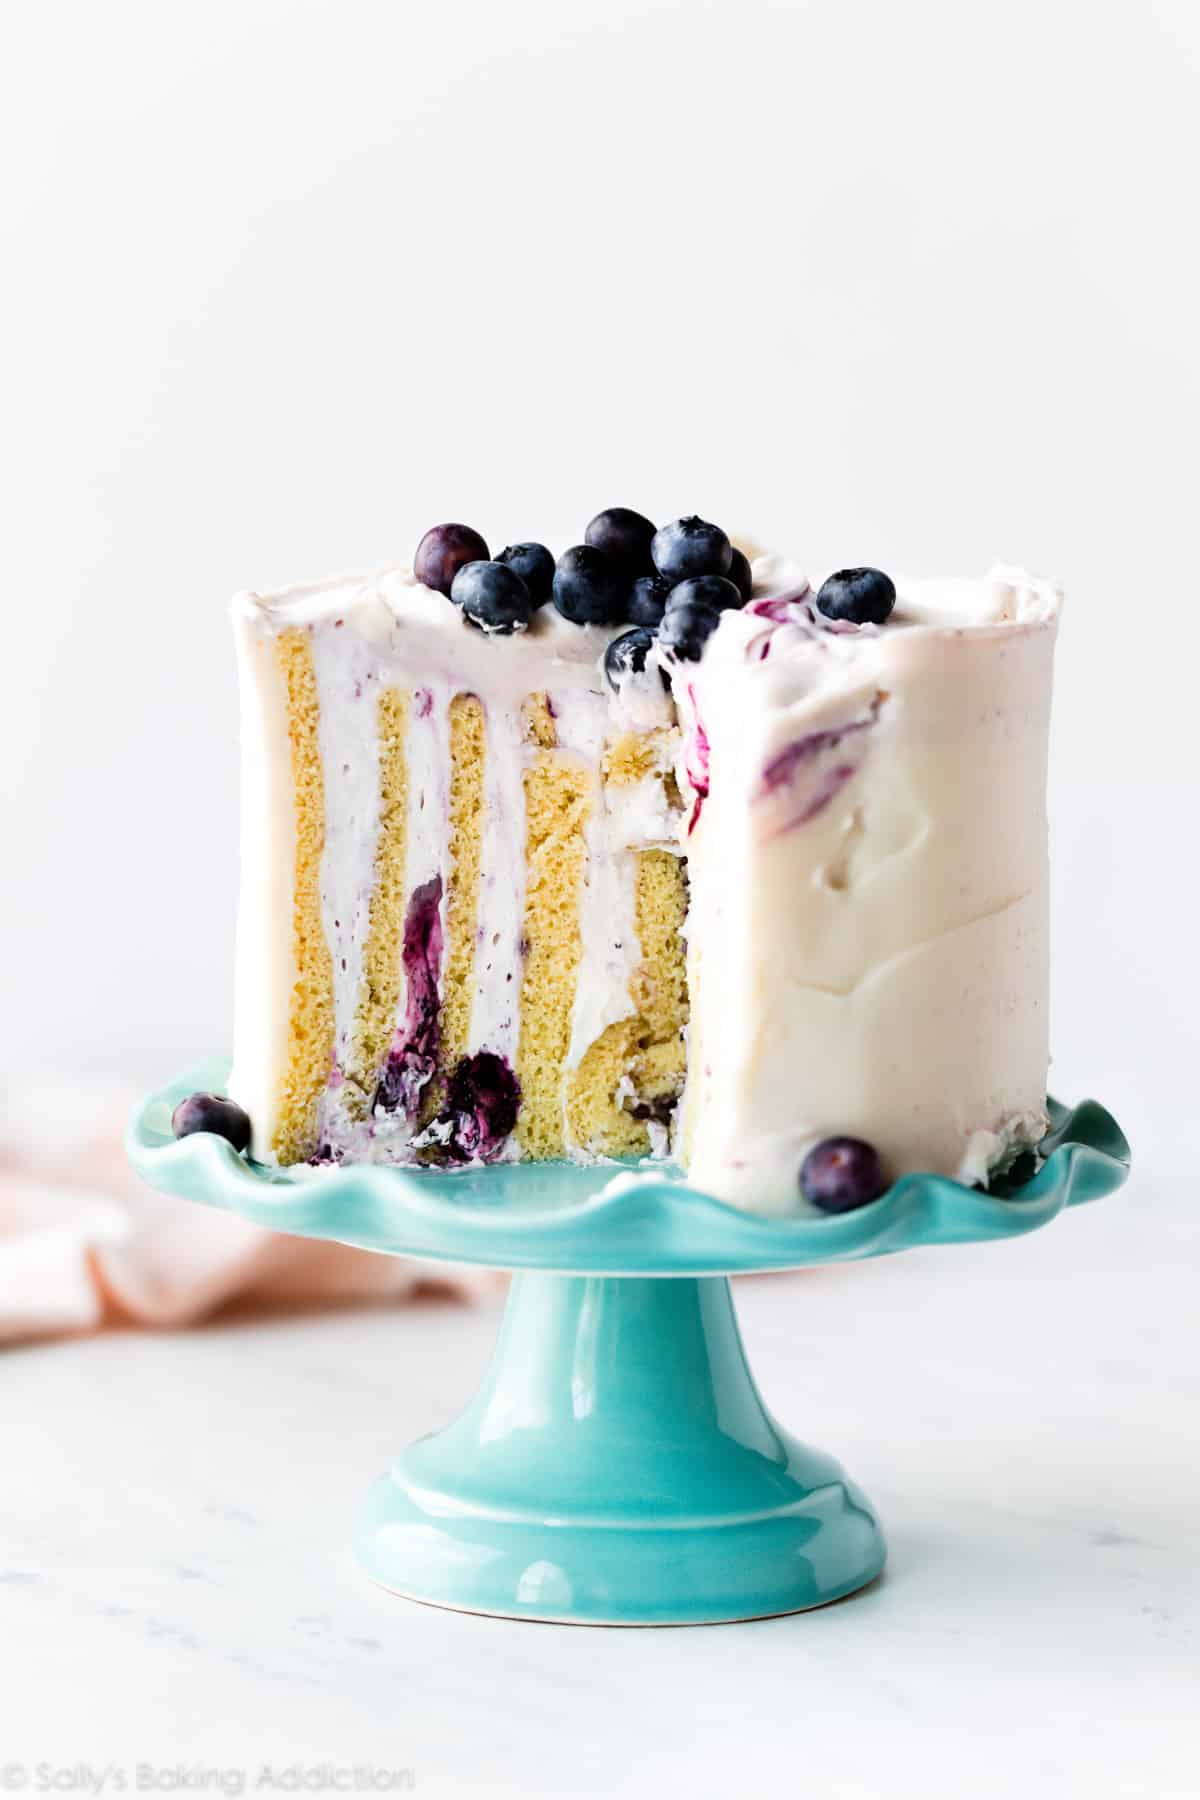
Assembled with vanilla sponge cake, lemon blueberry swirl whipped cream, and lemon cream cheese buttercream, this vertical cake screams celebration. It’s soft and light with bright refreshing flavors and an impressive aesthetic. Who can resist?
You’ve been requesting a challenging dessert recipe and after 6 failed vertical cakes and 12 total recipe tests, I admit that this one is tough! But I’m happy to share my recipe fails and successes with you so you can get the recipe right on the first try. I know you can do this and will be proud to check this baking bucket list recipe off your list!
What is a Vertical Cake?
Our eyes are used to seeing horizontal layer cakes, so when you first cut into a vertical layer cake, you’re instantly impressed. They’re ALWAYS a crowdpleaser! But what are they and how can we make one?
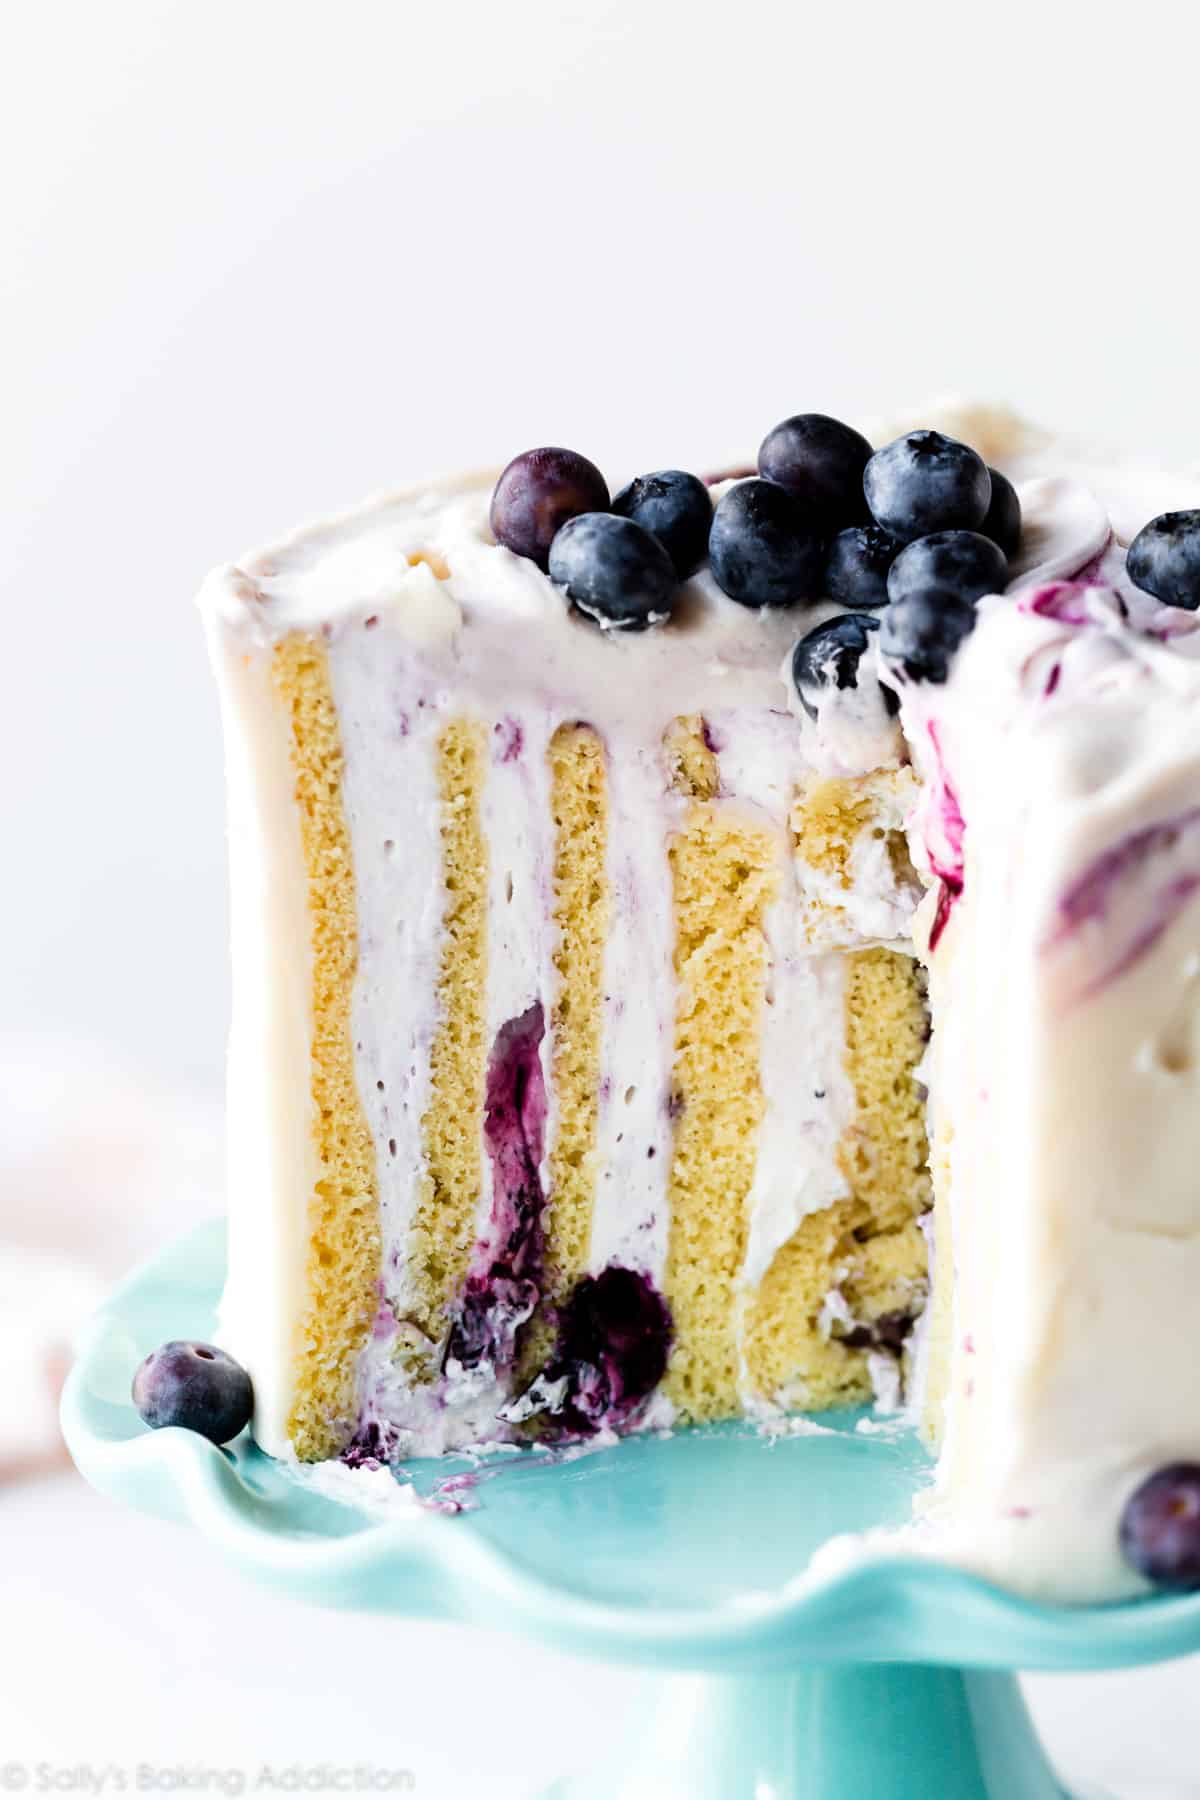
Vertical cake is just that: a cake with vertical layers. Instead of stacked layers like traditional layer cakes, vertical cakes are actually made with a cake spiral. When you cut into the cake, that spiral displays as vertical layers. You assemble the cake spiral with a sponge sheet cake. Roll the sponge cake into a cake roll when it comes out of the oven. Once cool, unroll it, cut it into 3 long strips, then top each with whipped cream. Roll the strips up, connecting the end of the first rolled strip with the next. Turn the cake upright and decorate with frosting as you would any other layer cake.
There’s a few more steps along the way, but that’s the basic rundown!
Video Tutorial: Vertical Cake
Before we get into the nitty gritty, let’s watch this vertical cake come together:
Tools You Need:
- Electric Stand Mixer or Hand Mixer
- Sieve Set
- Half Sheet Baking Pan
- Cake Decorating Turntable (optional, but helpful for decorating)
- Offset Spatula (optional, but helpful for decorating)
- Bench Scraper (optional, but helpful for decorating)
How to Make a Sturdy Sponge Cake
A successful vertical cake must begin with a sturdy sponge cake. This is where all 6 previous recipe tests went horribly wrong. I tried separating the eggs, cake flour, all-purpose flour, baking powder, no baking powder, deflating the batter, creaming the butter, melting the butter, no butter… honestly I could keep going on about all the mistakes I made. If the sponge cake is too fragile, the vertical cake will collapse. If the sponge cake is too firm, it won’t roll up. Take it from me– follow this sponge cake recipe to the letter.
- Beat eggs until pale yellow and relatively thick. (Use 4 whole eggs.)
- Slowly add sugar, vanilla extract, and a touch of oil. Butter dried out this cake.
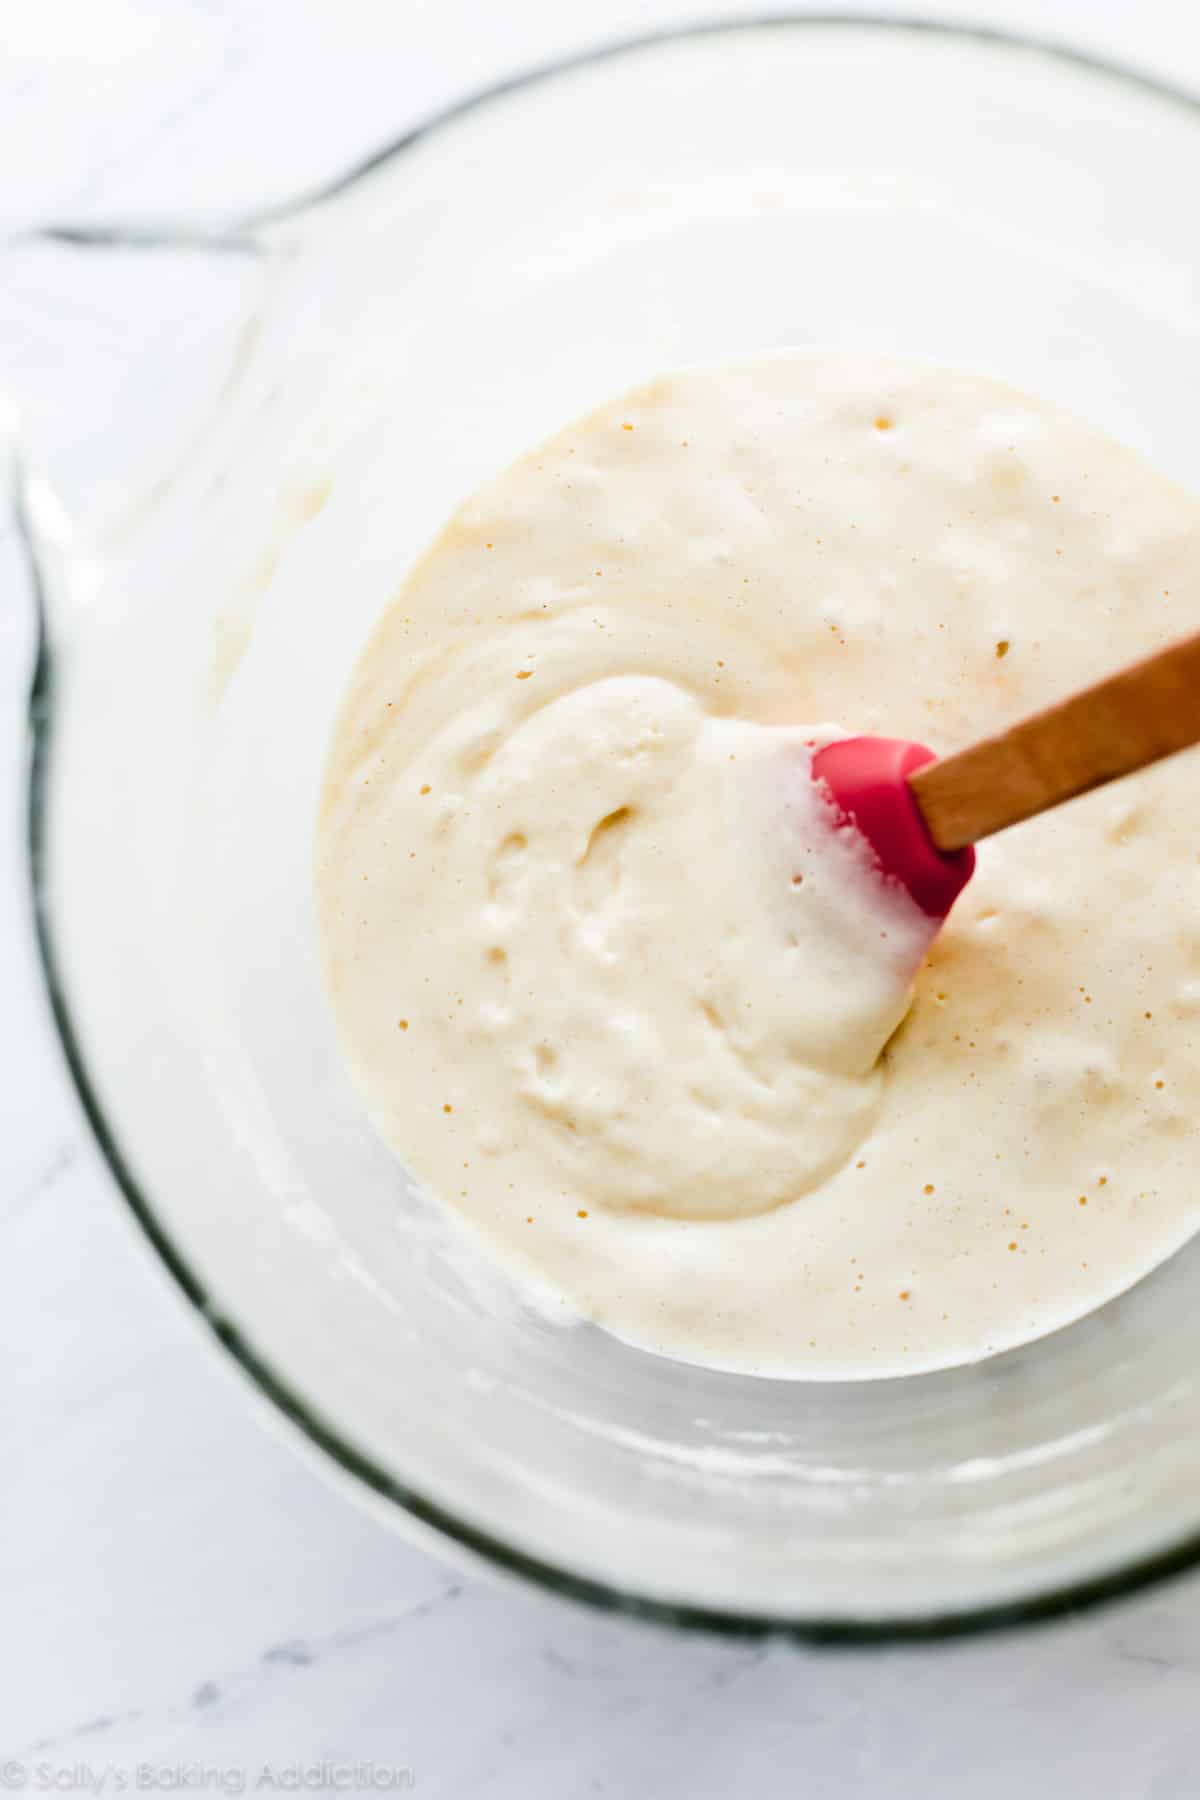
- Whisk all-purpose flour, baking powder, and salt together. In 2-3 additions, sift the dry ingredients over the wet ingredients, stirring lightly to combine after each addition. This sponge cake batter is very light and airy, so be careful not to deflate it.
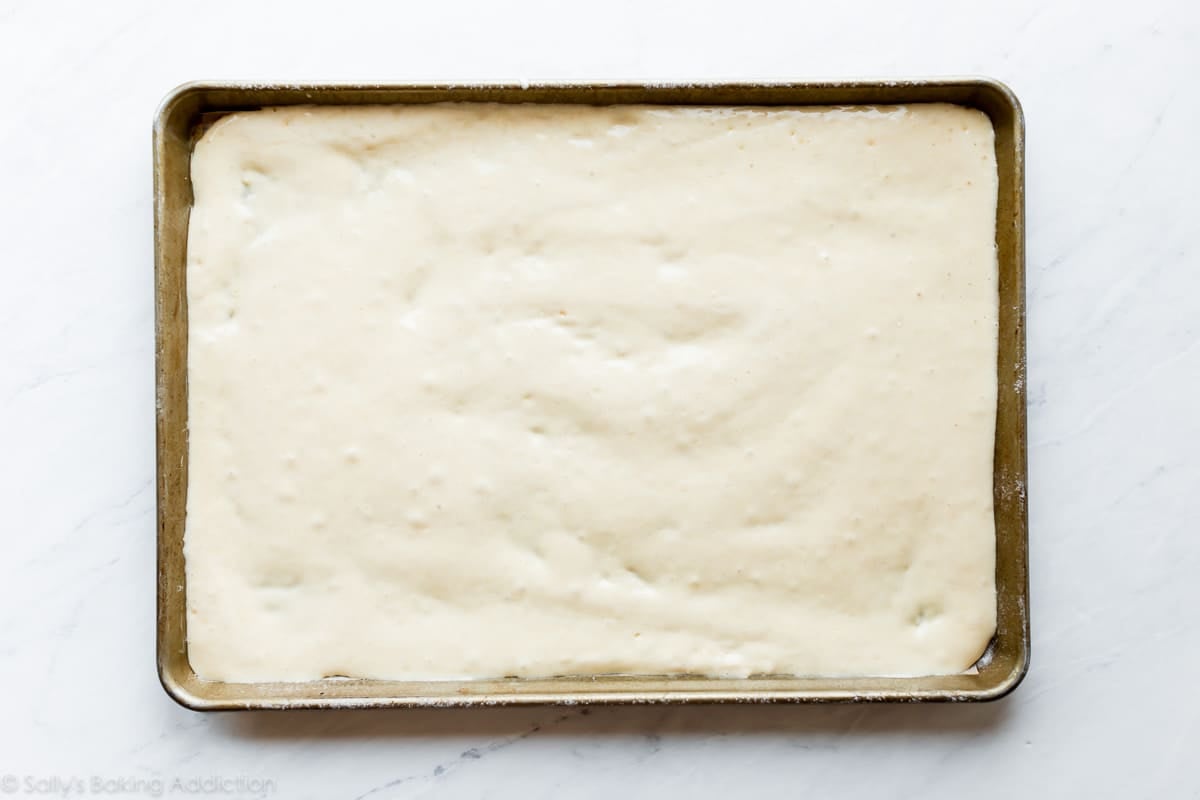
- Grease a 12×17-inch cake pan, line with parchment paper, grease the parchment paper, then dust with flour. We need an extremely nonstick surface for this cake. While we use a rectangular piece of parchment paper here, this parchment paper rounds for cakes video and post may be helpful to review if you haven’t used parchment paper when baking cakes before.
- Spread cake batter into prepared cake pan. It will be a very thin layer of batter.
- Bake for a short 12 minutes or until the top is set. Do not over-bake.
Forceful mixing will deflate this airy sponge cake batter. Be gentle—it needs volume!
Roll the Cake Up
No time for cooling! When it comes out of the oven, immediately invert the warm cake onto parchment paper or a thin kitchen towel dusted with confectioners’ sugar. Gently roll the cake up with the parchment/towel. Let it cool in the rolled up shape so when it’s time to roll it up with the whipped cream filling, it’s already “familiar” with the rolled up shape.
Lemon Blueberry Swirl Whipped Cream Filling
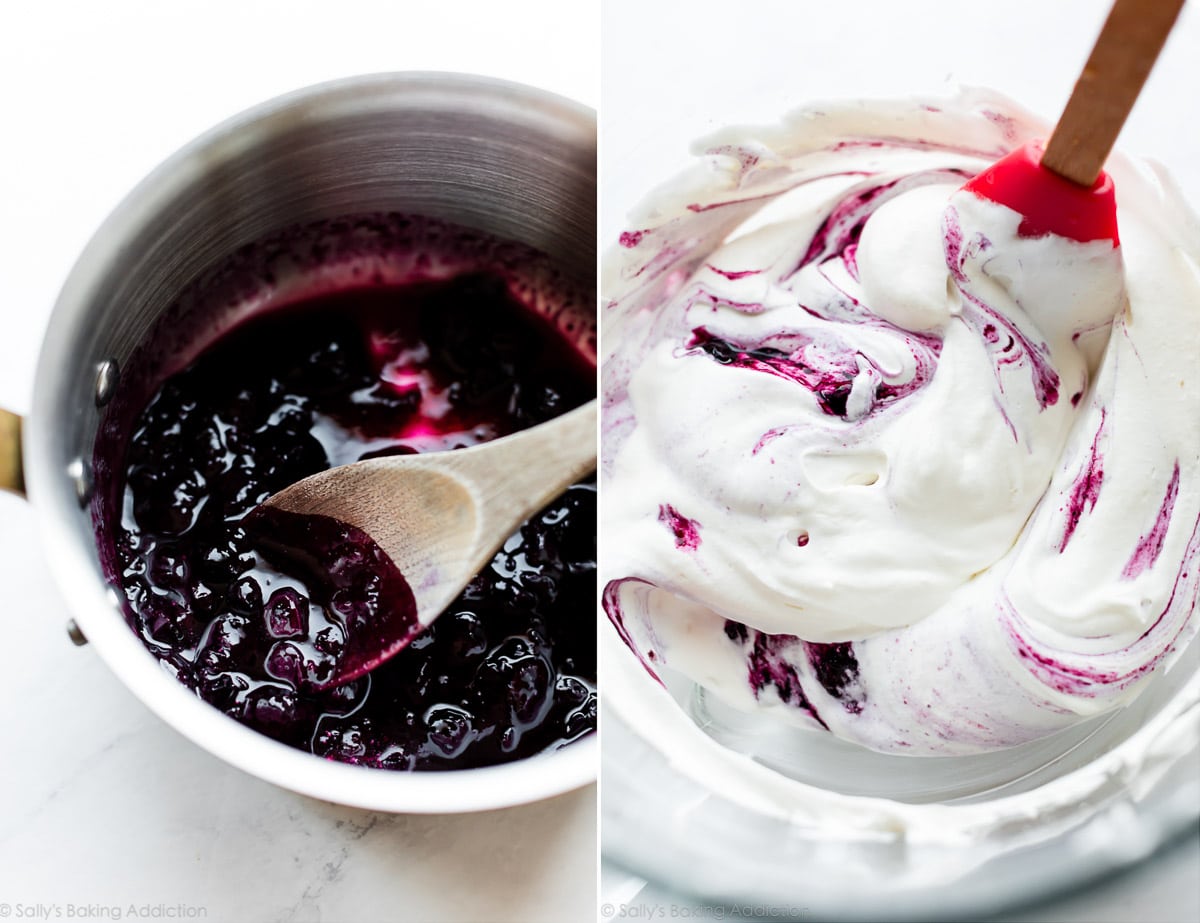
The lemon blueberry swirl whipped cream combines homemade lemon blueberry sauce and whipped cream. If desired, feel free to use your favorite blueberry (or any flavor) jam to replace the homemade lemon blueberry sauce. The sauce must completely cool before you mix it into the whipped cream, so I recommend making it ahead of time or as the cake cools. You need blueberries, lemon juice, cornstarch, water, and sugar. Cook it on the stove, cool it completely, then fold into lightly sweetened whipped cream. For the whipped cream, you need heavy cream and a touch of confectioners’ sugar.
This whipped cream would be unbelievable with pound cake or sandwiched between choux pastry, too! Or our not-so-sweet whipped frosting would make a great alternate filling for this cake.
How to Assemble a Vertical Cake
Watch the video above for a visual of these steps.
- After the sponge cake cools in the rolled shape, carefully unravel it. The cake may crack a bit as you unroll it, so work slowly. You can see mine has a few cracks.
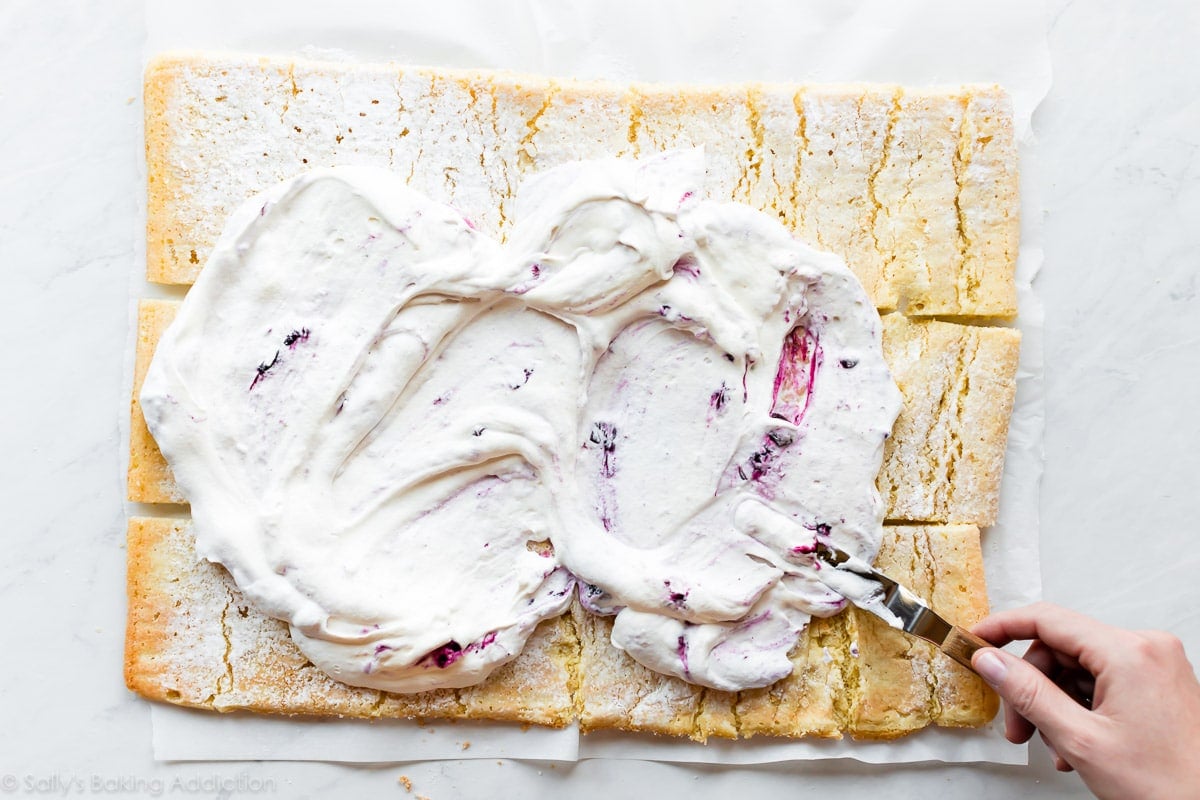
- Using a very sharp knife or kitchen shears, cut the cake into 3 long strips. The cake is about 11 inches wide (it shrinks when baking and cooling), so each strip is a little over 3.5 inches wide.
- Spread the whipped cream all over the top. It’s easier to neatly cut the strips without the whipped cream on top, so that’s why I recommend cutting before topping.
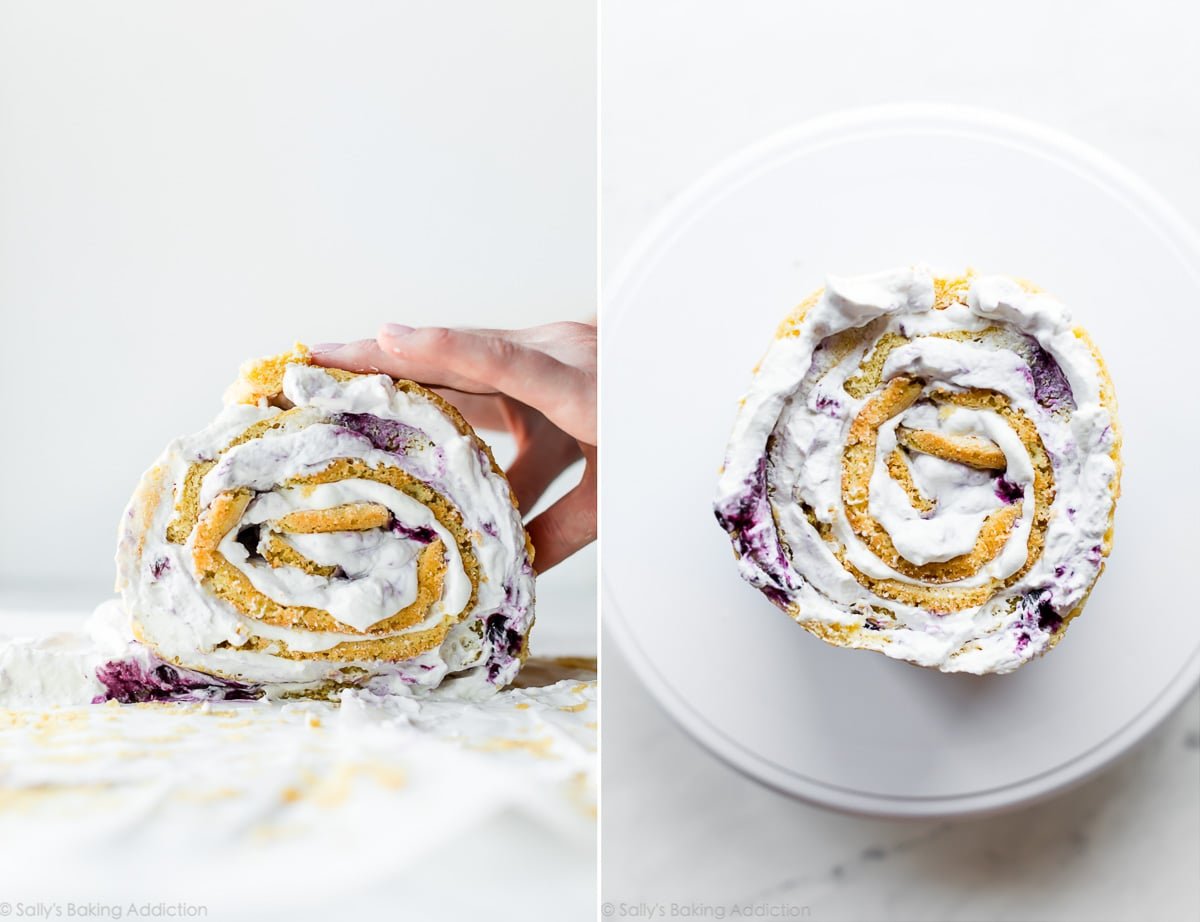
- Working with 1 strip at a time, gently roll the cake strip back up. Connect the end of the first rolled strip with the next, continuing to roll and wrap.
- You now have 1 large cake spiral. Turn it upright so one of the spiral ends is exposed at the top.
- Chill the shaped vertical cake for at least 45 minutes before decorating.
How Big is This Vertical Cake?
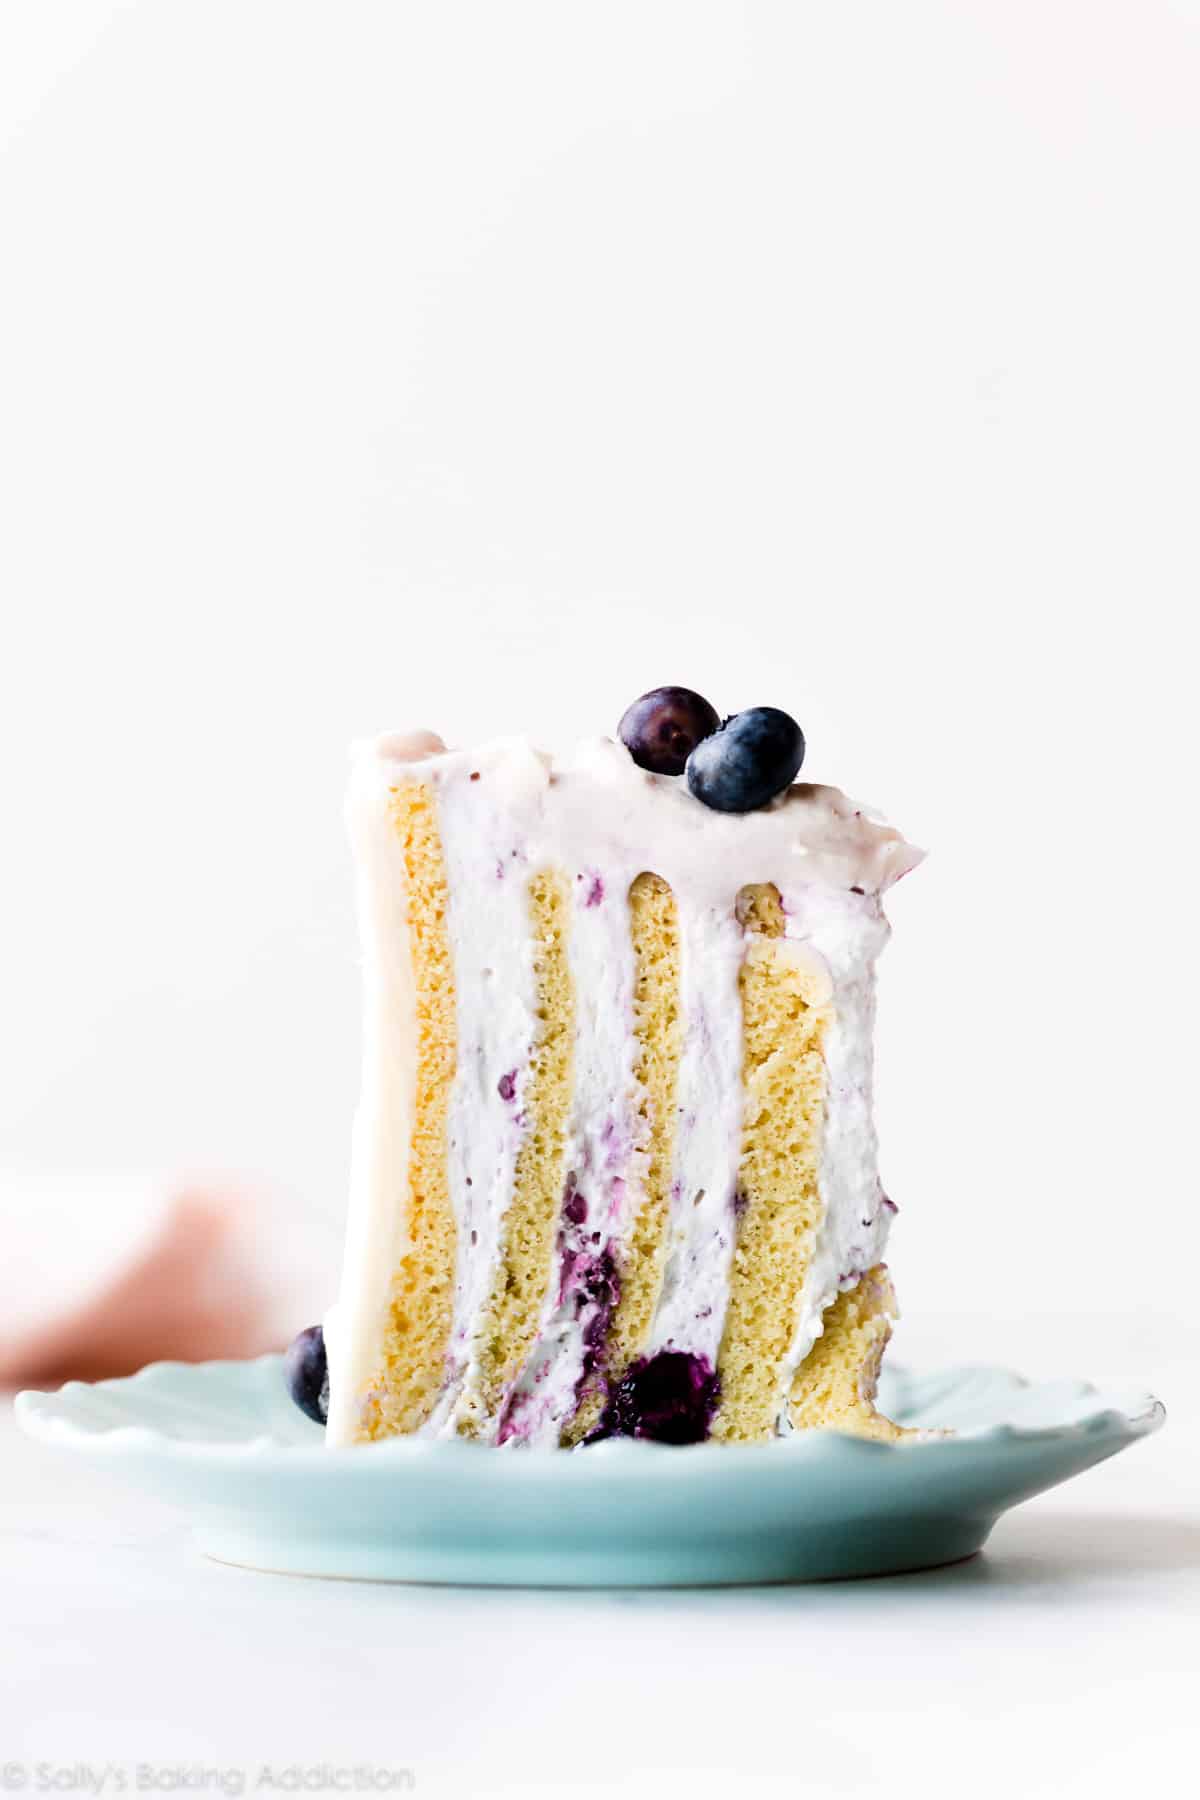
If you think about it, the cake should only be about 3.5 inches tall, right? The strips actually stretch and bulk up as you roll them with the filling! So after you top the cake with cream cheese frosting, the cake ends up being about 5 inches high by about 6 inches wide.
Cream Cheese Buttercream
Just like any layer cake, this lemon blueberry vertical cake needs a frosting decoration. Whip up a simple lemon cream cheese buttercream by combining brick cream cheese, butter, confectioners’ sugar, lemon juice, and vanilla extract. A bench scraper and small offset spatula are handy for decorating. Some of the whipped cream exposed on the top of the cake will mix with the buttercream, creating beautiful random swirls of purple. This cake is gorgeous on both the inside AND outside.
One last step: refrigerate the decorated cake for at least 30 minutes before serving. This prevents the cake from squishing too much when you slice it.
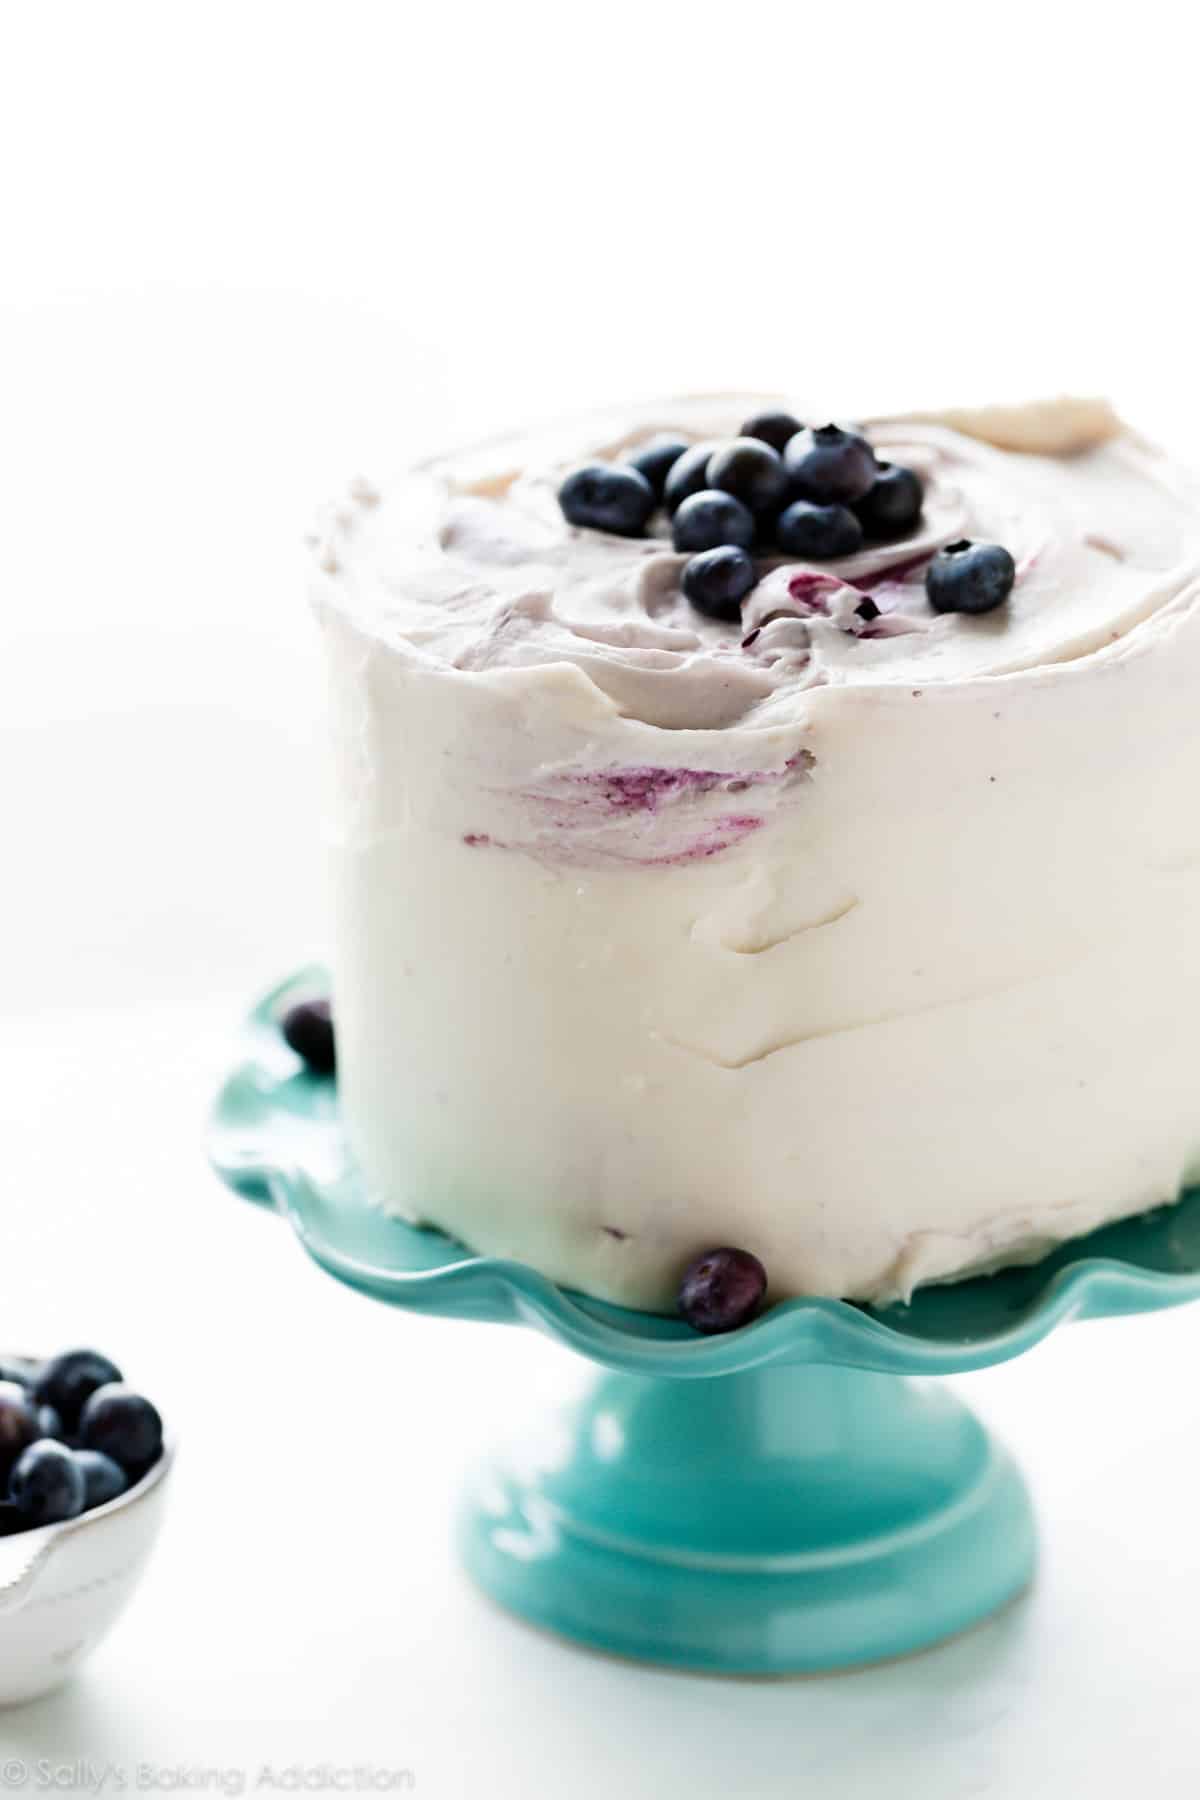
Looks like a regular cake, right?
It’s what’s on the inside that counts. 🙂
See Your Vertical Cakes!
Many readers tried this recipe as part of a baking challenge! Feel free to email or share your recipe photos with us on social media. 🙂
Print
Vertical Cake (Lemon & Blueberry)
- Prep Time: 1 hour
- Cook Time: 12 minutes
- Total Time: 4 hours
- Yield: serves 8
- Category: Dessert
- Method: Baking
- Cuisine: American
Description
This recipe yields one vertical cake, about 5 inches tall and 6 inches wide. For best results, follow the recipe carefully and read through the directions before beginning.
Ingredients
Cake
- all-purpose flour for dusting pan and confectioners’ sugar for dusting baked cake
- 4 large eggs, at room temperature
- 3/4 cup (150g) granulated sugar
- 1 and 1/2 teaspoons pure vanilla extract
- 2 Tablespoons (30ml) vegetable oil
- 1 cup (125g) all-purpose flour (spooned & leveled)
- 1 teaspoon baking powder
- 1/4 teaspoon salt
Blueberry Whipped Cream
- 1 teaspoon cornstarch
- 2 teaspoons warm water
- 1 cup (140g) fresh or frozen blueberries
- 1 Tablespoon lemon juice
- 1 Tablespoon granulated sugar
- 1 and 1/2 cups (360ml) heavy cream
- 3 Tablespoons (20g) confectioners’ sugar
Cream Cheese Buttercream
- 1/2 cup (8 Tbsp; 113g) unsalted butter, softened to room temperature
- 4 ounces (113g) full-fat brick cream cheese, softened to room temperature
- 3 cups (360g) confectioners’ sugar
- 2 Tablespoons (30ml) lemon juice
- 1/2 teaspoon pure vanilla extract
- optional: fresh blueberries for garnish
Instructions
- For best success, follow this recipe closely, be prepared with all of the special tools you need (see recipe notes), and watch the video tutorial in the blog post.
- Preheat oven to 350°F (177°C). Grease a 12×17-inch baking pan with nonstick spray or butter, line it with parchment paper, grease the parchment paper, then dust with a very light layer of flour. (A sifter helps.) Parchment paper helps the cake seamlessly release from the pan. (If it’s helpful, see this parchment paper rounds for cakes video & post, but note that you’ll use a rectangular piece of parchment paper for this cake.)
- Make the cake: Using a hand mixer or a stand mixer fitted with whisk attachment, beat the eggs in a large bowl on high speed for 5 minutes until pale yellow and relatively thick. Switch the mixer to medium speed and beat in the sugar, vanilla, and oil just until combined, about 1 minute. Set aside.
- Whisk the flour, baking powder, and salt together in a small bowl. In 2 or 3 additions, sift the dry ingredients over the egg mixture, gently folding together after each addition. You do NOT want to deflate the eggs. Make sure there are no pockets of dry ingredients. Batter is thick and airy.
- Spread batter evenly into prepared pan. You’ll really have to stretch the batter out to fit this pan. It will be a thin layer. Tap the whole pan on the counter a few times to pop any air bubbles on top.
- (As the cake bakes, complete step 7.) Bake for 12-13 minutes or until cake is set and the top springs back when lightly poked with your finger. Do not over-bake.
- As the cake bakes, place a piece of parchment paper (a little larger than the cake) or a thin kitchen towel flat on the counter. Using a sifter, dust with a light coating of confectioners’ sugar.
- Roll the cake: Once the cake comes out of the oven, run a thin knife along the edges to help release the cake, then immediately invert it onto the parchment/towel. Peel off the parchment paper that was on the bottom of the cake as it baked. Using a sifter, dust surface with a light coating of confectioners’ sugar. Starting with the narrow end, slowly and gently roll the cake up with the parchment/towel. The cake will be warm. Allow the cake to cool completely rolled up in the parchment/towel. Place in the refrigerator to speed it up, about 2-3 hours.
- As the cake cools, make the blueberry sauce: The blueberry sauce must be completely cool before folding into the whipped cream, so make it ahead of time or when the cake is cooling. Mix the cornstarch and water together in a very small bowl. Set aside. Combine blueberries, lemon juice, and granulated sugar together in a small saucepan over medium-low heat. Stir constantly, bursting the blueberries against the sides of the pan. Once the blueberries have released some liquid, add the cornstarch/water. Turn the heat up to medium. Stir and cook for 3 minutes. Remove from heat and allow to cool completely. Mixture will thicken as it cools. I place it in the refrigerator to cool down quicker.
- Remove the cake roll from the refrigerator and allow to sit on the counter for a few minutes to warm up as you prepare the whipped cream.
- Make the whipped cream: Using a hand mixer or a stand mixer fitted with a whisk attachment, whip the heavy cream and confectioners’ sugar together on medium-high speed until medium peaks form, about 3-4 minutes. Medium peaks are between soft/loose peaks and stiff peaks. Using a spoon or silicone spatula, gently fold in cooled blueberry sauce. If you want blueberry swirls as pictured, don’t completely combine the two. Only fold together a few times. Place in the refrigerator until ready to use.
- Assemble vertical cake: Slowly and gently unroll the cake. If you notice the cake cracking, unroll slower and gently press the cracked pieces back together. (Some cracks are fine!) Using a very sharp knife or even kitchen shears, cut the cake into 3 long strips. Cake is about 11 inches wide (it shrinks when baking and cooling), so each strip will be a little over 3.5 inches wide. Spread whipped cream evenly on top of each strip. Working with 1 strip at a time, gently roll the cake strip back up, without the parchment/towel this time. Connect the end of the first rolled strip with the next, continuing to roll and wrap the cake up. See video above if you need a visual for this step.
- Turn cake upright on its flattest end and place on a cake turntable for decorating or if you don’t wish to use a cake turntable for decorating, onto a cake stand or serving plate. Refrigerate covered or uncovered for at least 1 hour or freeze covered or uncovered for 45 minutes. Chilling helps ensure the cake holds its delicate shape.
- Make the cream cheese buttercream: In a large bowl using a handheld mixer or stand mixer fitted with a whisk or paddle attachment, beat the butter and cream cheese together on medium speed until creamy and smooth, about 2 minutes. Add confectioners’ sugar, lemon juice, and vanilla extract with the mixer running on low. Increase to high speed and beat for 3 minutes. Add more confectioners’ sugar if frosting is too thin, more lemon juice if frosting is too thick, or a pinch of salt if frosting is too sweet.
- Remove cake from the refrigerator or freezer. Spread the frosting all over the top and sides. A bench scraper and small offset spatula are handy for decorating. Some of the whipped cream exposed on the top of the cake will mix with the buttercream, creating beautiful random swirls of purple. Garnish with fresh blueberries, if desired. If you decorated the cake on a cake turntable, use a couple thin spatulas (and a helper!) to carefully lift the cake off the turntable and onto a cake stand or server. (Decorating on a cake board is helpful for this, too.)
- Refrigerate for at least 30 minutes before slicing. This helps the cake hold its shape when cutting.
- Cover leftover cake tightly and store in the refrigerator for up to 5 days.
Notes
- Make Ahead & Freezing Instructions: The best way to make the vertical cake ahead of time is to complete the recipe through step 8, letting the rolled up cake chill overnight in the refrigerator before continuing with the recipe. Make the blueberry sauce (step 9) 1 day ahead of time as well. Cover tightly in the refrigerator overnight. You could also complete the recipe through step 13, letting the assembled vertical cake chill in the refrigerator for up to 1 day or freeze for up to 1 month. Cover tightly if chilling/freezing for longer than 1 hour. If frozen, thaw overnight in the refrigerator before continuing with step 14.
- Special Tools (affiliate links): 12×17-inch Baking Pan | Sieve Set | Electric Mixer (Handheld or Stand) | Cake Decorating Turntable | Offset Spatula | Bench Scraper
This recipe was inspired by the beautiful vertical cake by Dan Langan


Reader Comments and Reviews
I’ve been wanting to make this vertical cake since your post first came out! The recipe was clear and easy to understand and follow-the cake came together easily & beautifully and was delicious too! Thank you Sally!
This cake is absolutely delicious! It was definitely messy to roll up and very delicate but turned out great in the end! I loved it! Thanks Sally!
I was super intimidated to try this! It was my first Baking Challenge and it was so fun!! Your step by step instructions and video were incredibly helpful! My fiancé said it is probably the best cake I’ve ever made! Can’t wait for September!
Successfully made this cake gluten-free! It was delicious and family who tried it who don’t eat gluten-free couldn’t tell the difference. The hint of lemon in the buttercream cream cheese frosting was a refreshing unexpected twist.
This recipe was quite challenging but also a lot of fun :). The taste…just amazing. I really love this cake 🙂
Thank you Sally for a wonderful recipe and great directions. This was way out of my comfort zone but feel so empowered I did it!!!
It was amazing! A little bit long but definitely worth it. Everyone was impressed. Thanks for the recipe, will be making again!
This recipe is SO GOOD! My family loved this, especially my dad who has been begging me to make something lemon for days. Thank you so much for a fun challenge!
Great recipe! New to the challenge and really enjoyed making this.
This looks amazing! Sadly my European oven is too small for a 12×17 inch pan, so I made a 6 inch cake instead. I used the pistachio strawberry cupcakes recipe. The cake turned out amazing, it’s my best cake yet! Thank you!!
I have been wanting to male a cake like this for some time and was completely inspired by Sally!! I followed the recipe pretty exact and it came out amazing♡♡ i couldnt believe i made something so beautiful and yummy ♡ def give this recipe a try♡
I made this stunning cake for my friend’s birthday! She requested lemon, blueberry and buttercream…..this nailed it! Were you listening??
Your instructions are so clear, that it’s relatively easy to make!
My vertical lines weren’t as distinctive as yours…..maybe my sponge should have baked a minute or two more…?
I made this for the August challenge. Sally’s directions and video were extremely helpful. My cake cracked twice though once it was completely my fault but it still held together and I got distinct layers. Overall it came out very good and I really liked the idea of flavored whipped cream.
Honestly, I was terrified to try this recipe! Haha. I watched your video and read over the recipe more times than I could count just to make sure I had it engrained in my mind! Once I got started, I found myself at ease though! Your directions were spot on (as usual) and I breathed more with each step. My cake cracked on me majorly in one spot but I managed to adjust it and was able to get my cake to cooperate! Now that I’ve done it, I LOVE THIS & want to make soooo many more, and try with different berries! Thank you for this challenge!! (& for boosting my confidence!)
So I just couldn’t get over the vertical layers which pushed me to try this challenge. If you follow Sally’s instruction exactly it will be a success. The hardest part for me was to roll up the three layers jelly roll style. Make sure you have a cake plate close by so you can plop it on it. Also it wasn’t perfectly round at that point but you can tweak the shape a bit with the icing. My friends studied it for a while to try and figure out how I got those layers vertical. I finally had to breakdown and tell them.
My mother-in-law loved her birthday cake and thought the vertical layers were a special surprise 🙂
Do you think this cake would still turn out if I doubled it and made it a 12 in cake instead?
Thanx in advance!!
I would recommend making the recipe twice so that you don’t over or under-mix the batter. Then bake on two pans and when you are rolling it up simply connect the strips together to make it twice as wide. I haven’t tested this so let me know how it turns out!
Absolutely stunning! And I don’t think there’s a better combination than blueberry and lemon. Oh, and I’d be happy to eat any leftovers from your practicing, if you have any left! 🙂
Amazing step by step recipe!! Tastes delicious and such a joy to make!!! Sparks joy – It’s a keeper!!
Thank you Sally!!
I made this dessert for my daughters 21st birthday cake. It was fun to make! I think I did over bake the cake a little, but it was still delicious. I followed your directions exactly and it turned out perfect. This cake is light and not too sweet. Thank you as always, Sally!
Wow this cake was amazing! I personally prefer a stronger lemmon flavor so next time I’ll add some lemon zest in the cake batter. This cake was so fun, I’ve never even heard of a vertical cake until this one. Mine turned out better than I expected and chilling it in the fridge after rolling definitely helped a ton. Thank you for sharing the recipe and I look forward to the next challenge recipe!
I’m so glad you enjoyed it, Maren! You can definitely add lemon zest next time – it would be a great way to boost the lemon flavor!
Sally,
This was so much fun to make! Thank you!
This is a delicious cake and so much fun to make! Thanks Sally
I made this cake yesterday. Daunted with the steps at first but followed the recipe to the tee except I mixed the whipped cream with the blueberry sauce more thorough since I like the purple look. Turned out and tasted amazing. Thank you Sally
Sally,
Thank you for all your hard work to master this recipe and sharing with us. Having no success making sponge cake before, the step by step instructions you provided made this recipe a success for me. I love all the components of this cake, it tastes amazing! So fun to make and submit my first baking challenge!
I made this recipe this evening and was delighted with the ease of assembly. It looked intimidating but I watched the video on YouTube about 5 times then while I made the cake and assembled it. I have not cut into it yet because it’s for a Sunday pool party but I’m sure my guests will love it! Thank you Sally for a fun and challenging recipes!
This cake is so good! Also, is it just me or is banging the pan on the counter to get the air bubbles out kind of cathartic?
This was so neat and fun to make! My only advice is to be careful of drying out the cake. I’m not sure if my oven was too hot or if it’s because I put the cake in the fridge to cool and left it overnight, but something dried it out a bit. Otherwise, give this a try!
Made this yesterday. It was delicious. I made only a minor change. We have hundreds of huckleberry bushes that are currently loaded with fruit so I used huckleberries instead of blueberries. (And I find huckleberries a little more flavorful.) The only other thing was I ran out of powdered sugar after adding 1 1/2 cups to the frosting. BUT it tasted sweet enough to me. Served this for our dinner party and everyone loved it. Phrases like “oh my god, that cake is so good” could be heard.
I want to try this again though because I made a mistake. I forgot to butt each strip against each other as I was rolling it up. I just rolled one around the other so part of the cake wasn’t quite as pretty.
Absolutely delicious! A fun baking challenge, was definitely very proud of the outcome when slicing into it tonight at a family get together! Thank you for the helpful tips and video, they helped in making me feel confident that I could do it!
– Kara
Was so much fun to make this one, and it turned out so yummy! Thanks Sally!