

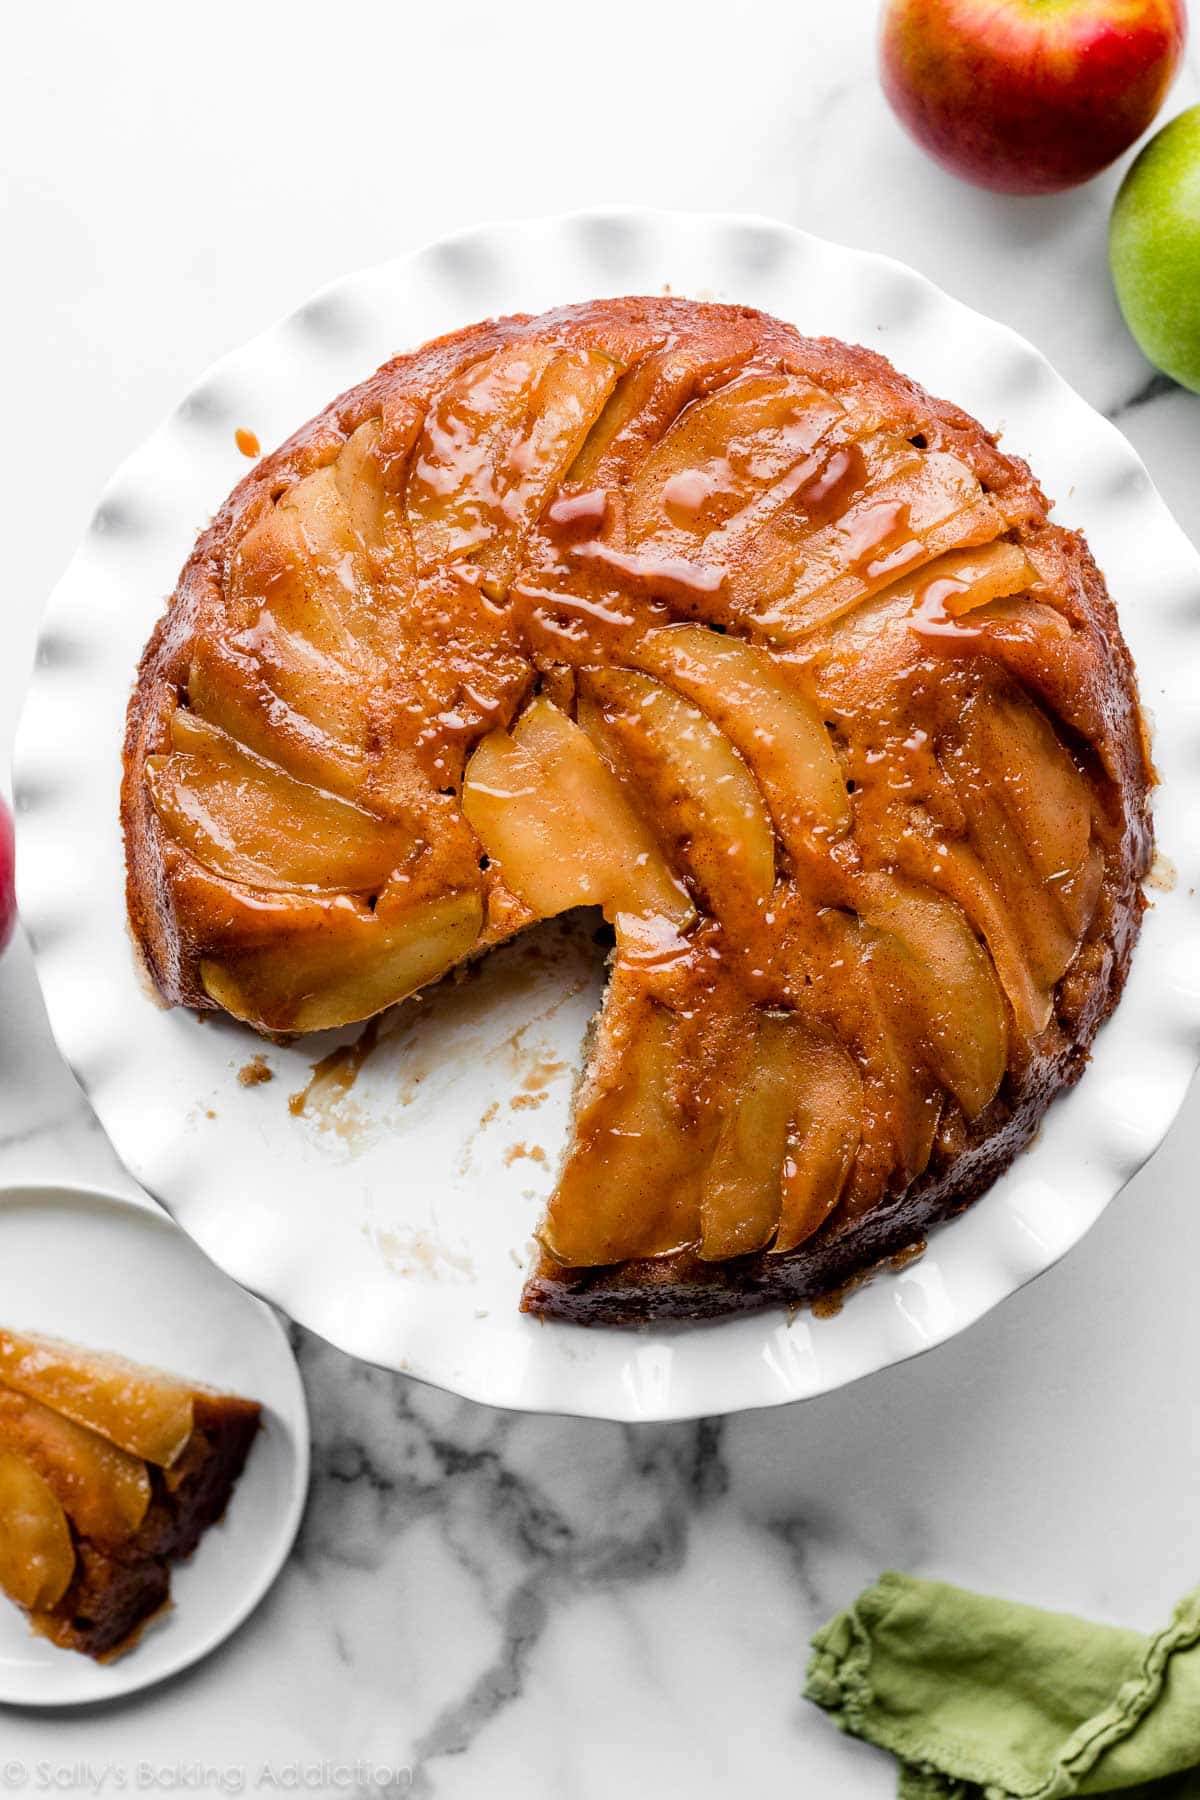
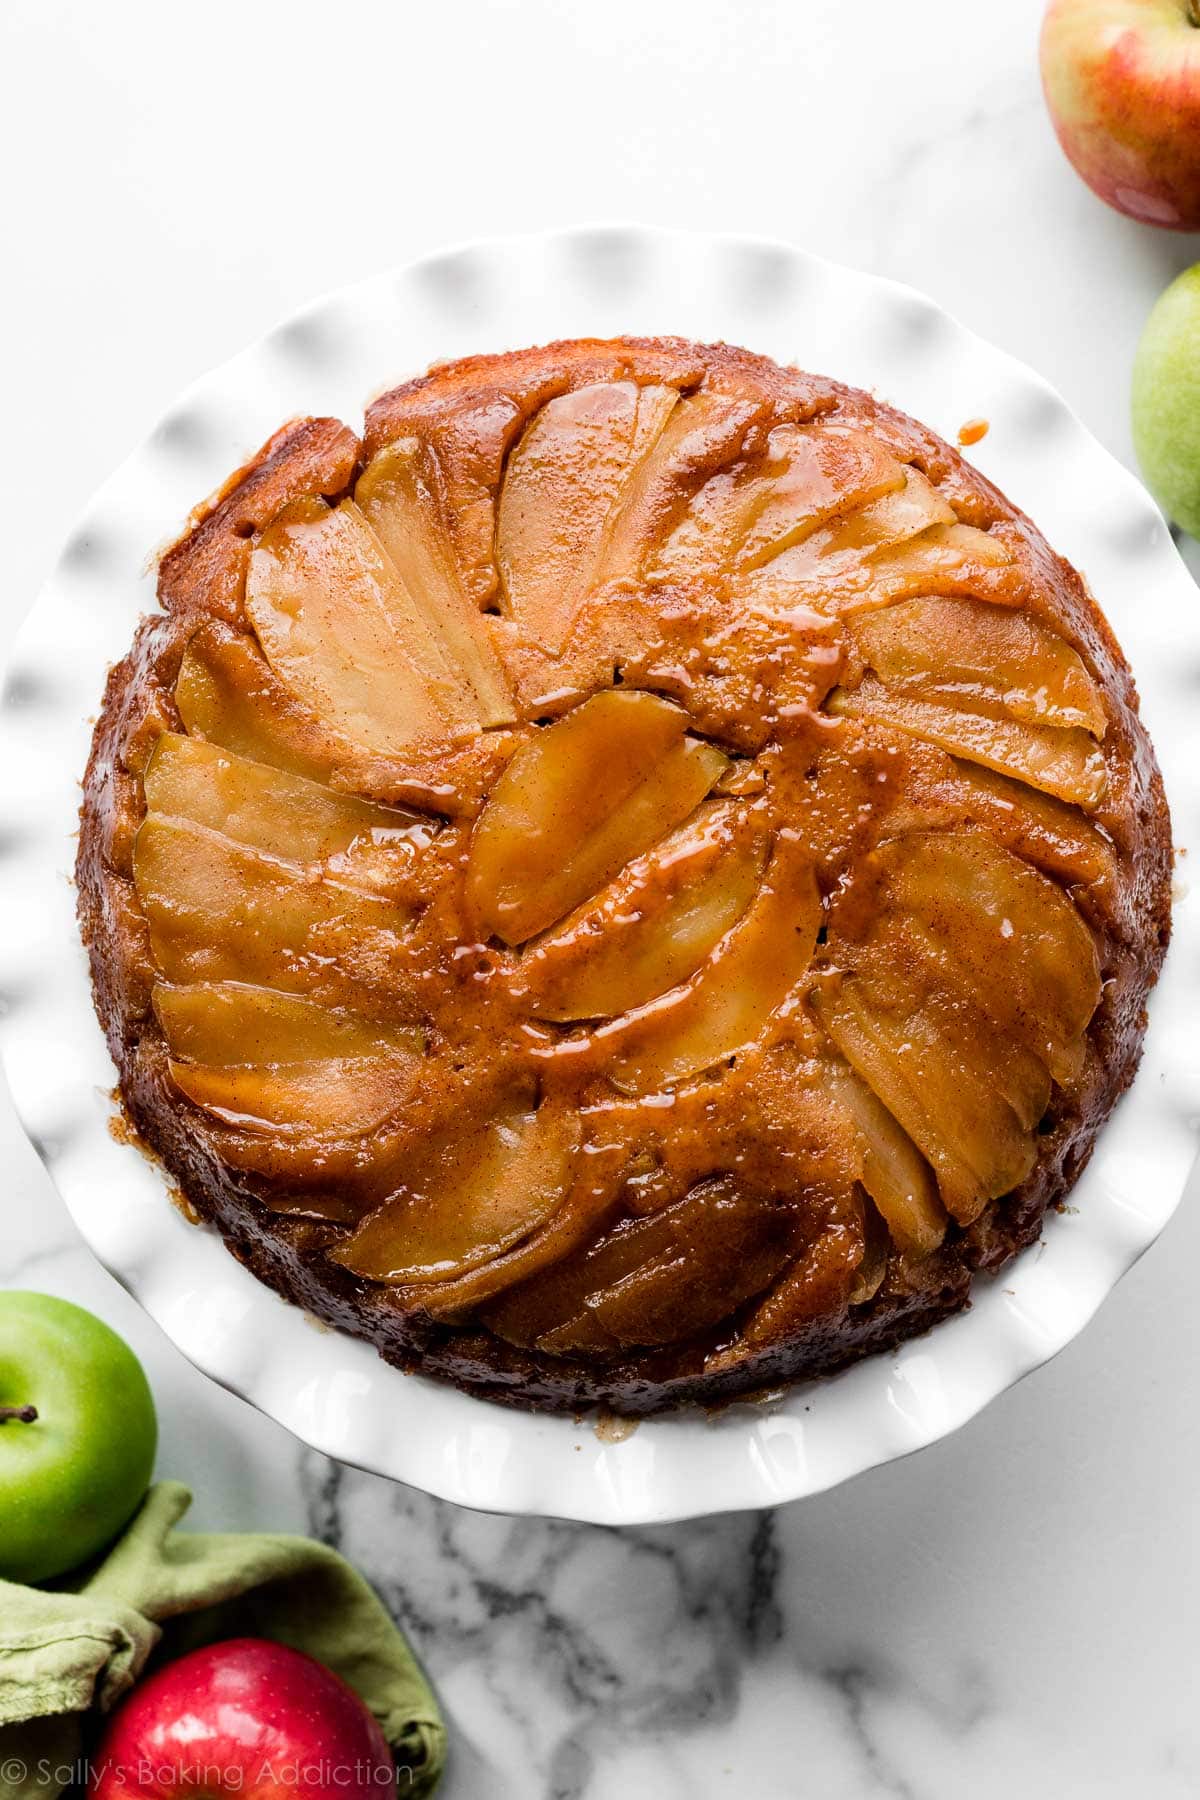
This caramel apple upside down cake is a fall must-make. Combining a soft cinnamon-spiced cake with buttery caramelized apples, we’re essentially getting two desserts in one. After inverting, the topping’s juices seep down into the cake and add unbeatable flavor and moisture. What you’ll love most, besides the flavors, is that there’s no fancy decoration required—the lovely garnish is literally baked into the cake!
I originally published this recipe in 2013 and have since added new photos, a video tutorial, and more success tips. I’ve also made a few small changes to the recipe which are reflected in the printable recipe below.
One of the first dessert recipes I published was caramel apple upside down cake. It’s a forever favorite and totally deserving of that early spot in my archives. I bake this recipe at least once every fall season and have made a couple minor updates to the recipe over the years. The cake is better than ever. I figured you’d appreciate seeing what I’ve done!
One reader, Hannah, commented: “This was so easy! I love that it only used two apples but made such an impressive dessert and really infused the cake with their flavor. A hit for my family 🙂 ★★★★★”
One reader, Kathy, commented: “This cake is easy and absolutely delicious! I’ve made it 4 or 5 times now, and I’m thinking of making another right now! Definitely becoming my go-to dessert recipe! ★★★★★”
One reader, Sasha, commented: “This recipe is SO GOOD! It will absolutely be a fall classic for years to come. Thanks for this recipe! I followed it as is and it came out perfect. ★★★★★”
This Caramel Apple Upside Down Cake Is:
- Melt-in-your-mouth soft & moist, like this apple cake but remixed a bit!
- Extra flavorful like my beloved apple cinnamon bread
- Easy—no crazy ingredients or techniques required
- Perfectly sized for a small family or gathering
- The best destination for your freshly picked apples 😉
Try it at least once. I guarantee it will be a repeat recipe in your kitchen. And if you are looking for even more inspiration, here is a list of 30+ fall cake recipes.
Apple Upside Down Cake Topping
The topping is baked underneath the cake. After the cake slightly cools we’ll invert it onto a serving plate, the same way we flip pear tarte tatin before serving. The caramel flavor comes from the butter and brown sugar. Combined with vanilla and apples, the topping alone makes this a recipe worth repeating. It’s downright GOOD.
I know you’ll appreciate this: I mention this above, but it’s worth repeating. Apple upside down cake is basically already frosted—once you invert the cake, the garnish is already there! Use apple slices, not chunks, just like I recommend for apple cobbler.
A few preliminary notes on the topping:
- The topping in my original recipe had a little too much butter. I also reduced the cinnamon and put more in the cake itself.
- Melt the butter and brown sugar together on the stove, then cook for 1 minute. The mixture will slightly thicken and take on a caramel-like flavor that intensifies as the cake bakes. Not a lot of recipes do this, but it makes a big flavor difference. In my pineapple upside down cake recipe, we simply add melted butter to the cake pan and sprinkle the brown sugar on top. As a result, you don’t really get the same caramel flavor. Perfectly fine for that recipe, but why not take an extra minute here?
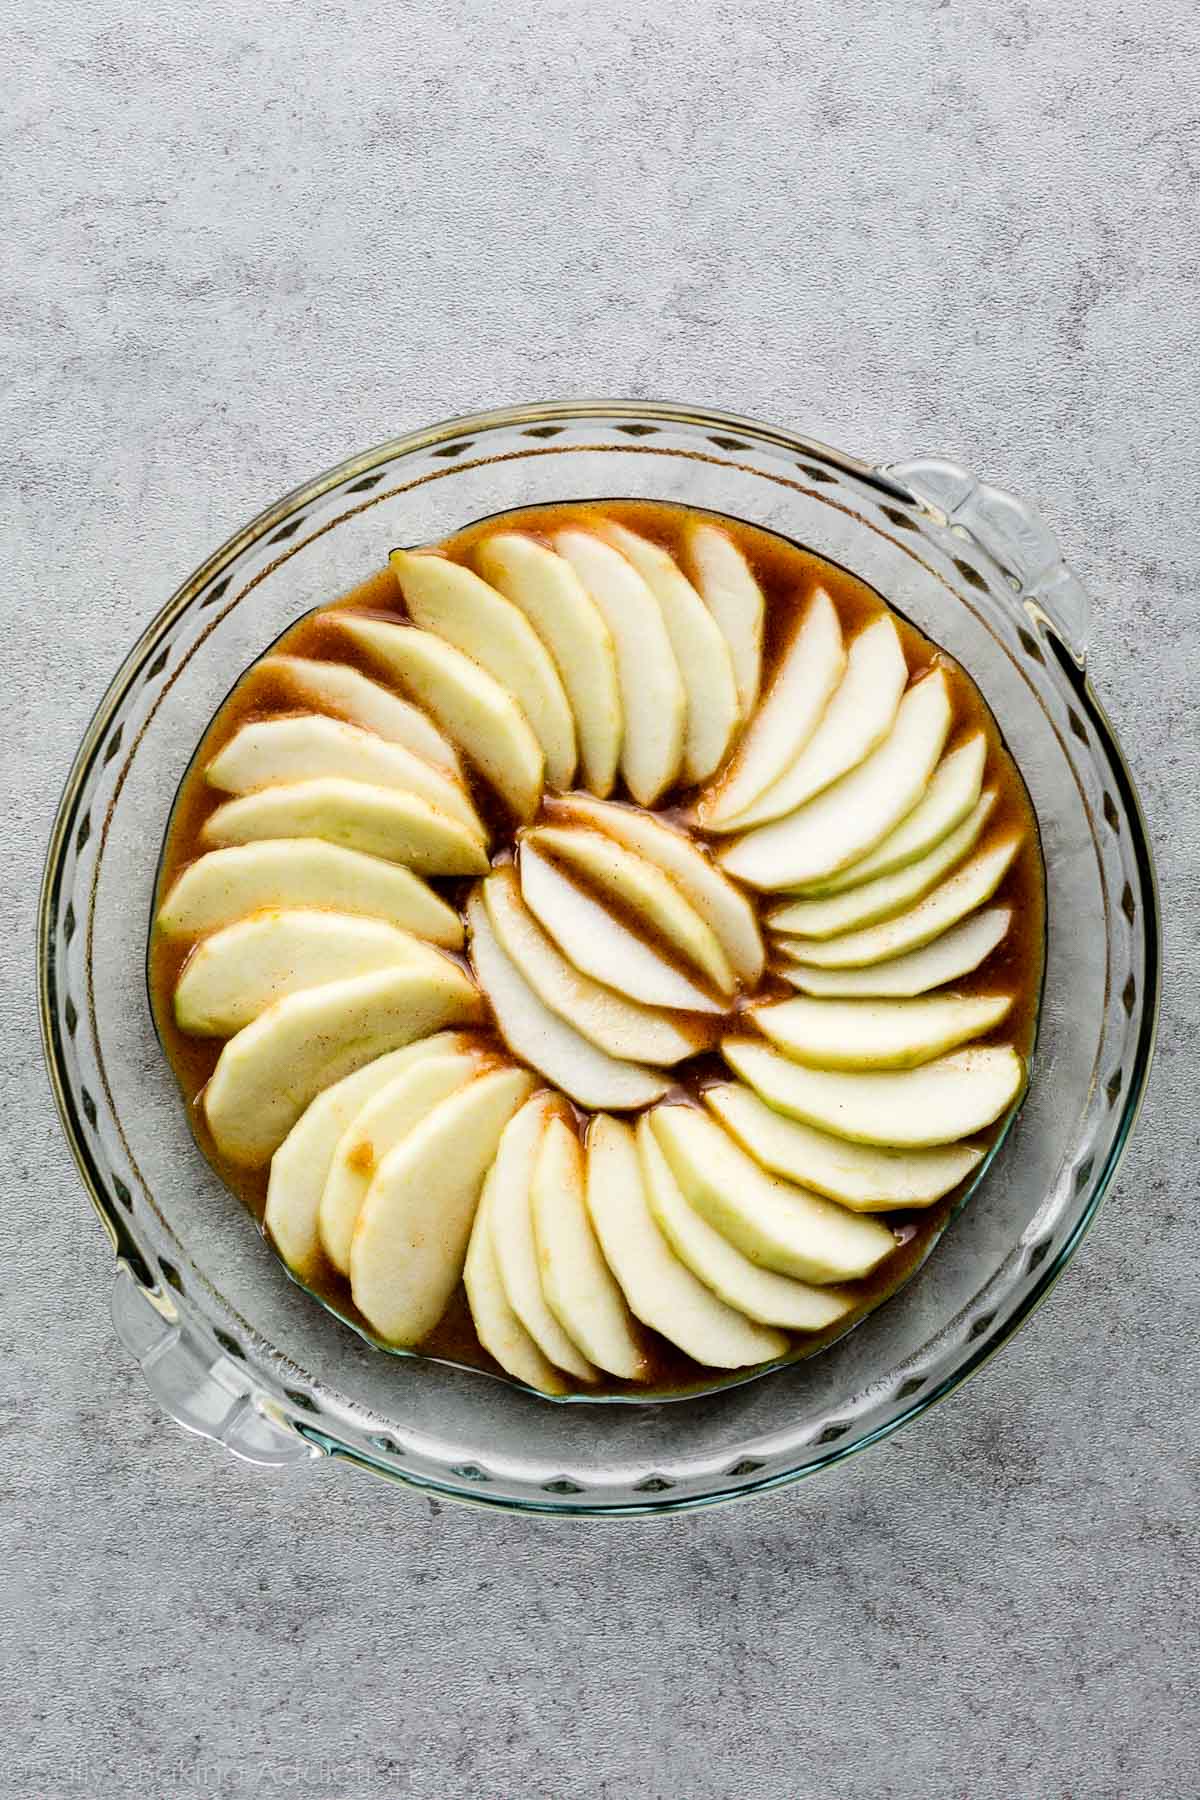
- Arrange the apple slices on top of the butter/brown sugar mixture. Try to squeeze as many apple slices in the pan as you can. No one has ever complained about extra caramel-y apples!
Let’s Make the Cake Batter
The cake batter is pretty straightforward and similar to the original recipe. Like most cakes, the base is creamed butter and sugar. Regular sugar lightens up the crumb, while brown sugar adds flavor. We use both in this cake. The cake is super soft and cinnamon-spiced—similar in taste and texture to apple cupcakes.
The batter differs from my pineapple upside down cake. Pineapple rings are heavier than apple slices, so we use cake flour, egg whites, and sour cream in that recipe to help keep the crumb light. Here we can use whole eggs and all-purpose flour.
Two Baking Tips:
- You can bake this cake in a cake pan or pie dish, but make sure it’s at least 2 inches deep. I recommend this pie dish, which is 1.8 inches deep but I never have an overflow issue.
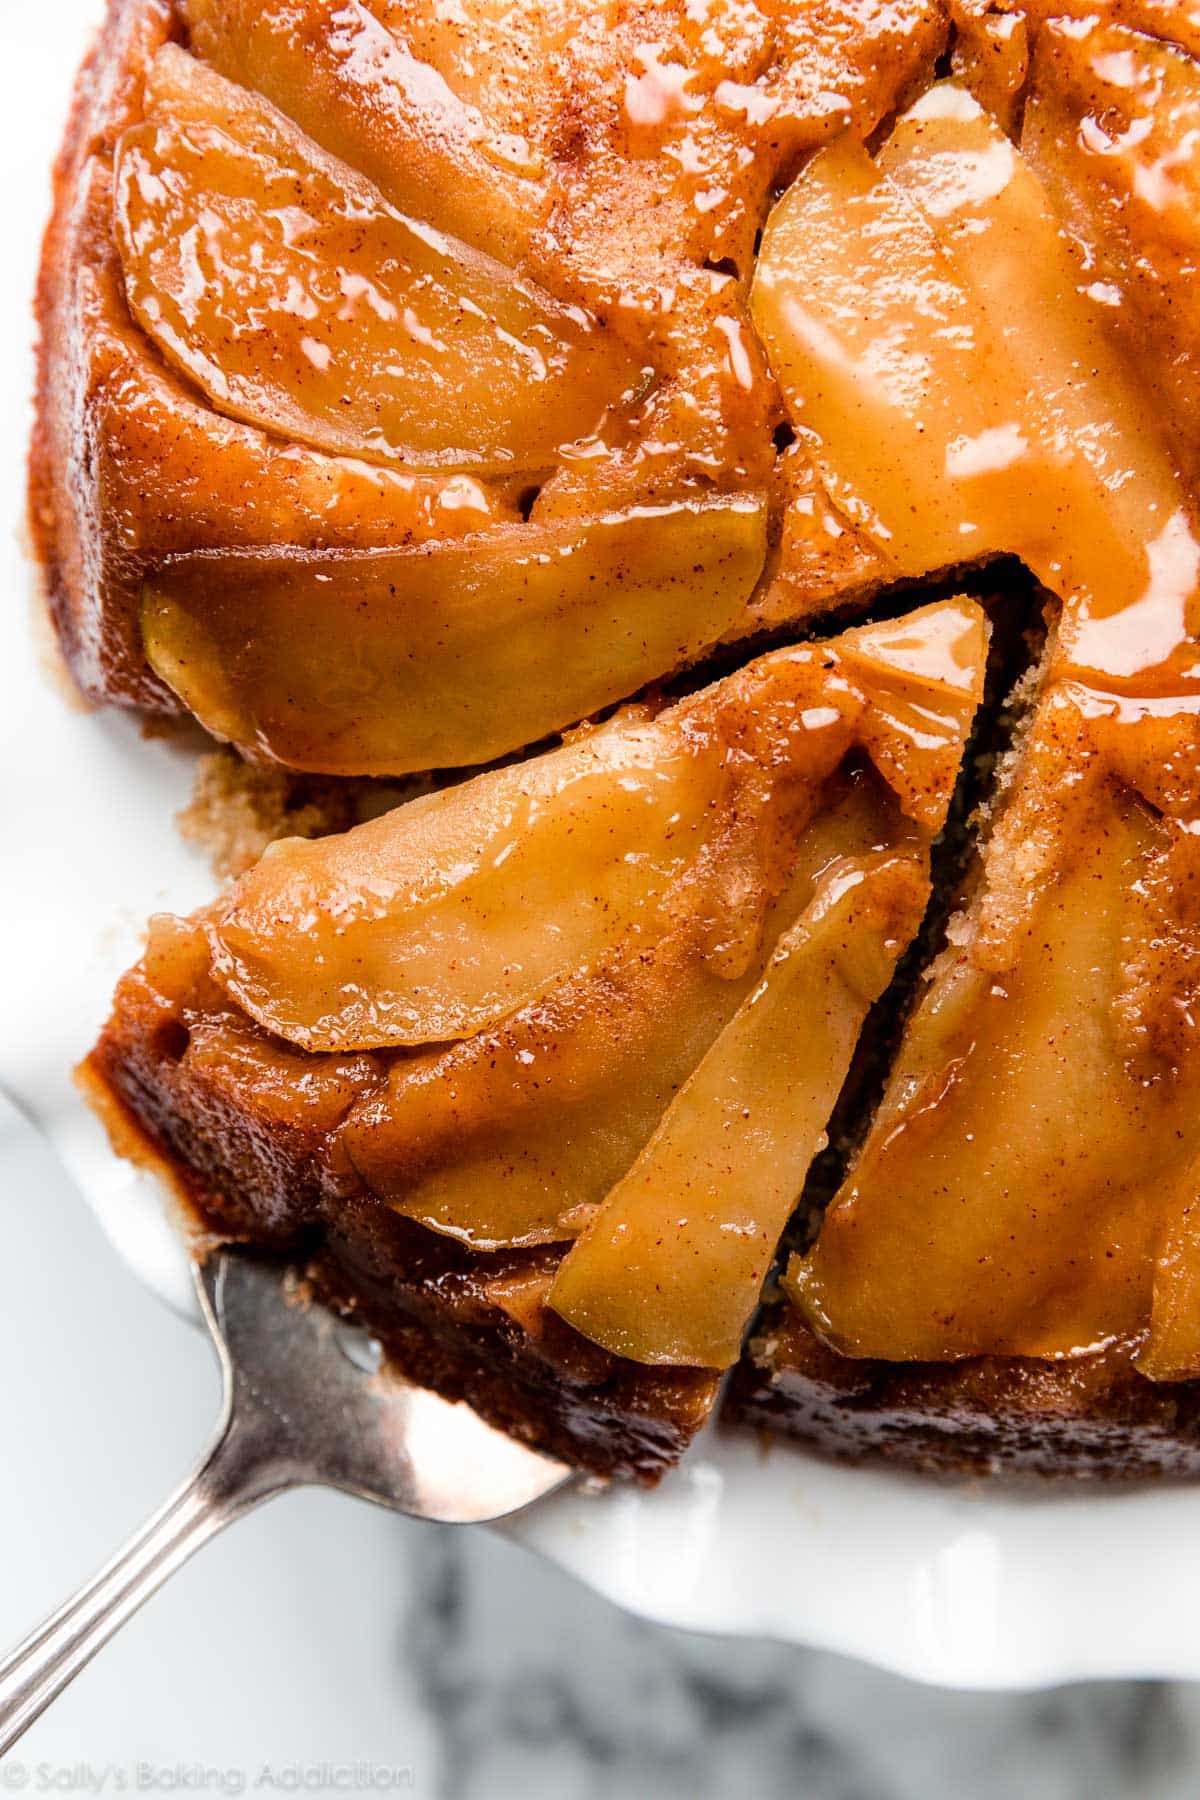
- Because of the wet bottom layer (which is the topping), the cake takes much longer than a typical 1 layer cake. Its juices will bubble up the sides, creating these incredible caramelized edges. (See the edges below? They’re so good!) With upside down cakes, it’s always good practice to place a baking pan or sheet on a lower rack to catch any juices should they splatter over the edges.
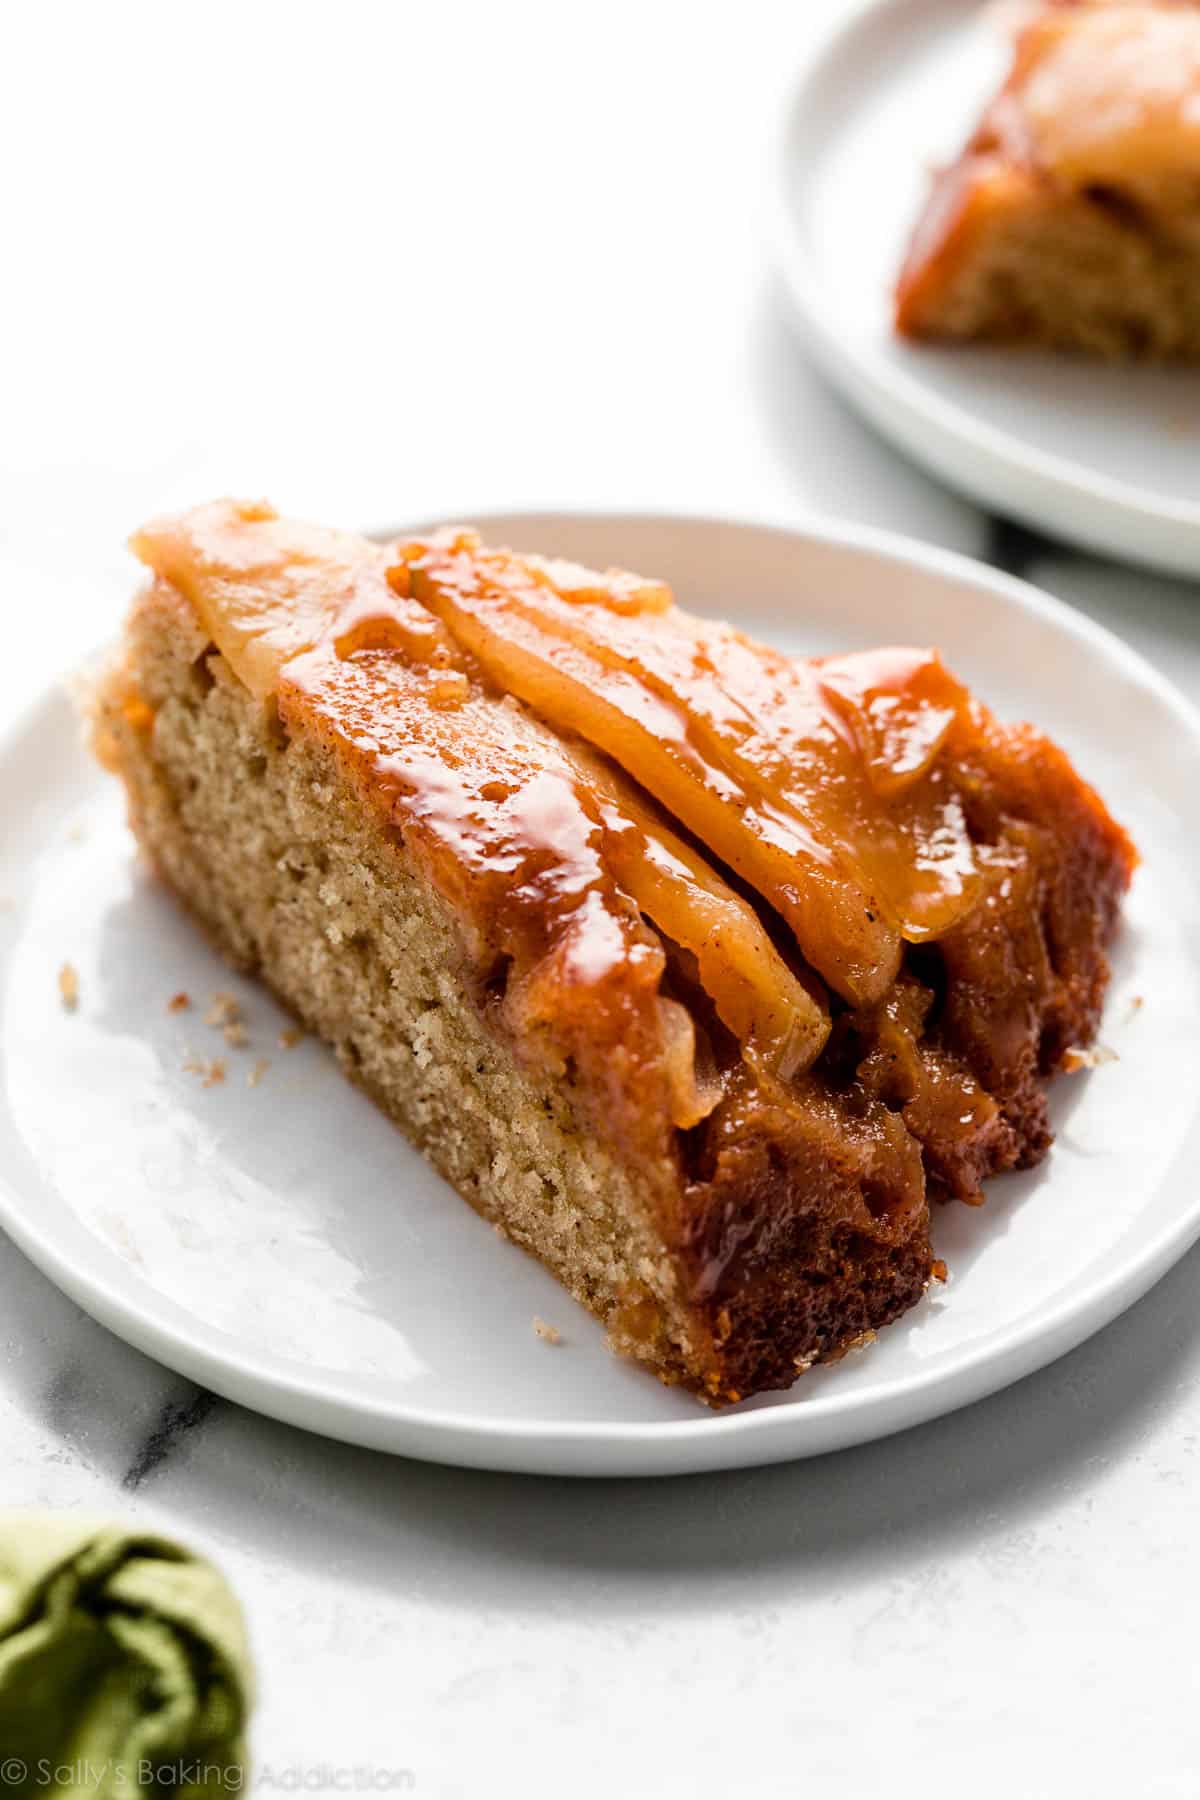
Expect a Dense Cake
I’ve made hundreds of upside down cakes, or so it seems, and I say with 100% certainty that this style of cake will always be on the denser side. (Unless you are using store-bought cake mix.) The cake is served upside down. The weight of the topping, which is the bottom of the cake as it bakes, weighs down the crumb beneath it. Upside down cake will never be as light and airy as white cake. If you were to make this exact cake batter and serve it right-side-up, the cake would taste much airier. Does that make sense?
While this apple upside down cake is mega soft and not nearly as dense as, say, pound cake, it’s not overly light either. I know you’ll love its unique texture, especially paired with the caramel apple topping. Let me know how you like it!


Caramel Apple Upside Down Cake
- Prep Time: 25 minutes
- Cook Time: 45 minutes
- Total Time: 1 hour, 30 minutes
- Yield: serves 8-10
- Category: Dessert
- Method: Baking
- Cuisine: American
Description
This stunning apple upside down cake combines a soft cinnamon-spiced cake with a delicious buttery caramel topping. Pack those apples into the pan—this cake can hold a lot and you won’t regret those extra slices!
Ingredients
Topping
- 6 Tablespoons (85g) unsalted butter
- 1/2 cup (100g) packed light or dark brown sugar
- 1/4 teaspoon ground cinnamon
- 1/4 teaspoon pure vanilla extract
- 2 medium apples, peeled and sliced into 1/4-inch slices (1.5–2 cups, or 188–250g, apple slices)*
Cake
- 1 and 1/2 cups (188g) all-purpose flour (spooned & leveled)
- 1 and 1/2 teaspoons baking powder
- 1 and 1/2 teaspoons ground cinnamon
- 1/4 teaspoon ground nutmeg
- 1/2 teaspoon salt
- 1/2 cup (8 Tbsp; 113g) unsalted butter, softened to room temperature
- 1/2 cup (100g) granulated sugar
- 1/2 cup (100g) packed light or dark brown sugar
- 2 large eggs, at room temperature
- 1 teaspoon pure vanilla extract
- 6 Tablespoons (90ml) whole milk, at room temperature*
Instructions
- Preheat oven to 350°F (177°C).
- Prepare topping first: Combine butter and brown sugar together in a small saucepan over medium heat. Whisk occasionally until butter has melted. Cook, whisking constantly, for 1 minute as mixture thickens. Remove from heat and whisk in the cinnamon and vanilla extract. Pour into an ungreased 9×2 inch pie dish or round cake pan. (Make sure the pan is 2 inches deep. I recommend this pie dish, which is 1.8 inches deep but I never have an overflow issue.) Arrange the apple slices neatly on top, overlapping where necessary. See photo above. Place pan in the refrigerator for a few minutes as you prepare the cake batter. This helps solidify or “set” the topping’s arrangement.
- Make the cake batter: Whisk the flour, baking powder, cinnamon, nutmeg, and salt together. Set aside.
- Using a handheld or stand mixer fitted with a paddle or whisk attachment, beat the butter on high speed until smooth and creamy, about 1 minute. Add both sugars and beat on high speed until creamed together, about 1 minute. Scrape down the sides and up the bottom of the bowl with a rubber spatula as needed. On high speed, beat in the eggs and vanilla extract until combined. Scrape down the sides and up the bottom of the bowl as needed. Pour the dry ingredients into the wet ingredients. Turn the mixer onto low speed and as the mixer runs, slowly pour in the milk. Beat on low speed just until all of the ingredients are combined. Do not over-mix. You may need to whisk it all by hand to make sure there are no lumps at the bottom of the bowl. The batter will be slightly thick.
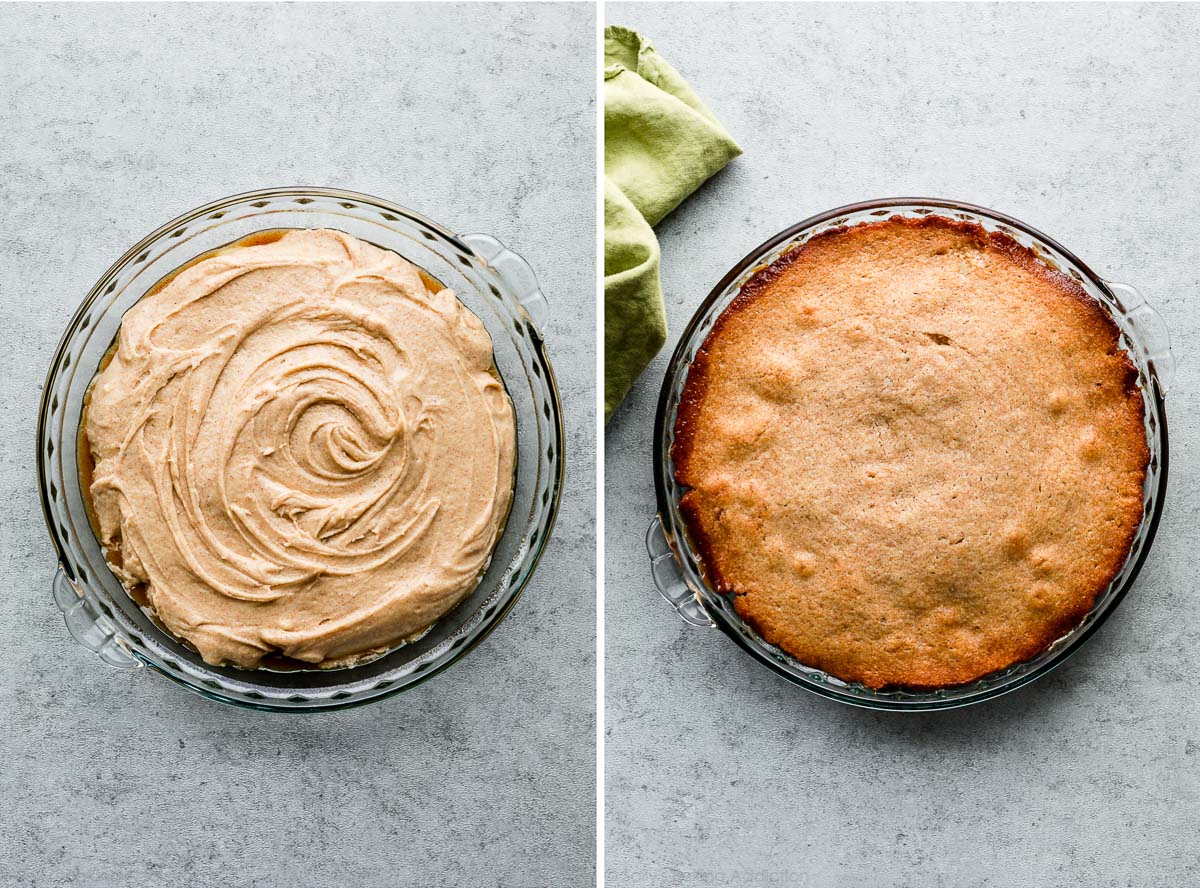
- Remove topping from the refrigerator. Pour and spread cake batter evenly over topping.
- Bake for 40–46 minutes, tenting foil on top of the cake halfway through bake time to prevent the top from over-browning before the center has a chance to fully cook. The cake is done when a toothpick inserted into the center of the cake comes out mostly clean—a couple moist crumbs are OK. Don’t be alarmed if your cake takes longer or if the cake rises up and sticks to the foil. (We serve the cake upside down anyway!)
- Remove cake from the oven and cool on a wire rack for just 15 minutes. Invert the slightly cooled cake onto a cake stand or serving plate. Some of the juices from the topping will seep over the sides—that’s ok. You can slice and serve the cake warm, but the slices will be messy. I find it’s best to cool the cake completely at room temperature before slicing and serving. Do not refrigerate the cake to speed up the cooling process because it could end up tasting overly dense.
- Cover leftover slices and store for up to 3 days in the refrigerator or 3 months in the freezer. Thaw at room temperature. I don’t recommend freezing the cake as a whole because the topping arrangement doesn’t thaw very nicely. See make ahead instructions below.
Notes
- Make Ahead Instructions: You can refrigerate the topping in step 2 for up to 1 day. If refrigerating for longer than 1 hour, cover it tightly. Other than that, this isn’t the best cake to make ahead of time or freeze because the apples will settle down into the cake—while still tasty, the presentation won’t be as pleasing. You can, however, prepare the cake batter’s wet ingredients (cover and refrigerate) and dry ingredients (cover at room temperature) separately up to 1 day ahead of time, then continue with the recipe the next day. Let the wet ingredients come to room temperature before mixing.
- Special Tools (affiliate links): Saucepan | Whisk | 9-inch Pie Dish | Glass Mixing Bowl | Electric Mixer (Handheld or Stand) | Cooling Rack
- Old Recipe: The current cake recipe was updated in 2020. If you loved the old cake recipe, originally published in 2012, here it is: increase the topping’s butter to 1/2 cup (1 stick; 115g) and add 1/4 teaspoon each of ground cloves and ground nutmeg when you stir in the cinnamon. Sprinkle 1/4 cup of walnuts on top of the apples before pouring/spreading on the cake batter. In the cake batter, reduce the milk to 1/4 cup (60ml).
- Apples: Use your favorite variety of apple. I typically use Granny Smith, Fuji, or Honeycrisp. Here’s more on the best apples to use for baking.
- Milk: Whole milk is best, but you can use lower fat or nondairy milk if needed.
- Why is everything at room temperature? All refrigerated items should be at room temperature so the batter mixes together easily and evenly. Read more about the importance of room temperature ingredients.


Reader Comments and Reviews
Am curious if I could double the recipe for a 13×9″ pan. Wondering if it would release as nicely. Any thoughts? I want to make for a church dinner. Thanks.
Hi Marlmm, you can try doubling it and baking in a 9×13 inch pan. We are unsure of the bake time needed but let us know if you give it a try!
I brought this to a gathering and it was gobbled! The outside was caramely and crispy, the apples were deliciously fried, and the cake was fluffy and beautiful! I will definitely make this again!
I guess I’ve succeeded to make that cake. I would love to add a !!!
I have made this the original way to rave reviews. Thank you.
Have you tried to steam this cake so the caramel breaks down and soaks the cake making it more dessert like?
We have not tested that method of cooking, Purnima – let us know if you do!
One more question. Some of the caramel oozed out of the pan into the oven even though my pan was the perfect size.
Any tips to avoid that? I have only made it once.
Thanks
Hi Purinma, did the caramel bubble up and out the sides? You can place the baking dish on a sheet pan to catch any drips.
Can I bake the cake in the morning and leave it setting out all day to serve in the evening?
That should be fine, Howard! Since the cake needs to cool completely at room temperature, you can simply leave it covered at room temperature before serving. Refrigerate any leftovers. Hope it’s a hit!
Don’t you need to line the tin. If not using a glass dish so the mix doesn’t stick to the sides and can come out easily?
Hi Aarti, no need to line the pan here.
I will definitely make this again. I used 6 apples that were badly bruised, so probably the equivalent of using 4 good apples. I baked this in a 10 inch round pan for 35 minutes. It turned out as a really nice, light cake and lots of caramel apples on top.
This was delicious. I wish the caramel in the sides hadn’t stuck to the sides of the pan but I scraped that off and ate it. OMG, delicious! I’m only imagining how the rest of the cake would have tasted with that on the sides! I, like another reviewer, might reduce the sugar in the cake slightly, since I like a less-sweet cake. Maybe also less vanilla, so the spice and apple flavours shine through more. I think a bit of salt in the topping would be really good too. I’m likely making this again and so I’m leaving myself recipe notes for next time. We really liked this recipe, but we are die-hard tweakers over here.
Great recipe delicious
Can I substitute pineapple slices for apple slices? I have made the apple cake and it’s delicious!
Hi Barbra, here is our pineapple upside down cake recipe instead.
Hello!! I’ve made this several times and it’s the most delicious cake ever!! I was wondering if you could make it into muffins… how would the baking time differ? Thank you!
Hi Cecilia! We haven’t tested anything, but that should work. Bake time will likely be a bit shorter. Let us know what you try!
What did I do wrong? The sugar didn’t dissolve in the butter and it became like liquid butter with sugar in it
Hi Ellen! Perhaps a higher heat would help dissolve the sugar and bring the caramel topping together.
The cake was delicious!! Excellent recipe. I halved all of the ingredients to make a half batch and baked it in a bundt pan because it was all I had around. It still came out so delicious, highly recommend
Hi Sally, this is my second time making this cake. I learned what not to do on the first cake. I at the last moment tasted the granny Smith slices and they were not sweet. I’m alittle worried about how they will taste in the cake. I also used a honeycrisp apple. I did replace some of the granny slices. Just wanted your thoughts.
Hi Rae, we often use Granny Smith and Honeycrisp apples for this cake, so that should be just fine!
If I wanted to add pecans, would I top the cake after baking, or add them into the bottom layer before baking? Thanks!
Hi Angie, you can try adding them to the bottom layer before baking. Or you might like adding the topping from this pecan pie cheesecake to the finished cake. Let us know if you try it!
Hi. Do you think this would work in a springform pan?
Hi Stephanie, That should be fine, though you risk the caramel topping seeping through the springform pan.
Hi, I love your recipes! Can I substitute buttermilk?
Hi Karen, whole milk is best here, but buttermilk should work just fine in a pinch.
Can this cake be made gluten free?
Hi Becky, we haven’t tested a gluten free version of this cake, but let us know if you do.
Hi Becky! I have celiac disease and as long as I use any of the measure for measure gluten free flours, the cake turns out fantastic! I have made a LOT of Sally’s recipes over the years and all of her cake and muffin recipes work great with a 1:1 flour!
I used leftover salted caramel sauce (Sally’s recipe of course!) as the bottom part of the cake and used a box of spice cake mix. Baked in two 9 inch round pans. Came out beautiful and delicious!
I made this cake turned out Beautiful! Family loved it!
Sally your recipes never let me down!!
Sinfully delicious! Didn’t look as pretty as Sally’s but who cares lol! Great carmelized crust around the edges. Took about an hour 10 mins to bake.
Omg. This cake was sooooooooo good and a huge hit! It was easy to make, too.
This recipe is going permanently into my repertoire and will be made several more times this season!!
My cake came out somewhat flat, dry, and a little tasteless. The caramel and apple top was the best part, and it was pretty! I was disappointed in it, though. Looking at all of the great reviews, I’m thinking I did something wrong. Will try again!
Amazing recipe. Did it twice now and can confirm the second time was way better since I got the hand of it. Definitely will become a recipe I will make very often
Have you made this with 1-1 gluten free flour?
Hi JMR, we haven’t, but let us know if you try it!
It looked beautiful and tasted delicious! My husband said it was the best apple cake he has ever eaten.
I left out half of the sugar in the batter and it was just perfect for our European taste buds.
Hi Sally! (Love your cookbook) I have a pear tree and so I have a buunch of pears. I was wondering if I can substitute the apples for pears?
Hi Briana, Absolutely. We have used pears in an upside down cake before (like our upside-down pear gingerbread cake)