

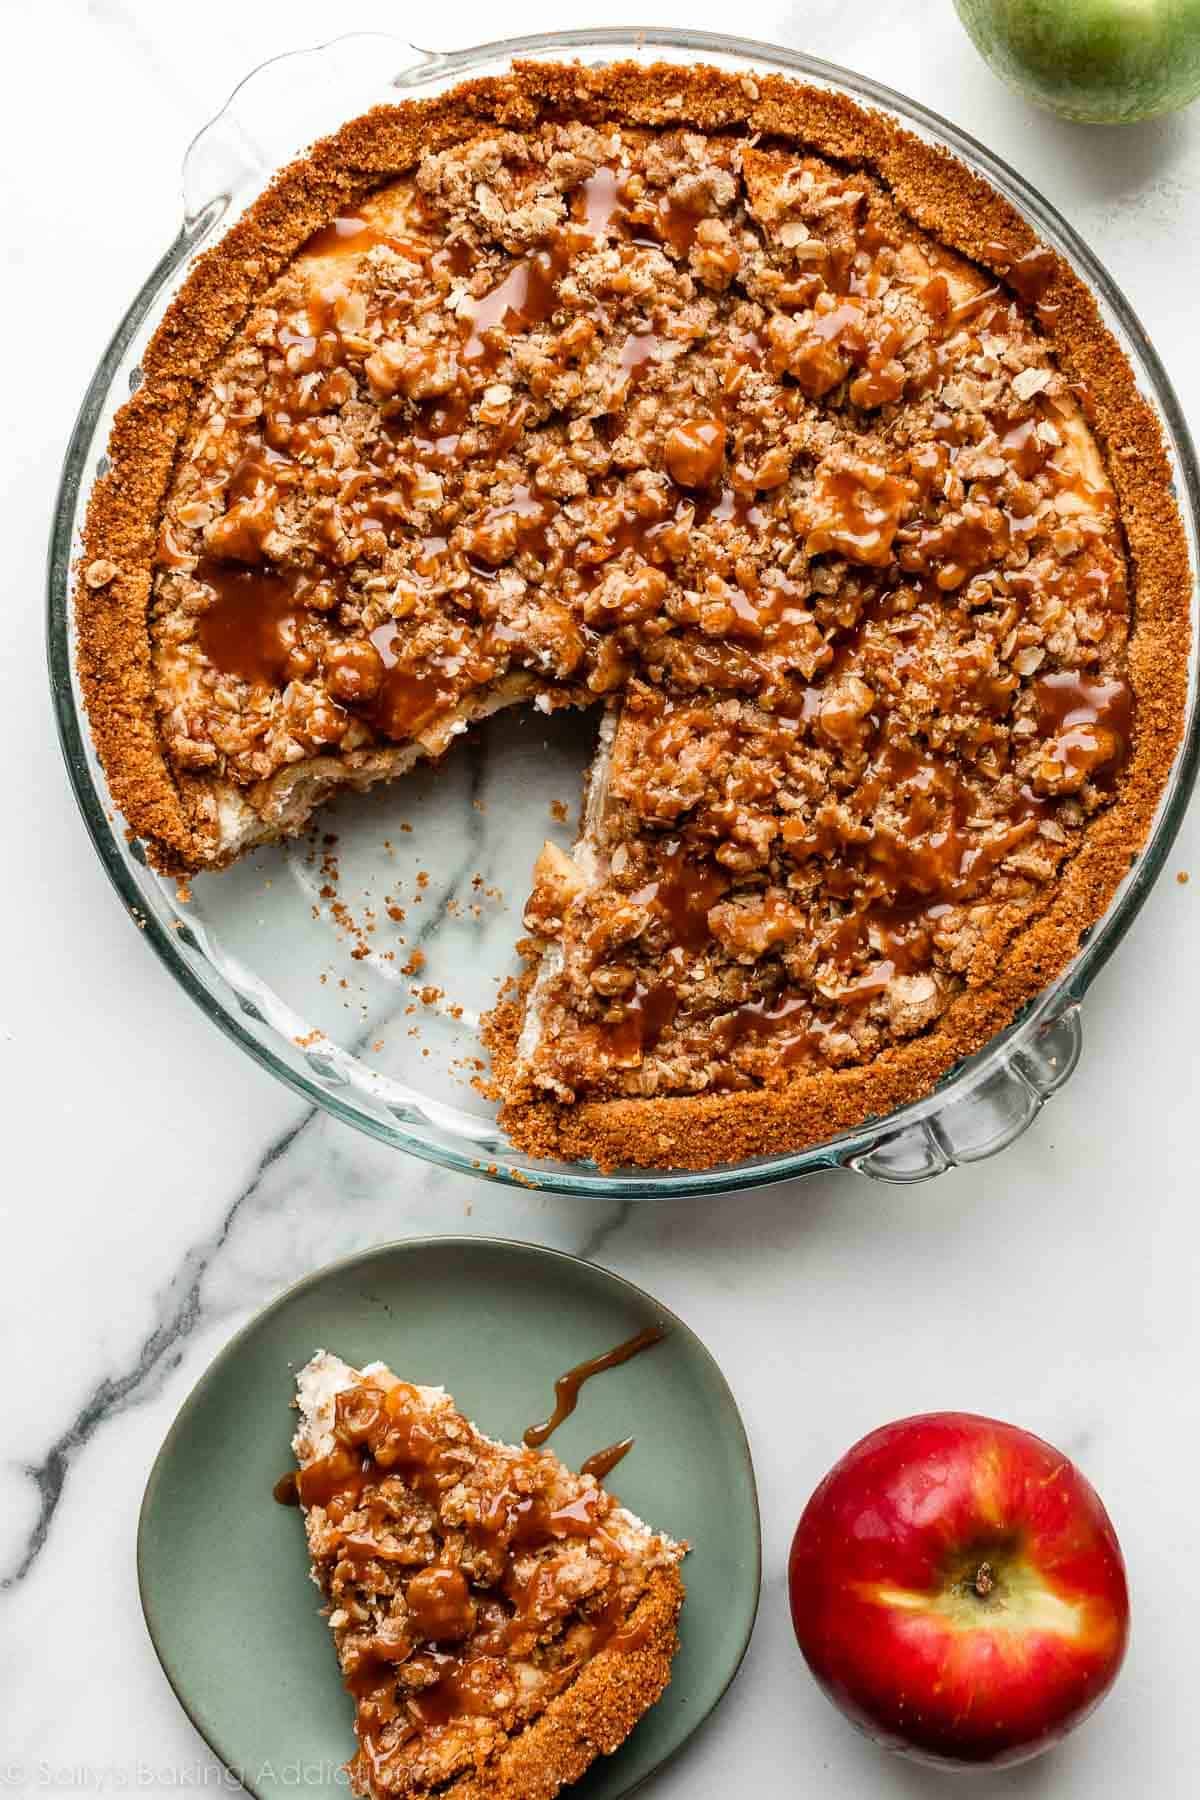
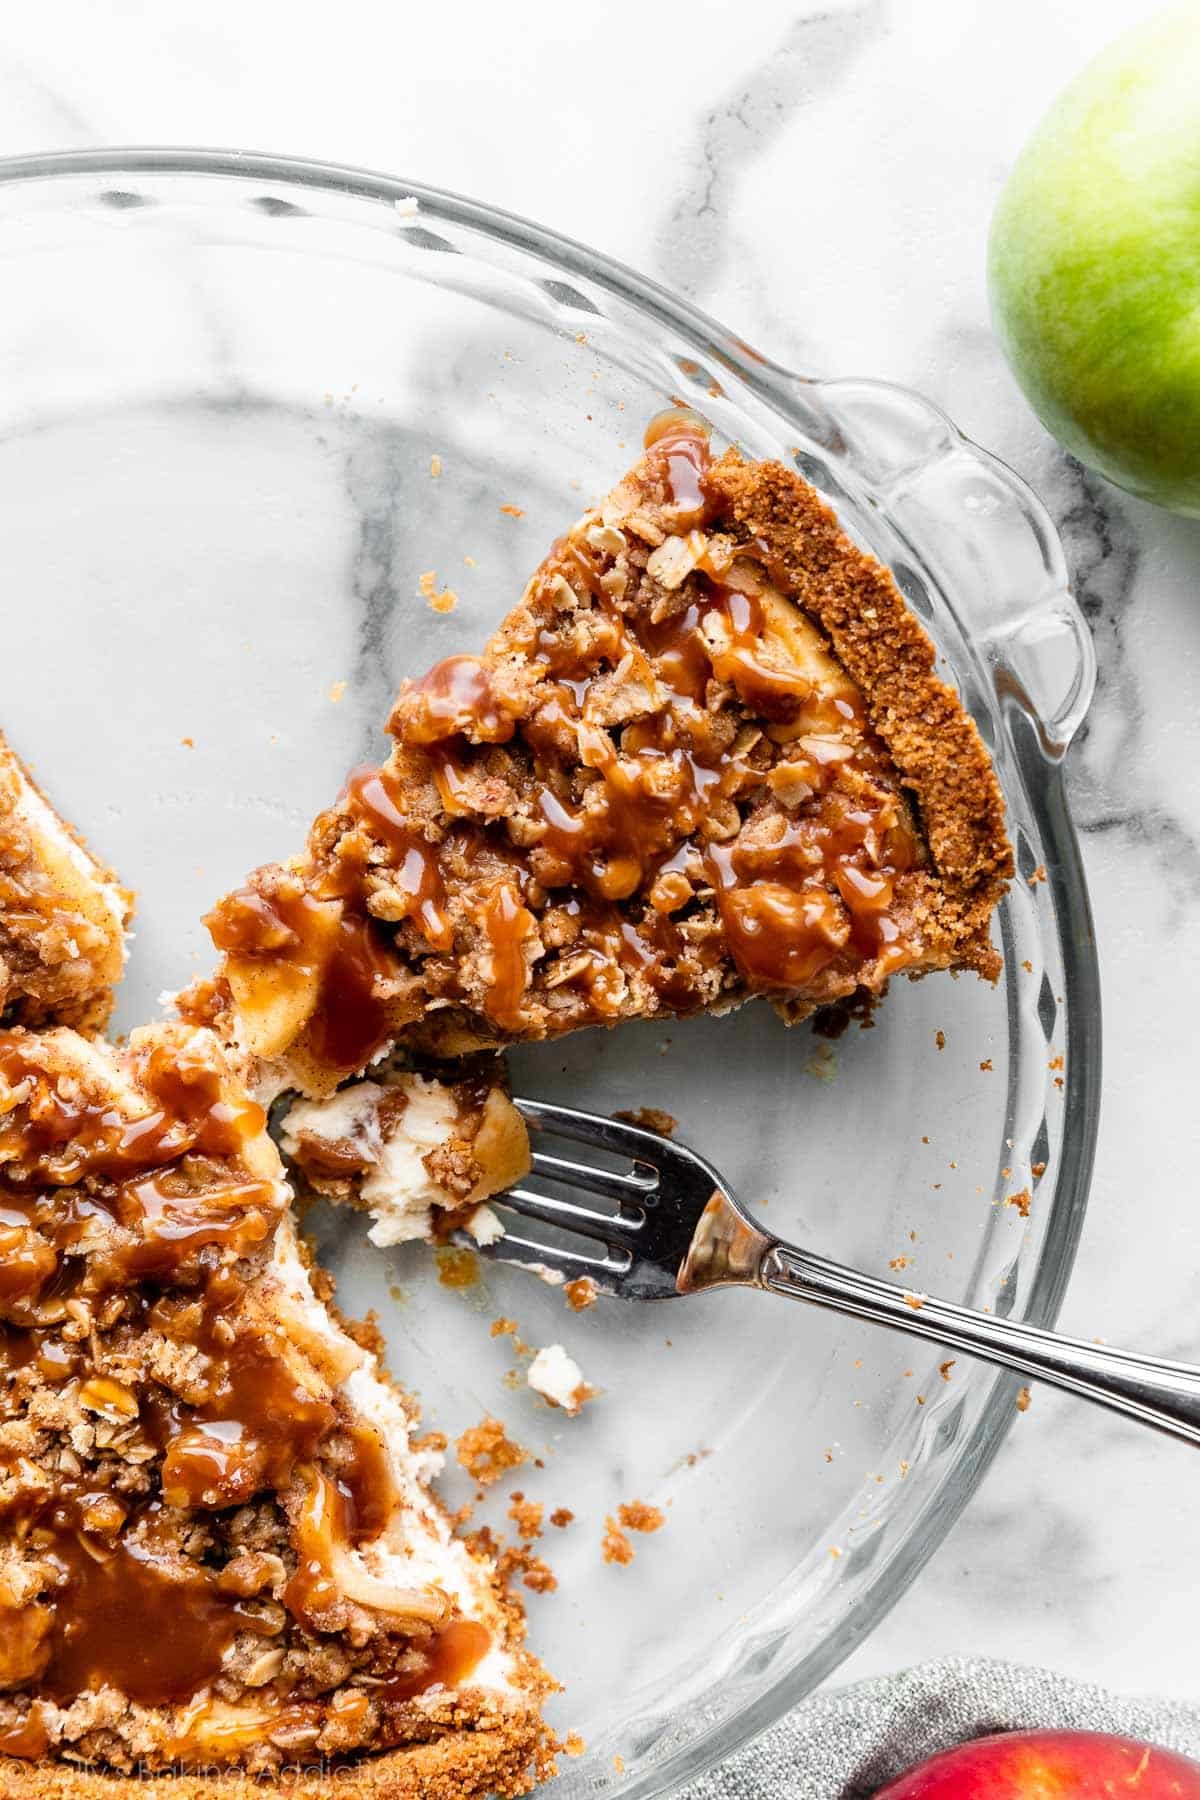
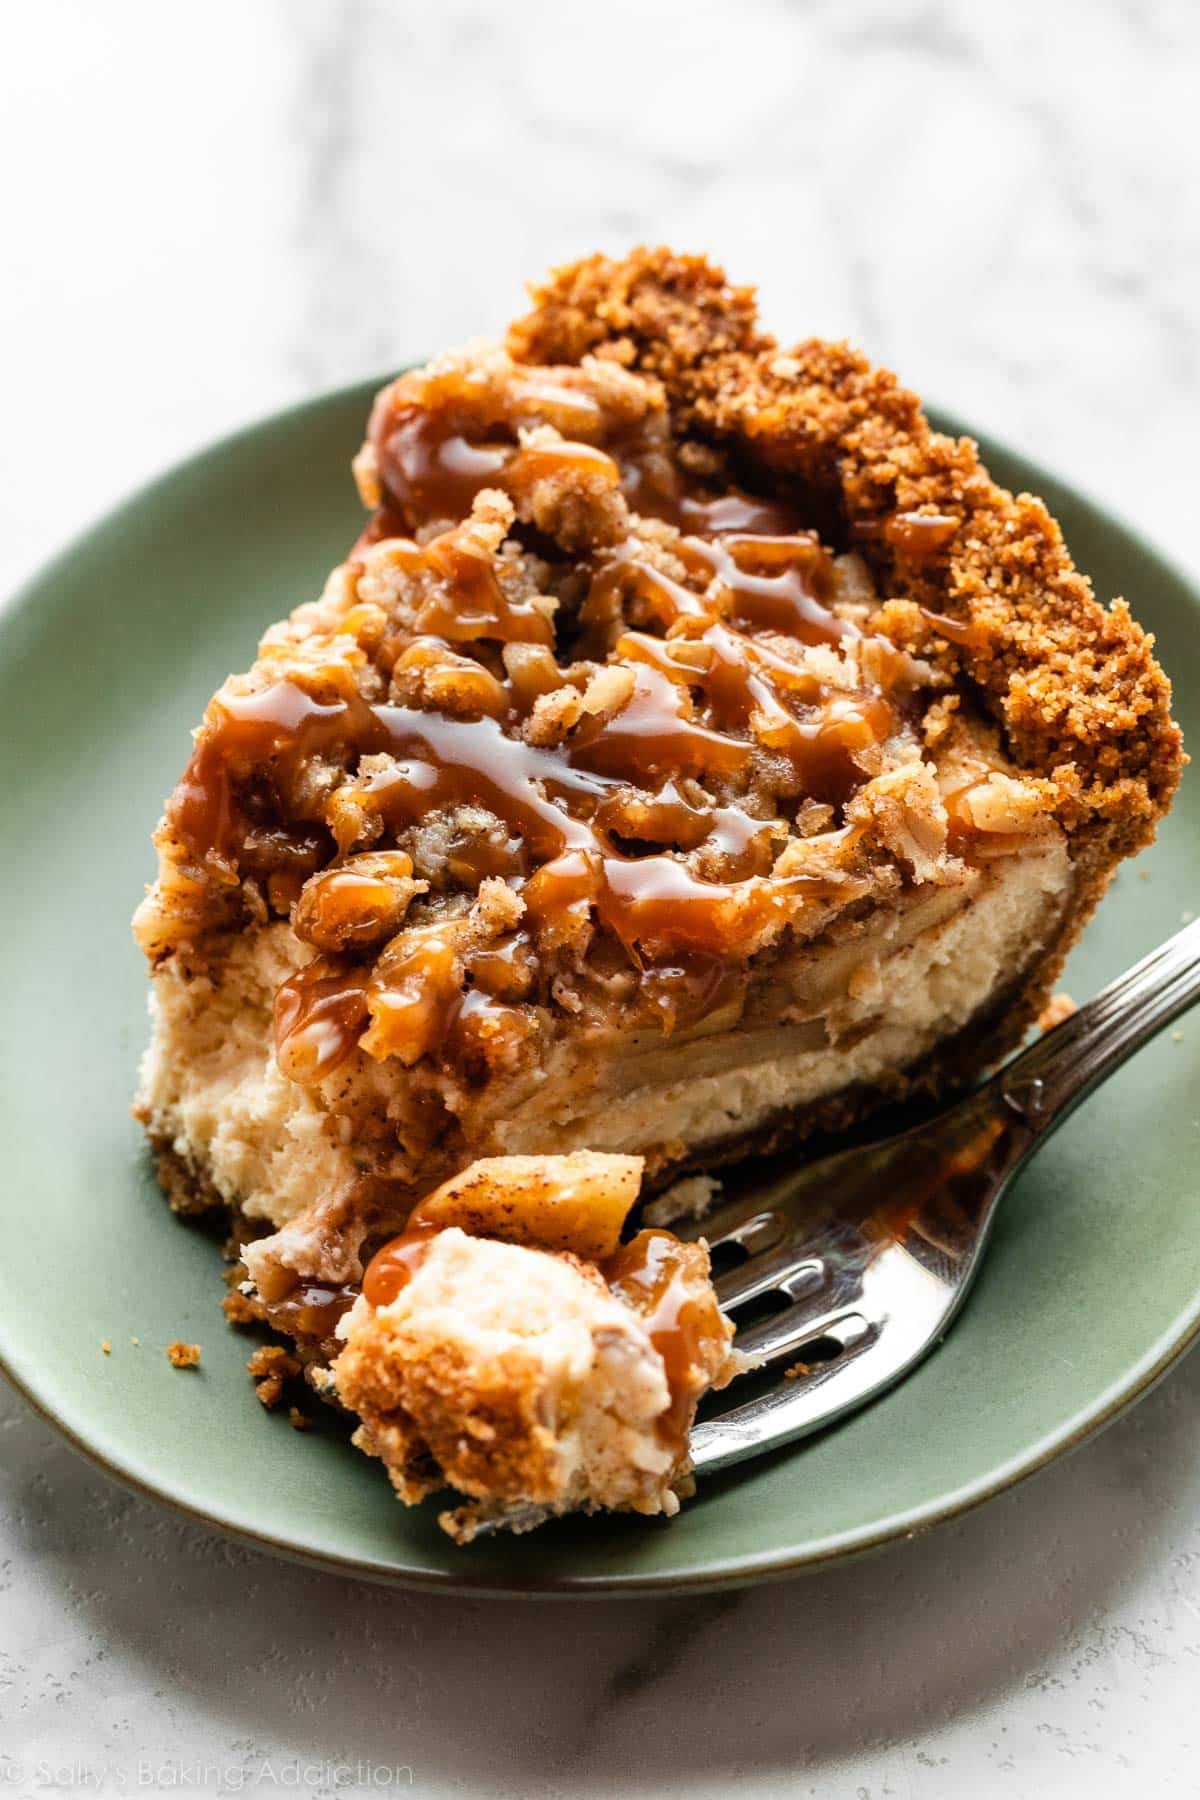
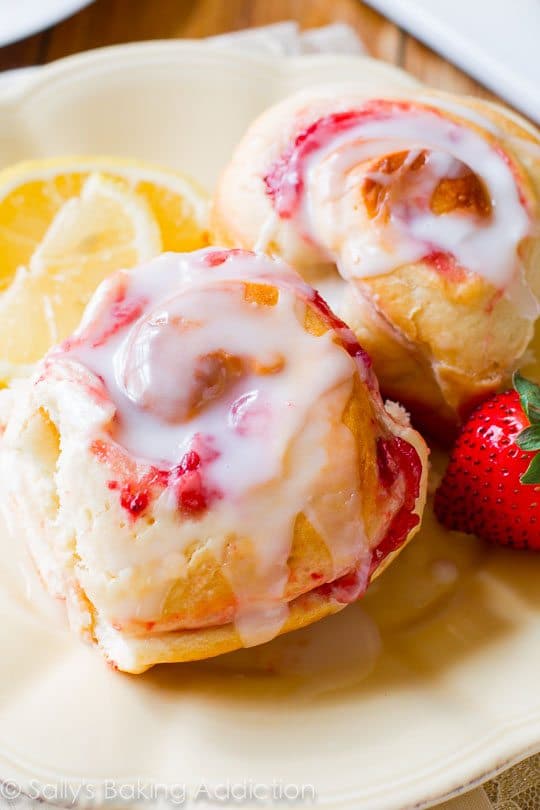
This caramel apple cheesecake pie has so many layers to love: it starts with a crisp and buttery graham cracker crust, followed by a creamy brown sugar cheesecake filling, sweet cinnamon-spiced apples, homemade salted caramel, and finished with a streusel topping. It’s like apple crisp meets cheesecake, and you’ll be very glad that they did!
I always love a good dessert mash-up, especially when it involves cheesecake. Have you seen this pecan pie cheesecake or these coconut cheesecake brownies before?
Today we’re talking all things apple. This recipe is as if I started making an apple crisp or salted caramel apple pie, then threw in a cheesecake. It’s very layered, textured, rich, and undoubtedly tasty. During testing and photography, my team and I made about 8 of these pies… and neighbors were literally leaving notes on our doors to bring them more. (Yes, that really happened!)
Why You’ll Love This Caramel Apple Cheesecake Pie
- A “people pleaser” dessert—satisfies the cheesecake lovers and apple pie lovers
- No water bath or pastry pie crust needed
- A magnificent use of dessert’s favorite condiment, homemade salted caramel
- Tons of texture in every bite
- It’s a lot of steps and layers, but each is quite simple to make
- A great make-ahead recipe because it needs time to chill
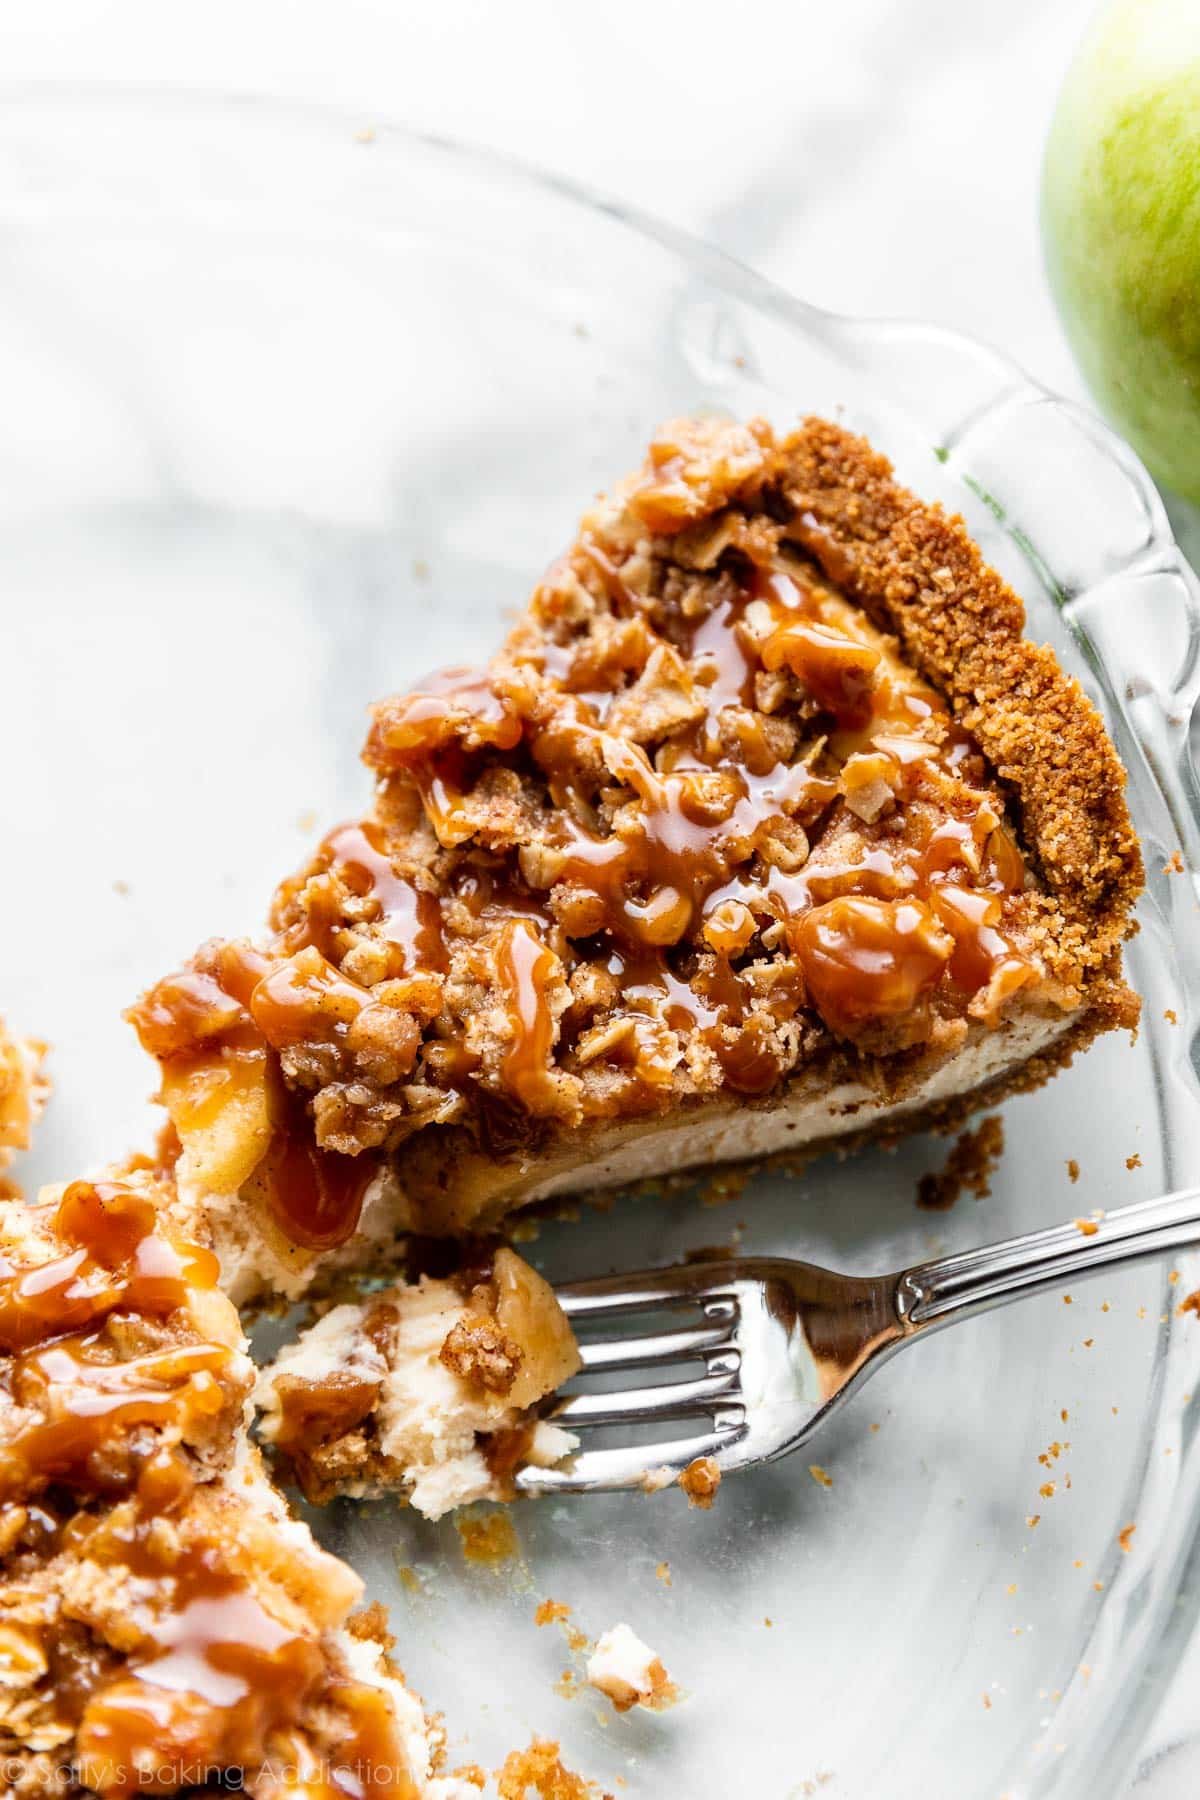
4 Layers to Love
This is a texture lover’s pie, for sure. Crispy, crumbly, creamy… oh my!
- Graham Cracker Crust: A classic crumb crust gets extra crispy from a longer bake time, just like in this s’mores brownie pie.
- Cheesecake Filling: Smooth, velvety, creamy, and lightly tangy cheesecake pie filling provides a perfect contrast to the textures in the layers above and below.
- Caramel Apples: Tart apples get the sweet treatment here. Tossed in cinnamon & brown sugar, then drizzled with salted caramel… is there a better way to get your apple a day? They bake long enough to soften but still maintain their texture, much like an apple pie.
- Streusel Topping: This crumbly topping is a scaled-down version of what we use on these salted caramel apple pie bars. I reduced the quantity down because, in testing, I found that too much streusel topping created a mushy layer on this pie.
Pie Testing (& Retesting)
My team and I tested many different versions to figure out the very BEST way to make caramel apple cheesecake pie. Some tests:
- We tried pre-cooking the apples before adding them to the pie, but not only was it an extra step (and an extra pan to wash), it made the apple layer a bit too soft and wet.
- Then we tried layering the caramel and apples directly on top of the crust, but the caramel adhered to the crust, making it nearly impossible to cut.
- We tried it without the streusel topping. Silly mistake. Our strategically selected panel of taste testers (i.e., neighbors who happened to be home—LOL) overwhelmingly preferred the versions with the streusel topping to the versions without.
All this recipe testing led to today’s truly delicious dessert—are you ready for it?
Start With a Graham Cracker Crust:
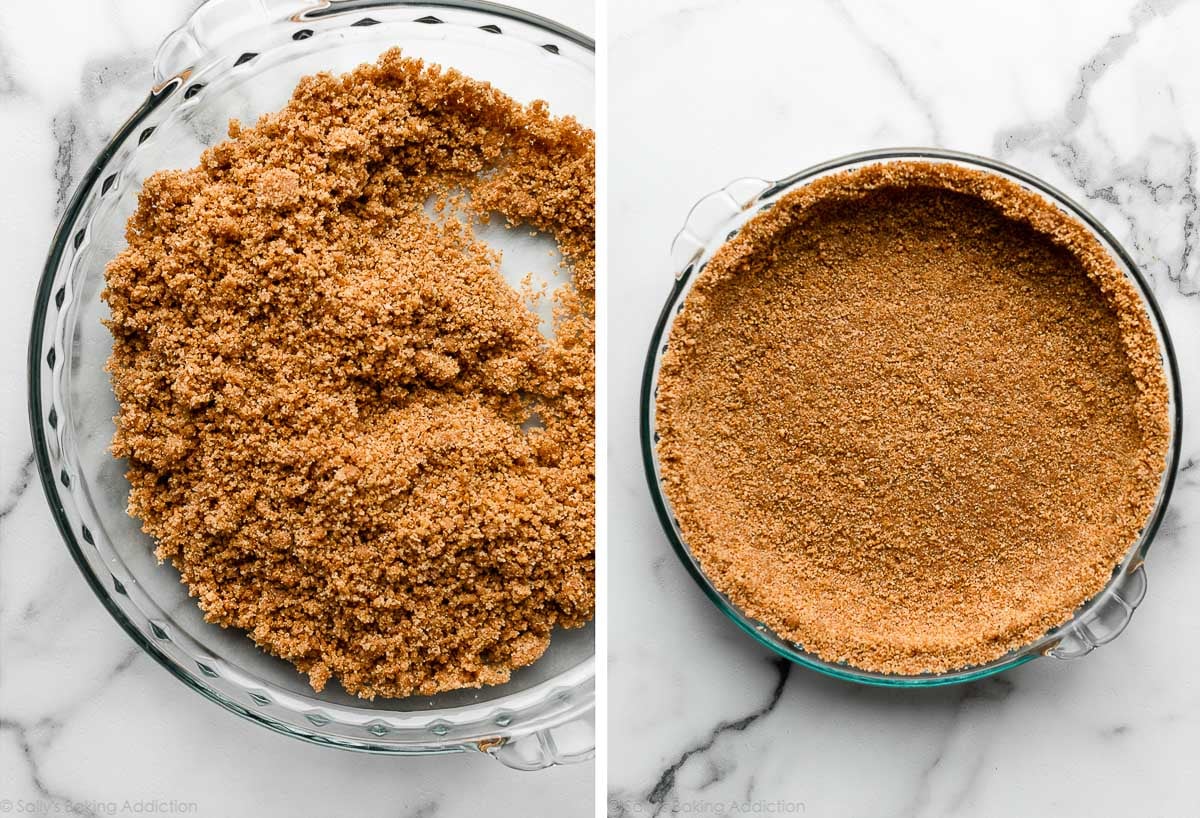
The recipe begins with this graham cracker crust. It’s just 3 simple ingredients: graham crackers, granulated sugar, and melted butter. If you’ve had trouble with graham cracker crust in the past, or if it’s not easy to get graham crackers where you are, read this How to Make a Graham Cracker Crust post for guidance and substitution suggestions.
Bake the crust by itself for 10 minutes, so it can set its shape before filling the pie. It’s ideal if the crust is still a tad warm when you add the filling (so it adheres nicely to the base).
Grab These Ingredients for Filling & Topping:
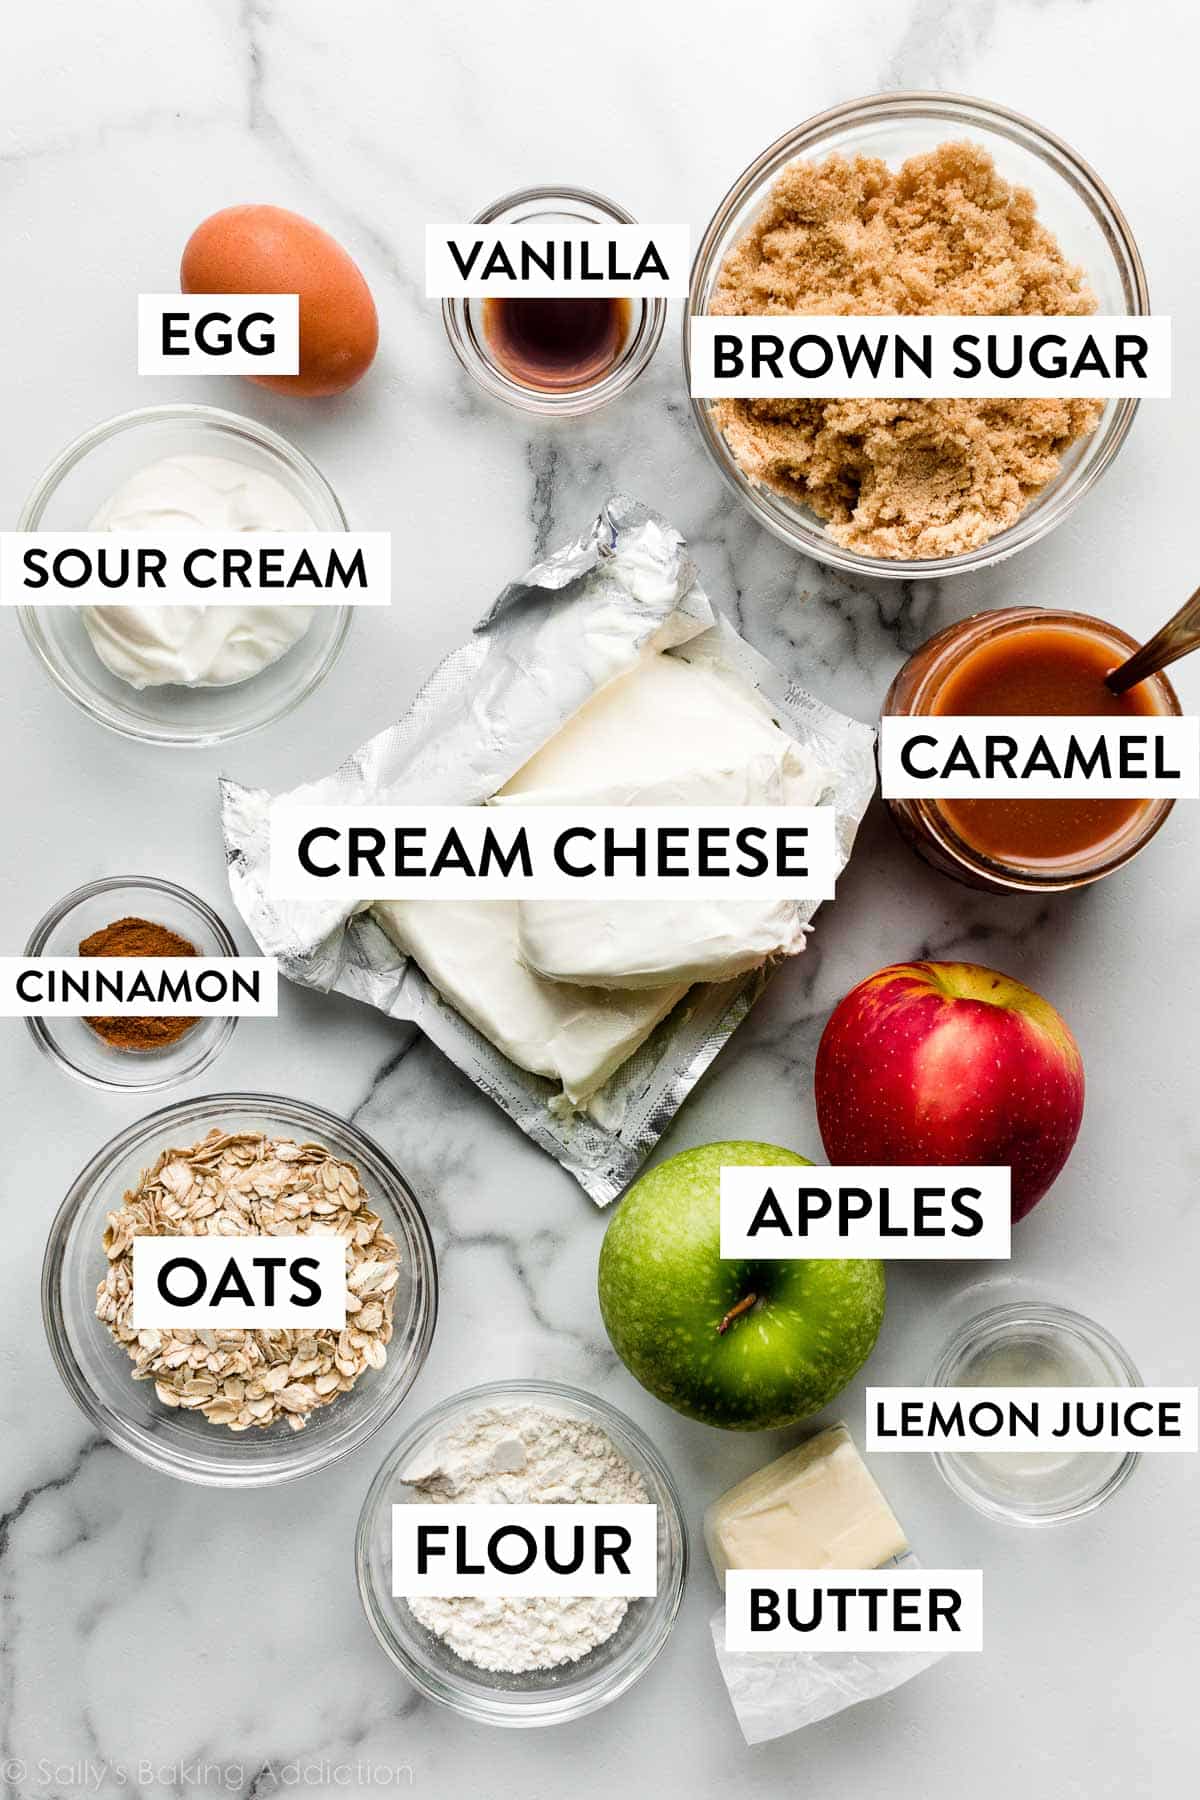
- Cream Cheese: Use 12 ounces (339g) of full-fat brick cream cheese. Make sure you’re buying the bricks of cream cheese and not the tubs of cream cheese spread.
- Brown Sugar: We’re using brown sugar in the cheesecake filling, like we do in this pecan pie cheesecake. Brown sugar also goes in the caramel apple and streusel layers.
- Sour Cream: Makes for a smooth and velvety texture, and gives it that lightly tangy flavor we all love in cheesecakes.
- Pure Vanilla Extract: Pure vanilla extract adds flavor, especially homemade vanilla extract!
- Egg: The egg provides structure in this baked cheesecake pie.
- Apples: I like to use a mix of tart & sweet apples in baking, like 1 Granny Smith and 1 Honeycrisp or other sweet variety. Peel and slice them really thin, then chop the slices into bite-size pieces. If your apples are too thick, they won’t soften enough when the pie bakes.
- Lemon Juice: I usually include lemon juice in a cheesecake filling, but in this pie, let’s add it to the apples. Tossing the chopped apples in lemon juice helps prevent browning, but we also want to give them a head start on softening before we layer them in the pie.
- Cinnamon: Apple’s favorite spice!
- Homemade Salted Caramel: Have you ever made this liquid gold before? This recipe for salted caramel is surprisingly simple. Use some in the filling and then as much as you want when serving the finished pie. If you want regular caramel (and not salted), reduce the salt in the caramel recipe down to 1/2 teaspoon.
- Oats: Use old-fashioned whole rolled oats. If you don’t want oats in the streusel topping, try halving the crumble topping used on this apple crumble pie and use that instead.
- Flour: Just a little bit in the streusel topping, for structure.
- Butter: Cut cold, cubed butter into the dry streusel ingredients, until you have a crumbly topping. You also use butter in the crust. (And in the homemade caramel!)
Again, there are a lot of layers. Go slow, and read through the recipe and watch the video tutorial before you begin. I categorize this as an intermediate baking recipe.
Let’s Assemble the Caramel Apple Cheesecake Pie
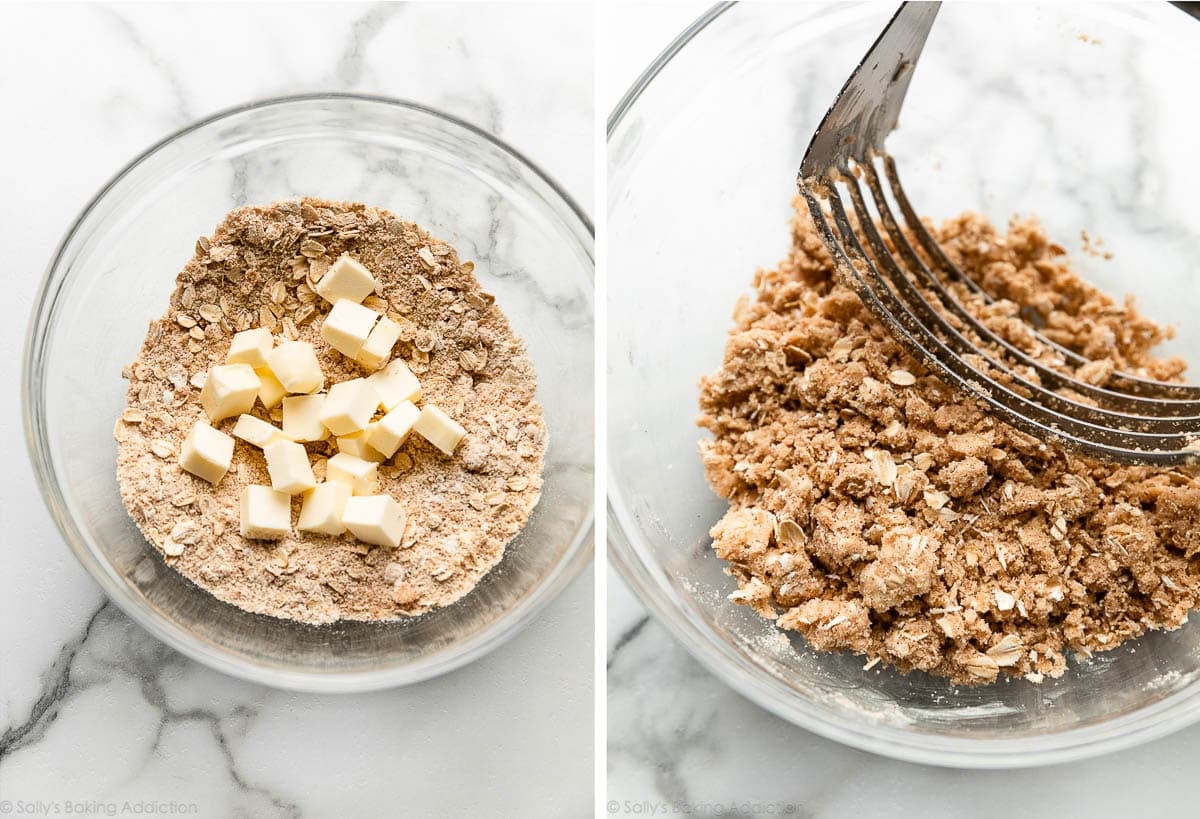
In the printable recipe below, I encourage you to start with the crust, then move on to the toppings before you make the cheesecake filling. Make the streusel first, and then chill it in the refrigerator or freezer as you work on the other layers. The colder the streusel, the better it will hold shape in the oven. A pastry cutter makes this step easy, or you can try cutting in the butter using 2 forks:
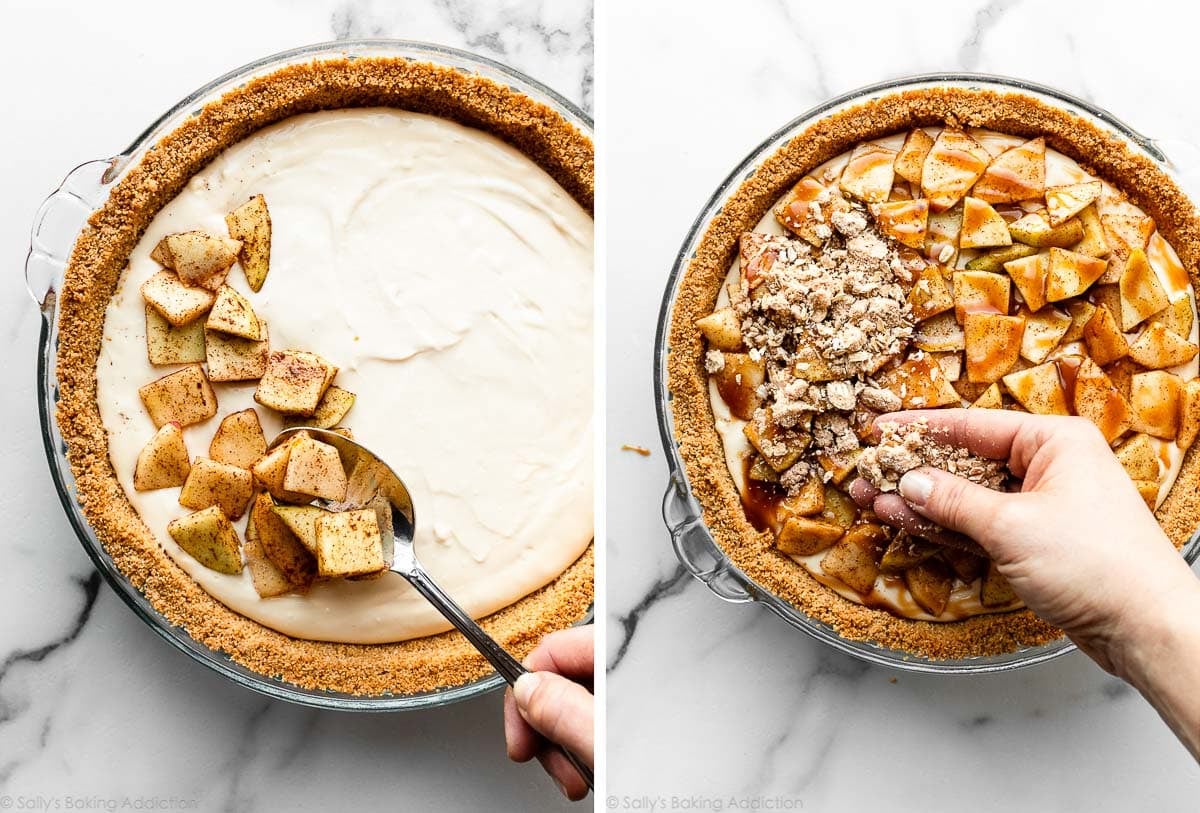
After your streusel is in the refrigerator, peel, slice, and chop the apples. Mix them with a little brown sugar, lemon juice, and cinnamon. You can see the apples when I layer them onto the filling below.
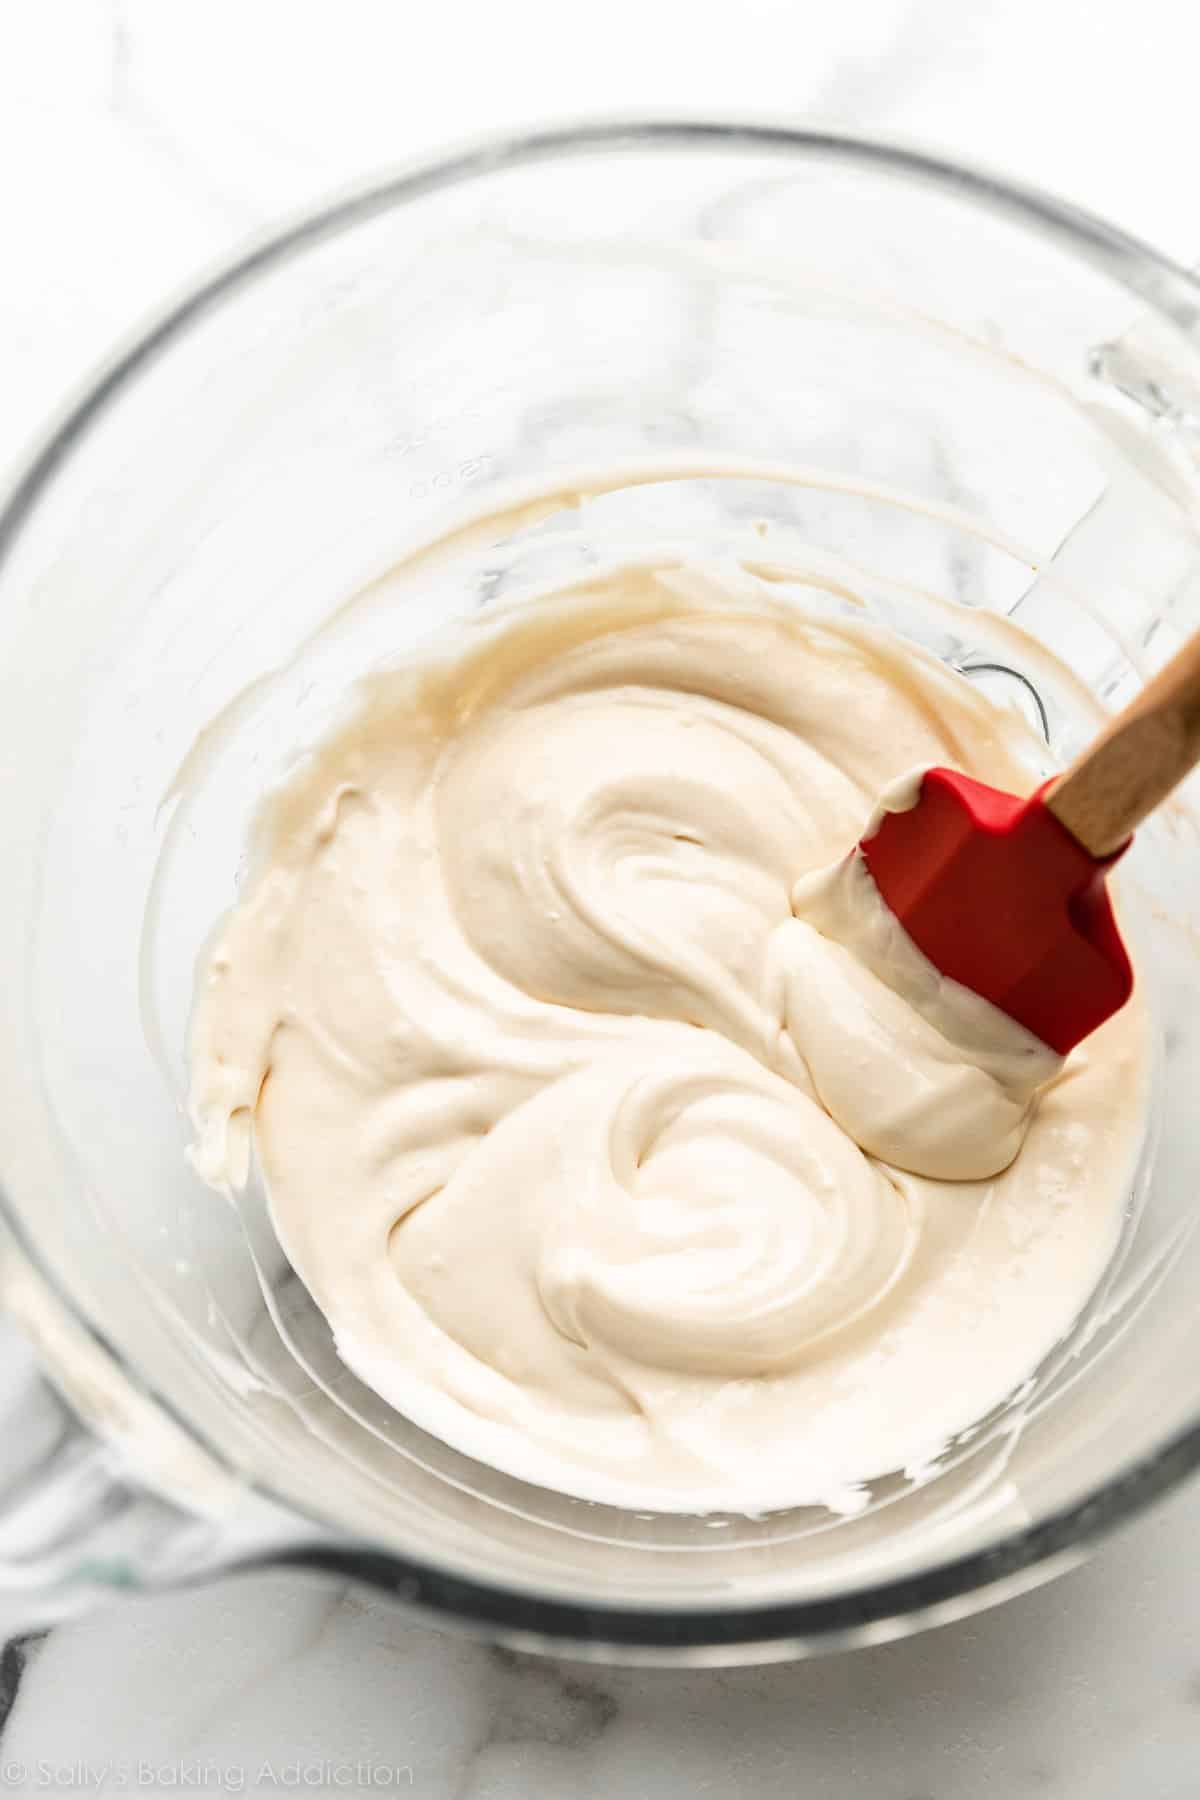
The cheesecake filling is a snap. It’s a slightly reduced version of this cheesecake pie filling. I reduced the amounts because we’re topping it with so many layers.
Spread the filling into the slightly warm pre-baked crust, and then top with the apple layer, a couple Tablespoons of salted caramel, and then the cold streusel topping.
Here is the pie before & after baking:
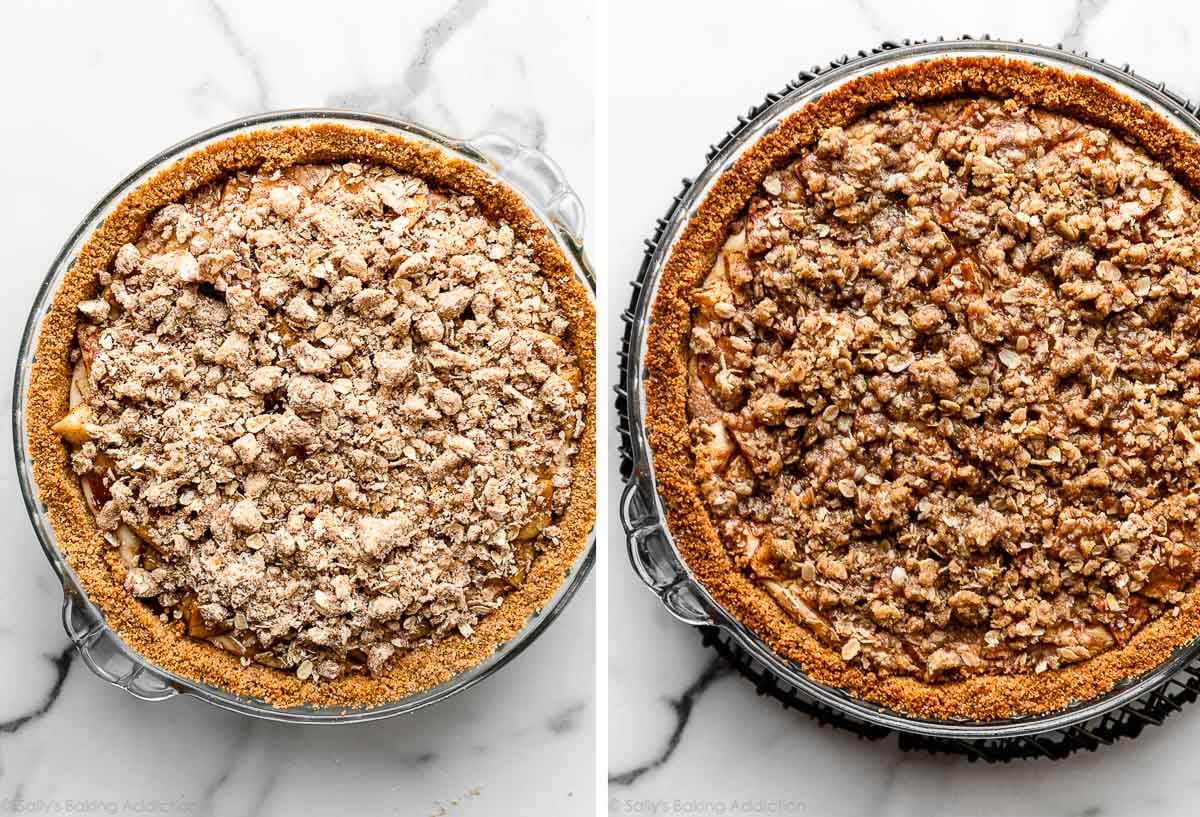
The caramel apple cheesecake pie needs about 45 minutes in the oven. Around the 30 or 35-minute mark, I loosely tent it with aluminum foil to prevent the top and crust from over-browning. The pie filling may seem a little wobbly when it’s done, but it will finish setting up as it cools and chills.
Cooling, Chilling, & Serving
Cool the pie at room temperature for about an hour, and then transfer to the refrigerator to chill for at least 2 hours and up to 2 days.
Since you used only a few Tablespoons of the caramel sauce in the pie, you’ll have plenty leftover for serving. Besides this pie, the salted caramel is fantastic on ice cream, pancakes, oatmeal, and so much more—find 50 ways to eat salted caramel here. I love gifting jars of it around the holidays!
Totally worth all of the prepwork!
Even More Apple Desserts
- Homemade Caramel Apples
- Apple Cake
- Apple Cinnamon Muffins
- Gluten Free Apple Crisp
- Apple Cinnamon Babka
This recipe is part of Sally’s Pie Week, an annual tradition where I share a handful of new recipes that fit into the pie/crisp/tart category. Join the community below!
Print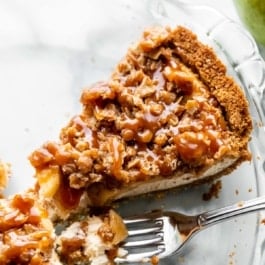
Caramel Apple Cheesecake Pie
- Prep Time: 45 minutes
- Cook Time: 55 minutes (includes crust pre-bake)
- Total Time: 4 hours, 25 minutes
- Yield: one 9-inch pie
- Category: Dessert
- Method: Baking
- Cuisine: American
Description
This recipe uses prepared homemade salted caramel in the filling, and for garnish on the finished pie. You can make the caramel ahead of time and store it in the refrigerator for up to 1 month. I encourage you to make the crust first, and then prepare the toppings before you make the filling. So many layers to love in this caramel apple cheesecake pie!
Ingredients
Crust
- 1 and 1/2 cups (180g) graham cracker crumbs (about 12 full sheet graham crackers)
- 1/4 cup (50g) granulated sugar
- 6 Tablespoons (85g) unsalted butter, melted
Streusel Topping
- 1/3 cup (28g) old-fashioned whole rolled oats*
- 3 Tablespoons (24g) all-purpose flour (spooned & leveled)
- 3 Tablespoons (40g) packed light or dark brown sugar
- 1/2 teaspoon ground cinnamon
- 2 Tablespoons (28g) unsalted butter, cold and cubed
Apple Layer
- 2 cups (250g) peeled, thinly sliced, and chopped apples*
- 1 Tablespoon (13g) packed light or dark brown sugar
- 1 teaspoon lemon juice
- 1/2 teaspoon ground cinnamon
- 2–3 Tablespoons salted caramel (plus more for topping)*
Cheesecake Filling
- 12 ounces (339g) full-fat brick cream cheese, softened to room temperature
- 1/2 cup (100g) packed light or dark brown sugar
- 3 Tablespoons (45g) sour cream
- 1 teaspoon pure vanilla extract
- 1 large egg, at room temperature
Instructions
- Preheat oven to 350°F (177°C). Have your ingredients ready and salted caramel prepared.
- Make the crust: If you’re starting out with full graham crackers, use a food processor or blender to grind them into fine crumbs. Stir the graham cracker crumbs and granulated sugar together in a medium bowl, and then stir in the melted butter. The mixture will be thick, coarse, and sandy. Try to smash/break up any large chunks. Pour the mixture into an ungreased 9-inch pie dish. With medium pressure using your hand, pat the crumbs down into the bottom and up the sides to make a compact crust. Do not pack down with heavy force because that makes the crust too hard. Simply pat down until the mixture is no longer crumby/crumbly. Tips: You can use a small flat-bottomed measuring cup to help press down the bottom crust and smooth out the surface, but do not pack down too hard. And run a spoon around the bottom “corner” where the edge and bottom meet to help make a rounded crust—this helps prevent the crust from falling apart. For more shaping technique tips, see the graham cracker crust recipe page.
- Bake the crust for 10 minutes. Continue with the next steps as the crust bakes.
- Make the streusel topping: Whisk the oats, brown sugar, cinnamon, and flour together in a medium bowl. Cut in the chilled butter with a pastry cutter or 2 forks (or even with your hands) until the mixture resembles coarse crumbs. Place the bowl of streusel in the refrigerator to chill while you continue with the next step.
- Prepare the apples: Mix the thinly sliced & chopped apples, brown sugar, lemon juice, and cinnamon together in a medium bowl. Set aside. (The caramel will be layered on top of them when you assemble the pie.)
- Make the filling: Using a handheld or stand mixer fitted with a paddle attachment, beat the cream cheese and brown sugar together on medium-high speed in a large bowl until the mixture is smooth and creamy, about 3 minutes. Scrape down the sides and up the bottom of the bowl with a silicone spatula as needed. Add the sour cream and vanilla extract, and then beat until fully combined and very smooth. Scrape down the sides and up the bottom of the bowl with a silicone spatula as needed to combine—you don’t want any large lumps. Add the egg and beat on medium speed just until combined. If you still see some lumps at this point, switch to a whisk and whisk by hand just until you break up the large lumps. Some small lumps are OK.
- Assemble the layers: Spread the cheesecake filling into the crust. The crust can still be warm at this point. A small offset spatula makes spreading easy. Spoon apples in an even layer on top of the cheesecake filling. Drizzle salted caramel over the apples. Sprinkle cold streusel evenly on top.
- Lower the oven temperature to 325°F (163°C) and bake the pie for 45 minutes, or until the center is almost set (it will still be a bit wobbly in the center—that’s OK). To prevent burning the crust edges, tent the entire pie with aluminum foil or use a pie crust shield for the last 10–15 minutes of baking.
- Set the pie on a wire rack and cool for 1 hour at room temperature. Then place it in the refrigerator and chill for at least 2 hours and up to 2 days before serving. The pie will continue to set up as it cools and chills. (Cover if chilling it for longer than a few hours.) The topping softens the longer it sits.
- To serve, drizzle chilled pie with more salted caramel. Salted caramel solidifies as it cools, so warm it back up to drizzle it. For neat slices, use a clean sharp knife, and wipe the knife clean between each slice. Tip: The first slice is never pretty! Much easier to slice after that first piece is out.
- Cover and store leftover pie in the refrigerator or freezer for up to 5 days.
Notes
- Make Ahead & Freezing Instructions: This caramel apple cheesecake pie can be made up to 2 days in advance. Store covered in the refrigerator until ready to serve. It’s best if the crust is still a bit warm when you pour in the filling, so I don’t recommend pre-baking the crust in advance. You can freeze the baked, cooled, and chilled pie. Thaw overnight in the refrigerator before serving. Note that the streusel topping becomes very soft after freezing and thawing.
- Special Tools (affiliate links): Apple Peeler | Food Processor | Glass Mixing Bowls | Whisk | Pastry Cutter | 9-inch Pie Dish | Electric Mixer (Handheld or Stand) | Silicone Spatula | Small Offset Spatula | Cooling Rack
- Oats: Whole oats are best, but you can use quick oats if needed. The crumble topping will just be a little more powdery. Use a 1:1 swap from whole oats to quick oats. For an oat-less topping, try halving the crumble recipe used on this apple crumble pie.
- Apples: For depth of flavor, it’s best to bake with a mix of sweet and tart apples. I usually use 1 small Honeycrisp apple and 1 small Granny Smith apple.
- Salted Caramel: If you prefer regular caramel and not salted, reduce salt in the caramel recipe down to 1/2 teaspoon.
- Room Temperature Ingredients: Bring all cold ingredients to room temperature before beginning. Room temperature ingredients combine quickly and evenly, so you won’t risk over-mixing. Also, beating cold ingredients together will result in a chunky cheesecake filling, hardly the way you want to begin!
- Non-US Readers: If graham crackers are not available where you live, use 200g ground digestive biscuit crumbs (about 2 cups; 13–14 biscuits), 1/3 cup (67g) granulated sugar, and 6 Tablespoons (85g) melted butter. Pre-bake the crust for a bit longer, about 12–14 minutes. And from what I understand, spreadable cream cheese sold in a tub in countries outside of the US is a little different from the spreadable cream cheese in the US. It’s thicker, sturdier, and more solid and should be OK to make this pie. I have no experience with it, but this is what I’ve heard from other non-US readers. If you try it, let us know how it turns out!


Reader Comments and Reviews
Easy to follow recipe. Came out perfect!
Wanting to make this for a diabetic family member, what’s the opinion on substituting the sugar in the filling for something like splenda? Or maybe a 50:50 or 75:25 ratio?
I’m keeping the sugar as written for the crust and apples, and subbing for the streusel. But I’m not sure how a sugar substitute affects a cheesecake.
Hi RM! We’d love to help but we are not trained in baking with sugar substitutes. Let us know what you try!
I have made this several times now and my guests rave about it. I serve it with a bit of whipped cream and it’s so delicious! Thank you for a great recipe and clear instructions.
Hi Silvia, we would make two pies – better to have extra than not enough!
Thanks Sally, I’d rather have one large one. My large deep pie dish is 9″ diam at the bottom, sloping to 11″ at top, and it’s 2″ deep. I think 1.5 x the recipe will prob be fine. Will need to bake longer, since deeper, agree?
Yes!
Thanks! One more question, I want to use the pecan shortbread crust (from the pumpkin tart) that was suggested to another reader. In that recipe, you fully blind bake the crust before adding filling. Same applies with the cheesecake filling, correct? Thanks!
Hi Silvia! I would partially blind bake that crust, as instructed in that recipe.
I have made this before and loved it! But I was wondering if I can make this in a cast iron skillet? 10 inch
Hi Corinne, we wouldn’t recommend it. The pie slices would be difficult to get out of the skillet, and the 10-inch size is too large for this recipe.
I baked for the full 45 mins I also added 3 mins because some of the streussel flour still looked a little white? I did use quick oats do you think it’s okay?
Hi Kristin, should be fine! Whole oats are best, but you can use quick oats if needed. The crumble topping will just be a little more powdery.
Hi! Planning on making this today and was wondering whether I could use a ceramic pie dish instead of a glass pie plate? Would I have to adjust baking times?
Hi Saara, a ceramic pie dish will work, although bake time may be just a bit longer. Hope you enjoy the pie!
I followed the recipe to a T and it came out perfect, from the tips on graham cracker crust to the baking time. So delicious and everyone loved it. Another great recipe Sally!! ❤️
Delicious! Everyone in my family loved it.
Could I make the streusel separate, then add on top after freezing and thawing? That way it would keep the same texture maybe?
Hi Sydney, no, you’ll need the streusel to bake with the other components during step 8. See recipe Notes for make ahead options.
Hello! I’d like to ask, do the apples change texture after being frozen? I see the note about the crumble, but nothing on how the apples hold up. I’ll be making this a few days in advance for Thanksgiving and would like to know what to look out for. Thanks so much!
Hi Xander, they should be fine! We’ve never had an issue.
You want the middle to have a slight wobble!
How big of an area are you considering the middle to be? 2” from the edge? 3”? 4”? I know this isn’t an exact science, but I can seem to nail it.
I would say about the middle-most 4 inches of the cheesecake should have a wobble. So hard to give an exact answer!
How deep should the pie dish be? I have one that is 2.5” deep and one that is 1.7” deep.
Hi Laura! Anything about 2 inches deep is fine. The 1.7″ is what we mostly use for pies.
Hi! I’m a bit skeptical about the rolled oats. Can I leave them out or would you recommend substituting with something else?
Hi Becca! See recipe Note about using the crumble topping option.
Time consuming but SO SO worth it. I recommend doubling the apple though as it wasn’t very much.
I made this recipe but in a 9inch springform pan and it was a hit! I reduced the baking time from 45 minutes to 35 and it came out beautifully. My brother-in-law said it was so good it should replace apple pie at thanksgiving! The cheesecake itself is not too sweet and it was nice to be able to add more caramel to everyones liking. Another hit!
I use the 9” springform too – perfect every time.
I just finished assembling it and looks SO good!❤️
This recipe is delicious!! I made it a couple of times last year.
I have a larger Thanksgiving dinner this year, and I’m wondering if it can be doubled? Perhaps in a 9×13 dish?
Also, any tips for preventing the crust from sticking to the dish? I noticed the crust has gotten hard and difficult to scrape off.
Thank you!
Hi Selina, We haven’t tried it, but a few readers have doubled the recipe in a 9×13-inch pan with success, if you’d want to give it a try. We’re unsure of the bake time. Is the pie slightly overbaked by chance? When the crust crumbles or gets stuck, it’s usually over baked. You could try reducing the crust pre-bake by just a minute or two. Hope this helps for next time!
I made this for a pie contest and won second place! People freaked out about it and I can’t wait to make it again!
I always use Sally’s recipes for desserts and they have never disappointed in the least!
I’m a HUGE fan!!!!
Can I make this with store-bought Dulce de Leche instead of making the caramel? Is that recommended? I just really love dulce de leche with apples. Can’t wait to try this recipe out this weekend!
Hi Mary Grace, that should work just fine here. Let us know how it turns out for you!
Hey! Could I make these into mini pies? If so, how would I go about that in terms of baking degree and time? I see there is already a comment for muffin tin, but I have mini pie tins!
Hi Nellie, you can certainly use this recipe to make mini pies. Same baking temperature, but time will vary depending on the size of your mini pie pans. Hope you enjoy it!
I made this cheesecake and it was a hit! However, I felt that the cheesecake layer was a bit thin. Can you advise on how I much i can increase the cheesecake portion on ingredients to make that layer a little thicker? As well as any increase baking time? The flavors were on point though!
Hi, Do you think I can substitute the shortbread crust from the caramel apple pie bars for the graham cracker crust? No stores near me have organic graham crackers.
Hi Bonvivant, I’m not sure we would recommend shortbread crust with a cheesecake filling. It will taste quite soft together. IF you want to try it, this is a favorite shortbread style crust for tarts/pies. I have personally made this caramel apple cheesecake pie with the pecan crust from our Spiced Pumpkin Tart and loved that combination. Let us know what you try!
American living in Sweden. I used the spreadable Philadelphia cream cheese and it turned out very well. By far one of my family’s favorite recipes I’ve served and every single one asked for the recipe.
This recipe is incredible. So much fun to make and DELICIOUS!!!
Can this be turned into cheesecake bars? Could I double to make bars in a 9×13 pan?
Hi Melissa! This shouldn’t be a problem in a 9×9 pan. Probably the same bake time, too. Or you may enjoy our salted caramel apple pie bars!