

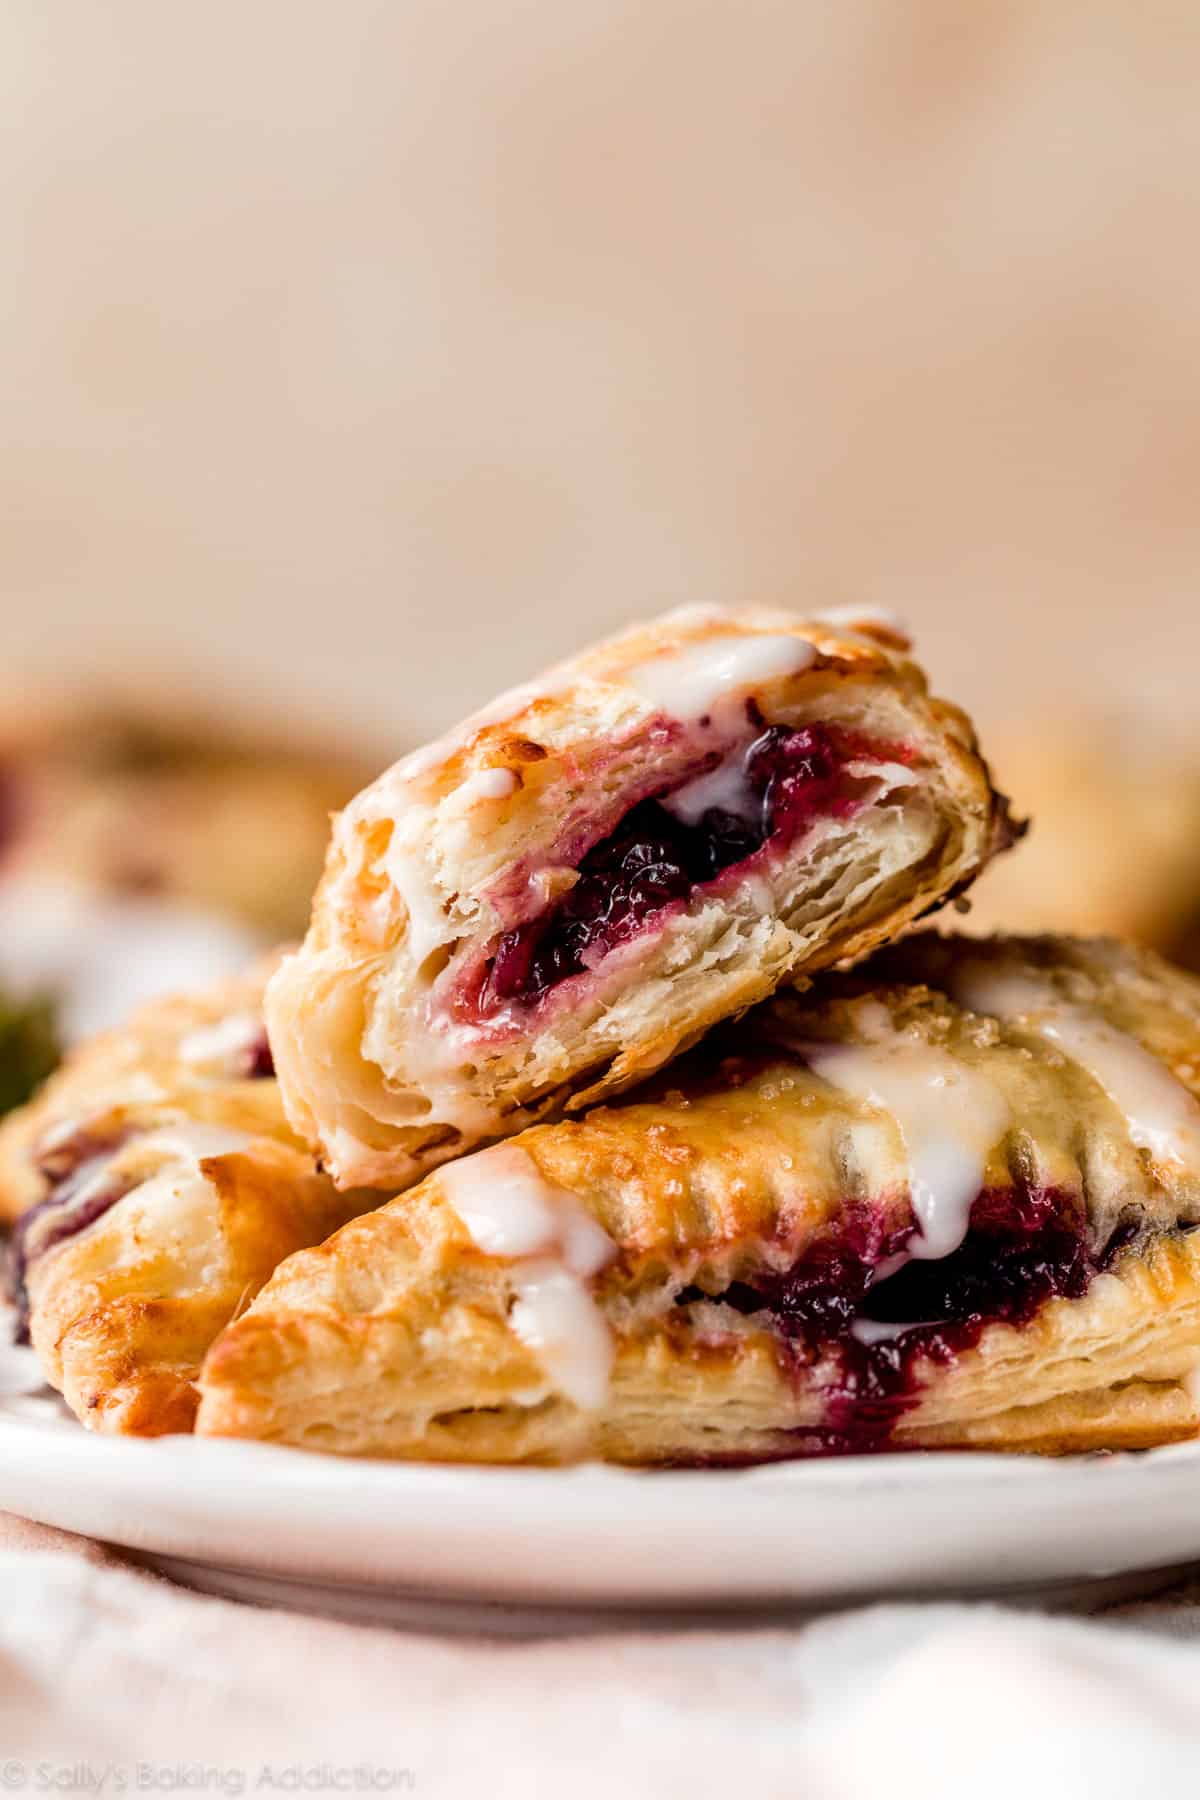
Use this in-depth tutorial to learn how to make homemade berry turnovers with a from-scratch puff pastry variation and a jammy mixed berry filling. The pastry dough comes together using a “rough puff” method where you carefully work butter into your dry ingredients and then fold and flatten the dough many times to create countless flaky layers. Unlike the breakfast pastries dough, this dough does not require any yeast and unlike croissants and traditional puff pastry, this dough does not require laminating with a separate layer of butter. Rather, the layers and crisp flakiness come from the particular mixing and folding methods. The turnovers are lightly sweetened and perfect for dessert or alongside a cup of coffee.
Step-by-step photos are below the written recipe.

Using this simplified method and a handful of basic ingredients, you’ll be amazed that you can make puff pastry from scratch within just a few hours. I’m still stunned with this outcome! And after you master these flaky berry turnovers, you’ll enjoy using this dough wherever you use a single pie crust or store-bought puff pastry.
One reader, Sammie, commented: “Wow. So good! This was my second time making rough puff. My first was with your palmier recipe, and it has come out amazing both times. These are so flaky, and you can see all the scrumptious layers. I may have just eaten three right out of the oven. Oops. ★★★★★”
Another reader, Aditi, commented: “I haven’t had much success with rough puff pastry before, but the step-by-step photos and video made it so helpful! I loved this recipe! The filling was also very delicious! ★★★★★”
Berry Turnovers Details
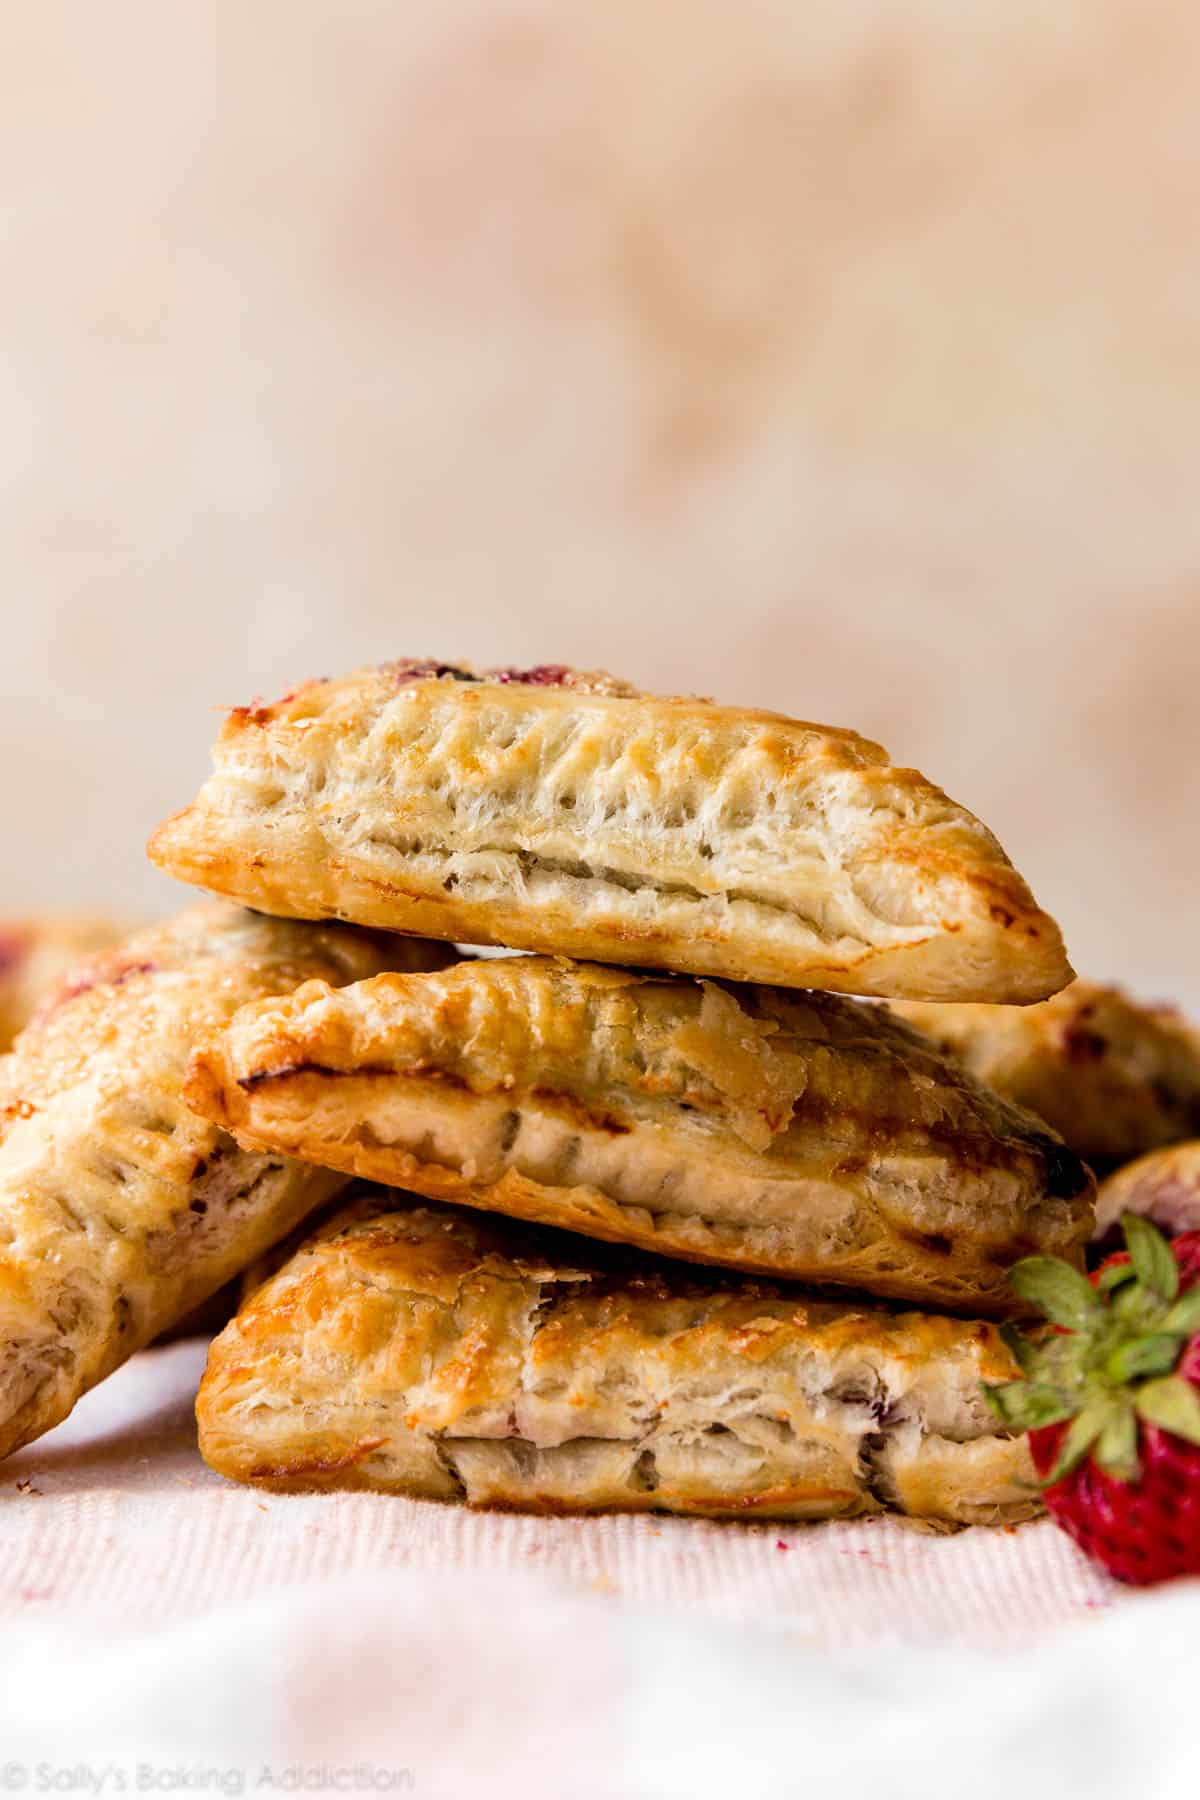
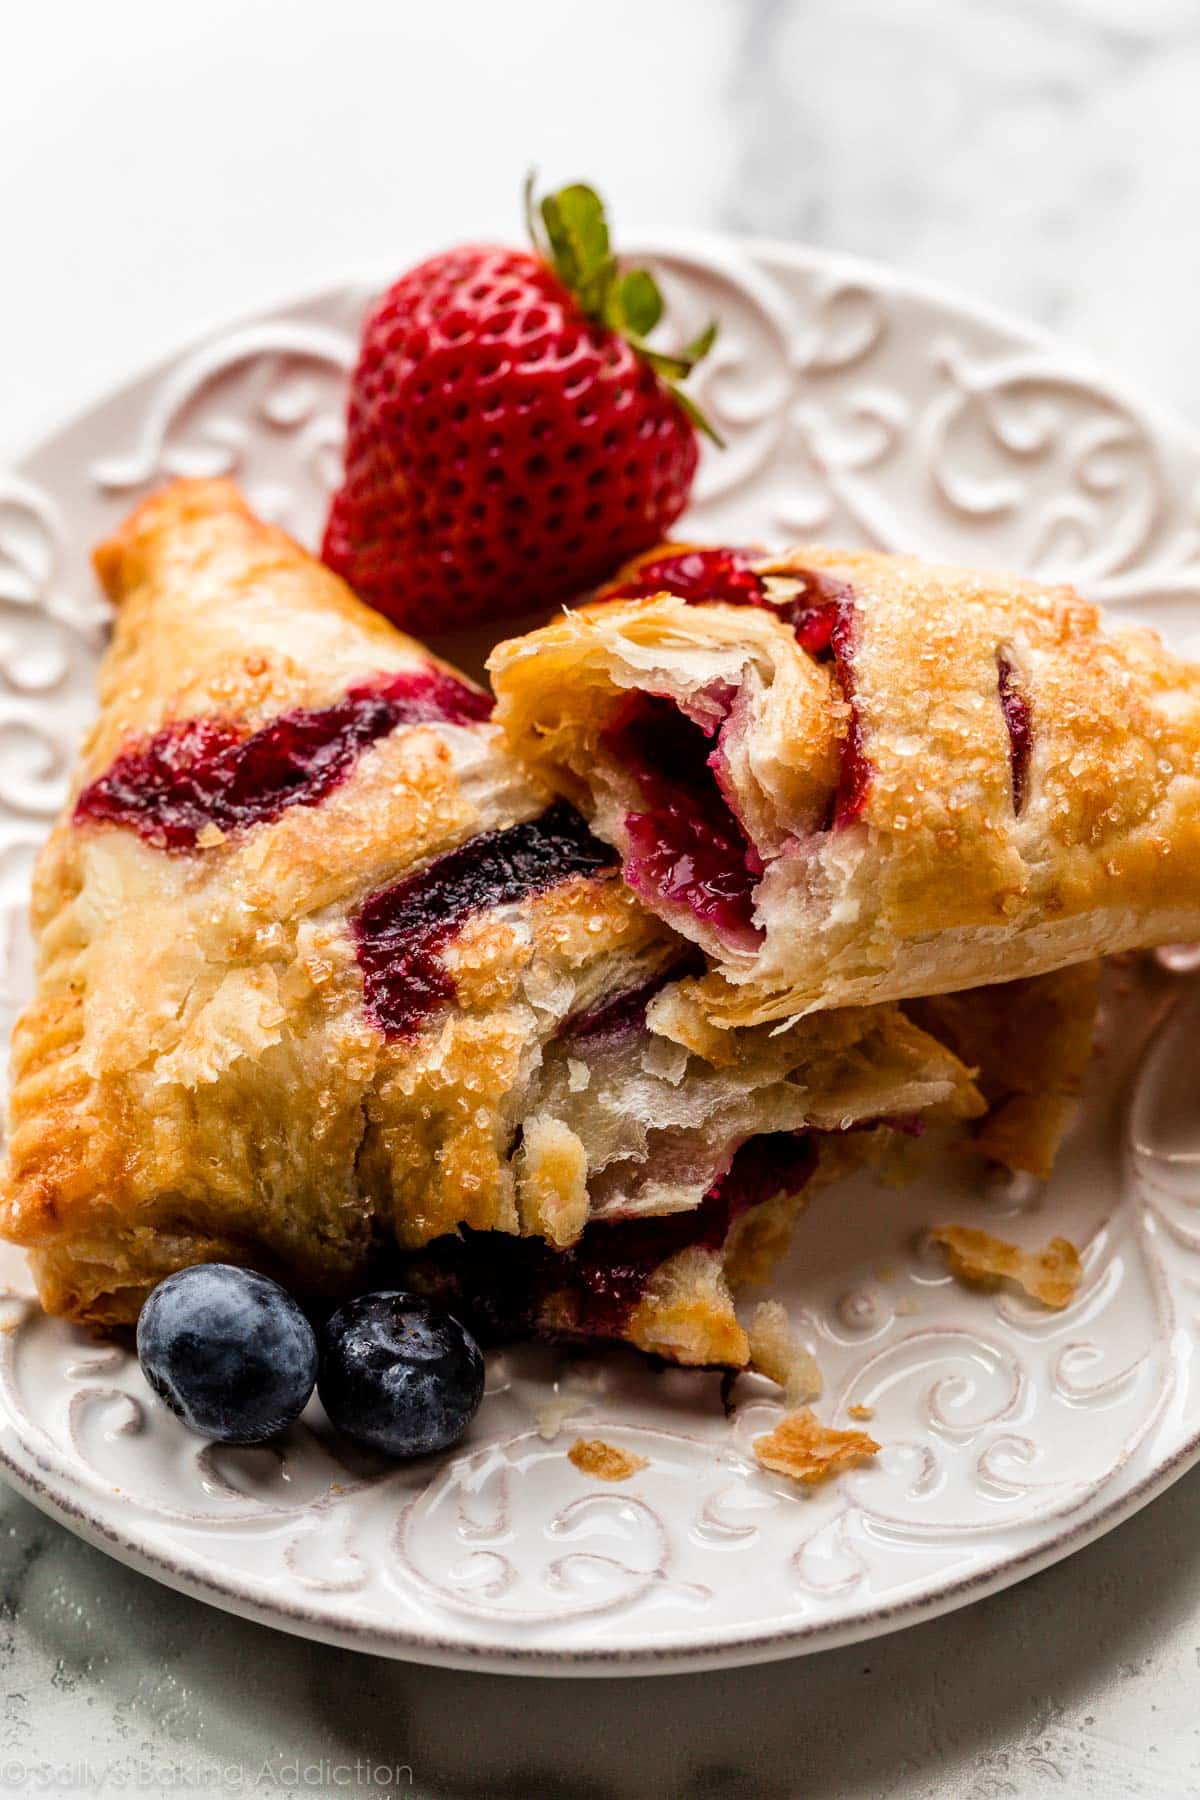
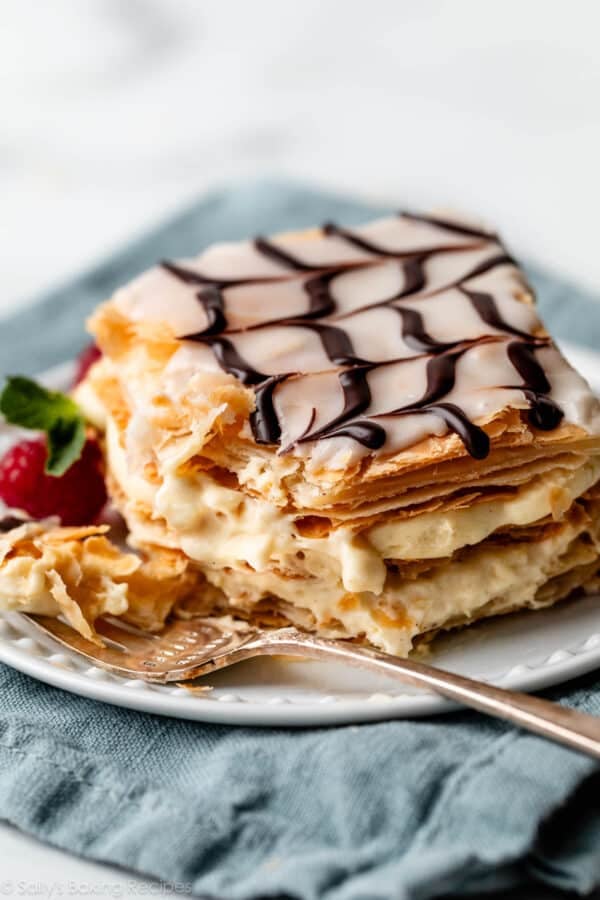
- Flavor: These berry turnovers are like mixed berry hand pies, but with a crispy, airy, and buttery dough. I would actually compare these more to store-bought Toaster Strudels but 100x better because they’re flakier, crispier, homemade, and not nearly as sweet. Great for breakfast or dessert! Vanilla icing is optional, but it’s a wonderful finishing touch, especially since these aren’t overly sweet in the first place. Each bite is mostly flaky dough with just a touch of berry filling. (Don’t want to over-fill those turnovers!)
- Texture: You know when you bite into golden brown baked puff pastry and you actually hear that loud CRISP? The layers crackle, pop, and quite frankly, make a big old mess on your fingers and plate? That’s exactly what you’ll experience with these homemade berry turnovers. This pastry is one of the FLAKIEST doughs I’ve ever worked with and comes close to croissant bread territory. (But made in a fraction of the time!) Pair this buttery pastry with a jammy berry filling and you’ll have a professional bakery-style treat made in the comfort of your home.
- Ease: I categorize this as an intermediate baking recipe. You need to flatten and fold the dough 6x, but there’s no chilling between each time so the recipe moves quicker than traditional homemade puff pastry.
- Time: The berry filling comes together in minutes over the stove, but the puff pastry will take you a few hours since there’s about 2-3 hours of chill time required. By this time the berry filling will have cooled down and you’ll be all set to shape, fill, and bake those irresistible turnovers. Set aside an afternoon for this fun baking project!
What is Rough Puff Pastry?
Have you ever heard of “rough puff” pastry? It’s become a really popular method with professionals and home bakers because it produces bakery-style puff pastry with oodles of buttery, flaky layers. Cookbook author and chef Claire Saffitz has a wonderful recipe for it and the term “rough puff” is often used on The Great British Bake Off! The trick is to work large pieces of cold butter into dry ingredients (flour and often a bit of sugar and salt), and hydrate it all with ice cold water. Sometimes bakers grate butter into the mix or use a food processor. There’s lots of ways to make rough puff pastry.
With this recipe, I stick with cold cubes of butter and use my hands to rub the butter into the flour mixture. Your hands are your best tool and method here because it’s nearly impossible to over-mix the dough this way. If the dough is over-mixed and you break down the butter too much, you’ll lose layers.
- Can I use a food processor, pastry cutter, or other mixer? I do not recommend it. These tools slice down the butter too much and you’ll lose a lot of flaky layers. I tried and it’s not worth it because the result is closer to a greasy pie dough than a layered puff pastry. (Still good, but not the goal here.)
How Is This Different From Pie Crust and Yeasted Pastry Dough?
Pie crust, while buttery and flaky, is not nearly as light, doughy, and crisp as this shortcut puff pastry. Yeasted pastry dough, such as something we can use for croissants or a blueberry cream cheese pastry braid, contain yeast. This recipe simply relies on big chunks of cold butter (lots of it) and folding.
Rolling & Folding the Dough
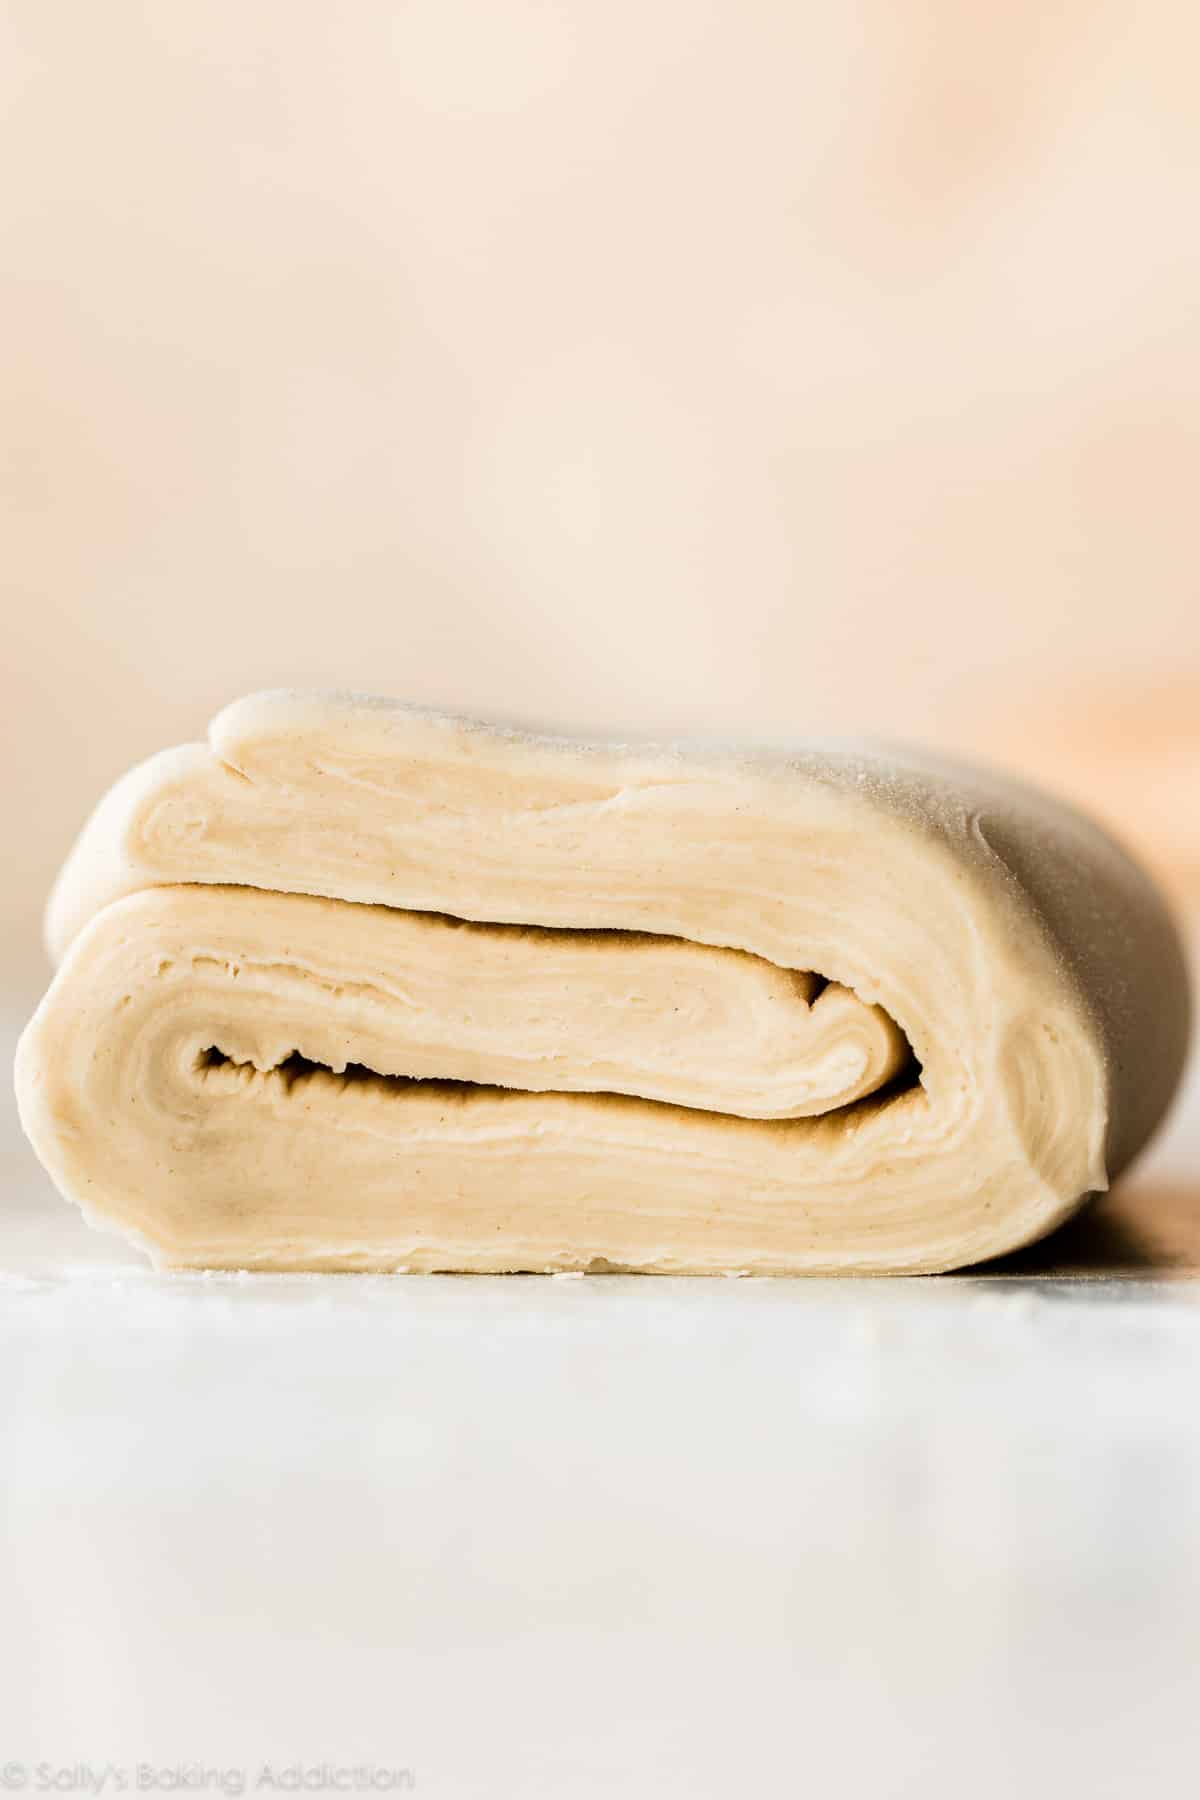
After you prepare the dough and chill it in the refrigerator, you will begin rolling it out with a rolling pin and folding it like a business letter, rolling it out again, folding again, and so on. You will roll + fold it a total of 6 times.
The photo below shows what the center of your dough looks like after all the rolling and folding. *Note that I sliced a sliver off the end so I could show you this!
Just 5 Ingredients in the Dough
This shortcut pastry dough comes together with flour, sugar, salt, cold butter, and cold water.
- Why do the butter and water have to be cold? It’s important for the butter to stay cold so it doesn’t melt and soak up all the flour. We want the butter to stay solidified as we roll, shape, fold, and flatten this dough because if it melts before baking, you lose all the flakes. Game over. You see, when the butter melts in the oven, it creates steam and that steam separates the dough into multiple flaky layers. Warm fat will lend a much denser, flatter turnover.
The dough requires 2 separate refrigeration steps, but the 2nd one is only 15 minutes. You can easily make this dough in a few hours or over the course of 2 days. I always appreciate make-ahead dough where you have plenty of options in terms of timing. You can also freeze the dough, too. (See recipe below.) After both refrigeration steps, you can use this dough in many recipes such as these turnovers, butternut squash tart, cranberry brie puff pastry tarts, mushroom tarts, or even these homemade cinnamon palmiers.
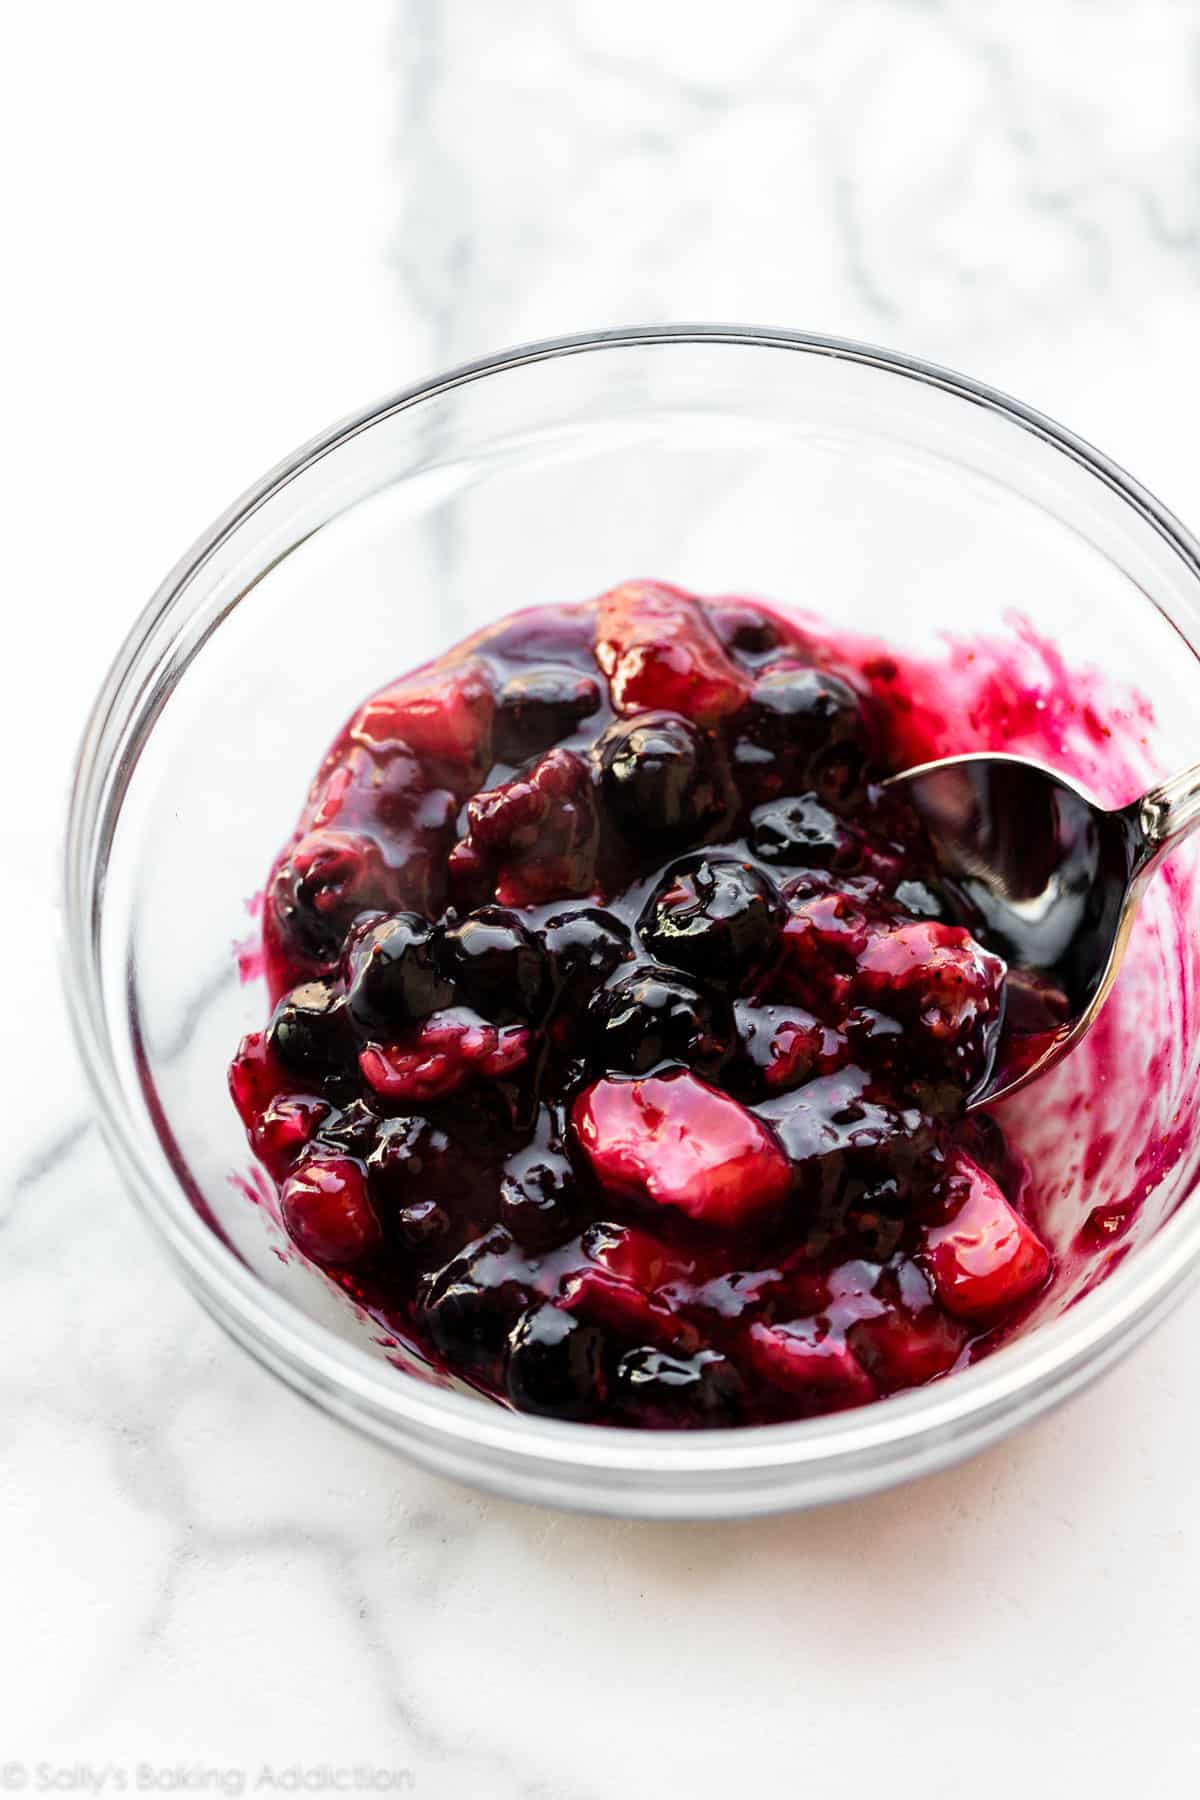
Homemade Berry Turnovers Filling
This thickened berry filling is adapted from these strawberry sauce and blueberry sauce recipes. I reduced it down so we have just enough for the turnover recipe below. It’s sweet like jam with big chunks of delicious berries. Feel free to use frozen berries, too. You could also use the filling from these apple turnovers and top them with salted caramel for an extra special treat.
Tip: Make sure it cools completely before using as the filling in your turnovers. My recipe below works this into the instructions.
See Your Turnovers!
Many readers tried this recipe as part of a baking challenge! Feel free to email or share your recipe photos with us on social media. 🙂
Lots of photos below the recipe!
Print
Homemade Berry Turnovers
- Prep Time: 3 hours, 30 minutes
- Cook Time: 25 minutes
- Total Time: 4 hours
- Yield: 9 turnovers
- Category: Pastries
- Method: Baking
- Cuisine: American
Description
These homemade berry turnovers use a shortcut version of traditional puff pastry dough that’s often referred to as rough puff pastry. Each bite is mostly flaky dough with just a touch of berry filling. Make sure the butter is very cold before beginning the dough.
Ingredients
Berry Filling
- 1 teaspoon cornstarch
- 1 teaspoon warm water
- 1 cup (about 150g) mixed berries (I use 1/2 cup blueberries, 1/4 cup halved blackberries, 1/4 cup chopped strawberries)
- 1 and 1/2 Tablespoons (18g) granulated sugar
- 1 teaspoon lemon juice
Dough
- 1 and 1/3 cups (166g) all-purpose flour (spooned & leveled), plus more for generously flouring hands, surface, and dough
- 1 teaspoon granulated sugar
- 1/2 teaspoon salt
- 3/4 cup (12 Tbsp; 170g) unsalted butter, very cold and cubed
- 6–8 Tablespoons (90-120ml) ice cold water
Egg Wash + Topping
- 1 large egg*
- 2 Tablespoons (30ml) milk
- optional: coarse sugar for topping
- optional: vanilla icing
Instructions
- Make the filling first so it has time to cool: Whisk the cornstarch and water together until all the cornstarch has dissolved. (I just use a fork to mix–very easy.) Place the berries, sugar, cornstarch mixture, and lemon juice into a small saucepan over medium heat. Using a wooden spoon or rubber spatula, stir the mixture as it cooks. Break up some of the berries as you stir. Bring it to a simmer and allow to simmer for 3 minutes, stirring constantly. Remove pan from the heat and cool completely. The mixture will thicken as it cools. Once cool, filling can be covered and refrigerated for up to 5 days before using. Makes 3/4 cup of filling.
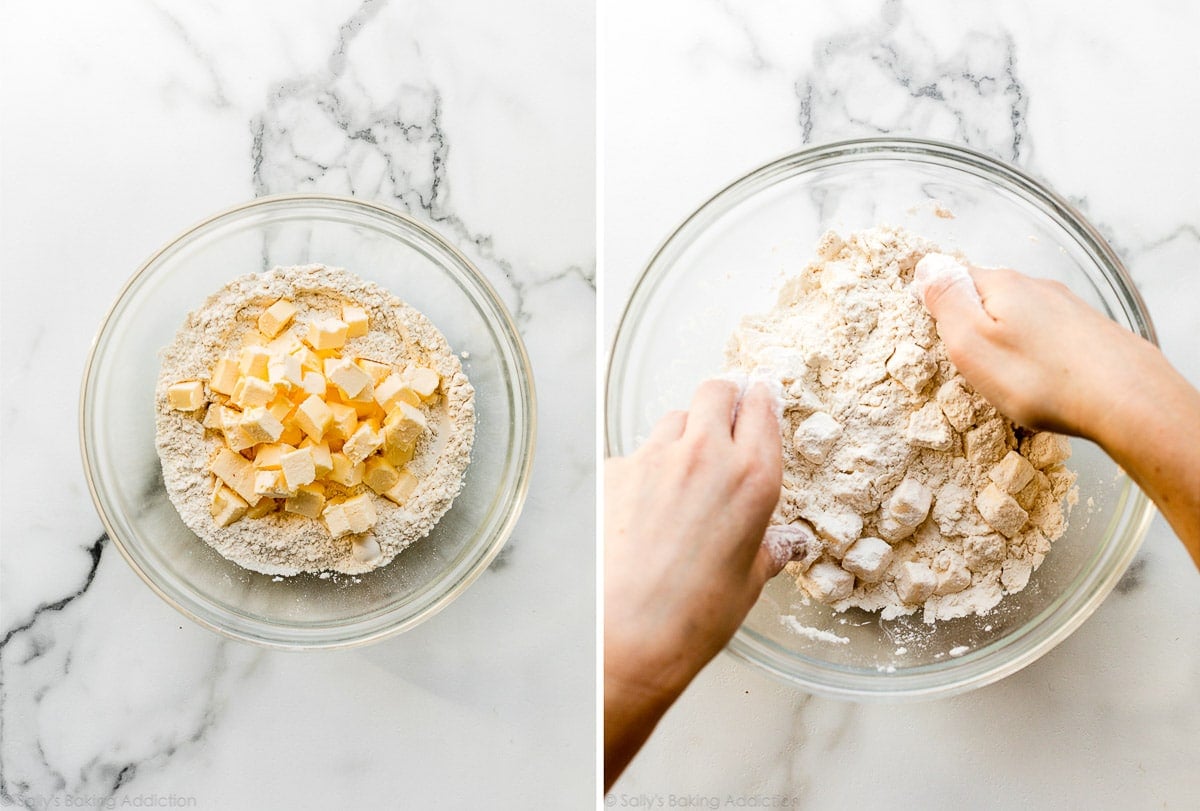
- Make the dough: Whisk the flour, sugar, and salt together in a large bowl. Place the cold and cubed butter on top. Gently toss the flour and butter together with your hands, and then briefly rub the butter into the flour to begin combining them, as you can see in the video tutorial below. You do not want to break down the butter too much in this step. This step is only possible if the butter is very cold because if the butter is warm, you’ll end up with paste. I do not recommend a food processor, pastry cutter, or mixer for this step because it will break down the butter too much.
- At this point, the butter is still in large cubes/chunks. Begin adding the ice cold water 1 Tablespoon (15ml) at a time until dough forms 1 large shaggy clump in your bowl. Use your hands to toss the mixture together after you add each Tablespoon. (I usually start with 2 Tablespoons (30ml) of water before I begin tossing together.) You can use a spatula or spoon for tossing, but I really do recommend your hands so you get a good feel of the dough. As the dough begins to hydrate after about 4 Tablespoons (60ml) of water, you can start lightly squeezing or clumping the dough together with your hands to help bring it together. Mixture will still be very shaggy, as you can see in the video and photos below. If your dough feels sticky and wet before adding 6 Tablespoons of water, your butter was likely too warm—you can continue with the recipe, but the dough will not be as flaky.
- Pour the shaggy clump of dough out onto a lightly floured work surface. There will still be large chunks of butter at this point and that’s a good thing. Begin patting the dough down with lightly floured hands until it’s 3/4 – 1 inch thick, about a 5×8 inch rectangle. Fold the dough into thirds as if you were folding a business letter. Use your hands to gently flatten and smooth out any cracks in your dough. Wrap it up tightly in plastic wrap, parchment paper, or aluminum foil, or place into any tightly sealed container.
- 1st refrigeration: Refrigerate dough for at least 2 hours and up to 24 hours.
- Roll & Fold: Take the dough out of the refrigerator to begin the “rolling and folding” process. If the dough chilled for longer than about 3 hours, it’s likely very stiff so let it rest for about 5 minutes before you begin rolling. Lightly flour a work surface. The dough gets sticky, so make sure you have more flour nearby as you roll and fold. Use your hands to gently flatten the dough into a small square. Using a rolling pin, roll the dough into a 6 inch wide and 12 inch tall rectangle that’s 1/2 inch thick. The exact dimensions are not important, but the thickness is. As you roll, it’s best to flip the dough over once or twice to make sure it’s not sticking to your work surface. Lightly flour your work surface as needed. Fold the rectangle into thirds as if it were a business letter. (See photos and video tutorial.) Turn it clockwise or counter clockwise and roll it out into a 6×12 inch 1/2 inch thick rectangle again. Then, fold into thirds again. Turn it clockwise or counter clockwise. You’ll repeat rolling and folding 4 more times for a total of 6 times.
- 2nd Refrigeration: Wrap up/seal tightly and refrigerate for at least 15 minutes and up to 24 hours. You can also freeze the dough at this point. See freezing instructions.
- Line two large baking sheets with parchment paper or silicone baking mats. Rimmed baking sheets are best because butter may leak from the dough as it bakes. If you don’t have rimmed baking sheets, when it’s time to preheat the oven, place another baking sheet on the oven rack below to catch any butter that may drip.
- Take the dough out of the refrigerator to begin the shaping steps. Lightly flour a work surface. Using a rolling pin, roll dough into a 12-inch square. Using a pizza cutter or sharp knife, cut into 9 4-inch squares. Transfer squares to prepared baking sheets. (4 on one, 5 on the other.)
- Spoon 1 heaping Tablespoon of filling into the center of each square. Fold one corner over the filling to make a triangle. If some chunky filling has seeped out, use a fork to push it back in if you can. Using a fork, crimp the edges of the turnovers together to seal. If the dough has become too warm and sticky to crimp, refrigerate the triangles for 10 minutes. You want to make sure you have a tightly sealed turnover to help prevent filling from spilling out in the oven.
- Chill the shaped turnovers in the refrigerator, covered or uncovered, for at least 15 minutes and up to 1 hour (or freeze, see freezing instructions below). You can preheat the oven and make the egg wash (next steps) as they finish up chilling.
- Preheat oven to 400°F (204°C).
- Egg Wash: Whisk the egg and milk together. Brush on each turnover. Cut 3 slits into the tops of each to allow steam to escape. If desired, sprinkle with coarse sugar.
- Bake for 22-25 minutes or until golden brown on top and around the edges. Some butter may leak from the dough, that’s completely normal and expected. Feel free to remove the baking sheets from the oven halfway through baking and brush the dough with any of the leaking butter, then place back in the oven to finish baking. (That’s what I do!)
- Remove baked turnovers from the oven. Cool for at least 5 minutes before icing/serving. Centers will be hot.
- Drizzle with vanilla icing if desired.
- Cover leftover iced or un-iced turnovers and store at room temperature for 1 day or in the refrigerator for up to 5 days. Or you can freeze them for up to 3 months. Thaw before serving. Before enjoying, feel free to reheat leftover iced or un-iced turnovers in the microwave for a few seconds until warmed.
Notes
- Make Ahead & Freezing Instructions: You can make the filling up to 5 days ahead of time. See the end of step 1. For the dough, prepare as instructed in steps 2-4. At this point the dough can be refrigerated up to 24 hours. You can also prepare the dough through step 6. At this point the dough can be refrigerated for up to another 24 hours. During or after this second chilling time, you could also freeze the dough for up to 1 month. (I don’t recommend freezing the dough before the rolling and folding step.) Thaw overnight in the refrigerator, then continue with step 8. In step 11, you can cover and freeze the shaped turnovers for up to 1 month. Thaw in the refrigerator, then continue with step 12.
- Special Tools (affiliate links): Glass Mixing Bowls | Whisk | Small Saucepan | Rolling Pin | Baking Sheets | Silicone Baking Mats or Parchment Paper | Pizza Cutter or Sharp Knife | Pastry Brush
- Mixed Berry Filling: The ratios I list above are what I find work best, but feel free to substitute in raspberries. You can use all blueberries, all halved blackberries, or all chopped strawberries instead. Raspberries are very fragile and juicy, so I don’t recommend using all raspberries for this filling. You can use frozen berries (don’t thaw) with no changes to the recipe.
- Double Batch: The filling and dough recipe can easily be doubled. In step 4, make sure you’re patting the dough to be about 3/4 – 1 inch thick. In step 6, roll out to 1/2 inch thick. The dimensions in both of these steps doesn’t matter much, but the thickness does. In step 9, divide dough in half before rolling out into 2 separate 12-inch squares. Continue with the recipe as written.
- Other Uses For This Dough: After the dough has chilled in step 7, it’s ready to shape however you want. This recipe makes around 1 pound of dough, which is enough for one 9-inch tart or pie. If your pie or tart recipe requires par-baking with pie weights, I still recommend using them with this dough. I would follow all of the same instructions in your recipe, just switching out the dough to this. After step 7, roll it out to a 12 inch circle and use it as the topping for this skillet pot pie. Or after step 7, roll it out to a 12 inch circle and use it as the bottom crust for quiche—par-bake and dock the crust with a fork as instructed in the quiche recipe. Or after step 7, roll it out to a 10×14 inch rectangle and follow the recipe for honey pear tart.
- Chilling shaped turnovers: Chilling the shaped turnovers in the refrigerator before baking them helps them maintain their shape in the oven. Remember, cold pastry dough is best. I usually refrigerate them for 15 minutes as the oven preheats. If you’re nervous to chill the baking sheets in the refrigerator then bake them (which can cause warping), you have two other options. You can simply assemble the turnovers on parchment paper or silicone baking mats, lift the parchment/baking mat as a whole and place on another baking sheet or directly onto a shelf in the refrigerator. After chilling, carefully lift up and place the entire parchment/baking mat onto the baking sheets for baking. Or you can use a thin spatula and very carefully transfer the assembled unbaked pastries to a large plate to chill.
- Egg Wash: An egg wash promises that golden sheen on your pastries. You can skip the egg and use a total of 3 Tablespoons (45ml) milk (any kind, dairy or nondairy) instead.
Detailed Explanations & Step-by-Step Photos
The following photos show the bowl of dry ingredients with the cold and cubed butter on top. In the right photo, you can see me gently tossing the flour and butter together. In this step, I’m briefly/barely rubbing the butter into the flour to start combining them. This step is only possible if the butter is very cold because if the butter is warm, you’ll end up with paste.
At this point, as you can see in the photo on the left below, the butter is still in large cubes/chunks. That’s great! Now let’s add the ice cold water 1 Tablespoon at a time, using our hands to toss it all together. (Note that I usually start with 2 Tablespoons of water before I begin tossing together.) You can use a spatula or spoon for tossing, but I really do recommend your hands so you get a good feel of the dough.
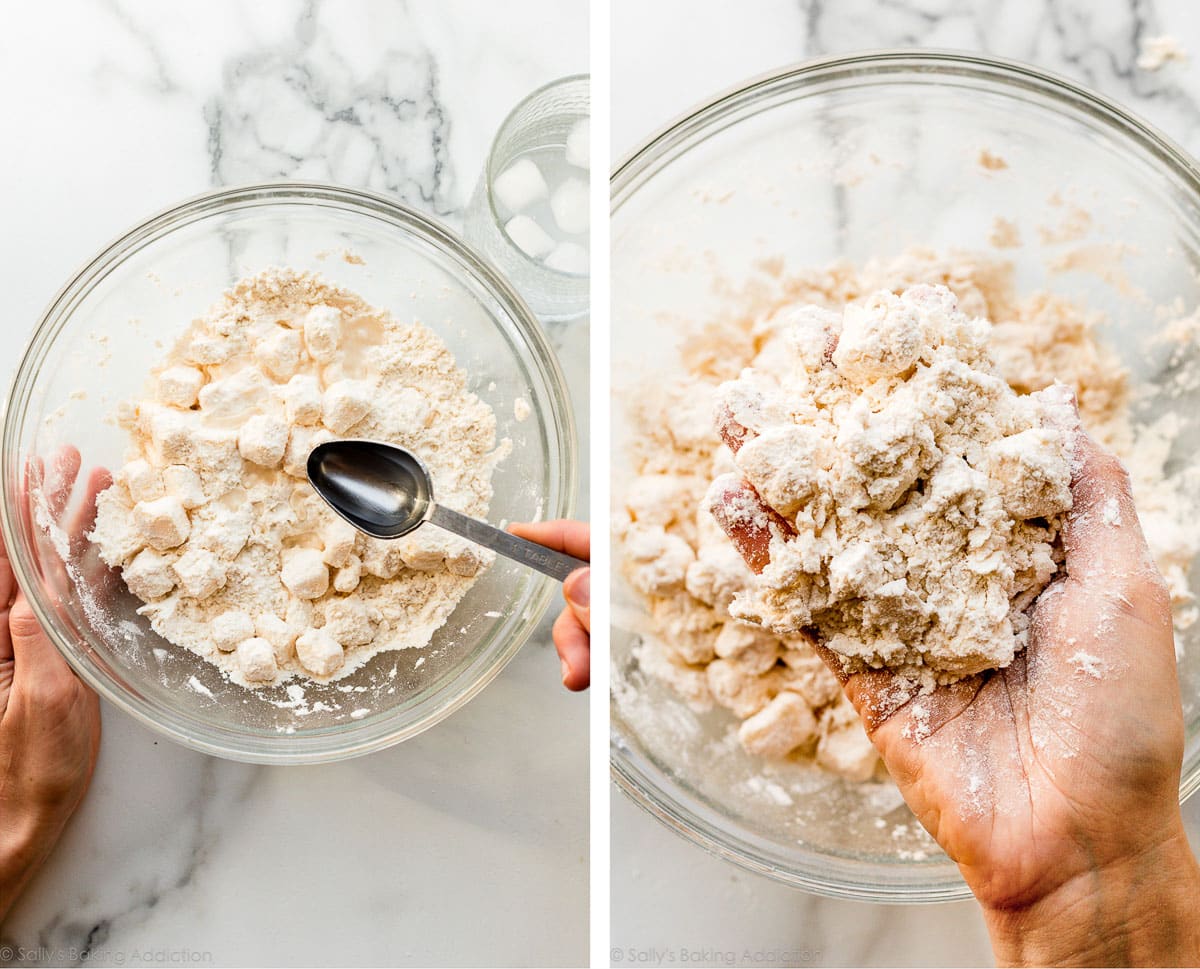
Photo below left: Continue adding the ice cold water and tossing the mixture together after each has been added. As the dough begins to hydrate after about 4 Tablespoons of water, you can start lightly squeezing or clumping the dough together with your hands to help bring it together. Mixture will still be very shaggy, as you can see.
See the photo below on the right? You only need 6-8 Tablespoons of ice cold water to get to this point. Do not add any more or any less. If your dough reaches this point before adding 6 Tablespoons of water, your butter was likely too warm. You can continue with the recipe with less water, but the dough will not be as flaky.
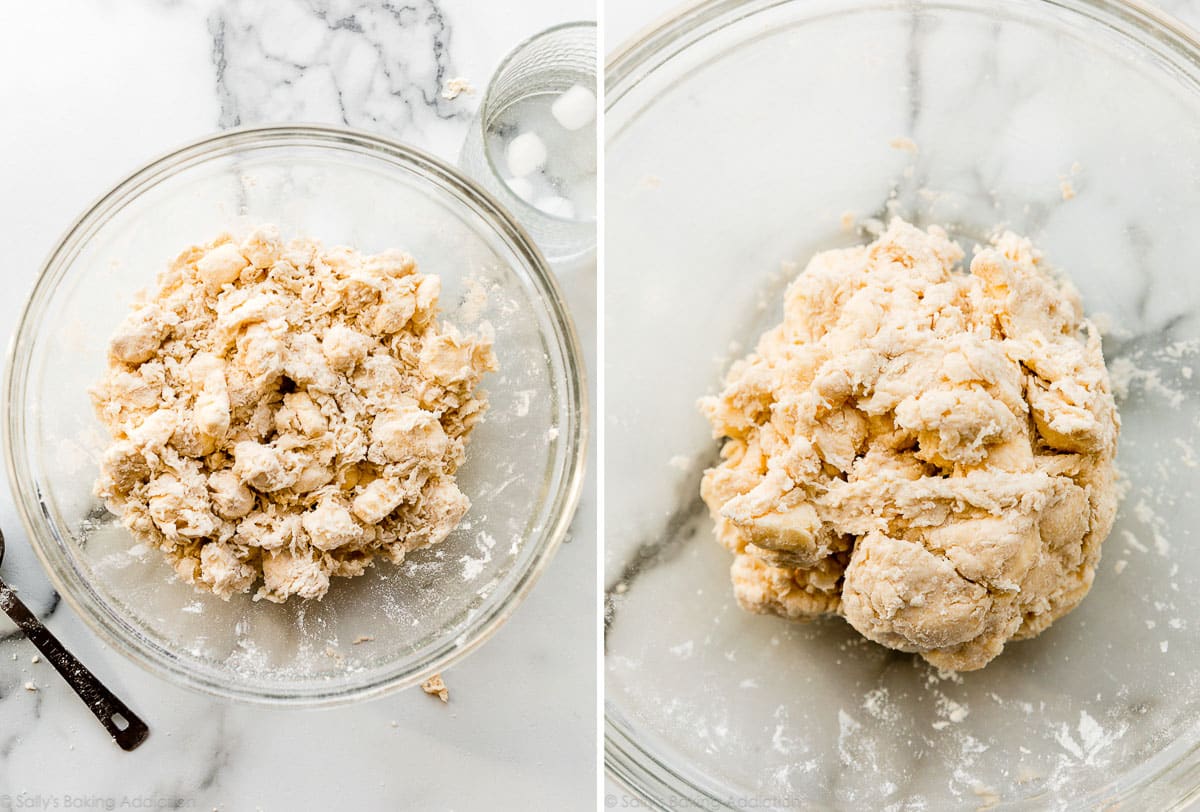
Pour the shaggy clump of dough out onto a lightly floured work surface, as you can see in the photo on the left below. There will still be large chunks of butter. That’s great! Begin patting it down with your hands until it’s about 3/4 – 1 inch thick, about a 5×8 inch rectangle:

As shown in the photos below, fold the dough into thirds as if you were folding a business letter. This is exactly how we fold biscuits dough, too!
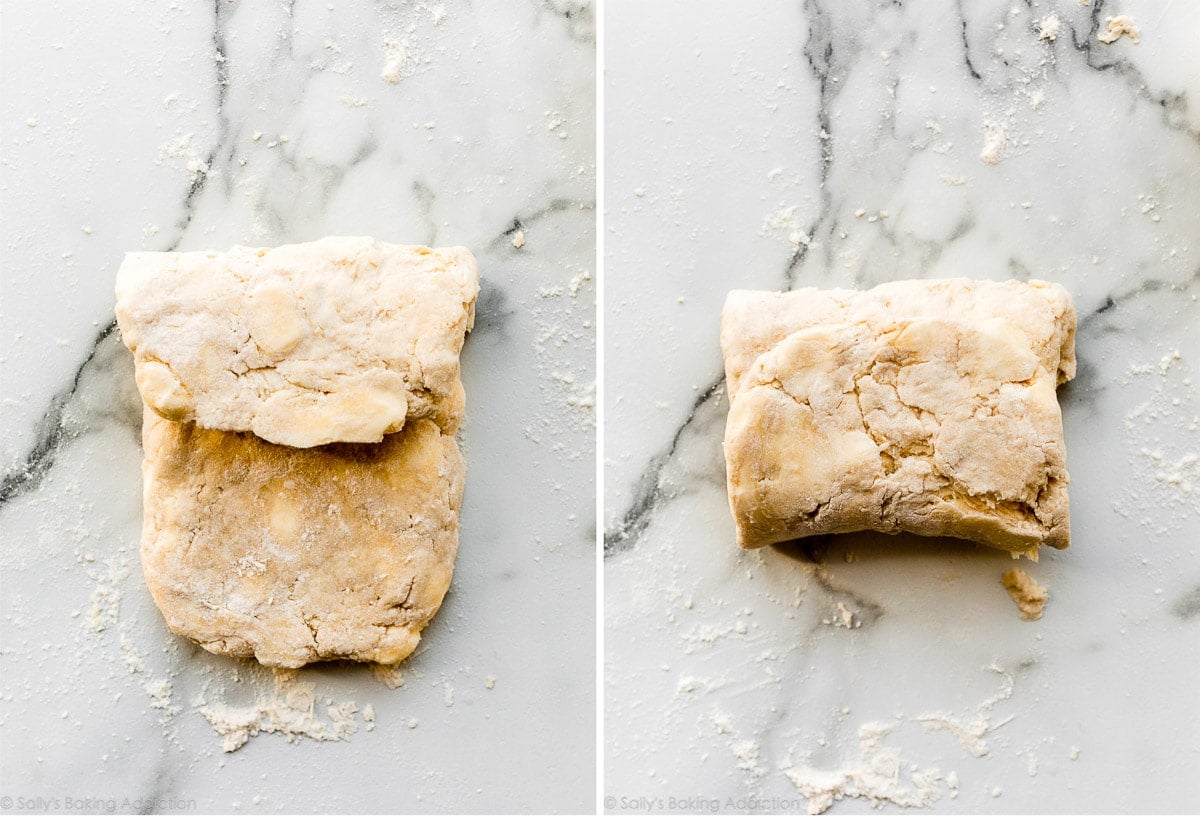
1st refrigeration: Now use your hands to gently flatten and smooth out any cracks in your dough “business letter” then wrap it in plastic wrap, aluminum foil, parchment paper, or place in a sealed container, and refrigerate for at least 2 hours and up to 24 hours.
Now it’s time for the rolling pin. Remove dough from the refrigerator and begin rolling out.
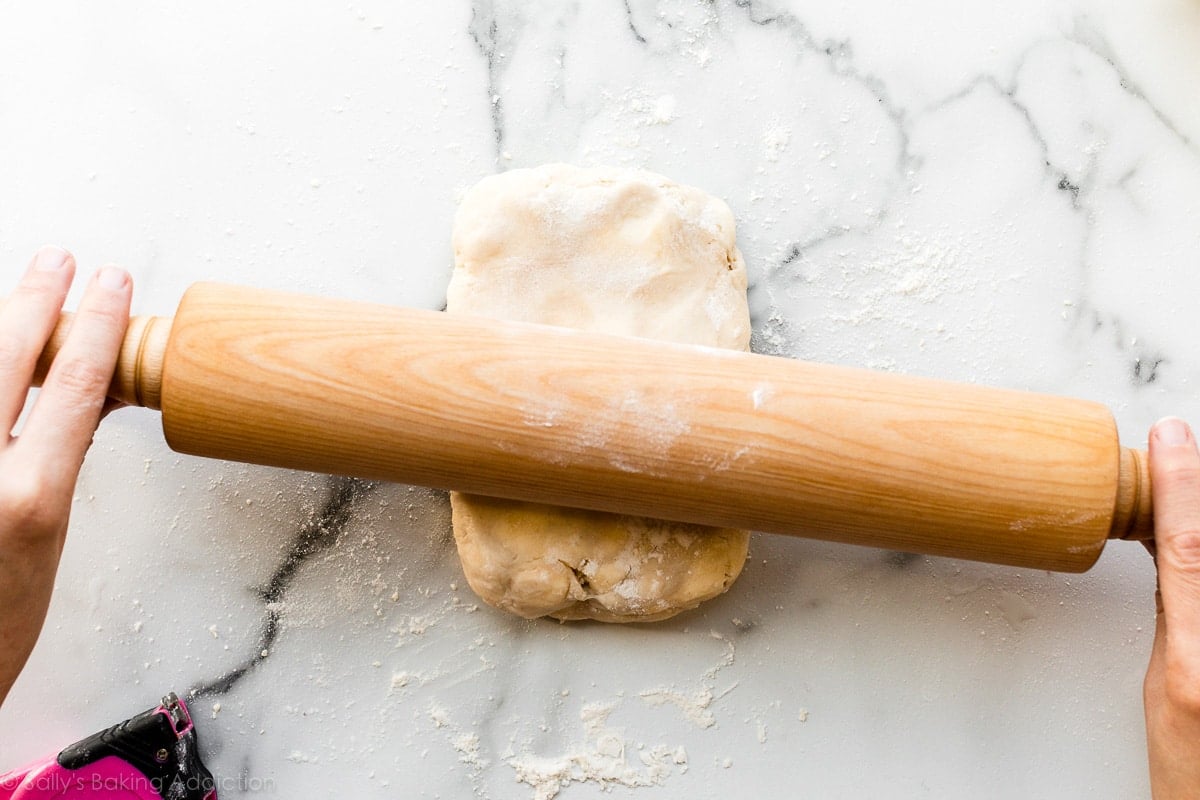
You’re going for a 1/2 inch thick, about a 6 inch wide and 12 inch tall rectangle. The exact dimensions are not important, but the thickness is. Fold the rectangle into thirds like a business letter:
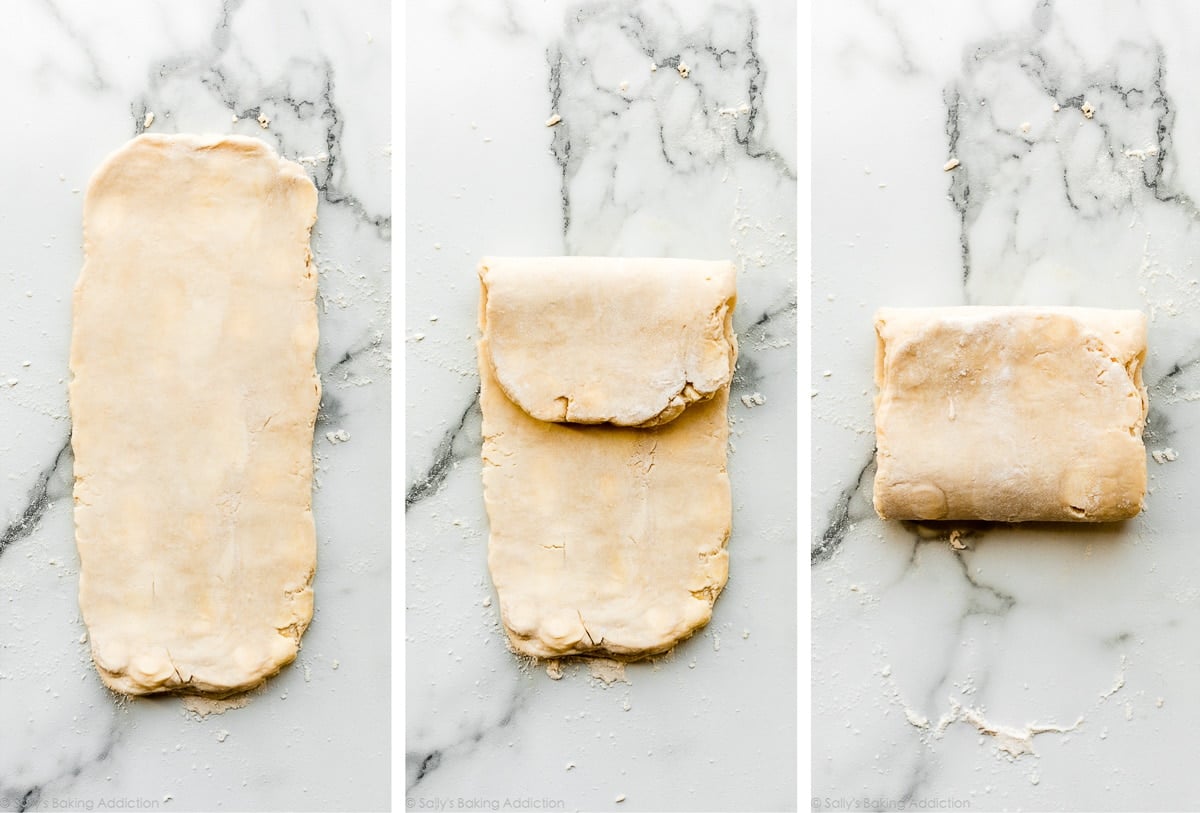
Turn it clockwise or counter clockwise, then grab your rolling pin again:
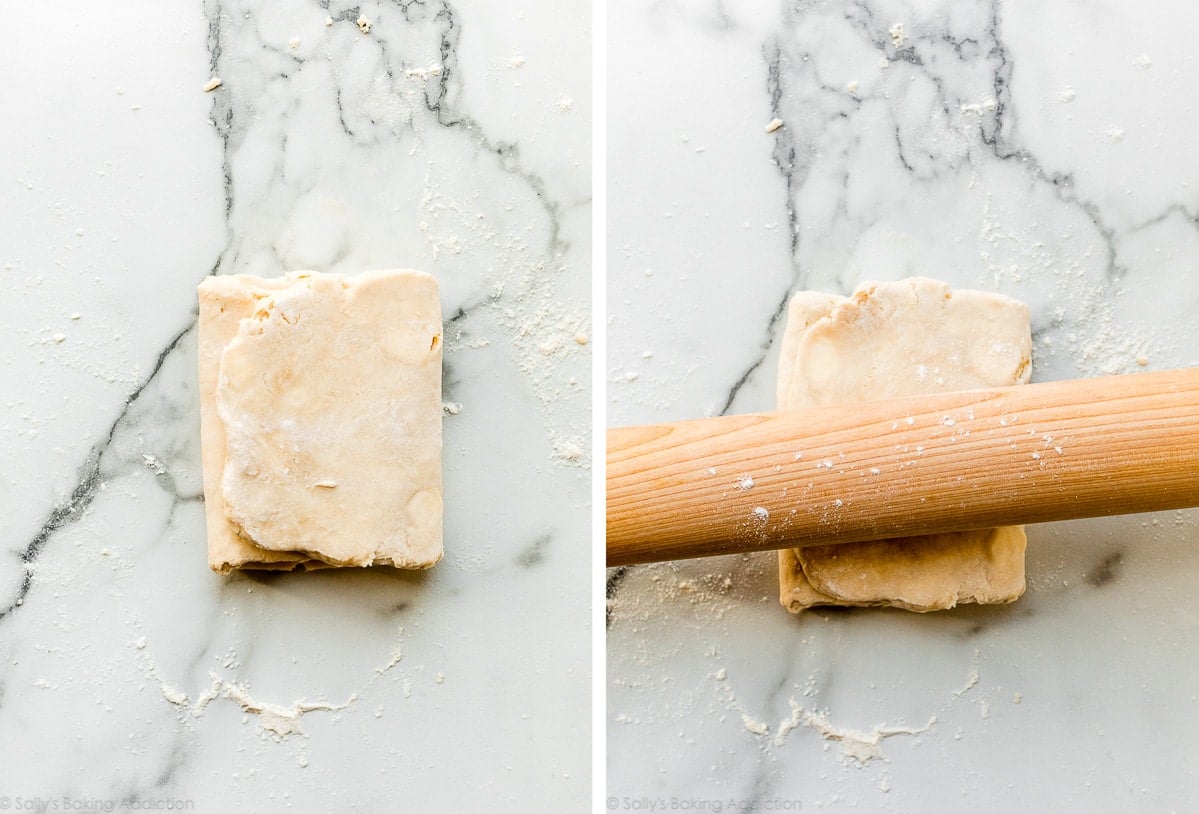
Repeat this 5 more times, for a total of 6 rolling out + folding sessions. After the 6th time, wrap the dough up again and chill for at least 15 minutes and up to 24 hours.
Success Tip: If the dough “business letter” is so thick or impossible to roll out, cover it with a clean kitchen towel and let it rest for 5 minutes before trying again. The butter just needs to slightly soften. Lightly flour your work surface whenever necessary.
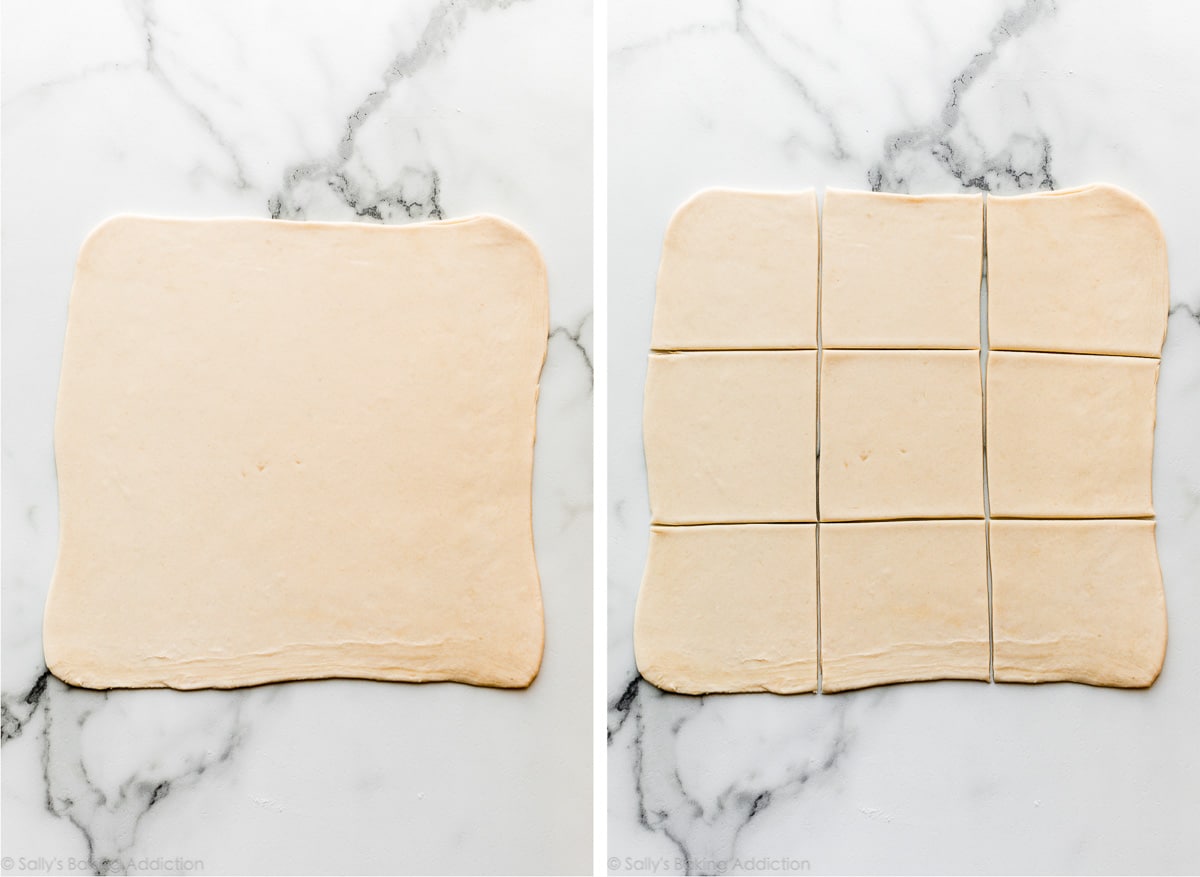
Now the dough is packed with layers upon layers of buttery dough. Roll it out to a 12-inch square. Cut into 9 4-inch squares.
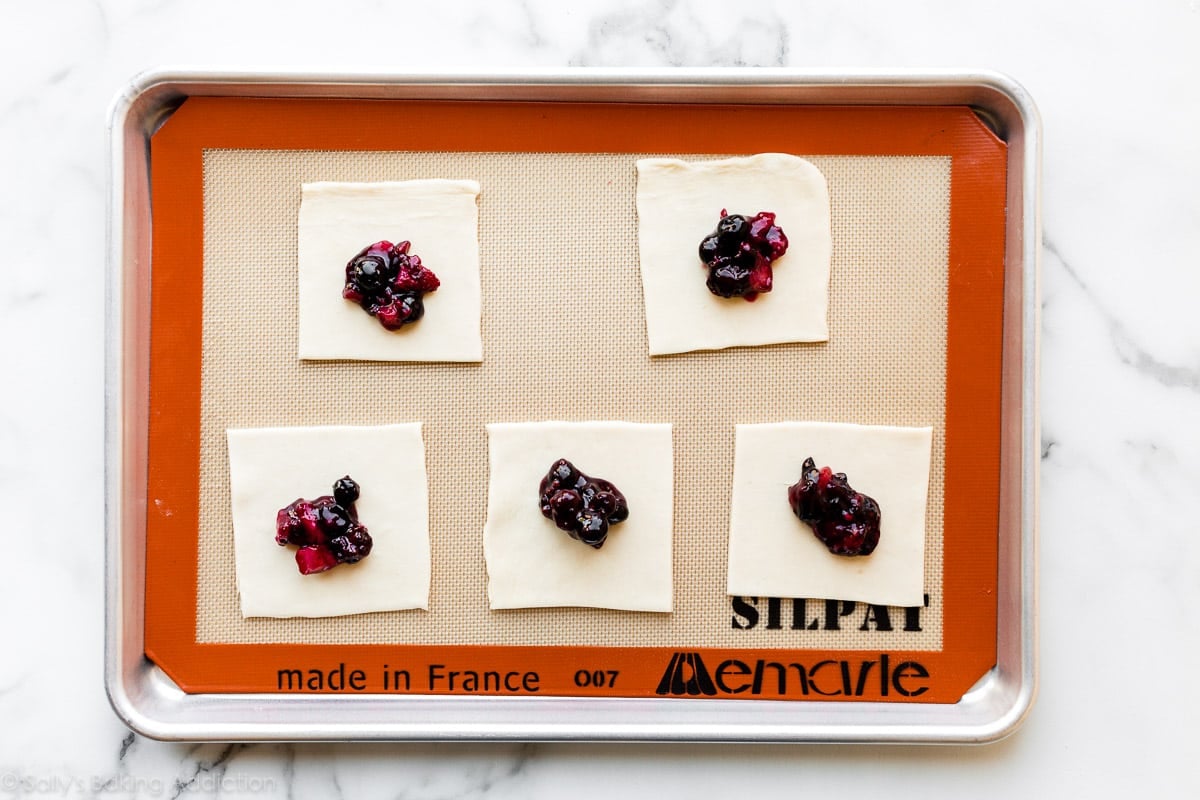
Place the squares onto 2 lined baking sheets. Place 1 heaping Tablespoon of berry filling in the center of each.
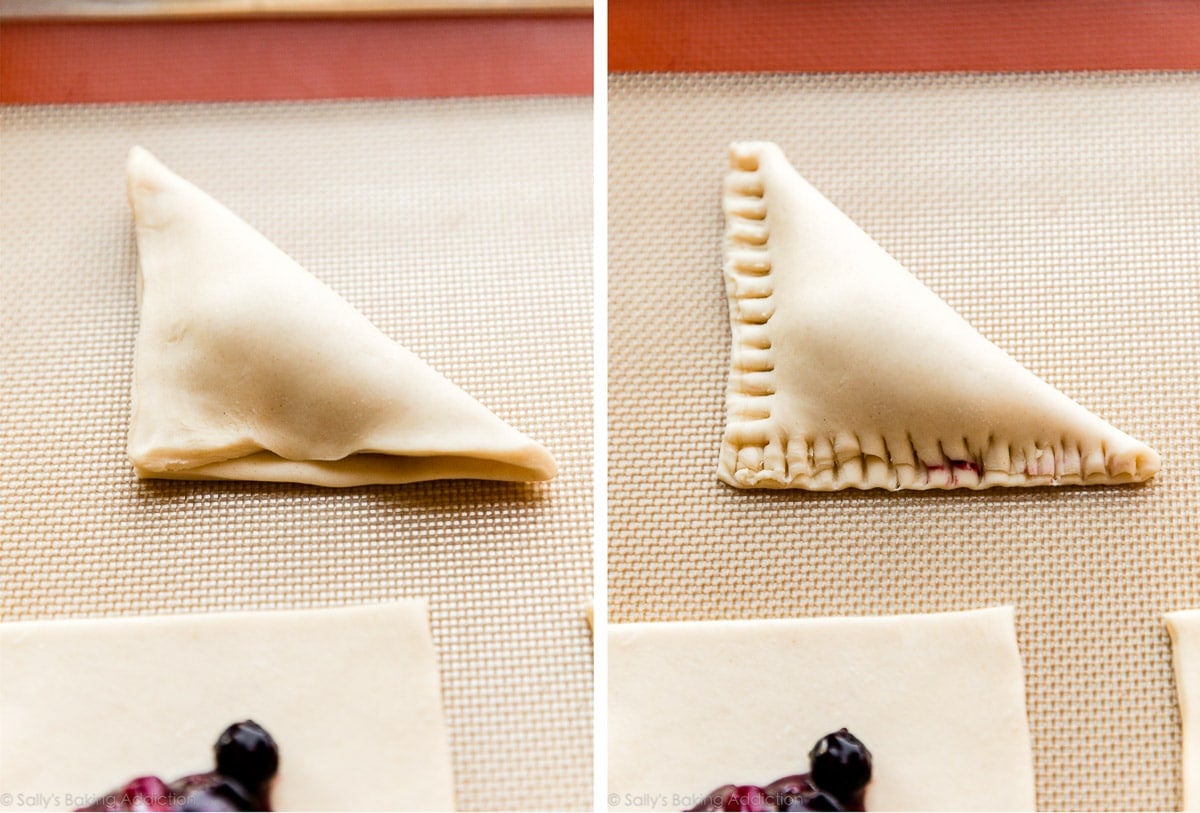
Fold over to create a triangle. Some filling is bound to leak out. Don’t worry about it! Crimp edges with a fork. If dough has gotten too soft at this point and the dough is too sticky to crimp shut, stop and refrigerate everything for 10 minutes. You want to make sure you have a tightly sealed turnover to help prevent it from spilling out in the oven.
After shaping each turnover and crimping the edges, I strongly recommend refrigerating them for at least 15 minutes as you preheat the oven and make your egg wash. This helps guarantee they will hold shape.
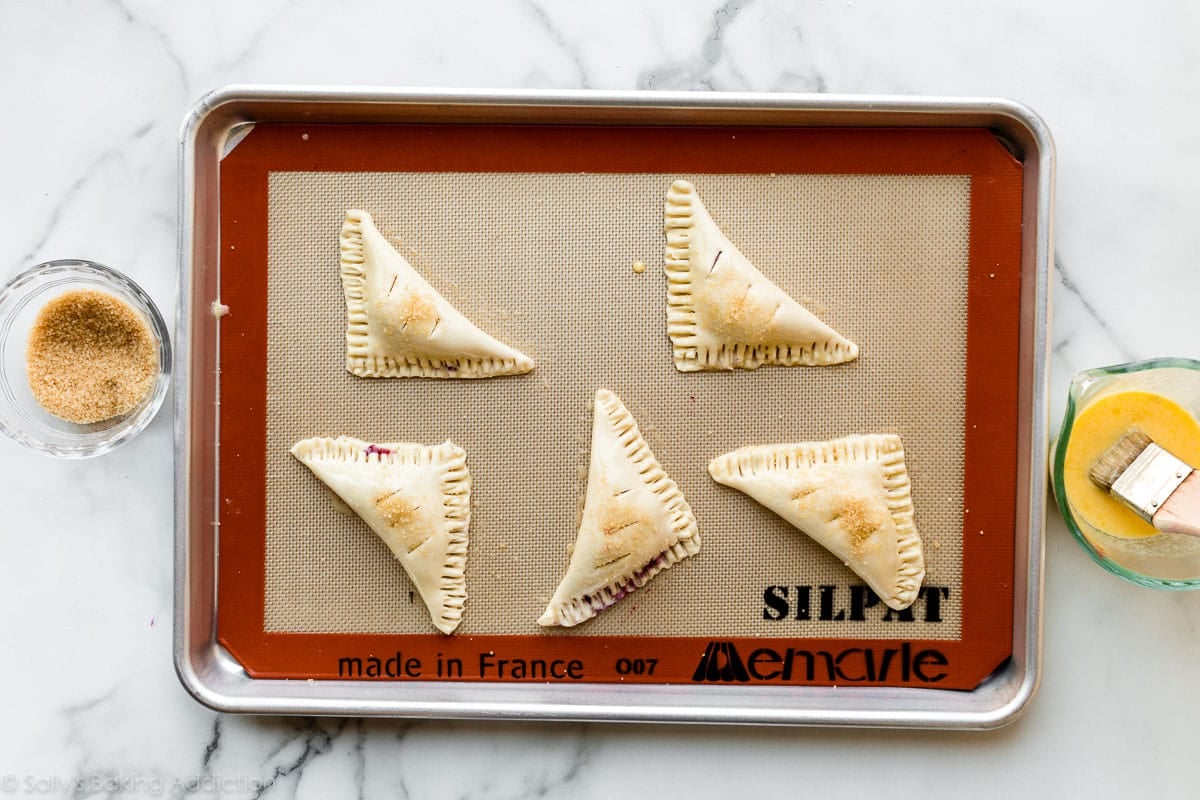
Cut slits into the tops of shaped turnovers and brush with egg wash (egg + milk or just use milk). Sprinkle with coarse sugar—I usually use Sugar in the Raw or these coarse sugar sprinkles, both of which can be found in the baking aisle of major grocery stores.
Bake until golden brown. Butter will definitely leak from this dough, so don’t get nervous if you see that happening in the oven.


Reader Comments and Reviews
Happy to report that these turned out great. I made mine with apple filling. Since I read some reviews saying the filling was too little, I made about double the amount and that was perfect for me. I love lots of filling.
For all of you who are based in Europe: I needed less water, so start slowly! The flour here seems to absorb less. If you are in Germany, use flour Type 550.
These were a chore to make but the result was absolutely delicious! The turnovers were the perfect balance of sweet and tart and the rough puff was perfectly flaky and delicious. I would like to make this again with other filling combinations. Pay particular attention to the size of your puff squares before you put the filling in…precision is key to not overfill.
LOVE LOVE LOVE this recipe! Rather than turnovers, I used mini pie molds to create mini-puff pastry tarts. My family and friends LOVED these so much! Thanks for another great recipe!
I had so much fun making these yummy, flaky, berry-filled turnovers! I enjoyed the process of making a rough puff pastry, and will definitely make it again. I always loved turnovers as a kid, and as an adult would always turn to frozen pastry if I wanted to “home-bake” fruit filled turnovers, but now I have a skill set to make the pastry from scratch….thank you Sally, for your wonderful, detailed instructions, pictures, and video! Another stellar recipe!
Making the rough puff pastry was quite a challenge as I have never attempted something like that before but feel it’s well worth the effort.
These turnovers are absolutely delicious! I can’t wait to make these again with different types of filling.
Like many other people, this my first time with rough puff pastry. It was so much easier than I thought! The rolling and folding was so satisfying and it was great to watch it come together. Next time, I’ll definitely double the recipe because 9 definitely isn’t enough!
The video was very helpful before I starting to make the dough. I had to refrigerate often to keep the dough from getting too soft. The berry recipe made just enough to fill all the turnovers and I generously sprinkled with sugar in the raw. They came out so flaky, very hard to eat just one.
First time participating in a challenge. First time making my own pastry. What a fun! Though my result was not perfect, it still tasted delicious and looked pretty. So hot here. I believe my butter, though right from fridge, got a little to warm… so I didn’t get as much flake as hoped. I will certainly try this again. It was fun and I learned along the way!
Great recipe. I actually ended up using cherries not berries, but it worked out really well! I will say the 6 rounds of rolling and folding were a bit frustrating. It’s so hot here I did have to take multiple breaks to refrigerate the dough again because it was getting too sticky/melty, but i was able to get lots of layers in my pastry so it did end up working out – it was definitely a temperature issue more than a recipe one
thanks!
Homemade puff pastry made easier than you think! Great recipe … I may never buy frozen puff pastry again!
I just completed the Berry Turnovers and I loved the recipe. However, I was disappointed at the end to find that the butter seemed to have sunk to the bottom of the turnovers (but it didn’t pool on the pans) and I didn’t get the layers I was expecting. Do you know what would have caused this? I thought that it could have been that the butter got too warm while I was making the turns. Should I have put it back in the fridge halfway through? I’d like to try making these again, but maybe when the weather cools a bit. Either way, they were still delicious!
Hi Marisa! Yes, if your dough and butter seems to be getting warm at any point in the rolling and folding process, it would be best to pop it in the fridge to cool again before continuing. Thank you so much for giving these a try!
They sure do look pretty! Sadly, they taste like nothing. The filling us delicious, but there’s hardly any in it. So I’m left with a flavorless crust. Maybe that’s what is supposed to happen, but it’s definitely not for me. Especially after all the work I did. Sorry, Sally, but I just don’t like this one (that’s a first for me!).
After reading the reviews, I wonder if I did something wrong. I did not think they had much flavor. Better with the icing, but not worth all of the work.
This is a great recipe that I will be making again. I did struggle with heat tho and it effected my outcome but the flavors were on point. Despite look not being exact or the texture was still very good! Buttery, flakey, berries!
The recipe was super easy to follow. Something I need to work on next time is making sure my squares look more like squares and are the same size! Some of them were much larger than others and some were rectangles. This led to difficulties with turning them into triangles when folded. However, this was my first time ever making a pastry, and I would totally make it again.
My first time making pastry too…and my 12×12 was a bit wonky…so my shapes were not all the same either!
But the taste was good! 🙂
I love this recipe! I don’t have much experience with rough puff pastry, but this recipe makes it easy and so fun to make!!
Very delicious! This was my first time making turnovers and they came out great! The instructions had great details and answered any question I thought of during the process. They cooked perfectly with a nice golden, flaky and flavorful crust. The filling was the perfect amount of sweetness and consistency! Thank you!
Lovely recipe – for sure using rough puff in the future! I found that a heaping tablespoon of filling a) didn’t leave enough for all 9 and b) made them prone to overflowing.
I’m sure that’s just a result of different berry compositions and such, not the recipe. My point is I would start with a smaller amount when filling, topping off with any remaining filling.
I was intimidated by this recipe when I first read it, but found it much simpler to make than expected. I loved the process and am thankful for all of Sally’s tips and video. The filling was perfect and the turnovers turned out perfectly. This will definitely be a recipe that I make again.
Question: Can this recipe be doubled?
Absolutely! See recipe notes for tips on doubling.
These are one of THE BEST things i’ve ever made! There is no words to describe the sweetness and flakiness of these turnovers and the SAUCE! So delicious, thank you!
These turnovers were so fun to make and ever better to eat! I made a strawberry rhubarb filling for mine, and after finally getting a cooler day, I baked them up today. The dough is so flakey and delightful!!!
This was so delicious and shockingly easy to make! Great recipe!
So much fun making rough puff pastry from scratch for the first time! This berry filling is so flavorful and these turnovers had so many flaky, buttery layers!!
My kids LOVE turnovers so they were so excited when I told them this was the monthly baking challenge. Of course another recipe from Sally that did not disappoint! The dough was so flaky and delicious! Much easier than I expected top thanks to the step by step detailed instructions and pictures!! Thanks again for an amazing recipe!
These Turnovers are so delicious – I used cherries because that’s what I had in the house and they were really divine. The recipe is not too difficult as long as you’re patient (and probably easier in a Dubai winter than a 45°c+ (115°f) summer day!). With a sprinkle of sugar on top I didn’t feel they needed the icing.
Delicious!
My 9 year old and I made these and we both loved them. We can’t wait to try different fillings for the rough puff.
Mine looked perfect but weren’t quite done inside. So I will do the full 25 min next time. I also went a little heavy handed on the egg wash so my husband said they tasted a little “eggy”. But relatively easy and they came out beautiful & delicious!
This was the first puff pastry recipe that actually worked for me, so this is now my go-to puff pastry. The turnovers came out perfect. I did double the filling recipe, because it didn’t seem like there would be enough filling for all of the dough, and it did fill them up nicely, with only a little bit of leakage. I thought they could have been a little sweeter, but I am a sugar addict and my sister thought they were just perfect as is.
These turnovers are amazing! I used a frozen berry mix of strawberries, blueberries, raspberries, cherries and pomegranate arils and topped them with coarse sugar and they came out great. They are so nice and flaky. Directions are easy to follow. Thank you for another great recipe!!
Awesome recipe! I completly botched my first batch but I attempted it again. It’s very hot and humid here so I cut and weighed the butter then froze it for 24 hrs. I also had to double the chilling times and add an extra chill for 30 minutes after the third roll&fold. Totally worth it for the results!
I want to freeze the dough but I’ve never frozen dough before. How should I wrap it up? Should I chill it before I freeze or just put the dough in the freezer after the roll&fold step?
Hi Samantha! See recipe notes for freezing instructions. We usually use an air tight container, but plastic freezer bags can work as well!