

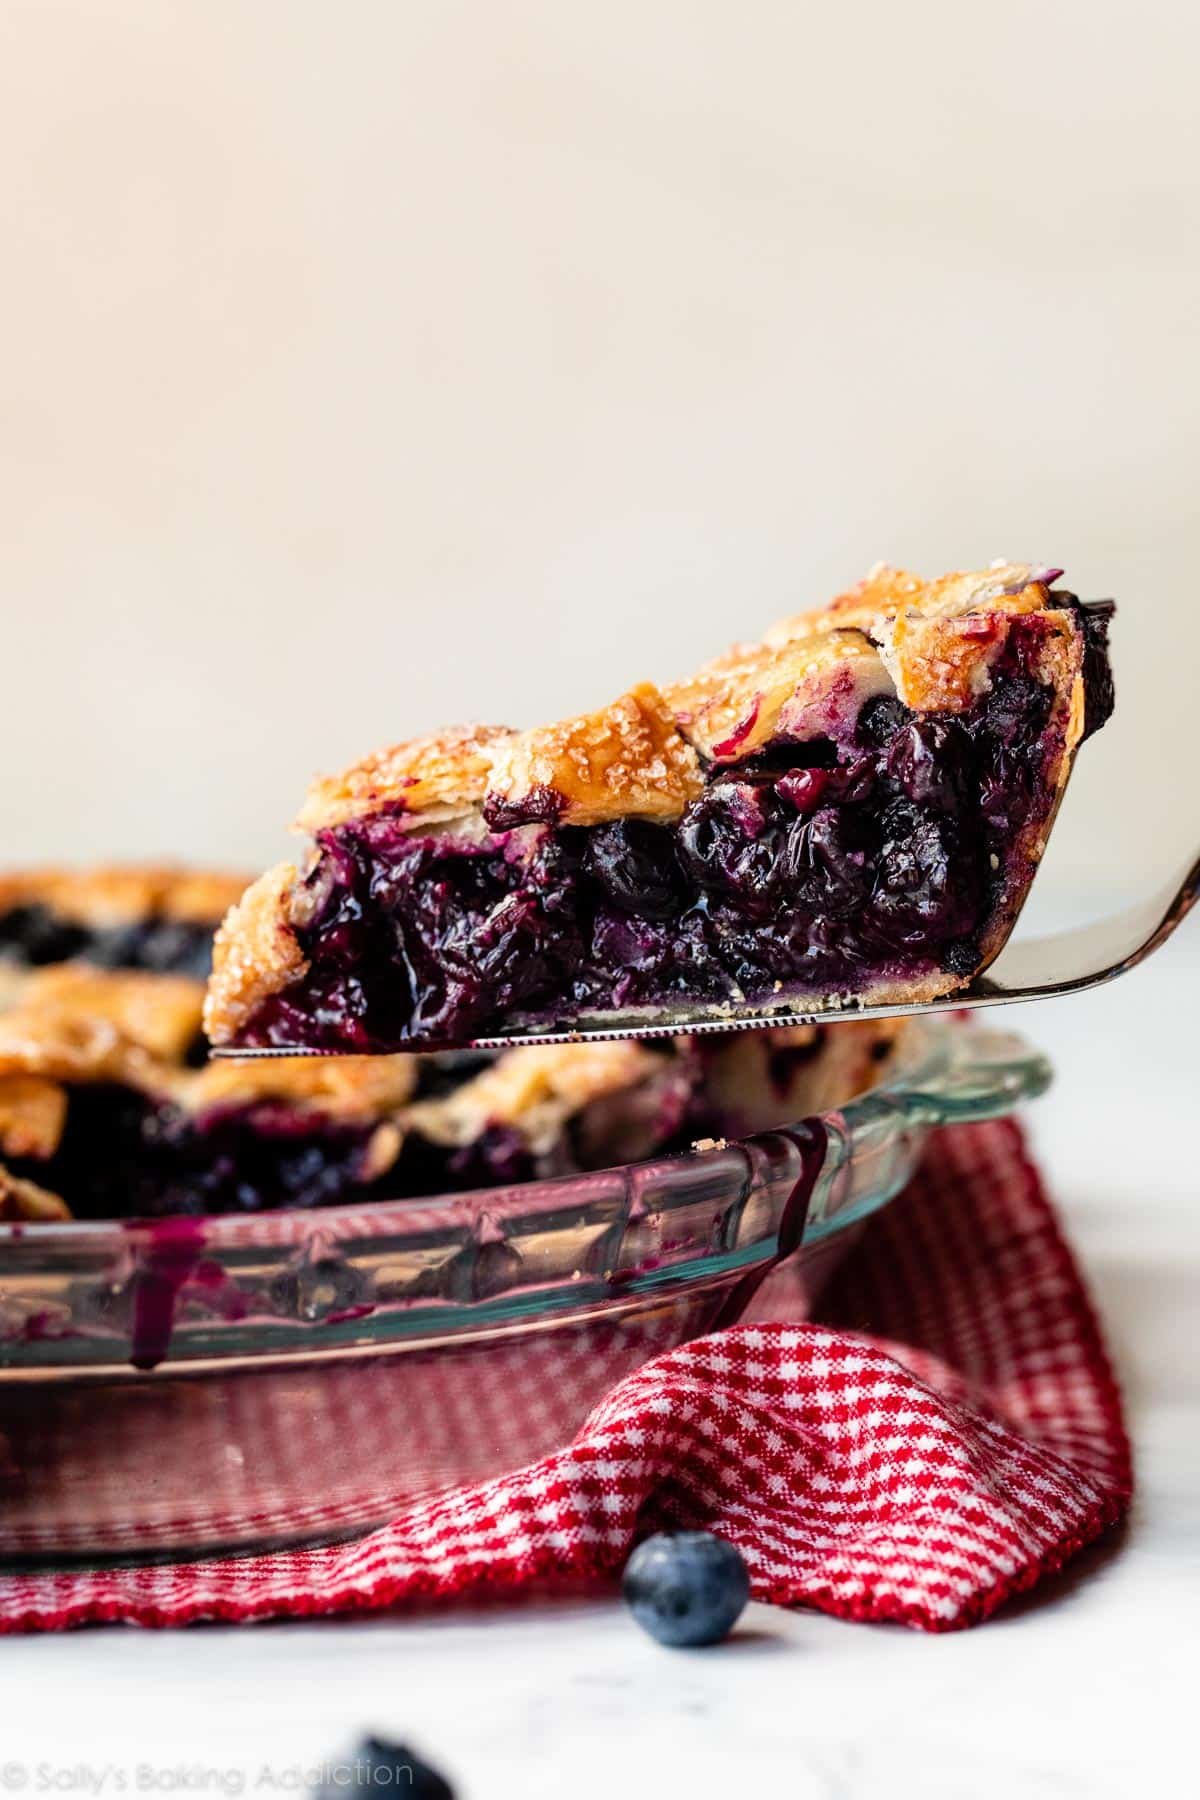
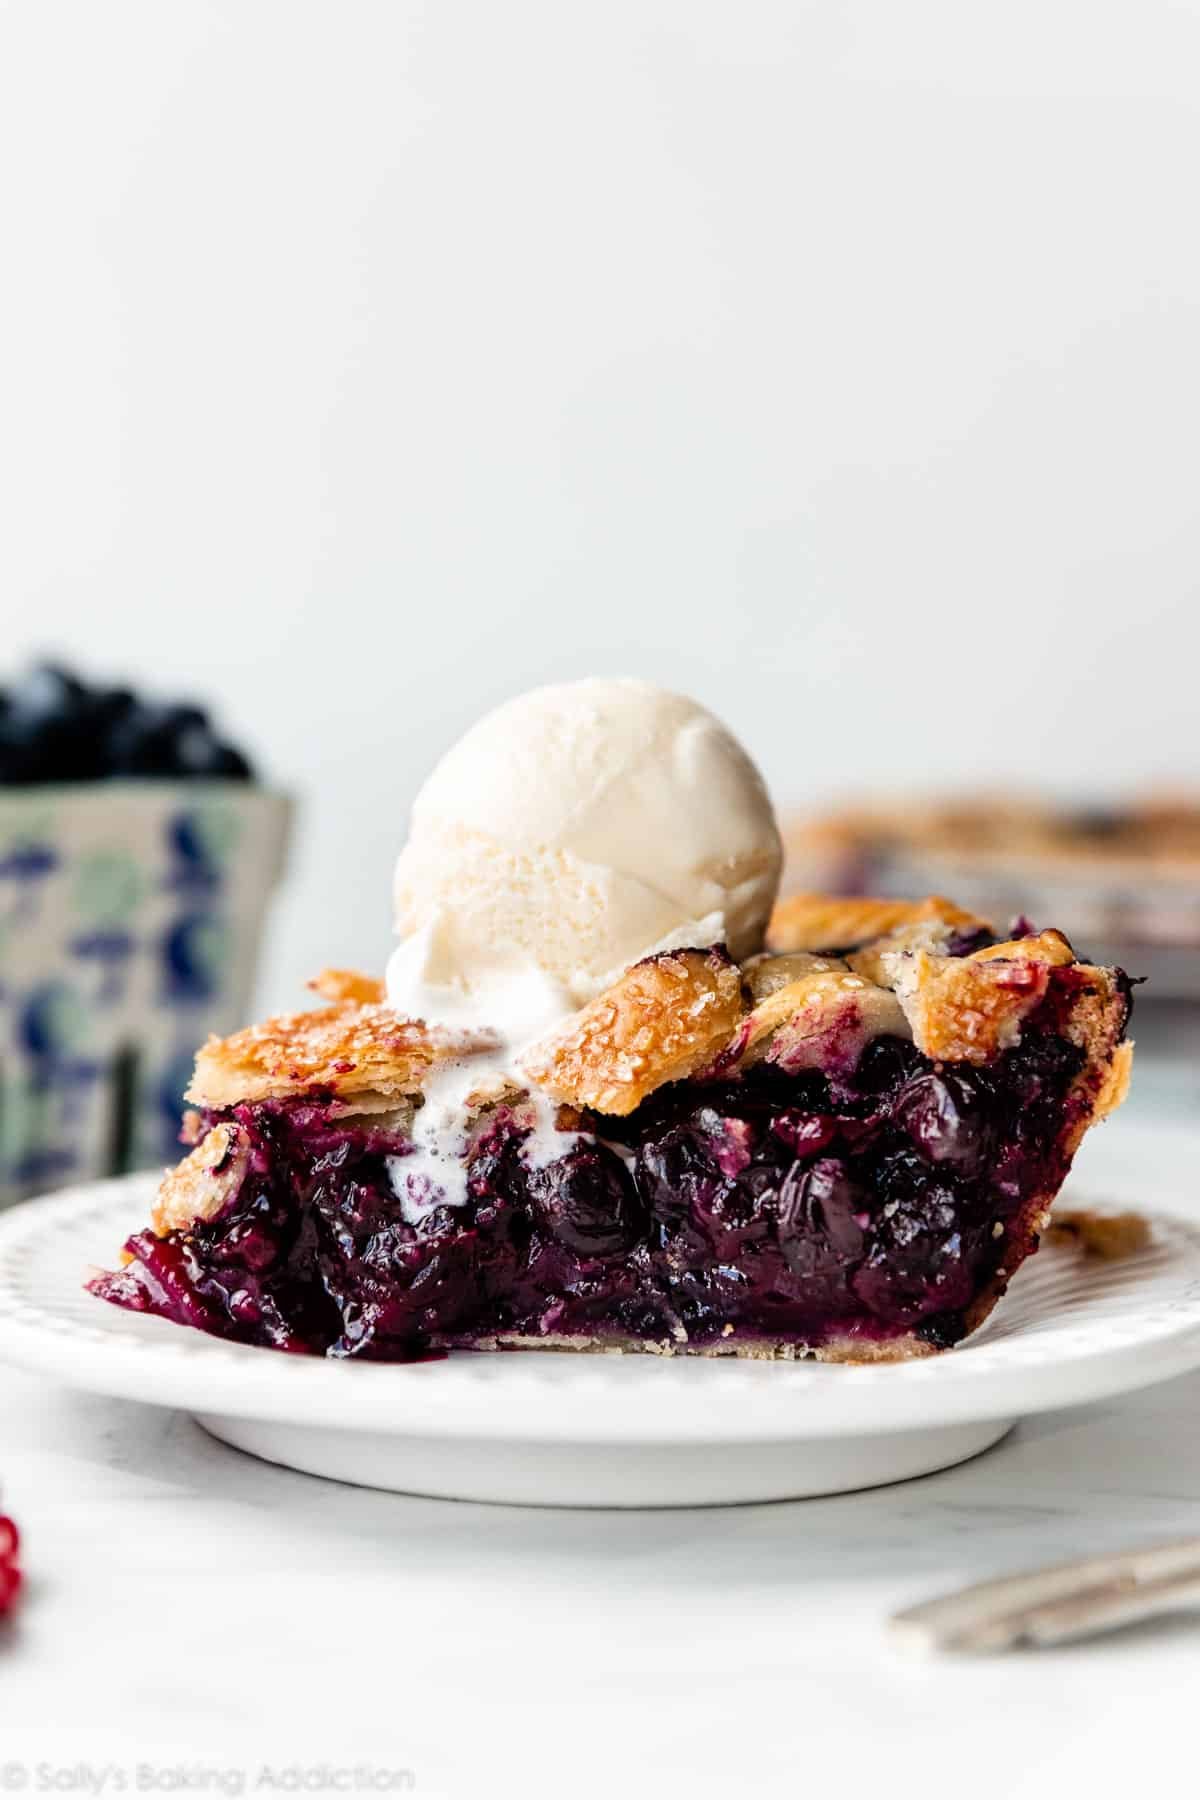
My homemade blueberry pie is better than ever and bursting with sweet juicy blueberries that sit in a golden-brown buttery, flaky pie crust. Follow my precise baking instructions for a filling that sets perfectly and is neither runny nor soupy. From-scratch pie can be hard work, so my team and I made sure to repeatedly test this recipe so the results are completely worth your time and effort.

I originally published this recipe in 2016 and have since added new photos, a video tutorial, and more helpful success tips. I’ve also made a few changes to the recipe and baking instructions to help ensure a filling that sets.
This slightly updated recipe produces a better-than-ever blueberry pie. Reader reviews reporting a soupy, runny filling inspired me to rework the baking instructions on my original recipe and make a slight change to the filling ingredients. My team and I tested a LOT of blueberry pies in the last few weeks. We searched for the magic trick to a perfectly flavorful, non-runny blueberry pie.
So what’s the verdict? What’s the magic trick to a perfect blueberry pie? Drumroll please…
The magic trick is: patience.
One reader, Judy, commented: “Wow! I’ve tried and loved many of Sally’s recipes, but this was the best so far! Absolute perfection! I followed the directions exactly as written and it came out perfectly, including the homemade pie crust. The pieces cut out without any mess. Simply delicious! ★★★★★“
Another reader, Nancy, commented: “I’ve been making blueberry pies for many years, but I think this recipe is the best I’ve made! The pie crust is truly great, so nice to work with. It was my first time that I made a true lattice crust. The dough was perfect! The berries were perfect as well. I couldn’t have been more pleased! ★★★★★“
Here’s Exactly Why This Blueberry Pie Recipe Works
It turns out that you need to (1) really work the filling ingredients together, (2) bake the pie for longer than I thought, (3) embrace a bubbling juicy messy pie filling, and (4) let it cool completely in order for the filling to fully set up. Just like peach pie, blueberry pie takes several hours and is undoubtedly a delayed-gratification dessert. But I promise you, they are both worth it. Get ready for the most incredible, juicy-yet-sliceable blueberry pie experience:
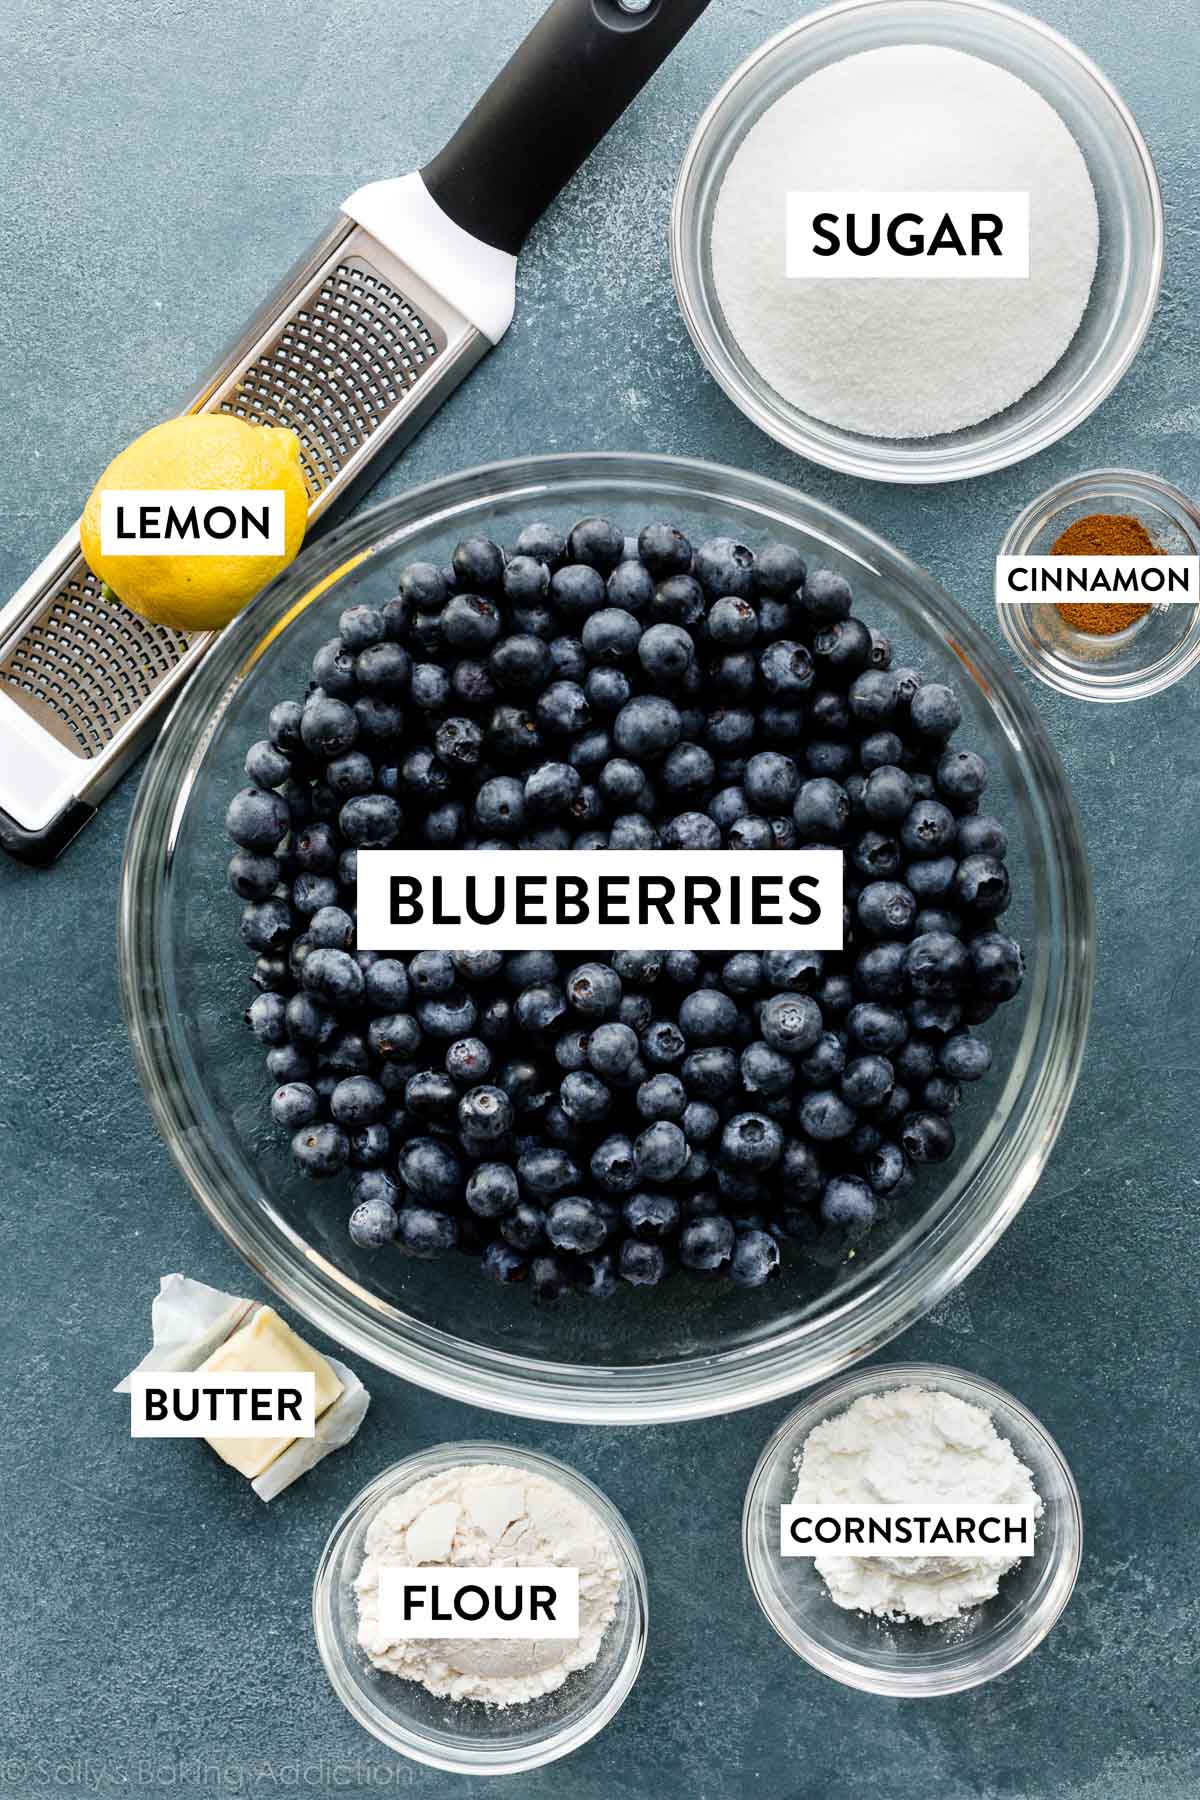
6 Ingredient Filling
After I’ve scared you off about the time it takes, let me mention that blueberry pie filling is actually one of the quickest fruit pie fillings to prepare! There’s no peeling, pitting, hulling, or chopping the fruit. Unlike triple berry pie, you do NOT need to pre-cook the filling either (a step we tested but found useless). Just rinse and pat the berries dry and then mix with sugar, flour, cornstarch, cinnamon, lemon juice, & lemon zest:
Pie Filling Success Tips:
- Use Flavorful Ingredients: You don’t need to add much to this pie filling to achieve amazing flavor. The berries are already pretty sweet on their own, so we only need to add ⅔ cup sugar. The zest and juice of a fresh lemon + a hint of cinnamon both add a subtle zing that really amplifies the natural flavor of the blueberries.
- Use 2 Thickening Ingredients: In the previous version of this recipe, I used ¼ cup of cornstarch to thicken the juicy filling, but we were still getting reader comments that their pies were turning out too runny. Taking note from my blueberry crumble pie, a reader favorite, I decided to use a mix of both cornstarch and flour. As long as you bake the pie long enough, the jammy filling sets up and thickens beautifully.
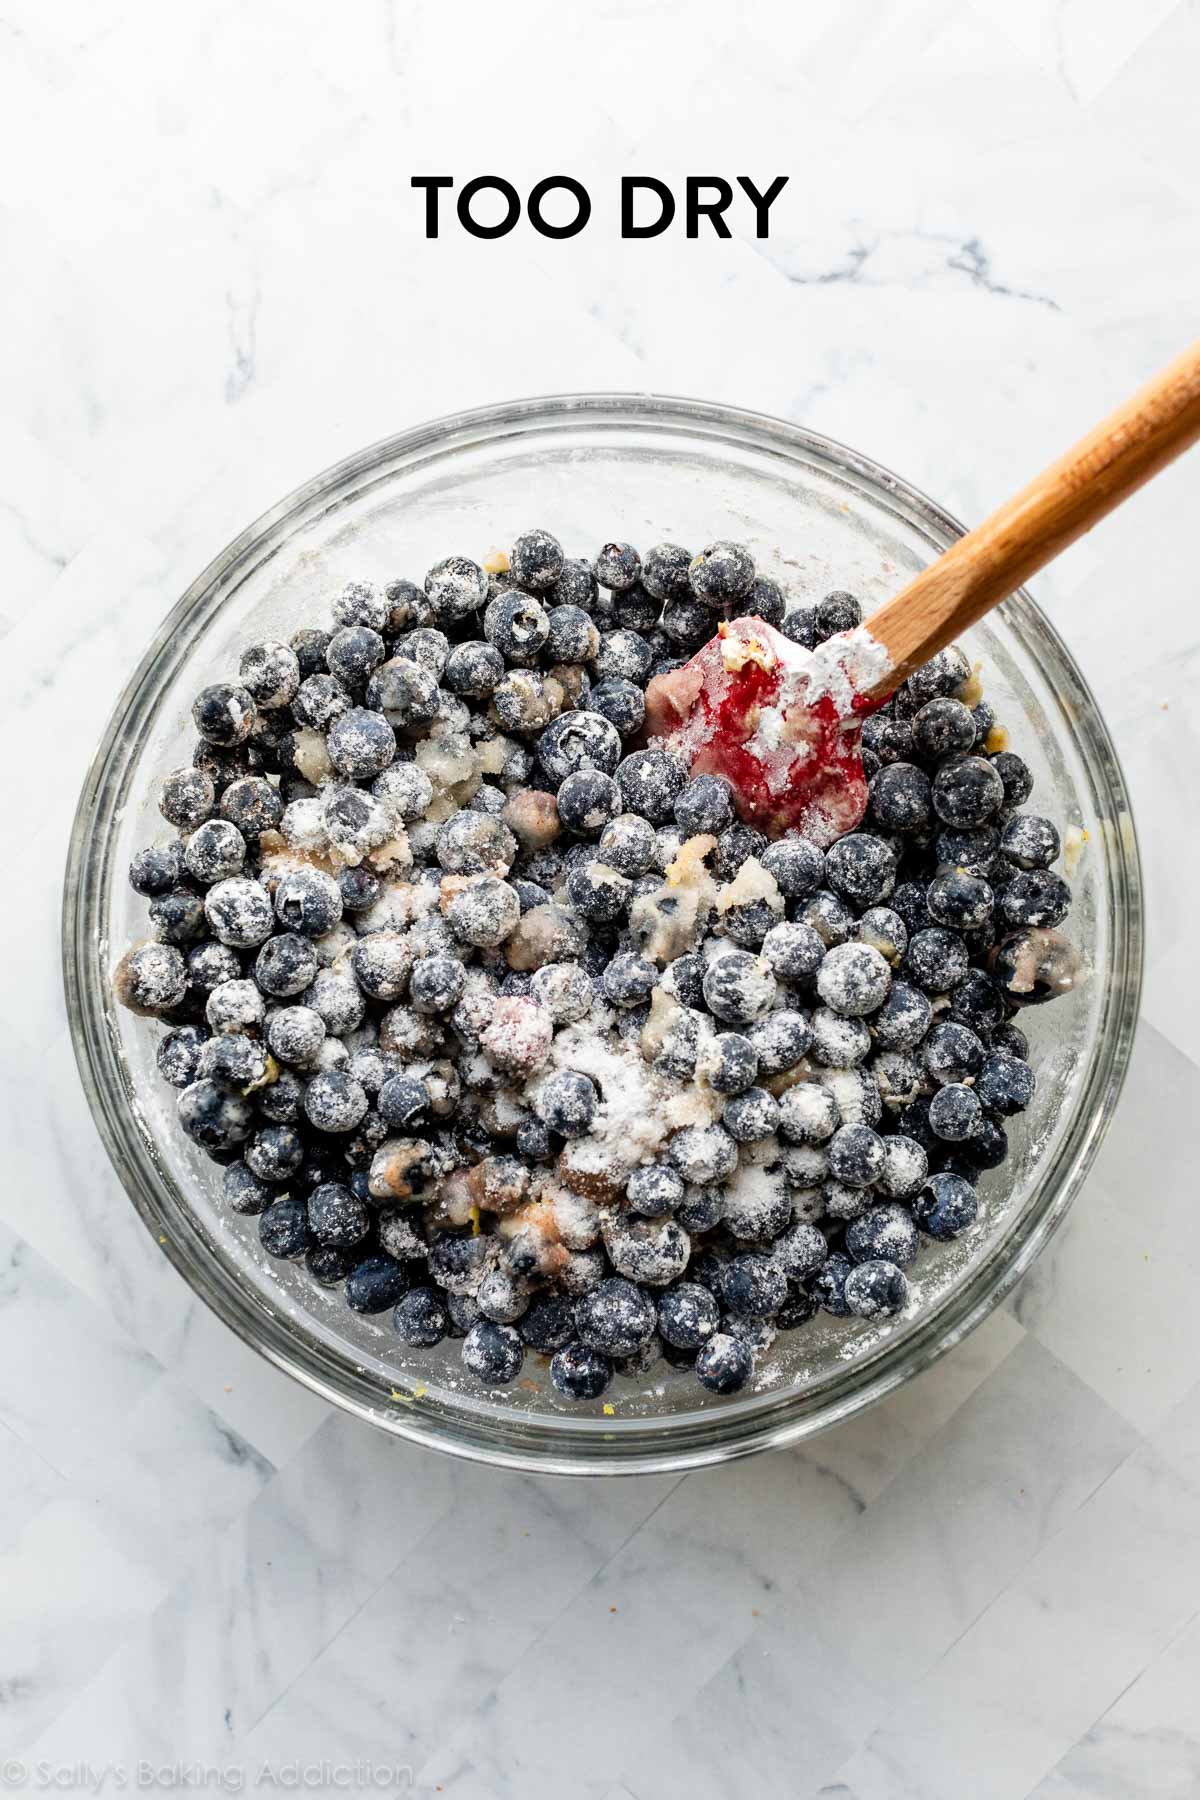
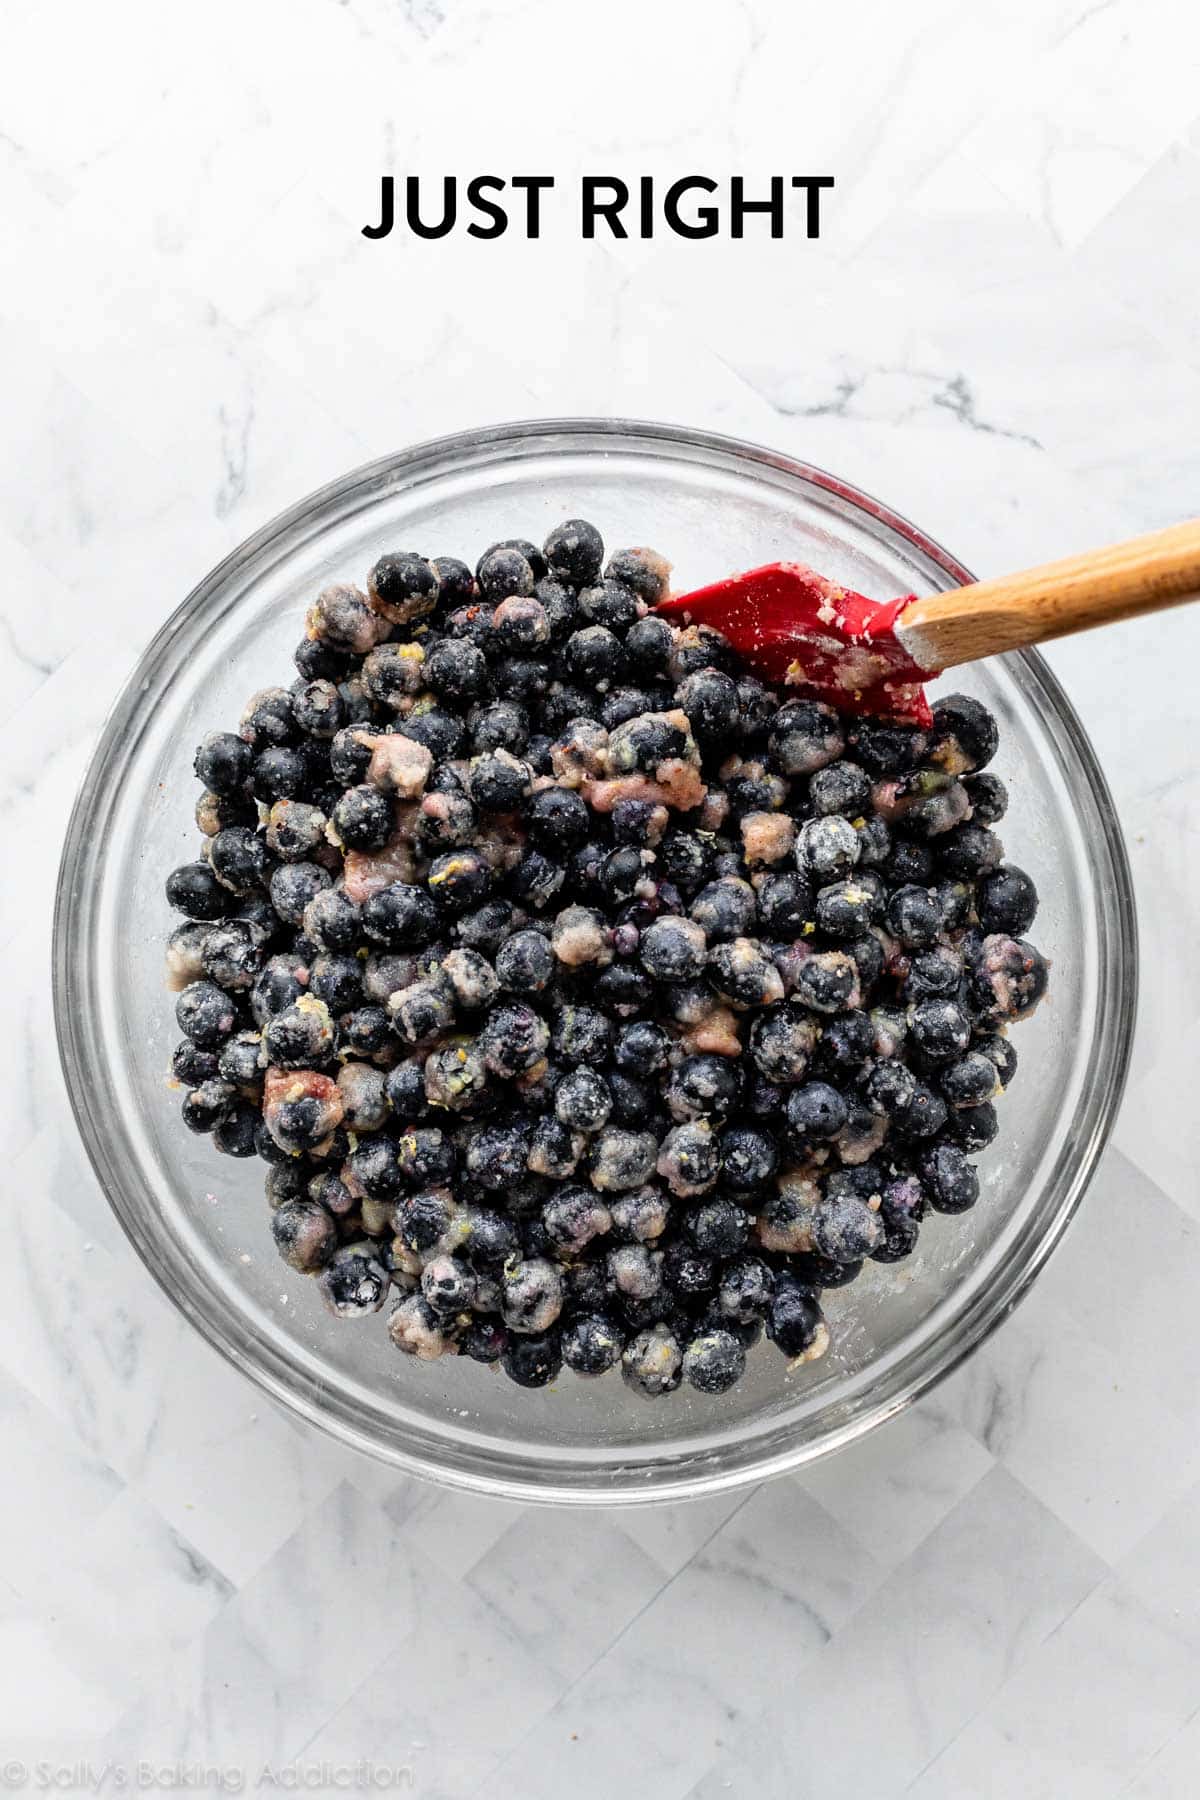
- Work the Ingredients Together: Between the flour, cornstarch, and sugar, there’s a lot of dry ingredients. To ensure there’s not too much dry powder, you may have to smash a few blueberries to help soak it all up.
Below Left: Your filling won’t bake properly if it’s this dry and powdery. Below Right: Work the ingredients together until the dry ingredients are moistened.
Assemble Your Pie
You can use your favorite pie dough recipe, but here’s why I encourage you to try mine. To make a perfect pie crust, I use a mix of shortening and butter because the two ingredients work together to make an unbeatable texture. Butter adds flavor and flakiness, while shortening’s high melting point keeps the crust tender and workable. The recipe yields 2 crusts—one for the bottom and one for the top—which is what you need for this pie. You don’t need to par-bake the crust because this pie bakes for so long.
A few topping notes:
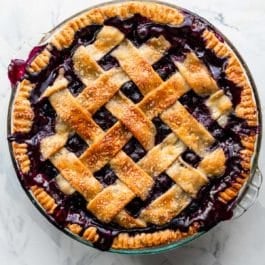
- Lattice: I like a signature lattice pie crust design for this blueberry pie (doesn’t it just scream “state fair blue ribbon winner“?!) but decorate the pie however you’d like. Here’s my detailed How to Lattice Pie Crust video & instructions.
- Other Designs: Feel free to check out other pie crust designs.
- Crumble: Or you could try this blueberry crumble pie. Note the slight variation in the filling to make up for a very buttery topping.
Regardless of the design, be sure to crimp or flute the pie crust, too. I simply crimped the edges with a fork in the photos here.
Don’t Forget…
- To dot butter on top of the filling. Like in this cherry pie recipe, a touch of butter adds richness and helps the filling ingredients bind together.
- To brush the top dough with egg wash. Egg wash promises a crispier crust and helps develop that signature golden sheen. Without it, dough is dull and lackluster. You use egg wash on many other bakes, like apple pie, croissants, stromboli, breakfast pastries, and peach cobbler, to name a few.
Unlike the butter and egg wash, coarse sugar is an optional topping. I love adding it to sweet pies because it adds a little crunch and sparkle.
Many More Blueberry Pie Success Tips & Tricks
- Make the Pie Crust Ahead of Time. It has to chill for at least 2 hours, but it keeps well in the refrigerator for up to 5 days and the freezer for up to 3 months, so make it in advance and it will save you time on the day you actually make this pie.
- Baking Sheet on Rack Below the Pie: This pie gets pretty messy when it’s happily bubbling away for over an hour. Place a baking sheet on the bottom oven rack to catch the bubbled-over juices. If you really want to save yourself cleanup time, line it with foil first.
- Start at an Initial High Temperature: 425°F (218°C) for 25 minutes, then the remainder at 375°F (190°C). The reason for the initial hot oven burst is to set the crust and encourage the cornstarch to begin working quicker.
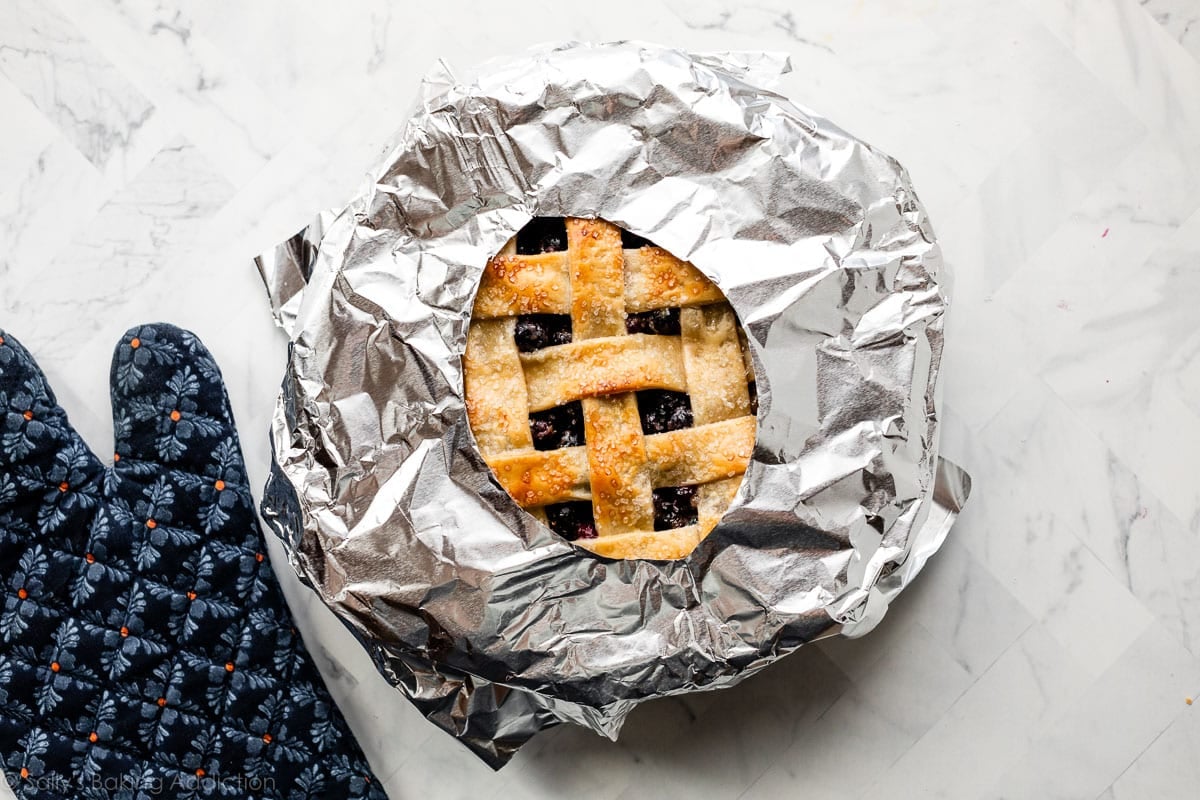
- Pie Crust Shield: After the first 25 minutes in the oven, when you lower the temperature, I recommend placing a pie crust shield (see Notes) on the crust’s edges to prevent it from over-browning too quickly. You can purchase a pie crust shield, but I often use aluminum foil. See the next photo.
- Bake for a Long Time: Blueberry pie takes a lot longer than some pies (like pumpkin pie and pecan pie). You want the filling to be bubbling at the surface nearly everywhere, and this takes close to 75–80 minutes total. The internal temperature in the test pies (easy to take with an instant read thermometer because of the lattice top) was around 200°F (93°C) when done. If you think about it, in order for gravies and other sauces to begin thickening, they must be boiling/simmering. Same with this blueberry pie filling.
- Cool Completely: Slicing warm will give you a soupy slice of pie. Cool for at least 4 hours at room temperature because the pie filling continues to set up as it cools.
Make a homemade pie crust shield out of a large square of aluminum foil by cutting a circle in the center of it:
There is something so soothing and satisfying about making pie from scratch and I hope you try this endlessly tested pie perfection soon. It’s perfect for summertime picnics, as part of your Father’s Day Recipes, or anytime you have fresh blueberries. Want to skip some pie drama? This blueberry cream pie, berry cobbler, blueberry galette, or these blueberry pie bars will satisfy your berry cravings and require half the work. 😉
Here is even more inspiration for blueberry dessert recipes. And if you can’t choose between this pie or peach pie, go for blueberry peach pie instead! Browse all of my summer pie flavors in this collection of delicious summer pie recipes.
Recommended Tools
- Pastry blender for making pie dough.
- This is my favorite pie dish. I prefer baking pies in a glass pan so I can see the crust browning on the sides and bottom. Want to skip the pie dish? This easy berry galette is always a crowd-pleaser.
- This rolling pin has held up well over several years with constant use.
- Zester for lemon zest.
- Citrus juicer for lemon juice.
- Pastry brush for the egg wash.
Homemade Blueberry Pie
- Prep Time: 3 hours
- Cook Time: 70 minutes
- Total Time: 7 hours (includes cooling)
- Yield: 8-10 servings
- Category: Pie
- Method: Baking
- Cuisine: American
Description
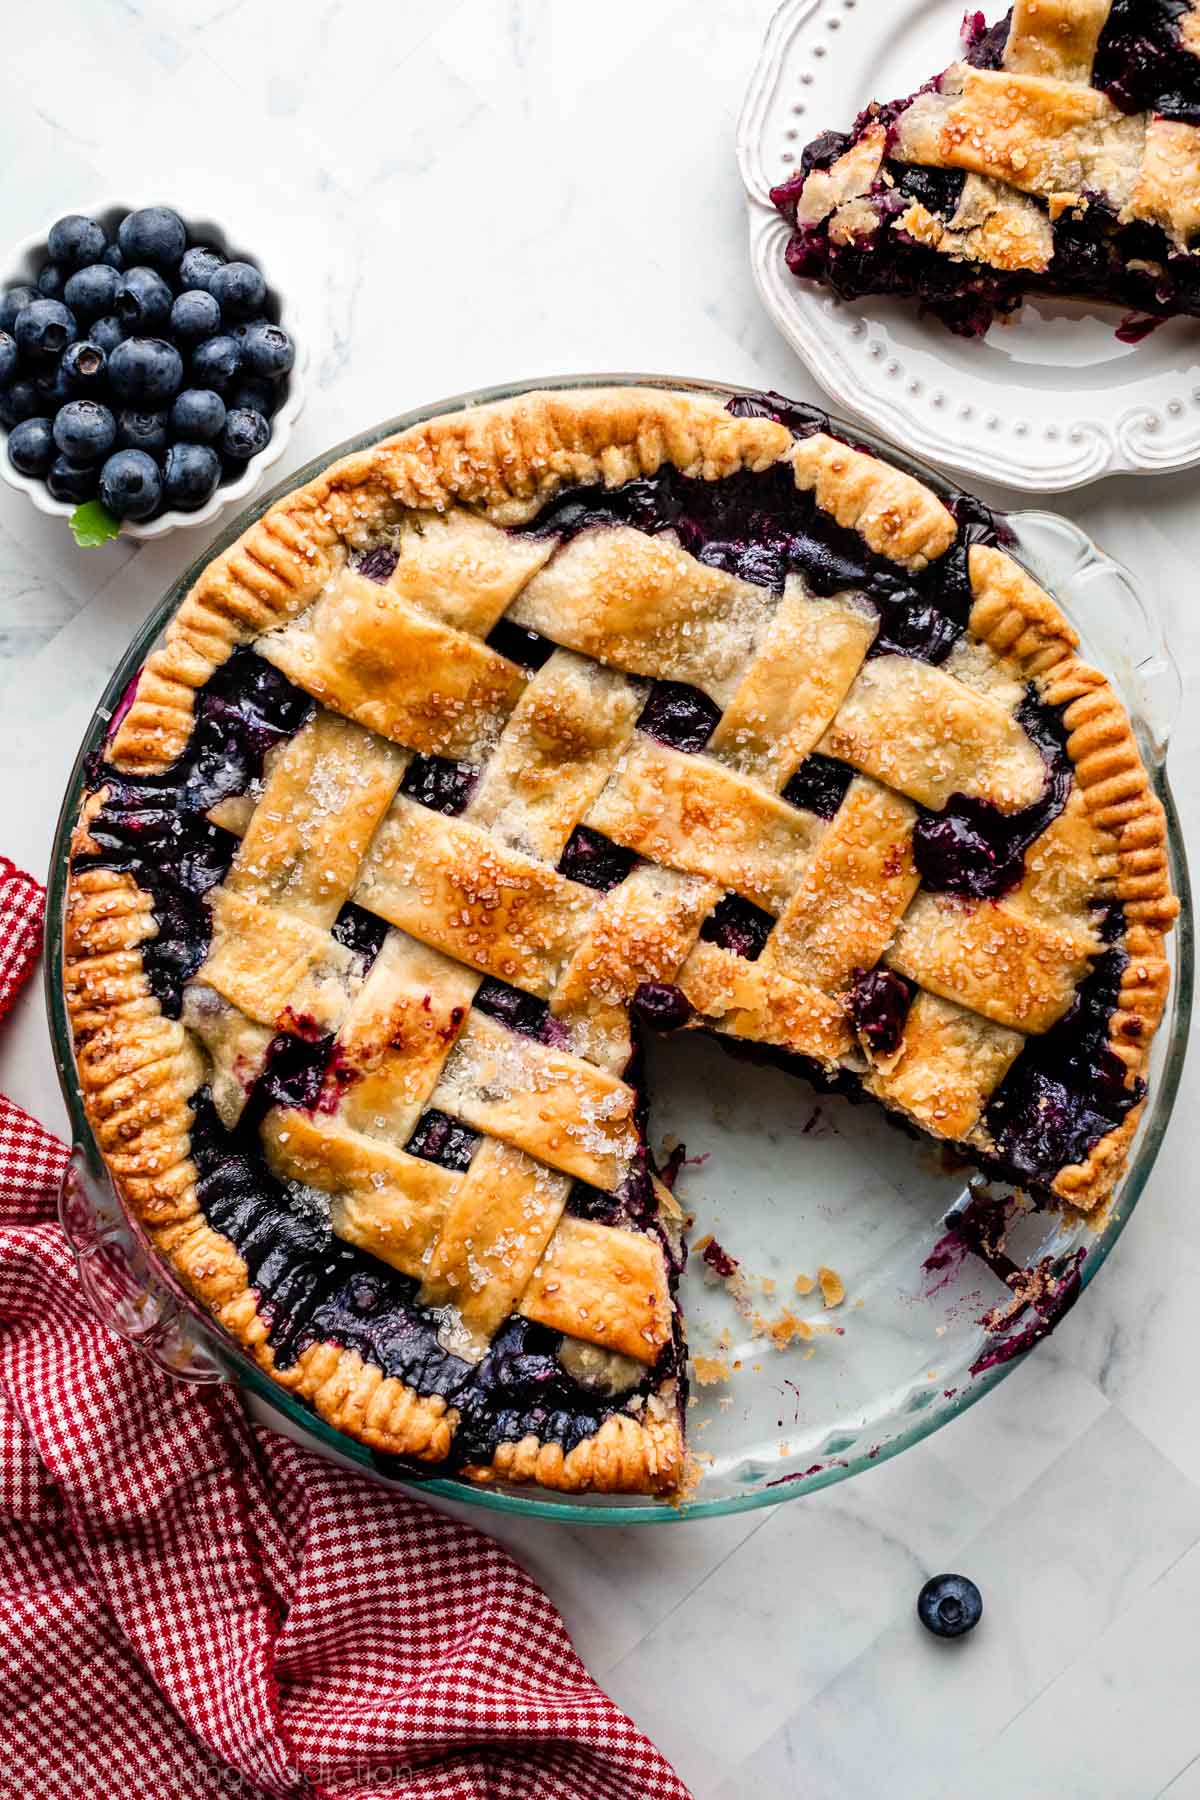
After a few additional years of testing, this is now the best blueberry pie. As the pie bakes, expect a messy, bubbly, and juicy filling. As the pie cools, the filling sets into a jammy, yet sliceable consistency. For a truly out-of-this-world summer dessert experience, serve each flavorful slice with vanilla ice cream.
Ingredients
- Homemade Pie Crust or All Butter Pie Crust (both recipes make 2 crusts, 1 for bottom and 1 for top)
- 6 cups (3 pints; about 860g) fresh blueberries*
- 2/3 cup (135g) granulated sugar*
- 1/4 cup (31g) all-purpose flour
- 2 Tablespoons (14g) cornstarch
- 1/4 teaspoon ground cinnamon
- 2 Tablespoons (30ml) lemon juice
- 1 teaspoon lemon zest
- 1 Tablespoon (14g) cold unsalted butter, cut into small cubes
- egg wash: 1 large egg beaten with 1 Tablespoon (15ml) milk
- optional: coarse sugar for sprinkling on crust
Instructions
- The crust: Prepare either pie crust recipe through step 5.
- Make the filling: Stir the blueberries, sugar, flour, cornstarch, cinnamon, lemon juice, and lemon zest together in a large bowl. Mix together until it’s no longer dry and powdery; burst a few blueberries if necessary to moisten. Set filling aside as the oven preheats. Filling can be covered and refrigerated for up to 24 hours if needed.
- Adjust the oven rack to the lower third position and preheat to 425°F (218°C). Place baking sheet on the bottom oven rack to catch any blueberry juices.
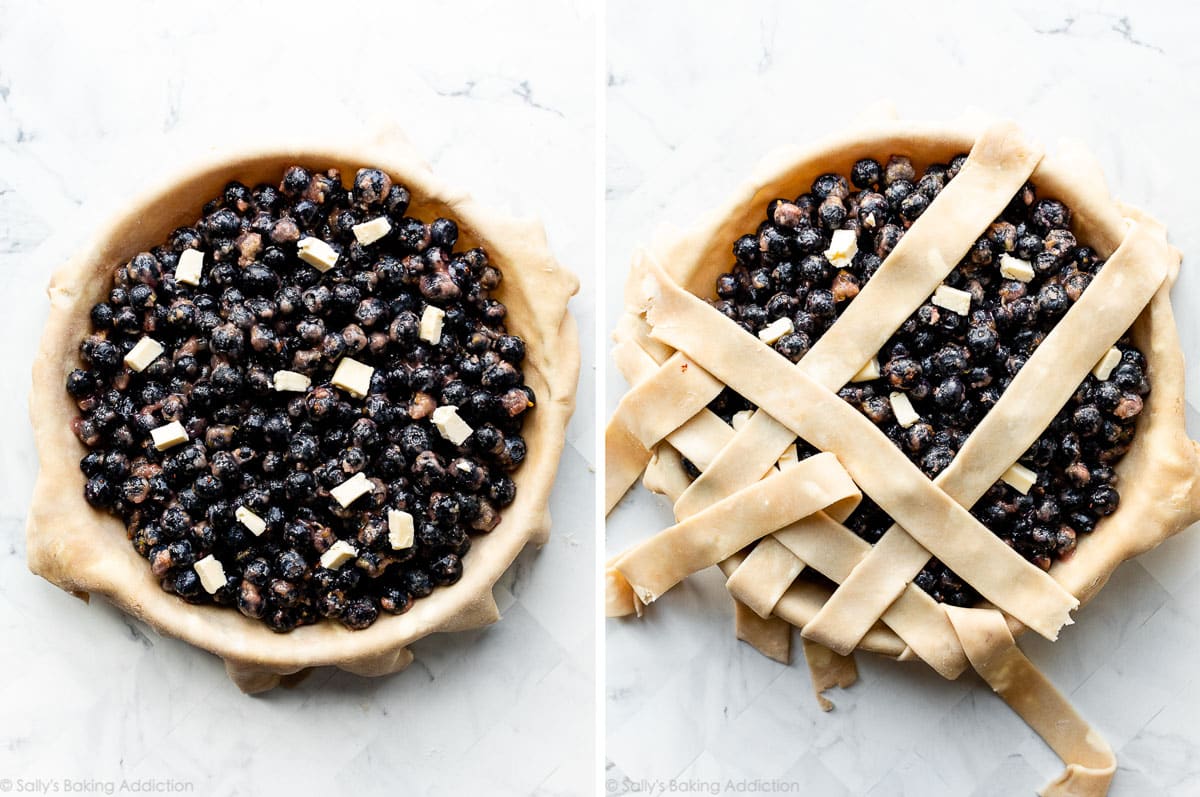
- Roll out the chilled pie dough: On a floured work surface, roll out one of the discs of chilled dough (keep the other one in the refrigerator). Turn the dough about a quarter turn after every few rolls until you have a circle 12 inches in diameter. Carefully place the dough into a 9 x 1.5 or 2-inch round pie dish. Tuck it in with your fingers, making sure it is smooth. Pour and spread filling evenly into pie dish. Dot the pieces of butter on top of the filling. Set aside at room temperature or in the refrigerator as you assemble the top pie crust.
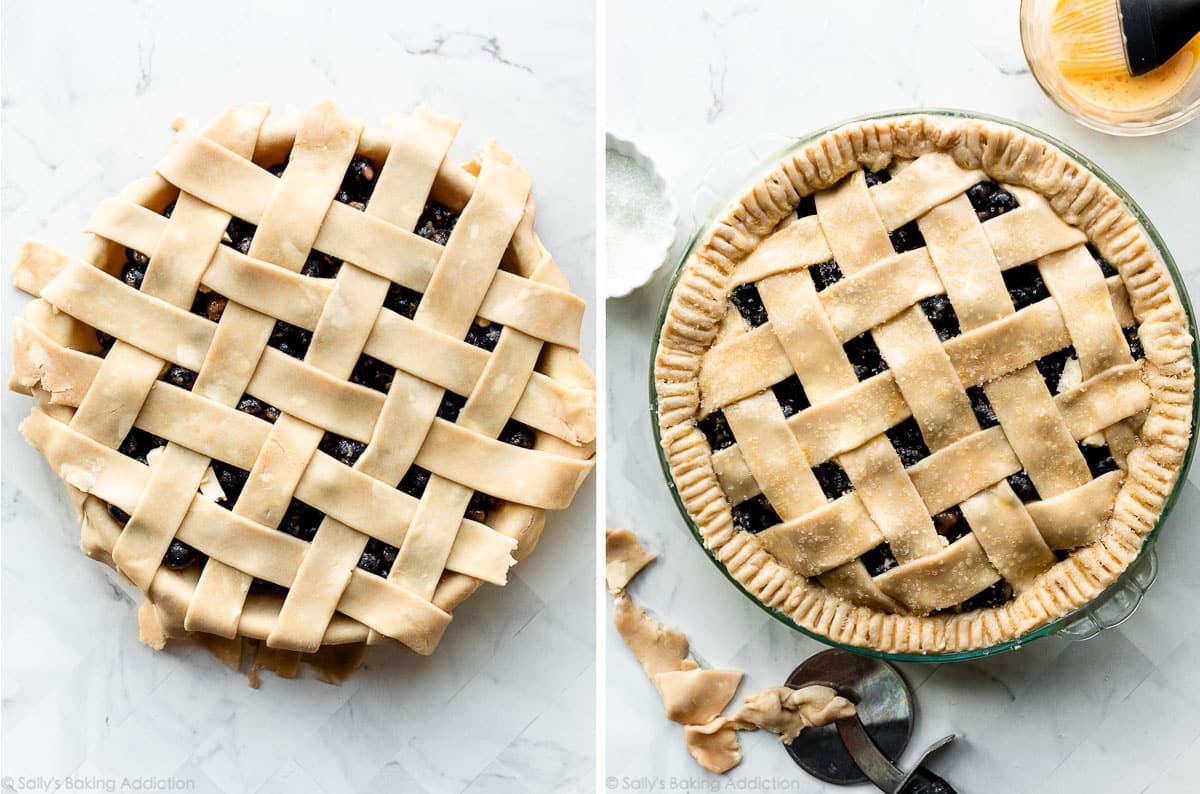
- Arrange the lattice: Remove the other disc of chilled pie dough from the refrigerator. Roll the dough into a circle that is 12 inches diameter. Using a pastry wheel, sharp knife, or pizza cutter, cut strips of dough; in the pictured pie, I cut 10 1-inch-wide strips. Carefully thread the strips over and under one another, pulling back strips as necessary to weave. (Here’s a lattice pie crust tutorial if you need visuals.) Press the edges of the strips into the bottom pie crust edges to seal. Use a small paring knife to trim off excess dough. Flute or crimp the pie crust edges with a fork.
- Lightly brush the top and edges of the pie crust with egg wash. Sprinkle the top with coarse sugar, if using.
- Bake the pie at 425°F for 25 minutes; then, keeping the pie in the oven, reduce the oven temperature down to 375°F (190°C). Place a pie crust shield (see Note for homemade shield) on the edges to prevent them from over-browning. Continue baking the pie until the filling’s juices are bubbling everywhere, including in the center, 40–50 more minutes. This sounds like a long time, but under-baking the pie means a soupy filling with paste-like flour and cornstarch chunks. If you want to be precise, the internal temperature of the filling taken with an instant read thermometer should be around 200°F (93°C) when done. Tip: If needed towards the end of bake time, remove the pie crust shield and tent an entire piece of foil on top of the pie if the top looks like it’s getting too brown.
- Remove pie from the oven, place on a cooling rack, and cool for at least 4 hours before slicing and serving. Filling will be too juicy if the pie is warm when you slice it.
- Cover leftovers tightly and store in the refrigerator for up to 5 days.
Notes
- Make Ahead & Freezing Instructions: This a great pie to make 1 day in advance, because the filling will have time to set overnight. The pie crust dough can also be prepared ahead of time and stored in the refrigerator for up to 5 days or in the freezer for up to 3 months. Feel free to prepare the filling 1 day in advance. See end of step 2. Baked pie freezes well for up to 3 months. Thaw overnight in the refrigerator and allow to come to room temperature before serving.
- Special Tools (affiliate links): Glass Mixing Bowl | Silicone Spatula or Wooden Spoon | 9-inch Pie Dish | Rolling Pin | Pastry Wheel or Pizza Cutter | Zester | Citrus Juicer | Pastry Brush | Sparkling Sugar | Pie Crust Shield | Instant Read Thermometer | Cooling Rack
- Blueberries: You need 6 cups (3 pints) of blueberries, which is about 2 lbs. (about 860g) total. I strongly suggest using fresh blueberries, not frozen. If you decide to use frozen, do not thaw first. The pie will take several more minutes in the oven if using frozen berries.
- Sugar: If your blueberries aren’t super sweet, such as in the wintertime, feel free to add another few Tablespoons of sugar. I find 2/3 cup (135g) is the perfect amount for sweet summer blueberries. You can increase to 3/4 cup (150g) if needed.
- Aluminum Foil Pie Crust Shield: You can purchase a pie crust shield or make one from aluminum foil. Cut a 14-inch square of aluminum foil. Fold in half. Cut out a 5-inch semi-circle on the folded edge. Unfold. Carefully fit the aluminum foil over the pie crust edges, securing down on the sides as best you can (careful, the pie is hot!), leaving the center of the pie exposed.
- Updated in 2022: The recipe you see above was very slightly updated in 2022 to produce a thicker, less soupy filling. The old recipe did not call for flour and instead used 1/4 cup (28g) of cornstarch. The old recipe also baked for less time (about 60 mins total), which is why the filling was often too runny. For a jammy, yet sliceable filling, bake the pie as instructed above in step 7.


Reader Comments and Reviews
That was my first ever attempt to make pie as well as the dough and it turned out amazing. Clearly the instructions are detailed if even a first timer succeeded.
I used berries that I picked and froze. Followed the recipe but when I cut into it there was a lot of juice. What did I do wrong?
Hi Beth, we strongly suggest using fresh blueberries, not frozen (see Notes after the recipe). Frozen berries let off a lot of liquid that keeps the pie from setting up properly. So sorry you had trouble!
I love this pie, but Sally, maybe you can help me out. This was not reaching the internal temp of 200 even with 30+ extra minutes in the oven. I have made it and pulled it out early twice because I had to go! The first time it was at like 180/190 and had a day to sit and was fine. The second time it hit like 170 and had 4 hours to sit and was runny. Do I just need to up the oven time? Or try a higher temp? Or convection bake? If convection bake, do I lower the temp? Or maybe this is a good reason to do some precooking of the filling? It’s just hard to keep crust cold while building the lattice if filling is warm!
Hi Tracy, sounds like the pie just needs to bake longer! Does your oven tend to run a little cooler? We always recommend using an in-oven thermometer so you know the exact temperature (most ovens are a little off!).
I will have to use a thermometer and see if it runs cool! Baking times for cookies have typically matched the recipe.
When I used frozen i did cook them down for they wouldn’t be watery and that worked for me
Best pie I have ever made.
I’m so pleased with the result of my blueberry pie – looks beautiful and tastes wonderful!
Great recepie..The filling over ran my crust though so it was hard to cut
Could barely see the crust
Delivered on the promise of no runny filling! Everybody raved about the flavor, too. Definitely added to my recipe box. Thank you!
We always have an abundance of fresh blueberries and I love a good pie! I am excited to try this recipe and see if it makes the grade with the family critics!
It got two thumbs up from my family and I love it too!
Hi! So excited to try this recipe – I used your pie crust recipe the other day to make my first-ever pie and it was great!
In my first pie attempt my filling recipe used quick-cooking tapioca instead of flour, and the tapioca box says it can generally be substituted one-to-one for flour in pie filling recipes. Do you think that would be okay to do for this recipe as well? Thanks!!
Hi Jenna, we’re so glad you had success with our pie crust recipe! We haven’t tested this recipe with tapioca, so are unsure of the results. If you try it, let us know how it goes!
what can I say, this is the best overall the blueberry pie an why:
Primo, the explanations and procedures are well explained and it’s easy to see why you need to do what you do.
Secondly, my wife is on a fishing trip with friends to the 51st parallel in northern Quebec, near Mistassini. There she picks a phenomenal quantity of wild blueberries, taking care to make sure that the bears don’t come roaming. We’ve renamed this pie the X-treamly Wild Blueberries Pie.
Thenk you, merci
This pie was the absolutely delicious! The touch of cinnamon really adds a little something to it as well. So good! Can’t wait to make it again.
My family picked blueberries earlier this summer and I would love to use them, but they are frozen. Can I use them? Or will they add too much liquid?
Hi Jessica! See recipe Notes: I strongly suggest using fresh blueberries, not frozen. If you decide to use frozen, do not thaw first. The pie will take several more minutes in the oven if using frozen berries. We hope the pie is a hit!
I either did something horribly wrong or this recipe is somehow completely wrong. It tastes heavily of flour and cornstarch. I prepared and baked it as directed and, since it wasn’t bubbling anywhere on the surface even at 50 minutes for the second baking phase, I added another 10 minutes – it still wasn’t bubbling but the crust was already golden brown and would have burnt if it had stayed in any longer. 4 hours of cooling later, I cut into it and my heart sank when I saw what had happened: A very thick white layer just above the bottom crust and below the fruit. Somehow most of the flour/cornstarch sank to the bottom during baking! Taste-wise, it is not nearly sweet enough (needs at least another 1/4 to 1/3 cup sugar), tastes heavily of semi-cooked flour and cornstarch (yuck!), I don’t think cinnamon was a good addition as it completely overwhelmed the blueberries, it barely tastes of blueberry (this is probably not the recipe’s fault – the blueberries that I can get are not exactly sweet/ripe/flavorful), but the worst part is that it has a thick white layer between the fruit and the crust with a terrible, horrendous texture residing somewhere between glue and paste! A total disaster. I kind of want to cry but I’ve learned over the years that crying won’t solve problems. I’ve carefully re-read the recipe to see if I missed anything important. I didn’t. I followed it precisely.
So why did my pie not turn out? Possibly because of where I live, which is an ultra-dry, hot desert climate at an elevation well above sea level. The original, pre-2022 all-cornstarch recipe that is alluded to here would probably have performed better where I live or even a pre-cook phase of some of the filling on the stove to kickstart the cooking process thus allowing finer control over the result or…. Well I know there are many things I could have tried but I went and followed this recipe to the letter because it looked and sounded like it would be a surefire success while being relatively simple in preparation. I should have listened to that voice in the back of my head yelling at me: “You’re dumping in a 1/4 cup of…flour?!”
This is my first ever homemade baked fruit pie. I’ll suffer through eating it because I hate wasting food, but what a waste of fruit. I’ve made cold fruit pies before like fresh strawberry pie or pudding pies in a prebaked and cooled crust and those turned out just fine. I’ve also baked store-bought pies from the frozen food aisle but those are overly sweet and taste like the factory they were made in. This is just my first homemade *baked* fruit pie. So I’m familiar with tenting and dealing with crusts. The crust I’m messing around with came out “okay” – it still needs some work but that’s a separate issue since the filling itself here is the true disaster.
Whipped cream is the only thing I can think of at the moment that I’ve got on hand to try to salvage this pie. While whipped cream covers over a multitude of baking sins, good pies do not need whipped cream! I’ve had good blueberry pie. What I made today using this recipe is not a good blueberry pie. I will bury this pie under a mountain of homemade whipped cream, say a eulogy for the pie, and also not tell my doctor how my heart valves wound up getting clogged.
I hate to write/leave negative reviews because they can tank a reputation. I can generally cook an amazing meal that beats most restaurants. I can follow most recipes to the letter. Bread and pie *baking* are currently somewhat outside my area of expertise – things I normally just buy – but figured I’d try my hand at it. This is a major setback and extremely disappointing. I don’t blame you though nor am I mad/angry at anyone, including myself. Everything is a learning experience and I’ll dust myself off and try again in the future but with significant modifications.
I used the filling for a dump cake and it was perfect! The filling held together as promised and was absolutely delicious!
The first time I made this pie my husband took the first bite and rolled his eyes and said OMG. The pie is perfect! I have been making pies for years and hated how the juices all ran out of it when the first slice is taken to put on the plate. This recipe is spot on. There is no juice falling out and the berries stay right where they are supposed to do. I am known for my pies and it didn’t let me down. Thank you thank you.
Wow!!! Everything you promised it would be! Simple to put together. No pre-cooking the filling. It baked up beautifully. Cooled and sliced beautifully!
Easy to follow – clear directions. This pie was my first attempt T blueberry pie- it was amazing! Thanks you!
Thanks so much for giving this pie recipe a try, Genni!
Delicious! Followed recipe exactly. Used store bought crust though.
I cooked it the full time. Great recipe!
Perfect as described, you can eat it before the 4 hour cool time if you like hot melty filling like I do
I absolutely love this pie. My problem is my crust looks burned even if I totally tent it with foil after cooking it at 425. Is there anything I can do? Cover it from the beginning? Turning down the temp of oven?
Hi Lori, you can definitely tent it from the beginning if you find that works best for your oven.
I was wondering if you could use blueberry pie filling for this? Or would the taste be different or the crust get soggy? Thank you!
Hi Willa, it would be different, yes. Let us know if you try this homemade blueberry pie!
My all butter pie crust became very hard during the 2 and a half hrs. I chilled it. Is this common ? So, I’m letting it warm up to be able to roll it. I followed every step exactly as written. Any hints for next time ?
Hi Thomas, it will definitely stiffen up in the fridge. We want to keep the fats cold so they don’t melt!
I made this pie for my family and it was a big hit. More importantly it exceeded my expectations. It cut beautifully and the lemon gave it just the right amount of contrast with the sweet blueberries. I used Sally’s pie crust because mine fell apart when trying to make the lattice and Sally’s worked perfectly. I’m about to make a cherry pie. This pie is worth the effort. After making it a few times I’m sure it will get easier and easier.
Super recipe! It’s a whole lot of work getting so many together but then it’s so worth it! One thing.. in less than 20min my crust was already burning because of the sugar I had put on top (which I usually don’t). It was a brown bio sugar.. because of that
Great Pie. I always precook my filling for about 5 mins without the butter, then I add approx 1 cup of uncooked blueberries. This helps with the pie crust not caving in or a huge space between fruit and top crust. Plus it’s not soupy or too runny
I made this today but with my own French tart dough recipe (400 g flour, 60 g sugar, pinch salt, 200 g butter, 2 egg yolks, about 1/4 cup water, then 1 hour in the fridge) and I brushed the bottom crust with an egg white wash. It was absolutely perfect, it sliced beautifully, it was not too sweet and tasted so good. The directions are top notch, I particularly appreciated the photos showing the difference between a “too dry” filling and how it should look like. Also the fact that you gave metrics for the recipe, much easier to use in France. My lattice top didn’t look that great though but hopefully practice will make perfect. Thanks for a great recipe. Will 100% make it again.
Hi Sally, will frozen blueberries also work? Thank you
This is the best blueberry pie I have ever made!
I’ve tried a dozen different blueberry pie recipes over the years and my filling is always runny, this recipe is no exception. Anyone have any tips? I followed this recipe exactly and even let the pie cool in the refrigerator for several hours, it was still a soupy mess when I sliced into it. It doesn’t look like the picture of the pie slice at all. I guess maybe I need to leave it in oven another 45 minutes next time, I don’t see any other solution.
Hi Rick! Did the filling bubble throughout the pie? We would continue baking until you reach that visual cue.
I am rolling out my pastry casing and lattice strips this morning for a blueberry lattice pie I intend to serve in a few weeks.
May I have your opinion on the following, is it better to:
a) prep entire pie, freeze it raw, bake from frozen, or
b) prep entire pie, freeze it raw, thaw, then bake, or
c) prep entire pie, bake, freeze, then thaw
My glass pie dish handles freezer/hot oven without risk of thermal shock. Wondering if there is a preferred technique wherein flavour/texture is not compromised.
Hi Elaine, We have found that when we freeze an unbaked pie, the crust can become soggy. We prefer to bake it first, and then freeze.
Can I substitute huckleberries for the blueberries ?
Hi Janet, we haven’t tried it, but don’t see why not! If you try it, please let us know how it goes!
Trying this tonight!