

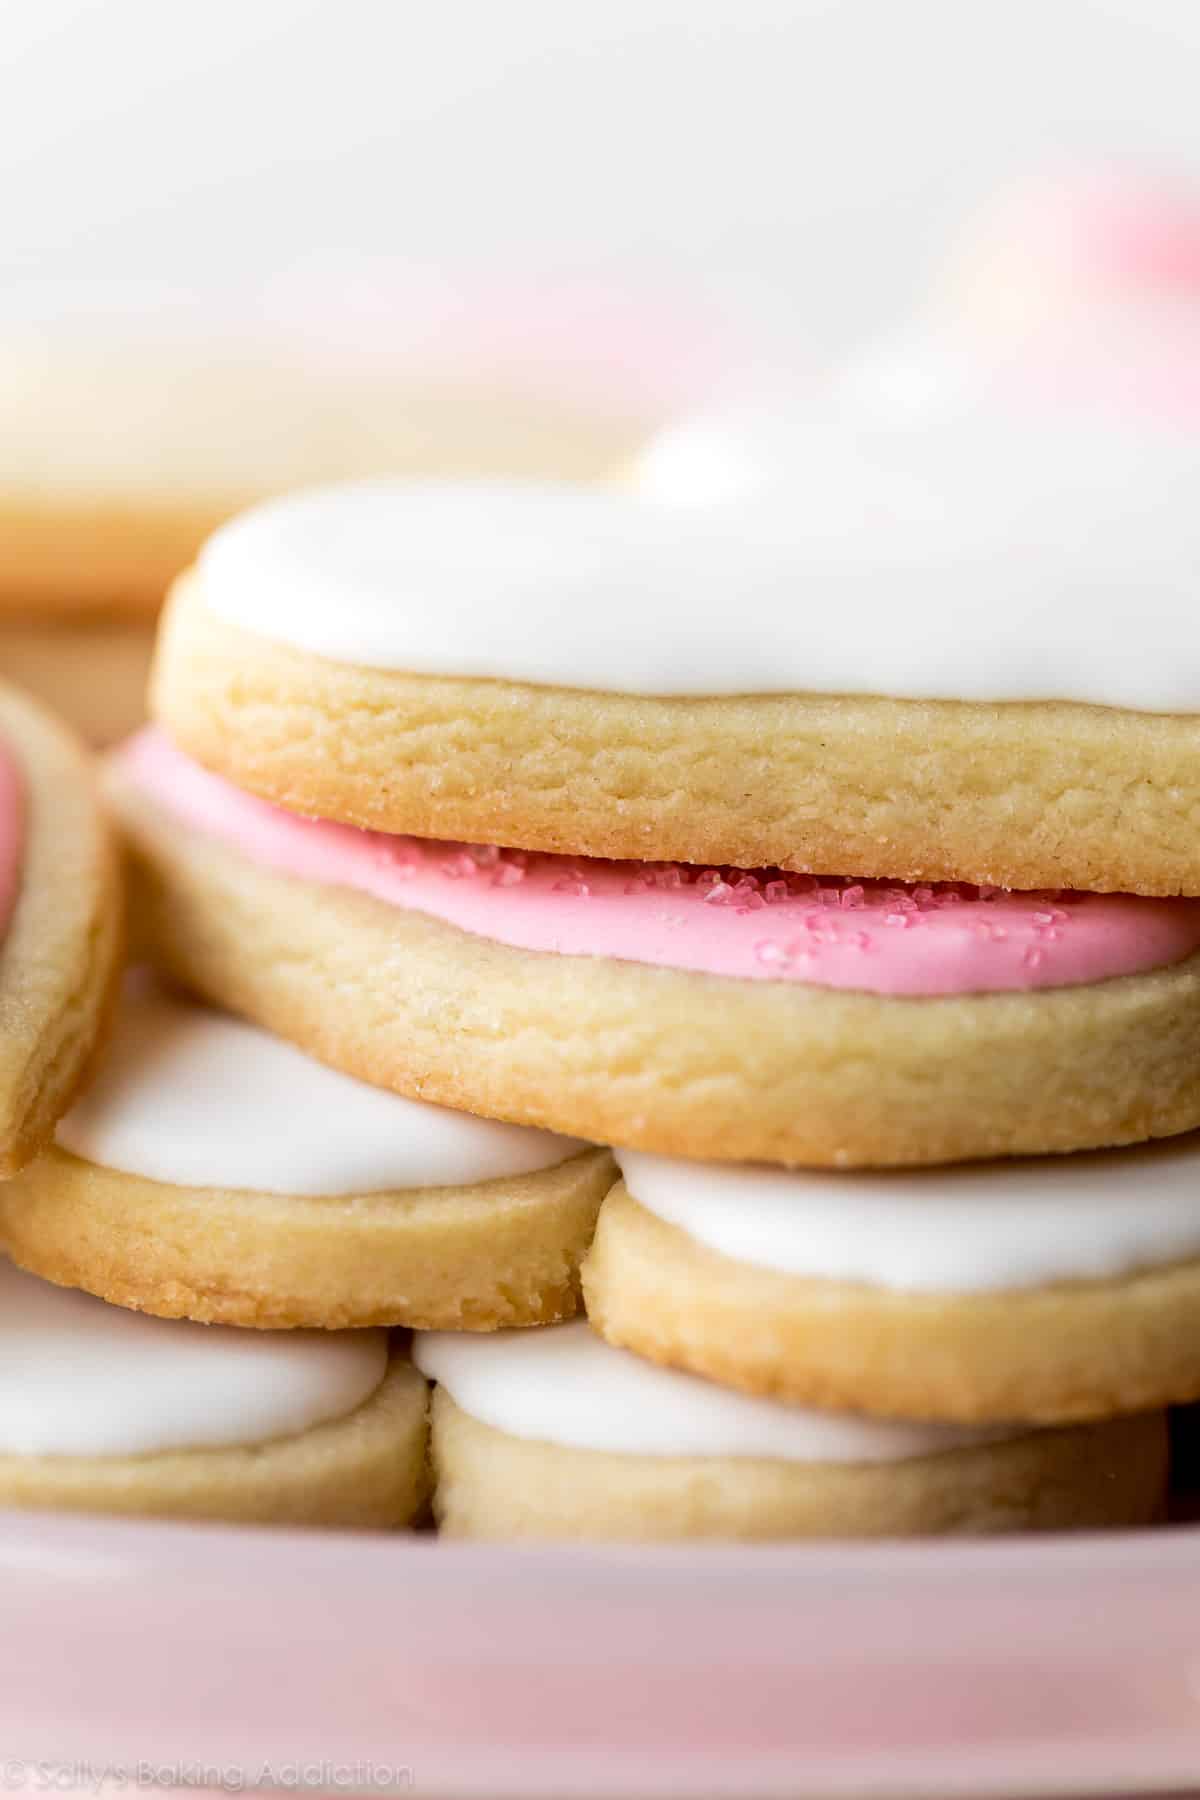
With crisp edges, thick centers, and room for lots of decorating icing, I know you’ll love these soft cut-out sugar cookies. Use your favorite cookie cutters and try my classic royal icing.
Originally published on my website in 2014, this recipe is a massive fan favorite. You’ll also find the recipe in my New York Times best-selling cookbook, Sally’s Baking 101.

This is my flagship recipe for cut-out sugar cookies. I’ve made them at least 38577 times (imagine all the butter), so I figured it’s time to share new recipe tips, a video tutorial, and more helpful information.
Why You’ll Love These Sugar Cookies
- Soft, thick centers with slightly crisp edges
- Irresistible buttery vanilla flavor
- Leave plain or flavor with extras like maple, cinnamon, and more
- Hold their shape
- Flat surface for decorating
- Stay soft for days
- Freeze beautifully
Sugar Cookies Video Tutorial

Overview: How to Make Sugar Cookies with Icing
- Make cookie dough. You only need 7 or 8 ingredients. With so few ingredients, it’s important that you follow the recipe closely. Creamed butter and sugar provide the base of the cookie dough. Flour and egg give the cookies structure, and vanilla extract adds flavor. I almost always add a touch of almond extract for additional flavor and highly recommend that you try it too! Baking powder adds lift, and salt balances the sweet. So many *little ingredients* doing *big jobs* to create a perfect cookie. By the way, I also have a recipe for chocolate sugar cookies!
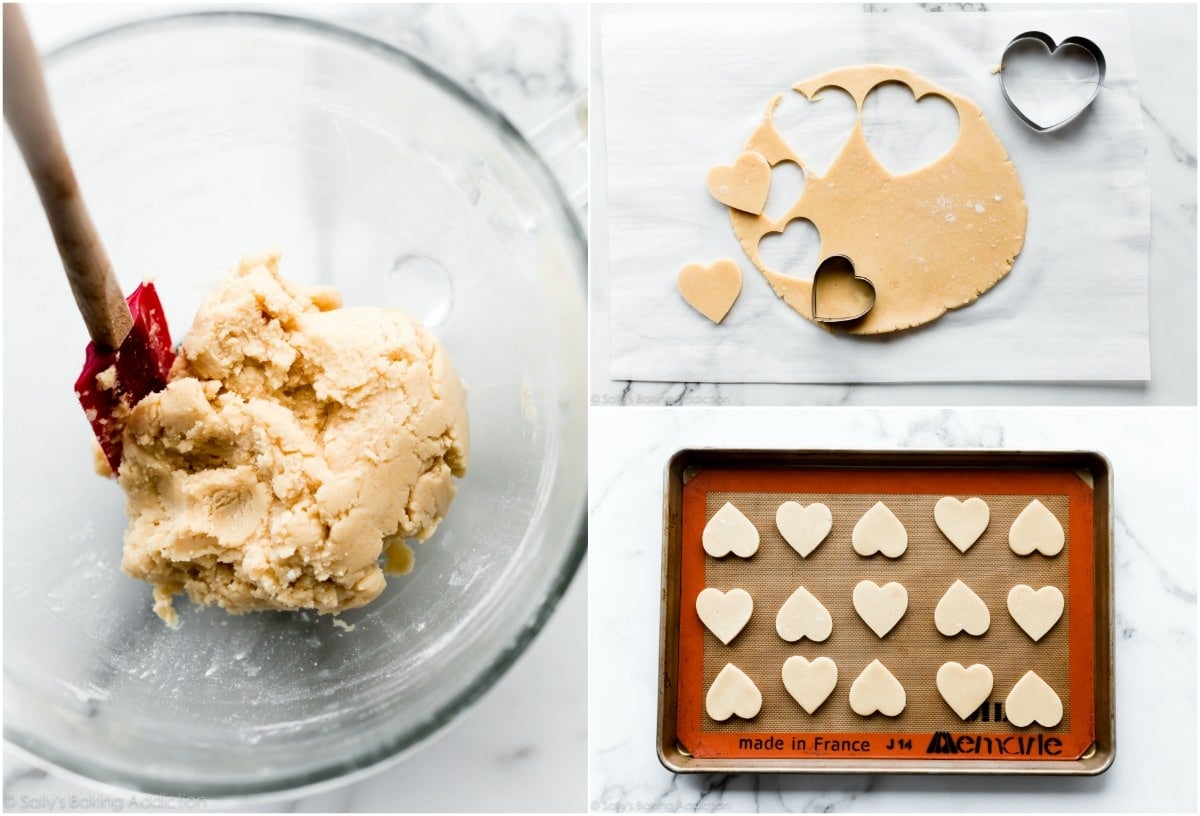
- Divide in two pieces. Smaller sections of dough are easier to roll out.
- Roll out cookie dough. Roll it out to 1/4 inch thick. If you have difficulty rolling out dough evenly, try this adjustable rolling pin. Speaking from experience—it’s incredibly handy!
- Chill rolled-out cookie dough. Without chilling, these cookie cutter sugar cookies won’t hold their shapes. Chill the rolled-out cookie dough for at least 2 hours or up to 2 days.
- Cut into shapes. If you need suggestions for cookie cutters, I love Ann Clark brand. (Not sponsored, just a genuine fan!) Some of my favorites include this heart set, dog bone, snowflake, snowman, leaf, and a pumpkin. I also use and recommend these heart cookie cutters.
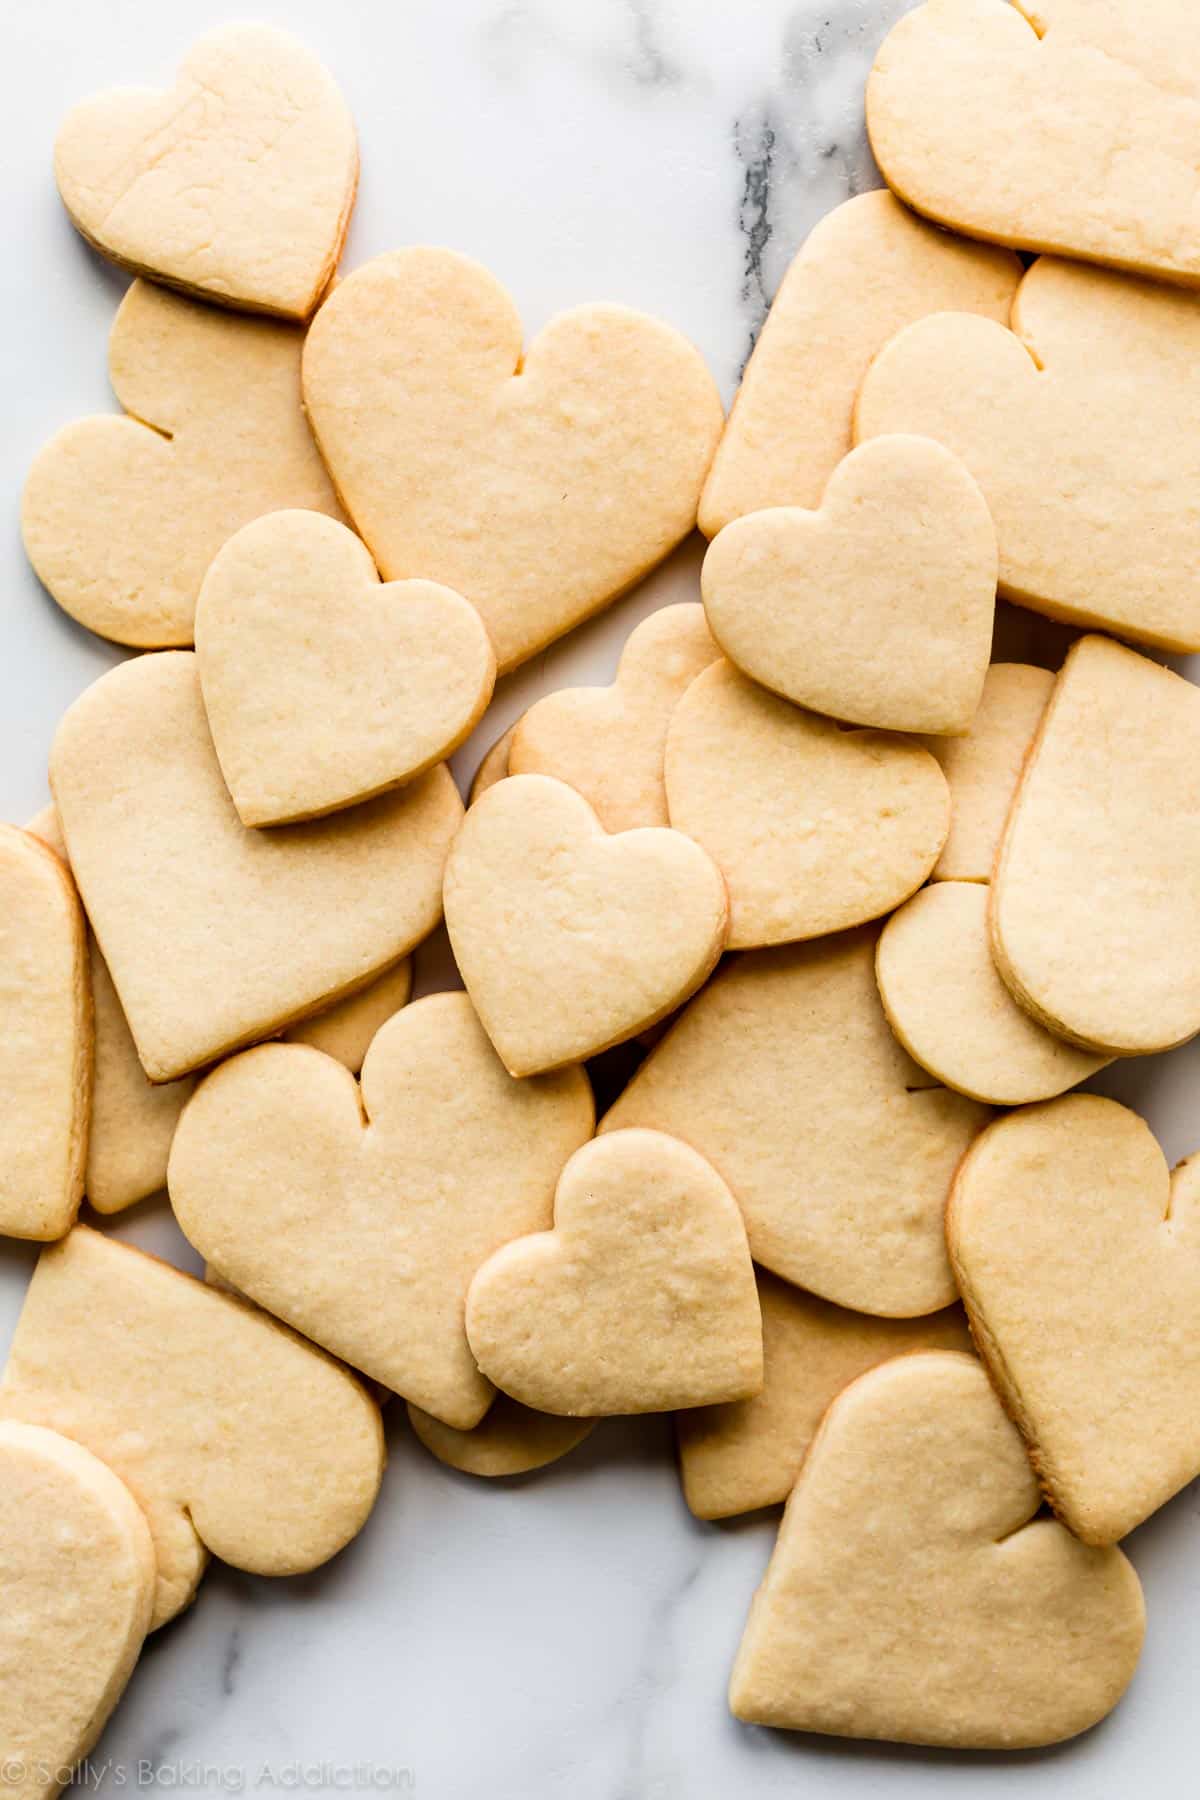
- Bake & cool. Depending on size, the cookies take about 11–12 minutes.
- Decorate. See my suggested icings below. I also have a tutorial on how to decorate sugar cookies with even more helpful decorating tips.
Have a little flour nearby when you’re rolling out the cookie dough. Keep your work surface, hands, and rolling pin lightly floured. This is a relatively soft dough.
The Trick Is the Order of Steps
Notice how I roll out the dough BEFORE chilling it in the refrigerator? That’s my trick and you can see me doing it in the video tutorial in this post.
Let me explain why I do this. Just like when you’re making chocolate chip cookies, to prevent the cookies from over-spreading, the cookie dough must chill in the refrigerator. Roll out the dough right after you prepare it, then chill the rolled-out dough. (At this point the dough is too soft to cut into shapes.) If you chill the cookie dough and then try to roll it out, it will be too cold and difficult to work with.
I also divide the dough in half before rolling it out, and highly recommend you do the same. Smaller sections of dough are simply more manageable.
Another trick! Roll out the cookie dough directly on a silicone baking mat or parchment paper so you can easily transfer it to the refrigerator. (Parchment paper will slide around on your counter, so I always place a piece of parchment paper on top of a silicone baking mat to roll the dough without slippage.)
Pick up the sheet of parchment with the rolled-out dough on top, transfer it to a baking sheet, and place it in the refrigerator. You don’t need to make room for two baking sheets in your refrigerator—simply stack the pieces of rolled-out dough on top of each other, with the parchment paper in between.
How Thick Do I Roll Sugar Cookies?
These sugar cookies remain soft because they’re rolled out pretty thick. Roll out the cookie dough to about 1/4 inch thick or just under 1/4 inch thick. Yes, this is on the thicker side and yes, this produces extra thick and soft cookies. If rolling out cookie dough doesn’t sound appealing, try my drop sugar cookies instead.
Sugar Cookie Icing
I have 3 sugar cookie icing recipes, and you can choose whichever works best for you.
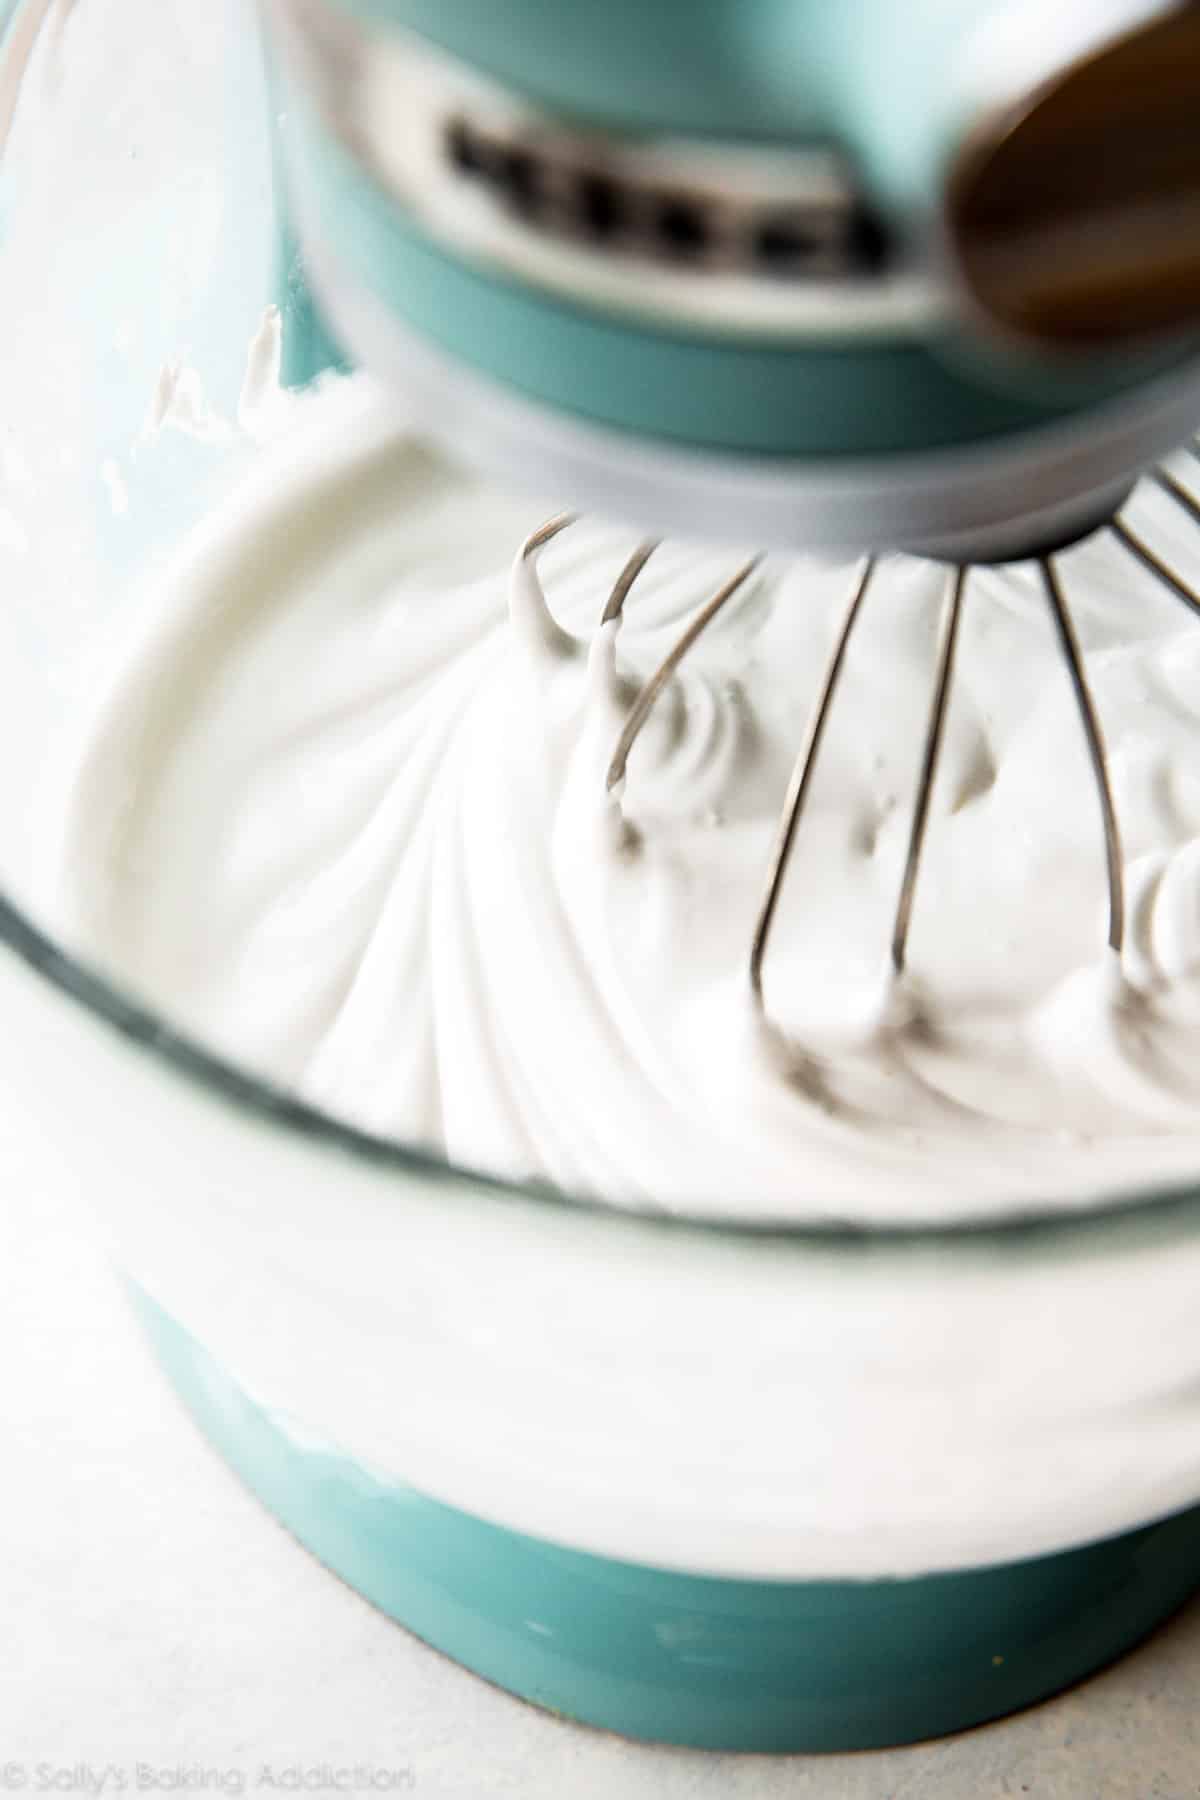
- Favorite Royal Icing: This royal icing is my preferred sugar cookie icing because it’s easy to use, dries within a couple of hours, and doesn’t taste like hardened cement. (It’s on the softer side!) I make it with meringue powder. Meringue powder takes the place of raw egg whites, which is found in traditional royal icing recipes. It eliminates the need for fresh eggs, but still provides the same consistency. You can find meringue powder in some baking aisles, most craft stores with a baking section, and online. The 8-ounce tub always lasts me a good while. The trickiest part is landing on the perfect royal icing consistency, but I provide a video in the royal icing recipe to help you.
- Easy Cookie Icing: This easy cookie icing is ideal for beginners. It’s easier to make than royal icing because you don’t need an electric mixer and the consistency won’t really make or break the outcome. However, it doesn’t provide the same sharp detail that royal icing decorations do. It also takes a good 24 hours to dry.
- Buttercream: This cookie decorating buttercream is also excellent for beginners. You can tint it any color you like, flavor it, and spread it on with a knife or use piping tips. It soft-sets after a few hours, meaning you can carefully stack the cookies for storage.
The pictured heart-shaped cookies are decorated with my royal icing using Wilton piping tip #4. If you’re not into piping tips, you can simply dunk the tops of the cookies into the icing, like we do with these mini animal cracker cookies. 🙂
Sugar Cookie Tips & Tools
Before I leave you with the recipe, let me suggest some useful sugar cookie tools. These are the exact products I use and trust in my own kitchen:
- Electric Mixer (Handheld or Stand Mixer)
- Baking Sheets
- Silicone Baking Mats or Parchment Sheets
- Rolling Pin or this Adjustable Rolling Pin
- Food Coloring: Liquid food coloring can alter the consistency of the icing, so I recommend gel food coloring. For the pictured cookies, I used a few drops of dusty rose and 1 drop of sky blue. This Americolor Soft Gel Paste Color Kit is great to have if you do a lot of decorating and want to have a variety of colors on hand.
- Piping Tips/Squeeze Bottle: If you’re using royal icing, I recommend Wilton piping tip #4 for outlining and flooding. This is a wonderful basic piping tip to have in your collection. If you’re using my easy glaze icing, I recommend using a squeeze bottle.
- Piping Bag: If you’re using royal icing and a piping tip, you need a disposable piping bag or reusable piping bag.
- Couplers: Couplers are handy if you have multiple colors of icing and only 1 tip, and need to move the tip to the other bags of icing.
- Cookie Cutters: I like this heart-shaped cookie cutter, but you can use any shape you desire!
For even more recommendations, see this complete list of my favorite cookie decorating supplies.


Here’s What You Can Do With This Dough
- Christmas Sugar Cookies
- Striped Fudge Cookie Sandwiches
- Snowman Cookies
- Cinnamon Roll Cookies
- Stained Glass Window Cookies
- Valentine’s Day Cookies
- Maple Cinnamon Cut-Out Cookies
- St. Patrick’s Day Cookies
- Easter Cookies
- Fireworks Cookies
And if you’re craving sugar cookies with a little extra tang, try my cream cheese cut-out cookies with Nutella glaze.
Print
Soft Cut-Out Sugar Cookies
- Prep Time: 40 minutes
- Cook Time: 12 minutes
- Total Time: 3 hours (including chilling)
- Yield: 24 3-4 inch cookies
- Category: Cookies
- Method: Baking
- Cuisine: American
Description
With crisp edges, thick centers, and room for lots of decorating icing, I know you’ll love these soft sugar cookies as much as I do. The number of cookies this recipe yields depends on the size of the cookie cutter you use. If you’d like to make dozens of cookies for a large crowd, double the recipe. This recipe is also in my New York Times best-selling cookbook, Sally’s Baking 101.
Ingredients
- 2 and 1/4 cups (281g) all-purpose flour (spooned & leveled), plus more as needed for rolling and work surface
- 1/2 teaspoon baking powder
- 1/4 teaspoon salt
- 3/4 cup (12 Tbsp; 170g) unsalted butter, softened to room temperature
- 3/4 cup (150g) granulated sugar
- 1 large egg, at room temperature
- 2 teaspoons pure vanilla extract
- 1/4 teaspoon almond extract (optional, but makes the flavor outstanding)*
For Decorating
- Royal Icing, Easy Glaze Icing, or Cookie Buttercream (royal icing is pictured)
- Assorted sprinkles
Instructions
- In a medium bowl, whisk the flour, baking powder, and salt together. Set aside.
- In a large bowl using a handheld or a stand mixer fitted with a paddle attachment, beat the butter and sugar together on high speed until the mixture is light and creamy, about 3 minutes. Add the egg, vanilla, and almond extract (if using) and beat on high speed until combined, about 1 minute. Scrape down the sides and bottom of the bowl and beat again as needed to combine. Add the dry ingredients to the wet ingredients and mix on low speed until combined. The dough should be soft. If it seems too soft and sticky for rolling, beat in 1 more Tablespoon of flour.
- Divide the dough in half. Place each portion on a piece of lightly floured parchment paper or a lightly floured silicone baking mat. With a lightly floured rolling pin, roll the dough to about 1/4-inch thickness. Use a bit more flour if the dough seems too sticky. The rolled-out dough can be any shape, as long as it is evenly 1/4 inch thick.
- Lightly dust one of the rolled-out dough portions with flour. (This prevents sticking.) Place the second rolled-out dough portion, still on the parchment paper, on top of the first. Cover the dough tightly and refrigerate it for at least 2 hours and up to 2 days.
- Preheat the oven to 350°F (177°C). Line large baking sheets with parchment paper or silicone baking mats.
- Carefully remove the top piece of dough from the refrigerator. If it’s sticking to the bottom, run your hand under it to help remove it. Using a cookie cutter, cut the dough into shapes. Gather the scraps, reroll, and continue cutting until all the dough is used. (Note: It doesn’t seem like a lot of dough, but you get a lot of cookies from the dough scraps you reroll.) Repeat with the second piece of dough. Arrange the cookies 3 inches apart on the prepared baking sheets.
- Bake for 11–12 minutes or until the edges of the cookies are very lightly browned and set. If your oven has hot spots, rotate the baking sheets halfway through bake time. Allow the cookies to cool on the baking sheet for 5 minutes, then transfer to a cooling rack to cool completely before decorating.
- Decorate the cooled cookies with royal icing, easy cookie icing, or cookie decorating buttercream. Feel free to tint any of the icings with gel food coloring. See post above for recommended decorating tools. No need to cover the decorated cookies as you wait for the icing to set. If it’s helpful, decorate the cookies directly on a baking sheet so you can place the entire baking sheet in the refrigerator to help speed up the icing setting.
- Enjoy cookies right away or wait until the icing sets to serve them. Once the icing has set, these cookies are great for gifting or shipping. Store plain or iced cookies covered tightly at room temperature for up to 5 days. For longer storage, cover and refrigerate for up to 10 days. If decorated with cookie buttercream, cover and store decorated cookies at room temperature for up to 1 day, or in the refrigerator for up to 5 days.
Notes
- Freezing Instructions: Plain or decorated sugar cookies freeze well for up to 3 months. Wait for the icing to set completely before layering between sheets of parchment paper in a freezer-safe container. To thaw, thaw in the refrigerator or at room temperature. You can also freeze the cookie dough (before rolling it out) for up to 3 months. Prepare the dough through step 2, divide in half, flatten each half into a disc (like we do with pie crust), wrap each disc in plastic wrap, place both wrapped discs in a freezer-safe container, and freeze. Thaw the wrapped discs in the refrigerator overnight, then bring to room temperature for about 1 hour. Roll out the dough as directed in step 4, then chill the rolled-out dough in the refrigerator for 1 hour before cutting into shapes and baking.
- Special Tools (affiliate links): Electric Mixer (Handheld or Stand Mixer) | Baking Sheets | Silicone Baking Mats or Parchment Paper | Wooden Rolling Pin or Adjustable Rolling Pin | Heart-Shaped Cookie Cutter | Americolor Soft Gel Paste Color Kit | Piping Bags (Disposable or Reusable) | Couplers | Wilton Tip #4 | Squeeze Bottle
- Room Temperature: Room-temperature butter is essential. If the dough is too sticky, your butter may have been too soft. Room-temperature butter is actually cool to the touch. Room-temperature egg is preferred so that it mixes quickly and evenly into the cookie dough.
- Flavors: I love flavoring this cookie dough with 1/4 teaspoon almond extract as listed in the ingredients above. For more flavor, use 1/2 teaspoon. Instead of the almond extract, try using 1 teaspoon of maple extract, coconut extract, lemon extract, or peppermint extract. Or add 1 teaspoon pumpkin pie spice or ground cinnamon. If using lemon extract, you can also add 1 Tablespoon lemon zest.
- Icing: Use royal icing, easy cookie icing, or cookie decorating buttercream. See post above to read about the differences.
- Can I Double the Recipe? Yes. Double all of the ingredients and divide the dough into 3 or 4 portions in step 3.
- Be sure to check out my top 5 cookie baking tips AND these are my 10 must-have cookie baking tools.


Reader Comments and Reviews
I’m wondering how to store the rolled out dough in the refrigerator overnight? What do you place it on, and how do you remove it from the surface you are rolling it out on?
Roll out the cookie dough directly on a silicone baking mat or parchment paper so you can easily transfer it to the refrigerator. Pick it up, put it on a baking sheet, and place it in the refrigerator. If you don’t have enough room for two baking sheets in your refrigerator, stack the pieces of rolled out dough on top of each other.
This recipe is awesome! Cookies were perfectly soft and delicious and the almond flavor in there was amazing.
I have never had luck with sugar cookies of any kind, but especially with cut out cookies. My cut out cookies always spread – not these! These were easy to cut, kept their shape perfectly, and were absolutely delicious. Sturdy enough to do large cutouts decorated with royal icing, but still soft when you bite into them. I can’t wait to make these again!
I absolutely LOVE this recipe!! Its perfect! You can double it and even triple it and it comes out the exact same every single time! The measurements are spot on, even with the flour I haven’t had to add extra. I use only 1/4 tsp of the almond extract, as the 1/2tsp was too over powering. Thank you for sharing I have definitely booked this one in my favorites! The royal icing is also super easy to make and pairs perfectly.
Never need another sugar cookie recipe again. These are perfect. I like that they’re on the thicker side too. Thanks for sharing. Kids and parents both loved them.
Will this recipe work with a gluten free 1:1 substitute? Others we’ve tried have been super dry and grainy…any tips to help with that?
Hi Amy, I wish I could help but I have no experience baking with gluten free flour. Let me know if you try any!
I’ve done this with a good quality gluten free flour and upped the baking powder slightly. Worked perfectly
Made these tonight with my toddler. It was fun, easy, and some of the best cookies I’ve ever made. We added lemon extract and a squirt of lemon. We couldn’t stop eating them. Thanks. Gotta check out your other recipes.
So a few things.. I must have been half asleep when I decided to try making these. Realized after I tried to roll that I had forgotten the baking powder AND only put in 1 1/4 cup flour. So I put it all back in the mixer added the rest and then rolled them out to 1/4” thickness. I was barely able to make 12 round shaped cookies that were 3 1/2 round. The recipe claims to make about twice that.
It says 24, 4 in cookies I believe. They still turned out fine and are soft and tasty as you mention but i would need to double this recipe or plan to make much smaller size cookies. I obviously messed up from the get go though, so who knows, haha.
I’m glad you were able to save the dough and that the cookies you baked turned out well. Did you re-roll the “scraps” after you cut out your 12 shapes? If you keep re-rolling you should be able to get a minimum of 24 cookies.
Oh yes.. I used the scraps and re-rolled the dough. I’ll try them again and see what happens. Doesn’t look like anyone else has had this issue.. so must be me . They are delicious none the less!
These are amazingly delicious! ❤️ The almond extract gives it the big boosting flavor. We love it!! How would we go about doubling this recipe?
Hi Sally, your recipe looks delicious! Is the refrigeration a recommendation for those using cookie cutters? Would it be ok to roll he cookie dough into small approximate 1 table spoon balls, lightly coated in sugar then pressed into a circular shape with the bottom of a glass? If so, is the refrigeration step still recommended or can I skip that step and just prep the cookies to bake after the mixing is complete? Thanks
Hi Sarah, I recommend rolling the dough into balls, rolling in sugar, then chilling the shaped balls for 1-2 hours before baking. (They will over-spread otherwise.) I also have a drop sugar cookies recipe. You can skip the sprinkles.
This recipe was delicious. I have been making sugar cookies for many years, but your trick to roll it out with parchment paper, refrigerate, and then cut out the shapes was a total game changer for me! It was so easy and the cookies held their shape and stayed thick. It was also so much easier to do with my kids this way. Thank you!
I don’t know why I go to Pinterest instead of straight to your website when looking for recipes. I always wind up settling on your recipes, and like these cookies, they are always winners. These are my first sugar cookies, and they turned out like I’d been making them for years. I think it’s because you do such a great job explaining the science behind the cooking. Thanks for another great baking experience!
We just made this recipe for Easter, I’ve tried other recipes before for Christmas cookies but this one is a winner! Rolling the dough before chilling is life changing
Good vibes from México!
Thank you so much for a very successful recipe!!! I made TWO batches on Christmas, for my 5 year old and his friends and they were ecstatic!!! We repeated it,today,following your steps to the letter,again and was huge success for Easter cookies!!! Will decorate tomorrow!!! Keep up the good work,Sally! Keep inspiring! Jesus is risen and we are his witnesses! Happy Easter!
Made these cookies with my 9 year old son for Easter and they turned out great! Thanks for the easy receipt with the video, I’m not a baker at all but we had fun making these!
Did u change the recipe? I’ve made these many times and they come out perfect but i noticed the pictures on the list changed and the past two times i them they didn’t come out well. The first ones were crumbly and the last ones were too wet even after adding extra flour.
Thank you! These were fantastic, you are right about the Almond extract. Also, rolling out sheets prior to refrigerating was much better. The cookies held their shape which is exactly what we wanted for decorating Easter cookies, plus they tasted so delicious.
Excellent! Rolling the dough and then refrigerating was so much easier! I added a little milk and baked on 350* for 10 min…rolled them out a little thicker than 1/4”.
Great recipe. My 11 year old made them (under my supervision) and they were delicious. We rolled them a little flat cause I prefer them crispy rather than chewy. Made them with the royal icing using pasteurized egg whites in lieu of meringue powder and they were excellent.
Seriously perfect! Made these for valentines gifts to co-workers and one gal told me the cookies were so good I should start selling them haha! Followed the recipe exactly for both the cookies and royal icing. Making again right now for some Easter treats! I will never need another sugar cookie recipe! Thanks so much sally!!
I haven’t finished making these yet but I have a question. Am I truly supposed to roll these out to a 1/4 inch? I divided my dough in two, rolled it out to a little thinner than 1/4 inch and when I placed my egg shaped cookie cutter (which is 3.75″ long and 2.5″ wide) it looks like I can get 4 cookies out of this, scraps not included. So that’s putting me at 8-10 cookies for this recipe. I’m wondering if I should roll it out much thinner?
Hi Lindsey! I’ve made these more times in the past 10 years than I can count and trust me, keep re-rolling the scraps. You’ll get a lot more cookies!
I’ve been meaning to thank you for responding to my question. You were right — I got way more cookies than I would have expected from the scraps (18 I think ). These are the best sugar cookies I’ve ever had and I’ve since used many of your recipes (love your lemon meringue pie!!!!) and told everyone I know about this site. I swear every recipe I try is the BEST version of it I’ve ever had.
Can you use Gluten free flour in this recipe?
So i tried the recipe last night and used half GF self raising and half GF plain flour and 1 teaspoon of xanthum gum, everything else was the same except i did not have almond extract so because the dough was still quite soft and sticky i added 2 tbs almond flour and it worked out great, taste is yummy and no issues. Thanks
Hi Sally! I have maybe a silly question, haha. How do you roll out the dough on parchment paper without the parchment paper moving all over my counter as I roll? it’s possible to do it, I just found it difficult. I had to get my husband to hold it down for me to make it easier. Didn’t know if you had a trick up your sleeve for this.
Love your recipes and always recommend you to friends!
Hi Erin! If I hold the rolling pin itself– not the handles– I have a much better grip on things and the parchment paper doesn’t slide around as much. It’s what I usually do!
I followed the recipe to a “T” twice and the dough is crumbly. I can’t roll out. Can you help?
Hi Annette! The flour may have been over-measured. This is a slightly crumbly dough, but comes together when you roll it out. Make sure you spoon and level it instead of scooping (or weigh it). The more you work with the dough (re-rolling scraps) the more it comes together. I hope my video tutorial is helpful.
Wishing I would have doubled this recipe! Delicious!
These cookies were great!! It took almost the whole day but it was worth it! I doubled the recipe. So we had too many cookies to decorate!! They were delicious!
I made a batch of these biscuits for my daughters baby shower with rolled fondant icing on top. I’m not really a baker and rarely make baked goodies but wanted to have a go at making these instead of the huge cost of buying them. My daughter and myself were so impressed and all the ladies thought they were professionally made. They tasted amazing. They definitely keep their shape while cooking. Definitely a recipe to keep.
Thank you sally
I am an EXTREMELY picky baker and have been let down time and time again with baking blogs carelessly throwing up recipes that look amazing, only to find that the quality is poor. I have made several of Sally’s Baking Addiction recipes now and am blown away with her attention to detail while recipe testing. Every single recipe has delivered on what she has promised and these sugar cookies are EXACTLY what you want a decorated sugar cookie to be. I wait in anticipating for the next holiday just so I have an excuse to take out my cookie cutters and go to down on my double (sometimes triple) batch of these! Please do yourself a favor, make these cookies, and everything else she posts! Well done Sally!
These were really good. With the almond extract, they almost tasted like a combo of a sugar cookie and marzipan. I like the rolling out then chilling. I popped it in the freezer for about 5 minutes and it worked great to cut shapes. The excess, I rolled into balls and smashed into colored sugar. They were great, too. My husband ate 3 when they cooled. I had to put them away!
Thank you! I followed your directions perfectly, and appreciated the video on the frosting consistency. Next time, I’ll make it a little less thin, but that was my error. The taste, and detailed instructions were so very awesome! Great results!!
Awesome recipe. Made mini cut out cookies with my 3 and 5 year old grandsons. They could easily use the mini cookie cutters. Was like playing with play dough to them. We just added some sugar sprinkles instead of icing. They came out perfect with a bit of reduced baking time. Yummily and addictive.