

This post is heavily detailed to teach beginner bakers how to make fluffy, yet rich 7 ingredient chocolate soufflé. If you’re already a pro, you can scroll right down to the recipe. But for best success, I recommend reading all of my tips and explanations, as well as reviewing the video tutorial and step-by-step photos.
Along with creme brûlée, chocolate souffle is one of the most raved about, luxurious French desserts. But here’s the thing that most beginner bakers don’t realize: much like chocolate mousse, it sounds a lot more intimidating than it actually is. Trust me, I was a ball of nerves when I first attempted soufflé in a French dessert class 3 years ago. It’s where I learned to bake choux pastry, too. Once I got started on both, I realized I was perfectly capable—and you are too. In fact, many are surprised to learn that you only need 7 basic ingredients for chocolate soufflé and the entire process is about 45 minutes start to finish. (If that!)
And for those in need of gluten free dessert recipes, chocolate souffle fits the bill!
I’m going to walk you through each step so you feel confident when it’s your turn.
One reader, Sarah, commented: “Perfect recipe! I found the detailed instructions super helpful for my first attempt (which turned out so well!) and have kept this as my go-to recipe ever since! ★★★★★”
Another reader, Purna, commented: “Chocolate soufflé is my favorite dessert and I have always been intimidated by making it myself. Your recipe is so simple with every step explained that I finally gave it a shot, and needless to say, it was absolutely divine. Thank you so much! ★★★★★”
Chocolate Soufflé Details
- Texture: I applied some techniques I learned in class and adapted this recipe from Saveur‘s flourless soufflé as well as the bittersweet soufflé recipe found on New York Times. (Their recipe has deep, dark chocolate flavor and I found it a little heavy on the cream of tartar—just my opinion though.) The soufflé I make at home is semi-sweet. Each spoonful is perfectly balanced between (1) magically rich and (2) blissfully spongey with a set crackly top. It’s wild that one bite can encompass all this varying texture, but that’s why chocolate soufflé is so special. There’s just nothing like it.
- Flavor: Semi-sweet. I first prepared it with 1/4 cup of sugar, but reduced the final amount to 3 Tablespoons so more of the chocolate flavor comes through.
- Ease: I’m categorizing this with my advanced baking recipes simply because there’s a few moving parts and there’s an importance placed on the precise mixing methods. However, if you’re a beginner, don’t let that discourage you from trying it.
- Time: I appreciate that this recipe can go from oven to table immediately. No waiting for it to cool because soufflé will quickly fall. This recipe will take you no more than 45 minutes if using ramekins. It also joins 30+ others in my collection of Quick Dessert Recipes—ready in 1 hour or less!
This chocolate soufflé is a naturally gluten free recipe.
Video Tutorial: How to Make Chocolate Soufflé
Chocolate Soufflé Success Tips: What I’ve Learned
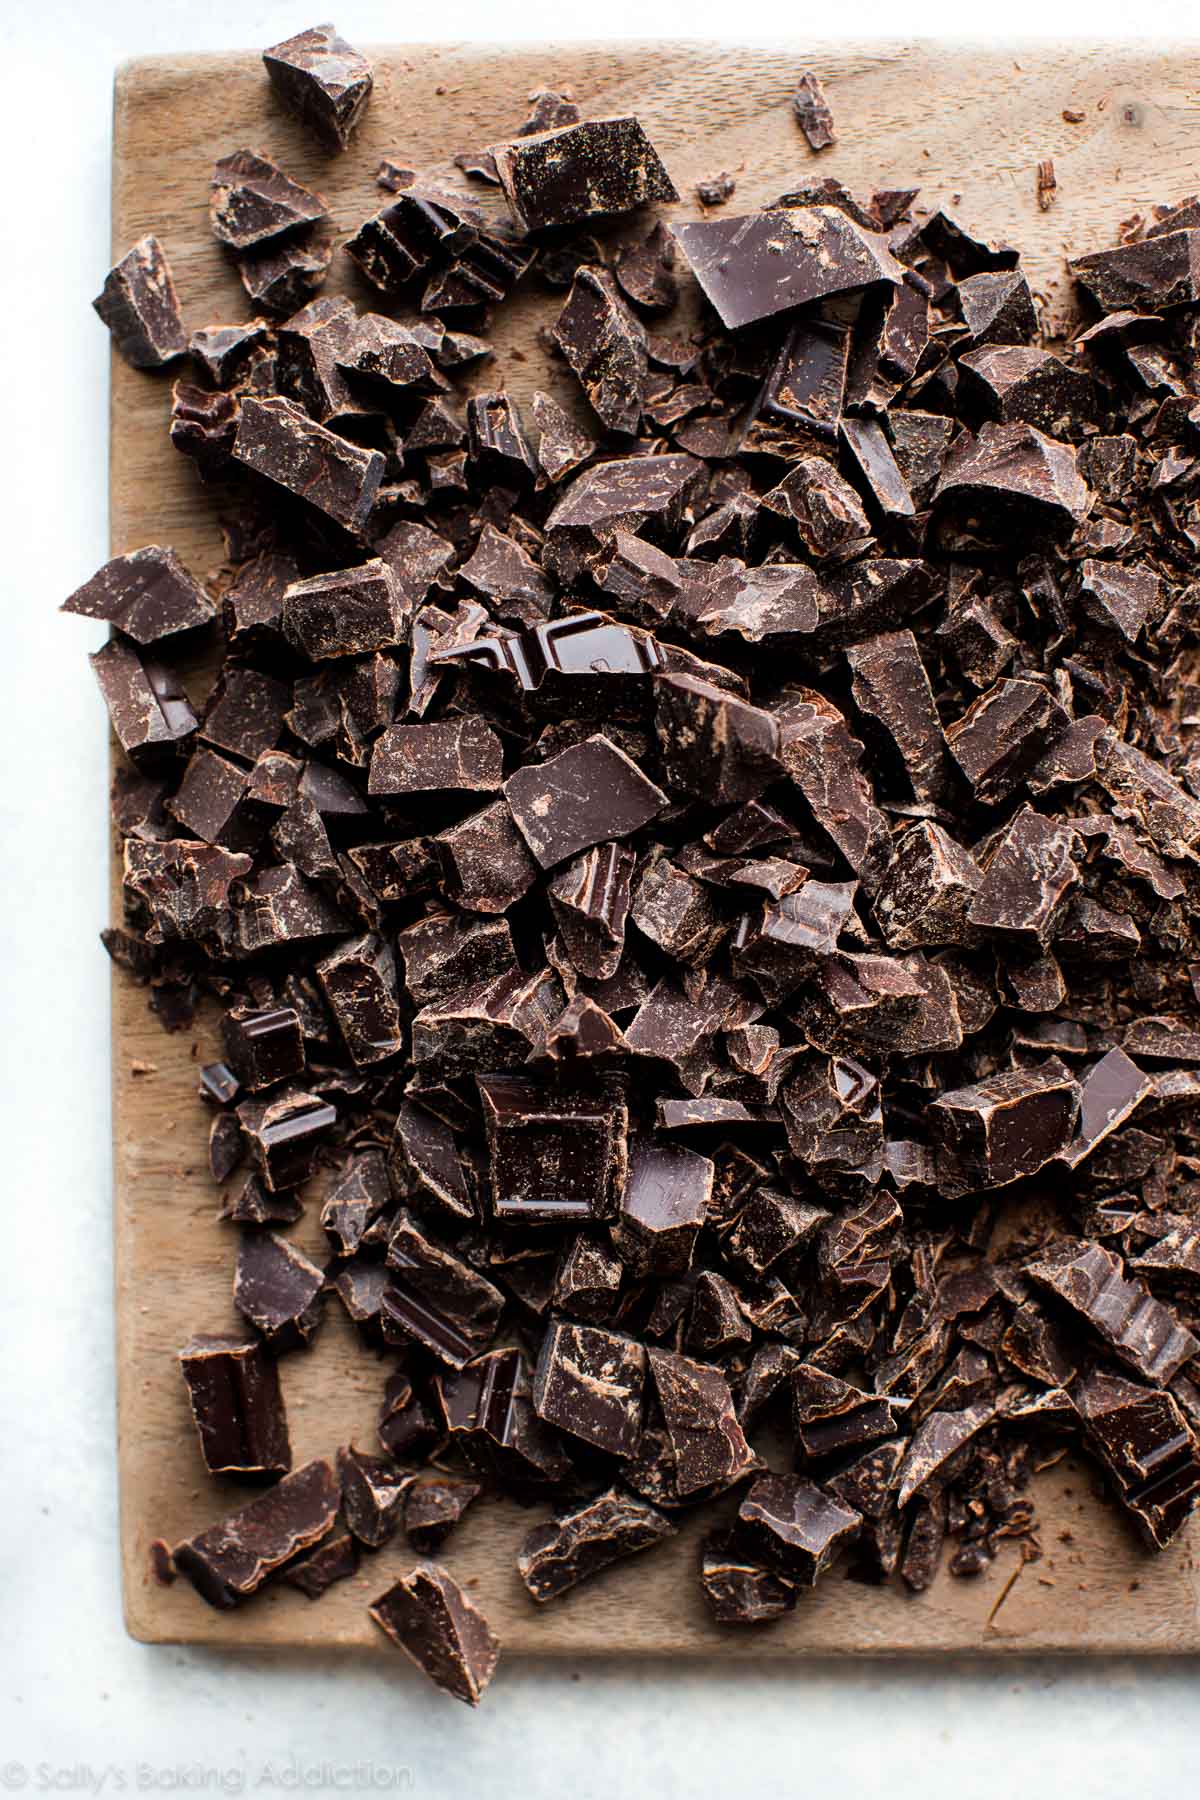
- Chocolate soufflé is only as good as the chocolate you use. I use and recommend semi-sweet or bittersweet baking chocolate. It’s sold in 4 ounce bars in the baking aisle near the chocolate chips. I use, love, and recommend Ghirardelli and Bakers brand. Do not use chocolate chips. The flavor, texture, and rise will be compromised.
- Whip the egg whites appropriately and fold in gently. You’ll notice that baking powder and soda are missing. That’s because all of a soufflé’s rise is from the whipped egg whites. If this step is skipped or changed, it will directly impact how your dessert rises. Beat egg whites and cream of tartar together until soft peaks form, then with the mixer still running, slowly add the sugar and beat until stiff peaks form. This is the same process we use for making chocolate swirled meringue cookies. We only use a small amount of cream of tartar, but it has a BIG job—it helps the egg whites hold their peaks. It’s an imperative ingredient that you cannot skip. In a pinch, the same amount of lemon juice or white vinegar can be used as a substitute. But for best results, use cream of tartar. Here are many more recipes using cream of tartar too. After your egg whites reach stiff peaks, very slowly and gently fold them into the chocolate mixture in 3 additions, always being careful to avoid excessive deflating.
- Chill the batter as the oven preheats. This is a super useful tip I learned in my class—as you preheat the oven, place the batter in the refrigerator. This quick 5-10 minute chill slightly thickens the batter and, from what I’ve experienced, helps the soufflés rise a bit taller. After refrigerating, spoon into your ramekins/dish. You could also cover and chill the batter up to 2 days in advance.
- Reduce oven temperature: Preheat the oven to a hot 400°F (204°C). Then immediately after you place the soufflés inside, reduce the temperature down to 375°F (191°C). Why? The initial hot burst of air will help the batter rise up, while the slightly lower heat will help evenly cook the centers.
Step-By-Step Photos
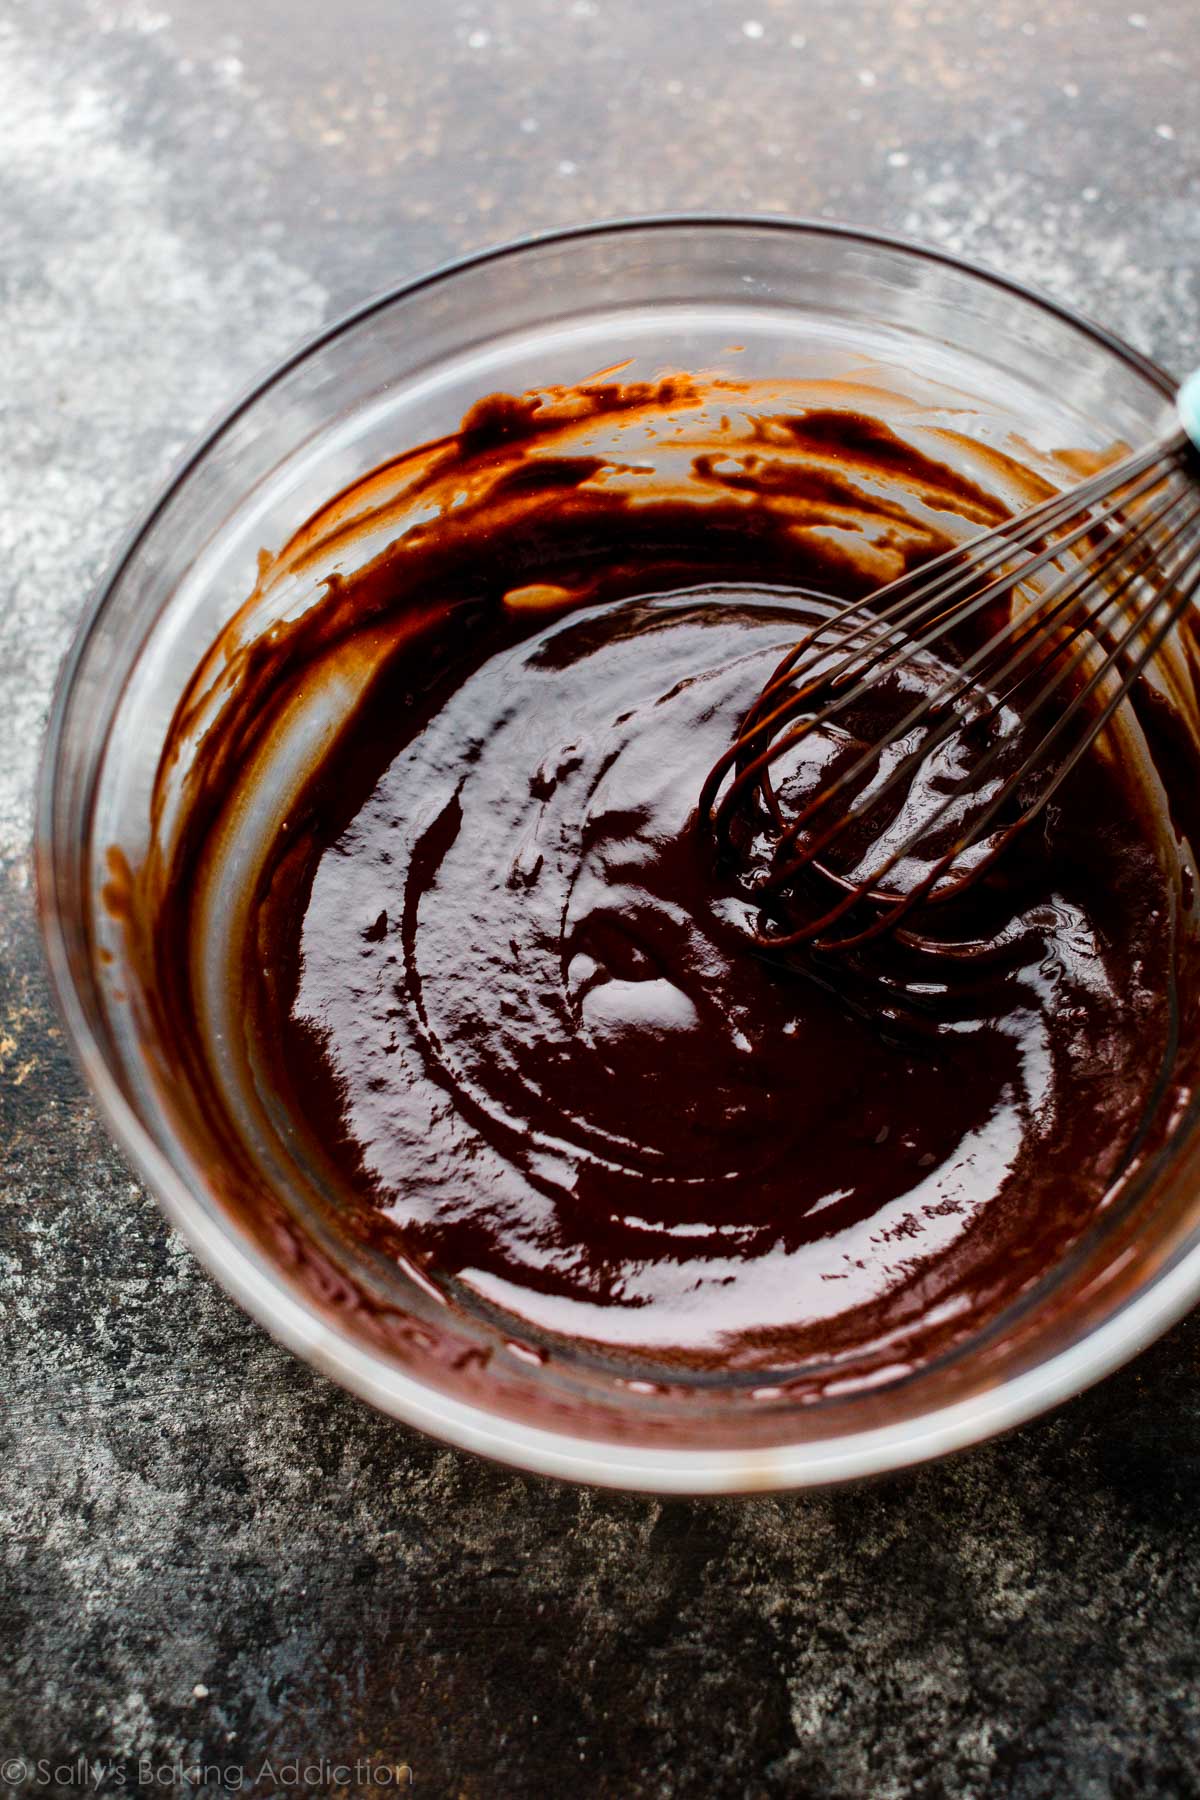
Chop up your quality chocolate, then melt it with butter in a double boiler or in 20 second increments in the microwave. Some chocolate soufflé recipes use heavy cream instead of butter, but I prefer the flavor, texture, and richness butter provides.
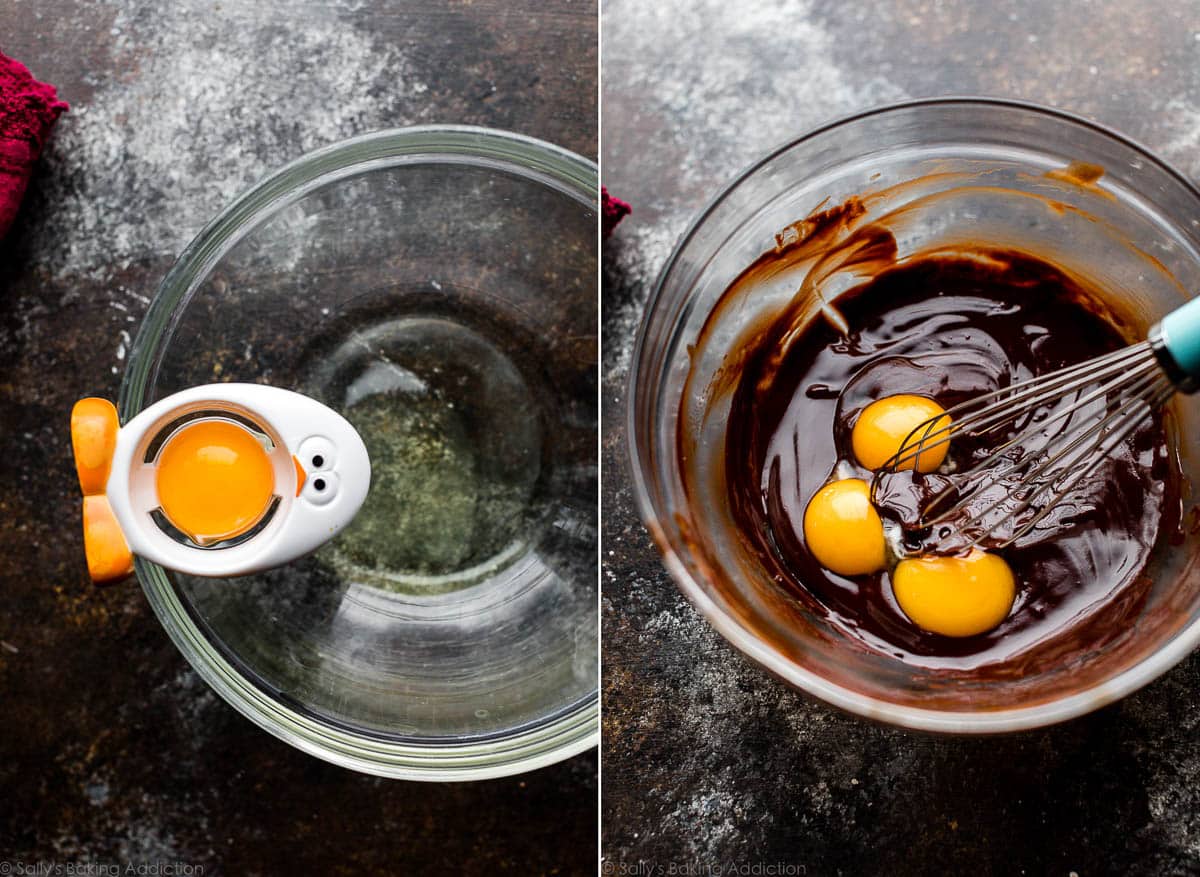
Below left: Separate your eggs. It’s convenient that this recipe uses 3 egg whites and 3 egg yolks—there’s no extra yolks or whites. If you’re interested, an egg separator always makes this task this easier. You don’t want any remnants of yolks in your egg white because any fat will prevent the whites from whipping properly.
Below right: Whisk egg yolks, vanilla, and salt into your chocolate/butter mixture.
Here is the chocolate/butter/yolk/vanilla/salt mixture:
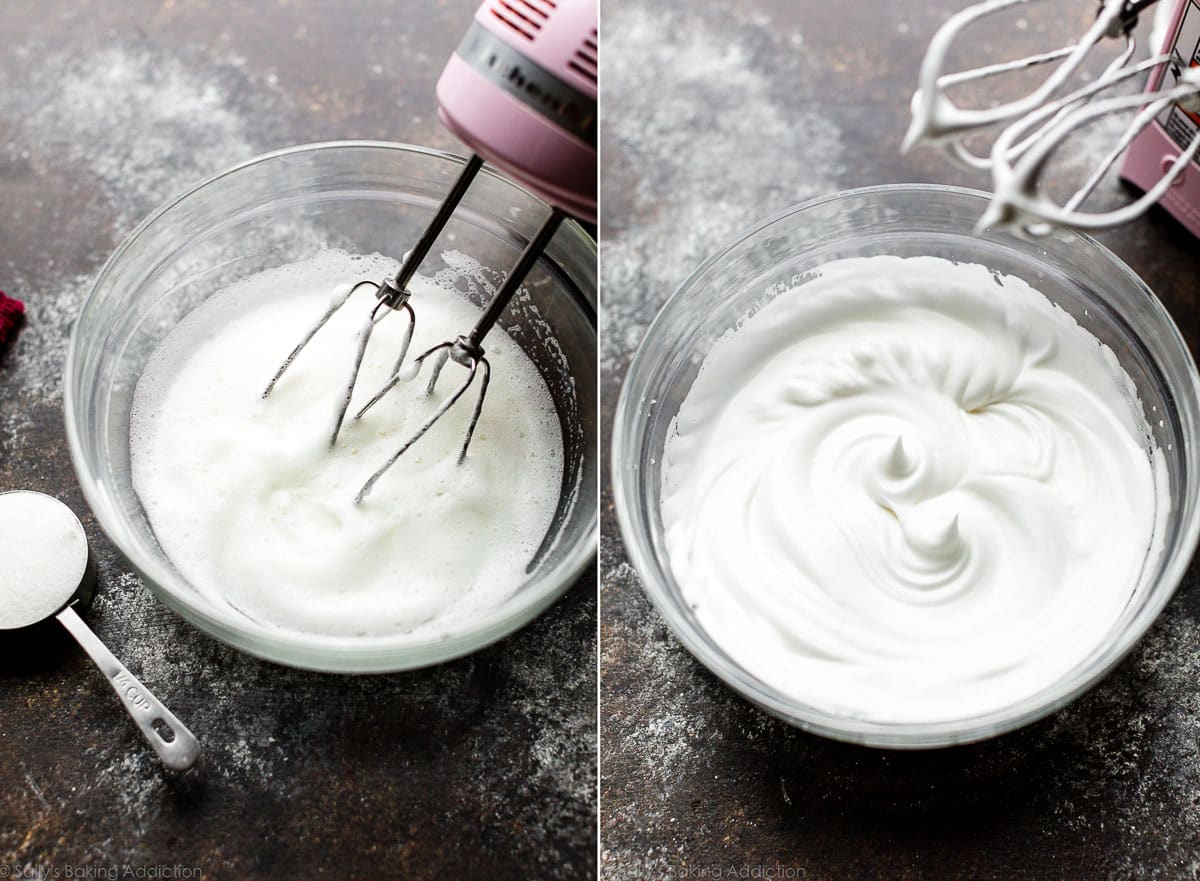
Below left: Whip egg whites and cream of tartar into soft peaks.
And below right: After you slowly add/beat in the sugar, the egg whites will considerably expand in volume and eventually reach stiff peaks.
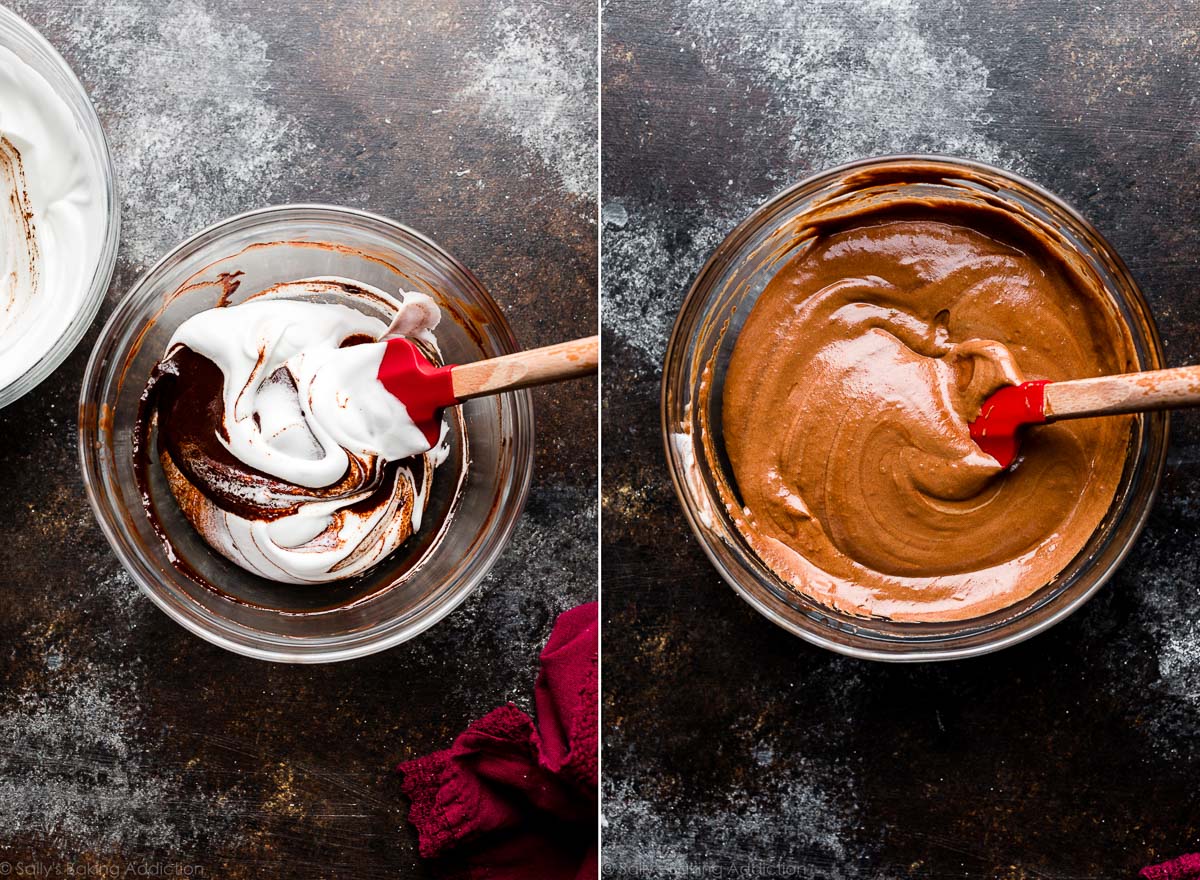
Below left: In 3 additions, slowly fold the beaten whites into the chocolate mixture.
And below right: Here is the batter after folding in all of the egg whites.
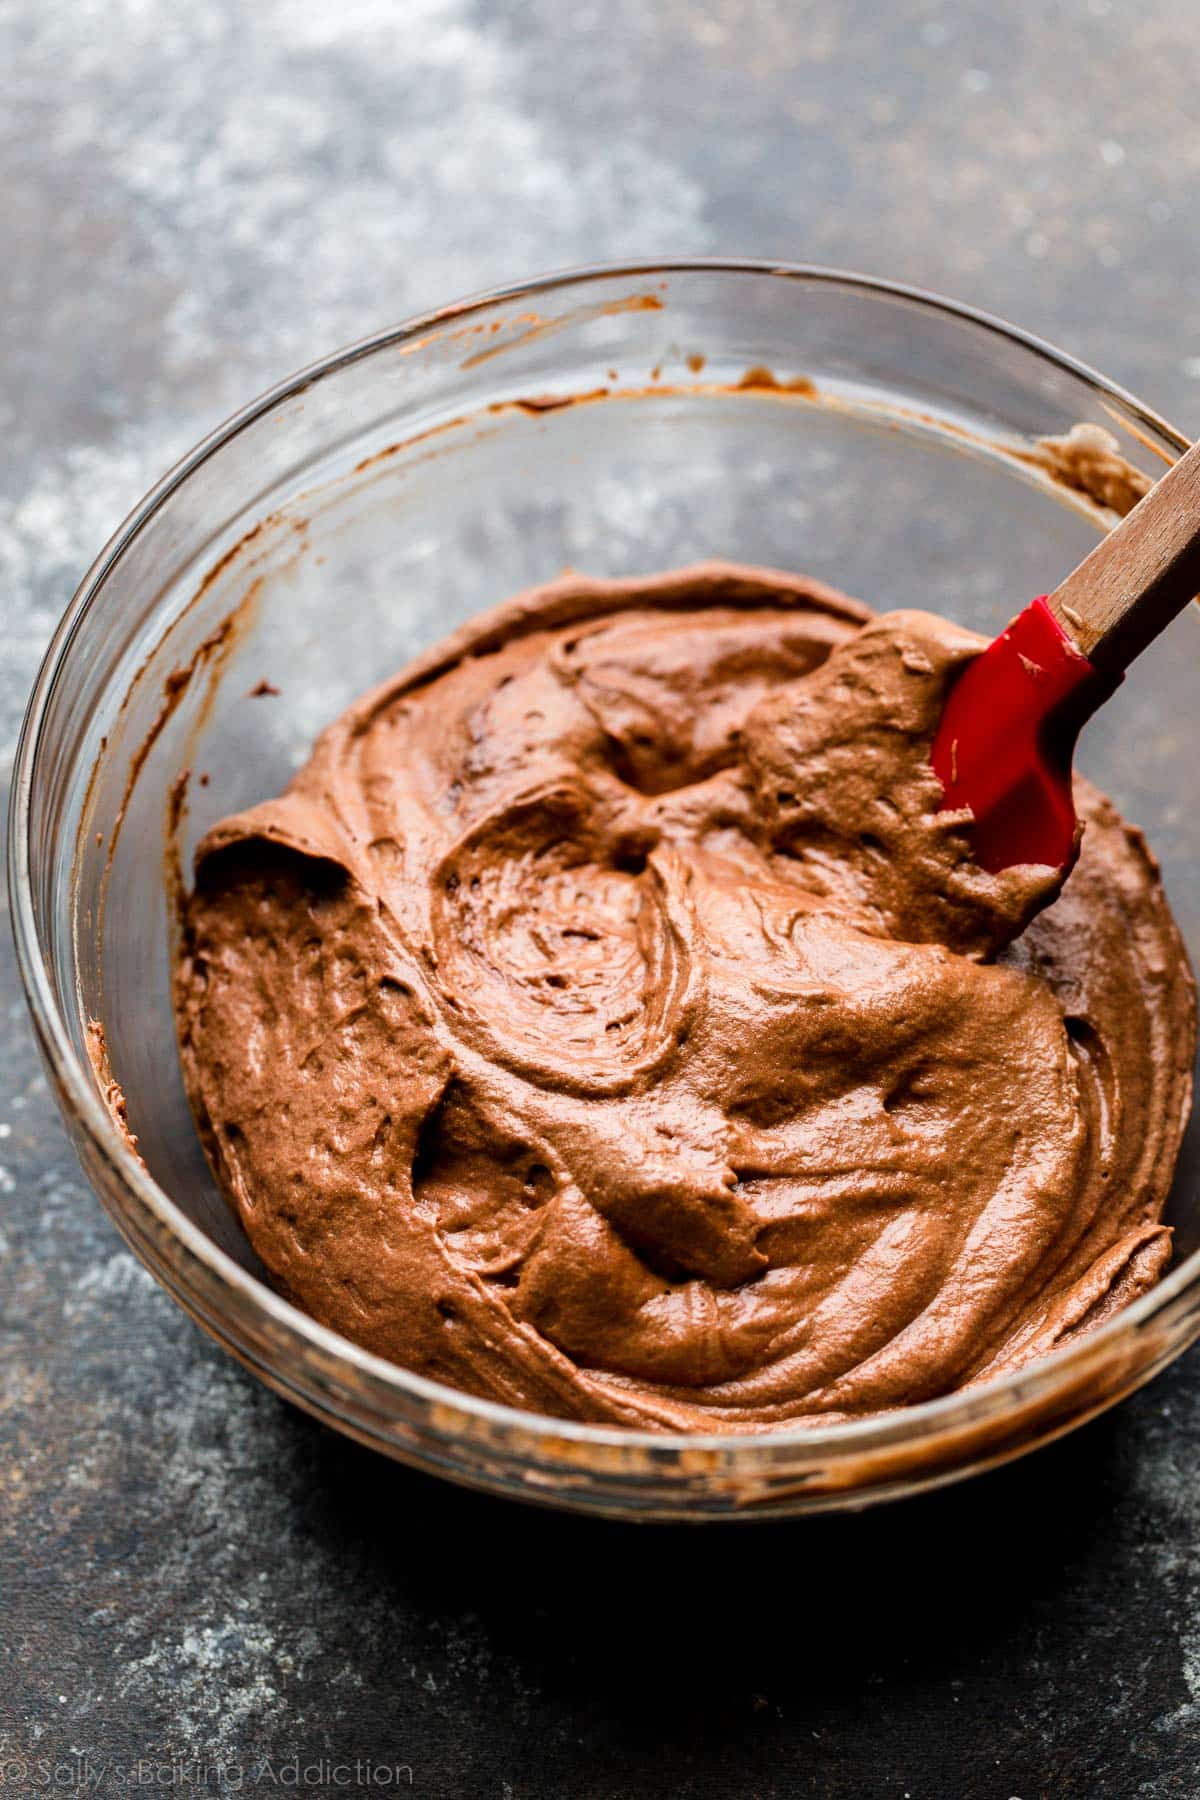
Refrigerate batter as you preheat the oven. See how it slightly thickened when compared to the photo above?
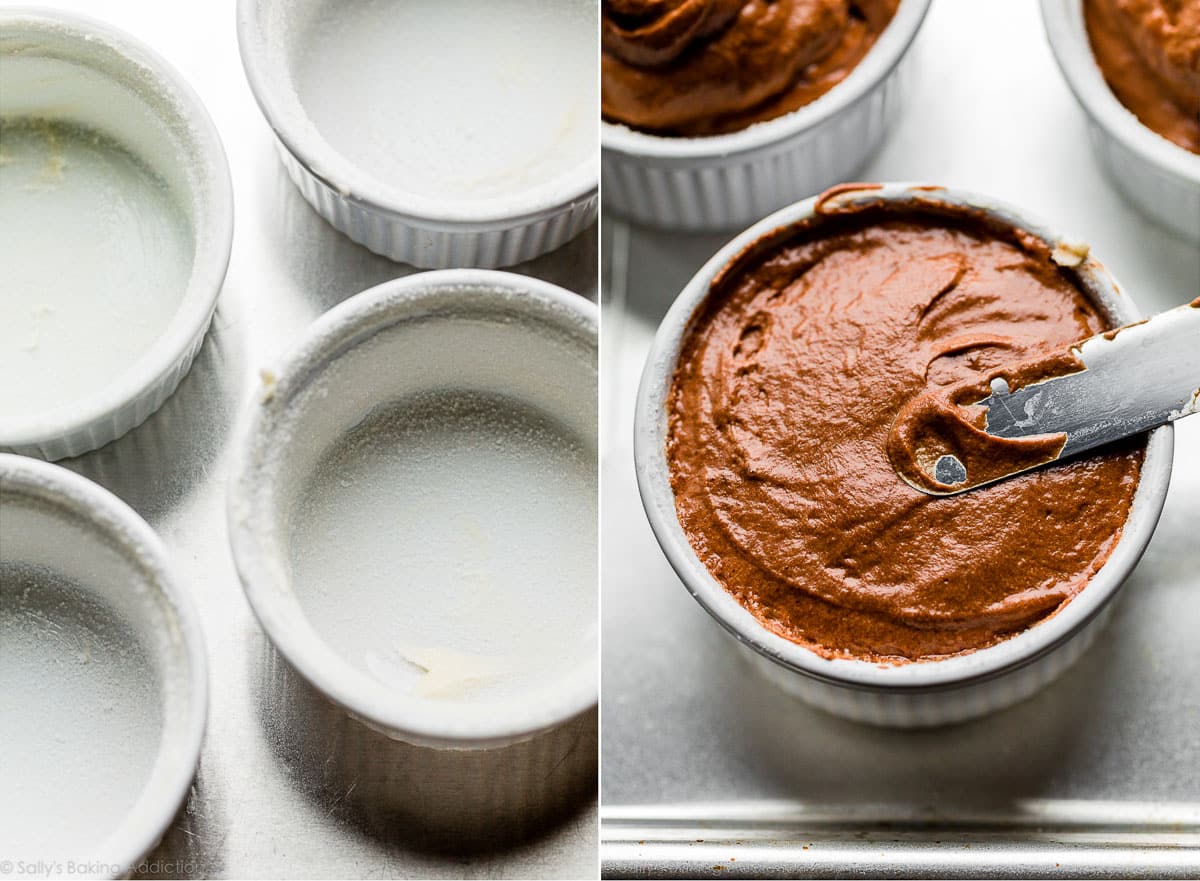
Now it’s time to prepare the ramekins/dishes.
Below right: Spread or brush every crevice/inch of your ramekin with softened butter, then coat in granulated sugar. The sugar coating helps the soufflés rise straight up (no sticking!) and adds a pleasant crust around the exterior. You saw me do this step in the video tutorial above.
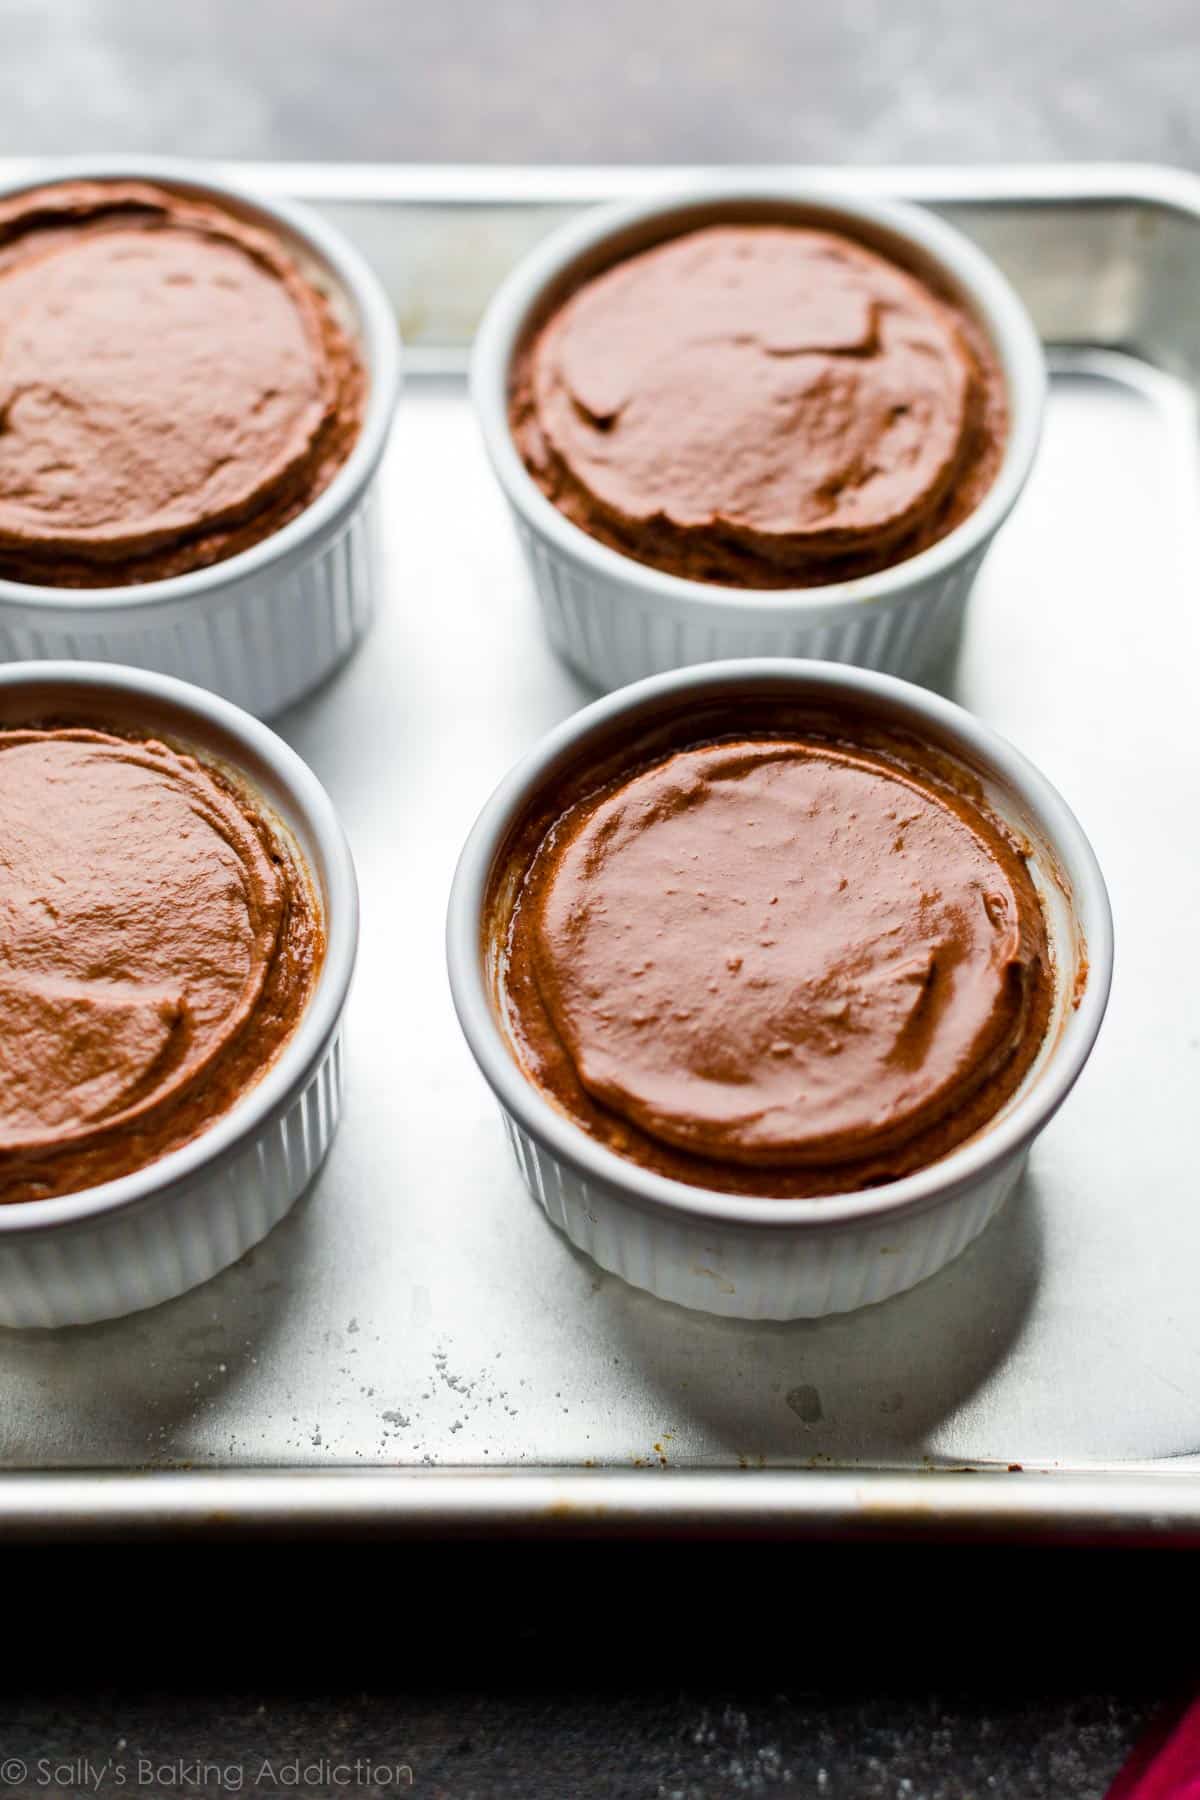
Below left: Spoon batter into ramekins, then level off with a knife or flat icing spatula.
If You Read Anything Here, Read This:
Run a knife, icing spatula, or your thumb around the very top rim, creating a “channel” between the batter and the rim of your pan. Why? This forces the soufflé to rise UP without expanding OUT.
Chocolate Soufflé Toppings
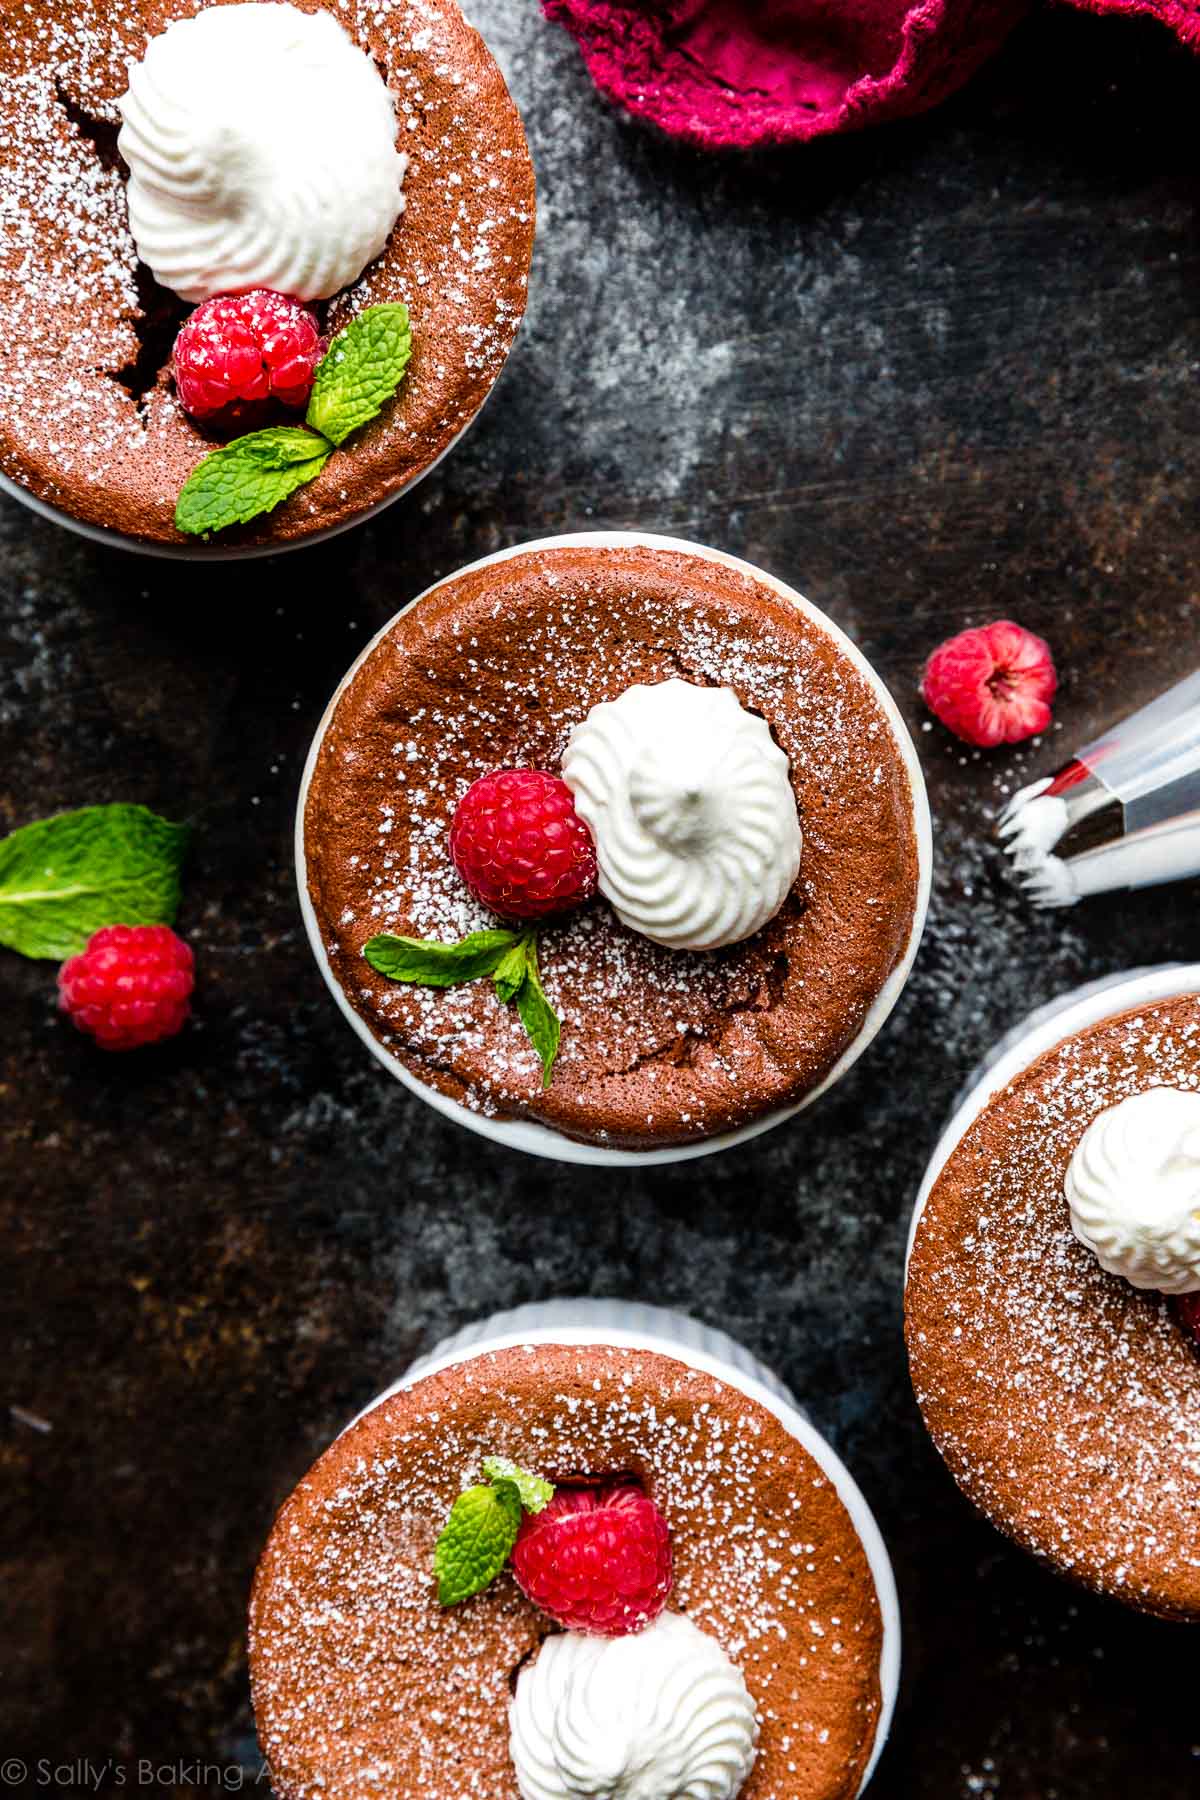
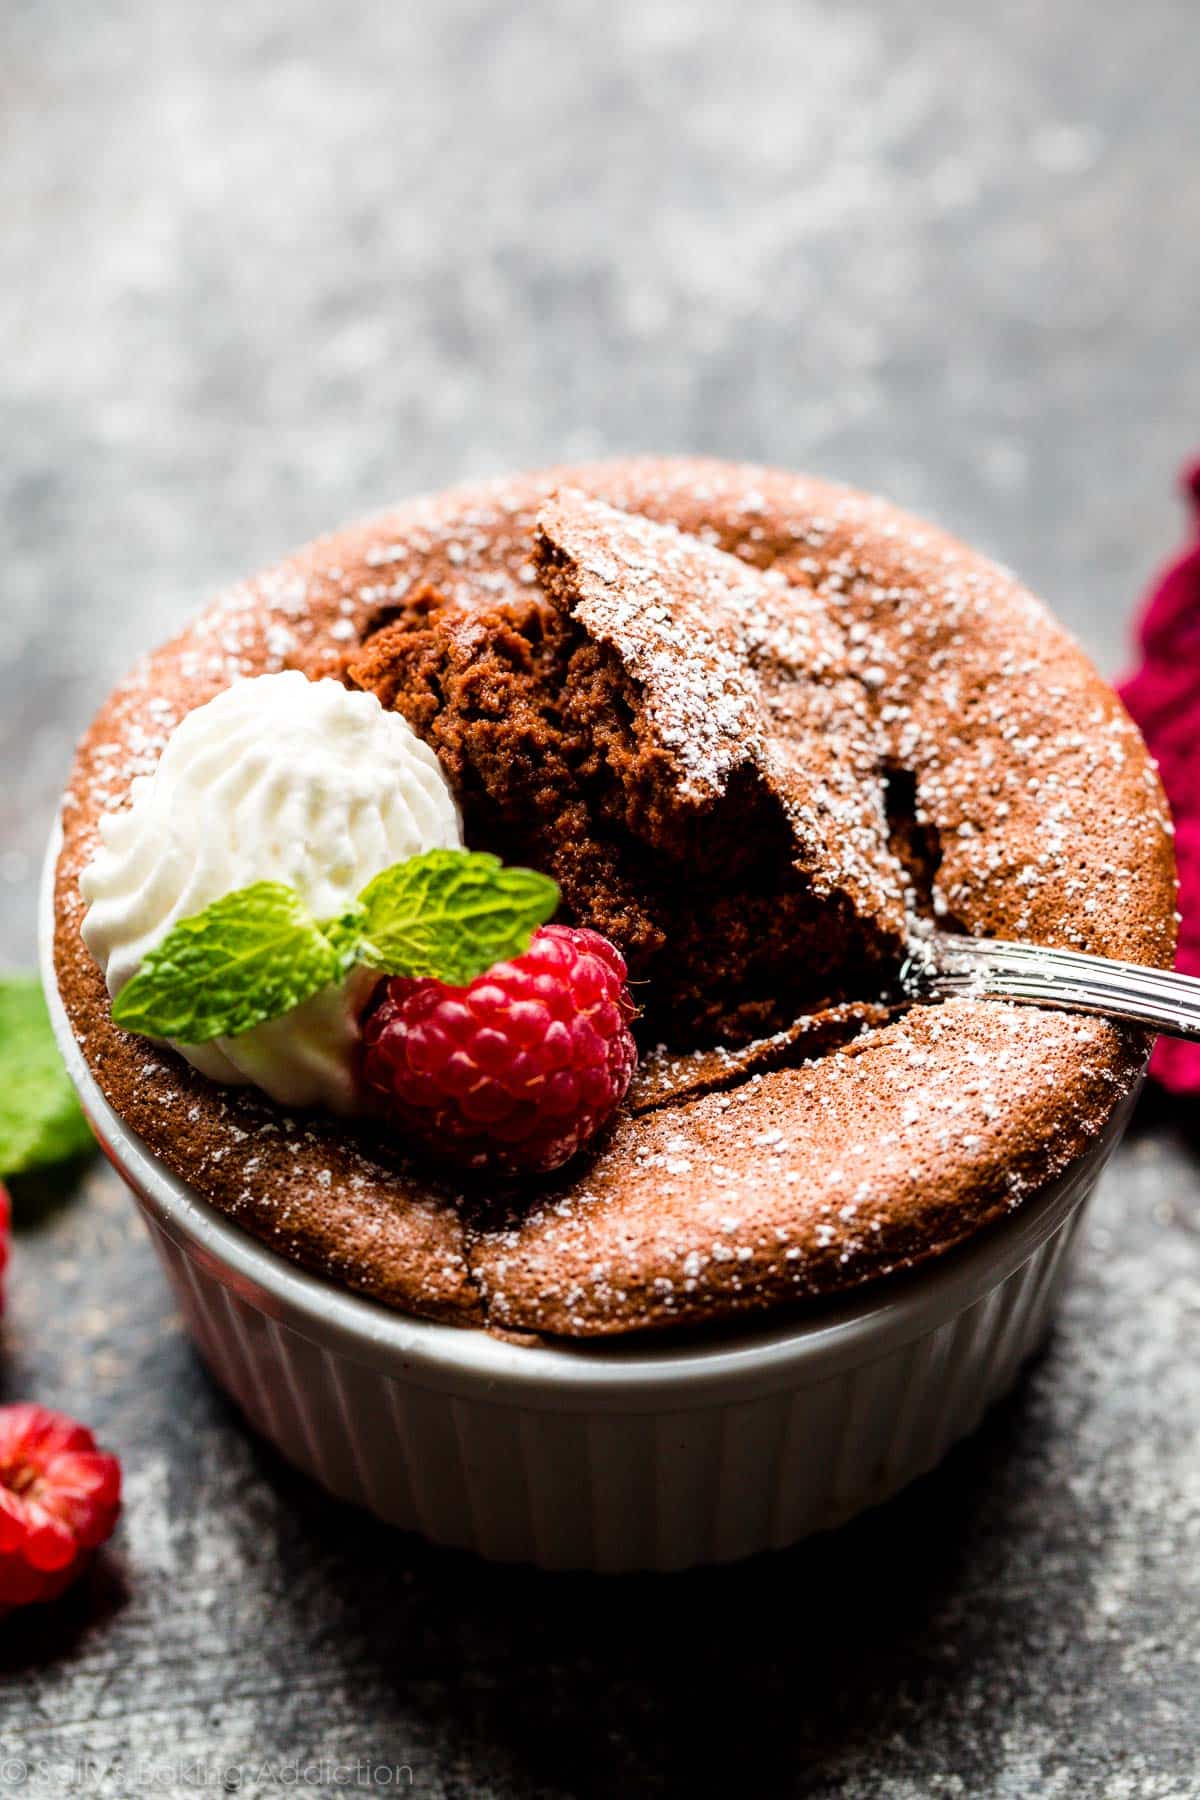
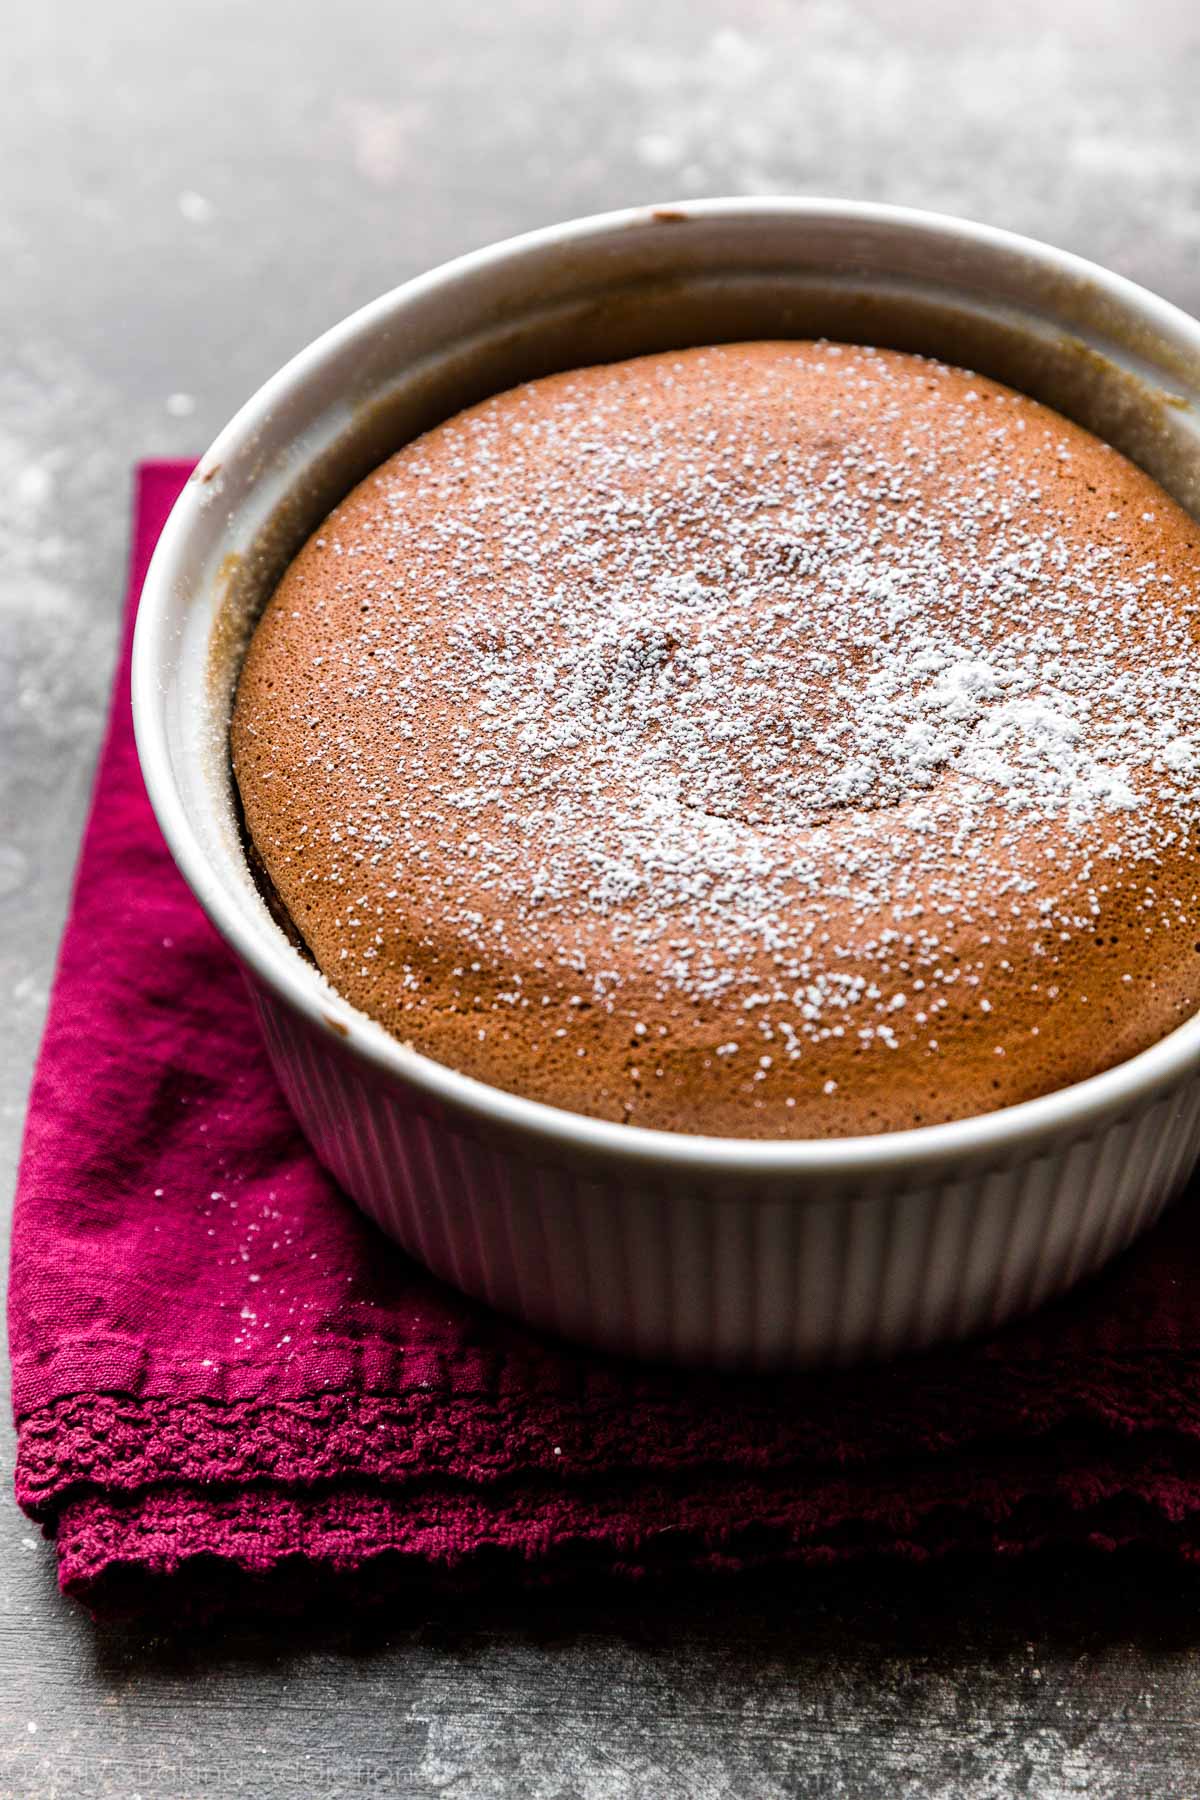
You can serve it plain, but crème anglaise, which is a thin custard cream, is a popular option. We like ours with a dusting of confectioners’ sugar, a little whipped cream (halve this whipped cream recipe), and fresh raspberries. Other options include a spoonful of red wine chocolate ganache, a drizzle of salted caramel, or you could even use the raspberry sauce from these white chocolate raspberry cheesecake bars. Have fun with garnishes! Dessert is now served. 🙂
Pan Options & Bake Times
This recipe produces about 3 heaping cups of batter, which is close to 1/2 quart. For the most authentic chocolate soufflé, I recommend the ramekins or soufflé dish detailed below. However, I know many home bakers don’t own either. You can definitely get away with using other pans and I explain each below.
Guideline/directions for other pans: The bake time for 6 ounce ceramic or porcelain oven-safe ramekins is included in the written recipe below. For all other pans, prep the pans as detailed in step 7 (same amount of butter/sugar should be plenty for any pan you use), add the batter as detailed in step 8, then bake until the edges are set and the center just barely jiggles when you give the pan a light tap. All pans/dishes should be placed on a baking sheet in the oven, though that’s not necessary if you’re using a muffin pan. Oven temperatures remain the same no matter which pan/dish you use.
- 6-ounce ceramic or porcelain oven-safe ramekins with straight sides: These ramekins are the best option for this recipe and the bake time is included in the recipe below. Conveniently, we use the same size for other recipes too including chocolate fudge cakes, chocolate lava cakes, upside down key lime pies, garlic & bacon spinach dip, and lemon pudding cakes. I love Emile Henry and Apilco brands for their high quality—I bought both online at Williams Sonoma. Other fantastic options include these or these. 6-ounce cast iron ramekins could work too, as long as they have straight sides. The bake time will be about a minute shorter than stated in the recipe below. If using smaller straight sided ramekins, the bake time will be shorter. If using larger (such as 8 ounce) straight sided ramekins, the bake time will be a couple minutes longer. Fill ramekins to the top with batter, just as I instruct with the 6-ounce size.
- 1 or 1.5 quart soufflé dish: I own and love the Apilco 1.5 quart soufflé dish, pictured below. It’s doubles as a great serving bowl, too. The amount of batter doesn’t fill either size, but the baked soufflé rises pretty tall as you can see. The bake time for either size about 26-30 minutes. You could get away with a 3/4 quart dish and an extra few minutes in the oven, but I wouldn’t go smaller than that due to rising.
- Any 1 or 1.5 quart oven-safe dish with straight sides: You can use any oven-safe casserole dish as long as it’s about 1-1.5 quarts and has straight sides. The bake time will vary depending on how deep your pan is, so use the guideline above. Like I mention with the soufflé dish, you could get away with a 3/4 quart dish, but I wouldn’t go smaller than that due to rising.
- Oven-safe mugs: Mugs could work too, but it’s imperative to ensure yours are 100% safe. It’s best not to assume mugs are oven-safe if they’re made from stoneware or porcelain, though. If they are truly oven-safe, there will be a manufacturer stamp/statement/guarantee on the bottom.
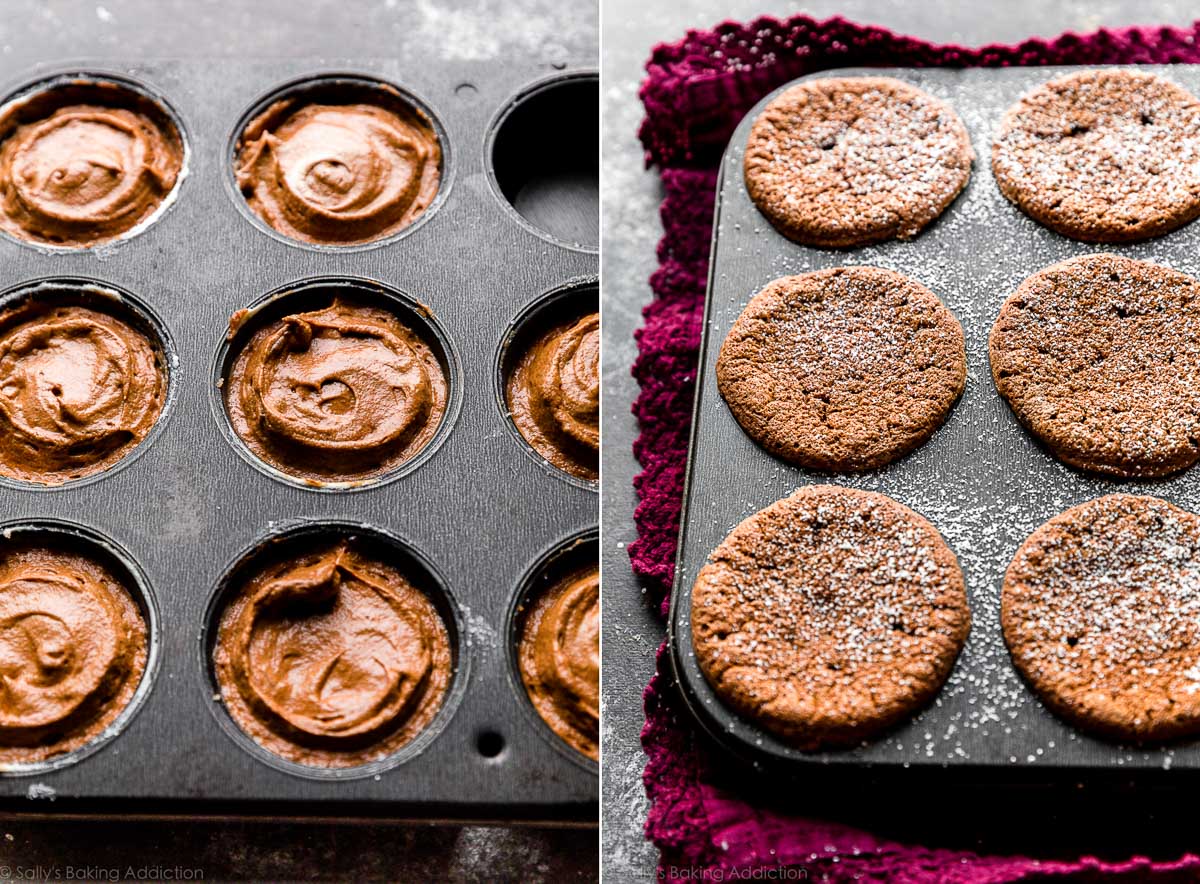
- Standard 12-count muffin pan: This recipe yields 8 muffin size soufflé-like desserts. As you can see in the photo below, they don’t rise much since muffin cups don’t have straight sides. Bake time is 10 minutes. For serving, spoon out the warm soufflés into bowls/onto plates. A jumbo muffin pan could work and will produce 2-3 large soufflés. I’m unsure of the best bake time for a jumbo pan, so use the guideline above.
Why Did my Chocolate Soufflé Fall?
- Under-whipped egg whites: Follow step 3 below very closely.
- Over-mixed + deflated batter: Slowly and gently fold the whipped egg whites into the chocolate mixture in 3 additions, always being careful to avoid over-mixing and excessive deflating.
- Opening and closing the oven too much: You’ll likely have to open your oven to check the doneness of your soufflé(s). Avoid checking excessively, though.
- Waiting too long to serve: Serve soufflé as soon as it comes out of the oven because it begins to fall within minutes. Have your toppings ready to go before they’re done. If they fall before serving, not much is lost except for that impressive height. You’ll still have that sponge-like texture underneath a crackly top, though it settles into a denser texture as time passes.
See Your Chocolate Soufflé Success!
Many readers tried this recipe as part of a baking challenge!
Print
Chocolate Soufflé
- Prep Time: 30 minutes
- Cook Time: 14 minutes
- Total Time: 45 minutes
- Yield: four 6 ounce soufflés
- Category: Dessert
- Method: Baking
- Cuisine: French
Description
Use this thorough recipe to make fluffy, yet rich chocolate soufflés. For best success, I recommend reading all of the recipe notes and explanations, as well as reviewing the video tutorial and step-by-step photos above.
Ingredients
Soufflé Batter
- 4 Tablespoons (1/4 cup; 56g) unsalted butter, cut into 4 Tablespoon size pieces
- 4 ounce (113g) semi-sweet chocolate bar, coarsely chopped*
- 3 large eggs, separated*
- 1 teaspoon pure vanilla extract
- 1/8 teaspoon salt
- 1/8 teaspoon cream of tartar
- 3 Tablespoons (38g) granulated sugar
Prepping The Ramekins
- 1 Tablespoon (14g) unsalted butter, extra soft (the softer it is, the easier it is to spread)
- 4 teaspoons (16g) granulated sugar
Instructions
- For the batter: Melt the 4 Tablespoons of butter and the chopped chocolate together in a double boiler or in a large heatproof bowl in the microwave. Microwave in 20 second increments, stirring after each until completely melted and combined. Slightly cool for 3-5 minutes.
- Whisk egg yolks, vanilla extract, and salt into chocolate mixture. Set aside.
- In a completely clean residue-free medium glass or metal mixing bowl, using a handheld mixer or stand mixer fitted with a whisk attachment, beat the egg whites and cream of tartar together on high speed until soft peaks form, about 2 minutes. With the mixer running on high speed, slowly add the sugar in 3 additions about 1 Tablespoon at a time, beating for 5 seconds before adding the next Tablespoon. After all 3 Tablespoons of sugar have been added, beat until stiff glossy peaks form, about 2 more minutes. Do not over-beat.
- Slowly and gently fold the egg whites into the chocolate mixture. It’s best to do this in 3 separate additions, combining each addition completely before folding in more.
- Refrigerate the batter for 5-10 minutes as you preheat the oven and prepare the ramekins. (No need to cover the batter unless you are refrigerating it for longer than 1 hour. Can be made up to 2 days in advance, see make ahead instructions below.)
- Adjust the oven rack to the lower third position and preheat to 400°F (204°C).
- Prepare the ramekins: Brush four 6-ounce oven-safe straight sided ramekins with a generous coating of the softened butter. Sprinkle in the granulated sugar, then shake/rotate each to ensure every spot of the ramekin has a sugar coating. Place ramekins on a baking sheet. Discard excess sugar.
- Spoon batter evenly into ramekins. Using a knife or icing spatula, smooth down the surface. Run a knife, icing spatula, or your thumb around the rim at the top, creating a “channel” between the batter and the rim of your pan. Feel free to wipe the edges clean with a towel, though I don’t always do that and don’t notice a difference in appearance or rise.
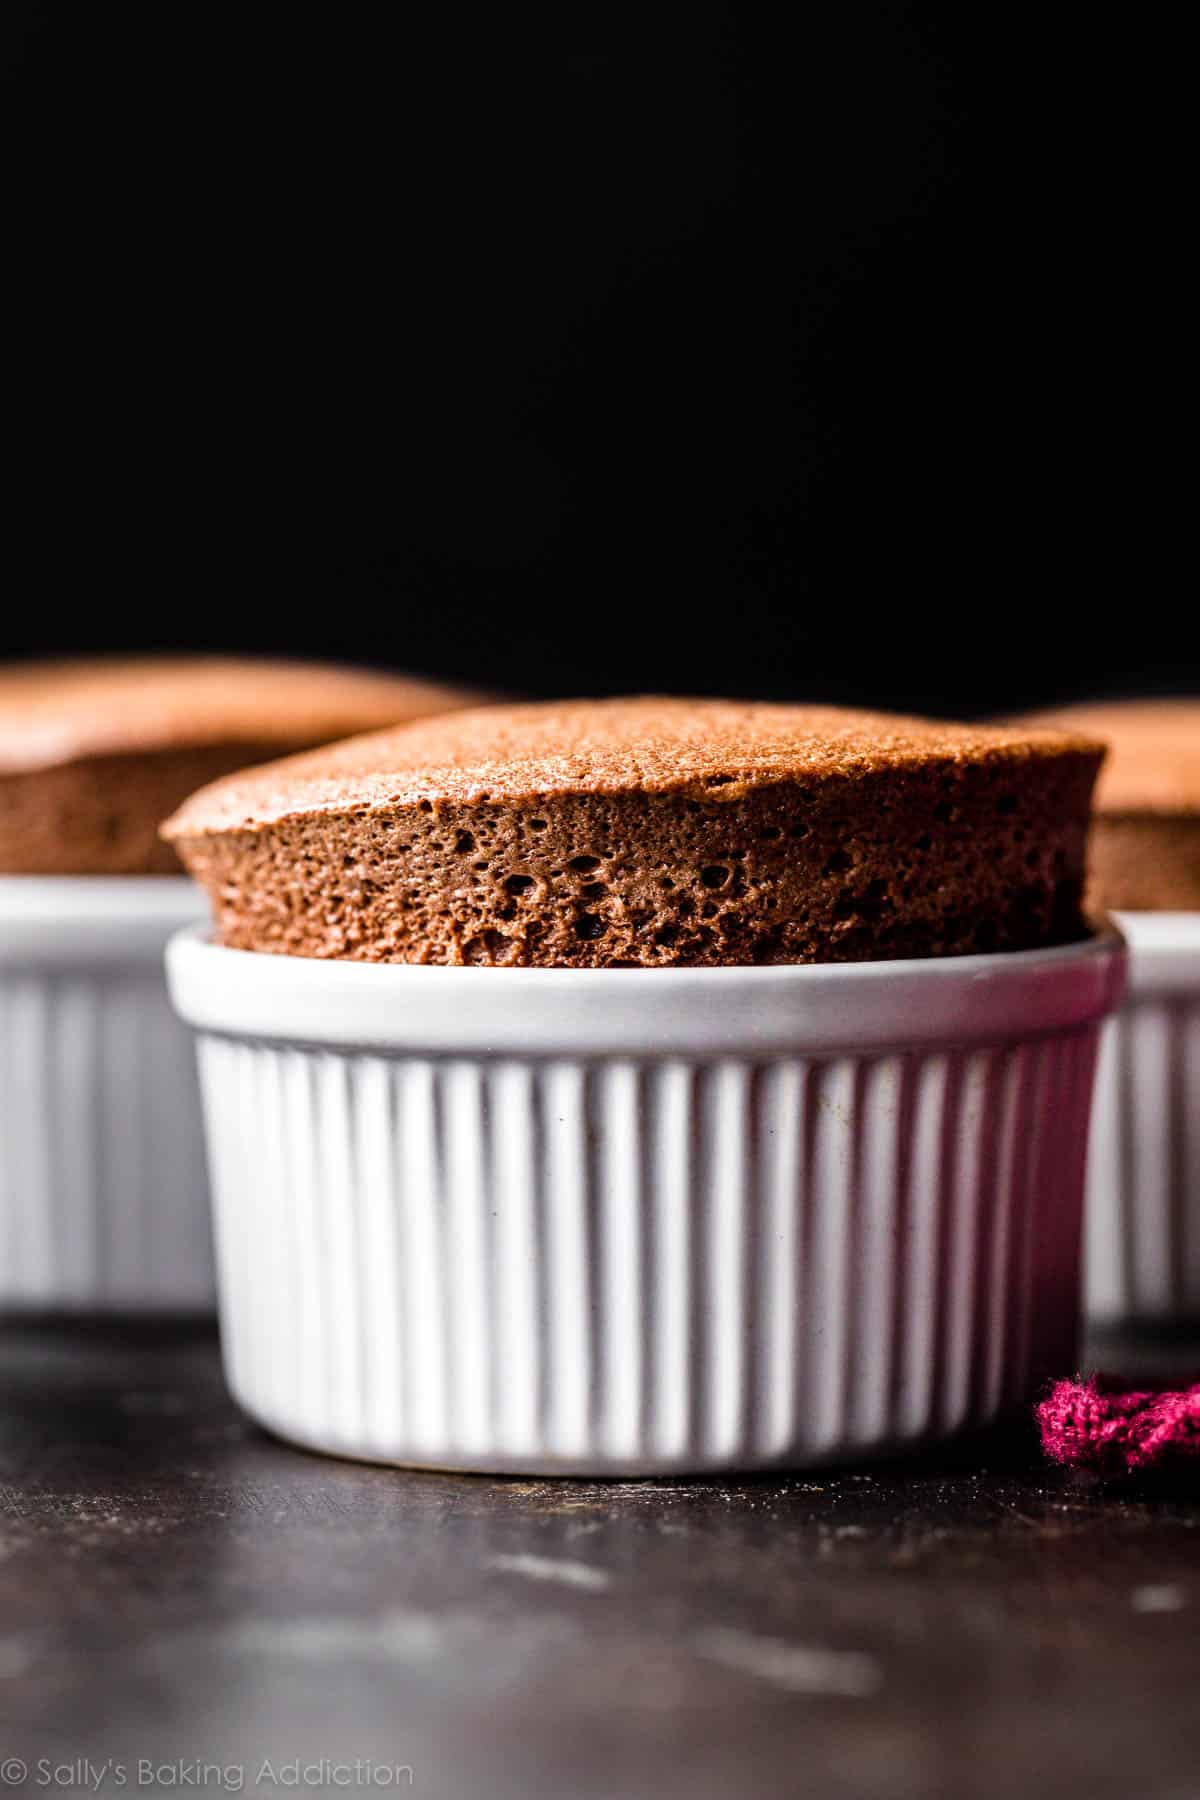
- Bake: Place baking sheet with ramekins on top in the oven. Immediately reduce oven temperature to 375°F (191°C). Bake for 13-14 minutes or until the edges are set and the center just barely jiggles when you give the pan a light tap. Avoid opening/closing the oven too much.
- Remove from the oven and serve immediately plain or with optional toppings. Soufflés begin to fall within minutes. You’ll still have that sponge-like texture underneath a crackly top, though it settles into a denser texture as time passes. Cover and store leftovers in the refrigerator for up to 3 days.
Notes
- Make Ahead Instructions: You can prepare the souffle batter up to 2 days in advance (steps 1-4). Cover and refrigerate the batter in the mixing bowl or in the ramekins/dish until ready bake. Add another minute or so to the bake time if you refrigerated it for longer than 1 hour. I do not recommend freezing this soufflé batter or the baked and cooled soufflés.
- Special Tools (affiliate links): Glass Mixing Bowls | Whisk | Egg White Separator | 6 Ounce Oven-Safe Ramekins (like these or these) | Flat Icing Spatula | Double Boiler (optional)
- Topping Options: You can serve chocolate soufflé plain, but crème anglaise is a popular option. We like ours with a dusting of confectioners’ sugar, a little whipped cream (halve this whipped cream recipe), and fresh raspberries. Other options include red wine chocolate ganache, salted caramel, or the raspberry sauce from these white chocolate raspberry cheesecake bars.
- Chocolate: For the best results, use a 4 ounce “baking chocolate” bar found in the baking aisle. I prefer Bakers or Ghirardelli brands. You can use semi-sweet, bittersweet, or even milk chocolate. We have not tested it with white chocolate, so we can’t guarantee results. Do not use chocolate chips, as they contain stabilizers preventing them from melting into the proper consistency.
- Eggs: Room temperature egg whites hold more volume, so if you can bring them to room temperature before beginning, that’s helpful. However, I’ve made soufflé with cold eggs and it’s never been a real issue.
- Cream of Tartar: We only use a small amount of cream of tartar, but it has a BIG job—it helps the egg whites hold their peaks. It’s an imperative ingredient that you cannot skip. In a pinch, the same amount of lemon juice or white vinegar can be used as a substitute. But for best results, use cream of tartar.
- Other Dishes/Pans: See Pan Options & Bake Times section above. Oven temperatures remain the same no matter which pan/dish you use.
- Doubling This Recipe: You can double this recipe for 8 individual soufflés by doubling all of the ingredients. Beating the egg whites may take longer since you’re working with more volume.
Methods/practice learned from pastry class; recipe adapted from Saveur & New York Times


Reader Comments and Reviews
I was pretty scared about this one! It turned out well though and my family loved it. Make sure and read the tips, they are important (as always). Thanks again for a winning recipe!!
This soufflé is SO fun to make! It felt so fancy and fun! It has a deep chocolaty flavor and a light, airy texture. I would recommend this recipe to anyone!
That was a really great recipe! I’ve never made soufflé before so I was scared but since these instructions were so good it was easy. I think it turned out great. I let my neighbor try it and she said it was fabulous! Thanks Sally!
Turned out great! Looks pretty. Thank you!
I’m an amateur baker so this was my first time making (and eating) chocolate souffle. I was pleasantly surprised by how easy this was. My entire family enjoyed it so I’ll be making it again soon!
Whenever I hear the word “souffle”, I get very intimidated. This recipe was MUCH easier to make than I thought it would be. I had some technical difficulties, but those were on my end rather than having anything to do with the recipe. I also learned that I don’t like souffles. The taste was good, but the texture was off-putting to me. Again, that has NOTHING to do with the recipe, I just have this issue with different textures. So overall, I was pleasantly surprised with the experience of making it, but it’s not something I would make again. However, I do recommend it to souffle fans. 🙂
This is the best recipe for a chocolate souffle. As I am from France and I am a very good cook from my family who owns a bakery, I am very impressed by your recipe of this dessert as I am happy to bake many of your recipes. Sally, you are very talented. Au revoir.
I never made chocolate soufle before and always wanted to. This recipe was so simple and so delicious. I thought soufle would be so difficult to make but I followed Sally’s directions and was succesful!
Well, this was a great recipe and certainly a challenge as it was my first time making a chocolate soufflé. I had four ramekins but not enough batter to fill all four. Perhaps my ramekins were larger than what was required. Not sure of the size. Even using three I didn’t have enough batter to fill to the top. Since it‘s me and my two kids, I wanted to make three so we could each have one. It’s not pretty since it didn’t rise over the top. Hopefully it tastes good!
I had the same problem. I used 6 Oz ramekins and barely filled 3. I know I didn’t over fold the egg whites so I don’t know what made the volume go down.
Came out great! I couldn’t believe it was so easy and I already had everything to make it sitting around. You make it so easy!
The texture of this was wonderful and it wasn’t at all difficult to make. I did forget to add extra bake time since I chilled the batter for longer than an hour and so mine were a little less done in the center than I’d have liked, but they were still excellent and that’s an easy thing to fix for next time. I used semisweet baker’s chocolate and that ended up being a little too sweet; next time I will use bittersweet. Topped with a dusting of powdered sugar, whipped cream, and a drizzle of raspberry. I’ll definitely be breaking this recipe out next time I need to make a dessert to impress.
WOW Sally! This elegant dessert was so easy to make- I would have never attempted such a dessert if it weren’t for your easy instructions and videos!! Thank you!!
OMG if it weren’t for tour challenges I would have never made them!! Sooo good and you make ever recipe so easy with all of your detailed instructions! Thank you!!
I have always wanted to make a soufflé and was pleasantly surprised at how easy it was! The instructions were clear and they came out perfectly. Using 8-ounce ramekins the bake time was a little longer but they still turned out beautifully. The semisweet chocolate flavor was the perfect amount of chocolate richness without being overly sweet. My husband was impressed and says “You can make those anytime!”
I did it! I made Chocolate Souffle for the first time in my life. It looks so fancy and tastes amazing. I followed the recipe exactly, but I only had enough batter for 3 ramekins instead of 4. That was a bit disappointing, but since this is my first time whipping egg whites, I figure I messed up in that step. At least they turned out great! Thanks Sally for pushing me to try new things!
Followed the recipe exactly and it came out perfectly. I don’t think I’ve ever had a soufflé at a restaurant so I wasn’t sure what to expect. But even my boyfriend who is not big on very rich desserts was was super pleased with the fluffy texture and rich chocolate flavor. Will definitely keep this on hand for post Covid dinner parties. Presents impressively!
First time making a soufflé!!! This recipe was very easy to follow and the tips were so helpful. It was so delicious! I have no window in my oven so I couldn’t peak until the timer went off. I was so relieved that they puffed up! I am a very happy baker!
I thoroughly enjoyed making this recipe! My husband and I made it together on Valentine’s Day (we love baking together)! We also made a delicious vanilla sauce that paired perfectly with it! We would definitely make this again!
Absolutely delicious!!!
This recipe was absolutely delicious! I love to bake, but generally stick to baking cookies. This was a wonderful challenge and I greatly enjoyed trying something new! I was nervous since this was my first time baking anything with whipped egg whites, but watching the video and the detailed instructions were really helpful. I look forward to making these again!
First time making a chocolate soufflé and it turned out really well. We wanted a chocolatey dessert, and Sallly’s recipes never disappoint. Unfortunately my ramekins disappeared so I attempted it in a glass loaf pan. Actually turned out really well, served “slices” topped with strawberries and whipped cream. It was so rich and decadent, really strong choc flavor, while also lighter than air! One commented that it was similar to a molten lava cake but 1000x lighter. Very quick and easy to put together. Thanks Sally!
Thank you for this great step by step recipe! Souffle has always intimidated me but you made it so easy. I made this for Valentine’s Day and my entire family adored it. Can’t wait for next months challenge!
My first time making soufflés and they were a success! Sally’s explanation and video were spot-on – she helps guide you through the entire process, helping to eliminate any errors. Thanks for another brilliant recipe sally!
Absolutely amazing! These were just as much fun to make as they were to eat! The recipe is concise and very easy to follow. Thanks Sally for making a novice baker like myself feel confident enough to make this delicate dessert!
Once again Sally makes a “hard” recipe feel so approachable! This was my first time making a soufflé and I have very little experience with egg whites in general so I was nervous about this one, but was determined to try it for the February baking challenge! The detailed instructions and video were so helpful. They rose nicely, the texture was sooo light and airy and they were not too sweet, with a deep chocolate flavor. For me, they took a bit longer than the instructions said to cook all the way though, and it also didn’t make near enough batter to fill 4 ramekins, but I realized later that my ramekins might be bigger than 6 ounces? Didn’t end up mattering too much as they still rose and most importantly, tasted great! They were gone before they could even begin to fall haha. Thanks for another great recipe!
One word: WOW!
These soufflés turned out delicious. I was scared to bake these but Sally provides very detailed steps that make me feel confident in trying any one of her recipes. Will be making these again for sure!
I had never made soufflé before and this was a challenging bake for me as a beginner baker. I tried 3 times. I got pretty good rise on first bake but the middle sank immediately after getting them out the oven and texture was more like pudding. On second bake, I got good rise again but top cracked open. Texture was much better. On third bake, top cracked around at 11 minutes. There was a little bit wobbly spot on the top but I was worried over bake so I took them out at 13 minutes. Overall, texture was soufflé like, finally! I am pleased at the outcome. I am glad that I did not give up this challenge.
Even with wrong texture, they all tasted good! I will try again. Thank you for your video and detailed instruction.
First time entering the contest but only making a soufflé. This is incredible recipe that is easy to follow. My partner and I loved it so much we immediately split another. Which is astounding because I normally find the flavor for soufflés being too egg forward. Your recipes have helped me become a better baker and I aim to do all your challenges from here on out. ❤
My remekins were bigger than I thought so I didn’t get much rise, but they tasted amazing. I will be buying smaller remekins and making these again.
This was a very detailed recipe that came out delicious! Every step was easy to follow. My family loved it, especially the crunch from the sugar coating. I added whipped cream and chocolate sauce to it, and it was amazing!