

Welcome to day 2 in Sally’s Cookie Palooza!
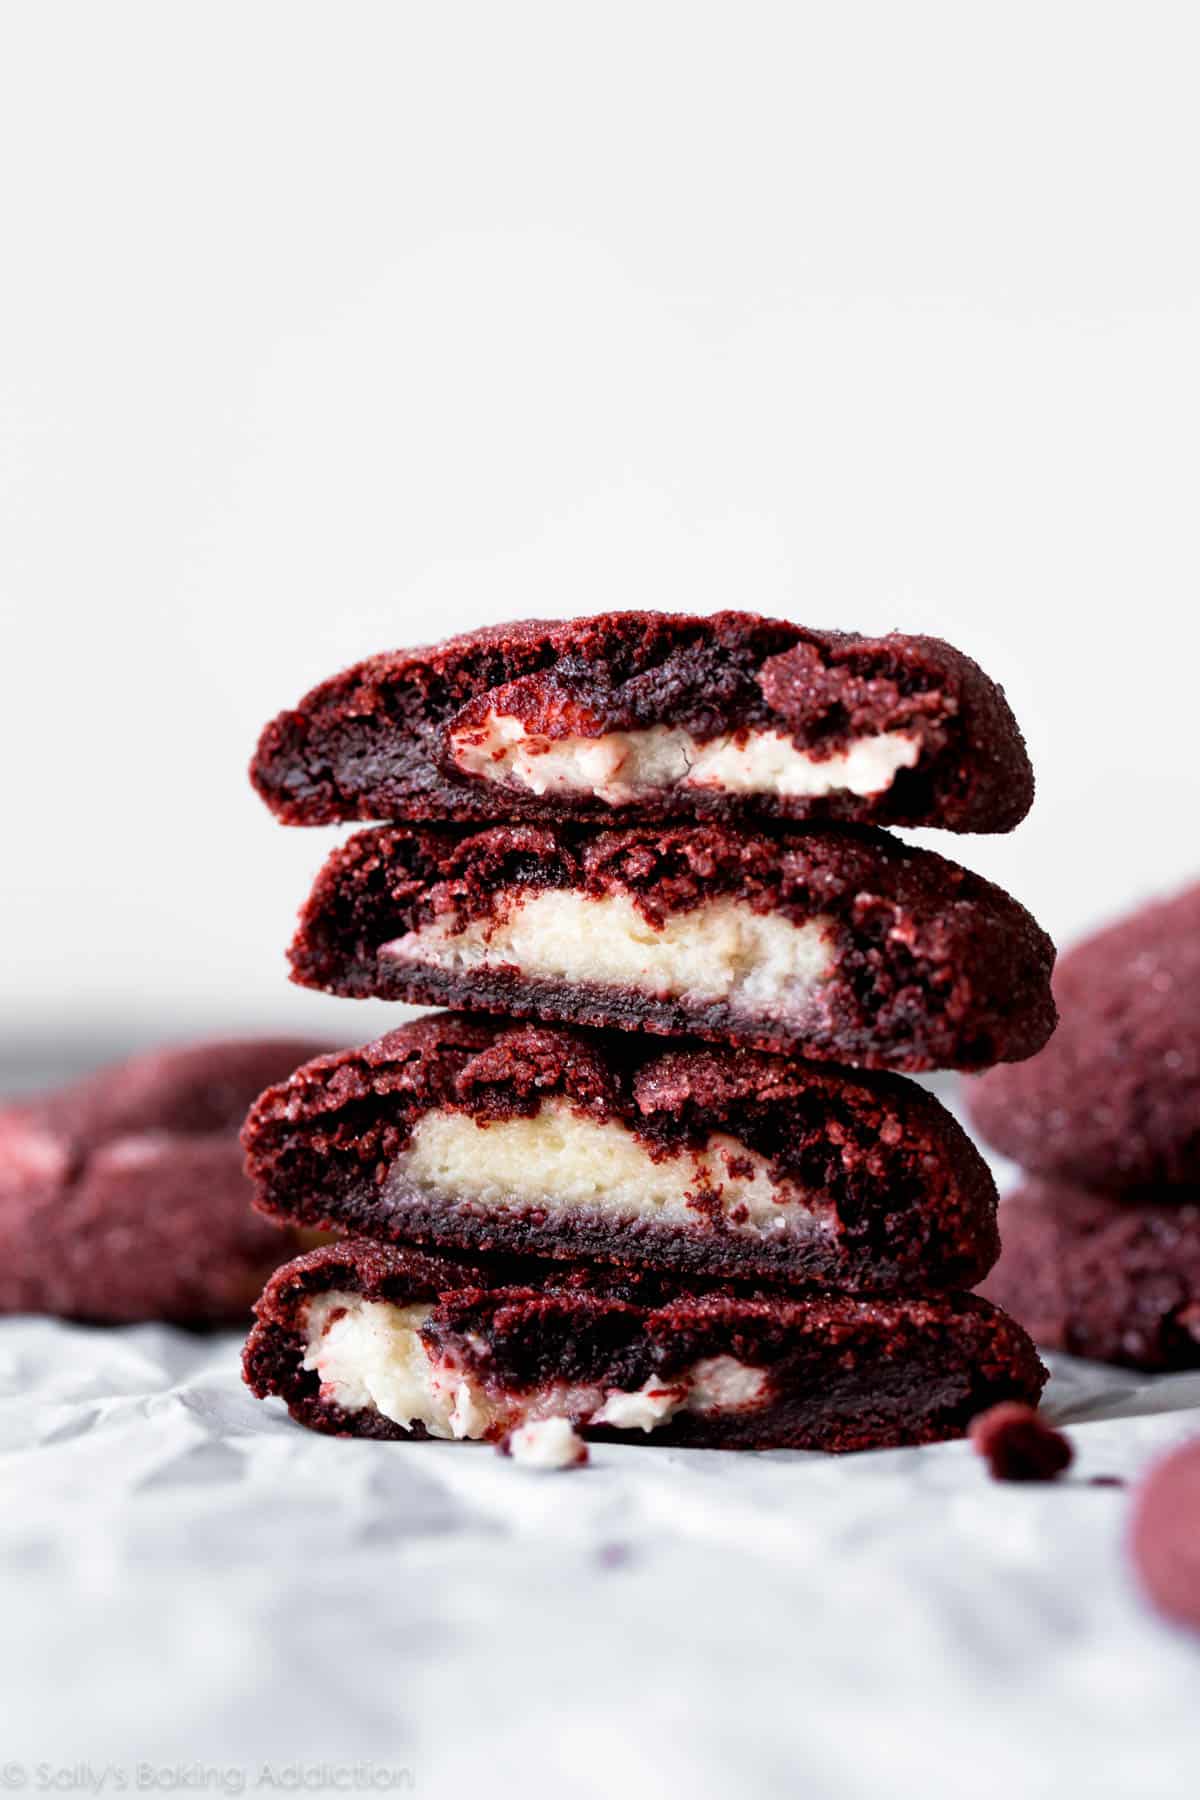
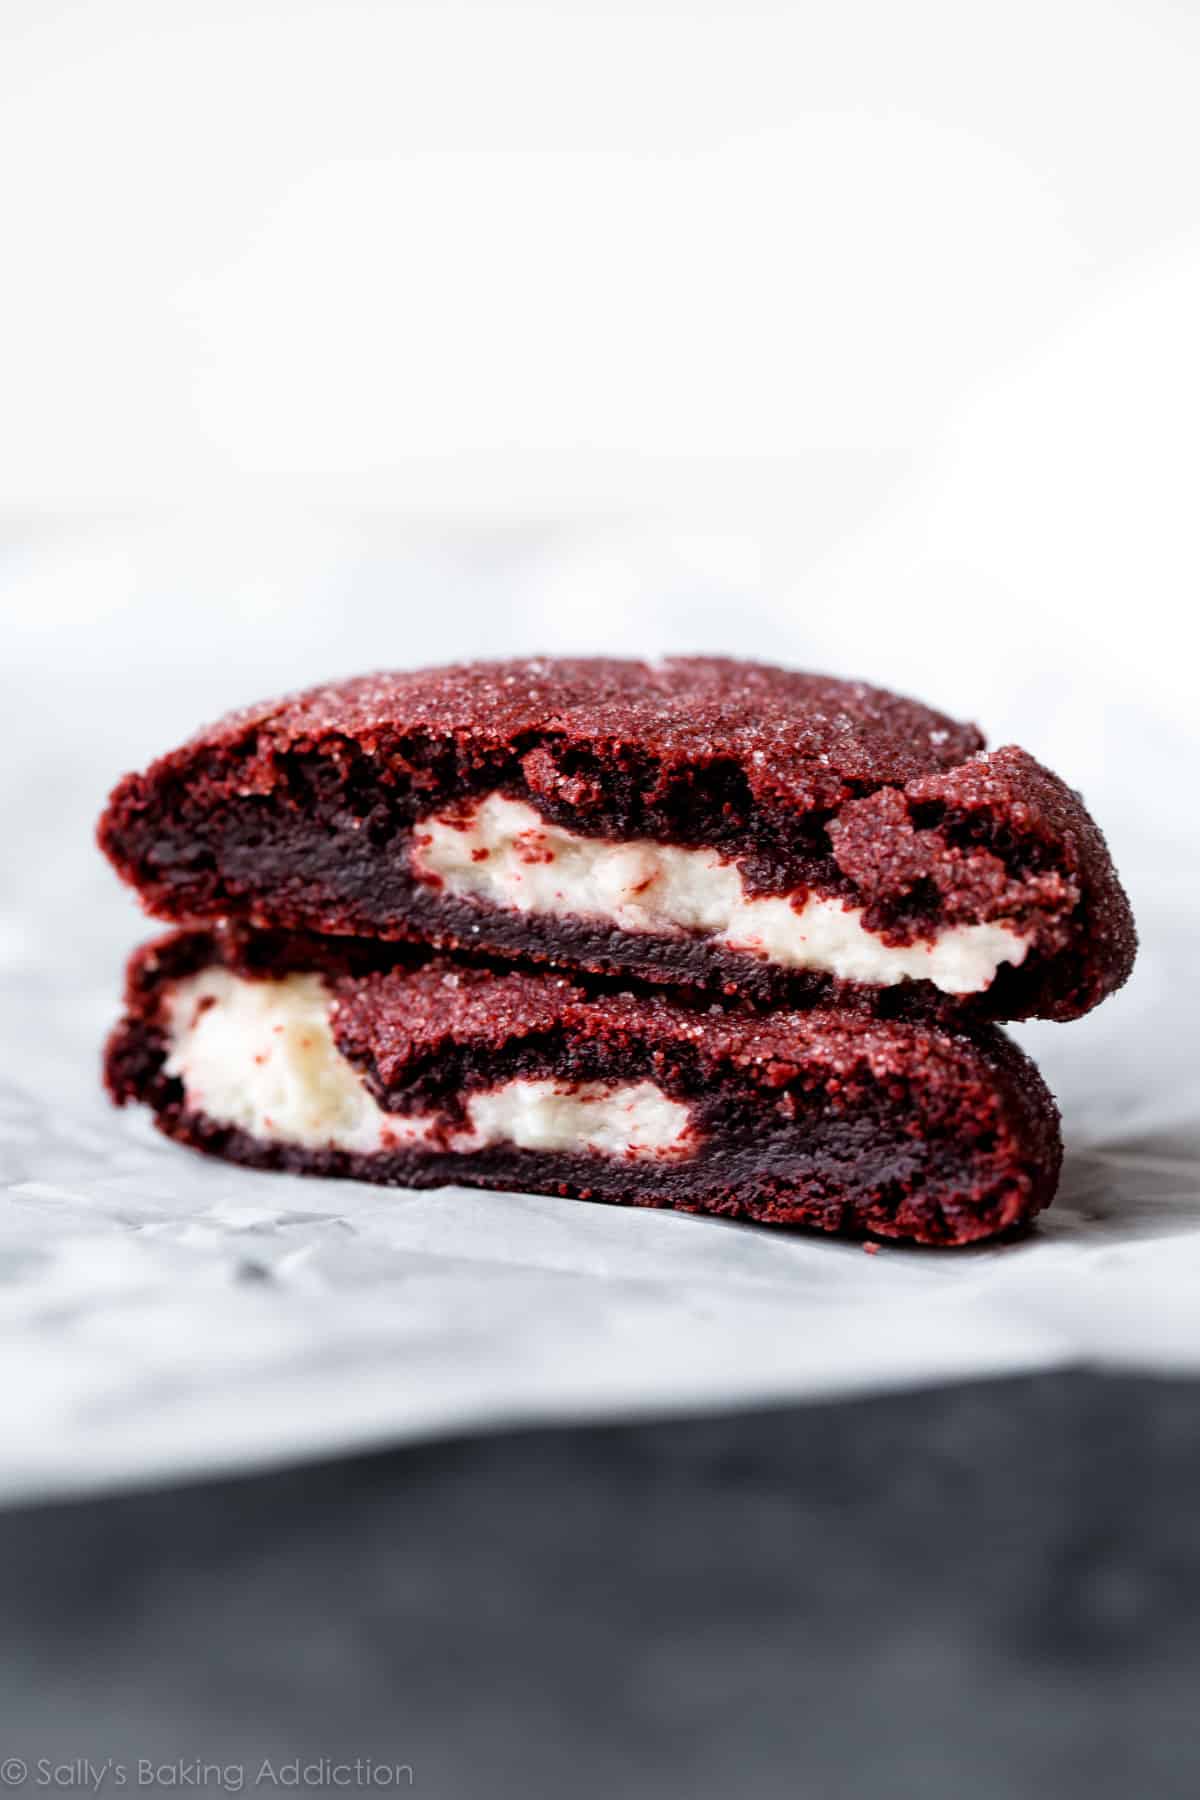
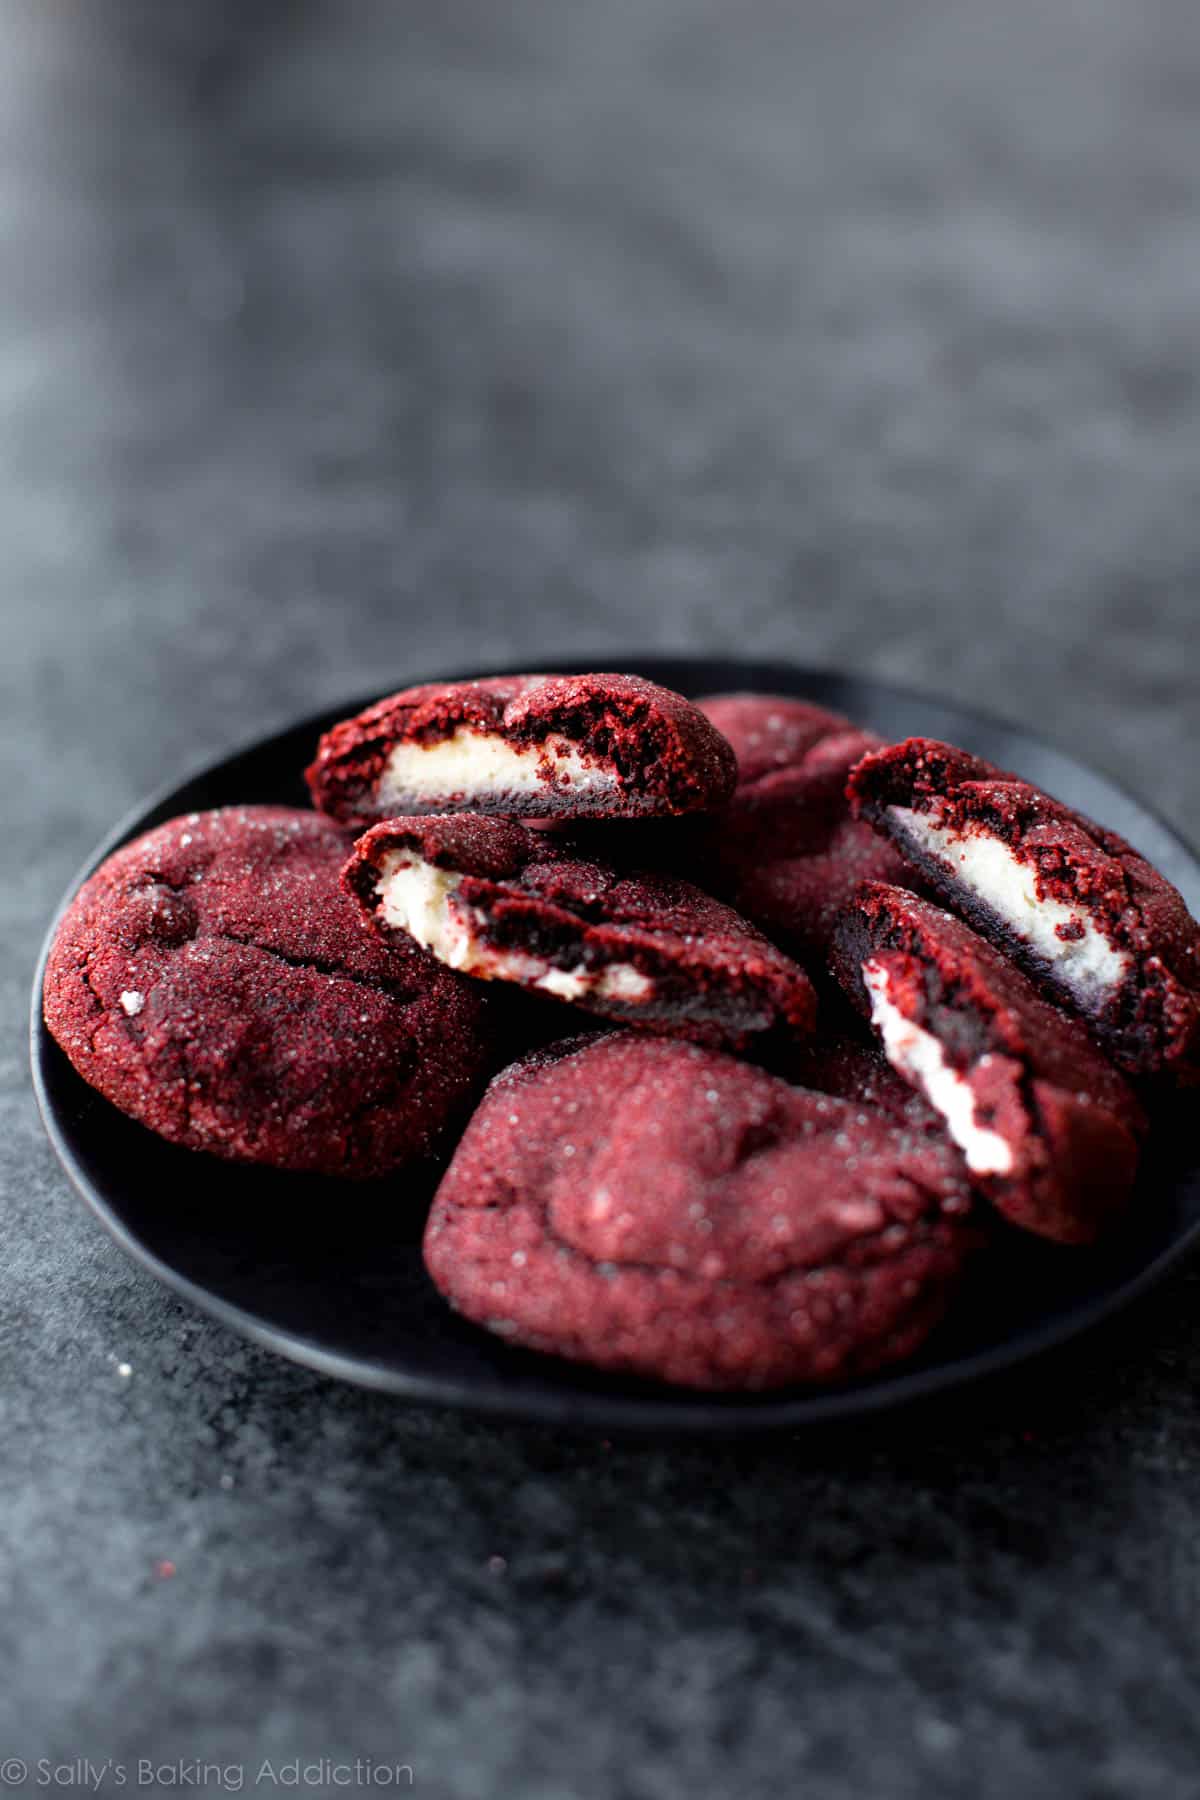
I’ve had a cookie like this on my mind for over a year now. Red velvet cake with cream cheese frosting in cookie form.
It took me many failed attempts and horrific cream cheese disasters… but here it is. Cream cheese stuffed red velvet cookies will be the talk of the town on every holiday cookie tray this year.

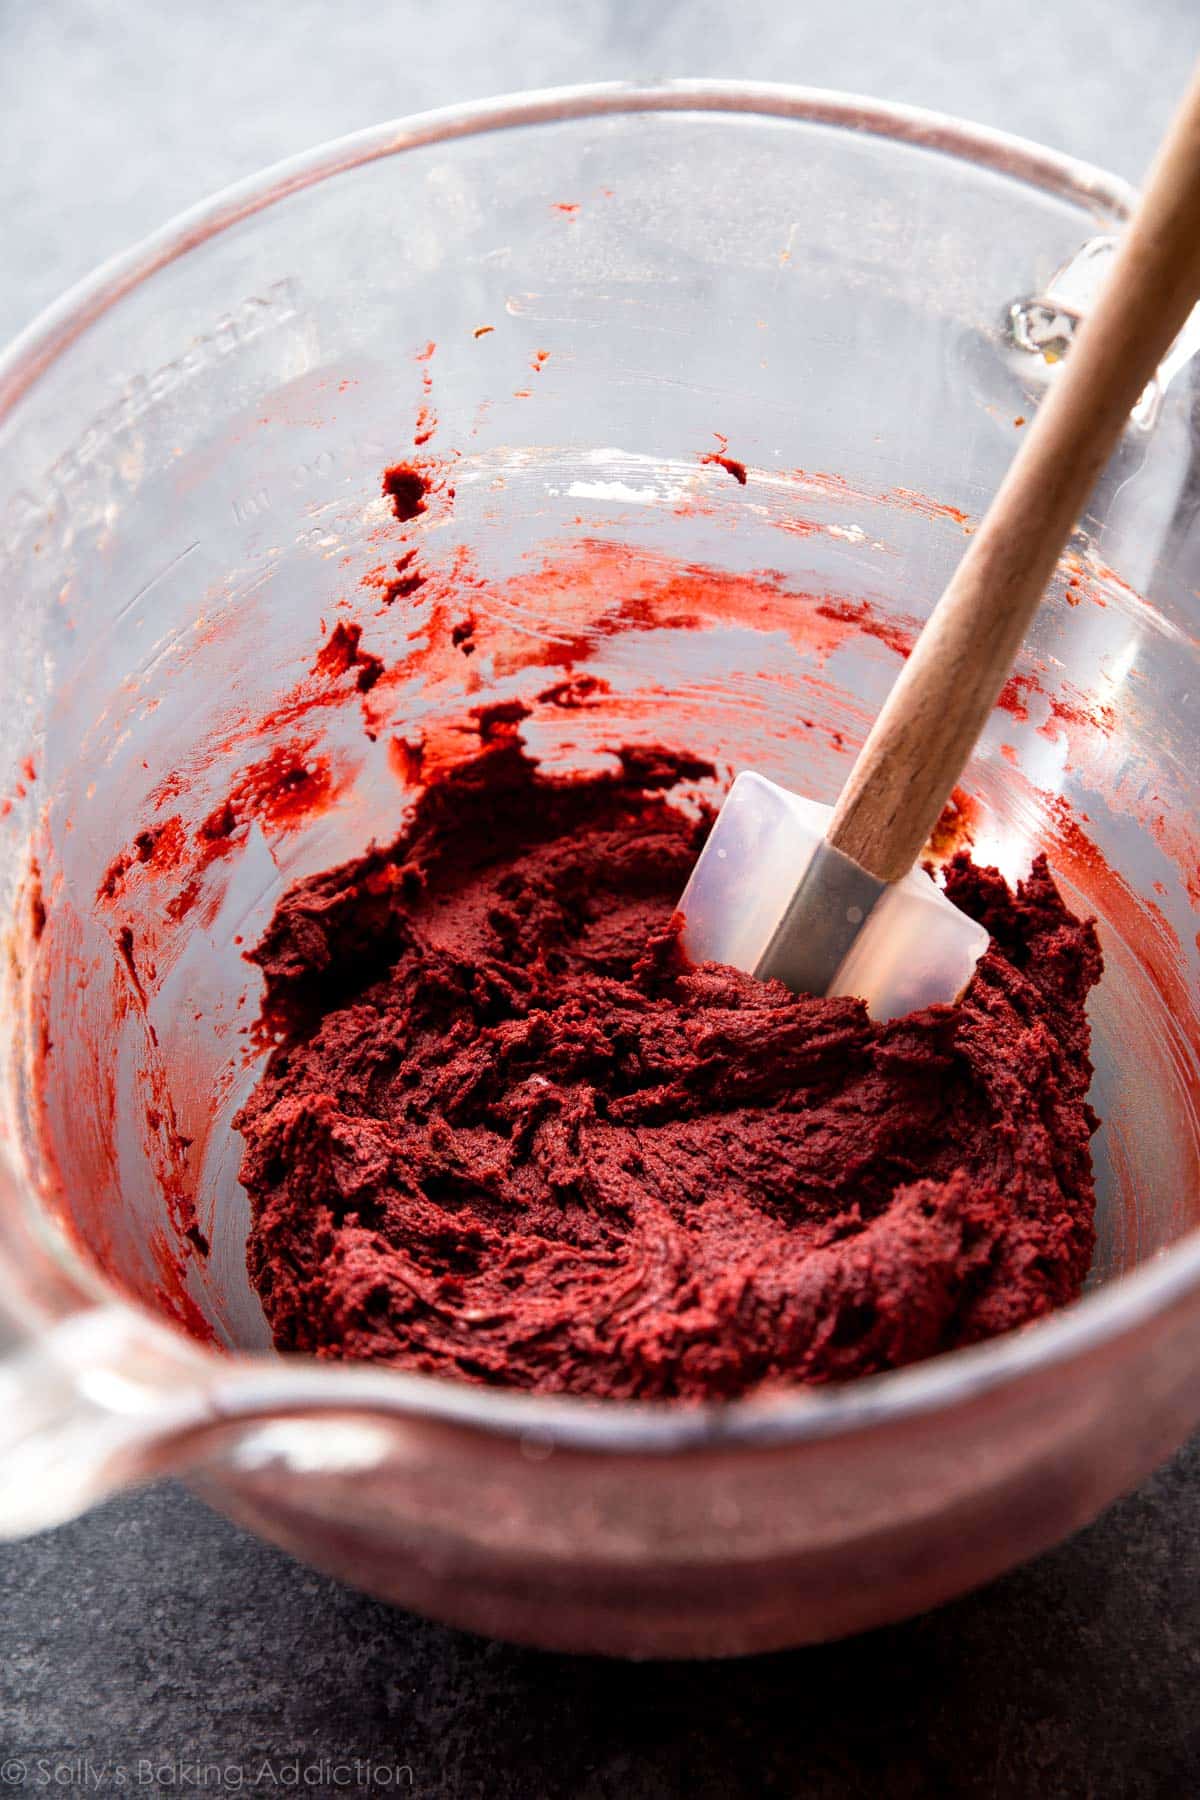
The red velvet cookie dough is pretty straightforward. It’s basically the same cookie dough I use for my red velvet chocolate chip cookies, and it’s similar to my red velvet kiss cookies, only I use a little extra cocoa powder in place of flour. The extra cocoa flavor definitely stands out. One of the main questions I receive regarding this red velvet cookie dough is… how is it red velvet? Isn’t it just chocolate chip cookie dough tinted red? Honestly, that’s a great question. But to me, red velvet is a blend of cocoa and vanilla paired with LOTS of buttery flavor. It’s a buttermilk-based cake, so you have a tangy flavor mixed in as well. And the chocolate flavor is toned down by only adding a small amount of cocoa. The cookies include all of it, though the buttermilk flavor isn’t as strong.
So what about today’s cookies?
I had a wonderful starting off point with my red velvet cookie dough, so the real issue was with the cream cheese filling. Man this stuff was annoying! It would either seep out the sides of the cookie, taste gross, or pull a disappearing act. Like, it would melt into the cookie dough itself. It simply wasn’t thick or sturdy enough. Like most cookie doughs, the cream cheese filling needs to be super cold going into the oven. And it needs to fit snugly inside the red velvet cookie dough. So how do we make it? The filling is basically an extremely thick cream cheese frosting.
Um, did you read that? These are cookies stuffed with frosting (!!!).
You’ll need cream cheese, obviously. Confectioners’ sugar to sweeten and thicken, a smidge of flour to also thicken, and a touch of vanilla extract for flavor. I always add butter to my cream cheese frosting, but butter caused the filling to melt. Once I (1) ditched the butter, (2) got the filling as cold and sturdy as possible, and (3) shaped the cookie dough completely around the filling… we were golden!!!
Let’s walk through the general process:
- prepare + chill red velvet cookie dough
- make the cream cheese filling
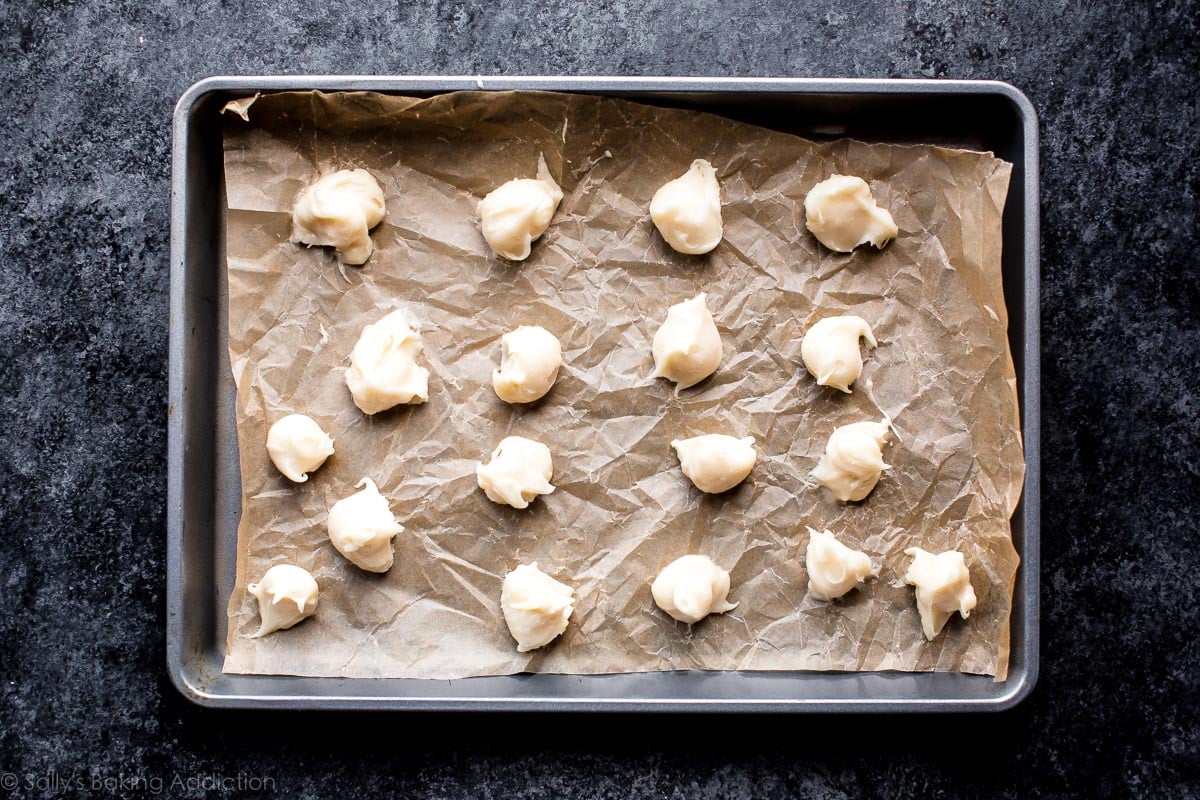
- drop spoonfuls onto baking sheet and freeze
- roll frozen spoonfuls of filling into balls
- assemble cookies
- bake cookies!
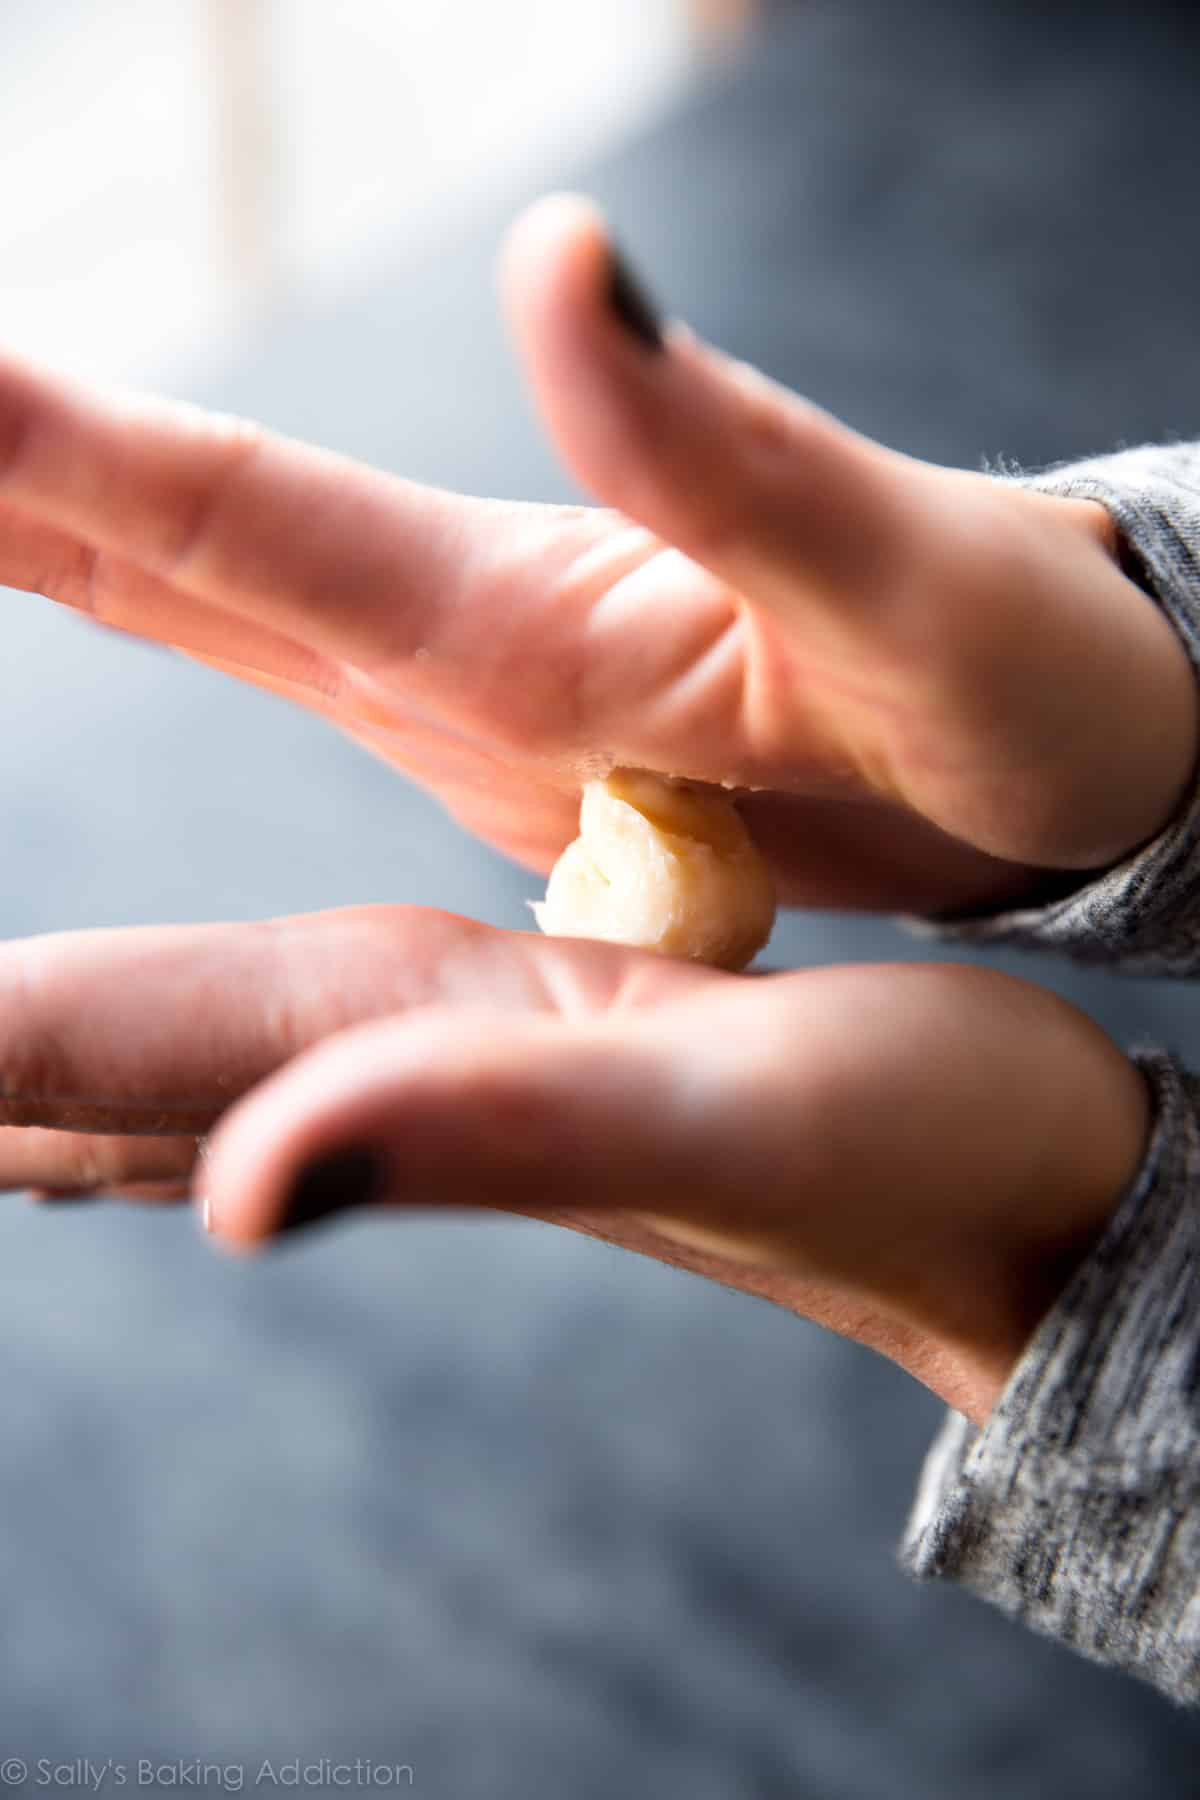
After the cream cheese filling is mixed together, it’s pretty sticky. So that’s why we have to freeze it. I don’t recommend freezing the filling in the bowl; rather, freeze it as little spoonfuls. It will freeze faster and more evenly this way. Once the little spoonfuls are frozen/cold, it’s easier to roll into balls to fit inside the cookie dough. It’ll still be a little sticky, but much more manageable.
Step Photos
Red velvet cookie dough:
Cream cheese filling:

Drop spoonfuls + freeze them:
Roll frozen cream cheese filling into balls as best you can:
Assemble cookies:
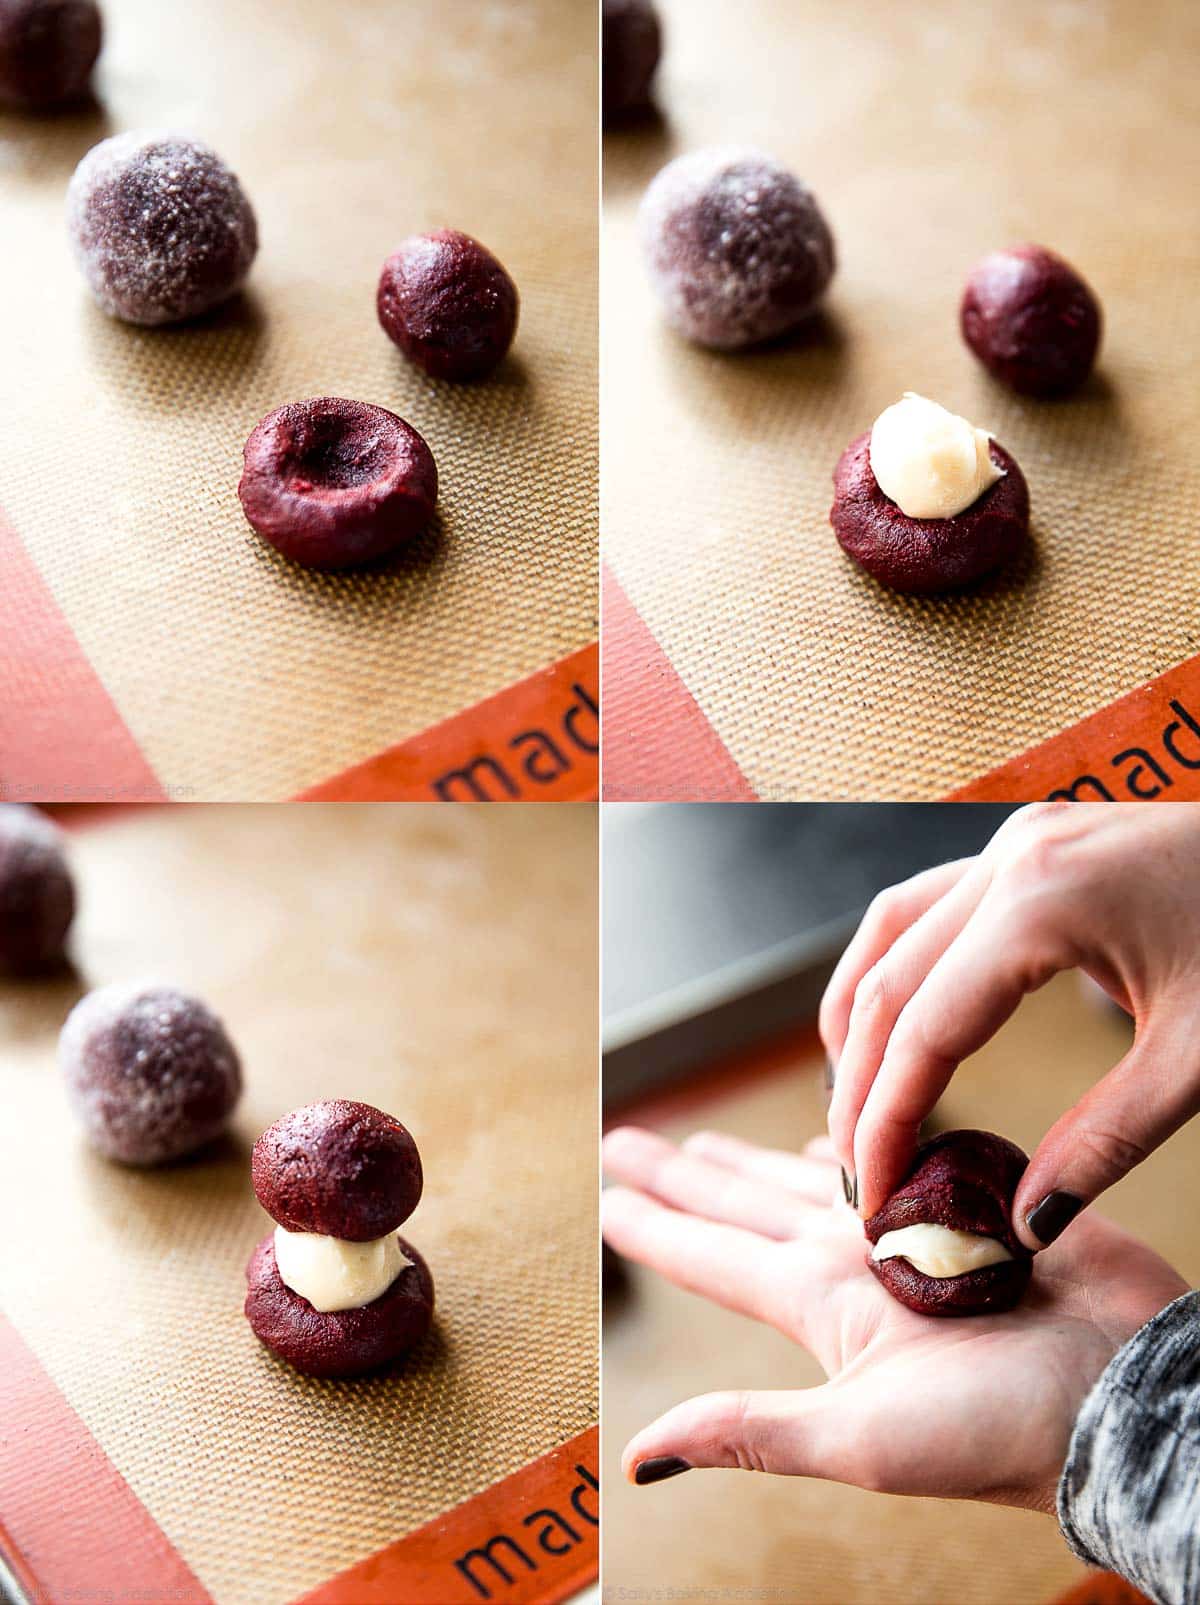
That bottom right picture shows how to mold the cookie dough around the cream cheese filling. Just push the dough down the sides to completely enclose the filling. As you’re assembling the cookies, the cream cheese filling balls may get a little soft. So don’t be afraid to just pop them back in the fridge for a few minutes.
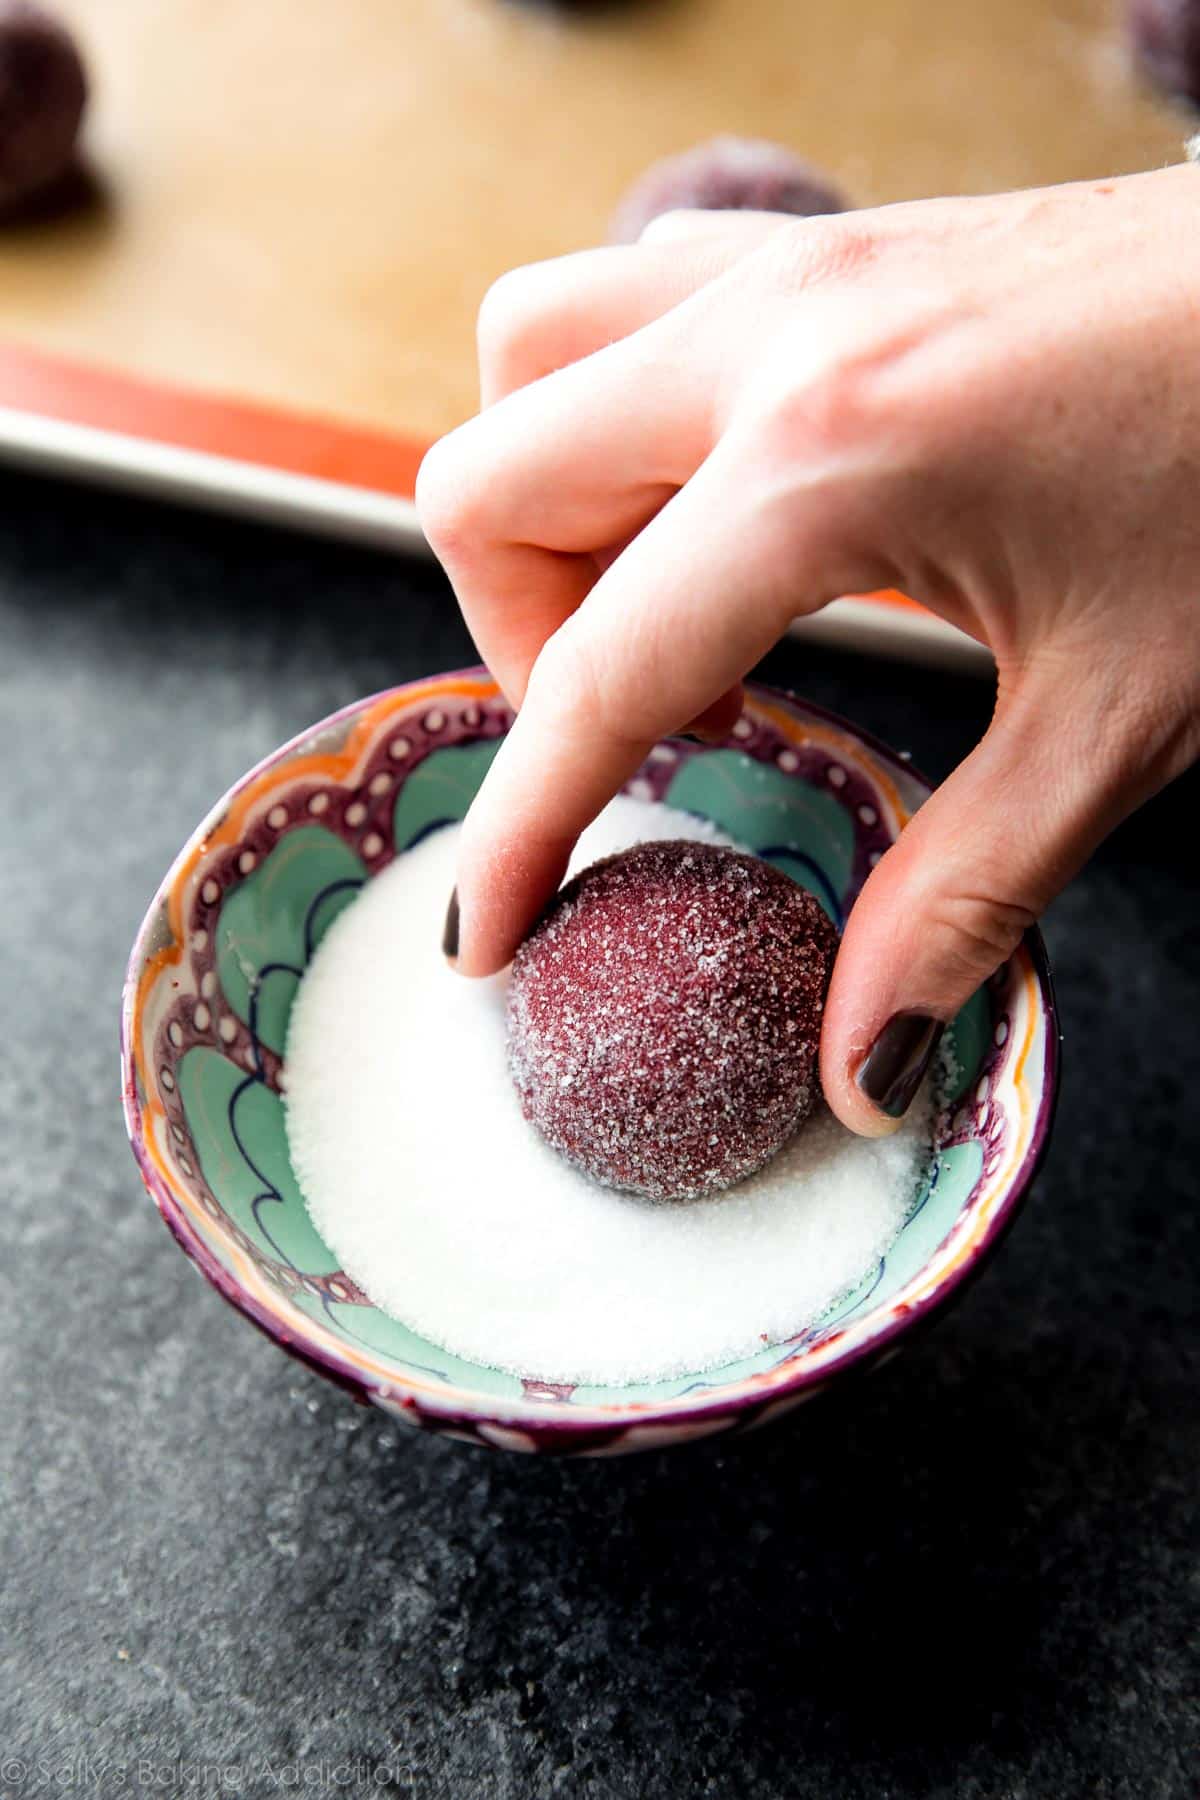
Roll the stuffed cookie dough balls in granulated sugar for some sparkle because sparkles are pretty.
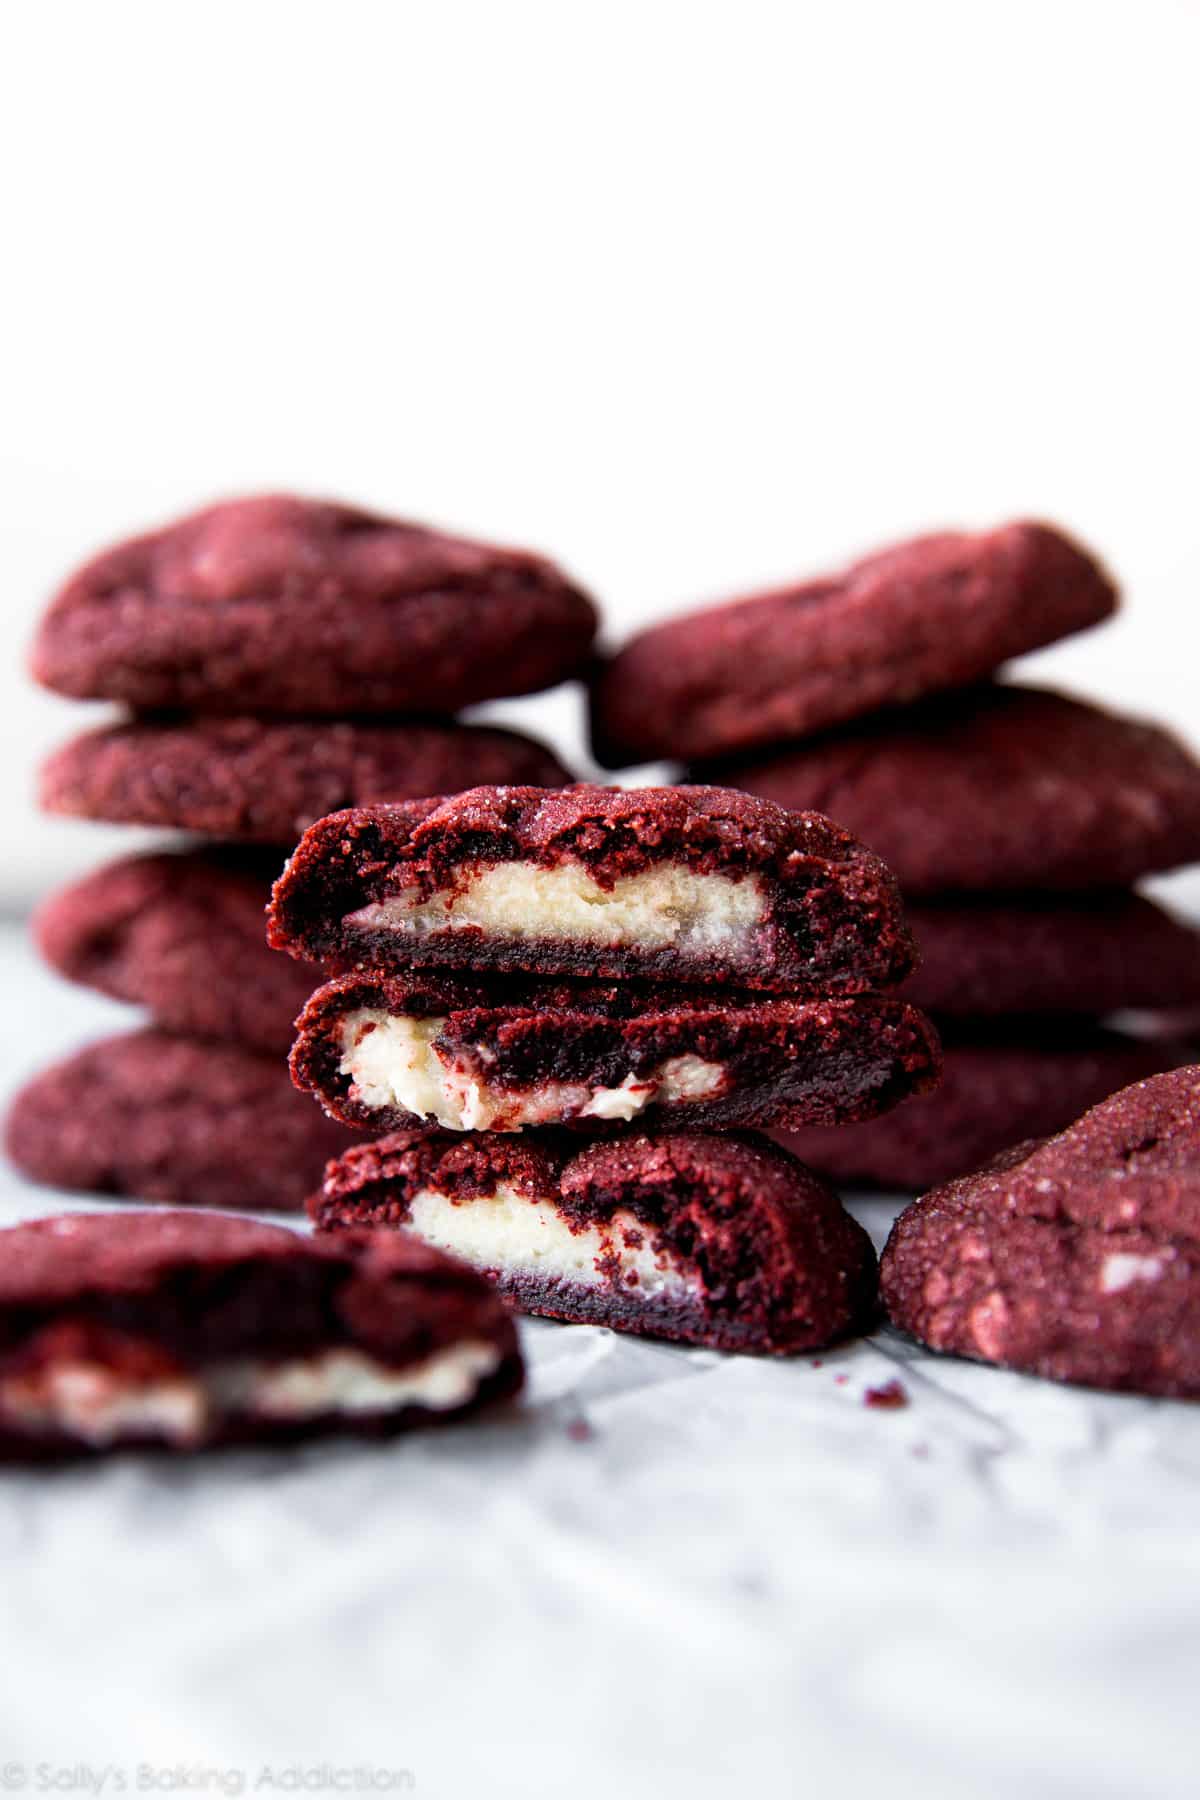
Bake up some stuffed cookie success!
Red Velvet Cookie Conclusion
- If you love red velvet, you’re going to obsess over these cookies.
- If you don’t love red velvet, you’re going to obsess over these cookies.
- I haven’t met a single person who doesn’t love these cookies.
- Even people who are all like “eh, I don’t really like dessert” (who even are you?) love these cookies.
See all cookie palooza recipes. And for your next red velvet-inspired bake, try my red velvet seven layer bars!


Cream Cheese Stuffed Red Velvet Cookies
- Prep Time: 2 hours, 45 minutes
- Cook Time: 12 minutes
- Total Time: 3 hours, 15 minutes
- Yield: 18 cookies
- Category: Cookies
- Method: Baking
- Cuisine: American
Description
These cream cheese stuffed red velvet cookies are like a chewy and dense slice of red velvet cake with cream cheese frosting.
Ingredients
- 1 and 2/3 cups (210g) all-purpose flour (spooned & leveled)
- 1/4 cup (21g) unsweetened natural cocoa powder
- 1 teaspoon baking soda
- 1/4 teaspoon salt
- 1/2 cup (8 Tbsp; 113g) unsalted butter, softened to room temperature
- 1/2 cup (100g) granulated sugar
- 1/2 cup (100g) packed light or dark brown sugar
- 1 large egg, at room temperature
- 1 Tablespoon (15ml) milk*
- 2 teaspoons pure vanilla extract
- 1 Tablespoon red liquid food coloring (or 3/4 tsp red gel food coloring, or 2 tsp beet powder alternative)*
Cream Cheese Filling
- 4 ounces (113g) full-fat brick cream cheese, room temperature
- 1 and 3/4 cups (210g) confectioners’ sugar
- 1 Tablespoon (8g) all-purpose flour
- 1/2 teaspoon pure vanilla extract
For Rolling
- 1/2 cup (100g) granulated sugar
Instructions
- Make the cookie dough: Whisk the flour, cocoa powder, baking soda, and salt together until combined. Set aside.
- In a large bowl using a handheld or stand mixer fitted with a paddle attachment, beat the butter, 1/2 cup granulated sugar, and the brown sugar together on high speed until completely smooth and creamy, about 2 minutes. Add the egg, milk, and vanilla extract and beat until combined, about 1 minute. Scrape down the sides and bottom of the bowl as needed.
- On low speed, slowly mix the dry ingredients (flour mixture) into the wet ingredients until combined. Finally, beat in the food coloring. Add 1-2 teaspoons more for a brighter red, if desired. The cookie dough will be slightly sticky. Cover dough tightly with aluminum foil or plastic wrap and chill for at least 1 and 1/2 hours and up to 2-3 days.
- Meanwhile, make the cream cheese filling: In a large bowl using a handheld or stand mixer fitted with a paddle attachment, beat the cream cheese, confectioners’ sugar, flour, and vanilla extract together on medium-high speed until completely smooth and creamy, about 3 minutes. Drop teaspoonfuls onto a lined baking sheet that will fit in your freezer. Freeze for at least 1 and 1/2 hours and up to 2-3 days.
- Remove cream cheese spoonfuls from the freezer. Roll each into a ball as best you can. It will be a little sticky. Place in the refrigerator until ready to use in step 7. You want them as cold as possible!
- Preheat oven to 350°F (177°C). Line two large baking sheets with parchment paper or silicone baking mats. (Always recommended for cookies.) Set aside.
- Assemble the cookies: Remove cookie dough from the refrigerator. If the cookie dough chilled longer than 3-4 hours, let it sit at room temperature for about 20 minutes. This makes the cookie dough easier to scoop and roll. Roll cookie dough, 1 Tablespoon each, into balls. Using your thumb, make an indent into one cookie dough ball. Remove cream cheese balls from the refrigerator. Place one inside the indentation. Cover the cream cheese ball with another cookie dough ball and mold the two dough balls around the cream cheese, making sure it is completely covered and snug inside. Repeat with remaining cookie dough and cream cheese.
- Rolling: Roll each stuffed cookie dough ball in remaining granulated sugar and arrange 3 inches apart on the baking sheets. Bake for 12-13 minutes or until edges appear set. Centers will look soft.
- Remove from the oven and allow cookies to cool on the baking sheet for 5 minutes before transferring to a wire rack to cool completely.
- Cookies will stay fresh covered at room temperature for 3 days or in the refrigerator for 1 week.
Notes
- Make Ahead Instructions: You can make the cookie dough and chill it in the refrigerator for up to 2-3 days. You can also make the cream cheese filling in step 4 and freeze for up to 2-3 days. Baked cookies freeze well for up to 3 months. Thaw overnight in the refrigerator and bring to room temperature, if desired, before serving. Unbaked cookie dough balls with cream cheese inside (that you assembled in step 7) will freeze well for up to 3 months. Let sit at room temperature for 30 minutes, pre-heat the oven, then roll in remaining 1/2 cup granulated sugar. Bake as directed. Read my tips and tricks on how to freeze cookie dough.
- Special Tools (affiliate links): Glass Mixing Bowl | Whisk | Electric Mixer (Handheld or Stand) | Americolor Super Red Food Coloring | Baking Sheets | Silicone Baking Mats or Parchment Paper | Cooling Rack
- Milk: Any milk, dairy or non-dairy, works. I like to use buttermilk.
- Red Food Coloring: I’ve successfully made these cookies using beet powder instead of red food coloring – this is a wonderful natural alternative to food coloring. Use 2 teaspoons for a slight red color.
- Keep Everything Cold: If the cream cheese filling or cookie dough become too soft as you assemble the cookies in step 7, simply place back into the refrigerator for a few minutes.
- Be sure to check out my top 5 cookie baking tips AND these are my 10 must-have cookie baking tools.


Reader Comments and Reviews
Excelent !!!!!!
A little time consuming but a huge hit at office. Forgot to roll them in sugar before baking but added milk powder to the dough.
I just made these. Double the recipe for the dough as you will have a lot more filling that dough. Here are some tips that made things go well in the assembly process: after mixing the dough, refrigerate it for about 20 min. Then, scoop it out into balls and freeze the scoops OVERNIGHT. After making the filling, pipe the filling into small swirls on a pan lined with parchment and freeze immediately OVERNIGHT. I cannot emphasize this enough. While the oven was pre-heating, I took the frozen dough out let it thaw slightly, then quickly quickly shaped it into little cups. After all the dough was shaped into little cups, I added the frozen filling, smooshed the dough cups together, rolled it in the sugar and threw it all back in the freezer for 10 minutes. I baked the cookies as directed and everything came out beautifully.
Hi Sally! Always love your recipes and excited to try this one! If I rolled in powdered sugar before baking, would i get the crinkle cookie look?
Absolutely!