

Learn how to make creamy green bean casserole completely from scratch with fresh vegetables and a homemade gravy sauce. Thickened with flour and a little butter, there’s no canned cream-of soups required. Out of all the Thanksgiving side dish recipes, this is our family’s #1 favorite, and the non-negotiable on the holiday table every year.
I originally published this recipe in 2015 and have since added new photos and additional success tips.

Thanksgiving turkey and green bean casserole go hand-in-hand. This vegetable dish has always been a beloved favorite, but ever since I began making it this way, it’s requested at nearly EVERY holiday… and not just in November!
You haven’t had green bean casserole until you’ve had green bean casserole from scratch.
One reader, Sandie, commented: “Amazingly delicious—I never serve beans because they aren’t my favourite, but now they are!!! I followed the recipe as written and it all turned out beautifully! ★★★★★”
Another reader, Katie, commented: “Yum!! Best GBC I’ve ever made. I decided to skip the homemade fried onions part and just went with the store-bought, but I followed the rest of the recipe. Your recipes were the stars of our Thanksgiving meal. ★★★★★”
This Is Green Bean Casserole From Scratch
- No cans of condensed soup
- Use fresh green beans
- Real, homemade gravy
- Homemade “fried” onions
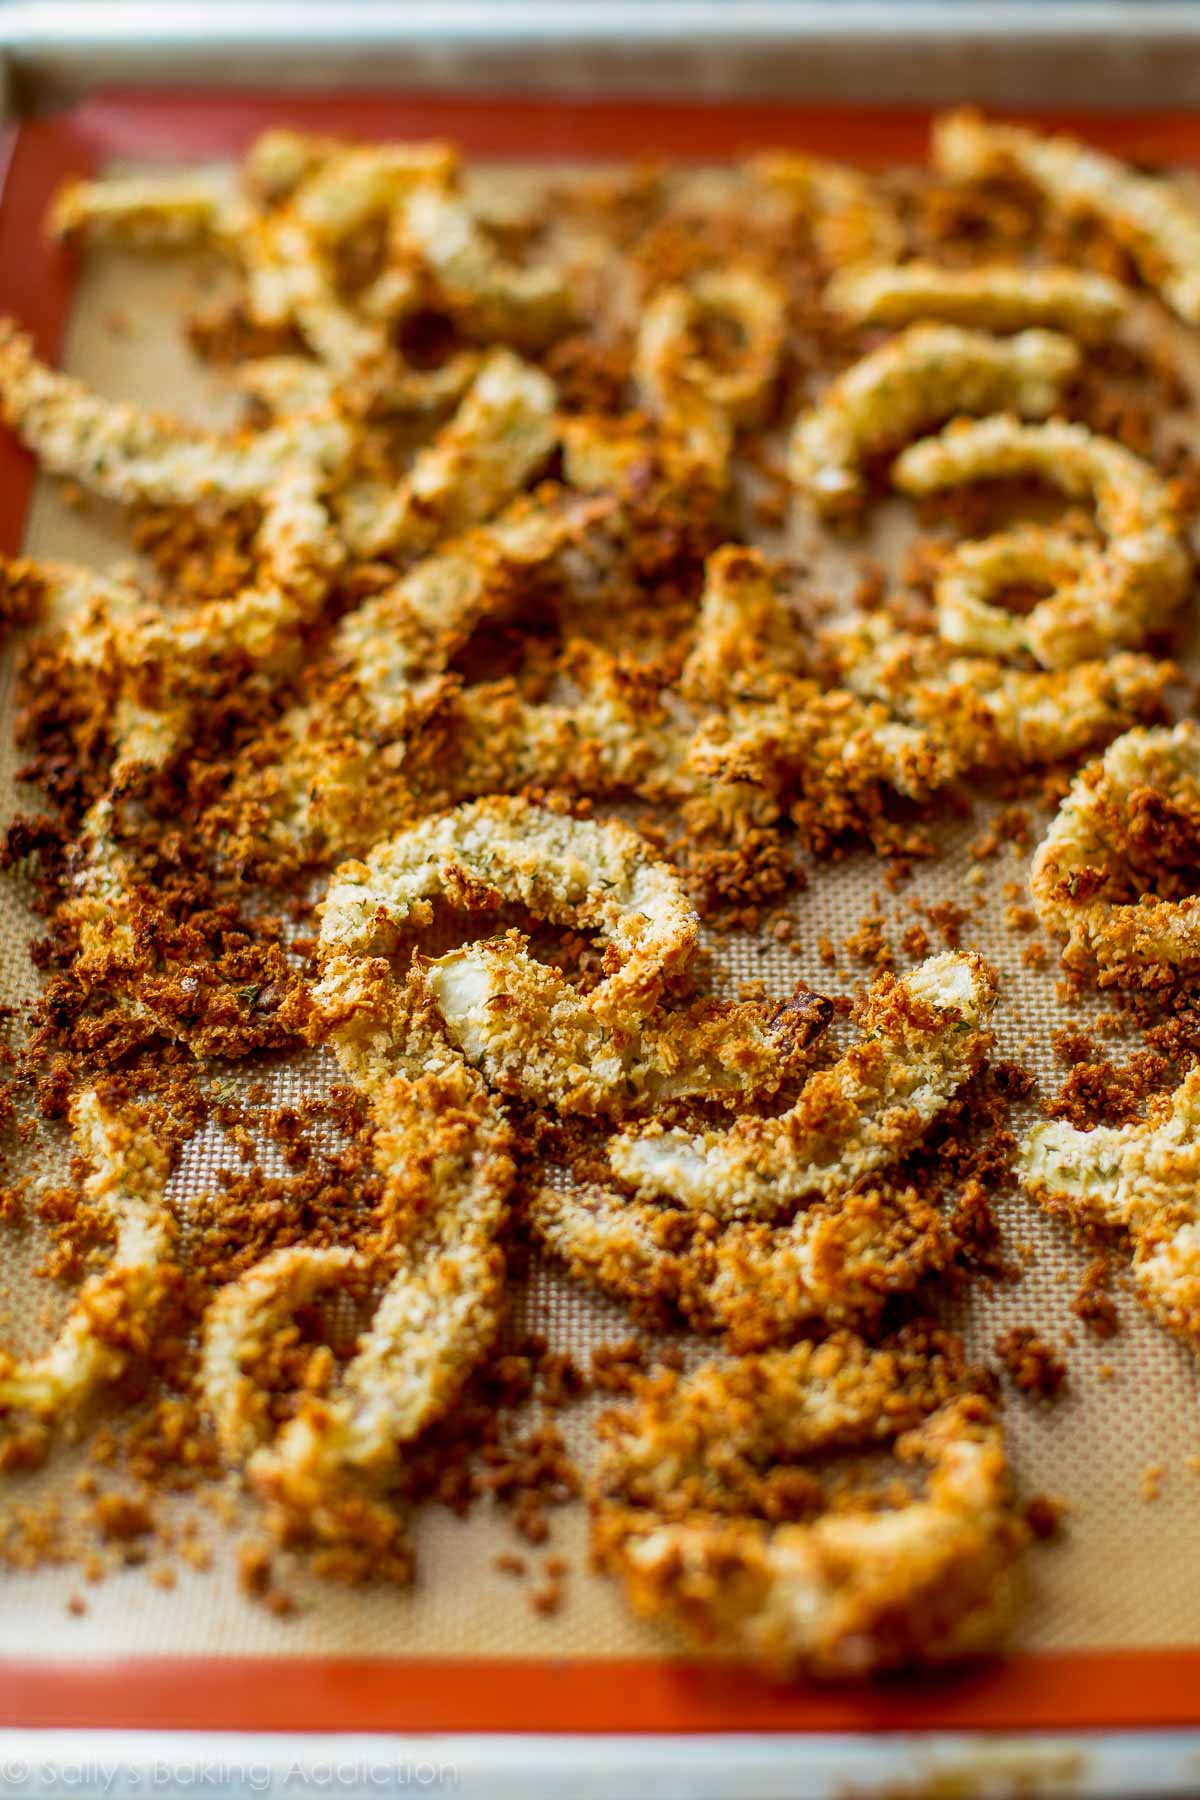
Not only are you preparing the homemade gravy, you’re also making the “fried” onions (pictured above). Of course, this is an extra step and completely worth it if you have the time. However, with a crowd to entertain, Thanksgiving pies to bake, and a million dishes to wash, I’m here to let you know that a carton of French’s crispy fried onions taste just as fabulous! (Pictured below.)

How to Make Green Bean Casserole
“Fry” the Onions: Coat sliced onions in some flour, then beaten egg + milk, and then a mixture of salt, pepper, and Panko breadcrumbs for extra crunch. Bake. Again, you can skip these and/or use a container of store-bought crispy fried onions.
The onions are golden brown and crunchy, the perfect texture contrast to the creamy sauce!
Here’s everything you need for the rest of the casserole. You’ll appreciate it’s a simple gravy sauce without any fancy herbs, spices, or specialty ingredients. Basic, everyday ingredients can produce outstanding results.

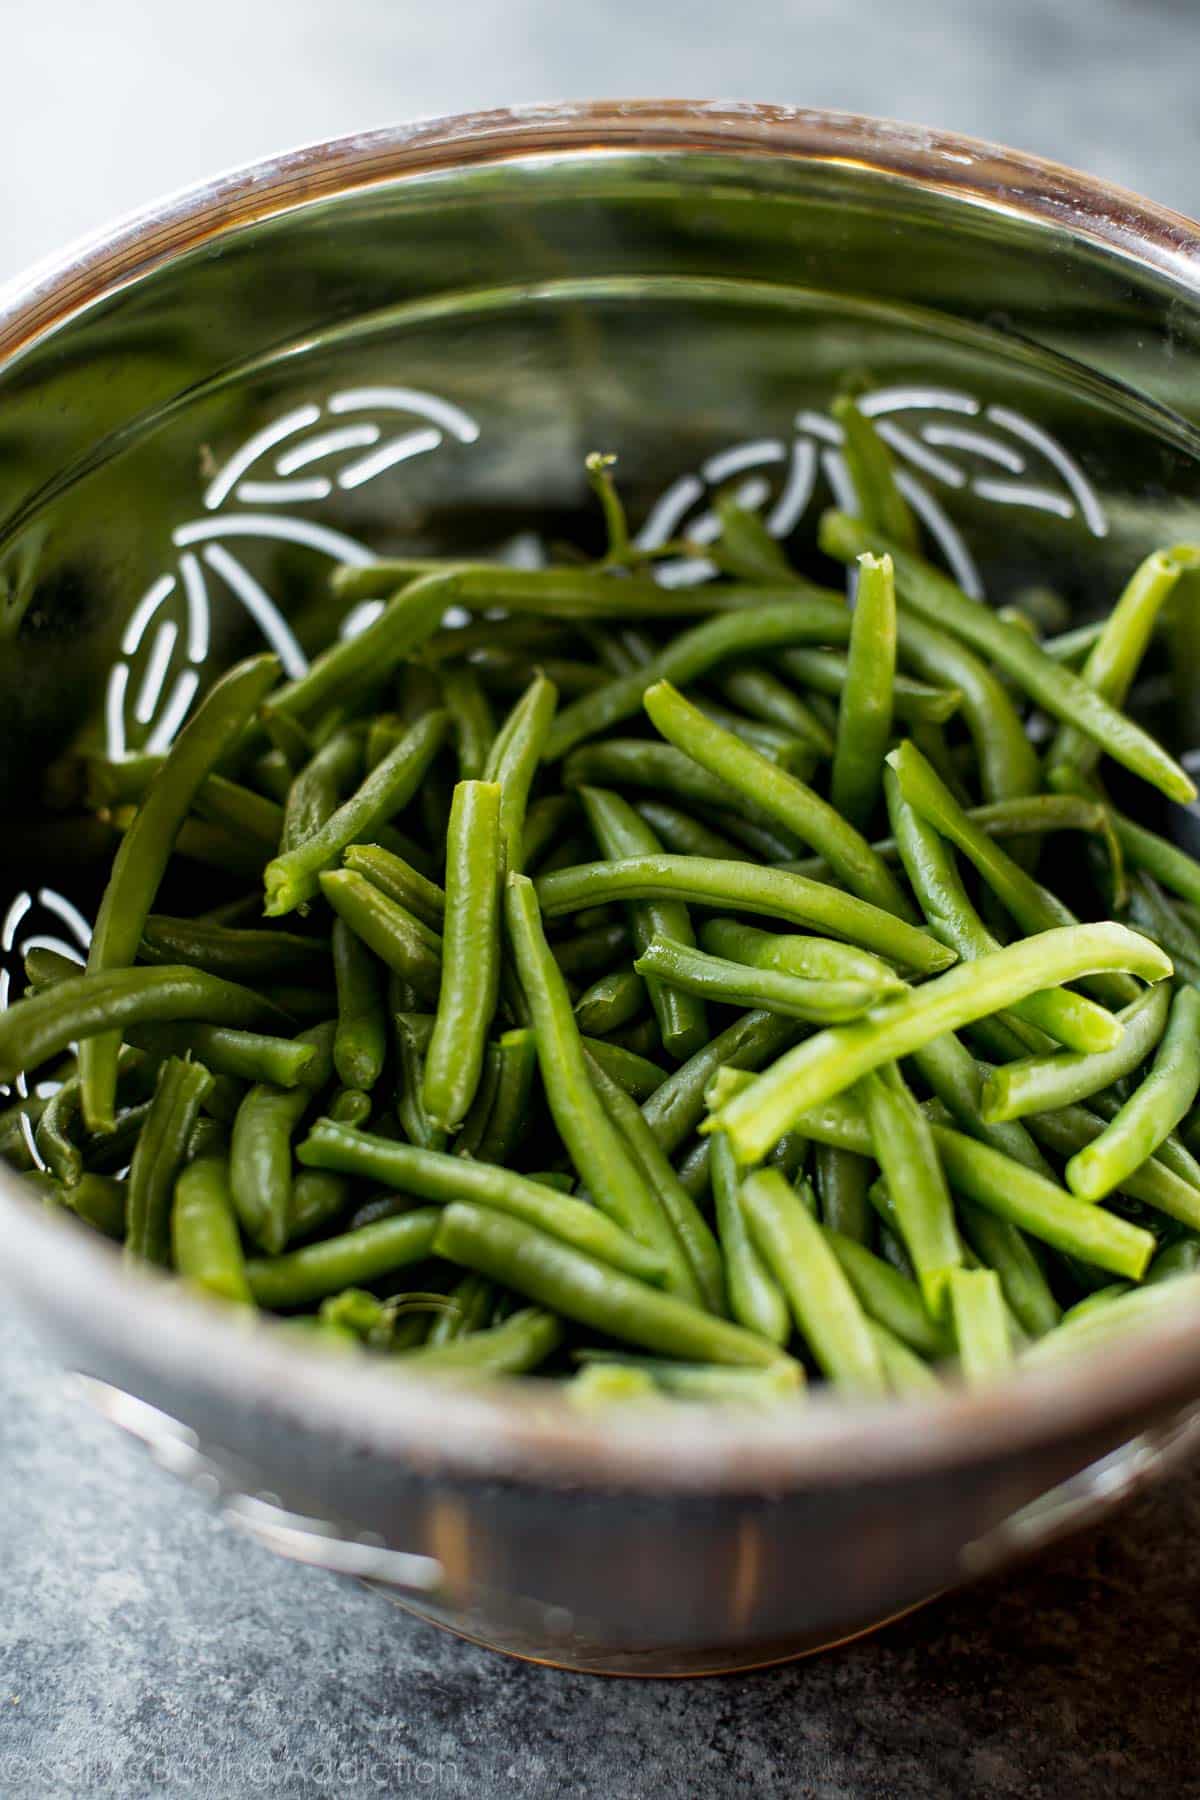
Blanch the green beans: Rinse fresh green beans, trim them, halve them, and then blanch them. Fresh green beans give the most wonderful flavor and texture; they aren’t soggy like canned green beans.
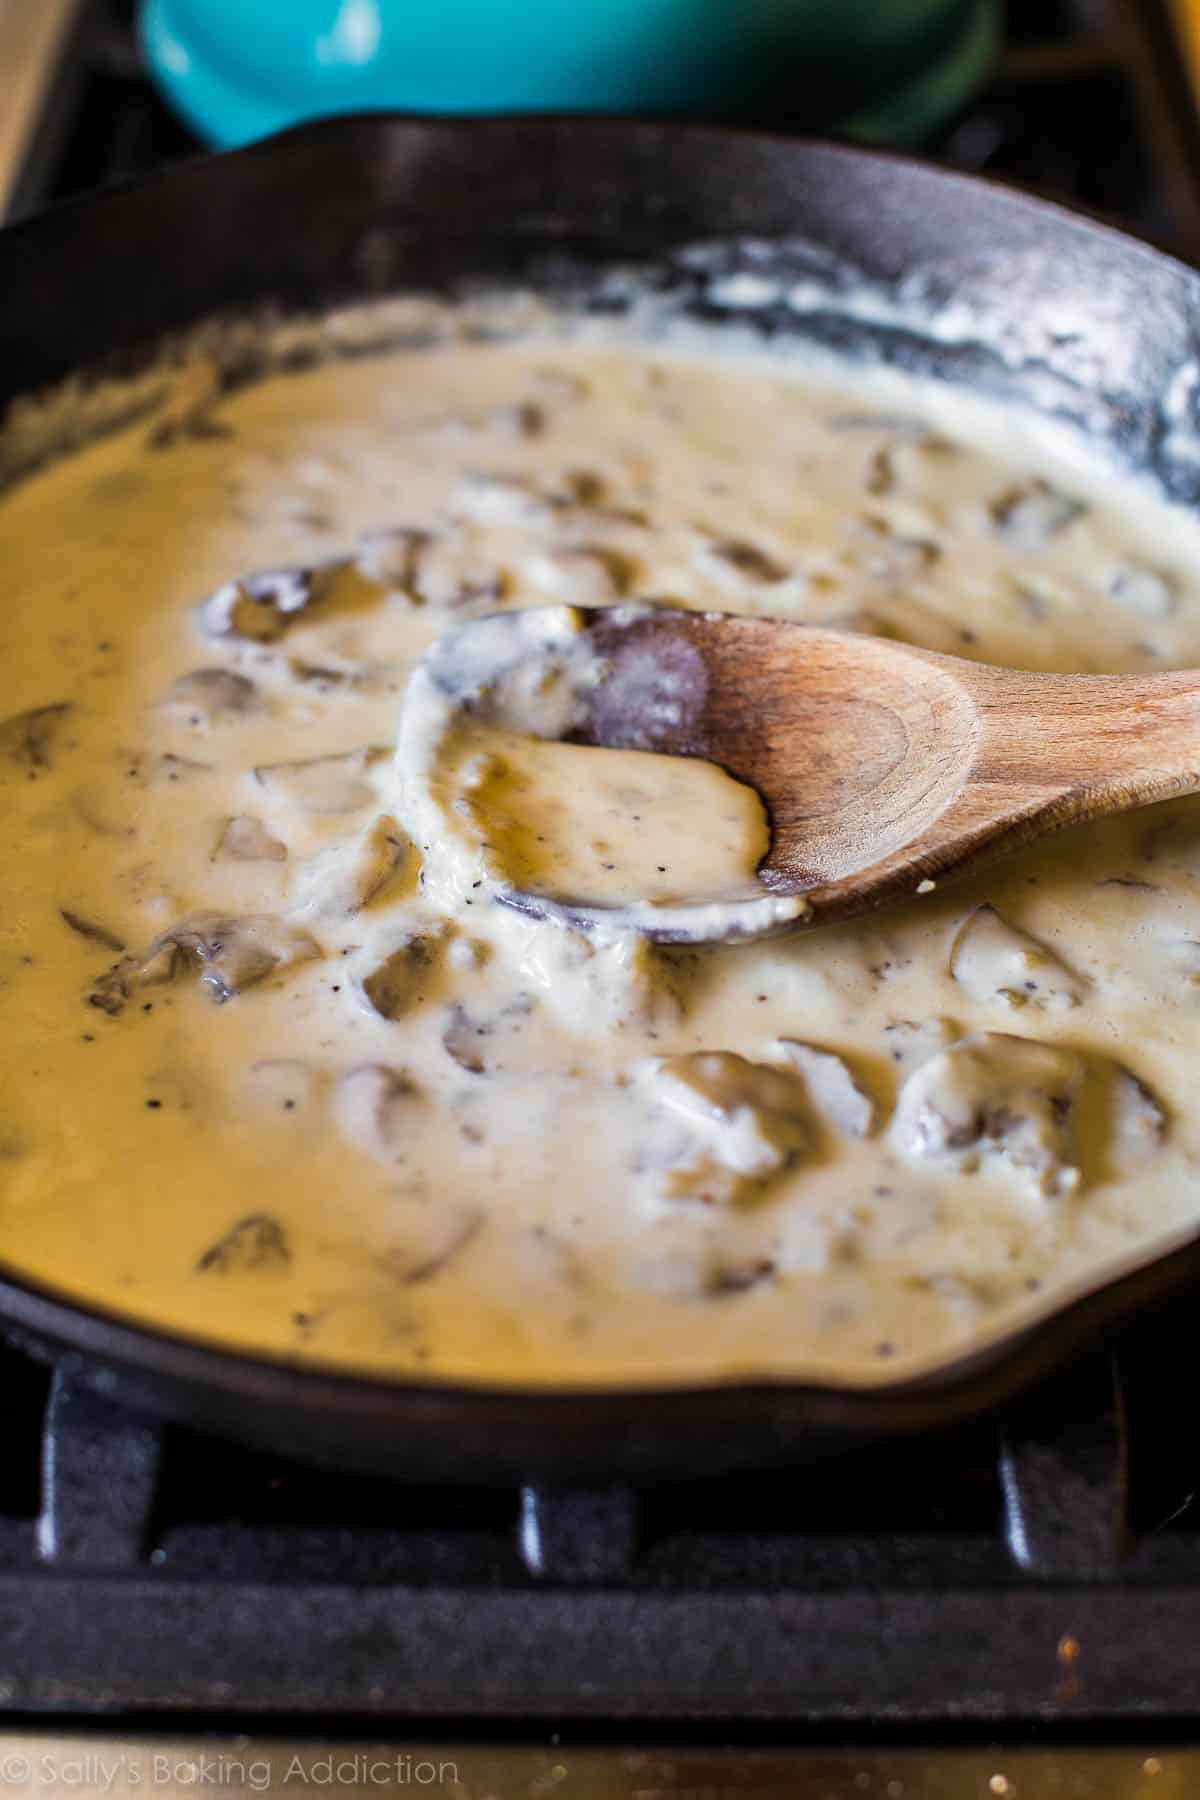
Make the gravy sauce: Melt butter with chopped mushrooms on medium-high heat in a large oven-safe skillet. Add a little salt and pepper, then some garlic. Next, add some flour to soak up all the moisture that the mushrooms have released in the cooking process. Add chicken broth and half-and-half, and cook to thicken the sauce.
Yes, absolutely. While the sliced mushrooms add wonderful flavor and some texture to the creamy gravy, I understand they are not everyone’s favorite! You can simply leave them out, with no other changes to the recipe. Or you can replace with 1 thinly sliced bell pepper. Some readers have even used 1/2 cup of sliced water chestnuts.
You can use heavy cream instead of the half-and-half for a much richer sauce if you prefer. In a pinch, you can use whole milk. But half-and-half is the preferred choice for the best results.
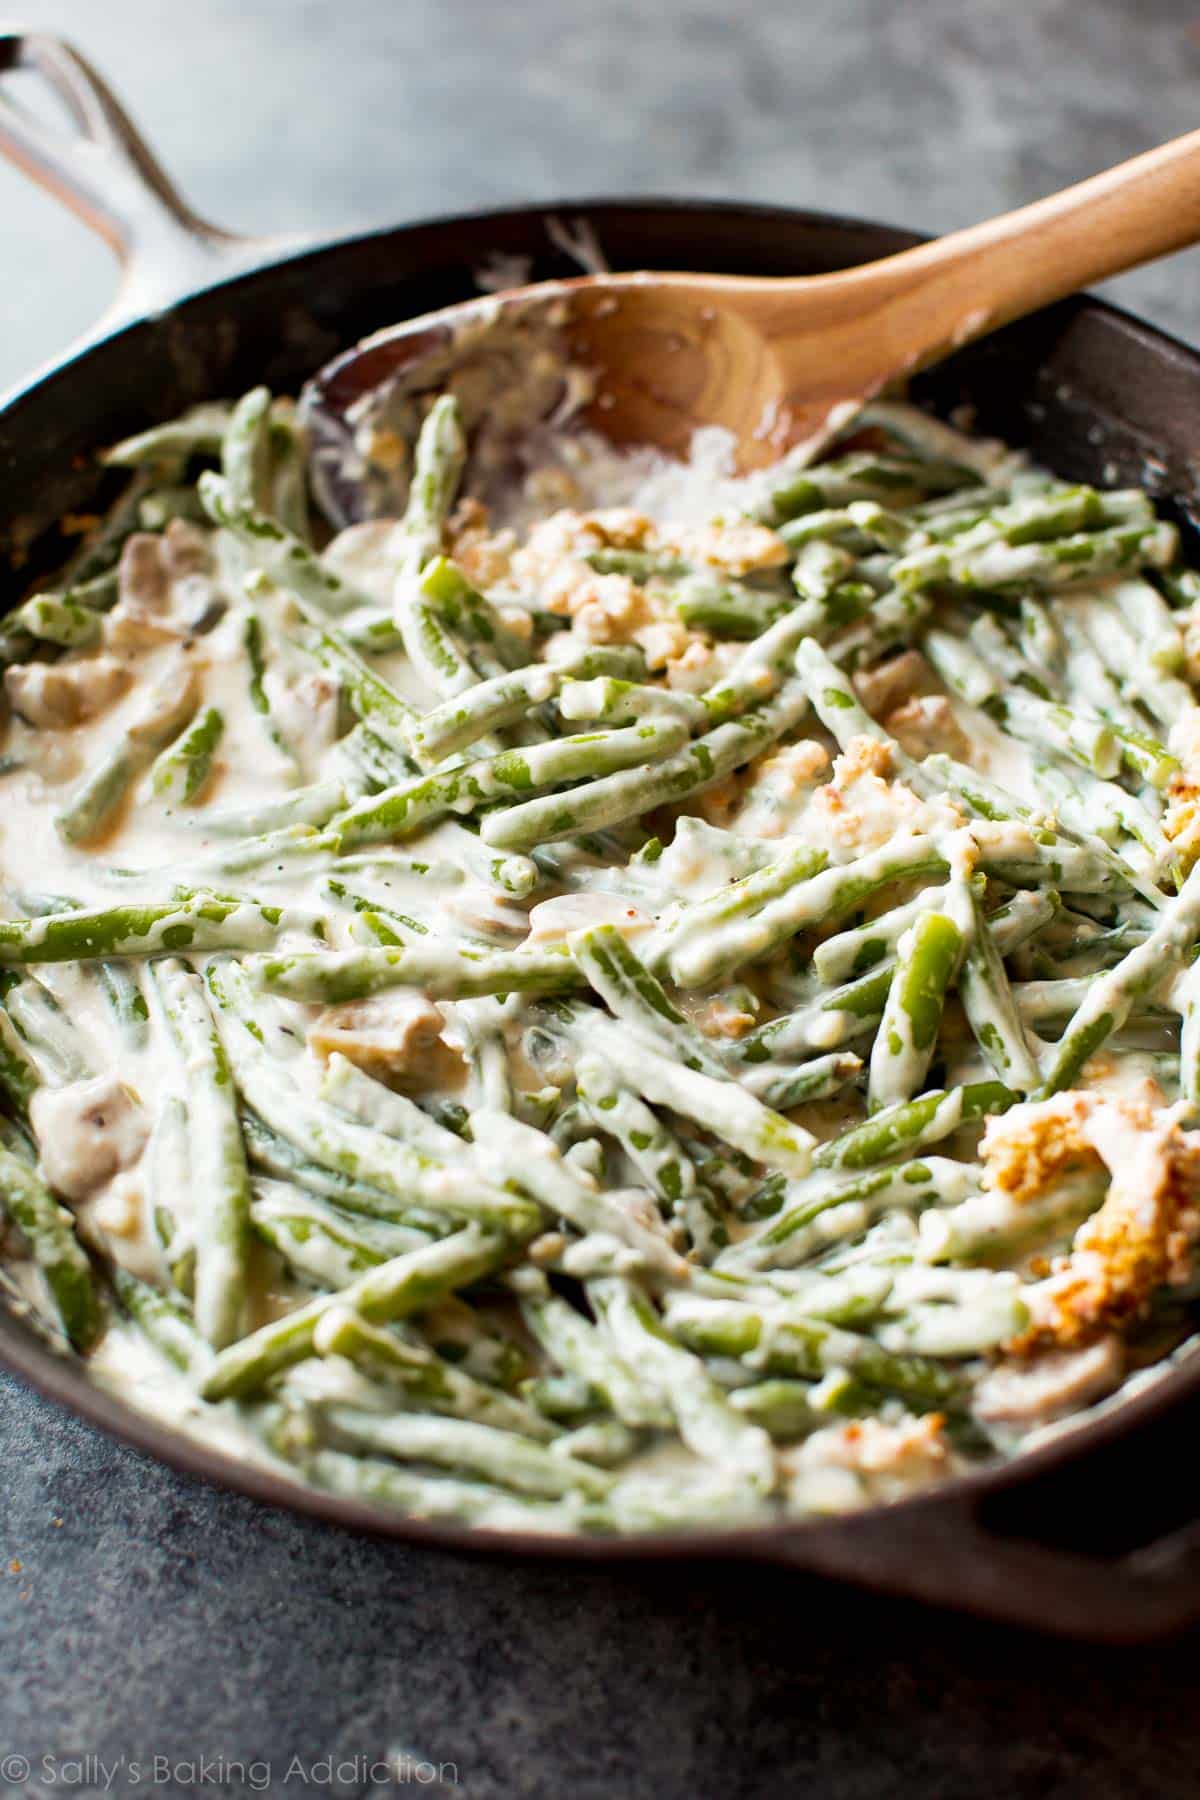
Stir it all together: Add some of your breaded onions and all of the green beans, then give it a good stir.
Bake: Top with the rest of the onions and bake for about 15 minutes, or until bubbly around the edges. I always appreciate a short bake time, especially on Thanksgiving!

If you’re not using an oven-safe skillet, transfer the green beans and gravy mixture to a medium casserole dish or baking pan that holds about 2–3 quarts. Top with the onions, and then follow the same baking instructions.
How Do I Make It With Store-Bought Crispy Fried Onions?
If you’d like to skip the homemade “fried” crispy onions, you can absolutely replace with store-bought. Stir about 1/2 cup of the crispy onions into the gravy/green beans, then top the casserole with about 1 cup of them. The baking instructions remain the same. Also, here I’m using a casserole dish:


How to Make Green Bean Casserole Ahead of Time
Prepare everything as directed, except turn the oven off after the onions are done. After the sauce is finished and the casserole is assembled, set aside and allow to cool. Cover tightly, then refrigerate overnight. The next day, bake for 20 minutes at 400°F (204°C) until bubbly. You can also prepare the casserole, including topping with onions, then freeze for up to 3 months before baking. Thaw in the refrigerator, and then bake as directed.
More Thanksgiving Recipes
If you’re looking for Thanksgiving side dishes and desserts, I have you covered!
- The Great Pumpkin Pie (reader favorite!)
- Sweet Potato Casserole
- Homemade Biscuits
- Cranberry Sauce
- Cornbread
- Sausage & Herb Stuffing & Cornbread Stuffing
- Pecan Pie
- Candied Sweet Potatoes
- Apple Pie
For even more Thanksgiving recipe inspiration, see all my favorite Thanksgiving pie recipes and my complete list of 40+ Thanksgiving side dishes.
Print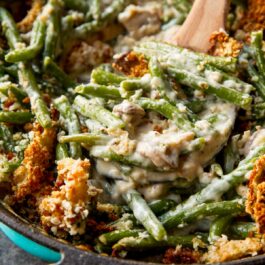
Creamy Green Bean Casserole from Scratch
- Prep Time: 30 minutes
- Cook Time: 55 minutes
- Total Time: 1 hour, 25 minutes
- Yield: serves 8
- Category: Dinner
- Method: Baking
- Cuisine: American
Description
Learn how to make creamy green bean casserole completely from scratch with fresh vegetables and a homemade gravy sauce. Thickened with flour and a little butter, there’s no canned cream-of soups required. For make-ahead option and freezing instructions, see recipe Note.
Ingredients
Baked “Fried” Onions
- 1 medium onion
- 1/2 cup (62g) all-purpose flour (spooned & leveled)
- 3/4 cup (45g) panko breadcrumbs*
- 1/2 teaspoon salt
- 1/4 teaspoon ground black pepper
- 1 large egg
- 1 Tablespoon (15ml) milk
Green Bean Casserole
- 1 Tablespoon + 1 teaspoon salt, divided
- 1 pound fresh green beans, rinsed, ends trimmed, and halved
- 2 Tablespoons (28g) unsalted butter
- 8 ounces sliced mushrooms*
- 1/2 teaspoon ground black pepper
- 2 cloves garlic, minced
- 2 Tablespoons (15g) all-purpose flour
- 3/4 cup (180ml) chicken or vegetable broth
- 1 and 1/4 cups (300ml) half-and-half*
Instructions
- Preheat the oven to 450°F (232°C). Line a large baking sheet with parchment paper or a silicone baking mat. Set aside.
- For the onions: (While the onions bake, you can blanch the green beans—step 4.) Thinly slice the onion, and separate the slices. Pour flour in one small bowl, panko + salt + pepper into a medium bowl, and whisk the egg and milk together in another small bowl. To bread the onion slices, you’ll want to use one hand for dry and one hand for wet. It helps things move a little quicker and easier. First, dip a few slices into the flour. Then into the egg mixture. And finally, give them a nice dunk into the panko and coat them well. Place onto baking sheet. Repeat with the rest of the onions. Bake onions until golden brown, about 20 minutes. Flip them twice during this time. Set them aside.
- Reduce oven temperature to 400°F (204°C).
- Blanch the green beans: Bring a gallon of water and 1 Tablespoon of salt to a boil in a large saucepan. Add the green beans and boil for 5 minutes. Fill a large bowl with ice water and set near the sink. Drain the beans and immediately transfer them into the bowl of ice water to stop the cooking process. Drain again, and set aside.
- For the casserole: Over medium-high heat, melt the butter in a large 10- to 12-inch ovenproof skillet. Add the mushrooms, 1 teaspoon salt, and the pepper. Cook, stirring occasionally, until the mushrooms begin to release some moisture—about 5 minutes. Add the garlic, stir, and cook for another 2 minutes. Sprinkle the flour on top and stir until combined. The flour will soak up all the moisture. Add the chicken broth and simmer for 3 minutes. Reduce the heat to medium-low and add the half-and-half. Stirring occasionally, cook until the mixture is thick—about 10 minutes or maybe more if you prefer a thicker sauce.
- Remove from heat and add about a quarter of the onions, and all of the green beans. Give it a good stir, combining the sauce and beans. (If you’re not using an oven-safe skillet, or want to bake this in a casserole dish, transfer mushroom/gravy mixture to a greased 2–3-quart casserole dish.) Top with remaining onions and bake until bubbling around the edges, about 15 minutes. Remove from the oven and serve warm.
- Leftovers keep well in an airtight container in the refrigerator for up to 4 days. Reheat as desired.
Notes
- Make Ahead & Freezing Instructions: Prepare everything as directed, except turn oven off after the onions are done. After the sauce is finished and the casserole is assembled, set aside and allow to cool. Cover tightly, either in the skillet or after carefully transferring to another dish. Refrigerate overnight. The next day, bake for 20 minutes at 400°F (204°C) until bubbly. You can also prepare the casserole, including topping with onions, then freeze for up to 3 months before baking. Thaw in the refrigerator, then bake as directed.
- Special Tools (affiliate links): Baking Sheet | Silicone Baking Mat or Parchment Paper | Glass Mixing Bowls | Whisk | 10- to 12-inch Oven-Safe Skillet
- Panko Breadcrumbs: Panko is a Japanese-style breadcrumb found in all major grocery stores or anywhere breadcrumbs are sold. It gives the onions a heartier crunch.
- Can I skip the onions? If you’re not into the onion topping, feel free to skip it and instead sprinkle the top of the casserole with 1/2 cup panko breadcrumbs before baking.
- Can I use French’s crispy fried onions instead? Yes, absolutely! Stir 1/2 cup into the gravy mixture when you add the green beans in step 6. Then top with 1 cup before baking.
- Mushrooms: Feel free to leave out the mushrooms or replace with thinly sliced bell pepper.
- Half-and-Half: I tested this recipe with varying amounts of half-and-half—this amount does the trick. You can use heavy cream instead of the half-and-half for a richer sauce if you prefer. You can use whole milk if absolutely needed, but skip nondairy or lower-fat milks. The ideal option for a creamy, rich gravy is half-and-half.
- If you’re not using an oven-safe skillet: If you’re not using an oven-safe skillet, transfer the green beans and gravy mixture to a greased casserole dish that holds about 2–3 quarts before baking.
- Want to double the recipe to feed a larger crowd? It’s easy! Simply double the ingredients. Then in step 6, remove the skillet from heat and pour the bean/gravy mixture into a large 9×13-inch (or similar size) casserole dish. Top with onions, then bake until bubbly, about 25 minutes.
Adapted from Alton Brown—he likes to add fresh ground nutmeg, but I wasn’t really a fan. Feel free to add some, though!


Reader Comments and Reviews
I love this recipe and I have altered it off and on and still found it to be delicious. Sometimes I add a little cheddar cheese or parmesan. I always double the onions! I make my own broth and roux but I like to add a little thyme. Regardless, it is a recipe that has helped me immeasurably.
I made this and doubled the sauce recipe because I wanted a more saucy texture, and it is a definite recipe that I will make again. I even had to omit the mushrooms and sub in potato chips in place of panko and it was still incredible
Hi! Would it make much of a difference to use chicken stock instead of broth?
Hi Jo, you could use either!
Wonderful green bean casserole. I made some substitutions that I want to mention because they worked. I used leeks instead of mushrooms, and toasted slivered almonds for the topping instead of the fried onion (added them after casserole cooked).
If I want to double this, what size pan would you recommend? Thanks.
Hi Samantha, see recipe Notes for doubling details. You’ll want a large 9×13-inch (or similar size) casserole dish.
Absolutely amazing! Best green bean casserole I’ve ever had! Will definitely make again
Sally, I loved having this recipe from scratch, thank you so much!! I have some dietary issues and because this is from scratch, I could tinker with ingredients as opposed to the normal recipe which is a no go. I can’t do dairy, and so I refrigerated a can of coconut milk (gum free) and took the thick cream part off the top and used that in place of half and half. It all turned out BEAUTIFULLY and so tasty! I don’t think the difference is noticeable at all. Thank you so much for this recipe, I thought I’d never be able to try green bean casserole! I also love the casserole just with the broth portion and green beans, so I plan to make it that way for myself for non holidays and amp it up with the homemade crispy onions for holidays! Simply, thank you for this!
Delicious! My whole family loved it at Thanksgiving dinner!
Delicious! Absolutely delicious. Will make again for thanksgiving but with fewer fried onions. I wanted a better ratio of green beans to onions. SO good though.
Can I use canned green beans?
Fresh are really best here!
Hi what casserole dish can I put it in for just half of the patch?
You could use an 8×8 pan.
What type of mushroom?
Hi Emory, We enjoy button mushrooms here but you can use any variety you like!
I started making this about 5 years ago when we did a fully scratch made Thanksgiving. This is the standard bearer of green bean casserole in our family (except for one stalwart uncle but I oblige because the other one is literally opening cans and dumping and family and all that).
This casserole is amazing. It’s really an easy dish to pull together and I highly recommend. I usually make it a day in advance but I have gone the frozen method a few times. It’s a hit every time.
This looks great! Hubby doesn’t like beans, so I’m thinking of subbing fresh blanched asparagus.
If you’re making 2 times the recipe in advance (2lbs) how long and at what temp should it be cooked next day?
Hi Palo Jaan, see Notes after the recipe for details on doubling this recipe!
Made this tonight for supper and it was wonderful. I substituted heavy cream for half in half and store bought French Fried Onions but it’s head and shoulders above canned green beans and mushroom soup.
If I wanted to make this dairy free, would coconut milk work? Perhaps with extra coconut cream?
We haven’t tested a dairy free version, but that’s certainly worth a try!
Coconut is a VERY strong flavor so unless you want coconut flavored greenbeans I’d look into other dairy free options maybe oatmilk or lactose free if the lactose is the problem.
Unflavored soy milk would work great as a dairy free option.
Vegan half and half is available in some stores also
I made it dairy free yesterday. I refrigerated a can of coconut milk and the cream floats to the top. I scraped all that off and used it where the recipe called for cream. There are enough other flavors working in this recipe that I don’t notice the coconut at all!
Oh my… this was creamy, delicious goodness! The only thing I changed was heavy cream for half and half. This recipe is definitely a keeper. Thanks!
I will definitely be making this! Can I use beef broth though??
Hi Pascale, that should work just fine!
What kind of onion?
Hi Ashley, we usually use a white or yellow onion here.
This sounds delicious. I will have a full oven this Thanksgiving and the temperature has to be 350. How much longer should I bake this at 350 rather than 400?
Hi Jane, Bake until bubbly around the edges– might be closer to 20 minutes.
Could you had some cheese to the green bean casserole?
Hi Teri, can’t see why not!
I had a bumper crop of green beans over the past two years so still have 22 pint jars on my pantry shelf. I live alone so make and eat smaller meals. I am not overly fond of canned or frozen green/wax beans but I do enjoy them fresh. So.. I have been looking for a way to use up my canned beans from my pantry before they get too old. I certainly don’t want to waste my food/time/ and efforts so decided a bean casserole might help me to use them up faster. (Remind me to can fewer and maybe gift some to my friends another year haha) Anyway, I will for sure be trying your recipe and maybe adding a few variations of my own. Thanks for the help.
Made with coconut cream, delicious! Definitely going to be making on a regular basis, not just Thanksgiving!
Oh, my. I’m a fan of coconut. 😀 I’ll have to give coconut cream a try!
I made this yesterday for Easter. Everyone loved the flavor and that the sauce was homemade! Thank you for another great recipe!
I made this recipe for Thanksgiving 2024. Someone else was bringing roasted veggies but when I saw that they were bringing the classic green bean casserole I hurriedly wrapped my dish up and put it in the freezer. Didn’t remember it until last month. I baked as directed, if frozen, and it was fantastic. I used fresh green beans and fresh mushrooms – the green beans were still bright green. The only change I would make to use the store bought onions because I has trouble doing them from scratch.
Loved your recipe! Came out just great, though Sally, please, put the NUTMEG back in as an ingredient! Though hey, just because you don’t like it does not mean it shouldn’t be in this recipe! 🙂 A little nutmeg is fantastic, an essential background flavor that just makes this dish. Anyway, I did 1.5X the recipe to be sure we had lots of this great dish (and it was great!) for the family’s Christmas Eve dinner, and everyone loved it. Thanks for another great recipe!
Paul, thanks for the nutmeg mention. I will add it to mine.
I know you said plant milks don’t work very well in this dish, but I’ve found that using canned coconut milk works beautifully! (And you don’t taste the coconut)) So with that & plant based butter, I was able to “veganize” the recipe. It’s arguably the best GBC I’ve ever had. My carnivorous family members agree! I’ve made this several times now.
Thank you for sharing such a wonderful recipe!
Can the garlic be omitted?
Can I use frozen beans instead of fresh?
Hi Dorothy, not a problem at all. Just thaw them first.
Would you still blanch them after they’ve thawed? I was looking to maybe use Trader Joe’s [Frozen] Garlic Shiitake Green Beans
Hi April, that shouldn’t be necessary since they are typically pre-blanched before freezing.