

Learn how to decorate an Elmo cake, an adorable Sesame Street-themed birthday cake! I love this method because it’s relatively easy, even if you’re a cake decorating beginner. Watch the video tutorial and review the recommended tools before beginning.
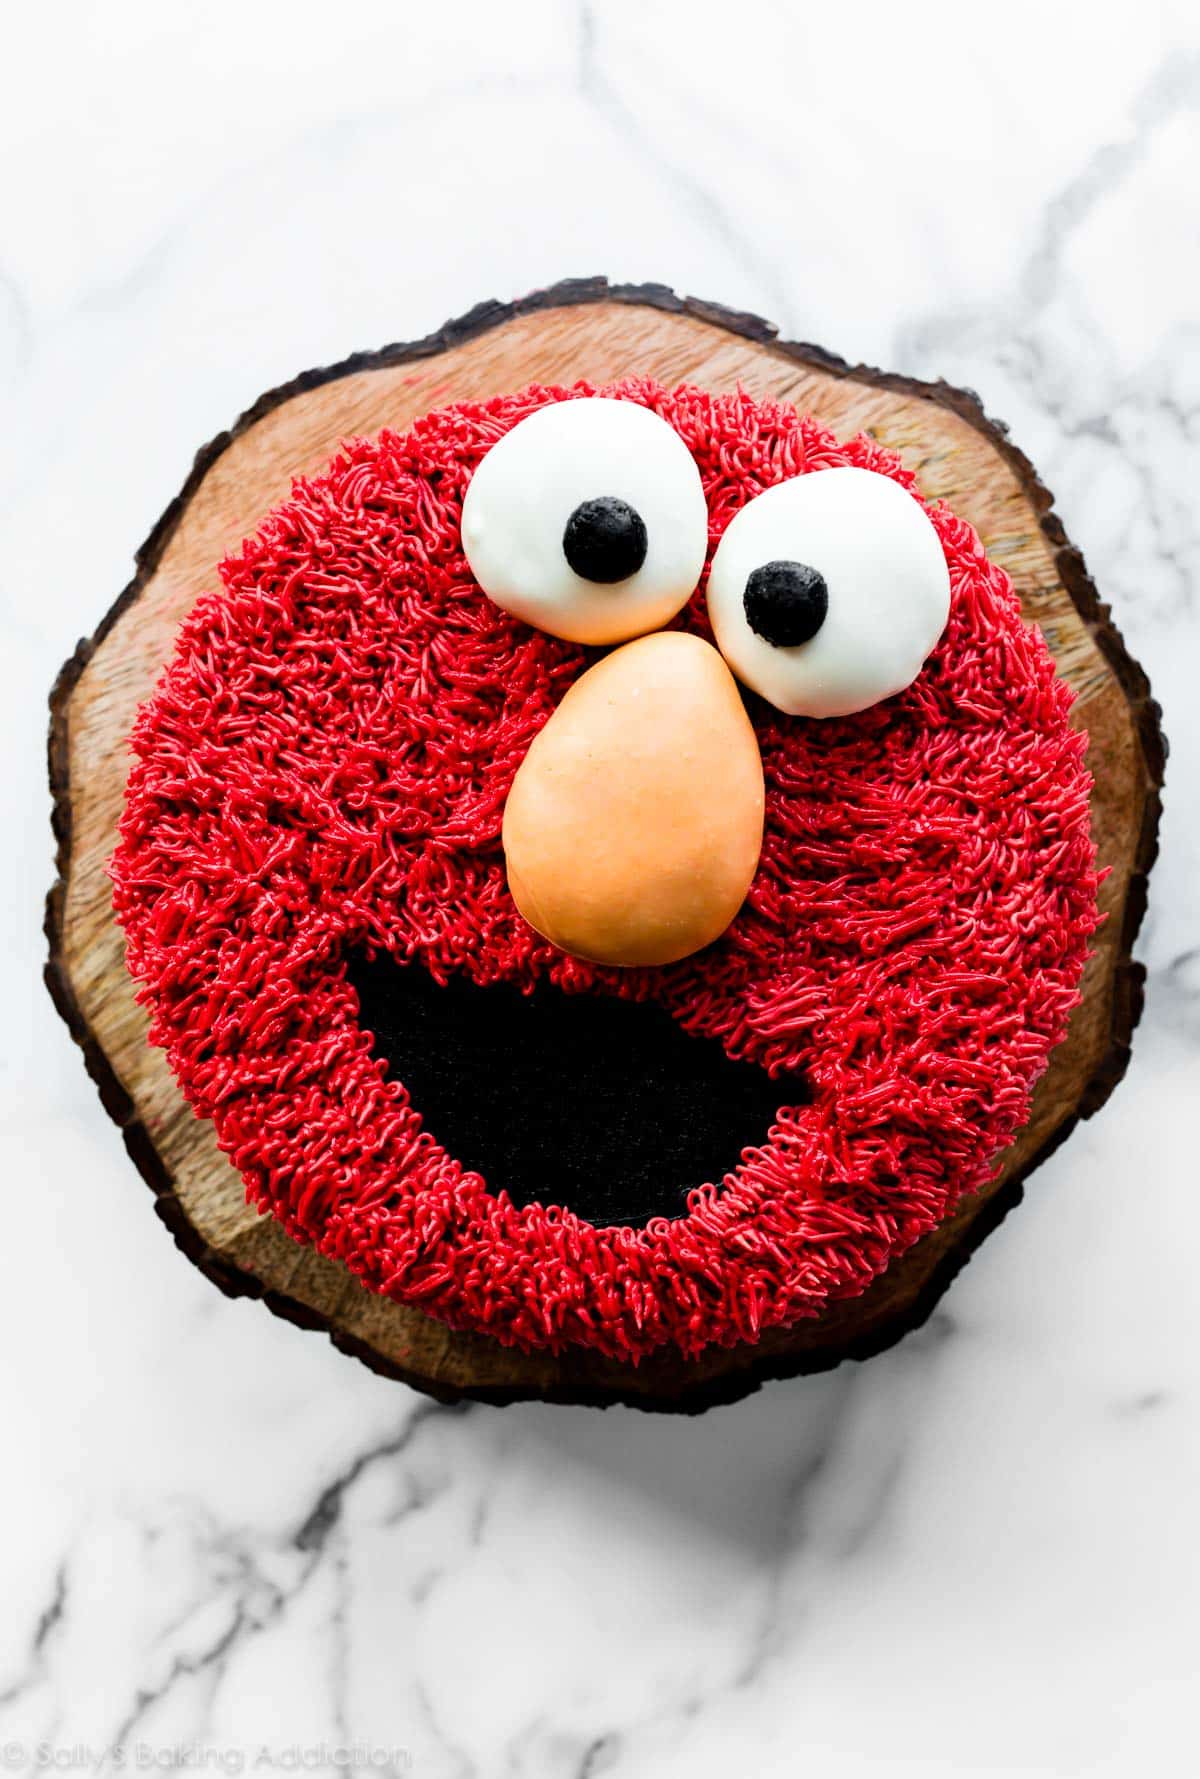
Out of all of my 1,200 recipes, you’re looking at one of the most special. To say my daughter loves Elmo is an understatement, so we made her a special birthday cake and I’m happy to share how I did it.
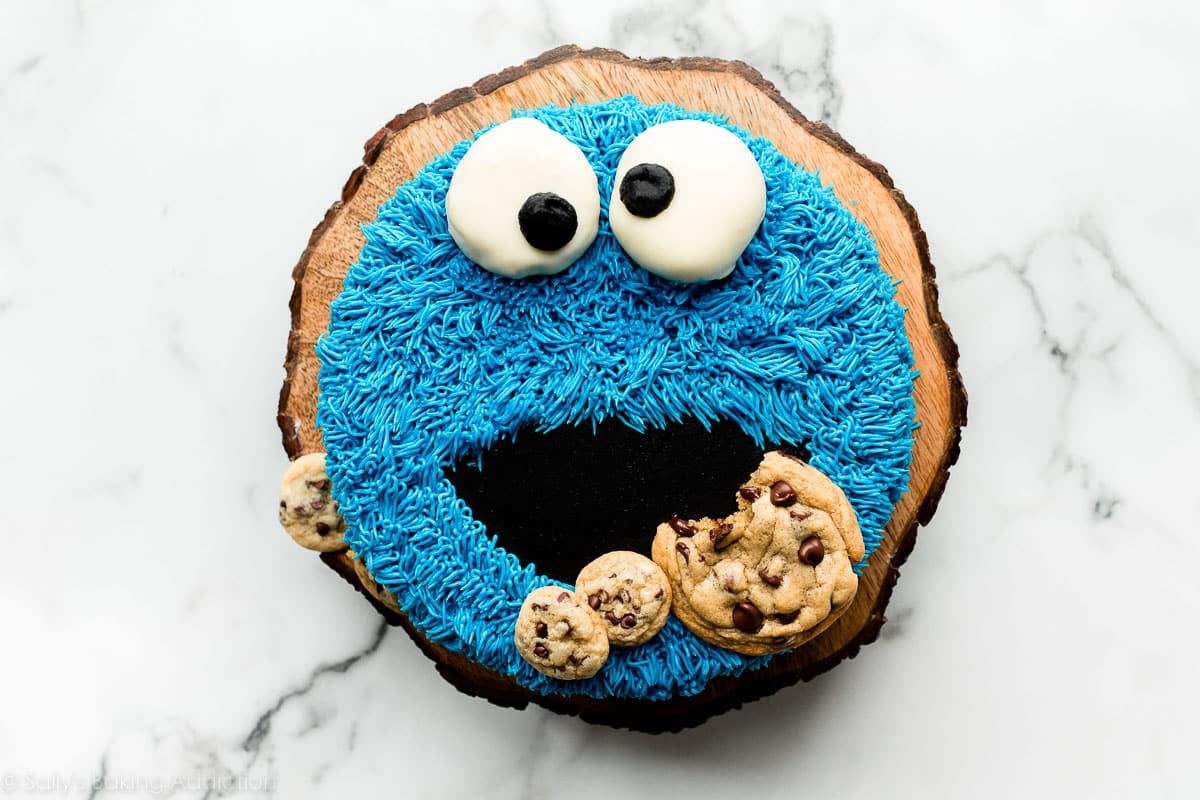
Update: I also have a Cookie Monster cake tutorial now!
Elmo Cake Video Tutorial
This is Elmo Cake for Beginners
I’m not an advanced cake decorator. While I’ve been practicing over the years, complicated cake decorations just aren’t realistic for me. I knew I wanted to decorate an Elmo cake for my daughter’s birthday, so I opted for an easier method. Team member Stephanie visited and we decorated a practice cake together. The practice was exactly what I needed to film a video tutorial for you.
How to Decorate an Elmo Cake
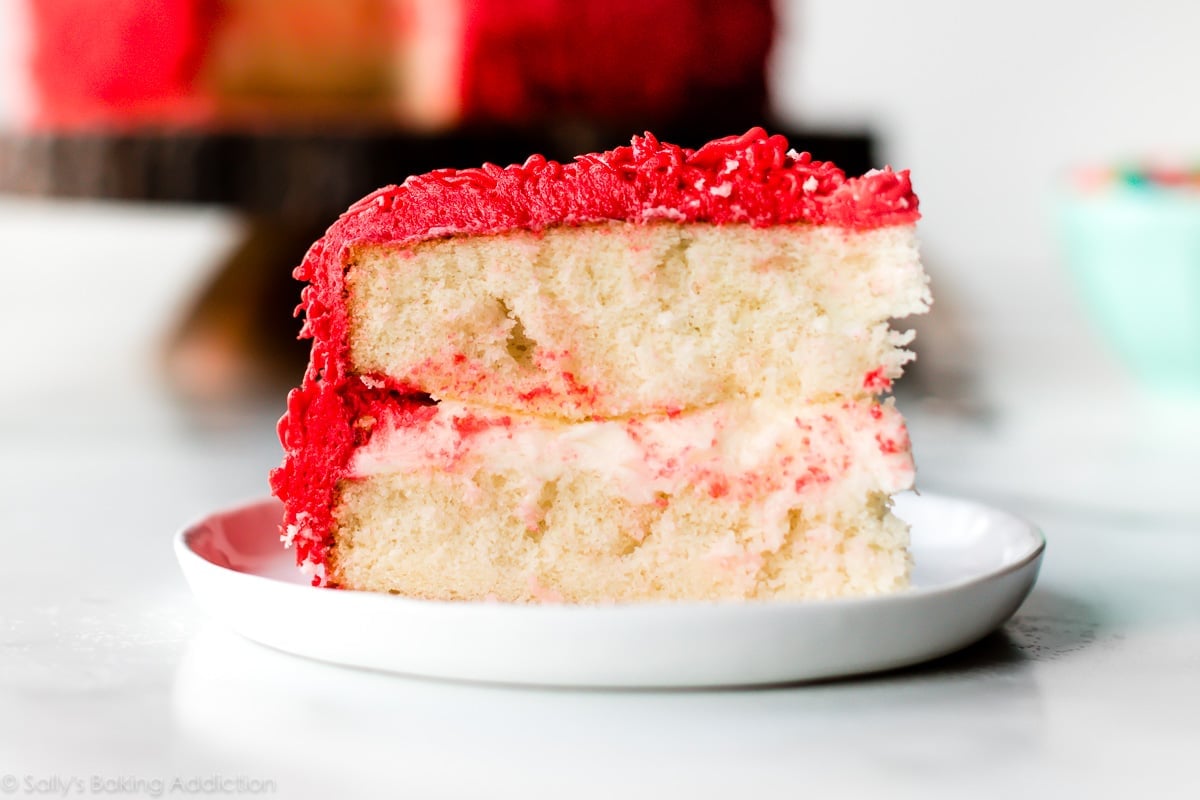
- Make the Cake: The focus of this cake is the top (as opposed to the sides), so I opted for a 2 layer cake. (Also, the taller the cake, the more piping you need to do!) My 2 layer white cake recipe promises a soft and flavorful cake with the fluffiest texture. It’s always a hit, especially for birthday parties. My #1 tip for any layer cake is to always line your round pans with parchment paper rounds before adding the batter so that your cake doesn’t stick to the pans.
- Make the Frosting: I used my favorite vanilla buttercream and increased the ratio so I had more frosting to work with. I highly recommend following the frosting recipe below. Tint most of the frosting red for Elmo’s fur. Then tint some frosting black for his mouth and pupils and leave the rest white for the cake’s filling and for Elmo’s eyes and nose. I recommend gel food coloring. The frosting’s color will dry darker, so don’t go overboard on the red and black.
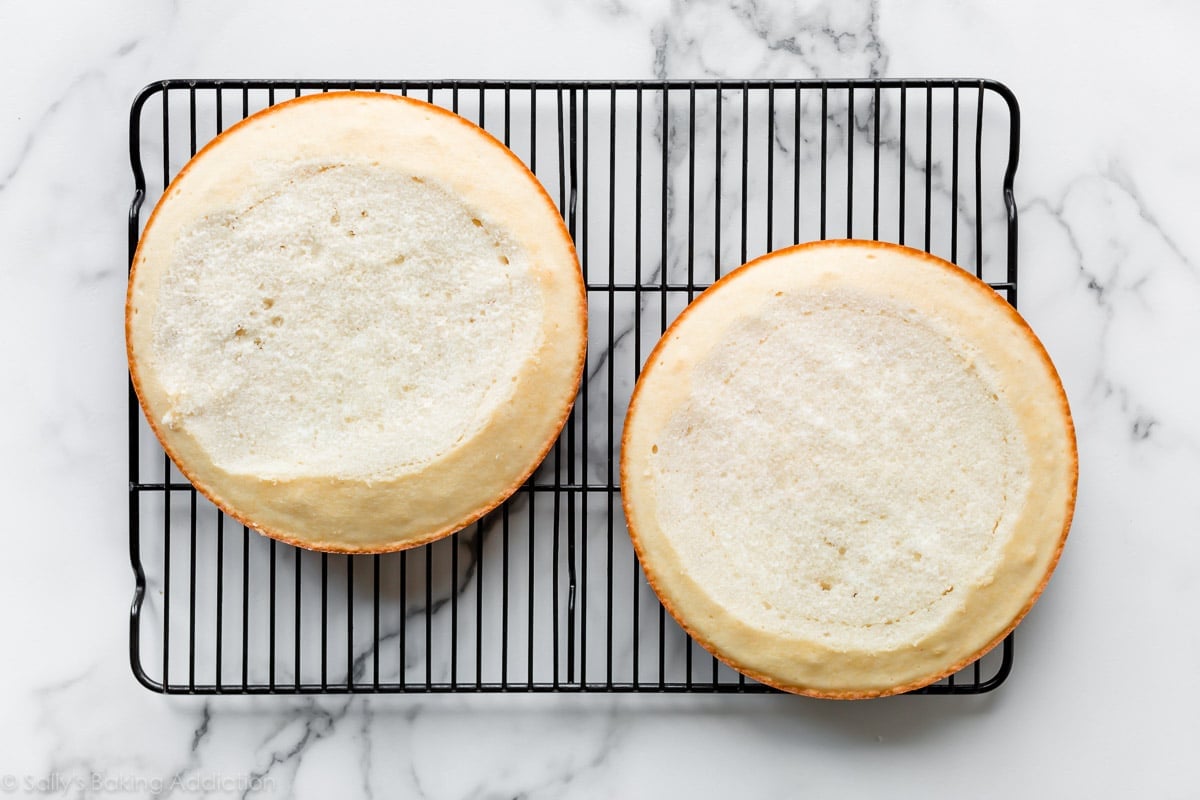
- Level the Cakes: The baked cakes will have a slight dome, so carefully level them off with a cake leveler or serrated knife. Save the scraps for Elmo’s eyes and nose.
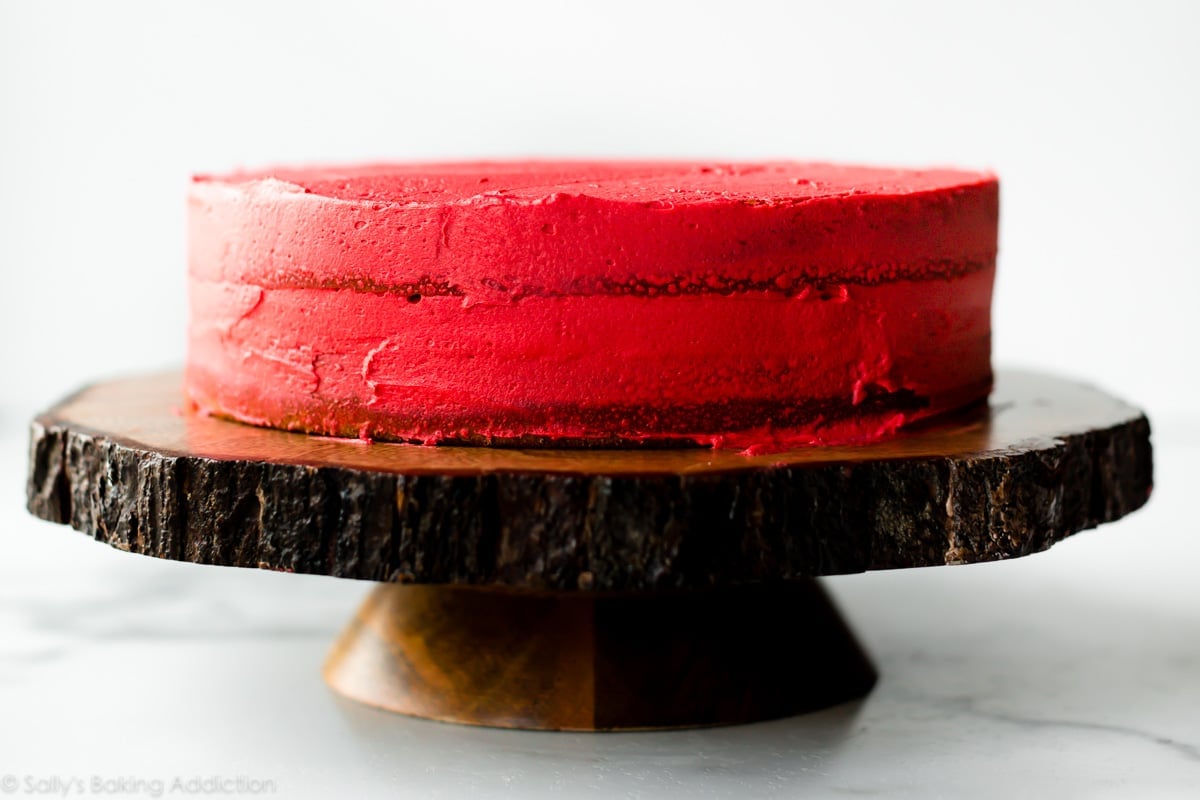
- Add Crumb Coat: Apply a thin layer of red frosting around the sides and on top of the cake. A bench scraper, icing spatula, and cake turntable are helpful. The crumb coat creates a helpful flat “base” of frosting for Elmo’s piped fur decoration. Chill the cake as you make his eyes and nose.
- Make Elmo’s Eyes & Nose: Remember the cake tops you leveled off? Crumble them up cake pops style. Mix with a little frosting and form into 2 circles for Elmo’s eyes and an oval or egg shape for his nose. Freeze until solid, about 30 minutes. Melt white chocolate (or even candy melts), then coat the eyes. Tint the remaining white chocolate orange (gel food coloring is best), and coat the nose. Chill until the coating has set.
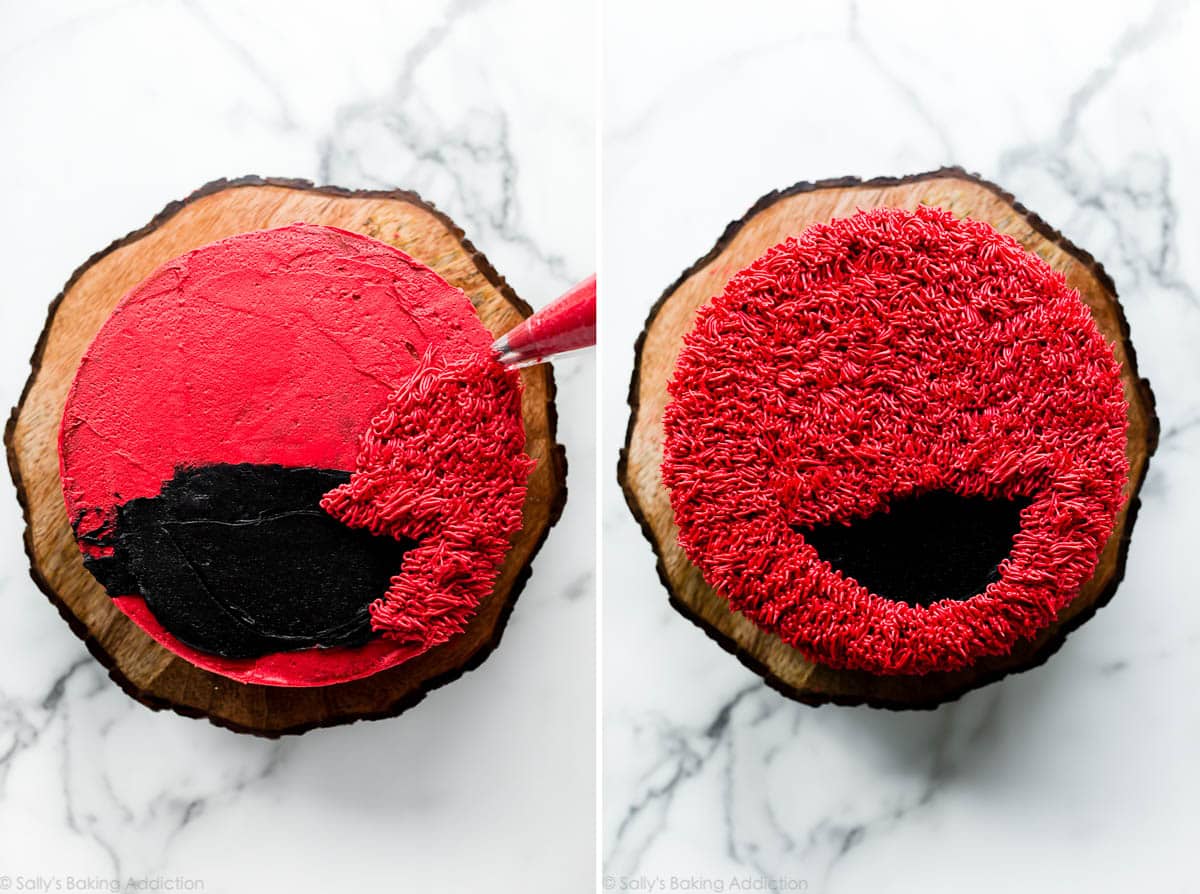
- Add Mouth & Pipe Elmo’s Fur: With a small offset spatula, spread a thin layer of black on top for Elmo’s mouth, then use a toothpick to trace out its exact shape. Now let’s begin piping! You need a grass tip, such as Wilton piping tip 233 or Wilton piping tip 234. In order for the fur to hold its piped shape, the frosting must be relatively thick, so make sure you follow my recipe below.
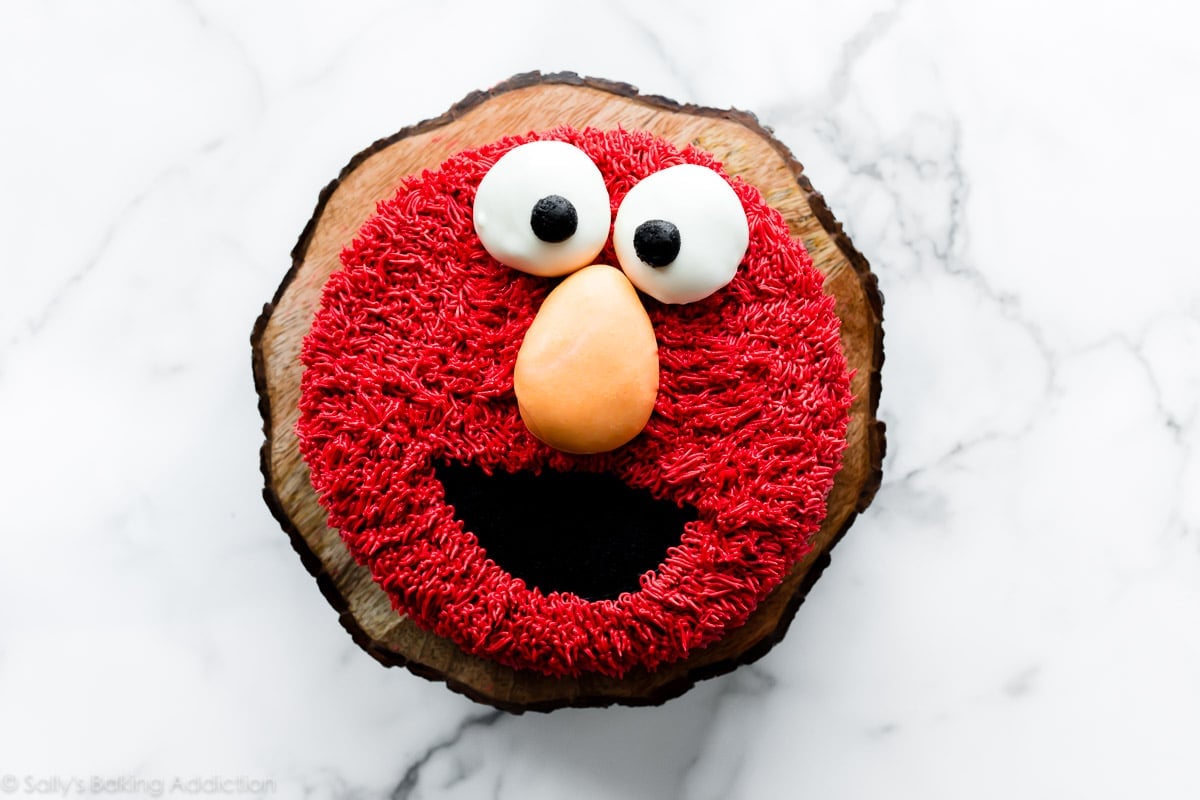
- Finishing Touches! Once the white chocolate coating has set, pipe the pupils with a round piping tip, then place the eyes and nose on top. 🙂
Great News!
The written instructions below include my time-saving suggestions for each step. For example, I recommend making Elmo’s eyes and nose while the crumb coat chills and piping Elmo’s fur while the eyes and nose set. I include in-depth make ahead instructions too!

Elmo’s Eyes and Nose
You don’t need anything extra like gum paste or rolled fondant for Elmo’s eyes and nose. Rather, simply use the scraps of cake that you leveled off. Isn’t that convenient?
Shaping Tip: Only add enough frosting to the cake crumbs to yield a semi-moist mixture that you can shape into his eyes and nose. Elmo’s nose is between an oval shape and an egg shape. Make his eyes a 2 inch disc and his nose about 2.5 – 3 inches long.
And here’s my Cookie Monster cake, also perfect for cake decorating beginners:
Recommended Tools for Elmo Cake Decoration
- Grass Tip and Round Tip
- Piping Bags (disposable or reusable)
- Toothpick
- Cake Turntable (optional; I didn’t use one in the video)
- Small Offset Spatula
- Large Icing Spatula
- Bench Scraper
- Food Coloring: orange, red, and black
- Cake Carrier for easy storing and transporting
If you’d like to use natural food coloring, I really like the brand Supernatural– they have some powdered food coloring that works well in frosting.
Print
Elmo Cake
- Prep Time: 1 hour, 30 minutes
- Cook Time: 25 minutes
- Total Time: 5 hours, 30 minutes
- Yield: serves 12
- Category: Dessert
- Method: Baking
- Cuisine: American
Description
I love this method for an Elmo cake because it’s relatively easy, even if you’re a cake decorating beginner. Watch the video tutorial below and review the recipe and recommended tools before beginning.
Ingredients
- 2 and 1/2 cups (285g) cake flour (spooned & leveled)
- 2 teaspoons baking powder
- 1/2 teaspoon baking soda
- 1 teaspoon salt
- 3/4 cup (12 Tbsp; 170g) unsalted butter, softened to room temperature
- 1 and 3/4 cups (350g) granulated sugar
- 5 large egg whites, at room temperature
- 1/2 cup (120g) sour cream, at room temperature*
- 1 Tablespoon pure vanilla extract (yes, Tbsp!)
- 1 cup (240ml) whole milk, at room temperature*
Vanilla Buttercream
- 1 and 1/2 cups (340g) unsalted butter, softened to room temperature
- 6 and 1/4 cups (750g) confectioners’ sugar
- 1/3 cup (80ml) whole milk or heavy cream, at room temperature
- 2 teaspoons pure vanilla extract
- 1/8 teaspoon salt
- red, orange, and black gel food coloring
Elmo’s Eyes and Nose
- two 4-ounce white chocolate bars (113g each), finely chopped*
- 1/2 teaspoon vegetable oil or coconut oil
Instructions
- Read through the full directions and watch the video tutorial below before beginning. If you wish to make the cake ahead of time, read my Make-Ahead Instructions below before beginning.
- Make the cakes: Preheat oven to 350°F (177°C). Grease two 9-inch cake pans, line with parchment paper rounds, then grease the parchment paper. Parchment paper helps the cakes seamlessly release from the pans. (If it’s helpful, see this parchment paper rounds for cakes video & post.)
- Whisk the cake flour, baking powder, baking soda, and salt together. Set aside.
- Using a handheld or stand mixer fitted with a paddle or whisk attachment, beat the butter and sugar together on high speed until creamed, about 2 minutes. Scrape down the sides and up the bottom of the bowl with a rubber spatula as needed. Add the egg whites, sour cream, and vanilla. Beat on high speed until fully combined and mixed, about 2 minutes. Scrape down the sides and up the bottom of the bowl as needed. Pour the dry ingredients into the bowl. Then with the mixer running on low, slowly pour in the milk. Do not over-mix. You may need to whisk it all by hand to make sure there are no lumps at the bottom of the bowl. The batter will be slightly thick.
- Pour batter evenly into cake pans. Bake for around 24-25 minutes or until the cakes are baked through. To test for doneness, insert a toothpick into the center of the cake. If it comes out clean, it is done. Cool cakes in the pans set on a wire rack for 30 minutes, then remove the cakes and cool completely directly on a wire rack. The cakes must be completely cool before frosting and assembling.
- Make the buttercream: In a large bowl using a handheld or stand mixer fitted with a paddle attachment, beat the butter on medium speed until creamy, about 2 minutes. Add confectioners’ sugar, milk/cream, vanilla extract, and salt with the mixer running on low. Increase to high speed and beat for 3 full minutes. Taste. Add a pinch of salt if frosting is way too sweet. Frosting will be thick.
- Tint the frosting: Place 1 cup + 2 Tablespoons (about 1 heaping cup or 275g) of frosting into a medium bowl. This will remain white and be used for the cake’s filling and to form Elmo’s eyes and nose. Place 1/3 cup (about 85g) of frosting into a small bowl. Stir in 3 drops of black gel food coloring until it’s dark gray. (Keep in mind that frosting dries darker.) Tint the remaining frosting red using about 4-5 big drops of red gel food coloring. Tint until you are satisfied with the color. Remember, frosting dries darker.
- Level the cakes & add the crumb coat: Using a large serrated knife, slice the domes off the cooled cakes (a semi-thin layer) to create a flat surface. Place tops into a bowl to use in step 9. Place 1 cake layer on your cake stand, serving plate, or cake turntable. Spread 1 cup (about 250g) of white untinted frosting all over the top. (Reserve remaining white frosting for step 9.) Top with 2nd layer. Spread a thin layer of red frosting around the sides and top of the cake. This is your crumb coat and should be a pretty thin layer. An icing spatula and bench scraper are helpful for this. See video tutorial below. Chill uncovered in the refrigerator or freezer for at least 30 minutes to help set the crumb coat.
- Meanwhile, shape Elmo’s eyes and nose: Crumble the pieces of cake that you leveled off into crumbs. I just use my hands for this. Stir in 1 Tablespoon of white frosting. If the mixture still seems pretty crumby and dry, add a little more of the white frosting until you have a moist mixture that you can form into shapes. Mixture shouldn’t be overly wet. Form into 3 shapes: two 2-inch discs for Elmo’s eyes and one 3-inch oval/egg shape for Elmo’s nose. Smooth them out as best you can. Place on a lined baking sheet and chill in the refrigerator or freezer for at least 30 minutes to set. Once they’re set, you can smooth out any bumps on the surface with your hands if needed.
- Meanwhile, pipe Elmo’s fur: First, spread a thin layer of black frosting on the bottom half of the top of the cake. Use a small offset spatula to help ensure it’s perfectly smooth. Reserve remaining black frosting. Using a toothpick, trace/outline Elmo’s mouth shape within the black frosting. Use it as your guide for piping his fur around it. Fit your piping bag with Wilton piping tip #233 (grass tip). Spoon some red frosting inside. It’s difficult to pipe this frosting if the bag is over-filled, so just work with a little bit of frosting in the bag at a time. Place the tip directly on top of the cake’s surface and apply pressure to squeeze the frosting out of the tip. Quickly lift the tip up while squeezing the frosting out. The video tutorial below is helpful for this step. Pipe his fur all over the top and sides of the cake. (The sides are optional, but if you have enough frosting, go for it!) It’s helpful to carefully tilt the cake stand/turntable so you can more easily pipe frosting on the sides. Set cake aside. You can refrigerate uncovered if desired as you finish Elmo’s eyes and nose.
- Melt the chocolate: You can melt the chocolate and oil together in a double boiler or the microwave. If using the microwave: place the chopped chocolate and oil in a medium heat-proof bowl. Melt in 20 second increments in the microwave, stirring after each increment until completely melted and smooth. Place one of the discs (eyes) into the white chocolate. Use a fork to help fully coat it. Using a fork, lift the disc (eye) out of the chocolate. Place back onto lined baking sheet. Repeat with 2nd disc (eye). Stir 1 drop of orange gel food coloring into the remaining melted chocolate. Coat Elmo’s nose just how you coated the eyes. Refrigerate or freeze for 20 minutes or until white chocolate has set. I find the orange becomes a little darker as it dries.
- After the white chocolate sets, fit your piping bag with Wilton tip #12 (round tip). Spoon some black frosting inside. Pipe Elmo’s pupils onto the eyes. Carefully press the eyes and nose on top of the cake to form Elmo’s face.
- If you decorated the cake on a cake turntable, use a couple thin spatulas (and a helper!) to carefully lift the cake off the turntable and onto a cake stand, server, or cake carrier base. I actually like to use a cake carrier to cover and store my cakes in the refrigerator.
- Serve cake. Cover leftover cake tightly and store in the refrigerator for up to 5 days.
Notes
- Make Ahead Instructions: You can prepare the cake layers ahead of time. Wrap the individual baked and cooled cake layers tightly and refrigerate for up to 2 days. You can also assemble the cake with Elmo’s mouth & piped fur 2 days ahead of time, too. You can also make, coat in white chocolate, cover, and refrigerate Elmo’s nose and eyes ahead of time, too. Do not place on cake until the day of serving as the red from Elmo’s fur may smear onto the eyes and nose. Pipe Elmo’s pupils the day of serving because the black can smear down onto his eyes if refrigerated ahead of time. It did this for me, so I just carefully wiped it off.
- Freezing Instructions: Freeze the cake layers for up to 3 months. See How to Freeze Cake for instructions. Bring cake layers to room temperature, then continue with step 6.
- Special Tools (affiliate links): Electric Mixer (Handheld or Stand) | 9-inch Cake Pans | Grass Tip | Round Tip | Piping Bags (Disposable or Reusable) | Toothpick | Cake Turntable | Small Offset Spatula | Large Icing Spatula | Bench Scraper | Food Coloring: Orange, Red, and Black | Cake Carrier (for storage)
- Whole Milk & Sour Cream: Whole milk and sour cream are strongly recommended for the best taste and texture. A full fat plain yogurt would work instead, though the cake may not be as light. Same goes with a lower fat milk.
- White Chocolate: Use real white chocolate to coat Elmo’s eyes and nose. You can use high quality white chocolate chips if needed (I prefer Ghirardelli brand), but I recommend using pure chocolate baking bars. You can find them right next to the chocolate chips in the baking aisle. They are sold in 4 ounce bars. I like Bakers or Ghirardelli brands. You can also use 8 ounces of candy melts.
- Servings: This cake serves about 12 people, but I served 16-18 people including half adults and half kids. Slice it up small!


Reader Comments and Reviews
Hi Sally, thanks thanks and thanks!! I have no words – the cake came out soooooooo well.. I baked it for my 4 year Bday girl.. she was just sooooooo happy!! I am a beginner and still could make it perfect – thanks to your notes and instructions.. it was such a hit that my friends and family now think i am a perfect baker
Cant thank u enough!! You rock!!
We’re so happy to hear that this cake was a success for you, Bharti. What a perfect cake for a 4th birthday!
Update. I tried the cake again and it was better, but the food colouring is definitely not a few drops. I had to use most of the bottle to get to the proper red colour
Hi! I made this cake last weekend and it was delicious and so cute! I have a request to repeat it, but with chocolate cake and white chocolate frosting. Do you think your white chocolate buttercream would work with the grass tip for the Elmo fur? Thanks!
Hi Alyssa, I’m so glad to read that. The white chocolate frosting should be just fine with the grass tip.
I love this cake idea! My baby sister who is turning 3 on April 12th would love it! Maybe I will try it out! I made a Minnie Mouse cake last year that she LOVED! I usually make her B-Day cakes and am looking for some ideas! She loves chocolate cake. Do you have any chocolate cake suggestions? Thanks so much!
Hi Olivia! We love this chocolate cake recipe for birthday cakes – always a hit!
thanks so much!
So excited to try this cake!!! My little one loves blueberries, and I was thinking of adding some to the cake, Will it throw off the recipe?
Hi Courtney, You can, yes. I recommend 1 cup of fresh blueberries. We hope it’s a hit!
I want to make this for my daughter’s birthday this week but we are on strict quarantine and I don’t have candy melts or white chocolate! Do you think a stiff royal icing would work for the eyes and nose?
Hi Kerry, That could work! I would recommend making the eyes and nose the day before to allow the royal icing enough time to dry if you try it.
I made this last weekend for my daughter’s second birthday. It was so easy to follow and she LOVED it. I only had issues with the red color…I had to use a LOT of food coloring. I was using the wilton gel, so I’m not sure why I had to use so much more that the recipe said. Overall, so fun and a great result!
Does the red frosting taste ok? Or did you use special food coloring? I’m concerned about the potential bad taste of the red food coloring.
Hi Lynne, We use and recommend gel food coloring. You don’t have to add as much compared to liquid food coloring for brighter colors and it has no taste. Also remember that your frosting will dry darker than it appears when it’s first piped. Let us know if you try it!
Thank you! Any preferred brand of food coloring?
Our team loves the AmeriColor brand. In the recipe steps you can click on the food colors for Amazon links of exactly what we used 🙂
Hi Sally,
I saw this yesterday and decided at the last minute to copy for my daughter’s bday – she’s turning 2 and also is obsessed with Elmo. My question is whether you think a simple funfetti cake mix will hold up to the frosting. Since it’s so last minute (her bday is in 2 days!) and given the pandemic, I could use any shortcut that will work. I plan to still make the buttercream and decorate as you did.
Thanks!
PS: your chocolate cupcakes and chocolate frosting are so very delicious!
Hi Sally,
I made this cake this weekend, and it was awesome!! Came out great and my son (turned 2) was so excited. I decorated it exactly as you indicate here and I was proud of myself how good it looked, and it wasn’t all that hard. Piping on the sides was tricky but it looked fine.
I used your coconut cake recipe instead (absolutely delicious, the grown-ups raved, the kids were too busy eating cake) and made your buttercream but made it strawberry (Reduced one pound of puréed and strained strawberries to a couple of tbp, cooled and mixed in). I thought it was a bit too sweet. Can you use less sugar for the buttercream and still get the right consistency for piping?
Thanks so much for this wonderful recipe! I will be scouring your site for more to try.
Hi Irene, We are so happy this cake was a hit! For the frosting, reducing the sugar will make it will be too thin using strawberry puree. Instead follow the recipe for The Best Strawberry Frosting which uses freeze dried strawberries ground to a powder – wonderful natural strawberry flavor without adding extra liquid!
I am planning to make this with chocolate cake. Will the white chocolate coat the cake sufficiently or should I make some white cake for the eyes and nose?
Hi Jessica, if you wish to use the chocolate cake you might just have to dip the eyes twice (dip once, let dry, then add a second coat for a brighter white color). Have fun!
This cake is so cute! I can’t wait to make it for my daughter’s birthday! I plan to make this cake but as a 3 layer cake. I’m using a different cake recipe but the same frosting one. Do you think I would need to make extra frosting to have enough?
Hi Heidi, you *should* have just enough but it might be best to 1.5x the frosting to really make sure.
Hi Sally!
How could I convert this cake to a 6 inch cake?
Hi Jen, Here is everything you want to know about making 6 Inch Cakes.
Novice baker here- I want to make this a few days- a week in advance in case I mess it up and need to re-do it. Do you think it will freeze OK??
Yes, you can freeze this cake– but I recommend freezing the layers (see recipe notes) rather than the decorated cake to ensure the design isn’t messed up in the wrapping/freezing/thawing process.
May I know if I wanna to make 2 6″ round cakes instead of 9″, the amount of ingredient of vanilla buttercream frosting also reduce by ratio as the cake ingredients,right?
Hi Heidi, Yes you would need less frosting for a smaller cake!
TIME SENSITIVE. Your ELMO is Fantastic and your instructions are giving me the confidence that I, a 70 yr old grandma can make this cake for my grandchild’s first birthday on Wednesday.
Question, you give the link to your chocolate cake for anyone wanting to make a chocolate cake version, but I am confused… should the cake layers be made with the original recipe: full amount of buttermilk, no sour cream and the full amount of the hot coffee or the updated recipe ie the recipe for Dark Chocolate Mousse Cake?
Either would be great– using the sour cream version (as used in my dark chocolate mousse cake) creates a sturdier crumb. Taste is the same as the original chocolate cake recipe.
My son turns 2 in November and we’ve been trying to decide between his two favorites – Elmo and curious George. Guess we’re doing Elmo!
What perfect timing! Happy baking, Heidi 🙂
What a beautiful cake! I love special cakes made at home. This cake reminded me the blue Cookie Monster cake, I made my son when he was one.
Such an adorable cake, Sally! Happy Birthday Noelle!! 🙂
I’m totally doing this, but with Cookie Monster instead! Thank you so much!!!
So cute and spot on! I love that the eyes and nose are cake pops… genius!
Happy birthday to your sweet little girl!
This is so weird; I was just looking at Elmo cake recipes for my son yesterday! This looks great. I love the idea of using cake scraps for the nose and eyes! If I were to make this with a chocolate cake what recipe of yours would you recommend?
Perfect! I recommend my chocolate cake recipe. 🙂
What a beautiful cake! I love special cakes made at home. This cake reminded me the blue Cookie Monster cake, I made my son when he was one. He was blue when he got done and so was the wall beside him. I think I got a bit carried away with the food coloring then as this was many years ago, he is now 39. Happiest of birthdays! I’m so glad you’re making special memories.
I couldn’t ask for better timing on this one! My daughter turns 2 next week and is also OBSESSED with Elmo! I now have a game plan! Can’t wait to try it!
I’m so happy for her. HAPPY BIRTHDAY. The cake look soooo good I’m going to need to try to make it.
Hi Sally,
Also making this for my son’s 2and birthday. My cakes didn’t rise much so I don’t anticipate I’ll have enough to make the eyes and nose. Any suggestions? Should I just make a smaller cake on the side and use that?
Hi Jennifer you can make a smaller cake or some cupcakes if you need extra – I’ve also seen bakers use white marshmallows for his eyes 🙂
Happy Birthday Noelle. Love the Elmo cake. Perfect for a two year old.
Aww. Brings back memories. My first (now an eye-rolling pre-teen – haha) loved Elmo, too! If you haven’t taken her to Sesame Place yet, put it on your list. When we took mine (first visit around age 2/3), she watched the parade with open mouth and wide eyes & said in wonder, “Mommy! All my friends are here!” Oh my heart!
Happiest birthday to her and you!
This cake is adorable! Happy birthday to your sweet girl!
Happy Birthday to your beautiful daughter! Sending good wishes for a wonderful year! Enjoy every minute, Sally. Your creations bring pleasure to so very many people.
Such a cute cake and so good with your true a s true vanilla cake and buttercream recipe
Happy birthday Noelle!
This cake is super cute! Perfect for birthdays!