

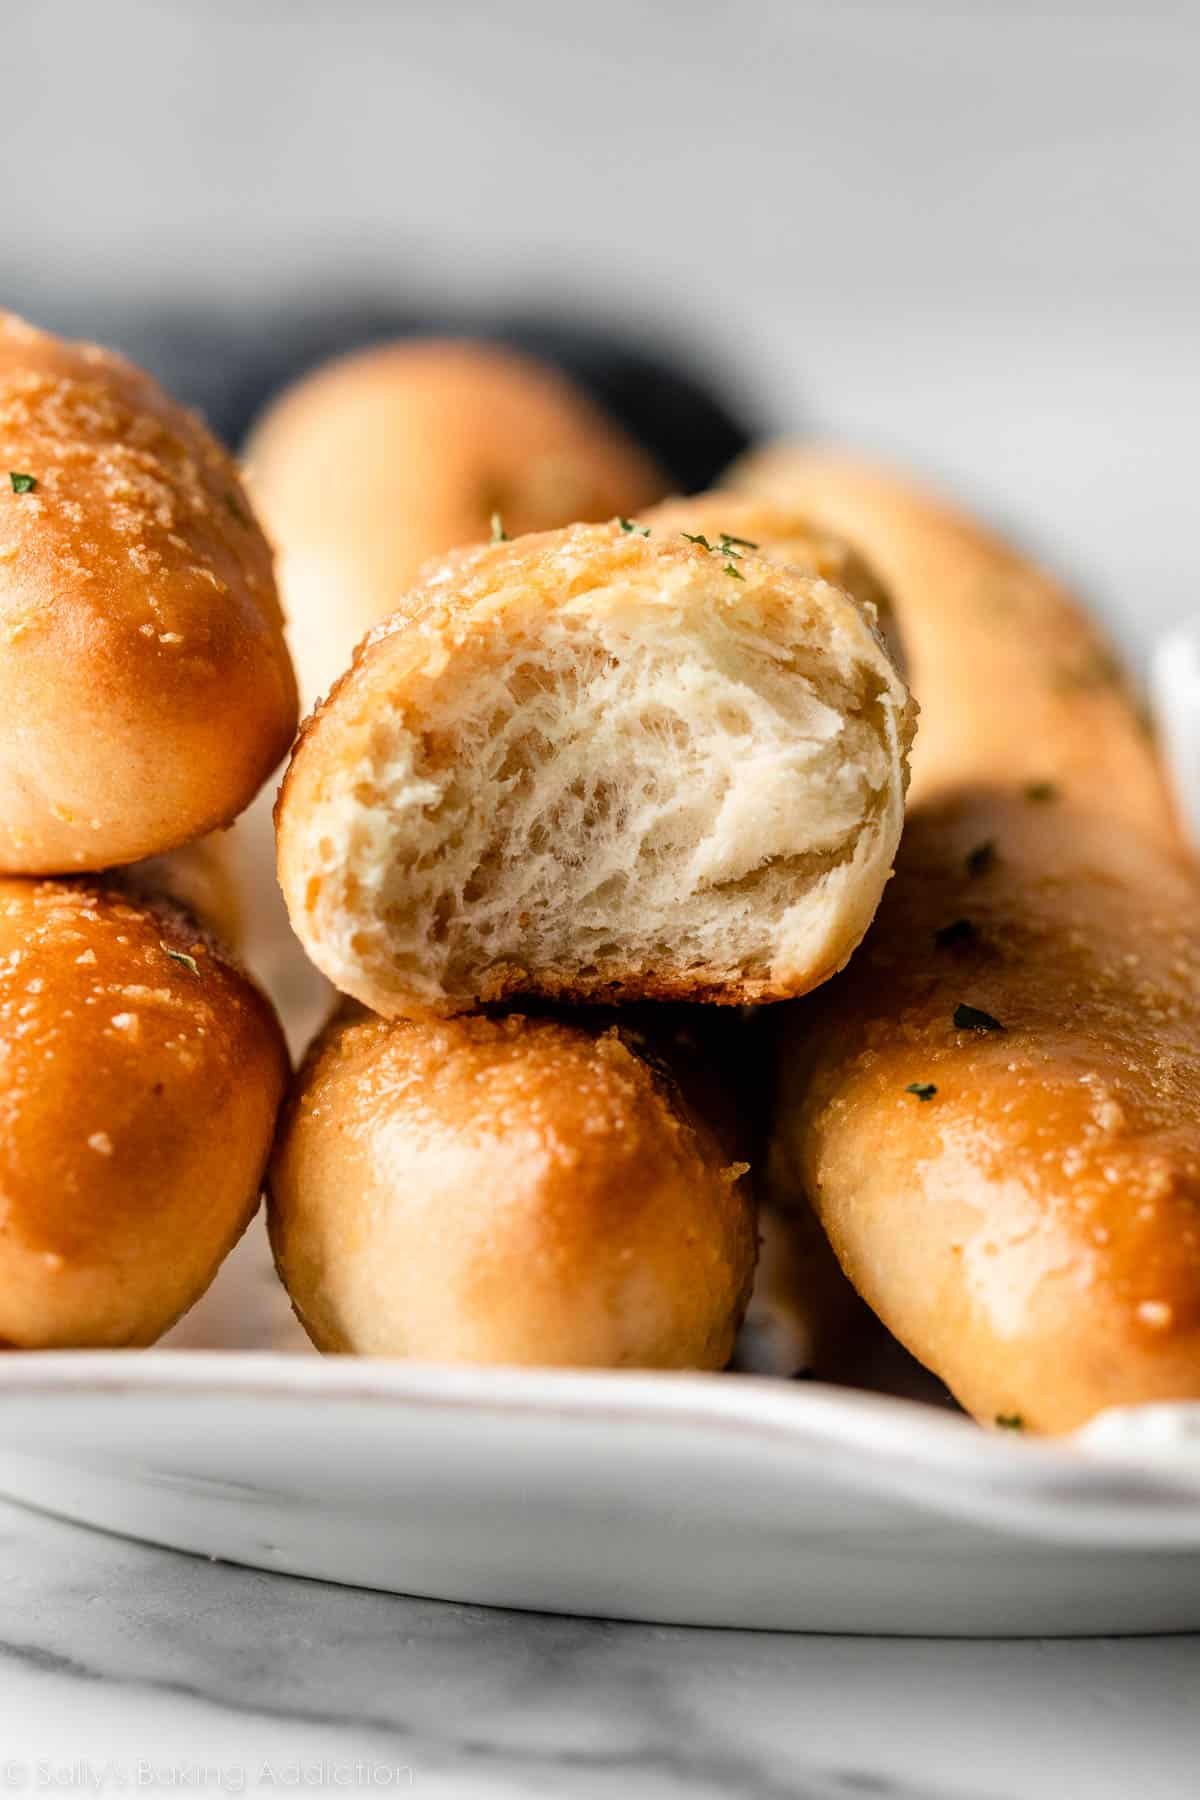
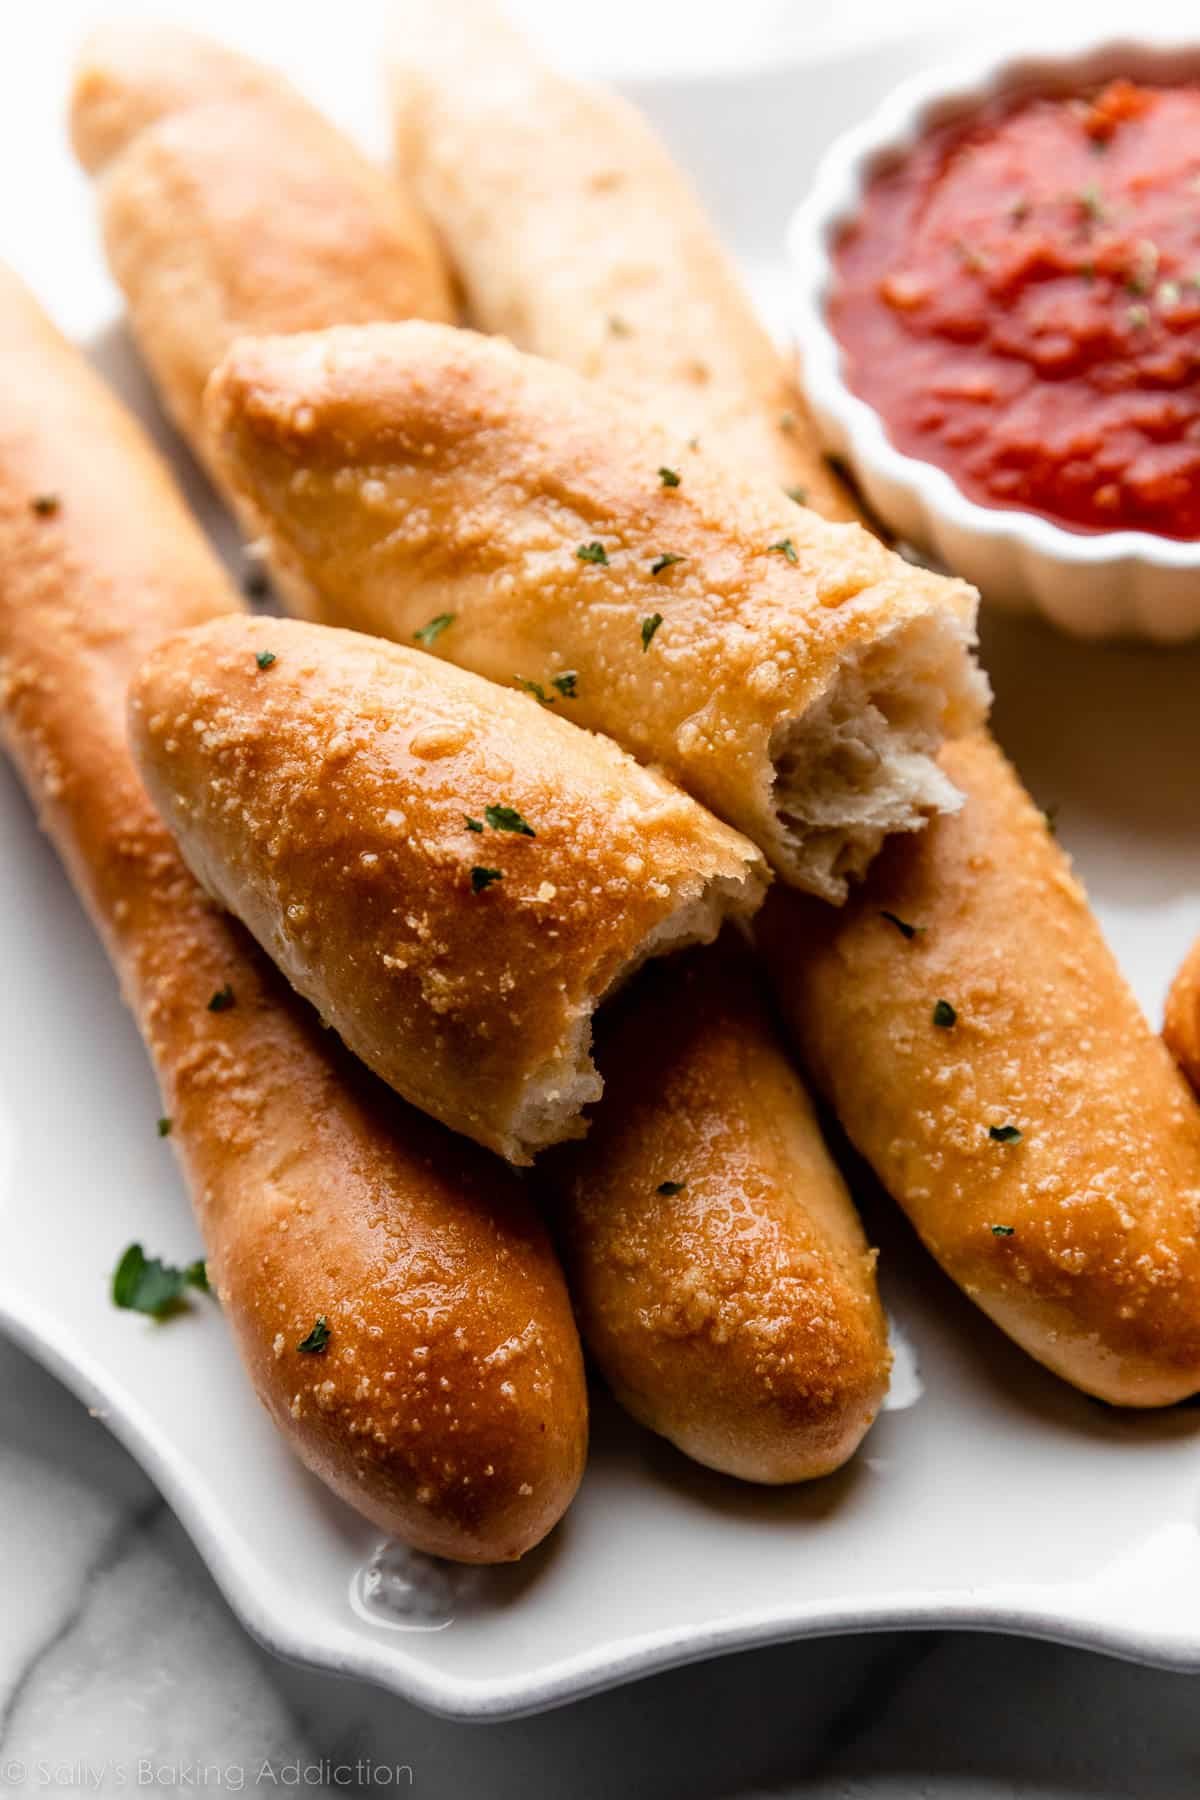
Soft, fluffy, garlic butter-topped homemade breadsticks are the perfect accompaniment to pretty much any dinner. The dough requires two rises, but the second rise is pretty quick as the oven preheats. This recipe should come with a warning: You’re only 7 ingredients away from (dare I say it?) better-than-Olive Garden breadstick bliss!
One reader, Sue, commented: “Thank you, Sally, for another winner! I’ve made these multiple times and they are perfection. I always make 2 batches and freeze them after baking. They’re better tasting than any store-bought version. Chef’s kiss! ★★★★★“
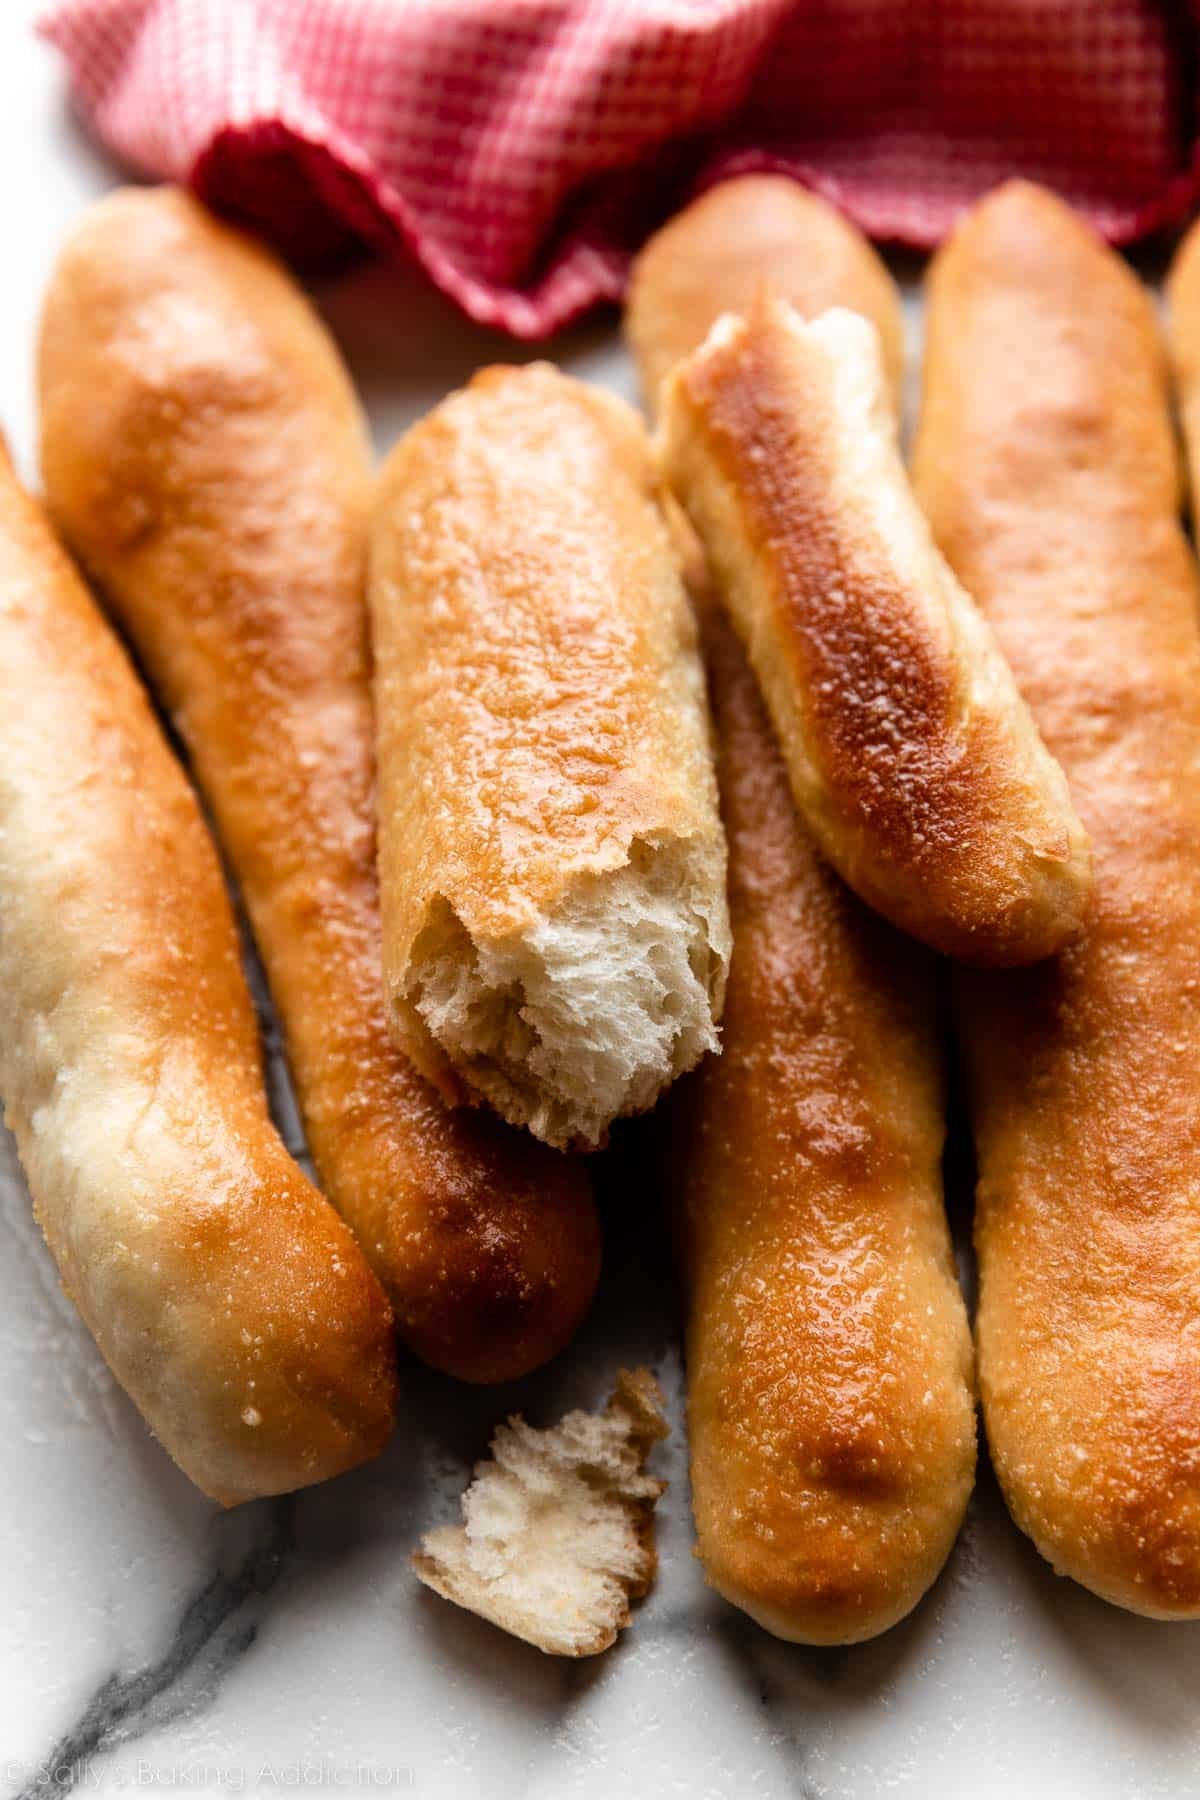
The moment when a fresh basket of bread hits the table is easily the best part of a dinner out. If you’ve ever been to the chain restaurant Olive Garden, you know what I mean. Each meal comes with unlimited soup or salad and breadsticks. I’ve always wanted to recreate those fan-favorite breadsticks, and it just so happens that you only need 7 ingredients to make a homemade version. There’s nothing like homemade.
These aren’t your authentically Italian crispy breadsticks; rather, they are basically elongated soft dinner rolls topped with salted garlicky butter.
These Homemade Breadsticks Are:
- Soft and fluffy on the inside, with a slightly chewy exterior
- Extra flavorful from melted butter and garlic both in the dough and brushed on after baking
- Delicious on their own, or dipped in a sauce
- Easy to make, perfect for bread-making beginners new to working with yeast
I adapted this recipe from reader-favorite pizza dough, with a few key changes. Since we’re not adding pizza toppings here, I wanted to amp up the flavor in the dough. I added a little more salt and sugar, and used melted butter instead of olive oil. Melted butter makes for a richer dough, which helps create a soft and fluffy bread, more like a dinner roll—as opposed to a lean dough that turns out a chewy pizza crust. If you’d like even more flavor, you can add 1/2 teaspoon garlic powder to the dough. (I usually do.)
In recipe testing, another version of this dough produced chewier breadsticks, with a texture more like soft pretzels. That dough was also harder to work with and shape than the one I’m sharing with you today.
If you’re new to working with yeast, be sure to check out my Baking With Yeast Guide.
Here Are the 7 Ingredients You Need & Why:
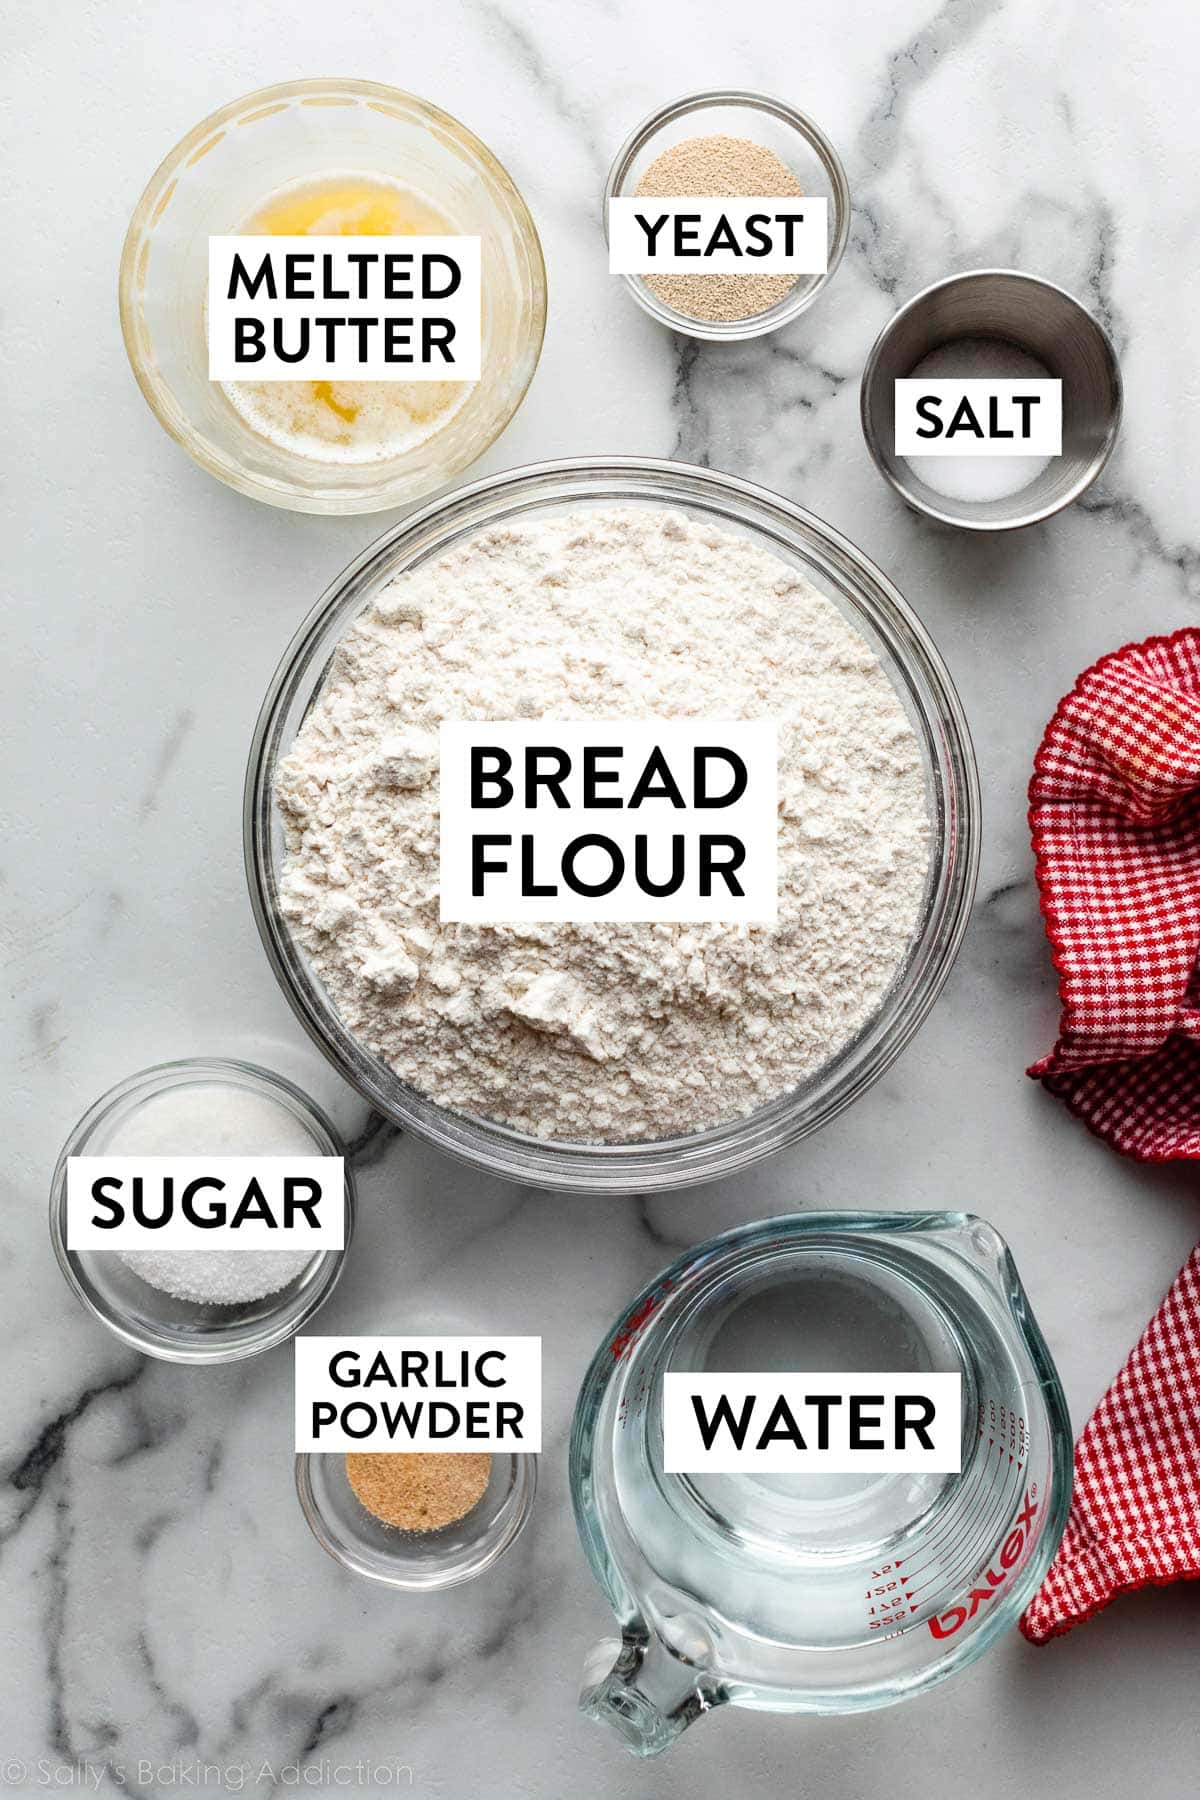
- Water: Warm water activates the yeast. It should be about 100–110°F (38–43°C). If the water is too hot, it will kill the yeast. And your dough will be doomed.
- Yeast: You need 2 and 1/4 teaspoons (which is 1 standard packet) of instant or active dry yeast to make this dough rise.
- Sugar: Sugar increases the yeast activity and tenderizes the dough, especially paired with melted butter.
- Melted Butter: Using butter instead of oil provides delicious flavor, and makes for a rich, soft dough. We’re using melted butter in both the dough and for brushing on top after baking.
- Salt: For flavor both in the dough and the buttery topping.
- Bread Flour: Bread flour gives these breadsticks a chewier texture, but if you only have all-purpose flour, you can use that instead.
- Garlic Powder: We’re mixing garlic powder into the melted butter topping, and if you want extra garlicky flavor, you can include some in the dough as well.
For cheese-topped breadsticks (that you don’t need to individually shape!), see these cheesy breadsticks.
Kneading the Dough Is Key
Kneading dough is a common step in bread baking, and this particular dough definitely benefits from a long kneading step (about 8–10 minutes) to help ensure the thin breadsticks stay soft. You can knead dough with your hands or in a stand mixer. A stand mixer obviously makes the job easier, but if you don’t have one, kneading is a great stress reliever. 😉 On a lightly floured work surface, using the heels of your hands, stretch and fold the dough with gentle motion. If you’re new to yeasted doughs, my how to knead dough post and video can help with this step.
- Why Do I Knead Dough? Kneading the dough serves a couple purposes. First, it incorporates air into the dough, which helps keep the thin breadsticks nice and soft. It also encourages the proteins in the flour and moisture in the dough to link together, forming a strong gluten network, which is essential for retaining the gas produced by the yeast. Gluten is what makes bread deliciously chewy.
You know your kneaded dough is ready to rise when it stretches without immediately tearing. After kneading, the dough will be soft and supple, and a windowpane test is always helpful. You can always poke the dough with your finger, too. If it slowly bounces back, it’s ready to rise. This is the exact same process we use to knead and test the dough for honey butter rolls.
- What’s a Windowpane Test? Tear off a small (roughly golfball-size) piece of dough and gently stretch it out until it’s thin enough for light to pass through it. Hold it up to a window or light. Does light pass through the stretched dough without the dough tearing first? If so, your dough has been kneaded long enough and is ready to rise. If not, keep kneading.
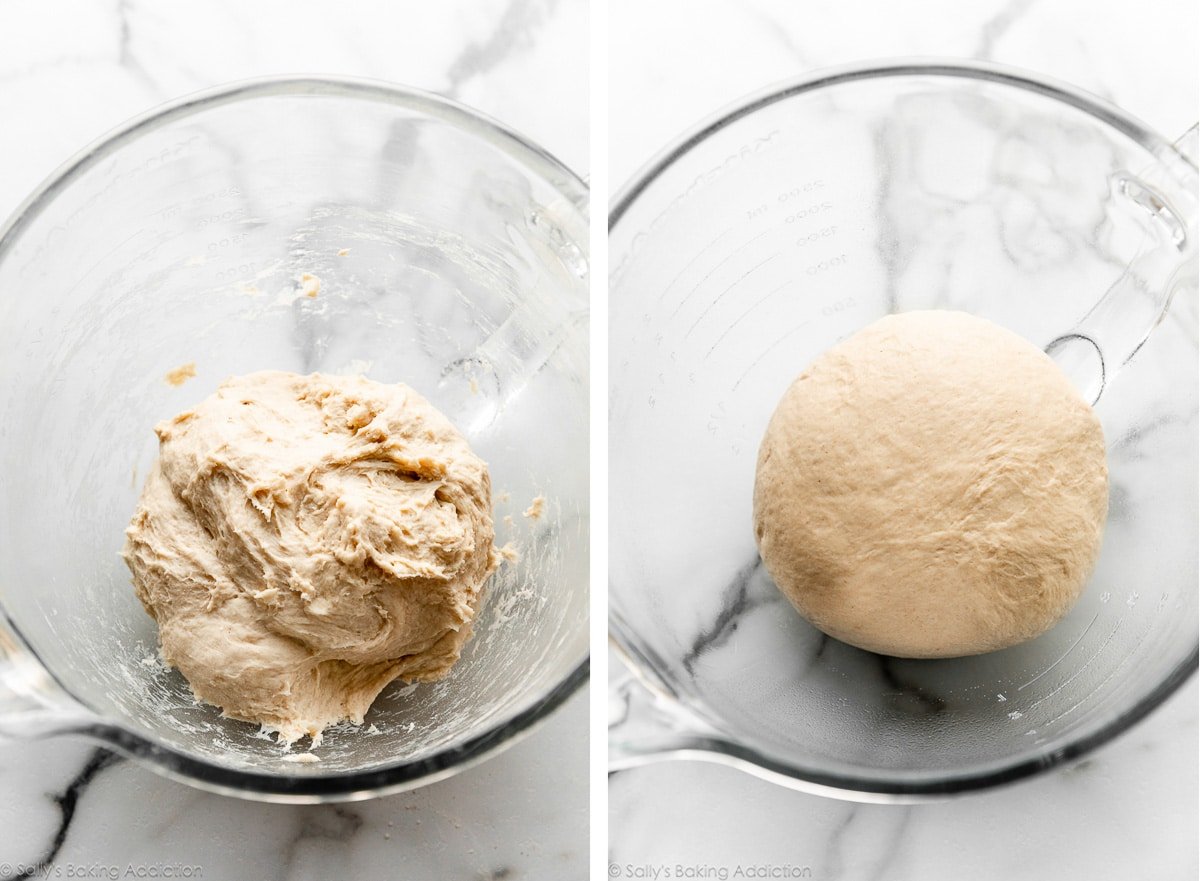
Pictured on the left below is the dough after mixing the ingredients together. And on the right is the dough after kneading. It’s smooth and stretchy, and ready to rise.
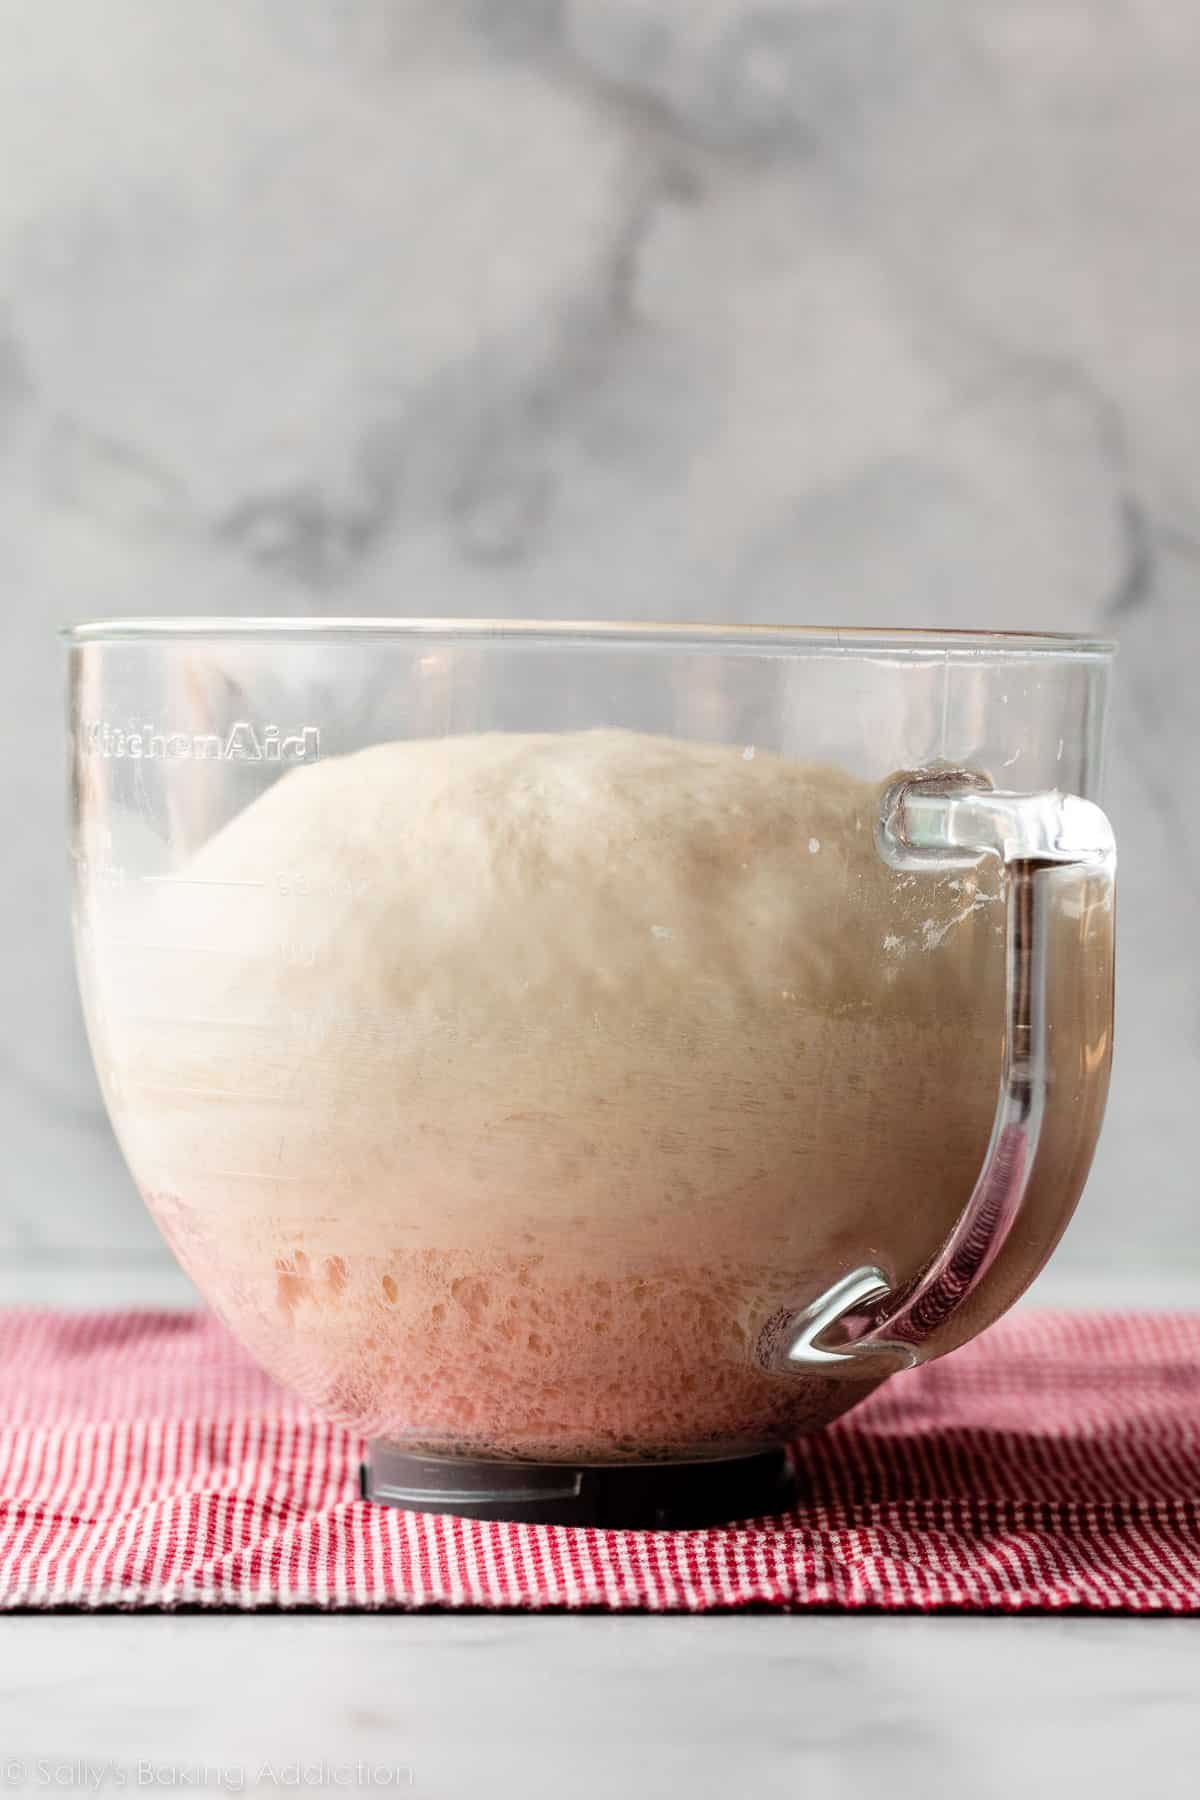
The breadstick dough requires 1 long rise time—about 1.5–2 hours—and then a shorter rise after shaping the breadsticks, about 20 minutes. Here is the dough after the 1st rise:
Shaping the Homemade Breadsticks
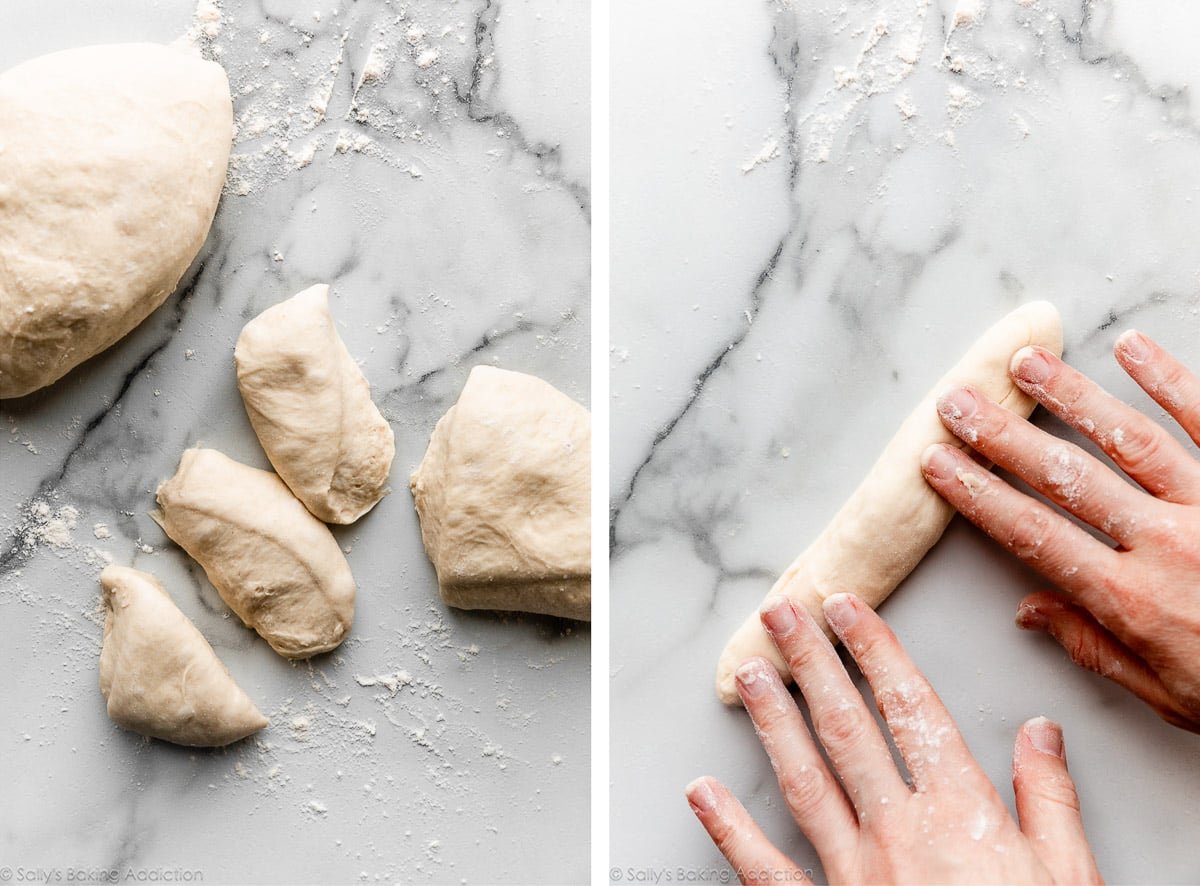
Punch down the risen dough, then cut it in half. You’ll have nearly 2 pounds of dough, total. Cut each half into 7 pieces, so 14 sticks total. (While not a necessary tool, I find a bench/dough scraper tool is handy for cutting dough.) Each piece of dough will weigh roughly 2 ounces, or 55 grams, but don’t worry about being exact.
Lightly flour your countertop and hands.
*Success Tip: The dough should feel a little tacky—not so sticky that it’s sticking to your hands and counter, but you do want it to get a little grip on the counter as you roll it into a log shape. If the dough is a little tacky, it will be easier to roll with your hands than if it’s too floury.
Roll each piece into an 8-inch log, sort of like you do when making homemade soft pretzels and garlic knots.
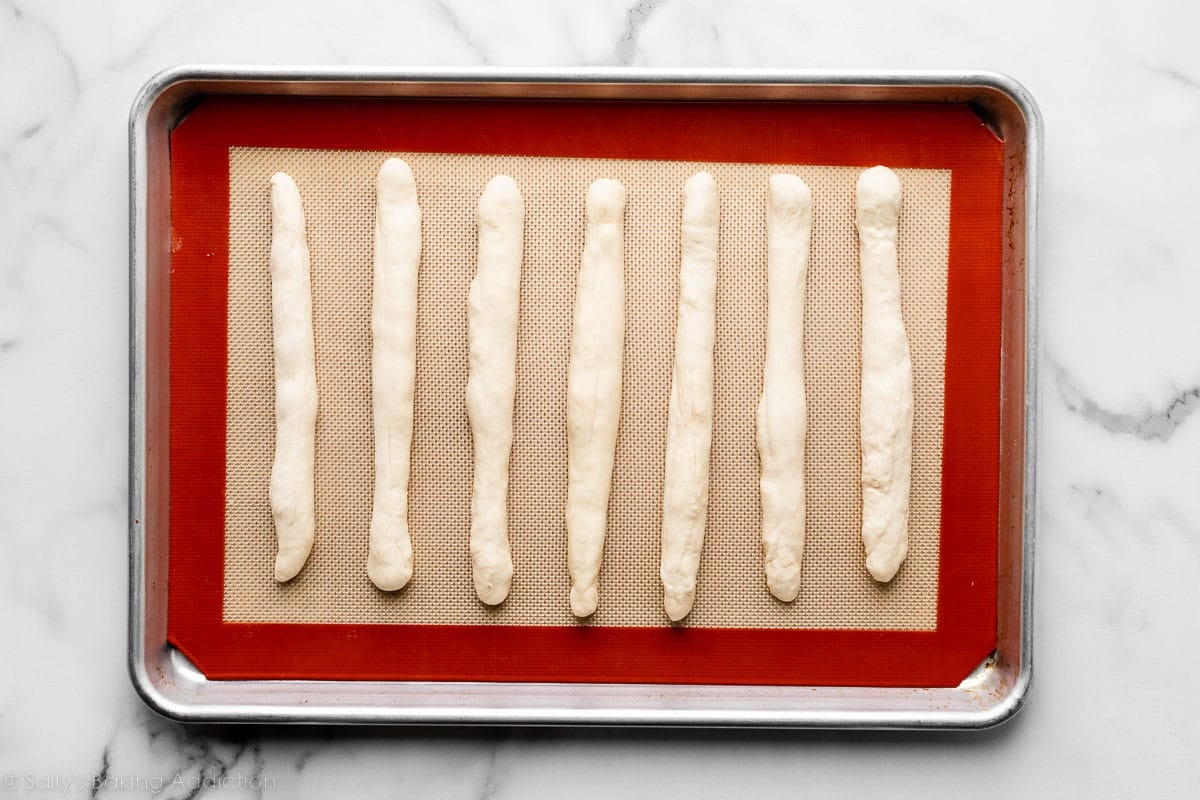
Lay the shaped dough logs on lined baking sheets, loosely cover, and let them rise for about 20 minutes.
This amount of dough makes 14 breadsticks, but you don’t have to use all of it. Shape as many breadsticks as you’d like, then use the remaining dough to make garlic knots or roll out to make a pizza. Yum!
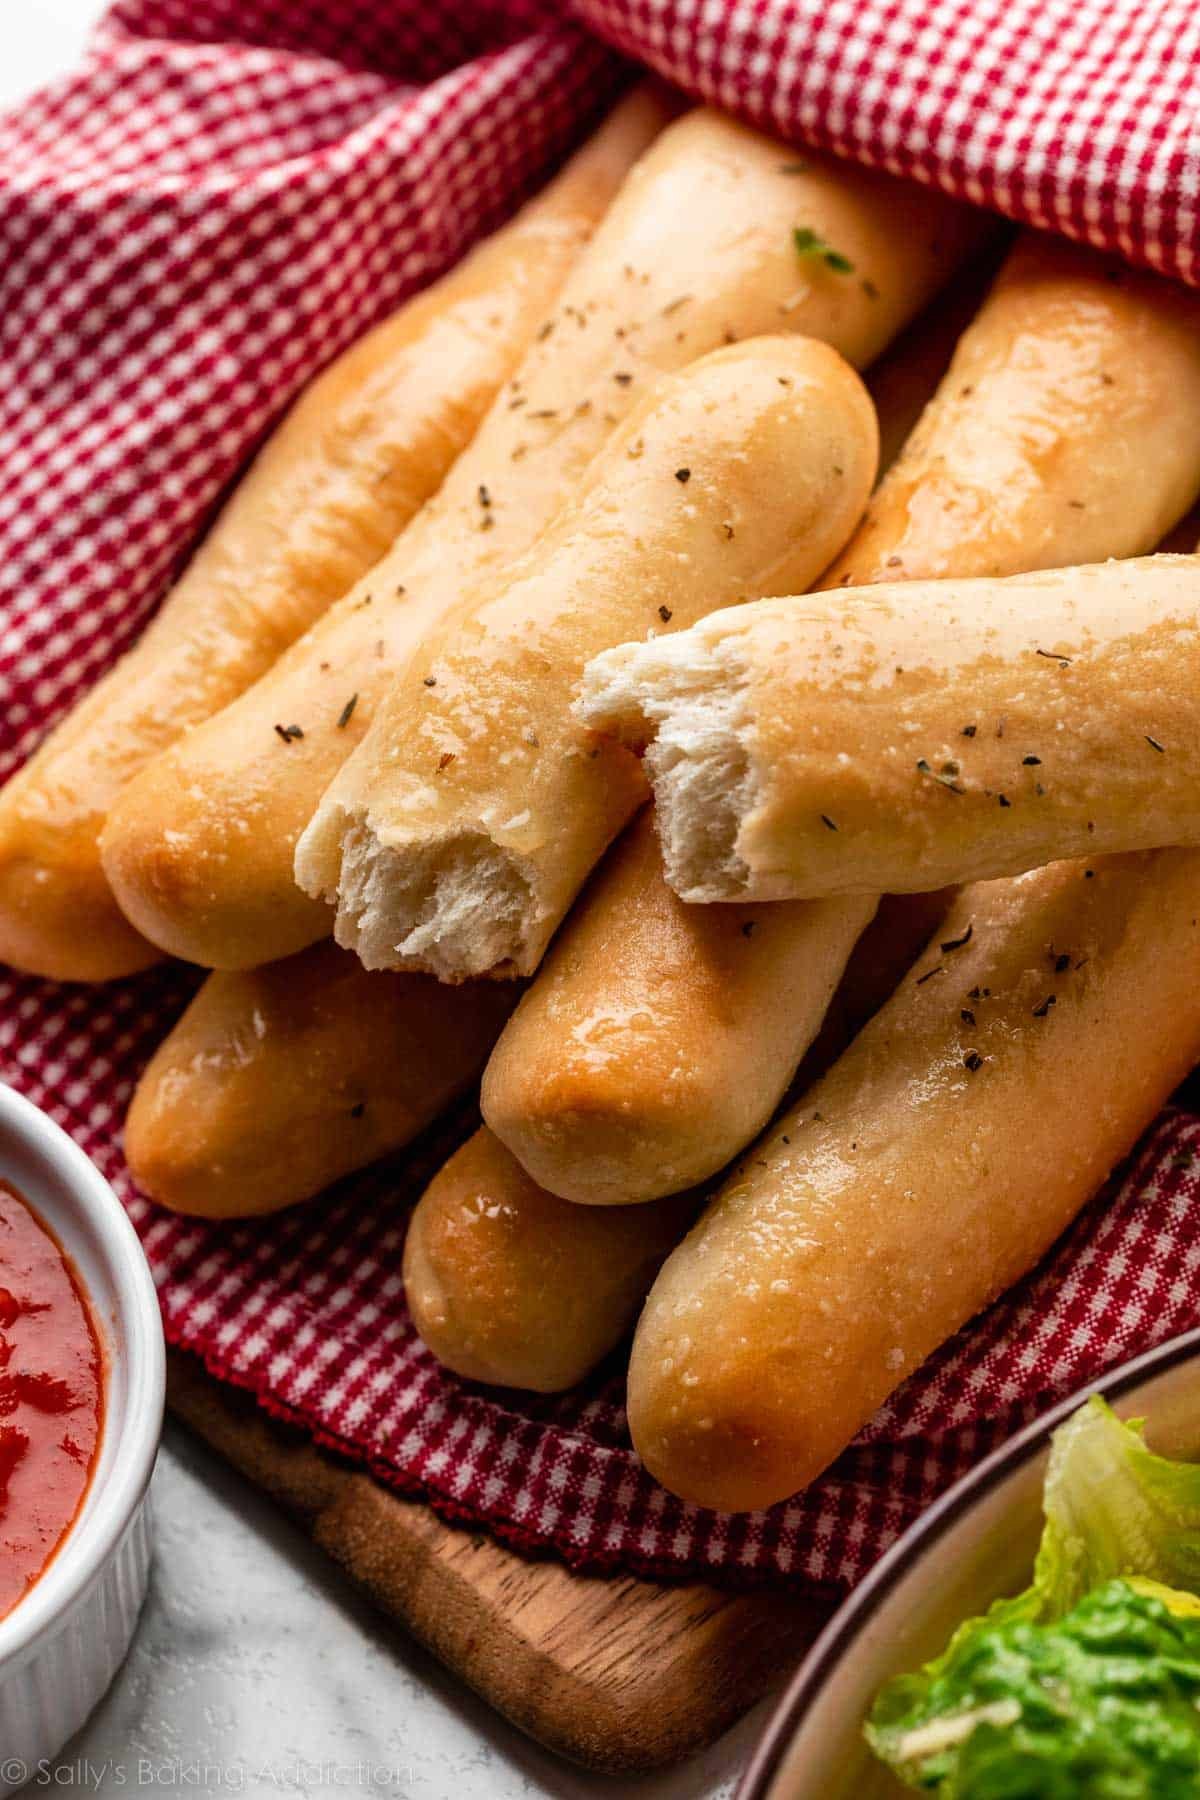
Garlic Butter Topping
Brushing on melted garlic butter is the perfect finishing touch to the warm homemade breadsticks.
The topping is made from just 3 ingredients, all of which you’re already using in the dough. While the breadsticks are in the oven, melt 2 Tablespoons of butter and stir in 1/4 teaspoon each of salt and garlic powder. If you want to add a little Italian seasoning like we do in the garlic butter topping for these pizza pull-apart rolls, or parsley like we do for cheddar biscuits, go for it.
As soon as they’re out of the oven, brush the garlic butter on top of the warm breadsticks. (A pastry brush is such a handy kitchen tool… always use it for pie crust!)
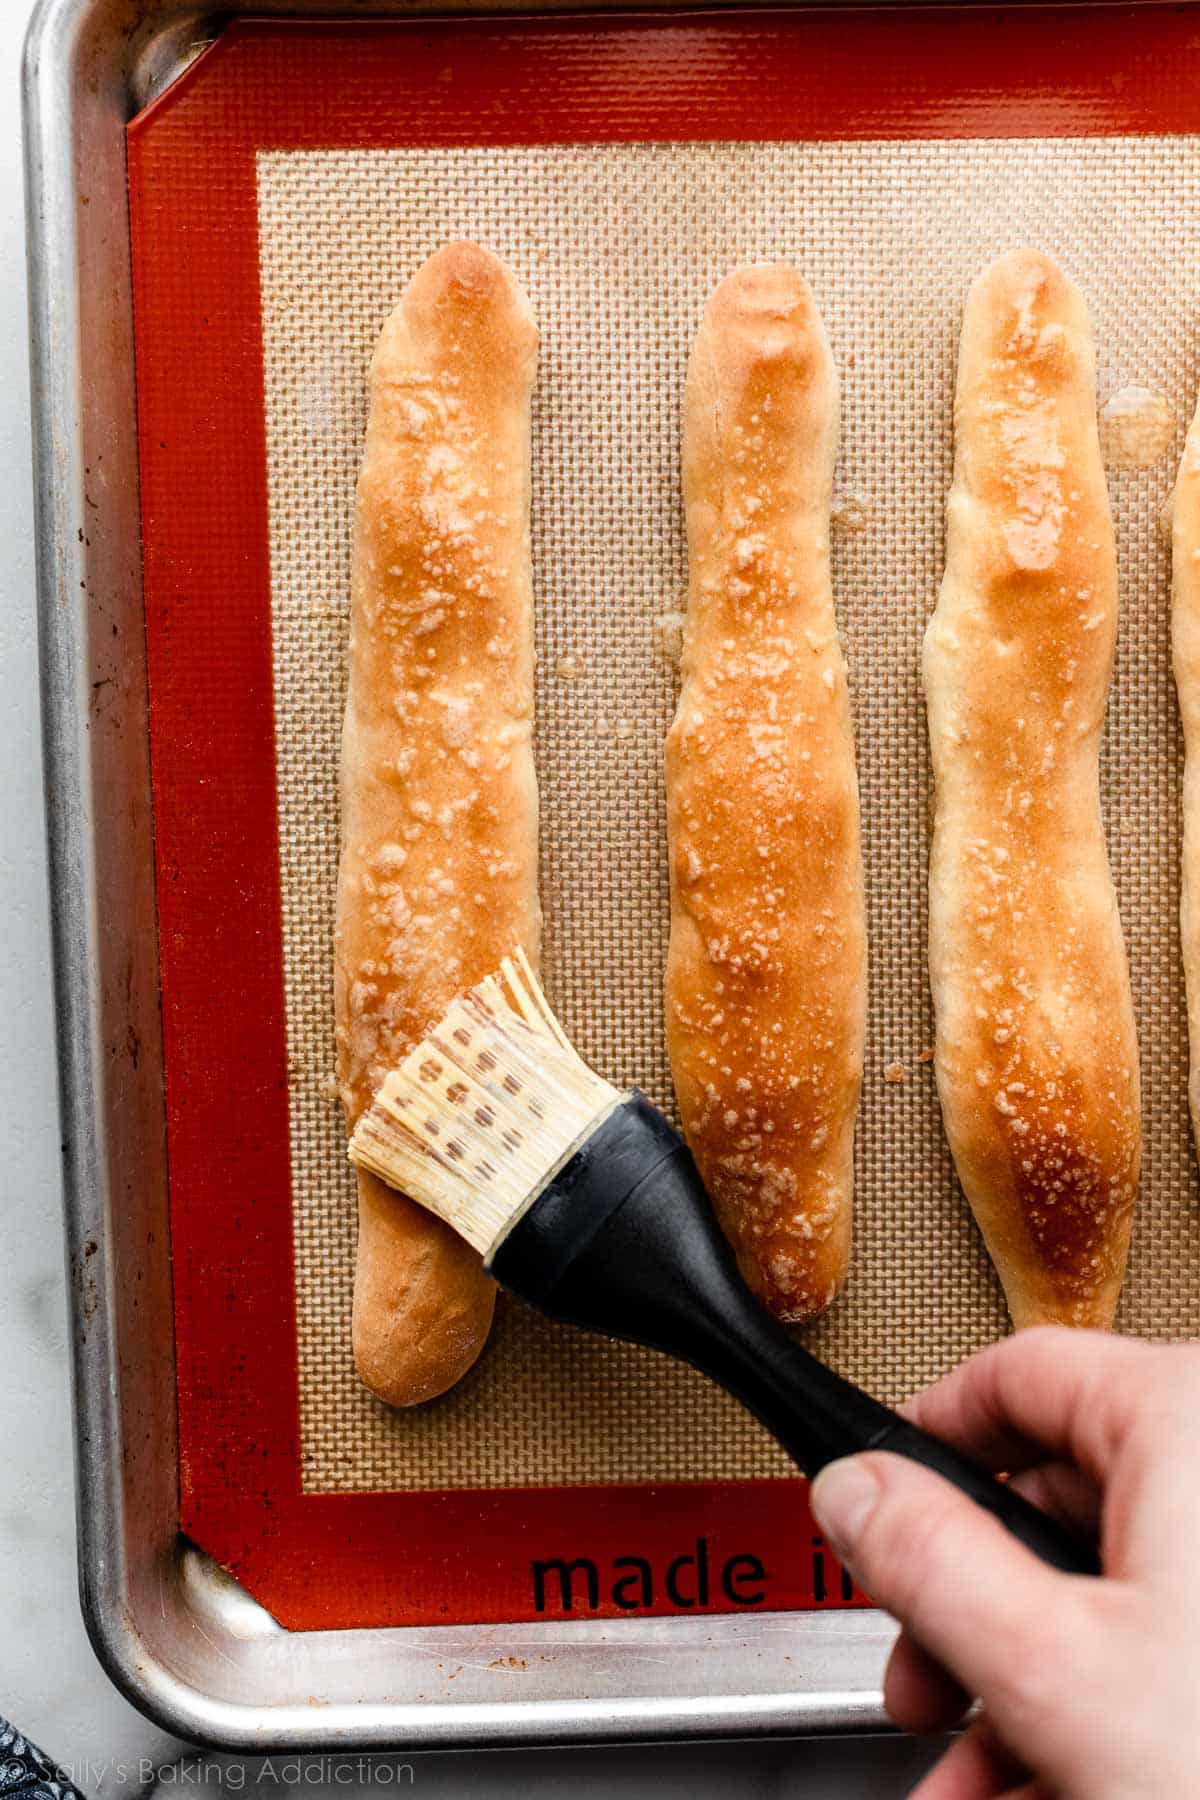
After buttering, you can sprinkle a little dried parsley or basil on top, too. These breadsticks taste best while they’re still warm, so serve right away (or reheat as needed).
What to Serve Them With
You’ll love these alongside dishes like homemade tomato soup, minestrone soup, alphabet vegetable soup, bruschetta chicken, chicken meatballs, and slow cooker turkey meatballs. They’re also a perfect accompaniment for garlic chicken & spinach stuffed shells or your favorite pasta meal, or serve them as an appetizer with a dipping sauce such as marinara, spicy cheese sauce, beer cheese dip, or homemade pesto.
The only downside to this recipe? You might have to make a second batch, because everyone lucky enough to dine at your table is definitely going to ask for unlimited refills of these breadsticks.

Homemade Soft Breadsticks
- Prep Time: 2 hours, 40 minutes (includes rises)
- Cook Time: 18 minutes
- Total Time: 3 hours
- Yield: 14 breadsticks
- Category: Bread
- Method: Baking
- Cuisine: American
Description
Soft, fluffy, garlic butter-topped homemade breadsticks are the perfect accompaniment to pretty much any dinner. The dough requires 2 rises, but the 2nd rise is pretty quick as the oven preheats. Reference my Baking With Yeast Guide for answers to common yeast FAQs.
Ingredients
- 1 and 1/4 cups (300ml) warm water (between 100–110°F, 38–43°C)
- 2 and 1/4 teaspoons (7g) instant or active dry yeast (1 standard packet)*
- 2 Tablespoons (25g) granulated sugar
- 3 Tablespoons (43g) unsalted butter, melted
- 1 and 1/2 teaspoons salt
- 3 and 1/3 cups (433g) bread flour (spooned & leveled), plus more as needed and for hands/work surface*
- optional: 1/2 teaspoon garlic powder
Topping
- 2 Tablespoons (28g) unsalted butter, melted
- 1/4 teaspoon salt
- 1/4 teaspoon garlic powder
- optional for sprinkling on top: dried parsley or other favorite herb
Instructions
- Prepare the dough: Whisk the warm water, yeast, and sugar together in the bowl of your stand mixer. Loosely cover and allow to sit for 5–10 minutes until foamy and frothy on top. *If you do not own a stand mixer, you can do this in a large mixing bowl and in the next step, mix the dough together with a large wooden spoon/silicone spatula. It will take a bit of arm muscle. A hand mixer works, but the sticky dough repeatedly gets stuck in the beaters. Mixing by hand with a wooden spoon or silicone spatula is a better choice.*
- Add the melted butter, salt, 1 cup (130g) bread flour, and garlic powder, if using. With a dough hook attachment, mix on low speed for 30 seconds, scrape down the sides of the bowl with a silicone spatula, then add the remaining flour. Beat on medium speed until the dough comes together and pulls away from the sides of the bowl, about 2 minutes. If the dough seems too wet to a point where kneading in the next step would be impossible, beat in more flour 1 Tablespoon at a time until you have a workable dough. Keep in mind that dough should be soft and a little tacky, but still manageable to knead with lightly floured hands.
- Knead the dough: Keep the dough in the mixer and beat for an additional 8-10 full minutes, or knead by hand on a lightly floured surface for 8-10 full minutes. (If you’re new to bread-baking, my How to Knead Dough video tutorial can help here.) If the dough becomes too sticky during the kneading process, sprinkle 1 teaspoon of flour at a time on the dough or on the work surface/in the bowl to make a soft, slightly tacky dough. Do not add more flour than you need because you do not want a dry dough. After kneading, the dough should still feel a little soft. Poke it with your finger—if it slowly bounces back, your dough is ready to rise. You can also do a “windowpane test” to see if your dough has been kneaded long enough: tear off a small (roughly golfball-size) piece of dough and gently stretch it out until it’s thin enough for light to pass through it. Hold it up to a window or light. Does light pass through the stretched dough without the dough tearing first? If so, your dough has been kneaded long enough and is ready to rise. If not, keep kneading until it passes the windowpane test.
- 1st Rise: Lightly grease a large bowl with oil or nonstick spray. Place the dough in the bowl, turning it to coat all sides in the oil. Cover the bowl with aluminum foil, plastic wrap, or a clean kitchen towel. Allow the dough to rise in a relatively warm environment for 1.5–2 hours or until double in size. (I always let it rise on the counter. Takes about 2 hours. For a tiny reduction in rise time, see my answer to Where Should Dough Rise? in my Baking With Yeast Guide.)
- Line 2 baking sheets with parchment paper or silicone baking mats. Set aside.
- Shape the breadsticks: When the dough is ready, punch it down to release the air. Divide the dough in half—each half should weigh just under 1 pound. Working with 1 half at a time, cut 7 pieces, roughly equal in size (each piece will weigh about 2 ounces, or 55g, but don’t worry about making them exact). Using lightly floured hands and a very lightly floured work surface (you still want some grip for the tacky dough, so do not over-flour), roll each piece of dough into a log about 8 inches (20cm) long. Arrange 7 breadsticks on each prepared baking sheet. Repeat with 2nd half of dough.
- 2nd Rise: Cover shaped breadsticks with aluminum foil, plastic wrap, or a clean kitchen towel. Allow to rise until slightly puffy, about 20 minutes.
- Meanwhile, preheat oven to 400°F (204°C).
- Bake the breadsticks: Remove cover from breadsticks and bake for 18–19 minutes or until golden brown on top, rotating the pans (top to bottom, bottom to top) halfway through. If you notice the tops browning too quickly, loosely tent with aluminum foil.
- Make the topping: Melt butter, and stir in salt and garlic powder.
- Remove breadsticks from the oven, brush with garlic butter topping, and allow breadsticks to cool for a couple minutes before serving. Sprinkle with dried parsley or your favorite herb, if desired, and serve warm.
- Cover leftover rolls tightly and store at room temperature for 1 day or in the refrigerator for up to 5 days. Reheat as desired.
Notes
- Freezing Instructions for Baked Breadsticks: Freeze the baked and cooled breadsticks for up to 3 months. To thaw, leave out on the counter for a few hours or overnight in the refrigerator. Warm in the microwave for 30 seconds or covered on a baking sheet in a 300°F (149°C) oven for 10 minutes.
- Freezing Instructions for Dough: After the dough rises and you divide the dough in half in step 6, you can freeze half or some of the dough to use at a later time. Or you can simply freeze all of the dough. Lightly coat all sides of the dough you want to freeze with nonstick spray or olive oil. Place the dough into a zipped-top bag and seal tightly, squeezing out all the air. Freeze for up to 3 months. To thaw, place the frozen dough in the refrigerator for about 8 hours or overnight. When ready to use, remove the dough from the refrigerator and allow to rest for 30 minutes on the counter. Preheat the oven and continue with step 6, punching down the dough to release air if needed.
- Overnight/All Day Dough Instructions: Prepare the dough through step 3. Then, grease a large bowl, place dough inside, and coat all sides of dough as instructed in step 4. Cover dough and allow to rise for 8–12 hours in the refrigerator. (If it needs to be in the refrigerator for longer, use cooler water in the dough, which will slow the dough’s rise and allow for more time.) The slow rise gives the dough wonderful flavor! When ready, continue with step 5. If the dough didn’t quite double in size during this time, let it sit at room temperature for 30–45 minutes before punching down (step 6).
- Special Tools (affiliate links): Stand Mixer or Large Mixing Bowl and Silicone Spatula or Wooden Spoon | Whisk | Baking Sheets | Silicone Baking Mats or Parchment Sheets | Bench Scraper | Pastry Brush
- Yeast: I usually use instant yeast. You can use active dry yeast instead, with no changes to the preparation. Rise times will be slightly longer. Reference my Baking With Yeast Guide for answers to common yeast FAQs.
- Flour: If you don’t have bread flour, you can use all-purpose flour. All-purpose flour is convenient for most, but bread flour produces chewier breadsticks. The breadsticks are still soft and fluffy no matter which you use.
- Can I Add Cheese on Top? Yes, absolutely. Bake for just 15 minutes. Remove from the oven, carefully push the warm breadsticks together so they are touching, brush with the garlic butter topping, and then top each batch with 1/2 cup (about 55g) of shredded mozzarella or cheddar cheese (or a mix). There are 2 batches of 7 breadsticks, so you’ll need 1 cup (about 110g) of shredded cheese total. Return to the oven for 3-4 more minutes until cheese has melted and breadsticks are golden brown. Or try these flatter cheesy breadsticks.


Reader Comments and Reviews
HI SALLY, FIRAT AND FORMOST, YOU ARE AWSOME. EVERY TIME I MAKE ONE OF YOUR RECIPES, NO MATTER WHAT IT IS, MY FAMILY COMMENTS, ” MOMS AT IT AGAIN, THANKS SALLY”. LOL. I TELL THEM ALL, LOOK HER UP. SHE HAS THE BEST RECIPES. I HAVE MY MOMS ITALIAN EASTER PIE RECIPE I WOULD LOVE TO SHARE WITH YOU. TRADITIONALLY MADE EVVERY EASTER. AND HER RICIOTTA PIE WAS TO DIE FOR. THANK YOU FOR SHARING ALL YOUR MAGIC.
Love this recipe! Made multiple time following exactly. Tonight made it again and added chives to the dough and good mozzarella when you shape into sticks. AMAZING!!!
I made a pot of Zuppa Toscana and it begged for breadsticks. I chose your recipe and am so glad I did. I followed your directions exactly as written and I was delighted with the outcome. They browned nicely and were soft and tender inside. After taking them out, I brushed them with some melted garlic butter. I invited the neighbor over and she thought they were excellent, too. Thank you for sharing this recipe.
So happy these breadsticks were a hit, Robin!
These taste fine but are not as attractive as yours. My dough “slumps” so my sticks spread and turn out flatter than round. I felt my dough was stickier when I rolled out the breadsticks than what I saw in your video. I followed the recipe as written (though I added two tablespoons of flour when the dough wasn’t coming away from the sides of the bowl in my mixer. I’ve had the same problem with my artisan bread and olive bread – the boule tends to spread and flatten out more than I see in your photos – taste fine just not as attractive. What am I doing wrong?
Hi Charles! You’re not necessarily doing anything wrong– a lot of factors go into this such as mixing time, speed, weather, yeast, and temperature of water. Feel free to add a little more flour to make a soft, yet workable dough that looks like the video tutorial.
Hi Sally, I broke both wrists in a fall last year and since I cannot knead bread dough. Can I use my Kitchen Aid to knead it?
Hi Kris, Yes, you can use your KitchenAid + dough hook attachment to knead this dough. I’m sorry to hear about your wrists!
Sally, Can I make these bread sticks into Salt Sticks? I can’t find a recipe that works for salt sticks. They have caraway seeds and salt on the outside and malt powder in the dough. The one recipe I tried was a disaster. Thanks.
Hi Deborah, we haven’t tested anything like that, but you may have better luck finding a recipe specifically written for those ingredients. Let us know if you do test anything, though.
Could this recipe perhaps be used for making hamburger buns with half the dough? Just two in the household, probably cannot eat 14 breadsticks before they go stale.
Hi Adrienne, we would try our bread bowls dough for buns.
These were fantastic and disappeared in minutes. They were lightly crispy, garlicky pillows and I will definitely be making them again. I dropped the flour to 400 grams and kept everything else the same. The dough wax esy to work with even by hand with just a light dusting of flour for rolling out. I’d make them every night if I could.
I saw the picture for extra cheesy bread sticks and this is not the recipe for it. Can you please send me your correct recipe? Thank you in advance Sally!!!!
Hi Tina, we unpublished that older recipe, but we still have it! Send us an email and we can forward it to you: sally@sallysbakingaddiction.com
These were just okay for me. I was hoping for really soft, gorgeous breadsticks and mine were difficult to shape, they looked misshapen after baking, and not the texture I was hoping for. I don’t know if I would try making these again. I’ve had great results with some of your other bread recipes so I might just try the artisan bread recipe next and see how that goes.
Super easy and delicious!
These were so easy to make and very good. I gave 12 of them to my daughters family along with dinner and dessert. She texted me they ate them all before dinner. Guess I’ll be making more tomarrow.
I made these last night, they were a big hit in our house! I froze half of the cooked breadsticks. Do they have to be thawed before cooking or can I cook them from frozen?
Hi Chelsea! We would thaw the frozen breadsticks before baking. We do recommend freezing the dough before shaping the breadsticks next time, see recipe Notes for details!
Delicious breadsticks! Extremely easy recipe requiring minimal effort, for one of those days when you’re craving something but really don’t want to think about what you’re doing. No dips necessary to enjoy these breadsticks. Sally’s baking addiction is my go-to website every time I feel like spending some time in the kitchen.
Can they be shaped into hotdogs buns?
Can I use Gluten-free bread flour?
Hi Laura, we would try our bread bowls dough for hot dog buns. We’re unsure exactly how many hot dog buns that recipe would make. We also haven’t tried baking with gluten-free bread flour. Let us know what you try!
THESE ARE AMAZING!!!!
11/10. so yummy. this was my first time making bread and i could not believe how beautifully these turned out! they were truly just like olive garden breadsticks!! the instructions were easy to follow and this recipe is def going in the rotation! thank you so much sally!!!
Amazing , they are so good and easy to make. I topped them with a lil ham and cheddar, heated up some Marinara sauce to dip them in as I watched a movie. So much better than microwave frozen dinners…lol it’s really hard cooking for just myself, but these are great and it makes several meals for me , being they can be frozen. Ty so much, looking forward to making lots of your recipes.
I absolutely love this recipe! Not only for the amazing taste and softness of the bread, but how easy it is too follow the directions.
Can I make something else with this dough? I put half in the fridge over night!
Hi Jill! This dough is adapted from our pizza dough recipe. This dough is a little softer and less chewy, but would still make a nice pizza crust.
OMG these are great, they look like little italian breads :). They are bigger than I thought they would be. I got 14 out of the dough.
QUESTION: Do I put the topping on the ones I am going to freeze or do that after when I reheat?
Hi Mimi, either way is fine! So glad you enjoyed these.
Well worth the time it takes to make these breadsticks!
Hi, I tired making this recipe but when I left the dough to rise, it did not rise at all. I only baked one breadstick and it wasnt as fluffy as yours show. Is there something I am doing wrong?
Hi Leah, is your yeast expired by chance? That could be the culprit for the bread not rising. Be sure to use room temperature water, too, and that it’s not so hot that it kills the yeast. Hope this helps for next time!
I made these tonight for a side with chicken and dumpling soup. They were a hit! My family wants me to make them more often, and I love how the dough can be frozen. Can I double the recipe to freeze half and bake half?
Hi Hannah, We’re so glad your family loves these! For best results, we recommend making two separate batches rather than doubling.
These breadsticks were so good the whole family loved them! Sally, you never disappoint girl!
Made these, turned out terrible.
These were easy and simply a delight to make. I decided to make them at about 4 for dinner at 6 – all in the hopes that three little girls wouldn’t complain about halving spaghetti (which they are not crazy about). Used the warm oven rising trick, dough was a delight to work with, smelled awesome and everyone loved it. Even had the girls asking for spaghetti again tonight just in the hopes of more breadsticks. Winner, winner breadsticks with dinner!!
So glad these were a hit with your girls, Mary!
What should I do if I want to double this recipe??
Hi Macie, for best results, we recommend making two separate batches rather than doubling.
It may not be recommended, but I doubled them and it turned out great!
Absolutely loved these breadsticks! I made first batch with the garlic butter and parsley topping, and made the other half with lots of cheese (white and yellow cheddar cheese). This is the best recipe for breadsticks around, thank you.
I love the bread sticks, and trying this recipe to make bread bowls for chili night
Delicious! I sprinkled some smoked paprika on them after I brushed on the melted butter and they were so yummy!
Sounds great! Glad you enjoyed these.
These are excellent soft breadsticks! I followed the recipe exactly and they are perfect and made by hand since there were a last minute add to a Chicken Parmesan dinner and I did not want to pull out the mixer.