Here’s a complete recipe and video tutorial for hot & fresh homemade everything bagels. Skip the store-bought because bagels are easier than you think!
This recipe is brought to you in partnership with Red Star Yeast.
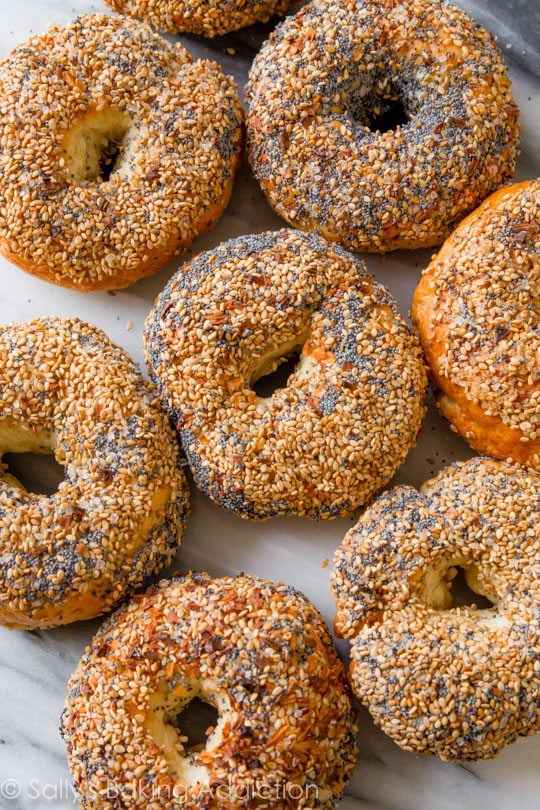
I dedicated the past month to homemade bagels. There are only so many ways to successfully make bagels, so I used a mix of kitchen-tested recipes as inspiration. I tested several recipes before figuring out what I like best. Never in 1 million years did I think I could EVER make New York bakery-style bagels in my own kitchen. It’s possible!
These everything bagels are:
- Hot ‘n’ fresh
- Extra chewy
- Soft in the center
- Golden brown
- Complete with a salty, crunchy crust
Incredible plain, toasted, with cream cheese, as a turkey sandwich, topped with a fried egg, avocado, and so much more.
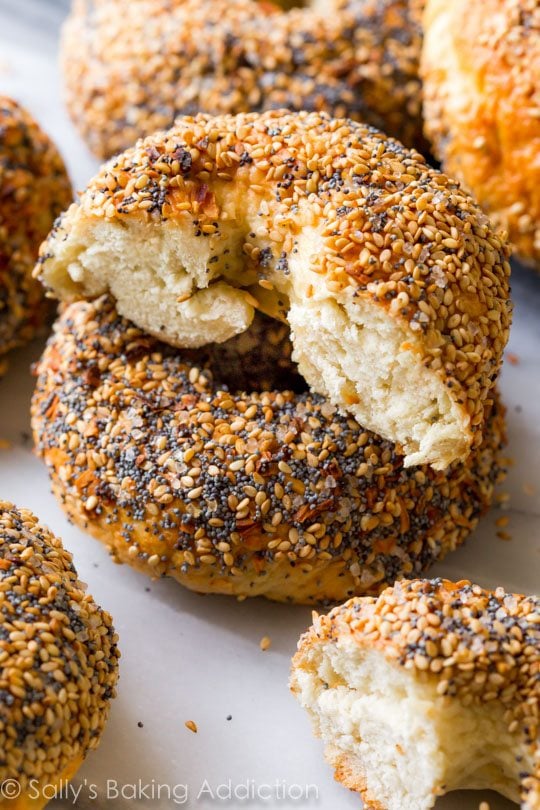
Homemade bagels aren’t difficult as long as you take your time. By the 2nd time you make them, you’ll breeze right through all the steps. I promise!
How to Make Homemade Everything Bagels
The first step is to prepare the bagel dough. There’s only 5 ingredients.
- Warm Water: Liquid for the dough.
- Yeast: Allows the dough to rise. I recommend an instant or active dry yeast. Red Star Yeast is my #1 choice. Reference this Baking with Yeast Guide whenever you work with baker’s yeast. I include practical answers to all of your common yeast questions.
- Bread Flour: A high protein flour is necessary for making bagels. We want a dense and chewy texture, not soft and airy like cinnamon rolls. Bread flour is the only solution!
- Brown Sugar: Bakeries use barley malt syrup to sweeten the bagel dough—it can be a little difficult to find, but brown sugar is a fine substitute. Read more in my recipe notes below.
- Salt: Flavor.
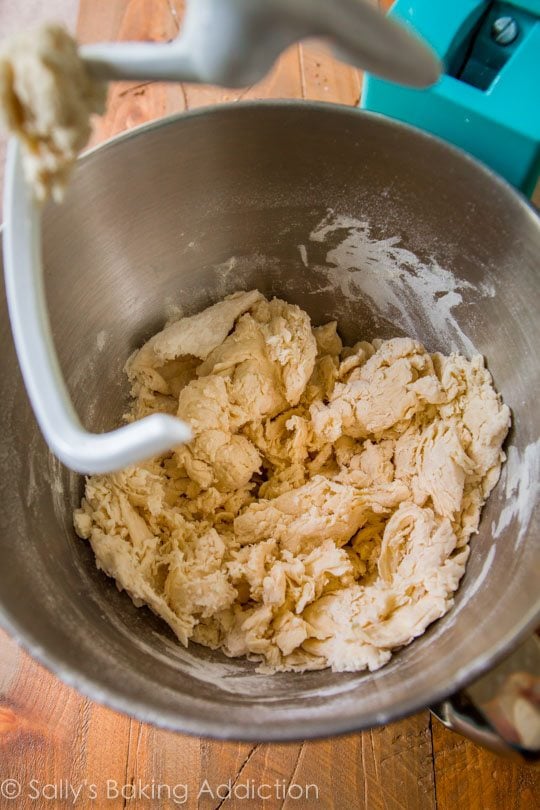
The bagel dough is a little dry, dense, and shaggy. This is perfectly normal and exactly what you’re looking for. It will come together as you knead it. See my How to Knead Dough video tutorial if you need extra help with this step.
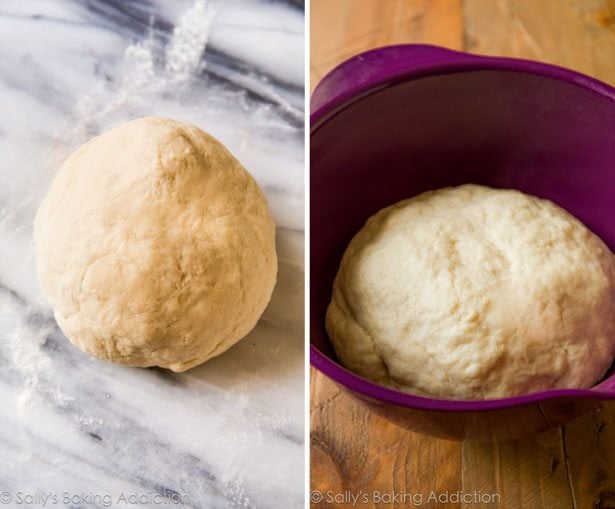
After the dough rises, it’s time to shape the bagels. First, divide the ball of dough into 8 equal parts. It does not have to be perfect! Some can be a little smaller than others. Smooth them out as best you can.
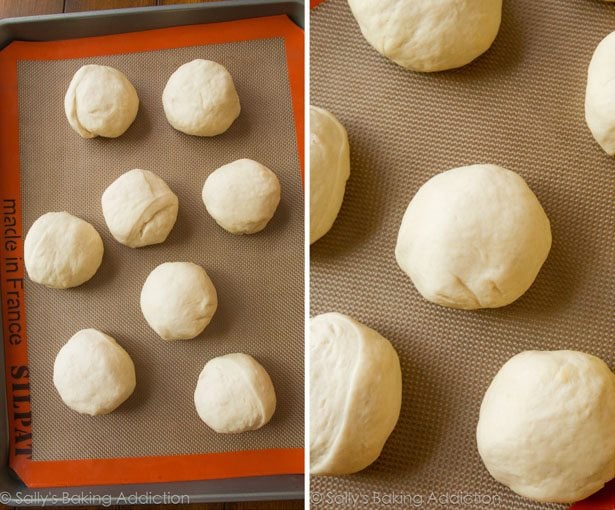
How to Shape Bagels
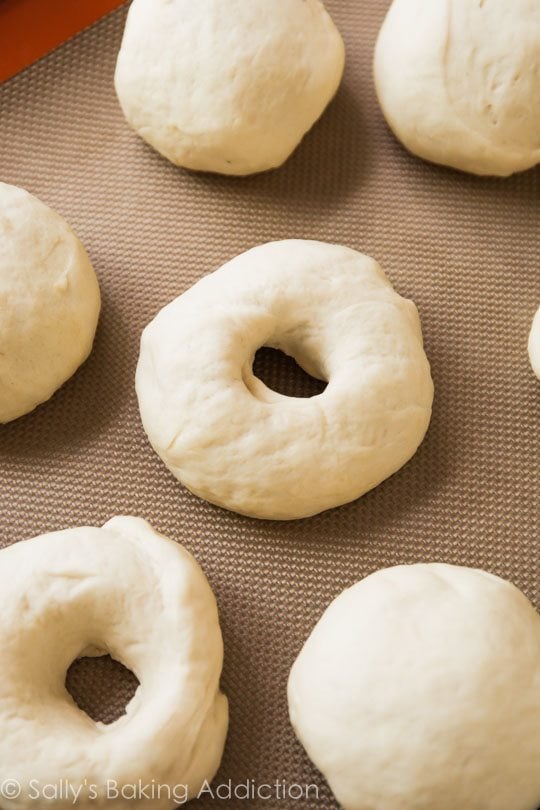
Shaping everything bagels is easier than it looks. Poke your finger through the center of the ball of dough. Make a hole about 1.5 – 2 inches large. That’s it! As you can see, mine aren’t totally perfect looking. Perfection is overrated and the bagels taste the same no matter how awesome they look. 😉
What is the Purpose a Bagel Water Bath?
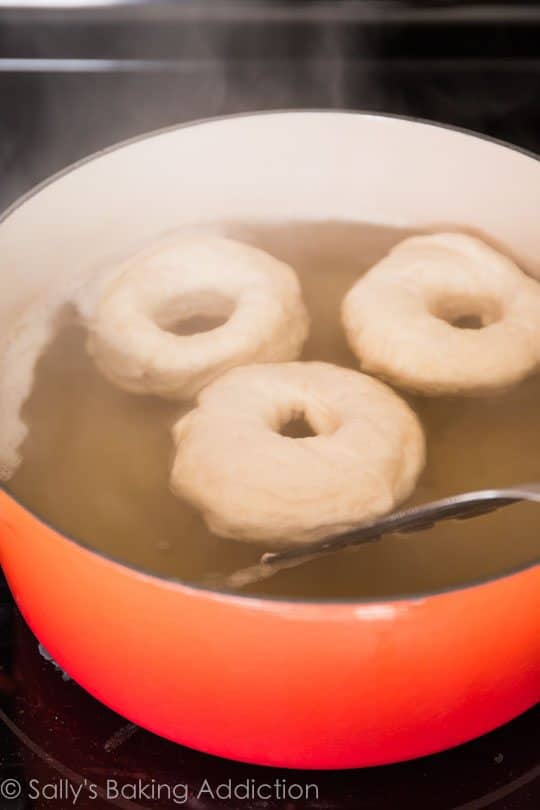
The bagel water bath is the most crucial step in bagel making. Boil the shaped bagels for 1 minute on each side.
- Boiling bagels give the crust its beautiful shine. But looks aren’t everything. This shine is actually a result of the dough’s starches becoming gelatinized. Cooks Illustrated teaches us that these starches cook to a crisp, shiny coating in the oven.
- Boiling bagels cooks the outer layer of dough, which guarantees they’ll hold their shape when baking.
Honey: Add a little honey to the boiling water. Honey provides extra caramelization on the bagel crust. Barley malt syrup works too—see recipe notes below.
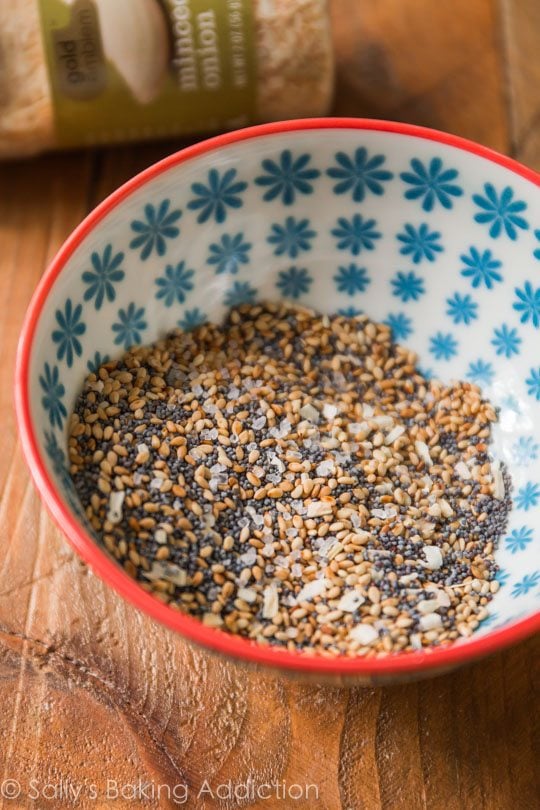
Everything Bagel Seasoning
Before baking, let’s top the bagels. Brush with a little egg white, then coat in everything bagel seasoning. This is a blend of poppy seeds, sesame seeds, dried minced onion, dried garlic flakes, and coarse sea salt or flaky sea salt. Feel free to use more of one seasoning than another, or leave one out if you don’t like it. Or use all poppy seeds, all sesame seeds, all coarse/flaky sea salt, etc. You can make so many bagel varieties from this homemade bagel recipe!
Highly recommended: Top homemade soft pretzels with this seasoning!!
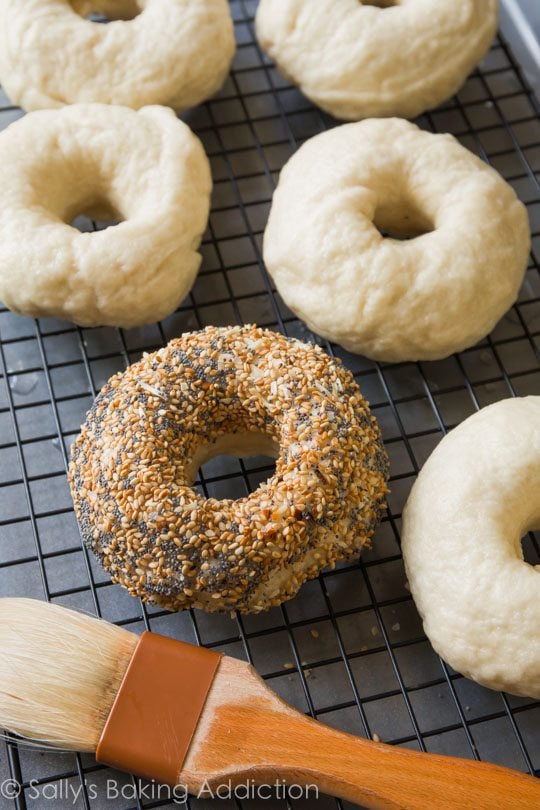
Last step is to bake the bagels until golden brown perfection.
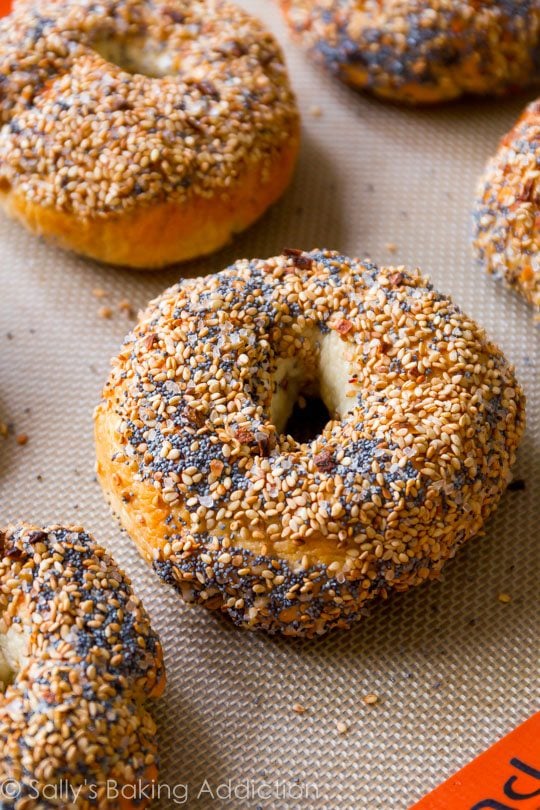
After you make the homemade everything bagels, you’ll realize how simple they are! The instructions look overwhelming, but I’m extra thorough so you have the best success. Save your money and make bagels at home!
More Homemade Bread Recipes
- Everything Bagel Pull Apart Bread
- Easy Jalapeño Cheddar Bread
- Homemade Biscuits
- Homemade Cinnamon Raisin Bagels
- Soft Pretzel Bites

Homemade Everything Bagels
- Prep Time: 2 hours, 10 minutes
- Cook Time: 25 minutes
- Total Time: 3 hours
- Yield: 8 bagels
- Category: Bread
- Method: Baking
- Cuisine: American
Description
Here’s a complete recipe and tutorial for hot & fresh homemade everything bagels. Skip the store-bought and bakery because bagels are easier than you think! Don’t skip the water bath and egg wash- both provide an extra chewy and golden brown crust.
Ingredients
- 1 and 1/2 cups (360ml) warm water (between 100-110°F, 38-43°C)
- 2 and 3/4 teaspoons instant or active dry yeast*
- 4 cups (520g) bread flour* (spooned & leveled)
- 1 Tablespoon packed light or dark brown sugar (or barley malt syrup)*
- 2 teaspoons salt
- coating the bowl: nonstick spray or 1 Tablespoon olive oil
Water Bath
- 2 quarts water
- 1/4 cup (85g) honey (or barley malt syrup)*
Topping
- 2 Tablespoons poppy seeds
- 2 Tablespoons sesame seeds
- 1 Tablespoon dried minced onion
- 1 Tablespoon dried garlic flakes
- 1 Tablespoon coarse sea salt or flaky sea salt
- egg wash: 1 egg white beaten with 1 Tablespoon water
Instructions
- Prepare the dough: Whisk the warm water and yeast together in the bowl of your stand mixer fitted with a dough hook attachment. Cover and allow to sit for 5 minutes. *If you don’t have a stand mixer, simply use a large mixing bowl and mix the dough with a wooden spoon or silicone spatula in the next step.
- Add the flour, brown sugar, and salt. Beat on low speed for 2 minutes. The dough is very stiff and will look somewhat dry.
- Knead the dough: Keep the dough in the mixer and beat for an additional 6-7 full minutes, or knead by hand on a lightly floured surface for 6-7 full minutes. (If you’re new to bread-baking, my How to Knead Dough video tutorial can help here.) If the dough becomes too sticky during the kneading process, sprinkle 1 teaspoon of flour at a time on the dough or on the work surface/in the bowl to make a soft, slightly tacky dough. Do not add more flour than you need because you do not want a dry dough. After kneading, the dough should still feel a little soft. Poke it with your finger—if it slowly bounces back, your dough is ready to rise. You can also do a “windowpane test” to see if your dough has been kneaded long enough: tear off a small (roughly golfball-size) piece of dough and gently stretch it out until it’s thin enough for light to pass through it. Hold it up to a window or light. Does light pass through the stretched dough without the dough tearing first? If so, your dough has been kneaded long enough and is ready to rise. If not, keep kneading until it passes the windowpane test.
- Lightly grease a large bowl with oil or nonstick spray. Place the dough in the bowl, turning it to coat all sides in the oil. Cover the bowl with aluminum foil, plastic wrap, or a clean kitchen towel. Allow the dough to rise at room temperature for 60-90 minutes or until double in size.
- Line two large baking sheets with parchment paper or silicone baking mats.
- Shape the bagels: When the dough is ready, punch it down to release any air bubbles. Divide the dough into 8 equal pieces. (Just eyeball it– doesn’t need to be perfect!) Shape each piece into a ball. Press your index finger through the center of each ball to make a hole about 1.5 – 2 inches in diameter. Watch video below for a visual. Loosely cover the shaped bagels with kitchen towel and rest for a few minutes as you prepare the water bath.
- Preheat oven to 425°F (218°C).
- Water bath: Fill a large, wide pot with 2 quarts of water. Whisk in the honey. Bring water to a boil, then reduce heat to medium-high. Drop bagels in, 2-4 at a time, making sure they have enough room to float around. Cook the bagels for 1 minute on each side.
- Combine the everything bagel seasoning ingredients together. Using a pastry brush, brush the egg wash on top and around the sides of each bagel. Dip into the everything bagel seasoning. Place 4 bagels onto each lined baking sheet.
- Bake for 20-25 minutes, rotating the pan halfway through. You want the bagels to be a dark golden brown. Remove from the oven and allow bagels to cool on the baking sheets for 20 minutes, then transfer to a wire rack to cool completely.
- Slice, toast, top, whatever you want! Cover leftover bagels tightly and store at room temperature for a few days or in the refrigerator for up to 1 week.
Notes
- Overnight Make Ahead Instructions: Prepare the dough through step 4, but allow the dough to rise overnight in the refrigerator instead of at room temperature for 60-90 minutes. The slow rise gives the bagels wonderful flavor! In the morning, remove the dough from the refrigerator and let the dough rise for 45 minutes at room temperature. Continue with step 5. I don’t recommend shaping the bagels the night before as they may puff up too much overnight.
- Freezing Make Ahead Instructions: Baked bagels freeze wonderfully! Freeze them for up to 3 months, thaw overnight in the refrigerator or at room temperature, then warm to your liking. You can also freeze the bagel dough. After punching down the dough in step 6, wrap the dough tightly in plastic wrap, then a layer of aluminum foil. Freeze for up to 3 months. Thaw overnight in the refrigerator, then punch the dough down again to release any air bubbles. Continue with the rest of step 6.
- Special Tools (affiliate links): Stand Mixer | Baking Sheets | Parchment Paper or Silicone Baking Mats | Large Pot (such as a large 5.5 quart dutch oven) | Pastry Brush | Coarse Sea Salt or Flaky Sea Salt
- Yeast: Use instant or active dry yeast. If using active dry yeast, the rise time may be up to 2 hours. 1 standard packet is about 2 and 1/4 teaspoons, so you will need a little more than 1 packet of yeast. Reference my Baking with Yeast Guide for answers to common yeast FAQs.
- Bread Flour: Bagels require a high protein flour. Bread flour is a must. Here are all my recipes using bread flour if you want more recipes to use it up. All-purpose flour can be used in a pinch, but the bagels will taste flimsy and won’t be nearly as chewy.
- Barley Malt Syrup: This ingredient can be a little hard to find, but truly gives bagels that traditional malty flavor we all know and love. Most natural food stores carry it. I offer alternatives such as brown sugar in the dough and honey in the water bath; I’ve made bagels with these alternatives AND with barley malt syrup and honestly love both versions.
- Bread Machine: Place the dough ingredients into the pan of the machine. Program the machine to dough or manual, then start. After 9-10 minutes, the dough will be quite stiff. Allow the machine to complete its cycle, then continue with the recipe.
- Halve or Double: You can halve this dough recipe by simply halving all of the dough ingredients (do not halve the water or honey for the boiling step). No changes to the recipe instructions. For best taste and texture and to not overwhelm your mixer with excess heavy dough, I do not recommend doubling this dough recipe. Instead, make separate batches of dough.
- Adapted from a mix of recipes I’ve tried: King Arthur Flour, Cook’s Illustrated, and Complete Book of Breads


Reader Comments and Reviews
I own a small bakery in Montana, and recently made bagels using this recipe. They were a hit! One of my customers is from NY and gave them a glowing review. My shapes are a little rough but I’ll get better as time goes on. This was my third ever batch and only the second that survived the creating process. Thank you
This was a great recipe and who knew bagels were so easy! Especially in NY where bagels have become so expensive! I do need a little help as I think my dough might be a little dry and when I form the balls the dough doesn’t stick together and has brick cracks ? More water? Everything else is totally and shockingly perfect
Hi Deb, was the dough dry? How did you measure the flour? Make sure to spoon and level (instead of scooping) to avoid packing in too much flour into your measuring cups – or use a kitchen scale. You can read more about properly measuring baking ingredients in this post.
These bagels are delish! My daughter says they are the best bagels she’s ever had!!
I’ve been making these bagels for months and they’re so delicious. I was curious if anyone could help with one dilemma. Sometimes a few of my bagels don’t cook all the way through in tiny spots. I am wondering if this is because they need longer boiling or longer in the oven, any feedback is greatly appreciated.
Hi Sara, it’s possible that your oven has some hot/cool spots, causing the bagels to bake through at different rates. You can try rotating the baking sheet half way through baking to help promote more even baking. Glad these bagels are a favorite for you!
Came out fantastic! My new go-to recipe
question, i have ap flour and cake and pastry flour available, but no bread flour, which of those options would be best for this recipe? thanks!
Hi Grace, all purpose flour will be fine in a pinch.
I left out the salt in the topping – and it’s much better! Otherwise a fantastic recipe, best bagel I’ve ever had.
I just made this and it turned out great! Thank you for the recipe l. With the price of bagels we haven’t been able to indulge but with this recipe I can make some a couple times a week!
I can’t wait to try making some of these bagels..
Love these bagels but was wondering if you know how long would you bake if you made mini bagels
Hi Sally, The bake time will be shorter but we’re unsure of the exact time.
I love this recipe but do you have then nutrional values?
Hi Kathy, We don’t usually include nutrition information as it can vary between different brands of the same ingredients. Plus, many recipes have ingredient substitutions or optional ingredients listed. However, there are many handy online calculators where you can plug in and customize your exact ingredients/brands. Readers have found this one especially helpful: https://www.verywellfit.com/recipe-nutrition-analyzer-4157076 So glad these bagels are a favorite for you!
Hi! I live in the UK but my mom on the other hand is american, and loves everything bagels. Unfortunately, you can’t buy them here so when I saw this recipe I was so happy! Just made them yesterday for mothers day for her & she loved them! So thanks so much!
So glad they were a hit, Kris!
These bagels are so easy and amazing. My kids couldn’t believe it when they saw them. Best recipe I’ve tried in a long time. Delicious!
So easy yet so delicious! Thank you for such a wonderful recipe.
I make these bagels often and they are delicious! We cannot go back to store bought.
So, so good! Easy too! I subbed brown sugar in the dough and molasses for the barley malt sugar in the water bath. They turned out perfectly! SO GOOD!!!
I’m so excited to make this! I want to make sure I follow correctly so I need to let the bagels sit in the refrigerator for 48 hours to rise?
Hi Katie! See recipe Notes for make ahead instructions. You’ll want to make the bagels through step 4, but allow the dough to rise overnight in the refrigerator instead of at room temperature for 60-90 minutes. The slow rise gives the bagels wonderful flavor! In the morning, remove the dough from the refrigerator and let the dough rise for 45 minutes at room temperature before proceeding with step 5. Hope this helps!
Wow… just WOW! These bagels knocked my socks off. I’m a bagelholic and will never need to buy bagels again – this recipe is not only easy, it makes the best bagels I have ever had. Now I can just make bagels any time I want them rather than settle for store-bought. Yum!
What an awesome recipe. My husband said never buy them again! Can’t wait to try the other recipes. Do you have a recipe for an onion bagel. I can not find one.
We haven’t tested onion bagels, but recommend adding about 1/4 teaspoon onion powder and 1/3 cup dried minced onion in the dough of our homemade bagels recipe. Add both when you add the flour. You can also top with more dried minced onion. You can find this in the baking aisle with the spices. Let us know if you try it!
So, all my flour bags say 1/4 cup is 30 grams. So 1 cup = 120 grams, 4 cups = 480 grams. But the recipe says 4 cups, 520 grams? We always weigh our flour and other ingredients whenever possible. So do you recommend using the gram measurements for flour, or the volume? If everything else stays the same.
Not really a big deal just wondering why the inconsistency since every bag of flour I’ve seen in recent years is 30 grams per 1/4 cup, and what’s your position regarding which amount to use in recipes.
By the way I’ve made these several times already before and they always come out great, I almost always just use the grams measure.
Hi S.W., I consistently weigh 1 cup of spooned and leveled flour as 125g, and that is how the recipes on this website are tested. I recommend using that amount.
Hello, Sally! I am looking forward to trying this recipe. You always have such great recipes! I always weigh my flour as well, so this note os a little confusing. 4 cups flour at 125 g does not equal the amount you list, at 520 grams. It would be 130 h per xup. Which do you ise in this recipe? Thx!!
Hi Leisha, I usually weigh 1 cup of spooned and leveled flour as 125g, but this recipe seems to be just fine when I use a slightly more generous cup, adding another 20g of flour. I have made these bagels based both on grams and cup measurements. Both work.
I am from the UK but really want to make these. Is it okay if I use strong white bread flour?
Hi Pam, that should be fine! Hope the bagels turn out great.
These turned out perfect!! Fluffy, chewy- perfect!! I usually make your blueberry bagels but thought I’d venture out. Thank you
This was so easy to make and they taste great! Although the bottom (outer layer) of the bagel is a little tough to bite through and eat, not sure if I did something wrong that causes that?
Will be making these again either way!
Hi Kristin! En extra chewy exterior is a signature feature of bagels, but if it seemed quite hard, maybe they were slightly over-baked? An easy fix for next time!
I’m making this recipe for the first time, and when I was shaping the Bagels they never fully came together (like they are formed but slightly layered?) I’m thinking maybe I used too much oil when letting them rise, but wanted to ask your thoughts.
Thank you for this recipe! I made the sandwich bread today (amazing) and have artisan bread in the fridge waiting to be baked.
Hello do you let it have its first rise before putting it in the fridge over night?
Hi Ashley, see the first Note in the Notes section for the overnight instructions; you don’t need to let the dough rise at room temperature before refrigerating, it will have a slow rise in the refrigerator overnight. Good question!
Can you clarify the hand kneading time? The recipe instructions say the dough is too stiff for a mixer, so knead 4-5 minutes. The notes say: By Hand: If you do not have a mixer, you can mix the dough together in a large bowl then knead by hand for 10-15 minutes.
Hi Donna, so sorry for that confusion. It looks like, when updating a recipe card recently, that note wasn’t removed. About 6-7 minutes is usually the time it takes to knead this dough.
Perfection!! I couldn’t believe how easy these were to make. Crispy on the outside, Chuy on the inside, baked up, fluffy and perfect.
Hi Sally! I tried my hand at these bagels this morning. I followed the directions closely but for some reason my dough never fully cohesively came together. This resulted in chunky/thick flake looking bagels. My husband added some water when kneading to help. Any other suggestions?
Hi Ashley! Was the dough dry? How did you measure the flour? Make sure to spoon and level (instead of scooping) to avoid packing in too much flour into your measuring cups – or use a kitchen scale. You can read more about properly measuring baking ingredients in this post.
My god. This recipe actually works, just made some incredible bagels yesterday. Gonna have some with cream cheese for breakfast now. Thanks!!
I have been missing NY bagels since moving to Switzerland 14 years ago. This recipe nails it! Thank you, Sally. I need to find the right bread flour as my bagels came out a bit too dense, but I will definitely be making this again…and again…and again! Any tips for how to store them for a few days?
Hi Jenn, we’re so glad you enjoy this recipe! For best storage, you can use either a tupperware or ziplock bag. They do start to lose their freshness after a few days, but they also freeze wonderfully! Freeze them for up to 3 months, thaw overnight in the refrigerator or at room temperature, then warm to your liking.
Hi! I don’t understand why my bagels stick to the parchment paper
And why they burned after 20-25 min in oven
Hi Aleksandra, Next time, try lowering the oven temperature and rotating the pan halfway through bake time. That should prevent burning and promote more even baking. Also, if you find the bottoms are more tough, wait for the bagels to somewhat dry before baking as that would be the water from the boiling step that is burning on the bottoms.
Hello, my bagels were so sticky I had to oil my hands to shape them and they are flat. I follow the recipe exactly, putting it in the fridge for about 12 hours let them warm up and they are so sticky. What did I do wrong
Hi Bette, is it particularly humid where you live? There are a lot of variables that can go into the consistency of dough, so feel free to add additional flour (1 tablespoon at a time) until the dough becomes workable. If the bagels are flat, ensure your yeast is fresh and that the dough was not over proofed.
What if I don’t have a stand mixer?
Hi Ann, If you do not have a mixer, you can mix the dough together in a large bowl then knead by hand for 10-15 minutes.
Hi Sally, do i need to do the window pane test for it in order to know if it is done after kneading?
Hi Jae, no need – just follow the instructions as directed!
Love this recipe! I’ve made it twice exactly as written and they’ve turned out perfectly! Chewy, crispy and delicious!