

Make your own ham & cheese pockets from scratch using my simple pizza dough, ham, and your favorite cheese. They’re total comfort food and easier to make than you think! See my recipe notes for freezer-friendly instructions.
This recipe is brought to you in partnership with Red Star Yeast.
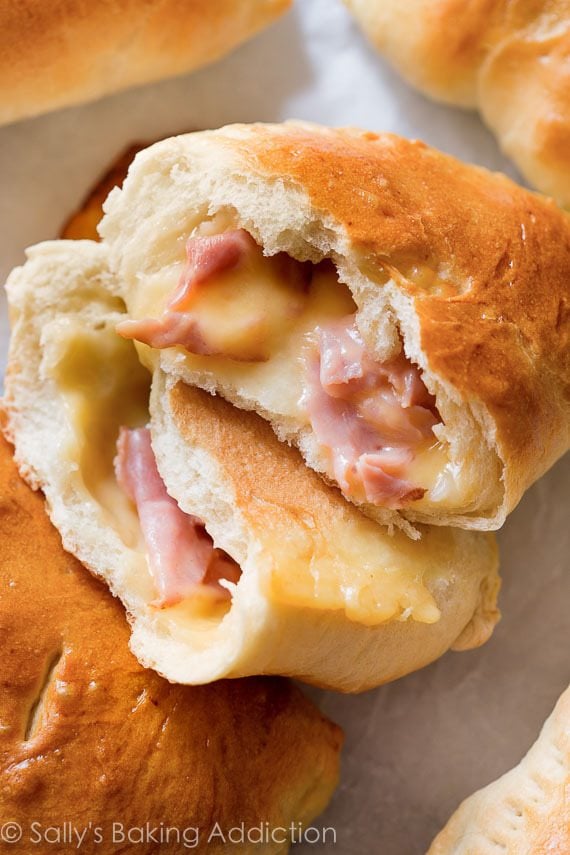
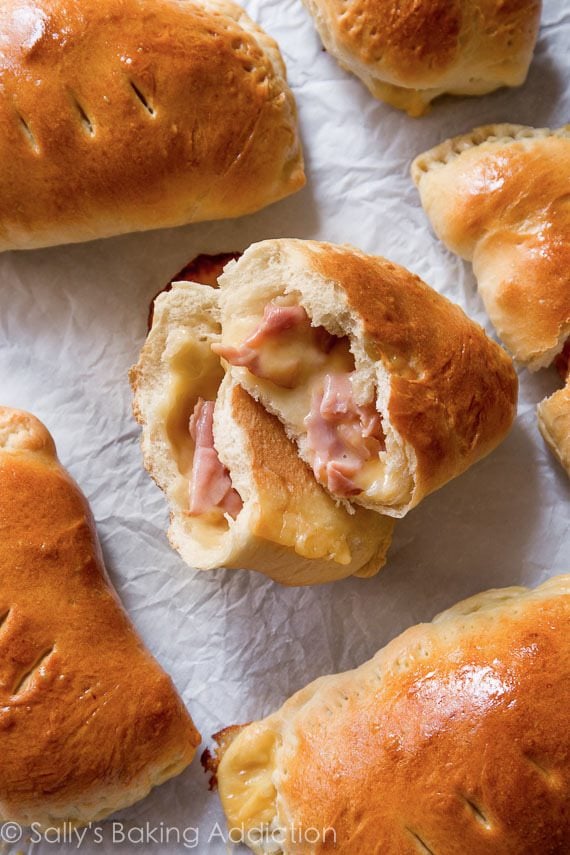
Will you just look at these?! Homemade pizza dough + ham & cheese = handheld bliss!
You may have grown up eating microwaved hot pocket snacks. Though I really don’t buy them anymore, I’m not ashamed to say that I loved them. (And still do!) A few years ago, I actually started I making my own using homemade dough. You can freeze them, microwave them, eat them on the go, etc. And, the best part of all, you can definitely taste the homemade difference!
Homemade Ham & Cheese Pockets Video
Homemade Dough Ingredients
Have you ever made my pizza dough before? I hope you have—it’s the only dough I’ll use for homemade pizza. It’s really simple to make and is actually the same dough we use for today’s ham & cheese pockets. You can also use it to make garlic knots, pepperoni pizza rolls, and cheesy breadsticks, too!
Here’s what you’ll need to make the dough:
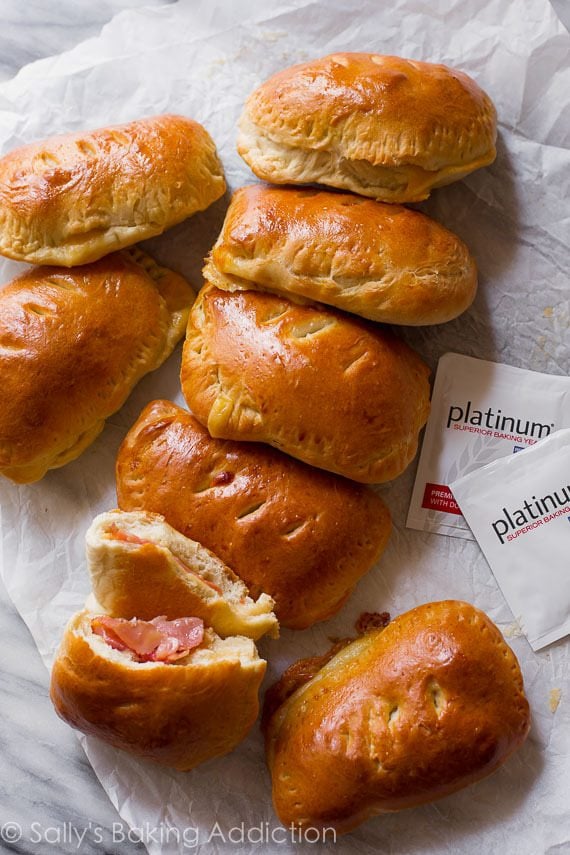
- Yeast: I use Platinum Yeast from Red Star. I have the best results when I use this instant yeast. The Platinum yeast is fantastic because its careful formula strengthens your dough and makes making working with yeast simple. You’ll see and taste the difference. I’ve been a fangirl for years! You only need 1 standard packet of yeast (2 and 1/4 teaspoons).
- Water: I tested this dough recipe with different amounts of water. 1 and 1/3 cups is the perfect amount. Use warm water to cut down on rise time, about 100-110°F. Anything over 130ºF kills the yeast.
- Flour: Use unbleached all-purpose white flour in this recipe. Bleaching the flour strips away some of the protein, which will affect how much water the flour absorbs.
- Oil: A couple Tablespoons of extra virgin olive oil adds wonderful flavor to the dough.
- Salt: Salt adds necessary flavor.
- Sugar: 1 Tablespoon of sugar increases the yeast’s activity and tenderizes the dough, especially when paired with a little olive oil.
Though the warm ham & melty cheese filling is fantastic, the crust is the best part. This bread tastes phenomenal!
Overview: How to Make Homemade Ham & Cheese Pockets
Here’s a quick overview of the process. For full instructions, scroll down for my complete recipe.
- Make the dough. If you need help with the kneading step, my How to Knead Dough video tutorial has you covered.
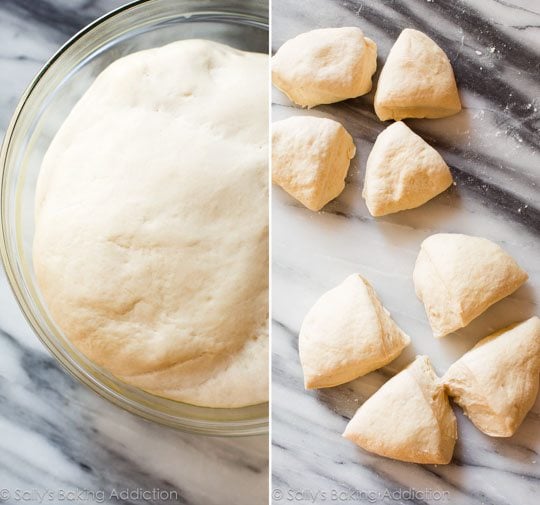
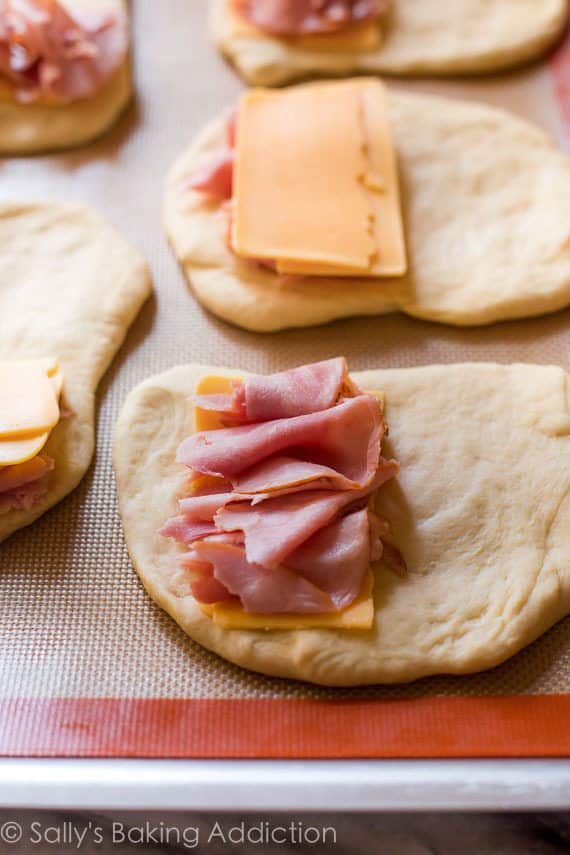
- Divide the dough. Slice the dough in half, then cut each half into quarters. You’ll have 8 pieces of dough for 8 homemade pockets!
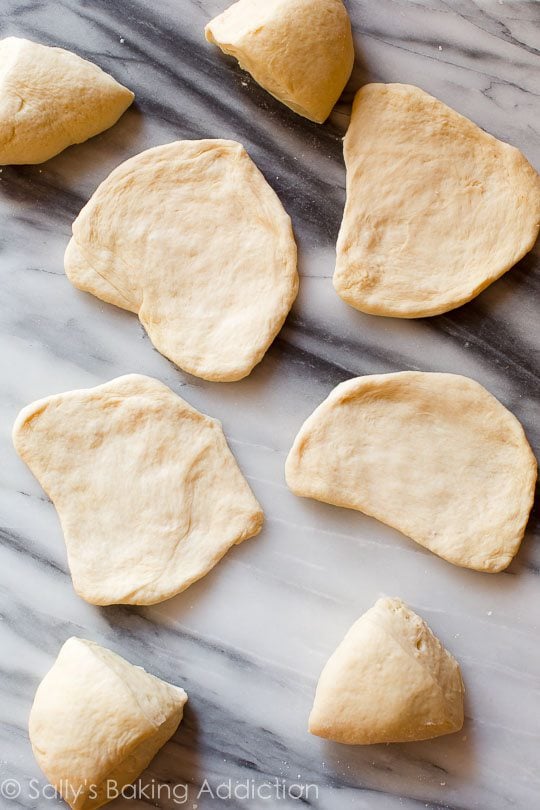
- Shape the dough. Flatten each piece of dough into a rectangle (about 4×6 inches). Place the shaped dough onto prepared baking pans.
- Add ham & cheese. Place the ham and cheese on one side, then fold the dough over to fully enclose it. Do you like this combination? If so, try my ham & cheese scones too.
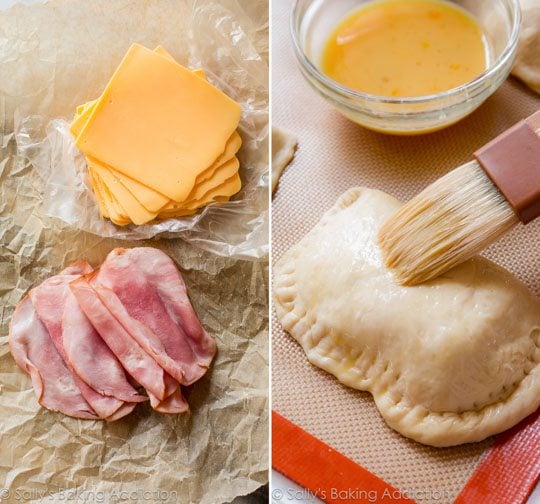
- Pinch the edges. Seal the pockets up as best as you can—use a fork to crimp the edges.
- Brush the sides & tops with egg wash. The egg wash helps brown the tops and gives each a beautiful sheen.
- Cut 2-3 slits into the tops.
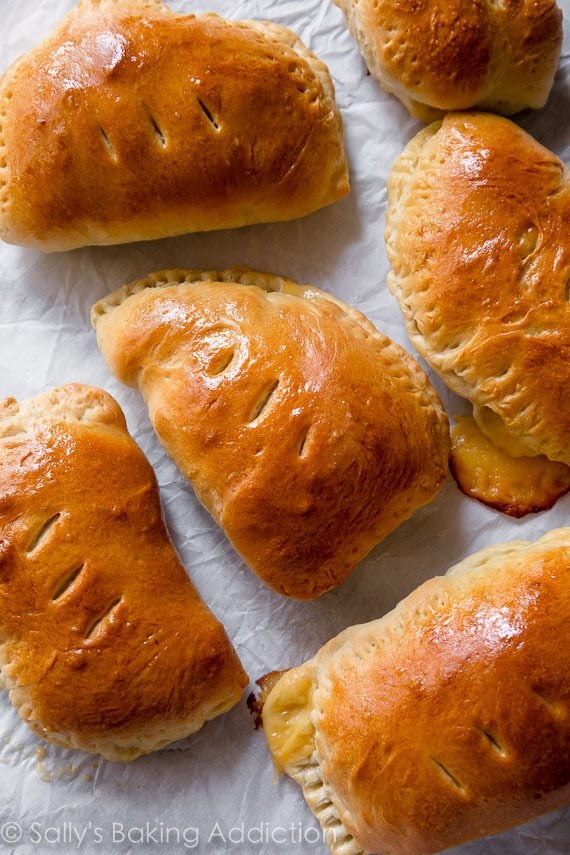
- Bake.
- Enjoy! They are incredible right out of the oven because the bread is crispy on the outside and soft on the inside. It’s a miracle in hand-held form. Just be careful when taking that first bite because the center is very hot!
Two Other Filling Ideas
You can use this dough and recipe to make other flavors of homemade pockets. Here are two of my favorites.
- Chicken, Broccoli, & Cheese Filling: Mix 2 cups chopped cooked broccoli, 1 cup chopped cooked chicken (such as rotisserie chicken), 1 cup shredded cheese, 2 Tablespoons sour cream or plain yogurt, plus a pinch of salt and pepper together. Spoon/spread onto the 1 side of your dough rectangles (as you do with the ham and cheese) before folding up/assembling.
- Pepperoni Pizza Filling: Spread 1 heaping Tablespoon of your favorite pizza sauce onto the 1 side of each dough rectangle (as you do with the ham and cheese). Divide 1 and 1/2 cups of shredded mozzarella cheese and 3/4 cup of mini pepperonis between each and layer on top of the sauce.
More Surprisingly Simple Homemade Breads
Print
Homemade Ham & Cheese Pockets
- Prep Time: 1 hour, 45 minutes
- Cook Time: 25 minutes
- Total Time: 2 hours, 15 minutes
- Yield: 8 pockets
- Category: Dinner
- Method: Cooking
- Cuisine: American
Description
Make freezer-friendly homemade ham & cheese pockets with this easy recipe!
Ingredients
- 1 and 1/3 cups (320ml) warm water (between 100-110°F, 38-43°C)
- 2 and 1/4 teaspoons (7g) Platinum Yeast from Red Star instant yeast (1 standard packet)*
- 1 Tablespoon (13g) granulated sugar
- 2 Tablespoons (30ml) olive oil, plus more for pan and brushing on dough
- 1 teaspoon salt
- 3 and 1/2 cups (about 450g) all-purpose flour (spooned & leveled)
- egg wash: 1 large egg beaten with 1 Tablespoon milk
Filling
- 8 slices cheese or 2 cups shredded (I use sharp cheddar)
- 16 thin slices deli ham or 2 cups cubed ham
Instructions
- Whisk the warm water, yeast, and granulated sugar together in the bowl of your stand mixer fitted with a dough hook or paddle attachment. Cover and allow to rest for 5 minutes. *If you don’t have a stand mixer, simply use a large mixing bowl and mix the dough with a wooden spoon or silicone spatula in the next step.
- Add the olive oil, salt, and flour. Beat on low speed for 2 minutes until combined.
- Knead the dough: Keep the dough in the mixer and beat for an additional 5 full minutes, or knead by hand on a lightly floured surface for 5 full minutes. (If you’re new to bread-baking, my How to Knead Dough video tutorial can help here.) If the dough becomes too sticky during the kneading process, sprinkle 1 teaspoon of flour at a time on the dough or on the work surface/in the bowl to make a soft, slightly tacky dough. Do not add more flour than you need because you do not want a dry dough. After kneading, the dough should still feel a little soft. Poke it with your finger—if it slowly bounces back, your dough is ready to rise. You can also do a “windowpane test” to see if your dough has been kneaded long enough: tear off a small (roughly golfball-size) piece of dough and gently stretch it out until it’s thin enough for light to pass through it. Hold it up to a window or light. Does light pass through the stretched dough without the dough tearing first? If so, your dough has been kneaded long enough and is ready to rise. If not, keep kneading until it passes the windowpane test.
- Lightly grease a large bowl with oil or nonstick spray—just use the same bowl you used for the dough. Place the dough in the bowl, turning it to coat all sides in the oil. Cover the bowl with aluminum foil, plastic wrap, or a clean kitchen towel. Allow the dough to rise at room temperature for 60-90 minutes or until double in size. (Tip: For the warm environment on a particularly cold day, heat your oven to 150°F (66°C). Turn the oven off, place the dough inside, and keep the door slightly ajar. This will be a warm environment for your dough to rise. After about 30 minutes, close the oven door to trap the air inside with the rising dough. When it’s doubled in size, remove from the oven.)
- Preheat oven to 400°F (204°C). Line 2 large baking sheets with parchment paper or silicone baking mats.
- Once risen, punch the dough down to release the air. Turn the dough out onto a lightly floured surface. Using a sharp knife, slice dough in half. Then slice each half into quarters. You’ll have 8 pieces of dough, as shown in the photo above. Flatten each piece with your fingers or use a rolling pin. You want each piece of flattened dough to be about 6 inches long and 4 inches wide. They don’t have to be perfect rectangles, as you can see in my photos! Transfer flattened dough to the baking sheets. Place the cheese (I fold the slice in half) and ham (2 slices for each) on top of the dough on one side, then fold the other side over top. Pinch the edges to seal as best you can. Use a fork to crimp the edges. Brush the tops and sides of each pocket with egg wash, then slice 2-3 slits in the tops for air vents (use a super sharp knife to do that).
- Bake the pockets for 20-25 minutes, or until the tops are golden brown. Make sure to rotate the baking sheet once or twice during bake time. Remove pockets from the oven and allow to cool on the pan until ready to handle and serve.
Notes
- Make Ahead & Freezing Instructions: The pockets can be made through step 5 then covered and refrigerated for up to 1 day. Then bake as directed. You can also freeze the baked pockets, which is what I do. After the pockets cool, wrap them individually in aluminum foil and freeze. Then microwave for 2-3 minutes on high or bake at 350°F (177°C) for 20 minutes. No need to thaw. To make just the dough ahead of time, see freezing and thawing instructions in my pizza crust post.
- Overnight/All Day Instructions: Prepare the dough through step 3, but allow the dough to rise for 8-12 hours in the refrigerator. (If it needs to be in the refrigerator for longer, use cooler water in the dough which will slow the dough’s rise and allow for more time.) The slow rise gives the dough wonderful flavor! When ready, continue with step 4. If the dough didn’t quite double in size overnight, let it sit at room temperature for 30-45 minutes before punching down (step 5).
- Special Tools (affiliate links): Stand Mixer or Glass Mixing Bowl with Wooden Spoon or Silicone Spatula | Dough Scraper | Baking Sheet | Silicone Baking Mats or Parchment Paper | Pastry Brush
- Yeast: Red Star Platinum yeast is an instant yeast. You can use active dry yeast instead. The rise time will be at least 90 minutes. Reference my Baking with Yeast Guide for answers to common yeast FAQs.
Also freezer-friendly: homemade bagels! I take you through each step, so you fully understand what’s happening. They’re surprisingly simple to make, too!


Reader Comments and Reviews
First time posting of any recipe I’ve made. I try and do at least one new one a week. And ever night at dinner I ask make it again or no. (House full of picky eaters I usually get at least one saying no) everyone said yes!!! It was super easy to make. I made it while the older kids were in school and then put in the fridge until dinner time. I did have to start over because my 4 yr old helped and killed the yeast the first time.
I’ll be making this for sure more often. And will try some different things inside. Maybe tacos one time!!!! So yummy and such an easy one to make different foods.
So yummy! Is there a trick to dealing and getting them to stay sealed? I used a fork but they still open a good bit!
Try moistening the tips of your fingers and sealing them shut with your hands instead of a fork– sometimes I do that and it works very well!
I come back to this recipe again and again. I’m using it to make freezer meals this time so I can cut down on time spent cooking during the week. Tried pepperoni and mozzarella this time. They turned out beautiful!
These were so fun and tasty! The dough is divine—easy enough to handle for my 3&5 yr old to help me assemble the pockets. A big hit with my family and so wonderful for a freezer option. We’ll see if these ever last long enough to try the frozen version!
They turned out delicious! I did ham/cheese filling, pepperoni and cheese and plain cheese with sauce to dip in. I also sprinkled pepper, salt, garlic powder and sesame seeds on top before baking. STILL THINKING about them!! Thank you.
Hi Sally, may I know why didn’t need to do 2nd proofing?
Hi Andrea! We don’t want the dough to rise too much after the pockets are shaped– otherwise, they would split open.
Just made these for breakfast / lunch today and they are fabulous. Your pizza dough recipe is so versatile and easy to work with.
Made these for the first time last week, but making them again today as my children really loves them and wants them for their packed lunch. I made a pizza version with peperoni, tomato sauce and cheese, yum. I tried other recipes for pizza pockets but they all came out a bit dry. This dough was perfect, soft and kept the shape well. Thanks for a great recipe
I’ve made these before, they turned out perfect and the whole family absolutely loved them! I made these tonight and for some reason they continued to rise in the oven therefore opening and losing all of their fillings… I used the exact same ingredients including the same yeast and followed the directions to a T. Not sure what happened this time. Nonetheless they still tasted great, even with the insides spilling out!
Hi Sally! I am very excited to try and make this amazing pockets of yours! All I have is an instant yeast, would it be possible to use that? I saw your note about not using instant yeast and it will take longer to rise. I am assuming you are using the instant one? thanks so much!!
Hi Kate! You can use instant yeast or active dry yeast (I prefer the Red Star Yeast Platinum line which is an instant yeast). IF you use active dry, the rise time will be slightly longer. But not with an instant yeast.
Good recipe, followed exactly as directed. My only challenge was that, despite sealing the edges with a fork, the seal opened and a good amount of cheese oozed out….There must be a way to keep the contents inside as my mother used to make calzone (italian name for these pockets) all the time and I dont recall her ever having this issue!
My Bottoms burnt 🙁 I don’t know what I did wrong. 22 mins on silicone lined pans
OMG thanks for the recipe!!!…. I’m from Mexico and I use to buy something similar, your recipe taste better!
I made them and my kids love them!!
I made your original recipe, very good, then I did turkey, spinach & brie version a little dry but tasty I will try again with some other cheese maybe swiss. Last night is make pizza pockets OMG, basic tomato sauce, pepperoni and cheese lots of cheese. yummy.
I love your site, everything I made was amazing. Thank you
Oh my goonies! I made these for the first time today and I’m OB-SESSED!!! I doubled the recipe and made 4 different fillings; ham and cheddar, ham and provolone, turkey and provolone, a pizza pocket with pizza sauce, cheddar and mozzarella cheese, and pepperoni. I’m a bit of a chicken fiend so I can’t wait to try a chicken pocket next time. This recipe made its way onto my “Stapel Recipes” list. Thank you so much for sharing this!!!
I am in the process of making these right now. If the family likes them I will be making all different variations of them. I pack my kids lunch everyday for school and these would be great!
My family used to love hot pockets, until I read the ingredients and stopped buying them. Yuck! It never occurred to me to make my own. Sally, you rock! I’ve made these with ham and cheddar; left over roast beef with provolone; and turkey and swiss so far. I’m thinking pepperoni (precooked and drained) and mozzarella with a little homemade marinara might be next, just need to figure out a way to keep the marinara from making the bread soggy. (Any ideas on that front?) The kids and grandkids love these, and they are so much healthier and cheaper than the ones in the freezer section of the grocery store, not to mention much, much better tasting. If I ever lose your awesome recipes I’m going to have to close my kitchen. Yeah, I use that many!
Haha! You are too funny. And so many great ideas you have!! What if you left the sauce out and used it as a dipping sauce instead?
That’s a really good idea! Obviously, I’m going for a pepperoni pizza hot pocket with this combo. My granddaughters like to dip their pizza slices in cheese or marinara sauce so sauce on the side would be right up their alley! When I saw your reply my first thought was ‘She’s had pizza with my girls!”. My second thought was “Duh! Why didn’t I think of that?!”. As always, Sally, you rock!
We love them, but we wish to add something maybe to the dough to give it a little more flavor, any suggestions??
How about some herbs/spices like thyme, rosemary, garlic powder, italian seasoning?
I used the ingredients correctly and my dough was very sticky even after using the extra 1/4 cup of flour. Is this normal for dough? When I tried to shape it into a ball it’s more like a lump haha. This is my first time making my own dough so not sure about anything.
Thanks
Some stickiness is actually perfect– that means the dough will be nice and soft. I don’t think you did anything wrong!
I’ve been making quite a few of your recipes lately and these were amazing! I also made a cheddar and broccoli filling and a Nutella and marshmallow filling, it oozed a bit but was fabulous!
I made these for my family and they gobbled them up. These are so delicious, thanks for sharing!!!
These were delish really enjoyed them the kids and hubby loved them . Also stuffed them with tuna ,corn,cheese
I made these the day you posted them, and my husband & kids loved them! Thanks Sally, I just love everything you post. My family is happy because ever since I discovered this site a few months ago, I’ve been baking like CRAZY. Haha 🙂
I made these last night, using our leftover Easter ham. After using your pizza dough recipe for pizza, calzones, and now these pockets, I am a convert to your recipe. It’s so much lighter than my other dough recipes. Yay!
I made these today for lunch for my family! They were so easy and so yummy!!!
Sally! I just made these! As soon as I saw it pop into my inbox I knew I would be making them this weekend! It’s my first time using yeast and making my own dough so was a little nervous but they turned out great! I made them for my girls (2.5 and 4) as they are very fussy eaters! They loved them so I am sure I will be making them again soon! I did forget to cut air pockets in the top but didn’t seem to do it any harm. Thank you for this recipe!!
I read this post yesterday, and it just so happenened that I had all of the ingrendients, no grocery store trip needed on a snowy afternoon. My three-year-old loved helping from start to finish, she was so proud of herself! It was such a fun recipe to make with her. I am usually a complete failure at any kind of yeast dough, but this turned out perfectly! We used half of the dough to make four pockets, so homemade barbecue chicken pizza is on the menu for tonight. Thanks, Sally!
Reporting back! I made the ham & cheese hot pockets yesterday! But I used your whole wheat pizza dough recipe for these to make them a tad healthier. And on some of them I added some cooked mushrooms! Next time, I’m definitely doing the original white bread recipe you used here. Still good with the whole wheat version though. Next time, I’ll remember to roll out the dough better before stuffing. Made extra for lunches throughout the week!
I made these but instead of cheddar/ham I used fresh mozzarella/pepperoni. After they came out of the oven we dipped them in warm homemade pizza sauce. SO good!