

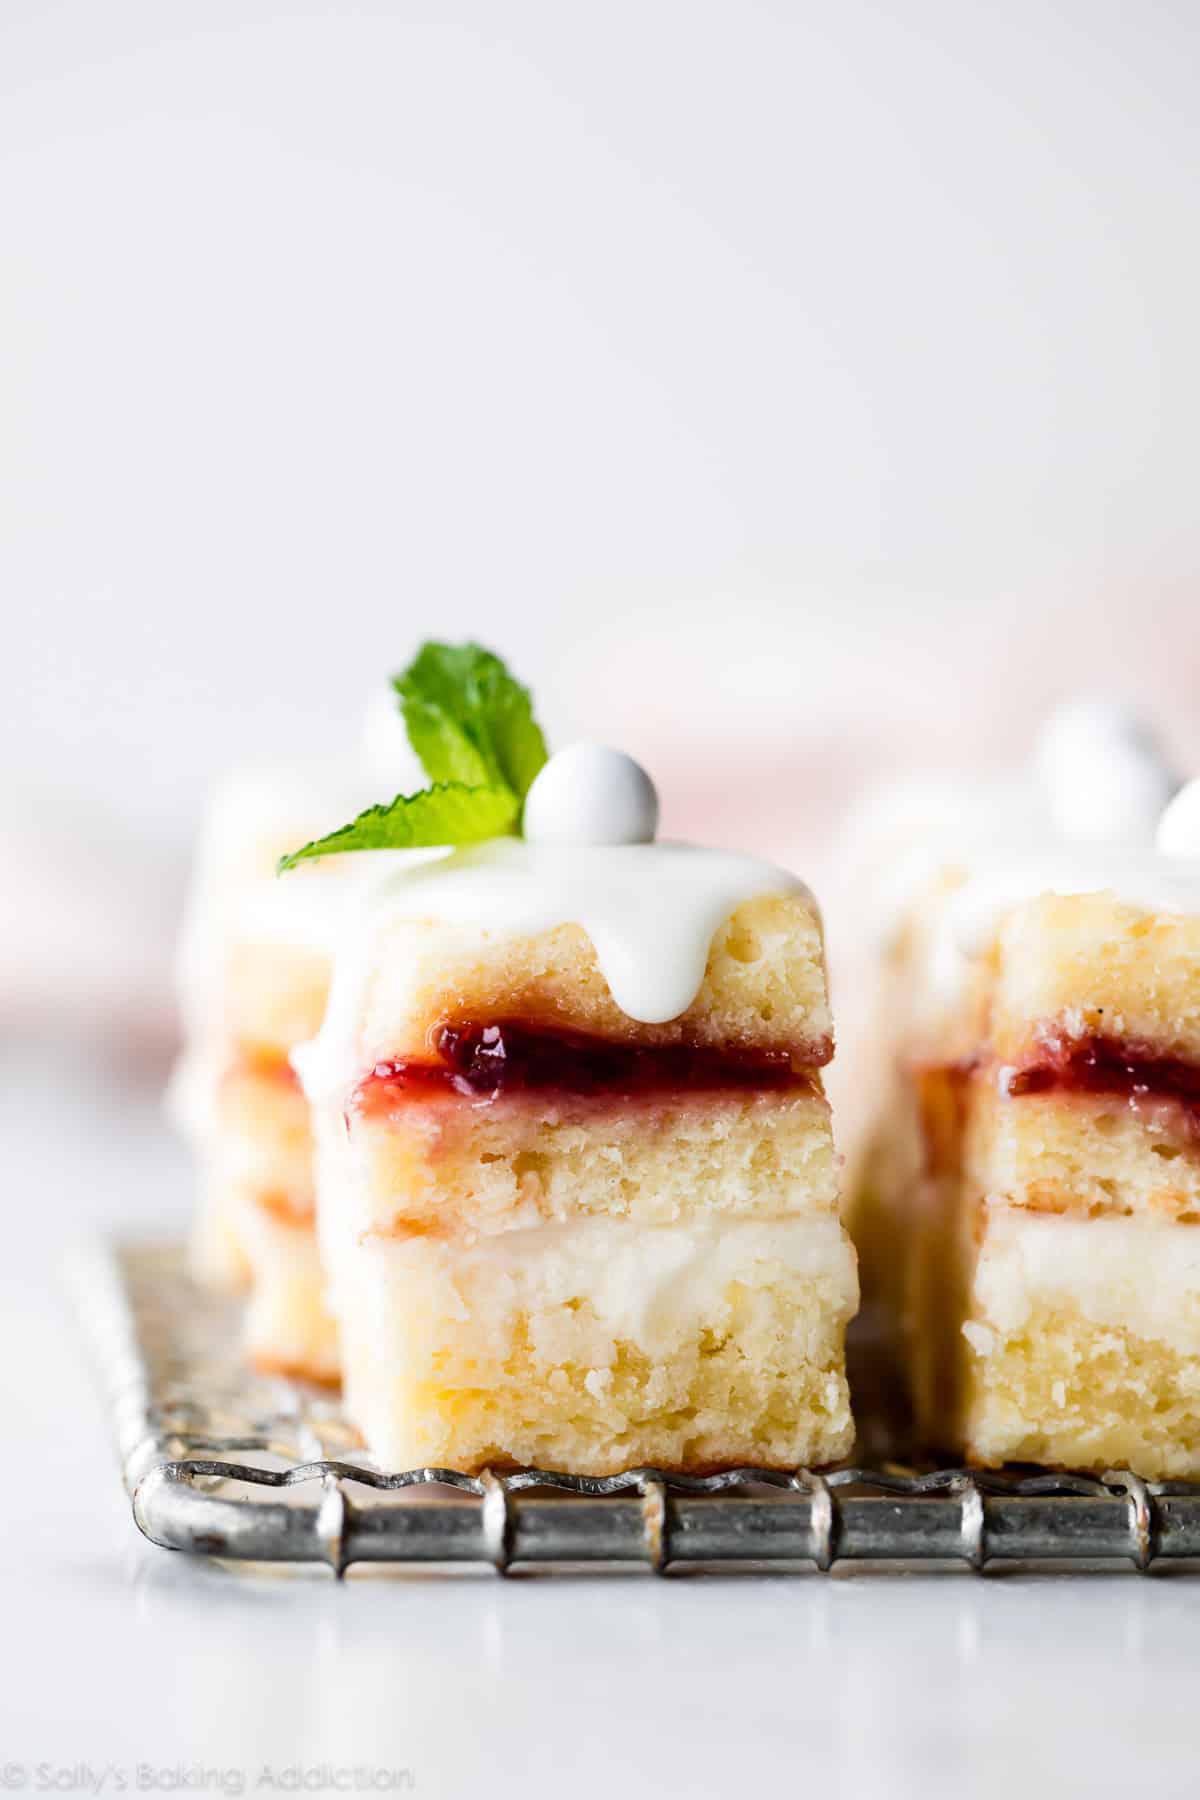
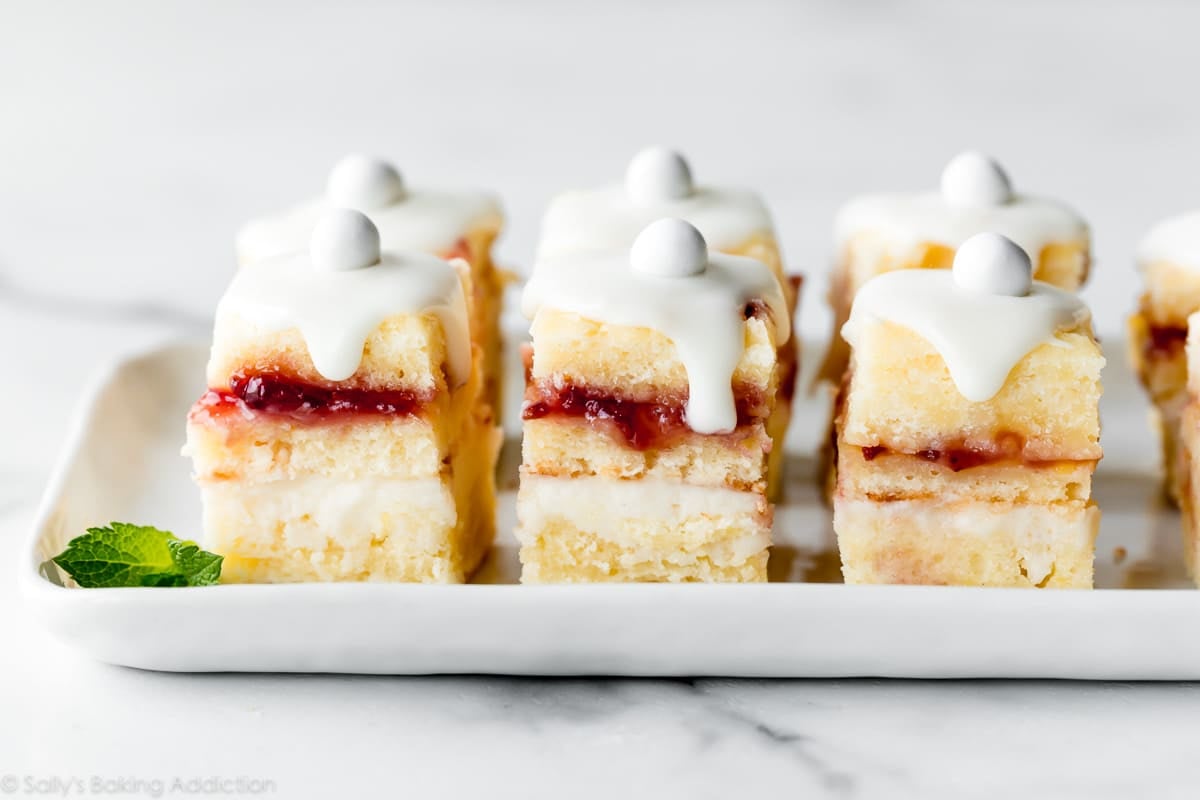
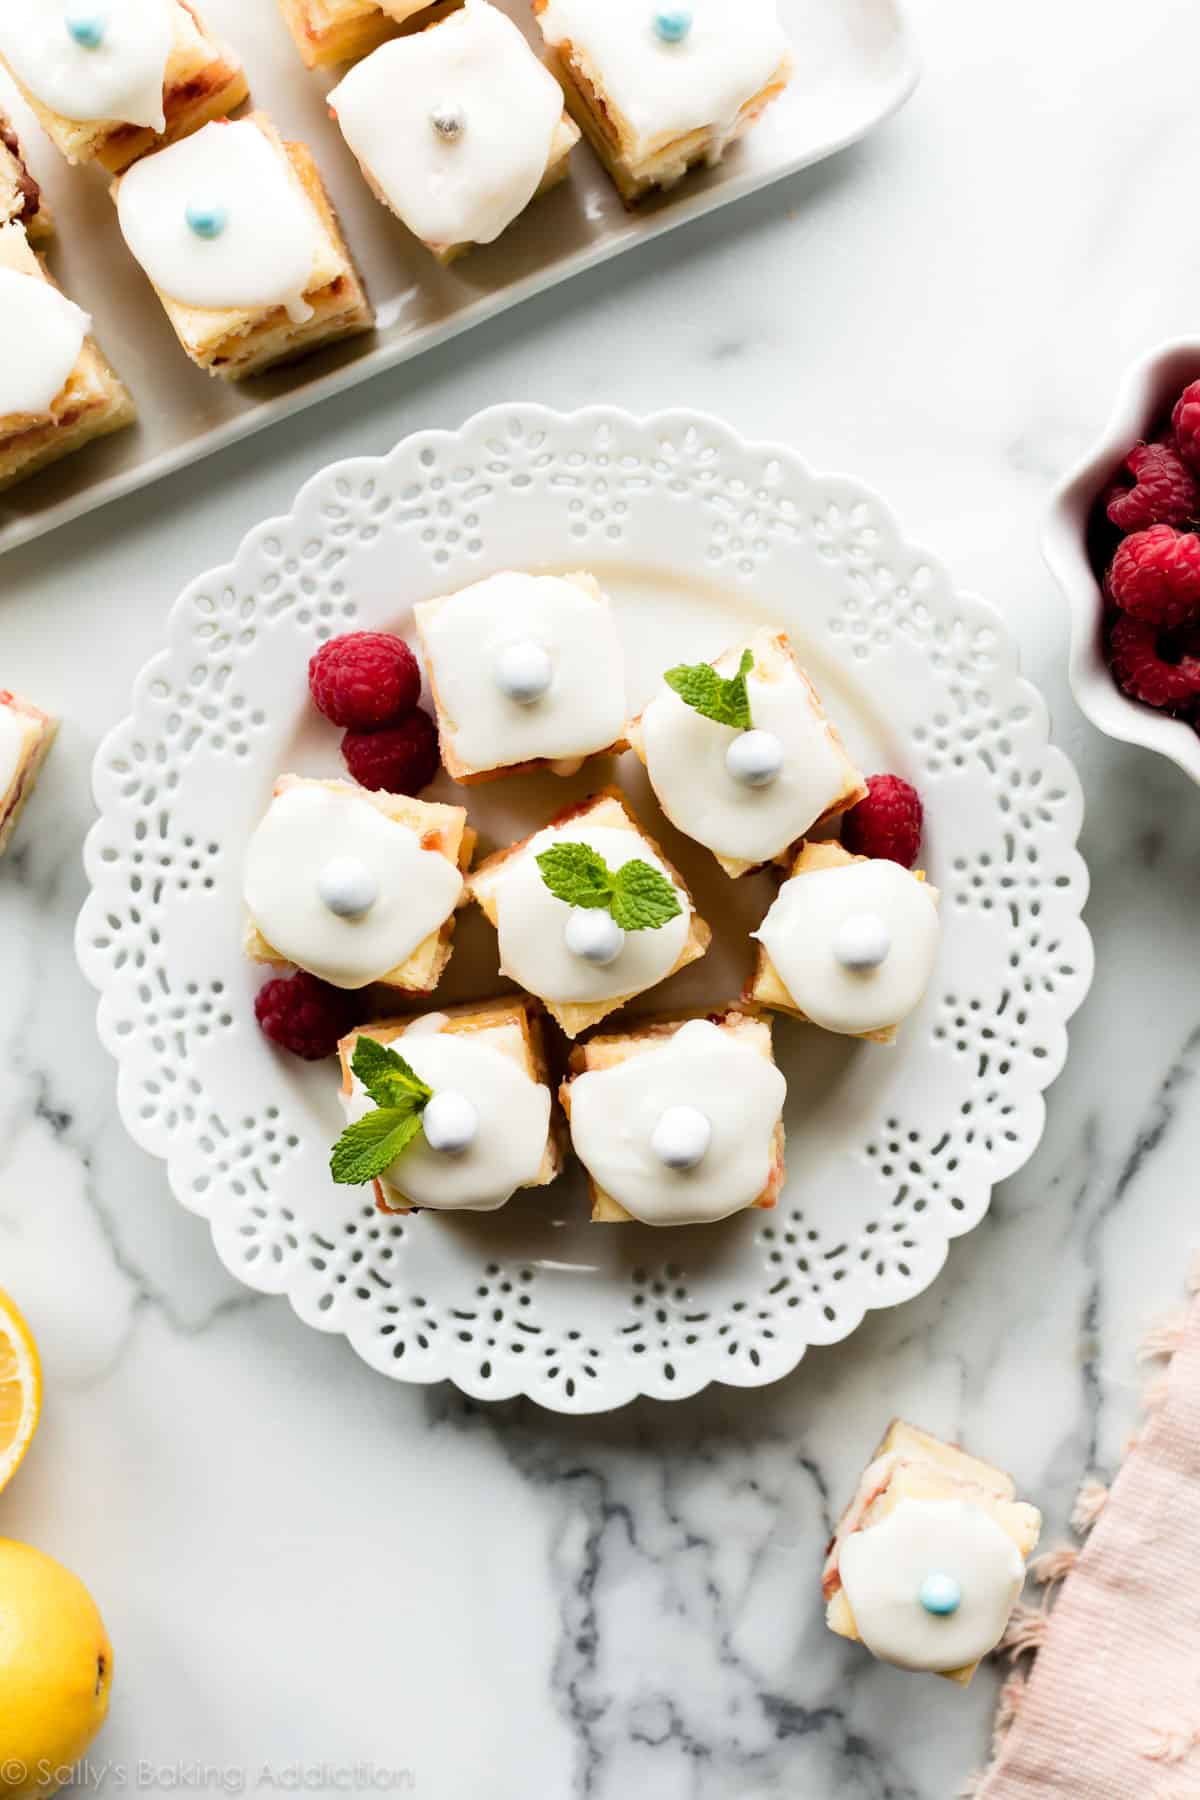
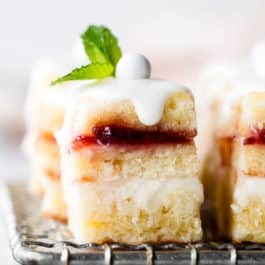
Delicate and sweet, these lemon berry petit fours are bite-size mini cakes perfect for weddings, parties, tea time, bridal and baby showers. Topped with a simple white chocolate garnish, these petit fours are easy and approachable. Perfect for beginners!
A dessert by popular demand. 🙂
We’re in peak wedding/brunch/bridal shower/spring season, so there’s been a lot of buzz about petit fours lately. Admittedly, I’ve never made them before but have always enjoyed the several varieties I’ve tasted. Always up for a new baking adventure, and eager to expand my spring dessert recipes and Mother’s Day recipes, I decided to make these petite cakes my personal goal for the spring season.
And I’m excited to share my results with you!! These lemon berry petit fours are flavorful and moist, cute and tiny, simple and sweet.

What are Petit Fours?
Petit fours are bite-size decorative cakes, typically of the sweet variety. The term petit four is French and also includes savory bite-sized appetizers and other small pastries like French macarons and meringues. Petit four is translated as “small oven.“
Today we’re focusing on glacé petit fours, which means “glazed.” Think of these as miniature layer cakes, perfectly pint-sized with no fork required. They’re most commonly found at bridal showers, baby showers, tea parties, weddings, and the like. Classic petit fours are made with delicate sponge cake, then enrobed in fondant and topped with intricate decor. They’re certainly beautiful and delicious, but the preparation can be tedious and complicated for the home baker. I wanted a recipe that was approachable for both you and I, but still produced the same elegance and dainty aesthetic as the fancy varieties. I couldn’t really settle on any petit four recipes that were both straightforward and delicious, so I created one my favorite pound cake, vanilla buttercream, lemon curd, and raspberry jam.
There’s approximately 1 billion petit fours varieties and this one’s my new favorite. The recipe is perfect for beginners and I even include a video demonstrating exactly how to shape and layer them, plus other flavor options.
How to Make Lemon Berry Petit Fours
I stuck with a cake recipe that I know works: my cream cheese pound cake. Pound cake has an ideal texture for petit fours because it won’t squish when you layer or cut the tiny cakes.
Let’s walk through the whole process together:
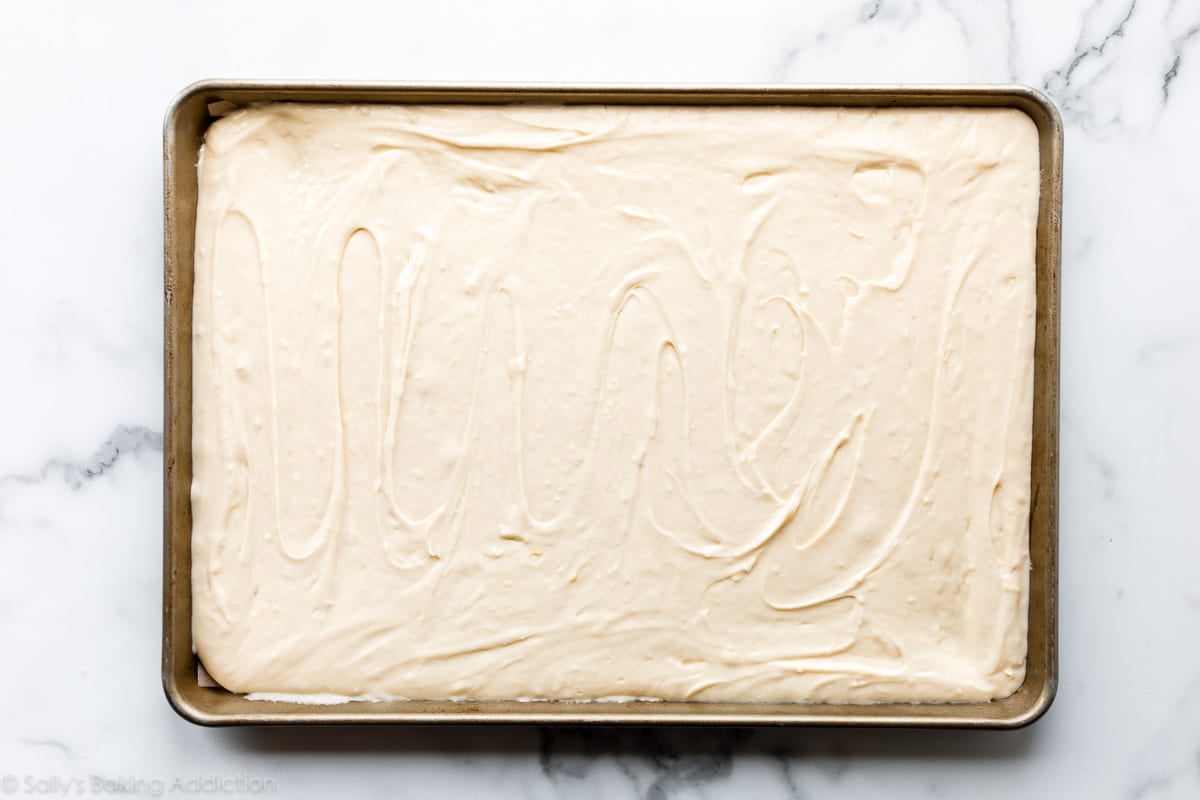
- Make cake batter: Since the cake will be filled and iced, I reduced the sugar in the original recipe. I also added a little lemon juice to flavor and thin out the batter and a little more baking powder—both produced a less dense crumb and a little more rise.
- Bake in a sheet pan: The most important part of this entire recipe is using the correct size baking pan. Use a 12×17-inch half sheet pan. The cake will overflow in small pans and be too thin in larger pans.
- Cut in rectangles: As the cake cools, it will shrink a bit. Have no fear, that’s totally normal. Peel the parchment off the bottom of the cake and slice into 6 even rectangles.
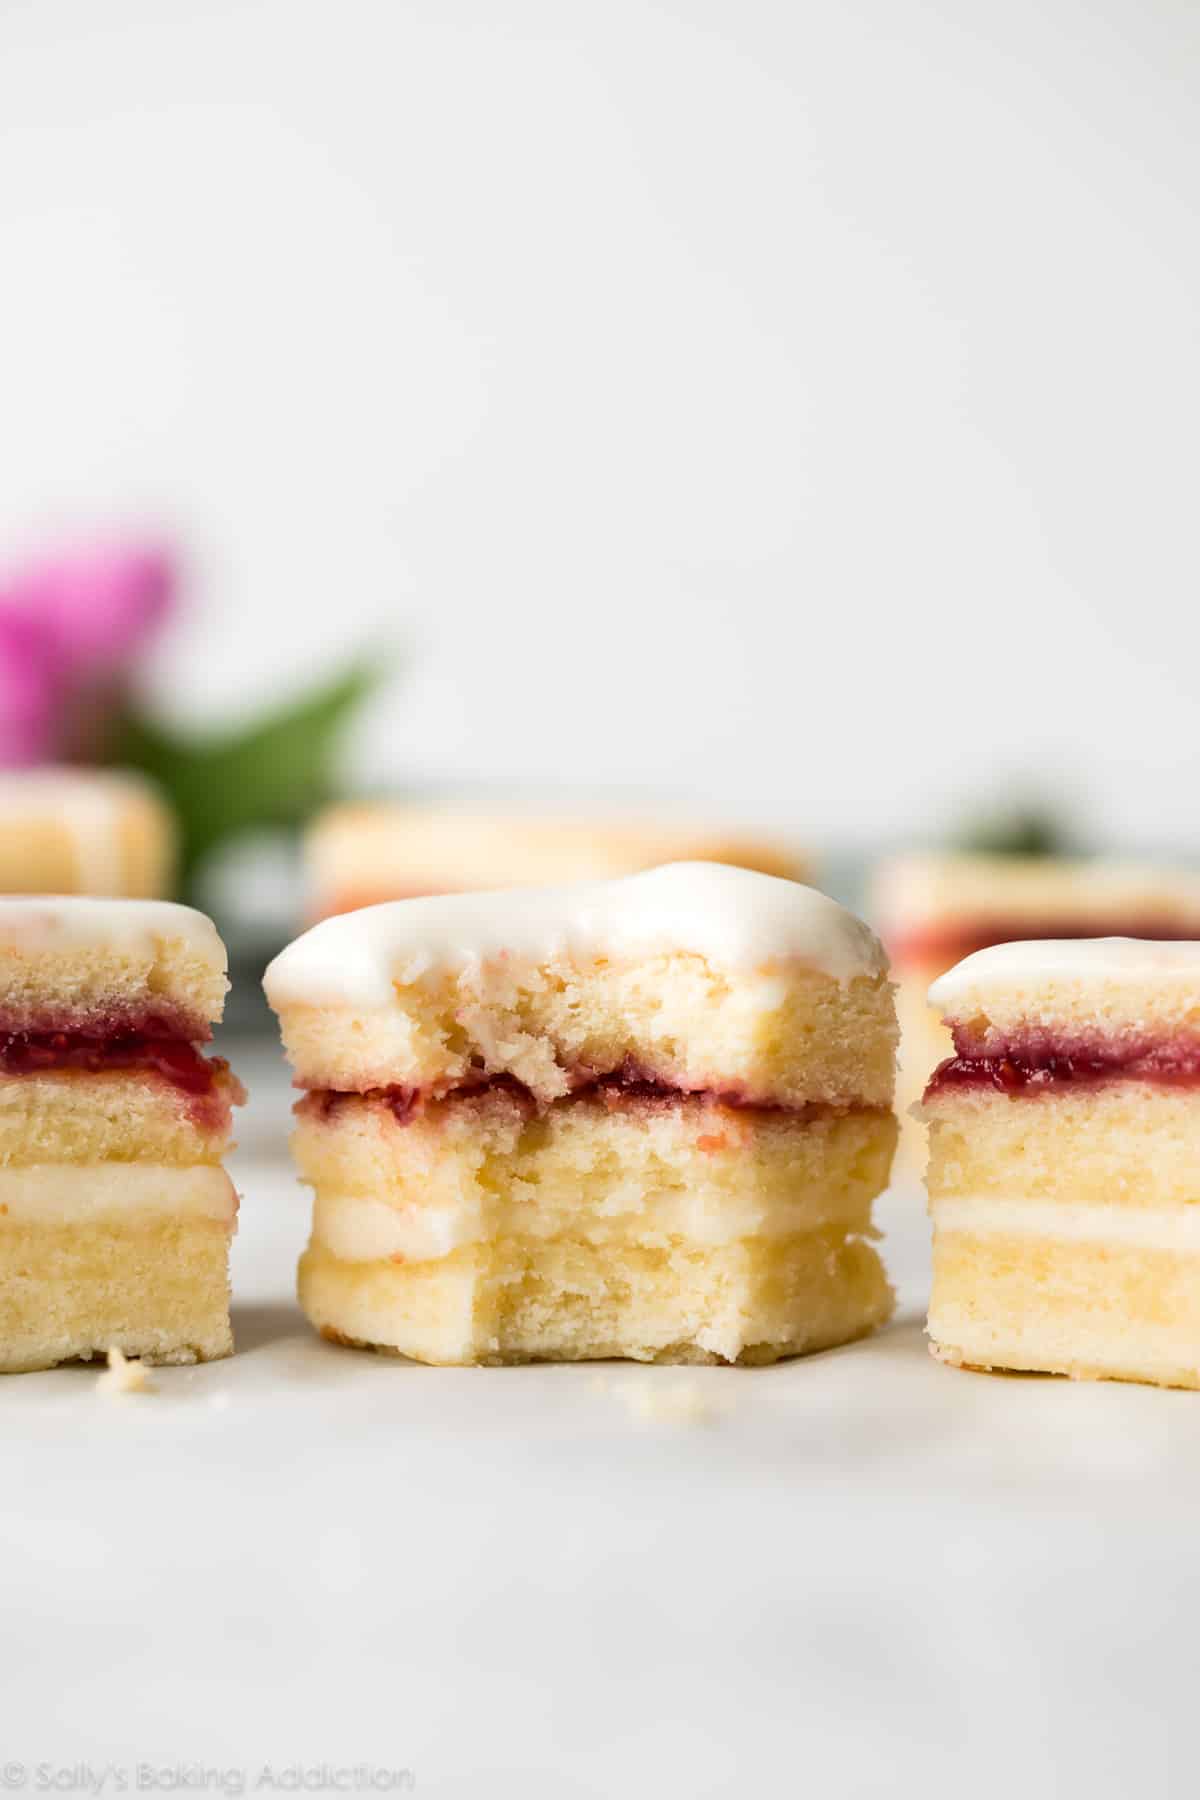
- Slice rectangles into 2 layers: Slice each rectangle in half. You’ll have 12 even rectangles that you will layer together to make four small 3 layer “cakes.”
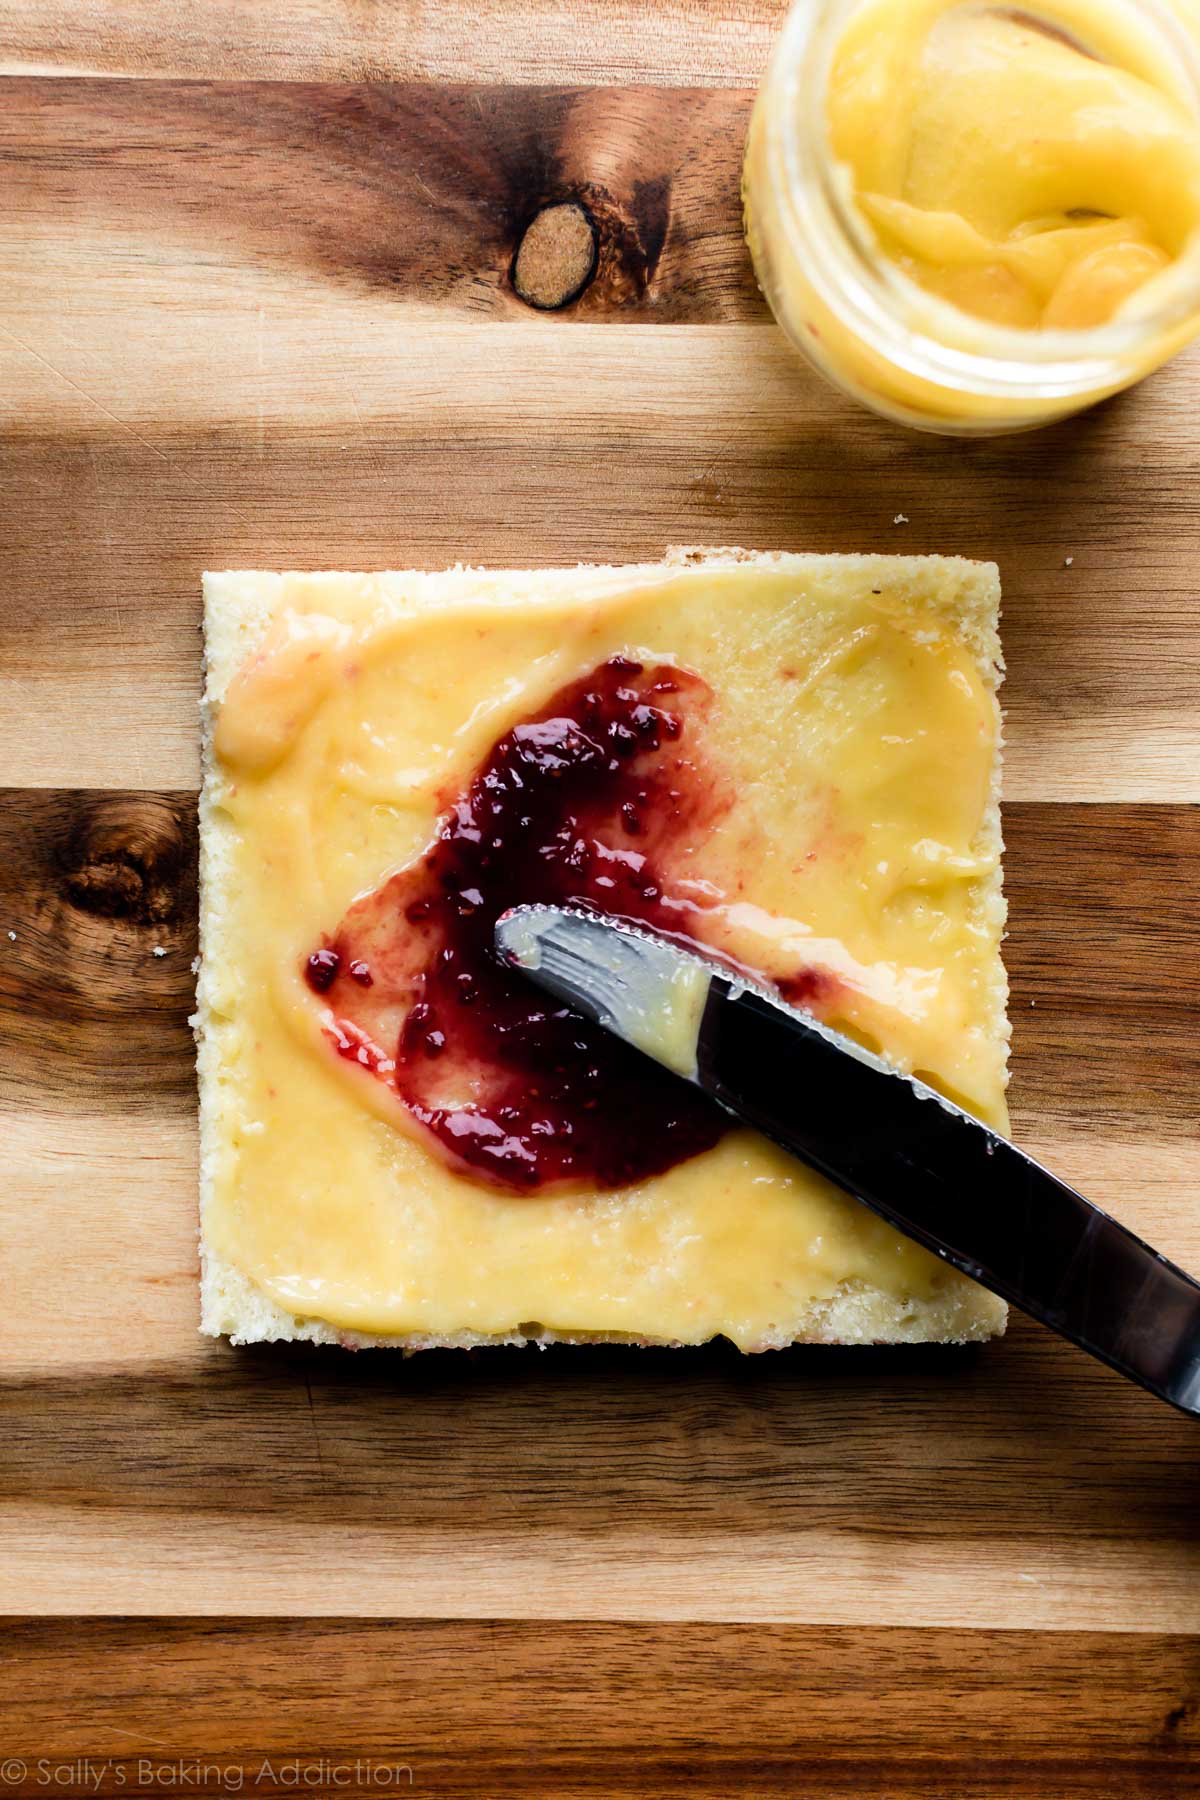
- Prepare fillings: I used lemon curd and raspberry jam in one layer and a thick vanilla buttercream in another layer. Fresh, fruity, creamy, and sweet! Use any jam you prefer and you could even use lemon buttercream or chocolate buttercream.
- Layer with fillings: Spread fillings onto each rectangle, then layer together.
- Chill: The layers *must chill* in the refrigerator prior to cutting into small petit fours.
- Cut into squares: Cut each into squares.
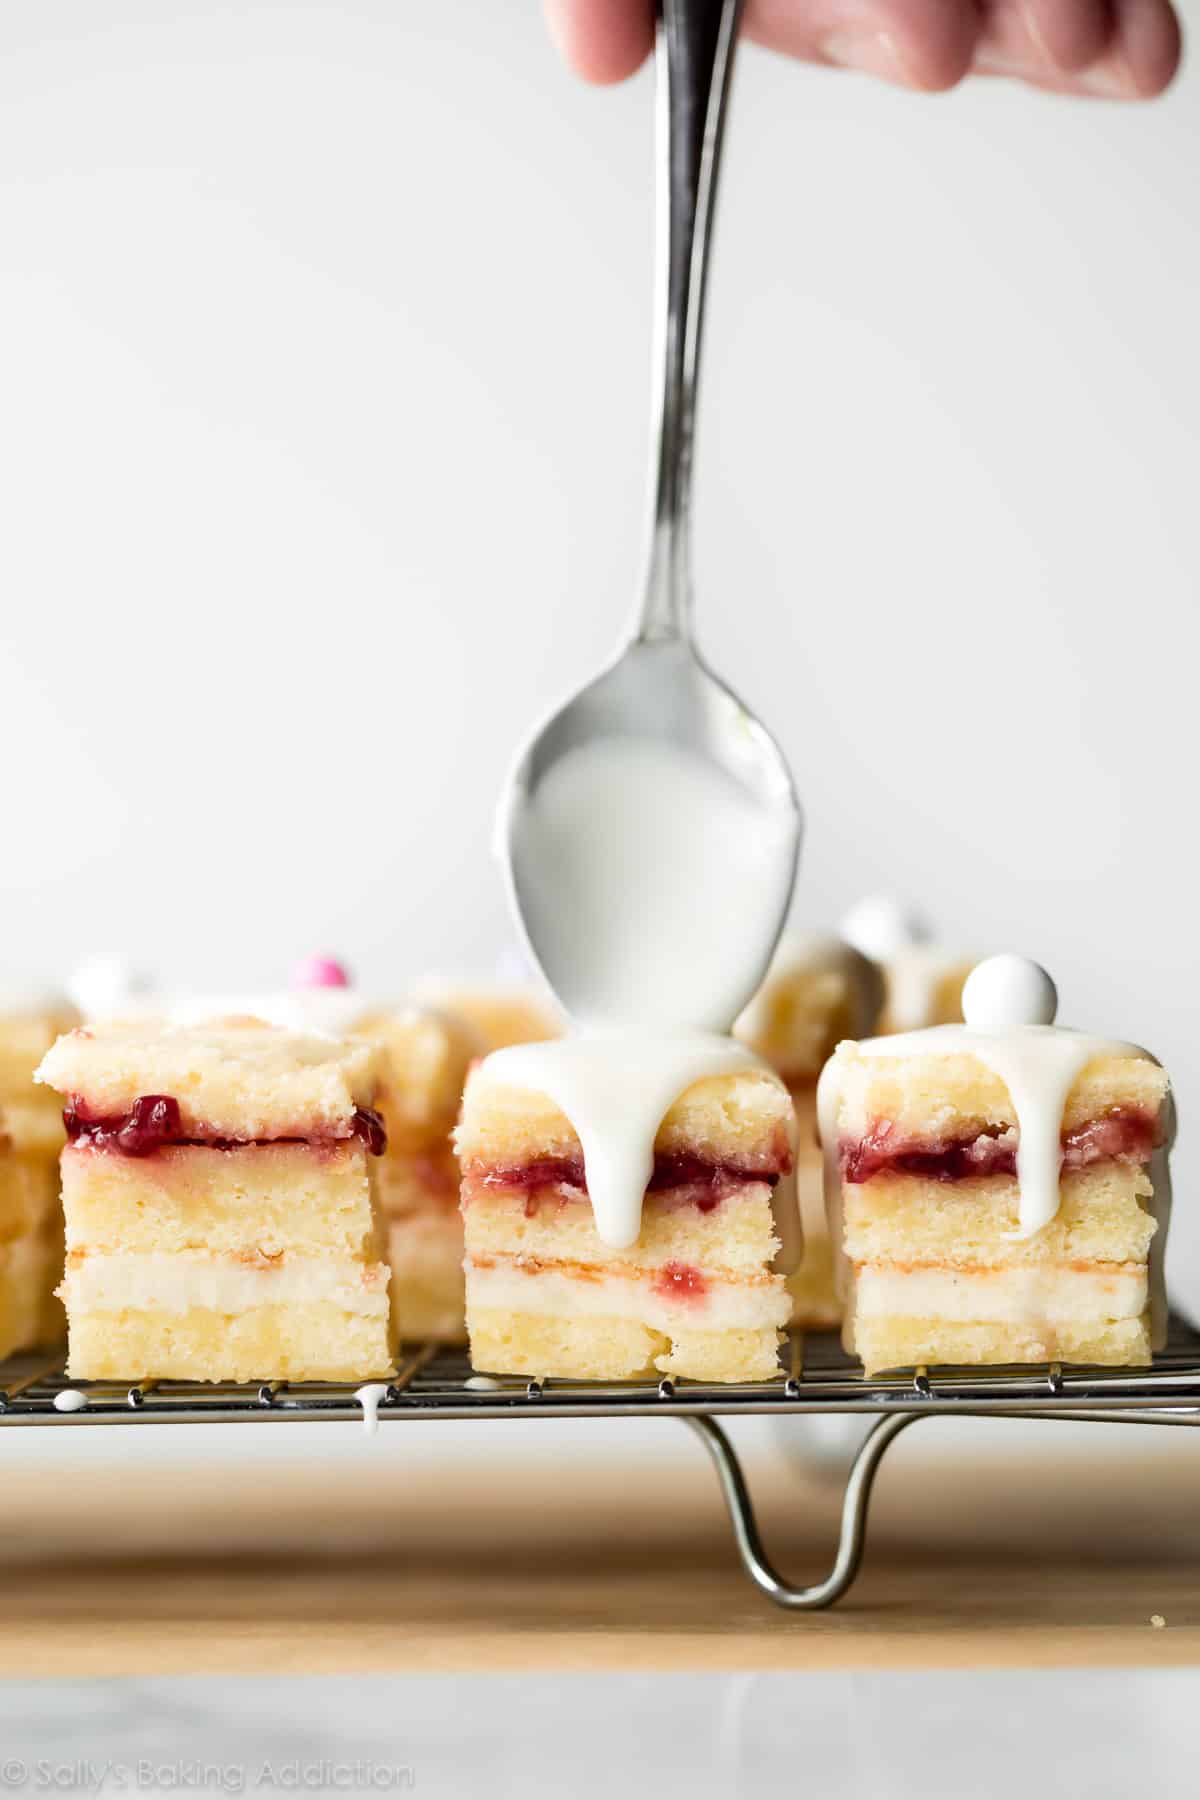
- Top with white chocolate: More on the topping below.
This recipe yields 48 petit fours, but you can cut them smaller if you need more. As long as the layered cakes are sufficiently chilled, cutting into tiny squares is easy.

Video Tutorial: How to Assemble Petit Fours
Assembling petit fours can be confusing, as I’m sure I lost you explaining the process above. I knew I’d have a hard time clearly explaining this, so I made a video showing you exactly how to cut, assemble, and layer them.
Now I know the following picture looks like I’m making a jelly sandwich on white bread, but I promise that’s pound cake under there!!
White Chocolate for Petit Fours “Icing”
Like I mention above, petit fours are usually covered in fondant. I wanted something a little less finicky, so I opted for white chocolate. Sure, they’re not as fancy looking but they’re still super cute… and really good! When applied lightly, the white chocolate thickens and sets, making these petit fours perfect for transporting and serving.
Melt the white chocolate with a little oil so it’s a thinner consistency for topping.
One tip: Use pure white chocolate or white chocolate that’s meant for melting. Pick up a 4 ounce bar of white chocolate from the baking aisle or white melting chips. (I use Ghirardelli brand white vanilla flavored melting chips.) White chocolate chips DO NOT melt down into the proper consistency; it will be too thick and taste grainy.
You could even use the lemon icing from this lemon pound cake instead. Much easier than fondant!
Garnish with sprinkles, edible flowers, white sixlets, or edible dragées.
Petit Four Flavors
Like always, there’s flavor options!
- Chocolate Raspberry: Replace lemon juice in cake with milk, replace lemon curd with more raspberry jam, and fill with chocolate buttercream instead.
- Lemon Coconut: Replace raspberry jam with more lemon curd and add 1 teaspoons coconut extract to cake and buttercream.
- Strawberry Champagne: Replace lemon juice in cake with champagne, the raspberry jam and lemon curd with your favorite strawberry jam, and vanilla buttercream with champagne buttercream.
Let me know if you try these for any special occasion!
More Simplified Fancy Treats
- Choux Pastry & Eclairs
- Almond Poppy Seed Tea Cakes & Brown Butter Berry Tea Cakes
- Madeleines
- Lace Cookies
- Chocolate Truffles
Lemon Berry Petit Fours
- Prep Time: 1 hour
- Cook Time: 30 minutes
- Total Time: 4 hours, 30 minutes
- Yield: 48 petit fours
- Category: Dessert
- Method: Baking
- Cuisine: French
Description
Delicate and sweet, these lemon berry petit fours are bite-size mini cakes perfect for weddings, parties, tea time, bridal and baby showers. Topped with a simple white chocolate garnish, this petit four recipe is easy and approachable. See video in blog post for a visual of the assembly.
Ingredients
- 1 and 1/2 cups (340g) unsalted butter, softened to room temperature
- 8 ounces (226g) full-fat brick cream cheese, softened to room temperature
- 2 cups (400g) granulated sugar
- 1/3 cup (80g) sour cream, at room temperature
- 1 and 1/2 teaspoons pure vanilla extract
- 6 large eggs, at room temperature
- 3 cups (354g) cake flour (spooned & leveled)
- 1 teaspoon baking powder
- 1/8 teaspoon salt
- 3 Tablespoons (45ml) fresh lemon juice (about 1 lemon)
- 1/4 cup raspberry jam
- 1/4 cup (60g) lemon curd
Vanilla Buttercream Filling
- 3/4 cup (12 Tbsp; 170g) unsalted butter, softened to room temperature
- 3 cups (360g) confectioners’ sugar
- 2 Tablespoons (30ml) heavy cream or whole milk
- 1 teaspoon pure vanilla extract
- pinch of salt
White Chocolate Topping
- two 4 ounce bars (226g) white chocolate, coarsely chopped*
- 2 teaspoons canola, vegetable, or coconut oil
- optional garnish: white sixlets, mint leaves, edible flowers, berries, and/or sprinkles
Instructions
- Preheat oven to 325°F (163°C). Grease a 12×17-inch half sheet pan, then line with parchment paper. Pan size is imperative. This batter won’t fit into anything smaller. Likewise, the cake would be too thin if baked in larger pans.
- Make the cake: Using a handheld or stand mixer fitted with a paddle or whisk attachment, beat the butter on high speed until smooth and creamy, about 2 minutes. Scrape down the sides and up the bottom of the bowl with a rubber spatula. Add the cream cheese and beat on high speed until completely smooth and combined, about 1 minute. Add the sugar and beat on high speed until combined, about 1 minute, then add the sour cream and vanilla and beat on high speed until combined and creamy. Scrape down the sides and up the bottom of the bowl with a rubber spatula.
- On low speed, beat the eggs in 1 at a time allowing each to fully mix in before adding the next. Careful not to overmix after the eggs have been added. Once the 6th egg is combined, stop the mixer and add the cake flour, baking powder, and salt. Beat on medium speed *just* until combined, then beat in the lemon juice. Try not overmix. Using a rubber spatula or sturdy whisk, give the batter a final turn to make sure there are no lumps at the bottom of the bowl. The batter will be thick and creamy.
- Pour/spoon batter evenly into prepared pan. Bang the pan on the counter once or twice to bring up any air bubbles. Bake for 26-31 minutes. Use a toothpick to test for doneness. Once it comes out completely clean, the cake is done.
- Remove cake from the oven and allow to cool inside the pan. The cake will shrink down from the sides.
- Cut cake into sections: Watch video tutorial above for a visual on the entire petit fours assembly. Once cool, invert the cake onto a cutting board or the counter with the long side facing you. With a sharp knife (I find serrated knife is best here) or pizza cutter, slice cake in half horizontally. Then cut each long rectangle into 3 smaller rectangles. You’ll now have 6 rectangles. Very carefully and slowly slice each in half as shown in the video above—as if you were making a 1 layer cake a 2 layer cake. You now have 12 thin rectangles.
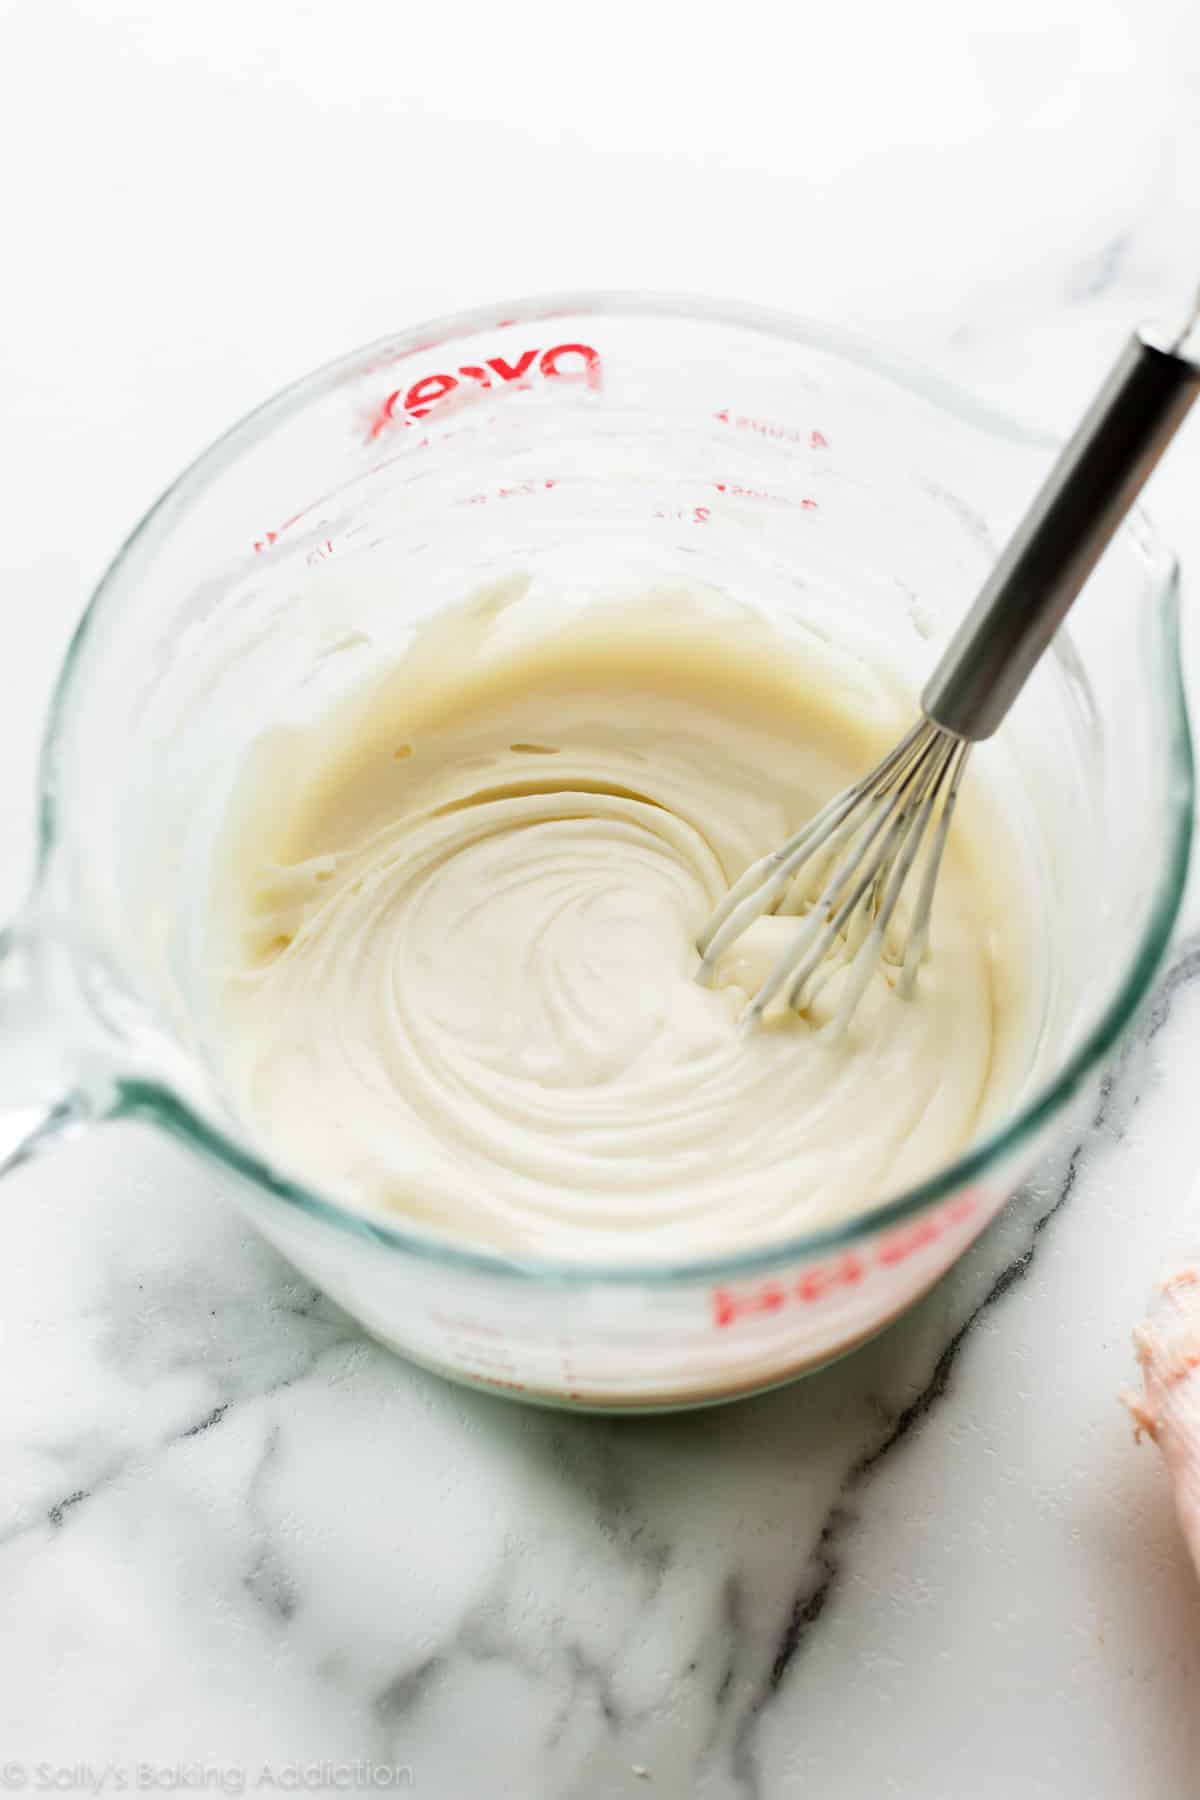
- Make the vanilla buttercream: With a handheld or stand mixer fitted with a paddle attachment, beat the butter on medium speed until creamy, about 2 minutes. Add confectioners’ sugar, heavy cream, and vanilla extract. Beat on low speed for 30 seconds, then increase to high speed and beat for 3 full minutes. Add up to 1/4 cup more confectioners’ sugar if frosting is too thin or another Tablespoon of cream if frosting is too thick. Add a pinch of salt if frosting is too sweet. (I always add a pinch.)
- Add fillings: With a sharp knife, trim the ends off the rectangles that touched the pan. They’re a little harder and uneven, which would create lopsided petit fours. Spread vanilla buttercream in a thick even layer on 4 rectangles. Spread both lemon curd and raspberry jam on 4 rectangles. (The remaining 4 rectangles are plain because they are the tops.) Go a little lighter on the raspberry jam and lemon curd compared to the vanilla buttercream. If there’s too much, it creates a big mess when cutting the petit fours.
- Layer the petit fours: Place the lemon curd/raspberry jam rectangles on top of the vanilla buttercream rectangles. Layer the plain rectangle on top. Loosely cover each and chill in the refrigerator for at least 2 hours or freeze for 1 hour. They must chill before cutting into tiny petit fours.
- Cut into tiny petit fours: Once cold, slice each into 12 little squares. Arrange on a baking sheet and chill in the refrigerator or freezer as you melt the white chocolate.
- Add the topping/garnish: Melt the white chocolate and oil together in a double boiler or in the microwave in 20 second increments, stopping and stirring after each until smooth and melted. If it seems too thick, add another drop of oil to thin out. Spoon or drizzle over petit fours. Top with optional garnish if desired.
- Cover and store petit fours in the refrigerator for up to 5 days.
Notes
- Make Ahead & Freezing Instructions: To make ahead, complete the recipe through step 9. Cover the rectangles tightly and refrigerate for up to 2 days or freeze for up to 3 months. Thaw, then continue with the recipe. Prepared petit fours freeze well for up to 3 months without white chocolate topping. Top with white chocolate prior to serving. Thaw in the refrigerator or on the counter.
- Special Tools (affiliate links): 12×17-inch Half Sheet Pan | Electric Mixer (Handheld or Stand) | Silicone Spatula | Glass Mixing Bowl or Double Boiler
- White Chocolate: Use real white chocolate or white chocolate made for melting, not white chocolate chips. I use Ghirardelli brand white vanilla flavored melting chips. White chocolate chips DO NOT melt down into the proper consistency; it will be too thick and taste grainy. White baking chocolate is usually sold in 4 ounce bars in the baking aisle. I love Ghirardelli, Bakers, or Nestle brands.


Reader Comments and Reviews
Hello, does cake flour have to be used or can AP be used instead?
Hi Isabel, If you don’t have cake flour, we highly recommend making a Homemade Cake Flour Substitute.
Hi Sally! Can I make only half of this recipe or would I have to make the whole thing for it to work?
Hi Callie! You can halve this recipe. We would use a quarter sheet pan– 9×13 inch.
Can petite fours be completely finished( with the chocolate topping on) and then frozen?
Hi Beverly, Prepared petit fours freeze well for up to 3 months without white chocolate topping. Top with white chocolate prior to serving. Thaw in the refrigerator or on the counter.
I made these for a tea. I dipped them in white chocolate and drizzled melted dark chocolate over them. I wasn’t going to serve them because I thought the cake was too dry. But after the jam and buttercream married with the cake they were very good. My guests absolutely LOVED them…and to think I wasn’t going to serve them. That would have been a shame. I will make these again!!!!
You should have seen my table. My guests were is awe. I hope they felt special because they are. Lots of work but worth it all.
This was my first try at petit fours and this was such a splendid recipe for it! I’ve done several recipes from this site, and it never disappoints. The accompanying video was very helpful for me as well and the raspberry and lemon were the perfect flavors! My only issue was the lemon curd did not really stick to the cake layer, so some petit fours were in pieces. I would love to know how to fix this because they were such a hit at my sister’s party that I’ve been asked by one of the guests to make them for their brunch. Thank you for the great recipe!
I made these for a tea party and they were a real hit. How do you preserve mint leaves to use as a garnish?
Hi Deb, we’re so glad they were a hit! We’ve always just air-dried the leaves, but you can do a quick search for a few other preservation options.
Made these for a friend’s birthday – she loved them! They’re very cute and light little treats – I used edible dried flowers on top which worked great. I had difficulty with the cake torting step so my layers weren’t super even, but since I was just making them for friends that wasn’t a huge deal.
This recipe calls for cream cheese which I don’t have. I only have sour cream. Can I omit the cream cheese?
Hi Aalz, cream cheese is necessary here—we don’t recommend leaving it out or replacing with more sour cream.
I made the lemon berry peti fours for a girls tea luncheon. They were decadent! It was fun making them. My kitchen and I were both a mess, but it was so worth it!
I followed this recipe exactly and I am an experienced baker. The cake consistency and taste was like rubber. I have no idea why, but will never be making it again.
Where did you get the top layer? I only see you cut 2.
Hi T, see step 6 for detailed instructions on cutting the cake layers.
I am going to be making this recipe and have the same question. I read step 6 but you are still only cutting each layer in half, where did the third layer come from?
Hi Suzan, the cutting process outlined in Step 6 will produce 12 thin rectangles, which will then be assembled into 4, 3 layer cakes before cutting into smaller pieces. The video tutorial will also be helpful for a visual.
I’m thinking about making these for an Easter brunch gathering – but I’m curious about your process after watching your video that demonstrates the cutting technique. Is there a reason that you don’t top your larger rectangles with the white chocolate and chill then cut the petit fours into adorable little layer cakes? I’m hoping to benefit from your experience here! If you tried this and it didn’t work as well – maybe made it harder to get a clean cut on the petit fours? – I’d love to know! Thank you!
Hi Maryann, We apologize we are just seeing this question! How did yours turn out? If you make them again you certainly could try topping the entire thing with the white chocolate and then cutting them apart. If refrigerated too long it may be more difficult to cut neatly, but we just liked the way they look with the white chocolate dripping over each individual piece.
Hi! Can I make these GF? Do you have a recommendation on which GF flour to use?
Hi Trish, we haven’t tested a gluten free version of these. Although some readers report using an all-purpose 1:1 gluten-free flour in many of our recipes with success, you should expect slightly different results anytime you substitute ingredients. Let us know if you do give it a try!
I have used this recipe several times and love it
Could you make the cake ahead and freeze? And if so could you freeze after applying the curd, frosting and jam?
Hi Lanette! See recipe Notes for our recommended make-ahead instructions.
I used the convection setting on the oven, and after 20 minutes, the cake surface felt firm and the tester was clean, but it was still very pale (not nearly as brown as yours) and the inside was gummy and inedible. Any idea what might have happened?
Hi Alison, if the inside was gummy, it sounds like it could use additional time in the oven. Be sure, too, not to over mix the batter which can lead to overly dense cakes. Finally, we always recommend conventional settings for baking (not convection/fan) if possible. The flow of air from convection heat can cause baked goods to rise and bake unevenly and it also pulls moisture out of the oven. If you do use convection/fan settings for baking, lower your temperature by 25 degrees F and keep in mind that things may still take less time to bake. Hope this helps!
Brilliant recipe – I’m a novice, and they came out beautifully! I see that these are meant to be stored in the refrigerator. Would they be ok at room temperature for several hours? When I bring treats to share at work I usually leave them in a common area and people help themselves throughout the day. Thanks so much for another A+ recipe!
Hi Jen, yes they should be fine for a couple hours! Glad they turned out well for you.
Awesome, thank you so much for the quick reply! 🙂
Made these for my daughter’s French themed birthday party “Bon Jour to Four!” … The perfect mini cake bites!