

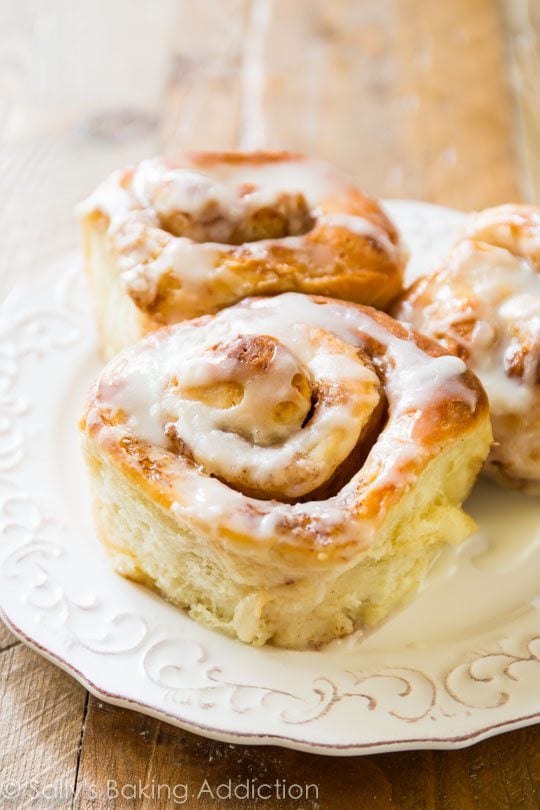
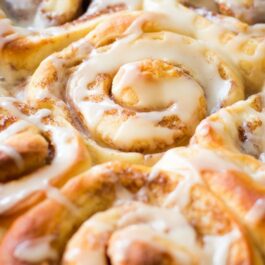
Wake up to warm, fresh, cinnamon goodness with these maple cinnamon rolls.
This recipe is brought to you in partnership with Red Star Yeast.
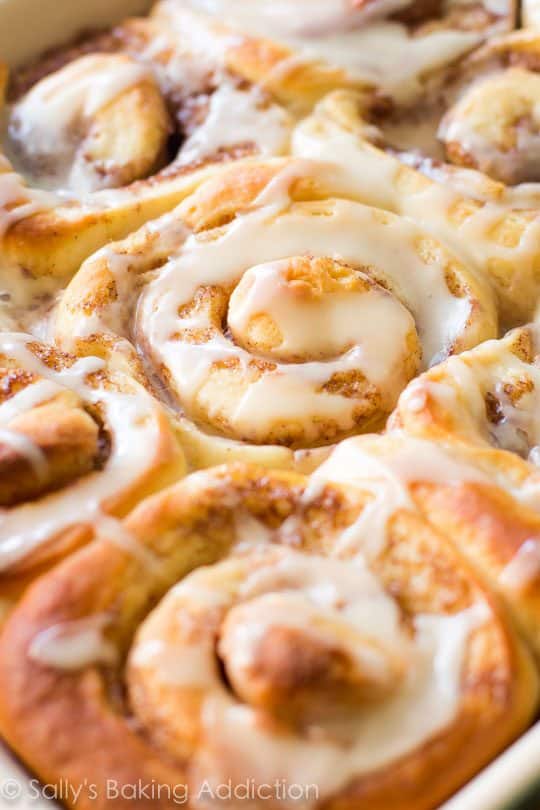
What sets these homemade cinnamon rolls apart from the rest is that they are maple flavored, which makes them an instant favorite if you have tastebuds. Pure maple syrup is worked both into the cinnamon swirl AND the sweet glaze on top.
Double the maple, double the goodness.
For my melt-in-your-mouth maple cinnamon rolls, we’re using my trusty dough recipe. This is the same dough I use for my overnight cinnamon rolls and raspberry sweet rolls. Which means (1) it’s dependable—I’ve used this dough at least 30x in the past couple years and am extremely confident with it—(2) it’s a make-ahead recipe, but doesn’t necessarily have to be.
Making The Dough
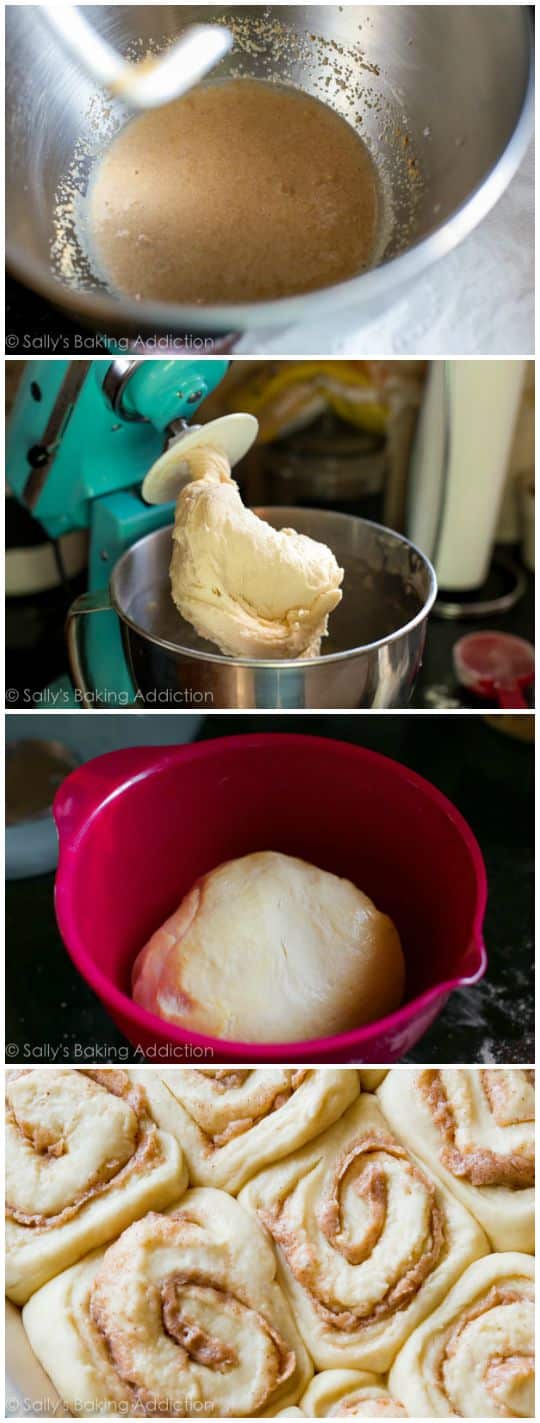
It’s not too complicated, I promise. First, you’ll need some yeast. Don’t let yeast send you running for the hills! It’s just an ingredient. My go-to brand is Red Star Yeast; I’ve been working with them for a few years and am always, always pleased with the results. Their Platinum line is fantastic and makes working with yeast… easy! I use a little more yeast in this recipe compared to my easy cinnamon rolls (a great beginner recipe, new bakers!) because today’s rolls are about twice the size. The butter and eggs both make the dough fabulously rich and tender. It will melt in your mouth. I actually use this same base dough in my cinnamon roll wreath and strawberry sweet rolls, too!
Melt. In. Your. Mouth.
This recipe is prepared in a stand mixer, but you can mix by hand if needed. Feel free to reference my How to Knead Dough video tutorial if you need extra help with this step. Once the dough is prepared, allow it to rise until doubled in size. This will be the first rise.
Once risen, roll the dough out and fill with a combination of softened butter, pure maple syrup, granulated sugar, and cinnamon. How can you not love something with THOSE FOUR ingredients? And when those four ingredients are melted together inside a warm, buttery roll, it’s pure bliss. You should try this filling in the no yeast cinnamon rolls, too!
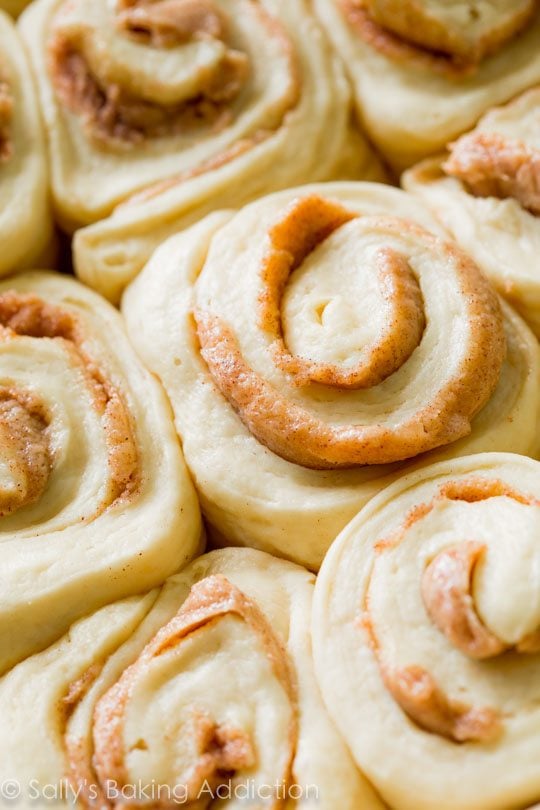
Then the rolls rise a second time or sit in the refrigerator and rise again in the morning.
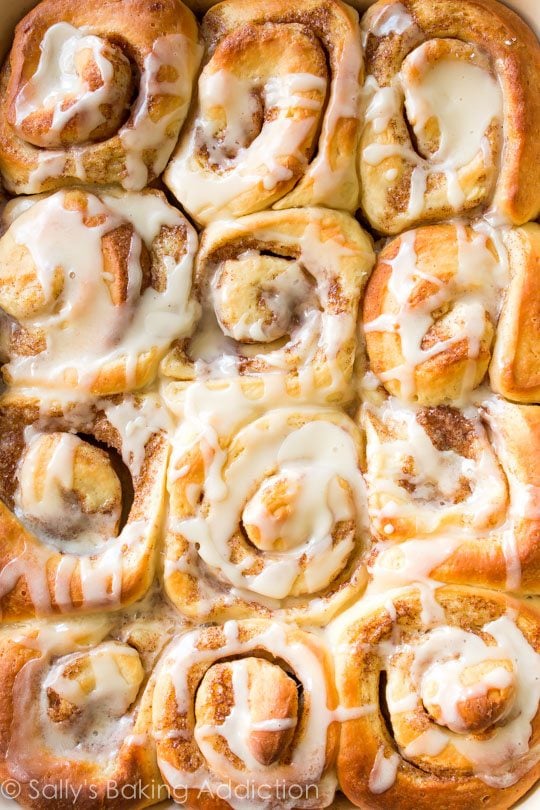
Bake until golden brown. Then, cover them in maple glaze.
Unwind each doughy roll and dip into the pools of maple glaze/cinnamon goo on your plate. Then, 5 seconds later, melt into a pool of maple love. I believe this is the only acceptable way to eat maple cinnamon rolls, by the way.
Rich, buttery, soft, maple bread. Now THIS is a cinnamon roll done right!!
As always, I encourage you to read the recipe before beginning. This is so important to do when it comes to yeast/dough recipes. There are a few moving parts—and I’m very thorough in my instructions. Have fun and let the good times “roll.” 😉
More Cinnamon Roll Varieties:
- Cinnamon Rolls
- Apple Cinnamon Rolls
- Blueberry Sweet Rolls with Lemon Glaze
- Raspberry Sweet Rolls (my favorite!!)
- Overnight Cinnamon Rolls
- Maple Pecan Sticky Buns
- Lemon Sweet Rolls
- Orange Sweet Rolls
- Birthday Cake Cinnamon Rolls
Maple Cinnamon Rolls
- Prep Time: 4 hours (includes rises)
- Cook Time: 25 minutes
- Total Time: 4 hours, 40 minutes (or overnight)
- Yield: 12 rolls
- Category: Breakfast
- Method: Baking
- Cuisine: American
Description
Wake up to warm, fresh, cinnamon goodness with these maple cinnamon rolls.
Ingredients
Dough
- 1 cup (240ml) whole milk*, warmed to about 100°F (38°C)
- 2/3 cup (135g) granulated sugar, divided
- 1 and 1/2 tablespoons (14g) Platinum Yeast from Red Star (2 standard size packets)*
- 1/2 cup (8 Tbsp; 113g) unsalted butter, softened to room temperature and cut into 4 pieces
- 2 large eggs, at room temperature
- 1/2 teaspoon salt
- 4 and 1/2 cups (563g) all-purpose flour or bread flour (spooned & leveled), plus more for dusting/rolling
Filling
- 1/2 cup (8 Tbsp; 113g) unsalted butter, softened to room temperature
- 1/4 cup (60ml) pure maple syrup
- 1/4 cup (50g) granulated sugar
- 1 Tablespoon ground cinnamon
Maple Icing
- 1 and 1/2 cups (180g) confectioners’ sugar
- 2 Tablespoons (30ml) pure maple syrup
- 2 Tablespoons (30ml) whole milk
Instructions
- Prepare the dough: Whisk the warm milk, 2 Tablespoons sugar, and the yeast together in the bowl of your stand mixer fitted with a dough hook or paddle attachment. Cover and allow mixture to sit for about 5 minutes or until foamy on top. *If you do not own a mixer, you can do this in a large mixing bowl and in the next step, mix the dough together with a large wooden spoon/silicone spatula. It will take a bit of arm muscle. A hand mixer works, but the sticky dough repeatedly gets stuck in the beaters. Mixing by hand with a wooden spoon or silicone spatula is a better choice.*
- On medium speed, beat in the remaining sugar (which should be 1/2 cup/100g) and the softened butter until it is slightly broken up. Add the eggs and salt and beat on medium speed until combined. The butter won’t really be mixing into the mixture, so don’t be alarmed if it stays in pieces. Switch the mixer down to low speed and with it running, add 1 cup of flour at a time, making sure it’s fully incorporated before adding the next. After 4 cups have been added, add the last 1/2 cup and beat until the dough comes together and pulls away from the sides of the bowl, about 3 minutes. Dough will be soft.
- Knead the dough: Keep the dough in the mixer and beat for an additional 5 full minutes, or knead by hand on a lightly floured surface for 5 full minutes. (If you’re new to bread-baking, my How to Knead Dough video tutorial can help here.) If the dough becomes too sticky during the kneading process, sprinkle 1 teaspoon of flour at a time on the dough or on the work surface/in the bowl to make a soft, slightly tacky dough. Do not add more flour than you need because you do not want a dry dough. After kneading, the dough should still feel a little soft. Poke it with your finger—if it slowly bounces back, your dough is ready to rise. You can also do a “windowpane test” to see if your dough has been kneaded long enough: tear off a small (roughly golfball-size) piece of dough and gently stretch it out until it’s thin enough for light to pass through it. Hold it up to a window or light. Does light pass through the stretched dough without the dough tearing first? If so, your dough has been kneaded long enough and is ready to rise. If not, keep kneading until it passes the windowpane test.
- 1st Rise: Lightly grease a large bowl with oil or use nonstick spray. Place the dough in the bowl, turning it to coat all sides in the oil. Cover the bowl with aluminum foil, plastic wrap, or a clean kitchen towel. Allow the dough to rise in a relatively warm environment for 2 hours or until double in size. (I always let it rise on the counter and it takes about 2 hours. For a tiny reduction in rise time, see my answer to Where Should Dough Rise? in my Baking with Yeast Guide.)
- Grease the bottom and sides of a 9×13 baking dish or line with parchment paper.
- Roll out the dough: Punch down the dough to release the air. Place dough on a lightly floured work surface and using a lightly floured rolling pin, roll dough into a 12×18-inch rectangle. Make sure the dough is smooth and evenly thick. If the dough keeps shrinking as you roll it out, stop what you’re doing, cover it lightly, and let it rest for 10 minutes to relax the gluten. When you return to the dough, it should stretch out much easier.
- For the filling: Using a handheld or stand mixer fitted with a paddle or whisk attachment, beat the butter and maple syrup together on medium-high speed until combined and creamy. Add the sugar and cinnamon, beating until combined. Spread the maple mixture all over the dough. Tightly roll up the dough to form an 18-inch-long log. Cut into 12 even rolls, about 1.5 inches each. Arrange in the prepared baking pan.
- 2nd Rise: Cover the rolls tightly and allow to rise until puffy, about 90 minutes. (Or use the overnight option in the Notes below.)
- Preheat the oven to 375°F (191°C).
- Bake for about 25 minutes, until they are lightly browned on top. About halfway through the bake time, tent a piece of aluminum foil over the pan to prevent the tops from browning too quickly. Remove pan from the oven and place pan on a wire rack for about 10 minutes as you make the icing.
- Make the icing: Whisk all of the icing ingredients together. If it’s too thin, add a little more confectioners’ sugar. Drizzle icing over warm rolls.
- Cover leftover frosted or unfrosted rolls tightly and store at room temperature for up to 2 days or in the refrigerator for up to 5 days.
Notes
- Make Ahead Instructions – Overnight: To prepare the night before serving, prepare the rolls through step 7. Cover the rolls tightly and refrigerate for 8–12 hours. The next morning, remove from the refrigerator and allow to rise on the counter for 1–2 hours before continuing with step 9.
- Make Ahead Instructions – Freezing: You can freeze cinnamon rolls for up to 3 months, and I recommend a few different methods for freezing cinnamon rolls. The first method is to freeze them after shaping, before they’ve had their 2nd rise (step 7). Thaw in the refrigerator overnight, then let rise for 1.5–2 hours at room temperature before baking. The second method is to par-bake the risen rolls for 10 minutes, let cool completely, then cover and freeze. Thaw in the refrigerator overnight, then let sit at room temperature for 30 minutes before baking. Finish baking for 15–20 minutes. You can also freeze fully baked cinnamon rolls. See How to Freeze Cinnamon Rolls for more details about all of these methods.
- Special Tools (affiliate links): Stand Mixer | Rolling Pin | 9×13-Inch Glass Baking Pan or Metal Baking Pan | Glass Mixing Bowls
- Milk: I recommend using whole milk for the best, richest-tasting dough. You could also use buttermilk. Reduced-fat, low-fat, or nondairy milk works in a pinch. Do not use nonfat milk.
- Yeast: I always use Platinum Yeast from Red Star, an instant yeast. You can use an active dry yeast instead, if needed. The rise times could be slightly longer. Reference my Baking with Yeast Guide for answers to common yeast FAQs.


Reader Comments and Reviews
I really wanted a cinnamon roll but had no cream cheese in the house for icing, so the maple icing was a perfect alternative. I used only bread flour and the rolls still turned out pillowy soft and had a wonderful flavor. The maple syrup enhances everything. Leftover rolls in the fridge get perfectly soft again if you microwave them for 30 seconds.
I made these cinnamon rolls yesterday for when my brother and sister-in-law come tomorrow. I put them in muffin pans and they turned out beautifully. I got 12 x large and 10 regular muffins. They turned out awesome. I sprinkled chopped pecans on the filling and put the maple icing on top. They are fabulous. Thank you for all your great recipes.
Hi Sally, I’ll be gifting a batch of these to my sister soon and I plan on adding finely chopped pecans to the filling. I’ve made these a few times in the past couple of months, so I’m comfortable with the recipe. I was wondering if you had any advice on the best way to go about adding pecans. Thank you!
Hi Emily, you may enjoy these Maple Pecan Sticky Buns!
Thank you for the recipe suggestion, however the pecans are wanted as part of the filling and not part of the topping.
Hi Emily, you could certainly try adding chopped pecans to the filling. Sprinkle them on top of the filling before rolling. Let us know how it goes!
I absolutely love working with this enriched dough. It’s so soft and easy to shape — and makes THE BEST sweet rolls. I’ve made countless varieties from SBR, and they’ve all been delicious. (This maple flavor being no exception.) I truly can’t choose a favorite. Another excellent recipe.
Just made these for the first time and they’re amazing! Definitely a new favourite! Highly recommend. I substituted the sugar in the filling for maple sugar, soooo good!
I’d like to bake these to encourage some fellow teachers, but want to make them larger and gift an individually wrapped one to each person. I’m wondering, if I cut them larger and bake them on a baking dish, so that they won’t be touching and will look nicer as individual rolls, will they still shape nicely, or will they spread out too much? Any thoughts?
Hi Laura, it’s best to cook the cinnamon rolls with their sides touching. This helps them to rise up more, rather than out. You can certainly roll them bigger, though. Let us know what you try!
I have made these a few times and absolutely LOVED them. However, I was so excited to try the option of baking them halfway, freezing them and then finish baking them for Christmas morning. They looked great rising, baking initially, but the y were very disappointing: sank way down when cooling, never rose again, and I baked and baked them for much longer than the recommended time but they were still dough in the middle. I’d love to try again but I’m not sure what I did wrong in this new-to-me method.
Mixing maple syrup with sugar and butter caused the filling to liquify. So hard to work with. A lot ran out. Even though I baked to the least amount of time and covered as you suggested. They were dry.I make a lot of yeast breads. I’ve had such great results with your recipes. So disappointing
Can you use almond milk in place of whole milk for the frosting?
Hi Lisa, that will work in a pinch, although the icing may be a bit thinner with that substitution.
I’ve never been a fan of cinnamon rolls, but I decided to give these a go today – so, so glad I did! These are the best cinnamon rolls I have ever eaten. Fantastic recipe, will definitely be making these again!
These cinnamon rolls made my mom’s day when I brought them to her. She declared them to be the best she’s ever had, which is a huge compliment since she’s quite the connoisseur of cinnamon rolls.
I do however keep having problems getting the rolls in the center to in the same time as those at the edge of the baking dish. I’ve tried covering the outer edges to prevent burning but then it dries the outer rolls out. Any tips on getting them to cook evenly?
Hi Dora, we’re so glad your mom enjoyed these cinnamon rolls! It’s normal for the center rolls to come out softer than the outer edges, but if you find the outer rolls are over browning before the middle rolls are finished, you can tent the edges with foil as you mention and try turning your oven down just a bit. Thank you for giving this recipe a try!
I want to say thank you. My grandson asked me to make his wedding cake. I went on your site and got all the information I needed including the icing.
Rave reviews were received and I was so proud.
Thank you for all your help
We’re so happy to read this, Suzanne! Thank you so much for trusting our recipes to make your grandson’s wedding cake – congratulations!
These rolls were so delicious! We made them twice for the Christmas season. I wanted to make them again for a larger group of people. Is there anyway I could roll and cut the rolls to be a little smaller?
Hi Cyd, I’m so glad to read that you enjoy these maple cinnamon rolls. They’re one of my favorites too! You can make the rolls smaller by rolling the dough out to a larger rectangle. Roll up as directed and then cut into smaller, thinner rolls so there’s more.
I made the “Homemade cinnamon rolls” a few weeks ago and they were perfect. Decided to try this recipe today, and they were a bit dry. I then noticed that the recipe for both of the doughs is exactly the same, but the baking temp is different (350 for the other ones, 375 for these). I am curious to know why??
Hi Esther, Thank you for trying both recipes! This filling is a different texture (it’s thinner) due to the maple syrup so the slightly higher temperature works better here. But you can certainly bake them at 350 if you wish to try them again.
I am a loyal fan of Sally yet my cinnamon rolls came out super dry and crumbly.
Hi Pat, thank you so much for making our recipes and giving this one a try. Make sure to spoon and level your flour (or weigh!) when measuring and be very careful not to over-bake the rolls. It could require a shorter time, depending on your oven, so always keep an eye on them in the oven!
Hi, I tend to cook by temperature rather than color and am wondering if you have a recommended internal temperature for these to determine doneness? Thanks!
Hi Regina! A temperature of 190 F is what you’re looking for for most bread recipes.