

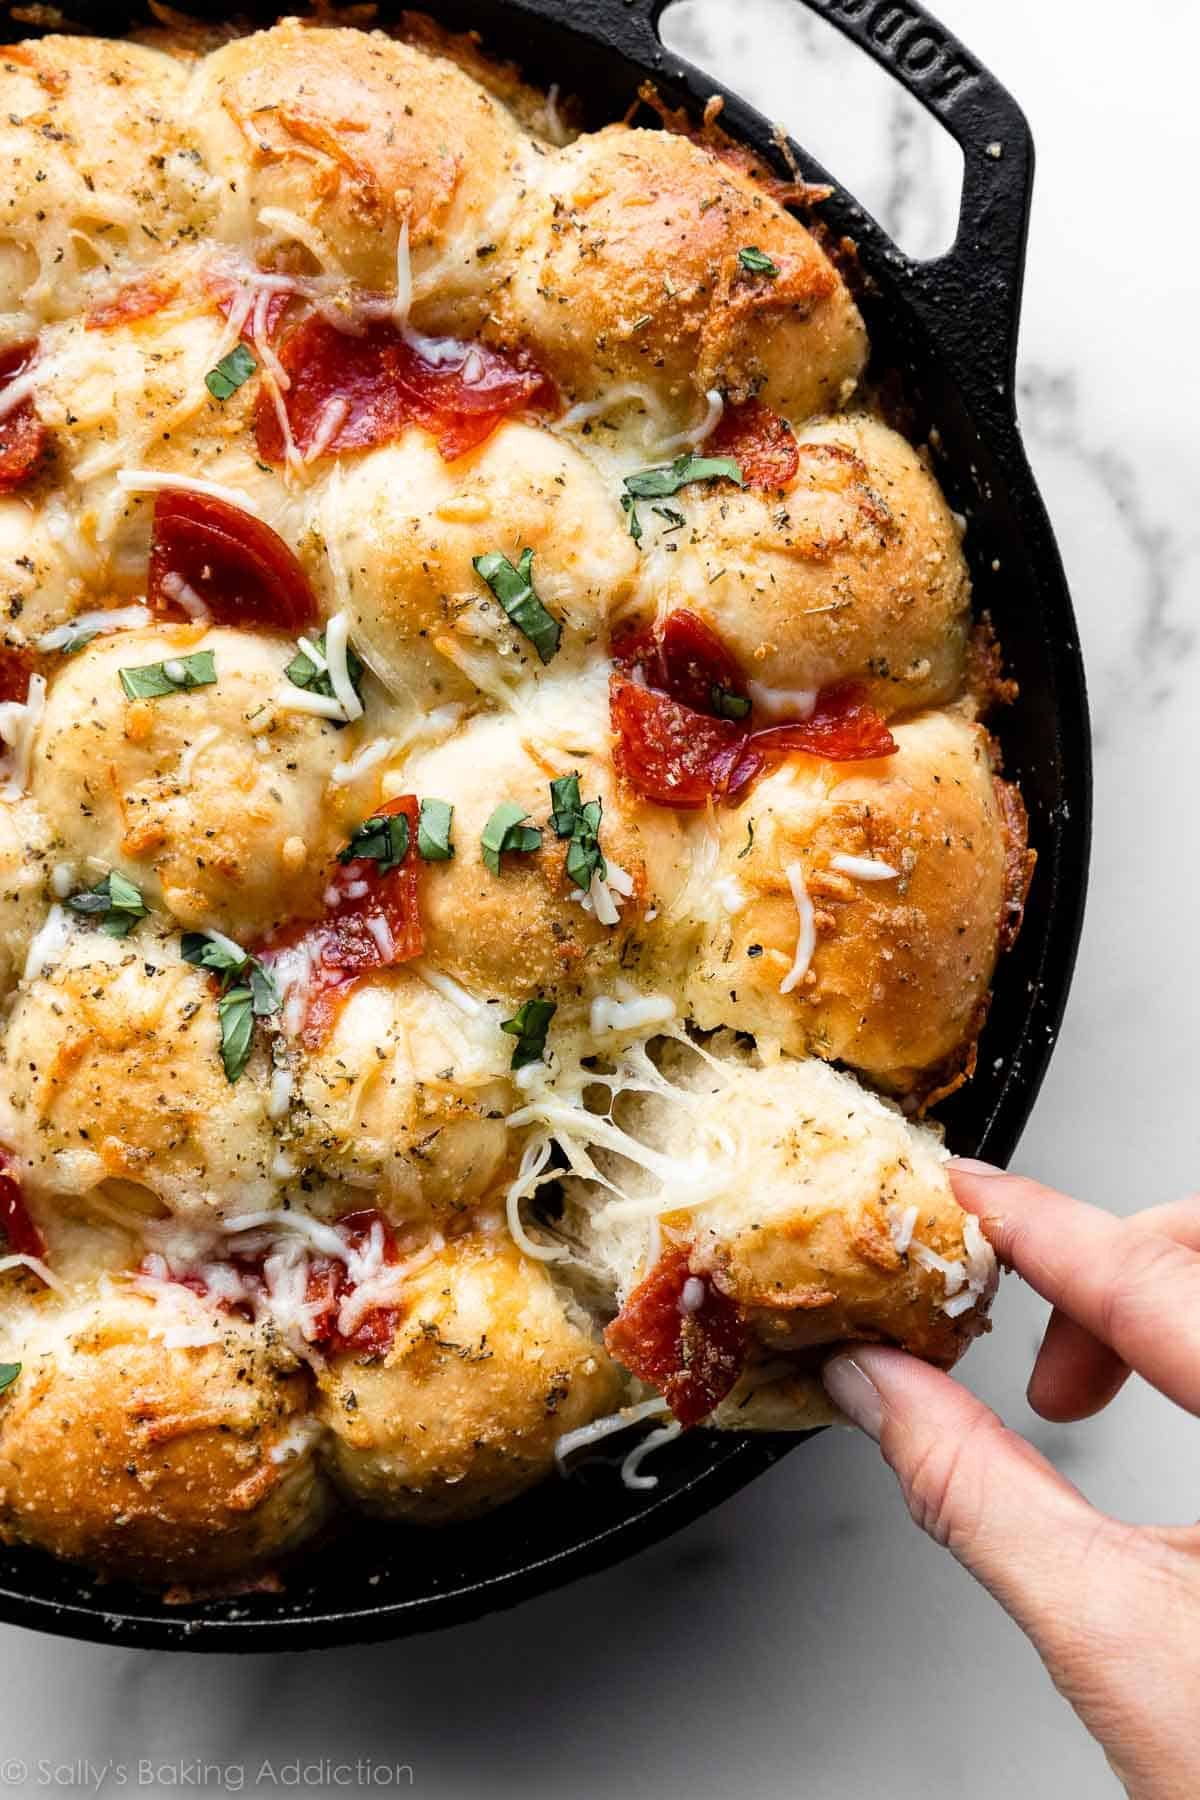
Bring new pizzazz to pizza night with these stuffed pizza pull apart rolls! Soft, buttery garlic herb yeast rolls are topped AND stuffed with mozzarella cheese and pepperoni, and finished with garlic herb butter. Use your favorite pizza toppings and wait until you taste (and smell!) one fresh from the oven.
This recipe is brought to you in partnership with Red Star Yeast.

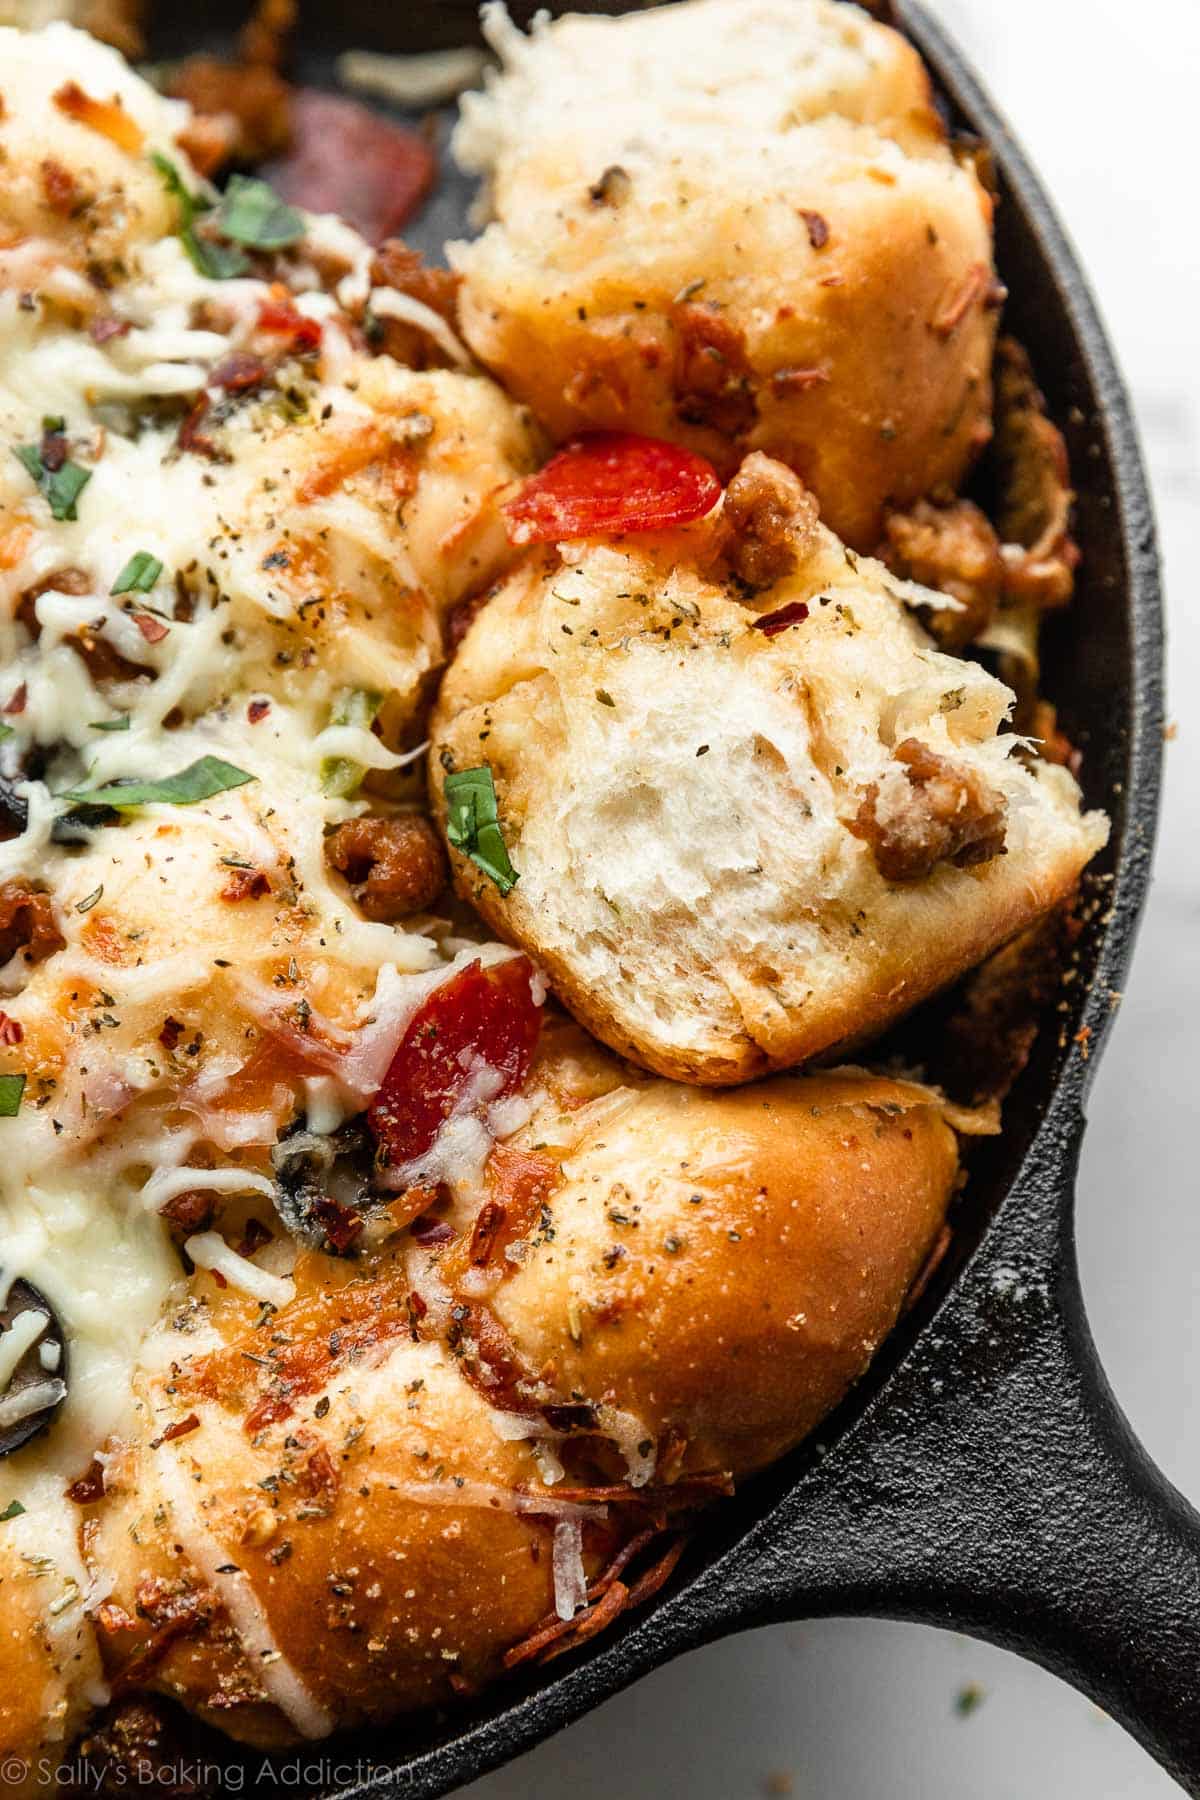
Is there anything more appetizing than pulling apart a warm, soft roll to reveal a gooey cheese center, a little puff of steam escaping? Add to that the smells of freshly baked bread and pizza, garlic butter, and Italian seasonings. Oh my gosh… is your mouth watering yet?
My taste testers raved about these pull apart pizza rolls, and especially loved them dipped in some warm pizza sauce. They’re soft and flaky like dinner rolls, but with the added flavors and toppings of your favorite pizza, and a surprise-inside melted mozzarella-and-pepperoni middle.
One reader, Remi, commented: “I made this recipe rather than our typical dinner rolls for salad night tonight. They were a hit, and suffice to say, I will be making them again. They were the perfect amount of every ingredient and flavor, as well as buttery and soft. I can’t wait to try more variations! 11/10 would recommend! ★★★★★“
Here’s Why You’ll Love These Pizza Pull Apart Rolls
- Flavor: Today’s rolls combine the savory flavors of herbs, garlic, and butter, with the classic pizza flavors of mozzarella cheese and pepperoni. If you love the garlic and herb butter flavors in this recipe, try this rosemary garlic pull apart bread or these sea salt herb skillet rolls next!
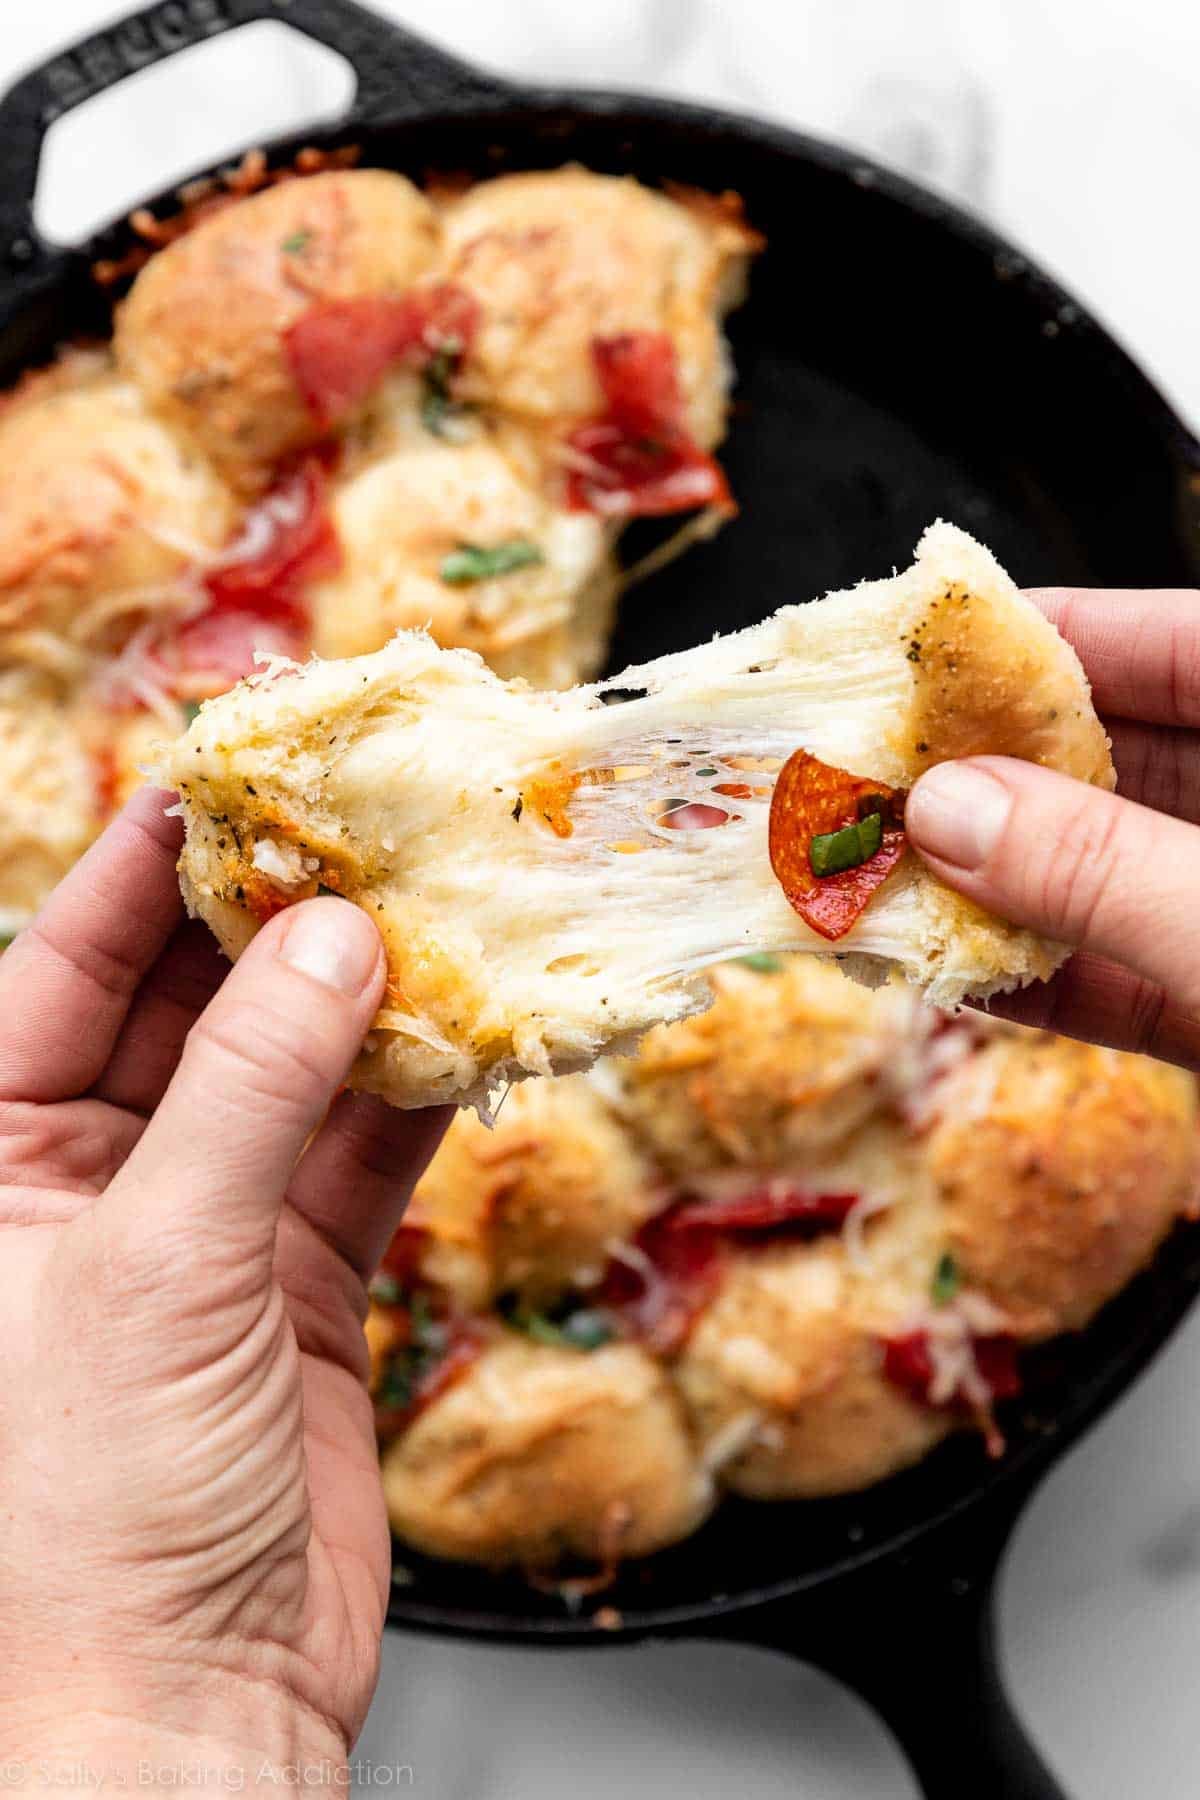
- Texture: This is a rich dough (think raspberry sweet rolls) rather than a lean dough (think pizza dough), so the texture is like flaky soft sweet potato dinner rolls, honey butter rolls, or homemade breadsticks as opposed to chewy pizza crust. (I do use pizza dough to make these different pepperoni pizza rolls though!) Pulling apart a roll reveals the stretchy melted mozzarella cheese and pepperoni in the middle. Stuffed crust pizza fans will love these rolls!
- Ease: Homemade bread or rolls can seem intimidating, but the recipe below is packed with thorough details so you can be confident in the kitchen. And if you’re new to baking with yeast, start by reading my Baking with Yeast Guide.
- Time: Making rolls from scratch certainly takes time, but after 1 taste of these pizza pull apart rolls, I think you’ll agree they’re worth it! Set aside at least 3 and 1/2 hours from start to finish, but keep in mind much of that time is hands off as the dough rises.
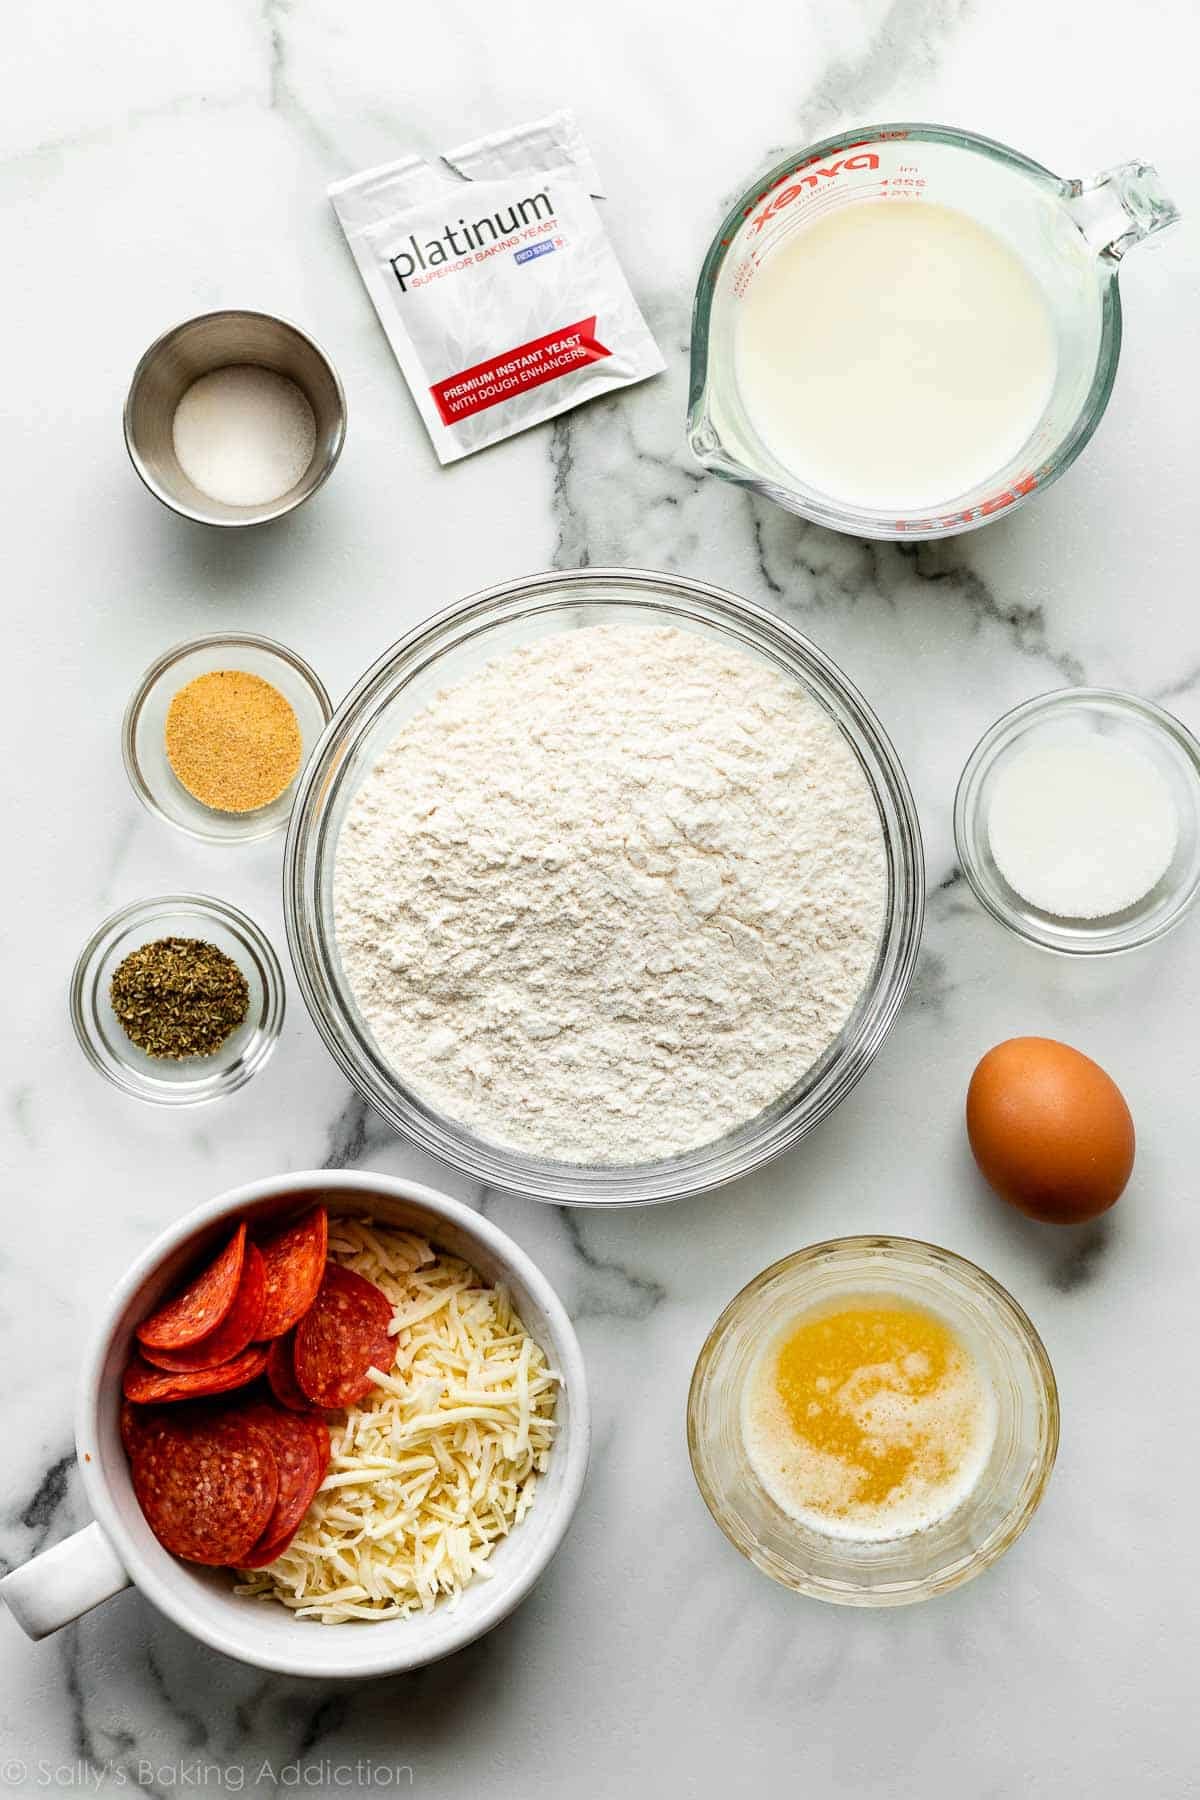
Ingredients You Need for Dough and Filling
- Milk: Liquid activates the yeast. For the softest pizza pull apart rolls, use whole milk. Non-dairy or low-fat milks work too, but whole milk produces phenomenal flavor and texture.
- Yeast: You can use active dry yeast or instant yeast. If using active dry yeast, the rise times will be a little longer. I recommend Platinum Yeast from Red Star, which is an instant yeast blended with natural dough improvers.
- Sugar: A scant 1 Tablespoon of sugar feeds the yeast and tenderizes the dough.
- Egg: Provides structure.
- Melted butter: We’re using melted butter instead of softened butter in this dough, because I just love the intensely buttery flavor it provides.
- Seasonings: Salt, garlic powder, and Italian seasoning. The Italian seasoning I use is a store-bought herb blend, but you can make your own homemade Italian seasoning if desired. Or substitute with the same amount of your favorite dried herb like oregano or parsley.
- Bread flour: Bread flour is best in this recipe, as it produces chewier rolls. But you can use all-purpose flour instead, and the rolls will still be delicious.
- Mozzarella cheese + pepperoni: If you don’t like pepperoni or want to make these vegetarian, simply leave out the pepperoni and add a little more cheese in its place.
You’ll top them with more cheese and pepperoni after about 20 minutes of bake time, and then finish them with a mixture of melted butter, garlic powder, and Italian seasoning. (All ingredients you need for the dough!)
Key Steps
- Proofing the yeast: Proofing the yeast isn’t always necessary when you use instant yeast. However, I recommend doing it anyway to ensure the yeast dissolves and that it’s alive and active. Mix the yeast with warm milk and a little sugar. Cover and let it sit for a few minutes until foamy on top.
- Making the dough: You can use a stand mixer or a spatula to combine the dough ingredients.
- Kneading the dough: Knead the dough with your stand mixer or with your hands for 5 minutes. If you’re new to yeasted doughs, my How to Knead Dough video tutorial will be a handy resource.
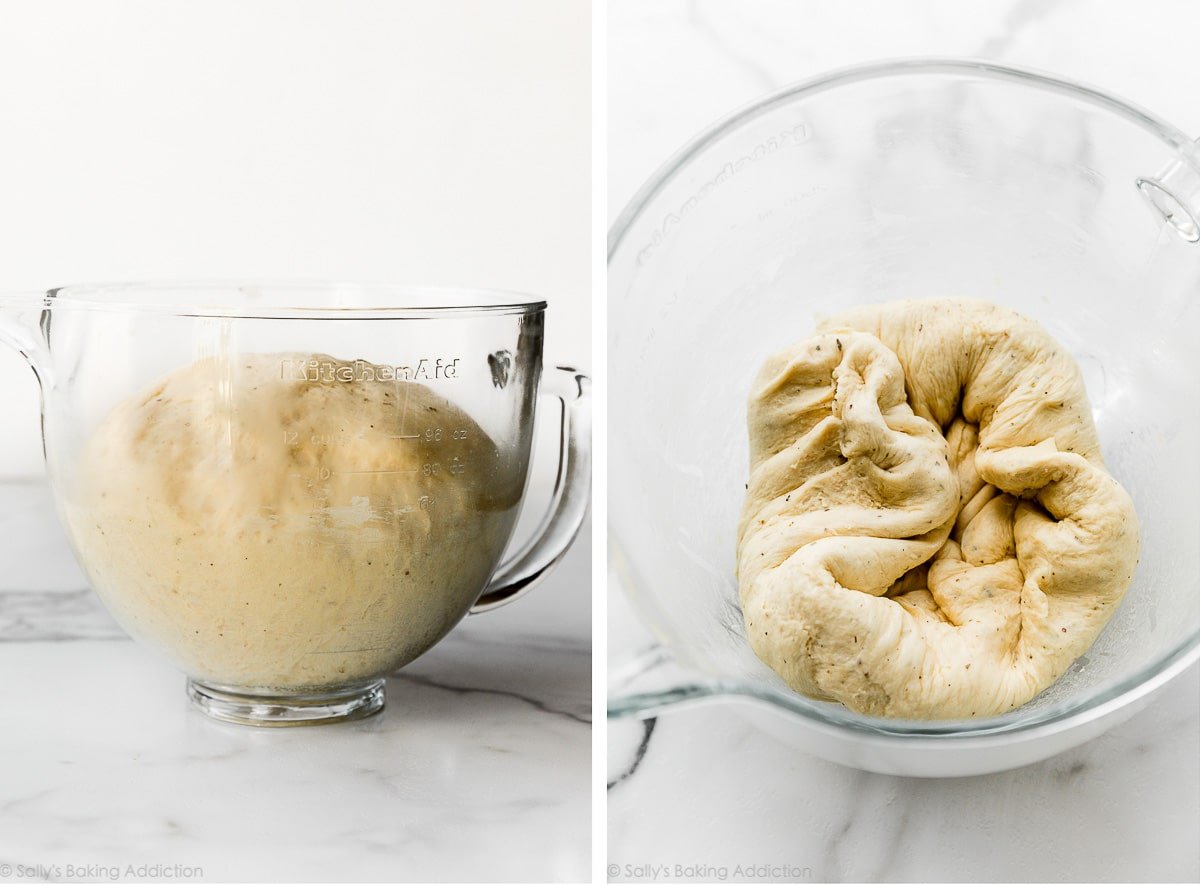
- 1st rise: The dough rises in about 60–90 minutes in a relatively warm environment.
- Shaping + stuffing the rolls: See below for detailed instructions on how to form the stuffed rolls.
- 2nd rise: Let the shaped rolls rise in the baking pan until puffy, about 30–45 minutes.
- Baking: Bake for 20 minutes, then remove from the oven to add your toppings.
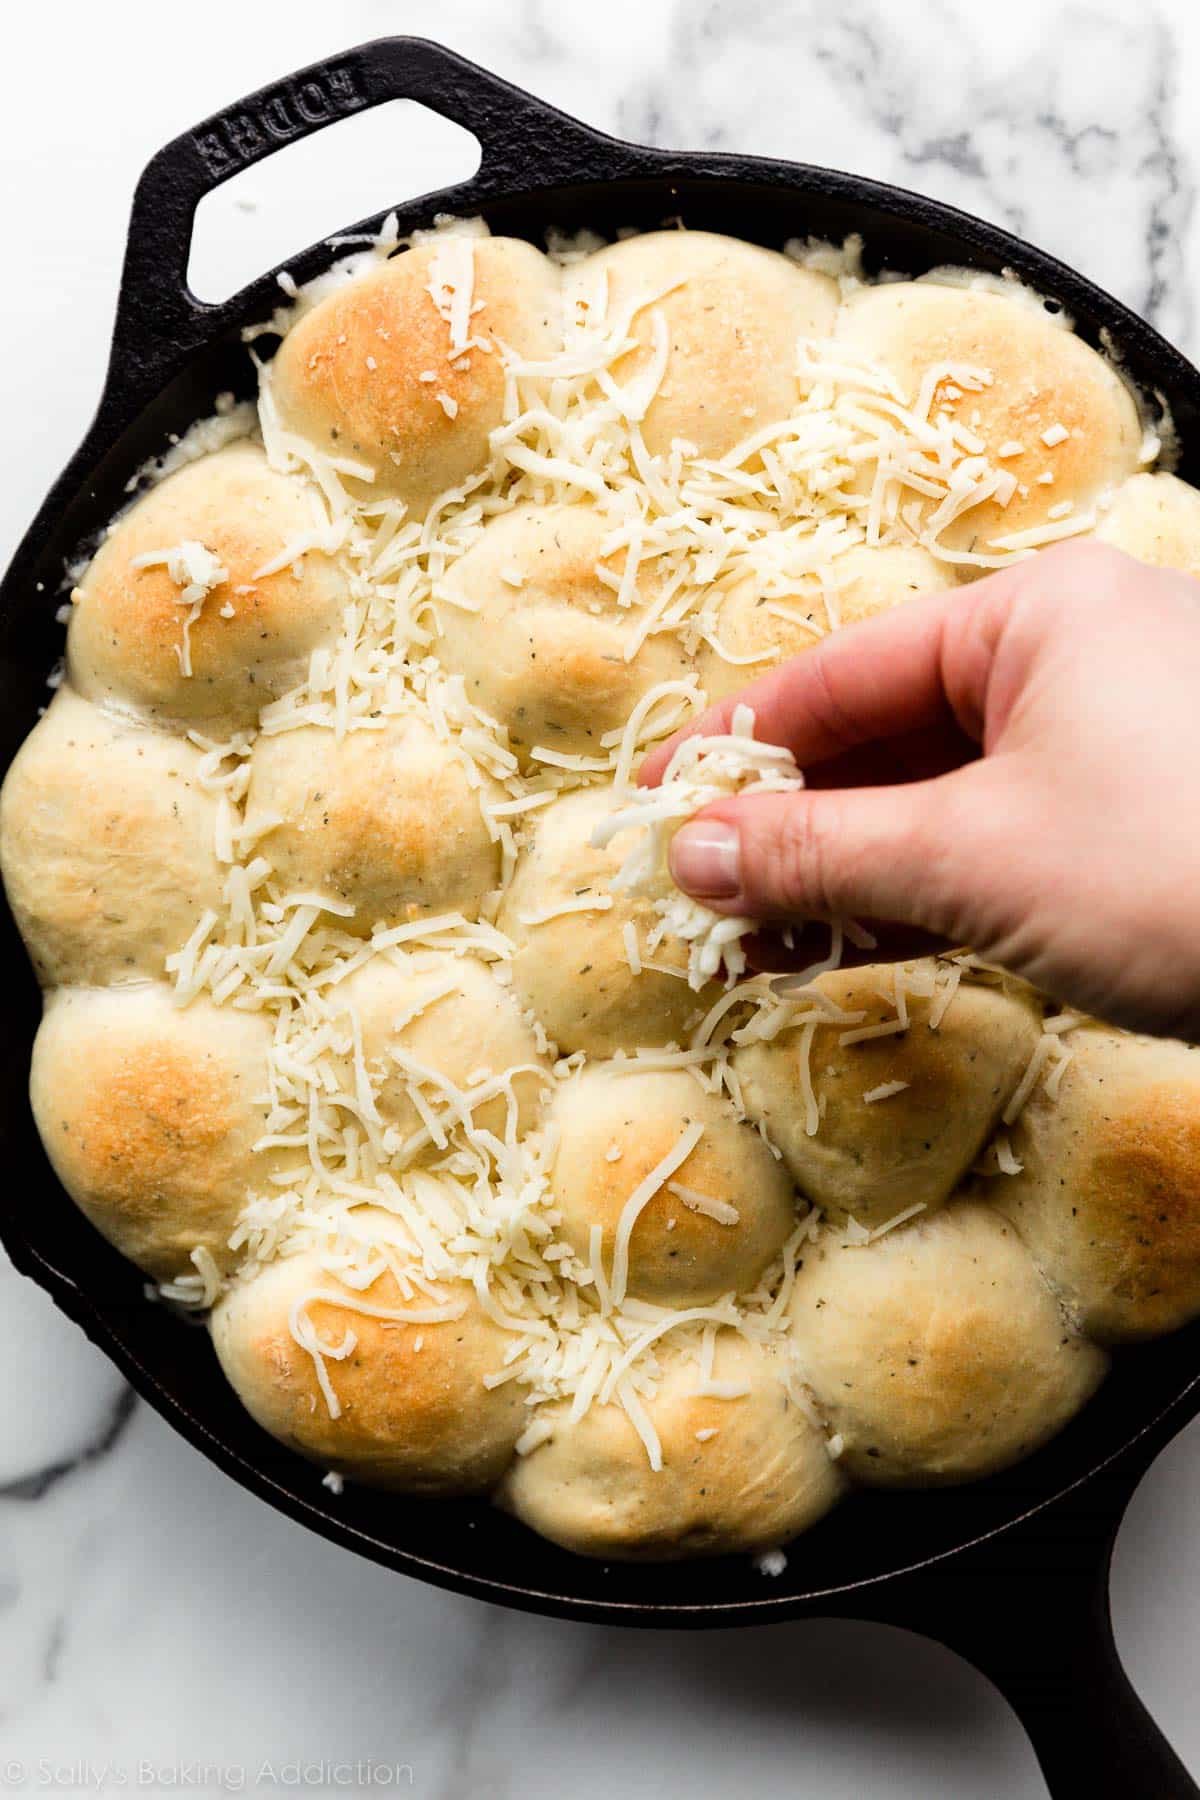
- Topping: Sprinkle on mozzarella cheese + chopped pepperoni, and supreme-topping mixture, if using. Loosely tent the pan with aluminum foil and return the pan to the oven for 12–15 minutes.
- Finishing: Brush melted garlic herb butter on warm rolls, and serve with a side of pizza sauce.
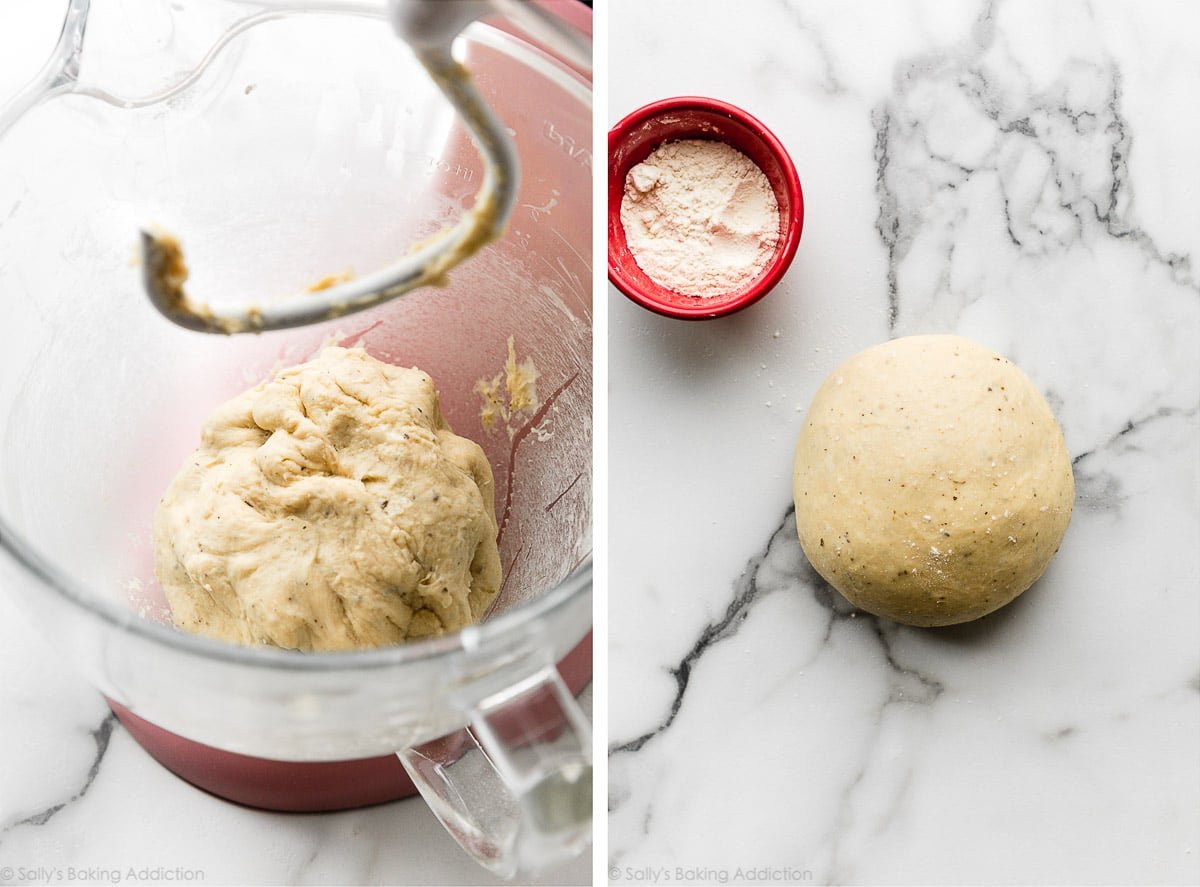
Proofed yeast mixture:

Pictured below on the left: Dough in the mixer before kneading. Pictured below on the right: Dough after kneading. It’s ready to have its 1st rise.
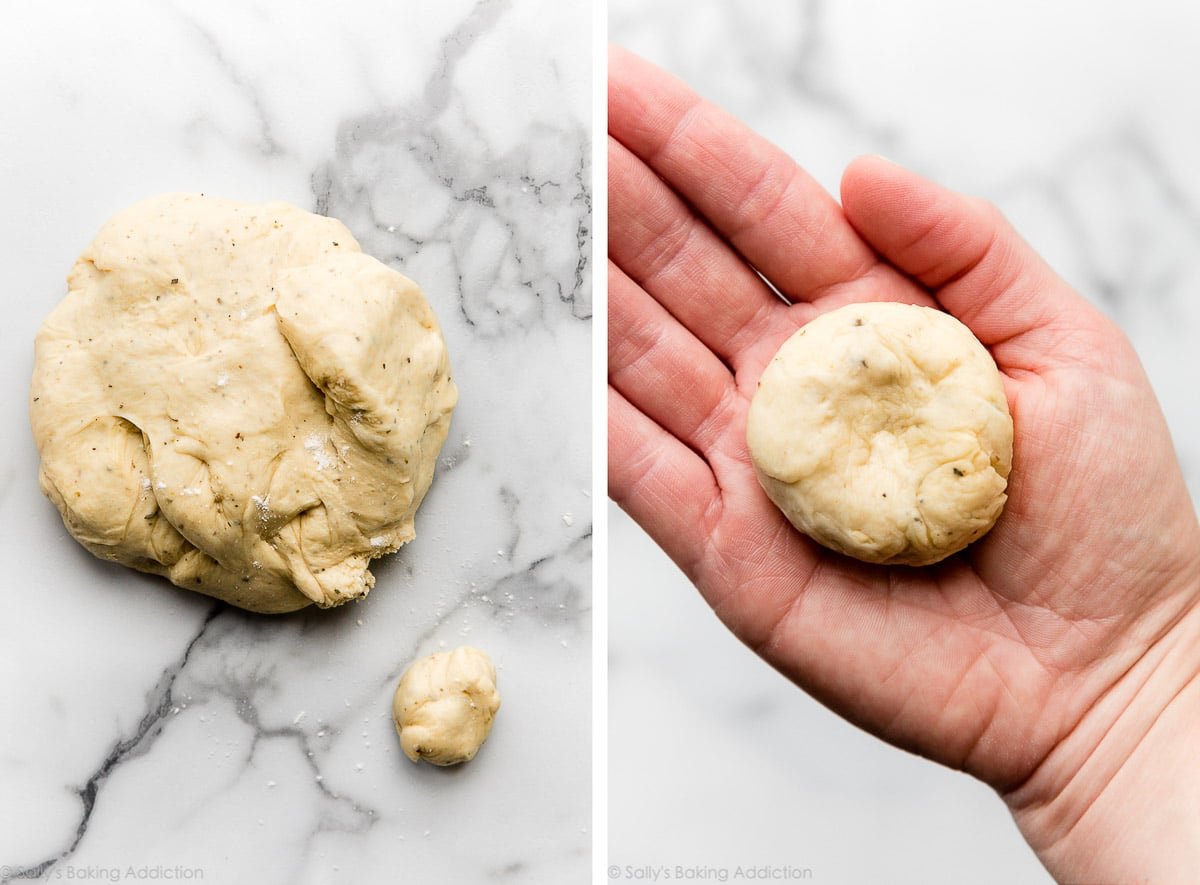
After rising, punch down the dough so you can begin shaping:
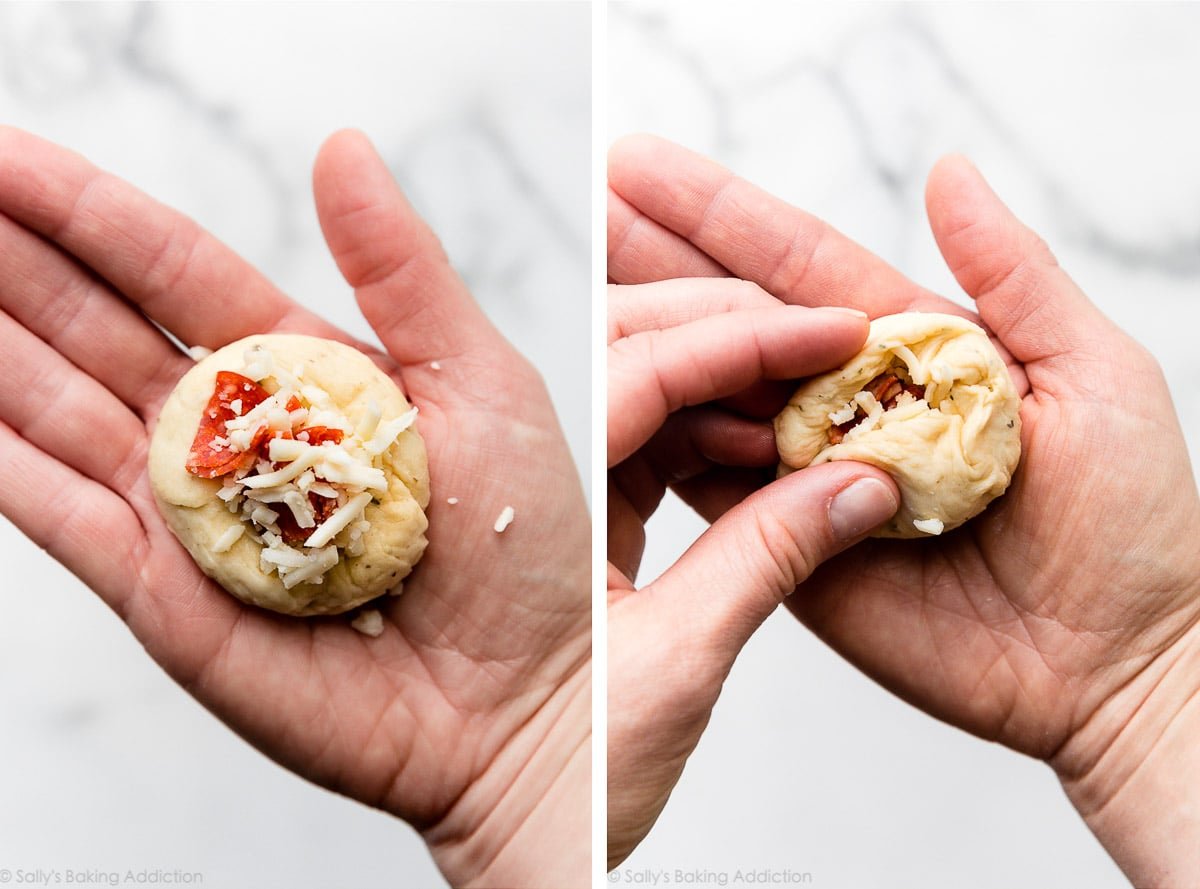
Let Me Show You How to Shape & Fill Them
Pinch off a piece of dough about 1 and 1/2 Tablespoons in size (1 ounce/30g). With your hands, form into a ball and make an indent in the center. Pinch a bit of cheese and pepperoni with your fingers and stuff into the middle of the dough. Press the dough around it to seal the filling inside, and place the stuffed dough ball into the prepared pan. Repeat with remaining dough and filling until you’ve filled the pan (you should have about 20–24 balls).
It’s much easier than it sounds and you can watch me do this in the video located in the recipe below.
Cover the pan of rolls loosely with plastic wrap or foil and let rise in a warm location until puffy, about 30–45 minutes.
Below: Before and after 2nd rise. Rolls get nice and puffy!
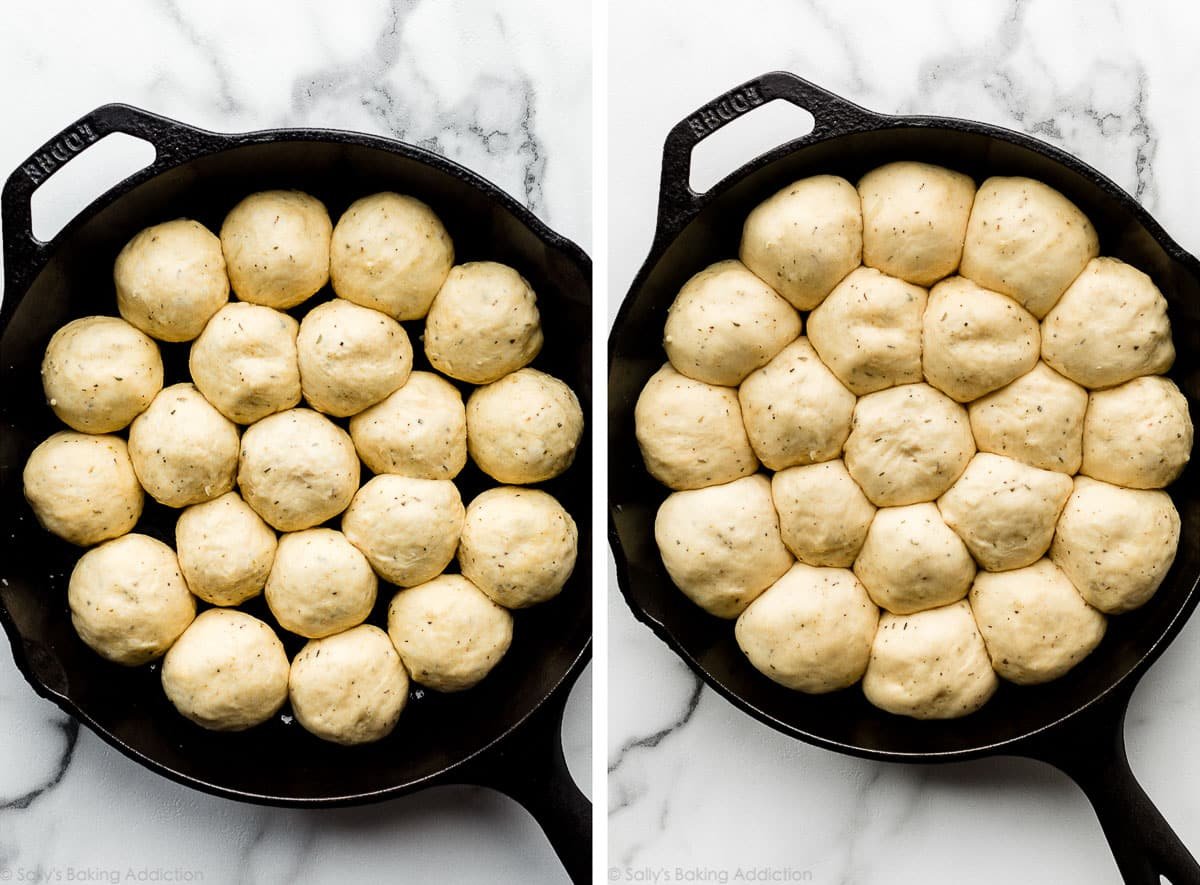
Bake the rolls after the 2nd rise. You’ll bake for only 20 minutes and then add some pizza toppings like more pepperoni and cheese, or you can try a “supreme pizza” version. Return topped rolls to the oven to finish baking. I don’t recommend adding toppings any earlier because they will burn.
Note that I also added pepperoni to the following rolls, but the photo only shows cheese:
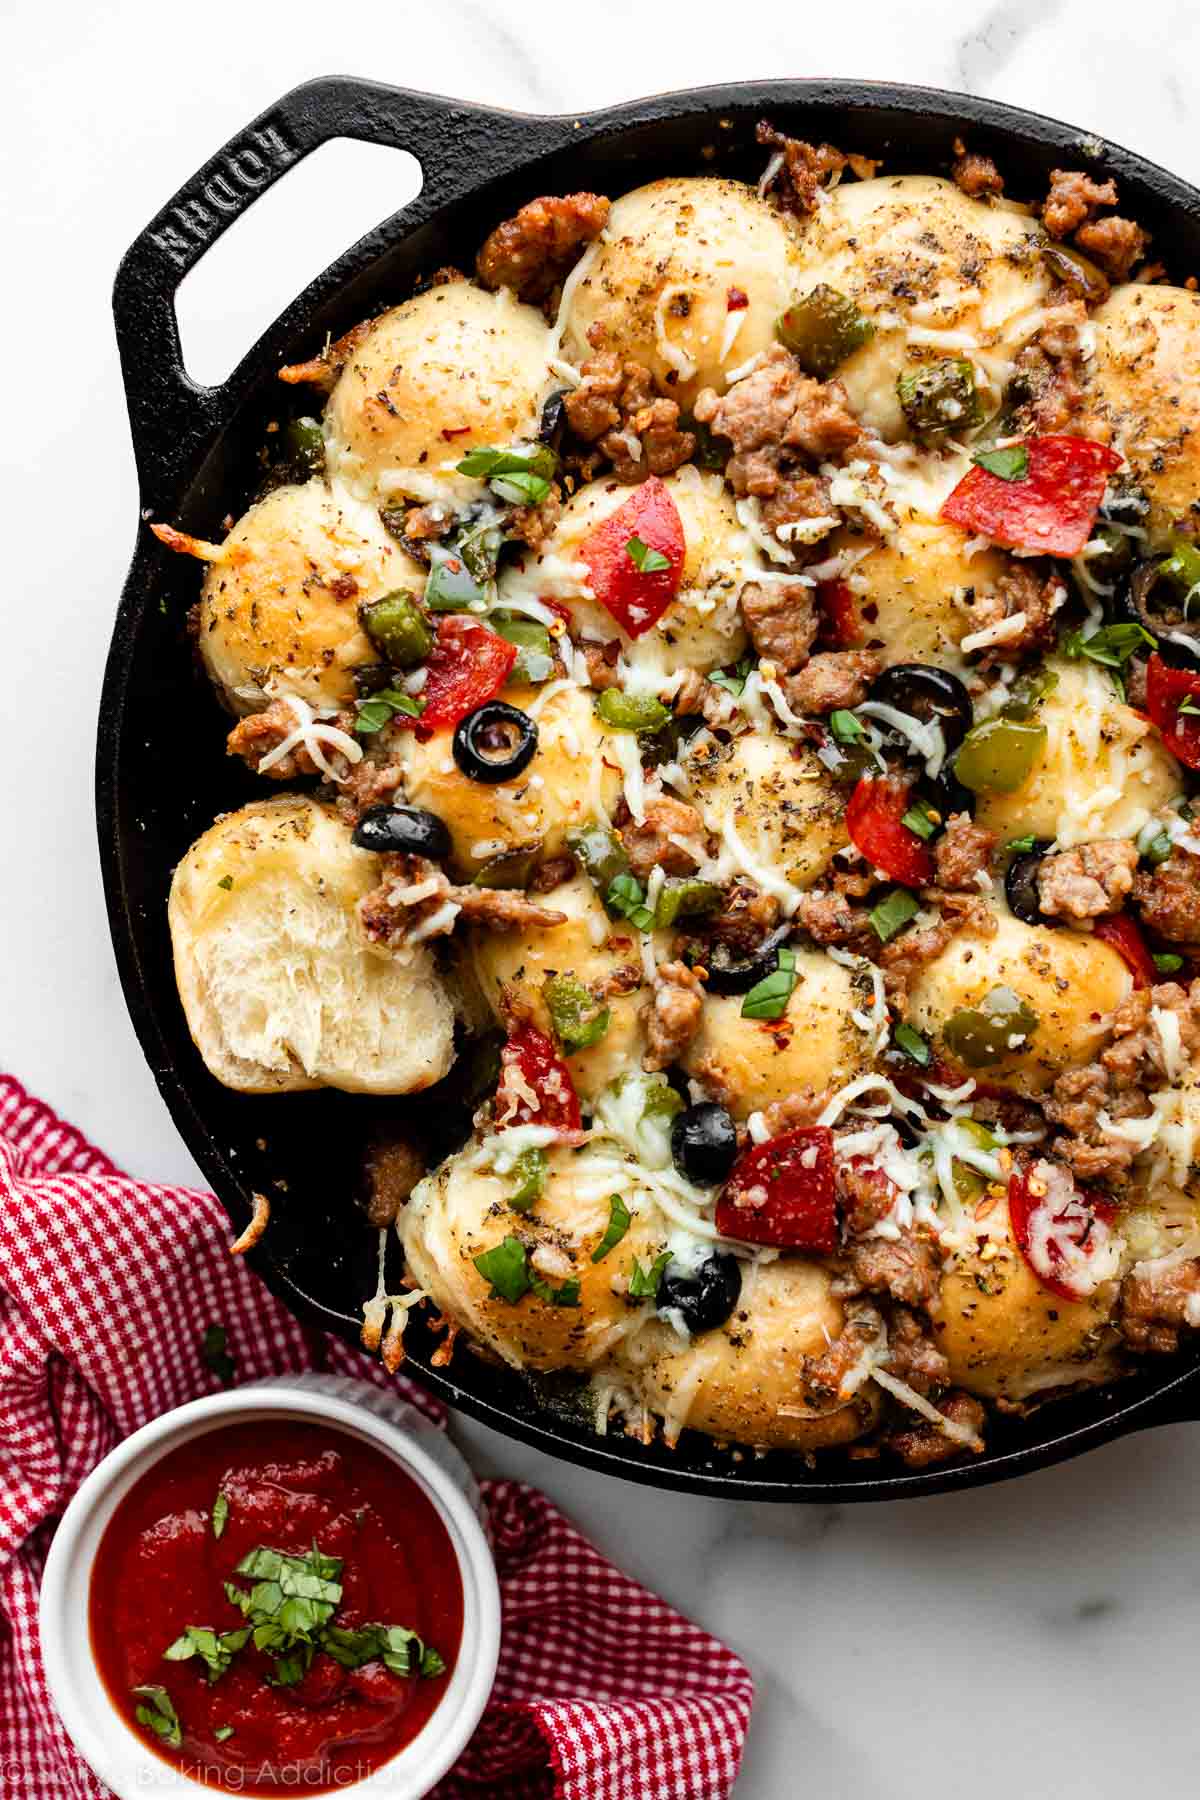
Supreme-Style Pull Apart Pizza Rolls
If you love a supreme pizza, loaded with sausage, pepperoni, olives, and green peppers, you’ll also love a supreme-style variation of these pizza pull apart rolls. Grab these ingredients:
- Ground Italian sausage (or plant-based sausage)
- Chopped green bell pepper
- Sliced black olives
After you’ve shaped and stuffed the dough balls, while they’re having their 2nd rise, cook the sausage and chopped green bell pepper together in a skillet, stirring and breaking up the sausage into small pieces, until the sausage is cooked through. Drain on paper towels, and then add in the sliced olives. You’ll add this supreme topping mixture to the rolls, along with more mozzarella cheese and chopped pepperoni, after the initial 20 minutes of baking.
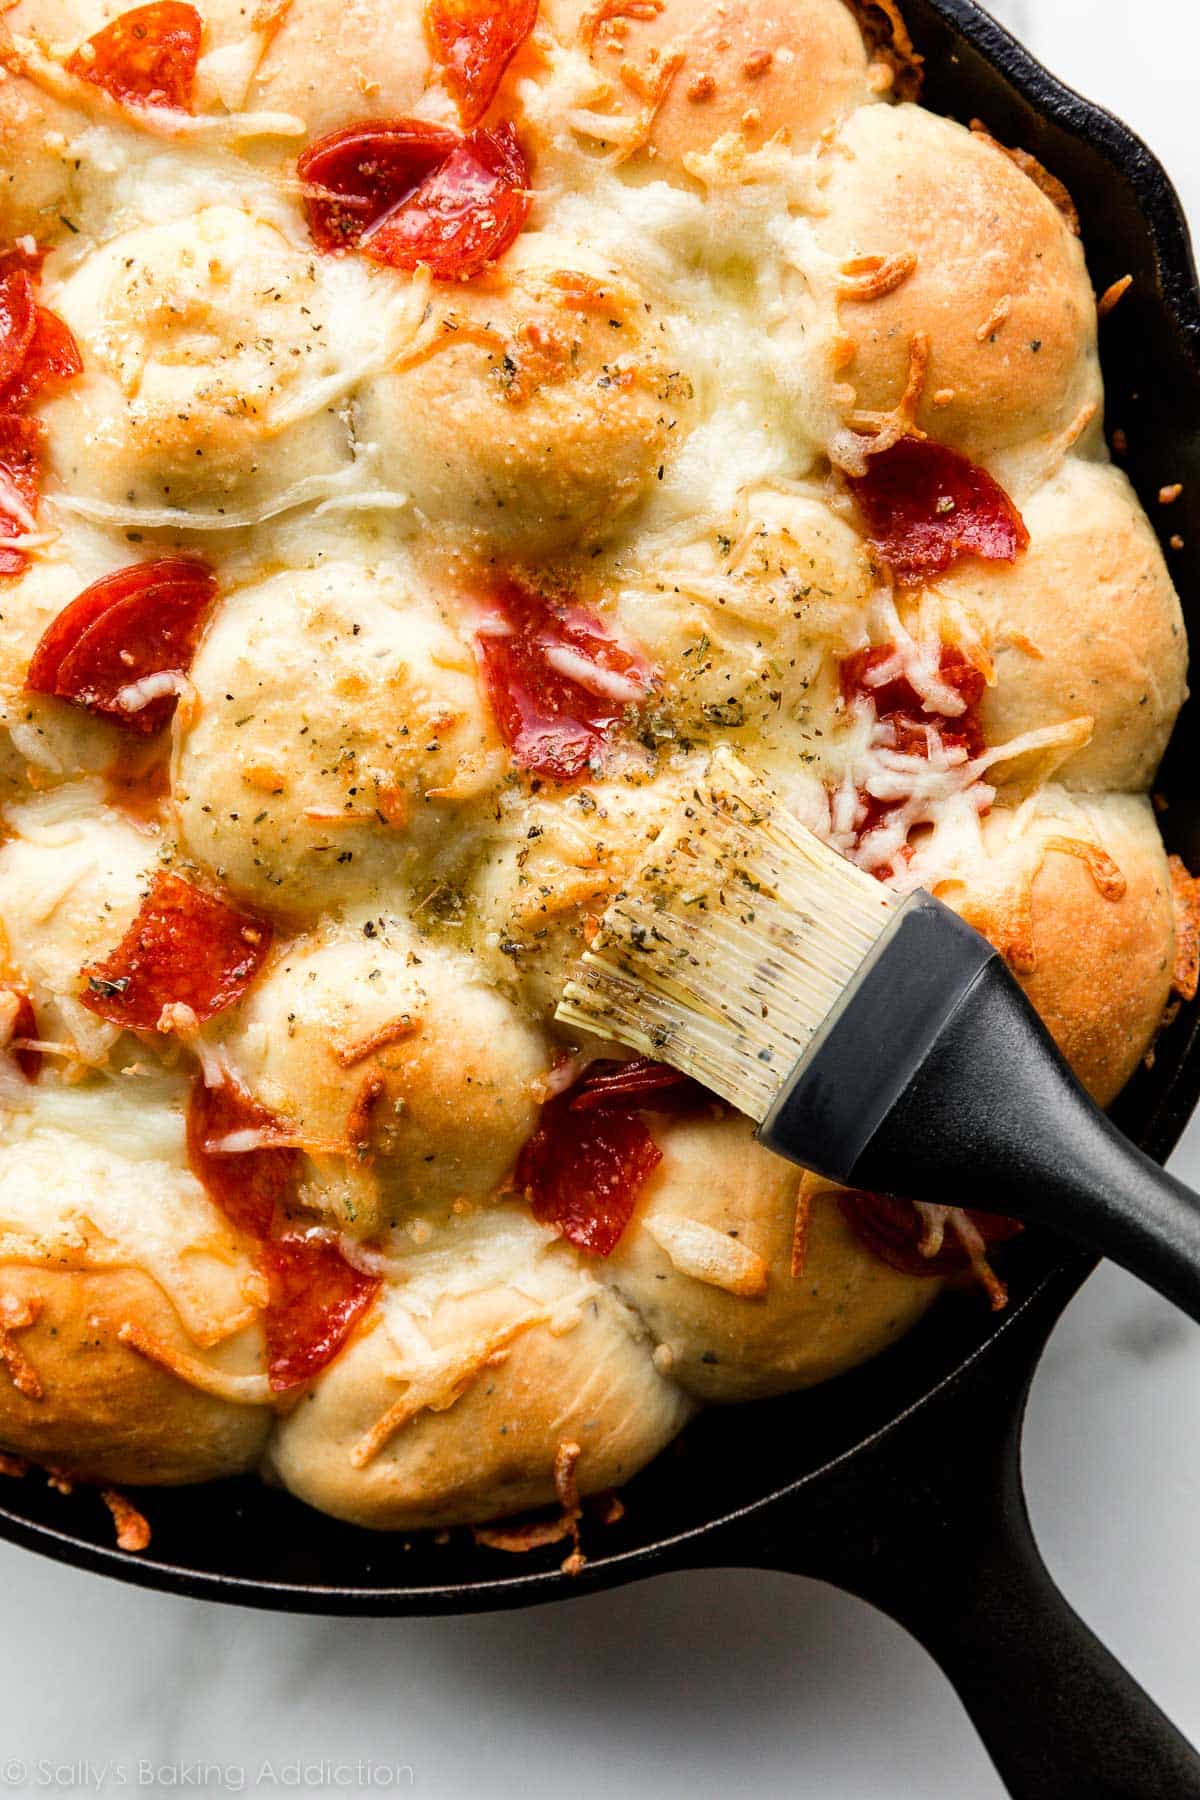
Please Do Not Forget the Garlic Herb Butter Topping!
No matter which version you make—plain cheese, cheese and pepperoni, or supreme—when the rolls finish baking, top with garlic herb butter. Melt 2 Tablespoons of butter and stir in 1/2 teaspoon each of Italian seasoning and garlic powder. Gently brush the garlic herb butter on top of the warm rolls. (A pastry brush is such a handy kitchen tool… always use it for pie crust!)
This simple finishing touch elevates all your hard work. 🙂
You can also add a sprinkle of crushed red pepper flakes for a little heat, and some chopped fresh basil adds color and fresh flavor. Serve with a side of pizza sauce or homemade pesto for dipping, or even with this pepperoni pizza dip for an extreme pizza experience!
Best Baking Pan to Use
You can bake these pizza pull apart rolls in an oven-safe skillet (I use this 10.25-inch cast iron skillet), but they’re just as tasty in a baking dish. In testing, we found that a 9-inch round cake pan or pie dish was too small for this recipe, but you can bake these rolls in a 9-inch square baking pan, a 9-inch springform pan, or a 9×13-inch baking dish.
Serve With…
The cheesy rolls are wonderful as a shareable appetizer—perfect for a football get-together—or make a delicious accompaniment alongside bruschetta chicken with zucchini noodles or a steaming bowl of minestrone soup or slow cooker chicken chili.
See Your Pizza Pull Apart Rolls!
Many readers tried this recipe as part of a baking challenge! Feel free to email or share your recipe photos with us on social media. 🙂
Print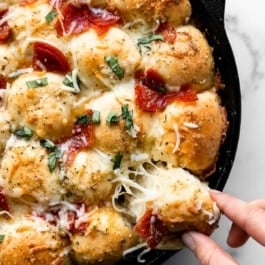
Pizza Pull Apart Rolls
- Prep Time: 3 hours (includes rises)
- Cook Time: 35 minutes
- Total Time: 3 hours, 35 minutes
- Yield: 20-24 rolls
- Category: Bread
- Method: Baking
- Cuisine: American
Description
Soft, buttery garlic herb yeast rolls are topped AND stuffed with mozzarella cheese and pepperoni, and finished with garlic herb butter. Take your time with this recipe because there are a few particular steps for shaping, topping, and finishing the rolls.
Ingredients
Dough & Filling
- 2 teaspoons Platinum Yeast from Red Star*
- 1 Tablespoon granulated sugar
- 3/4 cup (180ml) whole milk
- 3 Tablespoons (43g) unsalted butter, melted
- 1 large egg
- 1 teaspoon salt
- 1 teaspoon garlic powder
- 1 teaspoon Italian seasoning blend
- 2 and 3/4 cups (360g) bread flour (spooned & leveled), plus more as needed*
- 1 and 1/2 cups (135g) shredded mozzarella cheese
- 1/2 cup (60g) chopped pepperoni (or more cheese)
Topping
- 1/2 cup (45g) shredded mozzarella cheese
- 1/4 cup (30g) chopped pepperoni (or more cheese)
- optional: 4 ounces (113g) uncooked ground Italian sausage
- optional: 1/3 cup (50g) chopped green pepper
- optional: 2 Tablespoons (20g) sliced black olives
Garlic Herb Butter for Brushing
- 2 Tablespoons (28g) butter, melted
- 1/2 teaspoon Italian seasoning
- 1/2 teaspoon garlic powder
- optional, for serving: pizza sauce, chopped fresh basil, crushed red pepper flakes
Instructions
- Make the dough: Place the yeast and sugar in the bowl of a stand mixer fitted with a dough hook or paddle attachment. Or, if you do not own a stand mixer, a regular large mixing bowl. Heat the milk on the stove or in the microwave until warm to touch, about 110°F (43°C). Pour warm milk on top of yeast/sugar. Whisk gently to combine, then loosely cover with a clean kitchen towel and allow to sit for 5—10 minutes. The mixture will be frothy after 5—10 minutes.
- If you do not have a mixer, you can mix the dough together with a wooden spoon or silicone spatula in this step. Add the melted butter, egg, salt, garlic powder, and Italian seasoning and about 1 cup of the bread flour. Beat on low speed for 1 minute to combine ingredients, then add the remaining flour and beat on medium speed until the dough comes together and pulls away from the sides of the bowl, about 2 minutes. If the dough seems too wet to a point where kneading (next step) would be impossible, beat in more flour 1 Tablespoon at a time until you have a workable dough. Dough should be soft and a little sticky, but still manageable to knead with lightly floured hands.
- Knead the dough: Keep the dough in the mixer and beat for an additional 5 full minutes, or knead by hand on a lightly floured surface for 5 full minutes. (If you’re new to bread-baking, my How to Knead Dough video tutorial can help here.) If the dough becomes too sticky during the kneading process, sprinkle 1 teaspoon of flour at a time on the dough or on the work surface/in the bowl to make a soft, slightly tacky dough. Do not add more flour than you need because you do not want a dry dough. After kneading, the dough should still feel a little soft. Poke it with your finger—if it slowly bounces back, your dough is ready to rise. You can also do a “windowpane test” to see if your dough has been kneaded long enough: tear off a small (roughly golfball-size) piece of dough and gently stretch it out until it’s thin enough for light to pass through it. Hold it up to a window or light. Does light pass through the stretched dough without the dough tearing first? If so, your dough has been kneaded long enough and is ready to rise. If not, keep kneading until it passes the windowpane test.
- Place the dough in a greased bowl (I use nonstick spray to grease) and cover with plastic wrap or aluminum foil. Place in a slightly warm environment to rise until doubled in size, around 60—90 minutes. (If desired, use my warm oven trick for rising. See my answer to Where Should Dough Rise? in my Baking with Yeast Guide.)
- As the dough rises, grease a 9-inch square pan, a 9-inch springform pan, a 9×13-inch baking pan, or a 10-inch oven-safe cast iron skillet; if using a cast iron skillet that’s already seasoned, no need to grease it. A 9-inch round cake pan or pie dish is too small for this recipe. See Notes for other baking pan options.
- Prepare the filling: Mix together 1 and 1/2 cups (135g) shredded mozzarella and 1/2 cup (60g) chopped pepperoni in a bowl.
- Shape the rolls: When the dough is ready, punch it down to release the air. Pinch off a piece of dough about 1 and 1/2 Tablespoons in size (1 ounce/30g). With your hands, form into a ball and make an indent in the center. Pinch a bit of cheese and pepperoni (a scant Tablespoon, about 7–8g) with your fingers and stuff into the middle of the dough. Press the dough around it to seal the filling inside, and place the stuffed dough ball into the prepared pan. Repeat with remaining dough and filling until you’ve filled the pan (you should have about 20–24 balls).
- Cover the pan with plastic wrap or aluminum foil and allow to rise once again in a slightly warm environment until puffy, about 30–45 minutes.
- Prepare the toppings: In a small bowl, mix together 1/2 cup (45g) mozzarella cheese and 1/4 cup (30g) pepperoni. If you’re making the supreme-style option, heat a skillet over medium heat. Add sausage and chopped green pepper. Cook, stirring and breaking up the sausage into bite-size pieces with a wooden spoon or rubber spatula, until sausage is cooked through, about 6–7 minutes. Transfer the mixture to a plate lined with paper towels, to drain. Combine with the sliced olives.
- Adjust the oven rack to the lower third position, then preheat oven to 350°F (177°C).
- Bake for 20 minutes. After 20 minutes, remove the rolls from the oven and sprinkle on the cheese and pepperoni topping; plus the cooked sausage, peppers, and olives, if making supreme style. Loosely tent with foil, then return to oven and bake for another 12–15 minutes, or until lightly browned on top. For a more accurate test of doneness, the rolls are done when an instant read thermometer reads 195°F (90°C). Remove from the oven and let cool for a few minutes as you prepare the topping.
- Make the garlic herb butter: Melt 2 Tablespoons of butter and stir in the garlic powder and Italian seasoning. Brush on warm rolls before serving. Serve with a side of pizza sauce, and any other additional pizza toppings such as fresh chopped basil or crushed red pepper flakes.
- Cover leftover rolls tightly and store in the refrigerator for up to 5 days.
Notes
- Freezing Instructions: Prepare the recipe through step 7. Place shaped rolls in a greased baking pan, cover tightly, and freeze for up to 3 months. Once frozen, the dough balls won’t stick together anymore and you can place them in a freezer bag if needed. On the day you serve them, arrange the dough balls in a greased baking pan, cover tightly, then let them thaw and rise for about 4–5 hours. Bake as directed. You can also freeze the baked rolls. Allow them to cool completely and then freeze for up to 3 months. Thaw in the refrigerator or at room temperature. Reheat as desired. If reheating the whole pan, loosely cover with foil and reheat in a 300°F (149°C) oven for about 10 minutes or until warm.
- Overnight Instructions: Prepare the recipe through step 7. Cover the shaped rolls tightly and refrigerate for up to about 15 hours. At least 3 hours before you need them the next day, remove the rolls from the refrigerator, keep covered, and allow to rise on the counter for about 1–2 hours before baking. Alternatively, you can let the dough have its 1st rise in the refrigerator overnight (step 3). Cover the dough tightly and place in the refrigerator for up to about 15 hours. Remove from the refrigerator and allow the dough to fully rise for 2 more hours. Continue with step 4.
- Special Tools (affiliate links): Stand Mixer or Glass Mixing Bowl | 10.25-inch Oven-Safe Cast Iron Skillet, 9-inch Square Baking Pan, 9-inch Springform Pan, or 9×13-inch Baking Pan | Pastry Brush
- Yeast: I always use Platinum Yeast from Red Star, an instant yeast. If using active dry yeast, the rise times could be slightly longer. Reference my Baking with Yeast Guide for answers to common yeast FAQs.
- Flour: I recommend bread flour for extra chewy and flaky rolls. You can use all-purpose flour if needed instead. Either flour is fine and there are no other changes to the recipe if you use one or the other.
- Italian Seasoning: Italian seasoning is a store-bought herb blend and you can make your own homemade Italian seasoning if desired. Or substitute with the same amount of your favorite dried herb.
- Make Them Vegetarian: You can leave out the pepperoni and just include more cheese for the filling and topping, or use a plant-based pepperoni instead.
- Baking Pans (affiliate links): If baking in a skillet, make sure it’s oven-safe. I always use this 10.25-inch skillet. You can also bake these rolls in a 9-inch square baking pan, a 9-inch springform pan, or a 9×13-inch baking pan. A 9-inch round cake pan or pie dish is too small for this recipe. You could also arrange and bake them on a lined or greased baking sheet; make sure the rolls are touching.


Reader Comments and Reviews
This recipe was a big hit in my home! I made it for a snack as we watched college football, and it was a perfect game food! Will definitely be making it again. 🙂
Oh no…. I’m the odd man out on this one. We didn’t really like this . Like another reviewer stated, you couldn’t really tell they were stuffed and the rise wasn’t very puffy… I do live in a high humidity climate, so it’s possible it affected the recipe. Flavor of toppings /aroma was worth the couple stars, but texture and appearance of the bread roll was lacking.
Thank you so much for your honest review! I’ve found that some brands of mozzarella cheeses just… disappear inside the rolls. Some readers have used the small mozzarella balls with great results though. Thank you for trying this!
This was an absolutely perfect recipe!! I added the sausage with the cheese and pepperoni filling (instead of putting it on top), we loved it and will be making this over and over!!
I made these with a cheese filling, served with homemade baked spinach ricotta stuffed pasta shells, and your Pumpkin bars. Deliciousness, thank you for a fun challenge, Sally!
These were so good! The video with the steps was very helpful. I didn’t realize how much goodness I could stuff into each roll. I’ll definitely be making these again.
This was a fun take on pizza. I always enjoy your step by step thorough instructions and learning new methods (ie milk instead of water like your pizza dough recipe). We made the pepperoni version and dipped in Rao’s sauce. I used a cast iron skillet that seemed larger than 10” and it worked perfectly. Mine came out with 20 rolls. Thank you!
These were awesome! We really enjoyed them and immediately began dreaming up different fillings… Everything without too much moisture would be okay, I guess, like dried tomatoes, ham, corn (my kids love corn on pizza), olives. Looking forward to trying those out.
The recipe was easy to follow, the dough came out wonderful and was easy to fill and shape.
I don’t know about the egg though, I didn’t really expect egg in pizza dough. Maybe this was supposed to be a soft roll, which is more a thing for sweet than savory baking where I live, so it was somewhat of a surprise for me, texture-wise. Maybe I will try a version with my go-to pizza dough and see how that goes.
Thanks for the wonderful baking challenge!
Great recipe and super easy!
I truly loved this recipe, and so did my family! So much fun to make and so much fun to eat! I stuffed the rolls a bit more than directed, and we loved it! Thank you for ANOTHER winning recipe Sally!! I can’t wait to see what you challenge us with next month!!
A big YUM! I made these vegetarian and stuffed the dough with some pizza sauce and cheese and topped with cheese and the garlic butter. Absolutely delicious. The rolls were soft and very tasty. Will definitely make again.
I really had a fun time making this recipe, it seemed daunting at first but the instructions and video were super helpful! I opted to make my rolls in a Dutch oven and they turned out wonderfully! I definitely could have added more cheese and pepperoni in each roll, I’ll be doing that next time I make these! My husband really loved getting to eat these while watching some Sunday night football. Thanks again for a great recipe!
Love this recipe. Easy to follow instructions & super delicious rolls!
We loved these! I added hot Italian sausage along with the pepperoni and cheese on top and it was a great, filling meal!
Such a fun and delicious recipe!
Hi, I love monkey bread, all kinds so when I saw this I thought that looks interesting. So I made it. For me, being a vegan, I did have to substitute vegan items, like the cheese I used vegan mozerella and vegan parmesan and for the pepperoni I used vegan pepperoni. I also made my own pizza sauce. They were OMG delicious. Thank you so much. I often thought that was an interesting concept but wasn’t sure how to do it. I will be making them regular for e rest of my family, they tried my vegan ones and loved them too. Thank you for sharing this recipe and how to.
This was SCRUMPTIOUS! Only adjustment I had to make was bake the dish a little longer (I did bake it in my Dutch oven so that could have been a reason the extra time was needed). Going to use this dough recipe for our Sunday night pizzas moving forward!!
I love this recipe ! It was easier to make than it looks like and everybody at home loved it ! Definitely I’m gonna make then again soon.
Absolutely delish! So easy! Def going ti make again with some more toppings!
I’m giving this 4 and not 5 stars simply because my family didn’t love it. Their feedback focused mostly on the fact that they couldn’t really tell that I had stuffed the pull-aparts. They would’ve preferred more hidden goodies inside the dough, but I stuffed my 20 pull-aparts with the entire filling.
I made these with my 8 year old grandson. We did the just cheese version, used a 9″ springform and followed the recipe. They are so good!! Thanks, Sally!
Sooooo good!!! I love making breads and rolls is one of my favorite! I made is without the egg and added more oil instead. Turned out very flavorful fluffy! Thanks for this recipe! And i will say this is one of my favorite challenge recipes ♥️
Kinsee, how much additional oil did you substitute for the eggs? Thanks!
What a fun recipe! Looks lovely for an event, very fun to pull apart and eat. I did a veg option with spinach and cheese on the inside, and those and tomatoes on top.
I may have put too much topping centrally on top– I think the rolls were a little less baked under that. I’ll look forward to doing more with this recipe in the future. Thank you!
This was super easy to make and delicious! I used a 9in spring form pan which made it easy to access the rolls to pull them apart when it came time to eating.
For the filling, I used about half the amount of pepperoni (turkey) and added some mushrooms that I had chopped and sauteed. I also added sun dried tomatoes to the topping. It was so good – I cant wait to make this again!
Fun recipe! Our family does pizza night once a week and it was a fun variation!
We really liked these rolls. I had a couple of mishaps during baking but they still managed to turn out delicious!
These are delicious! Soft and garlicky with the herbs and pepperoni. We enjoyed them with a bowl of pasta fagioli soup.
My family all loved it! It was a perfect amount for dinner for my family of 5 (kids 2-5). Next time I will double the toppings and make extra herbed butter for dipping!
Yum! What a perfect and fun football game snack. Will definitely be making these again and again.
Great pizza night meal! My 9 year old daughter helped me roll in the filling. It was a great recipe for her to help with. I did have to add a little water to the dough to make it soft. It was a easy fix and the rolls turned out great. Thanks for a great recipe!
My dough also seemed a lot less soft than what I was expecting from the video! I thought maybe I added too much flour or overmixed it. Thanks for the water trick!
Would these work to make ahead for a pot luck? I would make them the day before and not be able to heat them the day of. I would either keep/serve them cold or room temp.
Hi b, yes, they are still delicious the next day! They’re best served warm, but room temperature should be ok too.