

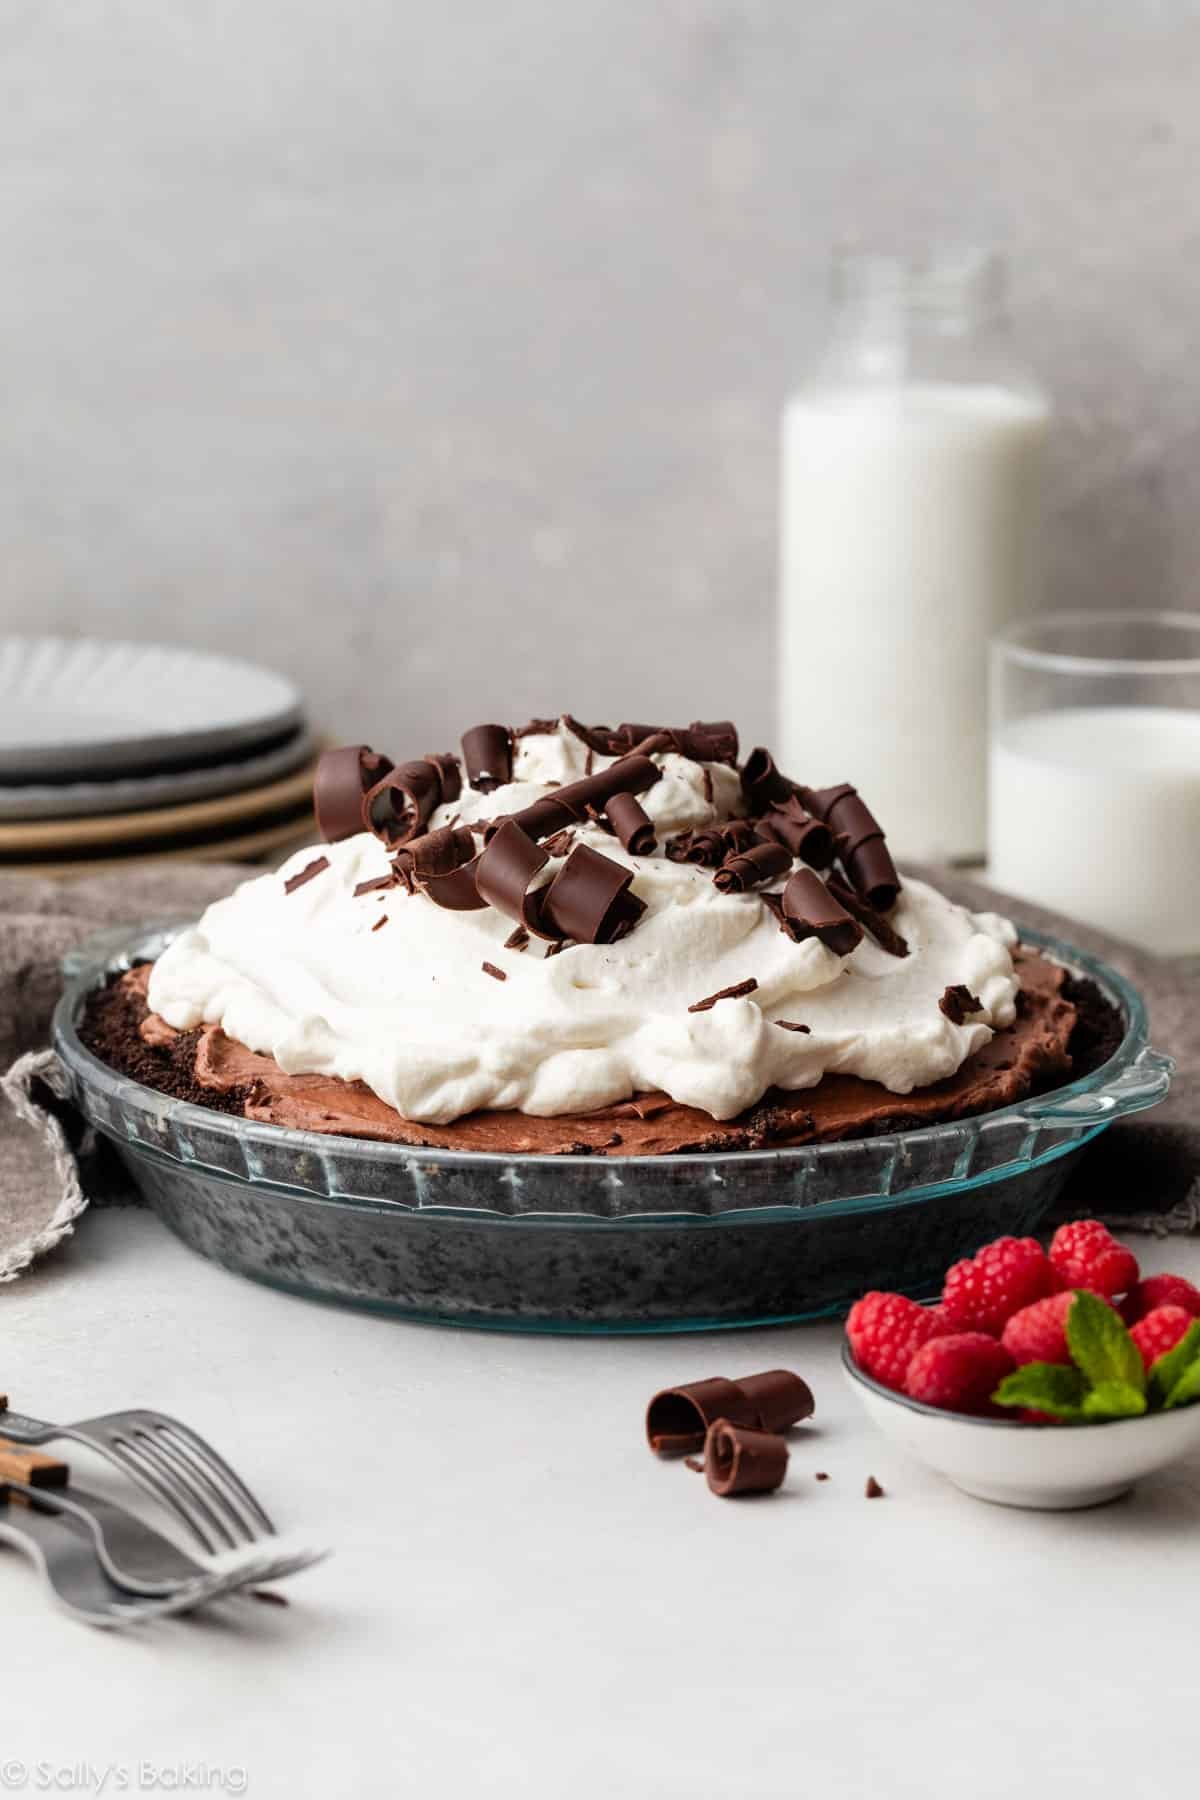
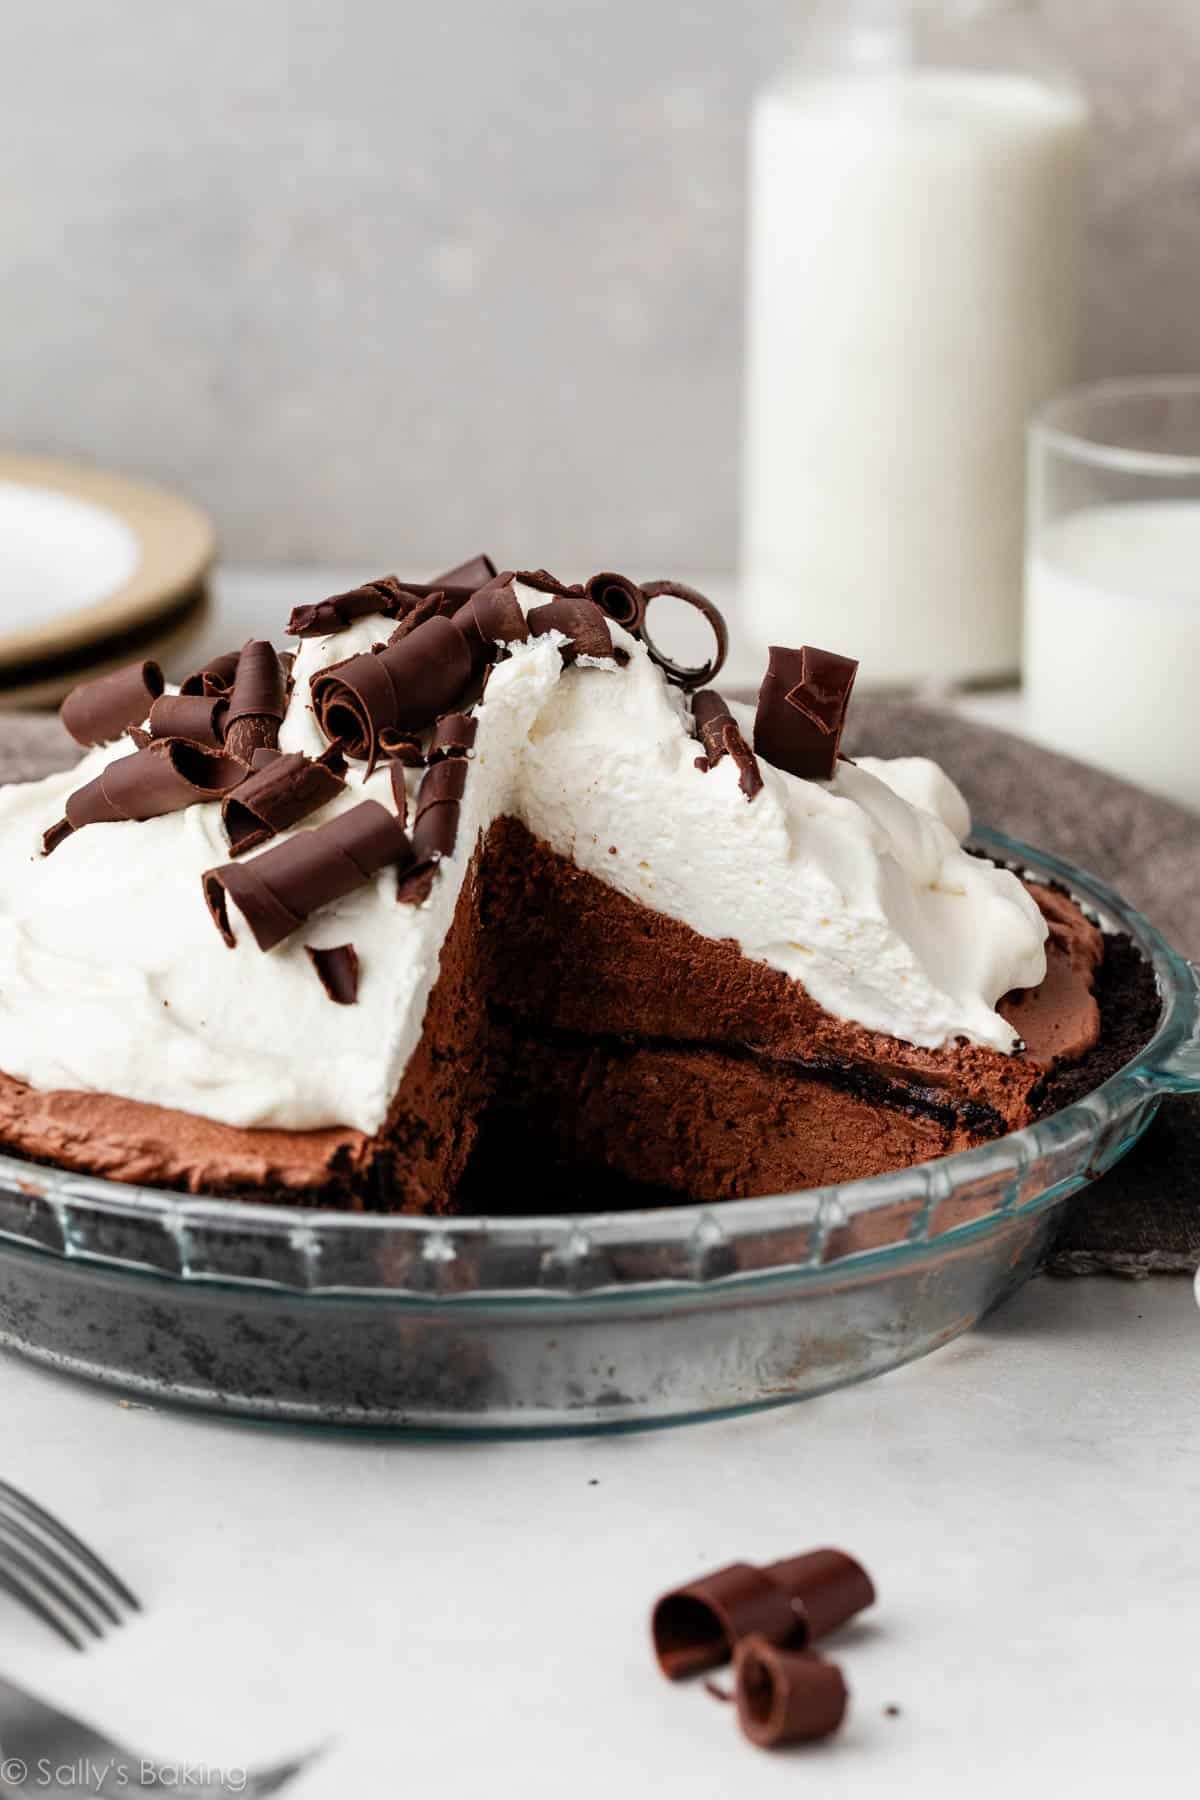
Featuring an Oreo crust, smooth chocolate mousse, and fresh whipped cream, every bite of chocolate mousse pie is irresistible! You’ll be pleasantly surprised at how manageable this towering beauty is to prepare. Be sure to check out my recipe notes for make-ahead instructions—this is a wonderful recipe to prepare 1–2 days in advance.

I originally published this recipe in 2017. It is such a personal and fan favorite, that it deserved a spot in print! You’ll also find this recipe in my New York Times best-selling cookbook, Sally’s Baking 101.
While it may look like a skyscraper of complicated steps, this sky-high chocolate mousse pie requires only a few. Everything is made completely from scratch, but none of that work is fussy. It just takes a little patience, and I encourage you to read through the recipe before starting.
One reader, Paula, commented: “Well, you did it again! You came up with the best chocolate mousse! So delicious and so easy! Not enough exclamation marks to match my enthusiasm. I made this for my daughter’s birthday, so I can’t wait to see her reaction. Thanks for sharing another great recipe. ★★★★★“
One reader, Susan, commented: “The recipe was a little time consuming, but the steps are all simple and the pie comes together beautifully. Light, fluffy, chocolate deliciousness. Everyone loved this pie. I served with fresh raspberries on the side. ★★★★★“
One reader, Rita, commented: “Fantastic for my daughter who can’t have gluten, so I subbed some gluten free sandwich cookies and did everything the same. This will be a great Christmas dessert for tomorrow. This was my first time using egg whites to make a meringue and it was flawless! Took a bit of time for the additions of ingredients, but overall an easy recipe. We will definitely keep this one handy for the future. ★★★★★“
3 Parts to Chocolate Mousse Pie
- Oreo Cookie Crust
- Chocolate Mousse (chocolate + meringue + whipped cream)
- Whipped Cream Topping
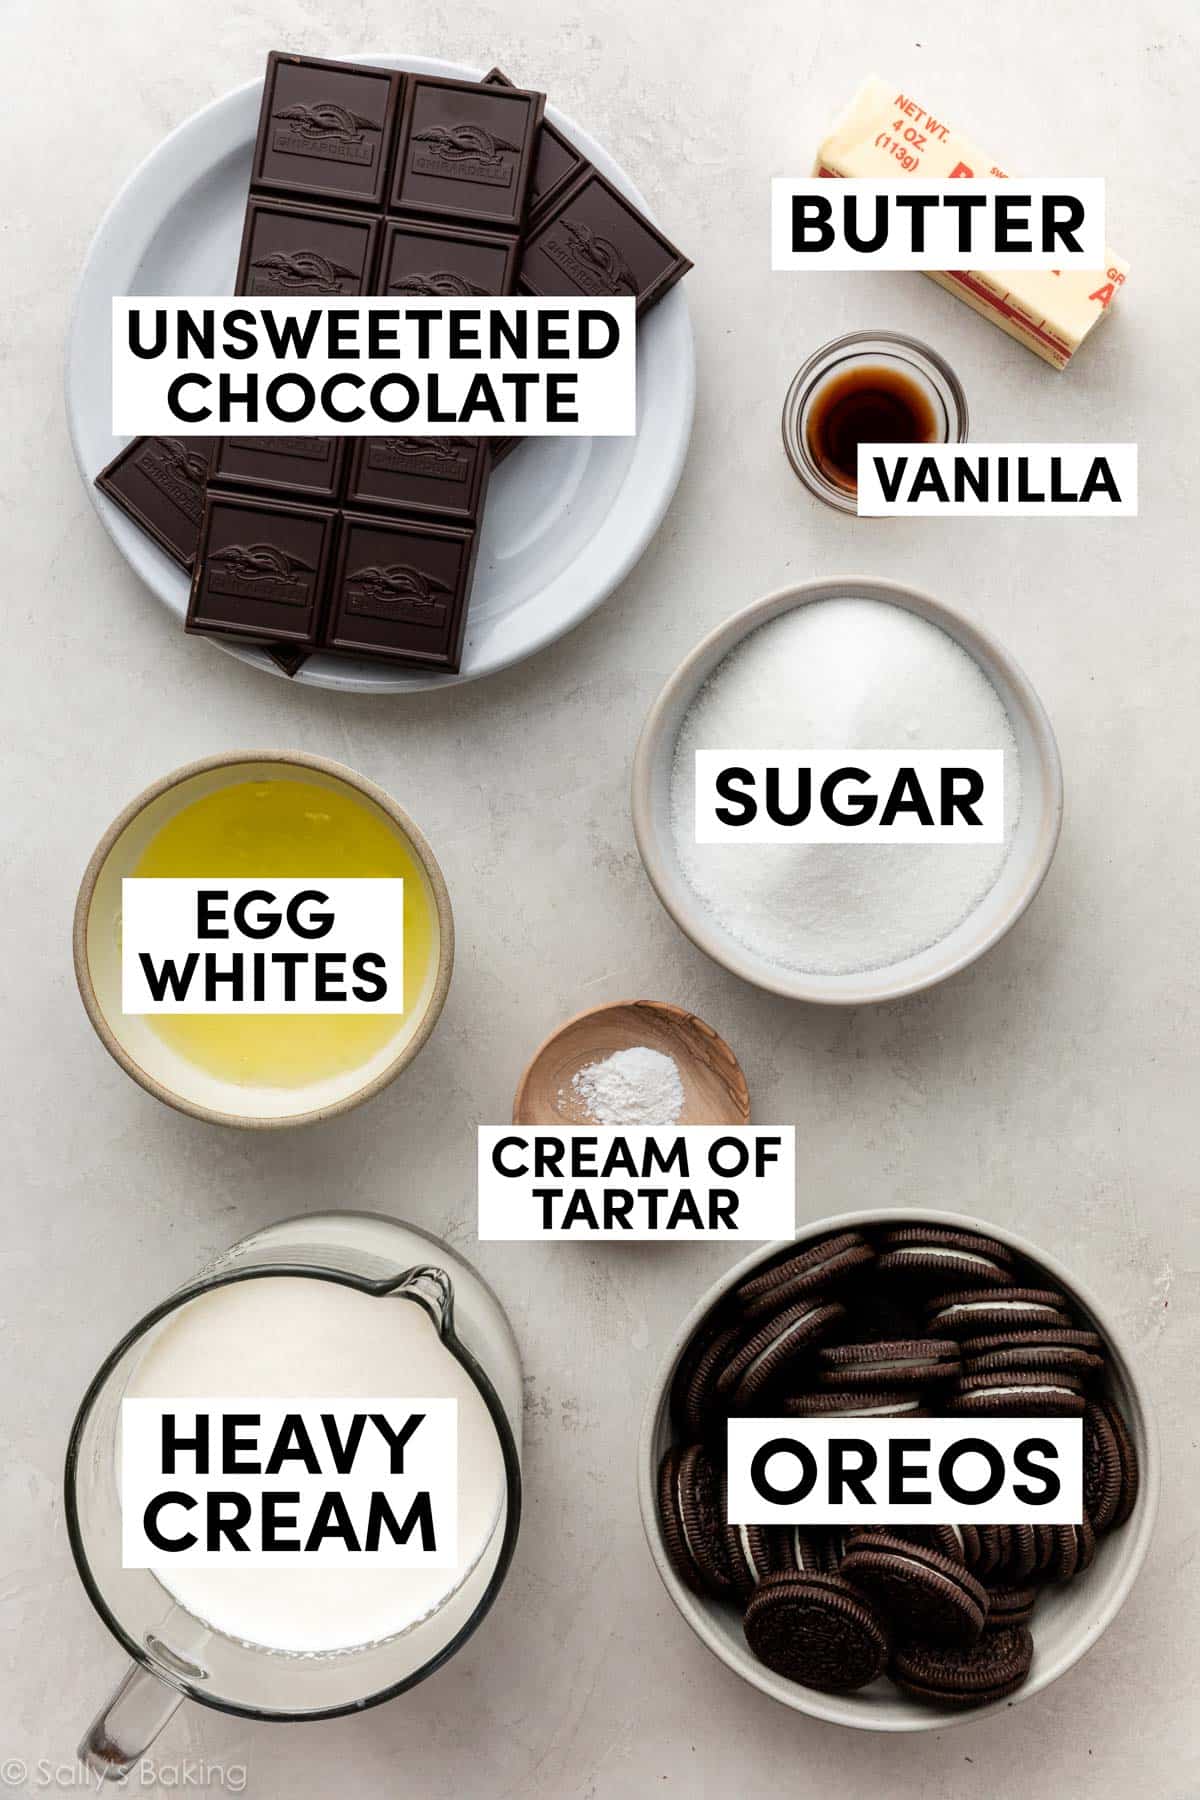
Ingredients You Need:
- Oreos: Use the regular kind, not Double Stuf. Need a gluten-free dessert? Use gluten-free Oreos!
- Butter: You need unsalted butter for both the crust and the chocolate mousse.
- Unsweetened Chocolate: Look for this in the baking aisle of the grocery store, near the chocolate chips. Baking chocolate is typically sold in 4-ounce bars (you’ll need 2). Pick up the bars labeled 100% cacao, or unsweetened chocolate. I like Ghirardelli and Baker’s brands.
- Egg Whites: A main component of the meringue. You’ll cook it on the stove so you don’t have to worry about consuming raw eggs.
- Cream of Tartar: Key for getting the meringue to whip into those glossy peaks.
- Sugar: Granulated sugar is cooked with the egg whites to sweeten the meringue.
- Heavy Cream: You’ll whip this twice: once for the mousse layer and once for the topping.
- Vanilla Extract: For flavoring the whipped cream on top.
Start With the Oreo Cookie Crust
An Oreo cookie crust is the perfect chocolatey base for our chocolate mousse pie. It’s the same crust we use for Nutella cream pie, cookies & cream pie, mocha chocolate pudding pie, and caramel turtle brownie pie.
Made from just Oreos and melted butter, this crust comes together easily. Make sure to use the whole Oreo when grinding them—both the chocolate cookies and the cream center. The cream center adds a delicious sweetness and also helps keep the crust together.
Bake the crust so it stays sturdy and intact when you slice the pie. Let it cool completely before topping with chocolate mousse. Feel free to make the crust a day ahead of time, too.

Chocolate Mousse
There are 3 parts to the chocolate mousse: chocolate (of course!), meringue, and whipped cream. Let’s review each component.
- Chocolate: When I tested this recipe for the first time, I used semi-sweet chocolate and found the mousse to be overly sweet. Reducing the sugar isn’t an option as it’s needed for the meringue, so unsweetened chocolate is the easy answer. Melt the chocolate with some butter and set it aside.
- Meringue: You’ll make a sweet whipped meringue (aka homemade marshmallow creme) and combine it with the melted chocolate.
- Whipped Cream: To add volume and a delightful texture, fold in unsweetened whipped cream.
If you skip the pie and just eat the mousse with a spoon, I understand. It’s light-as-air and remarkable all on its own. You could also try this recipe for homemade chocolate mousse which is even simpler!
Step-By-Step Photos of Chocolate Mousse Pie
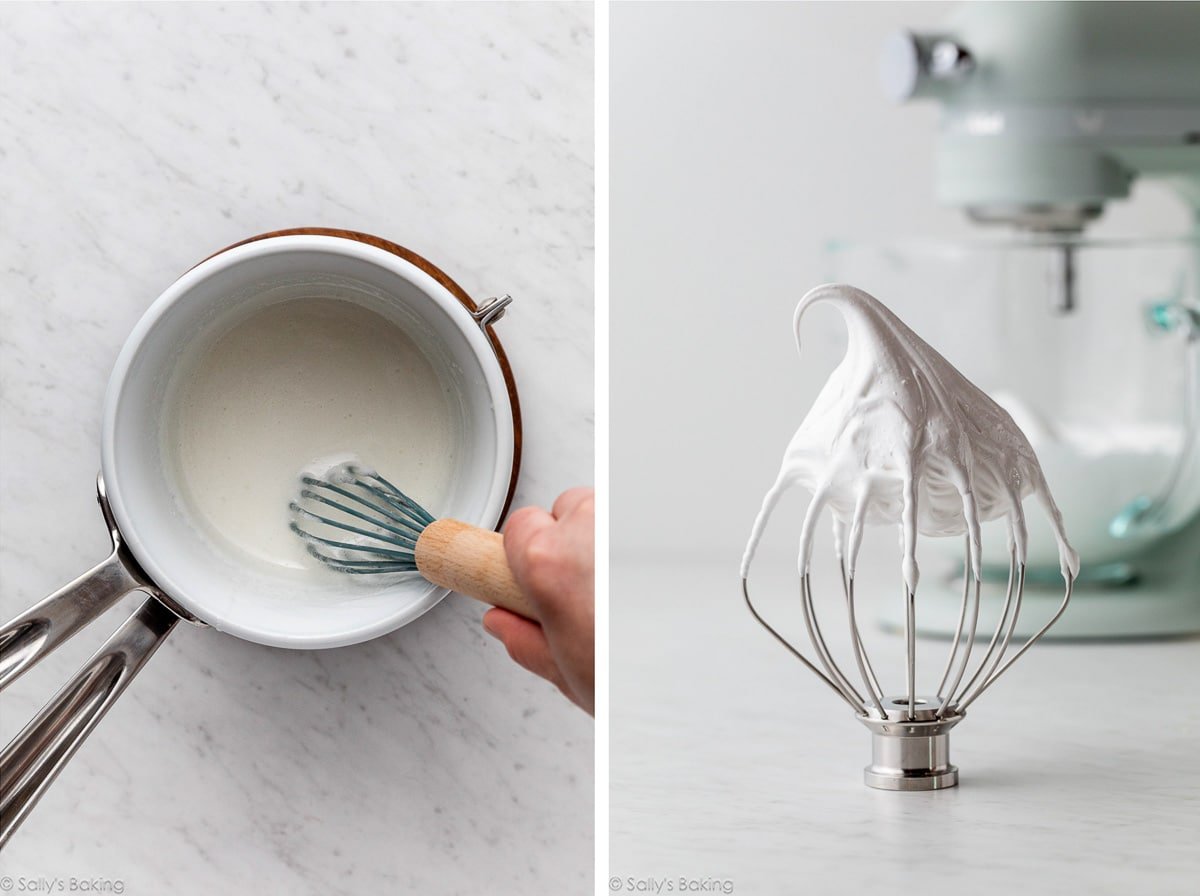
Melt butter and chocolate together first, so it can cool a bit while you prepare the meringue:

This is the meringue:
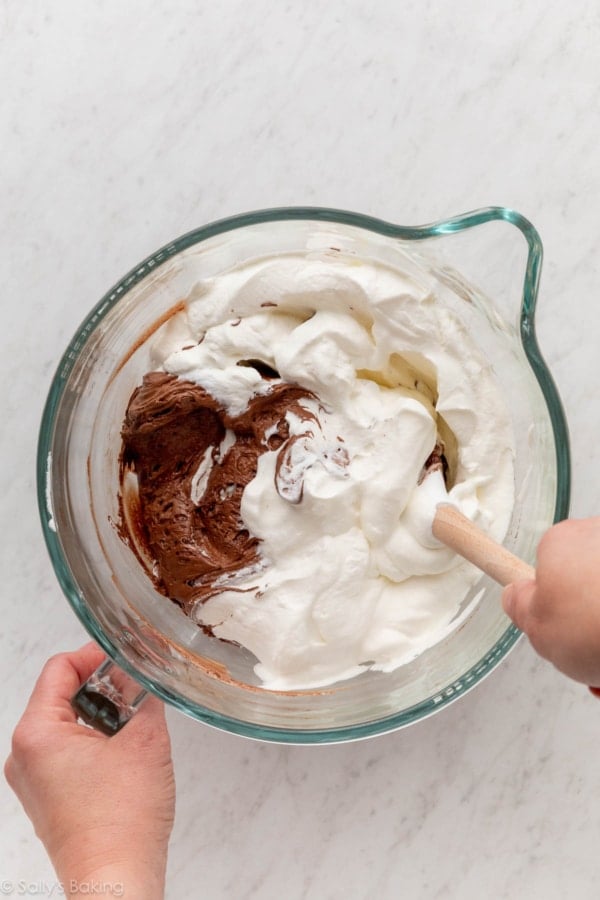
Now you’ll fold the meringue into the melted chocolate:
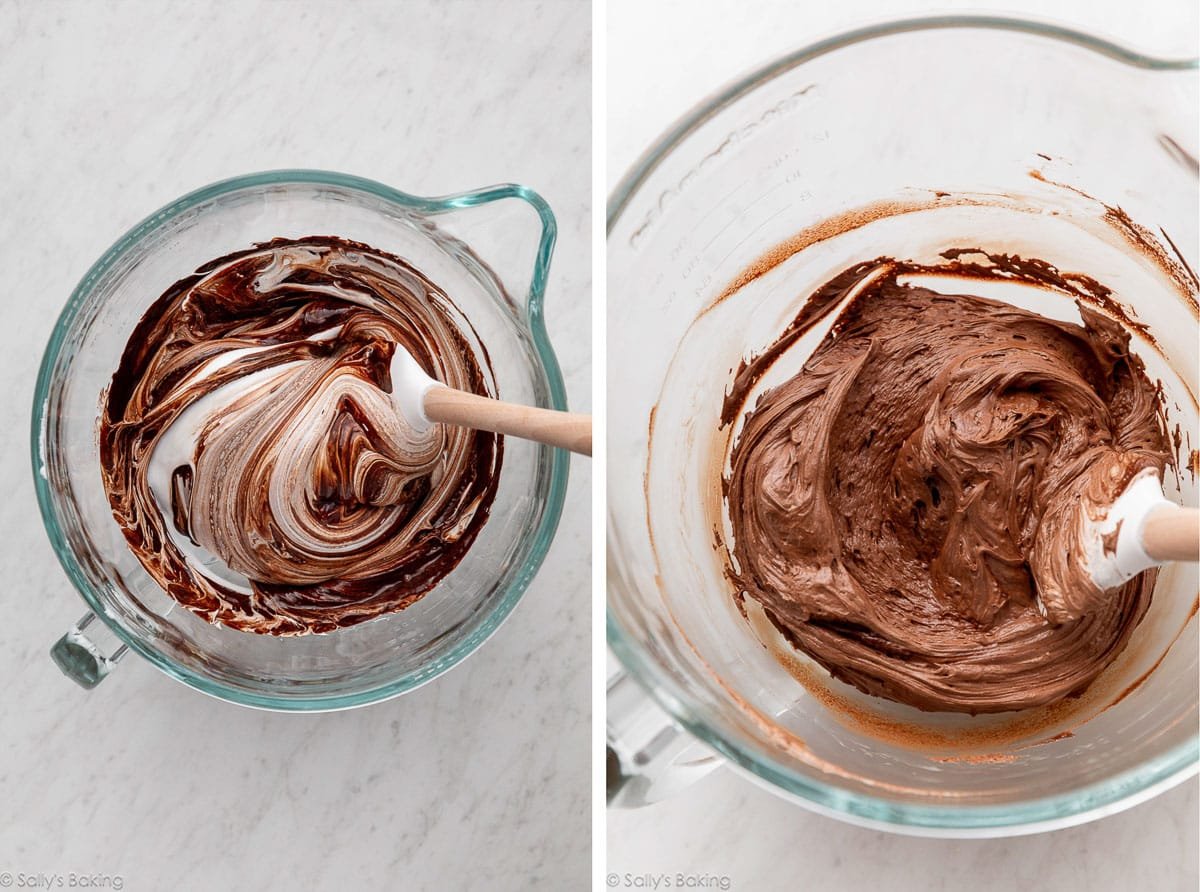
This is adding the whipped cream to make chocolate mousse:
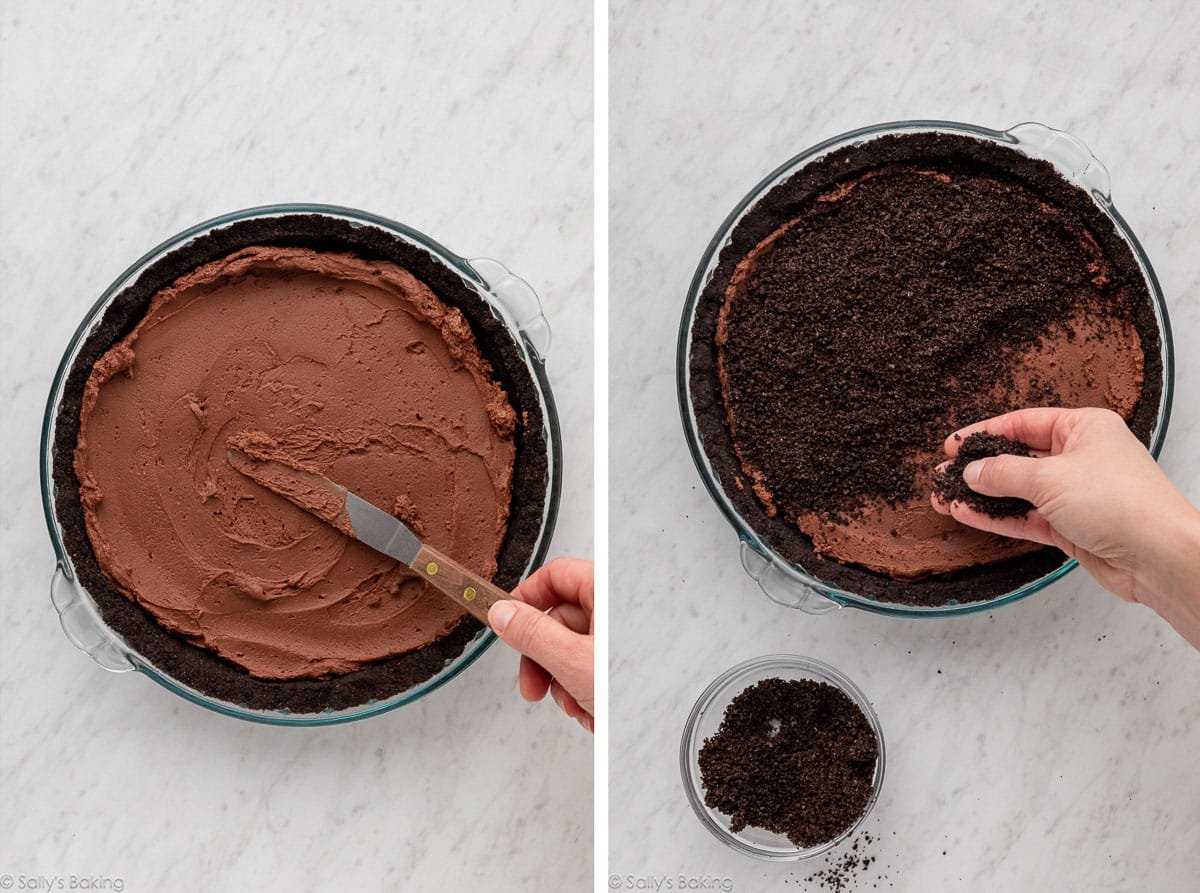
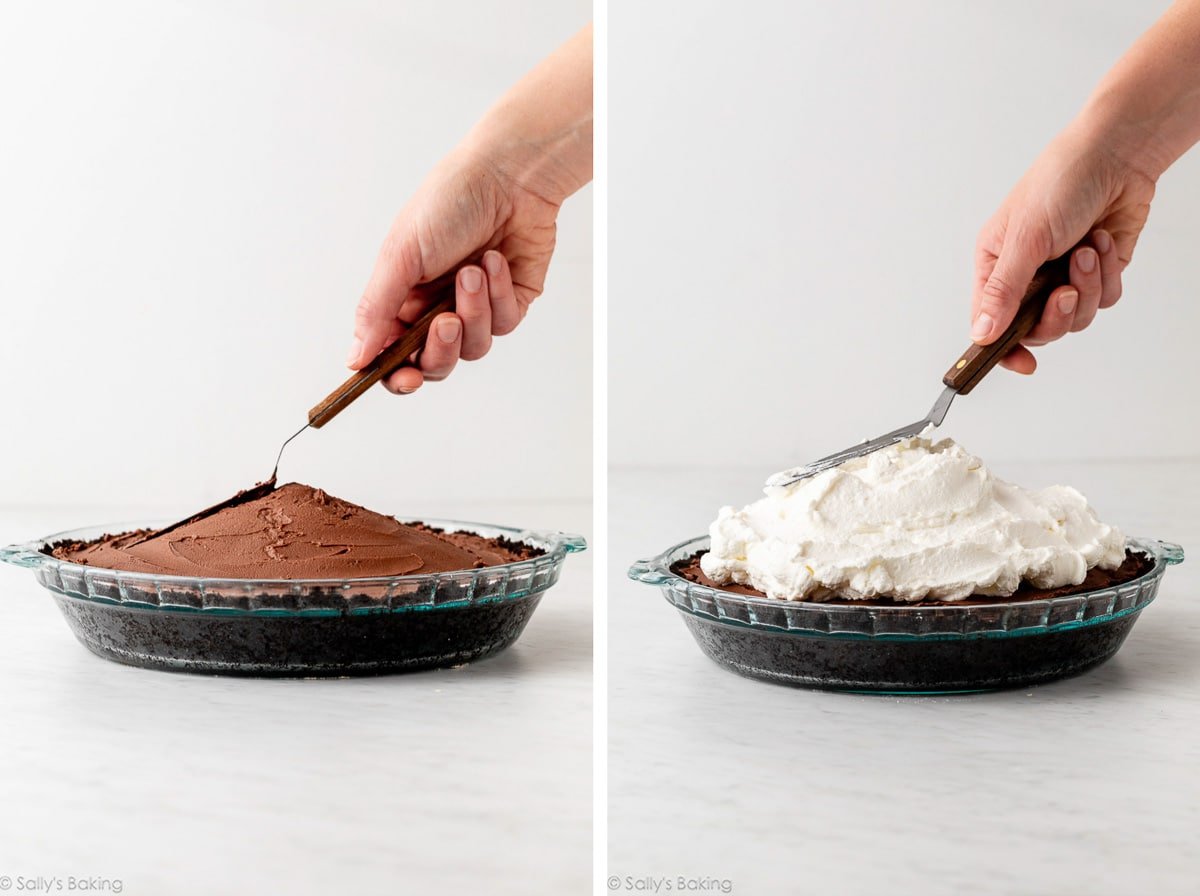
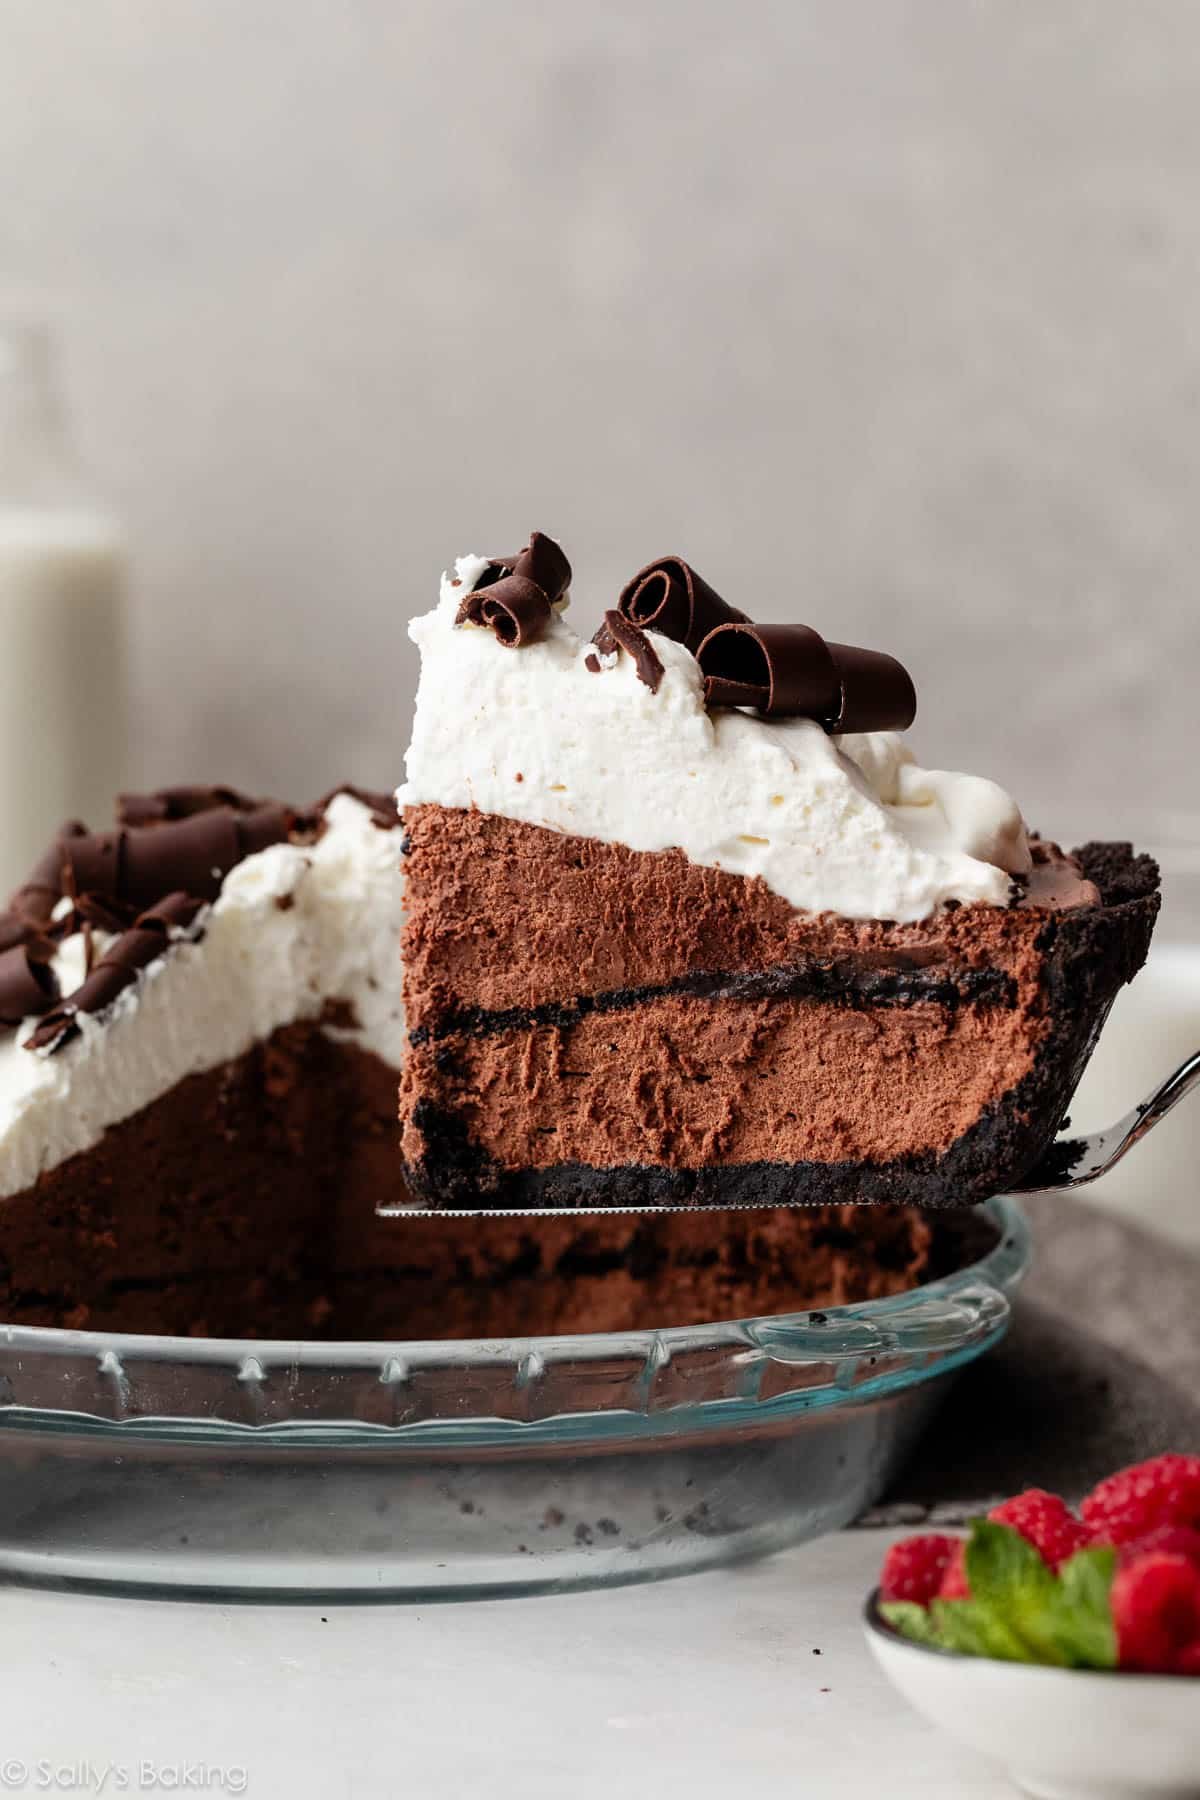
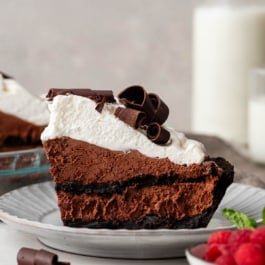
Dome that chocolate mousse so that it’s sky high in the center of the pie. This is easy and requires zero skill or special tools—you just need a spatula to spread it around and shape it into a mound. A layer of Oreo crumbs in the middle is a welcome surprise inside!
Lightly Sweetened Whipped Cream Topping
You’ll make two batches of whipped cream. One batch to fold into the mousse—simply whipped heavy cream—and one sweetened batch that we use as the third and final layer of this chocolate mousse pie. I use my favorite whipped cream recipe for the topping, made with a little sugar and vanilla for extra flavor. I like to keep the whipped cream topping on the softer side, so it spreads nicely over the top of the pie.
Place the pie in the refrigerator for a few hours to chill before slicing into it.
Today’s sky-high chocolate mousse pie is lighter and less sweet, made with an Oreo crust and an airy mousse that’s structured with cooked egg whites and whipped cream. French Silk Pie is richer and sweeter, built on a traditional pastry pie crust with a velvety filling made from whole eggs and plenty of butter.
Check out this towering beauty! It’s rich and creamy with a satisfying Oreo crunch. When you’re ready to serve your chocolate mousse pie, feel free to add some chocolate curls, fresh mint sprigs, more Oreo crumbs, or even fresh raspberries or raspberry sauce.


Sky High Chocolate Mousse Pie
- Prep Time: 40 minutes
- Cook Time: 18 minutes
- Total Time: 5 hours, 40 minutes
- Yield: serves 8-10
- Category: Pie
- Method: Baking
- Cuisine: American
Description
Learn how to make sky-high chocolate mousse pie with this easy tutorial and delicious recipe! This recipe is also in my New York Times best-selling cookbook, Sally’s Baking 101.
Ingredients
Oreo Crust
- 22 regular Oreo cookies (not Double Stuf)
- 5 Tablespoons (71g) unsalted butter, melted
Chocolate Mousse Layer
- 8 ounces (226g) unsweetened chocolate, finely chopped (two 4-ounce bars)
- 2 Tablespoons (28g) unsalted butter
- 4 large egg whites* (120g)
- 1 cup (200g) granulated sugar
- 1/4 teaspoon cream of tartar*
- 2 cups (480g/ml) heavy cream, cold
- 6 whole Oreos, crushed into crumbs (68g)
Whipped Cream
- 1 cup (240g/ml) heavy cream, cold
- 2 Tablespoons granulated sugar
- 1/2 teaspoon pure vanilla extract
- optional: chocolate curls or shavings for topping*
Instructions
- Make the crust: Preheat the oven to 350°F (177°C). In a food processor or blender, pulse 22 Oreos (including the cream filling) into fine crumbs. Pour the crumbs into a medium bowl. Add the melted butter and stir to combine. The mixture will be thick and quite wet. Try to smash/break up any large chunks. Pour the mixture into an ungreased 9-inch pie dish. With medium pressure using your hand, pat the crumbs down into the bottom and up the sides to make a compact, thick crust. Bake for 10 minutes, and then place on a cooling rack to cool completely.
- Make the chocolate mousse layer: Microwave the chopped chocolate and butter together in a large heat-proof bowl, stopping and stirring every 20 seconds until completely melted. Set aside.
- Make the meringue for the mousse layer: Place the egg whites, sugar, and cream of tartar in a heat-proof bowl or the upper pot of a double boiler. Set bowl over a saucepan filled with 2 inches of simmering water. Do not let the bowl touch the water. Whisking constantly, cook the egg white mixture until the sugar has dissolved and the mixture reaches 160°F (71°C) on an instant-read thermometer.
- Transfer the mixture to a heat-safe bowl (if using a hand mixer) or the bowl of a stand mixer fitted with a whisk attachment. Beat on high speed until soft, glossy peaks form, about 5–6 minutes. See photo above for a visual. Gently fold the melted chocolate into the egg white mixture until combined. Wash the mixer bowl and whisk attachment clean.
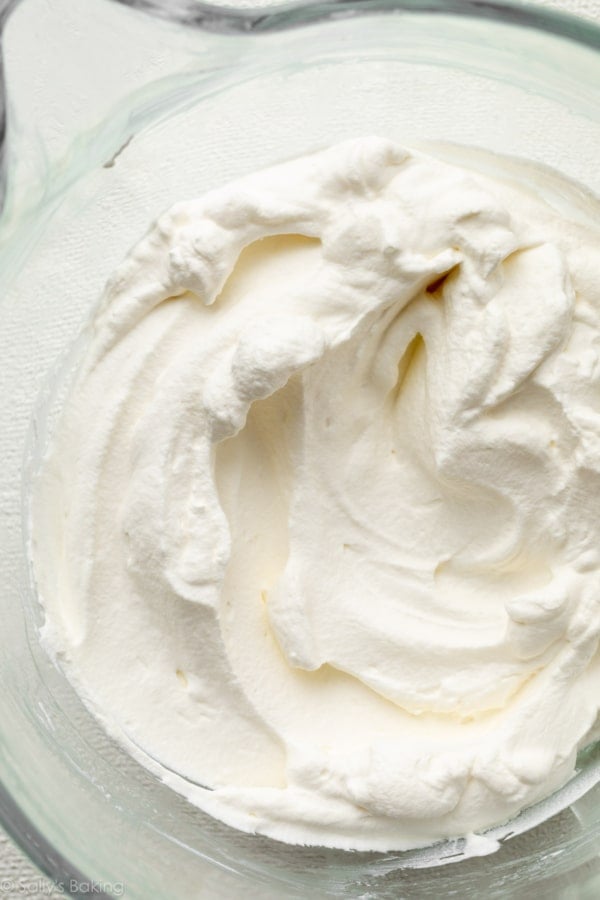
- Make the whipped cream for the mousse layer: Using a handheld or stand mixer fitted with a whisk attachment, whip the heavy cream on medium-high speed until medium-to-stiff peaks form, about 3–4 minutes. Gently fold whipped cream into the chocolate mixture. It may seem like a lot of whipped cream, but just keep folding and it will eventually come together. Do not over-mix; it will deflate the mousse. (No need to wash or wipe the bowl/whisk attachment clean—you’ll make sweetened whipped cream in step 7.)
- Using a small offset spatula, spread half of the mousse in the cooled pie crust. Sprinkle the crushed cookie crumbs evenly over the top. Top with the remaining chocolate mousse, mounding it in the center to create a dome shape. Place the pie in the refrigerator while you prepare the sweetened whipped cream topping.
- Make the whipped cream topping: Using a handheld or stand mixer fitted with a whisk attachment, whip the heavy cream, sugar, and vanilla on medium-high speed until medium peaks form, about 3 minutes. You want the peaks to be somewhat soft so the whipped cream spreads nicely on the mousse.
- Remove the pie from the refrigerator and spread the whipped cream on top—keeping that dome shape in the center. Top with chocolate shavings, if using. Refrigerate the pie, uncovered, for at least 4 hours or up to 1 day. Let it sit at room temperature for 10 minutes before slicing and serving. Store leftover pie, covered, in the refrigerator for up to 4 days.
Notes
- Make Ahead Instructions: Since this pie needs to chill for several hours or overnight, it’s perfect for making a day or two ahead of time. Carefully cover it if refrigerating for longer than 1 day. You can freeze the pie for up to 3 months, but it won’t be quite as beautiful. Freezing leftovers is a great idea—simply allow to thaw overnight in the refrigerator before enjoying. Or enjoy frozen!
- Special Tools (affiliate links): Electric Mixer (Handheld or Stand) | Glass Mixing Bowls | Whisk | Saucepan | 9-inch Glass Pie Dish | Food Processor (for Oreo crust)
- Pie Crust: Feeling ambitious? Try a traditional pie crust instead and follow the instructions in this How to Blind Bake Pie Crust post. Baked pie crust/shell must cool completely before adding the chocolate mousse filling.
- Egg Whites: The egg whites are gently cooked in step 3 to 160°F (71°C), which is considered safe to eat. You can use a candy thermometer or instant-read thermometer to determine their temperature. You can use pasteurized egg whites, though keep in mind they may never reach the volume of unpasteurized egg whites.
- Cream of Tartar: Key for stabilizing those egg whites.
- Chocolate Curls: Here’s how to make chocolate curls, or you can run a vegetable peeler down the long side of a Hershey’s milk chocolate bar. Chocolate sprinkles, mini chocolate chips, fresh raspberries, or more Oreo crumbs work just as well!
- Adapted from Bon Appetit.


Reader Comments and Reviews
I was looking for a new chocolate mousse pie recipe and this is it! I’ve loved so many recipes from here so I really had no doubt. I got the height and it was so much fun to make. Thank you!
HI Sally, i’m not a big macaron fan so I was thinking of trying this recipe for the challenge this month and since it’s flourless, using it for our passover seder dessert. however, we can’t have oreo cookies. any other ideas for what i can do for the crust? i know they make lots of passover cookies, so maybe i can just find a chocolate cookie to use instead. thanks!
Hi Alison, you sure can! Another chocolate cookie or even a graham cracker crust would be delicious here. Would love to know what you decide to try!
Hi Sally,. This is second attempt at msg,. Not sure if it went thru 1st time.
Anyway, it seems i goofed up somehow regarding the merangue. Iy didnt get stiff peaks, but rather a gooey drippy mess. I kept whipping to no avail and even tried adding a little cornstarch but still doesnt look right. Any suggestions? I never had this happen to merangue before but this is first time starting it in the double boiler. I am gping to use it anyway and hope for the best . But any suggestions for future attempts much appreciated. ( I’ll let you know how this pne turns out)
Thank you
Karen L
Hi Karen, if your meringue isn’t whipping to stiff peaks it’s likely some fat got into the mixture. Next time, wipe all tools that will touch the meringue with a little lemon juice or white vinegar and make sure no yolks get into the whites. Grease or fat prevents your meringue from setting up.
Good morning, I’m sure this sort of question drives you a bit crazy because you’ve spent so much time testing the recipe as is…but here it goes anyway (consider that my apology in advance). I would like to make this in 6 inch pie plates. Do you think I can split the recipe in half? If so, does that alter the baking time for the crust? Thank you for your help. Your vanilla cake (with the addition of mini chocolate chips) and your coconut cream pie were big hits this Thanksgiving! Happy Holidays!
Hi Sandra, We haven’t tested a smaller pie but yes, you can try cutting the recipe in half for a 6 inch pie. The bake time will be shorter for the crust (same oven temperature). Let us know if you try it!
Saaaallyyyy! I’ve been meaning to make this pie for YEARS and I finally just got around to it a couple days ago because I had 3 cups of whipping cream I needed to use up or it was going to go bad. Oh my gosh! It’s the most decadent dessert I’ve ever had! It is so rich but in the best way. I wanted to leave a review the day I made it but for some reason all of your comments were closed. But anyways, I’m incredibly thankful that I finally took the time to make this beauty. It really hits the spot at the end of a hot summer day! Thank you for yet ANOTHER keeper 🙂
Also, mine may have been just a high chocolate mousse pie, as opposed to SKY high because I couldn’t stop myself from snacking on that incredible chocolate mousse 😉
Boy did I mix it up. I had a craving for lemon and found a jar of lemon curd (10 ounce) in my pantry so I just folded the egg whites into the curd, then folded about two-thirds of the cream in, piled into an eight inch pie plate and topped it with the remaining cream that I sweetened. I also used a graham cracker crust. It was heaven on a fork. Perfect base for any flavoring. I WILL try it with chocolate!
I enjoyed this pie! Only thing is – it’s a big more dense, I think prefer the french silk chocolate pie varieties over this perhaps. I will have to try Sally’s french silk pie soon.
Thanks for another great recipe, Sally! Only tried the mousse element & it was great.
For a fun experiment, I tried this recipe by making the meringue with aquafaba (chickpea liquid). I was not aiming for a vegan recipe (just had a can of chickpea liquid leftover from dinner), so I kept the chocolate and cream.
For anyone curious, I used all of the liquid from a 15-ounce can of chickpeas. I whipped them in the same manner as the egg whites, including the cream of tartar. All of the ratios worked out great!
Happy baking!
I was just wondering what brand of baking chocolate you used for this.
Hi Adri, There are several brands to choose from like Baker’s, Ghirardelli, Lindt (Lindt bars are actually sometimes in the candy aisle), Nestle, etc. If you shop at Trader Joe’s, their “Pound Plus” bar is a good choice.
Haven’t tried this recipe yet, but it looks delicious. I’m a little concerned that a 9-inch pie won’t be enough for 8 to 10 people, as you describe. I’m making it for 8 people and want to make sure there’s enough to go around.
Hi Mary! This is a very rich pie, so it’s best to cut the slices thinner to yield 8-10 slices. Any larger than that would be huge!
Fantastic for my daughter who can’t have gluten so I subbed some gluten free sandwich cookies and did everything the same. This will be a great Christmas dessert for tomorrow. This was my first time using egg whites to make a meringue and it was flawless! Took a bit off time for the additions of ingredients but overall an easy recipe. We will definitely keep this one handy for the future. Thank you!
Hi Sally, I can’t wait to make this pie for Christmas. I just have a quick question… when you say to crush the Oreo, are you including the cream filling or just the cookie part? In the past when I’ve included the cream filling, I’ve had oil separate from it and make the crust less desirable, so I just wanted to double check before I make it. Thank you!!
Hi Beth! Yes, the entire cookie– cream included.
HI Sally !
Well you did it again ! You came up with the best recipe for chocolate mousse ! So delicious and so easy ! Not enough exclamation marks to match my enthusiasm. I made this for my daughter’s birthday – so I can’t wait to see her reaction . Thanks for sharing another great recipe
Hi! Sounds delicious!
Is there anyway to make mini versions of this pie? Like in a muffin tin, similar to the key lime pie ones that are Amazing!
Thanks!
I can’t see why not! If doing so, use a muffin pan. Pre-bake the mini crusts prior to filling. Definitely use cupcake liners, too!
The recipe was a little time consuming but the steps are all simple and the pie comes together beautifully. Light, fluffy, chocolate deliciousness. Everyone loved this pie. I served with fresh raspberries on the side. ♥️
Sally, I was wondering if I could possibly not bake the Oreo crust? Our oven isn’t working at the moment (isn’t that the worst!) and so I have to make something completely no-bake. If this crust won’t work out, do you have any other suggestions for a no-bake Oreo crust? Thanks! I appreciate your advice!
You can skip baking the Oreo crust, but make sure that the Oreos are very powdery so they soak up the butter and the whole thing sets in the refrigerator. 🙂 Let me know how it turns out!
Sally, this pie is amazing! The crust held up fine, even though I didn’t bake it. I just put it int he freezer while I prepared the mousse, and it was perfect! And the mousse is so light and delicious! And I learnt a new technique while making this: making swiss meringue! I was tentative and nervous at first, but once the whole process was completed without a problem, I realized just how simple and easy it really is! Like pie crust; you convinced me just how easy it is to make pie crust at home, and now I would never buy it from the store! The one problem we had with the pie is that the cookie layer in the middle of the two mousse layers made the slice separate when we tried to successfully transfer the slices from the pie dish. So next time I think I will either skip the middle layer of cookie crumbs, or maybe try and press the down into the mousse layer. Otherwise, the taste was outstanding, and I will definitely be making this again!
Hi Sally! Can this mousse be used as a cake filling as well?
Yes, absolutely!
Hi Sally!
First of all – this was delicious!!
My crust fell a lot in the oven. I had pressed it up the sides of the pie dish (ungreased), but when I got it out of the oven the crust was essentially flat. Nearly nothing on the inclined sides.
Any ideas what went wrong and how to fix it?
Thank you!!
Was it pressed pretty snug and tight? Did it simply crumble down the sides? I’m so happy you enjoyed the chocolate mousse pie though!
Hey Sally, quick question: I want to make this in small mason jars for individual serving. I understand that mason jars are not oven safe unless I bake with water bath what are your thoughts on this? Or should I just leave Oreo crust bake and just refrigerate it instead of baking? Many thanks!
I’d skip the baking of the crust and layer the filling in with Oreo crumbs!
Made this today- late to the challenge. Where has this pie been all my life? It was surprisingly simple to make ( compared to the trepidation I felt! ) and I’m super excited to share it with my family tonight. I really appreciate all the clear steps and pictures, as well as the tips regarding freezing. This is a definite make again ( but not until I get a gym membership! 😉 )!
Hey Sally! A million thanks for encouraging the likes of us to try our hand at mousse for the first time! as much as my final mousse tasted light and delicious, I felt that the texture was not as smooth as desired – specks of maybe chocolate (inspite of melting it all the way) …..did not seem to be sugar…..any thoughts on this issue??
Also why do we need butter in the chocolate while melting…..is plain chocolate doable??
Thanks a ton for your recipes 🙂 Am an ardent fan!
The meringue was warm, correct? So that should further melt the chocolate/butter mixture to ensure no chunks of chocolate. I’m happy you loved the texture, though! The butter keeps the chocolate smooth and soft– otherwise is could harden, ruining the texture of the mousse.
Do you think I could make the different components the night before and then assemble it all the next day?
Absolutely!
This pie filling was excellent but I had issue with my oreo crust was rock-hard. I baked for exactly 18 minutes. I think it needed to be baked for a less amount of time if at all…
Definitely some time in the oven to prevent it from being an Oreo crumble— and more like a crust. If you decide to make again, feel free to reduce the pre-bake time. So happy you enjoyed the filling!
Today is pie day 3.14. So, that meant I had to make pic for everyone to enjoy and what a perfect day to complete this month’s challenge. Completed successfully! A very chocolate dessert that was delicious. Is this a trend…monthly baking challenge and delicious chocolate desserts? Probably not. Can’t wait to see what April will bring. I hope you made a pie today too!
Made this for my son’s birthday and LOVED it!! Thanks for the challenge, Sally!
I will be making this tomorrow but curious to know Sally, what brand of unsweetened chocolate did you use for this recipe?
Hi Eva! I used Baker’s brand unsweetened chocolate.
I made this over the weekend and it was AMAZING. So simple and not too sweet, but packed with chocolate flavor. So good!
Sally! Served this tonight, it was AMAZING, thanks so much for the great recipe! I’m really liking your monthly baking challenges, really hope you continue them! Thanks again:)
Hi Sally! I made this today as a component of my birthday cake, and it tastes DELICIOUS!! I love how the chocolate flavor is blended together with the creaminess of the whipped cream, it is so airy and light. Thank you for the recipe, keep baking!
Jasmine
Hi Sally. This looks amazing and can’t wait to make it. I have a question about the Oreos. It looks like you scraped off the filling. Am I right?
Hi Susan, They are actually whole Oreos crushed up…no need to scrape out the filling!