

Unless you were born in Maryland, you likely have no clue what Smith Island cake is. Even if you live here, you still might not know. Heck, I had no idea what Smith Island cake was until a reader emailed me encouraging me to try it. After a little digging, recipe testing, and LOTS of taste testing, let me present you with a homemade version of the official dessert of Maryland: the Smith Island cake. Only a handful of states have an official state dessert, so you know this one is extra special!!!
Smith Island, an island situated on the Chesapeake Bay between Maryland and Virginia and only reachable by boat, is home to this epic beauty. The cake, as I learn, dates back to the early 1800s (or even 1600s depending what you read!) when Smith Islanders would send the cake with watermen on the autumn oyster harvest. It’s frosted with fudge instead of buttercream because the fudge lasts much longer. Today the cake towers with anywhere from 8-14 ultra thin layers and comes in a variety of flavors like lemon, carrot cake, coconut, and strawberry. We’re sticking with the original Smith Island cake, a moist yellow cake with chocolate fudge icing. Sprinkles totally optional, but I always encourage a little rainbow happiness.
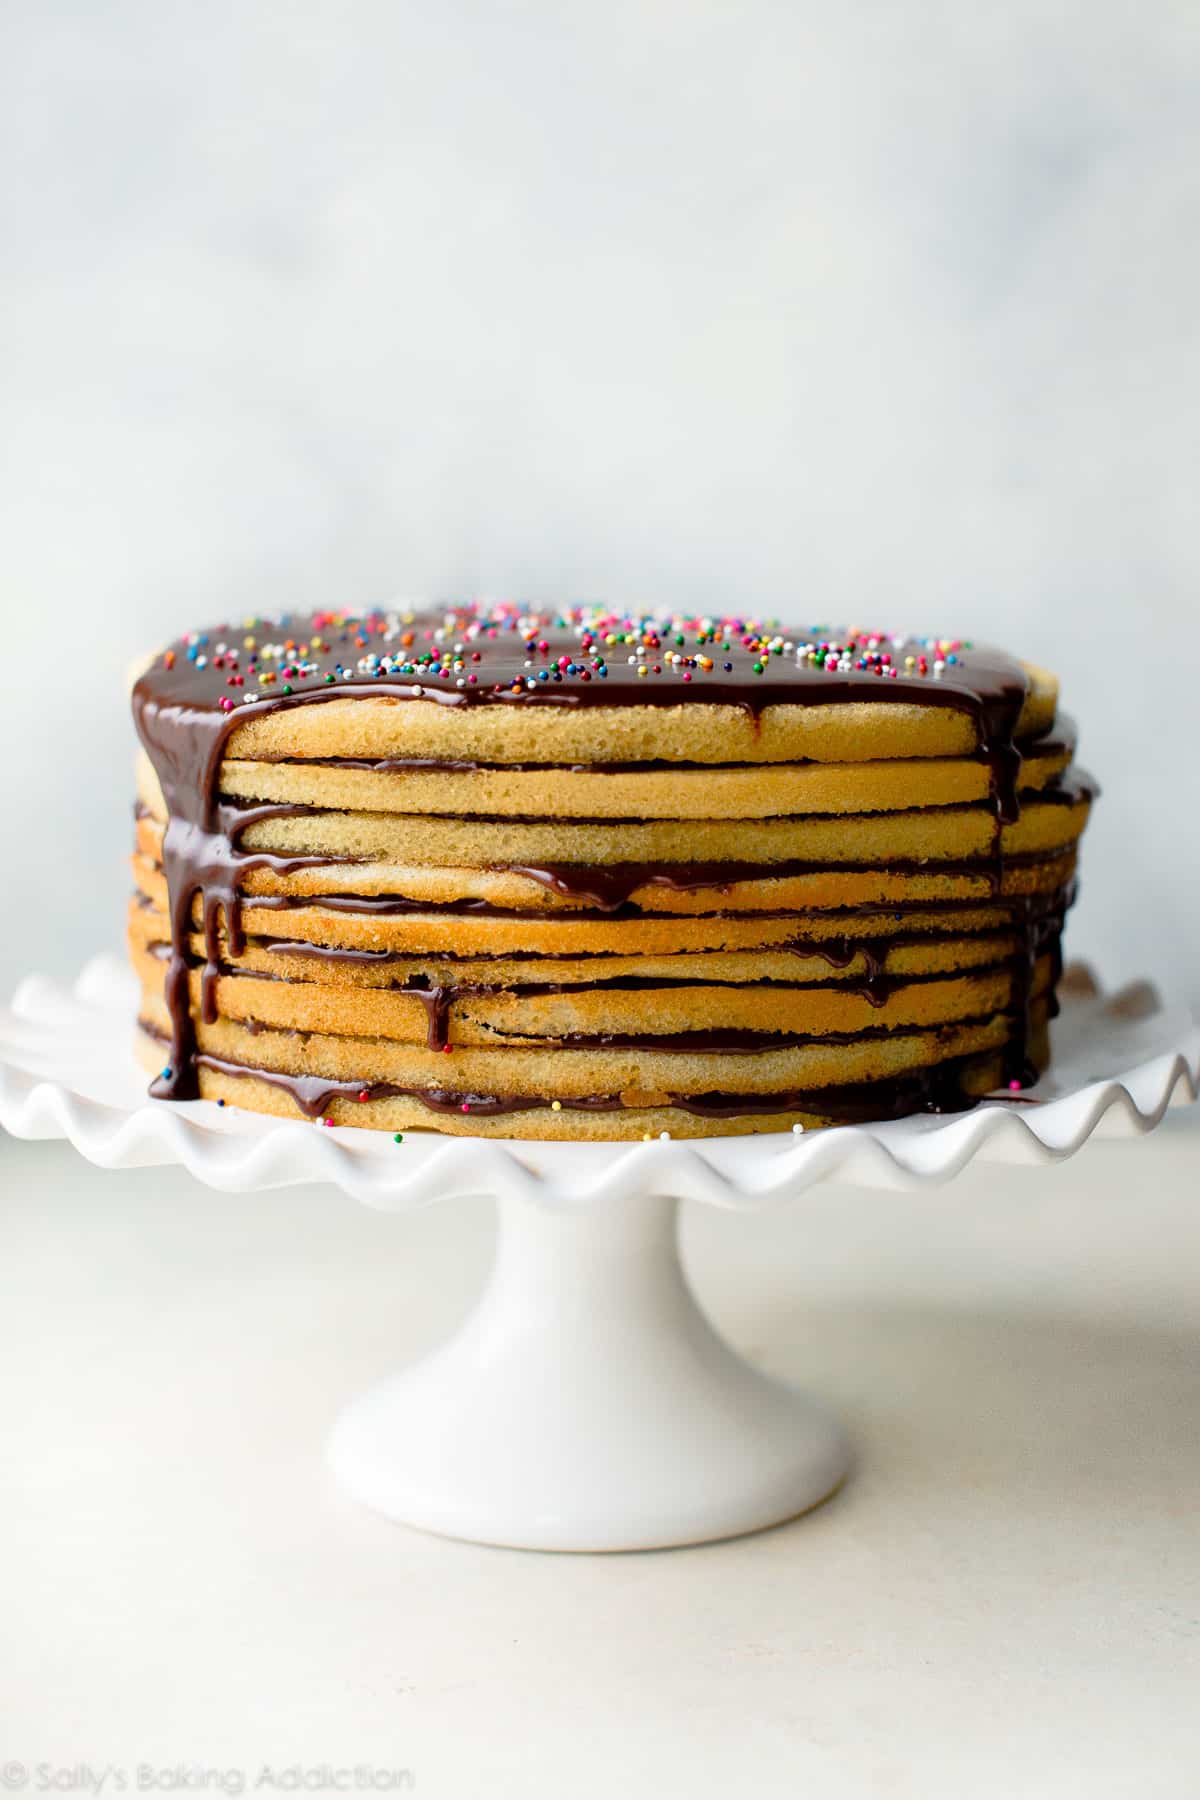
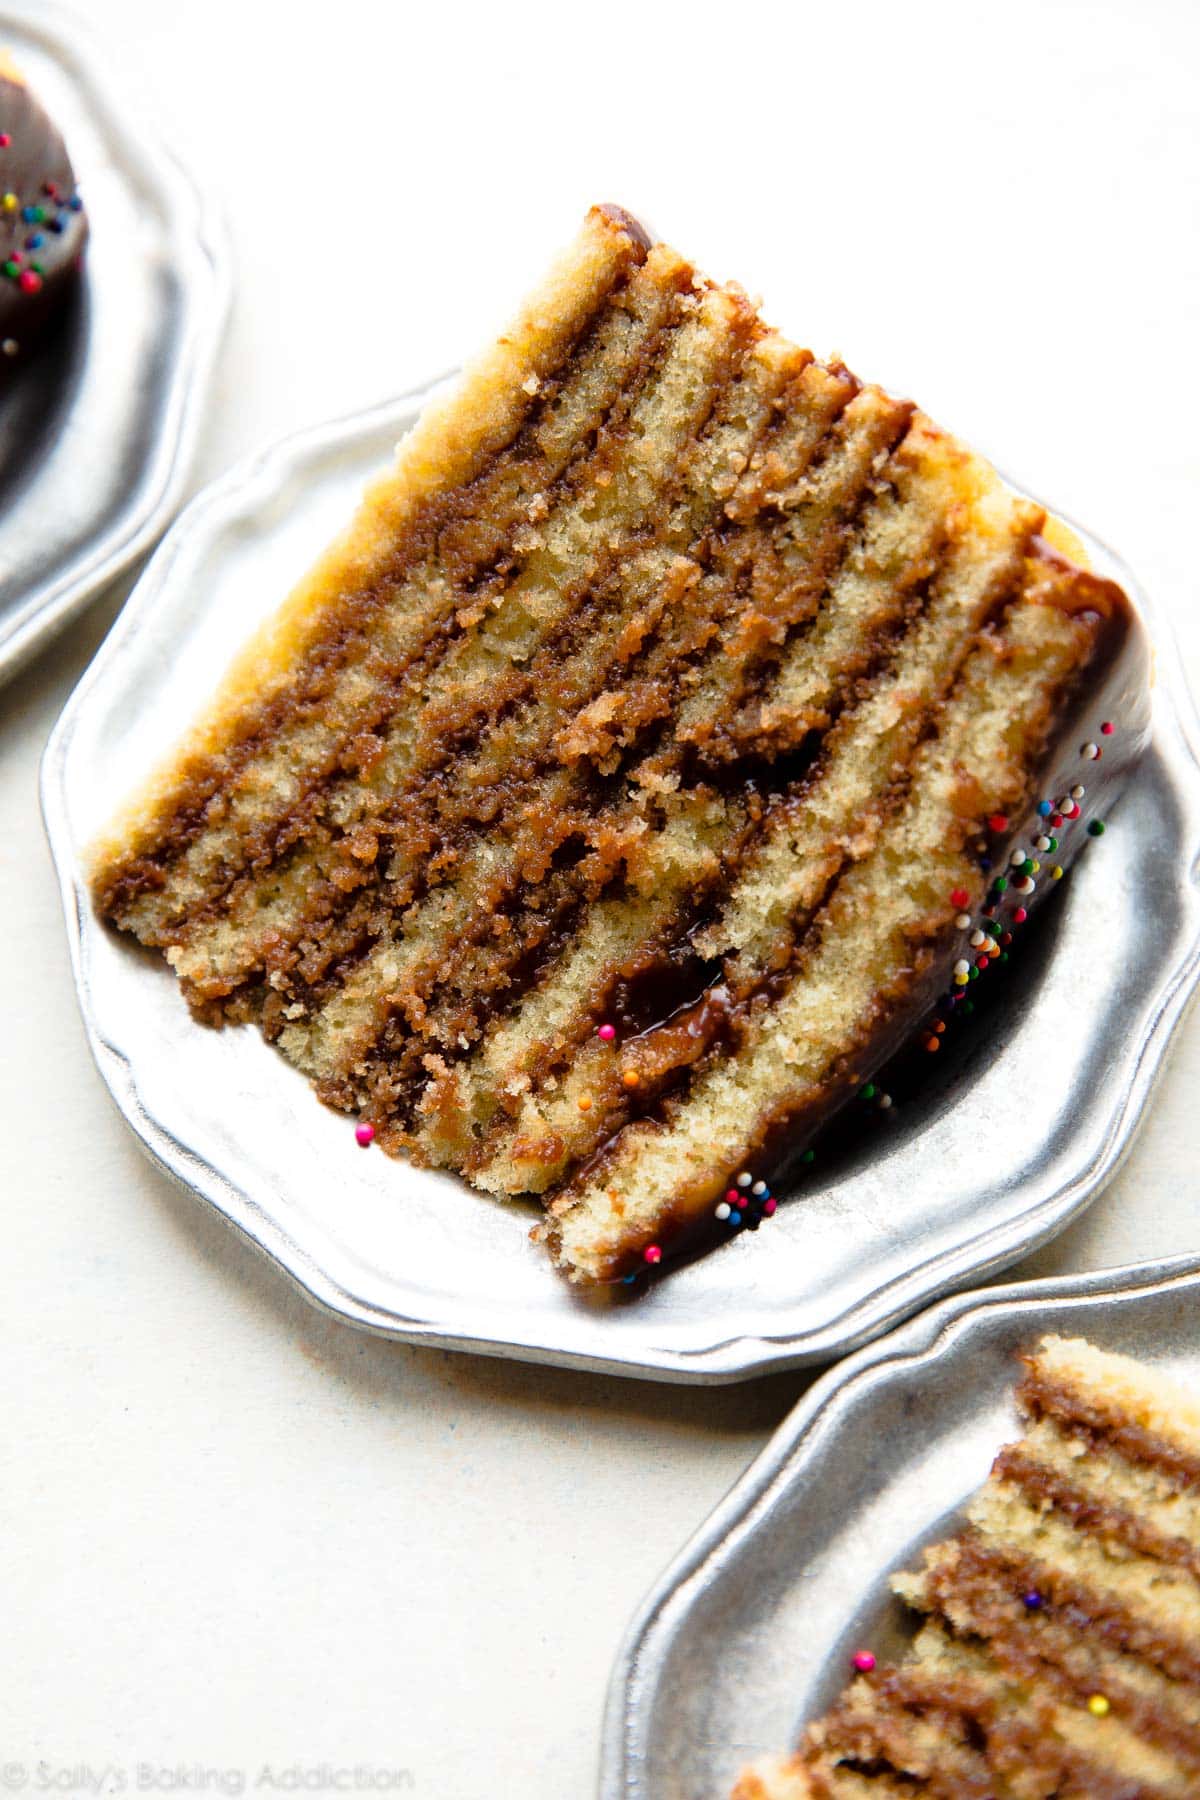
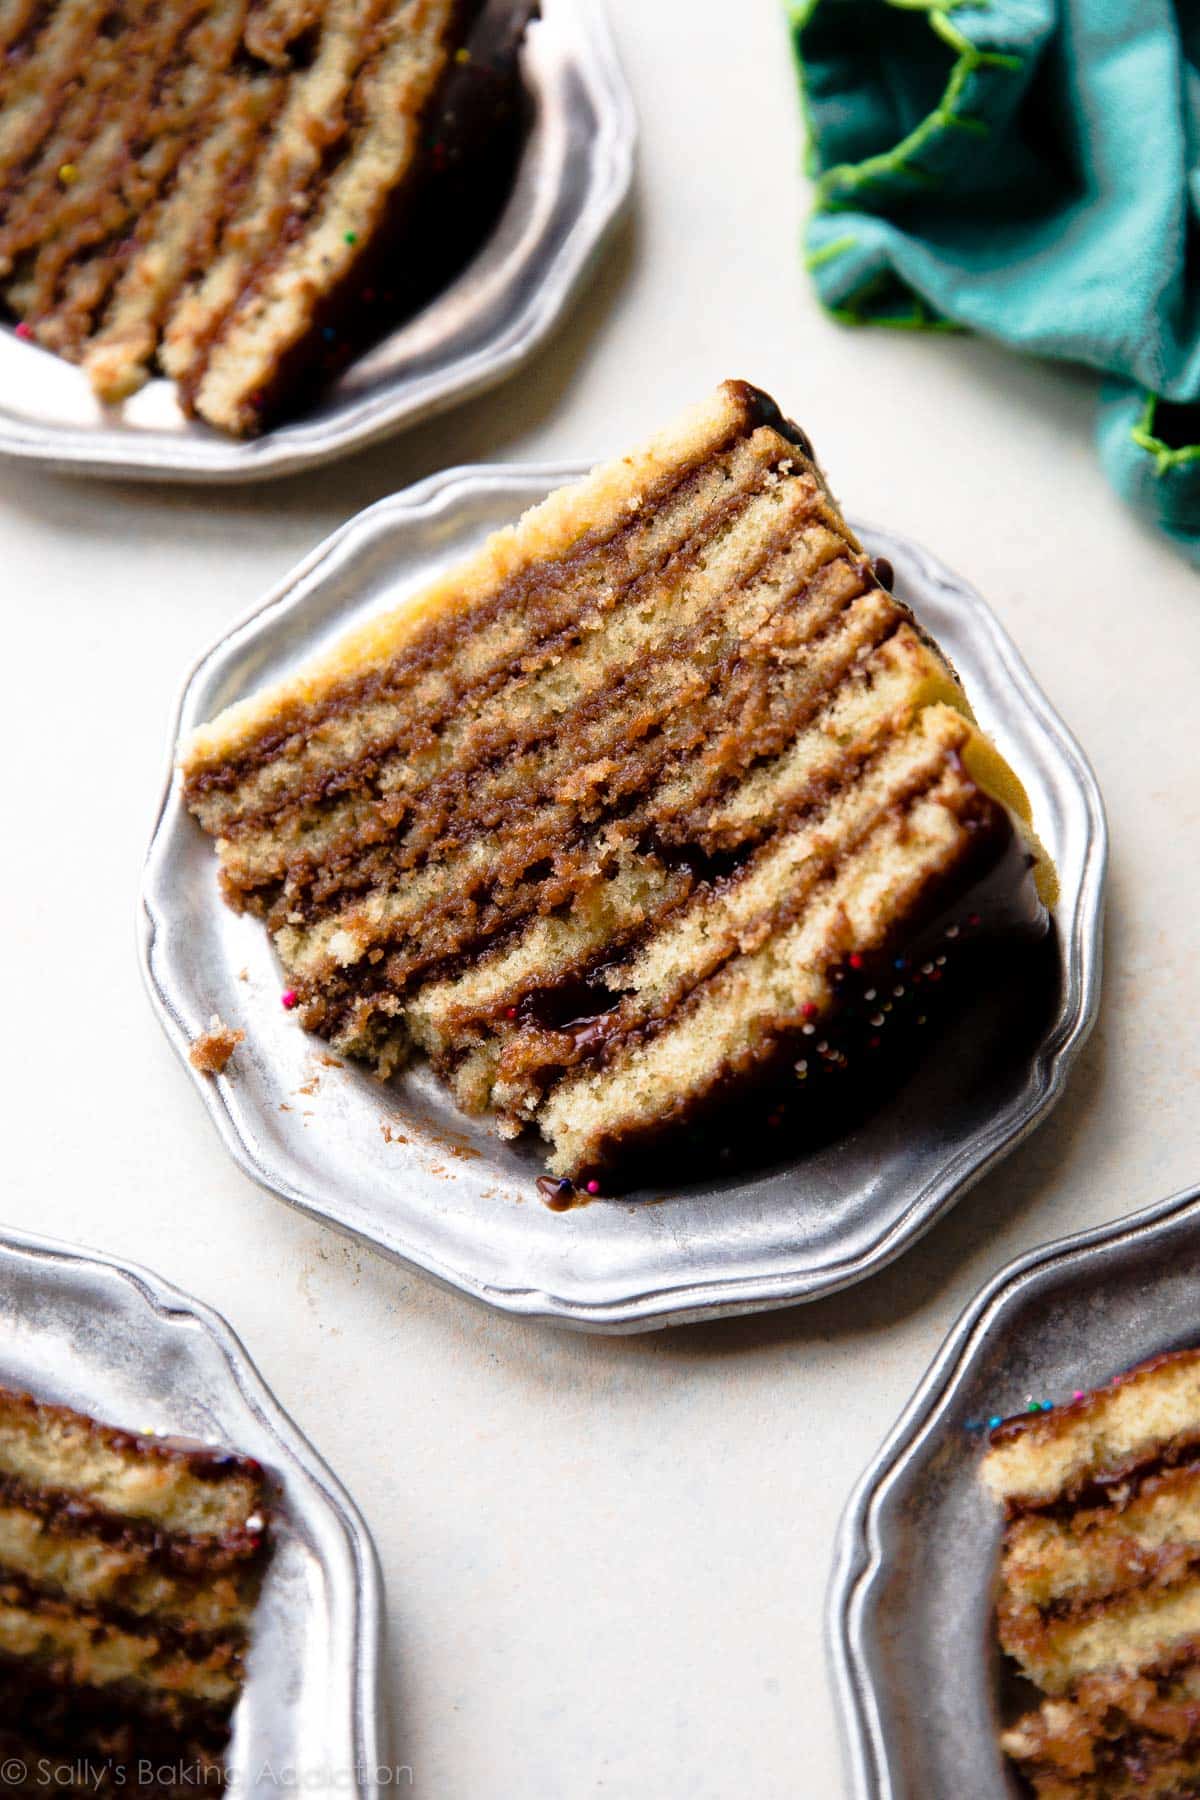
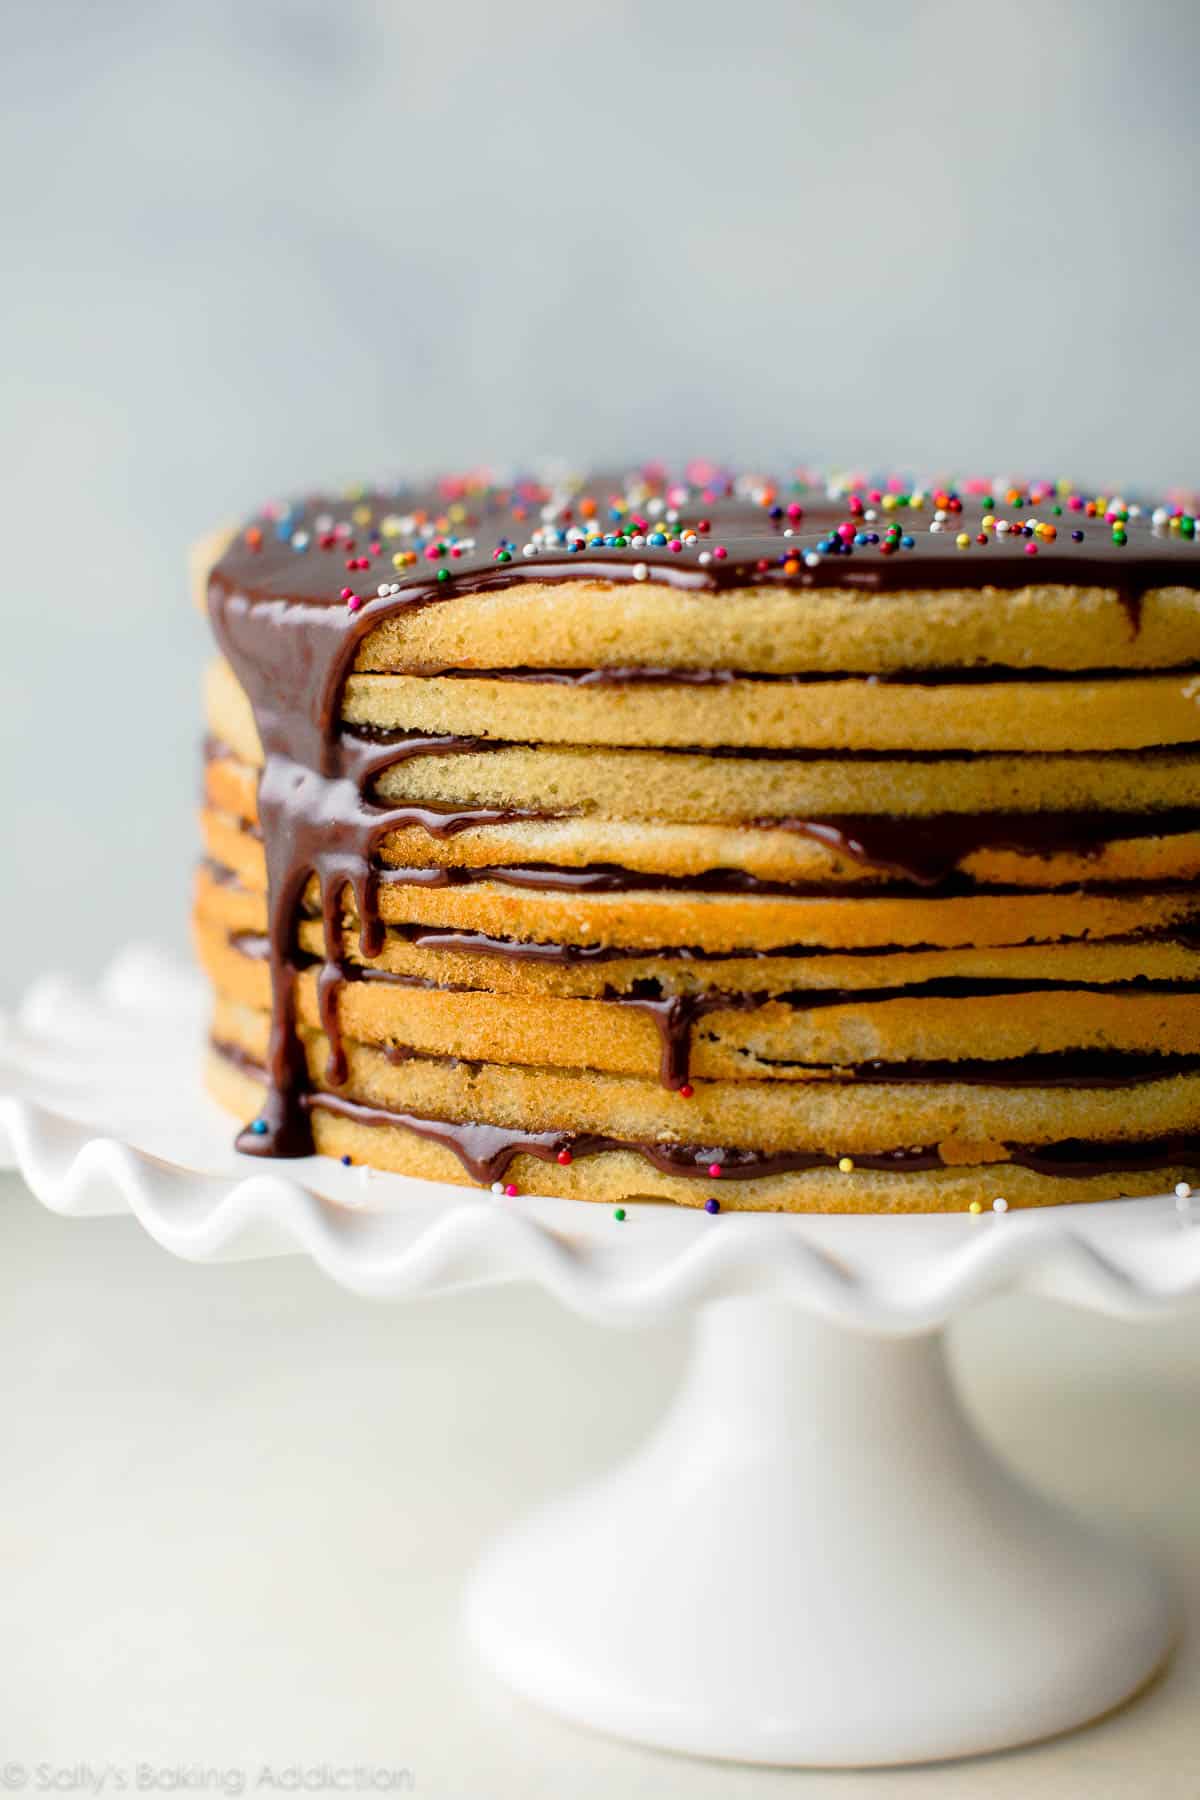
If there’s one thing to know, it’s this: Smith Island cake is decadently moist; no other cake on the planet can even compete. The chocolate icing seeps down into the pencil thin cake layers and if you start out with a moist yellow cake, there’s no denying this will be the most tender and moist cake you’ll ever experience!!!
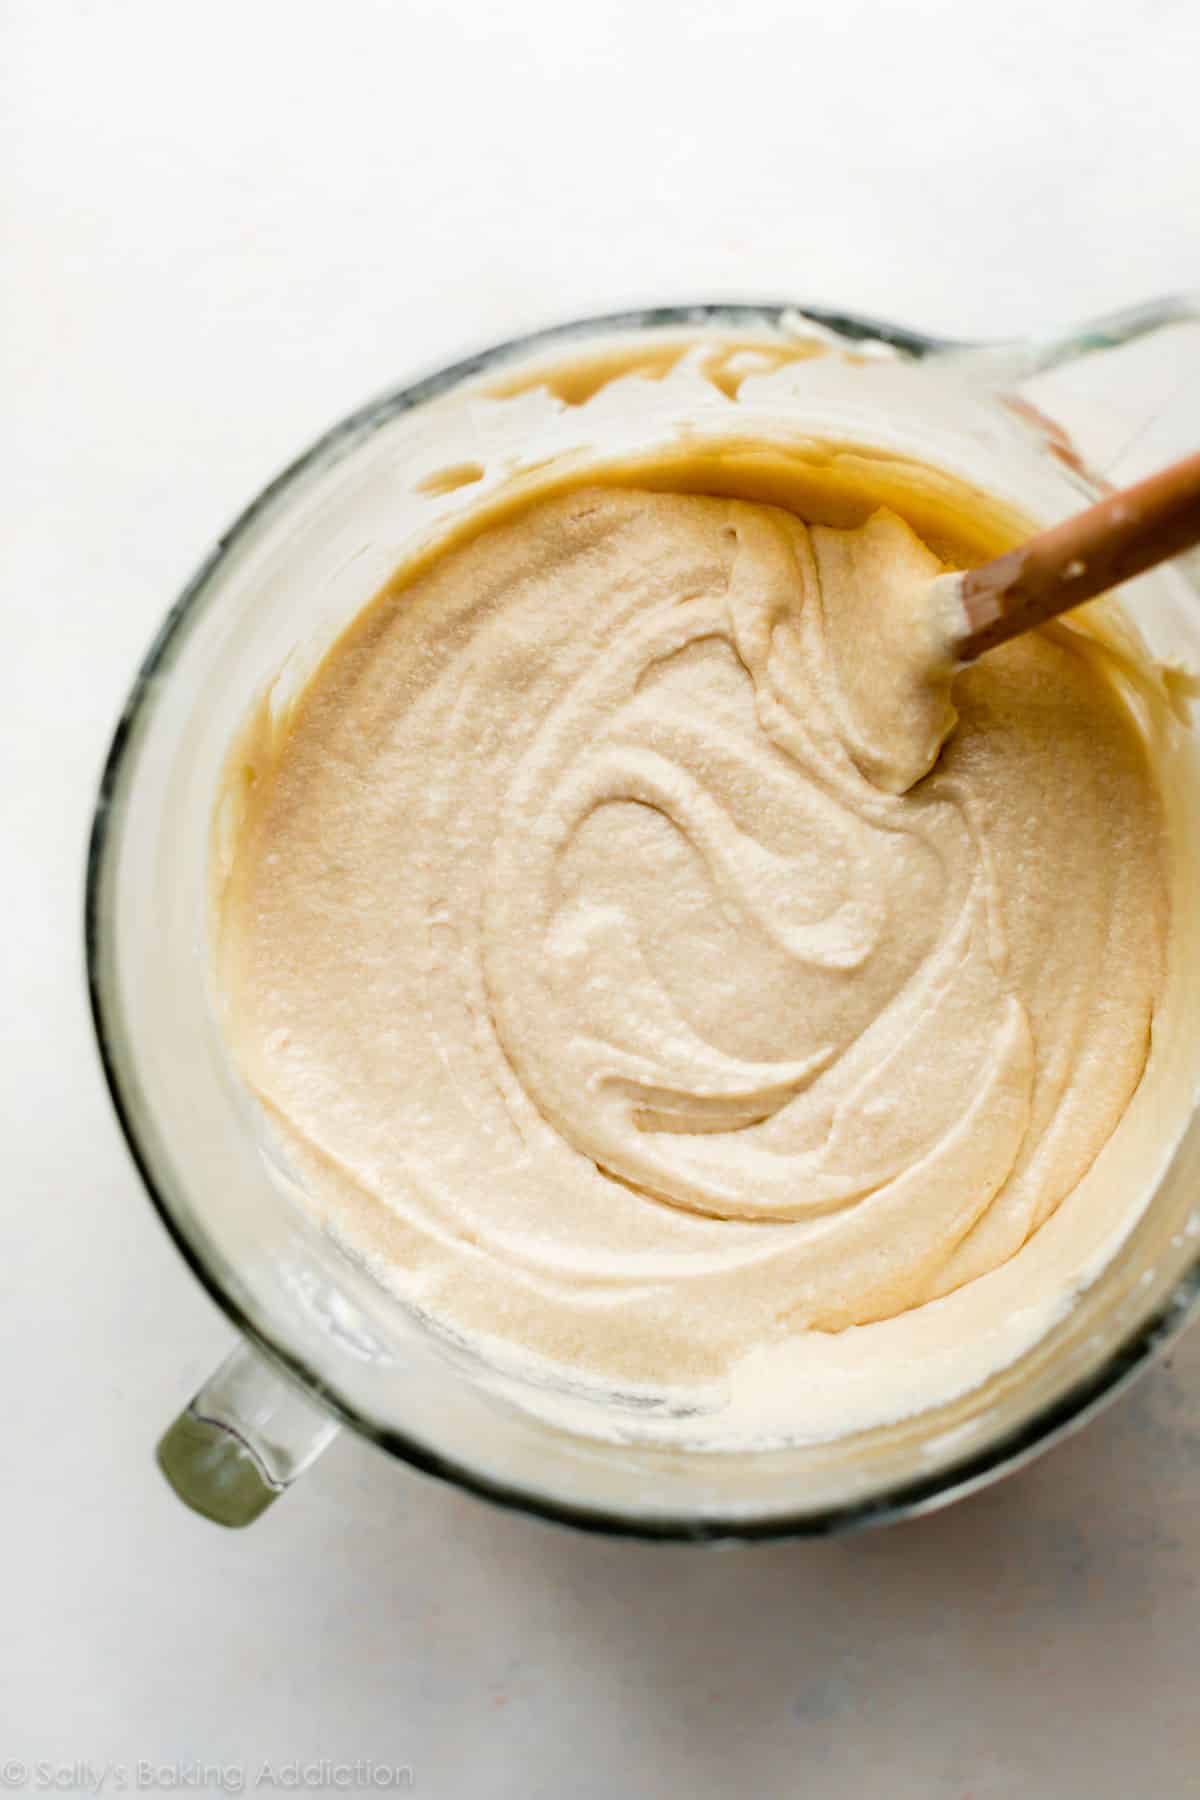
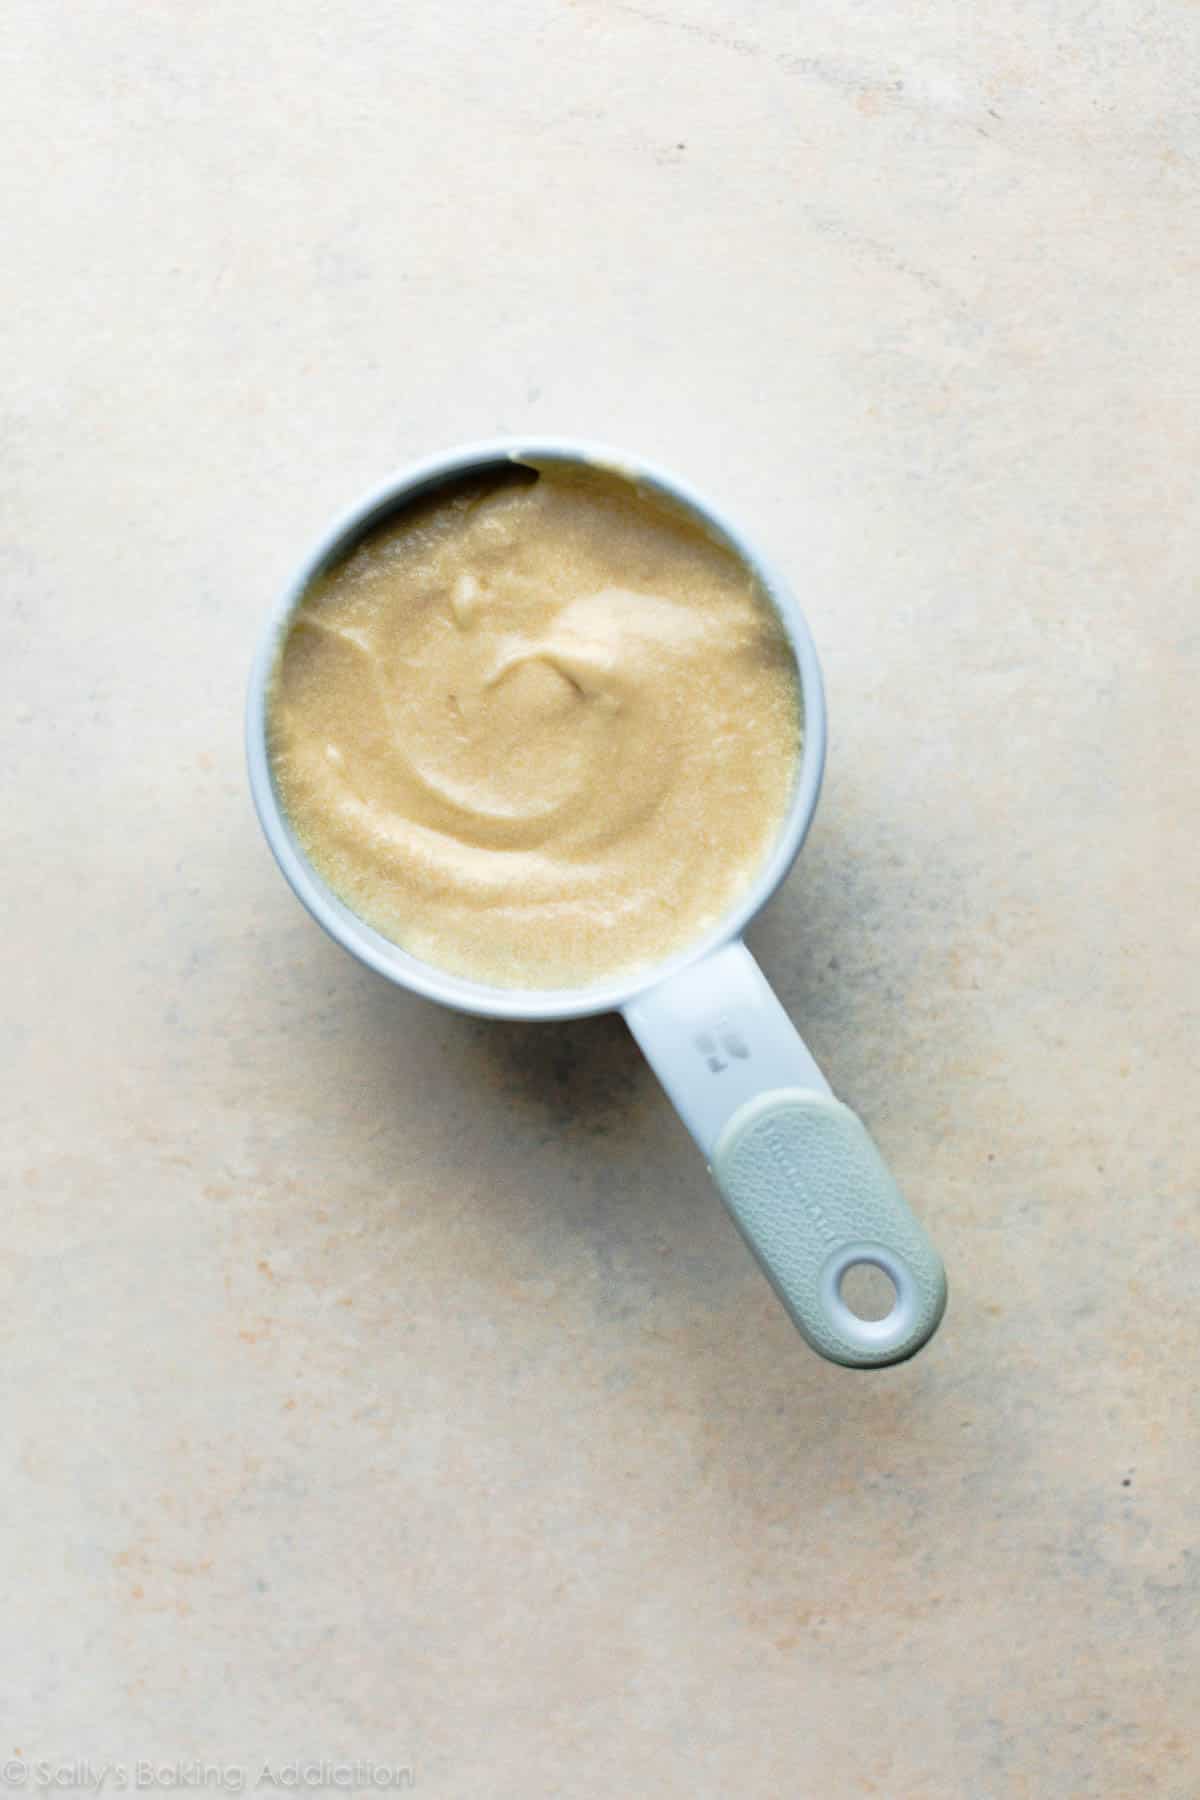
At its core, this is literally a 9 layer yellow birthday cake. Between cakes and cupcakes, I have a couple yellow/vanilla cake batters that I love but my checkerboard cake came to mind first. It produces a lot of batter which I know would spread nicely over multiple layers. I used this batter again for my vanilla naked cake. It’s a simple batter combining sifted all-purpose flour, butter, sugar, eggs, and buttermilk.
I wasn’t sure how many layers I could get from this batter, but I ended up baking 9. You’ll have about 8 cups of batter to work with, so I used a little less than 1 cup of batter per cake. You could, of course, bake 8 cakes using 1 cup of batter each.
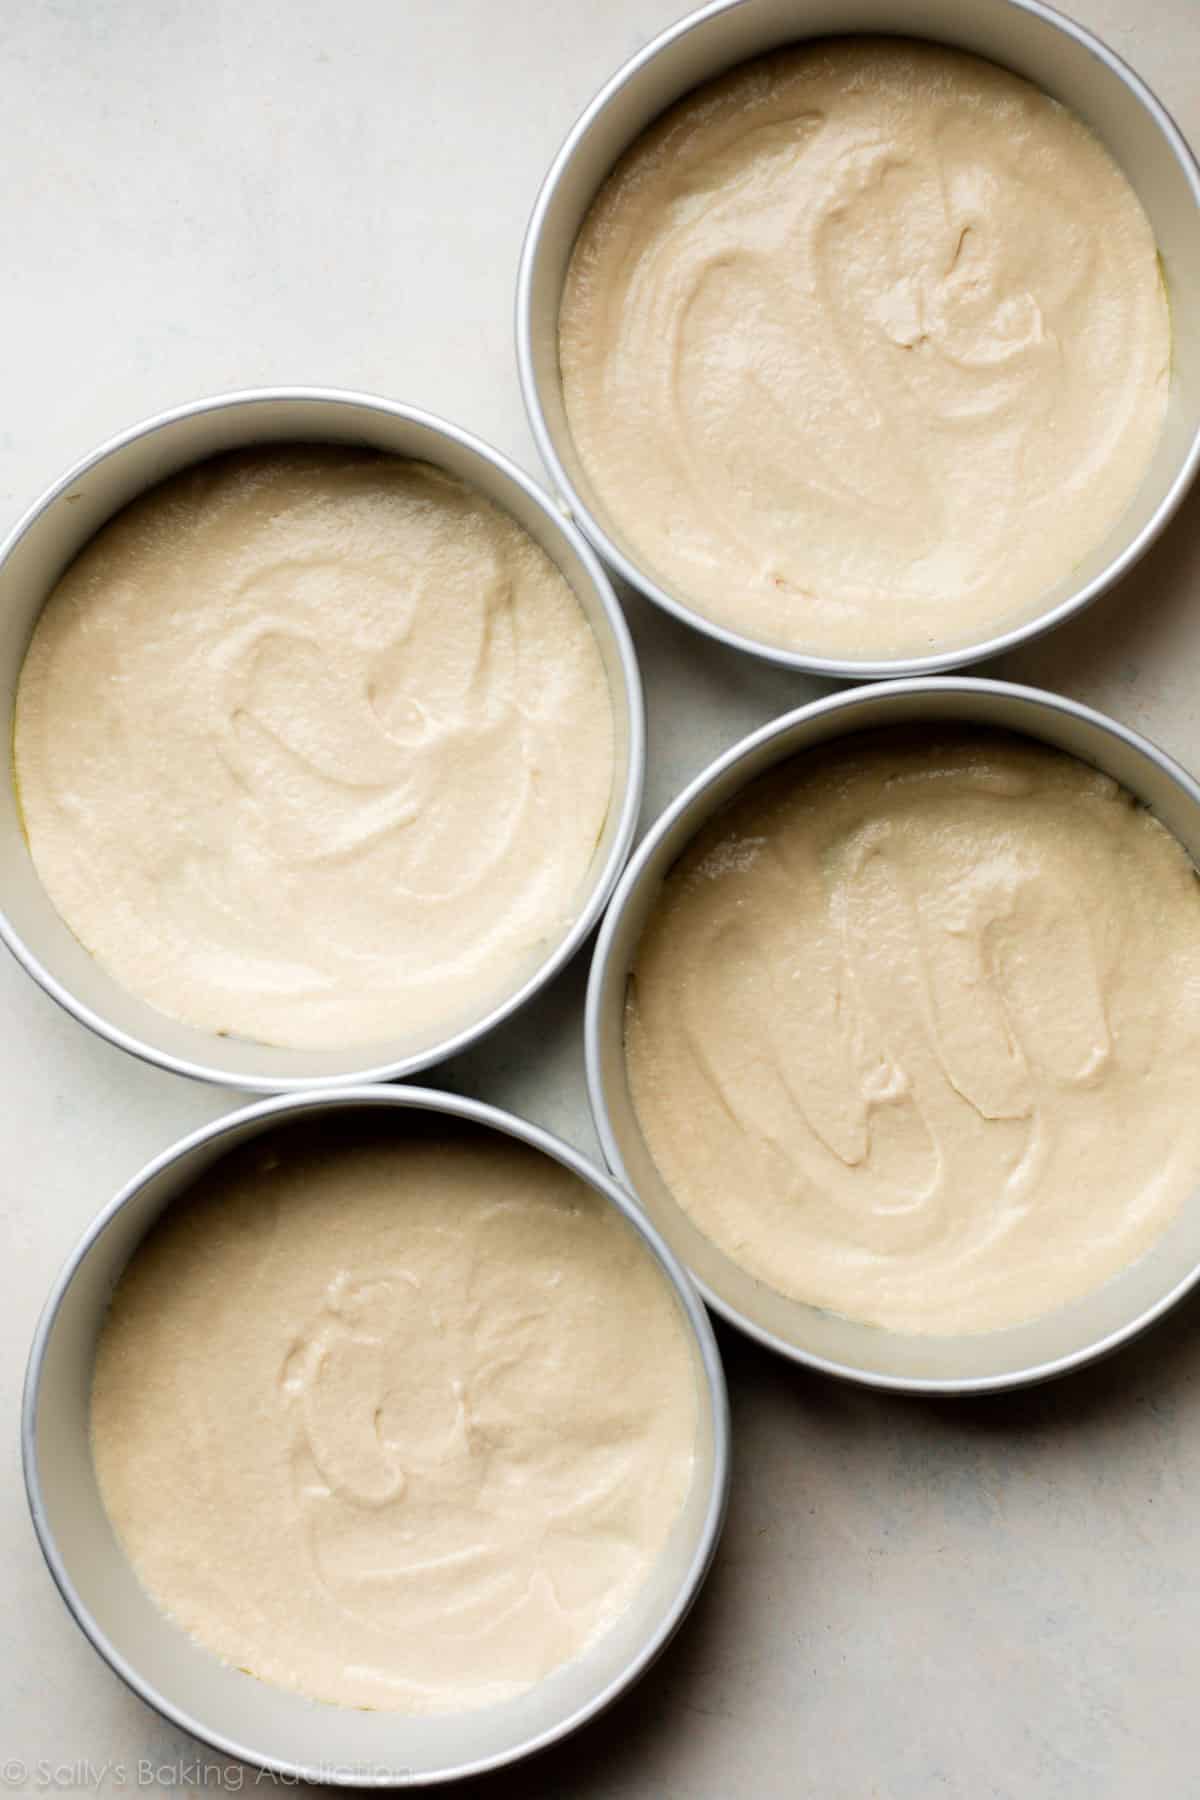
The 9 cake layers are baked individually instead of baking 3 or 4 thick cakes and precisely slicing them horizontally to create layers. Baking each cake layer individually doesn’t take any longer since the thinner cakes take less time in the oven, about 12 minutes each. Baking 3 at a time, they’ll be done in less than 40 minutes. This method also ensures that each layer is baked evenly. Baking a couple thicker cakes risks over or under-baking and the cakes are more likely to sink in the centers because they’re so thick. If you have more than 3 9-inch cake pans, bake more cakes at once. I baked 4 cakes 2x then 1 cake by itself. If you have fewer than 3 9-inch cake pans, simply bake in batches until all 9 cakes are baked.
Spread the batter across the cake pans as best you can. It’s a very thin layer of batter! To guarantee the cakes will release from the pan without breaking, line the pans with greased parchment paper.
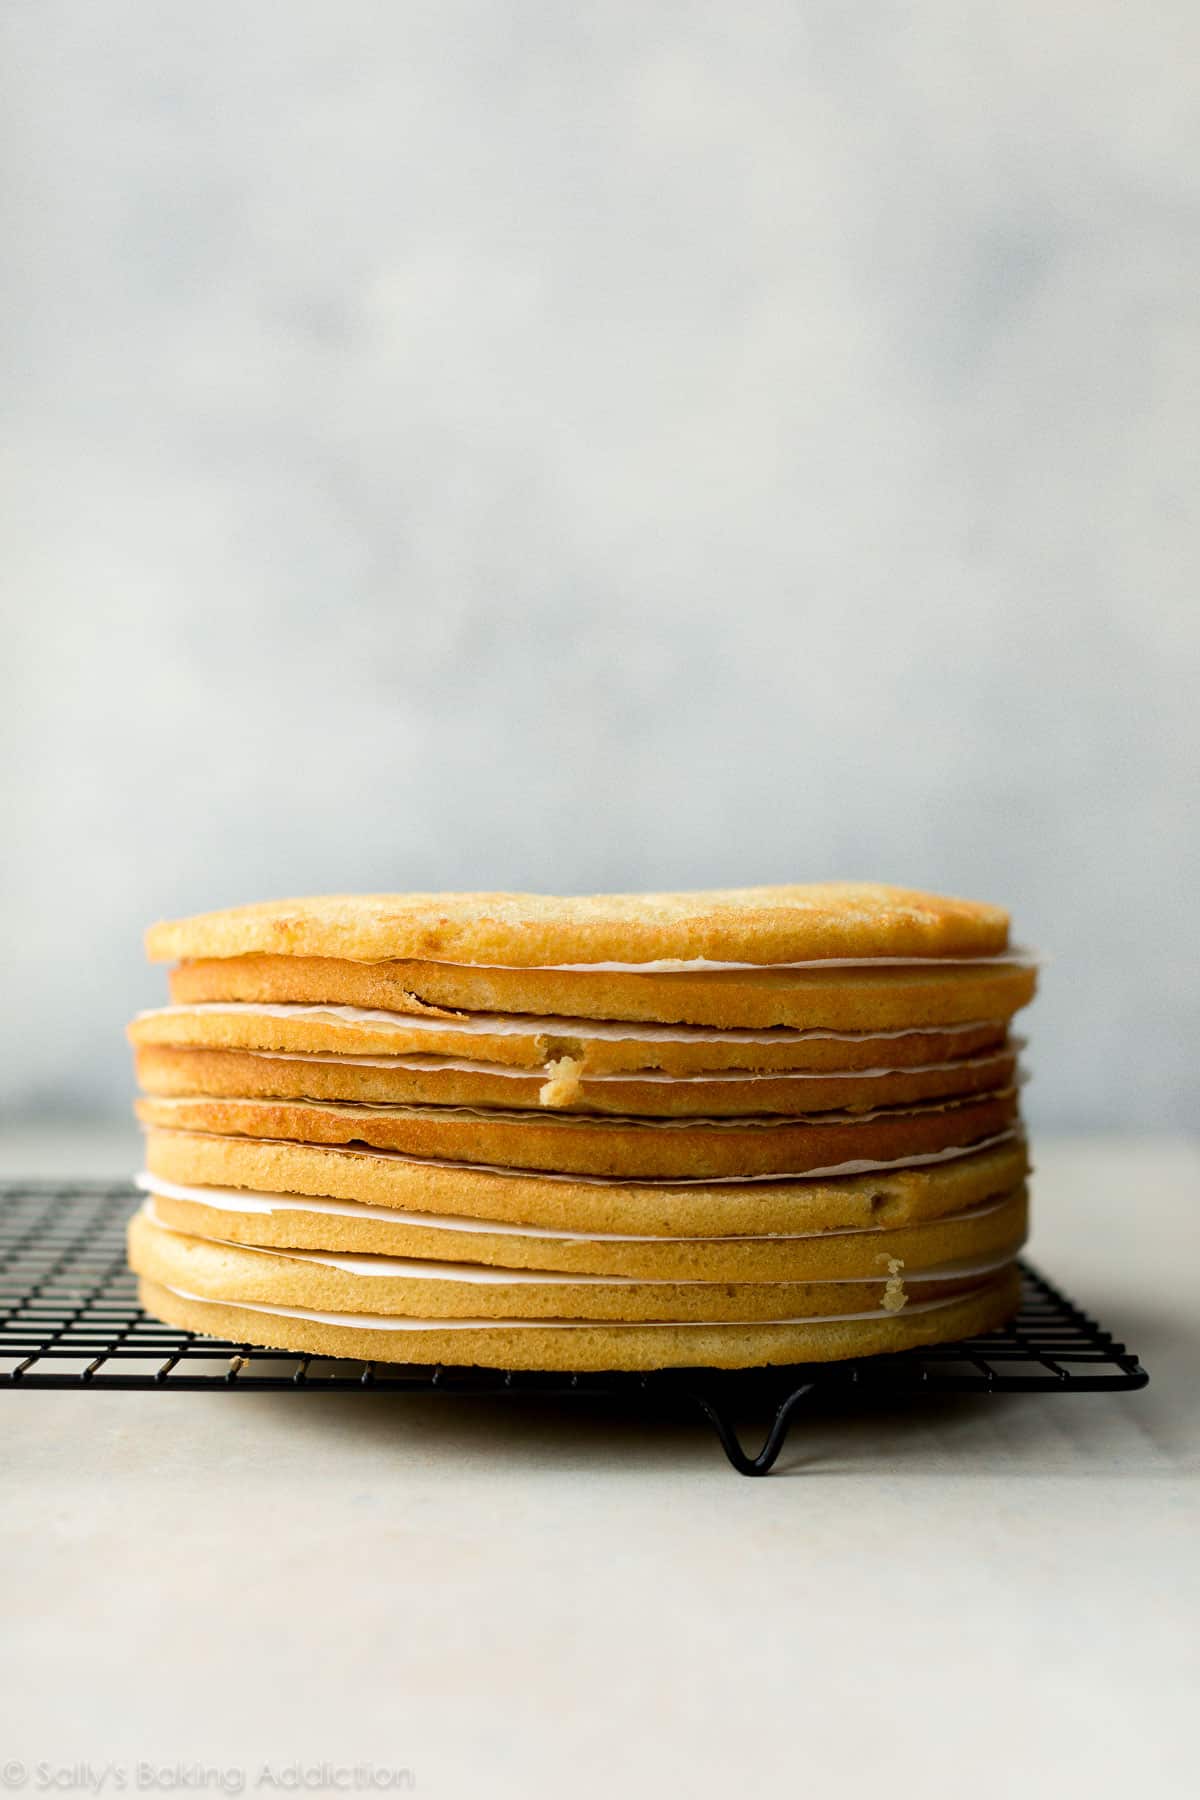
Thinner cakes not only take less time to bake, but take less time to cool as well. Just let the cakes cool on the counter. I stacked them in this picture so you could see just how thin they are without the icing applied. The cakes are fragile, so handle with care when cooling and assembling the cake.
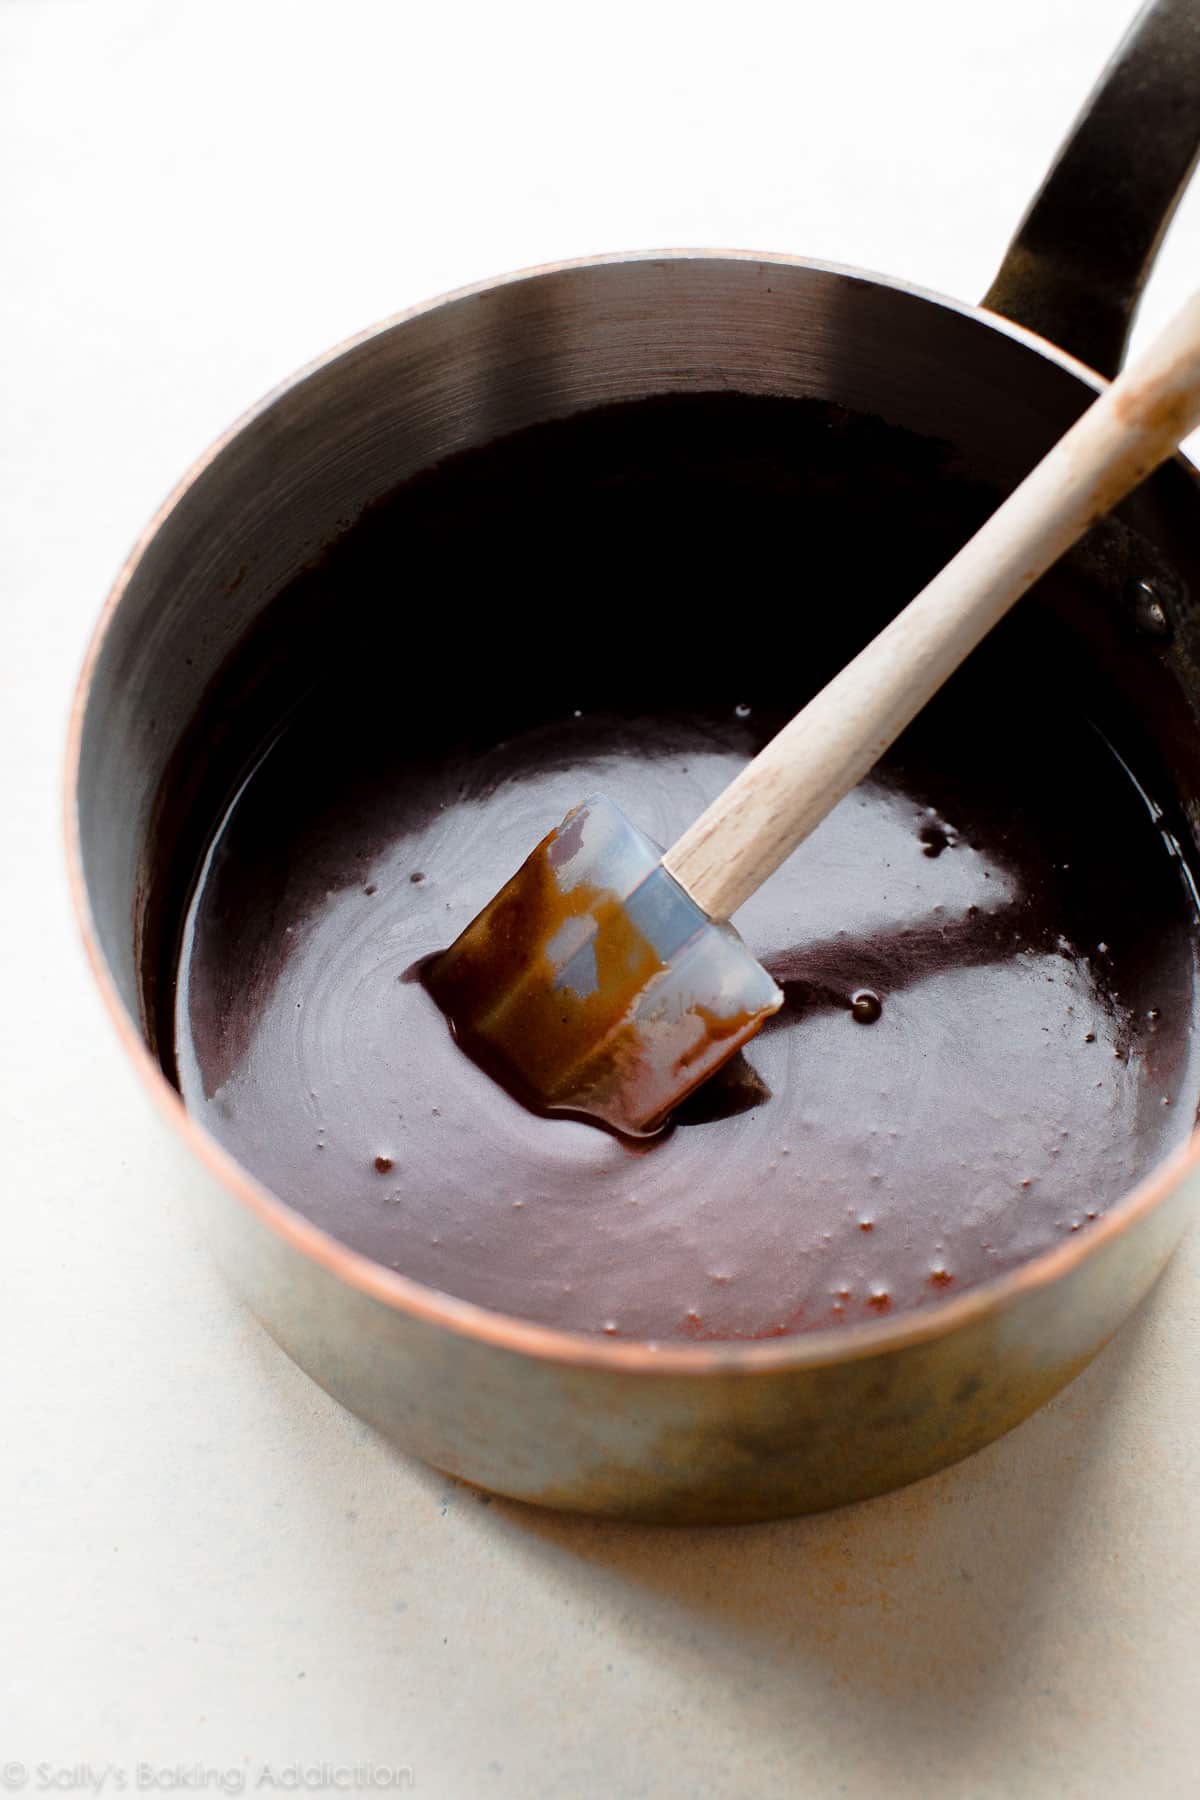
While the yellow cake layers are delicious, the cake’s hallmark is actually the chocolate fudge icing. The icing is cooked on the stovetop and must cool down before spreading between the layers. In the recipe below, I encourage you to make the icing first. Let it cool and thicken as the cake layers bake. Best way to save time!
The chocolate fudge icing reminds me of hot fudge. It’ll cool down before applying to the cake, but in terms of taste and thickness, hot fudge all the way. Unlike hot fudge, though, this icing “sets” on top of the cake. Think of a thick-ish chocolate glaze. The best part? Literally every bite of Smith Island cake has cake and icing. No frosting-less forkfuls.
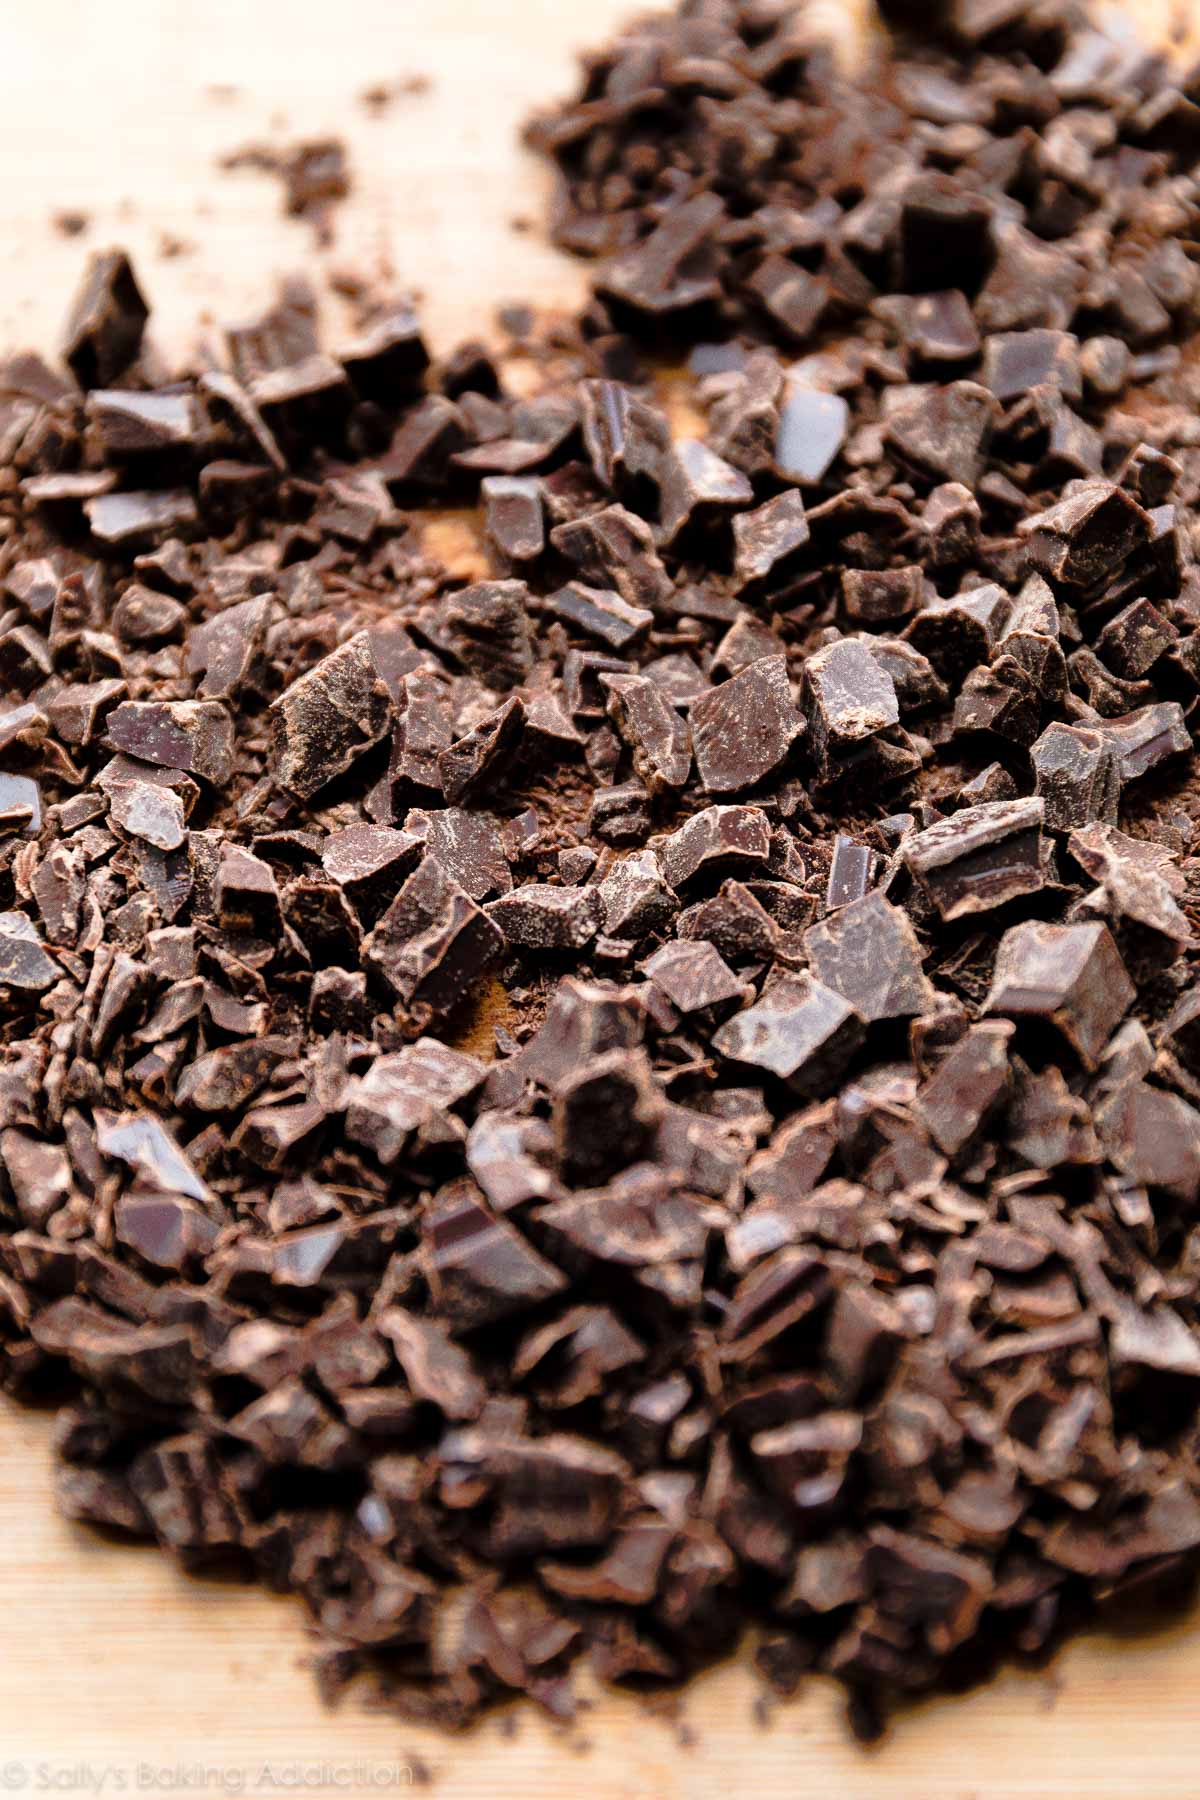
Simply combine butter, heavy cream, chopped chocolate, and sugar on the stovetop. Depending on your sweetness threshold, you can use semi-sweet, bittersweet, or unsweetened chocolate. I reach for one 4 ounce bar of bittersweet chocolate. A little corn syrup provides shine, though it’s completely optional. Finish the icing off with a little vanilla extract and a pinch of salt.
This is definitely a cake for chocolate lovers.
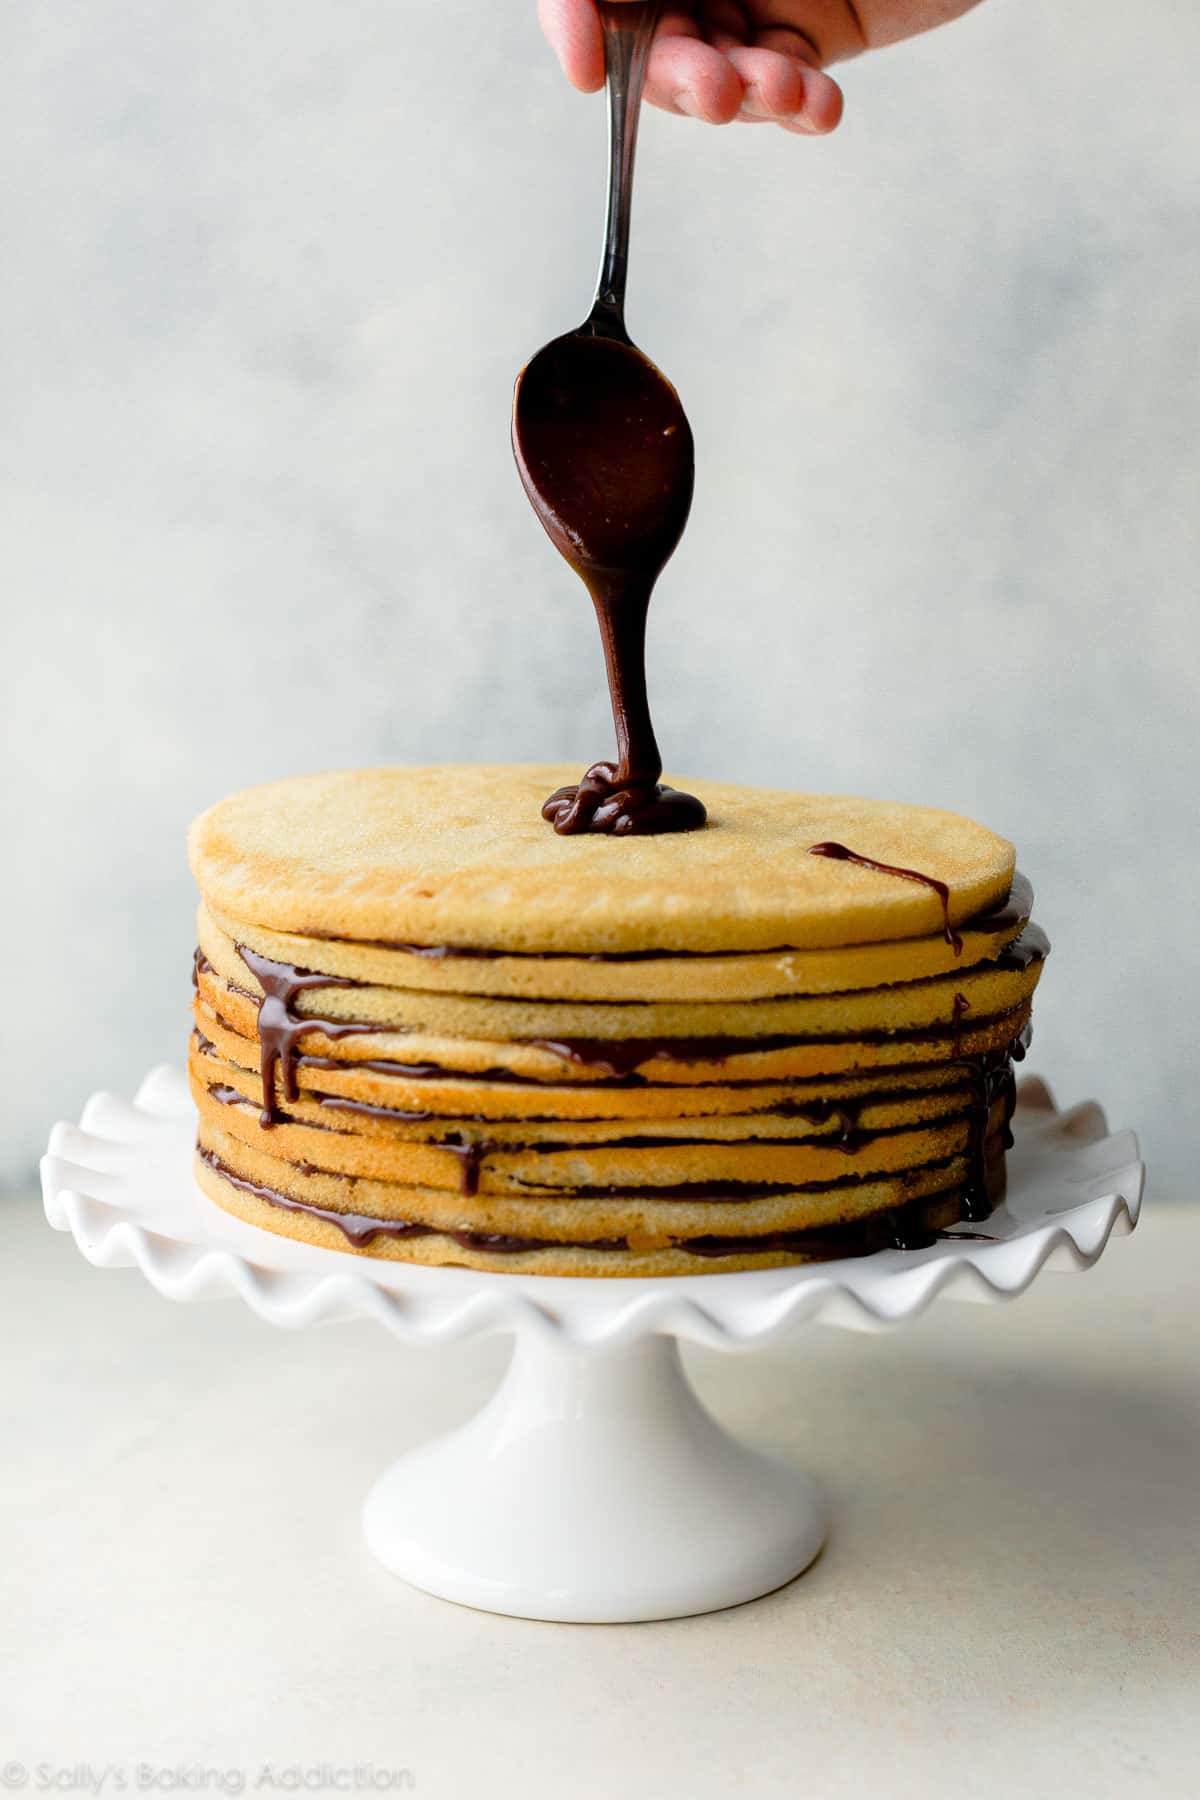
The thickened icing is very easy to work with—much easier than carefully decorating a cake with buttercream!!! Spoon and spread it over the cake layers. It’ll drip down the sides but that’s what helps create appeal, much like Boston Cream Pie and Chocolate Chip Cake.
Embrace the elegant mess.
You can literally see how moist this cake is.
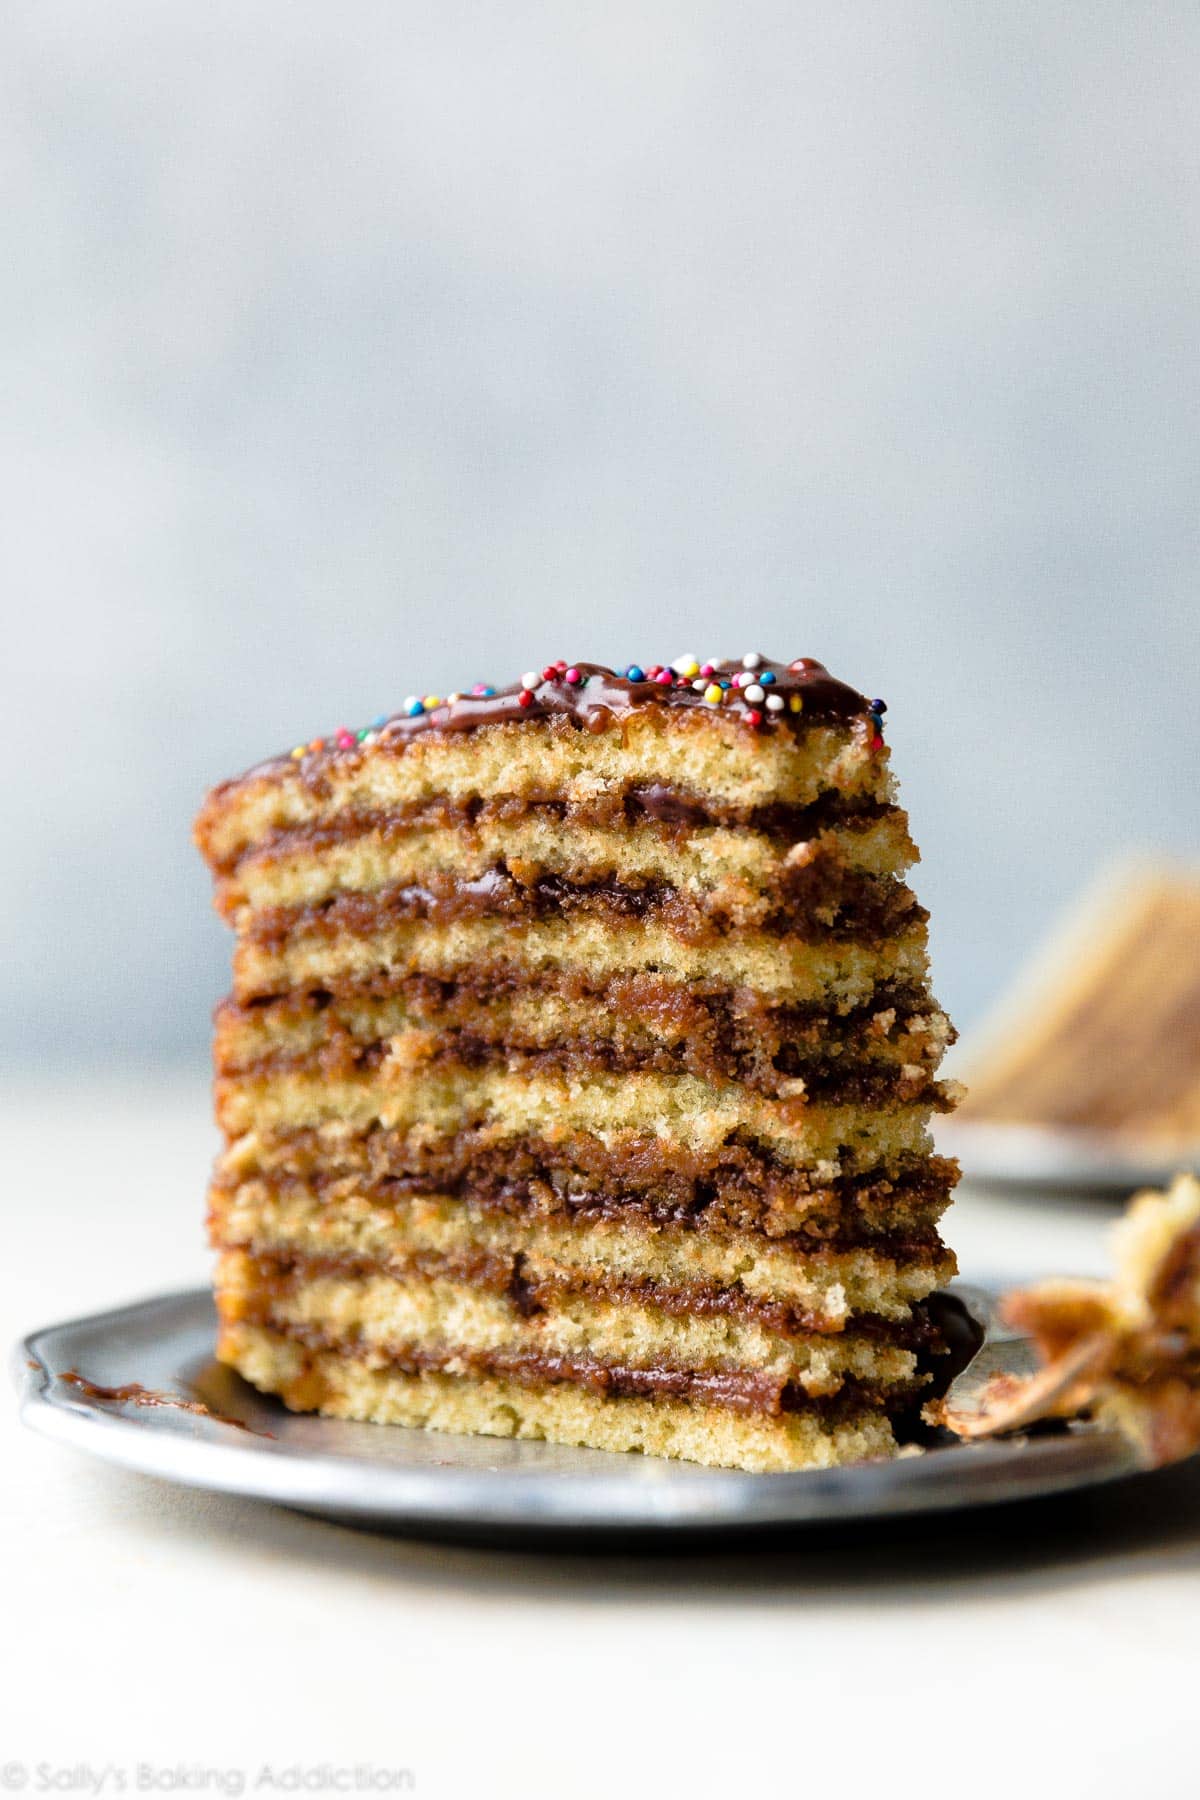
An unforgettable cake if there ever was one. So impressive and taking less time to cook, cool, and decorate than most cakes. Ladies and gents, this is Smith Island cake!
Print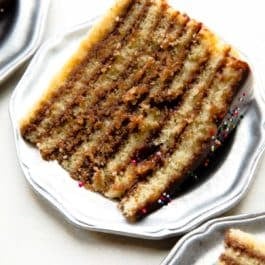
Smith Island Cake
- Prep Time: 1 hour, 15 minutes
- Cook Time: 36 minutes
- Total Time: 4 hours
- Yield: 12 servings
- Category: Cake
- Method: Baking
- Cuisine: American
Description
Smith Island cake is the official dessert of Maryland. This stunning cake features 9 delicious yellow cake layers and chocolate icing layers. The chocolate icing seeps down into the cake layers creating the most deliciously moist cake you’ll ever taste. Garnish with sprinkles for an extra special treat!
Ingredients
Chocolate Icing
- 6 Tablespoons (85g) unsalted butter, cut into 6 pieces
- one 4 ounce bar (113g) bittersweet chocolate, coarsely chopped*
- 1 and 2/3 cups (335g) granulated sugar
- 1 cup (240ml) heavy cream
- 2 teaspoons corn syrup (optional, for shine)
- 1 teaspoon pure vanilla extract
- pinch salt
Cake
- 3 and 3/4 cups (443g) sifted all-purpose flour* (spooned & leveled)
- 1 teaspoon baking powder
- 3/4 teaspoon baking soda
- 1 teaspoon salt
- 1 and 1/2 cups (340g) unsalted butter, softened to room temperature
- 2 cups (400g) granulated sugar
- 5 large eggs, at room temperature
- 2 and 1/2 teaspoons pure vanilla extract
- 1 and 3/4 cups (420ml) buttermilk, at room temperature*
- optional: rainbow sprinkles for garnish
Instructions
- Make the icing first: The icing needs to completely cool and thicken, so prepare it first. Combine the butter, chocolate, granulated sugar, heavy cream, and corn syrup together in a medium saucepan over medium heat. Stir constantly until butter has melted. Once melted, stir occasionally as the sugar dissolves and the mixture comes to a boil. Allow to boil for 1 minute. Remove from heat and stir in the vanilla extract. Taste (it’s warm, so be careful!) Add a sprinkle of salt, if desired. I always add a pinch. Leave uncovered and set aside to thicken and cool for at least 1-2 hours or until it has a spreadable consistency. This is enough time to bake and cool the cake layers. See make ahead tip if you want to prepare ahead of time. Yields about 2 and 1/4 cups icing.
- Preheat oven to 350°F (177°C). Grease three 9-inch cake pans, line with parchment paper rounds, then grease the parchment paper. Parchment paper helps the cakes seamlessly release from the pans; they may crack and crumble otherwise. (If it’s helpful, see this parchment paper rounds for cakes video & post. You can also reuse the parchment for each of the 9 cakes or cut 9 individual circles.)
- Make the cake: Whisk the flour, baking powder, baking soda, and salt together in a large bowl. Set aside. Using a handheld or stand mixer fitted with a paddle or whisk attachment, beat the butter and sugar together on high speed until smooth and creamy, about 3 minutes. Scrape down the sides and up the bottom of the bowl with a rubber spatula as needed. On medium-high speed, add 1 egg at a time, beating well after each addition. Beat in the vanilla extract. Scrape down the sides and up the bottom of the bowl with a rubber spatula as needed. Scrape down the sides and up the bottom of the bowl with a rubber spatula as needed.
- With the mixer on low speed, add the dry ingredients in three additions alternating with the buttermilk, beginning and ending with the dry ingredients, and mixing each addition just until incorporated. Do not overmix this batter. The batter will be smooth, velvety, and slightly thick.
- (There are 8 cups of batter total, so each of the 9 cakes will have slightly less than 1 cup of batter. Leave unused batter loosely covered at room temperature as cakes bake.) Pour slightly less than 1 cup of batter into prepared cake pans. Bake for 12 minutes or until a toothpick inserted comes out clean. The cakes are VERY thin, so they shouldn’t take much longer than that. Allow to cool for a couple minutes, then carefully invert the cake onto the counter. Peel off the parchment to reuse (or use a new parchment round). Grease the warm cake pans, line with parchment, and grease the parchment. Repeat with slightly less than 1 cup of batter per cake pan. Repeat baking, cooling, and releasing the cakes from the warm pans. Grease the warm cake pans, line with parchment, and grease the parchment. Repeat one final time. Allow all 9 layers to cool completely, about 45 minutes.
- Assemble cake: Carefully place one layer on a serving platter, cake turntable, or cake stand. Spoon and spread 1/4 cup of icing on top, then repeat with the rest of the cake layers and icing. Some icing will spill over the sides and that’s ok! Makes a beautiful cake! Decorate the top with sprinkles, if desired.
- Set cake aside for at least 30 minutes before slicing and serving. This gives the icing a chance to adhere to the cake and makes slicing a little easier.
- Cover and store leftover cake at room temperature for 1-2 days or in the refrigerator for up to 1 week.
Notes
- Make Ahead Instructions: The cake layers can be baked, cooled, and covered tightly at room temperature overnight. Likewise, the icing can be prepared then covered and refrigerated overnight. Set the icing out at room temperature for an hour to soften up before using. The assembled cake can be frozen up to 2-3 months. Thaw overnight in the refrigerator and bring to room temperature before serving. Tastes better fresh though!
- Special Tools (affiliate links): Medium Saucepan | 9-inch Round Cake Pans | Whisk | Glass Mixing Bowl | Electric Mixer (Handheld or Stand) | Cake Turntable | Cake Carrier (for storage)
- 9 Layers: The 9 cake layers are baked individually instead of baking 3 or 4 thick cakes and slicing them horizontally to create layers. Baking each cake layer individually doesn’t take any longer since the thinner cakes take less time in the oven, about 12 minutes each. Baking 3 at a time, they’ll be done in less than 40 minutes. This method also ensures that each layer is baked evenly. Baking 3 thicker cakes risks over or under-baking and the cakes are more likely to sink in the centers because they’re so thick. If you have more than 3 9-inch cake pans, bake more cakes at once. I baked 4 cakes 2x then 1 cake by itself. If you have fewer than 3 9-inch cake pans, simply bake in batches until all 9 cakes are baked.
- Icing: For a sweeter icing, use semi-sweet chocolate. For dark chocolate icing, use bittersweet chocolate. For very dark chocolate icing, use unsweetened chocolate. I prefer bittersweet chocolate.
- Flour: Sift flour before measuring.
- Buttermilk: Buttermilk (an acid) is required for this cake recipe. If you don’t have any, you can make a DIY buttermilk substitute. Add 1 Tablespoon of white vinegar or lemon juice to a liquid measuring cup. Then add enough whole milk to the same measuring cup until it reaches 1 and 3/4 cups. (In a pinch, lower fat or nondairy milks work for this soured milk, but the cake won’t taste as moist or rich.) Stir it around and let sit for 5 minutes. The homemade “buttermilk” will be somewhat curdled and ready to use in the recipe.


Reader Comments and Reviews
Very delicious. I did add mixed chopped nuts every couple of layers and on top of cake instead of sprinkles. It was a big hit and a keeper.
Super excited to make this cake for family and have all the ingredients ready but just realized my pans are 8-inch! Will that still work? Should I just bake them a minute or so longer? Thanks in advance!
Hi Helen, that should be fine! Bake time will be slightly longer for the slightly thicker layers.
This cake is the new birthday cake in our family. It’s always requested. The recipe is clear and easy, just takes a bit of time. I love the flavor of the vanilla cake and my husband says the frosting is death by chocolate and could eat it by the spoonful – fudge is a good description. I have 3 – 9″ pans and this last time started weighing each when putting the batter in them. Three rounds of baking and my 9 layers aren’t perfectly even, but I think it’s a bit of the charm of this cake. Thanks for developing easy and tasty recipes.
Hello – any way to do a
Hello – any advice on making a six inch version of this cake? Thank you!
Hi Anna, For best results, we recommend skipping this recipe if you don’t have the right size pan. You can bake our 6 inch cake instead and use this frosting for it. Halve this frosting if doing so.
Tried baking in parchment. Rolled out batter evenly. When done each layer was thick at one end and thin at the other. When put together it made for one ugly cake. Do you trim each layer? How do you get each layer uniform across the layer? Would it be better if I didn’t use parchment? Suggestions?
Hi Haydn! The step by step photos in the post above may be helpful – you shouldn’t have to trim the cake layers if you spread the batter out evenly before baking.
Would love to know – can you freeze the cake, If you can’t eat it all at once or in a week? Wanting to know for my niece who lives in Maryland and just told me about the cake.
Hi Lisa, see recipe notes for freezing instructions!
No icing on the sides? I’m from Maryland and have never seen a Smith Island cake that wasn’t completely covered with icing, including the most authentic version from the Smith Island Bakery. What made you decide not to cover the whole cake, and if I wanted to, how hard would it be? Did you opt not to because it was difficult, and not worth it?
Hi Julie! We preferred the look of seeing all the beautiful layers in the cake, but you can absolutely coat the sides as well! This icing recipe yields about 2 1/4 cups. If you want to make sure you have enough to coat the sides better, we suggest making 1.5x the icing recipe. One reader commented that she actually made chocolate buttercream frosting to frost the outside of this cake and it was a hit, so that’s also an option!
This cake looks great! Im planning to make it for a small bbq we are having. Question- instead of the chocolate icing.. can you use a chocolate ganache? Thanks!
Sure can, Becky!
I am from Maryland, actually I live very close to Smith Island and this cake is fabulous! We have tried many of the different flavors including many of the fruit flavors. A tradition here on the Eastern Shore of Maryland and a true treat for special ocassions!
perfect for Preakness parties. purists would make extra icing to coat the sides.
I hope I am not repeating this as I was writing a message and then it disappeared. I was asking if you have made other versions of this? Years ago I made something similar with a chocolate sponge cake and a crème de menthe, stabilized whipping cream filling with chocolate glaze. I would love to try other flavors if you have suggestions. Your cake is yummy and I love all of your recipes! Thank you for sharing!!
Hi Jaye, we haven’t tested other flavor variations of this recipe, but that sounds delicious! If you enjoy that flavor combination, you might like this mint chocolate cake recipe.
I haven’t had a Sally’s recipe yet that I did not love. Honestly! Thanks for all of your very detailed instructions and excellent recipes. Making this today for a family members bday. They always loved yellow cake and chocolate icing growing up so I thought this would be a treat for them. It looks great (mines a lil sloppy, but still works!) and it tastes great!!!
So glad you loved this recipe – hope it’s a hit with your family 🙂
This cake is worth the time and effort! Family favorite
I’m a Maryland transplant and think I am going to have my Girl Scouts attempt this as a “regional recipe” for their New Cuisines badge. I hope I’m not insane to have them tackle this. Maybe I should make a test cake this weekend. I’ve only had Smith Island cake once and it was sooooo good. Thank you for the recipe!
We would love to hear how it goes, Carrie!
Could I use milk chocolate for the frosting?
Hi Ella! We found the icing to be too sweet with anything sweeter than semi-sweet chocolate. Milk chocolate would work, though, if that’s your preference. Make sure to use pure baking chocolate.
What size pans could I use to make this cake rectangular?
I have lost track of tbe number of your recipes that I have tried and can’t wait to give this one a go. In South Africa we don’t have all purpose flour readily available. I have cake flour, bread flour or 00 flourto choose from. Normally I just pick the one that seems as thougb it would work best but in this instance I am uncertain. What would you recommend?
Thanks!
Hi Rowan, of those options, I would use cake flour. You may want to slightly reduce the liquid in the batter since cake flour is lighter than all-purpose/plain flour. I recommend 1 and 2/3 cups (400ml) buttermilk.
How would you make a chocolate peanut butter icing for the Smith Island Cake?
Thank you,
Mariann
Hi Mariann, That sounds delicious! We haven’t tested it so we’re not sure of the exact amount, but it should work to add a little bit of peanut butter to this icing recipe. Let us know what you try!
Spotted the photo of this and instantly thought of the Russian honey cake (Медови́к), there’s also Napoleon’s cake which has a similar high number of layers (although involves pastry). I’ve made honey cake a few times and it’s definitely much nicer after sitting in the fridge 24 hours, so the cake can soak up the cream, after which point it has a moist fudge-esque consistency/flavour.
Haven’t tried this recipe, but I assume it’s great if it’s anything similar and thought you might be interested in the additional context.
I love this cake. I’ve made it twice now and it was perfect both times. The only aspect I am having a challenge with is that even though I scoop just under a cup of batter into each pan, I can only get 7 or 8 layers. Can you suggest a measurement that would work to ensure nine layers?
Hi Karen, Thank you for using this recipe! You’ll have about 8 cups of batter to work with, so we used a little less than 1 cup of batter per cake. You could, of course, bake 8 cakes using 1 cup of batter each.
As a native Marylander, I’ll let you in on a secret – anything between 8 and 10 layers is okay! Most often I see an even number of layers, either 8 or 10, but 9 is just fine, too!
I’m from Maryland and I’ve always wanted to make a Smith Island cake! This recipe was easy to follow and I was pretty pleased with how mine turned out. Just one question – How did you get your layers so flat? I had some trouble getting the thick batter to spread out evenly in the pans so my layers had a slight dome to them.
Hi Amanda, Thank you for trying this recipe and we are glad you enjoyed it! The trick to flat layers is that it needs to go into the oven flat. When you pour your batter it your pans, use an offset spatula to smooth it out as best you can and shimmy the pan a little little to make sure it’s level before going in the oven. If they dome up a bit you can alway use a knife to cut the tops off for flatter layers.
Can I use a caramel icing on this cake?
Sounds delicious, Mickie!
Is there a reason the recipe calls for all purpose flour instead of cake flour?
Hi Brenda! You’ll want to stick with all-purpose flour to ensure these thin layers don’t fall apart when assembling.
How can I alter this recipe to make a cookies and cream smith island cake?
Hi Vanessa, We haven’t tested it but you should be able to add crumbled Oreo cookies to this cake batter with no problem. You can even top the cake with the frosting from this cookies and cream sheet cake. Let us know if you give it a try!
i haven’t tried this yet, but it reminds me of the Indonesian Lapis Legit! give it a try
I have made this once before and added crumbled Reece’s cups into the layers. So good!! Do you think I could add peanut butter into the fudge icing? If so, do you have a recommended amount, or a different recipe that would work well? Thanks!
Hi Jen, That sounds delicious! We haven’t tested it so I don’t know the exact amount, but I’m sure it would work. Let us know if you try it!
My stepson, a Maryland boy, requested a Smith Island cake for his birthday. I was up for the challenge and this recipe made it 100% easy to bake and build. And it was so, so, SO SO SO SO good. Oh my gosh. It was so good. SO GOOD. I ended up making 8 layers for his 8 years.
I wish you could have seen his face when he saw it, and when he bit into it. Heaven. Thank you!
I have always wanted to try a Smith Island cake, but did not have any around here. This recipe provided clear instructions that walked me through the steps and delivered a delicious cake. We are dark chocolate lovers and so I used Baker’s unsweetened chocolate for the icing. It had great chocolate flavor without being too sweet or too bitter. I made eight layers with the batter. Next time I will put a bit less on the batter for each pan and try to get to the nine layers. I had a little bit of trouble spreading the batter out in the pans as the parchment paper would move. Using the back of a soup spoon and moving from the center out worked well. Overall this cake came out a success. Sally, thank you for guiding me through it!
Best –
Christine
Do read through the recipe thoroughly before starting. Do spread the batter as close to the edges of pans as possible, and as evenly as possible. Do make 1 and 1/2 of the frosting recipe- being sure to calculate out the revised measurements before you begin. Do pour the frosting on the top of the cake after putting it on the layers – but give it a quick mix with your hand mixer before frosting the sides of the cake – it will thicken it up and make it easier to work with. Sally, a video for this cake would be really helpful for less experienced bakers
Hi Sally, I made this cake recently and it was absolutely delicious. My only concern was, the chocolate icing was not runny and kept on following off the cake making a puddle around the base. I measured the ingredients correctly. So is this how the icing should be, or am I missing something?
Hi Rosalin, since the icing is made with butter, it thickens as it cools. Did you let it cool completely? It’s meant to be a little drippy, but shouldn’t be pooling at the base of the cake.
Sally, will there be enough icing to frost the outside of the cake as well, if one so desires?
Hi Tracie, this icing recipe yields about 2 1/4 cups. If you want to make sure you have enough to coat the sides better, we suggest making 1.5x the icing recipe. One reader commented that she actually made chocolate buttercream frosting to frost the outside of this cake and it was a hit, so that’s also an option!
I doubled the icing recipe and it was very grainy. Should I have boiled it longer?