

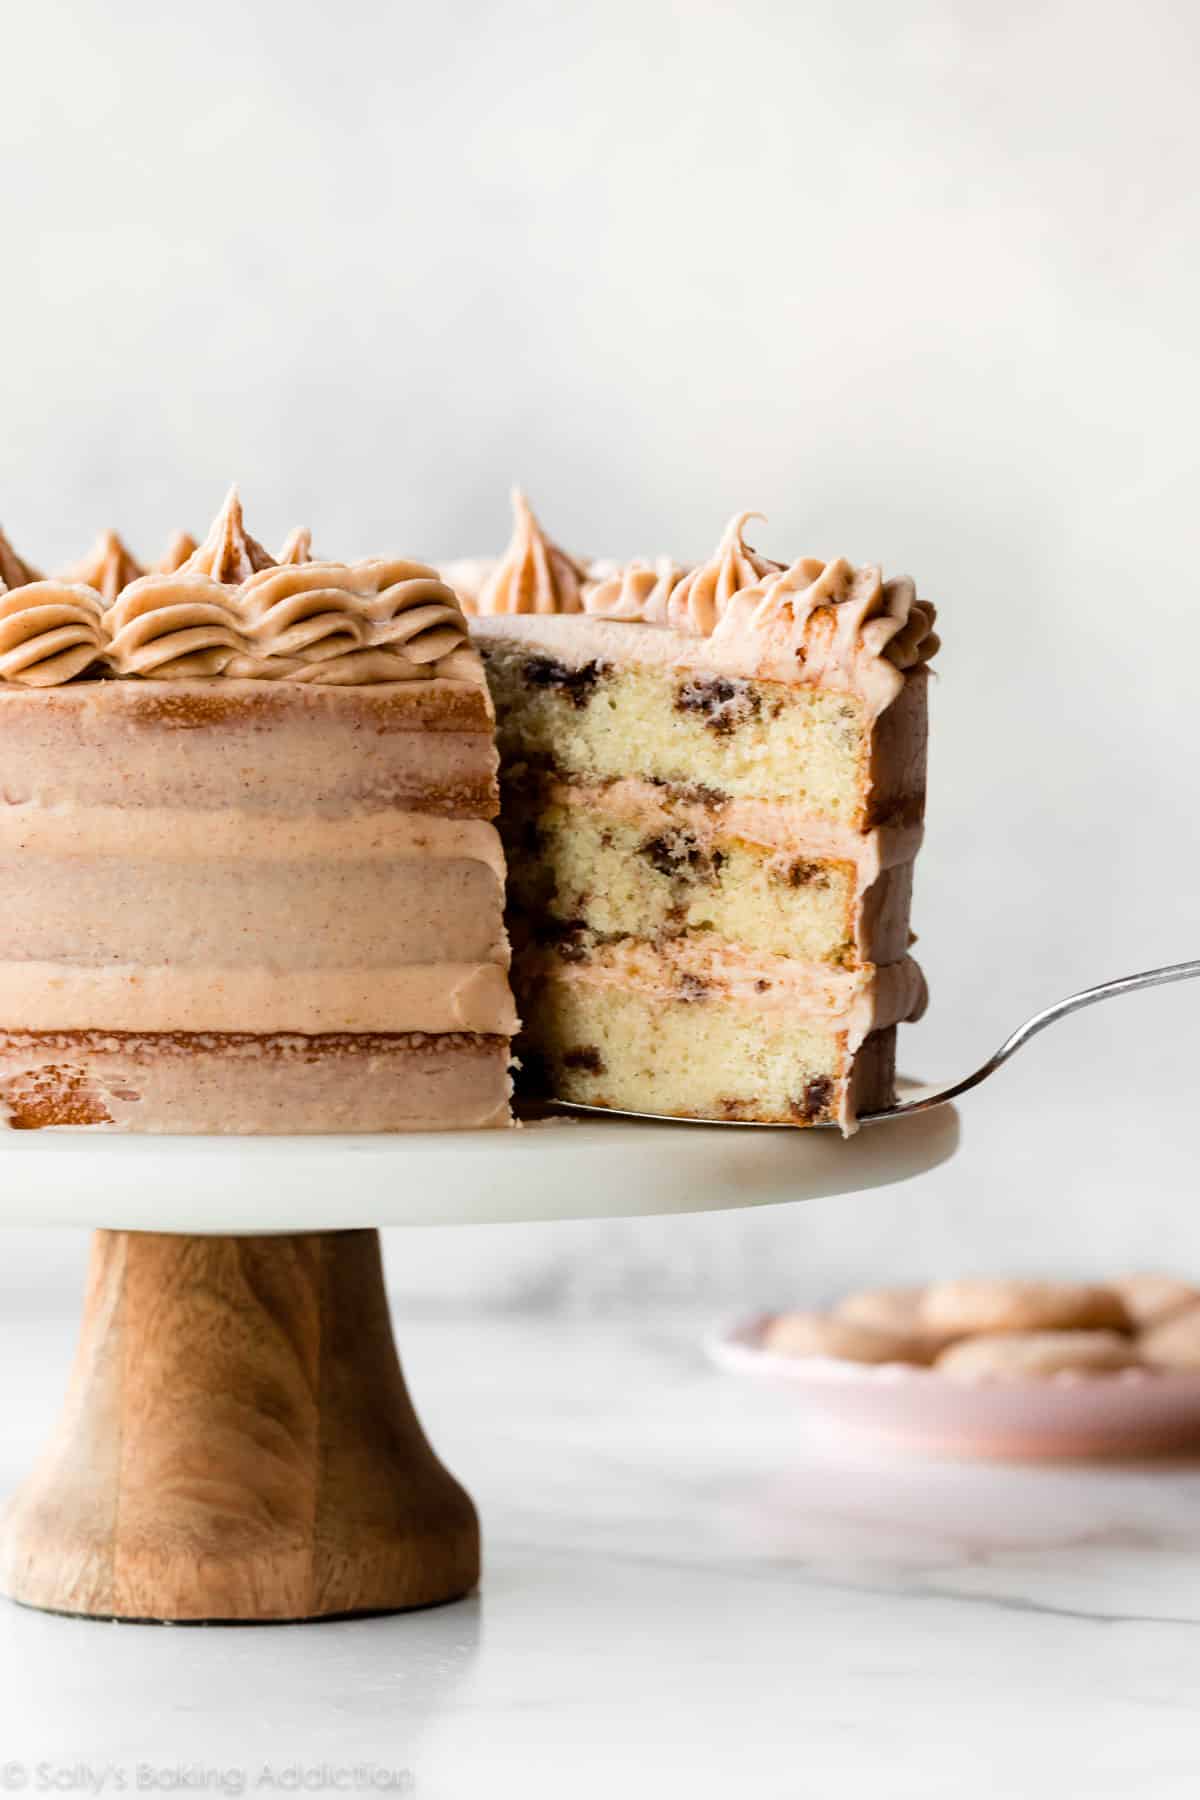
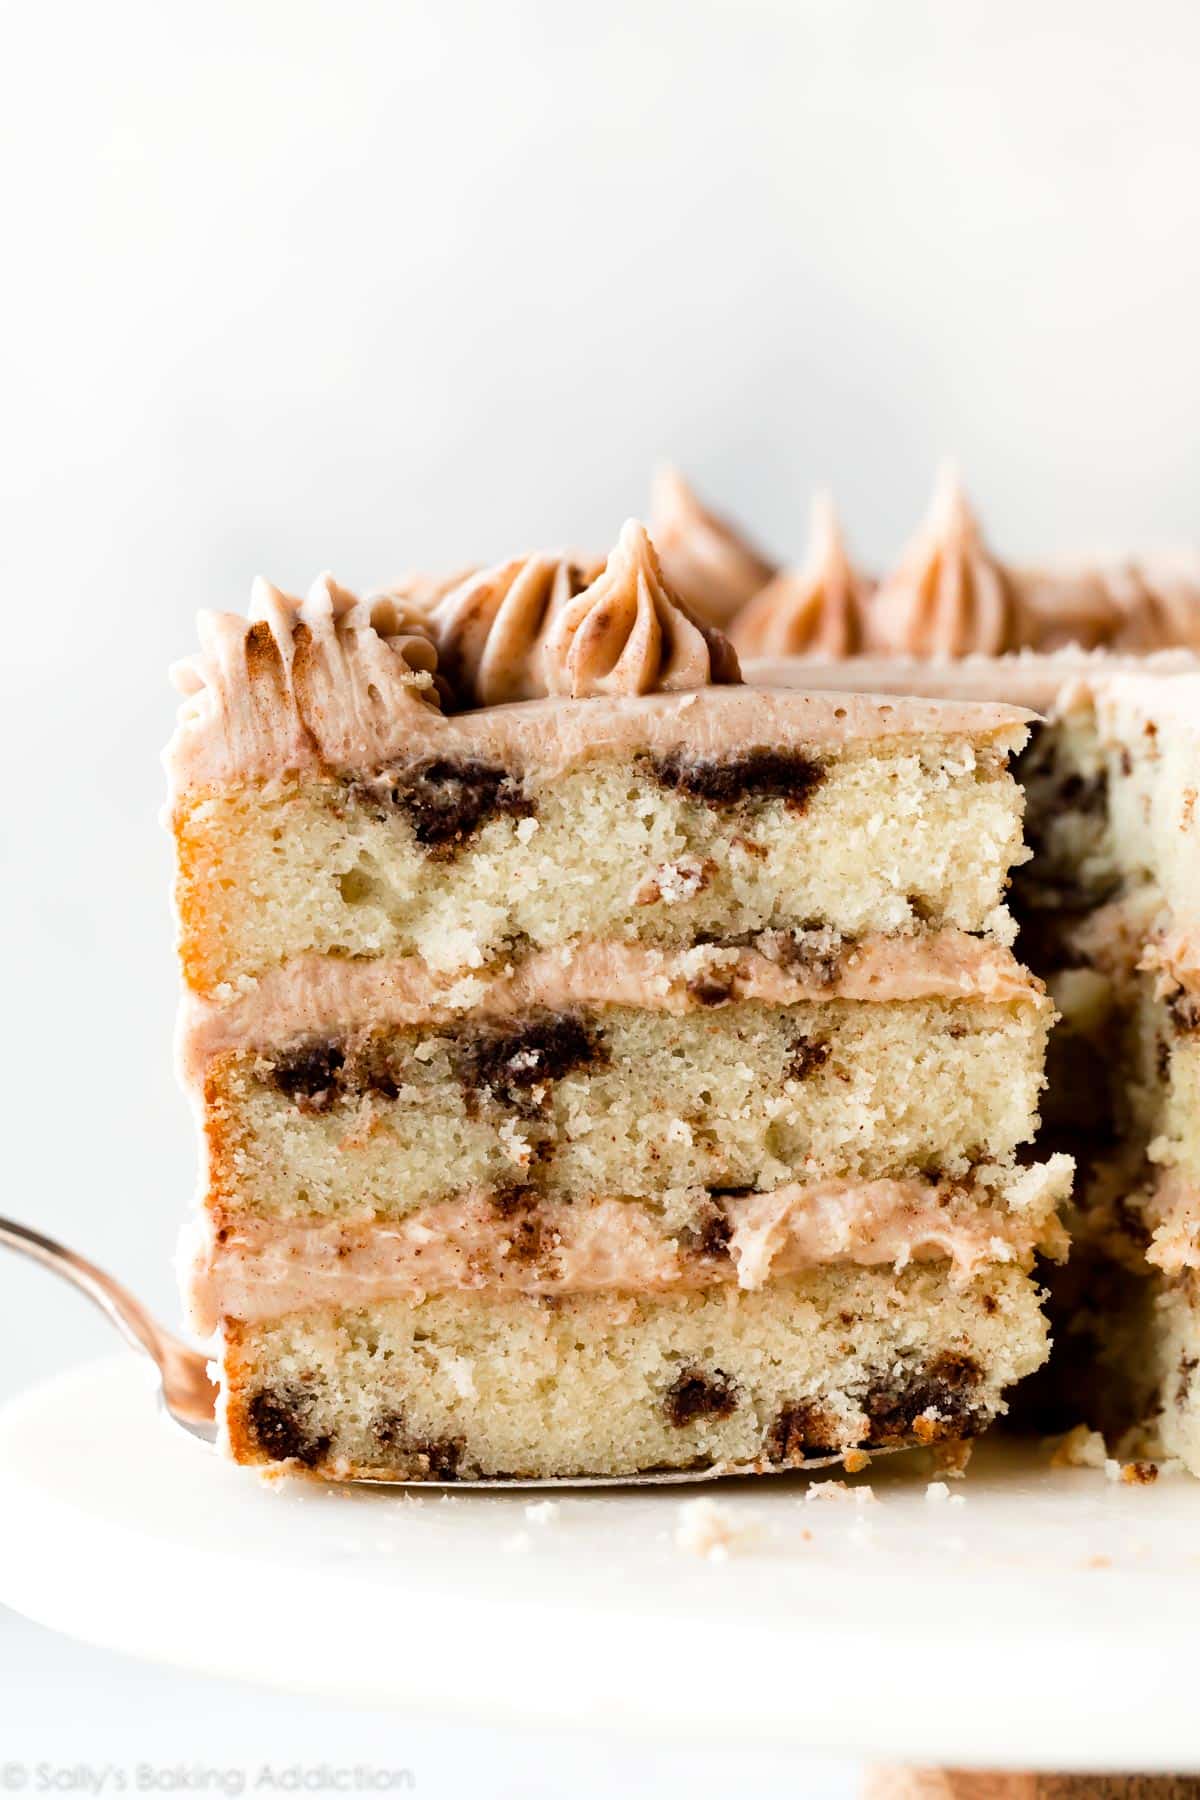
Using my vanilla cake recipe as the base, you can create an absolutely mouthwatering snickerdoodle cake filled with buttery cinnamon swirls and topped with creamy brown sugar cinnamon buttercream frosting. This cinnamon cake goes down in history as one of my best cake masterpieces. Everyone raved about it!
Earlier this month, I asked the Sally’s Baking Addiction Facebook group community if they wanted a snickerdoodle cake recipe this fall season. The response was an overwhelming yes. In fact, the general response was HECK YES HECK YES HEEEEEEEECK YES.
Your wish is my cake command.
This Snickerdoodle Cake Is:
- for cinnamon lovers
- special occasion worthy
- equal parts vanilla cake and snickerdoodles
- totally reminding me of brown sugar cinnamon pop tarts
- basically impossible not to love
3 Parts to Snickerdoodle Cake
- Buttery Vanilla Cake
- Pockets of Cinnamon Swirls
- Brown Sugar Cinnamon Buttercream
Snickerdoodle Cake Power Ingredients
The ingredient list below looks long. Thankfully, the ingredients are mostly repeated in each section. If you’ve made or read about my best vanilla cake recipe before, you know that I use a few “power ingredients” that promise the perfect cake texture:
- Butter: Use room temperature butter for the cake and frosting. Remember that room temperature butter is cooler than you think. Use melted butter for the cinnamon swirl.
- Cake Flour: If you want a soft bakery-style cake, cake flour is the secret. The cake will be heavy if you use all-purpose flour. If needed, you can use a cake flour substitute.
- Eggs & 2 additional egg whites: 3 whole eggs provide structure, moisture, and richness. 2 extra egg whites keep the cake light and airy.
- Baking Powder & Baking Soda: Remember the differences in baking powder vs baking soda and why it’s important to use both in some recipes? We’ll use enough baking powder to give the cake height without leaving a bitter aftertaste. Baking soda allows us to use less baking powder.
- Buttermilk: Buttermilk is an acidic ingredient and baking soda requires an acid to work. Plus, buttermilk yields an EXTRA moist cake crumb. See recipe note about using a buttermilk substitute.
- Brown Sugar: We’ll use brown sugar in the cinnamon swirl and again in the frosting. You can use light brown or dark brown sugar, but I recommend dark brown sugar for bolder flavor.
- Cinnamon: Cinnamon is the main flavor, so make sure you’re using a quality product. I adore McCormick and Penzeys brands. (Not sponsored, just a super fan!)
How to Make Snickerdoodle Cake
- Make the cake batter: Use the basic creaming method. If desired, see my vanilla cake recipe for more detail. I reduced the sugar in the cake batter since we’re adding a cinnamon sugar swirl.
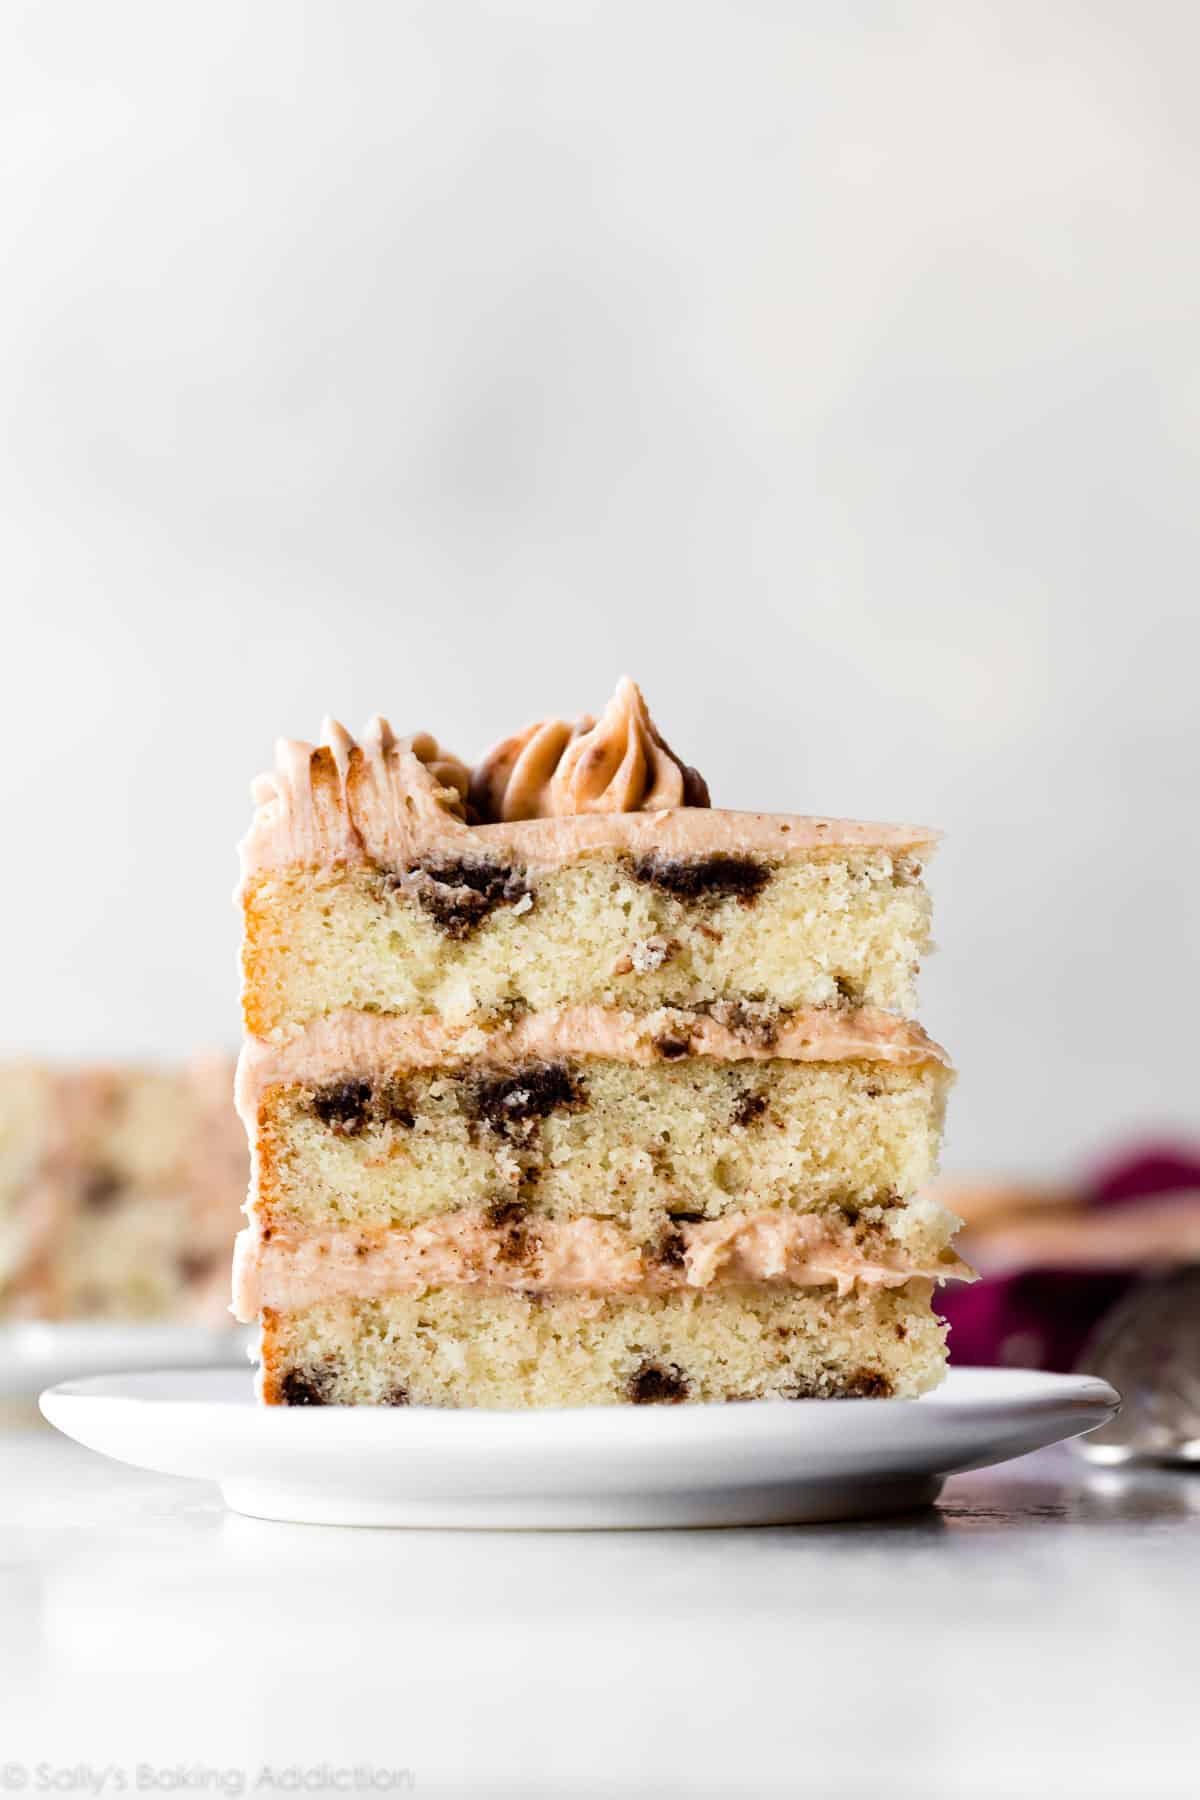
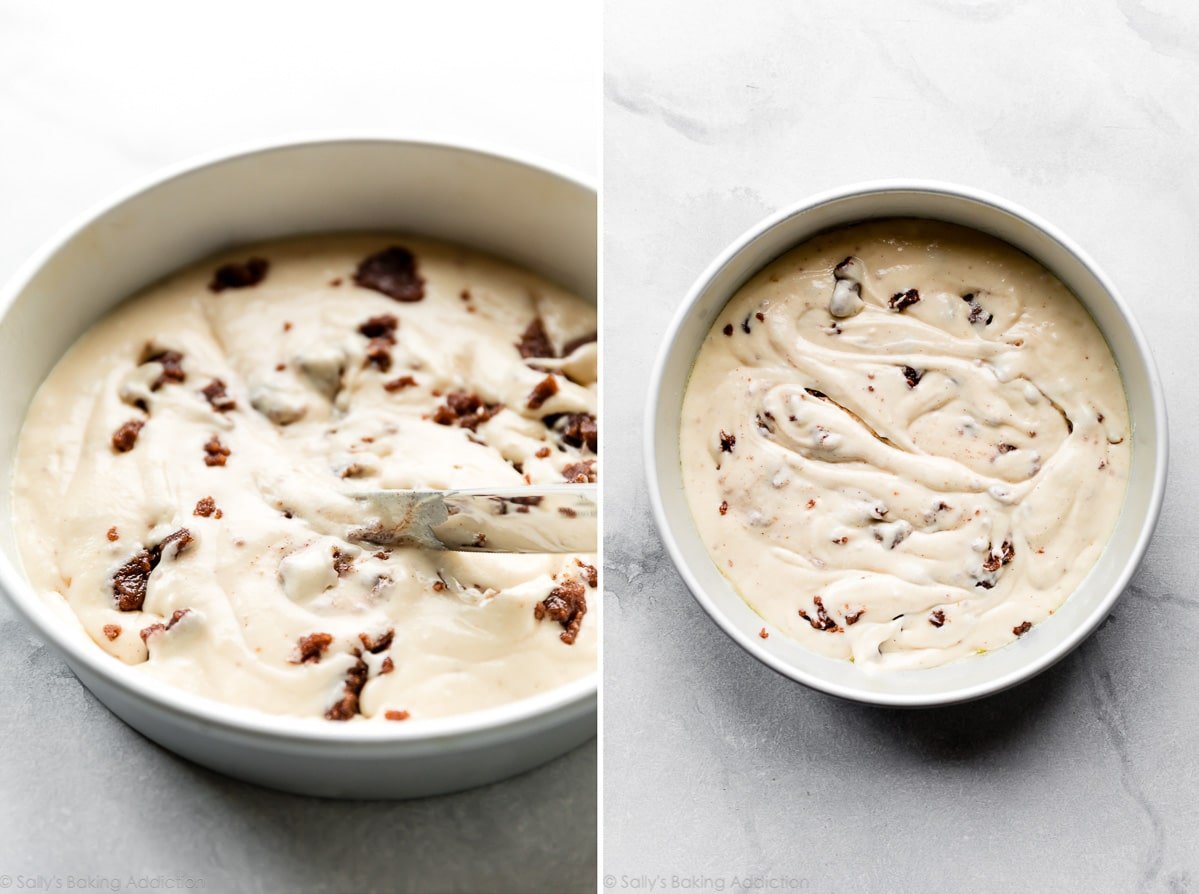
- Make the cinnamon swirl: Combine brown sugar, flour, and cinnamon. Gently mix in melted butter. Drop small spoonfuls over each unbaked cake layer, then swirl with a knife. The cinnamon swirl will slightly sink as the cake bakes, but that’s ok. When you eat the cake, the bits of cinnamon swirl are sticky, chewy, and massively flavorful.
- Bake & cool the cakes: Bake until a toothpick inserted in the center of the cakes comes out clean, then cool completely before assembling and frosting.
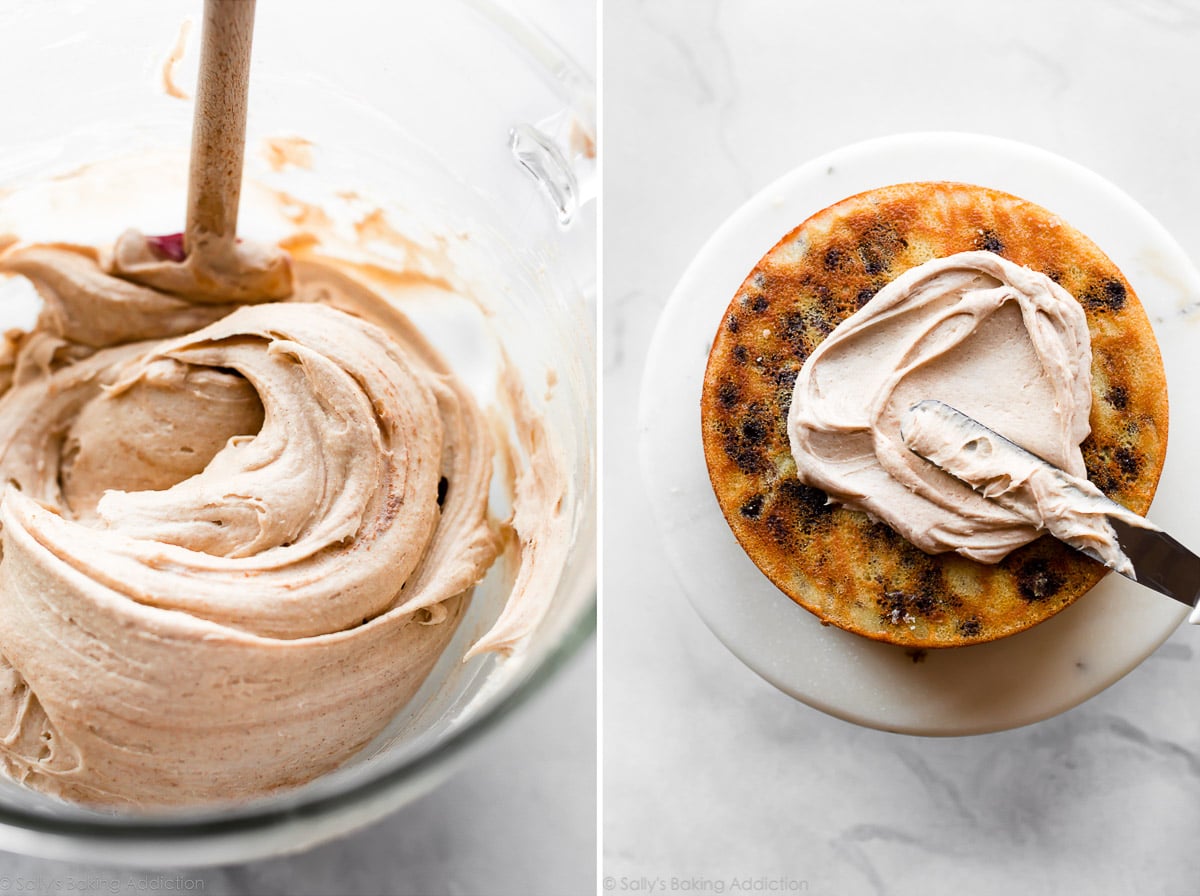
- Make the brown sugar cinnamon frosting: More on that next!
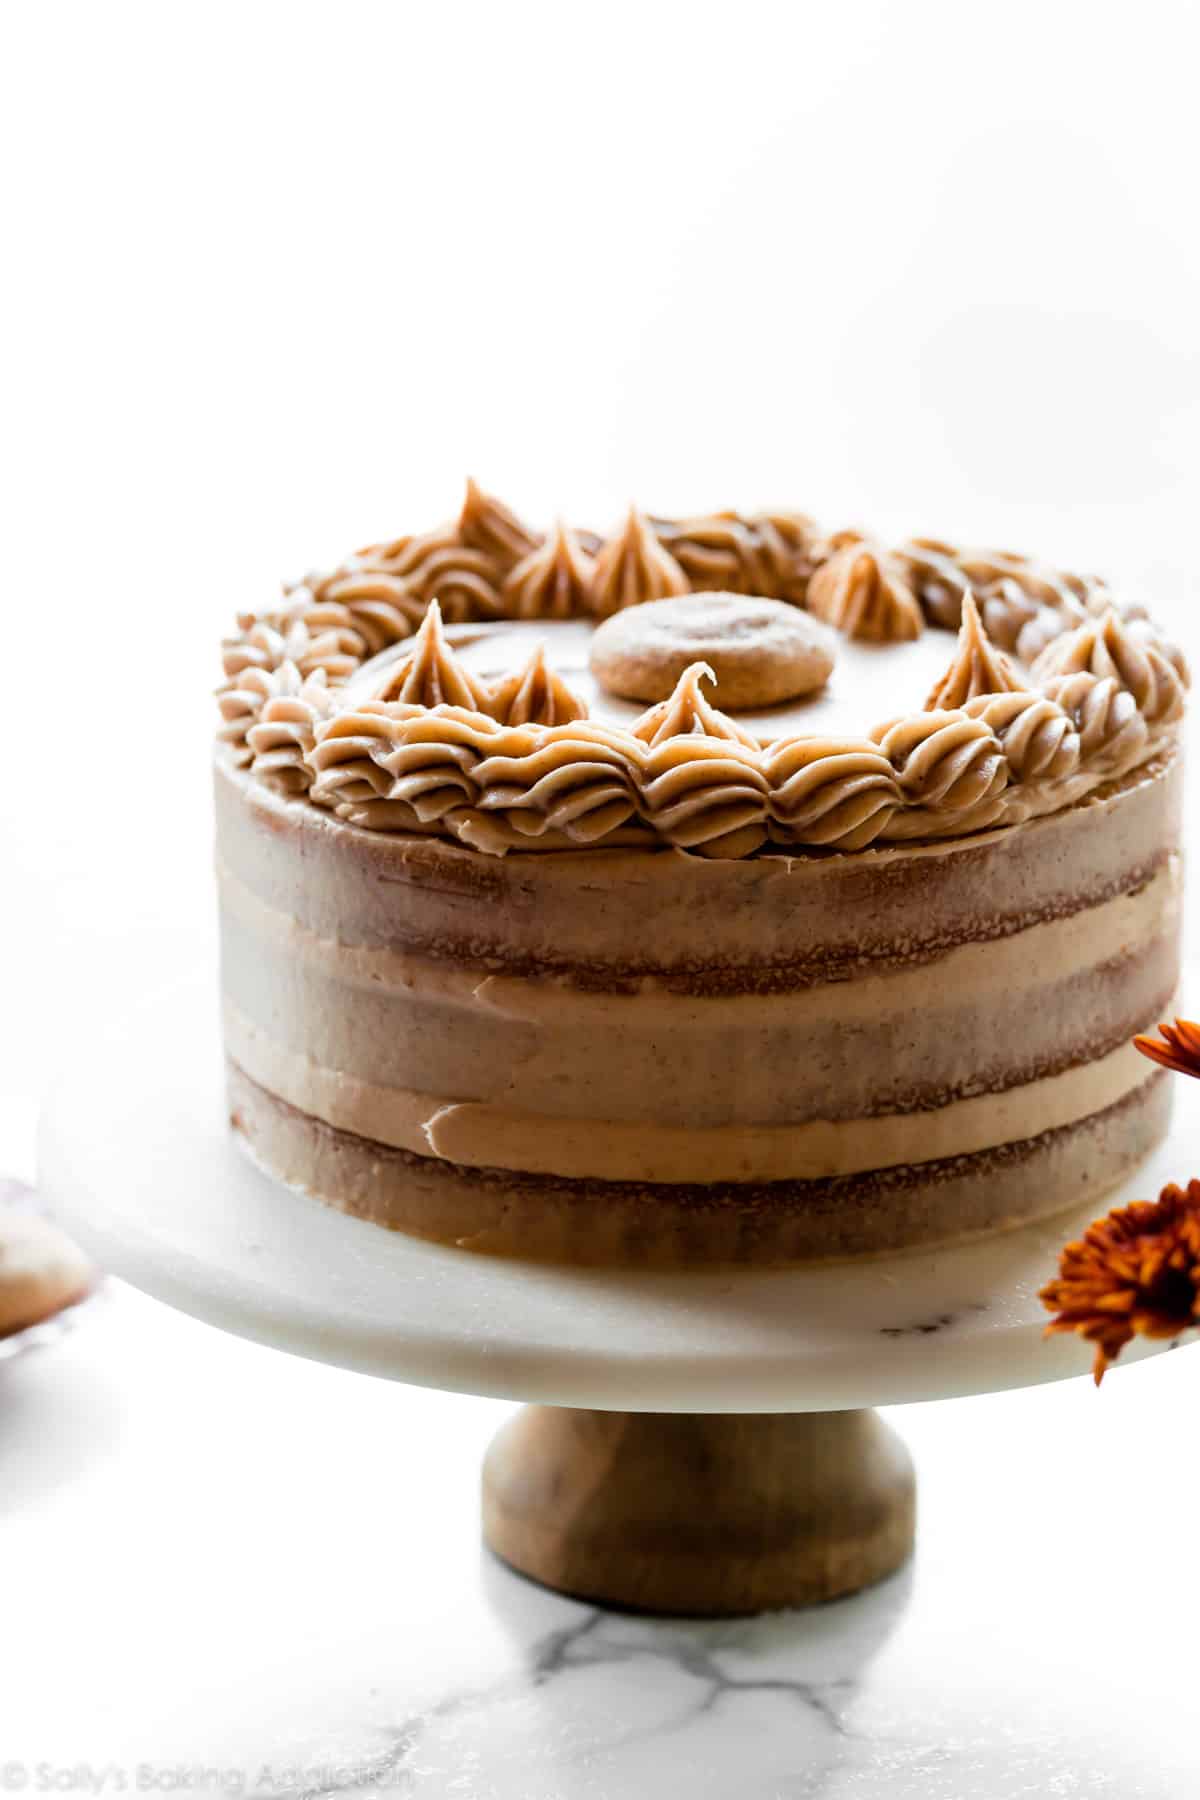
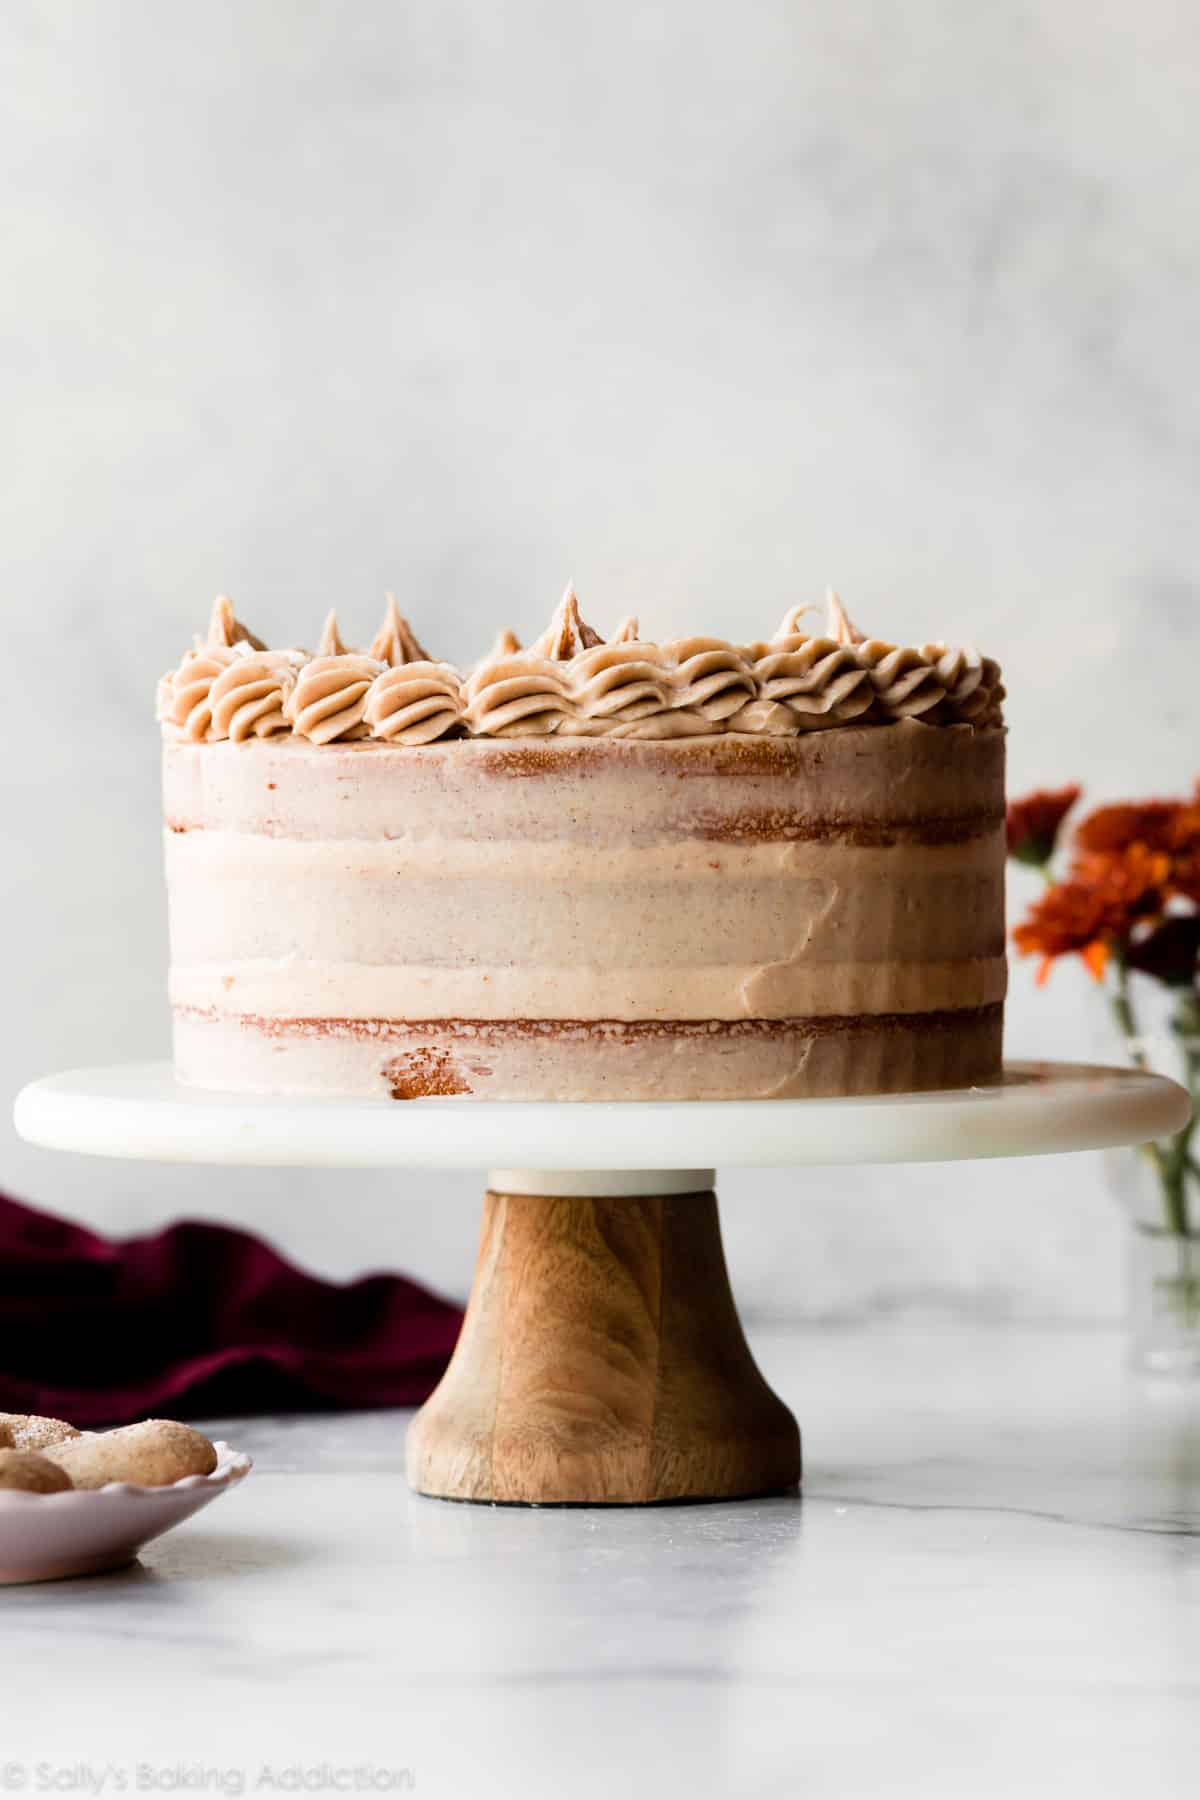
- Decorate the cake: I love a semi-naked cake decoration for this snickerdoodle cake.
- Chill before serving: For beautiful slices, chill the decorated cake for at least 30-60 minutes prior to serving. This tightens up the layers, so slicing is much neater and easier.
This cake batter is moderately thick and fits perfectly in 3 9-inch cake pans. Always line your round pans with parchment paper rounds before adding the batter.
Brown Sugar Cinnamon Buttercream
Simply put, this frosting is nothing short of a dream. Brown sugar isn’t a common ingredient in snickerdoodle cookies, but I really wanted to impart its flavor into the cake. Brown sugar weighed down the cake crumb, so I added some to the frosting. Thus, brown sugar cinnamon buttercream was born. (There’s no need for any other frosting flavor again, ever.)
You know what I love about snickerdoodle cookies? Their creamy texture and slightly tangy flavor—both make snickerdoodles uniquely delicious! Cream of tartar supplies those favorable components, but it didn’t really fit into this cake. So I compromised and added cream cheese to the buttercream frosting. Now we have a wonderfully tangy/sweet flavor, plus an ultra creamy texture.
To avoid a gritty texture from the brown sugar, cream it with the butter and cream cheese until relatively smooth. (Once you add the remaining ingredients, you won’t be able to detect its texture anyway.) If you find the buttercream too sweet, add extra salt. If you crave more flavor, add more cinnamon and/or vanilla extract. This brown sugar cinnamon buttercream would be outstanding with banana layer cake or carrot cake, too.
Look at all those cinnamon swirl specks on the bottom of a cake layer! ↑ ↑
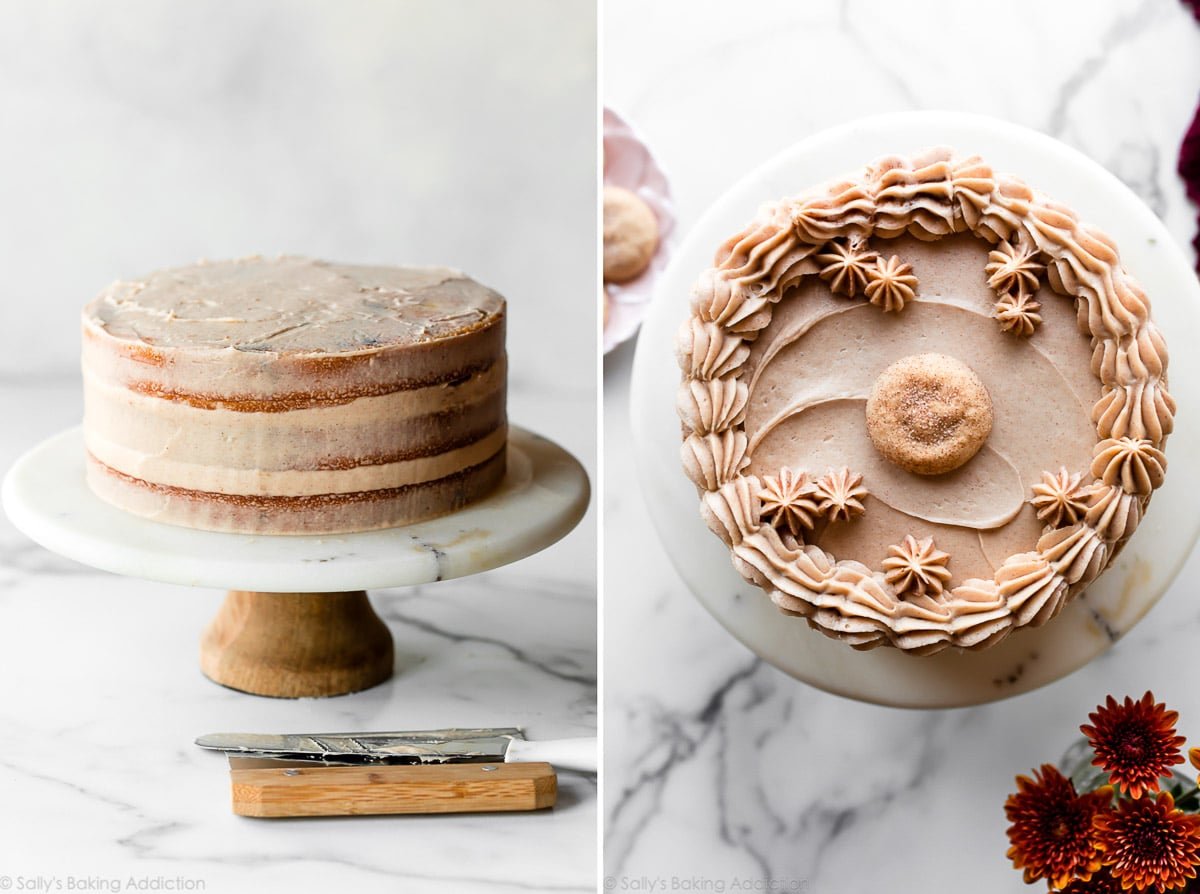
Semi-Naked Cake Style
Remember when I taught you how to make a vanilla naked cake? I recreated the look for this snickerdoodle cake. Perfect as a rustic chic autumn cake, no? If you need a visual for this semi-naked look (pretty much a crumb coat), see my naked cake video tutorial.
If you skip the piping detail, there’s enough frosting to cover the whole cake with a generous layer of frosting. 🙂
Need to freeze the cake layers? See how to freeze cakes for detailed instructions.
Love Cinnamon? More Recipes for You:
- Spice Cake
- Chai Cinnamon Swirl Bundt Cake
- Cinnamon Roll Cookies
- Snickerdoodle Cupcakes, Snickerdoodle Blondies, or Soft & Chewy Chocolate Snickerdoodles
- Banana Cupcakes (with Cinnamon Cream Cheese Frosting!)
- Giant Cinnamon Roll Cake
And if you need more inspiration, here is a list of 30+ fall cake recipes.
Print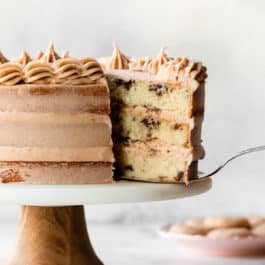
Snickerdoodle Cake
- Prep Time: 50 minutes
- Cook Time: 25 minutes
- Total Time: 4 hours, 10 minutes
- Yield: 12-14 servings
- Category: Desserts
- Method: Baking
- Cuisine: American
Description
Using my vanilla cake recipe as the base, create an absolutely mouthwatering snickerdoodle cake filled with buttery cinnamon swirls and topped with creamy brown sugar cinnamon buttercream frosting. Review recipe notes before beginning.
Ingredients
- 3 and 2/3 cups (433g) cake flour* (spooned & leveled)
- 1 teaspoon salt
- 2 teaspoons baking powder
- 3/4 teaspoon baking soda
- 1 and 1/2 cups (340g) unsalted butter, softened to room temperature
- 1 and 2/3 cups (330g) granulated sugar
- 3 large eggs + 2 additional egg whites, at room temperature*
- 1 Tablespoon pure vanilla extract (yes, Tbsp!)
- 1 and 1/2 cups (360ml) buttermilk, at room temperature*
Cinnamon Swirl
- 1/2 cup (100g) packed light or dark brown sugar
- 1/3 cup all-purpose flour (41g) or cake flour (38g) (spooned & leveled)
- 1 Tablespoon ground cinnamon*
- 1/4 cup (4 Tbsp; 56g) unsalted butter, melted
Brown Sugar Cinnamon Buttercream
- 1 and 1/4 cups (282g) unsalted butter, softened to room temperature
- 8 ounces (226g) full-fat brick cream cheese, room temperature and sliced into 4 pieces*
- 3/4 cup (150g) packed light or dark brown sugar
- 1 Tablespoon ground cinnamon*
- 5 and 1/2 cups (660g) confectioners’ sugar
- 1/4 cup (60ml) heavy cream or whole milk
- 1 teaspoon pure vanilla extract
- 1/8 teaspoon salt, plus more as needed
- optional for garnish: snickerdoodle cookies
Instructions
- Preheat oven to 350°F (177°C). Grease three 9-inch cake pans, line with parchment paper rounds, then grease the parchment paper. Parchment paper helps the cakes seamlessly release from the pans. (If it’s helpful, see this parchment paper rounds for cakes video & post.)
- Make the cake: Whisk the cake flour, salt, baking powder, and baking soda together. Set aside.
- Using a handheld or stand mixer fitted with a paddle or whisk attachment, beat the butter and sugar together on high speed until smooth and creamy, about 3 minutes. Scrape down the sides and up the bottom of the bowl with a silicone spatula as needed. Beat in the 3 eggs, 2 egg whites, and vanilla extract on high speed until combined, about 2 minutes. (Mixture will look curdled as a result of the egg liquid and solid butter combining.) Scrape down the sides and up the bottom of the bowl as needed. With the mixer running on low speed, slowly add the dry ingredients. With the mixer still running on low speed, slowly pour in the buttermilk then mix just until combined. You may need to whisk it all by hand to make sure there are no lumps at the bottom of the bowl. The batter will be slightly thick.
- Pour batter evenly into cake pans. If desired, weigh them with a kitchen scale to ensure accuracy. Set aside for a few minutes as you make the cinnamon swirl.
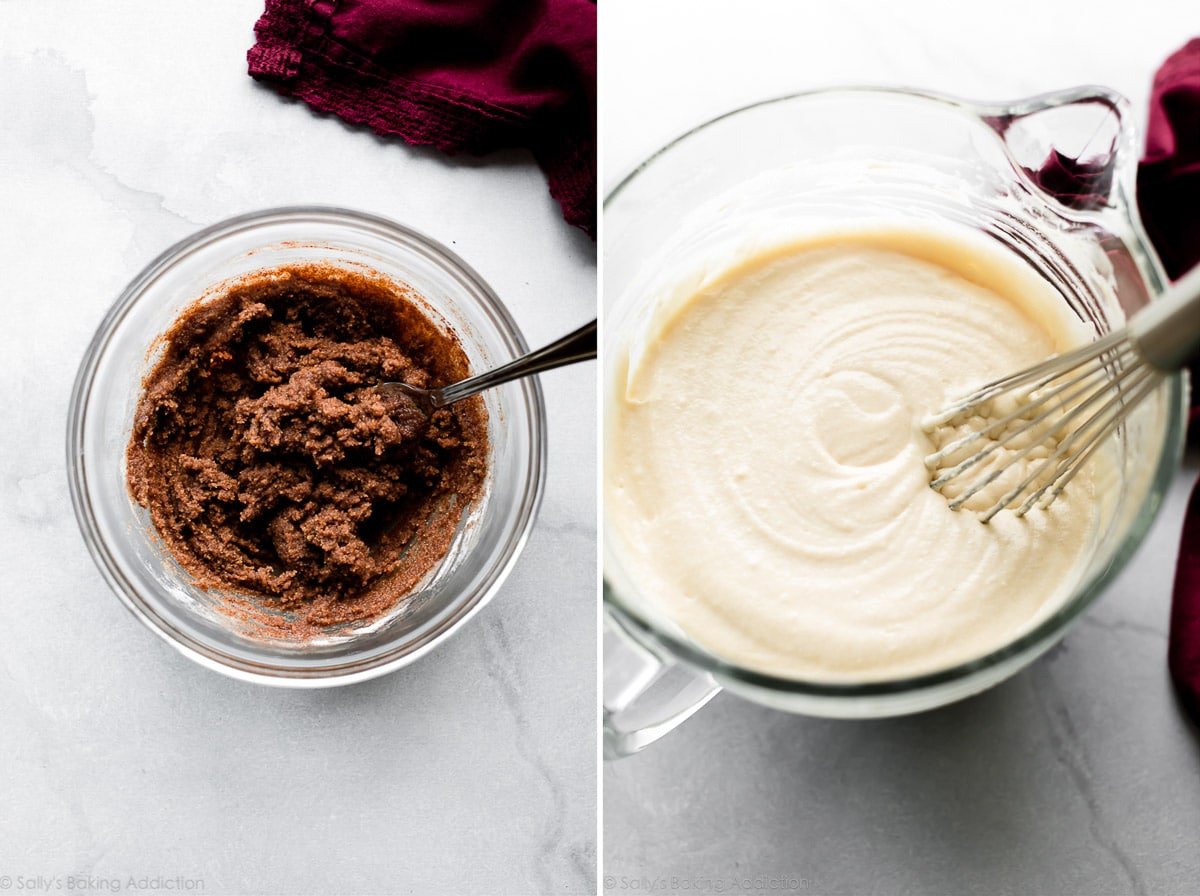
- For the cinnamon swirl: With a fork, mix the brown sugar, flour, and cinnamon together until combined. Pour the melted butter on top and mix just until combined. Use immediately in the cake batter (next step) because the longer it sits out, the harder it will get as a result of the butter solidifying.
- Drop small spoonfuls of the cinnamon swirl on each of the unbaked cakes. Use a knife to gently swirl the spoonfuls into the batter. Some pieces will remain as chunks (that’s fine!) and some will swirl into the batter.
- Bake for around 23-26 minutes or until the cakes are baked through. To test for doneness, insert a toothpick into the center of the cake. If it comes out clean, it’s done. Allow cakes to cool completely in the pans set on a wire rack. The cakes must be completely cool before frosting and assembling.
- Make the frosting: In a large bowl using a handheld mixer or stand mixer fitted with a whisk or paddle attachment, beat the butter on medium speed until creamy, about 2 minutes. Switch the mixer up to medium-high speed and add the cream cheese one piece at a time, mixing until each has combined before adding the next. Once the cream cheese is combined, add the brown sugar and beat on medium-high speed until combined, about 1 minute. Stop the mixer and add the cinnamon, confectioners’ sugar, heavy cream, vanilla extract, and salt. Turn the mixer on low speed and beat for 30 seconds, then turn the mixer up to medium-high speed and beat until completely combined and creamy. Add more confectioners’ sugar if frosting seems too thin—I usually add another 1/4 cup (30g) of confectioners’ sugar. You can add more heavy cream if frosting seems too thick or an extra pinch of salt if frosting is too sweet. (I usually add another pinch of salt.) If you crave extra flavor, add a little more cinnamon and/or vanilla extract.
- Level the cakes & add the crumb coat: Using a large serrated knife, slice the domes off the cooled cakes (a semi-thin layer) to create a flat surface. Discard domes (or crumble over ice cream!). Place 1 cake layer on a cake stand, cake turntable, or serving plate. Evenly spread about 1 and 1/2 cups of frosting on top. Top with 2nd cake layer and evenly spread another 1 and 1/2 cups of frosting on top. Top with the third cake layer. I decorated my snickerdoodle cake with a crumb coat, which makes it a semi-naked style cake. To recreate this, spread a thin layer of frosting around the sides and top of the cake (save extra frosting for the top in the next step). An icing spatula and bench scraper are helpful for creating this look. (If you need a visual, see my Naked Cake video tutorial.) Chill the crumb coated cake uncovered in the refrigerator or freezer for at least 30 minutes to help set the crumb coat.
- Spread a little extra frosting on top of the cake and use any leftover frosting to pipe detail around the edges, if desired. I used Wilton 8B piping tip. Garnish with snickerdoodles if desired.
- Refrigerate cake for at least 30-60 minutes before slicing and serving. This helps the cake hold its shape when cutting.
- Cover leftover cake tightly and store in the refrigerator for up to 5 days.
Notes
- Make Ahead & Freezing Instructions: The cake layers can be baked, cooled, and covered tightly at room temperature overnight. Likewise, the frosting can be prepared then covered and refrigerated overnight. Let the frosting sit at room temperature to slightly soften for 20 minutes before assembling and frosting. Frosted cake or unfrosted cake layers can be frozen up to 2-3 months. Thaw overnight in the refrigerator and bring to room temperature before decorating/serving. See how to freeze cakes for detailed instructions.
- Special Tools (affiliate links): 9-inch Cake Pans | Glass Mixing Bowls | Whisk | Electric Mixer (Handheld or Stand) | Silicone Spatula | Cooling Rack | Cake Turntable | Icing Spatula | Bench Scraper | Piping Bag (Reusable or Disposable) | Wilton 8B Piping Tip | Cake Carrier (for storage)
- Cupcakes: Fill cupcake liners 2/3 full with batter. Drop small spoonfuls of cinnamon swirl onto each, then gently swirl with a knife. Bake at 350°F (177°C) for 19-21 minutes. Yields about 3 dozen. Or try my snickerdoodle cupcakes recipe.
- 9×13-inch Cake: This recipe yields too much batter for a 9×13-inch pan. Instead, you can use my white cake batter and swirl in the cinnamon swirl. (See those recipe notes for baking instructions for a quarter sheet pan.) I recommend cutting this frosting recipe in half so you don’t have too much leftover.
- Cake Flour: To prevent a dry-tasting cake, make sure you are spooning and leveling the flour or weighing it. For the best results, I strongly recommend cake flour. You can find it in the baking aisle and I have many more recipes using it. If you can’t get your hands on cake flour, you can make a homemade cake flour substitute.
- Eggs: 3 whole eggs provide structure, moisture, and richness. 2 extra egg whites keep the cake light and airy. I don’t recommend using 4 whole eggs; stick to the 3 egg & 2 egg white combination. Here are recipes using leftover egg yolks.
- Buttermilk: Buttermilk (an acid) is required for this cake recipe. If you don’t have any, you can make a DIY buttermilk substitute. Add 2 teaspoons of white vinegar or lemon juice to a liquid measuring cup. Then add enough whole milk to the same measuring cup until it reaches 1 and 1/2 cups. (In a pinch, lower fat or nondairy milks work for this soured milk, but the cake won’t taste as moist or rich.) Stir it around and let sit for 5 minutes. The homemade “buttermilk” will be somewhat curdled and ready to use in the recipe.
- Cinnamon: Yes, the cinnamon swirl and frosting both call for 1 Tablespoon (not teaspoon) of ground cinnamon. We need that flavor to stand out!
- Brown Sugar: You can use light brown or dark brown sugar, but I recommend dark brown sugar for bolder flavor.
- Cream Cheese: Use brick cream cheese, not cream cheese spread. Slice the brick into four 2-ounce pieces. If desired, you can skip the cream cheese and add another 1/4 cup (4 Tbsp; 56g) softened unsalted butter instead.
- Why is everything at room temperature? All refrigerated items should be at room temperature so the batter mixes together easily and evenly. Read more about the importance of room temperature ingredients.


Reader Comments and Reviews
Can this cake be baked in an angel food cake pan or bundt cake pan? If so, about how long would it bake?
Hi Karen, a Bundt pan should work great, but we’re unsure of the exact bake time. Make sure you use a large Bundt pan with at least 10-12 cups capacity. The larger the better. Enjoy!
Made exact recipe. Wonderful cake!! very rich for sure! Small piece was plenty. I used crushed Cinnamon Toast Crunch cereal for garnish instead of crushed cookies. I do highly recommend using parchment paper as some of the cinnamon swirl stuck to my pans, even with Baker’s Joy sprayed.
WHAT A HIT! Made this for my adult daughter who loves cream cheese icing. I found this recipe and EVERYONE loved it! Going to make it again this week!
Can this be done as a Bundt cake?
Hi JC, a Bundt pan should work great, but we’re unsure of the exact bake time. Make sure you use a large Bundt pan with at least 10-12 cups capacity. The larger the better. Enjoy!
I loved this cake! But the icing was too much/too sweet for me. I would definitely halve it next time, but do you think I should use less confectioners sugar as well?
Hi Lauren, you can certainly try reducing the confectioners’ sugar, but keep in mind that the frosting will be thinner. We’re glad you enjoyed the cake!
Can this be made into a sheet cake?
Hi Katie, See recipe notes for details on making this in a quarter sheet pan.
Hello I was wanting to make this recipe but I don’t like cream cheese frosting and would like to use a different recipe. How many cups of frosting would I need to ice this cake.
Hi Brylie, you’ll want at least 4-5 cups of frosting to make the cake naked-style like we have in the photos. You can certainly feel free to use more depending on how heavily you like to decorate your cakes. Enjoy!
Hi! I want to make your snickerdoodle cake for my kids birthday….how difficult would it be to color the frosting with brown sugar and cinnamon in there? They want pastel colors…Should I make a frosting with white sugar and no cinnamon instead?
Hi Ashley, We fear that adding food coloring to the light brown frosting wouldn’t make the pretty colored cake you’re looking for. You can use this frosting between the layers, and use plain vanilla buttercream or cream cheese frosting to color and decorate the outside, instead.
This sounds delicious. I have a friend whose favorite cookie is snicker doodles so, I’d love to make this for her. You say it’s too much batter for a 9×13. Is there enough to make a two layed 9×13 cake?
Hi Lisa, this batter as written would yield 2 thin 9×13-inch cakes. You may wish to 1.5x the recipe, fill your cake pans half way, and then use the leftover batter for a few cupcakes on the side. Let us know if you try!
I thought snickerdoodles were cookies, never heard of a snickerdoodle cake. Thank you for the recipe and tips.
Howdy! Love your recipes, you are my go to for all cake recipes, and many other baked goods–thank you.
I do want to reiterate to other folks out there, for the frosting–really get that brown sugar mixed in first and maybe test for graininess before adding the other ingredients.
It was still pretty crunchy in the end product for me. My son and I liked the texture, the rest of the family did not. 🙁
Can I use this recipe to make this in a Jelly Roll pan? If so, how?
Hi Krystal, Here is everything you need to know about converting recipes to different Cake Pan Sizes.
Is this the old vanilla cake recipe? Should we do the updated on and then add the cinnamon swirl?
Hi Camille, this cake use our vanilla cake as the base, but we reduced the sugar in the cake batter since we’re adding a cinnamon sugar swirl. We recommend following the recipe card in this post.
Hi Sally! Would I be able to do this with 3 8 inch pans?
Hi Shelby, you can use your 8 inch pans. The layers will be slightly thicker and take a bit longer to bake so keep an eye on them and use a toothpick to test for doneness!
Hello Sally!
Could I make the cake layers, wrap and refrigerate on Thursday morning, make icing and assemble cake Friday night to serve for a Saturday evening party? I want to make sure the cake will still taste fresh.
*I will be leaving this same question on another recipe as well!
Thank you!
Hi Kimberly, yes, that timeline should work fine. Enjoy!
it was extremely delicious and everything on the recipe was extremely accurate including the bake time. very fluffy (low taper fade). my hair is just as fluffy as this cake! its like a mowhawk on wheels!
It’s been a long time since I’ve tried a baked good so delicious that I accidentally cursed, but this recipe did it. I made 36 cupcakes, each with 1/2 teaspoon of the cinnamon filling which used it up exactly. SO delicious. I’d recommend checking cupcakes after 16 minutes instead of the 19-21 she puts in the recipe notes. So buttery and delicious. They really do taste just like the cookies.
Did you swirl in the cinnamon filling or just drop it in?
Looking to make it this weekend for 5 people. Would have the recipe work in three 6 inch pans?
Hi Chris, this would be far too much batter for two 6 inch cake pans. For a three layer 6 inch cake, you can use this snickerdoodle cupcakes recipe (more on using cupcake recipes for 6 inch cakes) and follow the baking time and directions for 6 inch cakes.
This looks amazing and cannot wait to try for my Cinnamon lover Husbands birthday
Hope it’s a hit, Kimber!
I’m going to make this cake for my mom’s birthday and I’m super excited! She always baked us home made birthday cakes growing up and I’ve been loving finding new cakes each year to bake for her. Do you sift your powdered sugar for the frosting?
Hi Stefanie, no need to!
Hi! This recipe sounds delicious! Planning on making it but was wondering if I can sub butter in cake batter with unsweetened apple sauce? Could you give me your opinion! Thanks
Hi Karen, we haven’t tested it, so are unsure of the results, but we wouldn’t recommend it for this cake. This cake requires creaming butter and sugar together, which won’t be possible with applesauce. In general, applesauce is a better sub for oil than for butter.
Made this for Christmas Eve. I followed the recipe exactly as written and it turned out perfectly!
I’m excited to make this this weekend… my family loves your recipes! Question: we don’t really love cream cheese frosting. Can I substitute butter for the cream cheese? Or at least for most of it? Or is there a better substitute?
Hi Traci, You can definitely add a little cinnamon to vanilla buttercream. Enjoy!
Do you use convection bake? If not, how should I adjust your temperatures if I DO use convection bake? Thank you!
Hi Traci, All of the recipes on this site are written for conventional settings. We always recommend conventional settings for baking (not convection/fan). The flow of air from convection heat can cause baked goods to rise and bake unevenly and it also pulls moisture out of the oven. If you do use convection settings for baking, lower your temperature by 25 degrees F and keep in mind that things may still take less time to bake.
Thanks for responding! To both of my questions 🙂 ! So on conventional bake… you’d want to put all 3 cake pans on the middle rack right?
Can I bake the batter in two pans instead and just have two layers of cake?
Hi Ainsley, this batter is too much for two 9-inch cake pans. If you only want to bake two layers, I recommend weighing the batter, then dividing it in thirds, and bake 1/3 in each pan, and then the remaining 1/3 batter in a muffin tin as cupcakes.
Hi!!! Great flavor. We made this cake and baked it in an 8 inch round pan. The cakes for some reason fell apart completely like in large chunks when I flipped it over. Any reason why this could happen? I’m wondering what i did wrong. We still ate but we ate it like it was a coffee cake than a layer cake.
Hi Sandra, happy to help troubleshoot. Did you line your cake pans with parchment rounds and then spray with nonstick spray? This is our recommendation for getting cakes to release easily from the pans.
About how much batter, by weight, goes into each 9-inch pan? I only have two 9 inch baking pans and would like to make this without buying another pan. I would like to bake two and then bake the third after I remove the others from the pan but I want to try and make them close to even.
Hi Rachel, this batter yields about 8 cups of batter so you’ll want about 2 2/3 cups in each pan.
I’m hoping to make these as cupcakes, but 3 dozen is a lot; is there a way to halve the recipe?
Hi Laura, Our snickerdoodle cupcake recipe yields a dozen!
Hello. How can I convert this into 8inch pans and how long should I bake it for? Thank you so much!
Hi Kavi, you can use your 8 inch pans. The layers will be slightly thicker and take a bit longer to bake so keep an eye on them and use a toothpick to test for doneness!
The icing was fabulous–I had a hard time not eating a lot of it before I put it on the cake! But my cake was rather dense and dry. I just read your discussion of why cakes come out dry and perhaps I overbeat it. But I wondered if I made a mistake doing the following. I put the cake together at about 11am and then refrigerated it until dinner at 7pm. The recipe does say to refrigerate the cake before serving so it cuts well but not for that amount of time. So let me know if you think the excessive refrigeration could have been the problem or something else. Thanks!
Hi Jane, A dense, dry cake can be caused by many factors, like over-baking, over-measuring the flour, over mixing, etc. You can check out this post on preventing a dry or dense cake for next time if you decide to give it another go. Thank you again for giving it a try!
Thanks so much for your reply. I did read that discussion of the different reasons a cake can be dry. But my particular question is COULD refrigerating the cake for 6-7 hours before serving be a POSSIBLE cause? I need to know that because I want to try this recipe again and be sure I don’t do–or do do–ALL the things that could have undermined my cake, including whether several hours refrigeration could have been the cause or contributed to the cause. Thanks!
Hi Jane, that could be a contributing factor, particularly if the cake was not covered and/or if your fridge was especially cold.
I’ve been makinsp many of your recipes and all fantastic , this one came out so fence , the layers almost looked like marzipan ? The flavours were great .. I’m not sure what I did wrong ?
Hi Kim, there are a few different reasons why cakes may come out overly dense. This post on how to prevent dry and dense cakes will be a helpful place to start troubleshooting. Let us know if we can troubleshoot further!