These soft pretzel bites are exactly like regular homemade soft pretzels, but shaped into smaller pieces. The dough requires just 6 ingredients and there’s hardly any rise time, so this is a wonderful recipe for yeast beginners. Have fun shaping the bites (they don’t need to be perfect!) and enjoy warm flavorful homemade pretzels within an hour. Serve plain, cinnamon sugar style, or with your favorite dip such as spicy cheese sauce or stone ground mustard.

I’m writing this over 7 years after this recipe was first published and say with 100% honesty that kids and adults alike FLOCK to these pretzel bites. They’re always a massive hit, a favorite party snack, and the fact that they’re surprisingly easy is music to the ears!
Tell Me About These Soft Pretzel Bites
- Flavor: If you enjoy soft pretzels, you’ll love these smaller bites. They’re completely homemade, so unlike store-bought frozen soft pretzels, each has that soft, warm, and fresh-from-the-oven taste and texture. You can keep the pretzels traditional with a sprinkling of coarse salt or try the cinnamon sugar version detailed in the recipe notes.
- Texture: The difference between bread and soft pretzels/soft pretzel bites is an alkaline bath. Do you know what that is? I promise it’s a very easy step. This is when shaped soft pretzel dough takes a dip in boiling water and baking soda, a quick step that provides the iconic chewy pretzel texture and adds a deeper, richer color to the baked pretzels. The boiling water also locks in the shape so the pretzels don’t over-puff in the oven. (Without the baking soda bath, you lose texture, that deep brown color, and flavor. So, basically, you will have bite-size bread instead of pretzels.) We do this key step when making regular soft pretzels, pretzel rolls, jalapeño cheddar soft pretzels and soft pretzel knots, too.
- Ease: Have you ever made my recipe for regular homemade soft pretzels? It was one of the first recipes I ever published, only to be republished with step-by-step photos a few years later. It’s become a “famous” & popular recipe on this website because the pretzels are relatively quick, extremely easy, and deliver great taste. Same story with these pretzel bites! Though the recipe requires yeast, I always say that this pretzel dough is a terrific starting point for yeast beginners because there’s very little rise time. And shaping the dough into bite-size pieces is easier than shaping into pretzels. Lots of perks about today’s recipe!

Dough for Soft Pretzel Bites
I never stray from my original soft pretzel dough, so that’s what you’ll use for these pretzel bites. You need just 6 basic ingredients to get started including warm water, yeast, a little sugar to feed the yeast, melted butter, salt, and all-purpose flour. (If you have it, the same amount of bread flour works too!). You can use either instant (quick rise) or active dry yeast in this dough. I usually use Platinum Yeast from Red Star, which is an instant yeast.
The dough doesn’t require extended rise time and the baking soda bath is pretty quick, so besides the baking step, the longest stretch of time this recipe requires is shaping.
Baking with Yeast Guide
Reference this Baking with Yeast Guide whenever you work with baker’s yeast. I include practical answers to all of your common yeast questions.
Step-By-Step Pictures
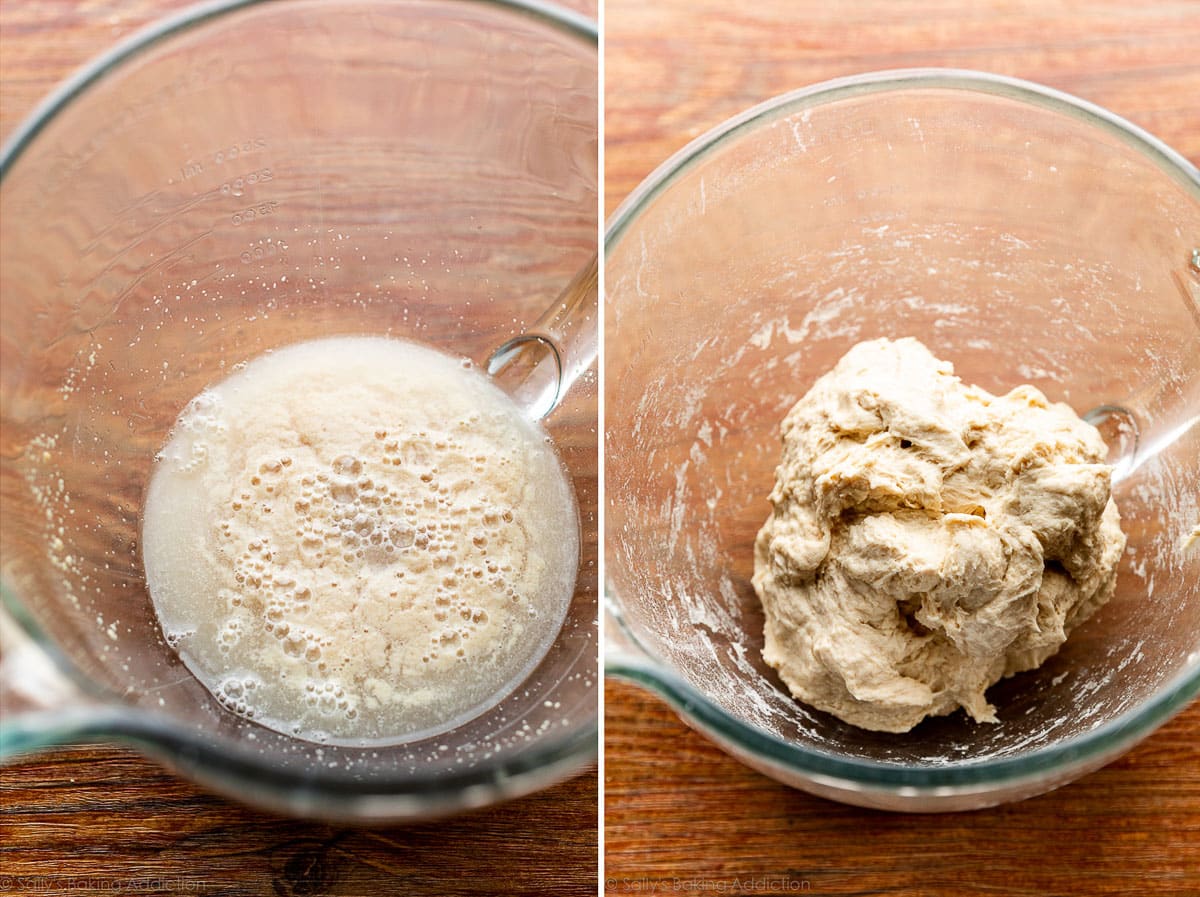
Whisk the warm water, yeast, and sugar together. Cover and let the mixture sit for a few minutes until foamy on top. Waiting for it to foam isn’t totally necessary, but it helps us see that the yeast is ready and active. The right photo below shows the dough before kneading. Review my How to Knead Dough video tutorial if needed before starting the next step.
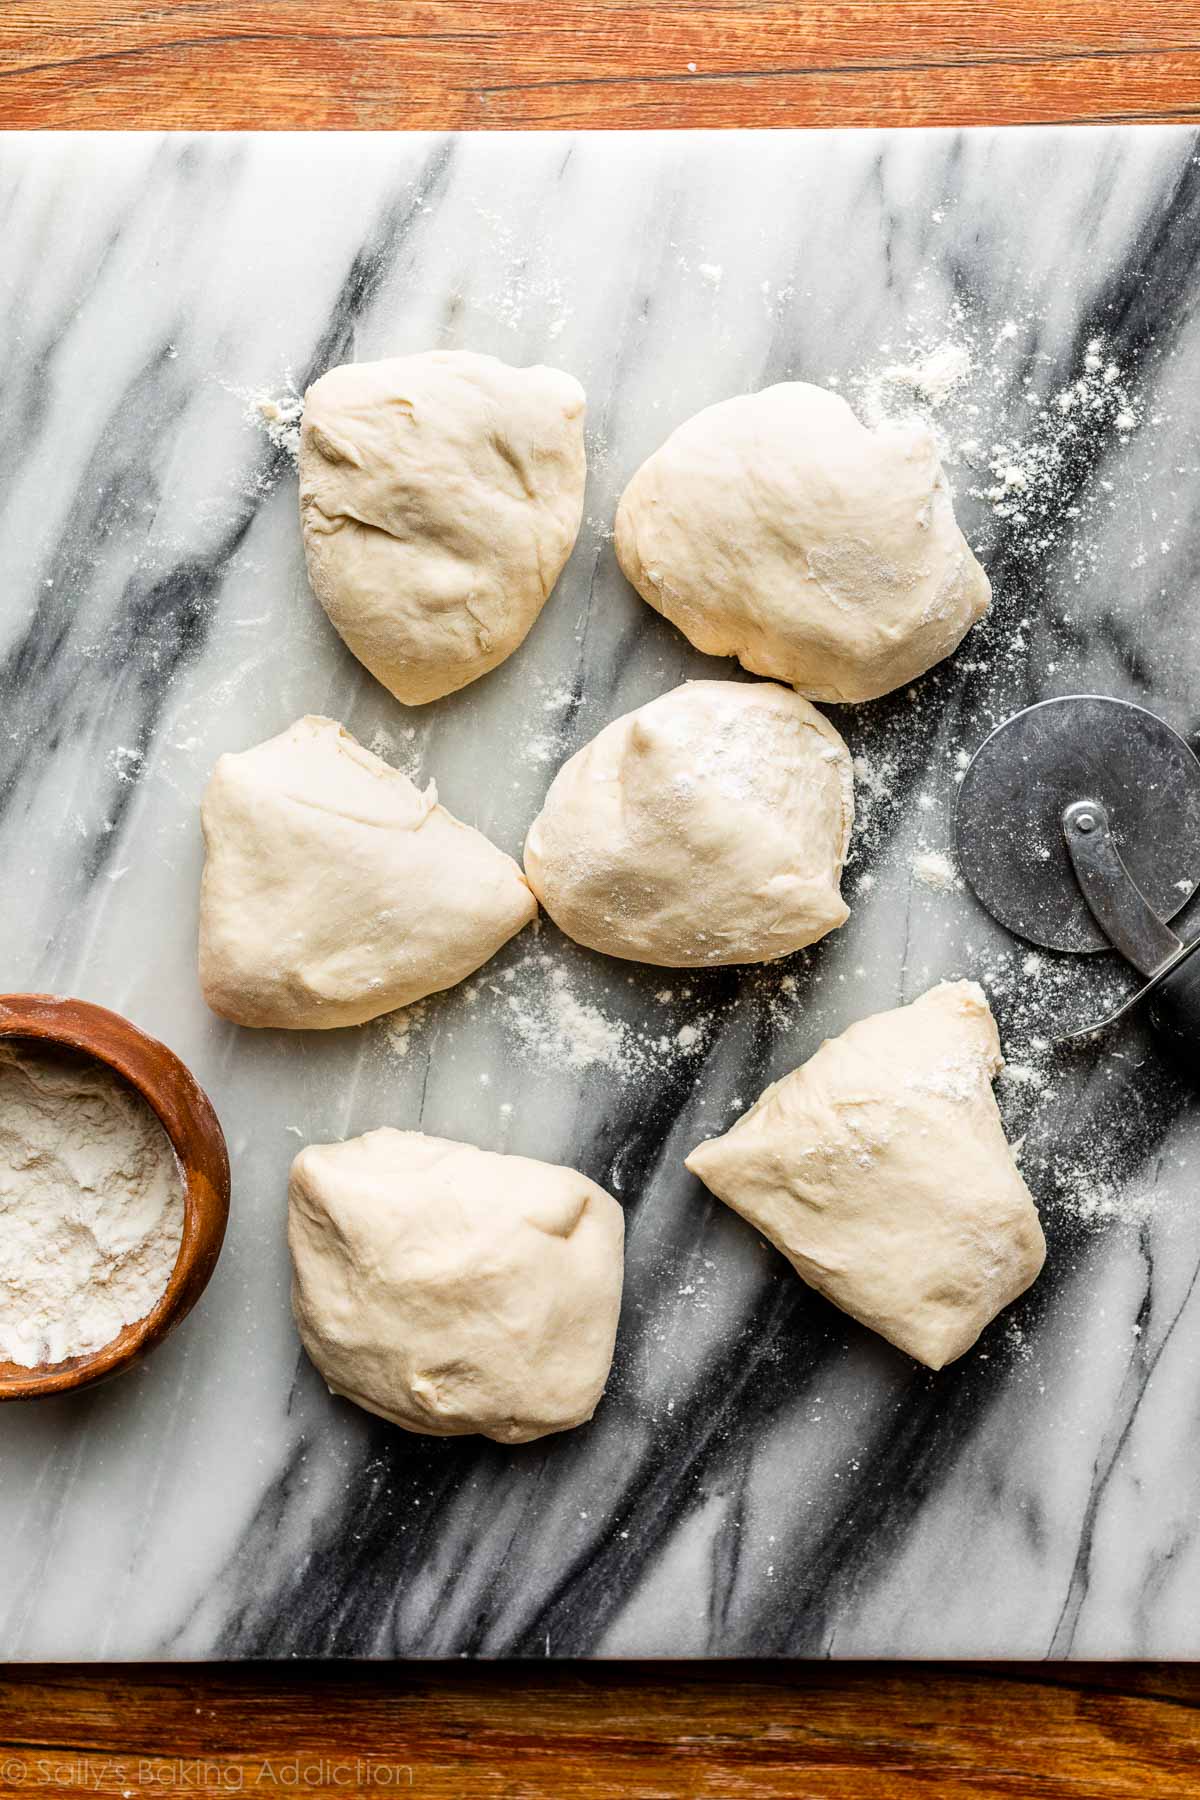
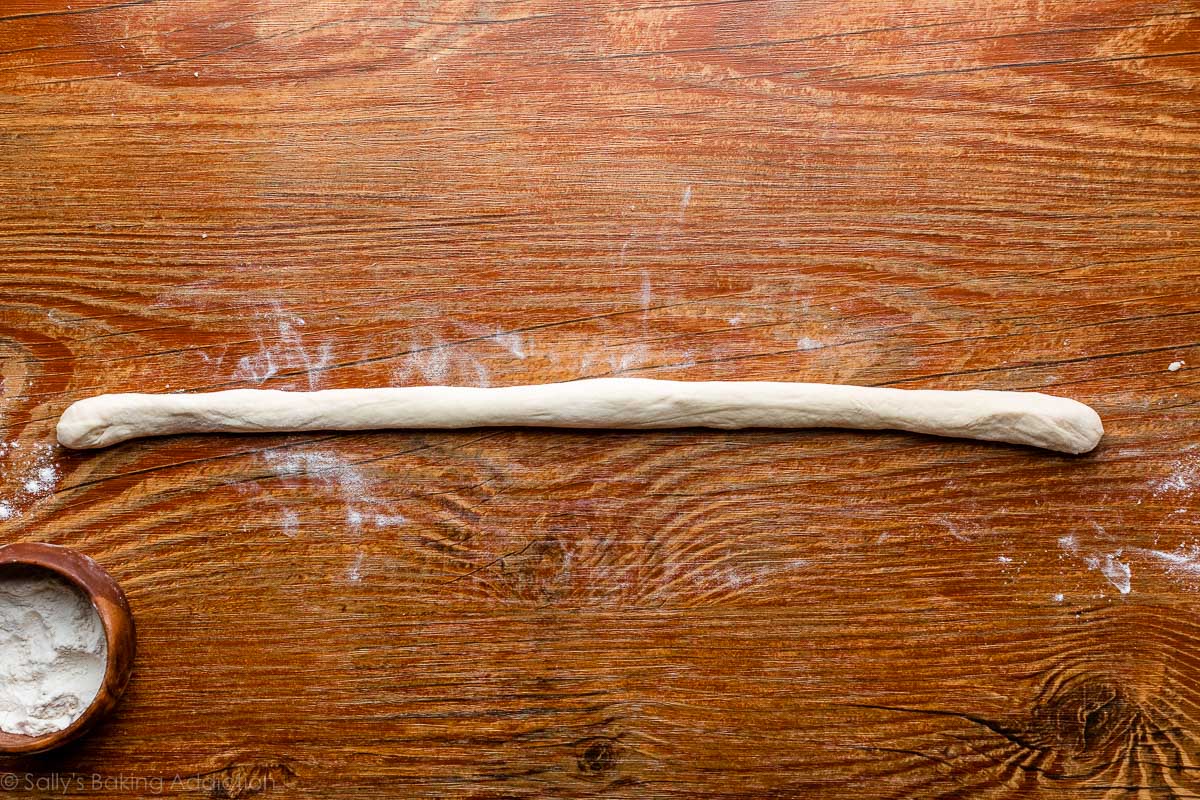
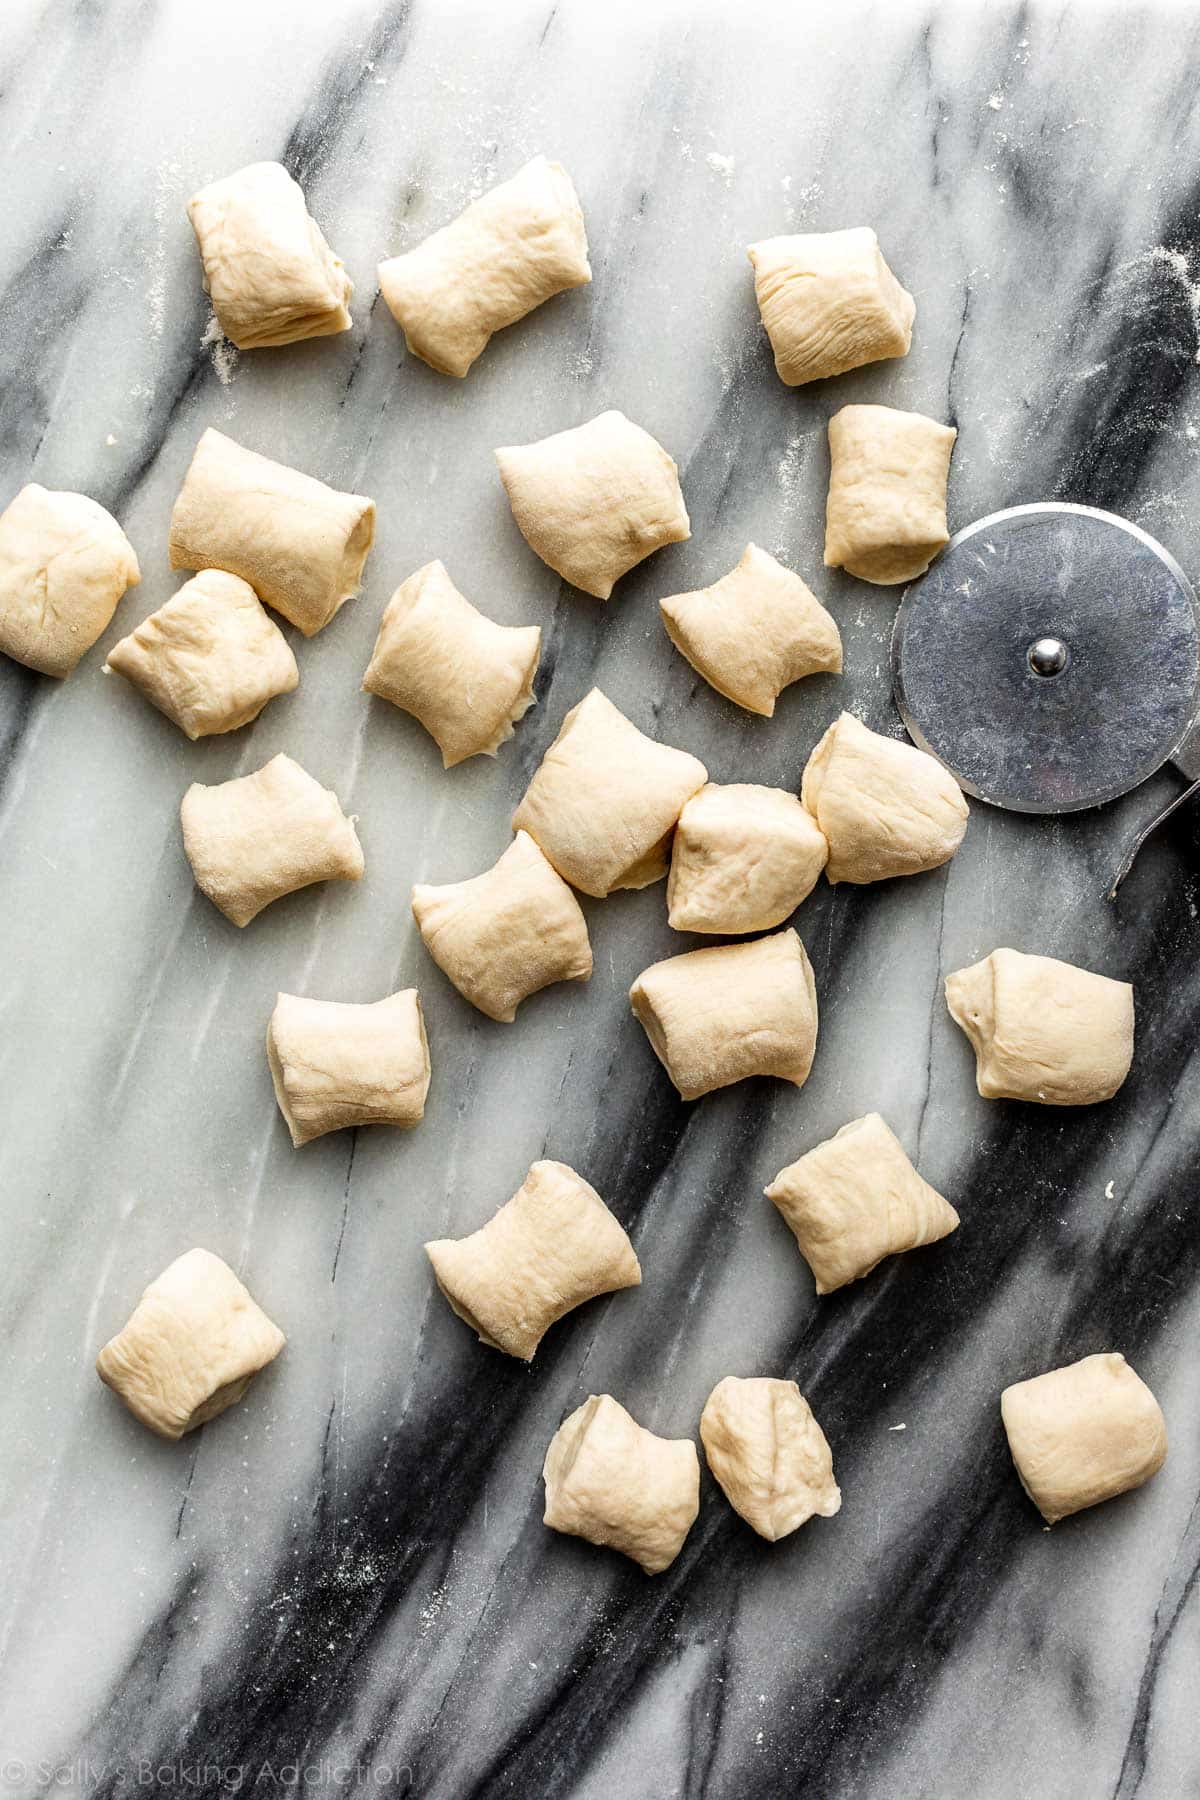
Knead the dough, divide into 6 sections, and then roll into six 20-inch ropes. The video tutorial located in the recipe shows these steps as well. Cut each rope into 1.5 – 2 inch pieces to make bites. I like to use a (affiliate links) pizza cutter or bench scraper for cutting this dough, but a sharp knife works perfectly fine too. Use what you have.
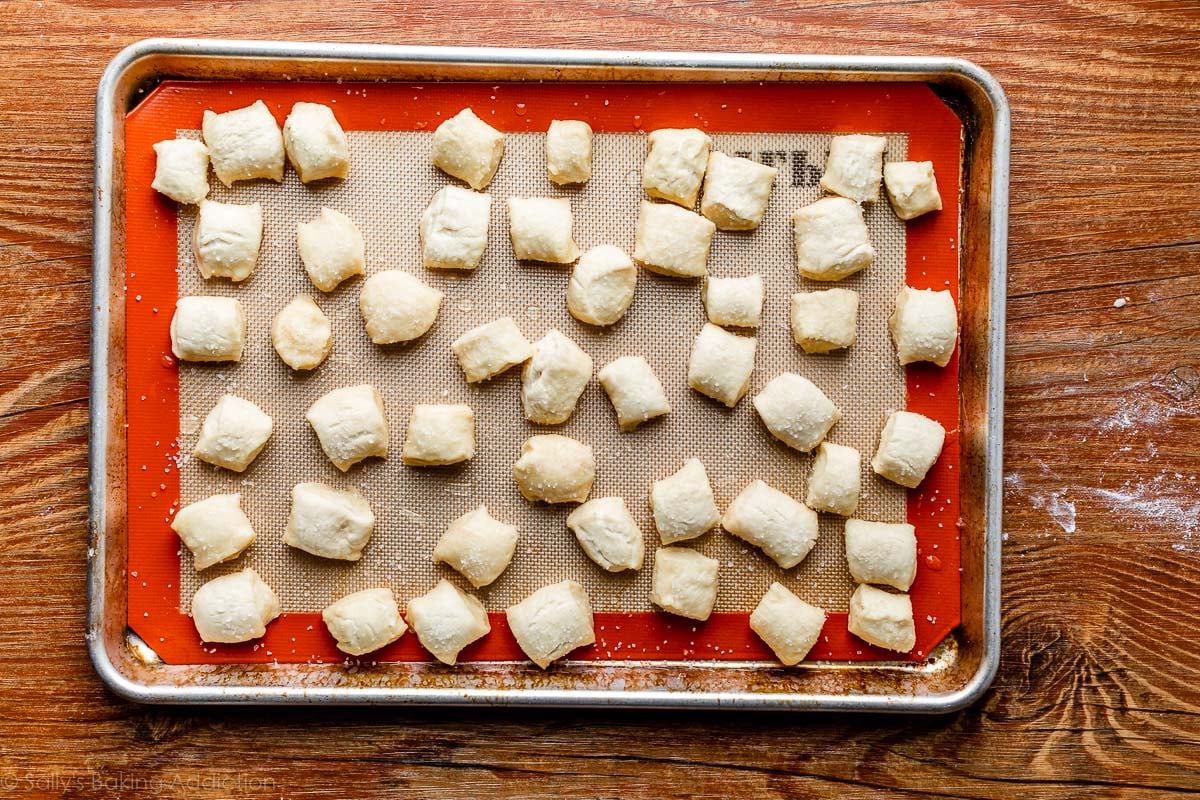
The photo above shows the pretzel bites after the baking soda bath. At this point, they are ready to bake.
Try Cinnamon Sugar Pretzel Bites
Immediately after the baking soda bath while the soft pretzel bites are still wet, sprinkle with coarse salt. Or if you’d like a different topping, skip the coarse salt and try the cinnamon sugar version. Bake the pretzels completely plain without salt. Once done and still warm out of the oven, brush with melted butter then dip into a mix of cinnamon and granulated sugar. See specific instructions in the notes below.
By the way, you can have fun with even more toppings such as everything bagels seasoning instead of coarse salt. Heavily sprinkle on the pretzels while they’re still wet from the baking soda bath before baking.

For a larger version, try these soft pretzel rolls. Great for sandwiches!
More Appetizers & Snacks
- Pepperoni Pizza Dip
- Roasted Garlic & Bacon Spinach Dip
- Sweet Potato Skins
- Crab Dip
- Bacon Wrapped Cheesy Stuffed Jalapeños
- Honey BBQ Popcorn Chicken
- Cranberry Pecan Cheese Ball

Soft Pretzel Bites
- Prep Time: 40 minutes
- Cook Time: 15 minutes
- Total Time: 1 hour
- Yield: 5 dozen
- Category: Appetizer
- Method: Baking
- Cuisine: American
Description
These soft pretzel bites are always a crowd favorite! The easy dough requires just 6 ingredients and there’s hardly any rise time, so this is a wonderful recipe for yeast beginners. Have fun shaping the bites (they don’t need to be perfect!) and enjoy warm flavorful homemade pretzels within an hour. Review recipe notes and watch the video tutorial before starting.
Ingredients
- 1 and 1/2 cups (360ml) warm water (lukewarm–no need to take temperature but around 100°F (38°C) is great)
- 2 and 1/4 teaspoons (7g) instant or active dry yeast (1 standard packet)
- 1 Tablespoon brown sugar or granulated sugar
- 1 teaspoon salt
- 1 Tablespoon (14g) unsalted butter, melted and slightly cool
- 3 and 3/4 – 4 cups (469-500g) all-purpose flour (spooned & leveled), plus more for hands and work surface
- topping: coarse salt/coarse sea salt
Baking Soda Bath
- 1/2 cup (120g) baking soda
- 9 cups (2,160ml) water
Optional for Serving
- spicy cheese sauce or your favorite mustard
Instructions
- Make the dough: Whisk warm water, yeast, and sugar together in the bowl of your stand mixer fitted with a paddle or dough hook attachment. (If you do not have a stand mixer, just use a regular large mixing bowl and a wooden spoon or silicone spatula.) Cover yeast mixture and allow to sit for 5 minutes or until foamy on top. Add salt, melted butter, and 3 cups (375g) of flour. Beat on low speed for 1 minute, scrape down the sides of the bowl with a rubber spatula if needed, then add 3/4 cup (95g) of flour. Beat on low speed until the dough comes together and pulls away from the sides of the bowl, about 2 minutes. If dough is extremely sticky after 1 minute of mixing, add remaining 1/4 cup of flour and continue to beat for 1 more minute. (You can see in the video that I add the remaining flour.)
- Knead the dough: Keep the dough in the mixer (and switch to the dough hook if using the paddle) and beat for an additional 5 full minutes, or knead by hand on a lightly floured surface for 5 full minutes. (If you’re new to bread-baking, my How to Knead Dough video tutorial can help here.) If the dough becomes too sticky during the kneading process, sprinkle 1 teaspoon of flour at a time on the dough or on the work surface/in the bowl to make a soft, slightly tacky dough. Do not add more flour than you need because you do not want a dry dough. After kneading, the dough should still feel a little soft. Poke it with your finger—if it slowly bounces back, your dough is ready to rise. You can also do a “windowpane test” to see if your dough has been kneaded long enough: tear off a small (roughly golfball-size) piece of dough and gently stretch it out until it’s thin enough for light to pass through it. Hold it up to a window or light. Does light pass through the stretched dough without the dough tearing first? If so, your dough has been kneaded long enough and is ready to rise. If not, keep kneading until it passes the windowpane test.
- Cover lightly with a towel and allow to rest for 10-30 minutes. (Meanwhile, I like to get the water + baking soda boiling as instructed in step 5.)
- Preheat oven to 400°F (204°C). Line 2 baking sheets with parchment paper or silicone baking mats. Silicone baking mats are highly recommended over parchment paper. If using parchment paper, lightly spray with nonstick spray or grease with butter. Set aside.
- Shape: With a sharp knife, pizza cutter, or bench scraper, cut dough into 6 equal pieces (just eyeball it, doesn’t have to be perfect). Sprinkle work surface very lightly with flour. (Tip: The heavier you flour the work surface, the harder it is to roll the dough. A little stickiness actually helps. You only need *a very light* dusting of flour.) Roll each piece of dough into a 20-inch rope. If the ropes keep shrinking and stretching the dough becomes difficult, stop what you’re doing, lightly cover all of the dough, and let it rest for 10 minutes so the gluten can relax. Then, return to rolling it into ropes. Cut each rope into 1.5 – 2 inch pieces to make bites.
- Baking Soda Bath: Mix water and baking soda together in a large pot. Bring to a boil. Place 8-10 pretzel bites into the boiling water for a quick 10-15 seconds. (Any longer and your pretzels could take on a metallic taste.) Using a slotted spatula or spoon, lift the pretzel bites out of the water and allow as much of the excess water to drip off. Place bites onto prepared baking sheets. Sprinkle each with coarse sea salt while they are still wet or leave plain if using cinnamon sugar topping listed in the notes. Repeat baking soda bath with remaining pretzel bites. If needed, you can cover and refrigerate the boiled/unbaked bites for up to 24 hours before baking.
- Bake for 15 minutes or until golden brown. Remove from the oven and serve warm.
- Cover and store leftover pretzel bites at room temperature for up to 3 days. They lose a little softness over time. To reheat, microwave for a few seconds or bake in a 350°F (177°C) for 5 minutes.
Notes
- Make Ahead & Freezing Instructions: Baked and cooled pretzel bites freeze well up to 2-3 months. To reheat, bake frozen bites at 350°F (177°C) for 10 minutes or until warmed through or microwave frozen bites until warm. The prepared pretzel dough can be refrigerated for up to one day or frozen in an airtight container for 2-3 months. Thaw frozen dough in the refrigerator overnight. Refrigerated dough can be shaped into bites while still cold, but allow some extra time, about 1 hour, for the pretzels to puff up before the baking soda bath and baking.
- Special Tools (affiliate links): Electric Stand Mixer | Baking Sheets | Silicone Baking Mats or Parchment Paper | Pizza Cutter or Bench Scraper | Large Pot
- Flour: If you have it, the same amount of bread flour works instead of all-purpose flour. Do not use whole wheat flour.
- Cinnamon Sugar: Bake the pretzel bites completely plain without salt in step 6. As the pretzel bites bake, melt 4 Tablespoons (60g) unsalted butter. Set aside. Combine 3/4 cup (150g) granulated sugar and 1 and 1/2 teaspoons ground cinnamon. Set aside. Once the pretzels are done and still warm out of the oven, brush each with melted butter then generously dip into cinnamon sugar. Cinnamon sugar pretzels are best served that day because due to the melted butter topping, they become soggy after a few hours.
- Reference my Baking with Yeast Guide for answers to common yeast FAQs.
- Egg? This recipe used to call for brushing the boiled pretzel bites with a beaten egg before sprinkling with coarse salt. Now you can skip the egg and sprinkle the salt on the pretzels while they are still wet from the boiling step. If you prefer them the old way, feel free to continue brushing with the beaten egg before salting and baking. I skip it these days.
Keywords: soft pretzel bites


Sally – I made these with my dad at high altitude with the suggestions from kingarthur.com. He wanted to use his Air Fryer and they came out great. We had to make temp and time adjustments due to the smaller space of the air fryer and the elevation of around 5,000 ft. We ended up baking them at 330 for 9 minutes no parchment paper. He shared a picture of them on an air fryer Facebook group he is in (shared the recipe link – the credit goes to you ) and got tons of responses and comments- the most he has gotten from any other post he has shared. Thanks again for another great recipe!!
★★★★★
This is a great recipe!! Made it to take to my dad in AZ. He’s at high altitude. Any advice on baking these at high altitudes? He hasn’t been able to find yeast so I’m bringing him some s as bf I know he’s going to want to make these.
★★★★★
Hi Cheryl, I’m so happy you enjoy these pretzel bites! I wish I could help, but I have no experience baking at high altitude. I know some readers have found this chart helpful: https://www.kingarthurflour.com/learn/high-altitude-baking.html
These are the best! Making for the second time during quarantine because baking is relaxing! My daughter, sister and nieces and I are baking our way through your website.
★★★★★
I made these today. I think it is important to note that pretzel salt is important. I used kosher salt and they weren’t very salty. They were cute though. ❤
★★★★
Is there a secret to adding other types of toppings? I’d like to mKe cheddar pretzel bites , or use a combination of seeds like an everything bagel
Hi Cindy! Instead of salt, feel free to use your favorite toppings like shredded cheese or everything bagel seasoning.
So good and so easy!! My husband ate almost the whole batch at once! 🙂
★★★★★
I’m in love!! These are amazing Sally! As a young baker I was a little intimidated by trying a yeast recipe but they turned out perfect! Excuse me while I eat the whole batch…
★★★★★
Can bread flour be used in place of AP flour?
Definitely!
Managed to make and enjoy them thanks
★★★★★
Sally, the pretzel bites are amazing, thank you! Can I add some of the ingredients from your cinnamon bagels to make them into bites? Many thanks and continued success!
★★★★★
Perfect, Sally! This recipe is a joy to make – I love the feeling of satisfaction when the dough comes together so beautifully after kneading, and feels so soft and pillowy……gets you poetic about bread dough! 😀 #sorrynotsorry
And they turned out beautifully – half had disappeared before they left the baking tray! Thank you for an amazing recipe, Sally!
★★★★★
I use this recipe all the time, love it!
★★★★★
Just made these – one of my lockdown recipe try-outs – they are amazing!!! My teenage son has just devoured 6 in a row! About to make the beer cheese dip to go with them. So simple to make, it will definitley be an addition to our party snacks (once this lockdown lifts!)
★★★★★
Made this for the Super Bowl. I am not an experienced baker but even I was able to make these. I didn’t get to the cheese sauce this time but the pretzel bites were awesome and super easy.
★★★★★
These were super easy to make and delicious to taste. Thank you for making baking easy and fun!
★★★★★
I ruined it twice I believe. I think it’s too wet but I was afraid to add more because I technically got to the max limit in the recipe. I do the spoon and level method for flour and as I measured the three cups out I put it in my handled 4 cup measuring dish and I noticed both times it was under 3 cups so should I have added more? Am I not measuring the flour correctly? I have the second batch “rising” right now but I don’t think it’s going to do anything. Last effort before I have to go buy some haha. I will get it right some day!
I had the same problem of my dough being too wet and sticky and they didn’t rise much but they still came out great.
Well, you’ve done it again Sally! Thank you Quinn Family! These are awesome.
I cut them a little smaller, about 1″ and cut the time down to about 12 minutes.
I’m going to have some happy kids when they get some from school!
★★★★★
I followed this recipe for bagel bites and they turned out fantastic. I skipped the cheese sauce. Whilst I was forming the little bites from the raw dough; I’ll have to honestly say I got a little tired and cocky and started just eyeballing to approximate sizes. With the very last batch of dough; Ibmade two full sized pretzels and tge rest larger bite sizes about 3″ long each. The second batch I used for the cinamon sugar flavored one. The first batch was strickly salty with kosher salt. I egg-washed the entire batch before baking. The sweet batch I brushed butter and sprinkled white sugar and cinnamon after baked.
The salted batch was salted right before baking.
Again, they all came out chewy soft yet bordered crunchy. Yum! Thank you so much. And also right before this recipe I made soft baked regular sized pretzels and before that I made bagels! They seem tto all have the same concept of boiling before baking! One led to the other! Again thank you!
★★★★★
Skip the egg wash and just put the course salt on before baking. Then melt some salted butter and add just a touch of sugar to the butter. Brush it on before serving. It makes them taste like a famous brand of mall pretzels!
★★★★★
I have made the recipe many times and they are great. Do you think I can use cookie cutter for the dough? Or they will loose the same into the boiling water?
★★★★★
Your base pretzel recipe is absolutely delicious… my daughter has asked me every day for the past 2 1/2 weeks when am I going to make more of those soft pretzels or the pretzel rolls I made… well, she got her wish last night… I made pretzel dough but I did t make pretzel dough to make pretzels … I wanted to try something…. I made. ……. PIZZA CRUST!!!! Yes, I said pizza crust! I made your basic pretzel dough recipe and then I made a slight change to it… I added a table spoon of onion powder and another one of garlic powder to the flour and salt mixture… after mixing every together, letting it rise for about half an hour, I split the dough into 4 pieces and took one of them and worked it out into a medium/large crust … after which I took another piece and rolled it out into a long Rope and sliced it into 4 pieces so I could get them into my pot of baking soda bath water… then I wrapped it around my crust and pressed It into the dough… I then loaded it up with my Alfredo sauce, mozzarella & Parmesan cheeses, baby spinach and diced cooked chicken pieces… popped it into the oven at 400* until the cheeses had dinner melted down into ooey gooey deliciousness and the crust had baked up to a rich golden brown…. I can’t begin to tell you good this thing was!!!! I will never make another pizza crust the old way again! From here on out, pizza crusts will be made with pretzel dough!! I wish I had the forethought to take a picture of that pizza… I could kick myself… I did however, snap one of the bites and pretzels I made today with the other half of the pizza crust dough that was left over 🙂
★★★★★
Hi Sally! I made these today with a honey mustard dip for a snack before lunch… they were delicious! My family loved them ☺
Veronica from Italy!
How do you make a honey mustard dip?
Hi! For the honey mustard dip I wisk together 3/4 cup honey,
1/2 cup yellow mustard and
1/4 teaspoon paprika!
These are great. I made them for a get together with some friends and they loved them so much they left with the leftovers. Plus they’re are easy to make.
Can I double or even triple the recipe? Or would I have to separately make it three times.
Thanks.
Hi Kathryn! For best taste and texture, I highly recommend making separate batches of dough.
Help! How would you suggest bringing this to a party? Is it possible to do the bath and bake later? Is reheating an option? Thanks!!
Hi Emily! Baking soda bath, then baking a couple hours later is just fine! I do that all the time. 🙂
I made this for a Christmas party and they were a huge hit! At first it looked like a ton of food but they were gone fast! I can’t wait to make again for other parties! Directions were easy to follow! I couldn’t find insant yeast so I used regular and allowed my dough to rise a little over an hour. Next time I will watch closer as baking as some of mine get extra golden brown, but were still tasty!
These turned out great- and the cheese sauce too! I would like to make these for a Christmas appy in 2 weeks. It made a lot of cheese sauce. Can I freeze the sauce? it would be lovely if I could make a batch of fresh pretzels and just whip some cheese sauce out of the freezer and bring to dinner. I have a couple other dips to name too.
If not how long can it stay in the fridge?
Yep, you can freeze the sauce for up to 2-3 months. Just thaw in the fridge and heat up on the stove or in the microwave before serving.