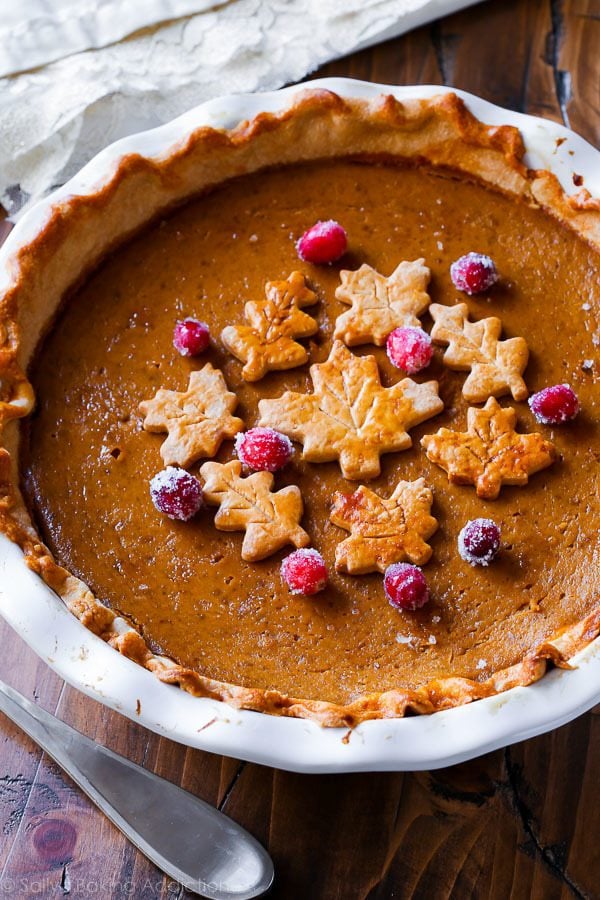
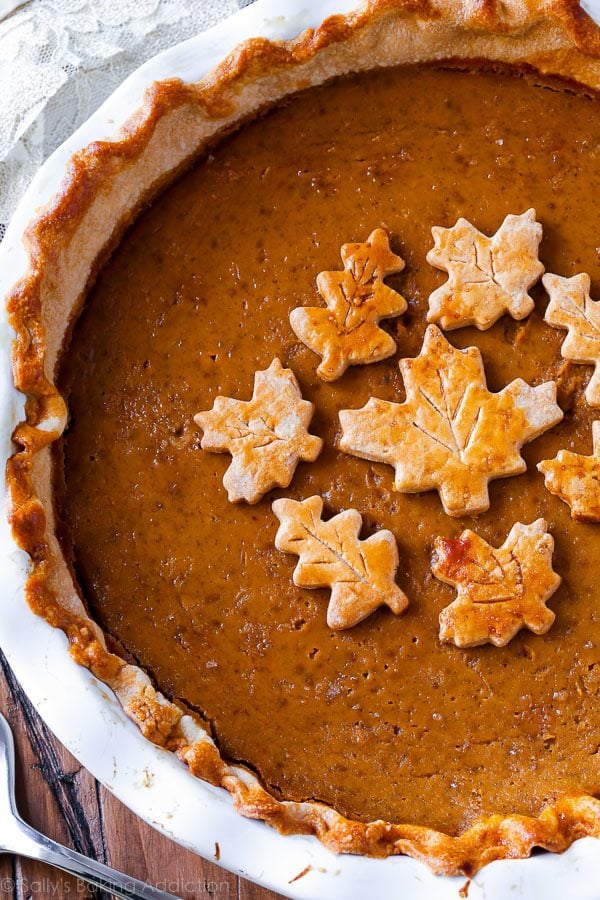
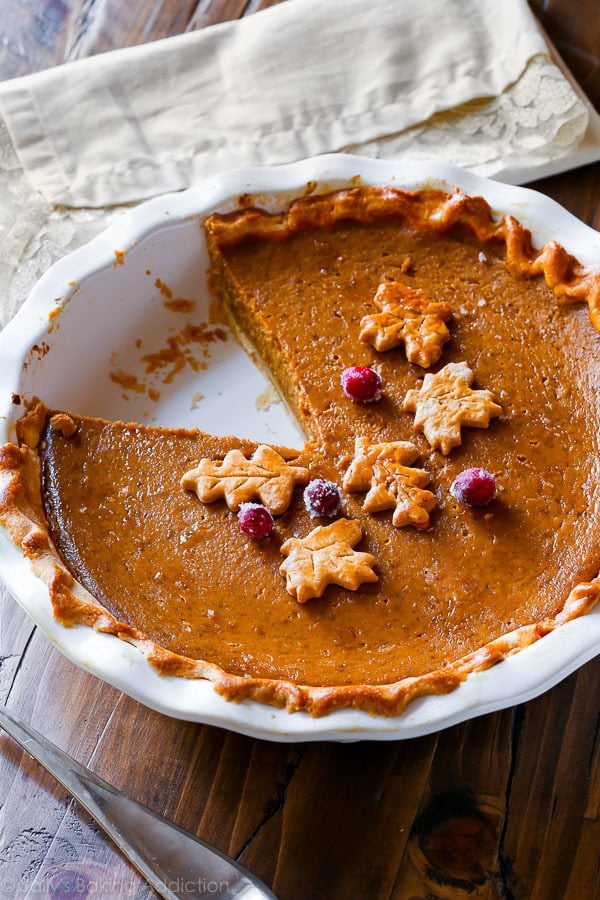
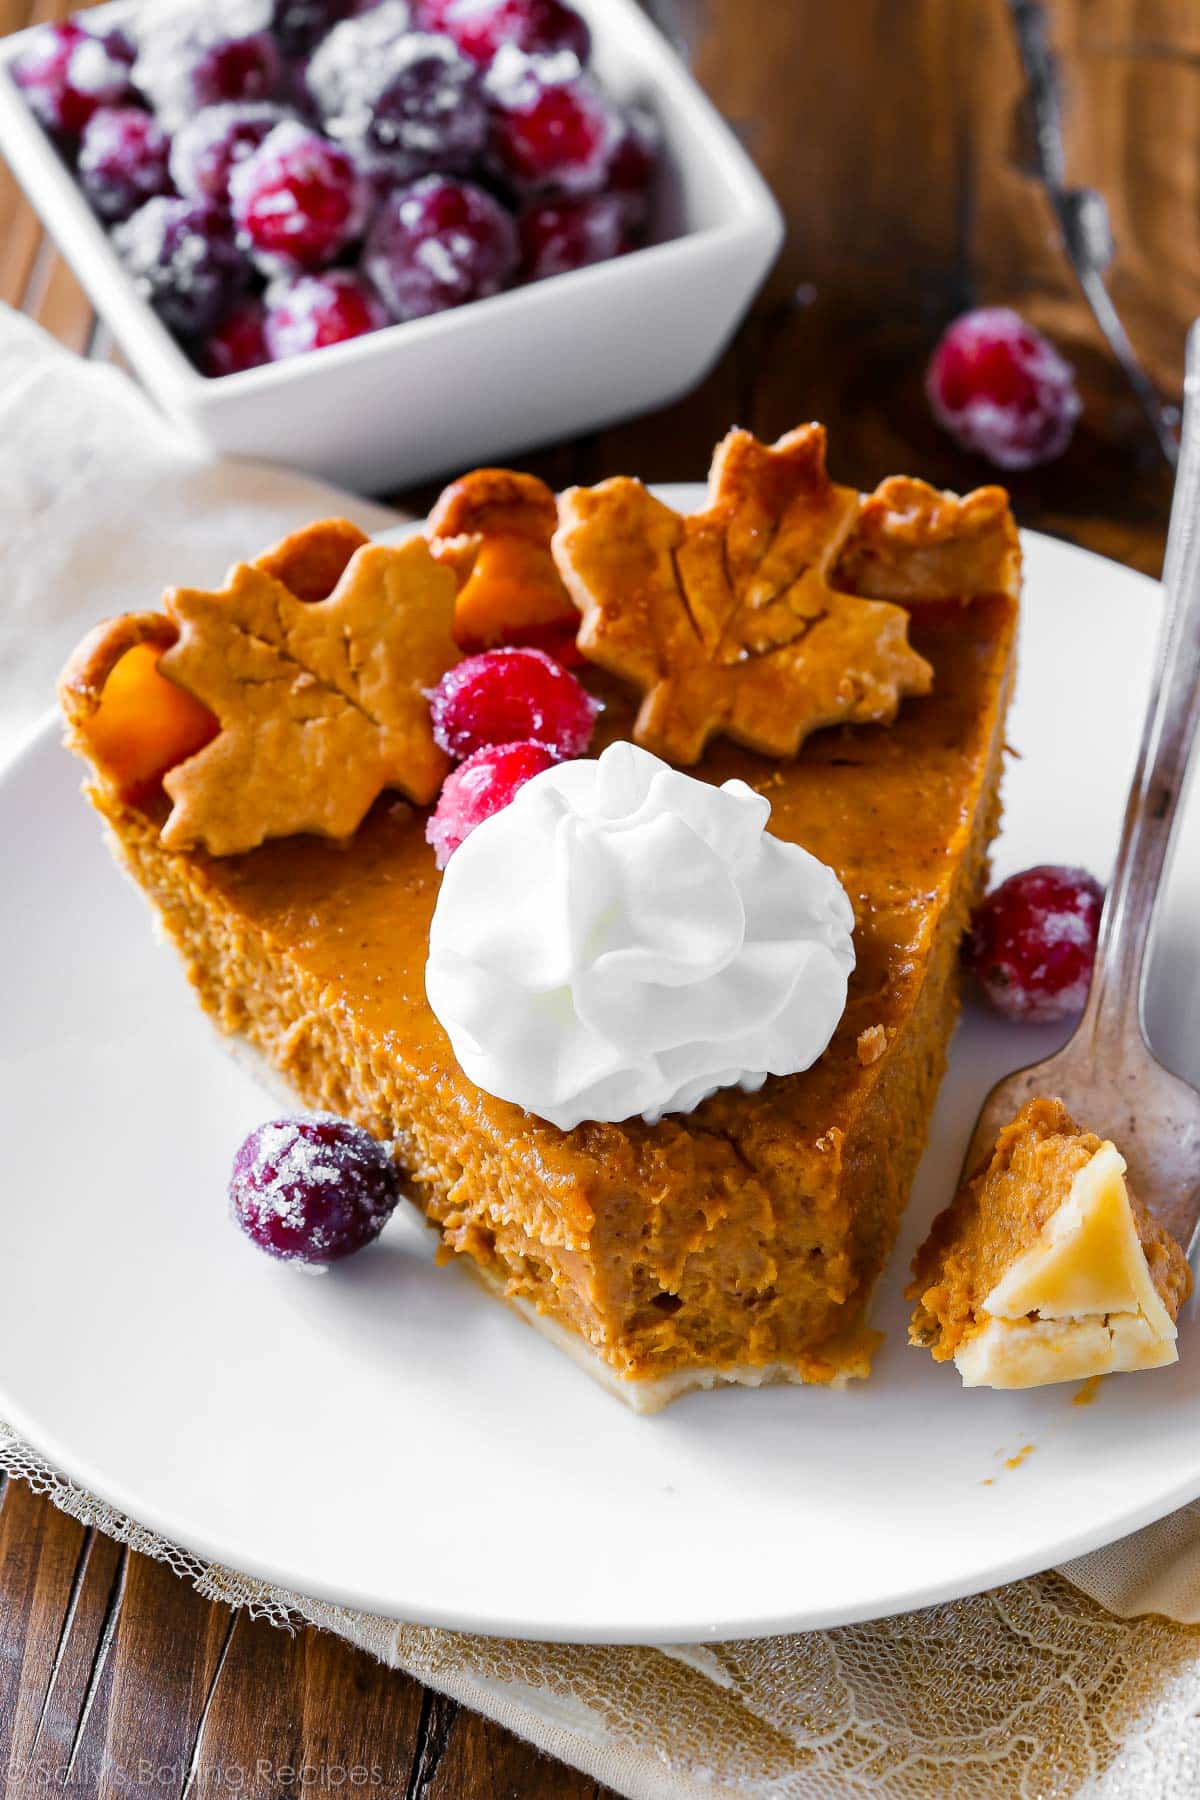
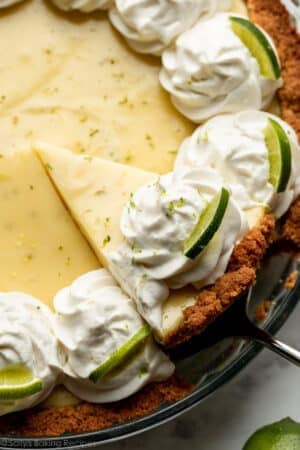
Bursting with flavor, this pumpkin pie recipe is my very favorite. It’s rich, smooth, and tastes incredible on my homemade pie crust and served with sugared cranberries and whipped cream.
Pumpkin cookies, pumpkin bars, pumpkin lattes, pumpkin cupcakes, pumpkin bread, pumpkin cake, and pumpkin Bundt cake, but HELLO what about pumpkin pie?? My Great Pumpkin Pie Recipe is here today.
Did you know that testing the perfect pumpkin pie recipe is a lot more challenging than one would assume!? Fresh pumpkin, canned pumpkin, ginger, no ginger, brown sugar, white sugar, cornstarch, flour, no cornstarch, no flour…?
But I finally I cracked the pumpkin pie code. I grew up in a house of pumpkin pie lovers and absolutely no Thanksgiving was complete without a nap and a massive slice of pumpkin pie. What I’m trying to say is, my pumpkin pie standards are high for this classic Thanksgiving dessert.
Pie Crust
Let’s start with the pie crust. Every pumpkin pie has to start with a stellar pie crust. My homemade pie crust uses a mix of shortening and butter so you get the most buttery tasting, tender, flaky (so flaky) pie crust. It’s easy to make. And I have a video tutorial and step-by-step photos in my pie crust recipe.
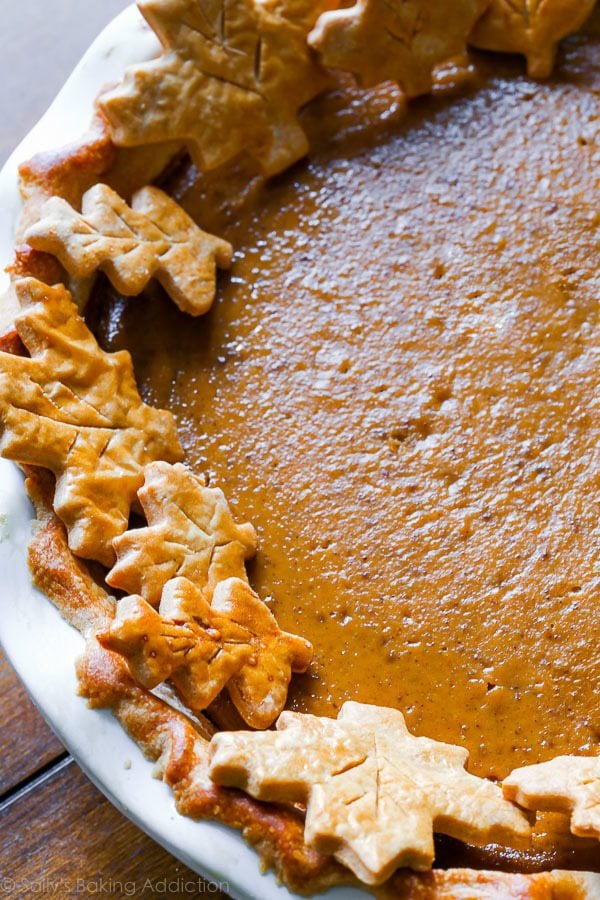
If you skip the leaf decorations on top, you’ll have a 2nd pie crust you can use to make leftover turkey pot pie or mini pecan pies! Or if you like extra thick pie crust, use some of your 2nd pie crust to make a decorative crimped or fluted edge. My how to crimp and flute pie crust tutorial will walk you through all the steps.
Fresh or Canned Pumpkin in Pumpkin Pie?
I tested this recipe with both and I truly liked the pie using canned pumpkin better. The canned pumpkin pumpkin pie (say that 3 times fast) was a little more sturdy when baked for the same amount of time. The pie baked with fresh pumpkin puree tasted grainy and a little… herbaceous? I prefer using fresh pumpkin puree in savory recipes, not desserts. This is your call, you can use either fresh or canned pumpkin.
Other Ingredients in Pumpkin Pie
- Eggs. Eggs set up the pumpkin pie filling. They give the filling its rich, luxurious texture.
- Heavy cream. Heavy cream makes pumpkin pie silky smooth. It’s thick, creamy, and absolutely heavenly in this pumpkin pie recipe. I use 1 cup of heavy cream and 1/4 cup of milk. I found that 1 and 1/4 cups of heavy cream (or more) was simply too much. Too thick, too gloppy! You can also use the heavy cream to make homemade whipped cream for the topping.
- Cornstarch. A starch thickener is one of the most important ingredients in a pie filling. I use a touch of cornstarch in my pumpkin pie because it helps set up the pie. Makes it a little sturdier and firm, while keeping everything smooth.
My Secret Ingredient
This sounds so incredibly weird, but I add freshly ground black pepper to my pumpkin pie filling. It’s bizarre, I know. But I’m being serious. I got this tip from the genius kitchen crew over at King Arthur Baking. And I am forever grateful. Because this little addition turns your pumpkin pie into the BEST pumpkin pie. No one will know it’s there except for you. And they will all be wondering what makes this spiced pie so good… it’s a pinch of pepper.
I actually add it to my homemade pumpkin pie spice blend, too! Feel free to replace the ginger, nutmeg, cloves, and black pepper below with my homemade spice. (Keep the cinnamon in the filling though!)
How to Avoid Cracks in Pumpkin Pie
Silky yet thick, this pumpkin pie cuts beautifully as long as it is baked for the right amount of time. The bake time is about 55-60 minutes. At this time, the center of the pumpkin pie will be slightly wobbly. It will set as it cools. Careful not to overcook; overcooking it will cause the filling to crack.
P.S.: For some fun twists on this classic, try this recipe as mini pumpkin pies, with a crunch topping on pecan praline pumpkin pie, or with extra spices in chai pumpkin meringue pie. You can also make a pumpkin cheesecake pie!
So from my kitchen to yours, enjoy The Great Pumpkin Pie Recipe. And if you’re looking for more inspiration for your dessert table, here are all of our favorite Thanksgiving pies and a list of 30+ pumpkin dessert recipes.
Print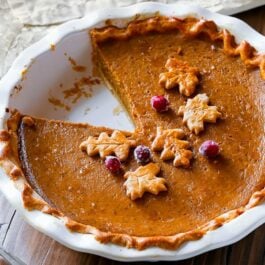
The Great Pumpkin Pie Recipe
- Prep Time: 45 minutes
- Cook Time: 1 hour, 5 minutes (includes blind bake)
- Total Time: 5 hours (includes cooling)
- Yield: serves 8-10; 1 cup sugared cranberries
- Category: Pie
- Method: Baking
- Cuisine: American
Description
Bursting with flavor, this pumpkin pie recipe is my very favorite. It’s rich, smooth, and tastes incredible on my homemade pie crust and served with whipped cream. The pie crust leaves are purely for decor, you can leave those off of the pie and only make 1 pie crust. You can also leave off the sugared cranberries.
Ingredients
Sugared Cranberries
- 1 cup (100g) fresh cranberries (do not use frozen)
- 3/4 cup (180ml) water
- 1 and 1/4 cups (250g) granulated sugar, divided
Pumpkin Pie
- Homemade Pie Dough (full recipe makes 2 crusts: 1 for bottom, 1 for leaf decor)
- egg wash: 1 large egg beaten with 1 Tablespoon milk
- one 15-ounce can (425g) pumpkin puree*
- 3 large eggs
- 1 and 1/4 cups (250g) packed light or dark brown sugar
- 1 Tablespoon (8g) cornstarch
- 1/2 teaspoon salt
- 1 and 1/2 teaspoons ground cinnamon
- 1/2 teaspoon ground ginger*
- 1/4 teaspoon ground or freshly grated nutmeg*
- 1/8 teaspoon ground cloves*
- 1/8 teaspoon fresh ground black pepper
- 1 cup (240ml) heavy cream
- 1/4 cup (60ml) milk
Instructions
- If garnishing with sugared cranberries, make those first: If you want to decorate the pie with sugared cranberries, start them the night before because they need to sit for several hours. Place cranberries in a large heatproof bowl. Set aside. In a medium saucepan set over medium heat, bring the water and 3/4 cup (150g) of sugar to a simmer, whisking until the sugar has dissolved. Remove the pan from heat and allow to cool for 5 minutes. Pour the sugar syrup over the cranberries and stir. Cover the bowl and set aside for 15 minutes. Line a baking sheet with parchment paper or a silicone baking mat. Using a slotted spoon, transfer the cranberries from the sugar syrup and place them on the prepared baking sheet. Allow to dry, uncovered, for 1 hour. Pour remaining 1/2 cup (100g) sugar into a large bowl. Toss the cranberries in the sugar, coating them all the way around. Place on a parchment paper- or silicone baking mat-lined baking sheet and let them dry uncovered for at least 1 hour at room temperature or in the refrigerator. Cover tightly and store in the refrigerator for up to 3 days. For more uses, see how to make sugared cranberries.
- Make the pie crust through step 5 according to my directions and video tutorial in my pie crust recipe. Or use your favorite pie dough or store-bought.
- Preheat oven to 375°F (190°C).
- Roll out the chilled pie crust: Remove 1 disc of pie dough from the refrigerator. On a lightly floured work surface, roll the dough out into a 12-inch circle. Make sure to turn the dough about a quarter turn after every few rolls. Carefully place the dough into a 9×2-inch deep dish pie dish (this is the one I use; it is 1.75-inches deep). Tuck it in with your fingers, making sure it’s tightly pressed into the pie dish. Fold any dough overhang back into the dish to form a thick rim around the edges. Crimp the edges with a fork or flute the edges with your fingers. Review my how to crimp and flute pie crust tutorial if you need extra help with this step. Brush edges lightly with egg wash mixture.
- Par-bake the crust: Line the pie crust with parchment paper. Crunching up the parchment paper is helpful so that you can easily shape it into the crust. Fill with pie weights or dried beans. (Note that you will need at least 2 standard sets of pie weights to fit.) Make sure the weights/beans are evenly distributed around the pie dish. Par-bake the crust for 10 minutes. Carefully remove the parchment paper/pie weights. Prick the bottom of the crust all over with a fork to create steam vents and return crust (without weights) to the oven for 7-8 more minutes or until the bottom is *just* starting to brown. (Review this how to par-bake pie crust page if you need extra help with this par-baking step.)
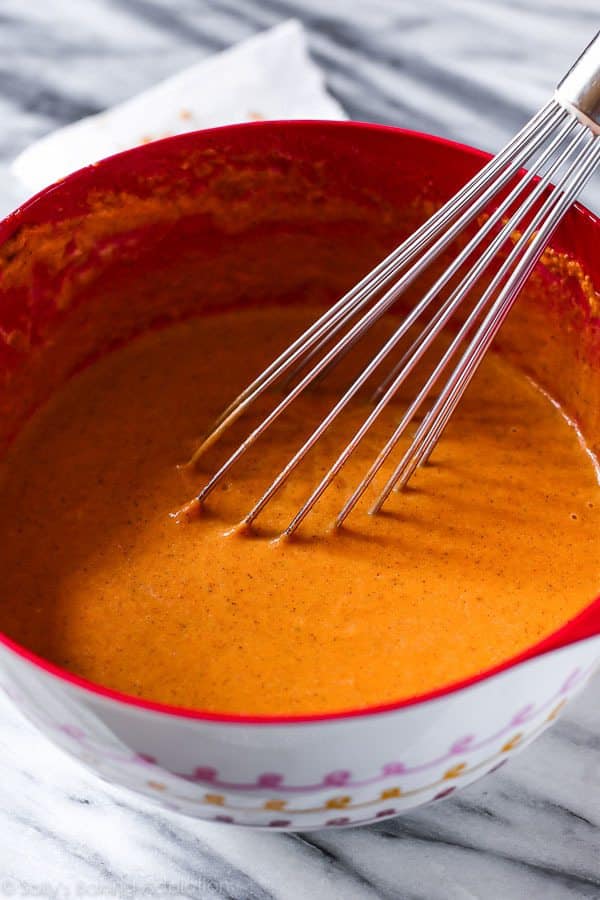
- Make the pumpkin pie filling: Whisk the pumpkin, 3 eggs, and brown sugar together until combined. Add the cornstarch, salt, cinnamon, ginger, nutmeg, cloves, pepper, heavy cream, and milk. Vigorously whisk until everything is combined.
- Pour pumpkin pie filling into the warm crust. Only fill the crust about 3/4 of the way up. (If using a deep dish pie dish as instructed, you should only have a little filling leftover. Use extra to make mini pies with leftover pie dough scraps if you’d like.) Bake the pie until the center is almost set, about 55-60 minutes give or take. A small part of the center will be wobbly—that’s ok. After 25 minutes of baking, be sure to cover the edges of the crust with aluminum foil or use a pie crust shield to prevent the edges from getting too brown. Check for doneness at minute 50, and then 55, and then 60, etc.
- Once done, transfer the pie to a wire rack and allow to cool completely for at least 3 hours before garnishing and serving.
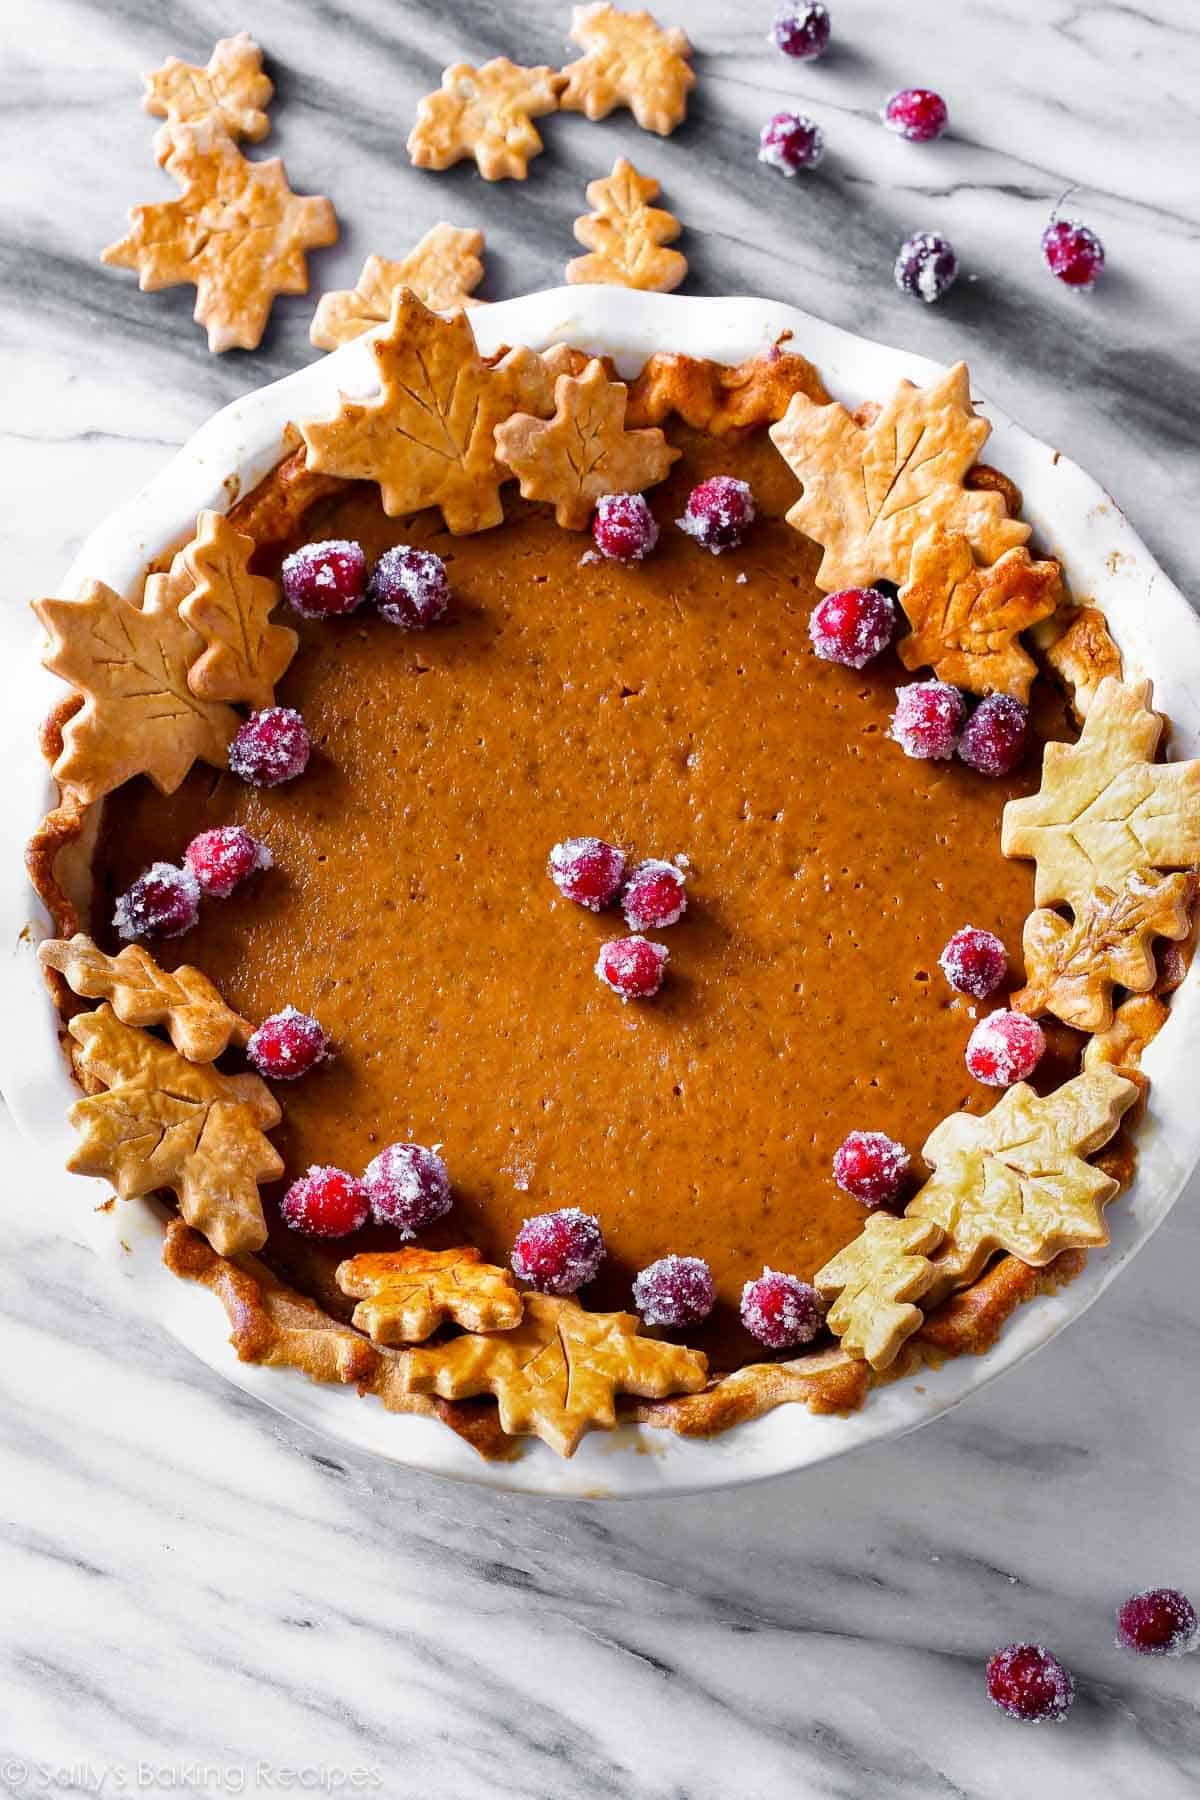
- Decorate with sugared cranberries and pie crust leaves (see note). You’ll definitely have leftover cranberries… they’re tasty for snacking. Serve pie with whipped cream if desired.
- Cover leftovers tightly and store in the refrigerator for up to 5 days.
Notes
- Make Ahead & Freezing Instructions: Pumpkin pie freezes well, up to 3 months. Thaw overnight in the refrigerator before serving. Pie crust dough freezes well for up to 3 months. Thaw overnight in the refrigerator before using. If decorating your pie with sugared cranberries, start them the night before. You’ll also begin the pie crust the night before as well (the dough needs at least 2 hours to chill; overnight is best). The filling can be made the night before as well. In fact, I prefer it that way. It gives the spices, pumpkin, and brown sugar flavors a chance to infuse and blend. It’s awesome. Cover and refrigerate overnight. No need to bring to room temperature before baking.
- Special Tools (affiliate links): Glass Mixing Bowls | Saucepan | Baking Sheet | Silicone Baking Mat or Parchment Paper | Rolling Pin | 9-inch Pie Dish | Pastry Brush | Pie Weights | Whisk | Pie Crust Shield | Cooling Rack | Fall Cookie Cutters
- Cranberries: Use fresh cranberries, not frozen. The sugar syrup doesn’t coat evenly on the frozen berries, leaving you with rather ugly and some very plain shriveled cranberries.
- Pumpkin: Canned pumpkin is best in this pumpkin pie recipe. I use and recommend Libby’s brand. If using fresh pumpkin puree, lightly blot it before adding to remove some moisture. The bake time may be longer.
- Spices: Instead of ground ginger, nutmeg, cloves, and pepper, you can use 1 teaspoon of pumpkin pie spice. Be sure to still add 1 and 1/2 teaspoons of cinnamon.
- Pie Crust: No matter if you’re using homemade crust or store-bought crust, pre-bake the crust. (Step 5.) You can use graham cracker crust if you’d like, but the slices may get a little messy. Pre-bake for 10 minutes just as you do with regular pie crust in this recipe. No need to use pie weights if using a cookie crust.
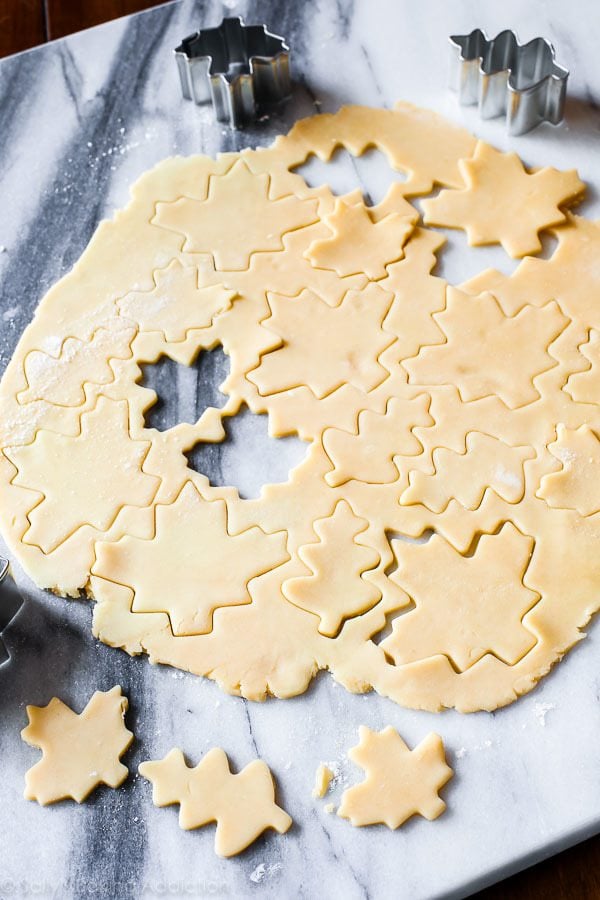
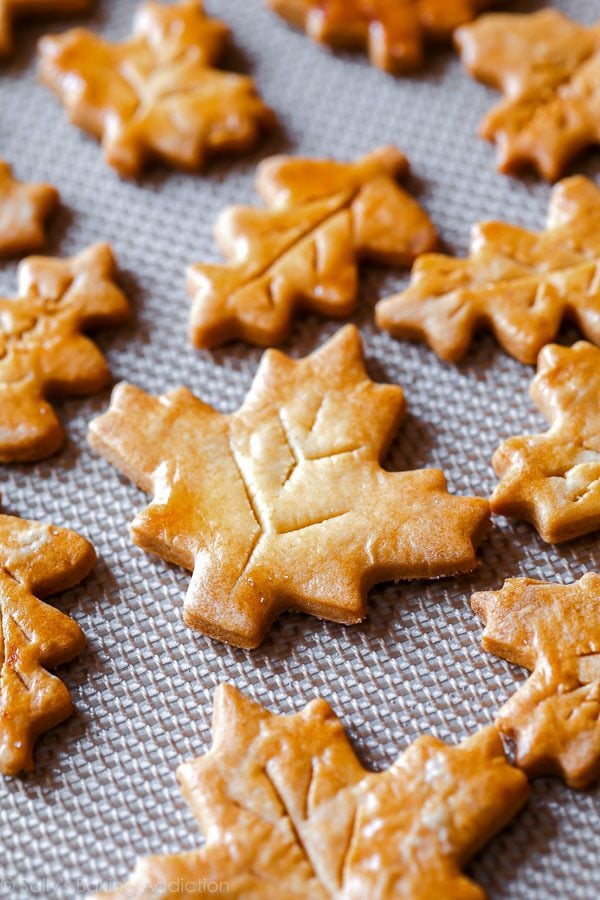
- Pie Crust Leaves: On a floured work surface, roll out one of the balls of chilled dough (keep the other one in the refrigerator). Roll out into any shape you really want (doesn’t matter) and 1/8 inch thickness. Using leaf cookie cutters, cut into shapes. Brush each lightly with the beaten egg + milk mixture. Cut leaf veins into leaves using a sharp knife, if desired. Place onto a parchment paper or silicone baking mat-lined baking sheet and bake at 350°F (177°C) for 10 minutes or until lightly browned. Remove and set aside to cool before decorating pie.
- Mini Pumpkin Pies: Many have asked about a mini version. Here are my mini pumpkin pies. They’re pretty easy—no blind baking the crust!
Pie Crust Leaves
My pie crust recipe makes enough for two crusts. So with the extra dough, you can make adorable leaves for decoration on your pumpkin pie. Or any pie, really. I’ve seen the pie crust leaves baked directly on top of the rim of the pie—and I tried that—but was not thrilled with the results. Too much uneven baking. The underside of the leaves weren’t really cooked through and the tops got a little burnt (even through my pie shield). So, to make things easier, just bake the pie crust leaves separately and place them on top of your pie before serving. You can also sprinkle them with a little cinnamon-sugar right before baking. I was going to do that, but I forgot.
My leaf cookie cutters (affiliate link) don’t have “veins” so I made leaf veins myself using a sharp paring knife. It’s tedious, but if you want authentic looking leaves you can go ahead. Don’t worry if your veins aren’t perfect. That’s a weird sentence.
My directions for the leaves are in the print-out recipe above.


I used this recipe to make my first-ever from scratch pumpkin pie, and it was a huge success. The steps you broke down were really helpful and the result was a hit with everyone that tried it (even someone who never likes pumpkin pie!). This will be making an appearance at Thanksgiving!
I made 3 of these pies this week and they turned out great! I never have been able to successfully make a homemade pie crust before. With your recipe, I was able to make the most perfect crusts. Many thanks Sally!
Everybody loved it. Thank you!!
This is literally the best pumpkin pie I’ve ever had. Black pepper and all. II’ll never use another recipe or a pre-mix pumpkin pie again.
I made it and it is fabulous
I’m making this recipe using fresh pumpkin and i have enough pumpkin left to make a second pie. Do you recommend preparing the pumpkin pie filling and freezing or making the whole pie and then freezing?
Thank you for your help!
Hi Michelle! Either way works, but I recommend freezing just the filling. Thaw in the refrigerator before using in another pie. Enjoy!
I made this for Canadian Thanksgiving, I live in the UK and a lot of friends were hesitant to try a pie made of pumpkin (!) however they tried it and it was a hit. I love baking and I must admit I have a fear of making pastry and it worked out! The spices are great – this will be my go to pumpkin pie recipe now.
This pie is amaaaaazing oh my gosh!! I admit I questioned the pepper but I think it brings out the flavor of the spices, the pie is so flavorful! Definitely the best pumpkin pie I’ve ever made.
I had so much filling I ended up with 2 small ramekins and two mini loaf pans of extra pie. I’m not complaining since I got a personal pie out of it. More pie is better.
Note that it pairs fantastically with chai tea in the morning
Hi Sally! I just doubled this to make 2 but have enough left for a 3rd. Is it ok to refrigerate the leftovers until I can get another crust tomorrow?
Yes, absolutely! I usually make my filling the day before 🙂
My husband absolutely LOVES this pie and so do I. I wasn’t a huge fan of pumpkin pie before this.
He has been begging me to try to make this with a crust made from crushed gingersnaps. Would that hold up to the filling? Would I need to do a pre bake? Any advice would be helpful.
I’m so glad you both love this recipe! I would suggest using my pumpkin pie bar recipe: https://sallysbakingaddiction.com/pumpkin-pie-bars/
And you can use crushed *crunchy* gingersnap cookies instead of graham crackers – YUM!!!
Delicious! Best pumpkin pie recipe ever!!!
I baked this recipe the pie turned out beautiful.
Hi Sally! I just made this recipe for my family and it was a huge hit. Pumpkin pie is always a favorite and we will be making it again it went away so quickly! What drew me to it specifically was the simplicity in the decoration that is absolutely beautiful. Great recipe!
Hello! I’ve made this recipe several times, and I LOVE LOVE LOVE the crust and filling. I’m not afraid of homemade pie crusts anymore! I’d like to make this ahead since we’ll be attending two Thanksgivings back to back this year. Would I be able to make the crust, blind bake, then fill it with the pumpkin filling, and leave this in the fridge until I need to bake the day of? Will this compromise the taste or quality? How much in advance could I do this, if possible? I wasn’t sure if this would make the crust soggy. Thank you!
Hi Diana! I’m so glad you love this pumpkin pie recipe and are looking to make it again this year. I’m happy to help. The BEST way– for best results– is to pre-bake the pie crust and prepare the filling separately. You can do this up to 1 day in advance, but I’ve done it up to 3 days in advance with no problem. When you’re ready to bake, give the filling a stir, pour into the pre-baked pie crust, and bake it as directed. You can keep the pre-baked pie crust covered at room temperature and the filling covered in the refrigerator.
Hi Sally made this last year it’s amazing! I wanted to try and make it in disposable pie pans since we will be hoping from one Thanksgiving meal to another. Have you done this before? What adjustments would you make to the baking process.
So glad you love this pumpkin pie recipe, Krista, thanks! You can bake it in a disposable pie dish, no problem. That’s what I usually do when I travel with it. Baking time doens’t change.
Can you use solid packed pumpkin? I couldn’t find a purée
Canned solid packed pumpkin, yes! That’s exactly what you want to make this pumpkin pie.
Would you have to freeze the pie after it has been cooked or is it possible to do before hand and then cook after pie is completely assembled and thawed from freezer?
Hi Abby! You can freeze the unbaked pie. Thaw in the refrigerator, then bake as directed.
Made this for the Thanksgiving Potluck at work, SUCCESS! Thank you
Any substitutes for cornstarch- have a corn allergy! I’ve used gravy flour in the past and it’s been ok- but was hard to know how much to use etc. everyone looks forward to this pie every thanksgiving and don’t want to disappoint!
All-purpose flour is the next best option.
First fell in love with your Hummingbird Cake recipe and excited to now give this pie a try! What size pie tin did you use? My pie tins are a little larger than average and trying to determine how to scale the recipe. Thanks!
Hi Beth! I use a 9×2 inch pie dish.
This recipe is amazing! The flavors are all there, without it being overly spiced or too sweet. The texture is silky like a chocolate pie and the crust was perfectly flaky and buttery.
And I know this recipe is a great one because this is literally the first pie I’ve ever made. I’ve never made a pie in my life before I attempted this last night. I followed the recipe exactly and it just… worked.
I brought it to work this morning and three separate co-workers have come to tell me it’s the best pumpkin pie they’ve ever had. THANK YOU for making it so easy! I can’t wait to try more pies!
How long will the sugared cranberries keep if I want to possibly make another pie a few days later? Thanks
They keep for 1-2 days in the refrigerator. They begin to weep after that.
Sally,
I made this pie last year and fell in love. I don’t think I will ever use another recipe. The black pepper is on point. I can’t wait to make this again this year. Thank you for this!
The black pepper is a GENIUS touch! This has become my go-to pumpkin pie, and *everyone* loves it. No one has figured out what makes it “just slightly different” from the rest, but they all love it. I’ve added BP to my pumpkin cookies now, thanks to this recipe, and the effect it has on them is the same! Thank you for the “secret ingredient”!
Hi Michelle! Canned is best for this pie, but you can definitely get by with fresh. Blot some of the moisture out first. (Not all, just some.) I find that the pie takes longer to bake using fresh pumpkin puree.
I’ve had readers use canned coconut milk for both the cream and the milk and they’ve had great luck! I haven’t personally tried it. Let me know what you think of it!
Definitely! Or you can try my sweet potato pie recipe. It’s my favorite!
Hi Caroline! Any time a pumpkin pie sinks in the center, that means it was not fully baked. It’s no problem at all– the pie will taste extra creamy that way. 🙂 Sometimes I prefer it!
Hi Carol! I’ve baked this pumpkin pie WITHOUT the crust pre-bake and honestly… it’s just fine!! You can skip that step if it’s giving you problems. I pre-bake the crust for extra insurance to ensure the crust isn’t mushy.