

This 3-layer zebra cake features mesmerizing swirls of chocolate and vanilla, plus a silky chocolate cream cheese frosting. This marbled cake is easier than it looks because it starts with just 1 batter!

I originally shared this recipe in 2017, and I’ve since updated it with new photos, a video, and extra success tips for consistently great results.
You’re looking at chocolate and vanilla cakes baked together in a striking striped pattern. Pretty impressive, right? Much easier than you think to pull off, too. Like marble loaf cake but a little more flashy. Zebra cake is often baked as a single-layer cake or a Bundt cake, but I needed a fun and towering cake for a friend’s birthday. And an excuse to make chocolate cream cheese frosting!
*No zebras were harmed in the making of this cake. 😉
One reader, Erin, commented: “This cake is delicious! It’s fun to make, and the final product looks astounding. The cake has a wonderfully soft and fluffy texture. And the frosting!! That chocolate cream cheese frosting has to be the best kind of frosting I have ever had. It’s creamy, smooth, chocolate-y, and downright perfect. Even my dad, who hates frosting, loved it. It’s nice because it’s not as tooth-decayingly sweet as normal buttercream. And the cream cheese adds a fabulous tang! This is definitely my new favorite chocolate frosting recipe. ★★★★★“


Ingredients You Need
- All-Purpose Flour: Cake flour is too light to stand up to this particular cake. Use all-purpose here, and be sure to sift it before measuring. Sifting the flour rids any clumps and aerates it, which I find important in a cake recipe that uses this much flour.
- Baking Powder & Baking Soda: These leaveners lift the cake up while baking.
- Salt: To balance out the sweet.
- Proper Room-Temperature Butter: To achieve a good rise, properly cream the butter and sugar together. You have the crutch of baking powder and baking soda, but the cake’s crumb truly sings when that creaming process steps in. You need softened, room-temperature butter, which is actually still cool and firm to the touch, not soft and greasy. Butter that’s too cold or too warm won’t mix properly.
- Sugar: We’re using granulated sugar to sweeten this zebra cake.
- Eggs: While I sometimes use only the egg whites to make white cake, we’re using whole eggs today. We don’t want a crumb as light and fluffy as the white cake; rather, this crumb is similar to the rich, moist texture of yellow cake.
- Sour Cream: It adds moisture and richness, and makes for a creamy, tender texture in every bite.
- Pure Vanilla: Reach for pure vanilla extract—a full Tablespoon goes in the cake batter, and then you’ll use it to flavor the frosting, too. You’ll really taste it in this recipe, so I don’t recommend using imitation vanilla here.
- Buttermilk: Store-bought buttermilk gives the best result, but you can make a DIY buttermilk substitute if you can’t find it in your grocery store.
- Cocoa Powder: Use unsweetened cocoa powder, and either Dutch-process or natural cocoa is fine. There’s enough acid in the cake batter that it wouldn’t make a difference. (Learn why that’s important here: Dutch-Process vs Natural Cocoa Powder.)
- Espresso Powder: Optional, for a deeper chocolate flavor.

Recipe Testing Zebra Cake
Back in 2018 when I was working on this recipe, I started with a basic vanilla cake/yellow cake hybrid recipe: my checkerboard cake. I ADORE this cake, which tastes like a cross between a mega-buttery yellow cake and lighter vanilla cake.
But if I’m not careful, I can over-cream the butter + sugar or over-mix the batter since there’s so much of it. Additionally, there’s extra mixing involved when you turn half of the vanilla cake batter into chocolate cake batter. Over-mixing can leave you with a denser-tasting cake. I wanted to avoid that, so I slightly reduced the flour and added a little more baking powder for lift + airiness. I added some sour cream too, for a little extra moisture. (Never hurts!) Totally worked—this cake is so moist!
Made From 1 Batter
The cake batter follows a simple, familiar process. Whisk the dry ingredients together, then work on the wet ingredients. In a separate bowl, use a mixer to cream the butter and sugar together. Beat in eggs, then the sour cream and vanilla. Pour in the dry ingredients and then with the mixer running, slowly add the buttermilk.

The chocolate cake is made from the vanilla batter, so you don’t have to prepare two completely separate batters. YAY! Divide the batter in half and add cocoa powder to one.
But since we’re adding a dry and bitter ingredient to the chocolate batter, it will dry out the cake. A little sugar and warm milk or buttermilk solved that problem. (Warmth helps the cocoa powder bloom/dissolve.) Both the vanilla cake and chocolate cake are so moist. We did it!
You can also add a little espresso powder to the chocolate batter. Just to help bring out the chocolate flavor. This is an optional ingredient. You can find it in the coffee or baking aisle at the grocery store, or online.

IMPORTANT: This is a thick batter, which is important for this recipe because as you are layering the two batters together, it helps keep them separate, whereas a thin, runny batter would end up just spreading all together.
Use Parchment Paper Rounds for Cakes
Lining cake pans with parchment rounds is the trick I use every single time I bake a round cake, whether I’m making a 1-layer sprinkle cake, a 9-layer Smith Island cake, or today’s recipe. Store-bought pre-cut parchment rounds are convenient, but it’s really easy to just make them yourself. You can cut the exact pan size you need, whether you’re making a 6-inch cake, an 8-inch cake, or a 9-inch cake. If you don’t make a lot of round cakes, just cut them as you need them. If you bake a lot, cut many at a time and store them with your baking pans, ready for the next time you bake.
Very lightly grease the cake pan with butter or nonstick spray. Place the parchment paper round inside, and then grease the parchment, too. Yes, you grease the pan and then also grease the parchment. This creates an ultra-nonstick environment for your cake. The cake won’t stick to the pan, and the parchment round won’t stick to the cake. For more tips on this method, see Parchment Paper Rounds for Cakes.
How to Make Zebra Stripe Cake Layers
Now here’s where the zebra shows up! You create the beautiful zebra stripe pattern by layering the batters on top of each other. Before baking, the cakes look like a bullseye.
Start with a spoonful of 1 batter in the center of each of the pans, then place a spoonful of the other batter on top. Alternate between the 2 batters until you’ve filled the pans.


Every now and then, tap the pans on the counter and give them a little shake, to level the batter off and help it spread toward the edges of the pan.
Don’t worry about making this look perfect. The layers of the finished cake are going to look swirly and stripey—we aren’t trying to achieve perfectly straight lines here.

Bake the cakes and then let them cool completely before you make the…
Chocolate Cream Cheese Frosting
Regular cream cheese frosting is one of my all-time favorites because it’s not as cloyingly sweet as American-style buttercream and it’s easier than, say, making Swiss meringue buttercream. It’s the creamiest of frostings with a silky smooth and velvety mouthfeel. With carrot cake, red velvet cake, banana cake, and pumpkin cake… it’s just the best!
But could we possibly improve on the perfection that is cream cheese frosting? By adding… chocolate?? Oh yes… we could indeed.
Not in the mood for cream cheese frosting? Chocolate buttercream, Nutella frosting, vanilla buttercream, or Swiss meringue buttercream would also taste fantastic on this zebra cake.


Yes! Instead of turning half of the batter into chocolate batter, simply tint half of the batter your desired color using a couple drops of gel food coloring.
Yes! See how I turned this into a 6-inch layer cake for a safari-themed 1st birthday cake.
Assembling This Zebra Cake
Once the cakes have baked and cooled, trim the tops using a cake leveler or a large serrated knife to create an even surface. A flat top ensures a sturdier and more stable layered cake.
If you’d like a little assistance with this part, I have a full post and video tutorial on how to assemble a layer cake.
Now the moment of truth. Cutting into the cake to see how those zebra stripes look!


One reader, Amy, commented: “Sally, thank you for this cool and easy technique! I omitted the cocoa & used pink & green food coloring to make an Easter cake. My 11-year-old son helped & said ‘I like that this is a cool, not boring, way to make a cake.’ ★★★★★“
Cool and not boring? I’ll take that as a major compliment, coming from an 11-year-old!
Print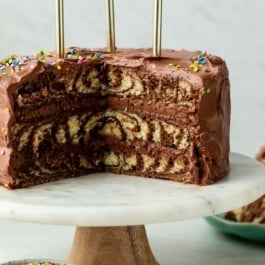
Zebra Cake
- Prep Time: 30 minutes
- Cook Time: 27 minutes
- Total Time: 4 hours, 30 minutes
- Yield: serves 12
- Category: Cake
- Method: Baking
- Cuisine: American
Description
This 3-layer zebra cake features mesmerizing swirls of chocolate and vanilla, plus a silky chocolate cream cheese frosting. This marbled cake is easier than it looks because it starts with just 1 batter!
Ingredients
- 3 and 1/2 cups (413g) sifted all-purpose flour* (spooned & leveled)
- 1 teaspoon salt
- 2 teaspoons baking powder
- 3/4 teaspoon baking soda
- 1 and 1/2 cups (340g) unsalted butter, softened to room temperature
- 2 cups (400g) granulated sugar
- 5 large eggs, at room temperature
- 1/3 cup (75g) sour cream, at room temperature
- 1 Tablespoon pure vanilla extract (yes, Tbsp!)
- 1 and 3/4 cups (420ml) buttermilk, at room temperature
Chocolate Batter
- 2 Tablespoons milk or buttermilk, warmed
- 1 teaspoon espresso powder (optional)
- 1/3 cup (27g) unsweetened natural or dutch-process cocoa powder
- 2 Tablespoons granulated sugar
Chocolate Cream Cheese Frosting
- 12 ounces (339g) full-fat brick cream cheese, softened to room temperature*
- 3/4 cup (12 Tbsp; 170g) unsalted butter, softened to room temperature
- 3 and 1/2 cups (420g) confectioners’ sugar
- 2/3 cup (55g) unsweetened natural or dutch-process cocoa powder
- 1 teaspoon pure vanilla extract
- 1–2 Tablespoons milk or heavy cream
- pinch salt
- sprinkles for decorating, if desired
Instructions
- Preheat oven to 350°F (177°C).
- Make the vanilla batter: Whisk the flour, salt, baking powder, and baking soda together in a large bowl. Set aside. Using a handheld or stand mixer fitted with a paddle attachment, beat the butter and sugar together on high speed until smooth and creamy, about 3 minutes. Scrape down the sides and bottom of the bowl with a silicone spatula as needed. Add the eggs and mix on medium speed until combined. Scrape down the bowl again, and then beat in the sour cream and vanilla extract. The batter will look lumpy and curdled; that’s normal at this point.
- Add about 1/3 of the dry ingredients and 1/3 of the buttermilk, then beat on low speed until combined. Add another 1/3 of the dry ingredients and 1/3 of the buttermilk, then beat again on low speed until combined. Add the remaining of each, and beat just until incorporated. Do not over-mix this batter. The batter will be smooth, velvety, and slightly thick.
- Make the chocolate batter: There will be around 8 cups of batter total. Divide it in half (you can just eyeball it) and transfer half of the batter into another bowl. Whisk espresso powder into the warmed milk and then add it to one of the batters, along with the cocoa powder and sugar. Whisk until combined; a few small lumps are OK.
- Grease three 9-inch round cake pans, line with parchment paper rounds, then grease the parchment paper. Parchment paper helps the cakes seamlessly release from the pans. (If it’s helpful, see this parchment paper rounds for cakes video & post.)
- Drop a large spoonful of 1 batter in the center of each pan. You can use the back of the spoon to spread it around a bit to make a circle. Top each circle with a spoonful of the other batter. Rotating the pans as you add the batters will help you get that circle shape. Alternate spoonfuls of the batters on top of each other in each pan and repeat until all the batter is used. After every few spoonfuls, give the pans a little shake to level out the batters.
- Bake for 25–27 minutes, or until the cakes are baked through. To test for doneness, insert a toothpick into the center of the cake. If it comes out clean, it is done. Allow the cakes to cool in the pans set on a cooling rack for 1 hour, then remove them from the pans and let the cakes finish cooling directly on the rack. The cakes must be completely cool before frosting and assembling.
- Make the frosting: In a large bowl using a handheld or stand mixer fitted with a paddle or whisk attachment, beat the cream cheese on high speed until completely smooth and creamy, about 1 minute. Scrape down the sides of the bowl. Add the butter and beat until combined. Scrape down the sides and bottom of the bowl with a silicone spatula as needed. Add the confectioners’ sugar, cocoa powder, vanilla extract, 1 Tablespoon milk, and salt and beat on low speed; gradually increase the speed to medium-high and beat until combined and creamy. Add 1 more Tablespoon of milk to slightly thin out, if needed. Taste, then add another pinch of salt if desired.
- Assemble and frost: First, using a large serrated knife, slice a thin layer off the tops of the cakes to create a flat surface. Discard (or crumble over ice cream!). Place 1 cake layer on your cake stand, cake turntable, or serving plate. Evenly cover the top with about 1 cup of frosting (about 240g). Top with the 2nd cake layer, upside down, and evenly cover the top with the same amount of frosting. Top with the 3rd cake layer. Spread the remaining frosting in a thick layer all over the top and around the sides. Garnish with sprinkles, if desired. Refrigerate for at least 45 minutes before slicing. This helps the cake keep its shape when cutting—it could slightly fall apart without this time in the fridge.
- Cover leftover cake tightly and store in the refrigerator for up to 5 days. I like to use a cake carrier for storing and transporting.
Notes
- Make Ahead & Freezing Instructions: Prepare cakes and frosting 1 day in advance. Keep cakes at room temperature, covered tightly. Refrigerate prepared frosting in an airtight container until ready to use. Bring frosting to room temperature before spreading as it will be quite stiff after refrigerating. (Add a splash of cream or milk to thin out, if needed.) Frosted or unfrosted cakes may be frozen for up to 3 months; thaw overnight in the refrigerator and bring to room temperature, if desired, before serving.
- Special Tools (affiliate links): 9-inch Round Cake Pans | Glass Mixing Bowl | Whisk | Electric Mixer (Handheld or Stand) | Silicone Spatula | Cooling Rack | Cake Turntable | Straight Spatula (for frosting) | Round Cake Carrier (for storage)
- Flour: Sift flour before measuring.
- Buttermilk: If you don’t have buttermilk, you can make a DIY buttermilk substitute. Add 1 Tablespoon of white vinegar or lemon juice to a liquid measuring cup. Then add enough whole milk to the same measuring cup until it reaches 1 and 3/4 cups. (In a pinch, lower fat or nondairy milks work for this soured milk, but the cake won’t taste as moist or rich.) Stir it around and let sit for 5 minutes. The homemade “buttermilk” will be somewhat curdled and ready to use in the recipe.
- Cream Cheese: Make sure you’re using the bricks of cream cheese, not cream cheese spread. They’re typically sold in 8-ounce bricks, so you’ll need 1 and 1/2 bricks.
- Room Temperature Ingredients: All refrigerated items should be at room temperature so the batter mixes together easily and evenly. Read more about the importance of room-temperature ingredients.
- Tint Half of the Batter: Instead of turning half of the batter into chocolate batter, simply tint half of the batter your desired color using a couple drops of gel food coloring.
- Smaller 6-Inch Cake: I scaled down this recipe to make a 6-inch version, and served it as a 1st birthday cake for my daughter’s “safari”-themed birthday.


Reader Comments and Reviews
this cake is one of the bet cakes I have ever had
I really like this cake it is so nice thanks for sharing your recipes
Is it possible to use this recipe for cupcakes as well?
Hi Natalie, it should work, layering the individual cupcakes like you do with the batter for the cake layers. Or here is our marble cupcakes recipe, if you’re interested in that instead.
I ended up with more like 10 cups of batter? Wish I had taken out more than the recommended 4 cups because ended up with way more batter left in the mixing bowl. My chocolate stripes will be taking over most of the cake I’m afraid.
Sally’s recipes are always the best, just bummed about the stripes.
Hi Kelly, thanks so much for giving this one a try. Were any of the ingredients over-measured by chance, getting you closer to 10 cups of batter? We always get closer to 8 cups in our testing. We’re sorry the stripes didn’t come out as you hoped, but we hope you still enjoyed the flavor!
This cake was okay. My family wasn’t crazy about the flavor of the cake but loved the creamy, smooth texture of the frosting. It is really pretty but I will not be making again.
I did make this as a two layer cake instead. It came out just fine. I had to adjust oven time and temperature.
Hi Sally – How much chocolate buttercream would be needed to ice this three-layer cake? Thanks so much!
Hi Nicole, you can follow the chocolate frosting ratios from this pinata cake. Enjoy!
Hey!
Can I bake it as two halves instead of three thirds?
There is too much batter for only 2 layers here. We’d recommend making the recipe as is, making two layers, and using the leftover batter for a few cupcakes.
Thanks, that’s a great solution
Hi Sally,
First off love your recipes.
First time making the cake. Im having problems with my frosting. I room temperature like it says, everything was smooth till I started adding the dry ingredients, now my cream cheese has tiny nudges in the frosting. What did I do wrong.
Wow!! To start off, I’ve never made a cake from scratch in my life. I was a little overwhelmed at first but once I watched the video, it was so helpful. The cake turned out AMAZING! So moist. I made it for my son’s 2nd birthday and turned it into a construction themed cake with different vehicles and chocolates on top. Everyone loved it!
I only have two 8 inch cake pans. What should I do?
Hi Jane, You can bake the first two layers and keep the unused batter lightly covered at room temperature until it’s ready to go in the oven. Happy baking!
Hi!
If I calculate correctly and increase the ingredients to make four 9 inch cakes, would this be stable enough for the four layers?
Thanks!
Hi Gemma, this cake should hold up to 4 layers. You may wish to use cake dowels for extra support. Let us know how it goes!
Hi! do you think I could use this technique with you’re strawberry and pistachio cakes or would that be too runny? should I half the recipe for each? thank you so much for all you do!!!!!!
Hi T, you could definitely do that instead. Hope it’s a hit!
I loved this recipe! Everything turned out great, I was just wondering if the cake needed to stay refrigerated or if it can be kept out after the 45 min in refrigerator.
Hi K, you can leave the cake out while serving, but because of the cream cheese in the frosting, it’s best to store in refrigerator. So glad it was a hit!
Hi! I made this gluten free with Bob’s Red Mill 1:1 gluten free flour. The batter was a little on the dry side so I added extra buttermilk a little bit at a time until the consistency was smooth like you mentioned. It turned out delicious!!! Another great recipe of yours that I will definitely be making again!
Can cake flour be used in the same amount?
Hi Mimi, cake flour isn’t strong enough for this cake, so we do suggest sticking to AP flour.
I did see this in an earlier post so I used regular flour. For the 9×13 pan I made two concentric circles of layered batter rather than 1 in the middle. I baked it for 37 min at 350. Still cooling, no sinking! and will decorate tomorrow will send pics then!!