

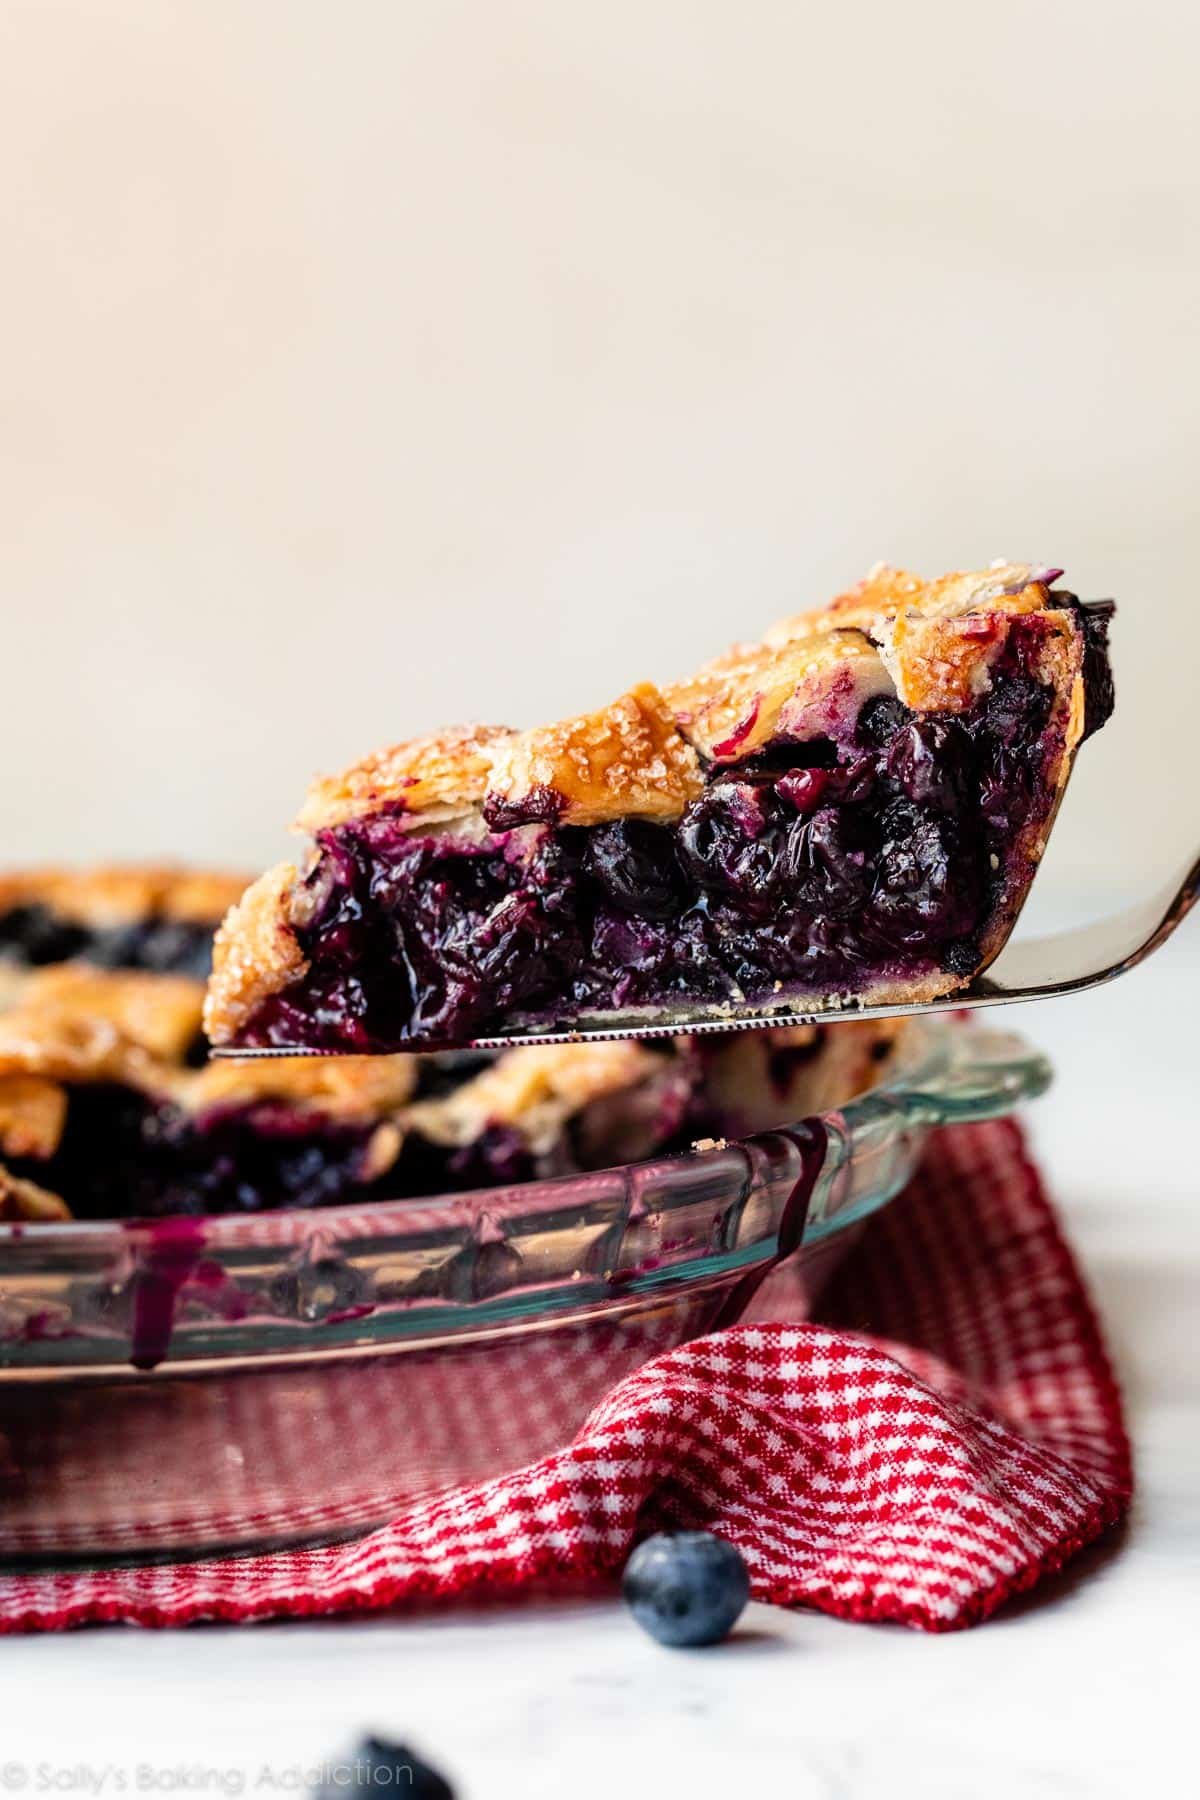
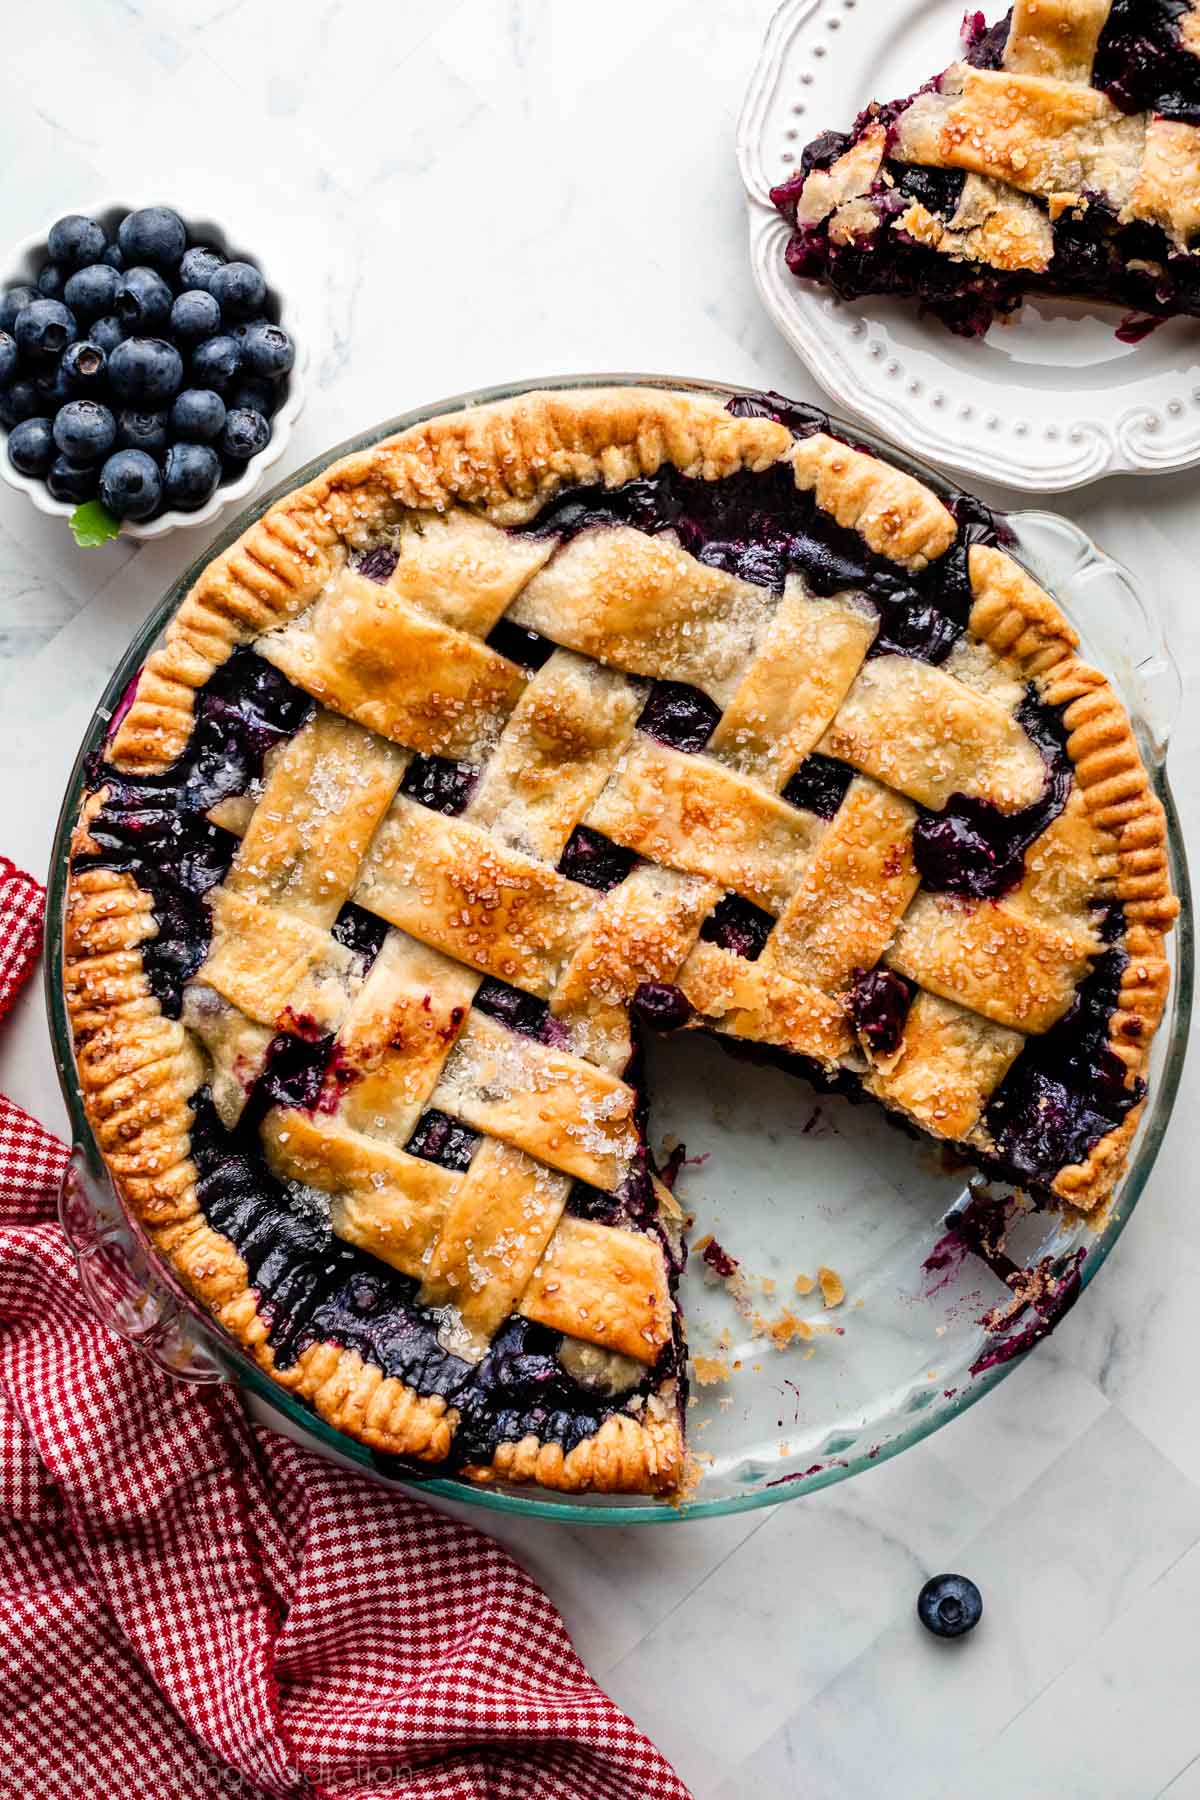
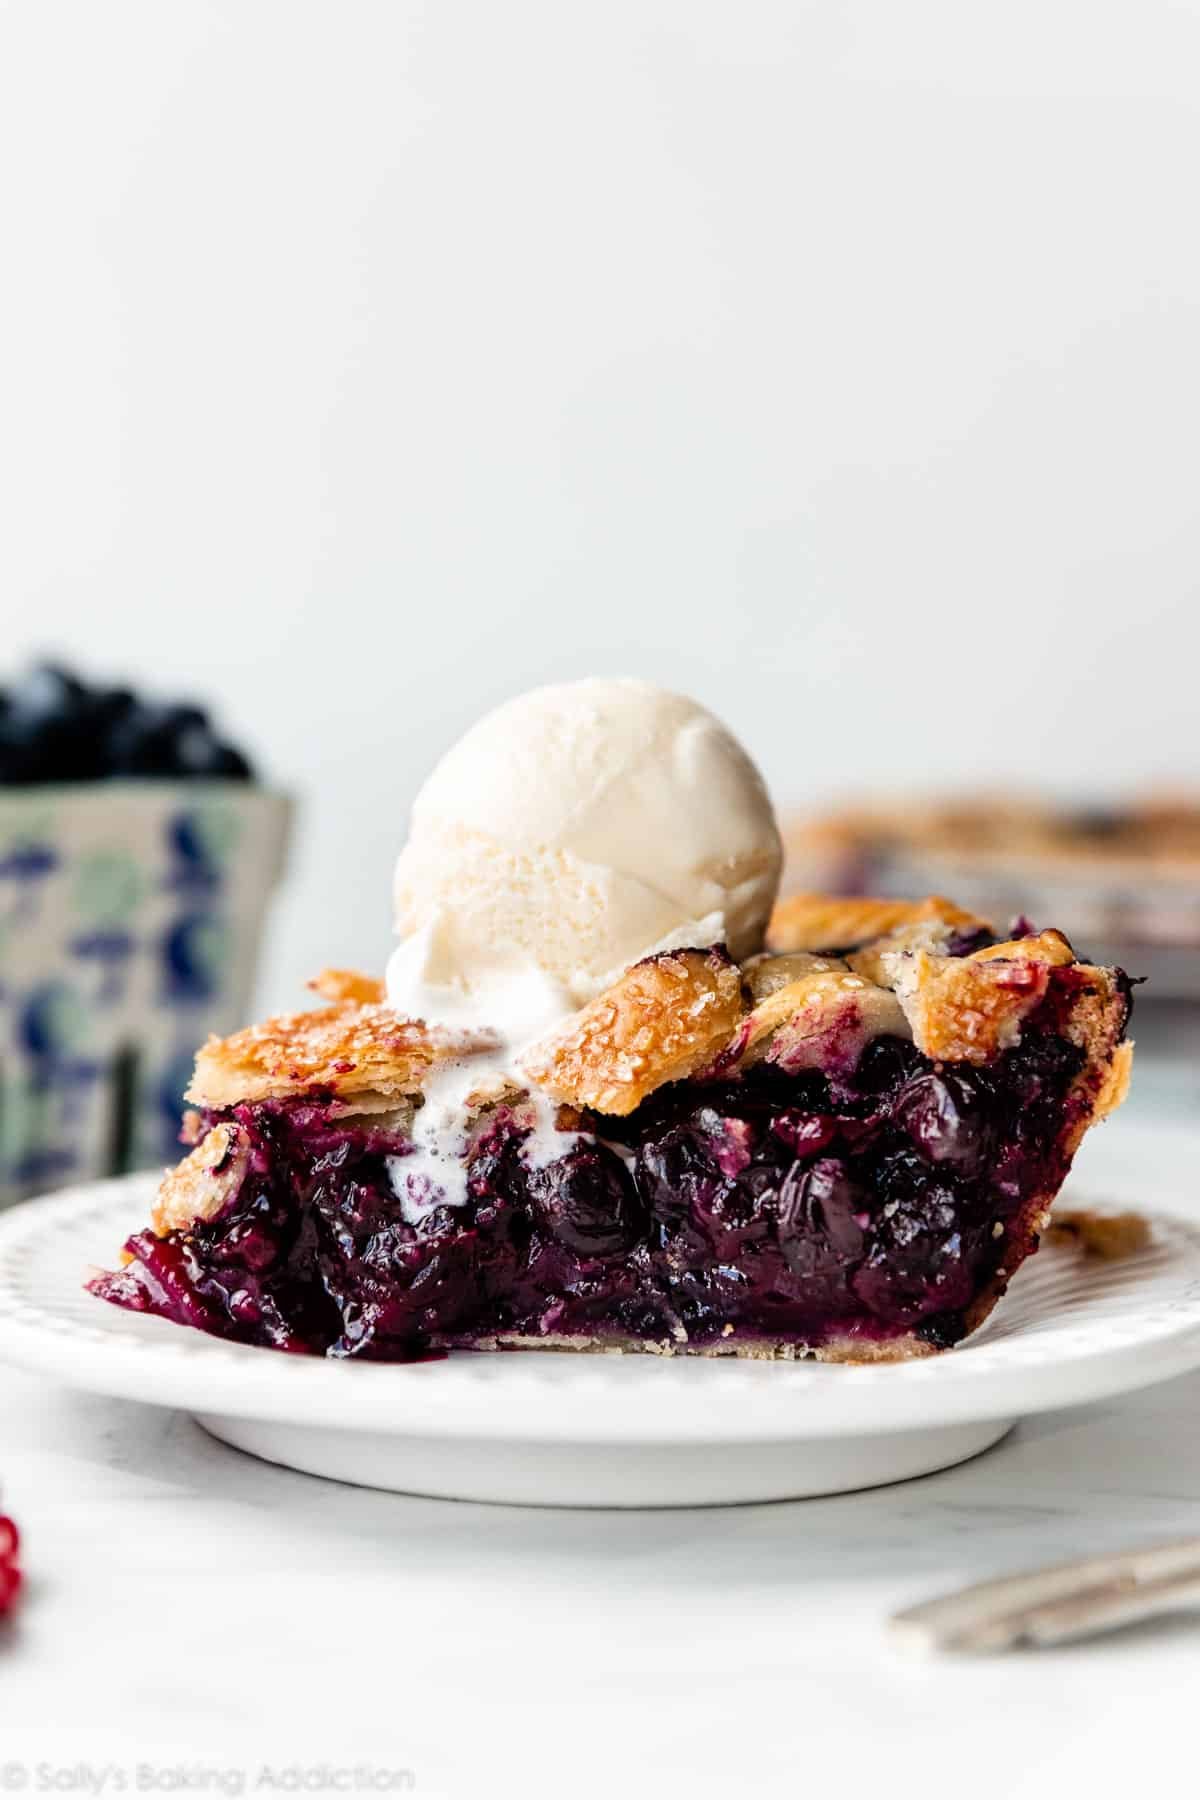
My homemade blueberry pie is better than ever and bursting with sweet juicy blueberries that sit in a golden-brown buttery, flaky pie crust. Follow my precise baking instructions for a filling that sets perfectly and is neither runny nor soupy. From-scratch pie can be hard work, so my team and I made sure to repeatedly test this recipe so the results are completely worth your time and effort.

I originally published this recipe in 2016 and have since added new photos, a video tutorial, and more helpful success tips. I’ve also made a few changes to the recipe and baking instructions to help ensure a filling that sets.
This slightly updated recipe produces a better-than-ever blueberry pie. Reader reviews reporting a soupy, runny filling inspired me to rework the baking instructions on my original recipe and make a slight change to the filling ingredients. My team and I tested a LOT of blueberry pies in the last few weeks. We searched for the magic trick to a perfectly flavorful, non-runny blueberry pie.
So what’s the verdict? What’s the magic trick to a perfect blueberry pie? Drumroll please…
The magic trick is: patience.
One reader, Judy, commented: “Wow! I’ve tried and loved many of Sally’s recipes, but this was the best so far! Absolute perfection! I followed the directions exactly as written and it came out perfectly, including the homemade pie crust. The pieces cut out without any mess. Simply delicious! ★★★★★“
Another reader, Nancy, commented: “I’ve been making blueberry pies for many years, but I think this recipe is the best I’ve made! The pie crust is truly great, so nice to work with. It was my first time that I made a true lattice crust. The dough was perfect! The berries were perfect as well. I couldn’t have been more pleased! ★★★★★“
Here’s Exactly Why This Blueberry Pie Recipe Works
It turns out that you need to (1) really work the filling ingredients together, (2) bake the pie for longer than I thought, (3) embrace a bubbling juicy messy pie filling, and (4) let it cool completely in order for the filling to fully set up. Just like peach pie, blueberry pie takes several hours and is undoubtedly a delayed-gratification dessert. But I promise you, they are both worth it. Get ready for the most incredible, juicy-yet-sliceable blueberry pie experience:
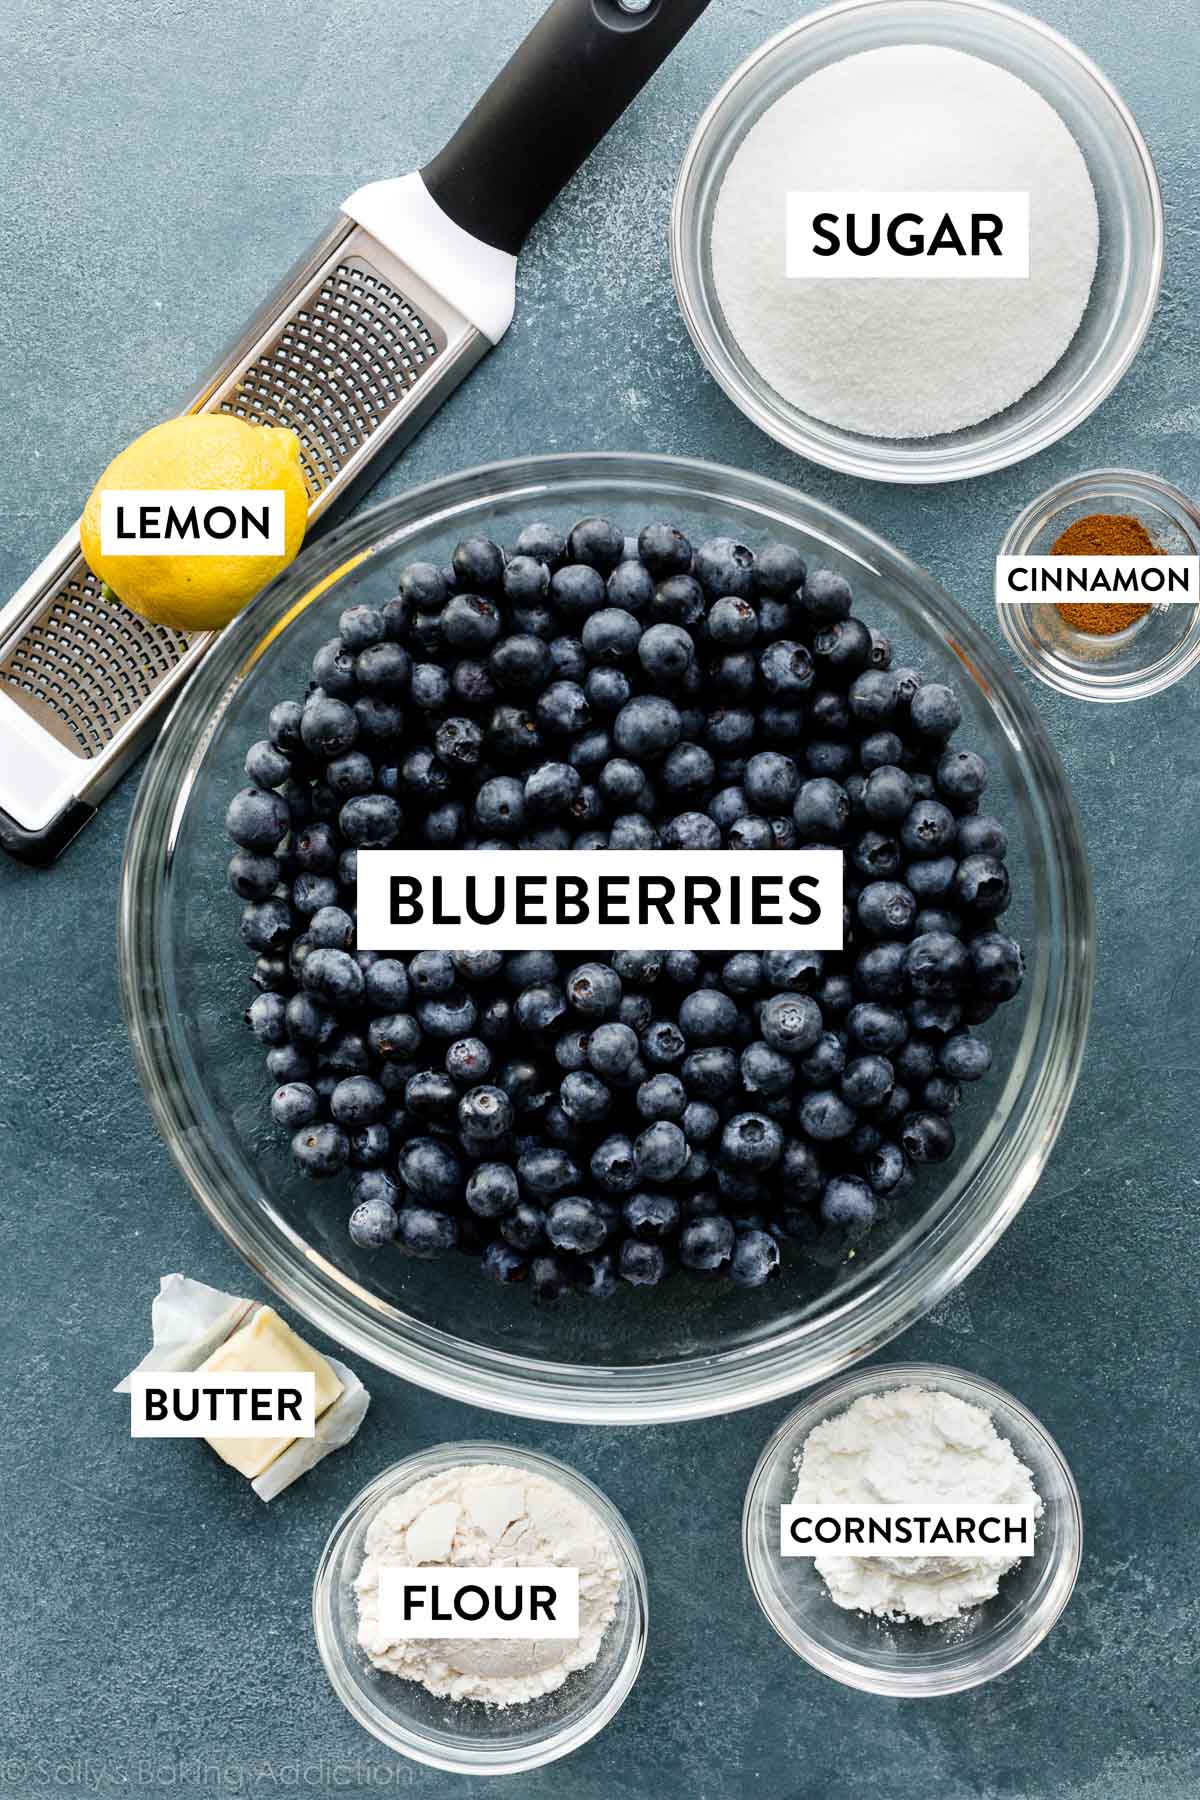
6 Ingredient Filling
After I’ve scared you off about the time it takes, let me mention that blueberry pie filling is actually one of the quickest fruit pie fillings to prepare! There’s no peeling, pitting, hulling, or chopping the fruit. Unlike triple berry pie, you do NOT need to pre-cook the filling either (a step we tested but found useless). Just rinse and pat the berries dry and then mix with sugar, flour, cornstarch, cinnamon, lemon juice, & lemon zest:
Pie Filling Success Tips:
- Use Flavorful Ingredients: You don’t need to add much to this pie filling to achieve amazing flavor. The berries are already pretty sweet on their own, so we only need to add ⅔ cup sugar. The zest and juice of a fresh lemon + a hint of cinnamon both add a subtle zing that really amplifies the natural flavor of the blueberries.
- Use 2 Thickening Ingredients: In the previous version of this recipe, I used ¼ cup of cornstarch to thicken the juicy filling, but we were still getting reader comments that their pies were turning out too runny. Taking note from my blueberry crumble pie, a reader favorite, I decided to use a mix of both cornstarch and flour. As long as you bake the pie long enough, the jammy filling sets up and thickens beautifully.
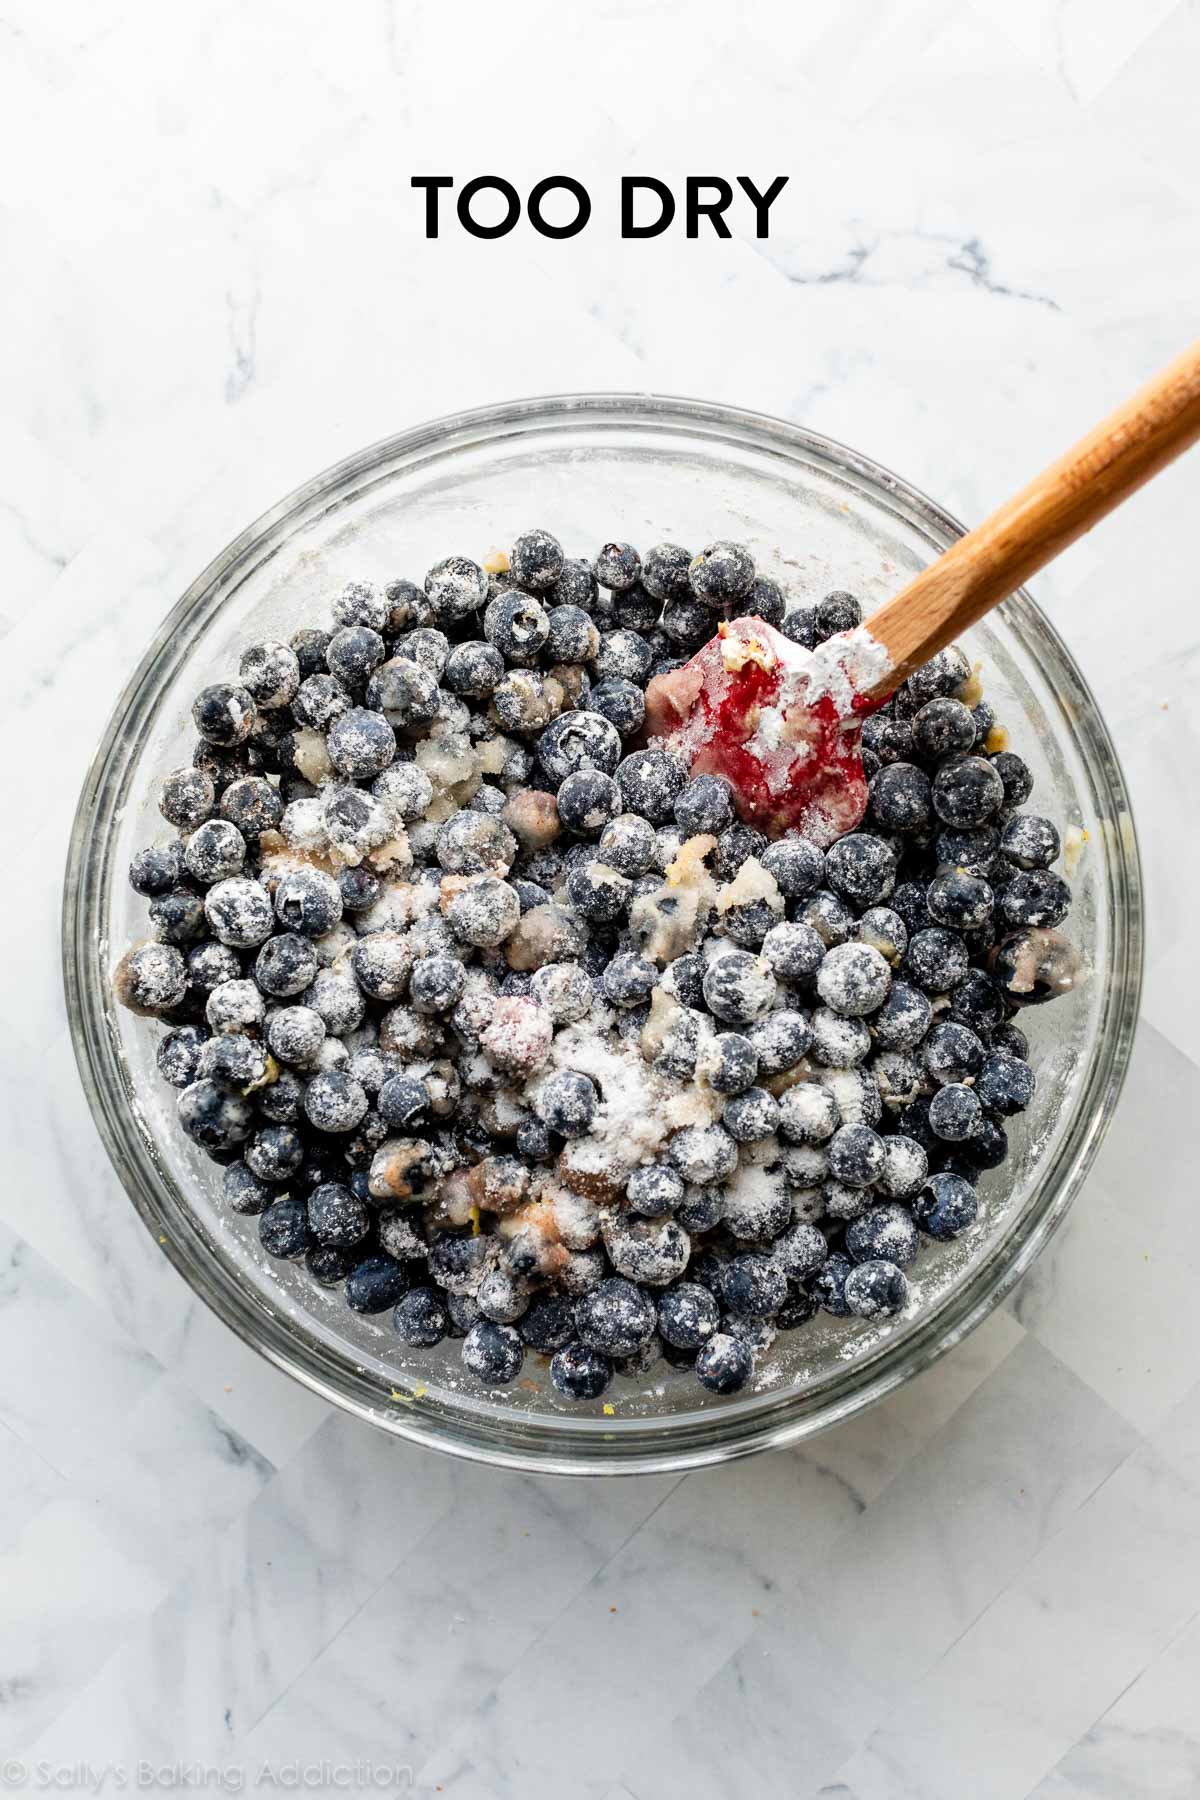
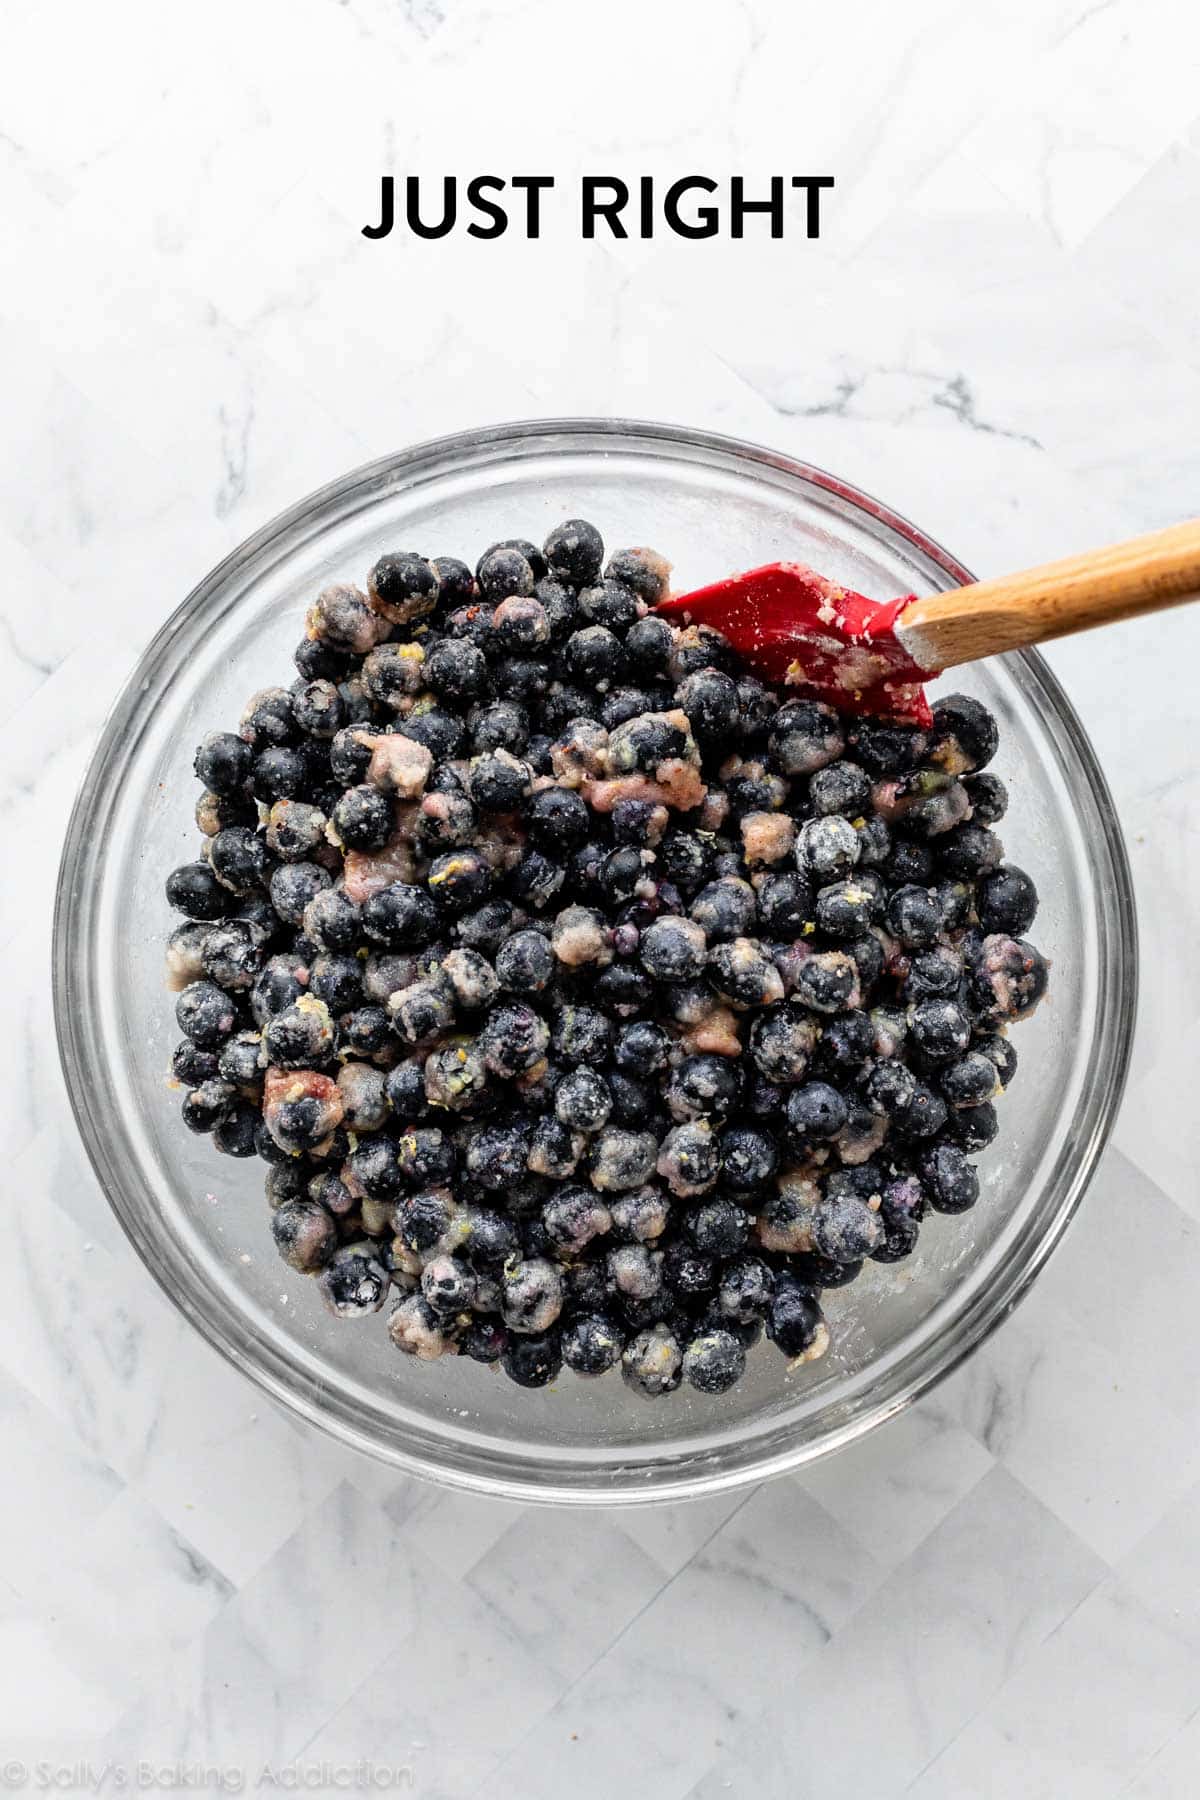
- Work the Ingredients Together: Between the flour, cornstarch, and sugar, there’s a lot of dry ingredients. To ensure there’s not too much dry powder, you may have to smash a few blueberries to help soak it all up.
Below Left: Your filling won’t bake properly if it’s this dry and powdery. Below Right: Work the ingredients together until the dry ingredients are moistened.
Assemble Your Pie
You can use your favorite pie dough recipe, but here’s why I encourage you to try mine. To make a perfect pie crust, I use a mix of shortening and butter because the two ingredients work together to make an unbeatable texture. Butter adds flavor and flakiness, while shortening’s high melting point keeps the crust tender and workable. The recipe yields 2 crusts—one for the bottom and one for the top—which is what you need for this pie. You don’t need to par-bake the crust because this pie bakes for so long.
A few topping notes:
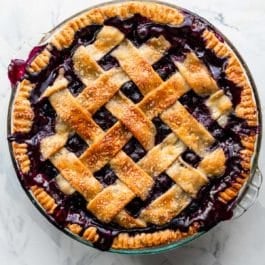
- Lattice: I like a signature lattice pie crust design for this blueberry pie (doesn’t it just scream “state fair blue ribbon winner“?!) but decorate the pie however you’d like. Here’s my detailed How to Lattice Pie Crust video & instructions.
- Other Designs: Feel free to check out other pie crust designs.
- Crumble: Or you could try this blueberry crumble pie. Note the slight variation in the filling to make up for a very buttery topping.
Regardless of the design, be sure to crimp or flute the pie crust, too. I simply crimped the edges with a fork in the photos here.
Don’t Forget…
- To dot butter on top of the filling. Like in this cherry pie recipe, a touch of butter adds richness and helps the filling ingredients bind together.
- To brush the top dough with egg wash. Egg wash promises a crispier crust and helps develop that signature golden sheen. Without it, dough is dull and lackluster. You use egg wash on many other bakes, like apple pie, croissants, stromboli, breakfast pastries, and peach cobbler, to name a few.
Unlike the butter and egg wash, coarse sugar is an optional topping. I love adding it to sweet pies because it adds a little crunch and sparkle.
Many More Blueberry Pie Success Tips & Tricks
- Make the Pie Crust Ahead of Time. It has to chill for at least 2 hours, but it keeps well in the refrigerator for up to 5 days and the freezer for up to 3 months, so make it in advance and it will save you time on the day you actually make this pie.
- Baking Sheet on Rack Below the Pie: This pie gets pretty messy when it’s happily bubbling away for over an hour. Place a baking sheet on the bottom oven rack to catch the bubbled-over juices. If you really want to save yourself cleanup time, line it with foil first.
- Start at an Initial High Temperature: 425°F (218°C) for 25 minutes, then the remainder at 375°F (190°C). The reason for the initial hot oven burst is to set the crust and encourage the cornstarch to begin working quicker.
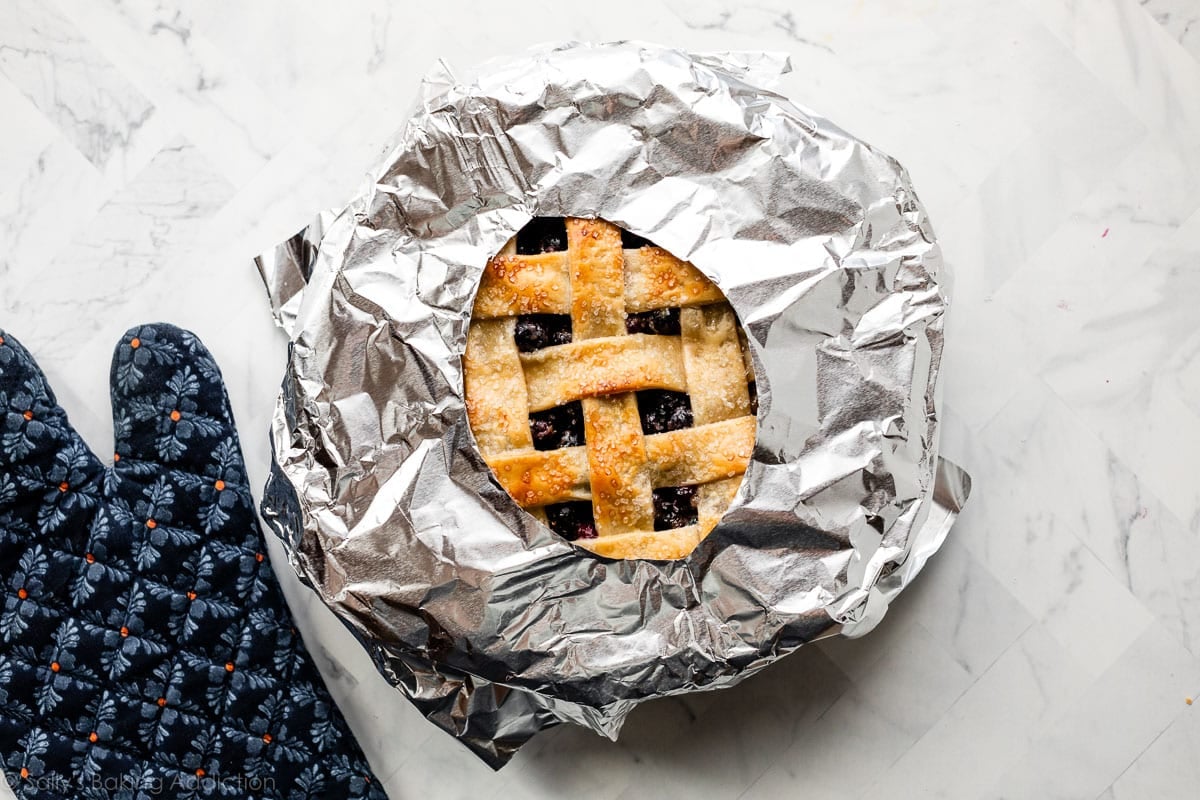
- Pie Crust Shield: After the first 25 minutes in the oven, when you lower the temperature, I recommend placing a pie crust shield (see Notes) on the crust’s edges to prevent it from over-browning too quickly. You can purchase a pie crust shield, but I often use aluminum foil. See the next photo.
- Bake for a Long Time: Blueberry pie takes a lot longer than some pies (like pumpkin pie and pecan pie). You want the filling to be bubbling at the surface nearly everywhere, and this takes close to 75–80 minutes total. The internal temperature in the test pies (easy to take with an instant read thermometer because of the lattice top) was around 200°F (93°C) when done. If you think about it, in order for gravies and other sauces to begin thickening, they must be boiling/simmering. Same with this blueberry pie filling.
- Cool Completely: Slicing warm will give you a soupy slice of pie. Cool for at least 4 hours at room temperature because the pie filling continues to set up as it cools.
Make a homemade pie crust shield out of a large square of aluminum foil by cutting a circle in the center of it:
There is something so soothing and satisfying about making pie from scratch and I hope you try this endlessly tested pie perfection soon. It’s perfect for summertime picnics, as part of your Father’s Day Recipes, or anytime you have fresh blueberries. Want to skip some pie drama? This blueberry cream pie, berry cobbler, blueberry galette, or these blueberry pie bars will satisfy your berry cravings and require half the work. 😉
Here is even more inspiration for blueberry dessert recipes. And if you can’t choose between this pie or peach pie, go for blueberry peach pie instead! Browse all of my summer pie flavors in this collection of delicious summer pie recipes.
Recommended Tools
- Pastry blender for making pie dough.
- This is my favorite pie dish. I prefer baking pies in a glass pan so I can see the crust browning on the sides and bottom. Want to skip the pie dish? This easy berry galette is always a crowd-pleaser.
- This rolling pin has held up well over several years with constant use.
- Zester for lemon zest.
- Citrus juicer for lemon juice.
- Pastry brush for the egg wash.
Homemade Blueberry Pie
- Prep Time: 3 hours
- Cook Time: 70 minutes
- Total Time: 7 hours (includes cooling)
- Yield: 8-10 servings
- Category: Pie
- Method: Baking
- Cuisine: American
Description
After a few additional years of testing, this is now the best blueberry pie. As the pie bakes, expect a messy, bubbly, and juicy filling. As the pie cools, the filling sets into a jammy, yet sliceable consistency. For a truly out-of-this-world summer dessert experience, serve each flavorful slice with vanilla ice cream.
Ingredients
- Homemade Pie Crust or All Butter Pie Crust (both recipes make 2 crusts, 1 for bottom and 1 for top)
- 6 cups (3 pints; about 860g) fresh blueberries*
- 2/3 cup (135g) granulated sugar*
- 1/4 cup (31g) all-purpose flour
- 2 Tablespoons (14g) cornstarch
- 1/4 teaspoon ground cinnamon
- 2 Tablespoons (30ml) lemon juice
- 1 teaspoon lemon zest
- 1 Tablespoon (14g) cold unsalted butter, cut into small cubes
- egg wash: 1 large egg beaten with 1 Tablespoon (15ml) milk
- optional: coarse sugar for sprinkling on crust
Instructions
- The crust: Prepare either pie crust recipe through step 5.
- Make the filling: Stir the blueberries, sugar, flour, cornstarch, cinnamon, lemon juice, and lemon zest together in a large bowl. Mix together until it’s no longer dry and powdery; burst a few blueberries if necessary to moisten. Set filling aside as the oven preheats. Filling can be covered and refrigerated for up to 24 hours if needed.
- Adjust the oven rack to the lower third position and preheat to 425°F (218°C). Place baking sheet on the bottom oven rack to catch any blueberry juices.
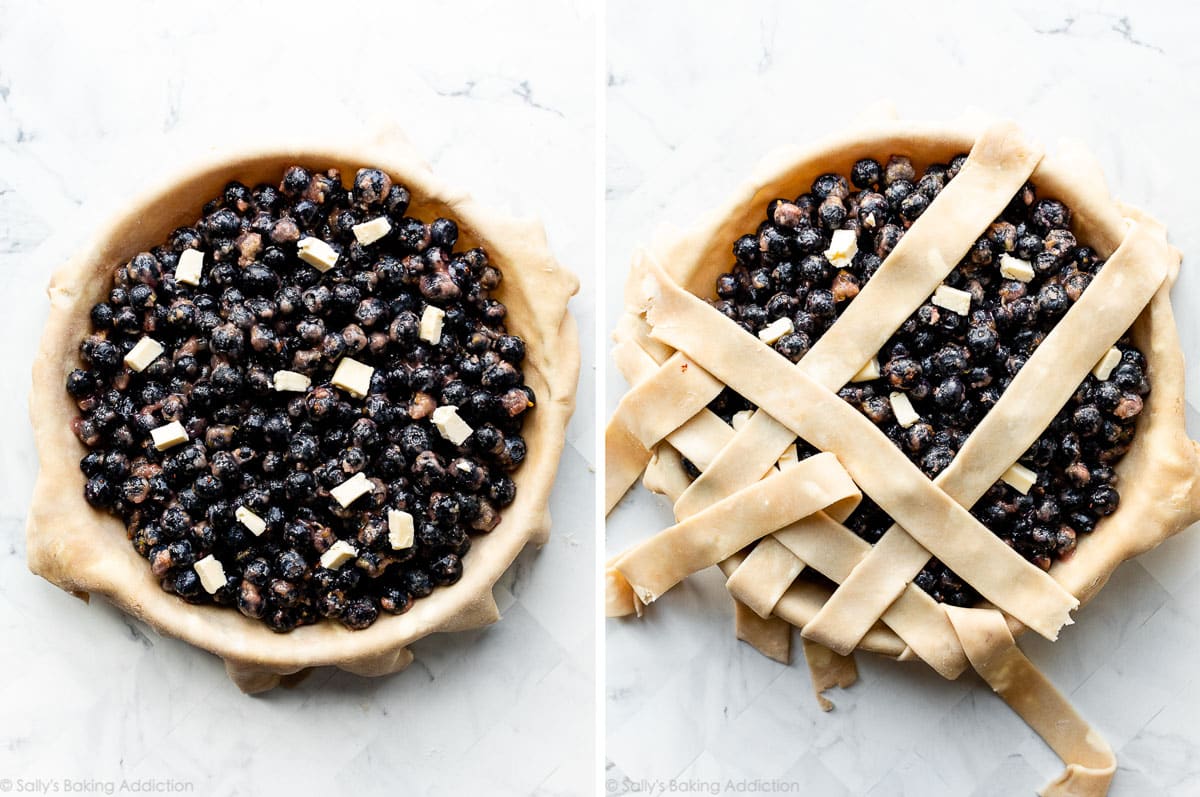
- Roll out the chilled pie dough: On a floured work surface, roll out one of the discs of chilled dough (keep the other one in the refrigerator). Turn the dough about a quarter turn after every few rolls until you have a circle 12 inches in diameter. Carefully place the dough into a 9 x 1.5 or 2-inch round pie dish. Tuck it in with your fingers, making sure it is smooth. Pour and spread filling evenly into pie dish. Dot the pieces of butter on top of the filling. Set aside at room temperature or in the refrigerator as you assemble the top pie crust.
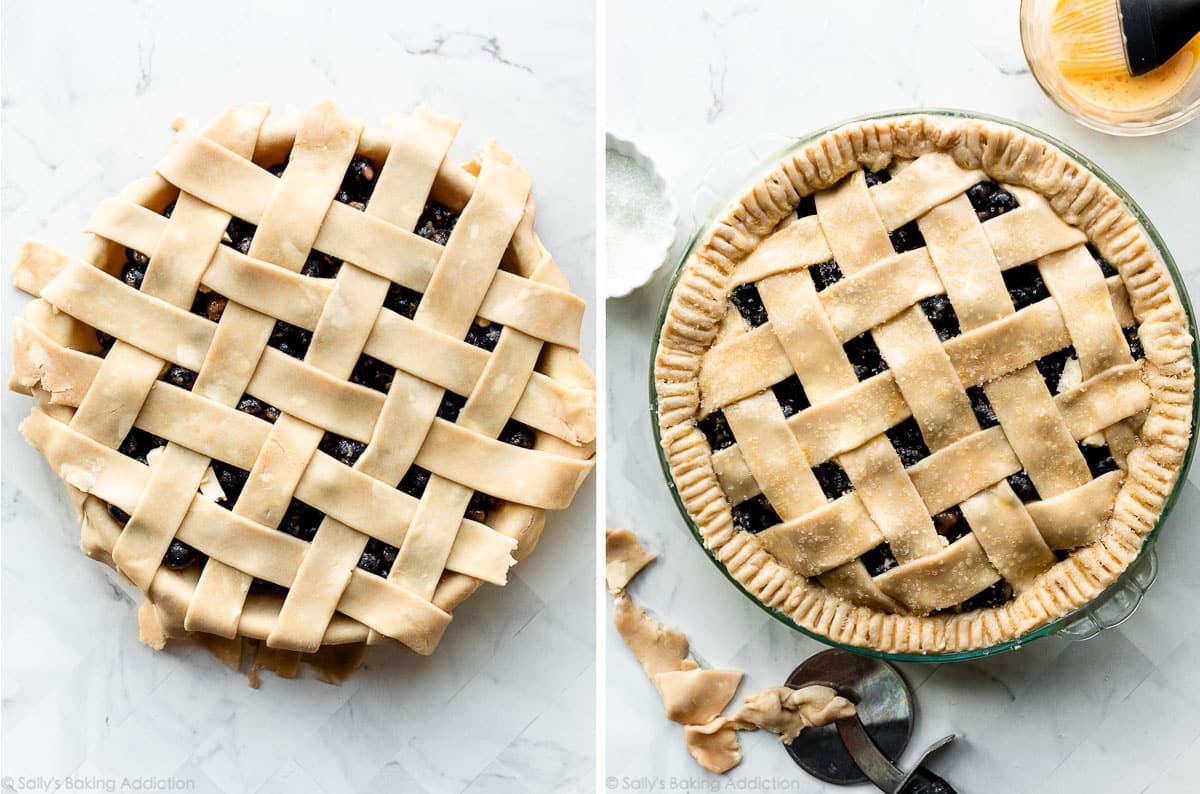
- Arrange the lattice: Remove the other disc of chilled pie dough from the refrigerator. Roll the dough into a circle that is 12 inches diameter. Using a pastry wheel, sharp knife, or pizza cutter, cut strips of dough; in the pictured pie, I cut 10 1-inch-wide strips. Carefully thread the strips over and under one another, pulling back strips as necessary to weave. (Here’s a lattice pie crust tutorial if you need visuals.) Press the edges of the strips into the bottom pie crust edges to seal. Use a small paring knife to trim off excess dough. Flute or crimp the pie crust edges with a fork.
- Lightly brush the top and edges of the pie crust with egg wash. Sprinkle the top with coarse sugar, if using.
- Bake the pie at 425°F for 25 minutes; then, keeping the pie in the oven, reduce the oven temperature down to 375°F (190°C). Place a pie crust shield (see Note for homemade shield) on the edges to prevent them from over-browning. Continue baking the pie until the filling’s juices are bubbling everywhere, including in the center, 40–50 more minutes. This sounds like a long time, but under-baking the pie means a soupy filling with paste-like flour and cornstarch chunks. If you want to be precise, the internal temperature of the filling taken with an instant read thermometer should be around 200°F (93°C) when done. Tip: If needed towards the end of bake time, remove the pie crust shield and tent an entire piece of foil on top of the pie if the top looks like it’s getting too brown.
- Remove pie from the oven, place on a cooling rack, and cool for at least 4 hours before slicing and serving. Filling will be too juicy if the pie is warm when you slice it.
- Cover leftovers tightly and store in the refrigerator for up to 5 days.
Notes
- Make Ahead & Freezing Instructions: This a great pie to make 1 day in advance, because the filling will have time to set overnight. The pie crust dough can also be prepared ahead of time and stored in the refrigerator for up to 5 days or in the freezer for up to 3 months. Feel free to prepare the filling 1 day in advance. See end of step 2. Baked pie freezes well for up to 3 months. Thaw overnight in the refrigerator and allow to come to room temperature before serving.
- Special Tools (affiliate links): Glass Mixing Bowl | Silicone Spatula or Wooden Spoon | 9-inch Pie Dish | Rolling Pin | Pastry Wheel or Pizza Cutter | Zester | Citrus Juicer | Pastry Brush | Sparkling Sugar | Pie Crust Shield | Instant Read Thermometer | Cooling Rack
- Blueberries: You need 6 cups (3 pints) of blueberries, which is about 2 lbs. (about 860g) total. I strongly suggest using fresh blueberries, not frozen. If you decide to use frozen, do not thaw first. The pie will take several more minutes in the oven if using frozen berries.
- Sugar: If your blueberries aren’t super sweet, such as in the wintertime, feel free to add another few Tablespoons of sugar. I find 2/3 cup (135g) is the perfect amount for sweet summer blueberries. You can increase to 3/4 cup (150g) if needed.
- Aluminum Foil Pie Crust Shield: You can purchase a pie crust shield or make one from aluminum foil. Cut a 14-inch square of aluminum foil. Fold in half. Cut out a 5-inch semi-circle on the folded edge. Unfold. Carefully fit the aluminum foil over the pie crust edges, securing down on the sides as best you can (careful, the pie is hot!), leaving the center of the pie exposed.
- Updated in 2022: The recipe you see above was very slightly updated in 2022 to produce a thicker, less soupy filling. The old recipe did not call for flour and instead used 1/4 cup (28g) of cornstarch. The old recipe also baked for less time (about 60 mins total), which is why the filling was often too runny. For a jammy, yet sliceable filling, bake the pie as instructed above in step 7.


Reader Comments and Reviews
I am wondering if freezing an unbaked pie will produce good results as well.
Hi Nancy, we do not recommend freezing the unbaked pie. It will become too wet and mushy during the thawing process. Freezing a baked and cooled pie works wonderfully, though!
This was the BEST blueberry pie! For me, the lemon zest put it over the top and gave the blueberries a deeper flavor. This is now my go-to fruit pie.
Sound great will try..
Hi! Can you make ahead and freeze this pie?
Hi Maria, Baked pie freezes well for up to 3 months. Thaw overnight in the refrigerator and allow to come to room temperature before serving.
What do you suggest for making a blueberry pie in the wintertime? I’m in Maine which produces the sweetest lowbush blueberries in the world (bias I’m sure 😉 ) but at this time of year fresh blueberries are coming from Mexico and sweetest is variable often non-existent. Should I use frozen which “might” be more consistently sweet but might not or is there enough sugar to offset the possible tartness of the fresh blueberries? My older neighbor snowblows my walkways for me and the only thing he asked for in the fall as repayment was a blueberry pie. 🙂 We have a big snowstorm coming and I’d like to make the pie he asked for before the end of the real winter season. I may make another for him when our blueberries are ripe but timely repayment is important. Thank you for what appears to be great instructions for a wonderful pie. I’m definitely going to make the recipe I just needed advice on which berries you would use. Thank you!!
Hi Margaret! We would take a chance on the fresh blueberries, knowing the pie won’t be *quite* as sweet as it would be during peak blueberry season.
Awesome!! Thank you so much for the quick reply!
Hi! So I made the pie it was fabulously delicious can I substitute the blueberries for raspberry’s maybe?
Hi Cleo, we wouldn’t recommend using all raspberries. They are very wet and it would require some additional tweaks to ensure the filling baked and set properly. However, you could replace some (no more than half) of the blueberries with raspberries. Since they are quite wet/juicy, you may need to add a few minutes to the bake time. Hope you enjoy it!
This is an excellent pie recipe, with just the right amount of sweetness and that special taste of lemon, which goes perfectly with blueberries, plus the hint of cinnamon. Great directions too
Will reheating it before serving cause it to become soupy again? What’s the best way to reheat? Nothing better than warm pie with cold ice cream
Hi Jasmine, no, it won’t cause it to be soupy again! Feel free to reheat individual slices in the microwave and then top with ice cream. Enjoy!
The filling was perfect. Letting it rest is so important. It was firm enough to cut clean pieces. The filling is a good balance of tart and sweet
I made this as mini pies today in muffin tins. My husband loves blueberry pie, but a whole pie all at once is too much for us, so making as a single serving, freezing until ready to eat and then thawing and warming in an air fryer works great. I was wondering if you thought the crust would still brown if I used parchment paper tulip liners so it’s not so messy when I remove them?
Hi Molly! We don’t usually use liners when making mini pies, but you can give it a try!
Can I blind bake the crust first?
Hi Lysa, you do not have to par-bake this crust here because the pie bakes for long enough.
Best pie ever! I’ve made this twice. I’m a total amateur baker and it turned out perfect both times. Full of buttery calories but oh so good. And not too sweet. Needs no additions- delicious as is.
This turned out SO WELL. It’s the first blueberry pie I’ve made that wasn’t soupy, so that’s a triumph. People commented that it tastes like blueberry, the sweetness is just right, and the cinnamon was a nice grace note. An excellent pie. Thank you!
Can gluten free flour be used in place of AP flour
Hi Brad, admittedly, we don’t have much experience with gluten free baking and haven’t tackled a gluten free pie crust before. Sorry we can’t be of more help here! Let us know if you give it a try.
Brad- I make this recipe but use my own GF pie dough recipe. It’s from the book “make everything gluten free” by Becky excell. Very simple pie crust that only uses GF flour (I use bobs red mill 1:1), butter, sugar, and water. After I roll out the pie dough I continue by using Sally’s pie recipe and cook as she directs. You don’t have to pre bake the gf pie dough or anything. The crust comes out perfect every time.
My additional comment: I left the leftover pie at room temperature until the next day. I heated it, only slightly, in the microwave. It was as good or better than it was fresh. FYI
Delicious! This pie turned out perfectly. I waited until it was bubbling all over and also checked with the thermometer. Then we patiently waited until it cooled. Topped with slightly sweetened whip cream, it was a hit.
This Blueberry Pie was absolutely delicious — and so simple to make!
I baked it for Thanksgiving, and despite it being my first attempt at pie, it came out beautifully. I used your wonderfully simple crust recipe—and only 1/2 cup of sugar with the blueberries—the filling was perfectly balanced and a true crowd-pleaser.
Thank you for your dedication. Every recipe I try from your site comes out fantastic, becomes an instant favorite, and usually earns enthusiastic requests for more.
I reduced the sugar to 1/3 as two thirds seemed like way too much. I found I had too many berries as well as too much powder mix – I added table spoons of water vs crushing the berries to get my mix to look like her picture. Next time I’ll reduce the berries to 5 cups and probably reduce my flour slightly. I didn’t start my heat at 425 after reading the comments that other pies burned. I kept the heat to 375 throughout and baked it for 80 mins. I also used a meat thermometer so I could see when the pie reached 200 degrees. I let the pie sit for 4 or 5 hours before cutting into it and it was perfect.
I have always been intimidated by pie crust and filling pies. I have no problem with cheesecakes or any other dessert. I finally decided to give this pie a shot for Thanksgiving and I’m so happy I finally did. First off, use a digital kitchen scale anytime you bake. I had 3 pints of blueberries but when I weighed them it was almost 100 grams more. This might not seem like a big deal, but the pie dish can only hold so much without the filling spilling out. I tasted the blueberries which were not that sweet, so I added a bit more sugar as suggested. Next time when I zest the lemon, I will add the zest to the lemon juice and then mix into the berries. Otherwise, the zest just kind of clumped in spots. Not a big deal, but makes more sense for it to be distributed throughout the filling. I did forget to add the milk to the egg wash (I splashed in some water instead) and I used a very light sprinkle of granulated sugar on top since some others said the sugar burned. I made my own foil pie shield and added that at the temperature reduction point. This pie was delicious, not very sweet like store bought pies and not runny at all. I made it the day before and let it sit overnight in the refrigerator. This pie was a success and I used Sally’s Homemade Pie Crust (with shortening) and now I finally have a crust that is not only flaky but was easy to roll out straight out of the refrigerator but also didn’t stick to the glass pie dish!
My granddaughter is going to be so excited! She’s 3.5 yrs old and announced that blueberry pie is her favorite pie for Thanksgiving. She’s never actually had blueberry pie, but that didn’t stop this grandma from making her one for Thanksgiving. I wish i could share a picture, it looks amazing and I snuck a taste of the filling and it’s so so good! I read the reviews and skipped the 425⁰ step and used a homemade crust guard after the initial 20 minutes to keep it from burning. I only had to add an extra 10ish minutes to get to 200⁰ filing temperature. I can’t wait to have a slice today. Oh, and I used Sally’s all butter pie crust recipe and it’s amazing as well!
I strongly recommend making this pie. The smell from the oven ss it was baking was amazing and the way that some of the blueberries had melted into jam was just incredible. Definitely serving it for Thanksgiving tomorrow.
I baked this pie and it turned out beautifully. I baked it this afternoon and I plan to serve it at Thanksgiving tomorrow. I’ll store it in the fridge overnight but what steps do you recommend for serving it tomorrow? Do I leave out to come to room temperature, or do I reheat the pie in the oven?
You can serve warmed or at room temperature, whatever you prefer. You can store it at room temperature overnight, that’s what we usually do!
I add about 2tbsp. Heavy cream to berry mix. Helps with acidity. Left over heavy cream for whipped cream. Or Alfredo sauce. No waste.
Where is the recipe for the crust, I have had little success so far making them and had hoped this would break the cycle but I haven’t found it.
Hi George, You can use Homemade Pie Crust (pictured above) or All Butter Pie Crust.
Hi Sally,
I have an oven with settings for convection, low bake or high bake. Do you know which is best to use?
Secondly, is it ok if I use a premade Pilsbury pie crust instead? Would I do anything differently? thanks
Hi Rita, You can use a premade crust with no changes to the recipe. We always recommend conventional settings for baking (not convection/fan). The flow of air from convection heat can cause baked goods to rise and bake unevenly and it also pulls moisture out of the oven. If you do use convection/fan settings for baking, lower your temperature by 25 degrees F and keep in mind that things may still take less time to bake.
What pie pan dimensions should I use?
Hi Scarlet! Any standard 9 inch pie dish will be great here.
I intend to make this pie for thanksgiving. I would like to be able to make it ahead of time and freeze it. However, I don’t want the top crust to be compromised in any way. Am I able to create the pie almost all the way except for the lattice crust, put it in an airtight plastic bag, freeze it, and then take it out the day before Thanksgiving and create the lattice top?
Hi Carol, in order for the top lattice to adhere to the bottom crust, you’ll have to bake it at the same time. We’d recommend making the entire pie (lattice included) and then freeze.
Skip the 425°, I made this for my culinary class and it almost burnt within 15 minutes.
I made this for my grandson’s birthday this weekend
I’m an excellent pie baker and I appreciated the reminder about mixing the blueberries. However, the baking times are very fickle. I’ve had my oven calibrated and I have an additional oven thermometer in my oven. I’m precise. My piecrust over baked at 425. By the time the filling was cooked, my crust looked horrible. I did use pie shields. Next time, I will skip the 425 step.
Has anyone subbed a streusel topping for the top? I have own extra pie crust and don’t want to make more. I think I’m going to give it a whirl and see what happens.
Hi Mary, you can use the topping from our blueberry crumble pie here. Enjoy!
Can Strawberries be used instead of Blueberries?
Hi Gary! Strawberries have a different consistency. We haven’t successfully made an all-strawberry pie that isn’t overly runny. You can try subbing out all the rhubarb for strawberry in our strawberry rhubarb pie, but again, it’s always a little too runny for our taste.
I’ve used a few of your recipes before, though never a pie recipe. The filling is excellent and the pie dough was pretty much the same as my recipe. However I’m not sure about the baking time and temp at the start—the edges of my pie burnt within 15 minutes and it only needed another 30 minutes to reach 200 degrees at 375. I am at a high altitude, so I the cooking temp may need some adjusting