

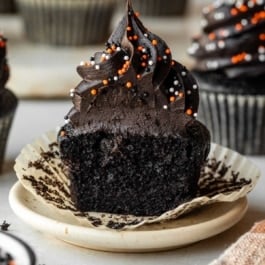
Serious chocolate lovers will adore black velvet cupcakes. These ultra-rich and fudgy chocolate cupcakes get their deep dark hue from black cocoa powder—no black food coloring needed. Just like with red velvet cupcakes, buttermilk and vinegar help create a velvety, tender texture that’s as soft as a kitten… making these the purr-fect choice for Halloween black cat cupcakes! 😉

Today’s black velvet cupcakes are as stunning as they are delicious. The jet-black color makes them perfect for Halloween (or any occasion that calls for something dramatic!). The flavor is deep, smooth, and sophisticated… think Oreo meets velvet cake. You can keep things simple with a swirl of black cocoa chocolate buttercream, or have some fun turning them into black cat cupcakes with some candies and sprinkles.
Why Black Velvet Will Be Your New Favorite Cupcake Flavor:
- Rich, fudgy, ultra-smooth chocolate flavor
- No mixer required for the batter
- Soft, tender, velvety texture
- No food coloring needed
- Fits right in with these Halloween recipes
- Cat cupcakes! Need I say more?

What Is Black Cocoa Powder?
Black cocoa, I learned, is made from cocoa beans that have been heavily alkalized—even more than regular Dutch-process cocoa. Dutch-process cocoa is washed in an alkaline solution to neutralize acidity, giving it a darker color and smoother flavor (think Oreo cookies).
Black cocoa takes this one step further. It’s ultra-Dutched, resulting in an intense black color, mellow chocolate flavor, and very low acidity. Because it’s not acidic, it doesn’t react with baking soda the same way natural cocoa does, so it’s usually paired with baking powder instead.
In this recipe, we use a precise mix of black cocoa, baking soda, baking powder, vinegar, and buttermilk. These acids and bases balance each other perfectly for a soft, velvety crumb and deep chocolate flavor. I don’t recommend any substitutions, as altering the recipe will not produce the same desired result. (And we don’t want to waste your time, effort, ingredients, and money!)
If you’d like to learn more, here’s some information on Dutch-Process vs. Natural Cocoa Powder and Baking Soda vs. Baking Powder. Both pages explain the science behind why we use these ingredients in baking.
Key Ingredients You Need for Black Velvet Cupcakes:
In addition to the black cocoa powder, here is everything else you need:

The other power players here are the vinegar, buttermilk, oil, and hot coffee. Here’s a quick rundown on why each one is so important:
- Vinegar: Vinegar (an acid) is added to red velvet cake to create a chemical reaction with baking soda (a base) that produces carbon dioxide bubbles. These gas bubbles expand as the cake bakes, creating a fluffy crumb that’s light, airy, and “velvety” in texture. Same situation in today’s cupcakes.
- Buttermilk: The acidity from both the vinegar and buttermilk also interferes with gluten development, which has a tenderizing effect. We want our cupcakes to taste tender and moist, not tough and chewy. If you can’t find buttermilk in the grocery store, try this DIY buttermilk substitute.
- Oil: Cocoa powder is a very drying ingredient, so we need the moisture from oil (and buttermilk) to step in.
- Coffee: Hot liquid enhances the cocoa powder’s flavor. It also encourages it to bloom and dissolve appropriately. If you don’t drink coffee, you can use hot water. For deeper and richer flavor, though, use coffee—you can’t taste it. (And decaf coffee works!) You use it in this chocolate cake recipe, too.
Now Let’s Bake Some Cupcakes!
Making the cupcake batter is as simple as whisking together the dry ingredients, whisking together the wet ingredients, and then combining the two.
Expect a thin batter: Cocoa powder takes the place of some flour, so that’s why there is so little flour in today’s batter. The batter is very thin, so I recommend using a bowl with a pour spout, so you can easily pour the batter into the cupcake liners.

Success tip: Fill your cupcake liners only 2/3 to 3/4 full. Trust me, you don’t want to fill them any higher, or they will overflow and sink in the center. This recipe makes 14 or 15 cupcakes, so line a second muffin pan with 2 or 3 additional liners, or bake in batches.

Black Chocolate Buttercream Frosting
This frosting is just like my favorite chocolate buttercream, but black cocoa gives it an extra-dark color and a smooth, Oreo-like chocolate flavor. We found that the black cocoa buttercream benefited from a touch more heavy cream to smooth out properly, and that recipe is below.
You can pipe it on your cooled cupcakes, or simply spread it with a knife. And if you’re turning them into black cats, see below. 😉

How to Decorate Black Cat Cupcakes
We used a large open star tip, Ateco 826, for the pictured cupcakes. A smaller version that produces a similar look is Wilton 1M. (Any open star tip works, though!) After piping the frosting, we sprinkled black sanding sugar on top for a hint of shimmer and a “furry” texture.
For the cat’s features, you need a few simple candies and sprinkles.
- Ears: Use a sharp knife to cut 2 rectangle pieces of a Hershey’s milk chocolate bar into 2 triangles.
- Eyes: Use yellow Reese’s Pieces. To make the pupils, transfer a small amount of the black chocolate frosting into a small bowl, and whisk in a little water to thin it out slightly. Then use a toothpick to “paint” skinny lines on the Reese’s Pieces.
- Nose & Whiskers: Pick up a sprinkle mix like this. Use the large orange ball sprinkle for the nose and the long orange jimmies/strands for the whiskers. Tweezers make placement easy.
It’s such a fun, approachable way to turn chocolate cupcakes into adorable black cats. Perfect for Halloween and easy enough for beginners:


Black Velvet Cupcakes
- Prep Time: 40 minutes
- Cook Time: 20 minutes
- Total Time: 3 hours
- Yield: 14-15 cupcakes
- Category: Dessert
- Method: Baking
- Cuisine: American
Description
These ultra-rich and fudgy black velvet cupcakes get their deep dark hue from black cocoa powder—no black food coloring needed. Just like with red velvet cupcakes, buttermilk and vinegar help create a velvety, tender texture that’s as soft as a kitten… making these the purr-fect choice for Halloween black cat cupcakes!
Ingredients
Cupcakes
- 1 cup (125g) all-purpose flour (spooned & leveled)
- 1/2 cup (42g) black cocoa powder (a dark, Dutch-process cocoa)*
- 1/2 teaspoon baking powder
- 1/2 teaspoon baking soda
- 1/2 teaspoon salt
- 1 cup (200g) granulated sugar
- 1/2 cup (120g/ml) buttermilk*, at room temperature
- 1/3 cup (75g/80ml) vegetable oil
- 1 large egg, at room temperature
- 1 teaspoon pure vanilla extract
- 1/2 teaspoon distilled white vinegar
- 1/2 cup (120g/ml) hot coffee* (decaf is fine) or hot water
Frosting
- 1 cup (16 Tbsp; 226g) unsalted butter, softened to room temperature
- 3 and 1/2 cups (420g) confectioners’ sugar
- 1/2 cup (42g) black cocoa powder (a dark, Dutch-process cocoa)*
- 4–5 Tablespoons (60–75g/ml) heavy cream or milk, at room temperature
- 2 teaspoons pure vanilla extract
- 1/8 teaspoon salt
Instructions
- Make the cupcakes: Preheat the oven to 350°F (177°C). Line a 12-count muffin pan with cupcake liners. This recipe yields 14–15 cupcakes, so line a second muffin pan with 2 or 3 more liners (or bake in batches).
- In a medium bowl, whisk together the flour, cocoa powder, baking powder, baking soda, and salt. Set aside.
- In a large bowl, preferably with a pour spout, whisk together the sugar, buttermilk, oil, egg, vanilla, and vinegar until combined. Pour the dry ingredients into the wet ingredients, add the hot coffee, and whisk until the batter is completely combined. The batter will be thin.
- Pour the batter into the liners, filling only 2/3 to 3/4 full to avoid overflowing and sinking.
- Bake for 20–22 minutes, or until a toothpick inserted in the center comes out clean. Another way to test for doneness is to lightly press your finger into the surface of the warm cupcake. If the cupcake bounces back, they’re done. If your finger leaves an imprint, they need more bake time.
- Allow cupcakes to cool in the pan for 10–20 minutes, and then transfer to a cooling rack to cool completely before frosting.
- Make the frosting: With a handheld or stand mixer fitted with a paddle attachment, beat the butter on medium speed until creamy, about 2 minutes. Add confectioners’ sugar, cocoa powder, 1/4 cup (60g/ml) of the cream, vanilla, and salt. Beat on low speed for 30 seconds, then increase to high speed and beat for 1 full minute. If the frosting seems too thick, beat in another Tablespoon of cream.
- Frost cooled cupcakes and top with sprinkles, if desired. You can swipe the frosting on with an icing knife or use a piping tip such as Ateco 826. For cat cupcakes, see recipe Note.
- Store cupcakes at room temperature for up to 2 days or in the refrigerator for up to 4 days. I recommend a cupcake carrier for storing and transporting decorated cupcakes.
Notes
- Make Ahead Instructions: You can bake the cupcakes 1 day in advance. Keep cupcakes covered tightly at room temperature and frost the day of serving. Unfrosted cupcakes can be frozen for up to 2 months. Thaw overnight in the refrigerator and bring to room temperature before frosting and serving.
- Special Tools (affiliate links): 12-cup Muffin Pan | Cupcake Liners | Mixing Bowls with Pour Spout | Whisk | Cooling Rack | Electric Mixer (Handheld or Stand) | Piping Bag (Reusable or Disposable) | Ateco 826 Piping Tip or Wilton 1M Piping Tip | Cupcake Carrier
- Black Cocoa Powder: For the pictured cupcakes, I used this black cocoa powder. King Arthur also makes a black cocoa powder. If you can’t find it, you can use any Dutch-process cocoa powder, but the cupcakes and frosting won’t be as dark.
- Buttermilk: Buttermilk is required for this recipe. You can make your own DIY buttermilk substitute if needed. Add 1 teaspoon of white vinegar or lemon juice to a liquid measuring cup. Then add enough whole milk to the same measuring cup until it reaches 1/2 cup. (In a pinch, lower-fat or nondairy milks can work for this soured milk, but the cupcakes won’t taste as moist or rich.) Stir it around and let sit for 5 minutes. The homemade “buttermilk” will be somewhat curdled and ready to use in the recipe.
- Hot Coffee: Hot liquid enhances the cocoa powder’s flavor. It also encourages it to bloom and dissolve appropriately. I promise these cupcakes don’t taste like coffee at all! If you don’t drink coffee, you can use hot water. For deeper and richer flavor, though, use coffee (regular or decaf, but make sure it’s black with no sugar or cream). You can either brew it in a coffee maker or make instant coffee.
- Mini Cupcakes: Fill mini liners only halfway and bake for 10–12 minutes at 350°F (177°C). Yields about 3 dozen.
- Why Room Temperature? All refrigerated items should be at room temperature so the batter mixes together easily and evenly.
- Can I Turn This Into a Cake? Yes! The best option for a cake is to use this batter for a 3-layer 6-inch cake. Cupcake recipes are PERFECT for turning into 6 inch cakes. Here are the exact instructions to follow, but use this black velvet batter.
- More Success Tips: Be sure to check out my How to Use Piping Tips post for instructions on how to fill a piping bag, and you can also read my 10 Tips for Baking the BEST Cupcakes.
- Black Cat Cupcakes: To make black cat cupcakes, pipe frosting with a large open star tip (Ateco 826, Wilton 1M, or any open star tip), then sprinkle black sanding sugar on top for a touch of shimmer and a “furry” texture. For the ears, cut a Hershey’s chocolate bar into triangles and place 2 into each cupcake. For the eyes, use yellow Reese’s Pieces. Thin out a Tablespoon of the frosting with a couple drops of water in a small bowl and use a toothpick to “paint” thin vertical pupils onto each Reese’s Pieces. Place on the cat face under the ears. Finish with a large orange ball sprinkle for the nose and long orange jimmies for whiskers.


Reader Comments and Reviews
Hey Sally – I’m planning to make this recipe for a crowd (>30 people) – can it be doubled or do I have to make 2 separate batches?
Hi Donna, for best results, we recommend making 2 separate batches rather than doubling.
Can you double this recipe? Perhaps triple it?
Hi Jesi, we always recommend making separate batches for best results!
These cupcakes are just delicious! They have a deep chocolate flavor and fantastic texture, so moist and the frosting is out of this world. I had the neighbor girl come over and decorate them for me. The directions for the cat really makes it easy…of course my neighbor has gotten several blue ribbons at the county fair!
I’ve tried several of the recipes on this site and all of them have turned out great. This has become my go to site for baking. Thank you Sally!
I very rarely leave recipe reviews but I just want to say that if you’re even slightly on the fence about making these, DO IT. Black cocoa powder is a bit pricey so I was hesitant at first but I think this is going to be my go-to chocolate cupcake recipe from now on – it’s light and fluffy and doesn’t have that super intense chocolate flavor that you expect from a dark chocolate baked good. 10/10, no notes.
These cupcakes are amazing! light and moist. The frosting tastes great but after whipping it up it is not as black as I thought it would be. Do you have a white/yellow cake recipe that is as light as these?
Hi Patty, we’re so glad you enjoyed the cupcakes! That can often happen with chocolate frostings; as you whip and incorporate more air, the frosting color becomes lighter. You can try whipping a bit less next time. Here is our favorite light and fluffy vanilla cupcakes recipe!
Okay, these were the BEST cupcakes to date. Exciting with the black cocoa, rich and delicious. I tried decorating with the frosting tip – it was pretty ugly for my first try but with some edible gold flakes on top nobody noticed. I will be making these again as such a nice ending to a dinner party. Huge hit. Thank you. And now I shall practice with the leftover icing I have in the fridge!
I just made a batch of these, and they are so delicious! Velvety and rich chocolate flavor. I appreciate that they aren’t overly sweet too. Definitely going to be using this recipe again. Thanks for sharing! I tried them without frosting so far, I will be adding frosting before I serve them at a birthday party tomorrow. Thank you for including storing instructions for making them ahead of time.
Are these successfully made using gluten-free flour?
Hi Julia, We have not tested this recipe with gluten free flour but let us know if you give it a try.
Sally! Girl! These are divine!!! I made these and took them to my church fall festival, entered into the dessert contest, and won first place!! Everyone was going CRAZY for these amazingly chocolate cupcakes! Everyone kept asking if I used food dye
I have not been able to find black cocoa powder or Dutch process cocoa powder, am I able to use natural cocoa powder and black gel food colouring?
Hi Emma! In this recipe, we use a precise mix of black cocoa, baking soda, baking powder, vinegar, and buttermilk. These acids and bases balance each other perfectly for a soft, velvety crumb and deep chocolate flavor. We don’t recommend any substitutions, as altering the recipe will not produce the same desired result. (And we don’t want to waste your time, effort, ingredients, and money!) If you only have access natural unsweetened cocoa powder, we would use these chocolate cupcakes and add some black gel food coloring for a darker crumb. Hope this helps!
I purchased Black Cocoa from King Arthur Baking
These cupcakes turned out fantastic!!! Definitely a keeper ☺️
Hi, I’m from Portugal, and black cocoa isn’t commonly sold here. Is it possible to make the recipe with cocoa powder and add a few drops of black food coloring? Or will it dry out too much?
Hi Rute, yes, you can make them that way. Use Dutch-processed cocoa powder and add a bit of gel food coloring. Hope they turn out great!
I always keep black cocoa stocked in my pantry and add some of it to any chocolate baked good I’m making, and this is the first recipe I’ve made where the cocoa used is ALL black cocoa. I was worried it would taste too rich, but this recipe is now my go-to for chocolate cake! It was so soft, moist, fudgy, and just the right amount of richness, so it was perfect for my Halloween-themed birthday cake. My favorite part was the unassuming look my family had when they took a bite from the cake today, assuming it was like any other chocolate cake, and watching their eyes widen as it melted in their mouths and they absolutely gushed over this chocolate cake. Rather than making cupcakes, I opted to use Sally’s recommendation and made a 3 layer 6” cake. This recipe and the amount is perfect for 3 6” layers! My batter came to almost 720g, so I divided 240g into each cake pan and baked for about 15 mins in my convection oven. The layers seemed thin when I poured the batter in, but they puffed up and were the perfect size when they finished baking. This really was so divine and I encourage anyone who’s waiting for a sign to stop waiting, get the black cocoa powder (I can only ever find it online), and try this recipe. Thank you Sally for sharing this recipe with all of us!
Thank you so much for your positive feedback, Amy! We’re so glad you loved this recipe.
I was so excited when I saw this recipe! I have made these cupcakes twice in the past couple days in anticipation of a party this week. They haven’t really turned out either time- the cupcakes are completely sunken in for some reason. I’m not overfilling them and my leavening agents are fine (I’ve done other baking at the same time with no issues). Any ideas as to what could be going on?
Hi Samantha, I’m so sorry they’ve been sinking on you. That’s always disappointing, especially after testing them more than once! The batter for these does have a tendency to sink a bit if the liners are overfilled, since it’s a thin batter and very moist cupcake. I know you mentioned not over-filling them. Did you get around 14 or 15 cupcakes, or fewer? We’ve found filling each around 2/3 full is best. If you try the recipe again, you can slightly reduce the hot coffee; try 6 Tablespoons instead of 1/2 cup (8 Tbsp). I really appreciate you sharing your experience, and I hope your next batch turns out just right.
Hi Sally, thank you for this recipe, I’m going to make it for a Halloween party. I’d like to make this into a cake instead. I read your response to other comments, but I do have have 6-inch cake pans. *Would you recommend this same batter for 2 8-inch pans or 2 9-inch pans?* Those are my 2 options.
And, would the amount of frosting in this recipe be the right amount for an 8 or 9 inch 2-layer cake as well?
Thank you for your guidance!
Hi Aish, This wouldn’t be enough batter for a two layer 9 inch cake and a 2 layer 8 inch cake would still be quite thin. Here is everything you need to know about converting recipes to different Cake Pan Sizes.
Would these work well as mini cupcakes? If so do you have a recommended bake time? Thanks!
Hi Morgan, Fill mini liners only halfway and bake for 10–12 minutes at 350°F (177°C). Yields about 3 dozen.
i like the things that you make
Oh I have black cocoa powder! Can I use olive oil in this recipe?
Hi Chris, olive oil will change the flavor quite a bit. It is best to bake with a neutral-tasting oil. Avocado oil can work as well!
Regarding neutral oils, I find that vegetable oil tastes really noticeable to me – usually putrid, and it ruins my baked goods, as I struggle to taste anything but.
Which neutral oils do you recommend the most v. the least?
Thank you.
Hi Alexandria, usually when vegetable oil has a strong flavor, it is expired. We usually use vegetable or canola oil!
Have you ever thought of a filling flavor for these, if so what would it be?
Hi Jessica! A cream filling or a raspberry filling would be great, or even a peanut butter frosting filling – so many options!
I did Sally’s raspberry filling and it was heavenly.
can you make this batter into a cake? thanks.
Hi Patricia, The best option for a cake is to use this batter for a 3-layer 6-inch cake. Cupcake recipes are PERFECT for turning into 6 inch cakes. Here are the exact instructions to follow, but use this black velvet batter.
I am never able to find full fat buttermilk. Which would be better, reduced fat buttermilk or make my own with whole milk?
Reduced fat buttermilk works great!
Can I use special dark cocoa in place of black cocoa?
Hi Jessica, yes, that should be fine here. Obviously they won’t be quite as dark as the pictured cupcakes, but they should still taste good!
Can I use this recipe to make a 6 inch layer cake? If so, how would I convert the recipe? Thanks!
Yes, absolutely! Here’s our post on making 6 inch cakes from cupcake recipes.
Hi Sally,
Can I use this recipe in 2 – 9inch
Cake pans.
Hi Lynn! This wouldn’t be enough batter for a two layer 9 inch cake. Here is everything you need to know about converting recipes to different Cake Pan Sizes.
I’m looking to make these into vegan cakelets for my skeleton cakelet pan. If I use vegan buttermilk 1:1 and make my own vegan frosting, should that work for this?
Thanks!
Hi Jen, you can certainly try it. I can’t say for sure how the black velvet cakelets will taste because I have not tested this recipe with vegan buttermilk + frosting. Can you let me know how it turns out? Thank you!
Once again I’m trying to scroll through all recipes and only the first page will load. Any other number you click on just reloads page one. Please let me know how I can fix this.
Hi Melissa, We are sorry you are still having trouble. We are unable to replicate this issue, can you please email us at sally@sallysbakingaddiction.com and we can try to help troubleshoot?
Instead of coffee, could I add espresso powder to the dry ingredients and use hot water? If so, how much would you recommend using?
Absolutely. I recommend using 1 teaspoon of espresso powder in the dry ingredients. Or you can mix the espresso powder with the hot water and add it. Either way works!
Sally, do I need to make any changes to this recipe if I prefer a cake to cupcakes?
Hi Jill, just switch the pans you use. The best option for a cake is to use this batter for a 3-layer 6-inch cake. Here are the exact instructions to follow, but use this black velvet batter. Let me know how you like it!
Would I be able to make 1 8 inch round vs cupcakes?
Hi Heather, this amount of batter is too much for an 8-inch round cake pan. I recommend a 10-inch round pan. A 9-inch round pan may be too small, but a 9-inch square may work.
Can these black velvet cupcakes be made into a cake?
Hi Kathy! The best option for a cake is to use this batter for a 3-layer 6-inch cake. Cupcake recipes are PERFECT for turning into 6 inch cakes. Here are the exact instructions to follow, but use this black velvet batter.
Hello for the black buttercream did you need any gel food coloring?
I’d love to make these cupcakes,but with a cookies and cream type frosting with crushed Oreos. Do you have a recipe for a frosting like?
Hi Linda, you can fold chopped Oreos into this frosting (though piping would be difficult). Or try a swirled buttercream, but use the black cocoa in the chocolate buttercream. Just like this.