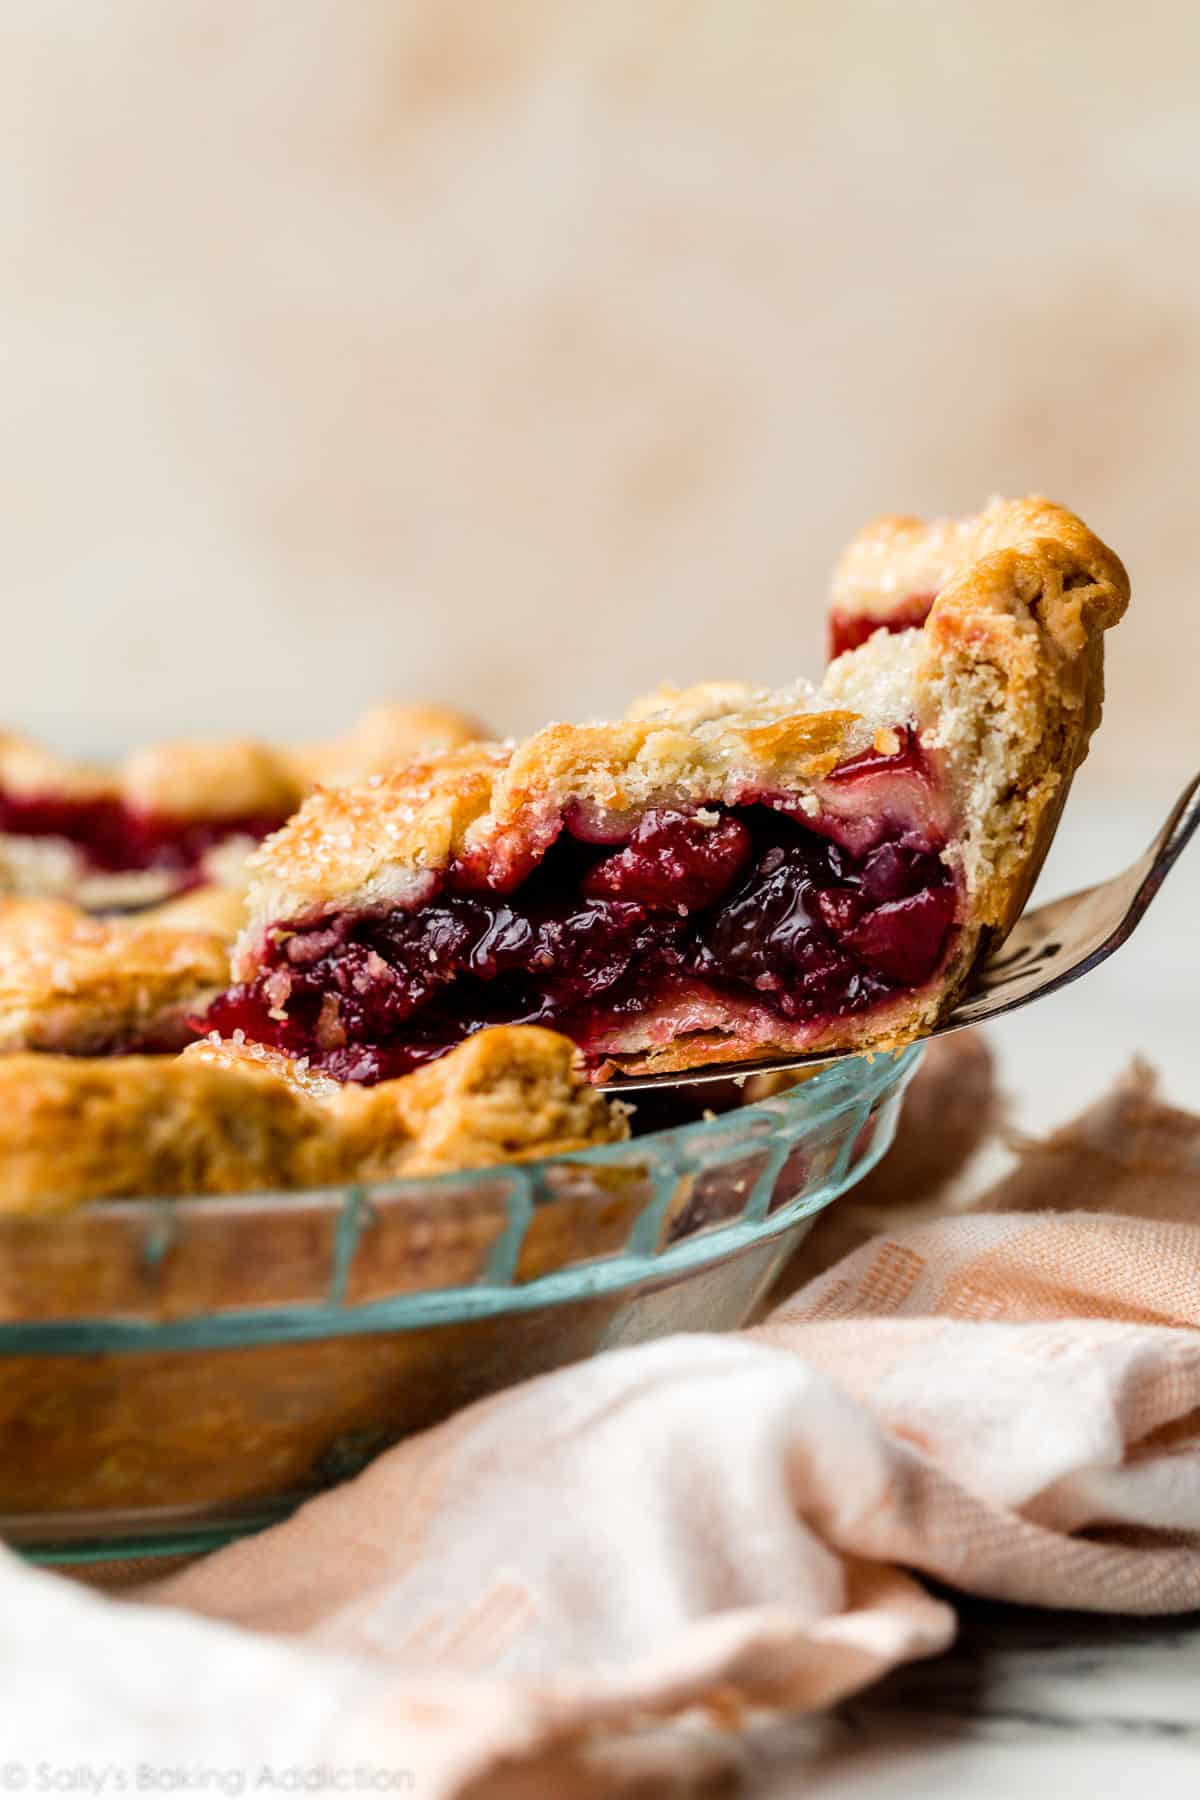
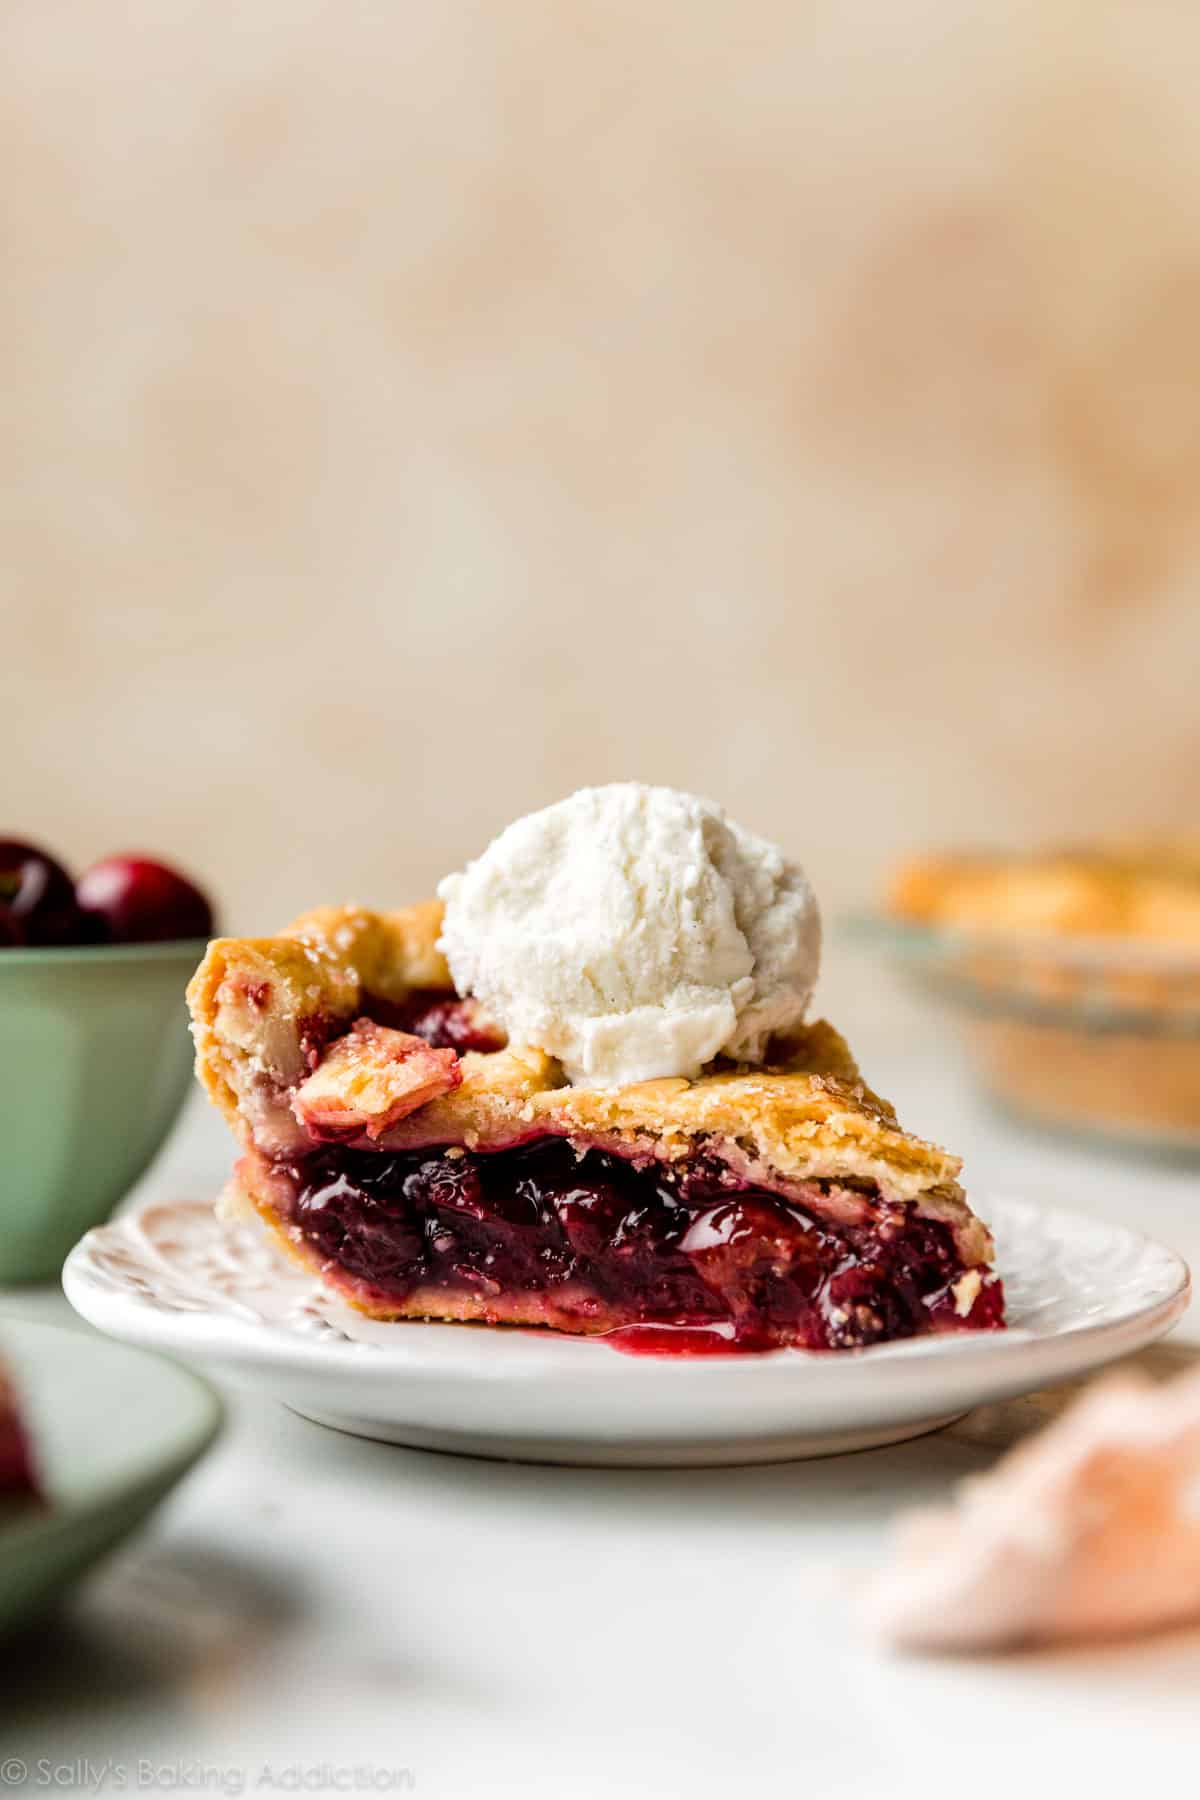
This recipe is better than ever. My homemade cherry pie is perfectly sliceable with a thick almond-hinted cherry pie filling and a golden brown buttery flaky pie crust. The ingredients are exactly the same as when I originally published the recipe in 2017, but quartering *some* of the cherries instead of just halving and reducing some juices on the stovetop both guarantee that the pie filling will set up perfectly. As always, wait for the pie to cool completely before slicing, which is another non-negotiable that helps avoid a soupy pie filling.
No store-bought pie filling or pie crust because today we’re making cherry pie completely from scratch. Does making homemade pie intimidate you? I promise this dessert specialty is nothing to fear and that’s exactly why I’m sharing my recipe with you. Out of all pie flavors, cherry pie is where most bakers depend on canned filling, but I’m going to teach you how to make the most of fresh cherries and a delicious crust.
Cherry Pie Details
- Flavor: While the cherry flavor is front and center in this pie, you’ll enjoy the notes of vanilla and almond as well. Vanilla and almond extracts add richness and depth and a touch of lemon juice keeps the overall flavor fresh and bright. (Without it, the filling can taste a little flat.) A scoop of vanilla ice cream and a dollop of homemade whipped cream pair perfectly on top of a slice.
- Texture: If you follow the recipe closely, this cherry pie filling is buttery, jammy, sturdy, and sliceable. You can use your favorite pie crust recipe, but I encourage you to try mine linked below. We use a mix of shortening and butter because they work together to make the BEST crust. Butter adds flavor and flakiness, while shortening’s high melting point keeps the crust tender and workable. It’s my go-to crust for apple pie and pumpkin pie, too. If you don’t want to use shortening, try this all butter pie crust recipe instead.
- Ease: It goes without saying that homemade pie is a labor of love, especially if you’re a beginner. Consider this recipe an activity—hopefully fun and definitely satisfying—and set aside several hours from start to finish. My time-saving tip is to prep the pie dough ahead of time because it needs to chill for at least 2 hours before you can roll it out. Plan accordingly if you want to include this cherry beauty in your lineup of Memorial Day recipes.
Best Cherries to Use for Cherry Pie
If you’re making cherry pie from scratch, it’s helpful to know which cherry variety works best. I usually choose a mix of rainier cherries and dark sweet cherries, but opted for all dark sweet cherries in the pictured pie. You can use all Rainier or all dark sweet. If using sour cherries, add a little more sugar as referenced in the recipe note below.
You can also use frozen halved or quartered cherries. Follow the recipe as written below and don’t skip the reducing step on the stove.
Pitting Cherries
Pitting fresh cherries is always a tedious and messy task, so if you want to save time and prep work, pick up a cherry pitter. If you’re anything like me, you don’t like stuffing your kitchen drawers with endless gizmos and gadgets, but a cherry pitter is most definitely an exception. I don’t bake with cherries often, but when I do, I’m VERY thankful for this tool.
- It’s also a timesaver if you’re baking bourbon cherry crisp and/or cherry buckle!
Reducing the Cherry Juices on the Stove Takes Less Than 10 Minutes
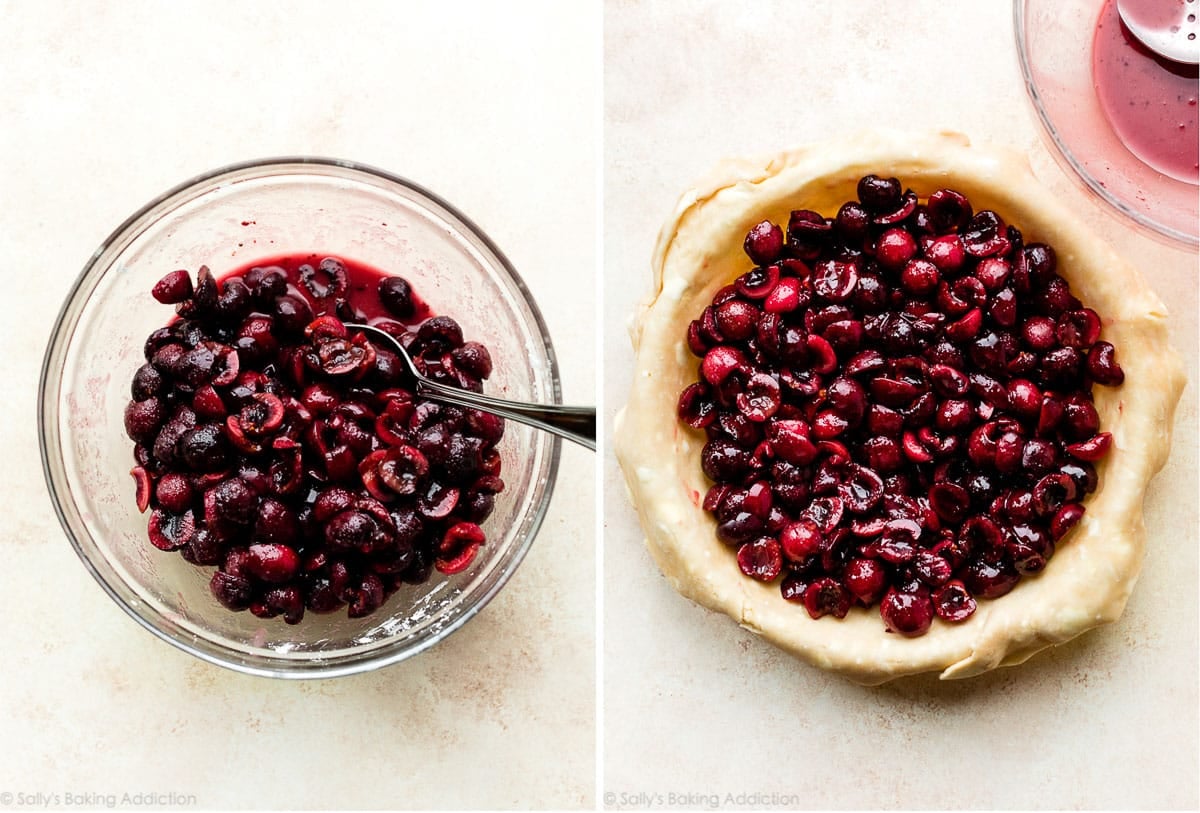
After you combine the filling ingredients together, set it aside and roll out the pie dough for your pie dish. During this time, your filling is already working as the sugar pulls juices from the cherries. Normally I discard all this juice, but it’s where a lot of the cornstarch ends up and that’s what helps thicken the filling in the oven.
Instead, use a slotted spoon to transfer the fruit into your crust, then pour the leftover juice into a small saucepan. You’ll only have a few Tablespoons, but this juice is pure GOLD as it holds our thickening agent and a lot of flavor. Reduce on the stove over low heat for about 3-4 minutes. Cool for 5 minutes, then pour over the cherries and toss gently (in your pie dough!) to combine.
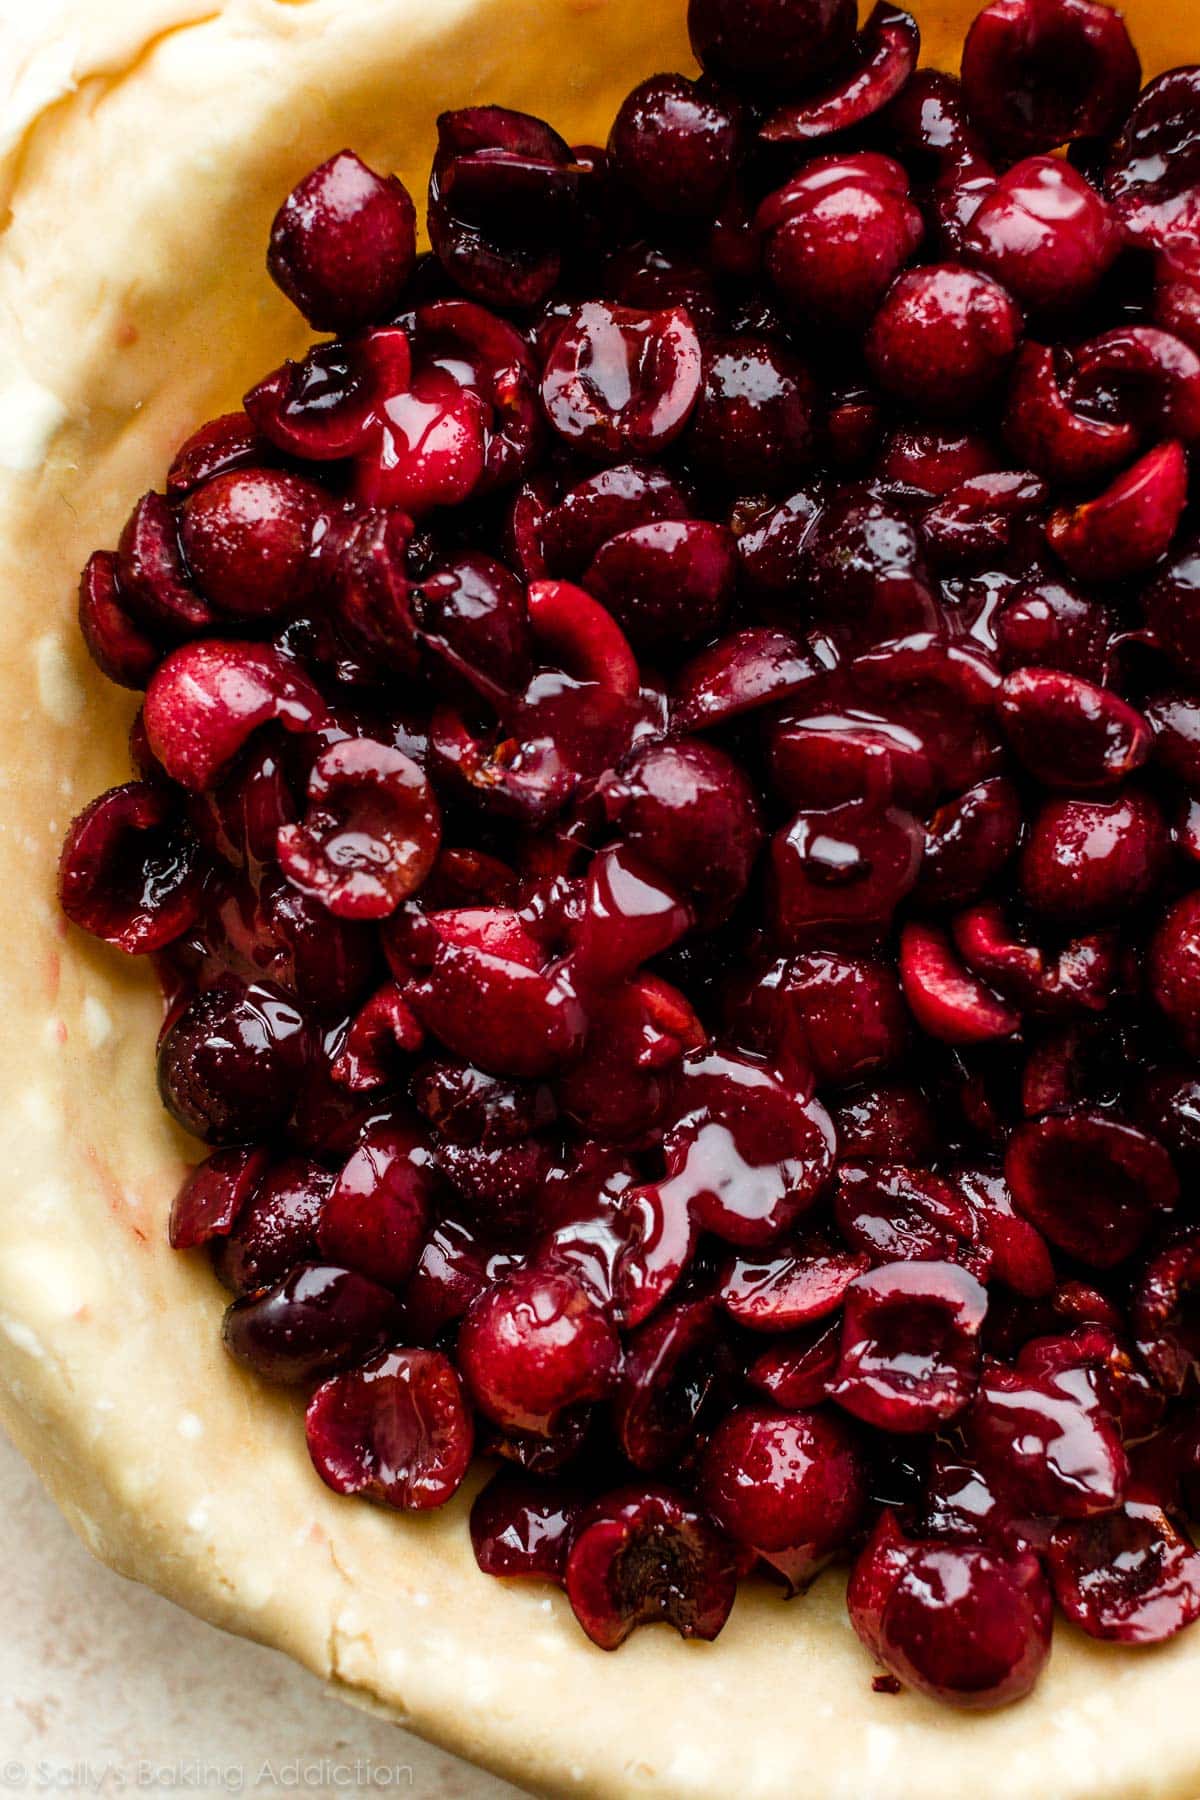
Here’s the filling in the mixing bowl. You can see all the juices at the bottom. Spoon cherries into the pie dough:
Reduce the excess juice on the stove until it has thickened:
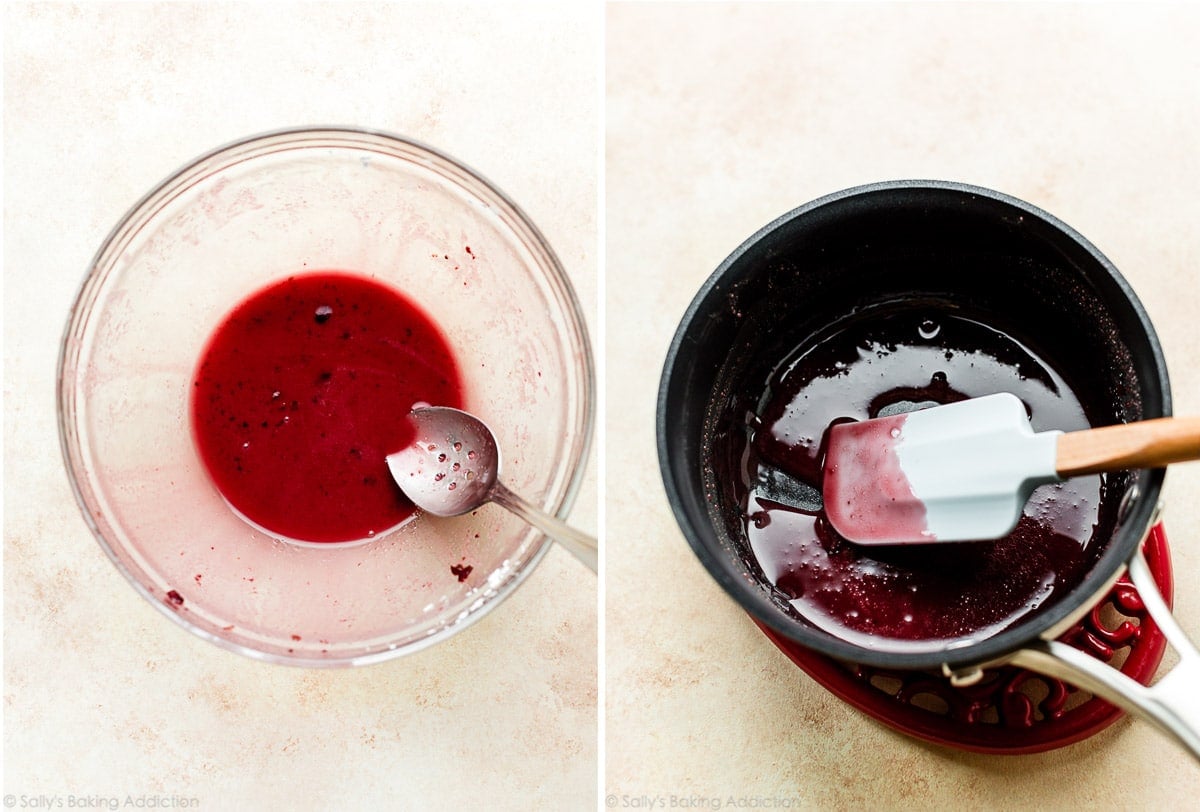
Let it cool for a few minutes, then toss into the cherries. The sugars in the reduced juice will harden and you’ll notice this “juice” become almost caramelized and stringy once it hits those cold cherries. This is NORMAL and totally fine! The “juice” will melt down in the oven, but keep the filling thick.
Don’t Forget the Extras
- Butter: Dot the pie filling with small cubes of butter before applying the top crust. Why? It adds buttery richness and actually helps prevent the formation of bubbles on the filling’s surface. We do the same thing when we make peach pie.
- Egg wash: An egg wash is egg mixed with milk (or water) and you use it pretty much whenever you’re baking pie dough or baking other shaped dough such as stromboli, vanilla biscotti, homemade bagels, choux pastry, croissants, etc. Egg wash promises a crispier crust and helps develop that signature golden sheen. Without it, dough is dull and lackluster.
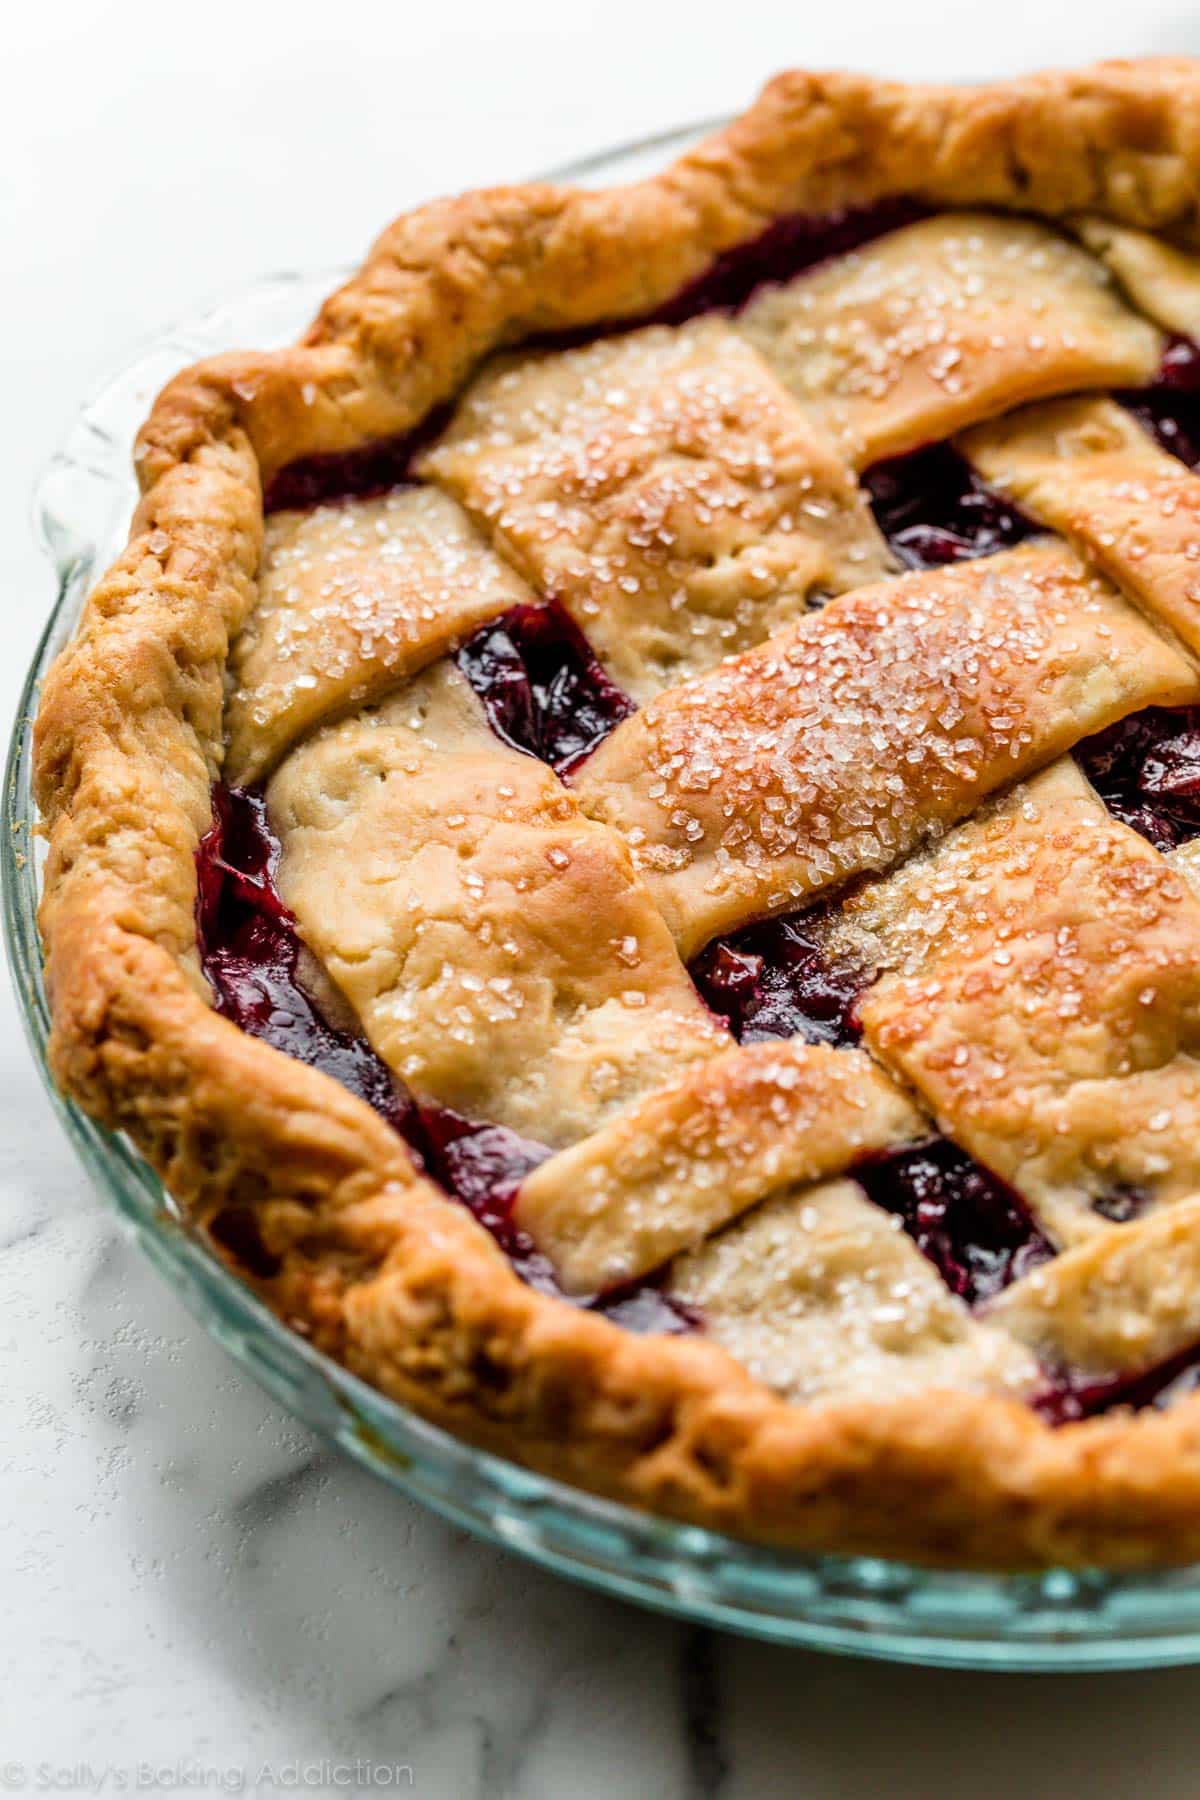
- Coarse sugar: This is optional, but I love finishing sweet pies with coarse sugar because it adds a little crunch and sparkle. I usually use Sugar in the Raw or these coarse sugar sprinkles, both of which can be found in the baking aisle of major grocery stores.
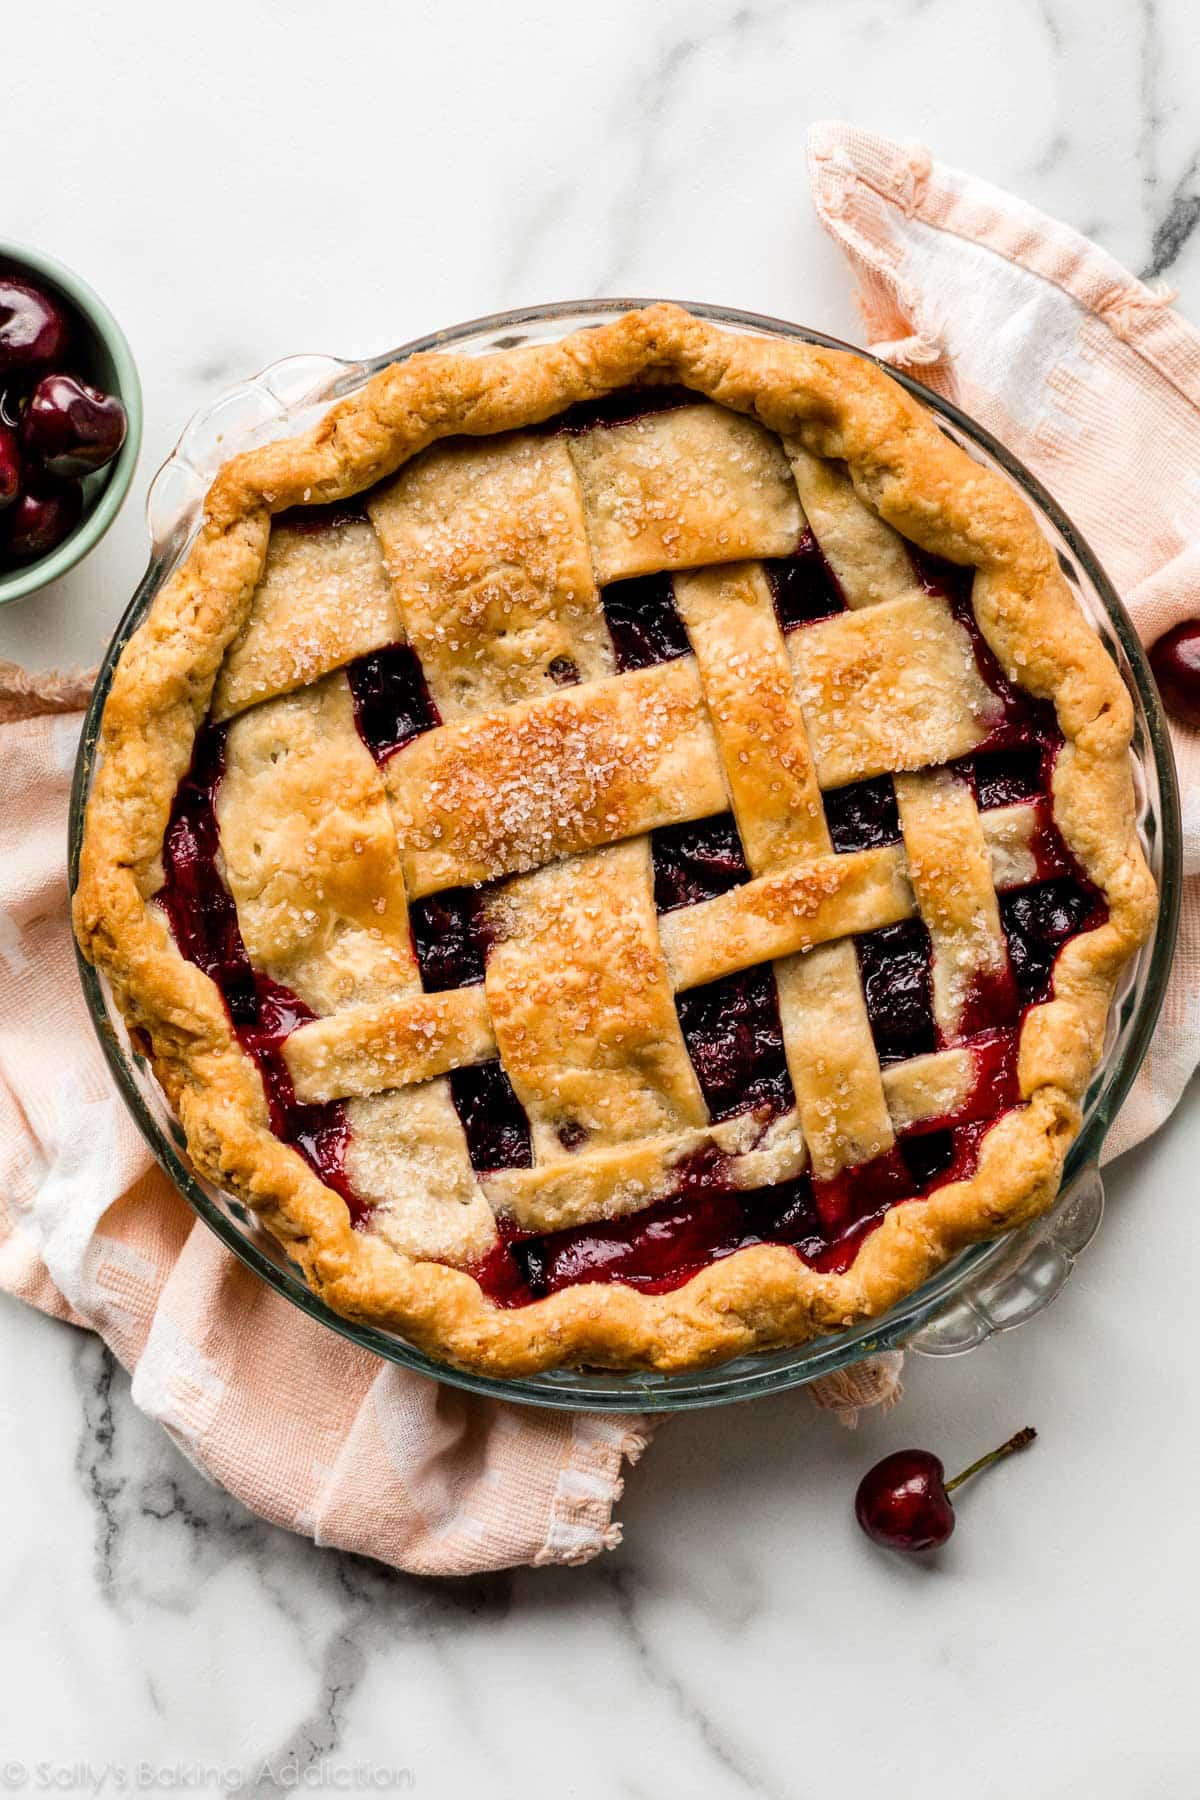
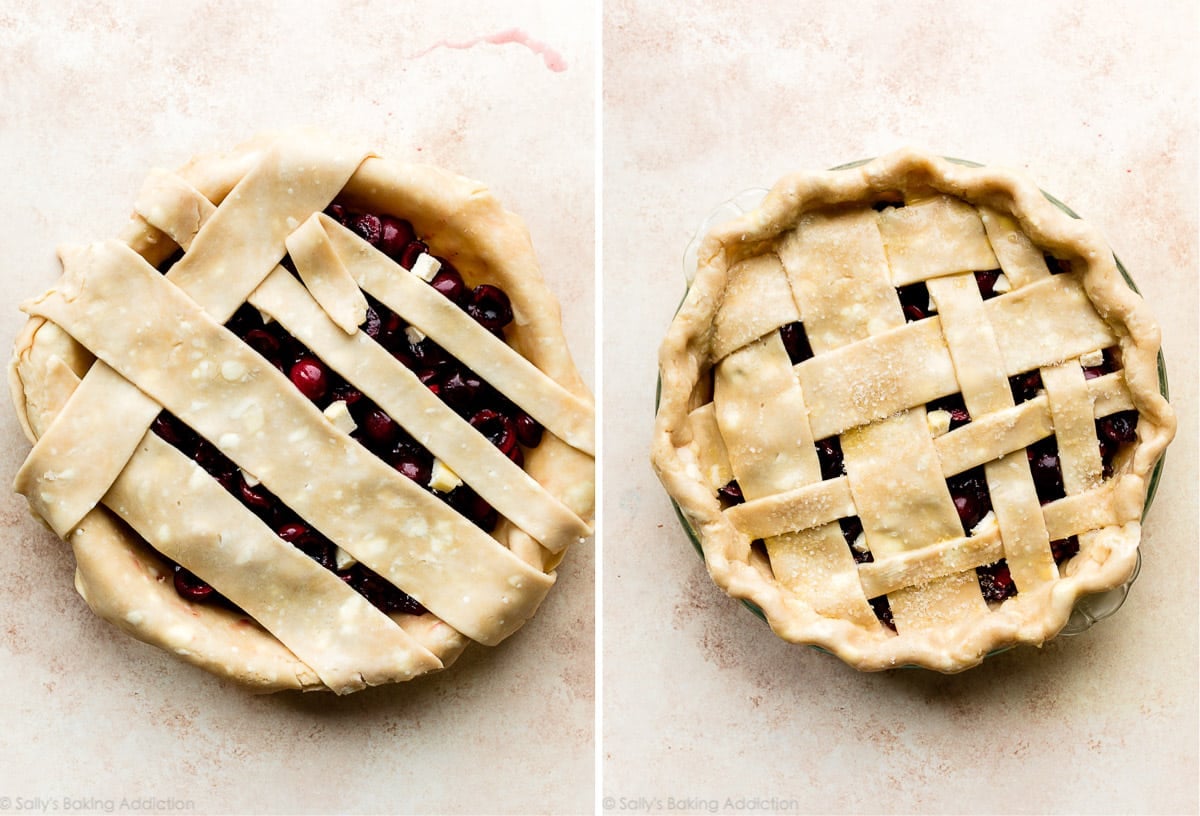
Lattice Pie Crust
Note that our pie crust recipe yields enough dough for a double crust pie—one for the bottom and one for the top. If you’re new to working with pie dough or need a little troubleshooting, our pie crust tutorial walks you through each step in thorough detail and includes a video, step-by-step photos, and all my tips and tricks for pie crust perfection.
I made a simple lattice pie crust design with thick and thin strips, but decorate the pie however you’d like. Once your lattice is assembled, you’ll want to crimp or flute the pie crust to finish it off. I fluted the pie crust in these photos.
You could even skip the top crust and use the crumble topping from our blueberry crumble pie. Or if you wish to skip the pie dough completely, try these cherry pie bars instead.
Start the Pie at a High Oven Temperature
Why do some pie recipes call for an initially hot oven temperature that you eventually lower? Baking this pie at 400°F (204°C) for 20 minutes helps the pie dough set and activates the cornstarch in the filling (as does heating it on the stove). After that, reduce oven temperature down to 375°F (190°C) to continue baking the pie. We use this same trick when we make blueberry pie.
Do I Need to Par-Bake The Crust for This Cherry Pie?
Before you begin, let me answer a FAQ we receive on this recipe. You do not need to par-bake or blind bake this bottom pie crust. Reducing the filling’s juice on the stove keeps excess liquid off the bottom pie dough, plus we bake the pie for long enough that the bottom crust sufficiently cooks through. It’s helpful to use a glass pie dish so you can see when the sides/bottom of the pie crust has browned.
See Your Homemade Cherry Pies!
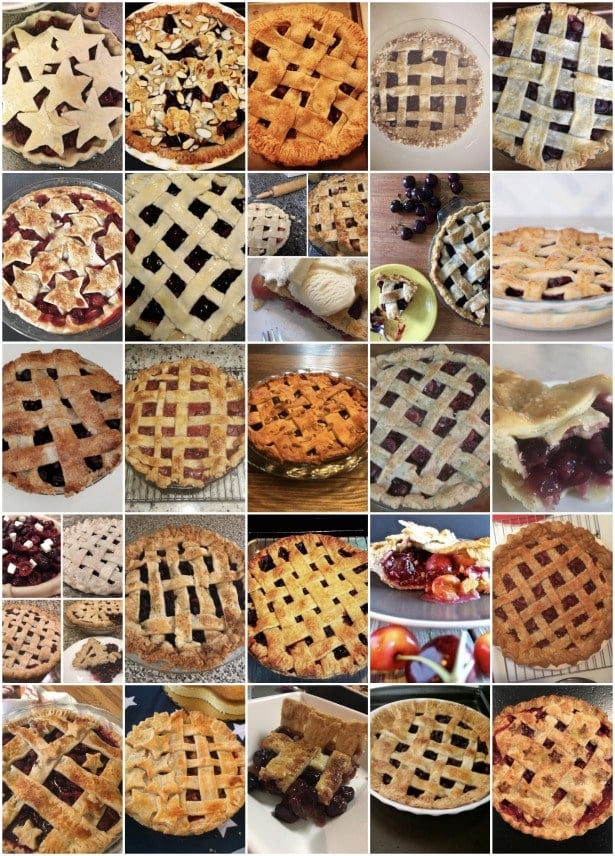
Many readers tried this recipe as part of a baking challenge! Feel free to email or share your recipe photos with us on social media. 🙂
Print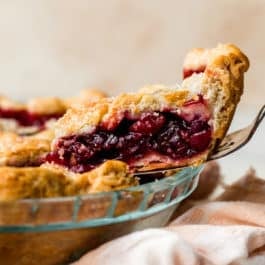
Homemade Cherry Pie Recipe
- Prep Time: 3 hours
- Cook Time: 55 minutes
- Total Time: 7 hours (includes cooling)
- Yield: 8-10 servings
- Category: Pie
- Method: Baking
- Cuisine: American
Description
This homemade cherry pie is perfectly sliceable with a thick almond-hinted cherry pie filling and a golden brown buttery flaky pie crust. The ingredients are exactly the same as when I originally published the recipe in 2017, but quartering *some* of the cherries instead of just halving and reducing some juices on the stovetop both guarantee that the pie filling will set up perfectly.
Ingredients
- Homemade Pie Crust or All Butter Pie Crust (both recipes make 2 crusts, 1 for bottom and 1 for top)
- 4 and 1/2 cups halved & quartered pitted fresh cherries (see note)
- 2/3 cup (135g) granulated sugar
- 1/4 cup (28g) cornstarch
- 1 Tablespoon (15ml) lemon juice
- 1 teaspoon pure vanilla extract
- 1/4 teaspoon almond extract
- 1 Tablespoon (14g) cold unsalted butter, cut into small cubes
- egg wash: 1 large egg beaten with 1 Tablespoon (15ml) milk
- optional: coarse sugar for sprinkling on crust
Instructions
- The crust: Prepare either pie crust recipe through step 5.
- Make the filling: In a large bowl, stir the cherries, sugar, cornstarch, lemon juice, vanilla, and almond extract together until thoroughly combined. Cover filling and place in the refrigerator as you roll out the pie dough or for up to 24 hours.
- Roll out the chilled pie dough: On a floured work surface, roll out one of the discs of chilled dough (keep the other one in the refrigerator). Turn the dough about a quarter turn after every few rolls until you have a circle 12 inches in diameter. Carefully place the dough into a 9-inch pie dish. Tuck it in with your fingers, making sure it is smooth. Use a slotted spoon to spoon and spread the cherries into the crust. Reserve the juice for the next step. Refrigerate pie, uncovered, as you reduce the juices in the next step.
- Pour the few Tablespoons of leftover juice into a small saucepan over low heat. Cook and stir for 3-4 minutes or until juice has slightly reduced and thickened. Cool for 5 minutes, then pour over cherries in filling. Do your best to gently toss together—doesn’t have to be perfect. The reduction will harden and thicken as a result of mixing with the cold cherries. This is normal and it will melt again in the oven. Dot the pieces of butter on top of the filling.
- Preheat oven to 400°F (204°C).
- Arrange the lattice: Remove the other disc of chilled pie dough from the refrigerator. Roll the dough into a circle that is 12 inches diameter. Using a pastry wheel, sharp knife, or pizza cutter, cut strips of dough—I cut four strips 2 inches wide and two strips 1 inch wide. Carefully thread the strips over and under one another, pulling back strips as necessary to weave. Press the edges of the strips into the bottom pie crust edges to seal. Use a small paring knife to trim off excess dough. Flute or crimp the pie crust edges with a fork.
- Lightly brush the top of the pie crust with the egg wash. Sprinkle the top with coarse sugar, if using.
- Place the pie onto a large baking sheet and bake for 20 minutes. Keeping the pie in the oven, turn the temperature down to 375°F (190°C) and bake for an additional 30-40 minutes or until the top crust is golden brown and the filling juices have been bubbling up around the edges or through the lattice/vents for at least 5 minutes. **After the first 20 minutes of bake time, I recommend placing a pie crust shield on the crust’s edges to prevent it from over-browning too quickly.**
- Remove pie from the oven, place on a cooling rack, and cool for at least 3-4 hours before slicing and serving. Filling will be too juicy if the pie is warm when you slice it.
- Cover leftovers tightly and store in the refrigerator for up to 5 days.
Notes
- Make Ahead / Freezing Instructions: There are a couple ways to make this pie ahead of time. Prepare the pie in full 1 day in advance—after pie cools, cover tightly and keep at room temperature. The pie crust dough can also be prepared ahead of time and stored in the refrigerator for up to 5 days or in the freezer for up to 3 months. Baked pie also freezes well for up to 3 months. Thaw overnight in the refrigerator and allow to come to room temperature before serving. Prepared filling (with juices) can also be frozen up to 3 months, thaw overnight in the refrigerator before spooning into dough and reducing the juice.
- Special Tools (affiliate links): Cherry Pitter | Glass Mixing Bowl | Rolling Pin | Pie Dish | Pastry Wheel or Pizza Cutter | Pastry Brush | Pie Crust Shield | Cooling Rack
- Cherries: You need about 1.5 lbs of cherries for this recipe. Cut half of the cherries into halves and the remaining half of cherries into quarters. Using a mix of halved and quartered cherries helps keep the baked filling in tact. You can use any variety of cherries. I use all dark sweet cherries in the pictured pie, but also enjoy using a 50/50 combination of dark sweet and Rainier cherries. Feel free to use all Rainier cherries if desired. If using sour cherries, increase sugar to 3/4 or 1 cup depending how sweet you like your pie. You can also use frozen cherries. Halve/quarter them while they’re frozen, then toss with other filling ingredients as instructed. Reduce the juices as instructed as well. Bake time may be a few minutes longer.
Keywords: cherry pie


I tried this today and did every step on this recipe and definitely the cherries need cooked first for me anyways or cut on tiny pieces
★★
The pie was made in a pan that has a moat around it. When cooled family members would suck up the juices. Not too many juices with this recipe.
Can I share a photo of it? Thanks
★★★★★
I have never made a “fresh” cherry pie before and I was disappointed that the cherries remained firm…like they weren’t cooked. We did bake it for the full time in the recipe. I put some cherries into the freezer for a second pie so hopefully this one will yield “softer” cherries
The best cherry pie recipe yet!! Thoroughly happy with spending the time to make this!
★★★★★
I have made a lot of pies in my day, but I have never made a fresh cherry pie. This recipe was perfection. Thanks so much….this is a keeper!
★★★★★
I made this but I’m curious why all other recipes call for cooked cherries and this one is left uncooked? I feel that this left out an important step. It didn’t have that juicy pie feel unfortunately.
★★★
Hi Amanda, it’s not a necessary step for this particular recipe, though you will reduce the juices. Cooking the filling made this entirely too soggy and juicy. I wonder if you cooked the pie long enough for the cherries to full break down?
This was my 1st cherry pie and 1st time the crust came out almost perfect, I couldn’t get it off the pie pan without it crumbling and sticking on the pan, however it was the best pie crust I’ve made and I’m 64 ! I am known for my desserts but gave up on pie crust decades ago, your video was inspiring and very educational , any advice will be appreciated on keeping the pie crust from sticking and the filling was a little too liquidity.
Thanks
★★★★★
I made the cherry pie with the all butter pie crust recipie as suggested and it was phenomenal! The absolute best cherry pie I’ve ever had. I can’t wait to try a sour cherry version. Thank you
★★★★★
My family really enjoyed this pie. The almond extract gives the filling a more unique flavor. The top and sides of my crust were perfect, but the bottom seemed a bit soggy. I’m wondering if it would be better to bake this without the sheet pan, so the bottom gets more baked?
★★★★★
Hi Nabeela, the baking sheet is really only there to catch any bubbled-over juices so they don’t end up burning on the bottom of the oven. You could simply place a baking sheet on the oven rack below the rack the pie is on, and that would likely solve the problem!
This recipe was amazing! The juice reduction was perfect. Made the cherry filling from this recipe, then put into two perfect pie crust galettes, absolutely perfect for the two of us. Will definitely make this again!
★★★★★
It worked out well for me! Not chalky tasting at all. I liked that it wasn’t soupy, but held together well. I used frozen cherries (and some fresh berries I had lots of), so there was lots of juice. I needed to turn the heat up to medium, so that it boiled (then stirred for four more minutes) to reduce it. Maybe that’s where it went wrong for others? I would make this again.
Terrible. I have made cherry pie the last 4 years for 7/4. Decided to try your filling. A soppy mess. Out of every 5 of your recipes I try, 4 are terrible and 1 works. For anyone else reading – save your time and use ‘joy of baking.’ This is too commercialized.
I just made this tonight and my family loved it! Wondering if it was made incorrectly? My husband said it was the best pie he ever had.
This was such a delicious pie! I made it with half fresh Bing cherries and half frozen since that’s what I had in the house. I would reduce sugar to half cup instead of 2/3 cup, as I like more of a tarter cherry flavor. This pie is not juicy, but it does have a wonderful tasting filling full of fruit. Don’t leave out the lemon juice!
★★★★★
I used the crust recipe with shortening. Very nice. The filling was perfect! Cherry pie is a bit labor intensive though so I did crust dough one day and wrapped it and let it rest in the fridge overnight. I did the same with the cherries. I washed, stemmed, pitted, cut and seasoned them and refrigerated them overnight. I did the assembly and baking the following day.
★★★★★
This recipe is missing the steps with the almond extract, etc. I got confused mid-way through
Hi Emma, see Step 2: “Make the filling: In a large bowl, stir the cherries, sugar, cornstarch, lemon juice, vanilla, and almond extract together until thoroughly combined.” Hope this helps!
Sooooo goood!!! And I might have messed up a few thing and it still turned out so yummy!
– I put the juice in the microwave to reduce (I have a limited kitchen and so-) it would have been fine- if I didn’t cook it for so long
-I think I pulled the pie maybe 15 mins easy. Which was fine too. The cherries were still firm. It was good though. Wish I could leave the photos of the pie and my son loving it . 9yrs old. He hasn’t been much for cherries and when I bought a bag he said we’re too sour- I decided to just make it a pie. And he loved it.
★★★★★
I’m not much for the pies but my boyfriend loves them, especially cherry pie. I made this one yesterday and he gave it five stars. I made it with sweet cherries. Put 1/2 cup of sugar instead of recommended in the recipe amount. It came out very good. Thanks for the recipe.
★★★★★
Hi Sally! I’ve made this recipe 3 times and the last two times came out perfect! This time, the top was flaky but the bottom is chewy and tough to cut. Any suggestions/ tips on what what wrong and how to avoid that for next time? Thanks!!
★★★★
Hi Gisella, I wonder if the pie was over-baked? Are you using glass, metal, or a ceramic pie dish? I find juicy fruit pies bake best in glass.
Is it possible to use fresh can a person use fresh cherries and can cherry pie filling together..
Hi Beth! We recommend using all fresh cherries for the best results.
You don’t need to get a cherry pitter if you don’t process lots of cherries. I use a paper clip. I’ve found the ones that are a little bigger work best.
I also made this pie for my husband for Father’s Day, and he loved it. It is absolutely delicious and not difficult to make. Just great!
★★★★★
Overall very disappointed with this recipe. The step of cooking the juices did not work out, within 5 seconds it was a hard mass from the corn starch. The pie had no juiciness and did not taste sweet at all. The crust turned out great and it was very sliceable. Was too dry.
This was the first time I ever made a cherry pie but with this recipe it will not be the last! Wow! The clear and simple instructions made it so easy to make this sinfully delicious dessert. I didn’t have cornstarch so I had to substitute arrow root powder 1:1. Came out perfect! The best cherry pie I have ever tasted – I was so proud to serve this to my family tonight! Thank you for a great recipe!
★★★★★
I loved this recipe! I used the all butter crust and made it with the crumble topping (from the blueberry pie)! My cherry pie loving brother says this is the best cherry pie he’s ever had. Thank you
★★★★★
I made this for my husband for Father’s day. I was perfect. My adult children said it was the best cherry pie they ever ate! The instructions were very helpful and easy to follow.
This is THE BEST cherry pie recipe! I made the ‘crazy for crust’ all butter crust for the pie shell.
★★★★★
Excellent pie! Very jammy and a big hit. The crust was perfect.
★★★★★
This is the best cherry pie! Your pie crust recipe made the flakiest mouth watering experience
★★★★★
I love anything from your page! I tend to love sweets too much so I wanted to make a mini version of your cherry pie. I thought it would be fun to make mini pies in a muffin pan. Instead of crust, I used phyllo dough and they turned out so perfect and delicious! I baked them at 425 for 18 minutes(I covered the top with foil once the phyllo dough was light brown). YUM!
★★★★★
I love many of the recipes you create and had high hopes for it his cherry pie. Unfortunately, it was a bust for me. I will say I prefer cooking to baking, but usually my pies are pretty good. I’ve finally perfected my pie crust recipe! However, I think where this recipe went wrong for me was the amount of cornstarch called for. My family and I agreed that you could definitely taste the cornstarch and the filling had an almost chalky consistency because of the amount the recipe called for. Despite using the 1/4 cup called for, I found the filling to still be very watery. The entire pie fell apart when we sliced into it. We let it sit at room temp for 5 hours before we cut into it. Lastly, and this is just my opinion, but I’m not a fan of lattice crusts. For a pie like this, that is very juicy and full of fruit, I felt it needed a top crust to balance the amount of fruit. Maybe that’s just my preference, but I figured it was worth mentioning.
Again, I have tried and loved many of your recipes. Thank you for sharing and please know I’m still a huge fan.
★★
Can you do a video tutorial on how to reduce juices? Thank you!
Hi Courtney, that’s a great idea! We will add it to our list of future video tutorials. Thank you!
I read this comment as I was waiting for my cherry pie to cool and hoping it wasn’t true. It is. The cornstarch flavor was too obvious and it made the filling taste very chalky. And I measured it correctly, spooned and leveled. I love Sally’s recipes but this one isn’t the best.
★★
This is such an amazing recipe. So delicious!! I substituted arrowroot powder for cornstarch 1:1 and it turned out perfect!!
★★★★★
I wanted to use arrowroot powder too so I appreciate your tip on the right ratio to use!