

These outrageously rich and indulgent chocolate sweet rolls come together with a buttery soft fresh homemade dough and brown sugar chocolate filling. They’re shaped like cinnamon rolls, but taste like flaky chocolate babka. Drizzle the warm rolls with espresso glaze or choose another topping from the suggestions below.
These make for an extra special Christmas, Mother’s Day, Easter, or Father’s Day brunch recipe!
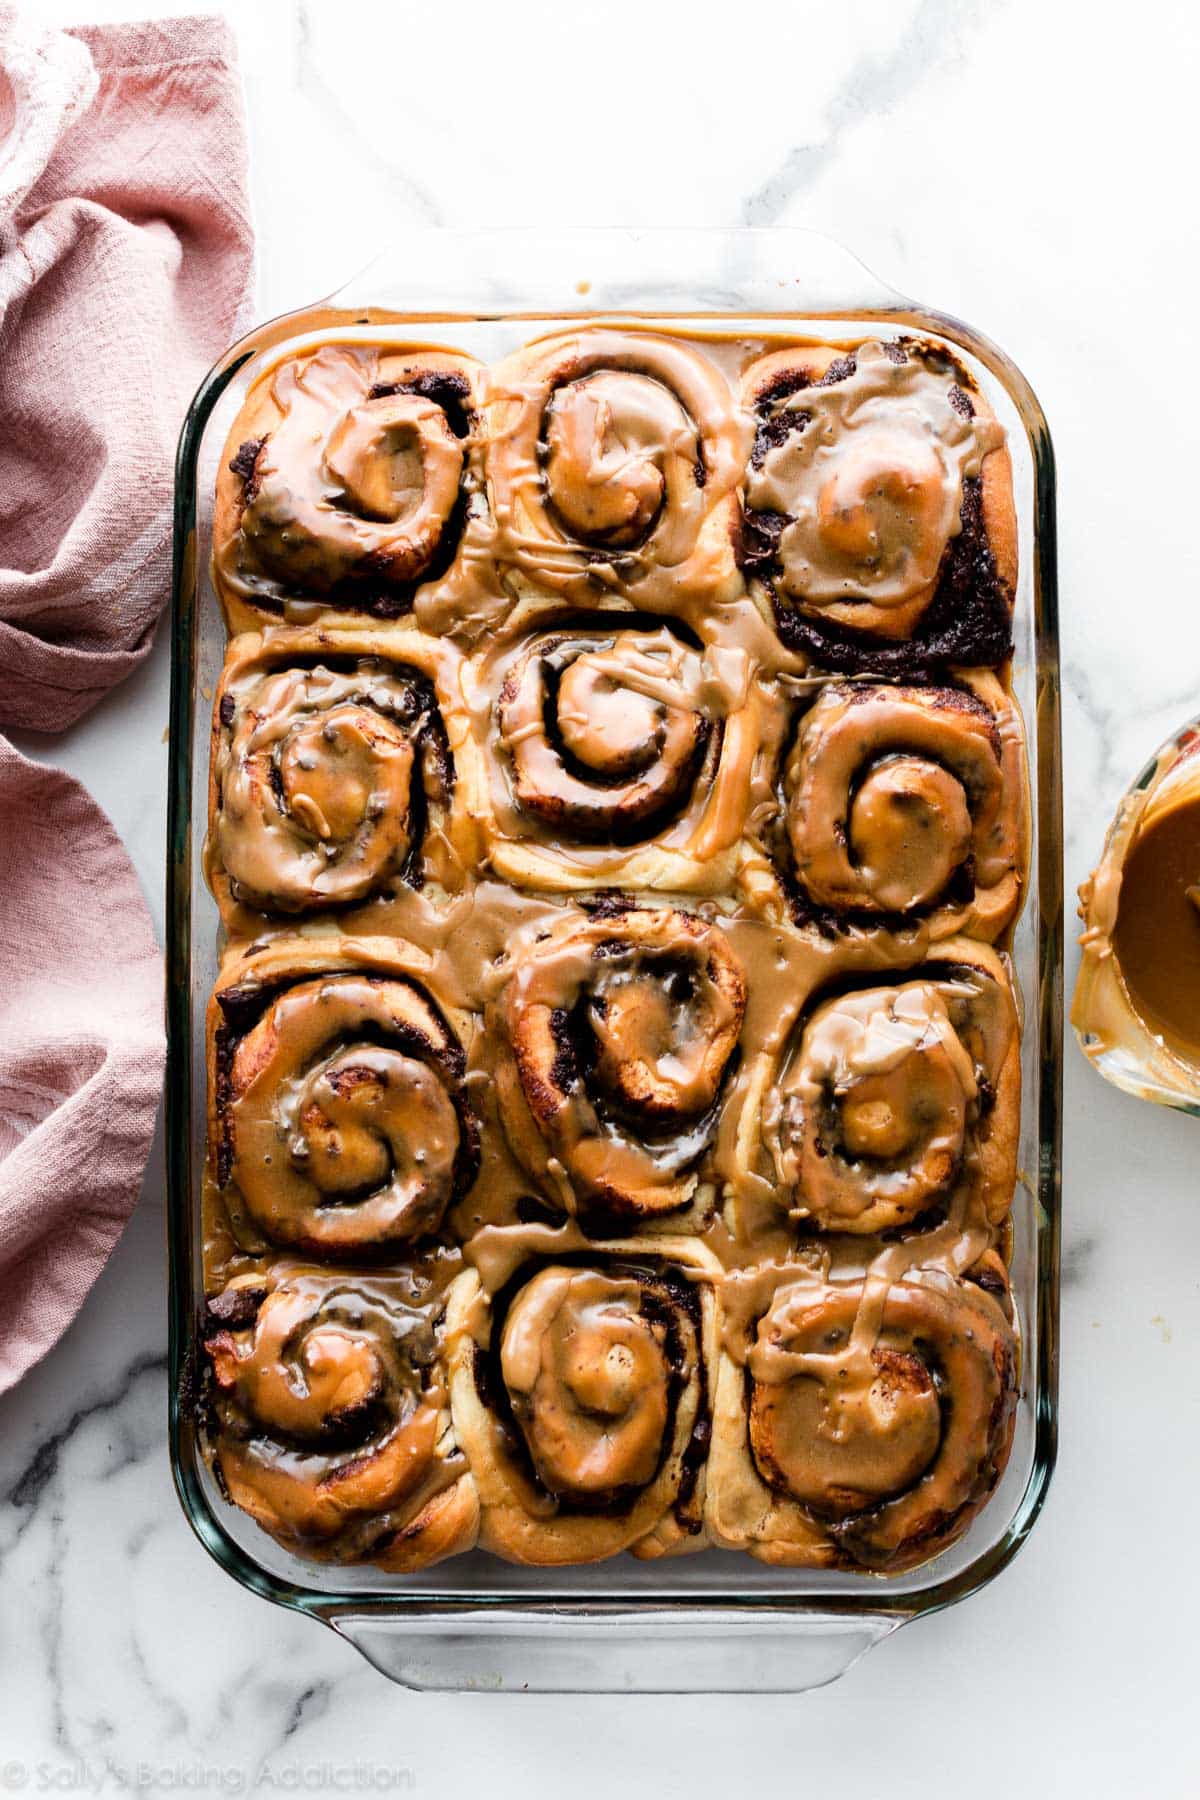
Melty chocolate, fresh dough, and espresso glaze. What’s not to love about this trio?
One reader, Veronica, commented: “Wow! This is very chocolatey! Tastes perfect with a giant glass of cold milk. Easy to make, delicious, and a great showstopper on any occasion. ★★★★★”
Another reader, Danielle, commented: “These were delicious! Absolutely loved the espresso icing on top and the dough was super easy to work with! Will certainly be making these again. ★★★★★”
Tell Me About These Chocolate Sweet Rolls
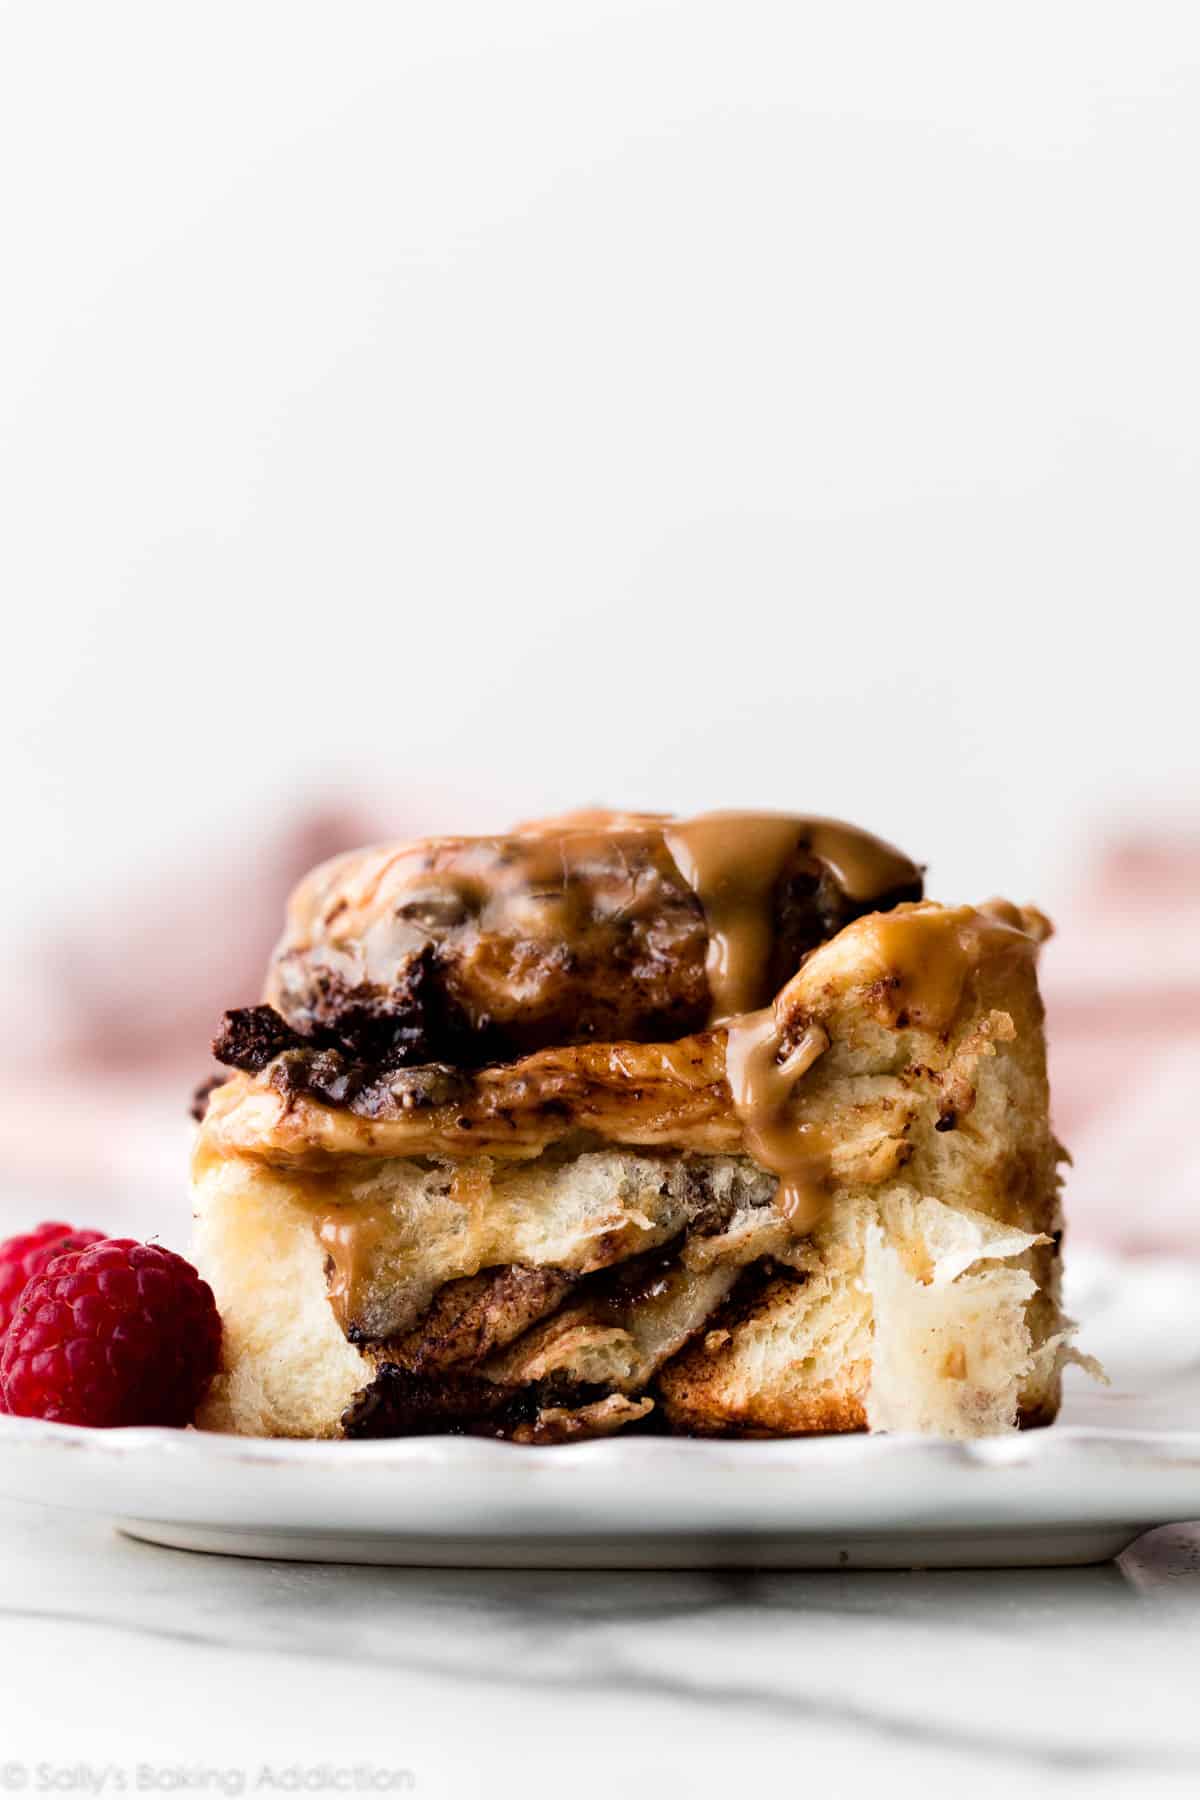
- Flavor: I often use softened butter in softer bread doughs, but opted for melted butter here. I find melted butter adds more, well, buttery flavor. This dough is sweet and so buttery—in fact, it would be fantastic completely plain. But plain’s not in our language today and we’re filling it with brown sugar, cocoa powder, a bit of cinnamon, vanilla, and lots of real chocolate. Don’t limit them to the morning hours because these chocolate sweet rolls definitely taste like dessert.
- Texture: Because there’s fat in the dough from the whole milk, eggs, and butter, the bread is extra soft, rich, and flaky. Though all-purpose flour is fine, bread flour promises extra bread-like chewiness. These textures work perfectly with the gooey chocolate swirls and smooth espresso glaze. Each bite has different twists, flakes, and pockets of melty chocolate—similar to the texture of apple cinnamon babka. They’re like warm chocolate babka rolls.
- Ease: It goes without saying that homemade bread takes time and effort. Consider these chocolate sweet rolls a fun afternoon or weekend baking project. The dough requires 2 rises, but otherwise is pretty straightforward. You can even get started the night before by following the overnight instructions. Freezing these is also a helpful way to prep ahead for a special breakfast or brunch! If you’re new to baking with yeast, review our Baking with Yeast Guide.
Use a Rich Dough for Chocolate Rolls
Before I show you how to make chocolate rolls, let’s talk about the dough. This is a rich dough, which means that it’s prepared with fat like milk, butter, and eggs. Rich doughs make soft breads such as dinner rolls, pull apart bread, and glazed doughnuts. Lean doughs, on the other hand, are made without much fat and produce crusty bread like homemade bagels, artisan bread, and pizza dough. There are so many ways to bake bread and if you want to expand your bread skills, here are all of our yeast bread recipes. (This cheese bread is a reader and team favorite!)
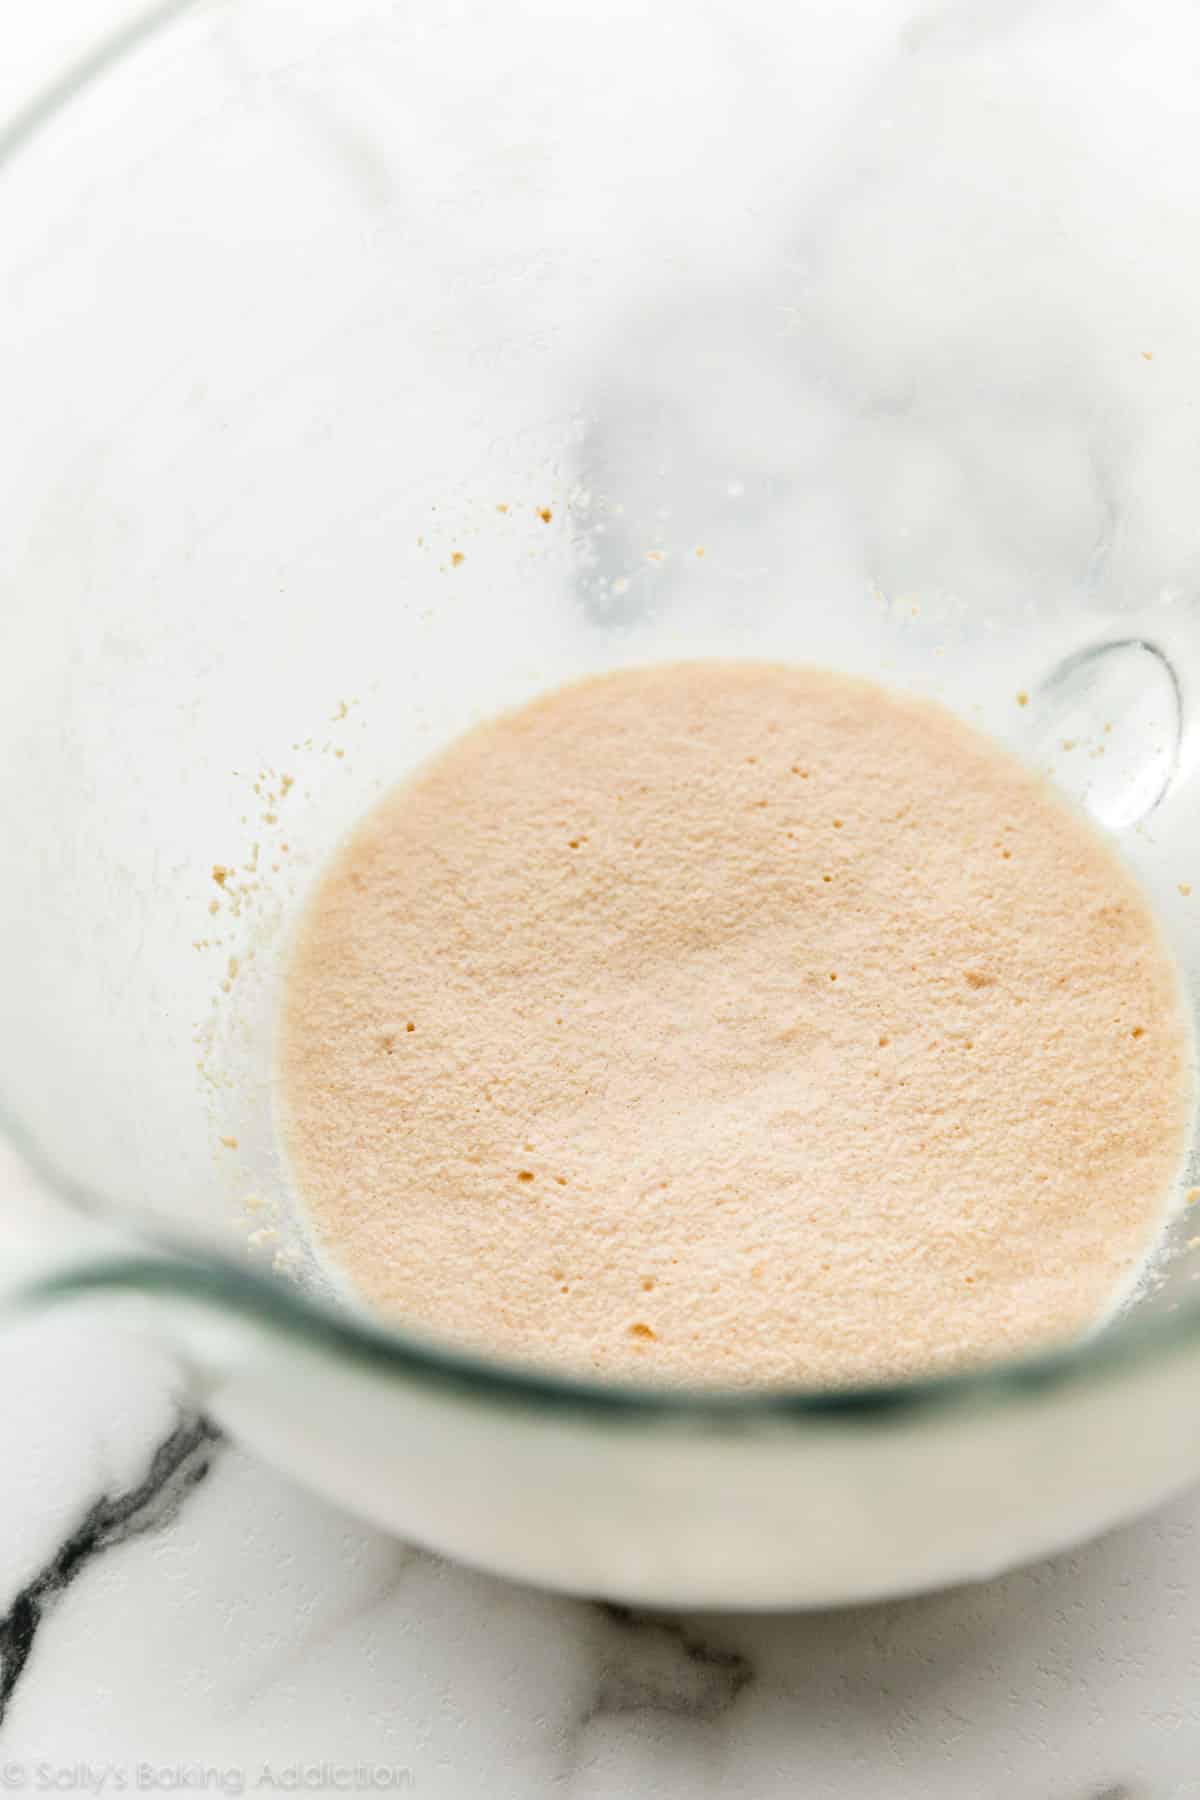
- Instant Yeast or Active-Dry? You can use instant yeast or active-dry yeast in the chocolate rolls. I usually use instant yeast and still take the time to quickly proof the yeast in step 1. Proofing the yeast means mixing it with a little sugar and the warm liquid to prove that it’s active—the mixture will look foamy on top, see photo below. But this step is not usually required when using instant yeast. Still, it doesn’t hurt and takes 5 minutes and you can prep your other dough ingredients as you wait.
This rich dough is supposed to be very soft, so don’t add more flour than absolutely needed. Embrace the softness and a sticky work surface because if you don’t mind the mess, you’ll be rewarded with the richest, flakiest chocolate rolls. I heard chocolate croissants were borderline jealous of all these flakes.
Do These Taste Like Cinnamon Rolls?
As far as the process goes, we’re essentially making homemade cinnamon rolls but with a chocolate filling. Make the dough, let it rise, punch it down, roll it out, add the chocolate filling, roll up jelly roll style, cut into rolls, let them rise until puffy, then bake. If you’ve made homemade cinnamon rolls before, this process isn’t anything new. We do use cinnamon in the filling, but it’s really just a background flavor behind all the chocolate and brown sugar. They certainly resemble cinnamon rolls, but they taste like homemade bread swirled with gooey melted chocolate. We put a spin on the same dough for these gingerbread cinnamon rolls. Try them next!
Step-By-Step Photos
Proofing the yeast:
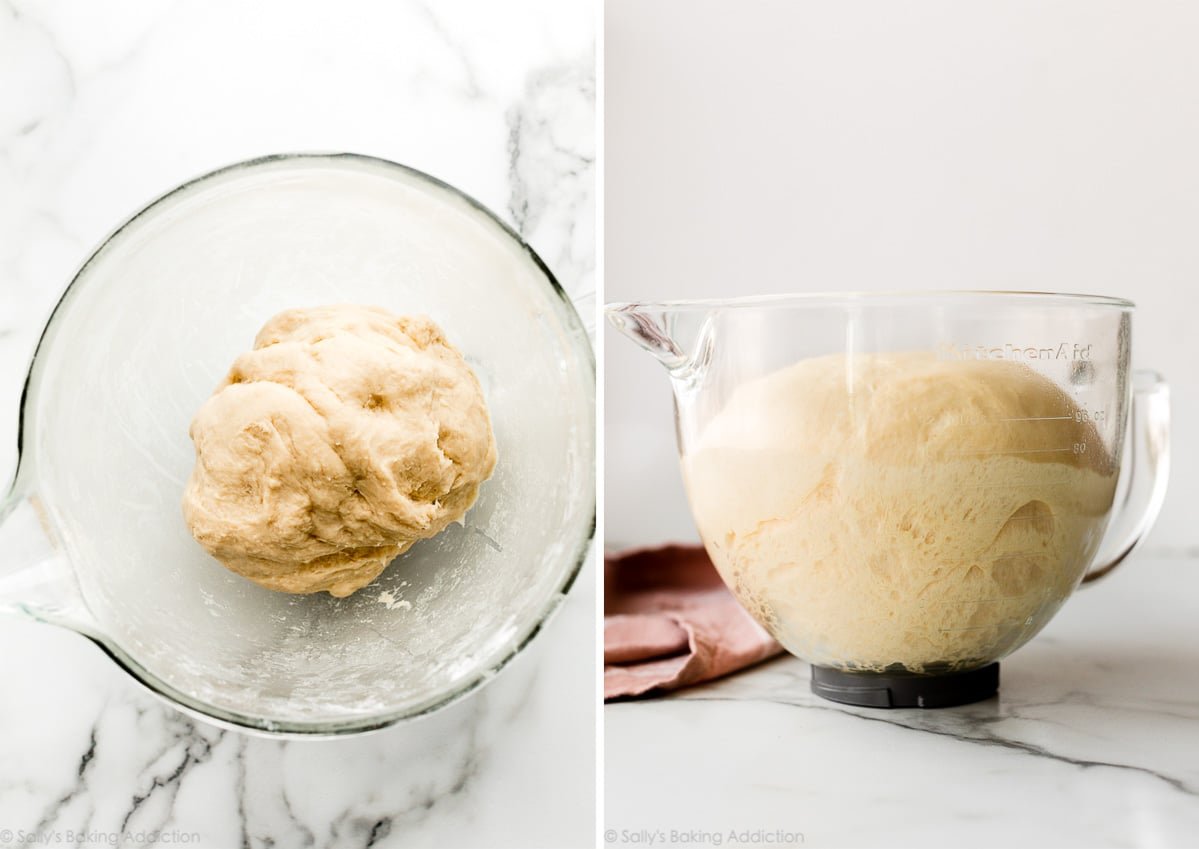
After the dough comes together, knead by hand or with your stand mixer. (See my How to Knead Dough tutorial for extra help with this step.) The dough is now ready to rise. Here is the soft dough before and after the 1st rise:
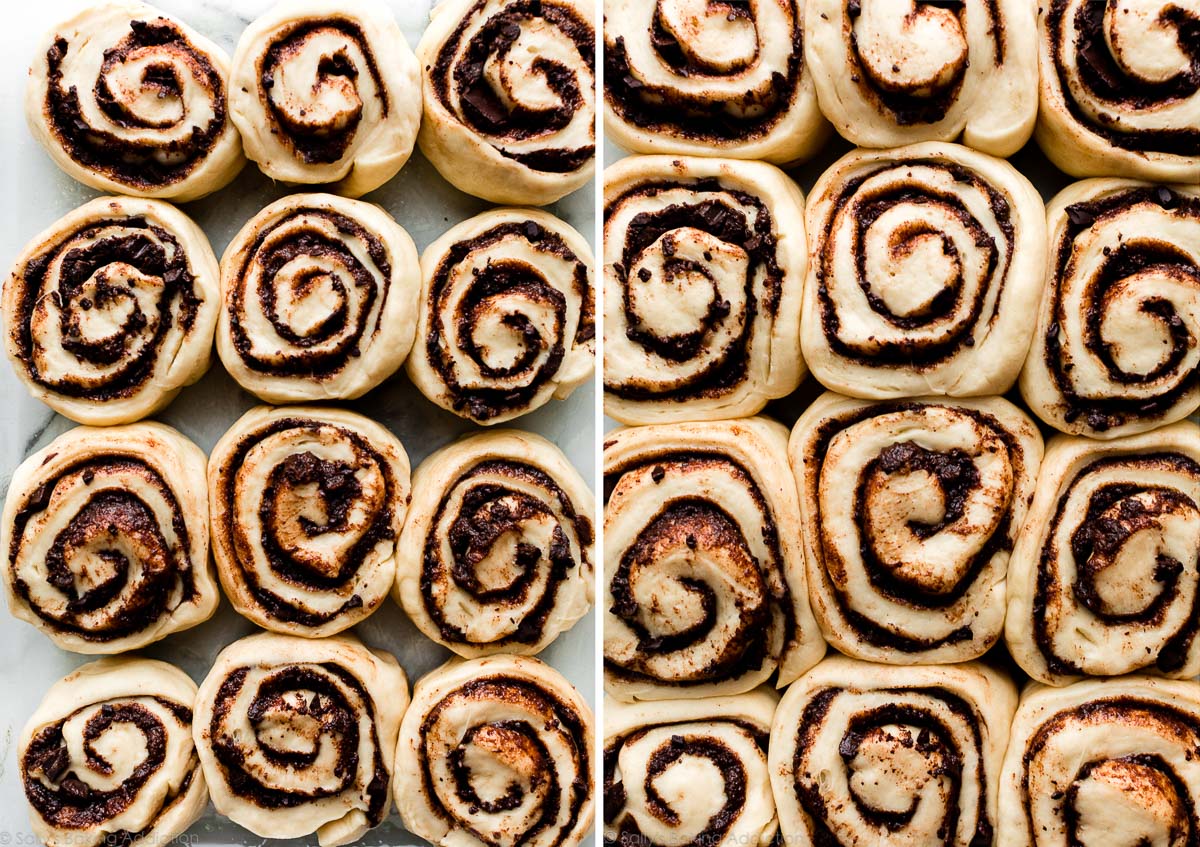
Here are the rolls before and after the 2nd rise. See how puffy they get?
I don’t want to stand in your way of chocolate bliss, so I promise I’m almost done. 😉
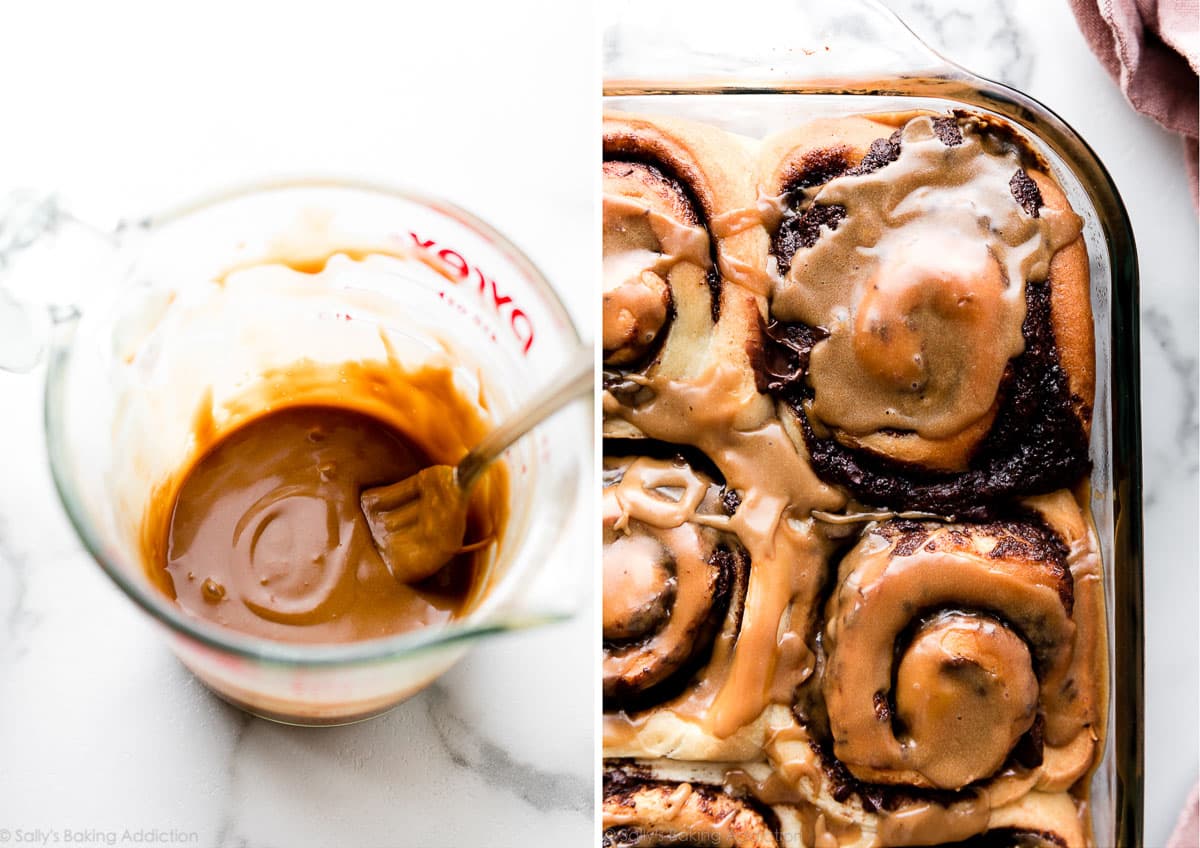
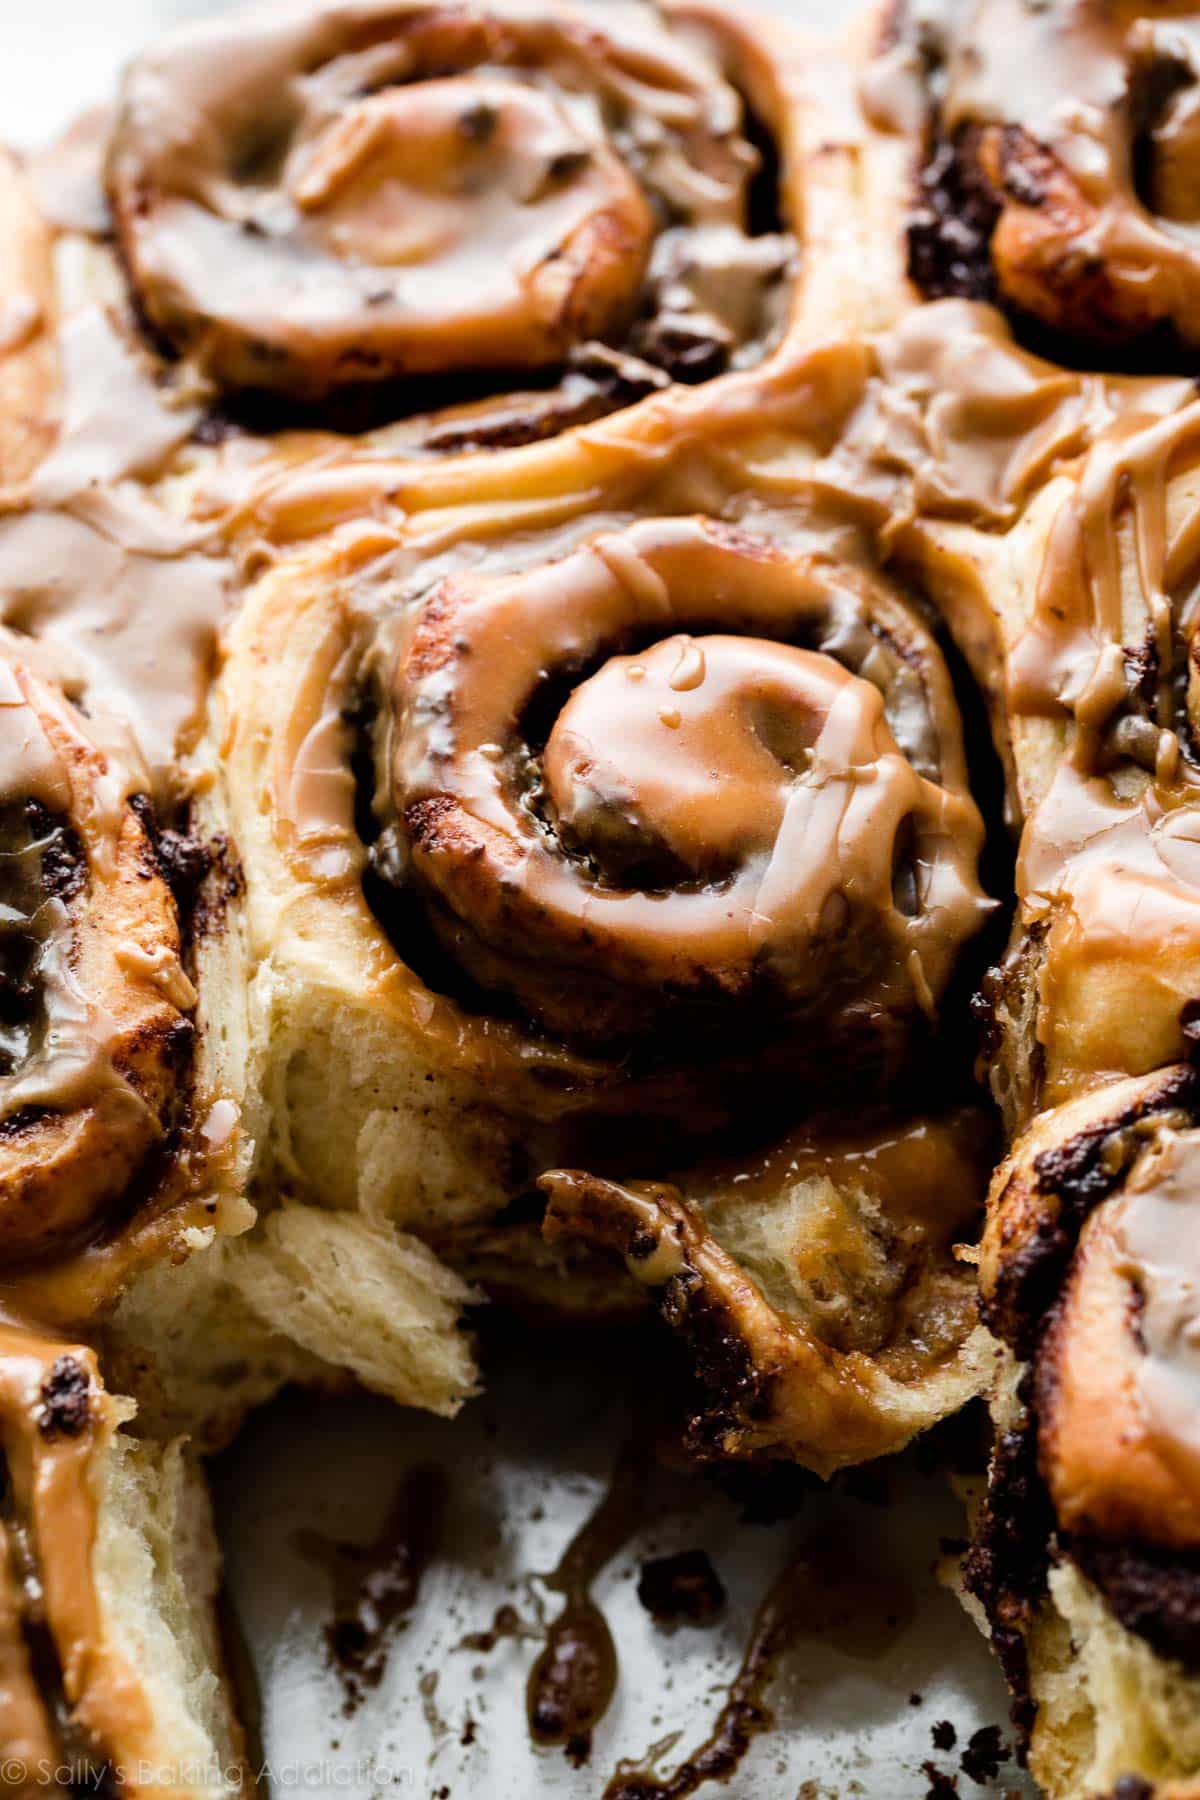
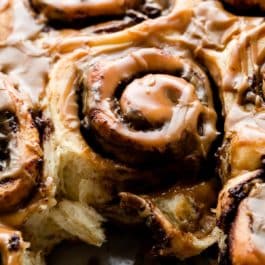
Espresso Glaze & Other Topping Options
I couldn’t decide on a topping that would be legendary enough for these extraordinary rolls, but espresso glaze comes pretty close. The bitter espresso powder helps offset the sweet confectioners’ sugar and all the sweetness in the rolls themselves. It would taste divine on these no yeast cinnamon rolls too!
Other topping options include salted caramel, vanilla icing, the maple icing from maple bacon doughnuts, or cream cheese icing from homemade cinnamon rolls or raspberry sweet rolls. For something simple, a light dusting of confectioners’ sugar would be beautiful. Peanut butter frosting would be over-the-top and I’m certain all your sweet teeth would be satisfied for weeks. Ha!
And, again, these rolls are RICH so you could easily skip the icing on top.
See Your Chocolate Sweet Rolls!
Many readers tried this recipe as part of a baking challenge! Feel free to email or share your recipe photos with us on social media. 🙂
More Cinnamon Roll Varieties:
- Cinnamon Rolls
- Apple Cinnamon Rolls
- Raspberry Sweet Rolls (my favorite!!)
- Overnight Cinnamon Rolls
- Blueberry Lemon Rolls
- Maple Pecan Sticky Buns
- Lemon Sweet Rolls
- Orange Sweet Rolls
- Birthday Cake Cinnamon Rolls
- Pumpkin Cinnamon Rolls
Chocolate Sweet Rolls
- Prep Time: 1 hour
- Cook Time: 28 minutes
- Total Time: 4 hours, 30 minutes (includes rise times)
- Yield: 12 rolls
- Category: Breakfast
- Method: Baking
- Cuisine: American
Description
These rich and fluffy chocolate sweet rolls come together with a buttery soft fresh homemade dough and brown sugar chocolate filling. They’re shaped like cinnamon rolls, but taste like flaky chocolate babka. You can make the chocolate rolls within a few hours or get started the night before using the overnight preparation option.
Ingredients
- 1 cup (240ml) whole milk, warmed to about 100°F (38°C)
- 6 Tablespoons (75g) granulated sugar, divided
- 1 Tablespoon (9g) active dry or instant yeast
- 5 Tablespoons (71g) unsalted butter, melted and slightly cooled
- 2 large eggs, at room temperature
- 1 teaspoon salt
- 4 cups (530g) bread flour (spooned & leveled), plus more as needed for hands/work surface
Chocolate Filling
- 6 Tablespoons (85g) unsalted butter, softened to room temperature
- 1/2 cup (100g) packed light or dark brown sugar
- 2 Tablespoons (10g) unsweetened natural or dutch process cocoa powder
- 1 teaspoon ground cinnamon
- 1 teaspoon pure vanilla extract
- 3/4 cup (135g) semi-sweet chocolate chips or a 4 ounce semi-sweet chocolate bar, finely chopped*
Espresso Icing
- 3 Tablespoons (45ml) heavy cream*
- 1 teaspoon espresso powder*
- 1 and 1/2 cups (180g) confectioners’ sugar, sifted (sift after measuring)
- 1/2 teaspoon pure vanilla extract
Instructions
- Prepare the dough: Whisk the warm milk, 2 Tablespoons sugar, and the yeast together in the bowl of your stand mixer fitted with a dough hook or paddle attachment. Cover and allow mixture to sit for about 5 minutes or until foamy on top. *If you do not own a mixer, you can do this in a large mixing bowl and in the next step, mix the dough together with a large wooden spoon/silicone spatula. It will take a bit of arm muscle. A hand mixer works, but the sticky dough repeatedly gets stuck in the beaters. Mixing by hand with a wooden spoon or silicone spatula is a better choice.*
- Add the remaining sugar, the butter, eggs, salt, and 1 cup (about 130g) of flour and beat on medium speed for 1 minute. Scrape down the sides of the bowl with a rubber spatula. Add 3 cups (about 400g) flour, switch the mixer down to low speed, and beat until a soft dough forms and pulls away from the sides of the bowl. Dough will be very soft, but not overly sticky. Beat in 2-3 more Tablespoons of flour if dough seems very sticky. Avoid adding more flour than you need.
- Knead the dough: Keep the dough in the mixer (and switch to the dough hook if using the paddle) and beat for an additional 6-8 full minutes, or knead by hand on a lightly floured surface for 6-8 full minutes. (If you’re new to bread-baking, my How to Knead Dough video tutorial can help here.) If the dough becomes too sticky during the kneading process, sprinkle 1 teaspoon of flour at a time on the dough or on the work surface/in the bowl to make a soft, slightly tacky dough. Do not add more flour than you need because you do not want a dry dough. After kneading, the dough should still feel a little soft. Poke it with your finger—if it slowly bounces back, your dough is ready to rise. You can also do a “windowpane test” to see if your dough has been kneaded long enough: tear off a small (roughly golfball-size) piece of dough and gently stretch it out until it’s thin enough for light to pass through it. Hold it up to a window or light. Does light pass through the stretched dough without the dough tearing first? If so, your dough has been kneaded long enough and is ready to rise. If not, keep kneading until it passes the windowpane test.
- 1st Rise: Lightly grease a large bowl with oil or use nonstick spray. Place the dough in the bowl, turning it to coat all sides in the oil. Cover the bowl with aluminum foil, plastic wrap, or a clean kitchen towel. Allow the dough to rise in a relatively warm environment for 2 hours or until double in size. (I always let it rise on the counter and it takes about 2 hours. For a tiny reduction in rise time, see my answer to Where Should Dough Rise? in my Baking with Yeast Guide.)
- Grease the bottom and sides of a metal or glass 9×13-inch baking dish or line with parchment paper.
- Roll out the dough: Punch down the dough to release the air. Place dough on a lightly floured work surface and using a lightly floured rolling pin, roll dough into a 10×16-inch rectangle. Make sure the dough is smooth and evenly thick. If the dough keeps shrinking as you roll it out, stop what you’re doing, cover it lightly, and let it rest for 10 minutes to relax the gluten. When you return to the dough, it should stretch out much easier.
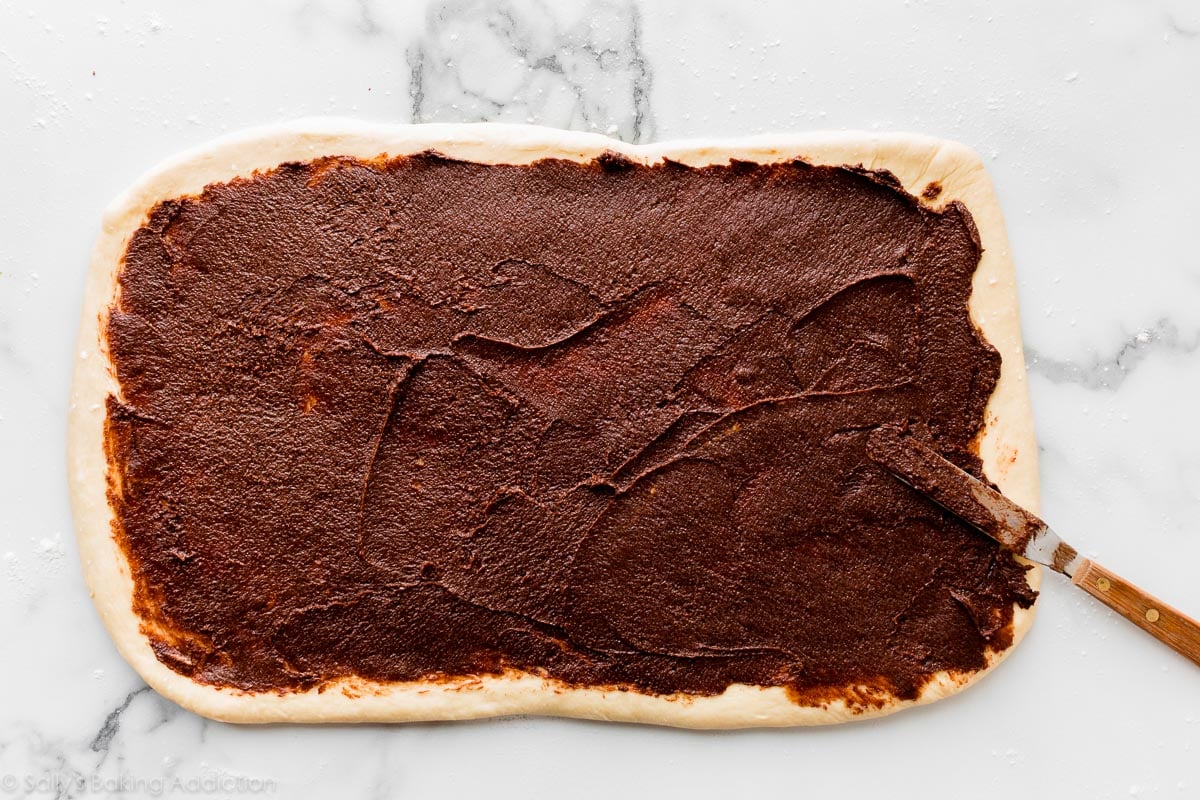
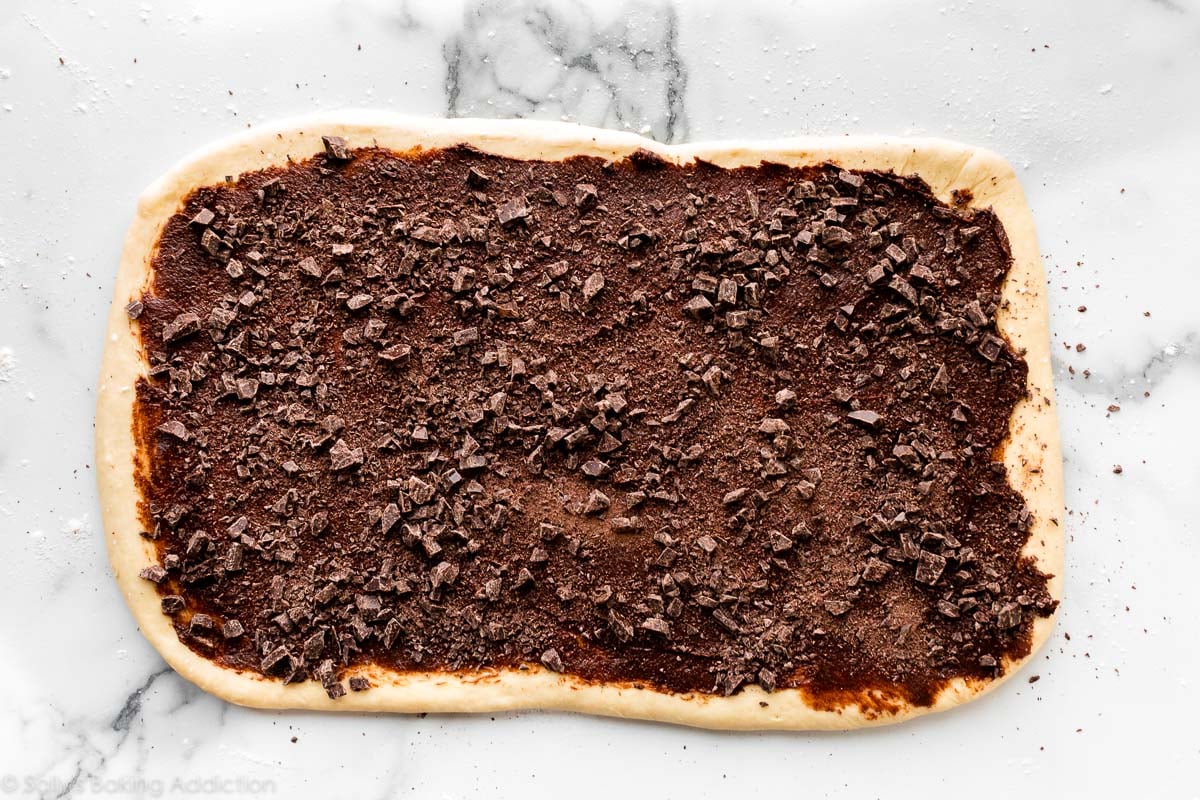
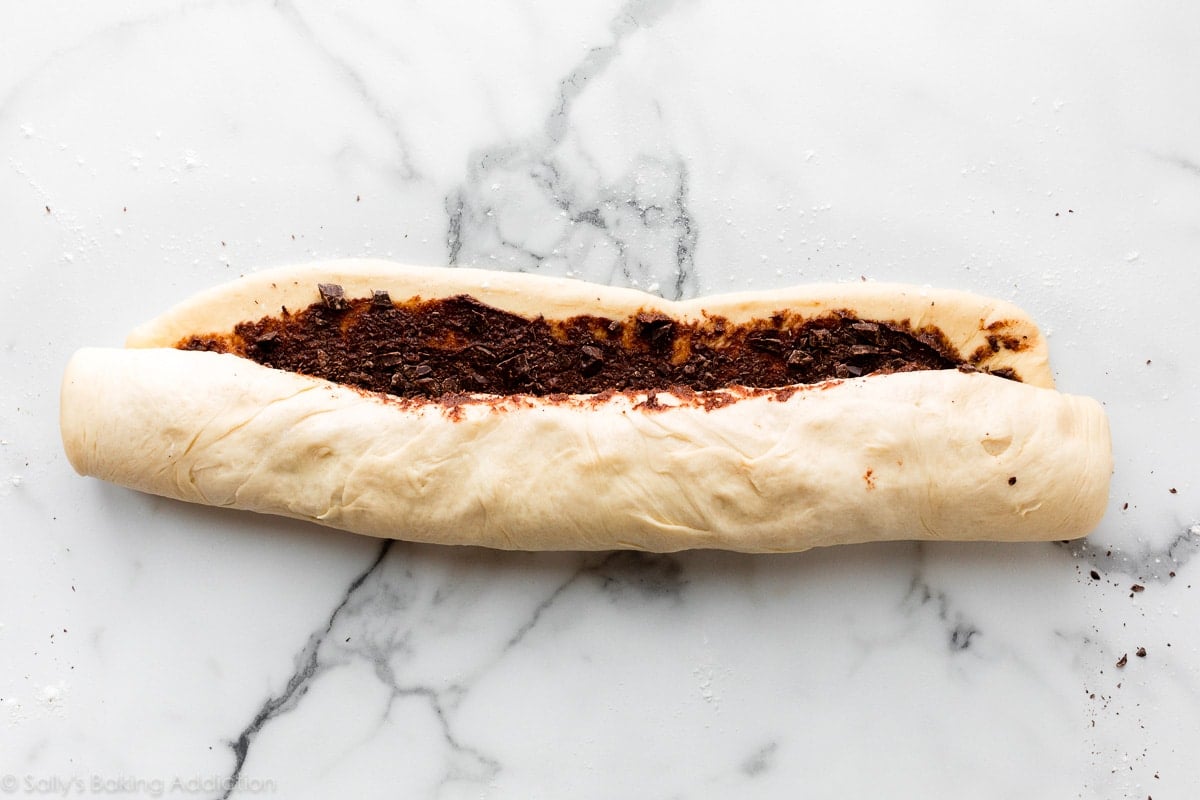
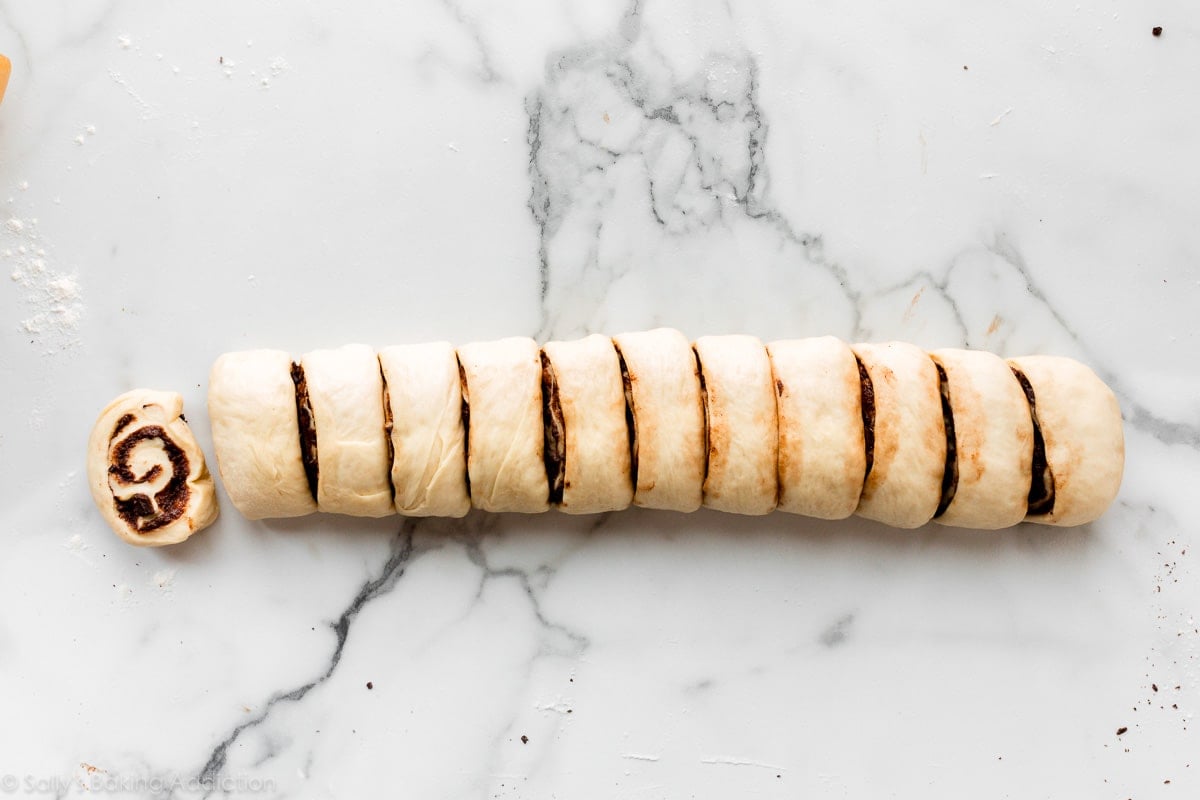
- For the filling: Mix all of the filling ingredients together except for the chopped chocolate/chocolate chips. The softer the butter is, the easier it is to mix. (Microwave it for a few seconds to soften if needed.) Spread mixture all over the dough. Sprinkle chopped chocolate/chocolate chips evenly on top. Tightly roll up the dough to form a 16-inch-long log. If some filling spills out, sprinkle it on top of the roll. With an extra sharp knife, cut into 12 even rolls, between 1-1.5 inches each. Arrange in the prepared baking pan.
- 2nd Rise: Cover the rolls tightly and allow to rise until doubled in size, about 1 hour. (Or use the overnight option below.)
- Preheat the oven to 350°F (177°C). Bake rolls for about 25-28 minutes or until they are lightly browned on top. After about 15 minutes, tent a piece of aluminum foil over the top of the pan to prevent the tops from browning too quickly and baking unevenly. Remove pan from the oven and place pan on a wire rack for about 10 minutes as you make the icing.
- Make the icing: Warm the cream on the stove until barely simmering or warm it in the microwave for 15-30 seconds. Whisk espresso powder into the warm cream, then whisk in the confectioners’ sugar and vanilla extract until combined. Drizzle the icing over the warm rolls and serve immediately.
- Cover leftover frosted or unfrosted rolls tightly and store at room temperature for up to 2 days or in the refrigerator for up to 5 days.
Notes
- Make Ahead Instructions – Overnight: To prepare the night before serving, prepare the rolls through step 7. Cover the rolls tightly and refrigerate for 8-12 hours. (16 hours max. 8-12 hours is best, but 16 hours is OK if absolutely needed. Do not exceed 16 hours.) The next morning, remove from the refrigerator and allow to rise on the counter for 1-2 hours before continuing with step 9.
- Make Ahead Instructions – Freezing: You can freeze cinnamon rolls for up to 3 months, and I recommend a few different methods for freezing cinnamon rolls. The first method is to freeze them after shaping, before they’ve had their 2nd rise (step 7). Thaw in the refrigerator overnight, then let rise for 1.5–2 hours at room temperature before baking. The second method is to par-bake the risen rolls for 10 minutes, let cool completely, then cover and freeze. Thaw in the refrigerator overnight, then let sit at room temperature for 30 minutes before baking. Finish baking for 15–20 minutes. You can also freeze fully baked cinnamon rolls. See How to Freeze Cinnamon Rolls for more details about all of these methods.
- Special Tools (affiliate links): Electric Stand Mixer (or Glass Mixing Bowl with Wooden Spoon/Silicone Spatula) | 9×13-inch Baking Pan | Rolling Pin | Cooling Rack | Whisk
- Milk: Use whole milk for the best, richest tasting dough. You could also use buttermilk. 2%, 1%, or nondairy milk work in a pinch. Do not use nonfat milk.
- Yeast: Make sure you use 1 Tablespoon of yeast, which is a little more than 1 standard packet. You can use active dry or instant yeast in this recipe. Follow all of the same instructions. If using active dry yeast, the rise times are usually *slightly* longer, but not much. Reference my Baking with Yeast Guide for answers to common yeast FAQs.
- Best Flour to Use: For best texture, I recommend bread flour. The same amount of all-purpose flour works and the rolls will still be wonderfully rich and soft. The rolls are a little more chewy and flaky when using bread flour.
- Chocolate: I usually use and recommend one 4 ounce (113g) baking chocolate bar, such as Ghirardelli or Bakers 4 ounce bars sold in the baking aisle. Chopped fine, this is about 3/4 cup. You can use semi-sweet or bittersweet. Avoid white chocolate or milk chocolate because the rolls will be overly sweet. You can use about 3/4 cup of chocolate chips, mini or regular size, instead. Chocolate chips weigh a little more, so use 135g if you are using a scale.
- Heavy Cream & Espresso Powder: In first part of the icing recipe, we are essentially making a creamy and very strong espresso liquid by mixing warm cream with espresso powder. (Make sure you use instant espresso powder, which is typically sold as simply “espresso powder.”) Feel free to use 3 Tablespoons of very strong brewed espresso or black coffee instead. Mix icing ingredients together, then add 1 more Tablespoon brewed espresso or black coffee to thin out if needed/desired.
- Half Batch: You can halve this recipe by halving all of the ingredients and using an 8 or 9 inch square or round pan. The 1st dough rise time may be a bit shorter. Roll the dough out to (approximately) a 7×10 inch rectangle. Roll up into a 10 inch log, then cut into 6 rolls. 2nd dough rise time will be about the same. Bake time is a few minutes shorter.


Reader Comments and Reviews
Hi Sally, I am a beginner with bread making and have always been fearful of using yeast. Thank you for this lovely recipe…it came out a success. The flavour was to die for but the appearance is in need of much improvement. But nonetheless, I noticed that you used melted butter for this recipe. 2 questions
1. What’s the difference between using softened butter and melted butter in the bread dough?
2. Can I use melted butter and softened butter interchangeably between the various recipes of bread eg cinnamon rolls?
Please advise. Thank you in advance 🙂
Hi Angie! Great questions. We use softened butter in many of our rich doughs, including the dough for our soft cinnamon rolls. It depends on the recipe, but for the most part they can be interchangeable. We opted for melted butter for these rolls because we find melted butter adds more, well, buttery flavor!
This came together so easily, and is so crazy delicious it’s hard to believe!
You gave us instructions for freezing after the first rise. Can a portion of them be frozen after they’re complete? Will they hold up? Would the flavor and texture be OK?
Hi Sue, Baked rolls can be frozen up to 2-3 months. Thaw overnight in the refrigerator and warm up before enjoying.
This was a delicious and very easy recipe .I will be keeping this one in my rotation.thank you for making this a success for a first timer.if you follow the steps closely you will have delicious chocolate rolls.I changed the frosting and used a cream cheese one ,but only because we are not coffee in dessert fans.so good it’s a must try!!!
These chocolate sweet rolls were so yummy. My family loved them! I will definitely make these again. Thanks Sally for another awesome recipe.
These were AMAZING!! Hands down the best dough I’ve found for a sweet roll/cinnamon roll. Will definitely be making again. Thank you!
I don’t know why I put off making these for so long. They were way easier to make than I anticipated (I forgot how easy cinnamon buns are to make). The flavor is delicious. I subbed coffee extract for the espresso powder because the last thing my 5 and 2 yo need is caffeine. I’ll definitely make these again.
Much easier to execute than I’d feared! I used Sally’s vanilla icing for the glaze, which was just the right level of indulgence for me and my friends!
I loved this recipe. It was easy, simple, and a great family project. We all enjoyed eating it. I recommend this to anyone who has a sweet tooth and a lot of extra time. Bon appetit!
Very good recipe! Like a cross between a chocolate croissant and a cinnamon roll.
These were spectacular- the bread flour really did make these rolls so fluffy and soft! I’ll definitely be using them in all my sweet rolls from now on.
Tastes like a chocolate croissant and very fun to make! Thank you for the overnight method too, saved me some time!
First time making a dough like this, and it was incredible! Made a half batch using the overnight method, and will definitely make again!
This was a great recipe! I chose the overnight option and it was very easy to follow! The dough was very easy to work with, and the filling is very customizable! Can’t wait to make these again!
In a word Fantastic! Especially the dough. I see no reason now to use any other dough for any sweet roll recipe! I used buttermilk in mine, followed everything else to the letter, and the rolls came out absolutely perfect. The easiest dough I’ve ever worked with. I’m looking forward to trying it again with just regular old cinnamon roll filling. I made the espresso glaze which went perfectly with the chocolate. I also doubled the glaze although I think it would’ve been just fine without doubling. Bake time was spot-on for me. Well done Sally!
This is an amazing recipe! The recipe was easy to follow and resulted in super soft and chewy rolls. I used dark chocolate for the filling and it was perfect. I made the icing but I didn’t like it so much, It was already awesome without it. The rolls were delicious fresh from the oven but I thought they tasted better served cold!!
I have never made a cinnamon roll from scratch and this recipe made it very easy to do. The chocolate added something different and the espresso glaze was amazing on it. Mine did not turn out too pretty but I definitely know where I messed up. It is a do again and again and again.
The chocolate in this recipe was a great twist to a traditional cinnamon roll. The dough was perfect and the flavor was decadent!
Wow! Thank you for the overnight instructions, this recipe is my favorite Sally recipe so far… Bravo!
This recipe was very easy to do when doing the overnight ride directions. It was lovely having warm rolls for breakfast with my coffee! I did find the rolls too sweet, but thankfully used the recommended espresso icing which was fantastic and I plan to use on other rolls in the future!
I love these chocolate sweet rolls! This is a great recipe!
I have a sweet tooth, so I added extra frosting to sweeten it up a bit more!
Overall this recipe is a keeper!
I just didn’t this recipe for the challenge and it was delicious! They came out perfect!
ive never made rolls or dough or used yeast before. this recipe made it so easy and everything came out perfect! the rolls are amazing. thank you for helping me bake something out of my comfort zone.
Made these today and they were delicious. The dough was really easy to work with and the filling was really good. Chocolate is not my usual go-to flavor, but I really liked these. I baked this for a lunch with kids, so I decided against the espresso glaze, and used instead the normal Cinnamon Roll cream cheese icing.
So yummy!!
I swapped out the espresso powder for Dutched cocoa it was so yummy!!
Made this recipe as my first Sally’s Baking Challenge and I was quite nervous because I haven’t baked a lot with yeast but this recipe was surprisingly easy! Came together so well and was absolutely delicious! Follow the bake time exactly, I went a little longer because I was worried they weren’t quite done and they ended up being a little over done
Forgot to mention I used AP flour and it was totally fine! Definitely will try the recipe with the bread flour sometime just didn’t have any on hand. I also cut my dough in half lengthwise before rolling it up to make 24 smaller rolls and didn’t have a problem! Rolls turned out perfect snack size
We’re so glad your first Sally’s Baking Challenge was a success, Heather! Thank you for participating and we hope you will join us again in the future!
The best Chocolate Sweet Rolls I’ve ever made. Tried with coconut glaze. It turned out to be very nice fusion of tastes. Thank you for sharing this recipe with us.
Very rich! I made with the espresso glaze, which helped to cut the sweetness. Everyone loved!
These were super simple to make and tasted delicious. I was a little hesitant of the chocolate being too sweet but I used the semisweet chocolate and they were perfect, not too sweet. And the espresso in the icing complimented the chocolate flavor excellently.
Made these using bread flour and chocolate chips. I let the Kitchen Aid do all the kneading and followed the overnight instructions. They turned out amazing and they are so delicious!! We loved the espresso icing as well. They won’t last more than a day in our house…
Soft & chocolately! The espresso icing is genius!
The dough was a dream to work with – not too sticky. Make sure to err on the side of underbaking