

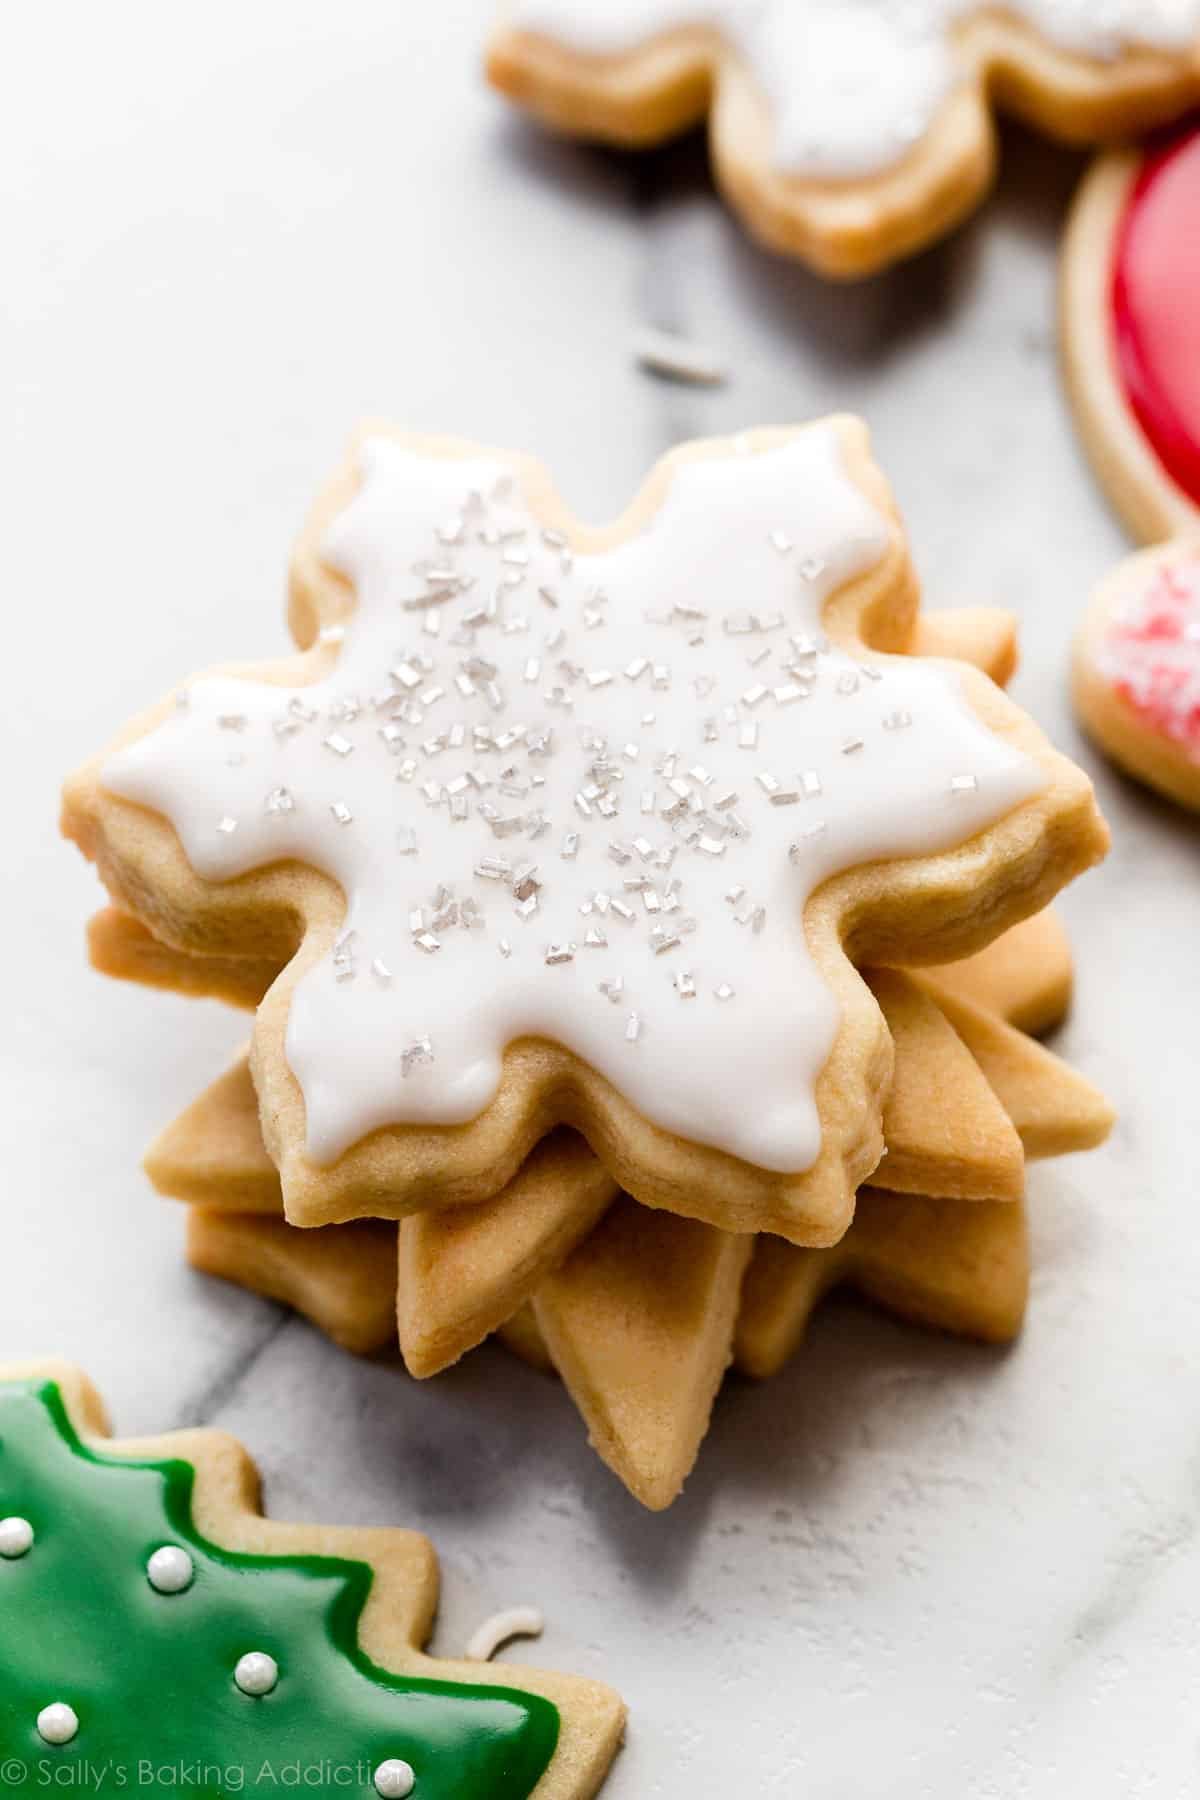
These are fan-favorite cut-out Christmas sugar cookies! My recipe for sugar cookies promises flavorful cookies with soft and thick centers, slightly crisp edges, and flat tops for decorating. The dough comes together with 7–8 simple ingredients, and the cookies hold their cookie cutter shape in the oven. Decorate them with my easy glaze cookie icing, a wonderful alternative to royal icing. Get out your rolling pin and favorite cookie cutters and have fun!

I originally published this recipe in 2014 and have since added new photos, a video tutorial, a few more success tips, and a list of helpful tools.
The holiday season and a batch of decorated Christmas sugar cookies go hand-in-hand. Today’s recipe is a classic staple, and has been a popular favorite since I first published it many years ago. It’s basically my favorite sugar cookie recipe, but all dressed up for the holidays. And I love that you don’t need to mess with royal icing! The cookie icing below is unfussy and low maintenance, which is definitely appreciated if you’re baking a lot of cookies in December. 😉
Here’s Why You’ll Love These Christmas Sugar Cookies
- Soft, thick centers with slightly crisp edges
- Irresistible buttery vanilla flavor
- Made from simple ingredients
- Leave plain or flavor with extras like maple, cinnamon, peppermint, and more
- Hold shape while baking
- Icing is manageable for young bakers and beginners
- Freeze beautifully
- Easy-to-follow recipe used by beginner and expert bakers alike
By the way, if you love sugar cookies, but aren’t up for decorating with icing, you’ll enjoy my stained glass window cookies, Christmas sparkle cookies, pecan sugar cookies, or drop Christmas sugar cookies instead.
How to Make Christmas Sugar Cookies
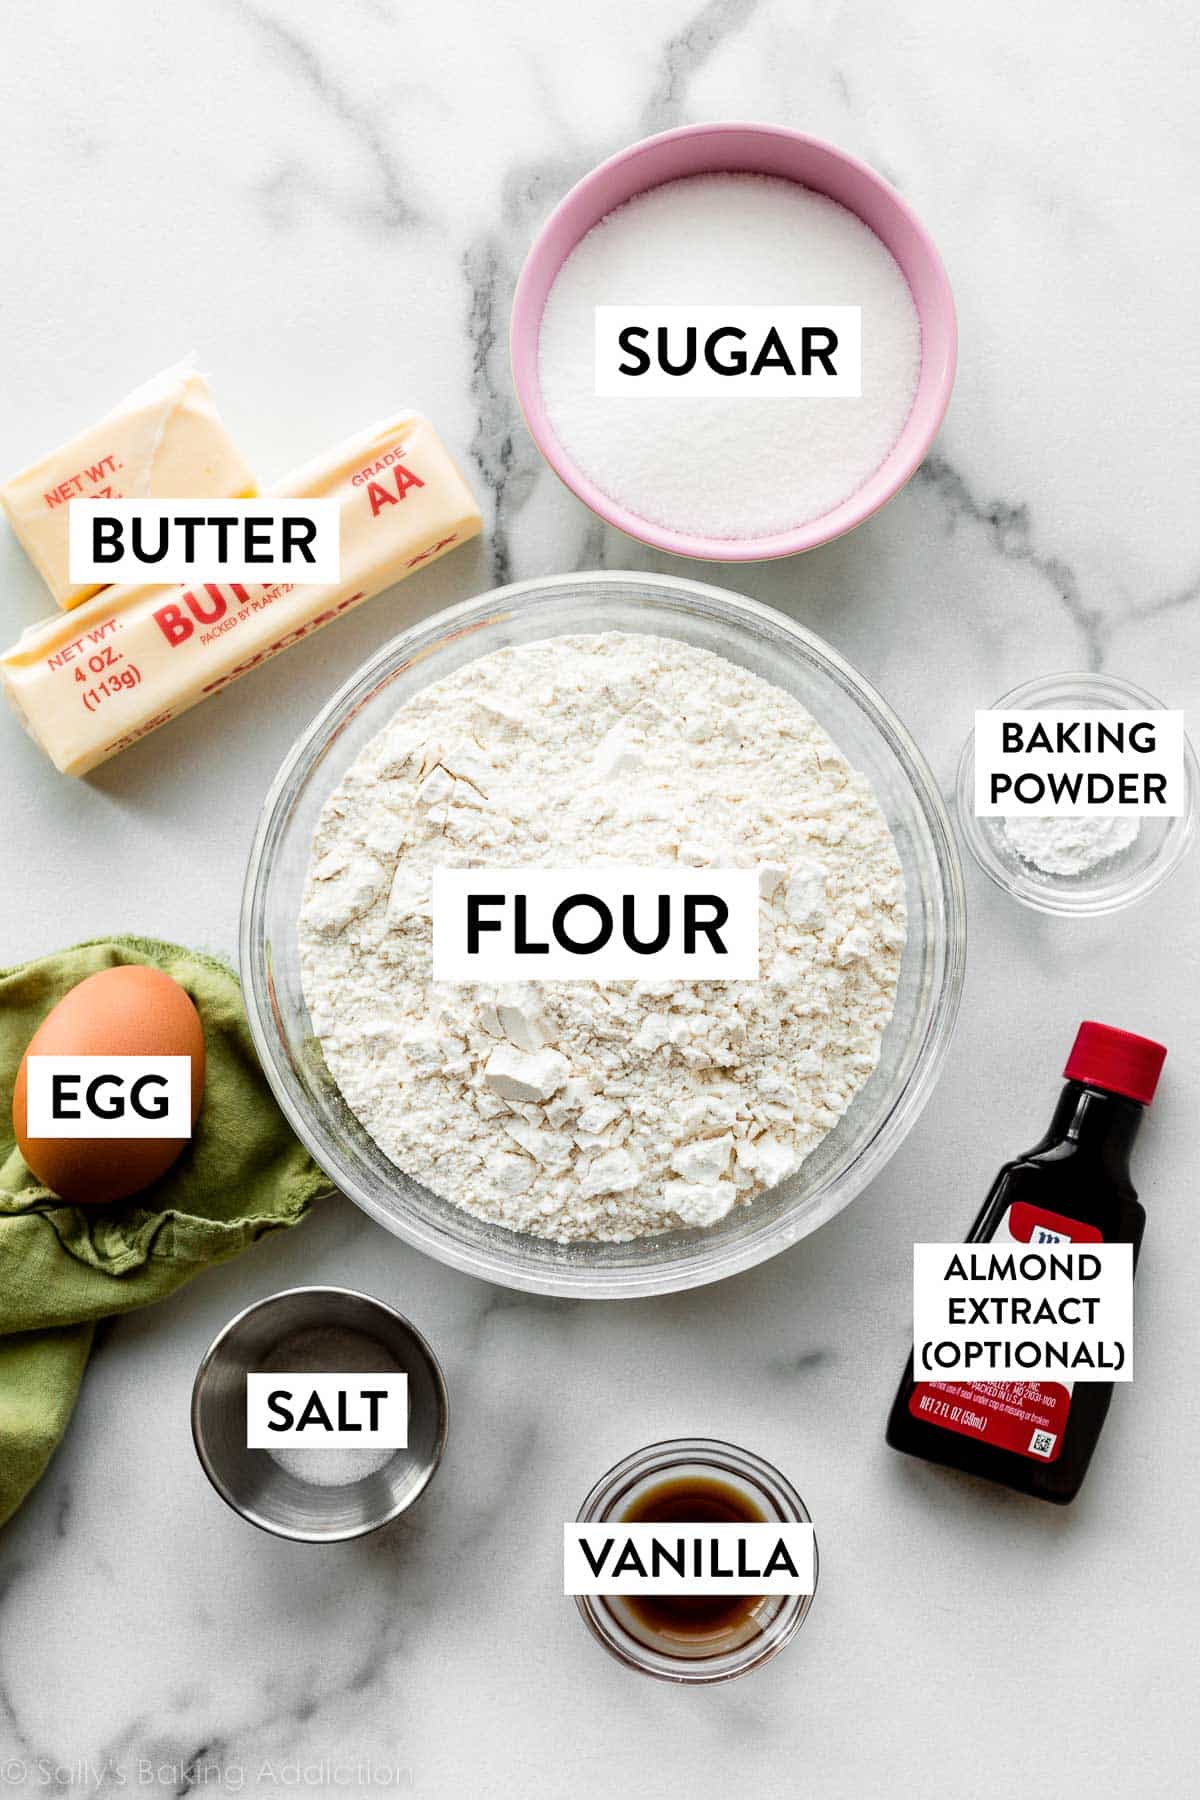
You need 7–8 ingredients for the dough. With so few ingredients, it’s important to follow the recipe closely, because each one has an important job. Creamed butter and sugar form the base of the dough. Egg and flour provide structure, and vanilla adds flavor. I almost always add a touch of almond extract for additional flavor, and highly recommend that you try it too! You could also use peppermint extract or another flavor extract instead. Baking powder adds lift, and salt balances the sweet.
So many little ingredients doing big jobs to create a perfect cookie:
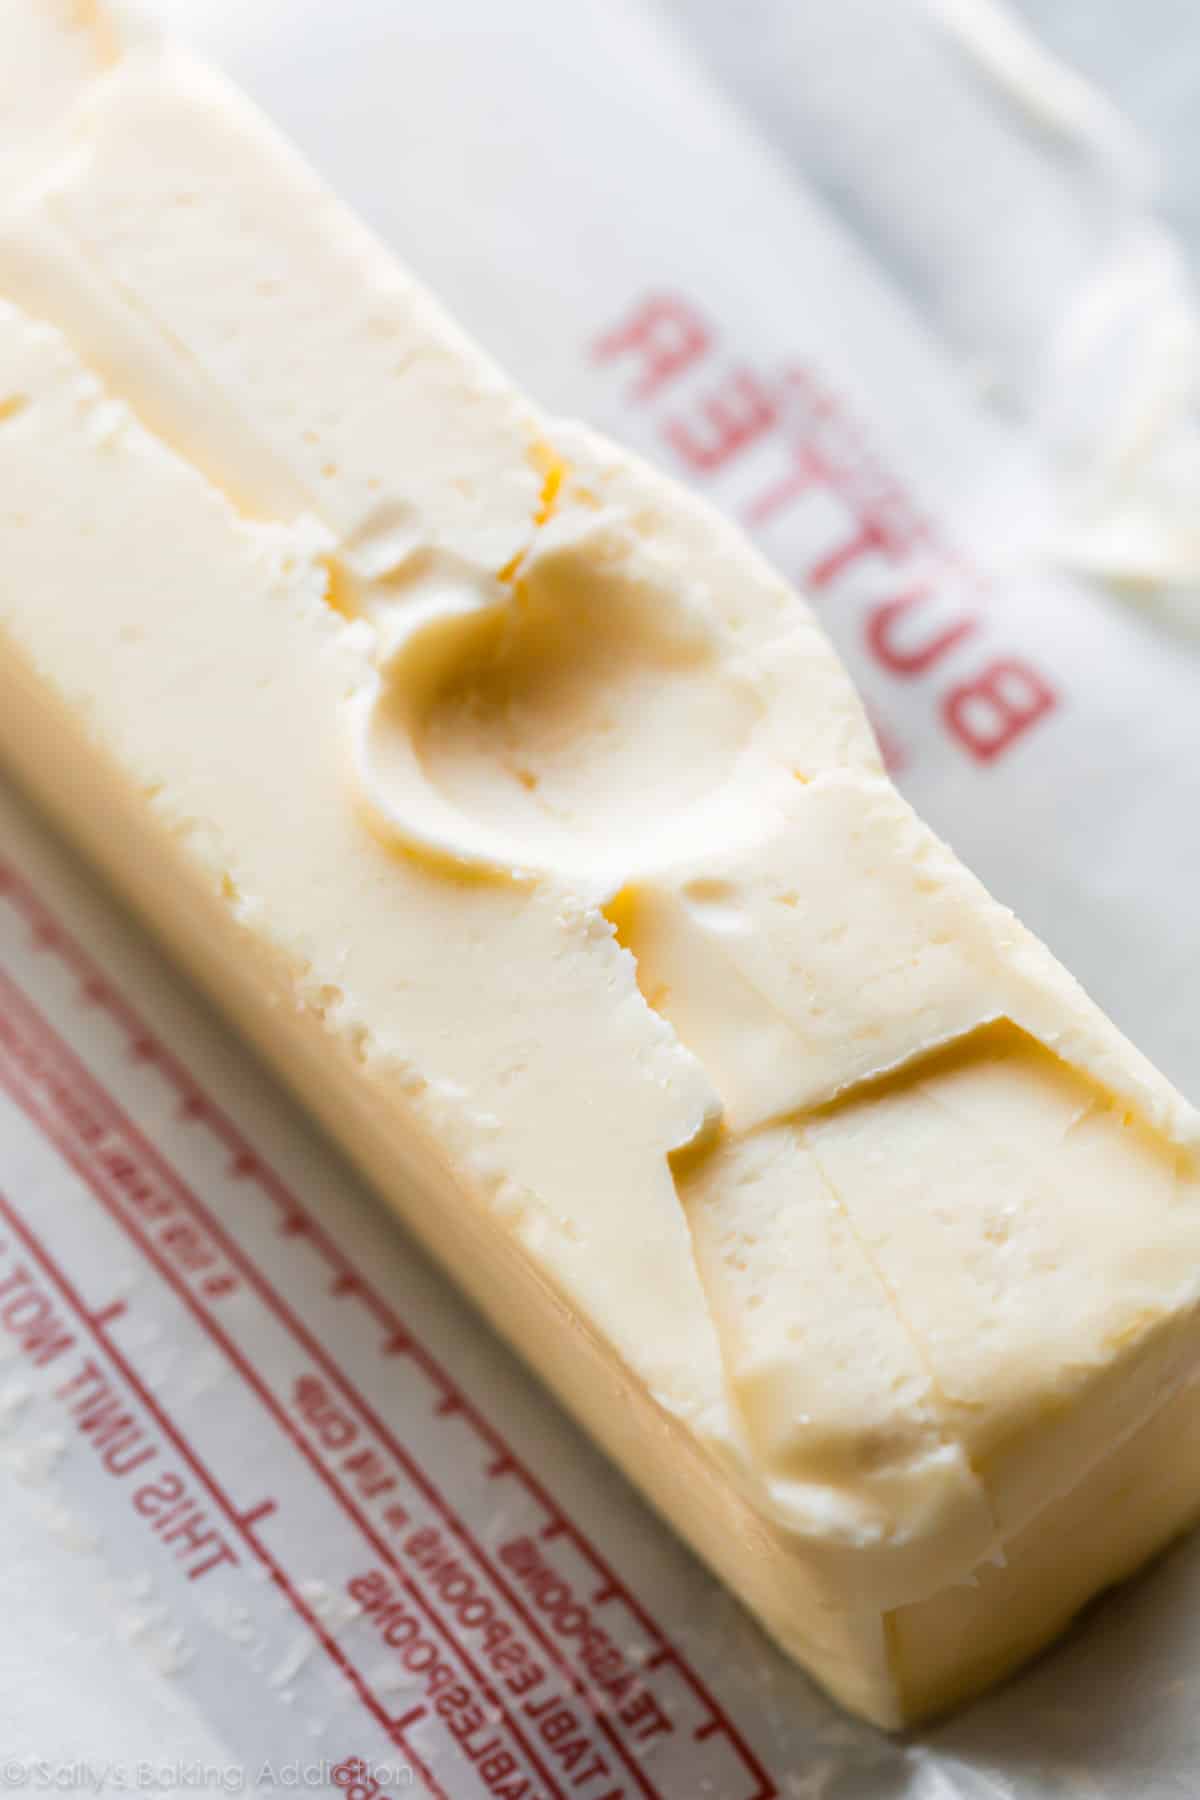
Success Tip: Make sure you start with proper room temperature butter. Room temperature butter is cool to the touch and about 65°F (18°C), which may be cooler than your kitchen. To test the butter to make sure it’s ready to cream, poke it with your finger. Your finger should make an indent without sinking down into the butter. The butter should not be shiny or greasy.
This is a recipe that requires some planning ahead.
After you make the cookie dough, it must chill for 1–2 hours, and up to 2 days. Chilling is a mandatory step. Without chilling, these cookie cutter sugar cookies won’t hold shape. You don’t want your snowman-shaped cookie turning into the Stay-Puft Marshmallow Man (though that could work for Halloween cookies).
Also, the icing recipe below needs at least 24 hours to dry/set (but you can certainly eat them prior to the icing drying!). This is much longer than royal icing, which usually dries in 2 hours. So even though we’re not messing with finicky royal icing, we do have to wait longer to stack/transport the cookies.
After you make the cookie dough, divide it in half:
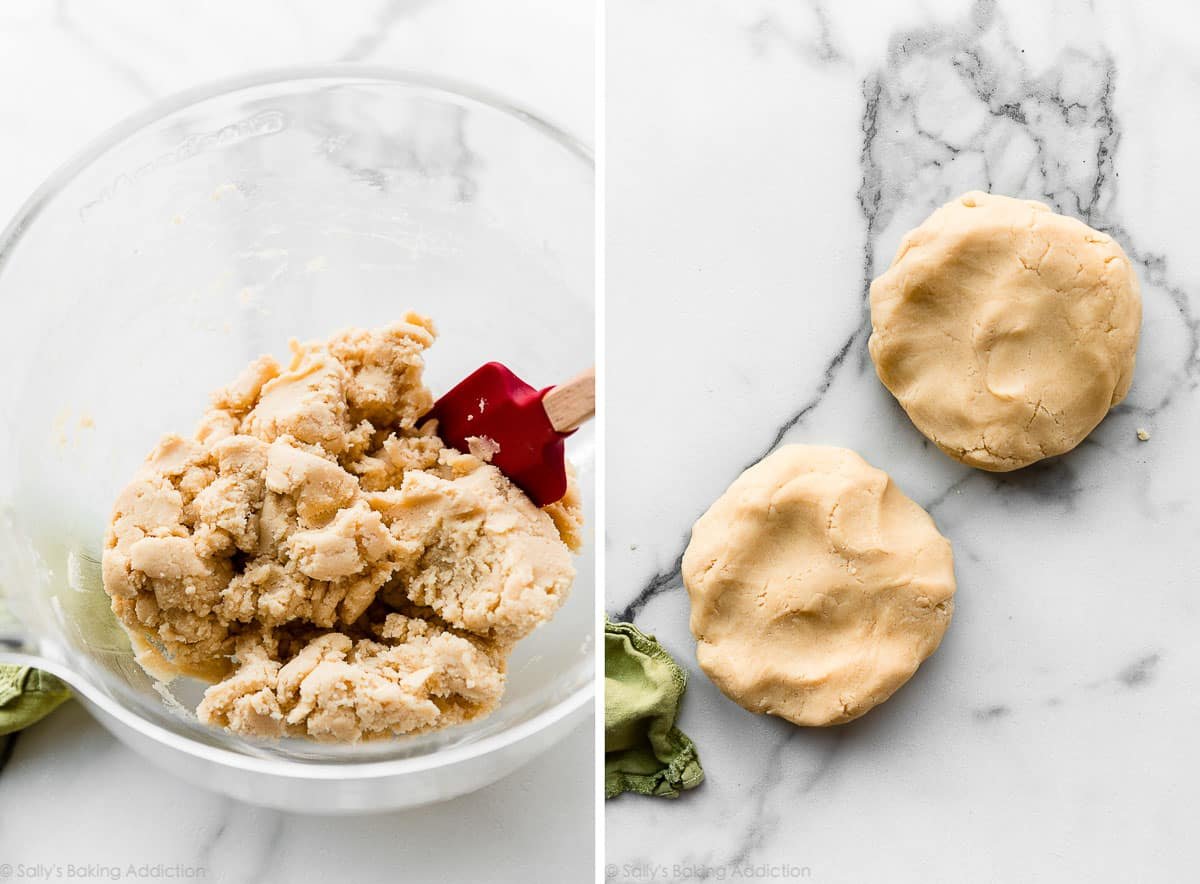
And then roll out each portion of dough before chilling:
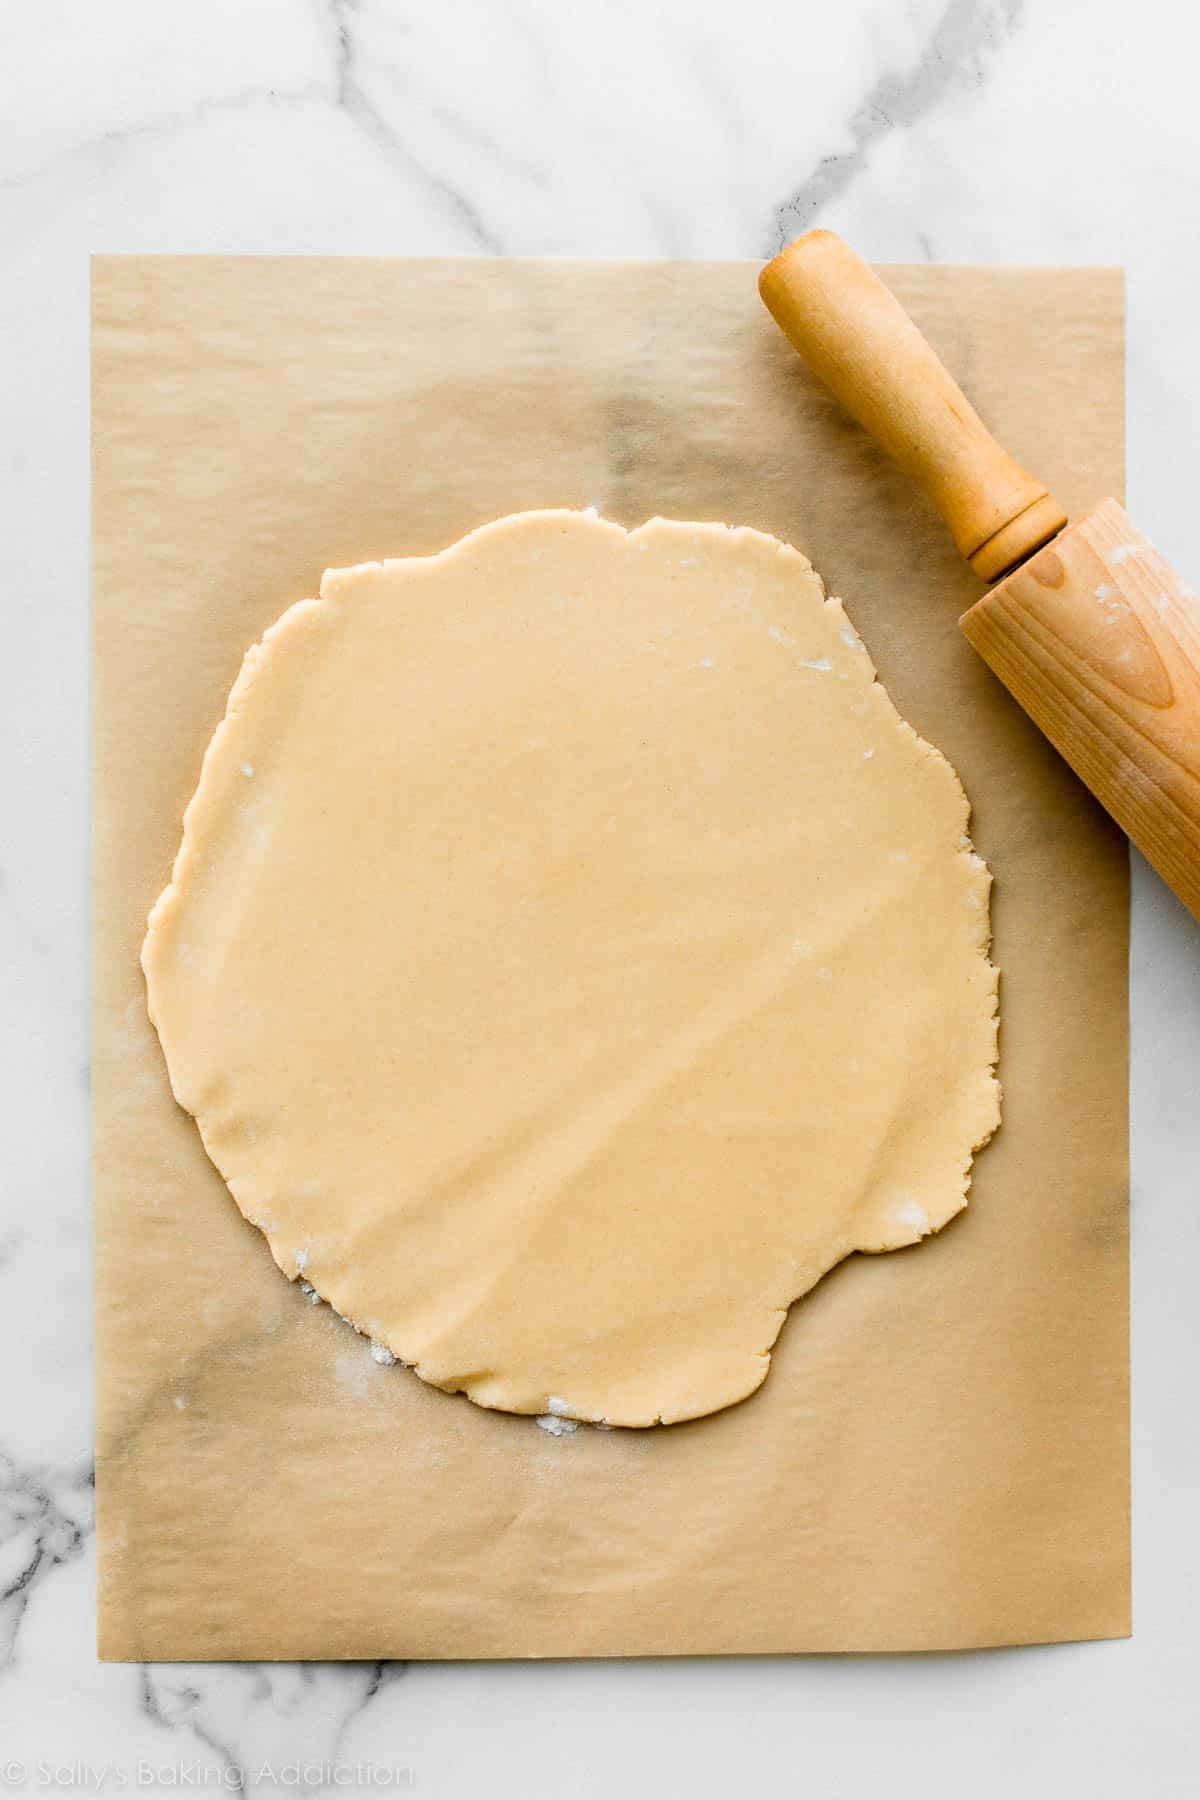
Let’s talk about rolling out this dough, because it’s an unusual order of steps.
3 Tricks to Rolling Out Christmas Cookie Dough
- Trick #1: Pay attention to the order of the steps. Notice how I roll out the dough BEFORE chilling it in the refrigerator? That’s the most important trick! Let me explain why I do this. Just like when you’re making chocolate chip cookies, to prevent the cookies from over-spreading, the dough must chill. If you’ve ever tried rolling out chilled sugar cookie dough, you may remember how difficult it is to roll out cold, stiff dough. So, roll out the dough while it’s still soft (right after mixing it together), and then chill the rolled-out dough.
- Trick #2: Divide the dough in half before rolling it out. Why? Smaller sections of dough are easier to roll out.
- Trick #3: Roll out the cookie dough directly on a silicone baking mat or parchment paper so you can easily transfer it to the refrigerator. Pick the whole thing up, set it on a baking sheet, and place it in the refrigerator. If you don’t have enough room for two baking sheets in your refrigerator, simply stack the pieces of rolled-out dough on top of each other, with parchment paper or silicone baking mat in between. You can see me doing this in the video tutorial below.
After the rolled-out dough chills for at least 1–2 hours, use cookie cutters to cut out shapes, and re-roll your scraps. Remember, you have two slabs of dough.
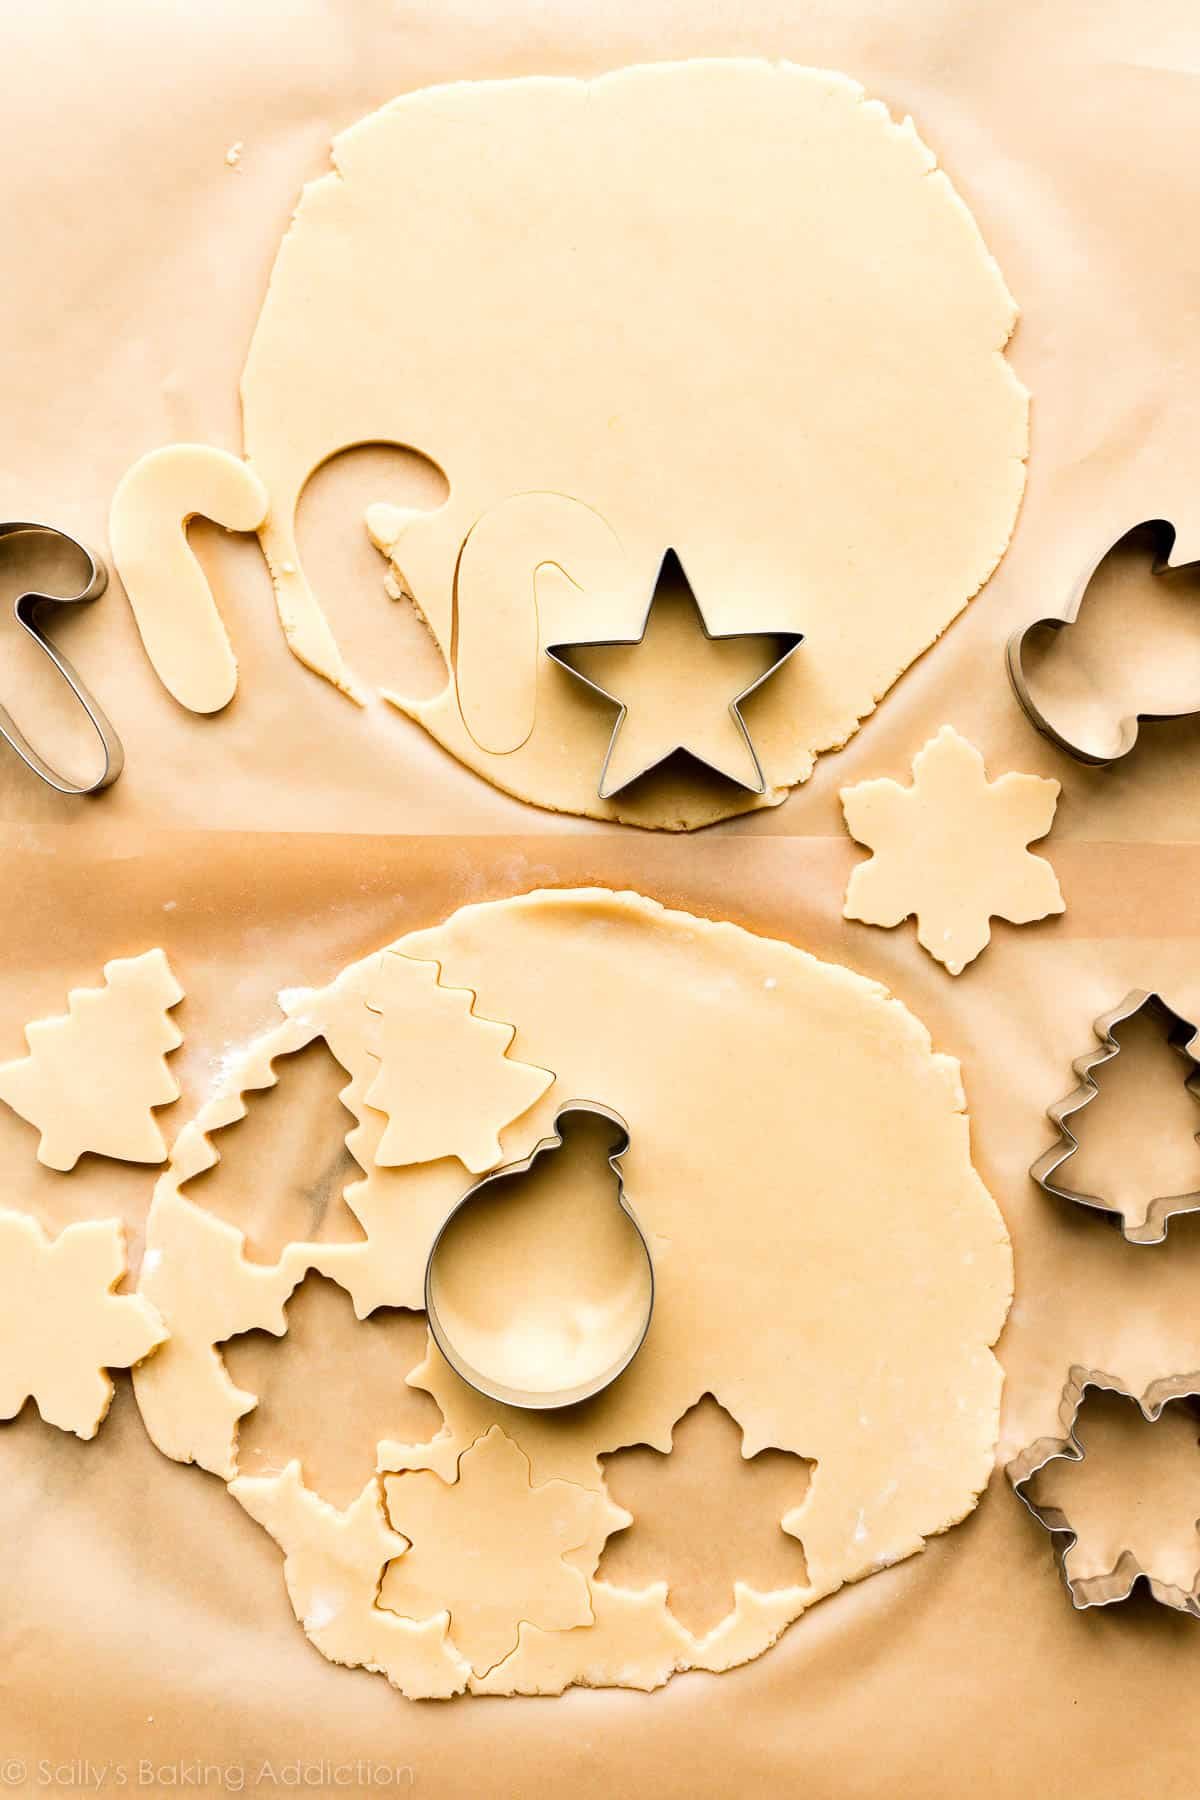
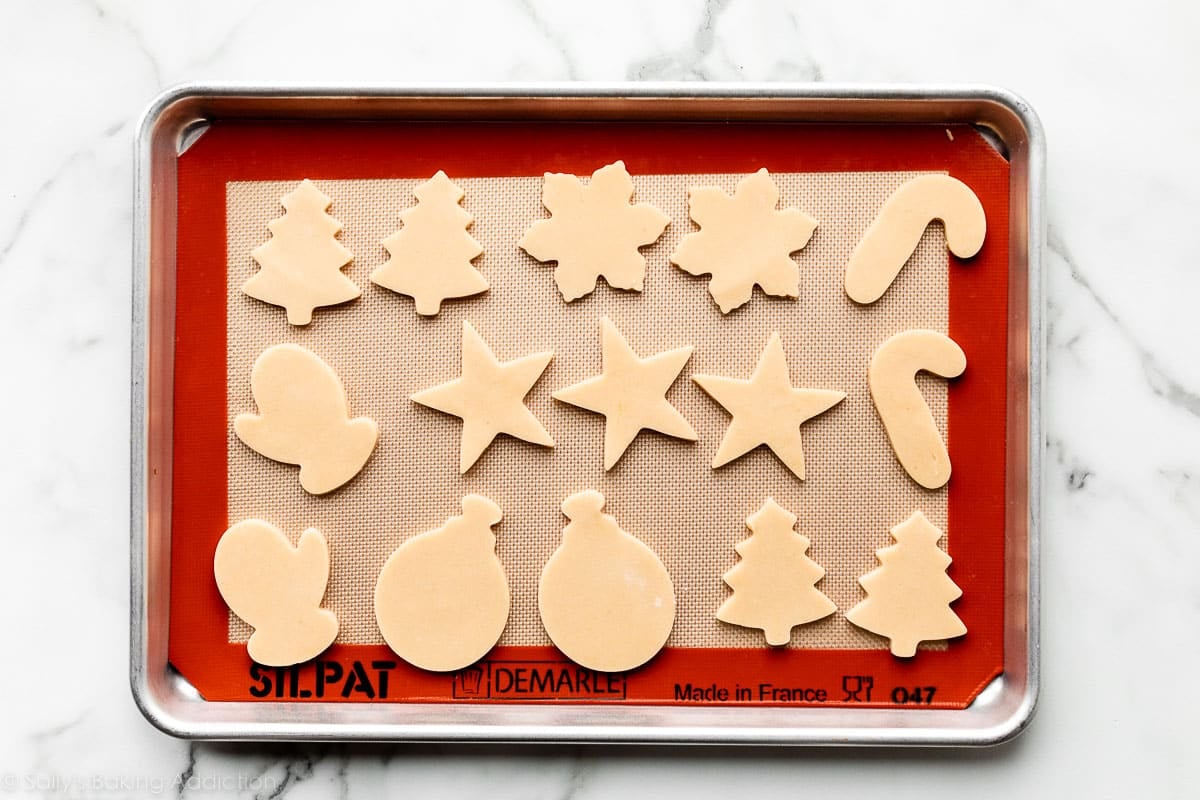
Arrange cookies on a lined baking sheet. I usually get about 2 dozen 3-inch cookies from this recipe. Here’s some of the cookies before baking:
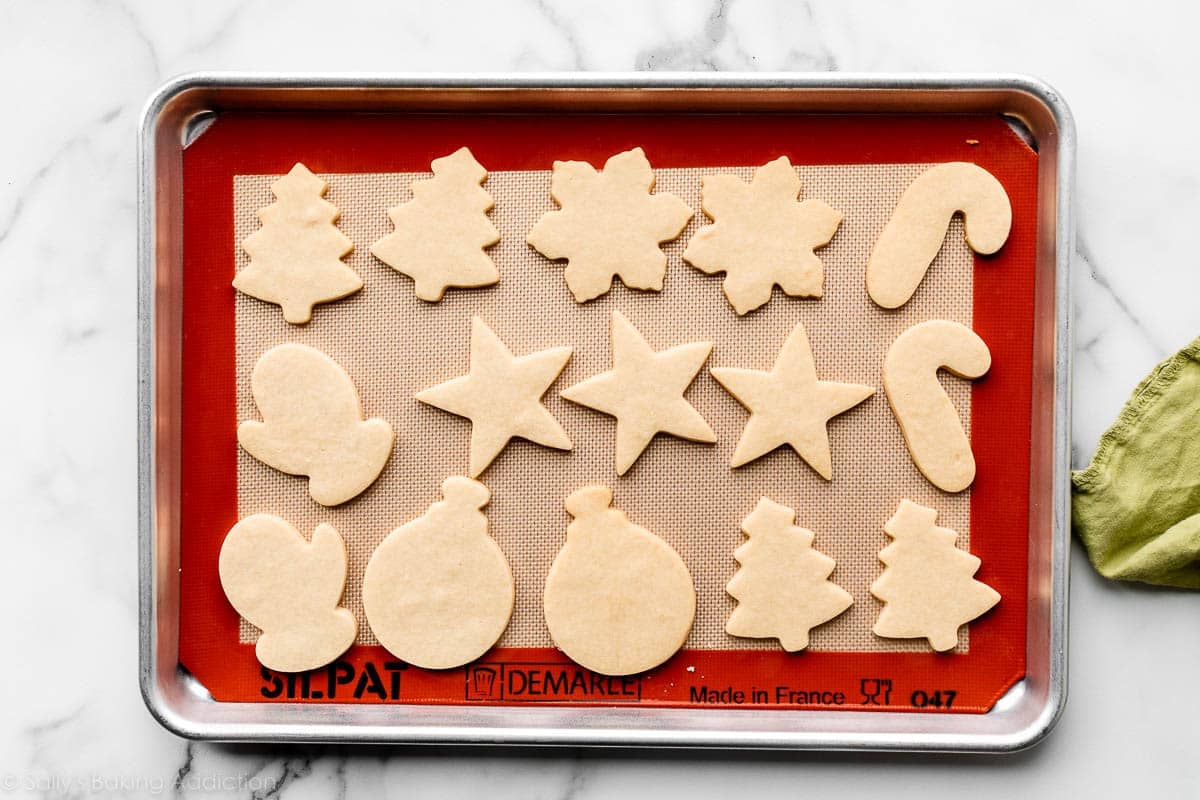
And after baking:
Use My Easy Cookie Icing
My easy cookie icing recipe below is a great alternative to traditional royal icing. It’s like a very thick opaque glaze and comes together quickly with a fork and a mixing bowl. This is one of my favorite ways to decorate sugar cookies because it’s low maintenance, but still delivers pretty (and tasty) results. I have a separate cookie icing page dedicated to it, and it can be used on pretty much any cookie cutter cookies like gingerbread cookies, brown sugar cut-out cookies, chocolate sugar cookies, Valentine’s Day cookies, or Easter cookies.
(I also have a recipe for thick cookie buttercream, if you’d like that option!)
Here’s why you’ll love the cookie glaze icing:
- 5 basic ingredients
- Can tint the icing different colors
- Can use squeeze bottle or piping tips to decorate
- Manageable for everyone
- Doesn’t dry into hard cement texture
- After it dries, you can stack, freeze, and transport cookies
You need confectioners’ sugar, water, vanilla extract (replace with water to keep the icing stark white), a touch of corn syrup, and a little salt. The corn syrup gives the icing sticking power and creates a beautiful sheen when the icing dries. The icing sets after 24 hours, so you can easily stack these Christmas sugar cookies for storage, transport, or even shipping.

Yes, you can create gourmet-looking Christmas cookies like the ones above without royal icing! For more decorating inspiration, see my video tutorial on how to decorate sugar cookies.
Christmas Sugar Cookie Tools
Before I leave you with the recipe, let me suggest some useful sugar cookie tools. These are the exact products I use in my own kitchen:
- Electric Mixer: stand mixer or handheld.
- Baking Sheets: I use and love these baking sheets.
- Parchment or Baking Mats: silicone baking mats or parchment sheets (for rolling out & transferring the rolled-out dough, and for baking the cookies).
- Rolling Pin: This is my favorite rolling pin. If you have difficulty evenly rolling out dough, try this adjustable rolling pin. It’s really helpful!
- Cookie Cutters: If you’d like suggestions for cookie cutters, I love Ann Clark brand. (Not sponsored, just a genuine fan!) The pictured shapes came from this holiday cookie cutter set.
- Food Coloring: Liquid food coloring can alter the consistency of the icing, so I recommend gel food coloring. I like Americolor brand.
- Squeeze Bottle: To make decorating a breeze, use a squeeze bottle. They’re less intimidating than piping tips and very easy to use. If you want to use a piping tip, I love Wilton #4 for decorating sugar cookies. (You’ll also need a disposable or reusable piping bag if using a piping tip.)
These baking tools would be great to add to your holiday wish list. And while you’re at it, be sure to check out my guide of Holiday Gifts for Bakers. Lots of fun ideas in there, either for yourself or other baker friends! You can also review my recommended Best Cookie Baking Tools and Cookie Decorating Supplies for even more suggestions.

Craving More Christmas Cookies?
- Peanut Butter Blossoms (same base dough as these peanut butter cookies!)
- Gingerbread Cookies
- Lace Cookies
- Homemade Gingerbread House
- Spritz Cookies
- Butter Cookies and Chocolate Butter Cookies
- Snowball Cookies
- Pinwheel Cookies
- Hot Cocoa Cookies
This recipe is part of my annual cookie countdown called Sally’s Cookie Palooza. It’s the biggest, most delicious event of the year! Browse dozens of cookie recipes over on the Sally’s Cookie Palooza page.


Christmas Sugar Cookies Recipe with Easy Icing
- Prep Time: 2 hours
- Cook Time: 12 minutes
- Total Time: 2 hours, 10 minutes
- Yield: 24 3-inch cookies and 1.5 cups icing
- Category: Cookies
- Method: Baking
- Cuisine: American
Description
Cut-out Christmas sugar cookies with crisp edges and soft centers. This icing recipe is so simple, making decorating hassle-free!
Ingredients
Cookies
- 2 and 1/4 cups (281g) all-purpose flour (spooned and leveled), plus more as needed for rolling and work surface
- 1/2 teaspoon baking powder
- 1/4 teaspoon salt
- 3/4 cup (12 Tbsp; 170g) unsalted butter, softened to room temperature
- 3/4 cup (150g) granulated sugar
- 1 large egg, at room temperature
- 2 teaspoons pure vanilla extract
- 1/4 or 1/2 teaspoon almond extract (optional, but makes the flavor outstanding)*
Easy Icing
- 3 cups (360g) confectioners’ sugar
- 1/2 teaspoon pure vanilla extract (omit and replace with water for stark white icing)
- 2 teaspoons light corn syrup*
- 4.5–5 Tablespoons (67–75ml) room temperature water
- pinch salt*
- optional: gel food coloring & sprinkles for decorating
Instructions
- Make sure you have allotted enough time (and enough counter space!) to make these cookies. The cookie dough needs to chill, the cookies need to cool completely, and the icing needs 24 hours to completely set. If enjoying right away and hardened icing isn’t a concern, you’ll only need about 3–4 hours to make these.
- Make the cookie dough: Whisk the flour, baking powder, and salt together in a medium bowl. Set aside.
- In a large bowl using a handheld or a stand mixer fitted with a paddle attachment, beat the butter and sugar together on high speed until completely smooth and creamy, about 3 minutes. (Here’s a helpful tutorial if you need guidance on how to cream butter and sugar.) Add the egg, vanilla, and almond extract (if using), and beat on high speed until combined, about 1 minute. Scrape down the sides and up the bottom of the bowl and beat again as needed to combine.
- Add the dry ingredients to the wet ingredients and mix on low until combined. Dough will be a bit soft. If the dough seems too soft and sticky for rolling, add 1 more Tablespoon of flour.
- Divide the dough into 2 equal parts. Place each portion onto a piece of lightly floured parchment paper or a lightly floured silicone baking mat. With a lightly floured rolling pin, roll the dough out to about 1/4-inch thickness. Use more flour if the dough seems too sticky. The rolled-out dough can be any shape, as long as it is evenly 1/4-inch thick.
- Lightly dust one of the rolled-out doughs with flour. Place a piece of parchment on top. (This prevents sticking.) Place the second rolled-out dough on top. Cover with plastic wrap or aluminum foil, then refrigerate for at least 1–2 hours and up to 2 days.
- Once chilled, preheat oven to 350°F (177°C). Line 2–3 large baking sheets with parchment paper or silicone baking mats. Carefully remove the top dough piece from the refrigerator. If it’s sticking to the bottom, run your hand under it to help remove it. Using a cookie cutter, cut the dough into shapes. Re-roll the remaining dough and continue cutting until all is used. Repeat with second piece of dough. (Note: It doesn’t seem like a lot of dough, but you get a lot of cookies from the dough scraps you re-roll.)
- Arrange cookies on baking sheets about 3 inches apart. Bake for 11–12 minutes or until lightly browned around the edges. If your oven has hot spots, rotate the baking sheet halfway through bake time. Allow cookies to cool on the baking sheet for 5 minutes, then transfer to a wire rack to cool completely before decorating. No need to cover the cookies as they cool.
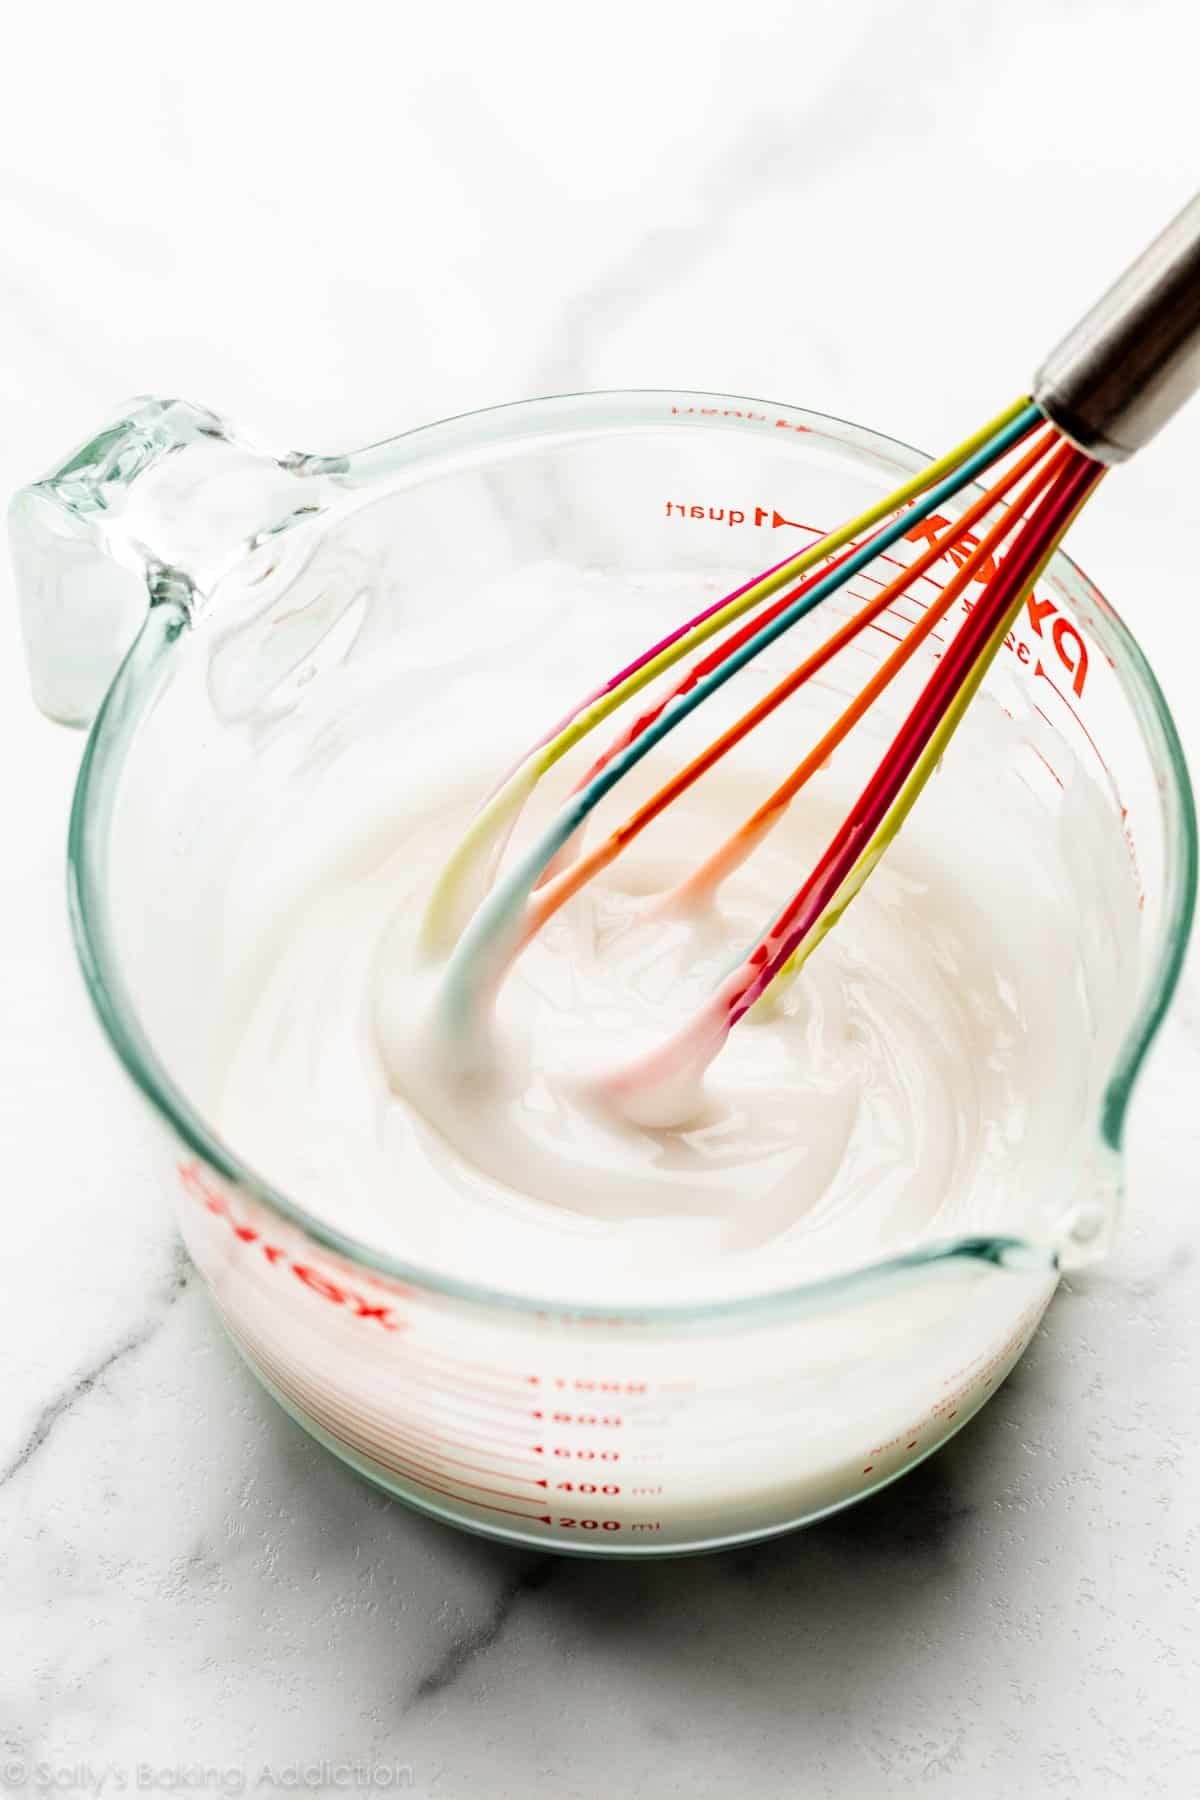
- Make the icing: Using a fork, stir the confectioners’ sugar, vanilla, corn syrup, and 4.5 Tablespoons (67ml) of water, and optional salt together in a medium bowl. It will be very thick and almost impossible to stir. Switch to a whisk and whisk in 1/2 Tablespoon (8ml) more of water. If you lift the whisk and let the icing drizzle back into the bowl, the ribbon of icing will hold shape for a few seconds before melting back into the icing. That is when you know it’s the right consistency and is ready to use. If it’s too thick (sometimes it is), whisk in another 1/2 Tablespoon (8ml) of water or a little more until you reach the proper consistency.
- If you’re tinting the icing another color, stir in the food coloring. You can pour some icing into different bowls if using multiple colors. When tinting icing, use only 1–2 drops at first, stir it in, then add more as needed to reach your desired color. Remember, color darkens as icing dries.
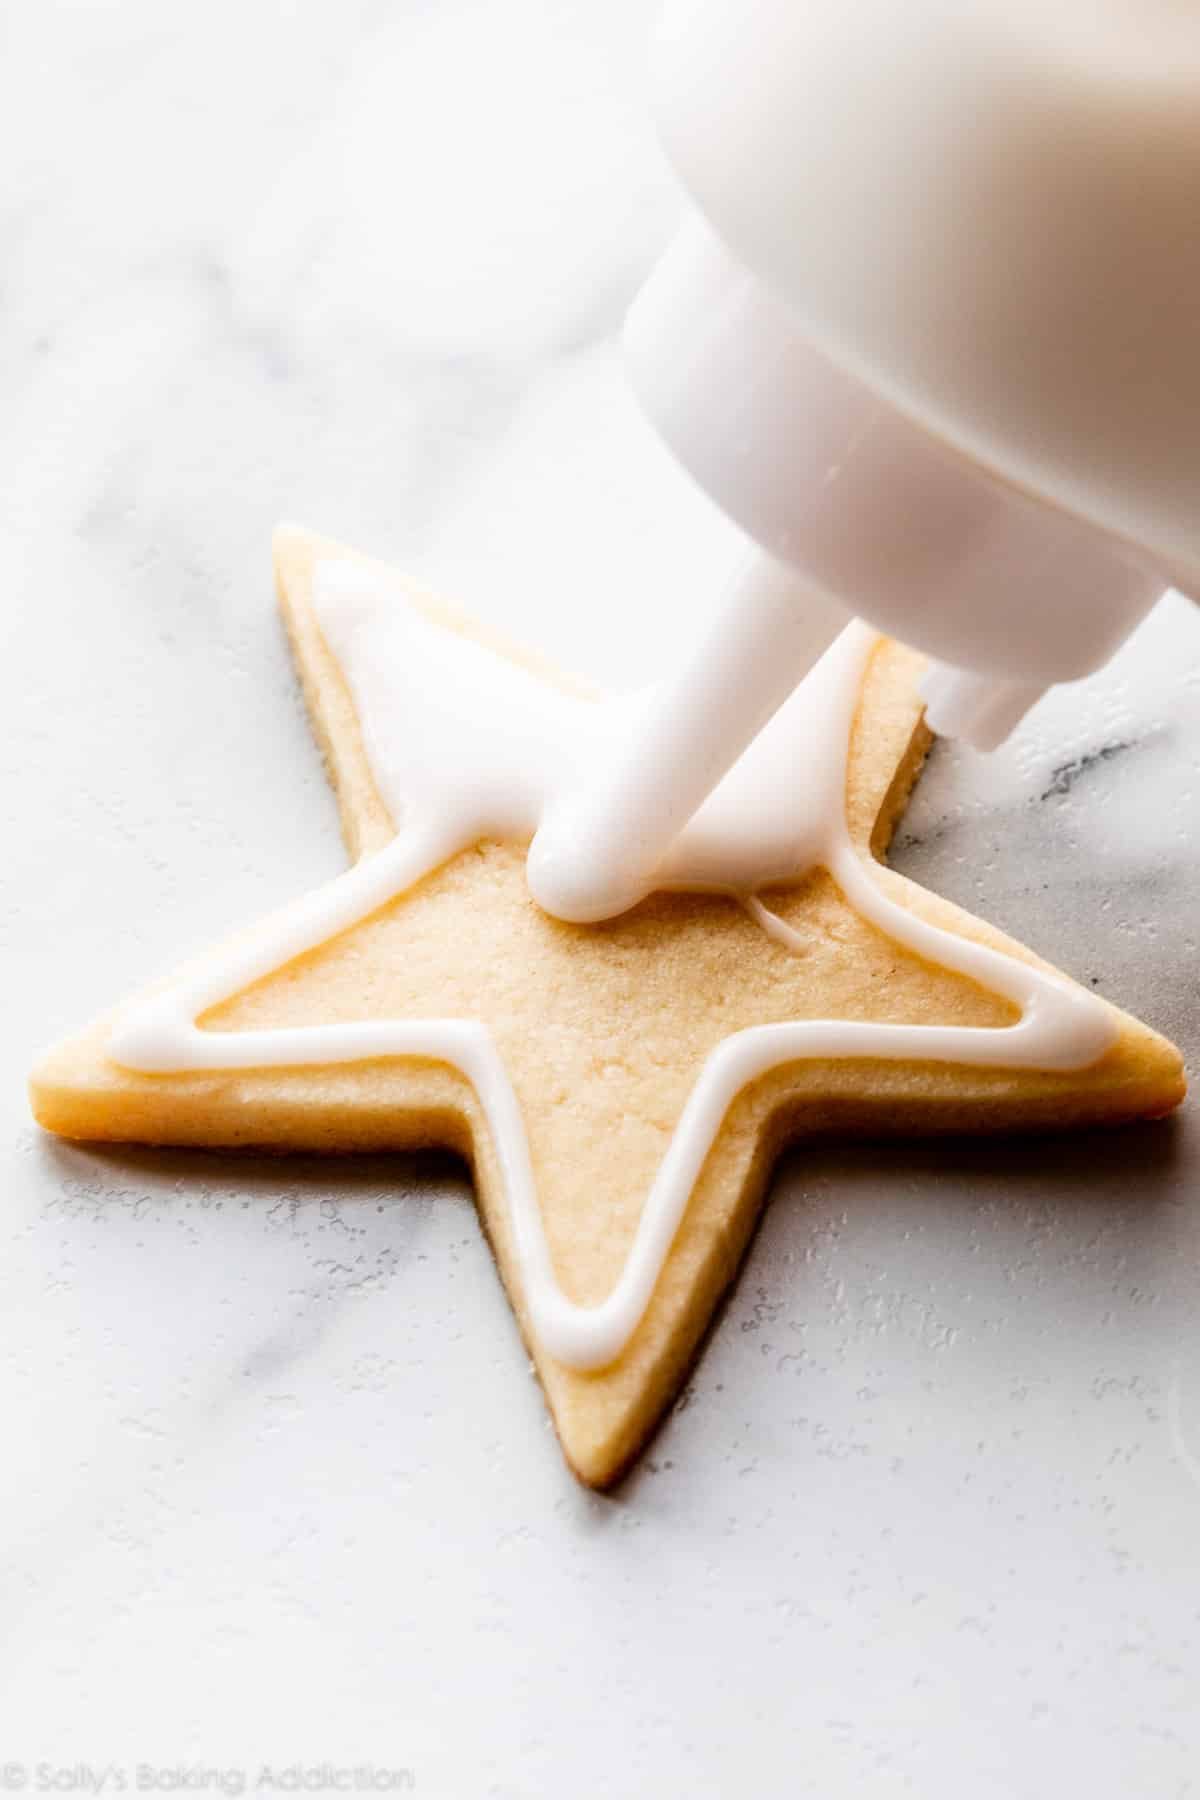
- Decorate the cookies: You can dip the cookies into the icing or use squeeze bottles or piping bags (reusable or disposable) fitted with piping tips (I usually use Wilton Piping Tip #4). Decorate your cookies as desired. If using the squeeze bottles or piping tips, I usually outline cookies with icing first, then fill in the middle. If adding sprinkles on top of the icing, add them right after applying icing on your cookie.
- Let icing dry/set: Feel free to enjoy cookies before icing completely dries. Icing dries in 24 hours. No need to cover the decorated cookies as you wait for the icing to set. If it’s helpful, decorate the cookies directly on a baking sheet so you can place the entire baking sheet in the refrigerator to help slightly speed up the icing setting. Once the icing has dried, these cookies are great for gifting or for sending.
- Cover and store decorated cookies for up to 5 days at room temperature or up to 10 days in the refrigerator.
Notes
- Freezing Instructions: Plain or decorated sugar cookies freeze well up to 3 months. Wait for the icing to set completely before layering between sheets of parchment paper in a freezer-friendly container. To thaw, thaw in the refrigerator or at room temperature. You can also freeze the cookie dough for up to 3 months before rolling it out. Prepare the dough through step 4, divide in half, flatten both halves into a disc as we do with pie crust, wrap each in plastic wrap, then freeze. To thaw, thaw the discs in the refrigerator, then bring to room temperature for about 1 hour. Roll out the dough as directed in step 5, then chill rolled-out dough in the refrigerator for 45 minutes–1 hour before cutting into shapes and baking.
- Make-Ahead Instructions & Storing Icing: If not decorating right away, cover the icing tightly and keep in the refrigerator for up to 2 days. You can store in piping bags (with clips or rubber bands to seal ends), in squeeze bottles, or covered in bowl or container. Bring to room temperature before using. If icing has thickened up, add a few drops of water and mix in to thin out. Depending how you stored the icing (squeeze bottle/piping bag/container or bowl) shake squeeze bottle to mix/massage piping bag to mix/whisk in bowl or container to mix.
- Special Tools (affiliate links): Electric Mixer (Handheld or Stand) | Baking Sheets | Silicone Baking Mats or Parchment Sheets | Rolling Pin or Adjustable Rolling Pin | Holiday Cookie Cutter Set | Cooling Rack | Squeeze Bottle | Piping Bag (Disposable or Reusable) | Americolor Soft Gel Paste Color Kit | Couplers | Wilton Tip #4
- Room Temperature Butter: Room temperature butter is essential. If the dough is too sticky, your butter may have been too soft. Room temperature butter is actually cool to the touch. Room temperature egg is preferred so it’s quickly and evenly mixed into the cookie dough.
- Flavors: I love flavoring this cookie dough with 1/2 teaspoon almond extract as listed in the ingredients above. For lighter flavor, use 1/4 teaspoon. Instead of the almond extract, try using 1 teaspoon of maple extract, coconut extract, lemon extract, or peppermint extract. Or add 1 teaspoon pumpkin pie spice or ground cinnamon. If using lemon extract, you can also add 1 Tablespoon lemon zest.
- Corn Syrup: Corn syrup gives the icing sticking power and creates a beautiful sheen on the dried icing. I don’t recommend skipping it, but you can if absolutely needed.
- Salt: I know salt isn’t a typical ingredient in cookie icing, but it helps offset its sweetness. You need just a small pinch.
- Yield of Icing: This amount of icing is enough for icing 2 dozen cookies. You’ll have plenty if you want to divide it and tint the batch multiple colors, too. Icing can easily be halved by halving all of the ingredients. (Still add a tiny pinch of salt.)
- Be sure to check out my top 5 cookie baking tips AND these are my 10 must-have cookie baking tools.


Reader Comments and Reviews
Could I make the icing a few days prior?
Hi Jamiee, If not decorating right away, cover the icing tightly and keep in the refrigerator for up to 2 days.
When do you put on the top layer of decorative icing? After the base has set? For example, the christmas tree is green, but I want to add some dots of red, blue, etc. for the ornaments or maybe draw a little candy cane or something. At what point can I do that?
Thanks!
Hi Nick, if you don’t want the two layers/colors of icing to bleed together, wait for the first layer/color to almost completely set before adding the other, so you get a more defined separation between them.
My first attempt at decorating cookies. This took me quite a bit of time due to many steps.
Although they turned out beautifully….I said to myself ….friends and family that I share these with will not appreciate the “toil and trouble” I went thru to deliver these special Christmas treats. I WAS SO WRONG ! My family says these are the best cookies I have ever made. My neighbors told me that I needed to open a bakery ! My friends say they were so delicious that they ate them for their breakfast with coffee. I don’t know any cookie that I have ever made getting this many compliments. So …thank you Sally. I guess these cookies will take top spot in my holiday baking from now on…..just hope I get more organized with decorating them
We’re so glad they were a hit, Jennie!
Would this work with earth balance “butter” sticks?
Hi Katie, we haven’t tested that exact substitution so we’re unsure of the results. Let us know if you give it a try!
Oh. My. YUMMMMM!
I am hardly a baker but these cookies are PERFECT!! I decided this was the year to start a Christmas cookie baking traditions – and these cookies sealed the deal!!! I . Followed exactly as directed and they turned our perfectly. I can’t stop eating the perfectly buttery and sweet cookies! I can’t wait to keep this new tradition alive!
This recipe turned out great! Subbed brown sugar for a slightly caramelly flavor. Delicious!
how many cookies does this batch make?
Hi Imogen, this recipe yields 24 3-inch cookies and 1.5 cups icing. Feel free to use smaller or larger cookie cutters, knowing that the yield will change.
These are great! They come together so easily and are tasty. I’m usually not a fan of sugar cookies (too sweet and just boring), but I really enjoy these. I had fun making them with my 3-year-old. I will say, the dough became too warm to use very quickly, so keep one half in the fridge while you cut out the first half, and move quickly (not always easy when baking with kids!). I made the frosting and just dipped the cookies in it, which turned out great. I did have a lot of frosting left over. I might try dying the frosting next time. I think these will become a holiday tradition!
These are great, especially the icing. I do wish Sally had this site set up like many others to double or triple the recipe, as I bake ALOT of cookies as gifts.
I use Sally’s recipes for just about everything i bake. I am always pleased with the results. Unfortunately, this time i added too much flour because i scooped and leveled instead of weighing it. How did i save my dough, you might ask. I added a bit of olive oil and coffee creamer, very minimally as the mixer ran and the dough came together. These cookies are perfect if only a bit more delicate than usual, and they are soft and flavorful and held shape well while baking. Thanks again, Sally!
I just made this cookie with my granddaughter and it is wonderful. I didn’t have almond extract but out of all the extracts I did have, my granddaughter chose to substitute it with lemon and oh my goodness what a delicious substitute! perfect cookie.
I was looking for an icing recipe that the grandchildren could easily do. We’ve always used royal icing in the past with the squeeze bottles and piping bags, but I wanted to forgo that this time for something they could easily spread and decorate. Can you spread this icing using a knife?
Thank you.
Hi Donna, you could do that or just dip your cooled cookies into the icing. No tools needed. If you want to decorate cookies with buttercream frosting instead, use this vanilla buttercream. Feel free to keep it on the thicker side by reducing 1 Tablespoon of milk/cream.
Thank you. That’s very helpful. I’ll check out the other recipe as well.
I’ve tried this recipe twice and each time it came out wonderfully. This year, I’m strapped for time and would like to freeze the dough. I read the instructions that you say to thaw in fridge overnight, then take it out for an hour at room temperature, and then to put it back in the fridge for 45-1hour. My question is why put it back in the fridge? Because I’d like to save some time if it’s not absolutely necessary. 😉
Excited also to try Santa’s whiskers this year and the festive chocolate chip drop cookies featured in the photo. Definitely impressed my 6 year old!
Hi quick question what to you use to make icing if you do not have gel color on hand and only food color
Hi Lindsey, while you can use liquid food coloring, be careful when adding. Start with just a drop at a time, since it will add liquid to the icing and change the consistency. The colors will likely not be as vibrant either, but it will work!
I’m so excited to make these again! Do you think these would hold shape/definition when used with press style cutters (the ones that cut and imprint an image/message)? My 3yo loves stamps and was thinking of trying them this year. Thank you!
Hi Michelle, cookie stamps typically hold their shape will in these sugar cookies (although how well can really depend on the exact stamp). The snowflake cookie toppers in these sugar plum fairy cupcakes were made with cookie stamps and this dough recipe. Hope this helps!
My family makes holiday cutouts every year, and this year we gave Sally’s sugar cookie recipe a try. Our cookies turned out so well! They held their shape, had great flavor, and were the perfect soft-but-not-too-soft texture. I’m using past tense because we ate all the cookies in just a few days—oops! I guess we’ll just have to make more before Christmas! The one thing I wish these recipes had was nutrition info, but its lack isn’t enough to turn me away. This is the third cookie recipe of Sally’s that I’ve made and they’ve all been amazing.
I have never left a review on any recipe site before, but I wanted people to know that I tripled this recipe for a large cookie decorating event we were hosting this year. I had looked at lots of recipes and chose this one. I followed it exactly, rolling out the dough and then chilling it overnight. The next day I did all the cookie cutting and baking. They turned out wonderfully. Not too hard, but sturdy enough for handling by the kids while decorating. And they were slightly soft and chewy with a lovely buttery flavour but not too sweet. They held their shape perfectly.
How do you make the icing the deep red like you have in the pictures? When I made the icing and added some “Christmas Red” gel food colouring it turned pink. When I added more it turned orange. Had to make the icing over again but could not achieve the deep red colour. Is there a trick?
Hi Andrea, how did the color look once the frosting set and dried? The color should deepen quite a bit as it dries. This happens especially with darker colors like red and black.
Hi Lexi – the icing actually stayed quite pink as it dried. Looked like a coral colour. I used the white and green I had and then used red sprinkles for red colour because the red I got just looked wrong on Christmas cookies. The cookies themselves turned out great just wondered if there was a trick for the red icing. Love the deep red in the pictures.
Wilton’s “Christmas Red” is awful. I would try another of their red shades, or another brand! I’m trying Americolor this weekend. It’s the weirdest thing – I now have a whole box of perfectly fine Wilton gel colors, but Christmas Red in the trash, and a single bottle of red Americolor, lol.
I enjoy your recipes. They are easy to follow and interesting. It’s fun!
I tried my hand at making sugar cookies with royal icing and I’m really happy how they turned out. I must add that this was my first time making sugar cookies and decorating them with royal icing and I’m thrilled about the results.
I used squeeze bottles at first and later piping bags. Followed your recipe and advise closely, including buying the recommended piping tools.
Wonderful recipe! Instructions and tips are very good and my dough was just right for rolling out. I decorated them using the easy icing recipe and food coloring. I am so pleased with how they look (and taste as I tested one!). I put them in a holiday tin and included them in a box of gifts I sent to my brother and family in Switzerland.
This dough is unfussy, delightful to work with, and makes delicious cookies. I doubled the recipe and used a scale to measure the sugar and flour. I used this recipe to make iced holiday cookies, but I think it would also work really well for making Linzer cookies. Thanks for the recipe. I will be using it for years to come! (I did not use this icing recipe and instead used Sally’s Favorite Royal Icing.)
I loved the flavor and shape was great but is there anyway they can be softer? I like my cookies more soft
Hi Valerie, we’re so glad you enjoyed these cookies! Is there any chance your cookies were slightly over baked? These cookies are pretty soft, so you could try a minute or so less in the oven next time to see if that helps.
Hello,
My wife must use Baking soda, not baking powder. Is there a way to use only baking soda in this recipe instead of baking powder? This is due to a corn allergy.
As well as grass fed butter (Most cows are fed corn as a filler) and use Bob’s Red Mill Egg replacer to replace the eggs (Usually two replacement eggs per one real egg works best)
Pure vanilla and almond extract, as ALMOST every brand uses corn based alcohol. Organic Turbinado sugar rather than white sugar.
Hi Kevin, though I have not tested this, you can replace half of the sugar (so, 6 Tbsp) with brown sugar and then use about 1/4 teaspoon baking soda instead of baking powder. Again, this hasn’t been tested but it’s the first test I would personally try.
You can buy baking powder that does not have cornstarch in it. The tin will probably be labeled gluten free. If you are sensitive to corn, you likely will be sensitive to xanthan gum which is a common thickener made from the fermentation of maize starch (corn starch) with the bacteria Xanthomonas campestris. If your gut is disturbed after having whipped cream desserts at restaurants, blame xanthan gum commonly added to commercial whipping cream. And if you love boba tea but it doesn’t love your GI tract, blame the xanthan gum in the cornstarch the pearls are tossed in at processing so they don’t stick together. Not all pearls are tossed in it but the storekeepers don’t know.
I have two questions! Can this recipe be doubled? and will this recipe work well if I make an extra large cookie? I am talking about a 7.8 inch cookie shaped like a gingerbread man. Thanks in advance for your answer!
Hi Gaby! Doubling this recipe shouldn’t be an issue. We haven’t tested making a cookie the large, but don’t see why it would be a problem. The bake time will be longer. Let us know if you give it a try!
This recipe worked so well and the cookies held their shape instead of spreading! Thanks for the recipe!!
Can you outline the cookies with the icing in the evening, and then come back the next day to fill them in? Will they look weird?
Hi Coco, the outline will likely look separated like an actual outline, as the filling icing the next day won’t bleed/blend into it. Does that make sense? Not a bad thing at all, though!
If I only have salted butter, can I use it for these cookies and just omit the salt from the recipe? I have a LOT of salted butter on hand that I’d like to use up.
Hi Michele, Yes that’s fine! Enjoy!
Hello! Wondering if you can freeze the cookies cut out into shapes without baking them first? So that we can just pull out pre cut cookies and bake them? Thank you!!!
Absolutely!
The cookies came out great! I’m still mastering how to decorate them, it’s tricky! I can’t for the life of me get my icing to turn out stark white like in the photos, though. I even made a batch with no corn syrup or vanilla and they still have an off white tint to them…. Could it be the powdered sugar I’m using?
Hi Emily, though I didn’t do this for the photos (and because yes, it may be your confectioners’ sugar? I use Domino brand), you can add a TEENY dot of purple food coloring. The purple will offset some of the yellow hue. And I’m talking the teeniest dot. Put some on a toothpick and dot it in. 🙂
Can I use maple syrup if I don’t have corn syrup?
You can simply omit the corn syrup if you don’t have any on hand — not a problem!
I made these to cut and decorate with my little grandsons. The 6 yr old was able to easily reroll the scraps and cut out more cookies. ( I had the first 2 circles of dough already rolled out and in the fridge for 2 days. ) The icing was way too thin with only 4 tablespoons of water so I added more powdered sugar, about half cup more. The 3 year old could spread the icing easily and the cookies were sturdy and didn’t break or crack.A lot of holiday fun! The flavor was outstanding. I will be making these again! Thanks for the clear instructions.
Hi Lara, could you substitute the all purpose flour with gluten free flour and not have to change anything else in the recipe?
I’m wondering the same thing!
I did and they are great!
Hi Sally. Can I make the icing ahead of time or does it need to be used right after making it?
Hi Lara, If not decorating right away, cover the icing tightly and keep in the refrigerator for up to 2 days.