

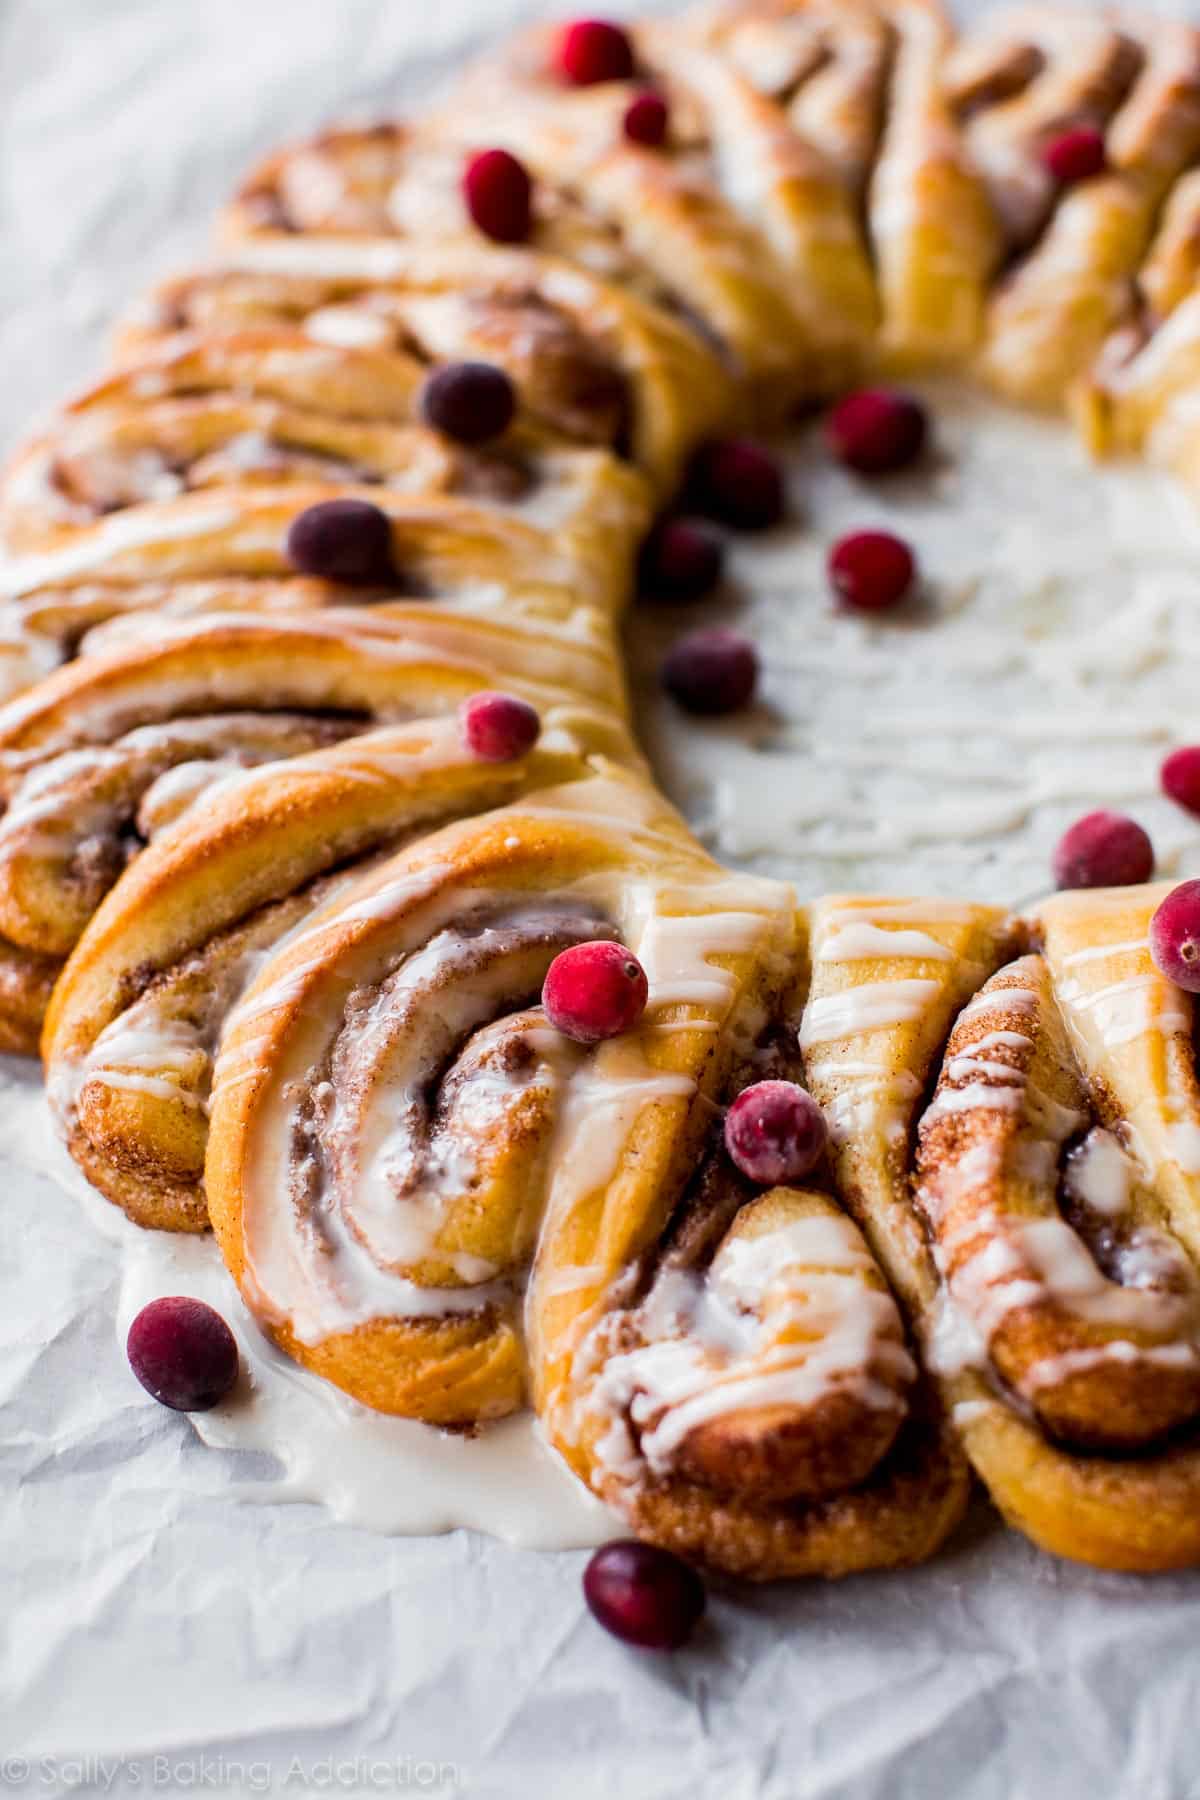
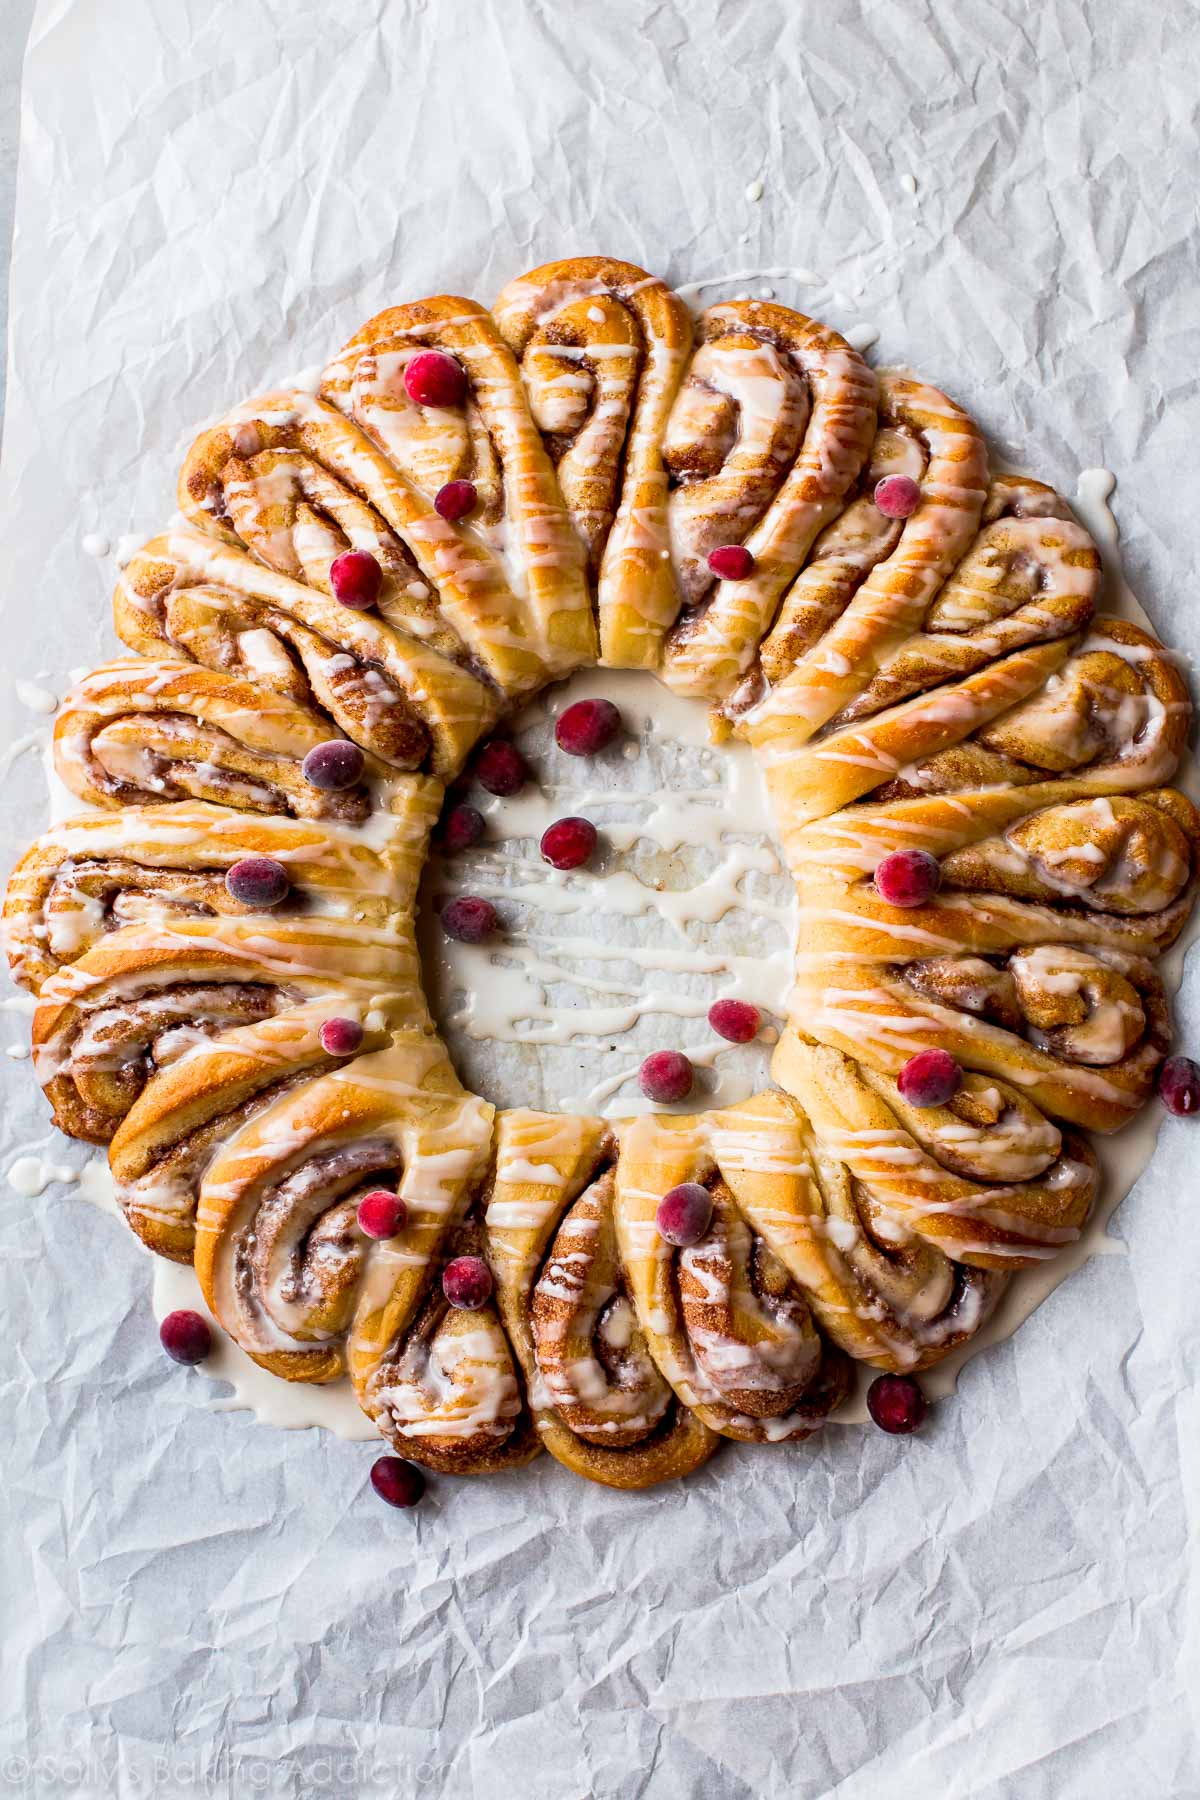
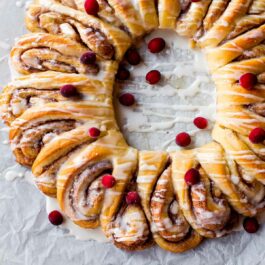
This beautifully festive cinnamon roll wreath is perfect for holiday brunch. Each bite is warm, fluffy, cinnamon-spiced, and drizzled with vanilla icing. It’s sure to impress a crowd and is much easier to make than it looks!
This recipe is brought to you in partnership with Red Star Yeast.
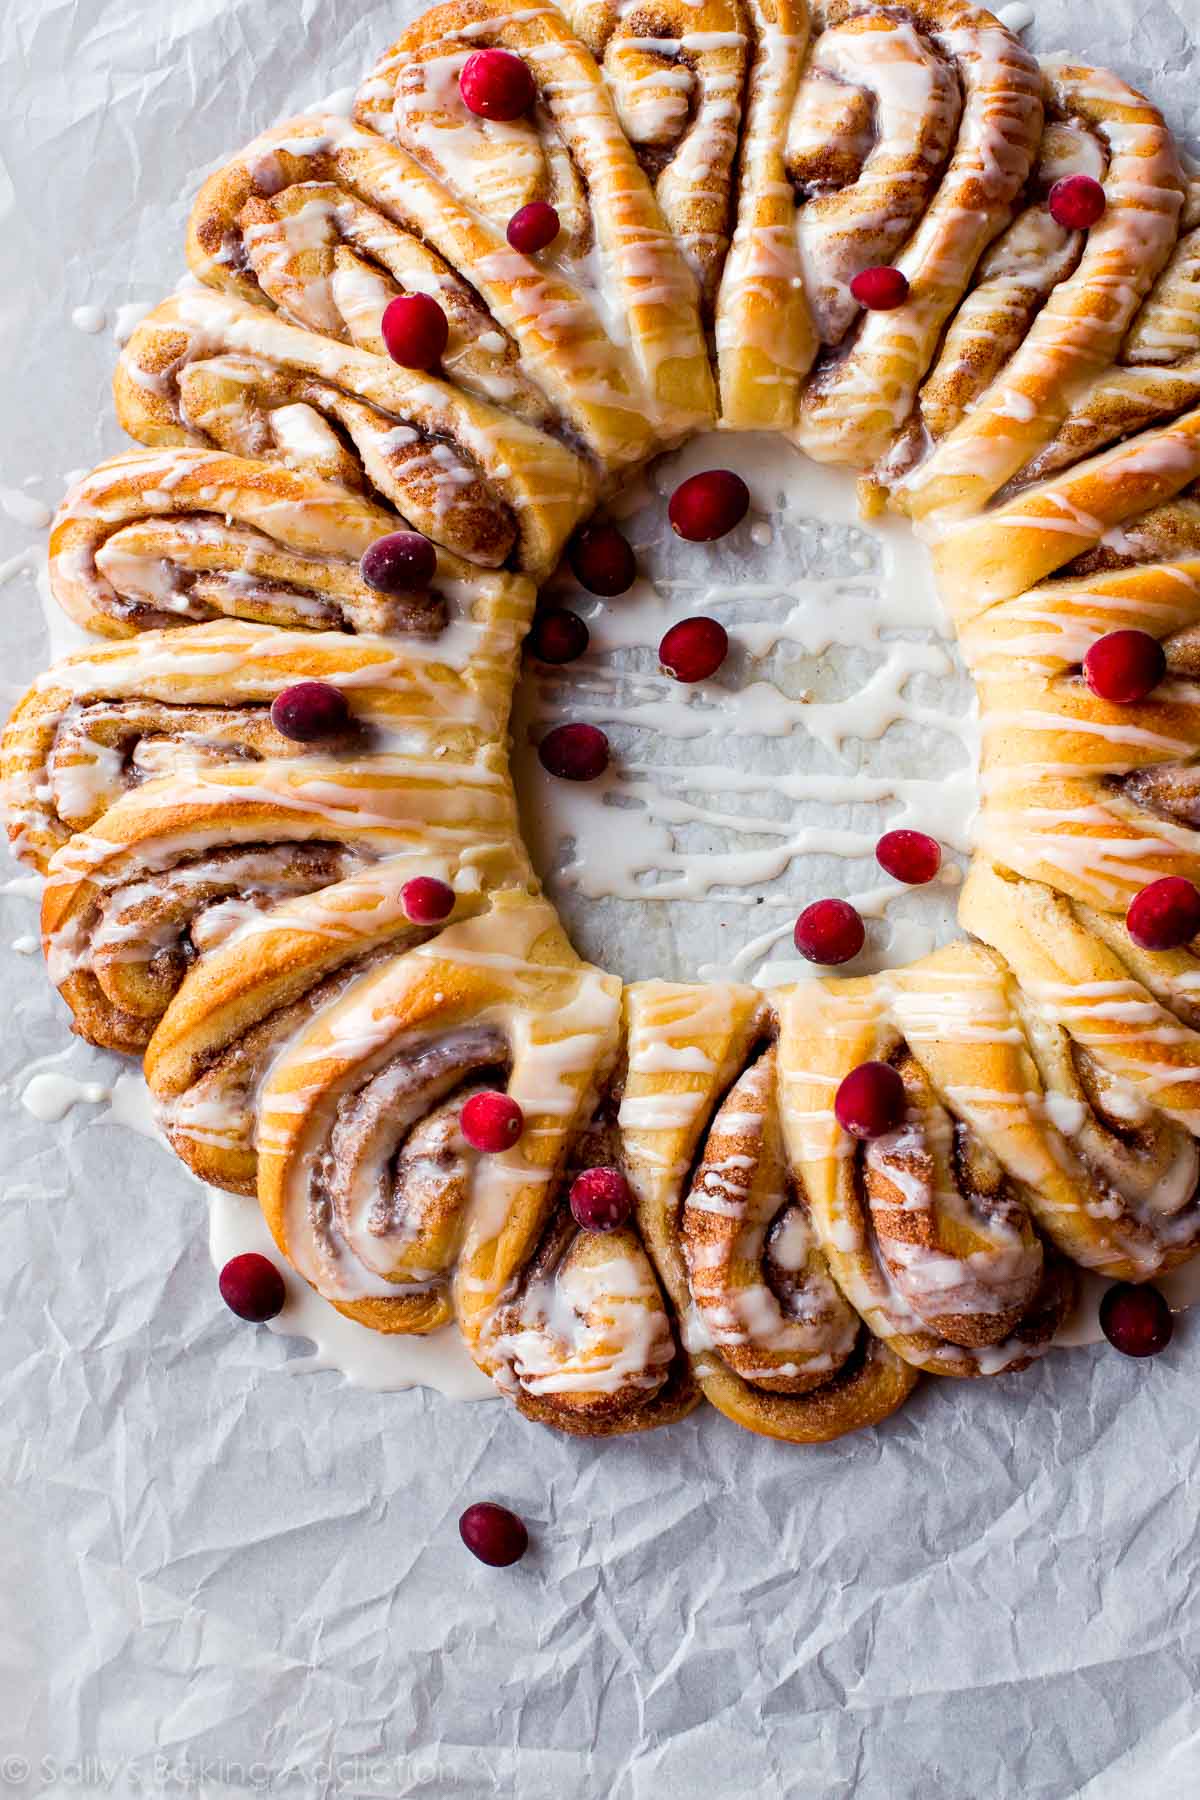
Today’s recipe has Christmas breakfast written all over it. This stunning brunch option is typically called a tea ring, but wreath sounds wonderfully festive. We adorn our front doors with wreaths during the holiday season, so why not decorate our breakfast tables too? You will DOMINATE breakfast with this one.
What Is A Cinnamon Roll Wreath?
You might be wondering what a cinnamon roll wreath actually is—is it bread, cinnamon rolls, something else? A cinnamon roll wreath is:
- Made from cinnamon roll dough
- Arranged to look like a wreath
- Beautifully presented
- Totally festive
- Gooey and fluffy, which is everything we love about cinnamon rolls
- Surprisingly simpler than it looks (just like my star bread!)
- Drizzled with sweet vanilla icing
- Garnished with fresh cranberries (pictured)—or sugared cranberries, if you’re feeling fancy!
What I love most about serving a cinnamon roll wreath is that everyone around the wreath can begin tearing off pieces, making this a total serve-yourself kind of holiday brunch. This is just like how you pull apart monkey bread. Eating together is the whole fun of it! Or if you prefer a little more order at your morning table, simply slice off pieces and serve.
Cinnamon Roll Wreath Ingredients
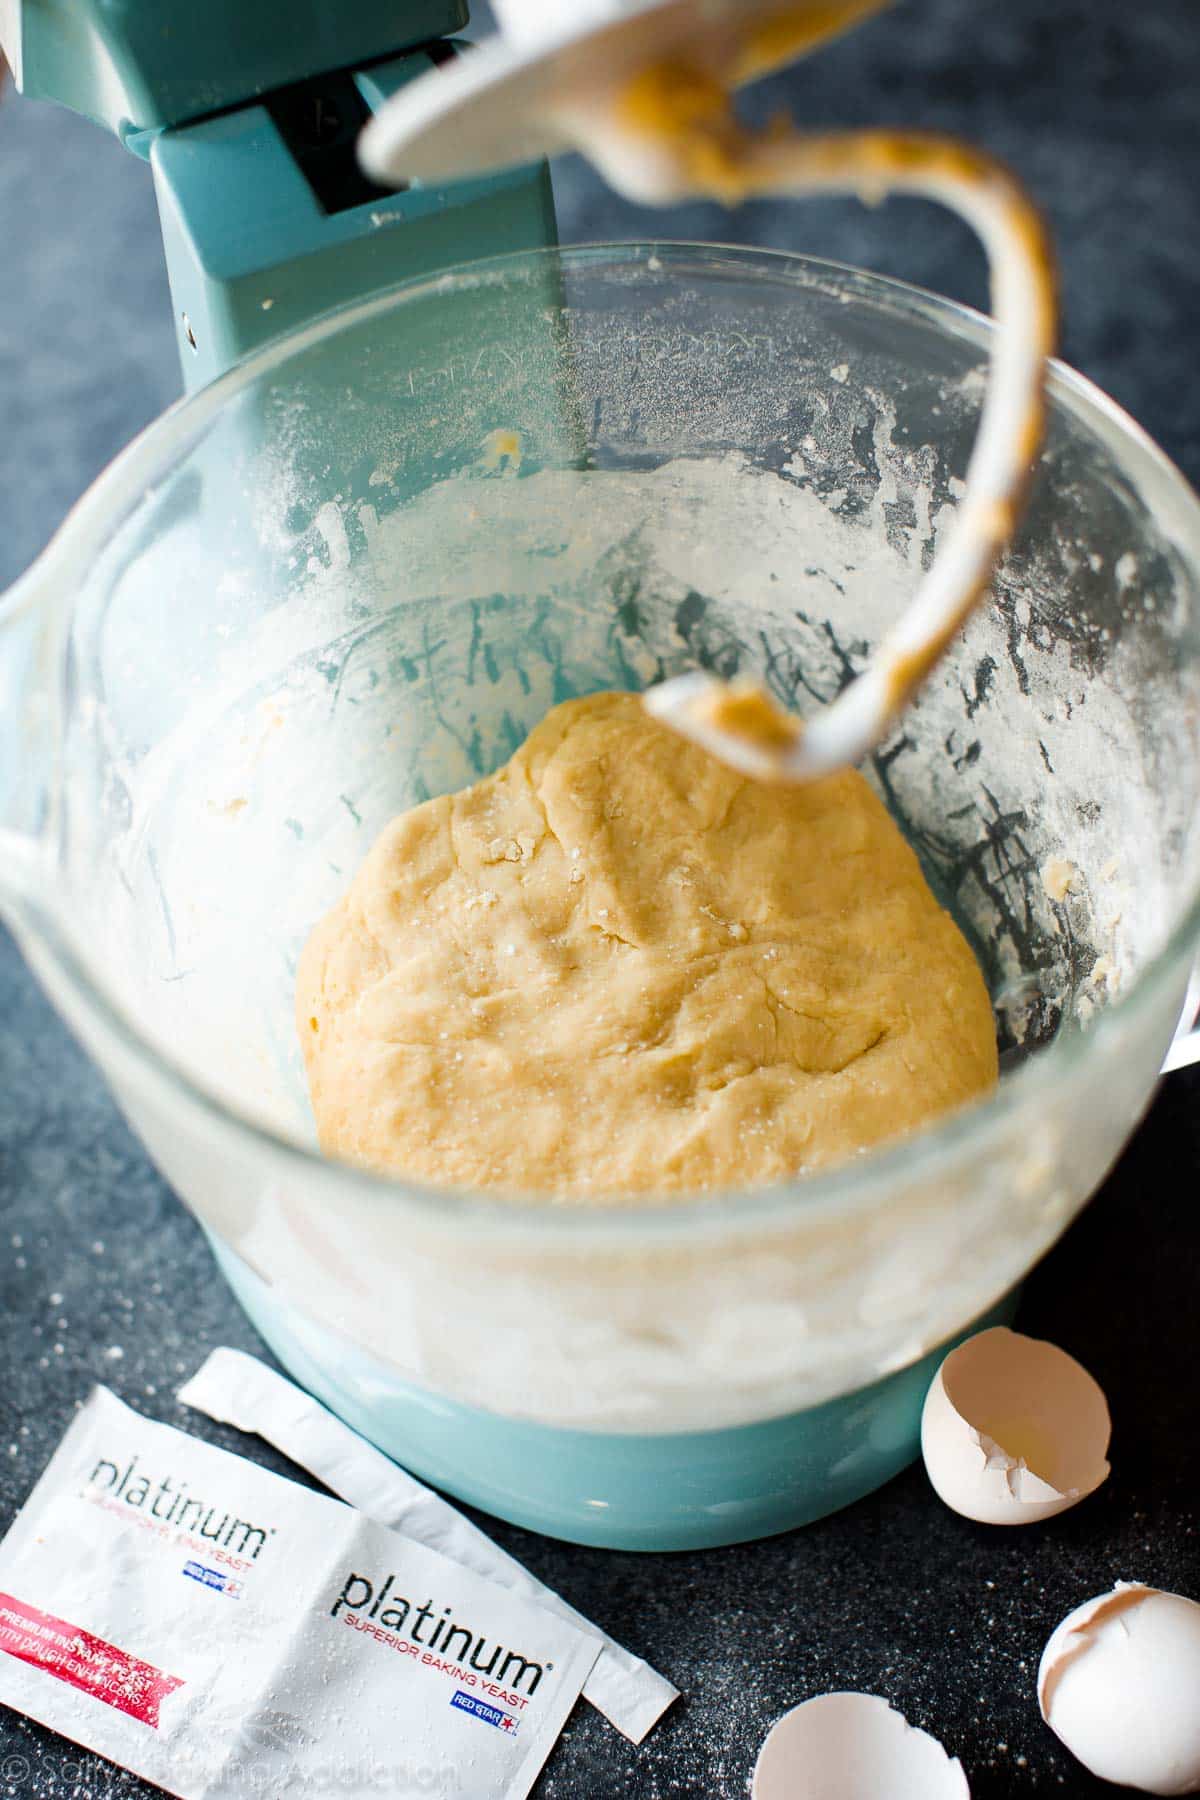
We’re using the same super soft dough from my overnight cinnamon rolls recipe to make a cinnamon roll wreath. Why? This cinnamon roll recipe makes more dough than my regular cinnamon rolls recipe, so we need extra dough. Using my overnight cinnamon rolls recipe also gives us the option to begin the cinnamon roll wreath the night before. This is convenient—especially if you’re entertaining. (If you’d rather make it all in the morning, that works too.) Let’s use Platinum Yeast by Red Star, a premium yeast that gives the dough extra strength and stability.
You need 7 ingredients for this dough:
- Milk: Liquid activates the yeast. Whole milk produces phenomenal flavor and texture.
- Yeast: We use 1 and 1/2 Tablespoons of yeast (2 full packets!).
- Sugar: Sugar feeds the yeast, increases its activity, and tenderizes the dough.
- Butter: Butter promises a flavorful dough.
- Eggs: 2 eggs provide structure and flavor.
- Salt: You can’t make flavorful bread without salt!
- Flour: All-purpose flour is the structure of the dough.
Cinnamon roll dough is a rich dough, which means that it’s prepared with fat (milk, butter, and eggs). Rich doughs make soft breads such as Nutella babka, dinner rolls, and glazed doughnuts. Lean doughs, on the other hand, are made without much fat and produce crusty bread such as focaccia, homemade bagels, and pizza dough.
How To Make A Cinnamon Roll Wreath
Prepare the dough, roll it up as you would cinnamon rolls, then cut into pieces. But here’s the trick—do not cut all the way through. You want the “wreath” to remain connected. Then, carefully, you’ll arrange the entire thing into a circle. If you have an extra hand in the kitchen—great! A helping hand will definitely make it easier. However, it’s completely doable by yourself. I know it looks a little overwhelming, but crafting a cinnamon roll wreath is much easier than you think.
Let’s review step-by-step:
- Make the dough.
- Place the dough on a lightly floured surface. Knead for 5 minutes, and reference my How to Knead Dough video tutorial for extra help. Form into a ball.
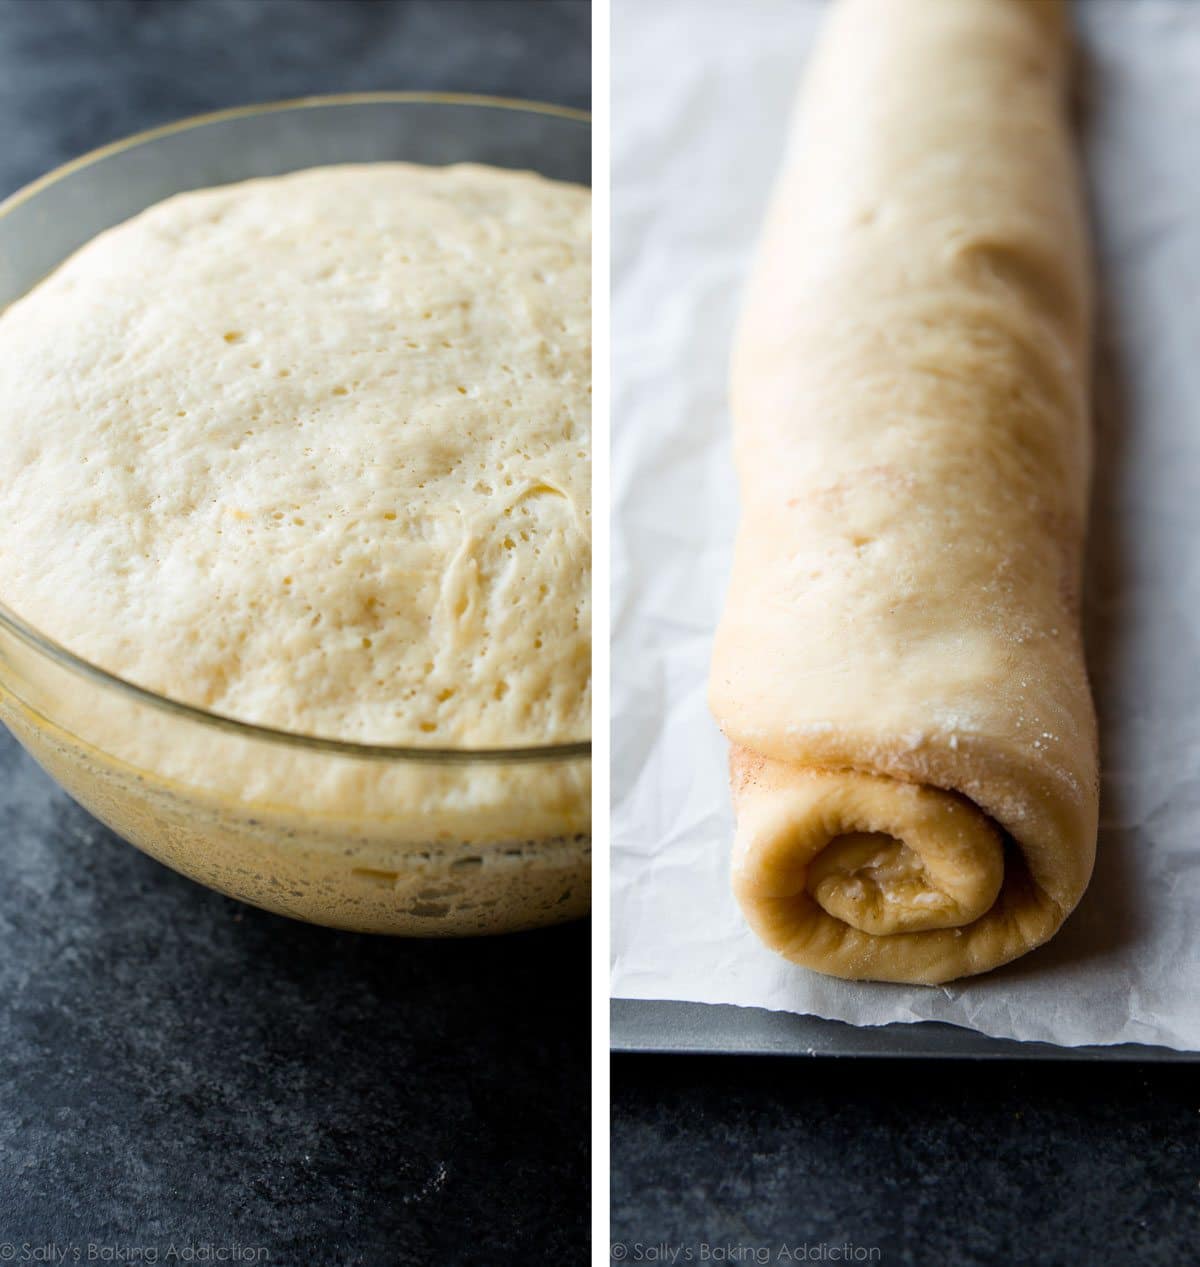
- Let dough rise. Transfer the dough ball to a lightly greased bowl. Cover and let sit in a warm place until doubled in size, about 1 to 2 hours.
- Roll dough into a rectangle. On a large baking sheet lined with parchment paper, shape dough into a 10×20-inch rectangle. Make sure the dough is smooth and evenly thick.
- Make the filling. Spread on top of rectangle.
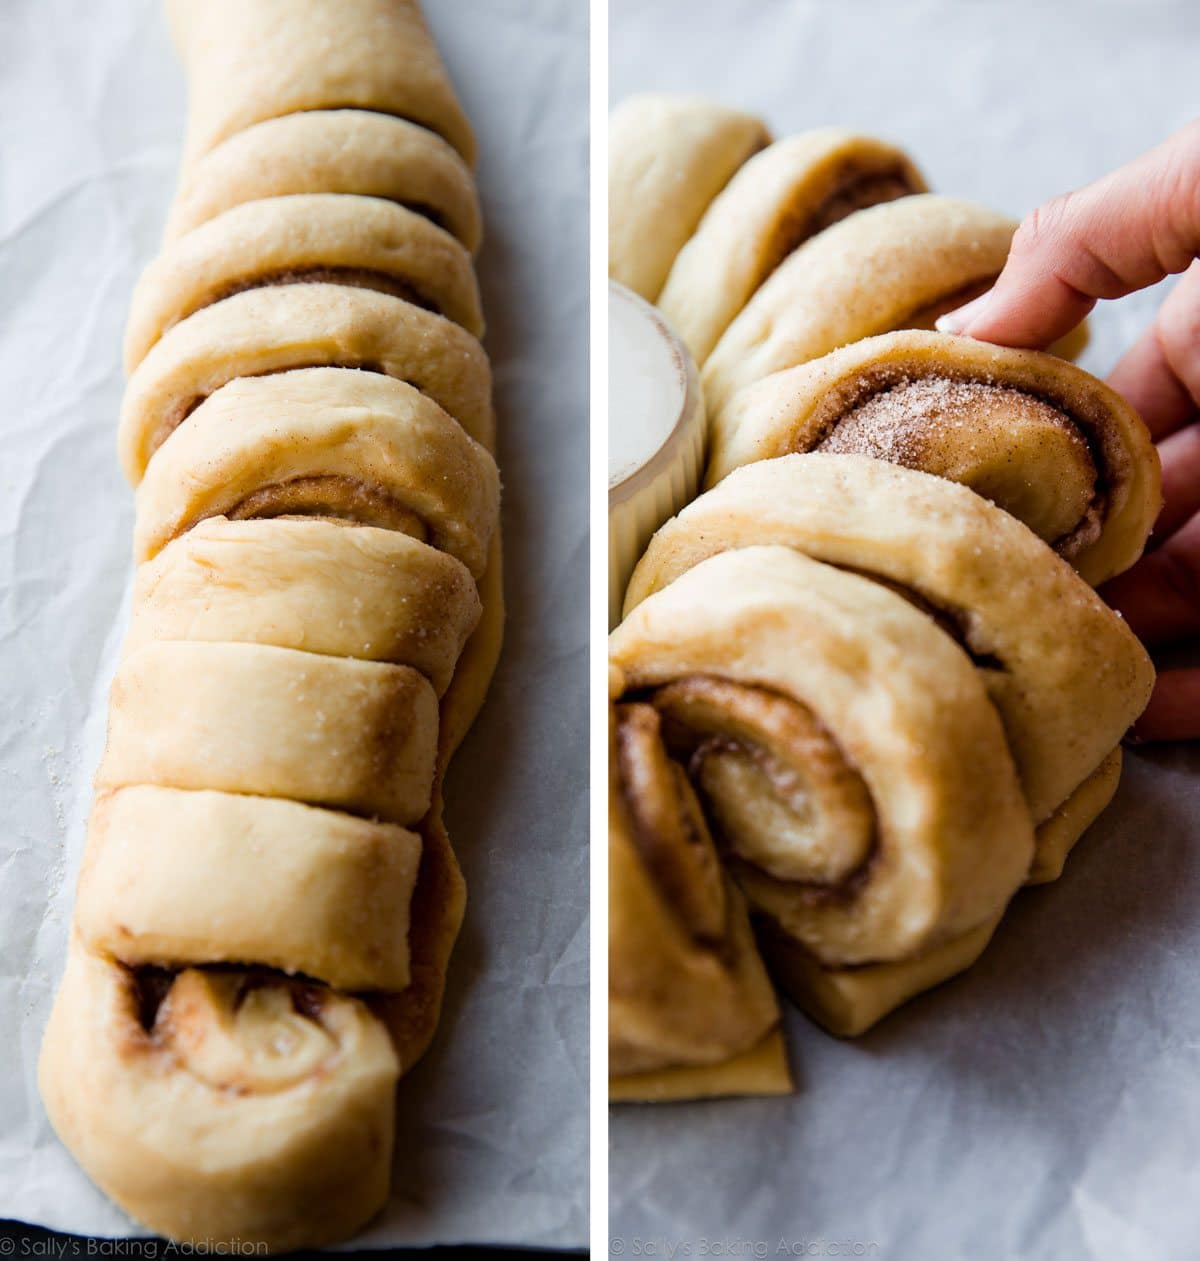
- Roll dough and cut. Tightly roll up the dough to form a 20-inch long log. Cut into 20 1-inch rolls, only slicing 3/4 of the way through so they are still connected at the bottom. Thinner rolls (about 1 inch wide) made an overall more attractive ring. I found any larger than that made for a very puffy wreath.
- Shape the wreath. Turn one of the end cinnamon rolls on its side. Turn the next one so that it slightly overlaps the first. Repeat with each roll, forming into a circle and overlapping each. Use kitchen shears to help cut any dough as you’re shaping.
- Form the wreath around a heat-proof something. I simply use an oven safe ramekin. I learned this trick from The Kitchn. The ramekin in the center makes it easier to shape and helps ensure those little rolls stay put.
- Let dough rise. Loosely cover the rolls with plastic wrap and slide a baking sheet underneath the whole thing. Allow the wreath to rise again in a warm environment until puffy, about 45-60 minutes. *This is when the entire shaped (and unbaked) wreath can go into your refrigerator and be finished up the next morning. See overnight instructions in the recipe notes.
- Bake until the rolls are golden brown.
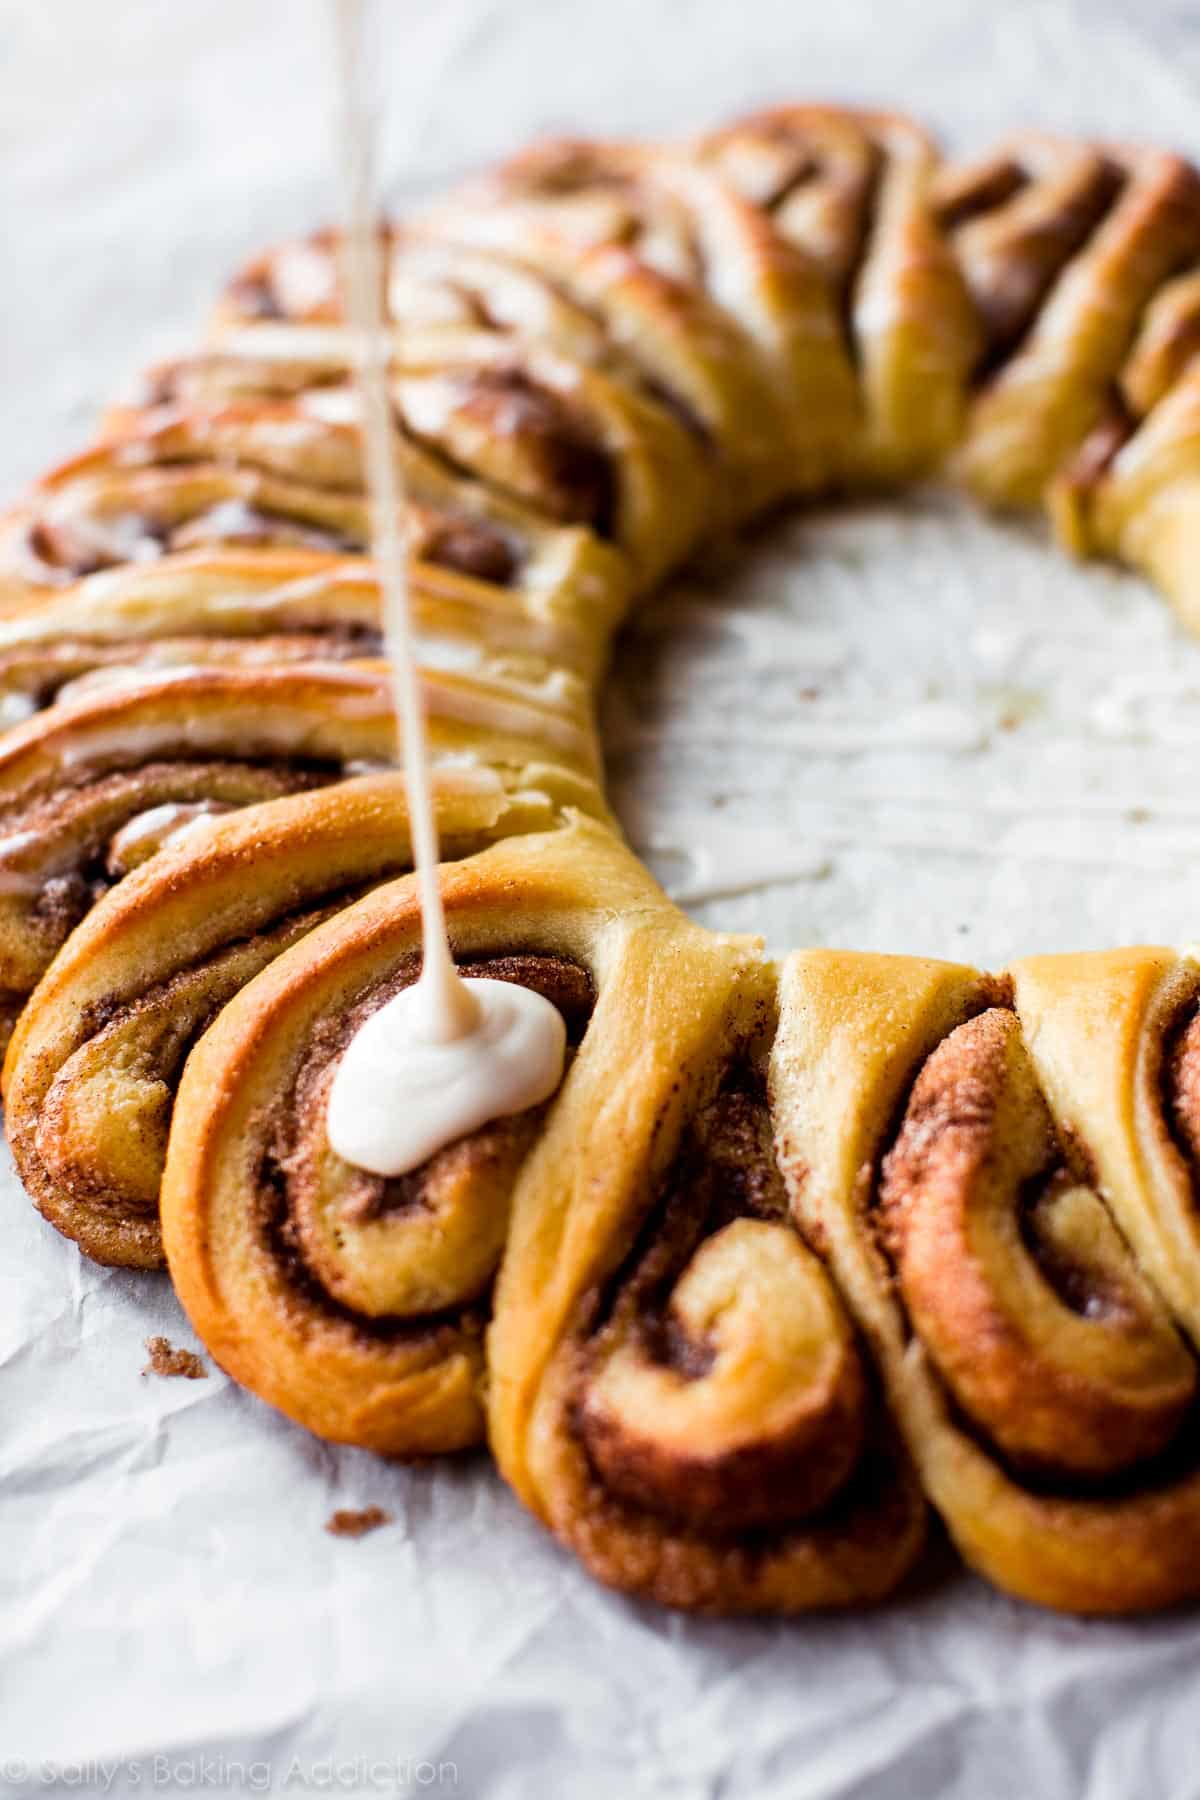
- Make the icing and drizzle on top.

Let’s Talk Toppings!
A wreath always needs a little flair and here are some of my favorites:
- Vanilla icing
- Fresh cranberries or sugared cranberries
- Maple icing from my maple cinnamon rolls recipe + raspberries
- Cream cheese icing from my overnight cinnamon rolls recipe + nuts + raisins
- Drizzle of warm Nutella + homemade salted caramel
There are no limits when it comes to cinnamon roll wreaths!
These are the same cinnamon rolls we love, but served in a completely different way. Small change, big festive difference!
More Holiday Breakfast Recipes
- Breakfast Casserole & Bagel Breakfast Casserole
- Monkey Bread
- Quiche
- Giant Cinnamon Roll Cake
- French Toast Casserole
- Gingerbread Muffins
- Ham and Potato Casserole
- New York-style Crumb Cake
- Cranberry Pecan Cake
Cinnamon Roll Wreath
- Prep Time: 3 hours
- Cook Time: 25 minutes
- Total Time: 3 hours, 25 minutes
- Yield: 20 rolls, serves 10
- Category: Breakfast
- Method: Baking
- Cuisine: American
Description
Learn how to make a warm and fluffy, ooey gooey cinnamon roll wreath!
Ingredients
- 1 cup (240ml) whole milk
- 2/3 cup (135g) granulated sugar
- 1 and 1/2 tablespoons Platinum Yeast from Red Star instant yeast (2 standard size packets)
- 1/2 cup (8 Tbsp; 113g) unsalted butter, softened to room temperature and cut into 4 pieces
- 2 large eggs, at room temperature
- 1/2 teaspoon salt
- 4 and 1/2 cups (563g) all-purpose flour (spooned & leveled), plus more for hands/work surface
Filling
- 6 Tablespoons (85g) unsalted butter, softened to room temperature
- 1/2 cup (100g) granulated sugar
- 1 and 1/2 Tablespoons ground cinnamon
Vanilla Icing
- 1 cup (120g) confectioners’ sugar
- 1/2 teaspoon pure vanilla extract
- 2 Tablespoons (30ml) milk
Instructions
- Make the dough: Heat milk to about 95°F (35°C) using a microwave or stovetop. Pour the warm milk into the bowl of a stand electric mixer fitted with the dough hook attachment (OR you can use a handheld mixer OR no mixer, but a stand mixer is ideal). With a whisk, manually whisk in the sugar and yeast. Cover with a towel and let sit until the yeast is foamy, about 5-10 minutes. If the yeast does not dissolve and foam, start over with fresh active yeast. On low speed, beat in the softened butter until it is slightly broken up. Next add the eggs, one at a time, and then the salt. The butter won’t really be mixing into the mixture, so don’t be alarmed if it stays in pieces. On low speed, gradually add the flour. Once it is all added, beat on medium speed until a soft dough forms. Increase speed to medium-high and beat until the dough is soft and supple, about 6 minutes longer. *If you do not have a stand-mixer with a hook attachment, knead the dough by hand in this step.
- Knead the dough: Keep the dough in the mixer and beat for an additional 5 full minutes, or knead by hand on a lightly floured surface for 5 full minutes. (If you’re new to bread-baking, my How to Knead Dough video tutorial can help here.) If the dough becomes too sticky during the kneading process, sprinkle 1 teaspoon of flour at a time on the dough or on the work surface/in the bowl to make a soft, slightly tacky dough. Do not add more flour than you need because you do not want a dry dough. After kneading, the dough should still feel a little soft. Poke it with your finger—if it slowly bounces back, your dough is ready to rise. You can also do a “windowpane test” to see if your dough has been kneaded long enough: tear off a small (roughly golfball-size) piece of dough and gently stretch it out until it’s thin enough for light to pass through it. Hold it up to a window or light. Does light pass through the stretched dough without the dough tearing first? If so, your dough has been kneaded long enough and is ready to rise. If not, keep kneading until it passes the windowpane test.
- Form the dough into a ball and transfer it to a lightly greased bowl. Cover the dough loosely with plastic wrap, a paper towel, or aluminum foil and let sit in a warm place until doubled in size, about 1 to 2 hours. Here’s what I do: turn the oven on to 200°F (93°C). Once heated to that temperature, turn the oven off. Stick the covered dough inside the oven and allow it to rise in this warm environment.
- Line a large baking sheet with parchment paper. Lightly flour the parchment paper. Place the dough on top and, with floured hands, pat down to roughly form a 10×20-inch rectangle. Make sure the dough is smooth and evenly thick.
- For the filling: Spread the softened butter all over the dough. In a small bowl, toss the cinnamon and sugar together until combined and then sprinkle evenly over the dough. Tightly roll up the dough to form a 20-inch long log. Cut into 20 1-inch rolls, only slicing 3/4 of the way through so they are still connected at the bottom. Use kitchen shears if you need to.
- Shape the wreath: Turn one of the end cinnamon rolls on its side. Turn the next one so that it slightly overlaps the first. Repeat with each roll, forming into a circle and overlapping each. Again, kitchen shears help to cut any dough as you’re shaping.
- Place a ramekin in the middle of the wreath. This will help it hold its shape.
- Cover the wreath loosely with plastic wrap and slide a baking sheet underneath the whole thing. Use a large one with no edges so it can slide under easily. Allow to rise again in a warm environment until puffy, about 45 minutes – 1 hour.
- Preheat the oven to 350°F (177°C). Bake for about 25 minutes, until the rolls are golden brown. Remove from the oven and allow to cool for 10 minutes before topping with icing.
- Make the icing: Whisk all of the icing ingredients together in a medium bowl. Drizzle over wreath.
Notes
- Overnight Instructions: Prepare the rolls through step 6. Instead of allowing to rise in a warm environment in step 7, place the baking sheet in the refrigerator and allow the wreath to rest for up to 14 hours before baking. When it’s time to bake the next day, allow the rolls to come to room temperature and rise for 1 hour on the counter, or until almost doubled in size. Then bake as directed.
- Freezing Instructions: You can freeze this cinnamon roll wreath for up to 3 months, and I recommend a few different methods for doing so. The first method is to freeze it after shaping (step 6), before it has its 2nd rise (step 8). Thaw in the refrigerator overnight, then let rise for 1.5–2 hours at room temperature before baking. The second method is to par-bake the risen cinnamon roll wreath for 10 minutes, let cool completely, then cover and freeze. Thaw in the refrigerator overnight, then let sit at room temperature for 30 minutes before baking. Finish baking for 15–20 minutes. You can also freeze the fully baked cinnamon roll wreath. See How to Freeze Cinnamon Rolls for more details.
- Let the wreath cool completely on the parchment paper that you baked it on and transfer to a large Tupperware (along with the parchment). Then cover with a layer of aluminum foil and freeze. Thaw overnight in the refrigerator. Transfer to a baking sheet and heat in a 350°F (177°C) oven until warmed throughout, about 20 minutes. Drizzle with icing and serve.
- Special Tools (affiliate links): Electric Stand Mixer or Large Glass Mixing Bowl with Wooden Spoon / Silicone Spatula | Whisk | Baking Sheet | Parchment Paper | Kitchen Shears | Small Ramekin
- Reference my Baking with Yeast Guide for answers to common yeast FAQs.


Reader Comments and Reviews
Is the ramekin left in the wreathe while it is baking?
Hi Marilyn, yes, so you’ll want to make sure it is a heat-proof ramekin.
Would it work to bake this in a tube pan?
Hi Esther, we’ve never tested that with any of our cinnamon rolls recipes, but let us know if you do. You may love this monkey bread recipe, it’s very similar to cinnamon rolls.
My mom has made cinnamon rolls every Christmas morning for as long as I can remember. This year she came down with COVID 2 days before Christmas and it was BAD. I decided to make some since she wouldn’t be able to & I decided on this recipe. I’ve never made cinnamon rolls before so I was really nervous and thought “Nobody can make dough the first time around and nail it.”. Come to find out my mom has never made her own dough & was so impressed I made mine from scratch. This couldn’t have come out anymore perfect. Thank you so much for this recipe!
Would this work with bread flour?
Absolutely!
Sally, I have a question about the two baking sheets. Did you mean to have two baking sheets? One with parchment that we prepare the wreath on, and another that goes under the first one? I’ve never seen that before.
Hi Laurie! You can just use one baking sheet here.
Thank you. I suspected that. The directions appear to say twice to get a baking sheet.
“Line a large baking sheet with parchment paper. Lightly flour the parchment paper (etc.)”
and then again, “Cover the wreath loosely with plastic wrap and slide a baking sheet underneath the whole thing (etc.).” I’m probably the only person who was confused by this, but I’m making it tomorrow for the first time, for a family get together.
Thank you so much for the amazingly quick response. Everyone in my family is very attached to Sally’s Baking Addiction. 🙂
I’ve made 1 batch and I’m making more today. They’re perfect for gifting! I decided to bake two minis. They baked for 17 about minutes and I tented them with foil towards the end. This time I added diced dried cranberries and some orange zest. I’m also going to drizzle them with a bit of both the vanilla icing and Sally’s cream cheese icing. The minis final diameter was about 8.5 inches. I’m going to place them in 10 in boxes with Sally’s sugared cranberries sprinkled on top and maybe even a sprig of sugared rosemary.
Thank you!
What is the final size of the wreath? I want to place them in cake boxes to gift them and I’m not sure what size to purchase. And what size box would the minis fit into. Thanks!
Hi Serenity, I’d say it’s about 1 ft (max) in diameter. No larger than that.
Delicious. My dough was a very soft brioche dough, hard to shape but it makes pillowy crumb. I should have shaped 2 crowns as it proved tremendously! Thanks for your fab recipes Sally!
I’m going to gift these for Christmas. Any tips on making multiple batches in advance? Also, any tips on making them minis would be helpful. Thank you!
Hi Serenity! See recipe Notes for complete make ahead and freezing options. For best results, we do recommend making separate batches rather than doubling or multiplying batches. For 2 smaller wreaths, we’d recommend making 8×12 rectangles, or 6×11 (somewhere in that range should be great). Bake time should be about the same, but keep a close eye on them. Hope they’re a hit!
Would it work to add apples and raisins to this wreath?
Hi Sal, you could certainly try adding some finely chopped apples and raisins to the filling. Let us know what you try!
When I was 8, I saw a picture of a cinnamon roll tea ring in a recipe book that looked like this. My grandfather, a chef, lived with us and I begged him to show me how to make it. He did. That was the beginning of my baking love and 61 years later, I still make it. I have made your lemon sweet rolls and just recently the raspberry sweet rolls, although I have yet to make the chocolate ones. Had thought to combine the raspberry and chocolate sweet roll recipe. I am hoping that others will see your beautiful picture and get started baking too! You are definitely my go to recipes for baking! It’s been great to pass along the baking tradition to my kids and grandgifts (grandkids). Thank you for posting such beautiful pictures AND recipes that work! Happy Holidays!
Did you try combining the raspberry and chocolate sweet rolls, btw? And did you form them into a wreath shape?
This recipe looks amazing just wondering if I can substitute evaporated milk for the whole milk?
Hi Jennifer, while I have not tested that, I can’t see it being an issue with this dough. Let me know if you try it.
These are delicious but they spread out too much. What am I doing wrong?
Hi Linda! Did the rolls un-roll themselves? Some spreading is normal.
If the dough sunk when baked, it may have been over-proofed. Try letting it rise for less time, or in a cooler spot next time. Here’s our baking with yeast guide with lots of helpful information as well.
Tried this 3 times with the instant yeast and never got any bubbles. Used 2 unopened packages. Then tried instant bread machine yeast, no bubbles and then opened a new thing of Red Star instant yeast and no bubbles even after 15 minutes. Water temperature was correct each time. I’ll make it with active dry yeast instead, but very frustrating and not sure why it wouldn’t bubble.
Hi Mel, the mixture should foam a bit on top. This recipe calls for milk, not water. Are you thinking of another recipe? (Still, it should foam a bit even if using water.)
Hi Sally and team, this recipe looks so good!
I want to make this for a brunch tomorrow but am making it now, so it would have to be left for over 14 hours in the fridge. Overnight instructions say that the wreath can only be left Up To 14 hours so what should i do?
Thank you so much for your help and happy holidays!
Hi Ben, we don’t recommend leaving the bread for any longer than 14 hours, as it may over rise in that amount of time and start to lose its defined shape. The texture of the baked bread will change, too. It would be best to start preparing the recipe a bit later in the day so that you can follow the overnight instructions for 14 hours of fridge time, max.
Great recipe! I have been making these since 1975. I always put ground walnuts and marachino cherries cut in half with my sugar and cinnamon. I always used a 12″ round pizza pan to make them and cut them right in the pan (it does make slight cut marks in the pan). You can take them to functions right in the pan and not mess them up. I am lactose intolerant but these never bothered me at all for the woman asking about Lactaid.
Made this for Christmas Day and my cinnamon roll aficionado husband and he said these were the best cinnamon rolls he’d ever had. I personally have never cared for cinnamon rolls but the buttery softness and fluffiness was impressive! By request, this recipe is now a family tradition.
Would it be okay to make the dough ahead of time? Let it rise overnight in the fridge?
Absolutely! See recipe notes of overnight instructions. Enjoy!
Great, thank you! Wasn’t sure if the dough needed to be shaped before refrigerating.
Will this work with a Lactaid free whole milk?
We haven’t tested that, but let us know if you do!
Turned this into a fabulous King Cake for Mardi Gras. A good layer of frosting and colored sugar disguises the “wreath” look and the rolls are so delicious!
These are great! I was skeptical about tweaking the recipe at first, but after a couple of less than stellar tries proofing the yeast, I reduced the amount to 15 grams for proofing, then added in the other 120 later on. After that, everything worked great! I guess my yeast just didn’t like the high-sugar environment as much; every baker has a different experience. Great recipe!!
Before beginning to bake, I had a question about whether active dry yeast could be used instead of the Red Star Platinum yeast (I couldn’t find it in the grocery store, otherwise I would have used it). Before asking my question I looked through your site and read your amazingly helpful article on baking with yeast. Answered all my question! I appreciate all the thoughtfulness you put into your site and teaching home bakers all the tricks. Thank you!!
Hi there!
This cinnamon roll wreath looks so pretty and yummy! I am planning on making it for our Christmas brunch! Can I substitute the granulated sugar in the filling for brown sugar? Thanks!
Hi Mallory! You can use brown sugar instead – same amount.
Can this be made into a savoury roll instead of sweet. what is a good suggestion for savoury? will I have to adjust sugar
Hi S, yes absolutely. Feel free to reduce the sugar in the dough. A couple Tablespoons would be sufficient. I love using pesto as the filling or even softened butter with shredded cheese and/or herbs.
I have made this recipe in the past and it is so easy and so yummy. This year I want to freeze the wreath before it rises the second time. If I shape it and use the ramekin, can I freeze it then remove the day before proofing it for it to thaw in the refrigerator then take out the next morning and let it rise then pop in the oven. I know I can cook and freeze just wondering about freezing it with the raw dough. Thank you for your help
Happy to help! You can prepare the dough through the shaping step, then freeze it. Let it thaw in the refrigerator then when you’re ready to bake it, let it warm up and rise at room temperature (covered). Then bake!
Hi Sally – I made this last Christmas Eve and it was amazing! Haven’t stopped thinking about it. Definitely going to make it again this year, but I was wondering if it would hold up if I made it in advance and froze it. Do you think the quality would suffer much, and what are your tips for thawing and reheating? Thank you!!
Hey Leigh! You can make the entire wreath and freeze it as a whole. I would let it cool completely on the parchment paper that you baked it on and transfer to a large Tupperware (along with the parchment). Then cover with a layer of aluminum foil and freeze. Thaw overnight in the refrigerator. Transfer to a baking sheet and heat in a 350°F (177°C) oven until warmed throughout, about 20 minutes. Then glaze 🙂
Sally, about how big was the ramekin you used to shape the center? Thanks for sharing this beautiful recipe! 🙂
It’s about 3-4 inches wide 🙂
Hi!!
I was wondering if adding cream cheese would work with this recipe?
Hi Kathy! We wouldn’t add cream cheese to the filling, but a cream cheese icing would be fantastic on top!
Hi Sally, this looks absolutely amazing. You think I can make this into 2 smaller crowns? What dimensions would you suggest I roll it out to ? Thanks!
Absolutely! I’d say maybe 8×12 rectangles– or 6×11. Somewhere around there.
Thank you,I’ve never ever made anything with yeast but I’m wanting to try and this seems just perfect to start with and the instructions are easy to read thank you lots and God bless you.
Will the baking time remain the same? Thanks!