

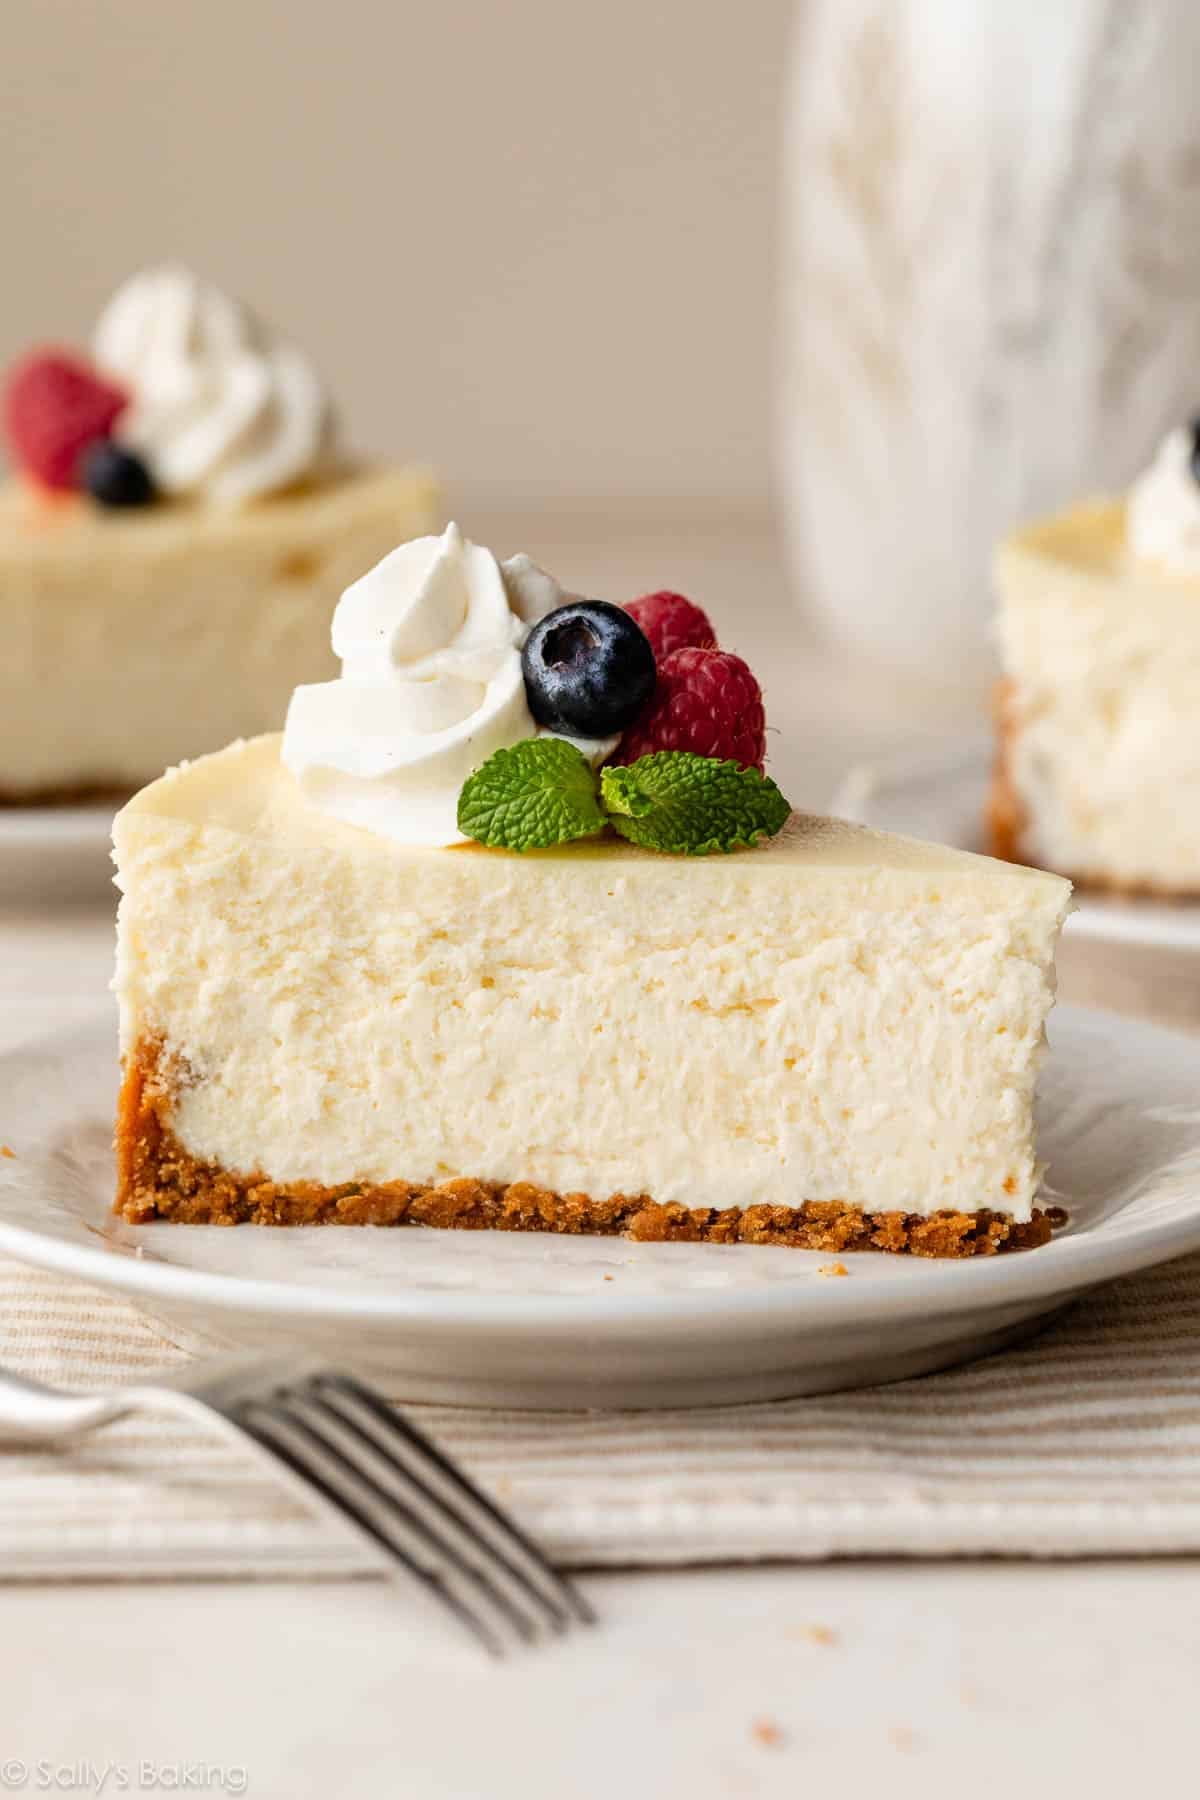
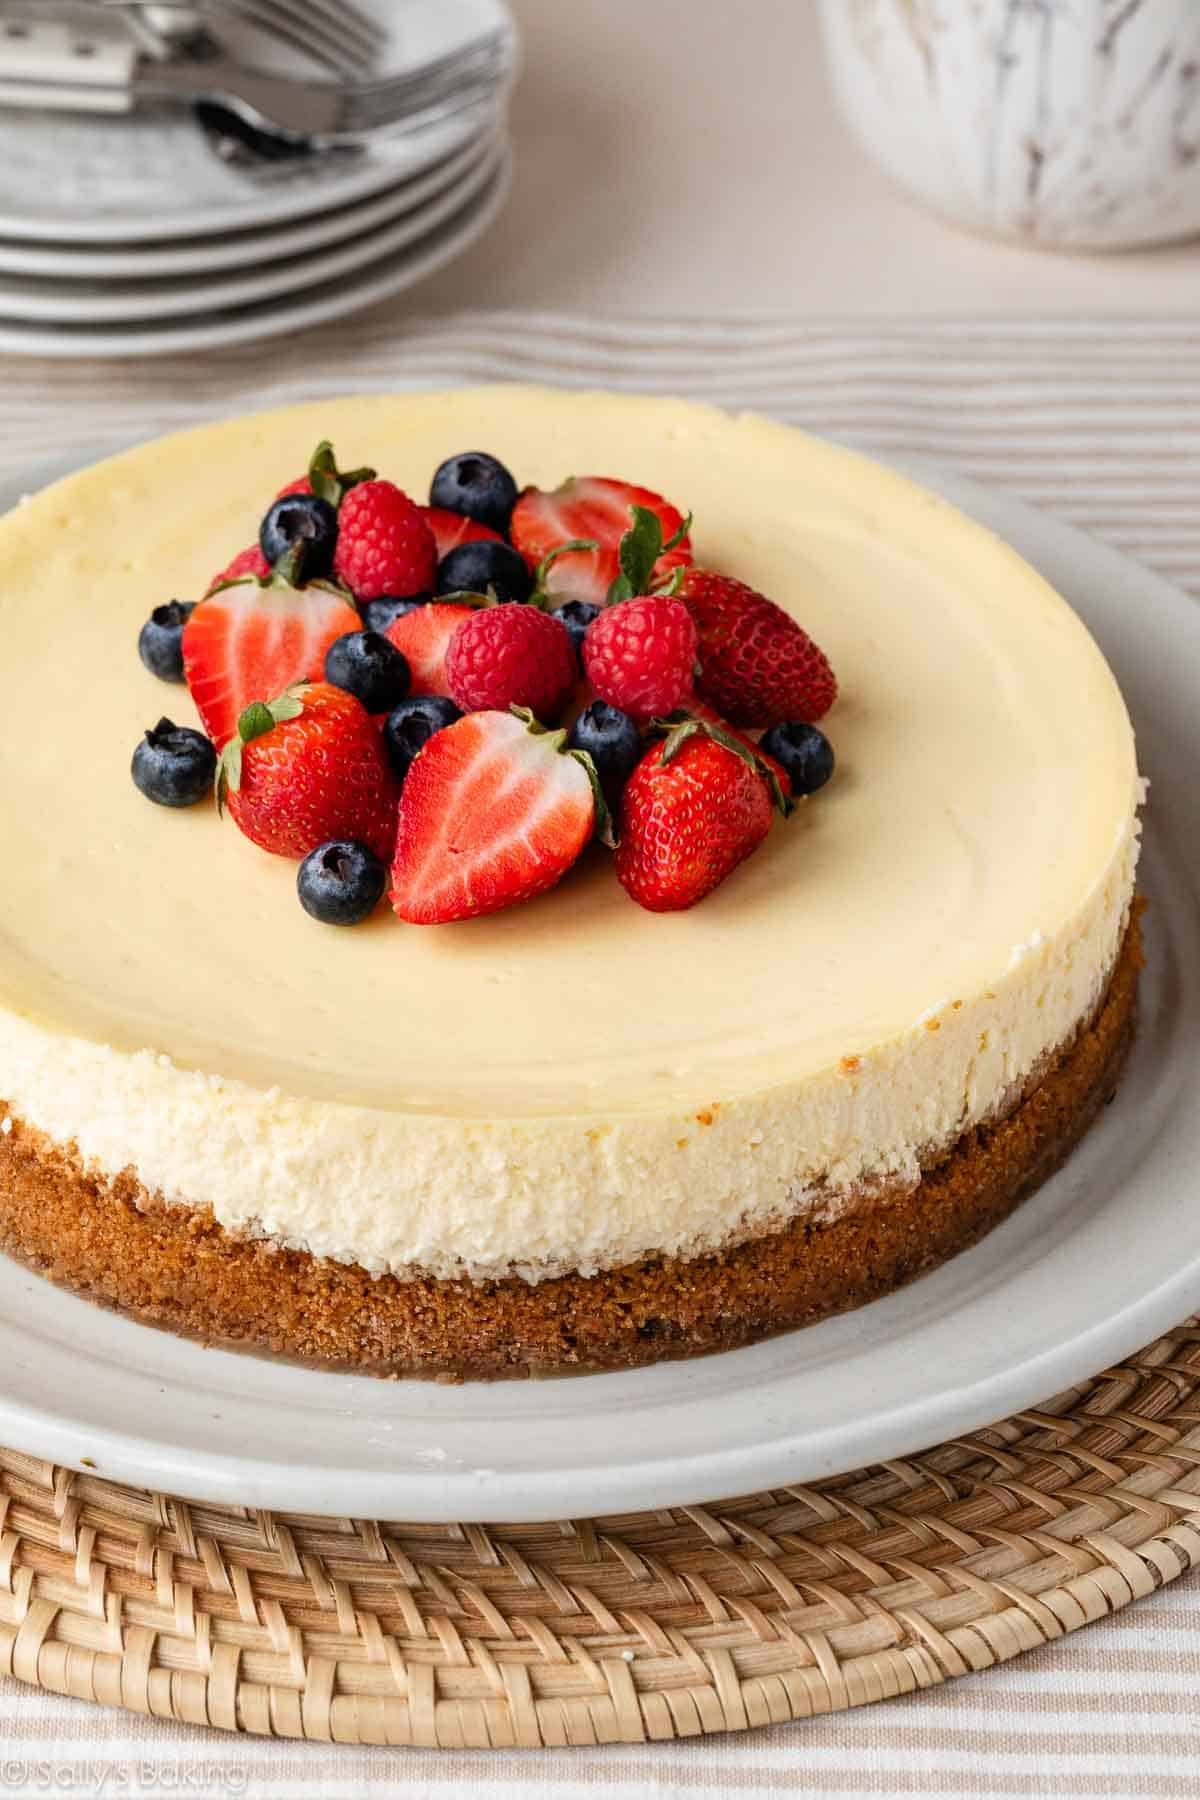
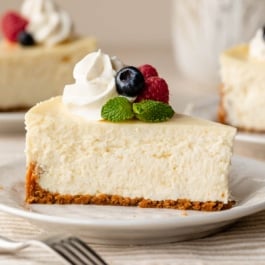
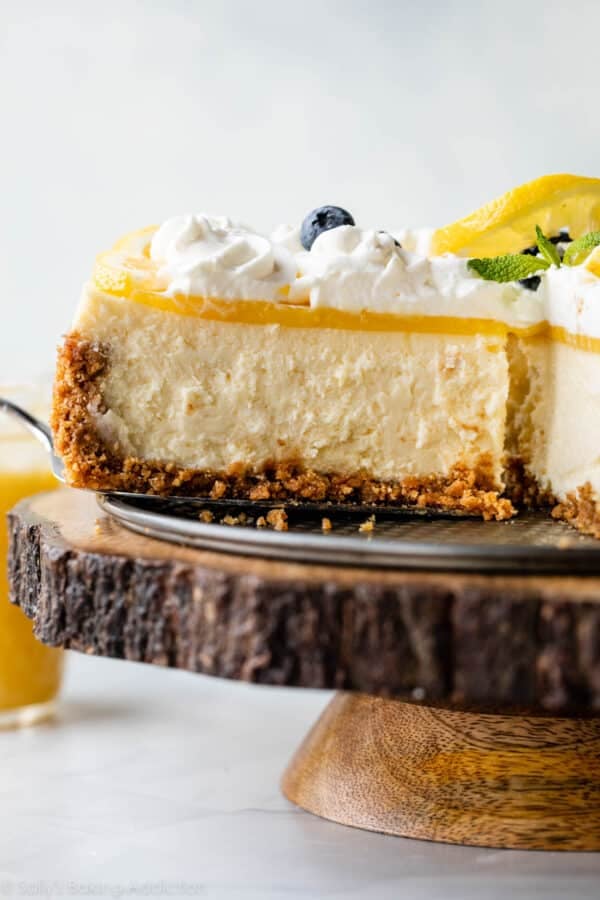
Look no further for a creamy and ultra-smooth classic cheesecake recipe! Paired with a buttery graham cracker crust, no one can deny its simple decadence. For the best results, bake in a water bath.
I originally published this recipe in 2018 and have since added new photos and a few more success tips. This recipe is such a fan favorite, that it deserved a spot in print! You’ll also find this recipe in my New York Times best-selling cookbook, Sally’s Baking 101. The one in the book also includes a recipe for an optional cherry sauce topping!
This is a classic baked cheesecake made with a graham cracker crust and a creamy, tangy filling. By following the recipe below and the success tips my team and I have included, you will be rewarded with a perfect cheesecake: no cracks, no water leaks, and no guesswork!!!
One reader, Randy, commented: “This is the best cheesecake I have ever had! I’m from New York and nothing there beats this—even in the fanciest of restaurants. The only problem is that everyone I’ve shared it with wants me to make more and more. They rave about it being the best ever. ★★★★★”
Not a Plain Cheesecake Recipe
I have shared many, many cheesecake recipes over the years.
There’s been peanut butter cheesecake, blueberry swirl cheesecake, Snickers cheesecake, pumpkin swirl cheesecake, lemon cheesecake, and Amaretto cheesecake. Plus more cheesecake in my published cookbooks. That’s a lot of cheesecake recipes without a single nod to where it all originates: classic cheesecake.
To me, classic cheesecake is creamy, rich, and smooth. My cheesecake recipe is not as dense as New York cheesecake, but it’s just as special. It’s thick, it’s velvety, and there’s no denying its decadence. When I imagine what Chandler and Rachel’s stolen cheesecake tastes like, it’s this!
While there’s a glaring absence of chunks, swirls, and sprinkles in this ivory crowned jewel, there’s nothing plain about this simply stunning dessert.
Preparing this cheesecake recipe is simple—it’s baking it that can make or break the results. Many factors are at play like the springform pan leaking, the surface of the cheesecake cracking, under-baking, over-baking, etc. I have plenty of tricks that will help guarantee classic cheesecake perfection, including determining when the cheesecake is done and everything you need to know about a cheesecake water bath.
Ingredients You Need & Why
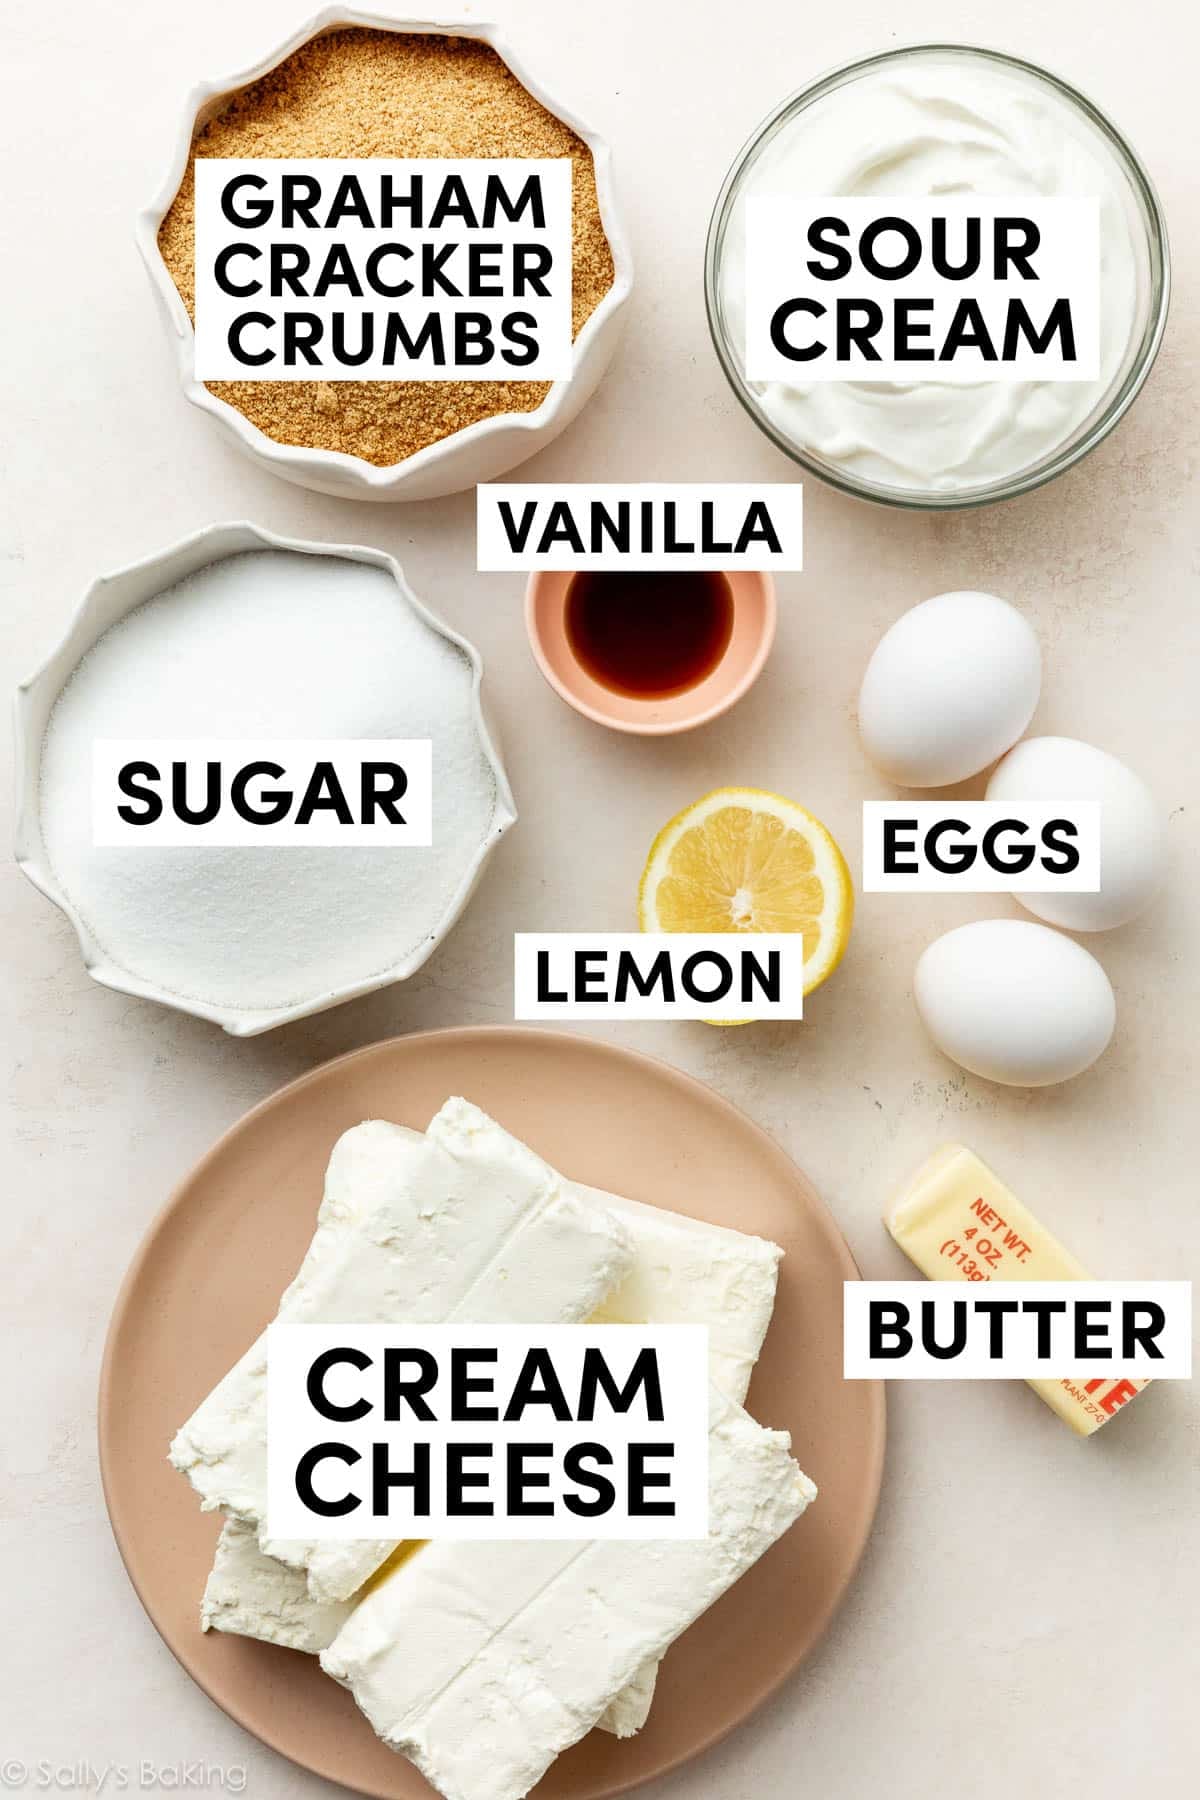
You only need a few basic staple ingredients for this cheesecake recipe.
- Brick cream cheese: Four 8-ounce bricks of full-fat cream cheese are the base of this cheesecake. That’s 2 pounds. Make sure you’re buying the bricks of cream cheese and not cream cheese spread. There are no diets allowed in cheesecake, so don’t pick up the reduced-fat variety!
- Sugar: 1 cup. Not that much considering how many mouths you can feed with this dessert. Over-sweetened cheesecake is hardly cheesecake anymore. Using only 1 cup of sugar gives this cheesecake the opportunity to balance tangy and sweet, just as classic cheesecake should taste.
- Sour cream: 1 cup. I recently tested a cheesecake recipe with 1 cup of heavy cream instead, but ended up sticking with my original (which can be found here with blueberry swirl cheesecake!). I was curious about the heavy cream addition and figured it would yield a softer cheesecake bite. The cheesecake was soft, but lacked the stability and richness I wanted. It was almost too creamy. Sour cream is most definitely the right choice.
- A little flavor: 1 teaspoon of pure vanilla extract and 2 of lemon juice. The lemon juice brightens up the cheesecake’s overall flavor and vanilla is always a good idea. Vanilla bean paste is wonderful too!
- Eggs: 3 eggs are the final ingredient. You’ll beat the eggs in last, one at a time, until they are *just* incorporated. Do not over-mix the batter once the eggs are added. This will whip air into the cheesecake batter, resulting in cheesecake cracking and deflating.
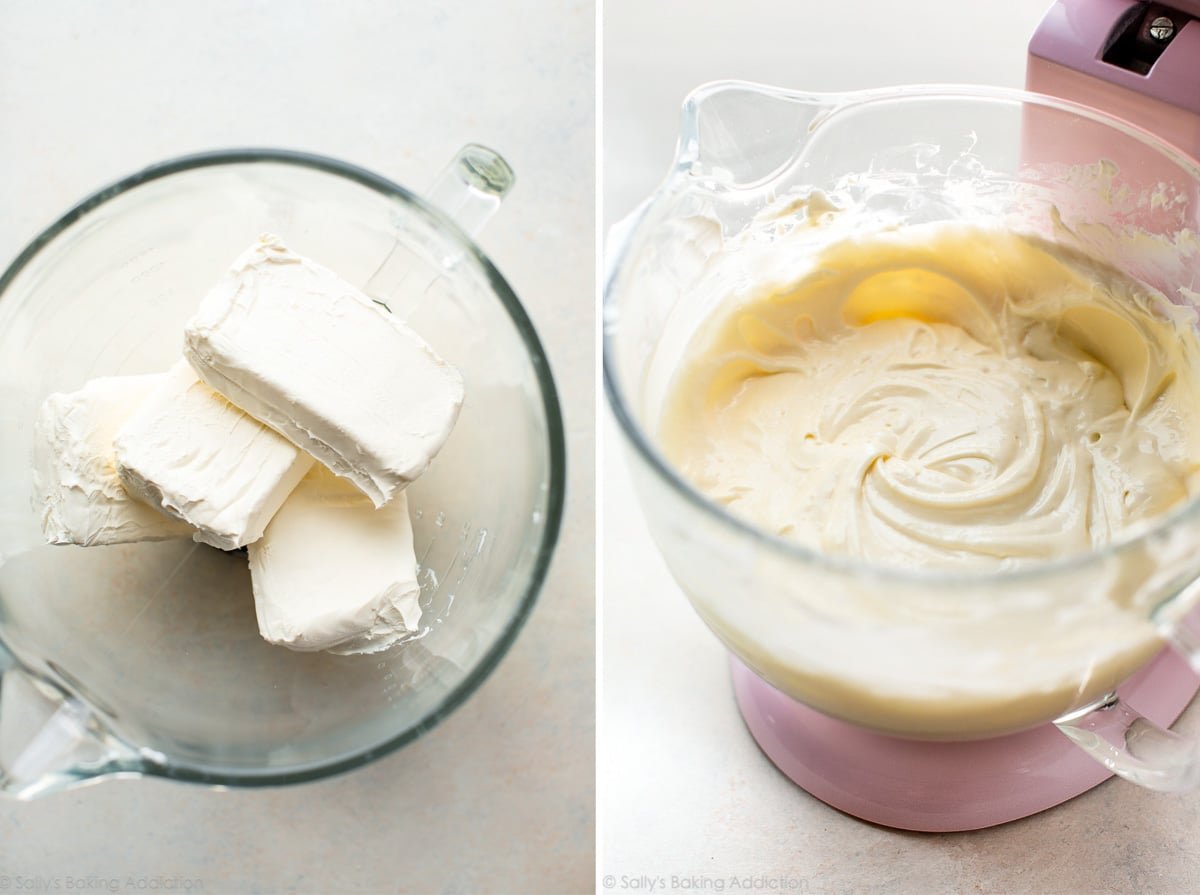
And as always, make sure all of the cheesecake batter ingredients are at room temperature so the batter remains smooth, even, and combines quickly. Beating cold ingredients together will result in a chunky, over-beaten cheesecake batter, hardly the way we want to start!
How to Make a Graham Cracker Crust
Since classic is the keyword of the day, we’re sticking with cheesecake’s main squeeze: a graham cracker crust. I reduced the butter from my original graham cracker crust recipe by 1 Tablespoon. I find this crust remains a little more crunchy. Make sure you pack the crust in tightly and pre-bake it to help prevent any sogginess.
You could use this Oreo cookie crust instead. No big changes necessary to the recipe below, but I do encourage you to lightly grease the bottom of the springform pan because Oreo crusts tend to stick. (You could also use a Biscoff pie crust instead if you’d like!)
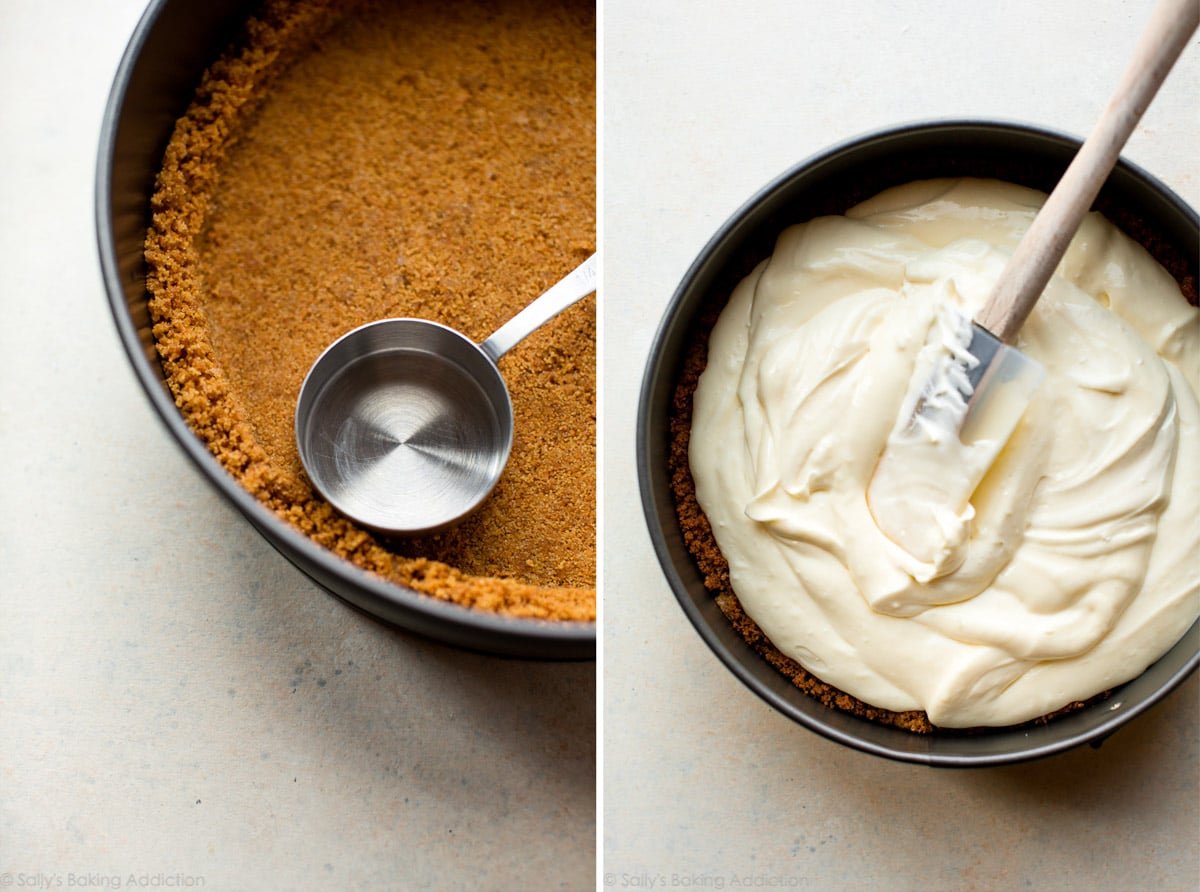
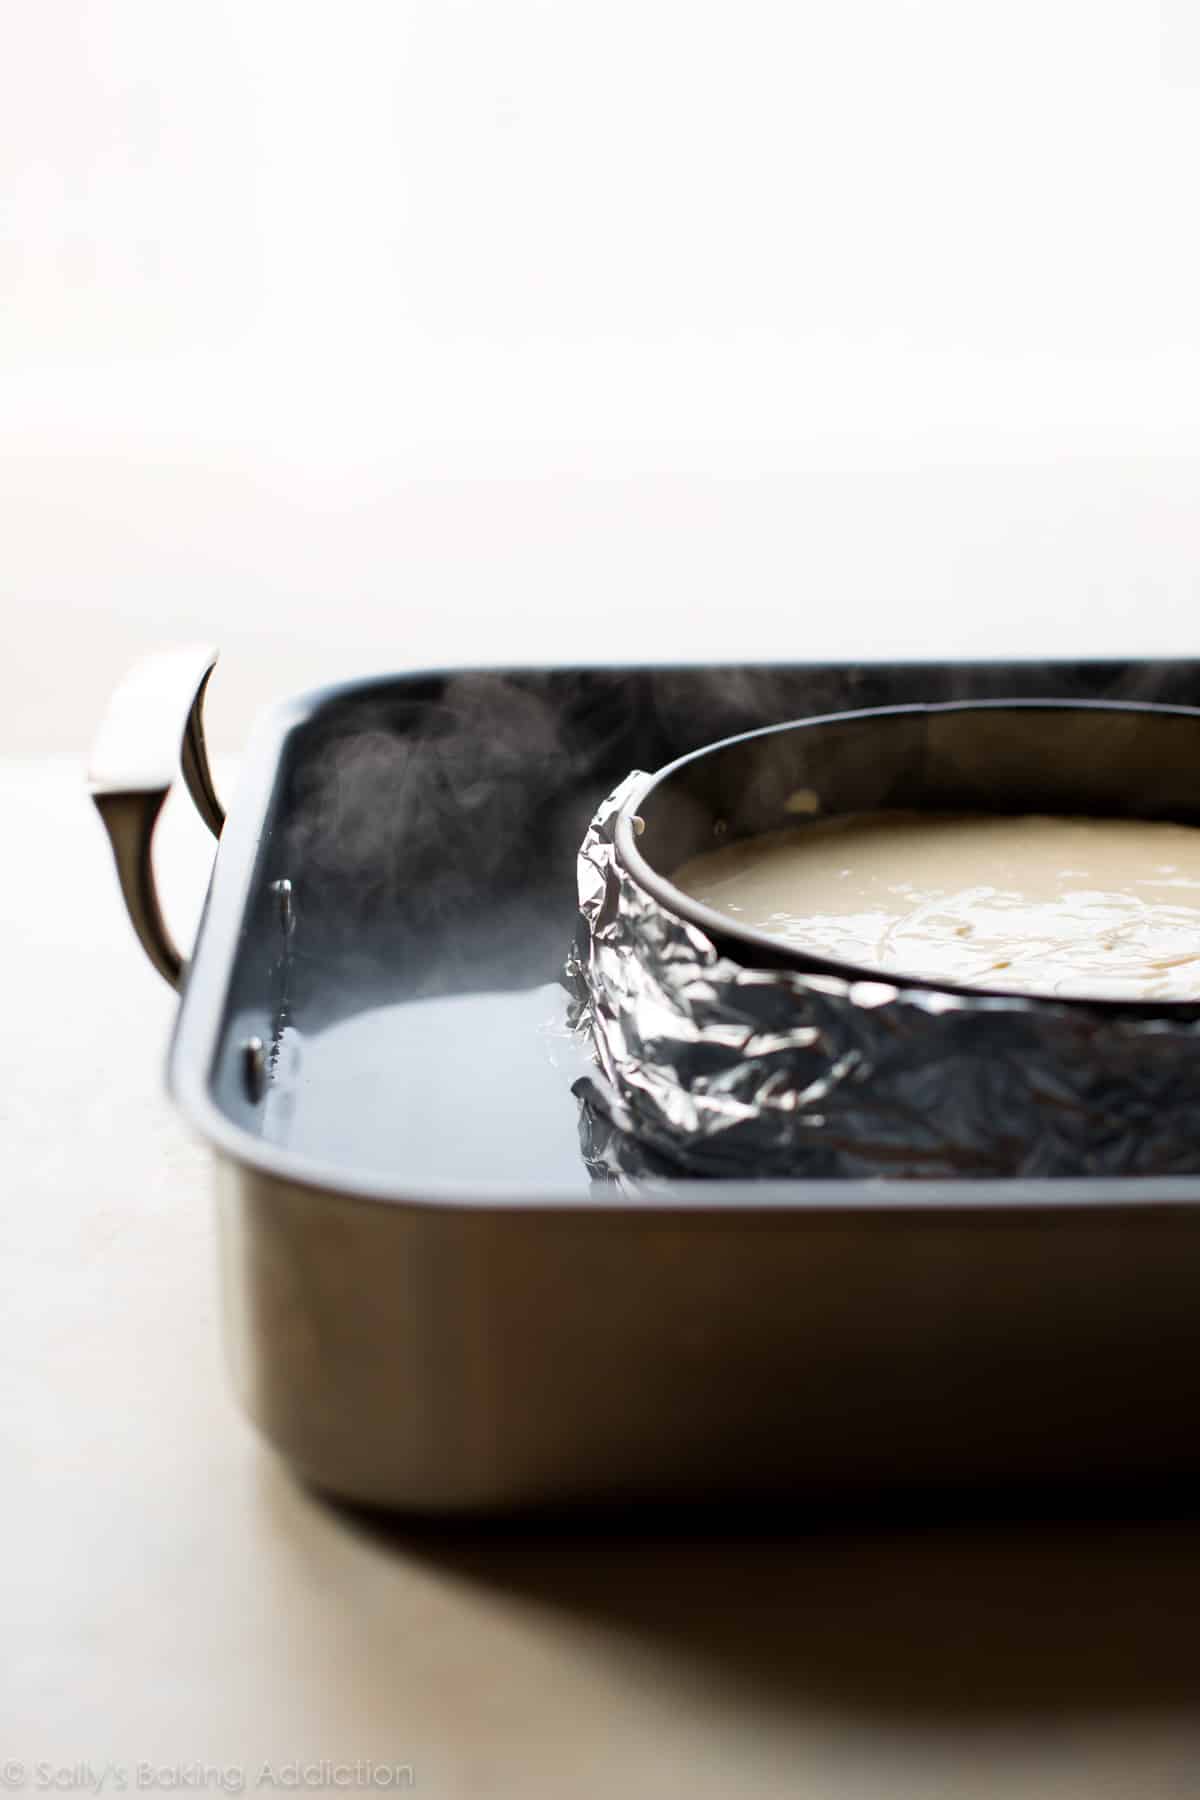
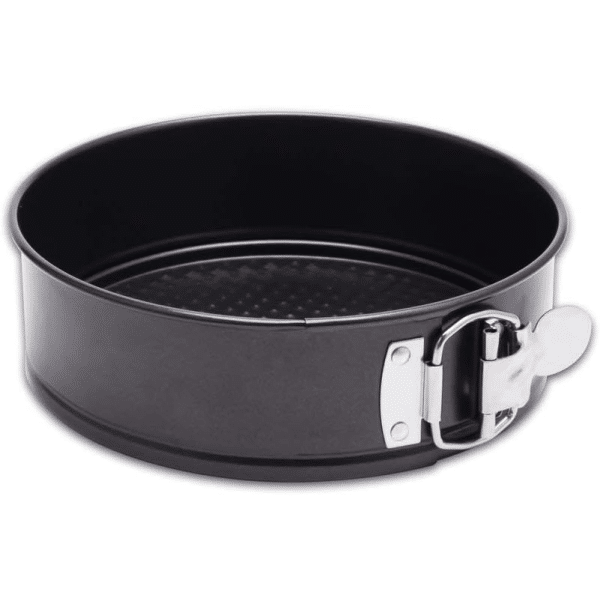
I like to use the bottom of a small measuring cup to smooth the crust mixture into the springform pan. Speaking of, you’ll need a 9-inch or 10-inch springform pan. A springform pan has removable sides so you can safely release the cheesecake without having to flip the pan over or struggle to cut the cheesecake inside the pan. Springform pans can leak if you’re baking the cheesecake in a water bath (more on that below!), but this particular pan is reliable. I haven’t had any leaking issues.
Cheesecake Water Bath
I promise a water bath is nothing complicated. All you’re doing is placing the springform pan in a roasting pan, filling it with hot water, and baking. What’s the point, you ask?
- I actually have an entire post and video tutorial for How to Make a Cheesecake Water Bath.
Cheesecake loves a humid environment. The steam from the hot water will lift the cheesecake up slowly and evenly, reducing the risk of cracks on the surface. Additionally, this slow and even baking method helps prevent the cheesecake from sinking back down as it cools. Taking a few extra minutes to prepare a water bath for this cheesecake recipe is well worth it.
Yes, but I don’t recommend it. A water bath creates a humid environment that helps the cheesecake bake gently and evenly. If you skip it, expect a slightly drier texture, browned surface, and there’s a higher chance it will crack.
Cheesecake is done when the edges are set and the center still has a slight wobble. All ovens are different, so this can take anywhere from 55 to 70 minutes.
Yes! Cheesecake is a wonderful make-ahead dessert because it needs to chill in the refrigerator for several hours and up to 2 days. You can also freeze it; see detailed instructions below.
Cooling & Chilling Cheesecake
In addition to using a cheesecake water bath, another way to help prevent cheesecake cracks is to let it cool slowly, starting inside the oven. When the cheesecake is done baking, turn the oven off, crack open the oven door, and leave the cheesecake inside for 1 hour. A drastic and sudden change of temperature isn’t ideal for cheesecake—from hot oven to cool counter—so do your best to control the environment by leaving the cheesecake inside. Does this make sense?
After the cheesecake cools in the oven for 1 hour, place it on the counter to cool completely to room temperature. After it’s cool, chill it in the refrigerator for at least 4 hours or even overnight. There’s no greater test to your willpower than those hours you’re forced to wait as the cheesecake cools down and then chills in the refrigerator. But when you take that first bite, every minute you waited will be completely worth it!
For a quicker, easier alternative to making a classic cheesecake, try this cheesecake pie or pumpkin cheesecake pie. Or if you want to completely skip the baking and cooling process, try my no-bake cheesecake instead.

4 Success Tips for This Cheesecake Recipe
To summarize the above, here are the key tips:
- Start with room-temperature ingredients.
- Do not over-mix the cheesecake batter.
- Bake in a water bath.
- Leave cheesecake in the cooling oven for 1 hour, then cool completely at room temperature.
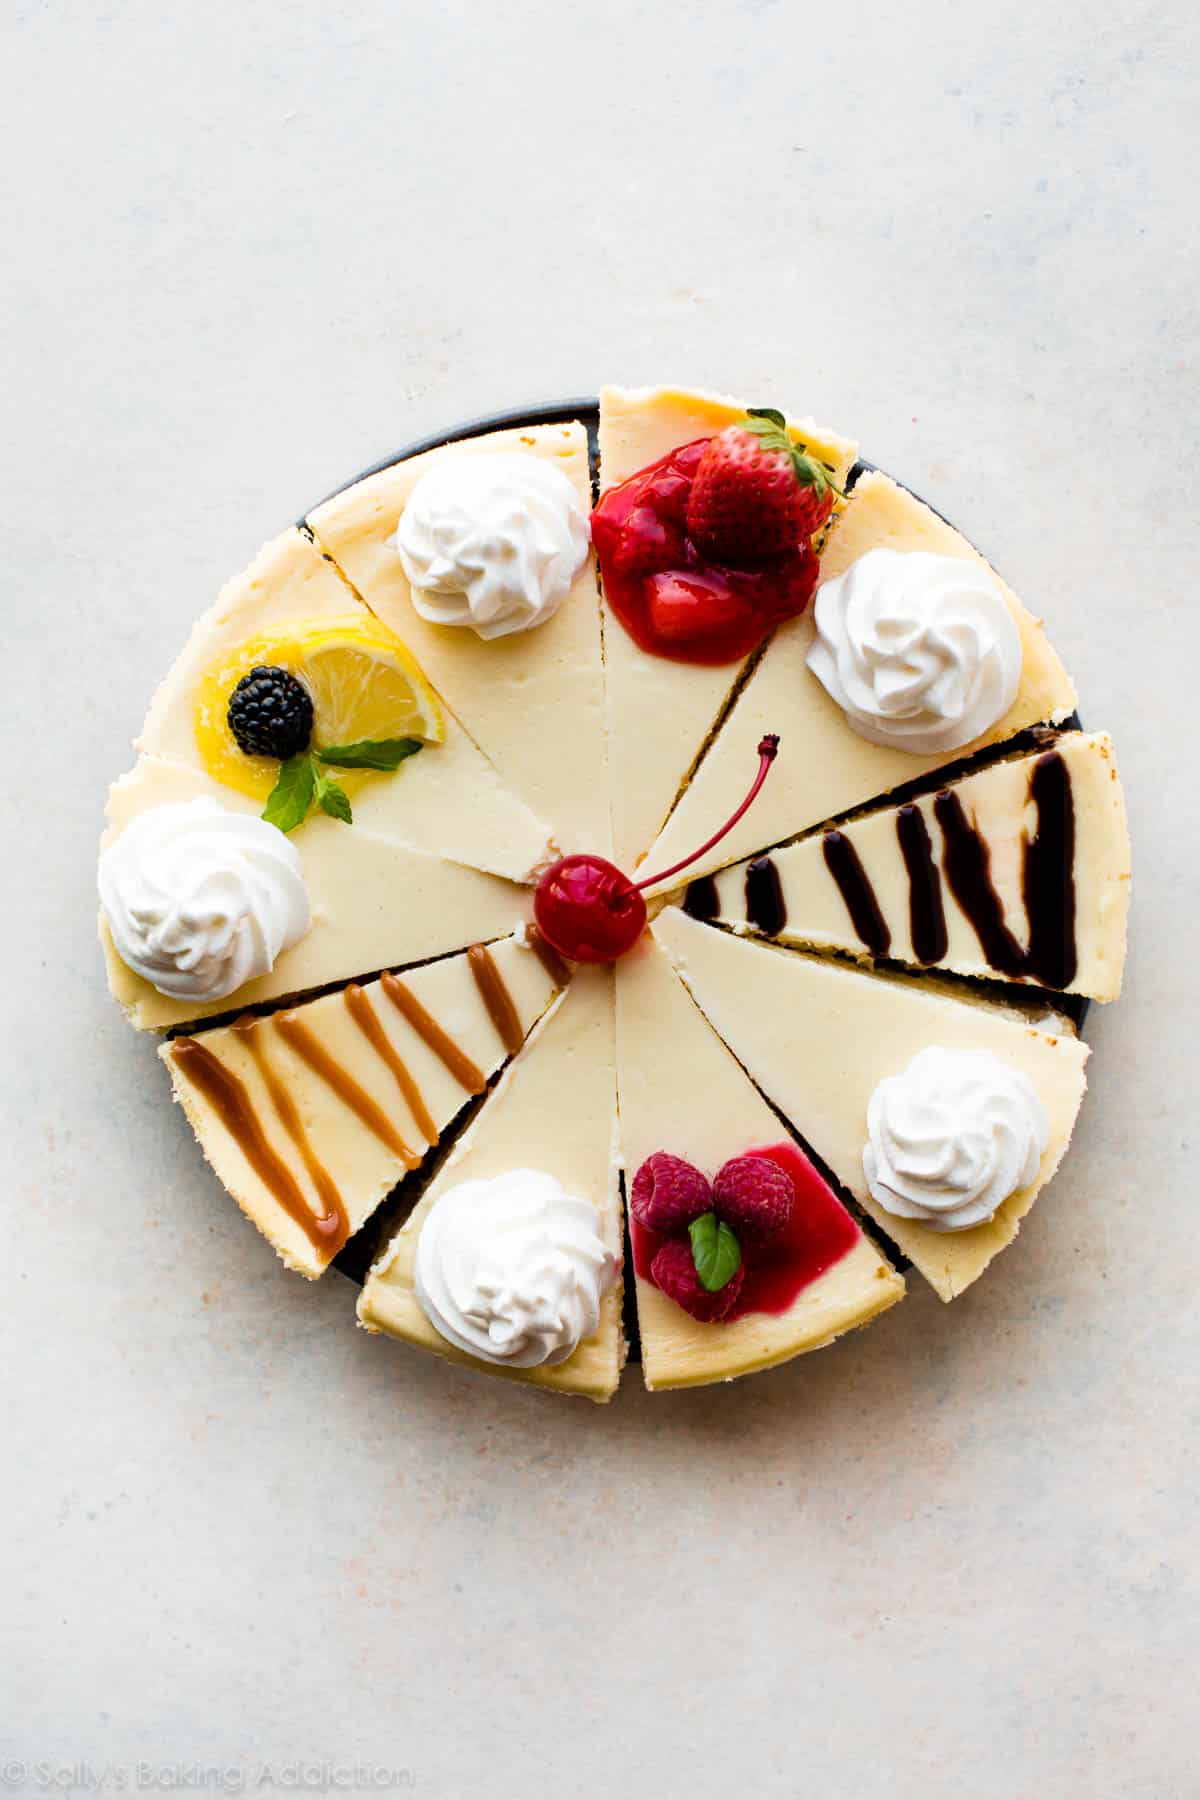
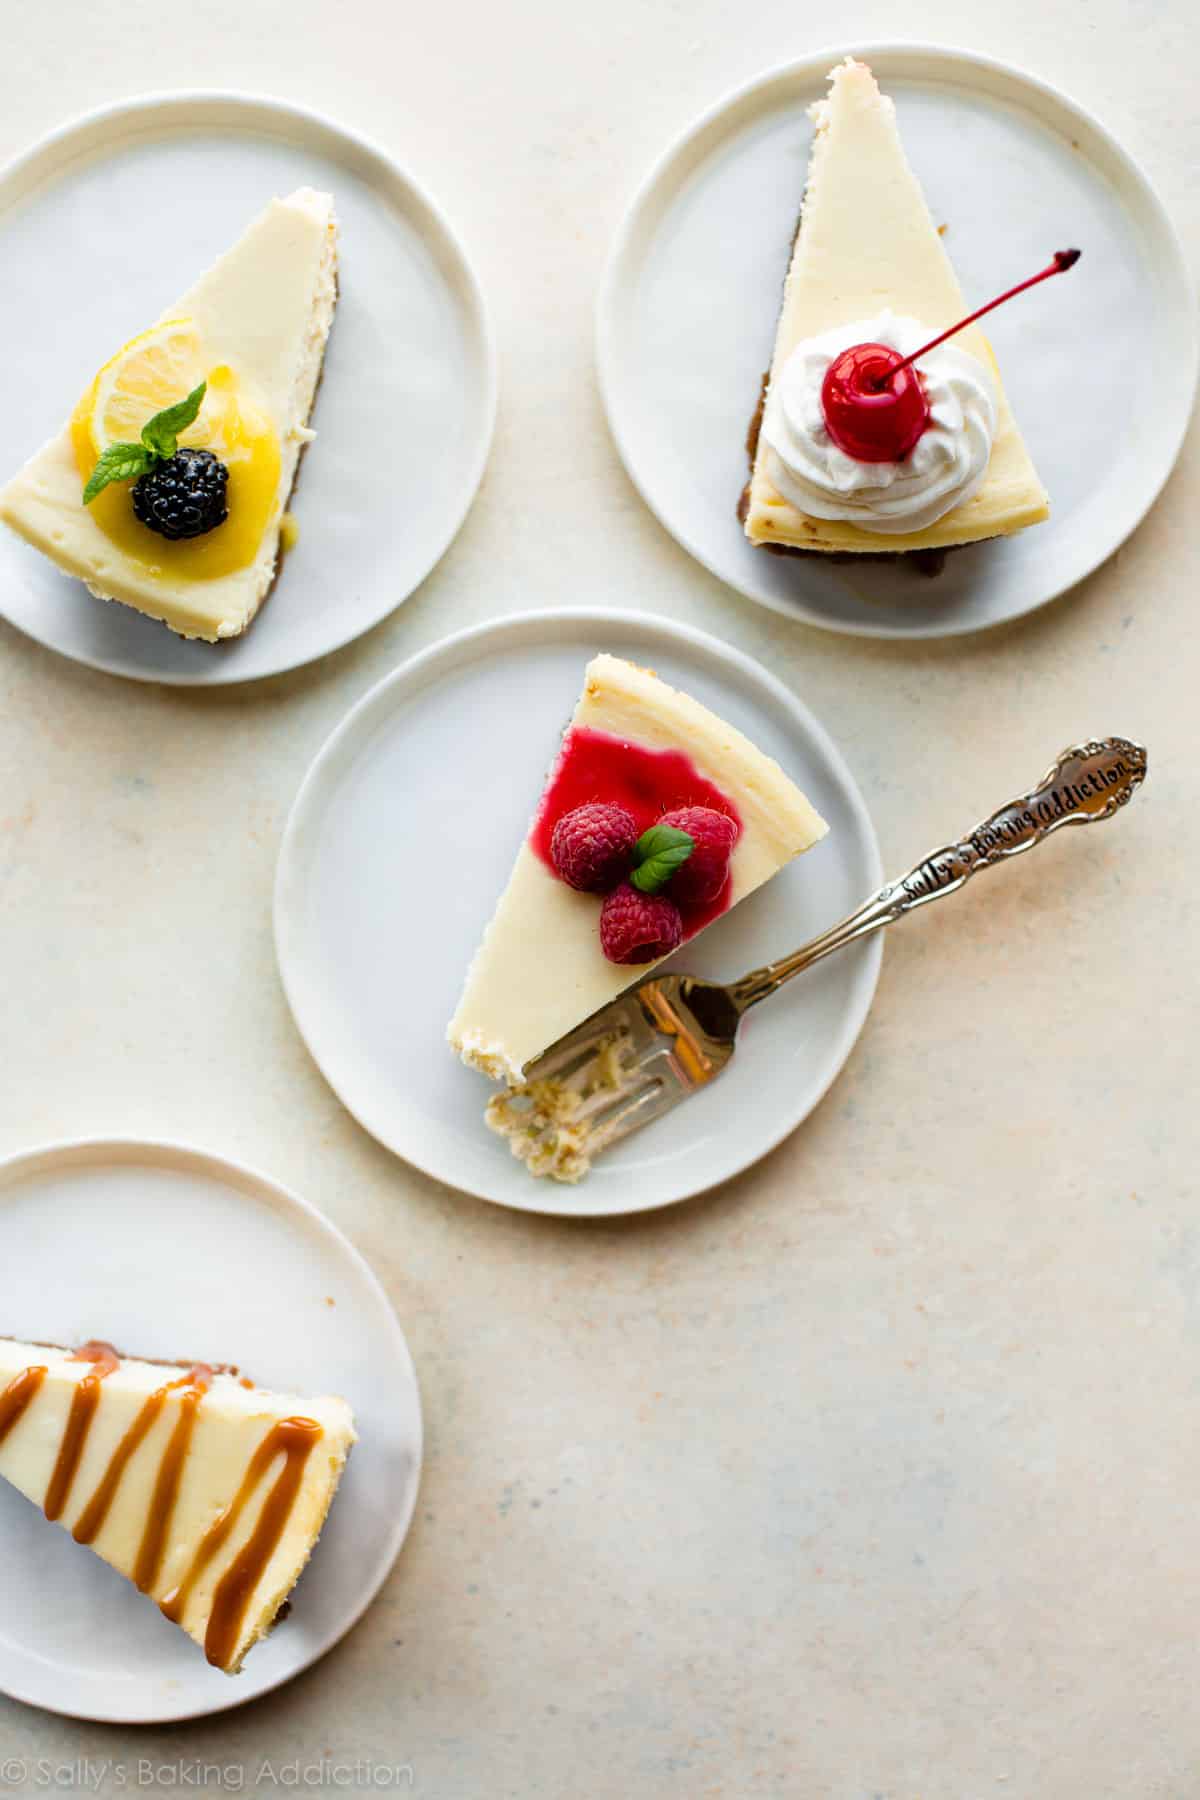
Cheesecake Toppings
Enjoy your velvet-rich cheesecake as is, or get a little fancy with a selection of toppings. Here are some recommendations:
Get creative or keep it simple. Either way, it’s going to impress.
And if you’re really looking to take your cheesecake to the next level, check out my pecan pie cheesecake, cinnamon swirl cheesecake, caramel apple cheesecake pie or this no-churn peach cheesecake ice cream.
How to Freeze Cheesecake
- Cool the cheesecake on the counter before freezing. No need to chill it in the refrigerator.
- How to freeze cheesecake on the springform pan: Remove the outer rim from the springform pan. Wrap the cheesecake with the bottom of the pan with a few layers of plastic wrap, then a final layer of aluminum foil.
- How to freeze cheesecake without the springform pan: After the cheesecake has completely cooled, run a sharp knife underneath the crust to release it from the bottom of the pan. Carefully slide it onto a parchment paper–lined piece of cardboard or use a freezer-safe plate. Wrap it all in a few layers of plastic wrap, then a final layer of aluminum foil.
- Freeze cheesecake for up to 3 months, then thaw overnight in the refrigerator before serving.
- Do not freeze cheesecake with any toppings. Add toppings just before serving the thawed cheesecake.


Classic Cheesecake Recipe
- Prep Time: 45 minutes
- Cook Time: 1 hour
- Total Time: 7 hours, 45 minutes (includes chilling)
- Yield: serves 12-16
- Category: Dessert
- Method: Baking
- Cuisine: American
Description
Look no further for a creamy and ultra smooth classic cheesecake recipe! Paired with a buttery graham cracker crust, no one can deny its simple decadence. For the best results, bake in a water bath. This recipe is also in my cookbook, Sally’s Baking 101.
Ingredients
Graham Cracker Crust
- 1 and 1/2 cups (180g) graham cracker crumbs (about 12 full-sheet graham crackers)
- 1/4 cup (50g) granulated sugar
- 5 Tablespoons (71g) unsalted butter, melted
Cheesecake
- 32 ounces (904g) full-fat brick cream cheese, softened to room temperature
- 1 cup (200g) granulated sugar
- 1 cup (240g) full-fat sour cream, at room temperature
- 1 teaspoon pure vanilla extract
- 2 teaspoons fresh lemon juice (optional, but recommended)
- 3 large eggs, at room temperature
Instructions
- Adjust the oven rack to the lower-middle position and preheat oven to 350°F (177°C).
- Make the crust: If you’re starting out with full graham crackers, use a food processor or blender to grind them into fine crumbs. Pour into a medium bowl and stir in the sugar until combined, and then stir in the melted butter. Mixture will be sandy. Try to smash/break up any large chunks. Pour into an ungreased 9-inch or 10-inch springform pan. With medium pressure using your hand, pat the crumbs down into the bottom and partly up the sides to make a compact crust. Do not pack down with heavy force because that makes the crust too hard. Simply pat down until the mixture is no longer crumby/crumbly (you can use the flat bottom of a small measuring cup to help smooth it out if needed). Bake for 10 minutes. Remove from the oven and set aside while you prepare the filling.
- Make the filling: In a large bowl using a handheld or stand mixer fitted with a paddle attachment, beat the cream cheese and granulated sugar together on medium-high speed until the mixture is smooth and creamy, about 2 minutes. Add the sour cream, vanilla extract, and lemon juice and beat until fully combined. With the mixer on medium speed, add the eggs one at a time, beating after each addition until just combined. Stop the mixer as soon as the final egg is fully incorporated into the batter; over-mixing can cause the cheesecake to deflate. You will have nearly 6 cups of batter.
- Prepare the simple water bath (see Note): (If needed for extra visuals, see How to Make a Cheesecake Water Bath; the visual guide and video will assist you in this step.) Boil a kettle/pot of water. You need 1 inch of water in your roasting pan for the water bath, so make sure you boil enough. I use an entire kettle of hot water. As the water is heating up, wrap 1 or 2 sheets of heavy-duty aluminum foil around the springform pan—be careful if it’s still warm from baking the crust! Place the wrapped springform pan inside of a large roasting pan. Pour the cheesecake batter on top of the crust. Use a spatula to smooth it into an even layer. Carefully pour the hot water inside of the pan and place in the oven. (Or you can place the roasting pan in the oven first, then pour the hot water in—whichever is easier for you.)
- Bake the cheesecake for 55–70 minutes or until the center is almost set. If you notice the cheesecake browning on top, tent it with aluminum foil halfway through baking. When it’s done, the center of the cheesecake should still slightly wobble if you gently tap or shake the pan. Turn the oven off and open the oven door slightly. With the door ajar, let the cheesecake sit in the oven in the water bath as it cools down for 1 hour. After 1 hour, remove from the oven and water bath, discard the foil, and place the springform pan on a cooling rack to cool completely at room temperature. When it has cooled, cover and refrigerate the cheesecake for at least 4 hours or up to 2 days.
- Run a knife around the edges of the springform pan to help loosen the cheesecake, then remove the outer rim. Using a sharp knife, cut into slices for serving. For neat slices, wipe the knife clean and dip it into warm water between each slice.
- Serve cheesecake with desired toppings (see Note). Cover and store leftover cheesecake in the refrigerator for up to 4 days.
Notes
- Make-Ahead Instructions: This cheesecake can be made the day before. It has to chill for quite some time before serving. See step 5. Another way to make this cheesecake ahead of time is to freeze it. Cheesecake can be frozen for up to 3 months. See instructions in blog post above.
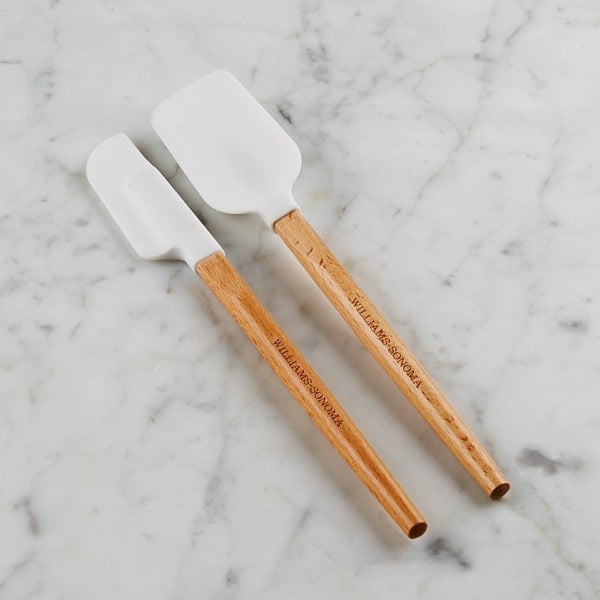
- Special Tools (affiliate links): Food Processor | Glass Mixing Bowl | 9-inch Springform Pan or 10-inch Springform Pan | Electric Mixer (Handheld or Stand) | Roasting Pan | Silicone Spatula
- Oreo Cookie Crust: Feel free to replace the graham cracker crust with this Oreo cookie crust. Spray bottom of springform pan with nonstick spray, as Oreo cookie crusts tend to stick. Pre-bake the crust, just as you do with the graham cracker crust in step 2 above.
- Toppings: One of my favorite toppings for this cheesecake is raspberry sauce. Or you could top the baked and cooled cheesecake with salted caramel, lemon curd, strawberry topping, chocolate ganache, red wine chocolate ganache, fresh fruit, or whipped cream. The topping from my pecan pie cheesecake is also an option!
- Alternate Water Bath Method: This method works as well, and you don’t have to bake the cheesecake IN water. Boil a kettle or pot of water. You need 1 inch of hot water in your roasting pan for the water bath, so make sure you boil enough. Place the cheesecake on the center oven rack of the preheated oven. Place a large metal baking or roasting pan (do not use glass—I usually use a 9×13-inch baking pan or an extra-large cast iron skillet) on the bottom rack. Pour boiling water into the empty pan, about 1 inch deep. Immediately close the oven door to trap the steam inside. This unique water bath adds steam to the oven without having the cheesecake sit inside the water itself. No need to wrap the springform pan in foil. See How to Make a Cheesecake Water Bath for more information.
- Room-Temperature Ingredients: Bring all cold ingredients to room temperature before beginning. Room-temperature ingredients combine quickly and evenly, so you won’t risk over-mixing. Also, beating cold ingredients together will result in a chunky cheesecake batter, hardly the way you want to begin!
- Non-US Readers: Don’t have graham crackers where you live? Use 200g ground digestive biscuit crumbs (about 2 cups; 13–14 biscuits), 1/3 cup (67g) granulated sugar, and 6 Tablespoons (85g) melted butter. Pre-bake the crust for a bit longer, about 12–14 minutes. And from what I understand, spreadable cream cheese sold in a tub in countries outside of the US is a little different from the spreadable cream cheese in the US. It’s thicker, sturdier, and more solid and should be OK for this recipe. I have no experience with it, but this is what I’ve heard from other non-US readers. If you try it, let us know how it turns out!


Reader Comments and Reviews
I made this cheesecake for my son’s birthday and followed the recipe to finish, I even use the raspberries topping and both came out tasting great. The texture were perfected everyone loved it.Thank you so much for this recipe, I’ve tried other recipes before none weren’t like this.
im just wondering when i did the water bath for the cheesecake some water leaked into the foil how can i prevent that from happening next time ? 🙂 thank you! 🙂 hehe
Hi Melissa, You can use a large pan of hot water on the rack beneath the baking cheesecake. See recipe notes for details!
I made this exactly like the recipe & it turned out perfect! I topped it with Lemon Curd using Sally’s recipe. . I wish I could post a pic.
Wow!!! I made this cheesecake for fourth of July. I made a raspberry sauce as the “stripes” and a blueberry sauce for the stars, and then used the remainder of the sauces + their fresh fruits as the border. Wow was this amazing. Everyone approached me at our small family party to tell me this was an amazing cheesecake. I walked away from the oven for 10 minutes and missed it browning slightly. So, my cheesecake WAS a little browned on top. I also used more graham crackers, and a little more of the butter and sugar for the crust, because I love more crust. but, my ratios must have been off a little because the crust had a hard time staying together as we served the slices. Still, amazing cheesecake that I will DEFINITELY make again!!
Thanks Sally,I made it today it was just awesome,all thanks to you.the cake was very well baked, yummy.
I made this my first ever cheesecake and followed it to the letter but still got cracks would altitude or ?? Cause this. Also when you say lower middle rack does that mean the rack just below mid way? It was delicious and we just hid the crack with strawberries!
Hi Peggy, I’m so happy you enjoyed the recipe! I wrote an entire post on How to Prevent Cracks in Cheesecake that you might find helpful to troubleshoot.
Most delicious cheesecake I’ve ever tasted! Took a long time to make but definitely worth the wait!
Hi Sally, my family loves your recipes, thank you! I made your S’mores Brownie Cupcakes for graduation and they were beautiful and delicious – and the graduate loved them! 🙂 I’d like to make this cheesecake for an upcoming birthday… but I was hoping to have it be a bit taller. If I were to do 1.5x the filling, do you know how long I would need to bake it for? Any other tips? Thank you! 🙂
Hi Jenni! I’m happy to help. (Glad you love those brownie cupcakes by the way!) I do not recommend adding more batter for this recipe. The more batter per cheesecake, the heavier it will be, the longer it will take to bake, and the more likely the cheesecake will bake unevenly. (Since it will be so heavy.) For best success, I recommend sticking to the recipe!
I have made many cheesecakes over the years. Your details and tips were spot on. This is a delicious dessert and one of my go to recipes now. Thank you so much.
My wife had been bugging me for a while to make a cheesecake for our family (she bought me a spring form pan *hint hint*). I’ve been using your cake recipes for a couple of years now, and figured I’d give it a shot. It wasn’t good-IT WAS ONE OF THE BEST CHEESECAKES I’VE EVER HAD! My wife “convinced” me to make another one a week later, and I’ll be adding oreo’s to the recipe and making a third one this week. Thank you for your detailed recipes!
Worked perfectly – very delicious!
Hi Sally, I try a some of your recipe, it was great…!!!
And now i want to try this classic cheesecake recipe, but i’m a bit curious, is it possible to add chocolate ganache or powder to the filling? i know it wont be classic anymore, but my family like chocolates very much, that’s why i want to make this classic cheesecake become chocolate cheesecake…
Thank you….
Hi Felix! You could definitely test this recipe by adding melted (and cooled) pure baking chocolate or cocoa powder. I don’t have a recipe for chocolate cheesecake at this time. I don’t recommend folding in chocolate ganache.
I did not even make this yet but am giving it 5 stars and will plan on making it for Father’s Day. For some reason I actually read your comments on why you chose each ingredient instead of skipping straight to Jump to Recipe as I always do…I love the reasons as to why you shouldn’t overbake, why you should have room temp. ingredients and I really appreciate that!
Its funny your right I was looking to make this for Father’s day and I didn’t even jump to the recipe I read and it seems so good I am getting everything now. Only thing I don’t have a mixer hopefully I am able to stir it really well.
Thank you so much. Its my first time to bake cheese cake and made it perfectly. Thank you for the recipe and the tips…
Hi Sally, I made my very first Cheese Cake yesterday and all my family members loved it! Thank you so much for your recipe and video. All your tips are very helpful. I didn’t have large roast pan like yours so I put my biggest pan with hot water at the lowest level in oven, right underneath the cake pan. It worked! Cheese cake is my most favorite desert. I will definitely make more and enjoy the cakes myself as well! Thank you again!!!
This is a great recipe! Thank you so much for the detailed tips & notes with clear instructions. I was nervous on the making my first cake in bathing method. I followed the double foil wrapped and indeed is necessary and everything went well. The tips of not to over beat the eggs and temperature estimates and tips on how to determine the cake supposed to be done, it was good! Everything went well! I had a perfect baked cake without crack! The digestive biscuits tips was good as well, because we can’t get graham crackers here in Asia. Thank you so much for such a great recipe! And I love the raspberries sauce. I served it with blueberries & cherries drizzle over the raspberries sauce! Just perfect! or even by itself taste delicious as well! My hubby love it in original taste by itself and my kids loved it with the sauce and toppings. My mom couldn’t help herself with more servings! ..lols! Forget about the calories!
I made your recipe over the weekend, it was dessert for our anniversary. This is one is the best cheesecakes I have ever had, and I and some what of cheesecake snob. I’ve only made cheesecake a handful of times, due to the fact that I have not found one that was really good. My family paid me the highest of compliments that this was even better than the cheesecake that a cherished family member makes, and they’ve been baking them for years! The crust was a perfect offset to your filling amount, which can sometimes not work out well together. The filling was light, creamy and a light citrus tang to it, it was perfectly decadent, without being too heavy. It complimented the strawberry topping I made, to accompany this beautiful cake! We won’t have to worry about it being refrigerated for long, my family is chomping at the bits for their next slice!
I wanted to make a simple cheesecake after years of complicated attempts. The measuring cup suggestion on the crust worked fabulously! I used water bath and it came out perfectly with no cracks. I bake a lot, but everyone said it was my best ever. Thank you. Sometimes simplicity is best.
Thank-you for this recipe! It made my boyfriend’s covid bday less drab. It was absolutely delicious to the point that I had to be sure to keep the recipe in my files to be able to make it again!
Your instructions were helpful too. I went about it slowly but surely and it turned out great! If I could post a picture I sure would.
Good afternoon Sally,
I made this cheese cake today. It came out full of deliciousness !!! Thank you for the step by step instructions!!!!
My 23-year old son requested cheesecake for his birthday and I turned to your Classic Cheesecake recipe. Forest time making your recipe. Absolutely divine! And I used only 5.5% sour cream. Silky, rich, decadent. Made a strawberry rhubarb compote for those who wanted a fruit topping. Can’t say enough great things about this recipe. In fact I’ve not been disappointed with anything you post! Thank you!
The cheesecake tasted perfect! My husband loved it. I skipped the water bath which left a big split in the middle. I was able to hide it with the cherry topping. I dont have a roasting pan. Can I use my Dutch oven next time for the water bath? I definitely won’t skip that step next time.
Hi Stephanie! I’m so glad that you enjoy this cheesecake recipe. I don’t recommend a dutch oven. While I’ve never tested it (and you certainly can!), I fear the tall sides would prevent the cheesecake inside the springform pan inside the dutch oven would bake properly– it would need a little longer in the oven. Instead, try my alternative water bath method listed in the recipe notes. Fill a baking pan with warm water and place on a rack underneath the cheesecake.
Thank you so much. I will try the baking pan next time!
I’ve baked this three times already and really love it.
My question is, is this too much batter for a 9″ springform pan? It bakes up over the top of the pan and sinks in every time I bake it.
Hi Matt, so glad that you enjoy this cheesecake. A 9 inch springform pan is the correct size. It’s normal for cheesecakes to rise and sink because they are so egg-heavy (air in the eggs rising up then sinking when cooled). Mine always do! Two things that may help though– (1) avoid over-mixing the batter after the eggs have been added and (2) avoid over-baking. Fewer minutes baking in the oven could help.
Just made this cheesecake and need to make another one. I am going to use my 8 inch pan. Do I need to change anything in the recipe? Also, what about oven temp. and time?
Hi Rebecca, There is too much batter for an 8 inch springform pan. You can make the recipe as written and use extra batter for some mini cheesecakes though!
Hi sally! I’m planning to try this recipe!!! But i dont have sour cream since its still quarantine here and it will be hard to buy one. Any suggestions for substitutes? Also, how should i convert this recipe if only have a 20cm/ 8″ springform? Thank you and very excited to try this out
Hi Kriz, You can use plain Greek yogurt in place of sour cream. The cheesecake may taste a little heavier, but not much. Same flavor though!
There is too much batter for an 8 inch springform pan. You can make the recipe as written and use extra batter for some mini cheesecakes.
Hey Sally! Thanks for the tip of making mini cheesecakes. That’s a great idea. For the sour cream, is it possible to replace it with cream instead? That is what I have on hand.
This is the most delicious cheesecake that I have ever made. I brought half of it into work with me the next day and it didn’t last past 9:00 am. They loved it!!!
I was hoping to make cheesecake bars. Your other bar recipes have additions & I was looking for plain ‘ol cheesecake. Would this work well in a different pan? Thanks!
Hi Jessica, you can try this recipe as cheesecake bars. I recommend halving the recipe. Follow the pan size, pre-baking crust, and baking instructions for my white chocolate raspberry cheesecake bars.
I never comment on sites but I just had to…I made this for my husband’s birthday and it is the best cheesecake I have ever had. My extremely picky 9 year old devoured it, which he has never done, and claimed it was amazing. I followed the instructions exactly and it was beautiful, without cracks, and delicious. Thank you for this recipe!
Fantastic fool proof recipe.
I love the taste of lemon so I added and extra teaspoon of lemon juice and zested the entire lemon.
The texture and flavour was fantastic.
Made this for mother’s day and my mother in law loved it! This recipe is perfect! Ty for this