

This is an in-depth beginner’s guide to homemade French macarons. This post includes a kitchen-tested recipe, plus plenty of success tips, descriptions, overview of techniques, list of tools, and links to my favorite macaron resources and other recipes on the web.
Let me start today’s tutorial with the following:
- Is this the one and only way to make French macarons? No.
- Is this the most complete, perfect French macaron tutorial out there? No.
- Is this a great place for macaron beginners? Yes.
Like many home bakers, I was a French macaron beginner a few years ago. These beautiful little cookies had always been a baking bucket list recipe for me. I started baking them after tasting the world famous Ladurée bakery macarons—talk about perfection! We originally published a French macaron recipe on my website in 2015. My homemade macarons weren’t nearly as flawless as the professional ones, but they worked for me at the time! However, the results weren’t always consistent. With 6 additional years of practice, I found a few small but very helpful improvements. Today’s recipe includes those updates.
One reader, Katy, commented: “Can I just say that I adore this recipe? I was always so afraid to try to tackle macarons because of how difficult I’d heard they were to make. The very first time I tried this recipe they turned out absolutely beautifully… Thank you for making this simple enough that a beginner to macarons can follow it. I’ve impressed so many people with macarons since then, and I always credit such an easy-to-follow recipe for my success! ★★★★★”
Macaroons Are Not Macarons
Macarons and macaroons are two completely different cookies. Macaroons have an extra O in the name and are coconut cookies. Macarons are delicate sandwich cookies. Here are my coconut macaroons. See the difference? Though they are both cookies made with egg whites, they are much different.
They are both, however, gluten free dessert recipes.
What Do These French Macarons Taste Like?
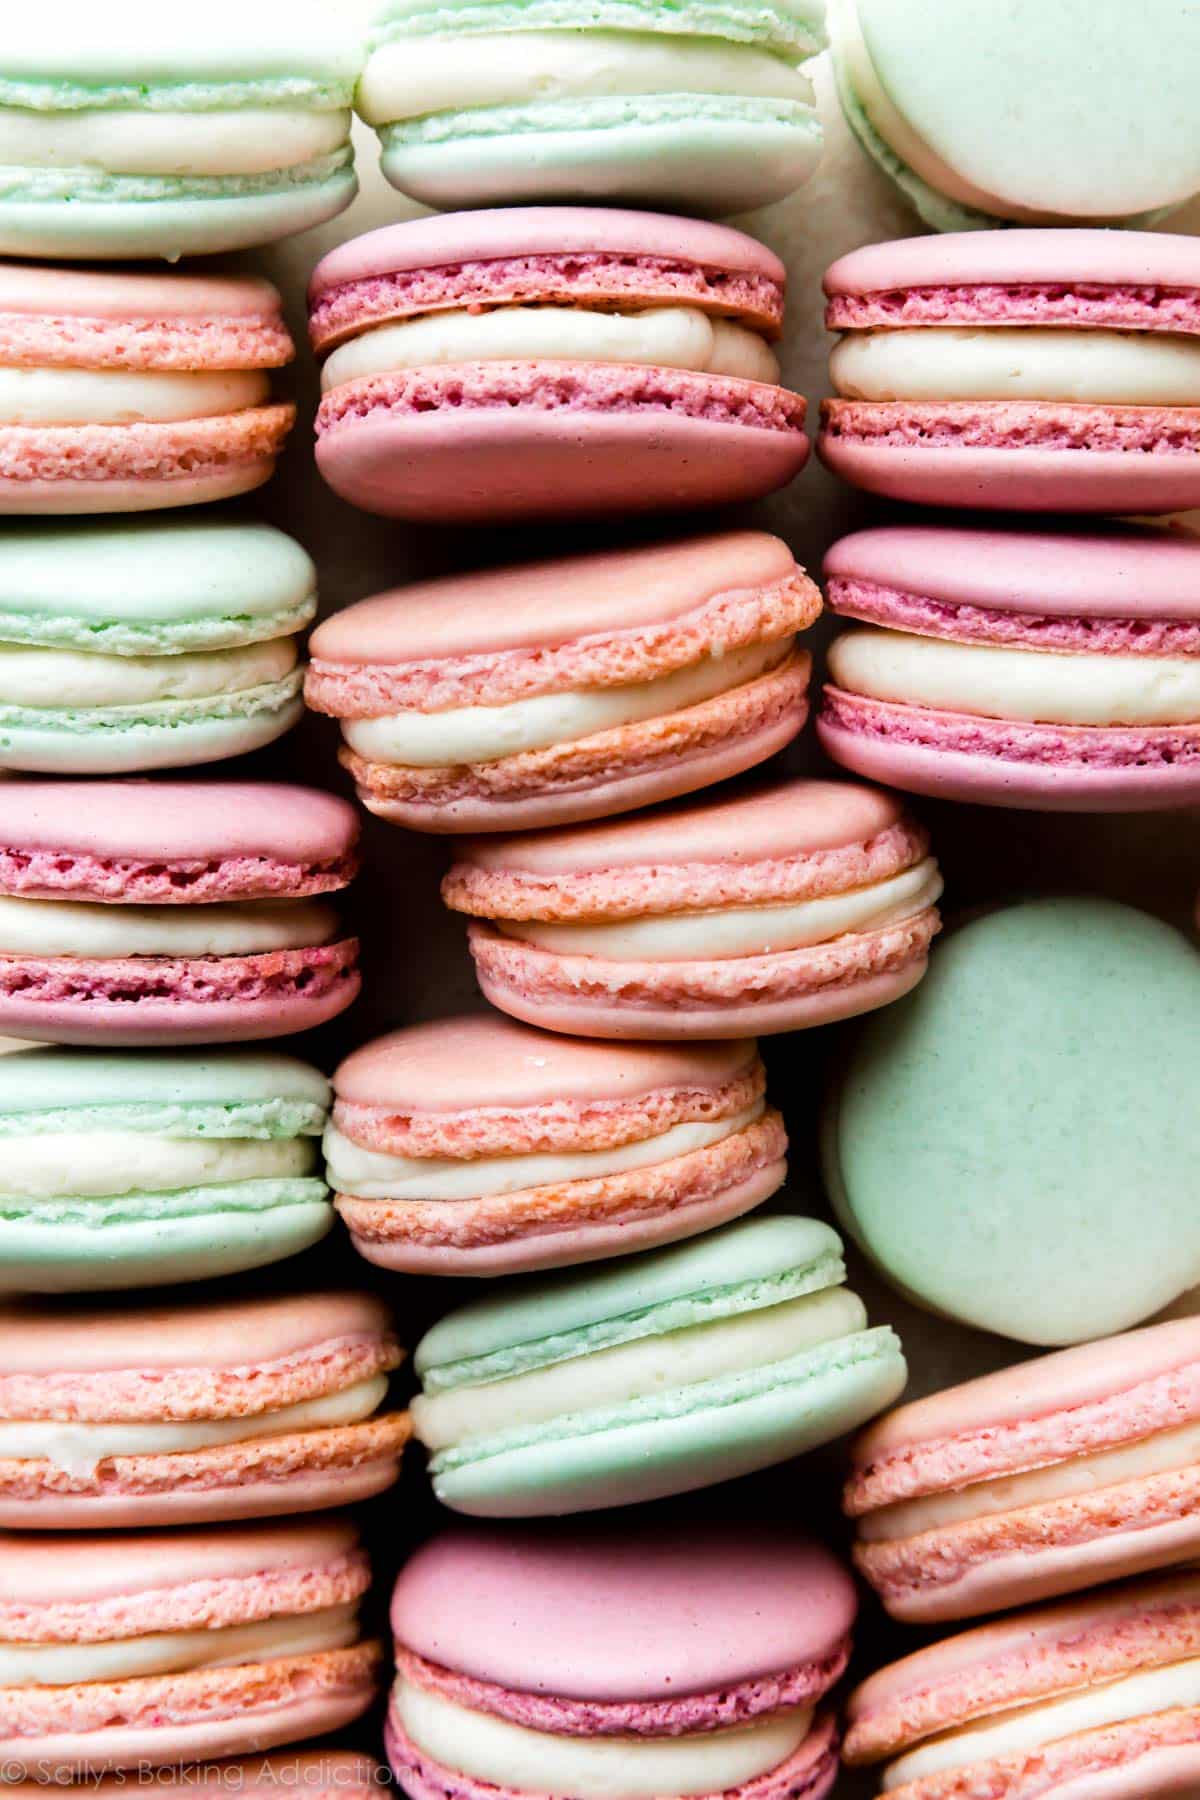
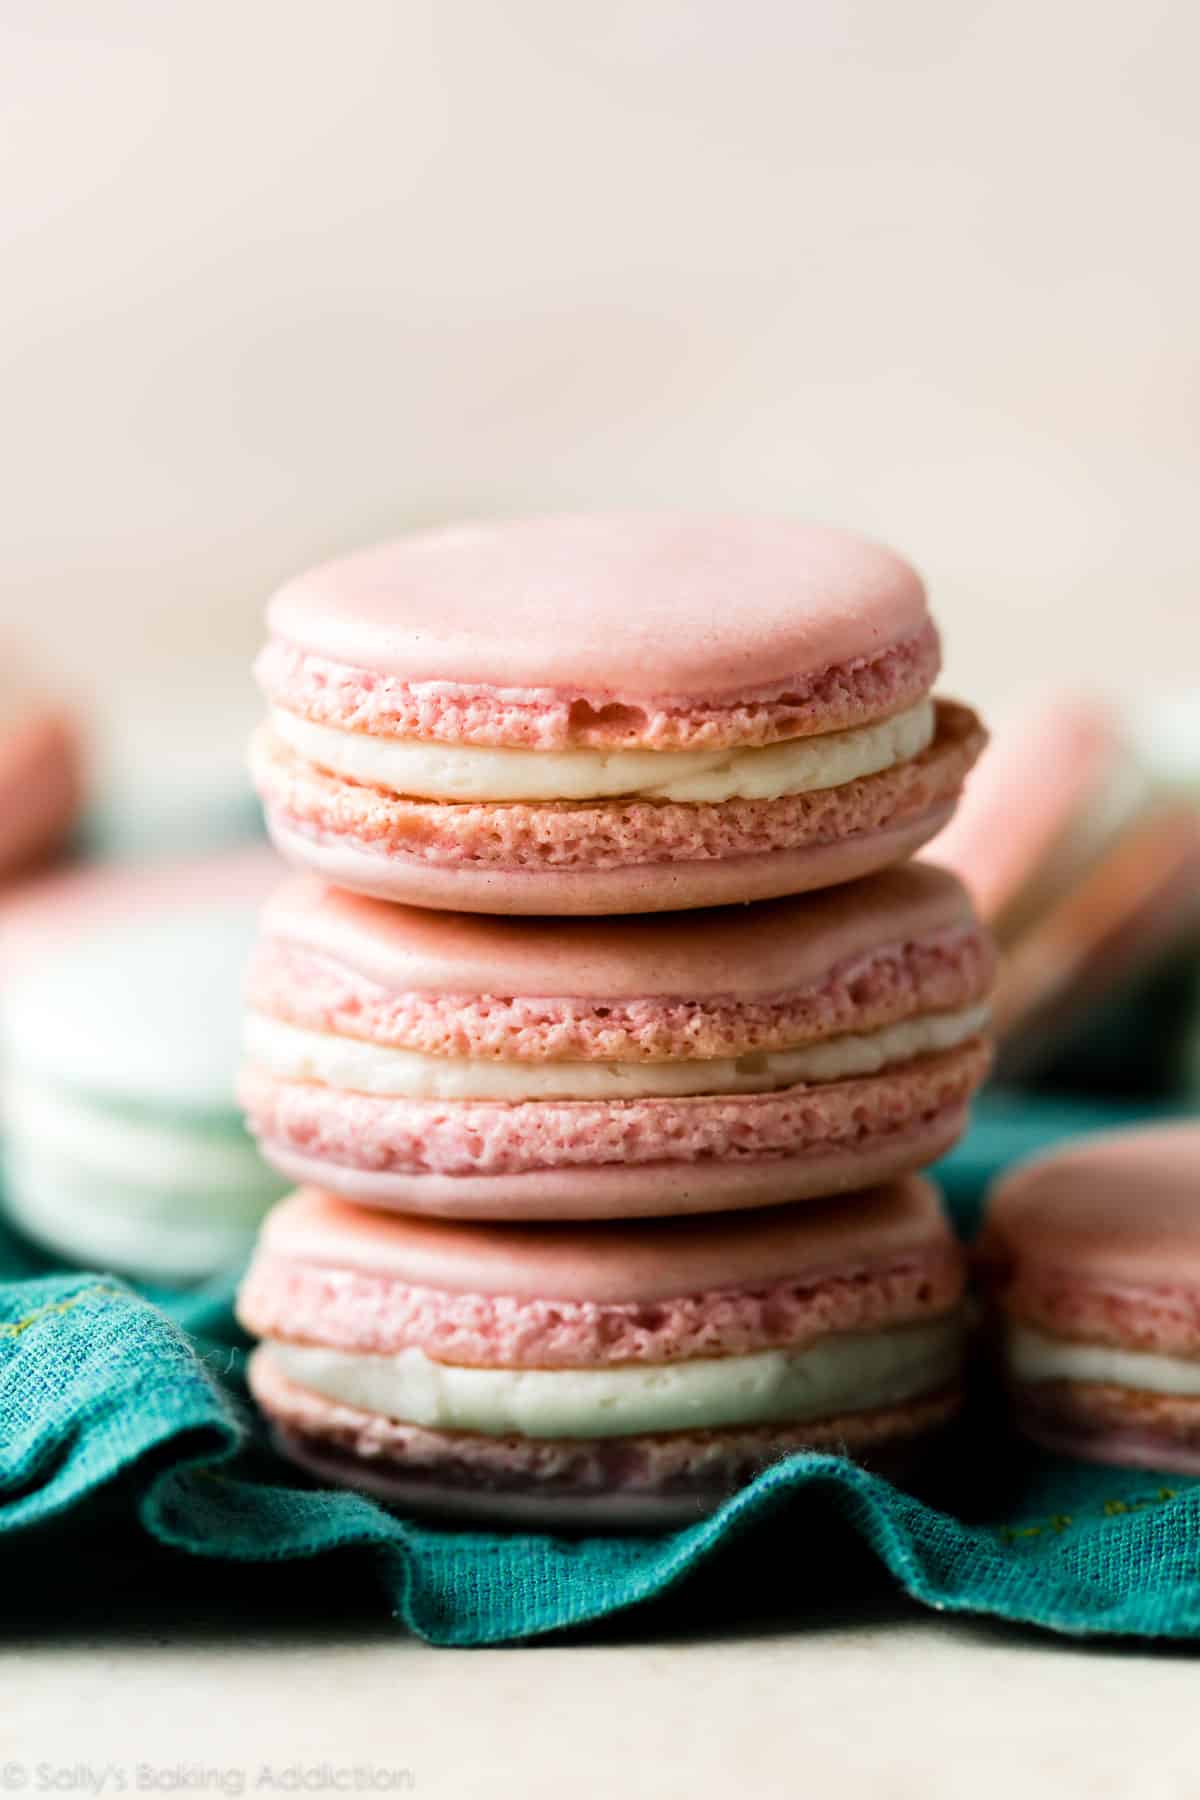
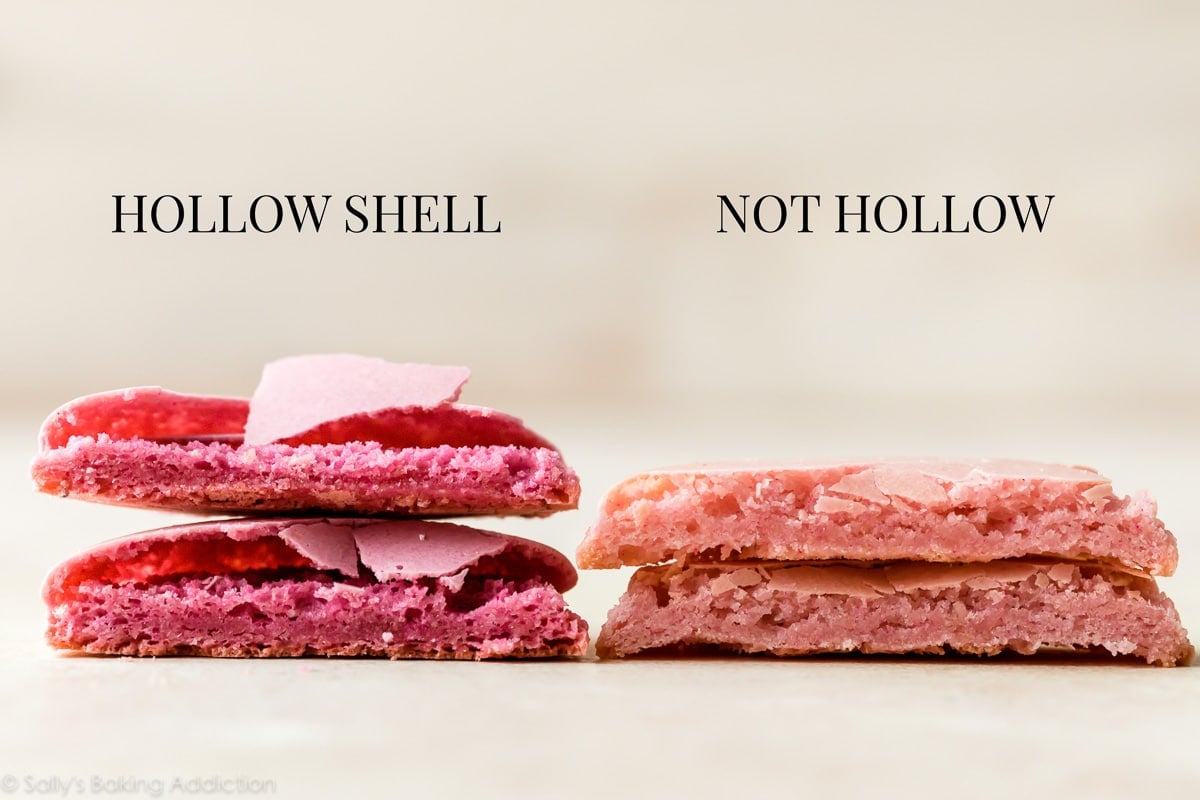
French macarons are delicate sandwich cookies with a crisp exterior. Each individual cookie is known as a macaron shell. The shells are made without any chemical leaveners and get all of their lift from properly beaten egg whites. If you follow the recipe carefully, the cookies have a unique nougat-like, chewy texture. They should not be hollow. You can flavor macarons many ways, but this recipe is for plain macarons. They taste like sweet almond—and they’re delicious! You can always have fun with different flavorful fillings such as vanilla buttercream, lemon buttercream, salted caramel, or chocolate ganache.
If there’s one thing to know before baking French macarons at home, it’s this: these cookies require precision, patience, and practice. I’m going to do my best to prepare any French macaron beginner. You can do this!
There are a few methods for making macarons including Italian, French, and Swiss. Swiss isn’t as common (I’ve never made them that way), but Italian macarons are pretty popular. The process is a little more involved than the French method, but the results are considered more reliable. If you’re looking for a recommendation, I really like these Italian macarons found on Chelsweets.
Today’s recipe uses the French method. You need 5 ingredients.
Overview of Ingredients in French Macarons
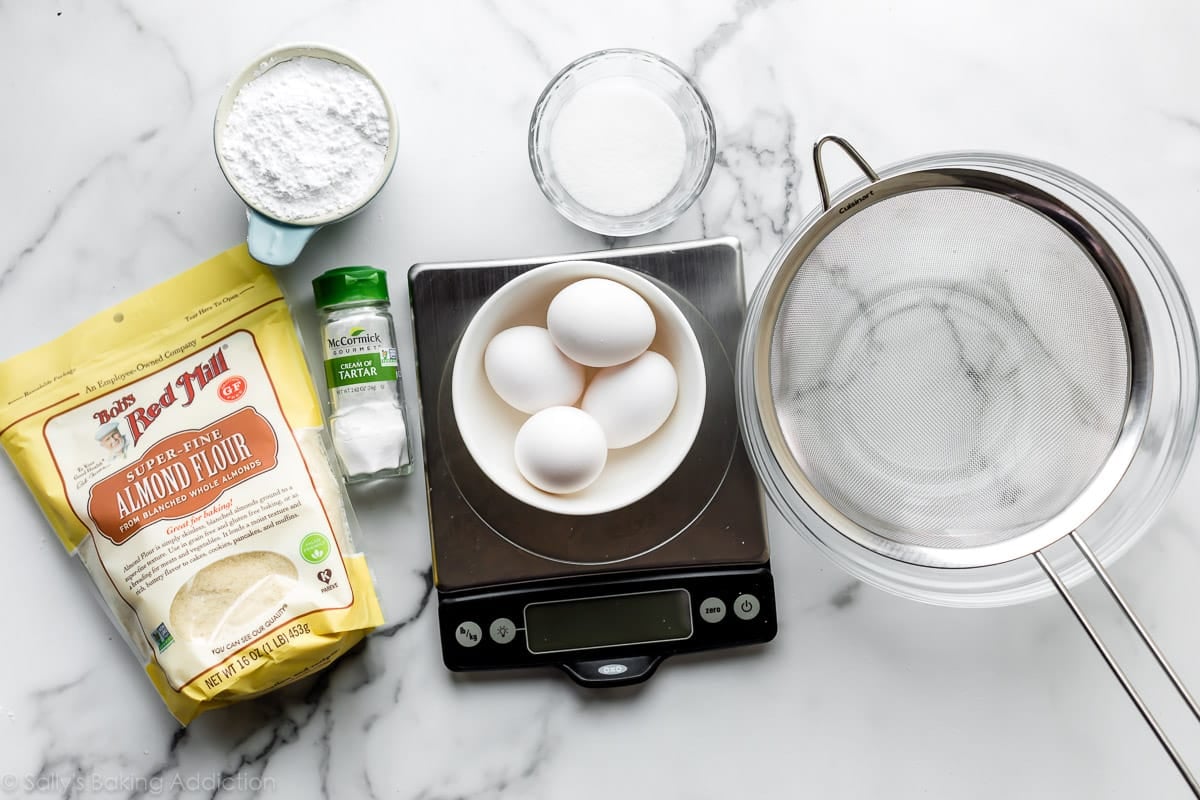
EGG WHITES: The bulk of French macaron batter is meringue made from properly beaten egg whites. For best and most consistent results, I strongly recommend using fresh egg whites instead of liquid egg whites from a carton. It’s imperative that NO egg yolks make it into the recipe. Like I taught you in our Swiss meringue buttercream recipe, any fat (yolk) in the egg whites will prevent them from reaching stiff peaks, a crucial step for the successful outcome in any French macaron recipe.
- Age The Egg Whites: It’s helpful to “age” the egg whites in the refrigerator for at least 24 hours prior to starting this recipe. Why? Egg whites that have been separated and set aside in advance have a chance to relax, which improves their elasticity during the whipping process. Elasticity is certainly beneficial when you’re trying to whip egg whites into a lofty volume. Some bakers skip this step, saying that it’s a waste of time but I’ll tell you this: most of my failed macaron batches did not include aged egg whites. I recommend taking the 5-10 minutes to separate your egg whites, cover, and refrigerate them 1 day in advance. It doesn’t hurt. Bring them to room temperature before you begin the recipe.
CREAM OF TARTAR: My old recipe doesn’t include this ingredient, but I started adding it after I began making successful batches of marshmallow meringue frosting and chocolate swirled meringue cookies. It just provides a little extra insurance. Let me explain: the acidity in cream of tartar helps the egg whites hold onto air and, like the sugar (explained next), helps prevent the egg whites from collapsing. If you’re making snickerdoodles or angel food cake, you already have this ingredient on hand. It’s sold with the spices.
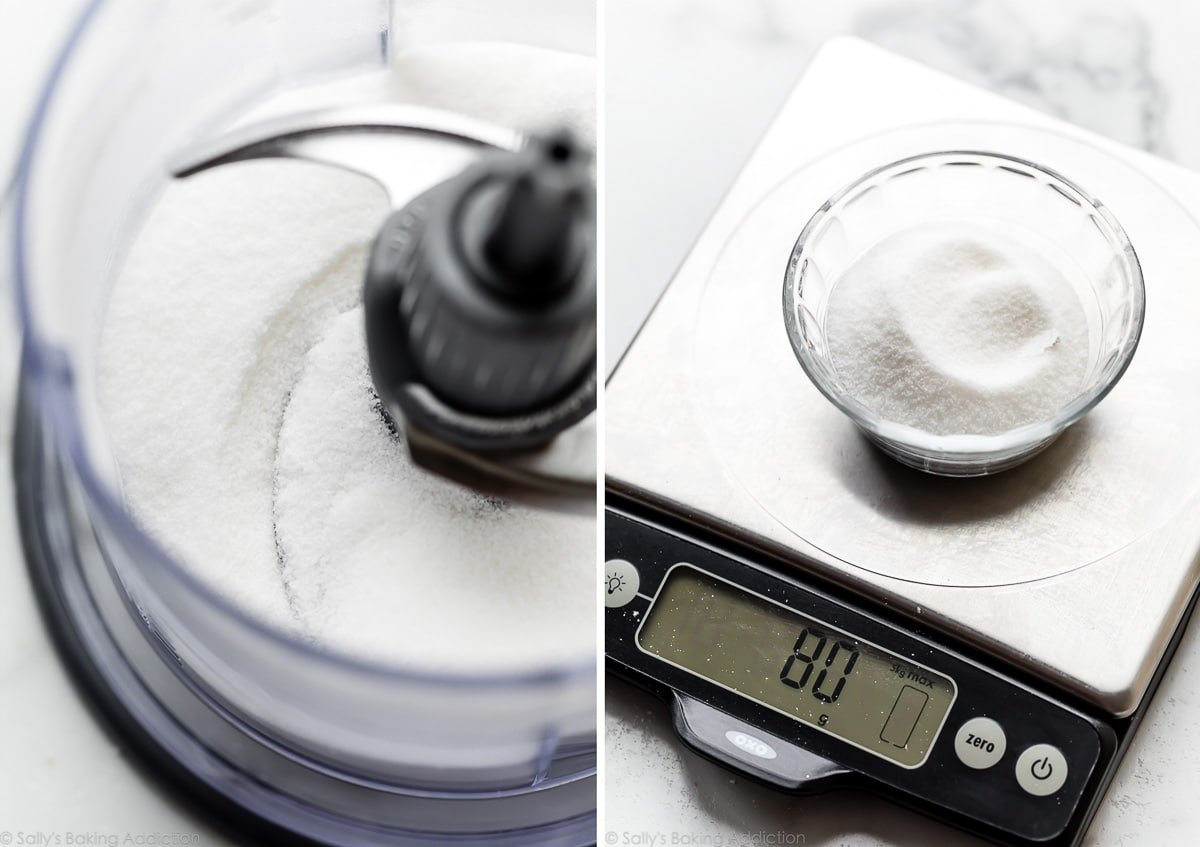
SUPERFINE SUGAR: In 3 additions, beat superfine sugar into the egg whites + cream of tartar. Without sugar, the protein molecules in egg whites will collapse. What is superfine sugar? Well, it’s regular granulated sugar that’s ground much finer, but not quite as fine as confectioners’ sugar. It’s also known as caster sugar. Superfine sugar’s granules are the best size to provide optimal structure for French macarons. Granulated sugar is simply too coarse, while confectioners’ sugar dissolves too quickly in the egg whites.
- I have a hard time finding superfine sugar in my local grocery store, so I make my own by pulsing regular granulated sugar in a food processor or blender. It takes about 10 seconds—very easy.
FINE ALMOND FLOUR: Almond flour is the ONLY flour that works in this French macaron recipe, however if you have an almond allergy, you could try these nut free macarons by Stella Parks. (I have not personally tried them.) Make sure you use almond flour, not almond meal. Almond flour is much finer and made from blanched, skinless almonds. Almond meal is coarser and contains almond skin.
- You can make your own almond flour, but be very careful because almonds can quickly release their oils, clump up, and turn into almond butter. It might be easier to just pick up a bag of fine almond flour. It’s very common in mostly all grocery stores these days—I use and love Bob’s Red Mill brand.
CONFECTIONERS’ SUGAR: Confectioners’ sugar adds bulk and sweetness to macaron batter. In this new recipe, I use equal parts confectioners’ sugar and almond flour to produce sturdy, more reliably successful macarons.
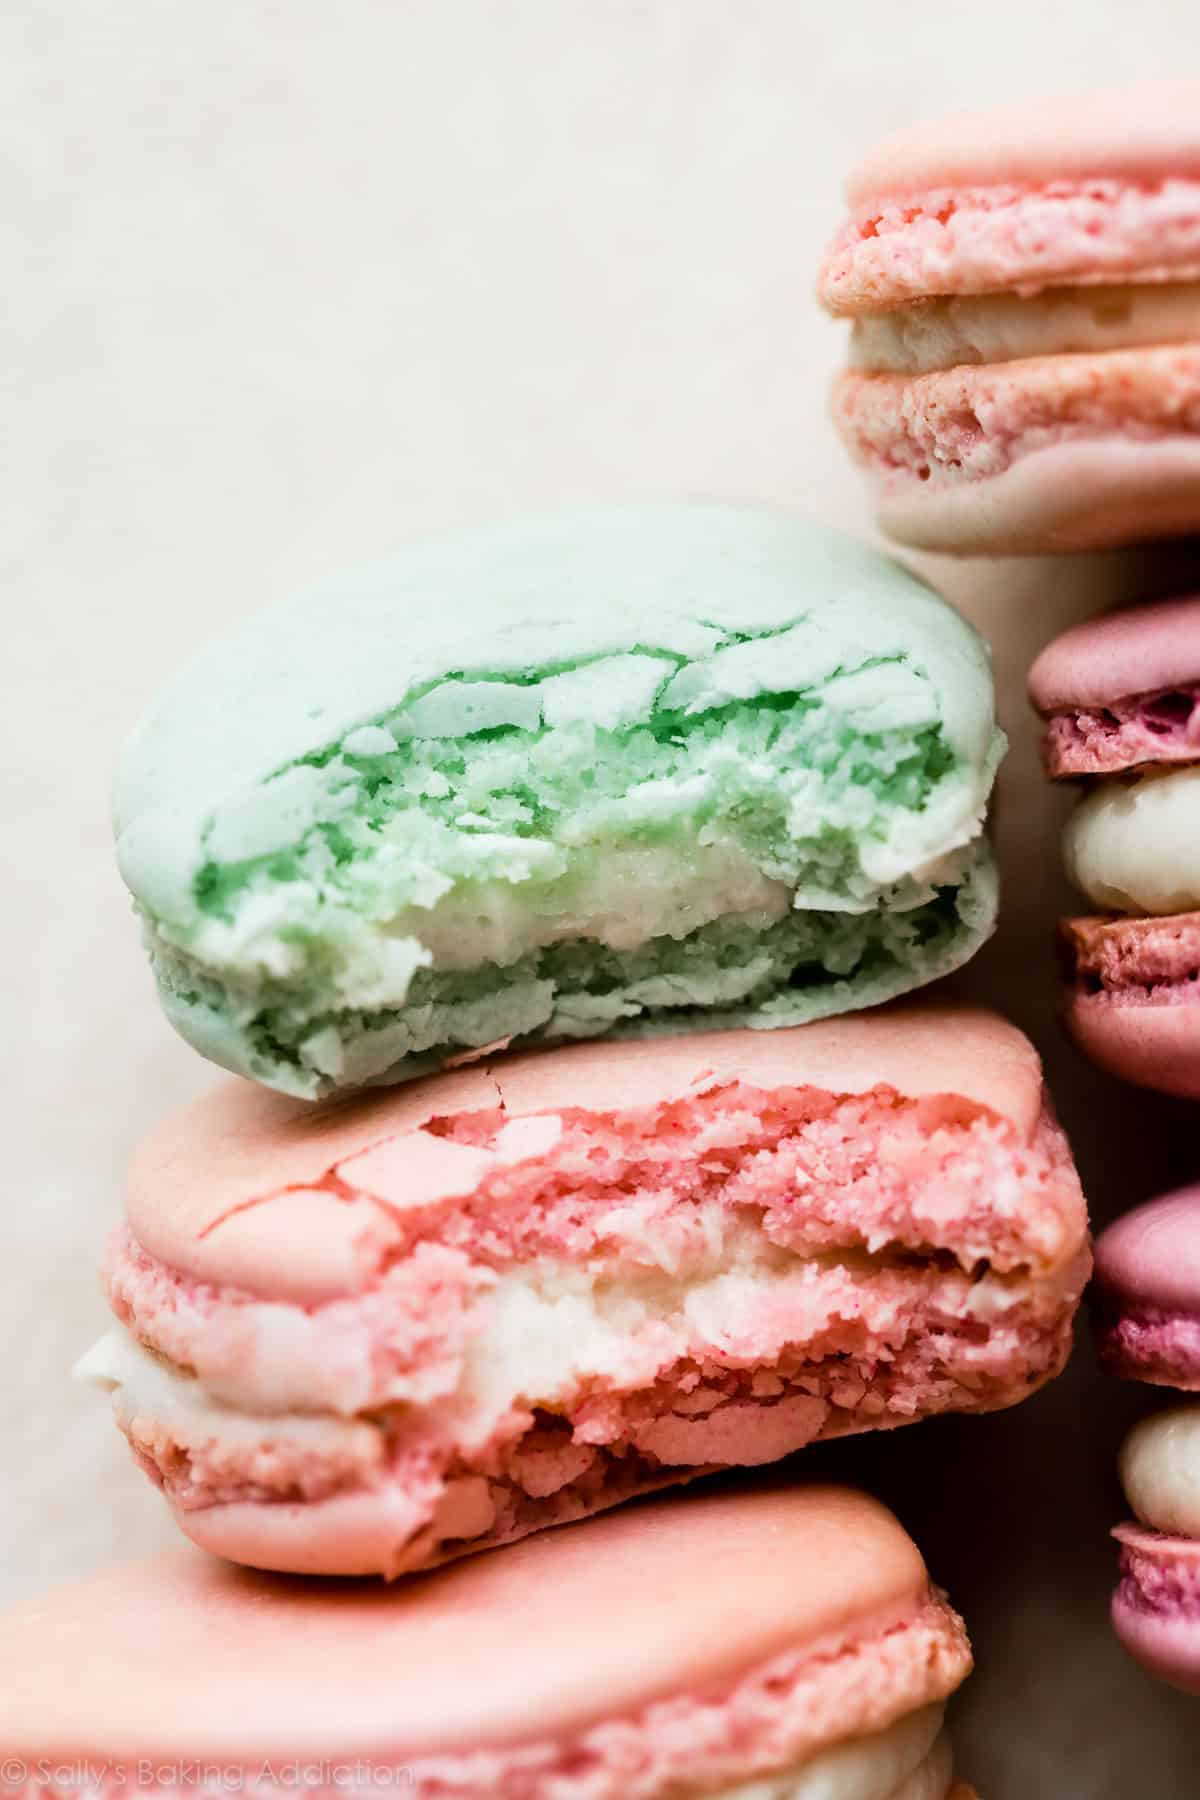
GEL FOOD COLORING (optional): Tinting macaron batter is completely optional. If you don’t tint it, the macarons will be a natural beige color. (And you can have fun with a colorful filling.) Avoid using liquid food coloring because it will change the consistency of your macaron batter. Instead, use 1-2 drops of gel food coloring.
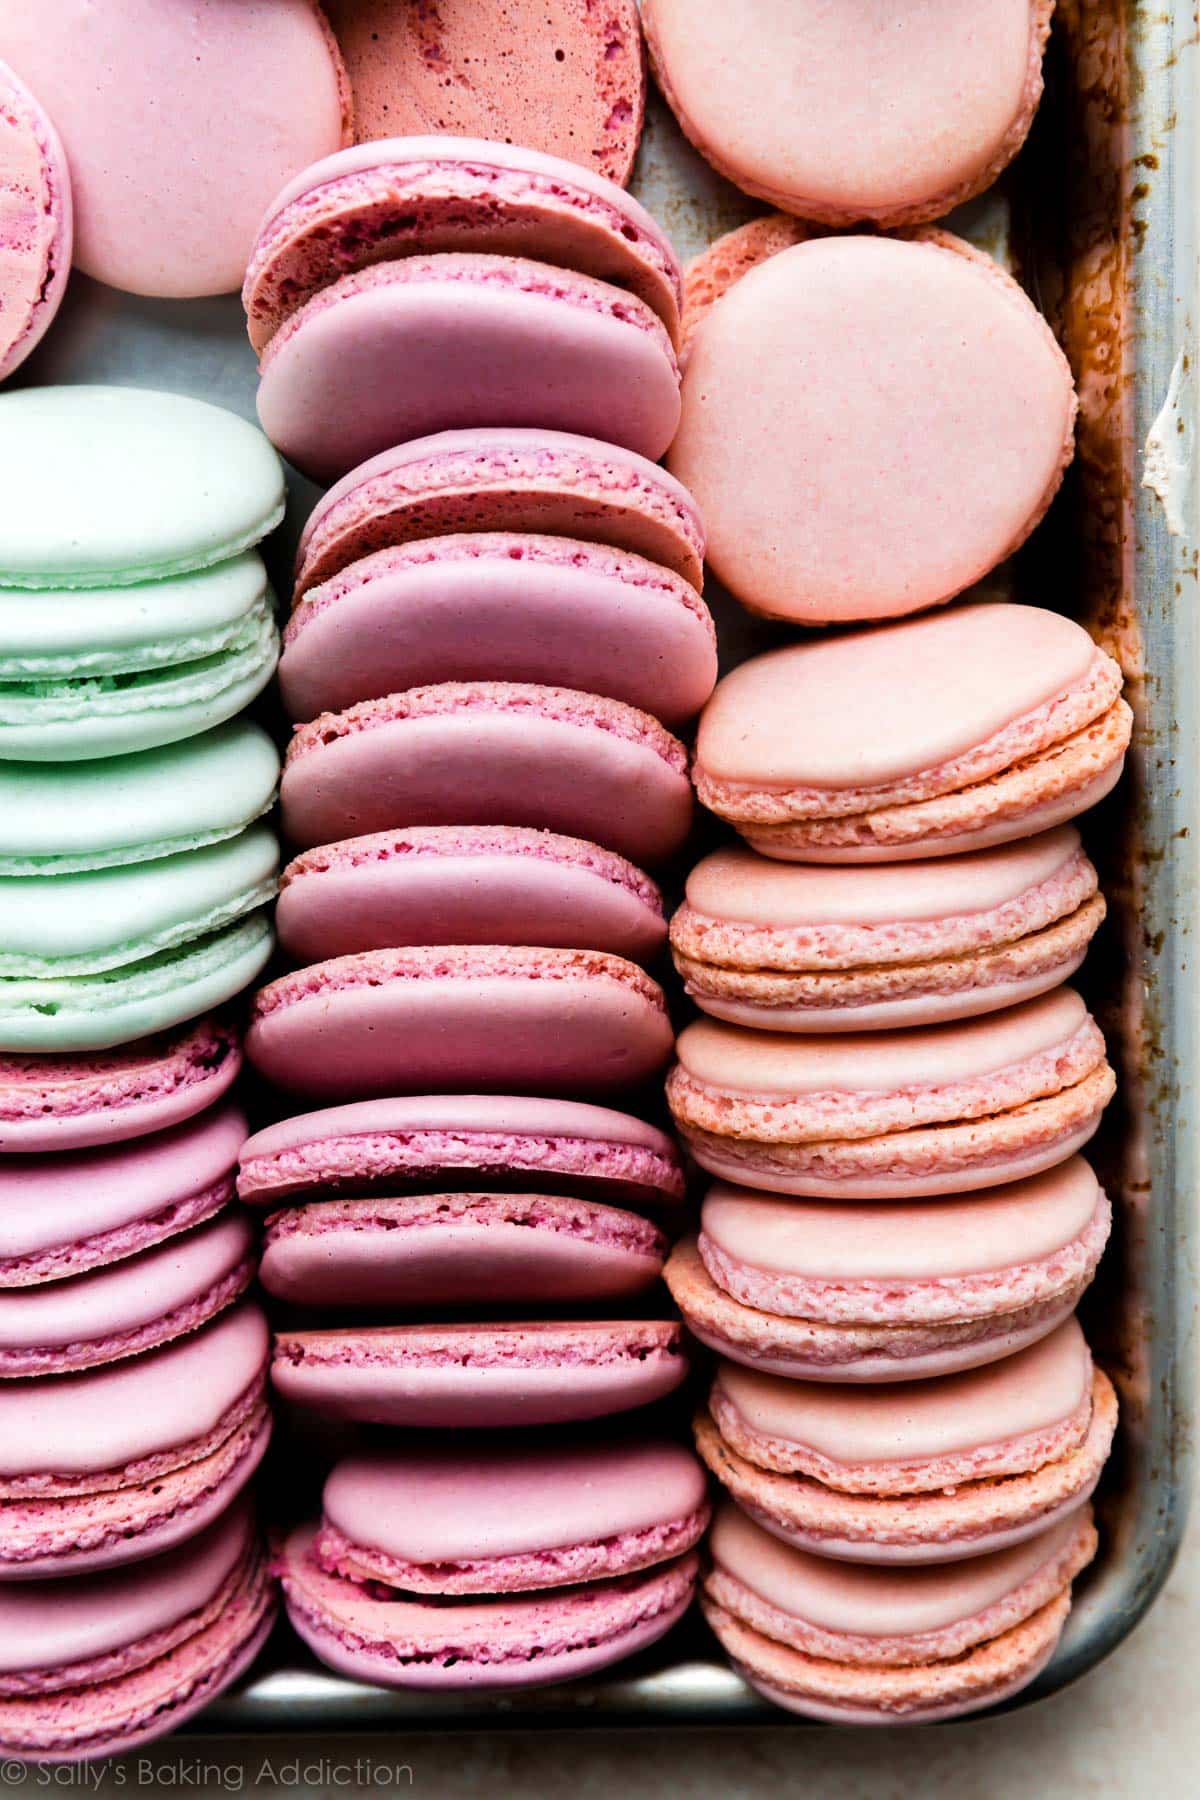
- In the pictured macarons, I made 3 separate batches and used dusty rose, aqua, and fuchsia.
- Powder food coloring should be fine, but I haven’t tested it. Use a very small amount.
Crucial Tools
This list contains affiliate links to the products we personally use and love.
- Glass or Metal Bowls: Plastic bowls are porous and can hold onto grease and residue, which will prevent your egg whites from whipping properly. Set yourself up for success by using glass bowls or metal bowls in this recipe.
- Egg Separator: Not crucial, but certainly helpful. Here is the egg separator I really like.
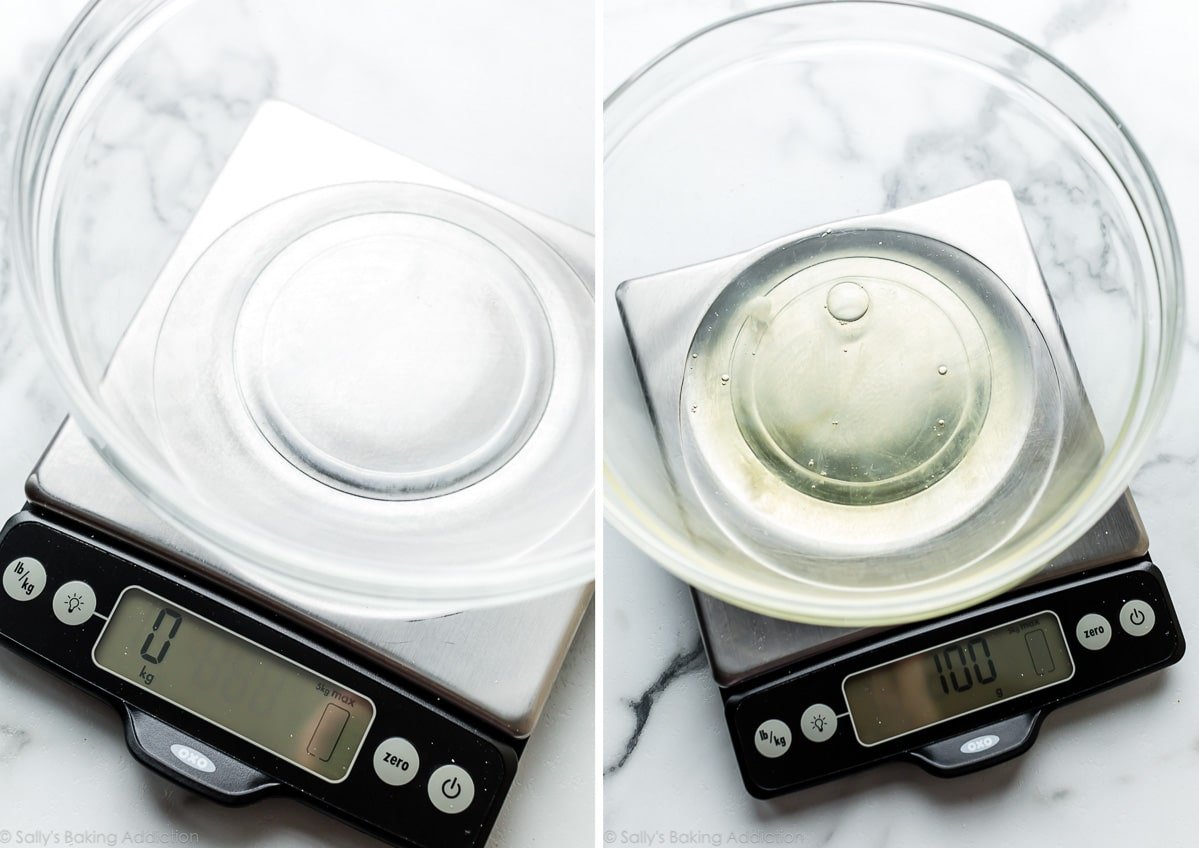
- Food Scale: The recipe below is written in grams, so a food scale is imperative. Anytime I make macarons using cup measurements, they fail. You can certainly find French macaron recipes online given in cup measurements, but for true accuracy (and so you don’t waste your time, effort, ingredients, or money), I strongly recommend using a food scale. Here is the one I own and love.
- Electric Mixer: An electric mixer is helpful for whipping the egg whites into stiff peaks. You can use a handheld or stand mixer (whisk attachment). I do not recommend whipping egg whites by hand. It requires a lot of arm muscle and at least 30+ minutes of mixing.
- Fine Mesh Sieve: To obtain a shiny and smooth macaron shell, you must run the almond flour and confectioners’ sugar through a fine mesh sieve. You can use a hand crank sifter if you have one, but I prefer using a mesh one.
- Piping Tip & Bag: You need a piping bag and tip to pipe the batter. You can use a disposable piping bag or reusable piping bag. (I use and love this reusable piping bag.) For the piping tip, use a round tip such as Wilton 12, Wilton 1A, or even Ateco 806. I use the same piping tip to pipe the filling, too.
- Baking Sheet & Liner: I own, love, and swear by these half sheet pans for baking all my cookies: Calphalon rimmed baking sheets and USA Pan half sheet pan. See more of my recommended baking pans on my Best Baking Pans page. It’s important to line your pan. You can use a silicone baking mat, parchment paper, or even a fancy macaron-specific silicone baking mat. I usually use sheets of parchment paper.
Video Tutorial:
Step-By-Step Photos: How to Make French Macarons
Do your prep work. This includes (1) making superfine sugar with a food processor if you can’t find it at the store. I always make my own—see recipe note. Prep work also includes (2) wiping down the bowl you’ll whip the egg whites in with vinegar or lemon juice. Grease or fat prevents your meringue from setting up. And finally, (3) age your egg whites as described above and in the printable recipe below.
Making superfine sugar:
Zero out your scale, weigh your egg whites, cover, and refrigerate them for 24 hours. Bring to room temperature before using.
Now it’s time to start the macaron batter.
Add cream of tartar to your aged room temperature egg whites (below left) and beat until very soft peaks form. This takes a few minutes of beating. At first the egg white and cream of tartar mixture will be foamy, then the bubbles will begin to tighten and the beaters will leave tracks (below right) as the egg whites build volume:
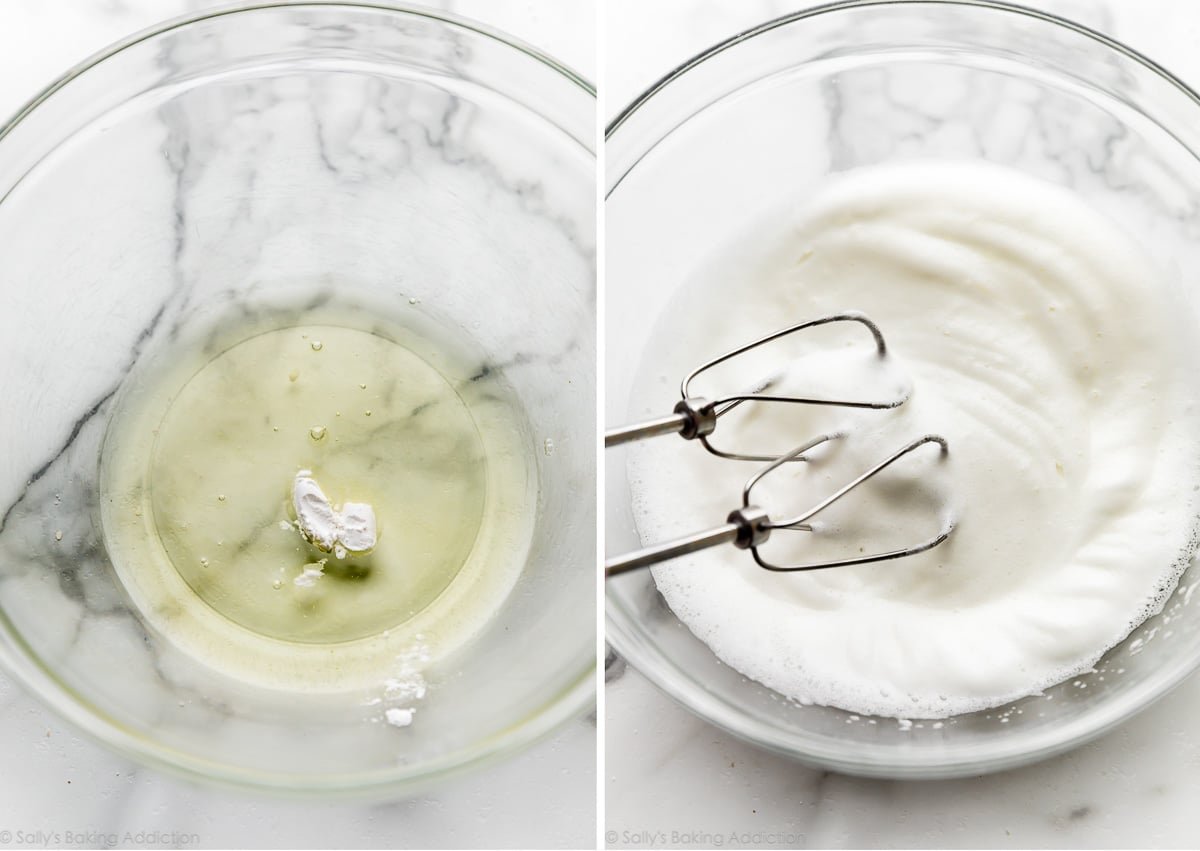
Now add your superfine sugar in 3 additions and beat until stiff glossy peaks form (below photos). What are stiff peaks? After several minutes of mixing in all the sugar, the egg whites will form stiff glossy peaks. This means the whites have stiff, smooth, and sharp points in the bowl or on the lifted whisk attachment/beaters. Stiff peaks do not droop down. You can literally turn the bowl upside down and the egg whites will not move or spill out. (You can watch me do that in the video tutorial.)

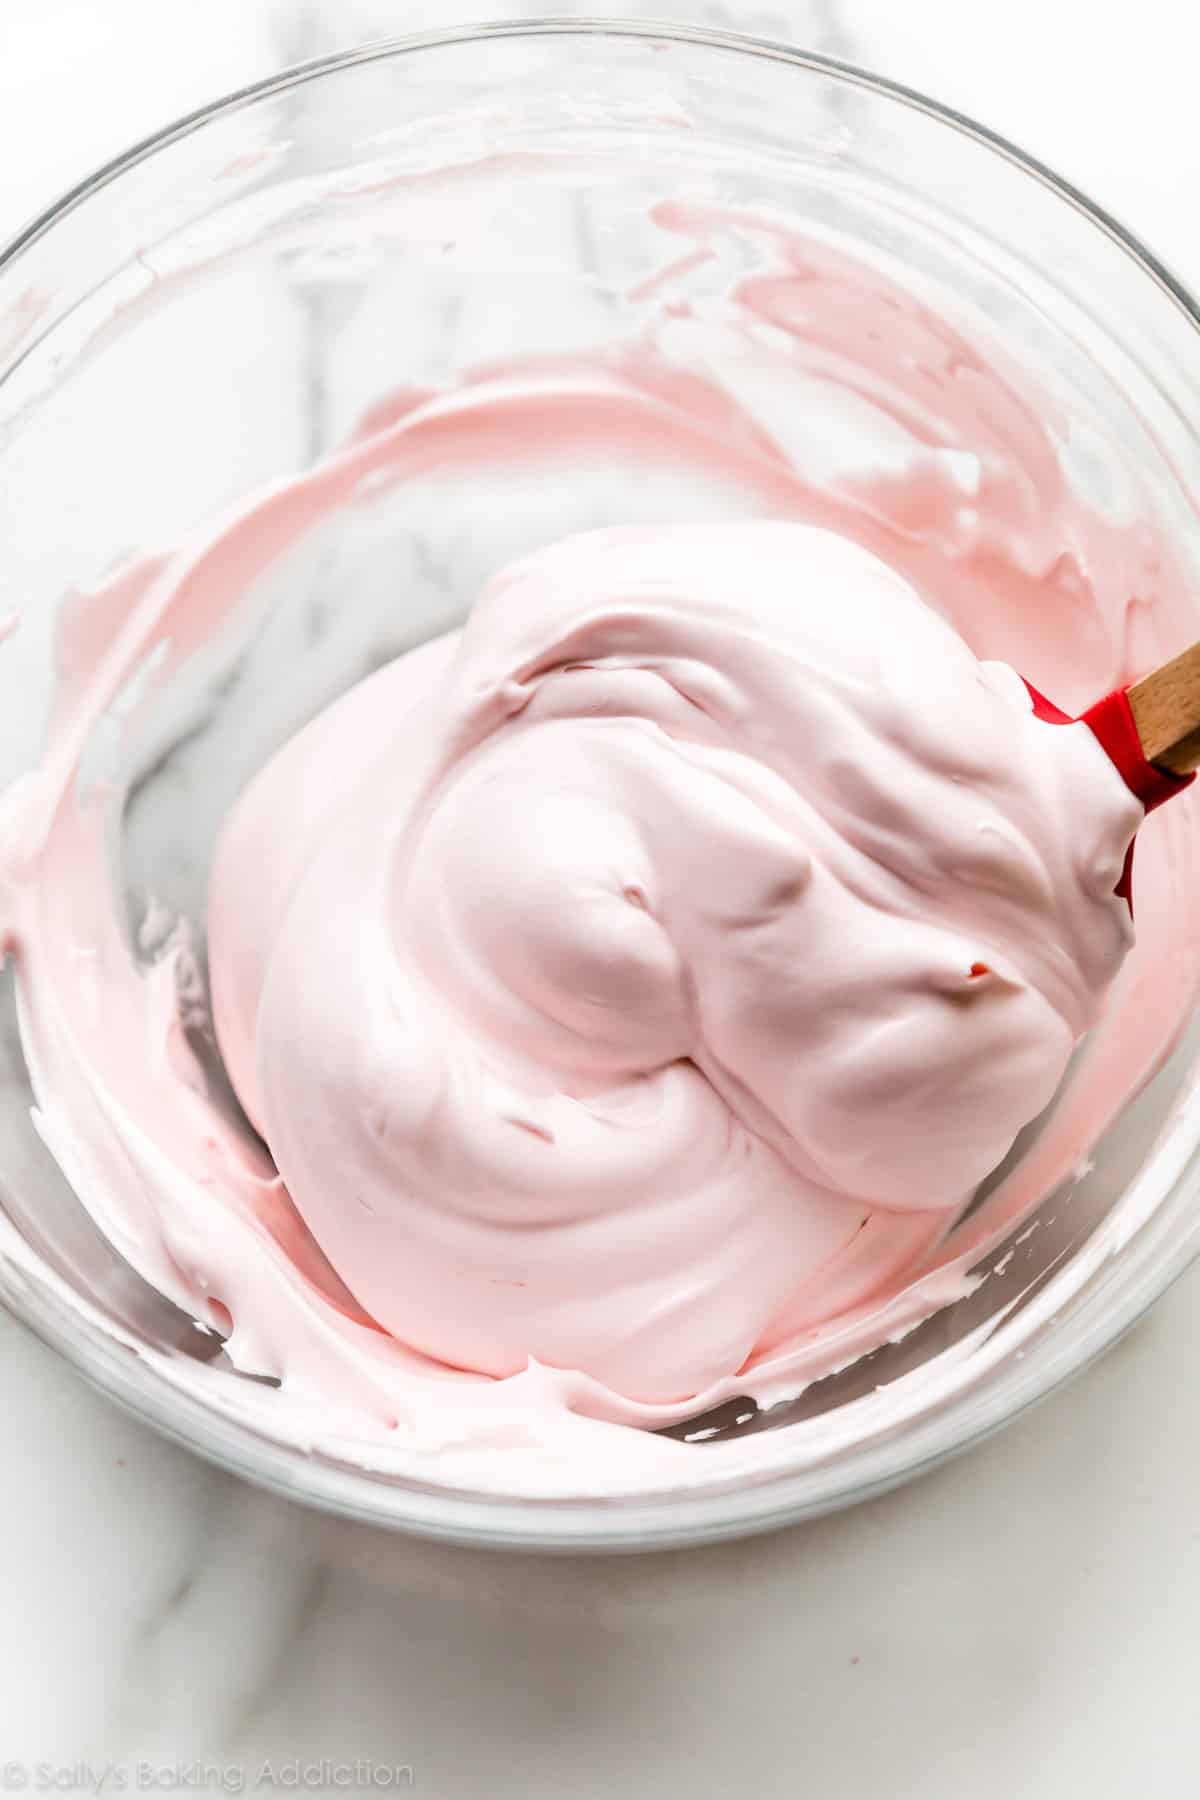
Now you can add your optional gel food coloring. It’s important to add gel food coloring to the egg whites directly, instead of the finished macaron batter. (Finished macaron batter more easily deflates.) Fold the coloring in very slowly. You can also beat in the food coloring with your mixer on a low speed.
Set your stiff egg whites aside.
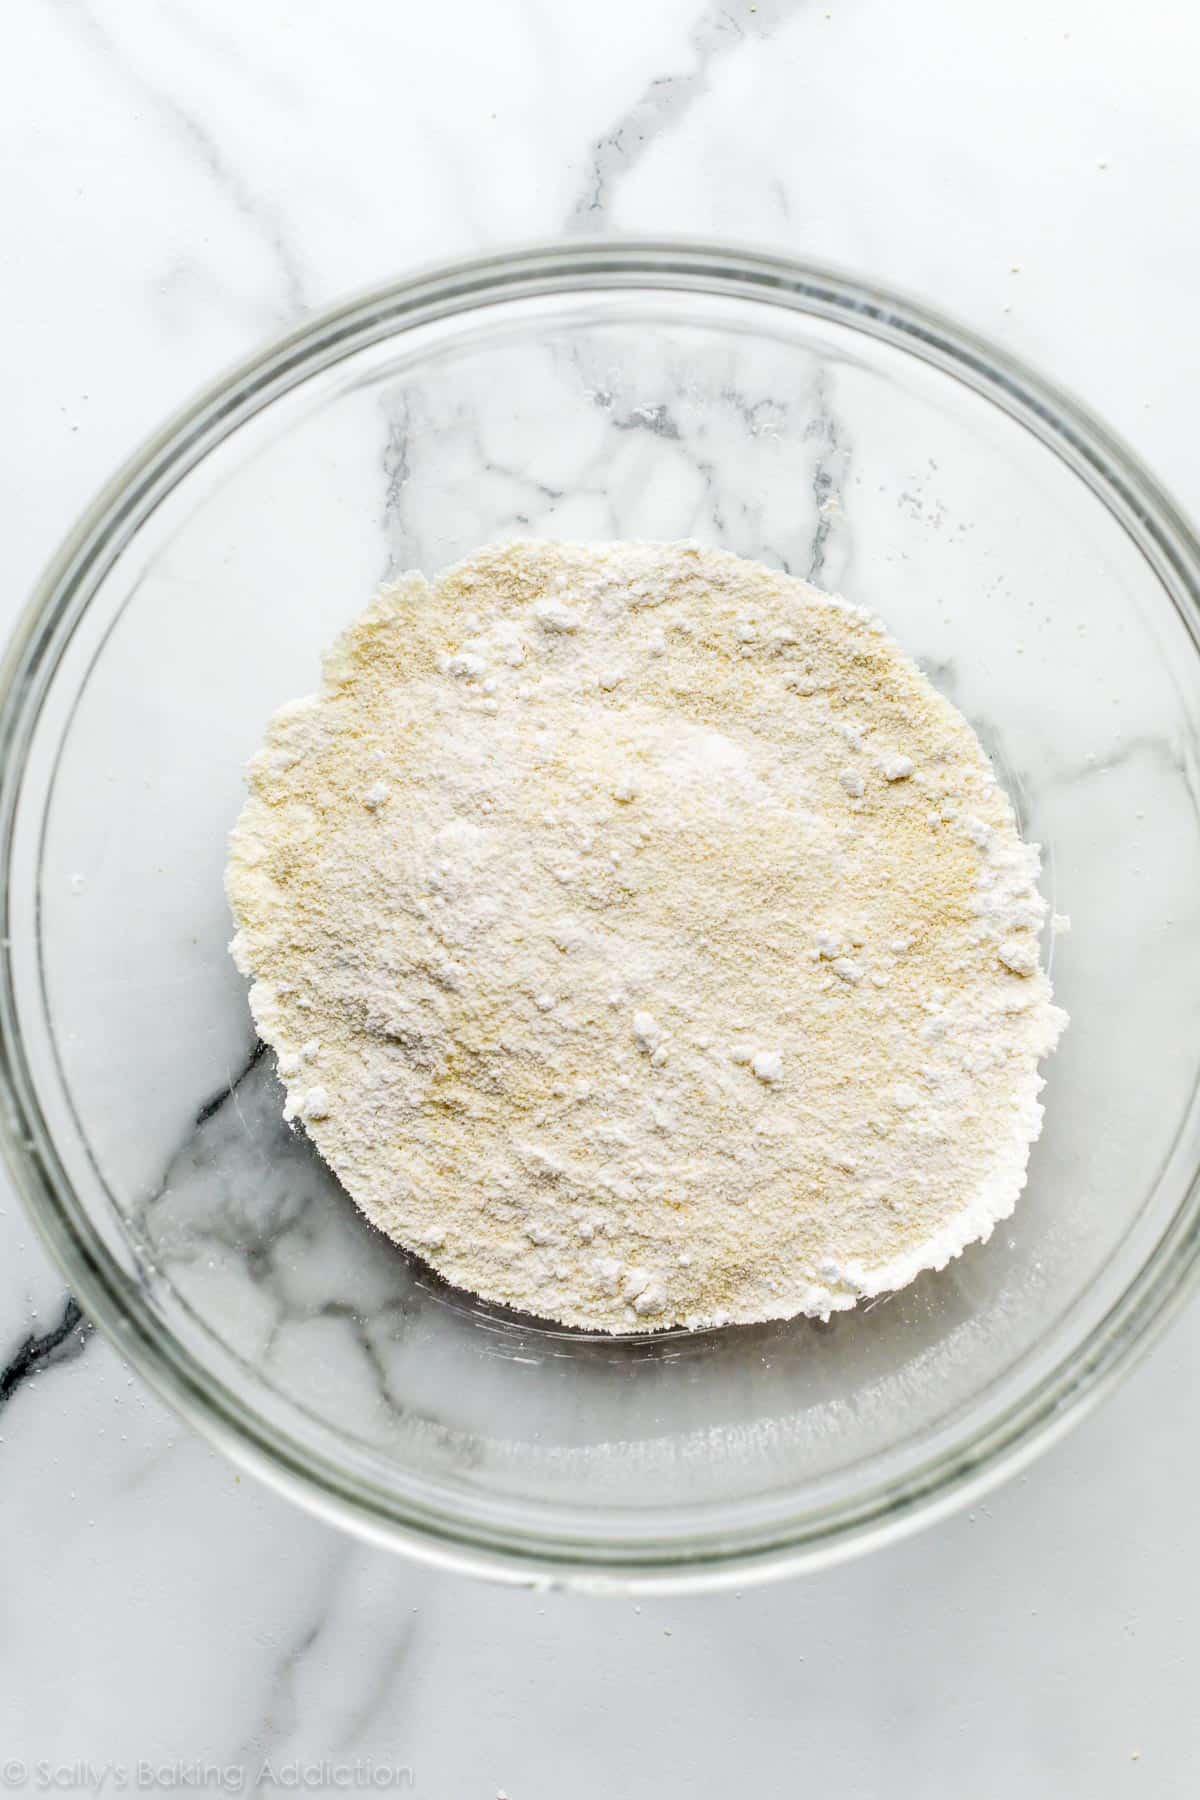
Sift the almond flour and confectioners’ sugar together in a large bowl. The bigger the bowl, the more room you have for the macaron batter, and the easier it will be to manage. Use a spoon to help work any larger pieces through the sieve. You don’t want to discard a lot of that because then you won’t have enough dry ingredients in the batter.
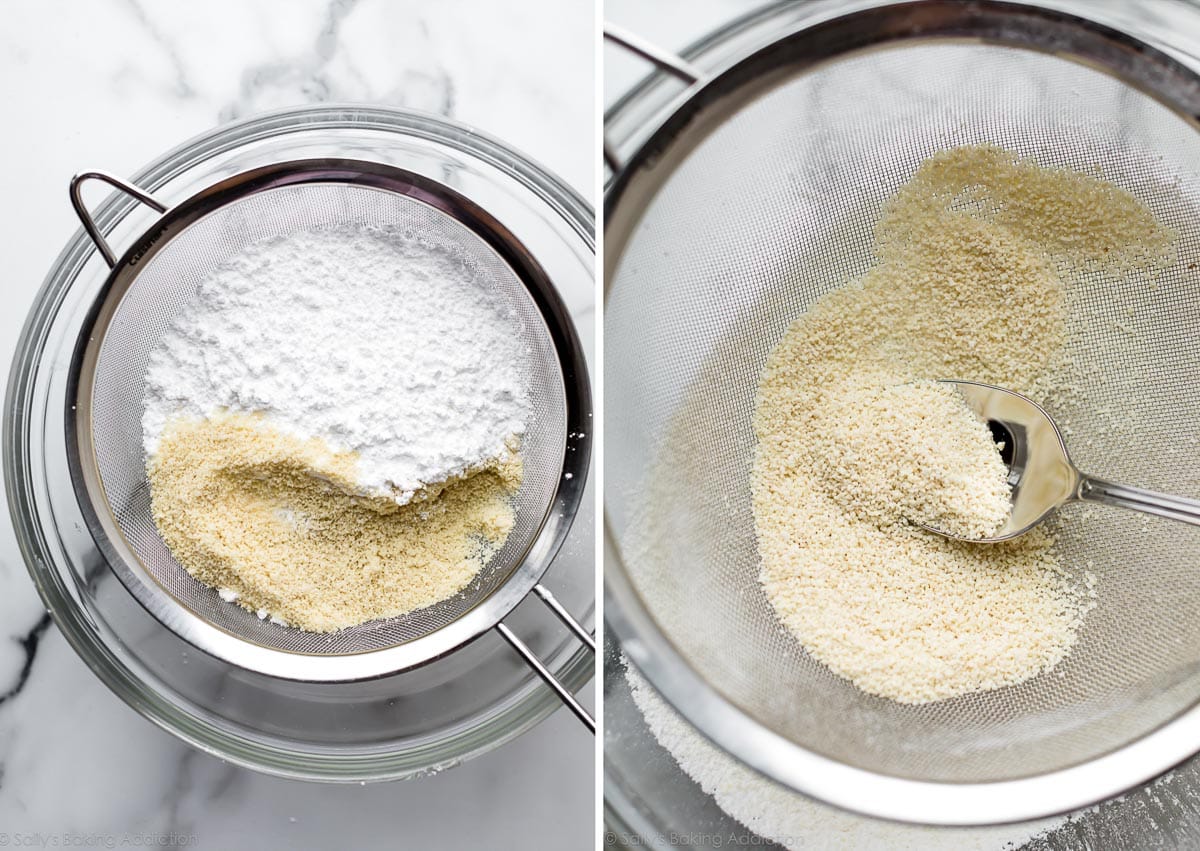
Sifting guarantees a nice light texture.
In 3 separate additions, begin slowly folding in the beaten egg whites in a circular motion. I always eyeball the amount. (Tip: The amount of egg whites you add at a time doesn’t have to be perfect because what you’re really looking for is the consistency of batter after the 3rd addition, known as macaronage and explained below.)
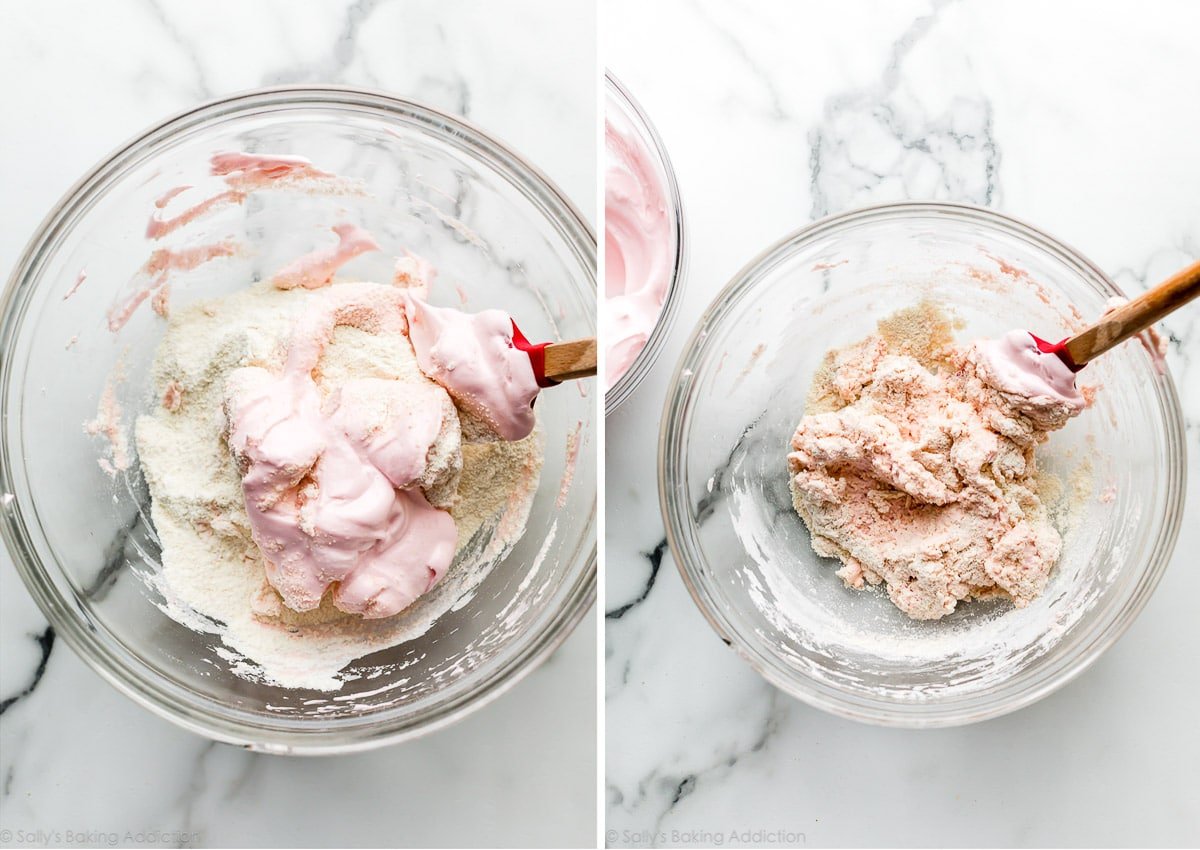
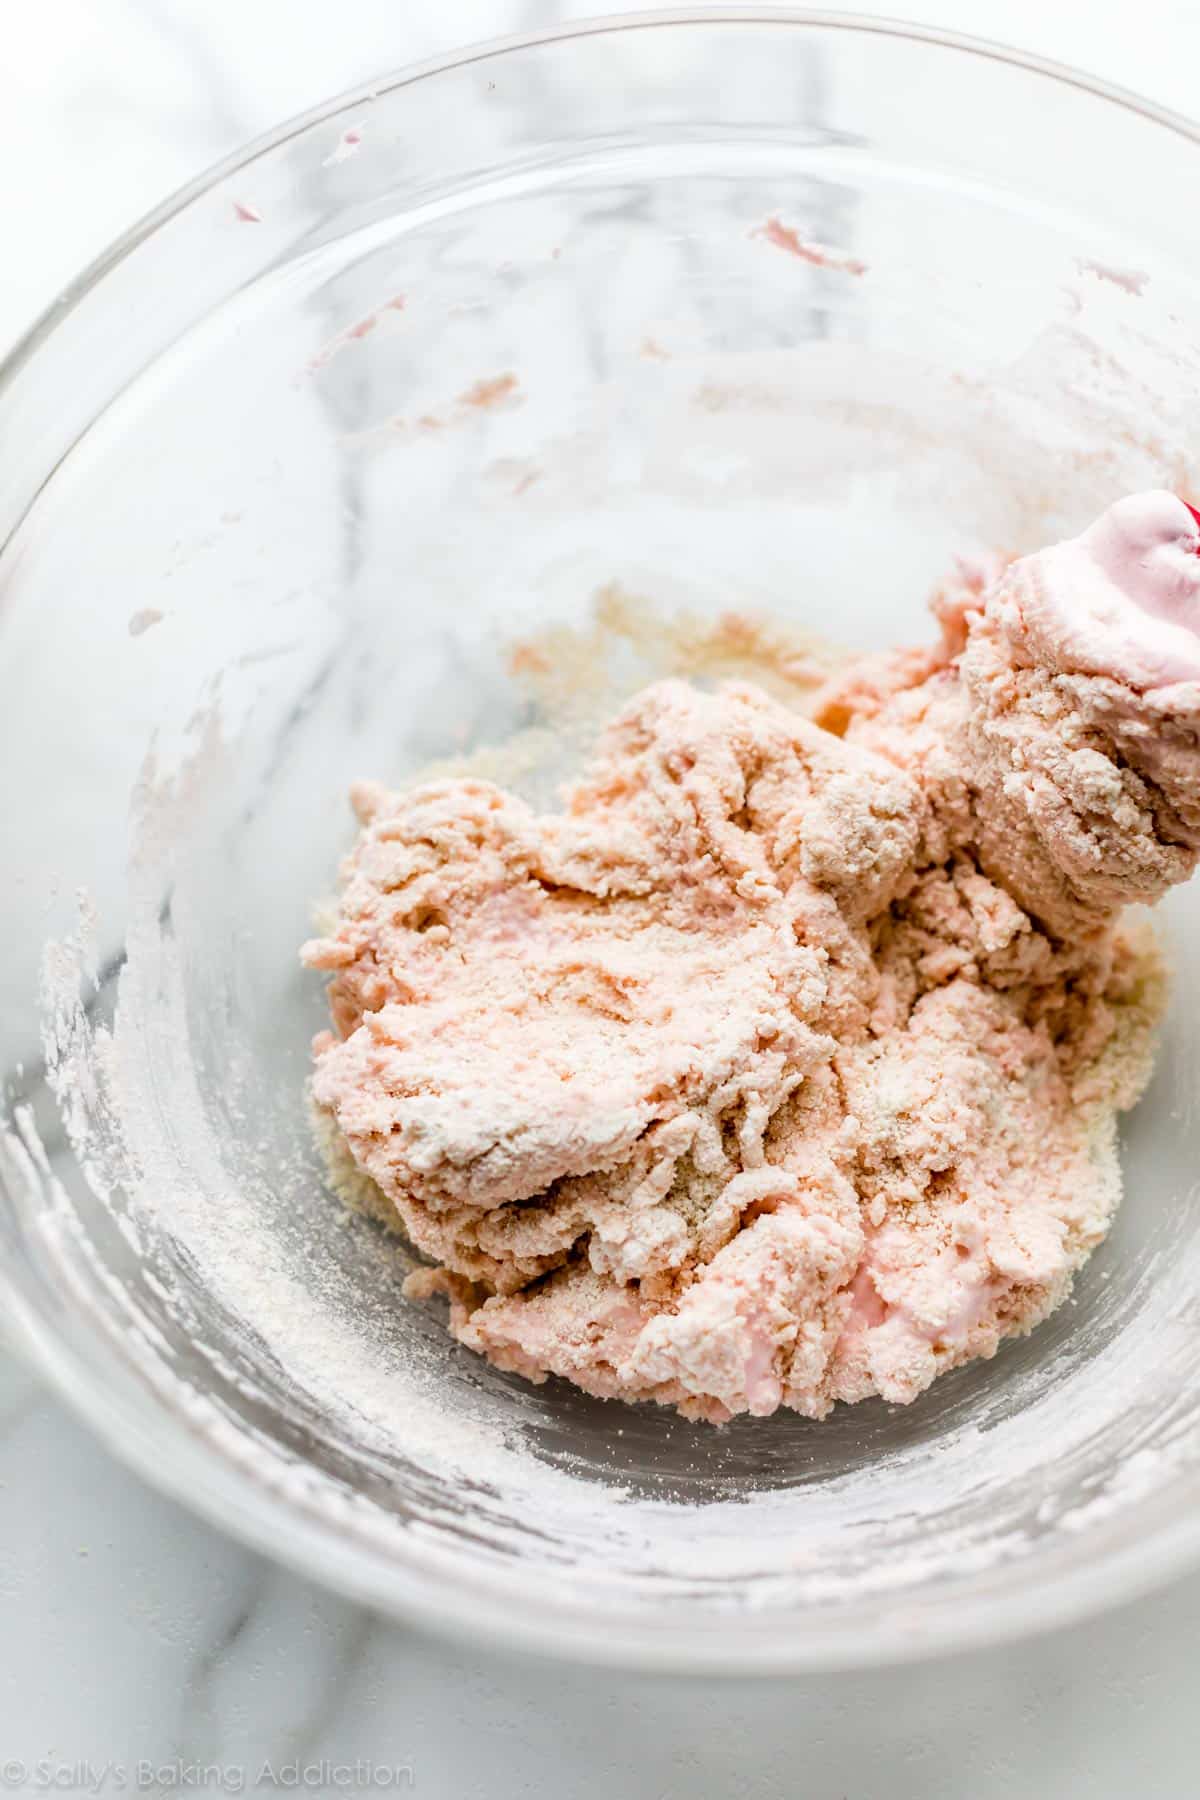
After only 1 addition, the batter will be very thick and dry:
The batter will begin to loosen up after you add the 2nd and 3rd addition:
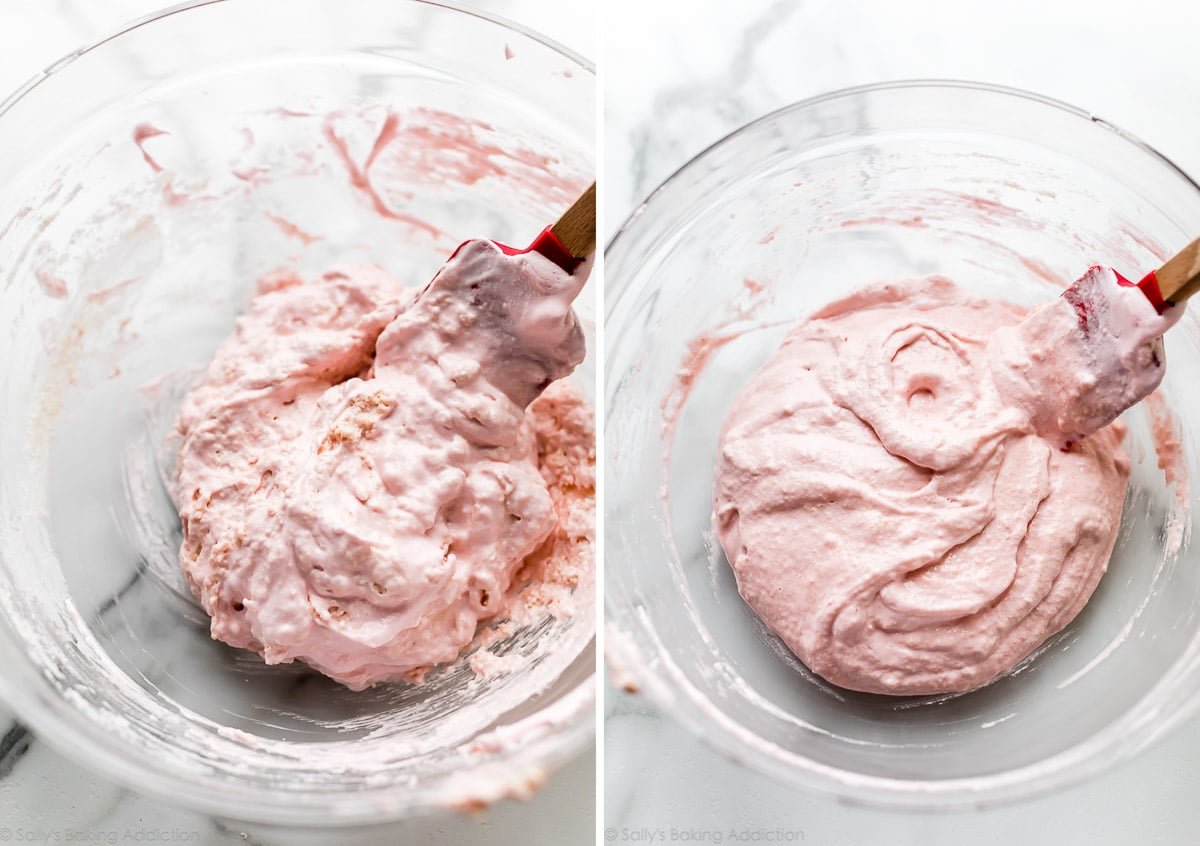
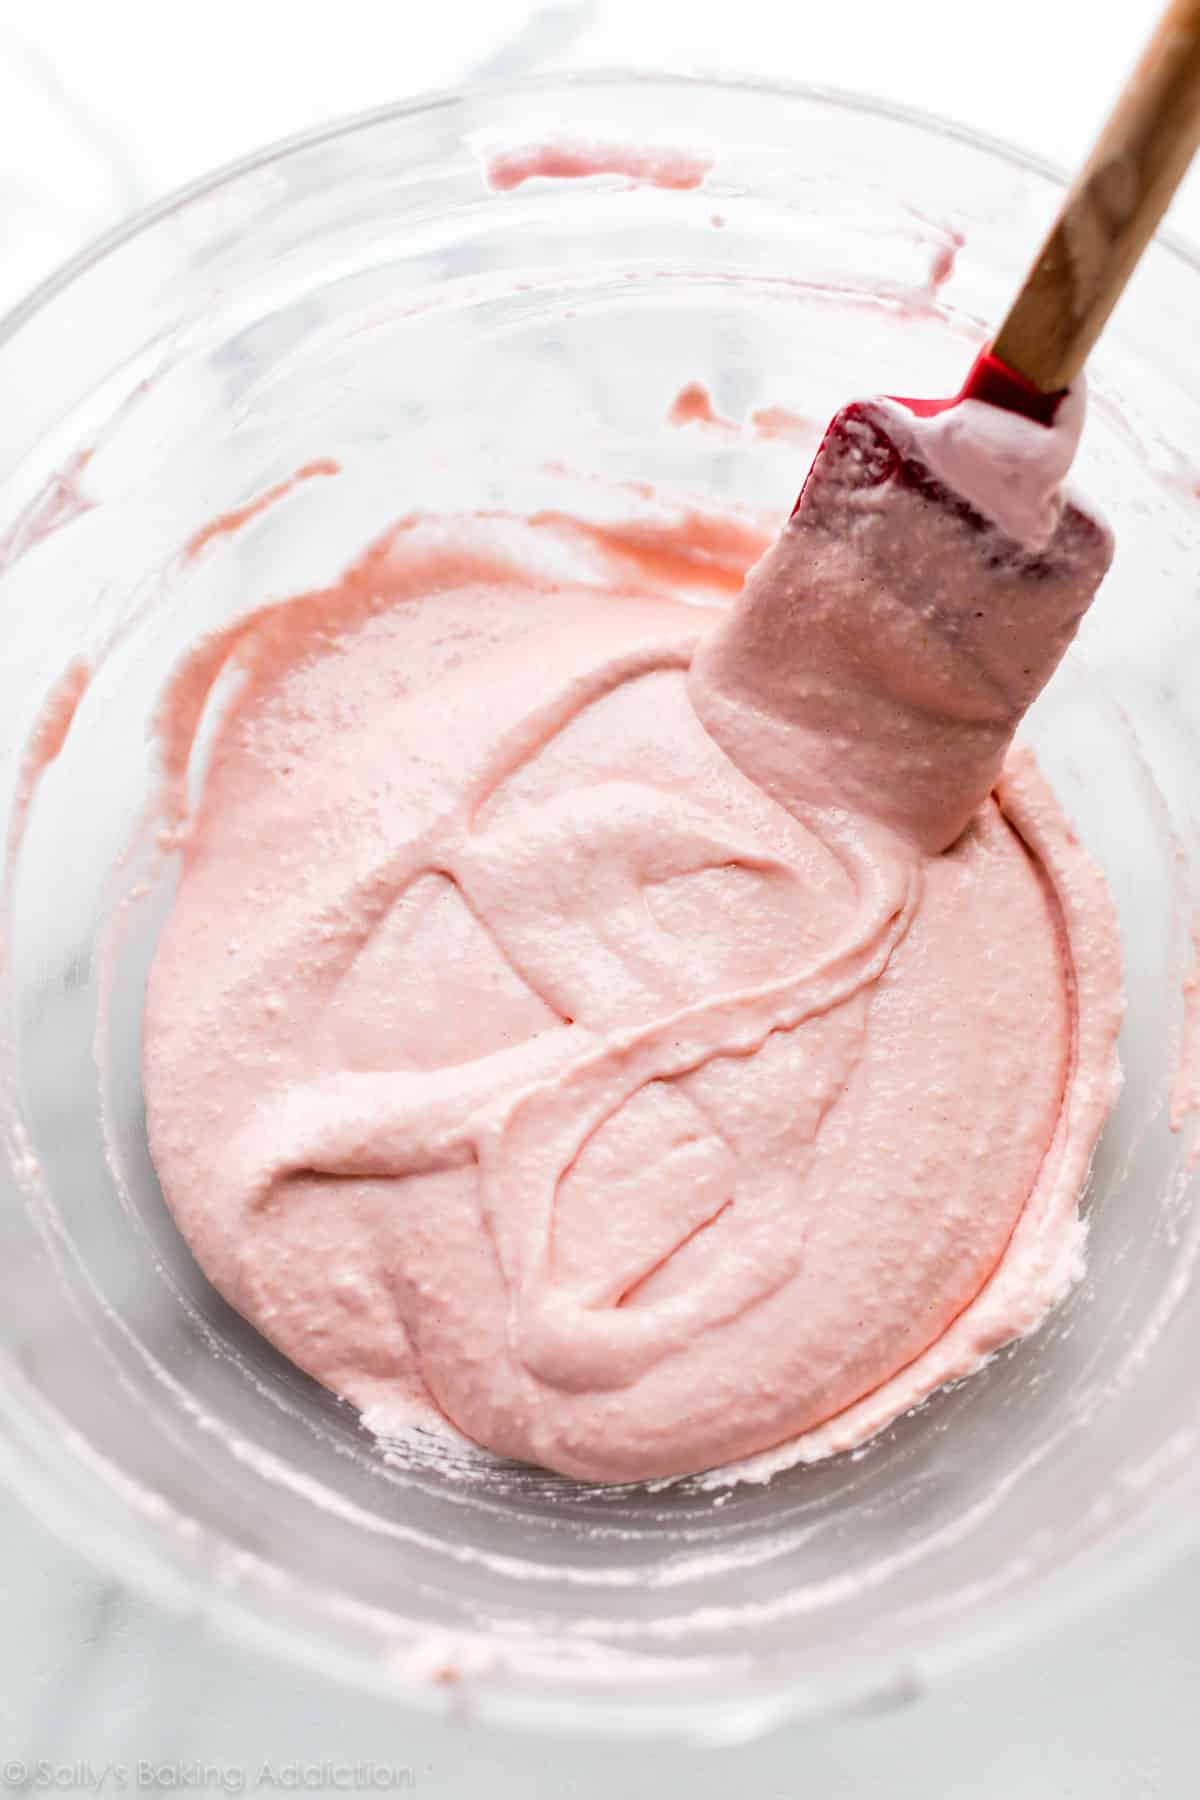
After that 3rd addition of egg whites, you’re at the macaronage stage. You need to keep folding and deflating air until you reach the perfect consistency.
What is Macaronage?
Macaronage is the process of working macaron batter into a shiny and flowy consistency that easily pipes into smooth macaron shells. You may have heard this term before and rightfully so—it’s a crucial step in this macaron recipe. During this stage, you want to be sure not to overmix or undermix the batter. Undermixed and thick batter can produce lumpy or hollow macarons. Overmixed and thin batter can produce cracked macarons or macarons without feet.
Balanced macaron batter after achieving that perfect macaronage is best understood through visuals. Use my video above as a guide starting at the 3:10 minute mark. The photo below should be helpful as well. Drop the macaron batter off of your spatula in the form of a figure 8. The batter will stream off of your spatula like honey and the figure 8 should take no more than 10 seconds to sink back into itself. If it takes less, your batter was overmixed and is too thin. If it takes longer, continue slowly folding the batter to deflate more air.
It’s best to go very slow so you don’t accidentally overmix.
Spoon the macaron batter into your piping bag fitted with your piping tip.
How to Fill a Piping Bag with Macaron Batter
It can be pretty difficult to fill a piping bag with macaron batter since the batter is so drippy. My trick is to use a big cup and you can watch me do this in the video above. Fit the piping bag with a piping tip, then place it in a large cup, folding the top of the piping bag around the rim of the cup. Spoon batter inside, then lift the piping bag out of the cup and twist the end to seal in the batter.

Pipe the batter in 1.5 inch or 2 inch circles at a 90 degree angle on the lined baking sheet. To guarantee your macarons are all the same size (helpful for sandwiching), it helps to have a template or drawn circles on your parchment. You can find free templates online—do a quick “macaron template” internet search—or purchase a macaron-specific silicone baking mat. I usually just trace something about 1.5 inches in diameter (like a medicine bottle cap or small round cookie cutter) with a pen on parchment paper then flip the parchment over. You can see the traced circle through the parchment, which makes an easy template for uniform circles.
Or just eyeball it! I promise no one will be offended by uneven macaron circles.
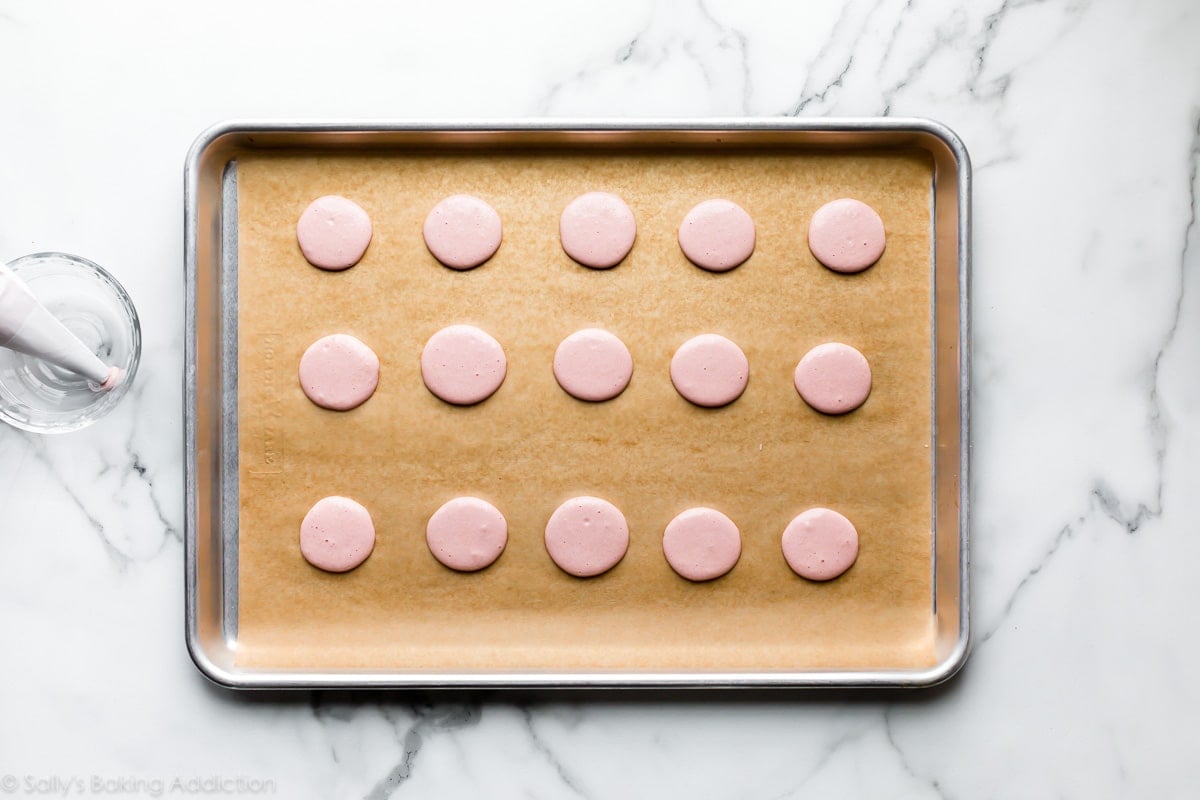
Bang your pan on the counter a couple times to pop any air bubbles. (You can see plenty of air bubbles before I popped them in the photo above.) Use a toothpick to pop any smaller air bubbles. Why is this necessary? Air bubbles will create cracks in your macaron shells. Pop any that you see.
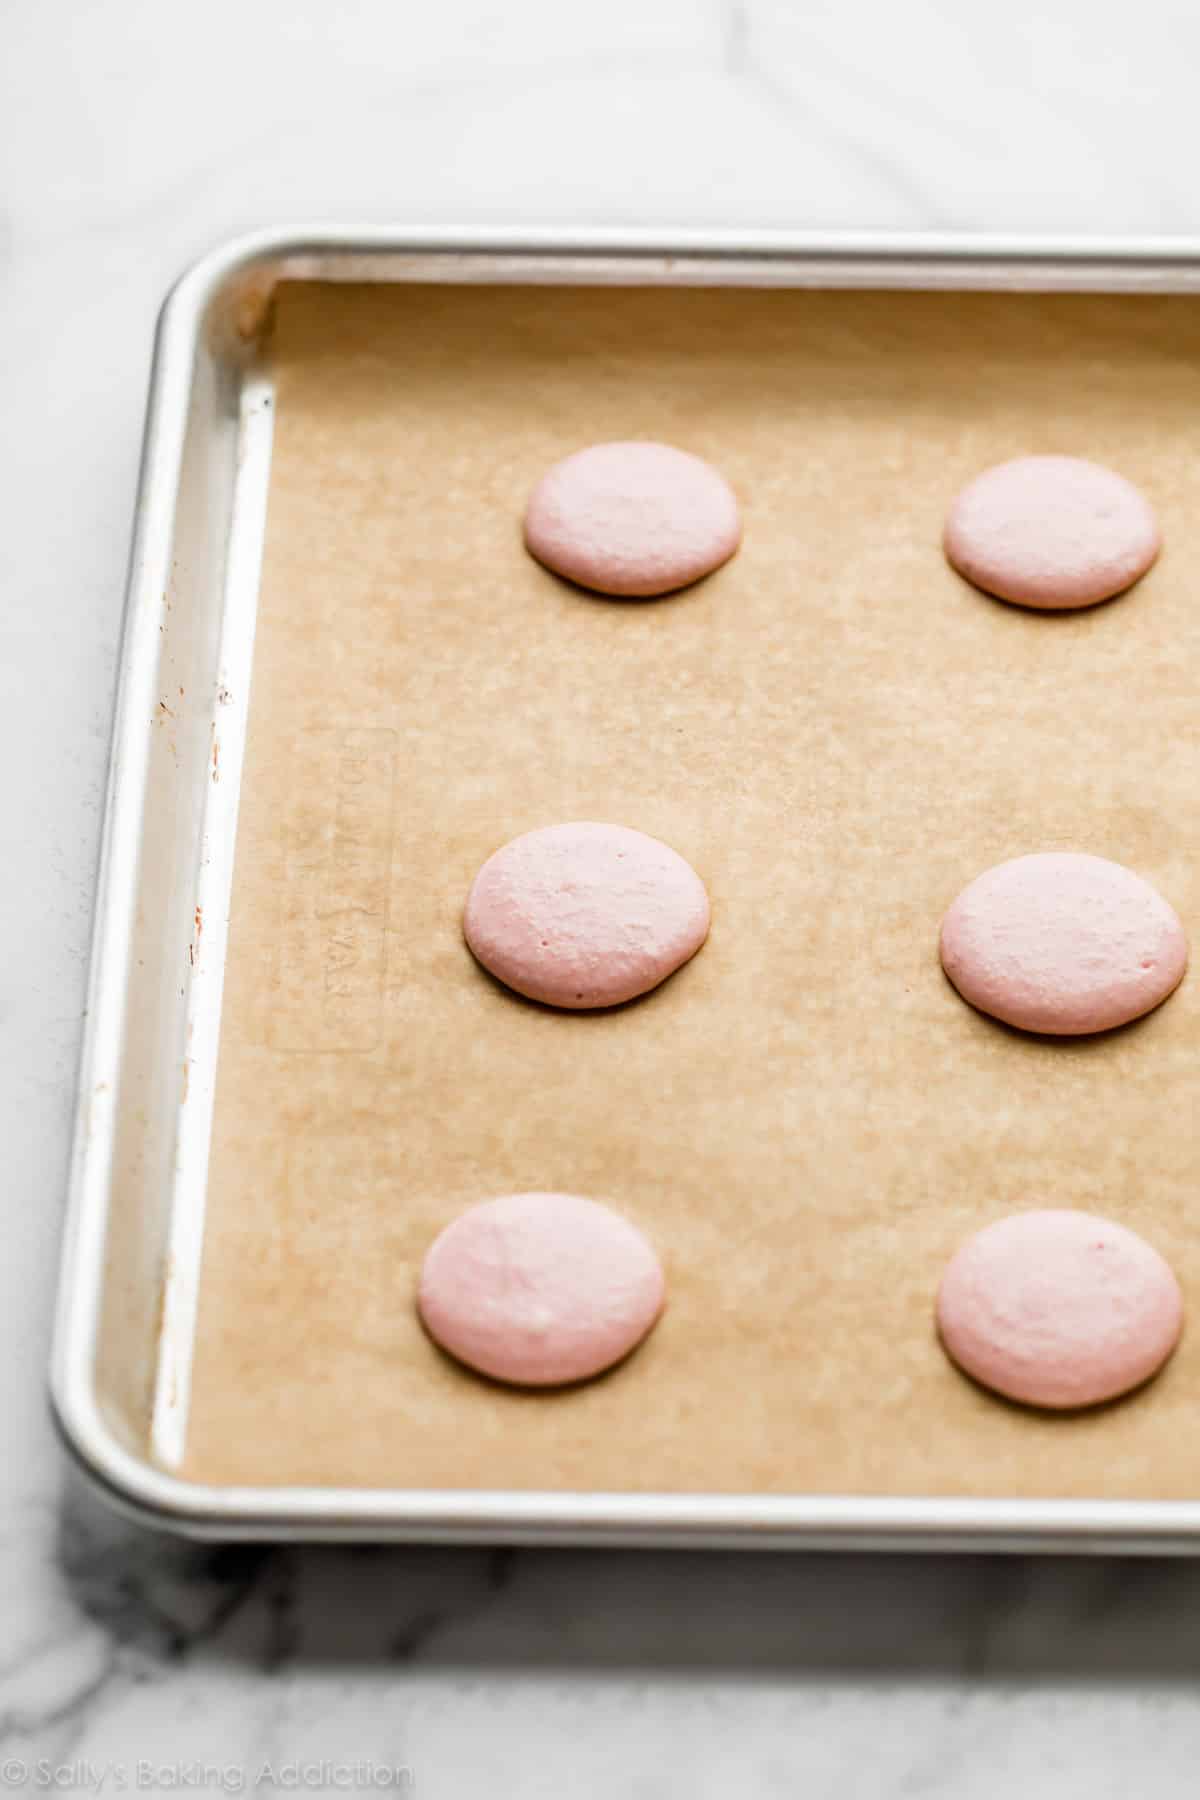
Dry The Shells
There’s one more crucial step before you bake the shells. Let the piped circles sit out until they are dry and no longer tacky on top, usually 30-60 minutes. This time allows the top to firm up and form a skin, which helps the macarons rise UP and form their trademark ruffly “feet.” Your macarons will over-spread and will not have their signature feet if you skip this step.
Do not let them sit out for longer than they need to because they could begin to deflate.
It’s hard to tell in the photo, but these circles are no longer tacky on top and are ready to bake:
Bake at 325°F (163°C) for 13 minutes. All ovens are different and the actual temperature inside your oven may not match what the display reads. I highly recommend an oven thermometer.
Macarons Are Done Baking When…
As the macaron shells bake, they should form feet. To test for doneness, lightly touch the top of a macaron with a spoon or your finger (careful, it’s hot). If the macaron seems wobbly, it’s not done and needs another 1-2 minutes. If it seems set, it’s done. Basically, bake until the macarons don’t move around when touched.
Let the shells cool on the baking sheet for 15 minutes, then transfer to a cooling rack to continue cooling. The macaron shells may stick to the parchment paper/baking sheet if you try to remove them too early. If this is happening, let them cool on the baking sheet a little longer before removing.
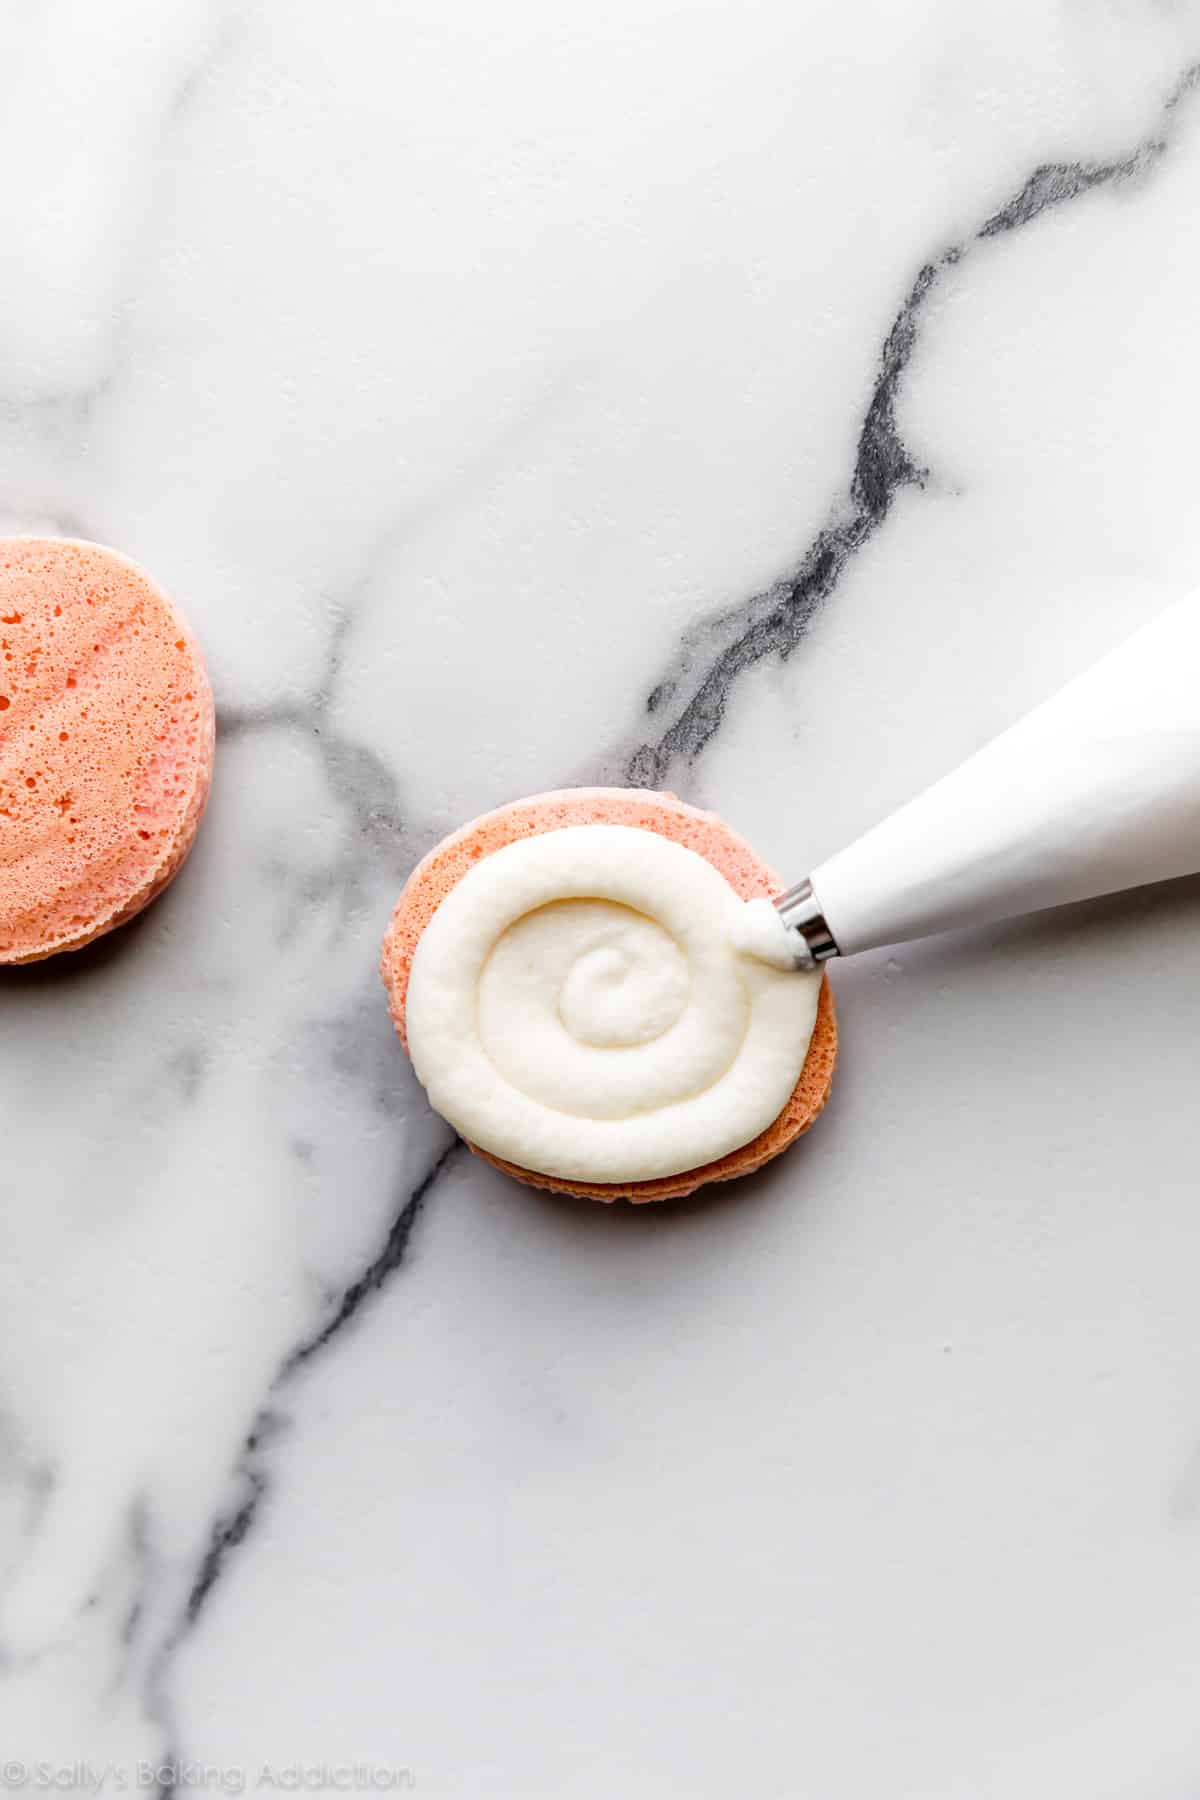
After cooling, the shells are ready to fill and sandwich together. I have plenty of filling suggestions in the recipe notes below. I usually halve my recipe for vanilla buttercream. You can spread the frosting on the underside of half of your macarons with a knife or you can use a piping bag/tip. Just use the same round tip you used for the macaron batter.
Troubleshooting French Macarons
- Hollow Macarons: It’s always so frustrating to bite into a macaron only to have it filled with… empty air. There are a few culprits leading to this disappointing outcome. If your macarons are hollow, the batter was likely undermixed or overmixed. Pay attention to the proper macaronage. Additionally, make sure you pop and air bubbles in the piped macaron batter as directed in the recipe. And finally, play around with your oven settings. The oven could be too hot or the macarons could be under-baked. All ovens are different and what some bakers find helpful is lowering the oven temperature down to 315°F (157°C) or 300°F (149°C) and extending the bake time by a few minutes.
- Macarons Have No Feet: Avoid over-beating the egg whites and over-mixing the macaron batter. Make sure you let your piped macaron batter dry/sit out before baking. It should no longer be tacky. See “Dry the Shells” above.
- Cracked on Top: If your macarons are cracked on top, they may have been over-baked, the batter may have been overmixed, air bubbles in the piped batter may not have been popped, and/or the egg whites may have been over-beaten.
- Runny Batter: Your macaron batter will be runny if you overmixed it, deflating more air than intended. Macarons baked with runny batter will over-spread, aren’t likely to develop feet, nor will they have the intended chewy texture. This is why the macaronage step is crucial. Fold the batter together slowly and perform the figure 8 test a few times until you have the correct consistency.
- Imperfect Piped Circles: Don’t get upset over this! My macaron batter is NEVER piped into perfect circles. You can even see in these photos that some are larger than others. Using a template helps, but so does practice.
5 Final Success Tips:
- Wipe down your egg white bowl and beaters/whisk attachment with vinegar or lemon juice to rid any grease or fat residue.
- Use large metal or glass mixing bowls.
- Bake macarons on a dry day. If it’s particularly humid, the piped batter will take awhile to dry and the shells may not develop feet.
- Pay attention to proper macaronage, explained and shown above.
- Do not make any ingredient substitutions or deviate from the instructions.
So, Are These Worth the Effort?
Yes. But, of course, we all have different taste buds and levels of patience. Once you understand the process, they’re perfectly doable. And it’s a lot of fun to play around with different fillings. Have fun and don’t stress out. Even the ugly ones can be delicious. Just load them up with a filling and no one will care! 😉
Further Reading and Fun Flavors:
- Cookies and Cream Macarons and Pistachio Macarons from House of Nash Eats
- Lemon Macarons from Indulge with Mimi
- Ultimate French Macaron Guide by Mike Bakes NYC (so helpful!)
- Chocolate Hazelnut Macarons by Sweet & Savory by Shinee
- Macaron Troubleshooting by Sweet & Savory by Shinee (incredibly comprehensive and helpful)
- The Art of Macaron Making on Bob’s Red Mill
- Sprinkle Macarons by Cloudy Kitchen
- Chocolate Macarons by Sugar Geek Show
- French Macarons Recipe Guide on Bigger Bolder Baking (includes a template)
See Your French Macarons!
Many readers tried this recipe as part of a baking challenge! Feel free to email or share your recipe photos with us on social media. 🙂
Print
French Macarons
- Prep Time: 1 hour (plus aging egg whites)
- Cook Time: 13 minutes
- Total Time: 1 hour, 30 minutes
- Yield: about 40 shells; 20 sandwiched macarons
- Category: Dessert
- Method: Baking
- Cuisine: French
Description
Review this page, video, troubleshooting, and success tips and follow the recipe precisely for crisp, chewy, delicate French macaron cookies. Have fun with fillings! I provide some filling ideas in the recipe notes. We strongly recommend using gram measurements, but see recipe note if you do not have a kitchen scale.
Ingredients
- 100g egg whites (usually between 3–4 large egg whites)
- 1/4 teaspoon (1g) cream of tartar
- 1/2 teaspoon extract such as vanilla, almond, coconut, etc. (optional)
- 80g superfine sugar (aka caster sugar, see note)
- 1–2 drops gel food coloring (optional)
- 125g almond flour
- 125g confectioners’ sugar
- desired macaron filling (some options listed in notes)
Instructions
- Wipe down a large glass or metal mixing bowl with lemon juice or vinegar. Add egg whites. Cover and refrigerate for 24 hours, then bring to room temperature.
- Line 3 large baking sheets with silicone baking mats or parchment paper. Set aside.
- Add cream of tartar and extract (if using) to egg whites. Using a handheld mixer or stand mixer fitted with a whisk attachment, beat together on medium speed until very soft peaks form. This takes a few minutes of beating. At first the egg white and cream of tartar mixture will be foamy, then the bubbles will begin to tighten and the beaters will leave tracks as the egg whites build volume. Once they begin leaving tracks, you likely have soft peaks. Stop beating. Add about 1/3 of the superfine sugar. Beat on medium-high speed for 5 seconds, then with the mixer continuing to run, add another 1/3 of the sugar. Beat for 5 seconds, then with the mixer continuing to run, add the remaining sugar. Beat on medium-high speed until stiff glossy peaks form. (This means the whites have stiff, smooth, and sharp points in the bowl or on the lifted whisk attachment/beaters. Stiff peaks do not droop down. You can turn the bowl upside down and the egg whites will not move or spill out.) Using a rubber spatula, slowly and gently fold the food coloring (if using) into the egg whites.
- Sift the almond flour and confectioners’ sugar together in a large glass or metal mixing bowl. Use a spoon to help work any larger pieces through the sieve. You don’t want to discard a lot of that because then you won’t have enough dry ingredients in the batter.
- Slowly fold the beaten egg whites into the almond flour mixture in 3 separate additions, folding until combined before adding the next addition. After you add all of the egg whites, pay very close attention to the consistency of your macaron batter. Continue folding the batter (which deflates air) until it thins out into the consistency of honey. What’s a more helpful cue is the figure 8 test. Drop the macaron batter off of your spatula in the form of a figure 8. The figure 8 should take no more than 10 seconds to sink back into itself. If it takes less, your batter was overmixed and is too thin. If it takes longer, continue slowly folding the batter to deflate more air, then perform the figure 8 test again. It’s best to go very slow so you don’t accidentally overmix.
- Spoon the macaron batter into a piping bag fitted with a medium round piping tip, such as Wilton 12, Wilton 1A, or even Ateco 806. The macaron batter is very drippy, so transferring to the piping bag can be messy.
- Holding the piping bag at a 90 degree angle over the baking sheet, pipe batter in 1.5 – 2 inch rounds about 1-2 inches apart on prepared baking sheets. I usually pipe little mounds—see video tutorial above. The piped macaron batter flattens out. Bang the pan a couple times on the counter to pop any air bubbles, then use a toothpick to pop any remaining air bubbles.
- Let the piped macarons sit out until they are dry and no longer tacky on top, usually 30-60 minutes. This time allows the top to firm up and form a skin, which helps the macarons rise UP and form their trademark ruffly “feet.” Do not let them sit out for longer than they need to because they could begin to deflate.
- Meanwhile, preheat the oven to 325°F (163°C).
- Bake for 13 minutes. As the macaron shells bake, they should form feet. To test for doneness, lightly touch the top of a macaron with a spoon or your finger (careful, it’s hot). If the macaron seems wobbly, it’s not done and needs another 1-2 minutes. If it seems set, it’s done. Basically, bake until the macarons don’t move around when touched.
- Let the shells cool on the baking sheet for 15 minutes, then transfer to a cooling rack to continue cooling. The macaron shells may stick to the parchment paper/baking sheet if you try to remove them too early. If this is happening, let them cool on the baking sheet a little longer before removing.
- After cooling, the shells are ready to fill and sandwich together. I have plenty of filling suggestions in the recipe notes below. You can spread filling with a knife or pipe it using the same round tip you used for the macaron batter.
- You can eat right away or, as some professionals prefer, cover and refrigerate them 12-24 hours so the macarons and flavors can mature. Bring to room temperature before serving. (I usually just serve them right away!)
- Cover leftover macarons and refrigerate for up to 5 days.
Notes
- Freezing Instructions: Cooled macaron shells and finished assembled macarons can be frozen for up to 1 month. Thaw at room temperature before filling/serving.
- Special Tools (affiliate links): Electric Mixer (Handheld or Stand) | Glass Mixing Bowls or Metal Mixing Bowls | Egg Separator | Food Scale | Fine Mesh Sieve | Piping Bag (Disposable or Reusable) | Medium-Round Piping Tip (Wilton 12, Wilton 1A, or Ateco 806) | Baking Sheets | Silicone Baking Mat, Macaron-Specific Silicone Baking Mat, or Parchment Paper | Cooling Rack
- Ingredient Substitutions & Weights: I do not recommend any ingredient substitutions in this recipe. Using weights (and a food scale) is the best way to guarantee success. However if you do not own one, use the following approximate measurements: for the superfine sugar, use 1/3 cup. For the almond flour and confectioners’ sugar, you need about 1 cup + 1 teaspoon each.
- Egg Whites: For best and most consistent results, I strongly recommend using fresh egg whites instead of liquid egg whites from a carton.
- Extract/Flavoring: I keep these macarons plain. Without flavoring, they have a sweet almond flavor. However, if desired, feel free to add 1/2 teaspoon of your favorite extract such as almond, vanilla, coconut, lemon, etc.
- Make Your Own Superfine Sugar: Add 80g of regular granulated sugar to your food processor or blender. Pulse about 10-15x until granules are much finer, aka superfine sugar. Weigh 80g superfine sugar—should be about the same amount you started with.
- Optional Food Coloring: Tinting macaron batter is completely optional. If you don’t tint it, the macarons will be a natural beige color. Avoid using liquid food coloring because it will change the consistency of your macaron batter. Instead, use 1-2 drops of gel food coloring. (I used dusty rose, aqua, and fuchsia.) Powder food coloring should be fine, but I haven’t tested it. Only use a very small amount.
- Almond Flour: Make sure you use almond flour, not almond meal. It is usually labeled as “fine” almond flour. Almond flour is much finer than almond meal and made from blanched, skinless almonds. Almond meal is coarser and contains almond skin. You can make your own almond flour, but be very careful because almonds can quickly release their oils, clump up, and turn into almond butter. It might be easier to just pick up a bag of fine almond flour. It’s very common in mostly all grocery stores these days– I use and love Bob’s Red Mill brand.
- Macaron Filling Ideas: The pictured macarons are filled with vanilla buttercream (I prepared a half batch). Other ideas are a 1/2 batch of chocolate buttercream, lemon buttercream, chocolate peanut butter frosting, Nutella frosting, cream cheese frosting, champagne frosting, strawberry frosting, or a full batch of peanut butter frosting. Cooled and thickened chocolate ganache or cooled salted caramel are great, too!
Adapted from Les Petits Macarons and Mad About Macarons


Reader Comments and Reviews
Sally , First and foremost thank you for all your baking tips they are great.
My 1st set of macarons got feet but cracked. I baked 2nd batch for 2 minutes less and they came out better.
On the one that cracked it’s almost like the top layer peels off,does that mean they are hollow?
Also after piping they spread quite a bit making them 3 inches.They were 2inch rounds to start. What did I do wrong?
Any suggestions would be most appreciated.
P.S. they may be ugly but they taste amazing!
Hi Denise, it sounds like the batter may have been over-mixed during the “macaronage” stage and that’s why they overspread before baking and perhaps why they cracked too. Did they feel dry or was it moist under that top layer?
Sally they were dry. It took a while to incorporate the eggs whites into dry ingredients . I kept mixing because it looked crumbly
Hi. Should metal bowl and whisk be cold when you start beating the eggs?
Hi Denise, after cover and refrigerating the egg whites for 24 hours, we recommend bringing the bowl + egg whites to room temperature before beginning with step 3. The whisk can be room temperature, too.
This was fabulous! Even on the first batch my macarons had the cute little feet and crunch followed by the chew! Something is magical about the 100g egg white with 125g almond flour (I used Diamond brand) and 125g powdered sugar. (the first recipe I tried used 130g almond flour and 130 of powdered sugar and they mounded up with a point) . Creating superfine sugar with food processor also seems to make a difference. Watch video as it helped me visualize the process. This wasn’t the first recipe I tried, but it will be the last!
My 7yo has been really eager to make macarons, but I was too intimidated. This recipe was a perfect way for us to make them and they turned out delicious and look beautiful! Highly recommend it!
Save yourselves some heartache and watch the video. I couldn’t figure out what I was doing wrong until I realized “soft peaks” meant still foamy according to the video. Also it’s apparently better to pipe them like mini rosettes, not mounds like described. Will try a third time now that I’ve watched the video, but lesson learned. Also I think I was letting mine sit too long, in the video they still indent far more mine when I went off how it’s written. The instructions don’t completely align with the video resulting in 2 failed batches 🙁
this did not work I did all that you said me and it did not work it was all burned at the bottem and I put it there in like 10 min
My egg whites are not stiffening and when i added the sugar, it was still liquid. Do you have any suggestions on what to do?
Hi Maya, Did you wipe down the bowl you whipped the egg whites in with vinegar or lemon juice? Grease or fat prevents your egg whites from setting up. The egg whites could also be over-whipped if they are deflating. Are you using a hand or stand mixer? It’s easy to over-whip with a stand mixer – try reducing the speed a bit or keeping a close eye out for stiff peaks.
I am going to make this recipe, but I don’t have almond flour. Could I just use All Purpose Flour? Thank you for your amazing recipes!
Hi Maya, almond flour is the only flour that works in this macaron recipe.
these look amazing…can’t wait to try the recipie!!!
i was looking at making 3 different fillings, and wanted the colours to match the fillings, would i have to make three batches with different colours or can i split the batches and colour them?
Hi Olivia, for best results (so as to prevent over or under mixing), we recommend making separate batches for separate colors. Hope you enjoy these macarons!
I got them perfect but the stick to my wax paper and cookie sheet. How do I remove them without breaking them to pieces?
Hi Julie! We don’t recommend using wax paper, which is sticky and melts in the oven. Use silicone baking mats or parchment paper for a non-stick surface and easy removal (see step 2).
My kids and I just made these today, and they are delicious! We followed the recipe and tips very closely- bought a scale to weight ingredients, used the recommended almond flour, and I purchased extra fine sugar instead of sifting my own. I only had regular food coloring so we used just a drop and it was fine. I was nervous about humidity because it’s a very rainy day today, but everything still turned out great!
Like a champ. First time making these cookies, and I’m floored they turned out so well. Thank you. I ate one straight away, but I’m looking forward to see how they “gel” overnight.
Great recipe! I tried it before and all was well up to the point of baking. I’m pretty sure my oven runs hot, so I used a much lower temp this time, 280 for 15 minutes, and they turned out great. They had feet, no burns or cracks! First time they have ever looked that nice for me. And of course they tasted fantastic.
Hi, may I know why my macarons does not form a shell on top when I dry it ? Have been waiting for 1 hour still does not work. Thank you.
Hi Colleen, french macarons can certainly be frustrating can’t they? So many factors play here. I wonder if the almond flour you used was too fine and it wasn’t soaking up the egg whites properly. If you want to try this particular recipe again, see if adding another 15g of almond flour helps. Additionally, avoid baking them on a humid day. Humidity never helps.
I double this batch regularly with no issues. I saw you advised someone to not double it for best results… I can’t imagine French pastry chefs taking the time to do it all twice.
That said; this recipe is pretty close to perfect instructions for a beginner, and maybe that’s why the advice was given. My advice, don’t be afraid to experiment unless you can’t afford to.
Whipped cream is also my go-to filling for these since I cannot stand buttercream. Whipped cream offers a light, fluffy inside and as long as they are stored in the fridge, doesn’t ‘eat into the cookie’. In fact, after a day or two in the fridge they are an even better texture experience.
Great recipe, and pretty great advice, but for all you aspiring pastry chefs out there, don’t be afraid to experiment outside the ‘rails’ of what people think is the ‘right’ way to do things. You may ruin a batch or two on the way, but this is how we get better and more innovative in the kitchen.
I love this recipe very much, I’ll try it today and I’ll let you know how it was, and thank you for clarifying the concept of the sugars
If you do not mind explaining to me what is the difference between confectioner sugar and superfine sugar
Hi Jorge, confectioners’ sugar (also called powdered sugar) is very light and fluffy – sugar pulverized into a powder. Superfine sugar is granulated sugar ground more finely. They have very different textures!
I made these macarons a couple of days ago (and they were awesome!!) but the cookies would not take on the gel food coloring no matter how much I added, so they turned out tan. On the other hand, the food coloring easily colored the buttercream. Is there any food coloring brands you recommend?
Hi Emi, we love Americolor gel food coloring!
macroons turned out as flat crisp crackers, no feet. followed recipe exactly. didnt even bother with making a filling since they failed so bad
Just made these and they turned out really well and were delicious! Now I’m hoping to try your chocolate peanut butter macarons and am wondering how many of these tips to apply. Should I add cream of tartar and beat in superfine sugar into the meringue (rather than fold it in after as per the recipe)? And is there any difference in the macaronage?
Hi Rachel, I would definitely use the tips/method here for the chocolate version, yes.
I love macarons and have decided to use this recipe for my first attempt. Do we have the nutritional information? I am specifically looking for the carb grams. I am diabetic but wouldnt dare sub any ingredients. Thsnk you.
Hi Sherry, We don’t usually include nutrition information as it can vary between different brands of the same ingredients. Plus, many recipes have ingredient substitutions or optional ingredients listed. However, there are many handy online calculators where you can plug in and customize your exact ingredients/brands. Readers have found this one especially helpful: https://www.verywellfit.com/recipe-nutrition-analyzer-4157076
I’m going to try these with your recipe. If successful I want to make some for a baby shower. How can I add flavor to the shells?
Hi Jennie, here are the instructions: If desired, feel free to add 1/2 teaspoon of your favorite extract such as almond, vanilla, coconut, lemon, etc. You can fold it in at the same time as the food coloring.
i have heard many many times how hard these macarons are to make and when i finaly made them they turned out AMAZING they were SO SO SO easy to make and tasted like perfection thankyou so much
Oh good to read. I’m attempting these for the first time and so nervous! They’re for a bridal shower I’m doing and want them to be good
First time ever making macarons. Easy to follow with great additional comments for this novice. Great flavor and texture. Started to get feet but not like a professional!
Thank you!
Sally, thank you SO MUCH for another AMAZING recipe!!! One of my absoulate favorites. I have tried other recipes, but they were all floppy and I couldnt even get them off the pan. These hold up perfect! Nice and crunchy and flakey on the outside, chewey and flavorful on the inside. I have now made these like 15 times . I would most deffinatley reccomend!!!!!!!!!
I followed your recipe exactly and viola they turned out great! This was my first time ever to attempt these delectables and they are worth the effort! I would make a few tweaks next time (learning as I go) but the recipe was very detailed and the video helped a lot! Can’t wait to make these again and try a different flavor next time. Thanks Sally!!!
Can you ever double a batch to make more instead of cleaning everything and starting over?
Hi Robin, For absolute best results, we recommend making separate batches rather than doubling.
A great place to start, but damn these are hard cookies. So many factors have made each batch I’ve done (about 10 at this point) slightly different.
I never get to the figure 8 stage, but some other videos just did a line/glob test where you just let some drop and do the same 8 second test. I found that when I tried to get the batter to the consistency to do a real figure 8, it was already way too thin.
Tastes great- looks ugly I’m not sure why, but after an hour and 15 minutes, no skin had formed on top of my cookies. But they had started to deflate, so I went ahead to bake them. Of course that means I didn’t get feet. At 13minutes bake time they were still wobbly, same thing at 17 minutes and 22 minutes Because they had to bake so much longer, the edges started to brown So yea I’ve got a couple dozen delicious, however, very ugly macarons to satisfy my craving I used Nutella to fill some and and I had leftover strawberry buttercream from filling cupcakes the other day so I used that on the rest.
I’m going to keep working on this recipe
Sounds really good! Once I made meranges, but I left them in the oven and my mom made green beans without taking them out! They still tasted ok, and i had ate some before they burned, though.
Oh man this was a complete fail. The cookies are flat, no feet, used her vanilla buttercream recipe and it melted when piping and tasted like straight butter. Pretty gross
The directions say to allow the cookie to cool and then pipe filling. If the buttercream melted, it’s probably because the shells had not cooled completely.
Following directions in baking is super important. When you cook, often things can be saved- not the same with pastries